

Page 1
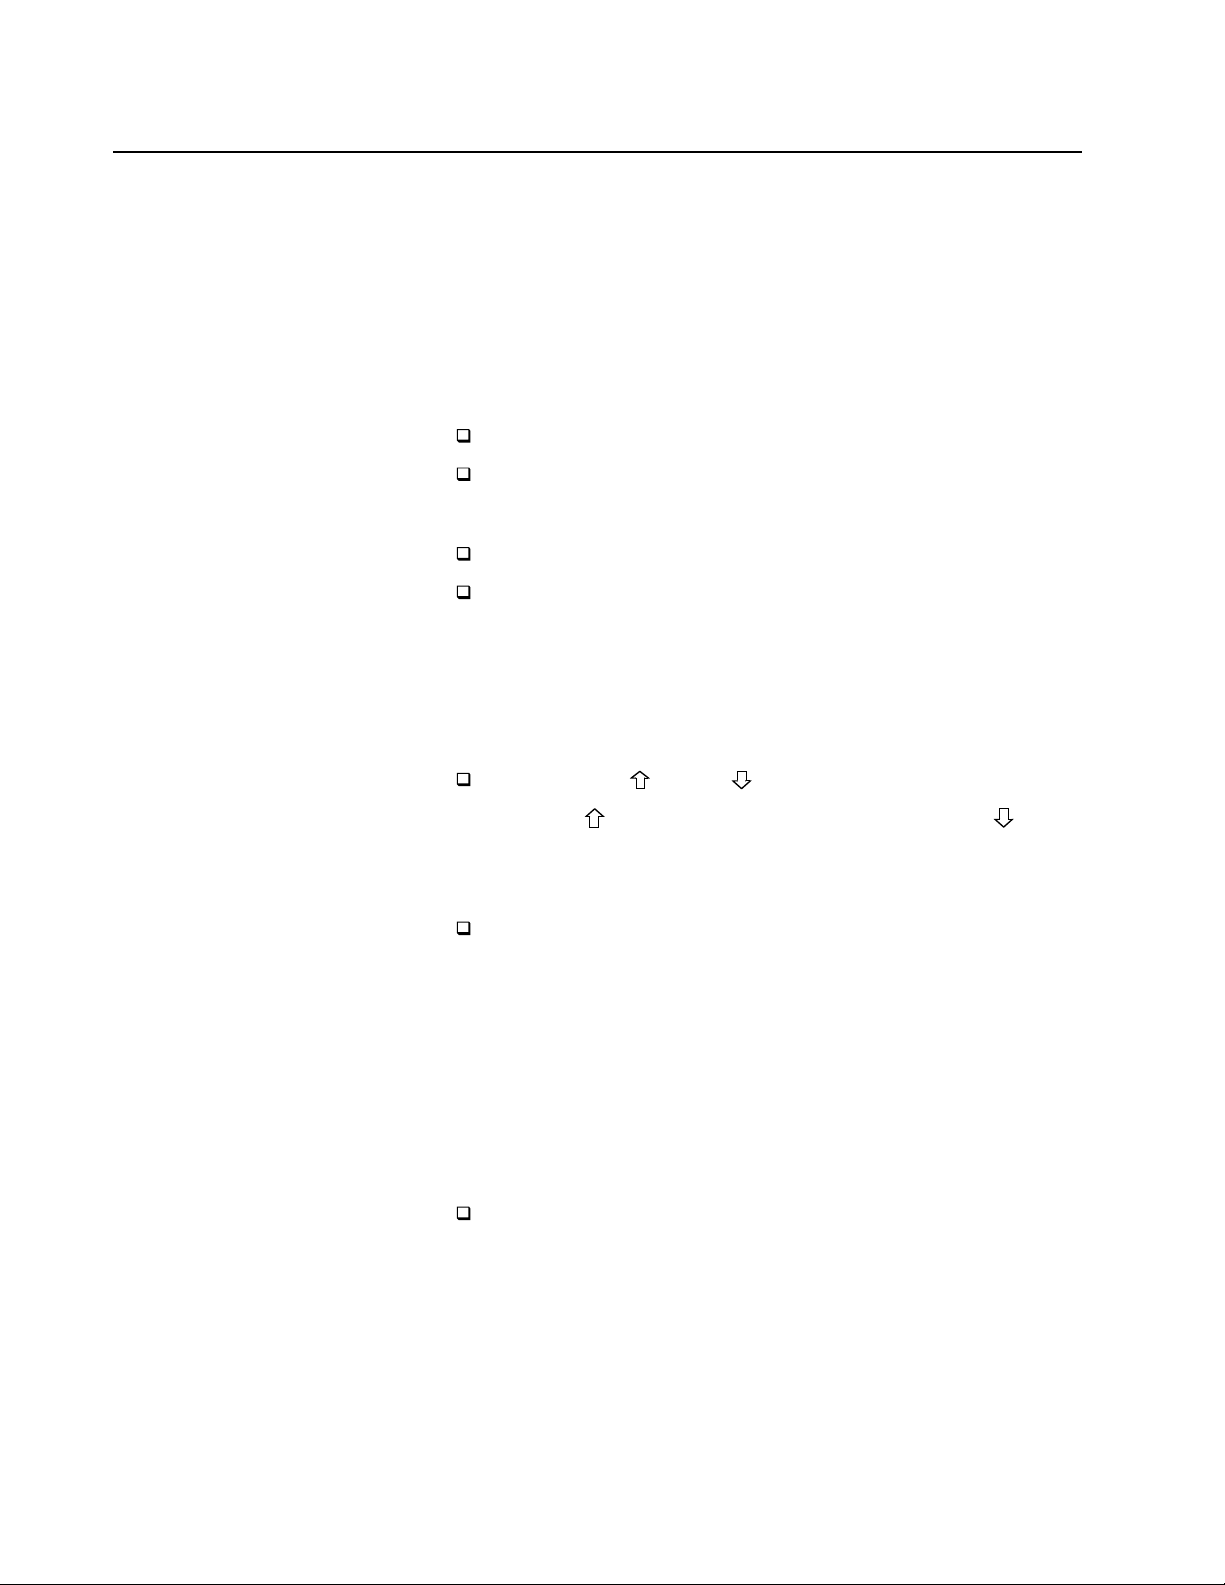
Digital Satellite
© 1996 by Sony Corporatio
Receiver
3-856-591-21(1)
Operating Instructions
BEFORE USING YOUR DSS SYSTEM
You must activate your programming service
by calling your program providers:
DIRECTV® 1-800-347-3288
USSB 1-800-204-8772
For more information, see page 25.
SAT-A2 MODEL ONLY
RF ANTENNA: The DSS receiver is shipped
with IR reception enabled and RF reception
disabled. To use the RF feature (and the
antenna), you must change the factory setting
(IR ONLY) to the RF setting (RF ONLY) using the
on-screen displays, as described in this
manual.
SAT-A2
SAT-B2
1
n
Page 2
WARNING
Owner’s Record
To prevent fire or shock hazard, do not expose the unit to rain or
moisture.
This symbol is intended to alert the user to the
presence of uninsulated “dangerous voltage”
within the product’s enclosure that may be of
significant magnitude to constitute a risk of
electric shock to persons.
This symbol is intended to alert the user to the
presence of important operating and maintenance
(servicing) instructions in the literature
accompanying the appliance.
Note to the CATV Installer
This reminder is provided to call the CATV system installer’s
attention to Article 820-40 of the NEC that provides guidelines for
proper grounding and, in particular, specifies that the cable
ground shall be connected to the grounding system of the building
as close to the point of cable entry as practical.
Note to the DSS® Satellite Dish Installer
This reminder is provided to call the DSS satellite dish installer’s
attention to Article 810 and in particular Article 810-15 of the NEC,
which covers proper installation and grounding of television
receiving equipment, as well as to Article 820-40 of the NEC,
which specifies that the satellite dish cable ground shall be
connected to the grounding system of the building as close to the
point of cable entry as practical.
Telephone Line Interruption
Periodically, information on your DirecTicket and Pay-Per-View
selections is sent, free of charge, via your telephone line to an 800
number. During the time the information is being forwarded, you
cannot use your telephone and you will hear static noise for
approximately 30 seconds. If you would like to use your telephone
while the information is being sent, you can interrupt the sending
of this information at any time by temporarily unplugging the
phone line to the receiver.
The model and serial numbers are located on the back of the
receiver. The number for the access card is on the front of the card
and on the carton label. Record these numbers in the space
provided below. Refer to these numbers whenever you need to call
your sales or service representative regarding this product.
Model Number: ___________________________________________
Serial Number:_____________________________________________
Access Card Number:_______________________________________
Customer Support
For DSS Programming
For subscription information, or to resolve problems related to
DSS programming, call:
DIRECTV® at 1-800-DIRECTV (347-3288) or
USSB at 1-800-204-USSB (8772).
For DSS Hardware and Installation
To arrange for the installation of your DSS system, call the dealer
from whom you purchased your system.
For general information, or to resolve problems related to the
operation of your satellite receiver or antenna, please contact your
Sony brand DSS dealer. If your dealer or installer is unable to
answer your questions, call the Sony Digital Satellite System
Information Center at 1-800-838-7669.
Trademark and Copyrights
Express Navigator is a trademark of Sony Corporation. DIRECTV
and DSS are registered trademarks of DIRECTV, Inc., a unit of
Hughes Electronics. USSB and USSB Entertainment Plus are
official service marks of the United States Satellite Broadcasting
Company, Inc. HBO is a registered trademark of Time Warner
Entertainment Company, L.P. Showtime is a service mark of
Showtime. MTV: Music Television is a registered trademark of
MTV Networks, a division of Viacom International Inc. Comedy
Central is a registered trademark of Comedy Partners.
Macrovision Information
This product incorporates copyright protection technology that is
protected by U.S. patents and other intellectual property rights.
Use of this copyright protection technology is granted by
Macrovision for home and other limited DSS IRD pay-per-view
uses only. Reverse engineering or disassembly is prohibited.
Note on Recording Programming
Programming may be taped for home viewing only. All other
taping is expressly prohibited. Some programming may not be
taped. An additional taping fee may be applied. Call your
program providers for details.
StarSight Licensed
The manufacture and sale of the television schedule feature of this
product was licensed under one or more of the following patents
of StarSight Telecast, Inc.: U.S. Patent Nos. 4,706,121; 4,977,455;
5,151,789; and 5,353,121; with use rights reserved.
Network Broadcasting Information
ABC, CBS, NBC, FOX, and PBS networks are available from
DIRECTV. Some restrictions apply.
2
Page 3

Contents
Chapter 1
Introducing the DSS System
4 DSS Features
5 Package Contents
6 Inserting Batteries into the Remote Control
Chapter 2
Using Basic Functions
7 Remote Control for Model SAT-A2
8 Remote Control for Model SAT-B2
9 Using a Program Guide
10 Using the Station Index
Chapter 3
Connecting Your System
11 Overview
12 TV Only
14 TV and VCR
16 Hi-Fi TV, Hi-Fi VCR, Audio Receiver
(SAT-A2 Only)
18 Home Entertainment System
(Hi-Fi TV, Hi-Fi VCR, Audio/Video
Receiver)
20 Connecting the VCR Mouse
21 Connecting Digital Audio Components
(SAT-A2 Only)
22 Setting Up the RF Antenna (SAT-A2 Only)
23 Setting Up Your DSS System
Chapter 4
Using the System Features
24 Overview
25 Before You Get Started ...
26 Using the On-Screen Displays:
Highlight and Select
27 Displaying the Program Guide
28 Features of the Program Guide
29 Moving Through the Program Guide
31 Selecting a Program from the Guide
32 Selecting a Program List
33 Selecting a Different Program Guide or List
36 Using the Station Index
38 Setting Up the Timer
40 Using the Favorite Station Guides
43 Displaying the Program Banner
44 Using the DISPLAY Feature
Chapter 5
Using the Options Menu
45 Overview
46 Displaying the Options Menu
47 Checking and Cancelling PPV Purchases
48 Setting Display Options
51 Using the Jump Loop Feature
52 Setting Locks and Limits
57 Setting Up a List of Custom Stations
59 Selecting Alternate Audio
61 Reading Your Messages
63 Selecting Data Services
Chapter 6
Using the Setup Menu
65 Overview
66 Displaying the Setup Menu
67 Setting Up the Satellite Antenna
68 Replacing Your Access Card
70 Setting the Aspect Ratio
71 Setting Up the Remote Control
75 Running a System Test
76 Displaying Help, Tips, and Shortcuts
Appendix
Other Information
78 Location and Function of Controls
81 Using the Remote Control
85 Programming the Remote Control
87 Using the Learn Function (SAT-A2 Only)
88 Troubleshooting
91 Precautions
92 FCC Regulations and Information
93 Limited Warranty
94 Specifications
95 Index
Contents 3
Page 4

Chapter 1
Introducing the DSS System
Welcome to the Sony brand DSS (Digital Satellite System), the ultimate
digital entertainment experience. Read this chapter for an overview of
the features of the system and to check the carton contents of the DSS
receiver.
DSS Features
Here are just a few benefits of the DSS system that you'll enjoy:
Excellent Performance
Superior, digital-quality video that rivals the performance of
laserdisc players.
Crisp digital-quality audio that will enhance your TV or home
theater experience.
Premium Entertainment
Choose from a variety of program packages available through your
SM
program providers, DIRECTV® and USSB
.
Convenience and Ease-of-Use
Order premium pay-per-view (PPV) movies. PPV programs start
as often as every 30 minutes, so you can watch programs when you
want to see them.
Sony’s Express Navigator on-screen display system guides you
through all the system features and functions.
Select from a variety of program guides that are sorted by program
categories, including Sports, Movies, News, and more.
The Timer feature, when used with Sony’s VCR Mouse, allows you
to easily automate the recording of DSS programs.
Customizable
Create a Custom Program Guide and up to five of your own
Favorite Station Guides for stations you watch most often.
Change the color palette, transparency, and station ordering of the
program guides. Use the DISPLAY button to toggle among
different sizes of on-screen displays.
Set up a passcode, which lets you choose spending limits and
control viewing of programs by rating and station.
4 Chapter 1: Introducing the DSS System
Page 5
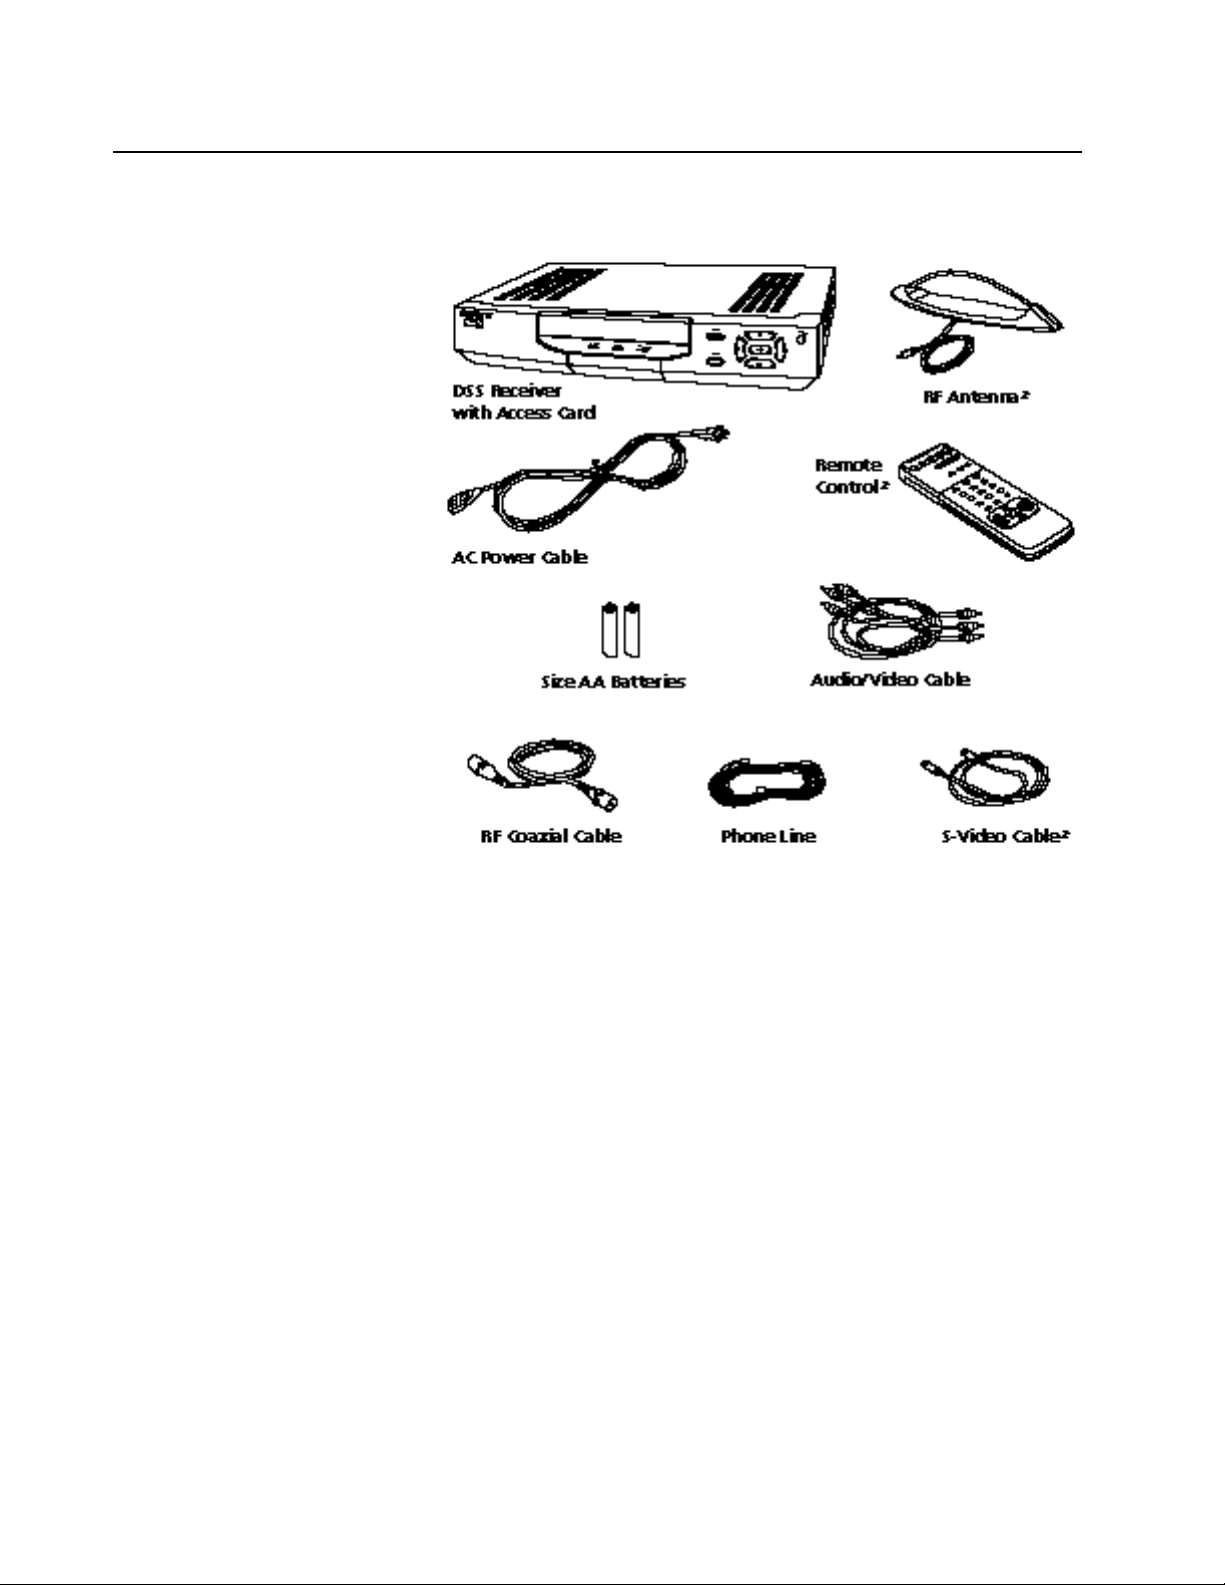
Package Contents
Check to make sure you’ve received the following items in the DSS
receiver’s carton:
* RF Antenna and S-Video cable not included with SAT-B2. SAT-A1
includes RM-Y130 remote control shown above; SAT-B2 includes
RM-Y129 remote control shown on page 8.
The access card comes already inserted into the DSS receiver.
If you are missing items, contact the dealer from whom you purchased
the DSS receiver.
Note
Keep the original carton and packing materials to safely transport the system
in the future.
Chapter 1: Introducing the DSS System 5
Page 6
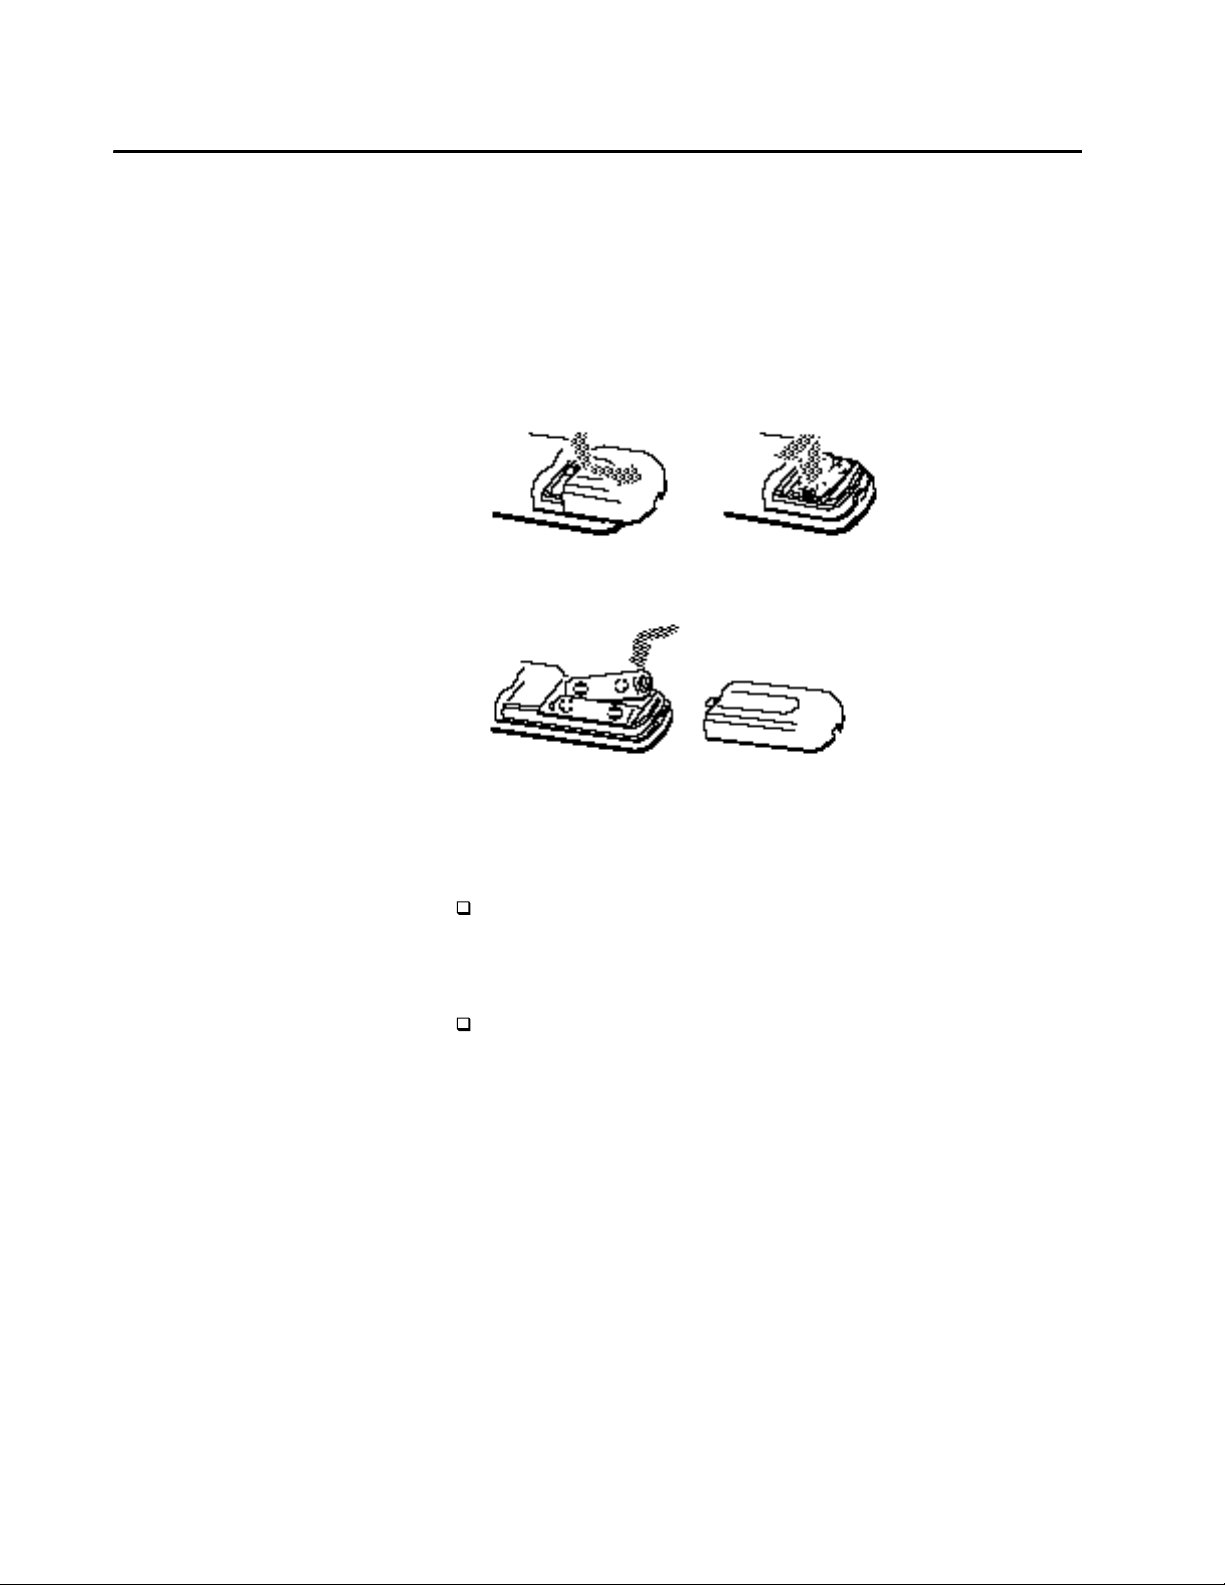
Inserting Batteries into the Remote Control
Before you can use the remote control, you must first insert the
supplied batteries. If you want to use this remote control to operate
other video components, such as a TV or cable box, you must also
program the remote as described in the Appendix on page 85.
To install the batteries:
1 Push and slide open the battery compartment.
SAT-A2 Remote Control:
SAT-B2 Remote Control:
2 Insert two size AA batteries (supplied). Be sure to line up the + and
– on the batteries with the + and – on the battery compartment.
Notes on Batteries
When the batteries become weak, the Function button indicator
blinks. If the remote control does not operate properly, the batteries
might be worn out. When replacing batteries, replace both of them
with new ones, and do not mix different types of batteries together.
When you remove the batteries — to replace them, for example —
any codes you’ve set may be erased. If this happens, you must
reprogram the remote. See “Programming the Remote Control” on
page 85 for details.
6 Chapter 1: Introducing the DSS System
Page 7
frutiger bol
d
Chapter 2
Using Basic Functions
You can start watching programs using just a few buttons on the
remote control. Here’s an overview of the buttons you’ll use most
often.
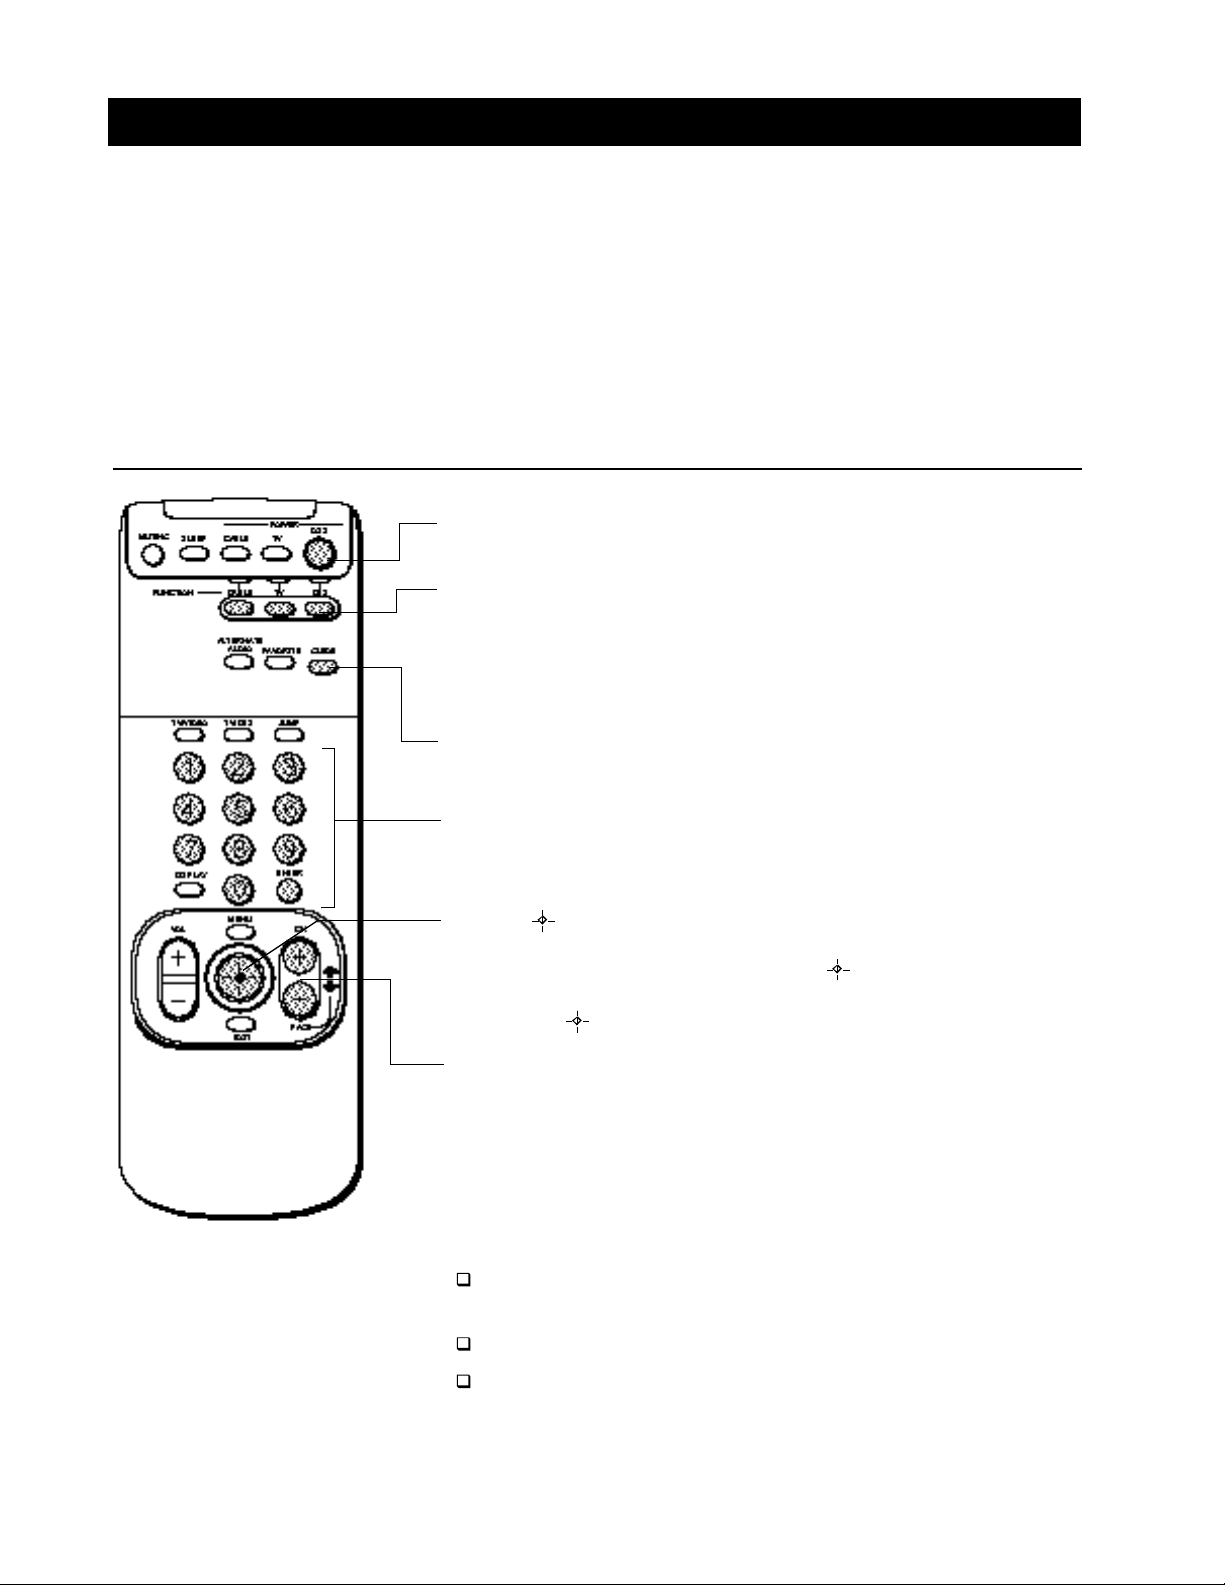
Remote Control for Model SAT-A2
DSS POWER Button
Turns the DSS receiver on and off.
FUNCTION Buttons
Selects the component (DSS, TV, CABLE) that you want to operate.
These buttons flash to indicate which component the remote control
is set to operate. To control your TV or cable box, you must first
program the remote control, as described on page 85.
GUIDE Button
Brings up the Custom Guide.
0–9 and ENTER Buttons
Pressing the 0–9 buttons and then the ENTER button selects a station
number directly.
Joystick/ Button
Moving the joystick up, down, left, right, and diagonally scrolls
through the program guides. Pressing the button selects the
program that’s highlighted. When a program guide is not displayed,
pressing the button brings up the Station Index.
CH/PAGE Buttons
Changes the channel. When a program guide is displayed, pressing the
CH/PAGE buttons pages through the guide.
See Also
Pages 9–10 for a quick start to using the program guide and the
Station Index.
Chapter 4 for procedures for using the main system features.
Pages 81–83 for a complete description of the buttons on the
remote.
Chapter 2: Using Basic Functions 7
Page 8
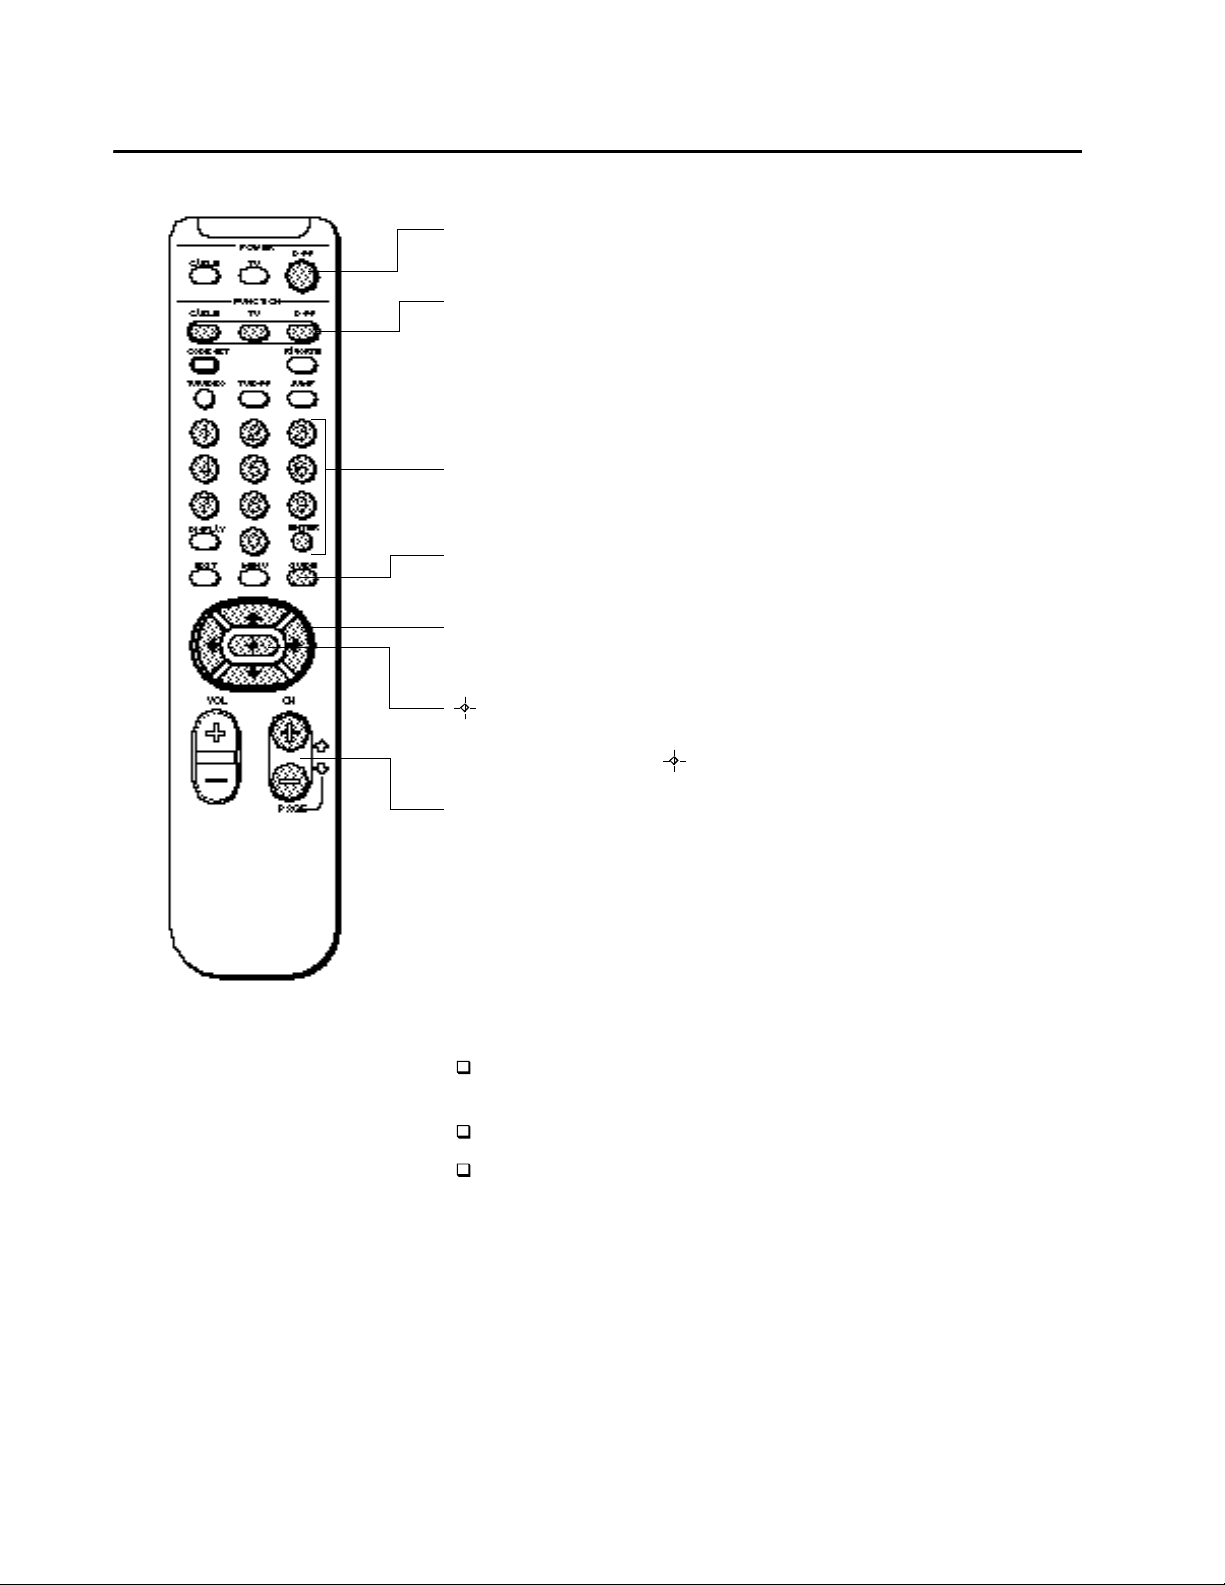
Remote Control for Model SAT-B2
frutiger
DSS POWER Button
Turns the DSS receiver on and off.
FUNCTION Buttons
Selects the component (DSS, TV, CABLE) that you want to operate.
These buttons flash to indicate which component the remote control
is set to operate. To control your TV or cable box, you must first
program the remote control, as described on page 85.
0–9 and ENTER Buttons
Pressing the 0–9 buttons and then the ENTER button selects a station
number directly.
GUIDE Button
Brings up the Custom Guide.
Arrow Buttons
Scrolls through the program guide.
Button
Selects the program that’s highlighted. When a program guide is not
displayed, pressing the button brings up the Station Index.
CH/PAGE Buttons
Changes the channel. When a program guide is displayed, pressing
the CH/PAGE buttons pages through the guide.
See Also
Pages 9–10 for a quick start to using the program guide and the
Station Index.
Chapter 4 for procedures for using the main system features.
Page 84 for a complete description of the buttons on the remote.
8 Chapter 2: Using Basic Functions
Page 9
Using a Program Guide
The program guide displays the programming that’s available from
your program providers.
1 Press the GUIDE button to bring up the Custom Guide.
CUSTOM GUIDE WED OCT 5 8:45 PM
2 Move the highlight to the name of the program you want.
First Knight
8:00 PM 10:00 PM PG-13
Act. Adv. 1995 Richard Gere, Sean Connery, Julia
Ormond. Thrilling romance results when rogue knight
Lancelot becomes torn between his loyalty to King
Arthur and his love for Queen Guinevere (CC, ST) (A, V)
8:00 PM 8:30 PM 9:00 PMWED
BoxingSHO2987
MTV 989
COM990 It’s Gary Shan...Tracy Ullman
USSB999
DTV 100 Direct Ticket Previews
DTV 102
DTV 105
USSB Programming Highlights
First Knight
The Alamo
Most Wanted ...MTV’s Best of the 90’s
Jefferson in Par...Johnny Mnemonic
Moving Around
In a Program Guide
You can also change the look of the program
guide by pressing the DISPLAY button. See
“Using the DISPLAY Feature” on page 44.
In program guides, you can select station
call letters/numbers to display a description
of the station.
You’ll hear the audio and see the video (in the background) of each
program as they are highlighted.
The table below lists the various ways in which you can move
around in the guide.
3 Press the button to select the highlighted program.
To Do This ... Use This Button
Go to other stations in the
guide one station at a time
Go to other time slots in the
guide one program at a time
Go to other stations in the
guide one “page” at a time
Go to a station directly
SAT-A2: Move the joystick up and
down
SAT-B2: Press the and buttons
SAT-A2: Move the joystick left and
right to move one time slot at a time.
SAT-B2:
Both Models: Or press the GUIDE
button to “page” to future time slots.
Press the PAGE (CH+) and
PAGE (CH-) buttons
Press the 0-9 buttons and press ENTER
(to specify the station number)
Press the and buttons
Return to the last station you
were watching
Press the EXIT button
Chapter 2: Using Basic Functions 9
Page 10
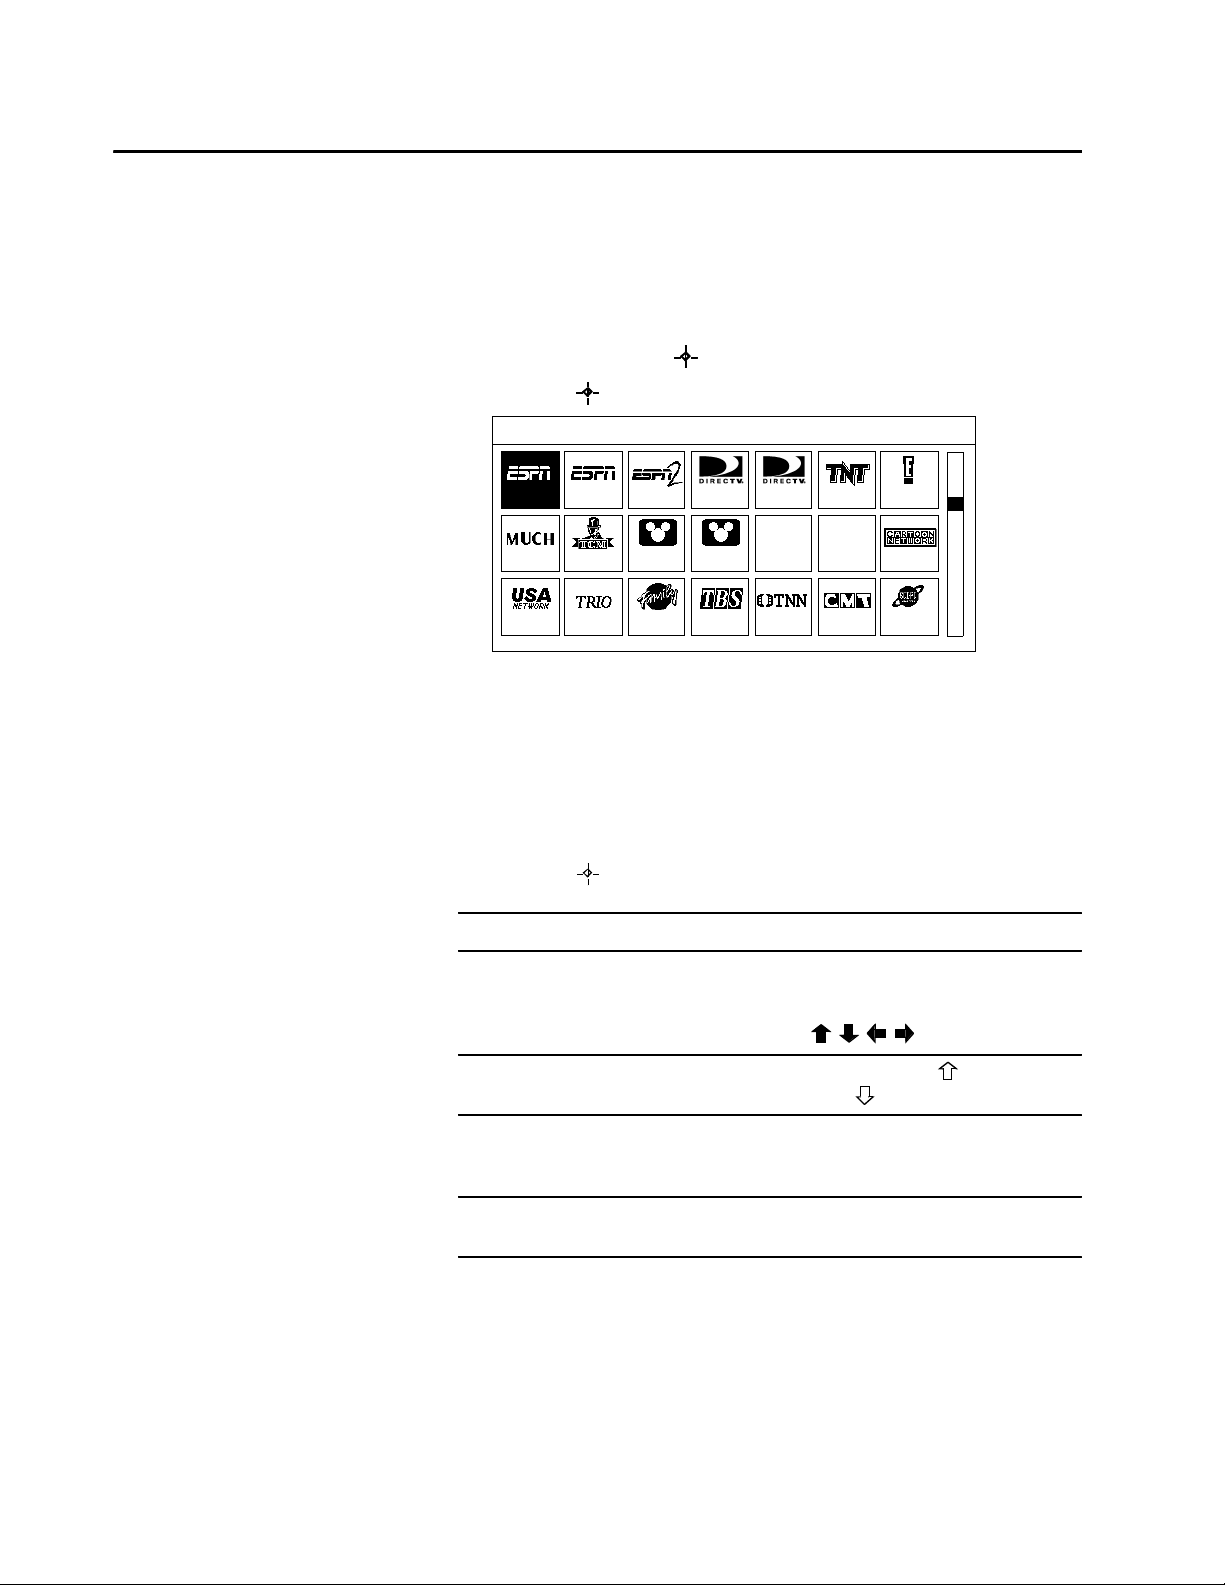
Using the Station Index
The Station Index lets you select a program from a grid of station logos
and call letters.
Note
Before you can bring up the Station Index, you must first clear the program
guide from your TV screen. Pressing EXIT removes all on-screen displays.
Also, you may need to change to another station if a message appears, which
requests that you press the button to purchase the program, etc.
1 Press the button to bring up the Station Index.
Your Station Index may not look
exactly like this. The stations
displayed depend on the
programming you’ve ordered.
2 Move the highlight to the station you want.
STATION INDEX Sports Center
206
216 220 222 224 225 226 227
229 230 232 233 235 236 240
207 208 209 211 212 215
DISC TLC
Moving Around
In the Station Index
You can also change the look of the Station
Index by pressing the DISPLAY button. See
“Using the DISPLAY Feature” on page 44.
The program title is displayed at the top of the Station Index. Also,
you’ll hear the audio and see the video (in the background) of each
program, as they are highlighted.
The table below lists the various ways in which you can move
around in the Station Index.
3 Press the button to tune to the program that’s highlighted.
To Do This ... Use This Button
Go to other stations in the guide, one
station at a time
Go to other stations in the Station
Index, one “page” at a time
Go to a station directly
Return to the last station you were
watching
SAT-A2: Move the joystick in any
direction
SAT-B2: Press the
buttons
Press the PAGE (CH+) and
PAGE (CH-) buttons
Press the 0-9 buttons and press
ENTER (to specify the station
number)
Press the EXIT button
10 Chapter 2: Using Basic Functions
Page 11

Chapter 3
Connecting Your System
Read this chapter to set up your DSS receiver for the first time, or to
add or remove audio or video components connected to your system.
Overview
You can connect the DSS receiver in a variety of configurations. The
answers to the following questions will determine how you hook up
and operate your DSS receiver. For example:
Do you have cable TV or a broadcast (terrestrial) TV antenna?
What type of connectors do your TV and VCR have: S-VIDEO,
A/V (RCA-type), or RF coaxial?
Do you plan to integrate your DSS receiver with your audio or
video system?
General Recommendations
Detailed hookup instructions are provided on the pages that follow.
For optimum audio and video performance, follow these general
recommendations as much as possible when hooking up your
components:
If you have an audio or audio/video system, consider integrating
the DSS receiver into a home entertainment configuration to take
advantage of your hi-fi system’s audio capabilities.
If your TV has an S-VIDEO jack, use it to connect your TV to the
DSS receiver. An S-Video connection provides a better picture than
RCA-type video or RF connections.
If your TV does not have an S-VIDEO jack, use your TV’s A/V
connectors to connect your components. An A/V connection
provides a better picture and audio when compared to an RF
connection.
If you have other Sony components that include CONTROL-S
jacks, you can connect these components via their CONTROL-S
jacks in order to pass remote control signals between the DSS
receiver and these components. This allows you to hide
components behind cabinet doors.
If you have a Sony TV that has the S-Link feature, you can connect
it to the DSS receiver’s S-LINK connector to simplify the operation
of your system. Using S-Link, when you turn on the DSS receiver
with the TV’s remote control, it automatically turns on the TV and
switches the video input to DSS. When you press the SYSTEM OFF
button on the TV’s remote control, it turns off both the TV and the
DSS receiver. (See your TV manual for more details.)
Chapter 3: Connecting Your System 11
Page 12
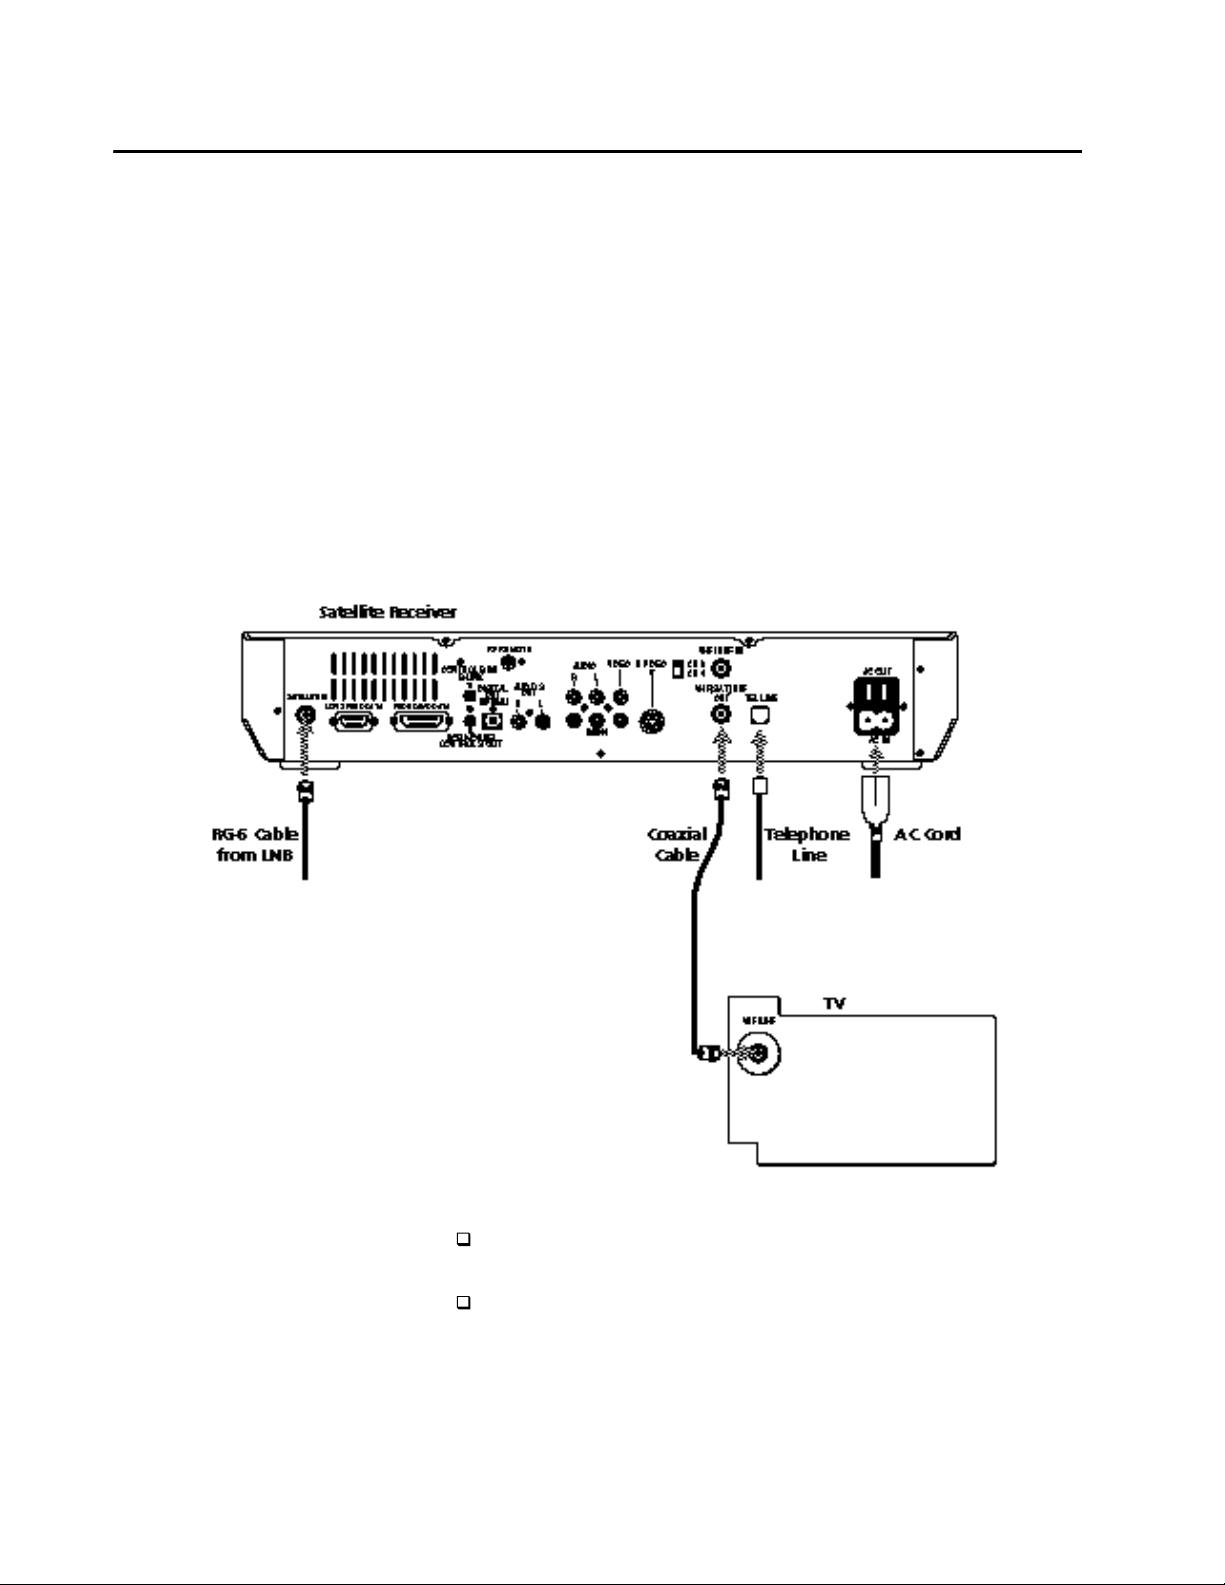
TV Only
TV With RF Connector Only
Some TVs label this jack RF IN,
instead of VHF/UHF IN.
Refer to the illustration below (SAT-A2 receiver is pictured).
1 Connect the RG-6 cable from the satellite antenna’s LNB to the DSS
receiver’s SATELLITE IN jack.
2 Connect the DSS receiver’s VHF(SAT)/UHF OUT jack to the TV’s
VHF/UHF IN jack.
Note
A VHF/UHF connection does not provide stereo sound. To receive stereo
sound, you must use an A/V connection (described on page 13).
3 Connect one end of the telephone line cord to the DSS receiver’s
TEL LINE jack. Connect the other end to your home’s modular
telephone outlet.
4 Connect one end of the AC power cord to the DSS receiver’s AC IN
jack. Connect the plug end to an AC outlet.
1 2 3 4
SAT-A2 receiver is pictured, but connections
are identical for SAT-B2.
Optional Connections
If you have a cable input, cable box, or a terrestrial TV antenna,
connect it to the DSS receiver’s VHF/UHF IN jack.
To connect the DSS receiver to your audio system, use audio cables
to connect the DSS receiver to your audio receiver’s AUDIO IN
jacks.
12 Chapter 3: Connecting Your System
Page 13
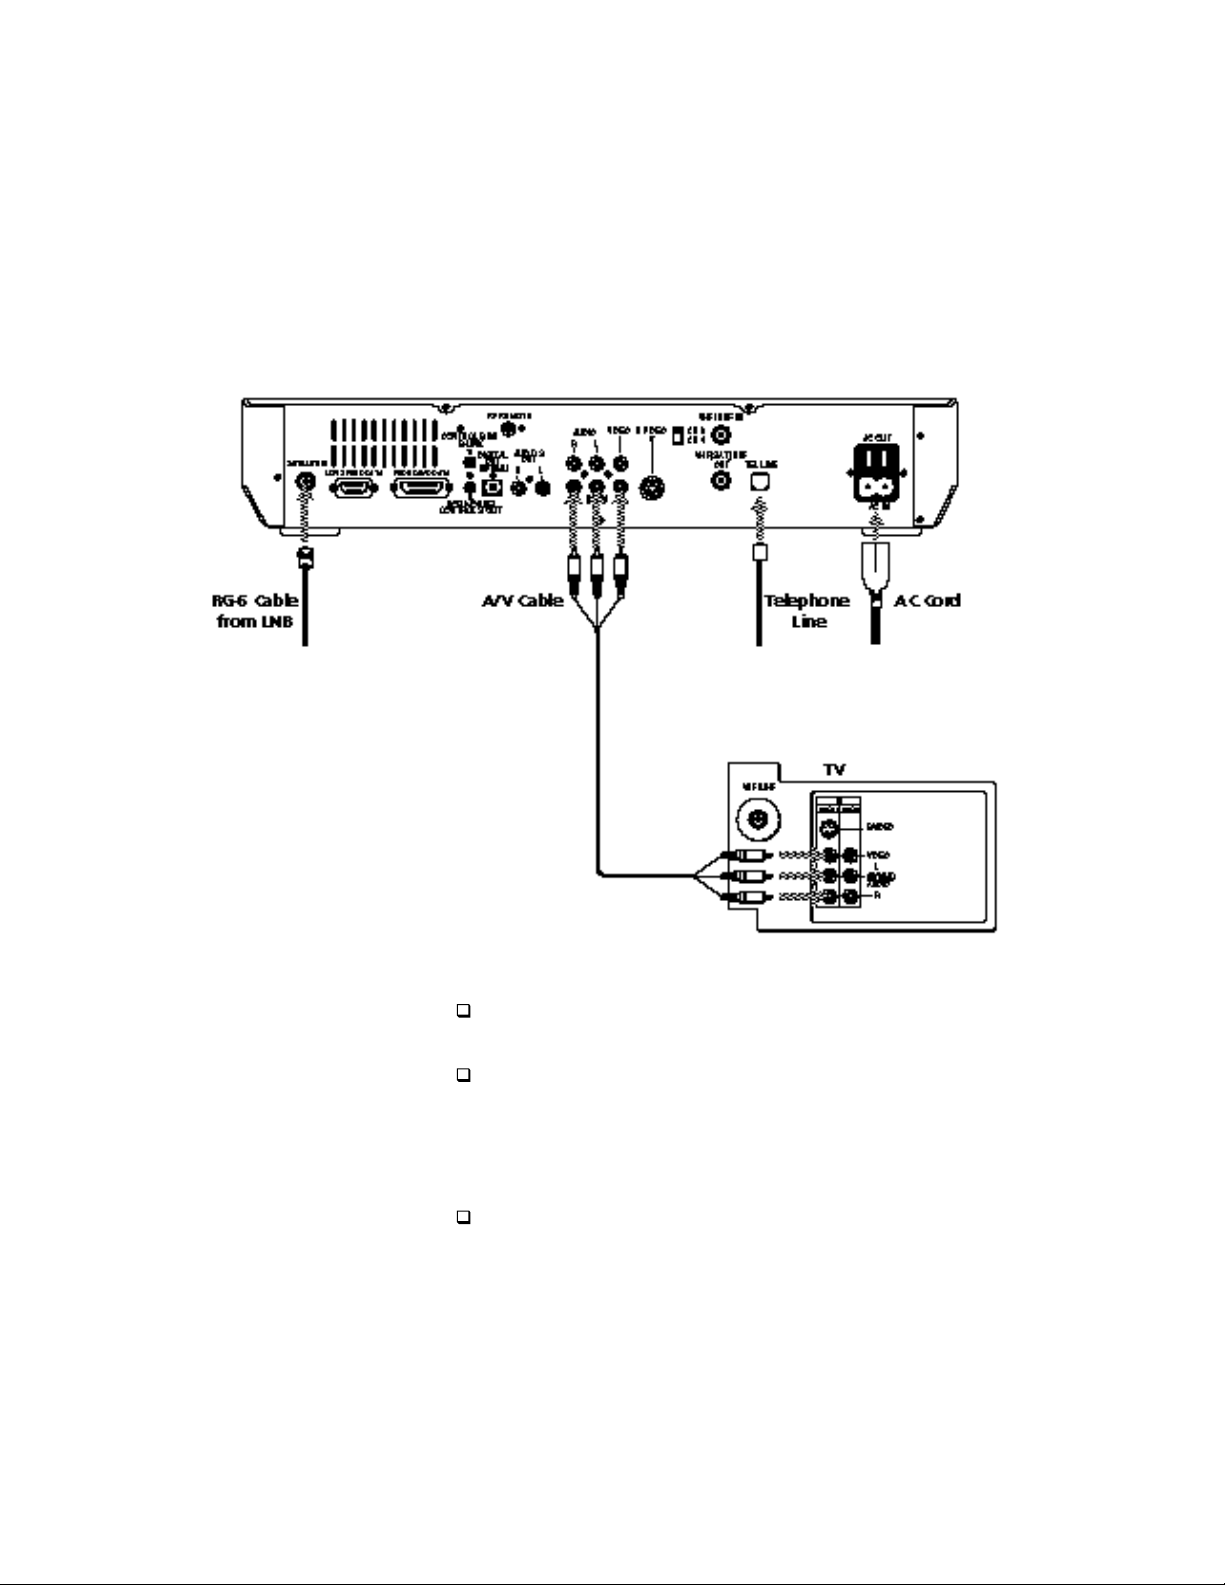
TV With A/V Connectors
Refer to the illustration below (SAT-A2 receiver is pictured).
1 Connect the RG-6 cable from the satellite antenna’s LNB to the DSS
receiver’s SATELLITE IN jack.
If your TV has only one AUDIO IN jack,
connect the lower (mono) AUDIO L jack
on the DSS receiver to the TV’s AUDIO
IN jack.
1 2 3 4
2 Connect the DSS receiver’s A/V jacks to the TV’s A/V IN jacks.
3 Connect one end of the telephone line cord to the DSS receiver’s
TEL LINE jack. Connect the other end to your home’s modular
telephone outlet.
4 Connect one end of the AC power cord to the DSS receiver’s AC IN
jack. Connect the plug end to an AC outlet.
SAT-A2 receiver is pictured, but connections
are identical for SAT-B2.
Some TVs label this jack RF IN,
instead of VHF/UHF IN.
Optional Connections
If you have a cable input, cable box, or a terrestrial TV antenna,
connect it to the TV’s VHF/UHF IN jack.
Best Connection: If your TV has an S-VIDEO jack, use an S-VIDEO
cable to connect the DSS receiver’s S-VIDEO jack to the TV’s SVIDEO IN jack. This provides the best picture quality. Then use
audio cables to connect one set of the DSS receiver’s audio jacks to
the TV’s AUDIO IN jacks.
To connect the DSS receiver to your audio system, use audio cables
to connect the DSS receiver to your audio receiver’s AUDIO IN
jacks.
Chapter 3: Connecting Your System 13
Page 14

TV and VCR
Refer to the illustration on the opposite page (SAT-A2 receiver is
pictured).
1 Connect the RG-6 cable from the satellite antenna’s LNB to the DSS
receiver’s SATELLITE IN jack.
2 Complete one of the following to connect the DSS receiver:
Better Connection: Connect the DSS receiver’s A/V jacks to the
A/V IN jacks on the TV and VCR. If your VCR has only one
AUDIO IN jack (monoaural VCR), connect it to the lower
(mono) AUDIO L jack on the DSS receiver.
Some VCRs and TVs label this jack RF
IN, instead of VHF/UHF IN.
Good Connection: Connect the DSS receiver’s VHF(SAT)/UHF
OUT jack to the VCR’s VHF/UHF IN jack.
3 Complete one of the following to connect the VCR to the TV:
Better Connection: If both your TV and VCR have A/V jacks,
connect the VCR’s A/V OUT jacks to the TV’s A/V IN jacks.
Good Connection: If your TV or VCR has only an RF jack,
connect the VCR’s VHF/UHF OUT jack to the TV’s VHF/UHF
IN jack.
4 Connect one end of the telephone line cord to the DSS receiver’s
TEL LINE jack. Connect the other end to your home’s modular
telephone outlet.
5 Connect one end of the AC power cord to the DSS receiver’s AC IN
jack. Connect the plug end to an AC outlet.
Optional Connections
If you have a cable input, cable box, or a terrestrial TV antenna,
connect it to the TV or VCR’s VHF/UHF IN jack.
Best Connection: If your TV has an S-VIDEO jack, use an S-VIDEO
cable to connect the DSS receiver’s S-VIDEO jack to the TV’s
S-VIDEO IN jack. This provides the best picture quality. Then use
audio cables to connect one set of the DSS receiver’s audio jacks to
the TV’s AUDIO IN jacks.
To connect the DSS receiver to your audio system, use audio cables
to connect the DSS receiver to your audio receiver’s AUDIO IN
jacks.
If you are using the VCR Mouse, see page 20 for setup instructions.
Note
If the screen appears fuzzy, the program you are watching may be protected by
Macrovision. Turn the VCR off to improve the picture quality.
14 Chapter 3: Connecting Your System
Page 15
2
1 2
2 4
5
3
SAT-A2 receiver is pictured, but connections
are identical for SAT-B2.
Chapter 3: Connecting Your System 15
Page 16

Hi-Fi TV, Hi-Fi VCR, Audio Receiver (SAT-A2 Only)
Refer to the illustration on the opposite page.
1 Connect the RG-6 cable from the satellite antenna’s LNB to the DSS
receiver’s SATELLITE IN jack.
2 Connect the DSS receiver’s audio OUT jacks to the audio receiver’s
audio IN jacks.
3 Connect the DSS receiver’s AV jacks to the A/V IN jacks on the TV.
4 Complete one of the following to connect the DSS receiver to the
VCR:
Better Connection: Connect the DSS receiver’s A/V jacks to the
A/V IN jacks on the VCR.
Some VCRs and TVs label this jack RF
IN, instead of VHF/UHF IN.
Good Connection: Connect the DSS receiver’s VHF(SAT)/UHF
OUT jack to the VCR’s VHF/UHF IN jack.
5 Complete one of the following to connect the VCR to the TV:
Better Connection: If both your TV and VCR have A/V jacks,
connect the VCR’s A/V OUT jacks to the TV’s A/V IN jacks.
Good Connection: If your TV or VCR has only an RF jack,
connect the VCR’s VHF/UHF OUT jack to the TV’s VHF/UHF
IN jack.
6 Connect one end of the telephone line cord to the DSS receiver’s
TEL LINE jack. Connect the other end to your home’s modular
telephone outlet.
7 Connect one end of the AC power cord to the DSS receiver’s AC IN
jack. Connect the plug end to an AC outlet.
Optional Connections
If you have a cable input, cable box, or a terrestrial TV antenna,
connect it the VCR’s VHF/UHF IN jack.
Best Connection: If your TV has an S-VIDEO jack, use an S-VIDEO
cable to connect the DSS receiver’s S-VIDEO jack to the TV’s
S-VIDEO IN jack. This provides the best picture quality. Then use
audio cables to connect one set of the DSS receiver’s audio jacks to
the audio receiver’s AUDIO IN jacks.
If you are using the VCR Mouse, see page 20 for setup instructions.
Note
If the screen appears fuzzy, the program you are watching may be protected by
Macrovision. Turn the VCR off to improve the picture quality.
16 Chapter 3: Connecting Your System
Page 17
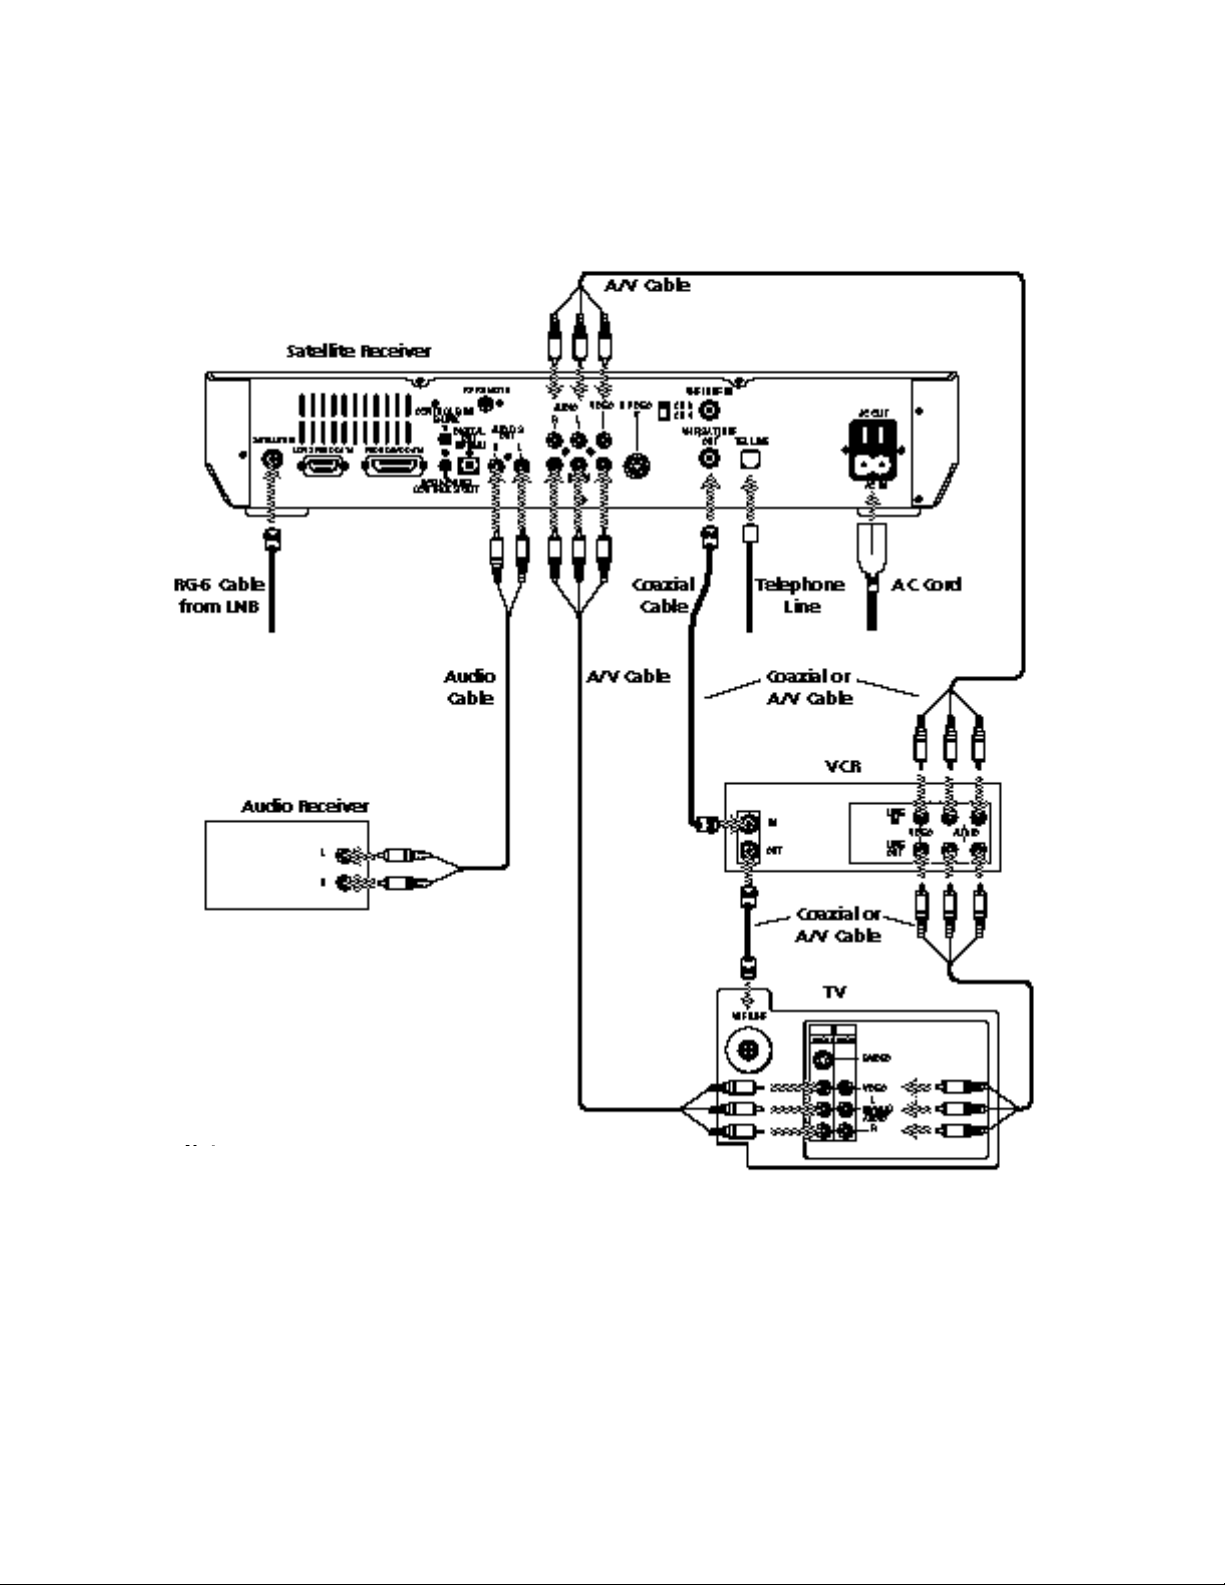
4
1
2
4 6
3
7
5
Note
SAT-A2 receiver is pictured, but
connections are identical for SAT-B2.
Chapter 3: Connecting Your System 17
Page 18

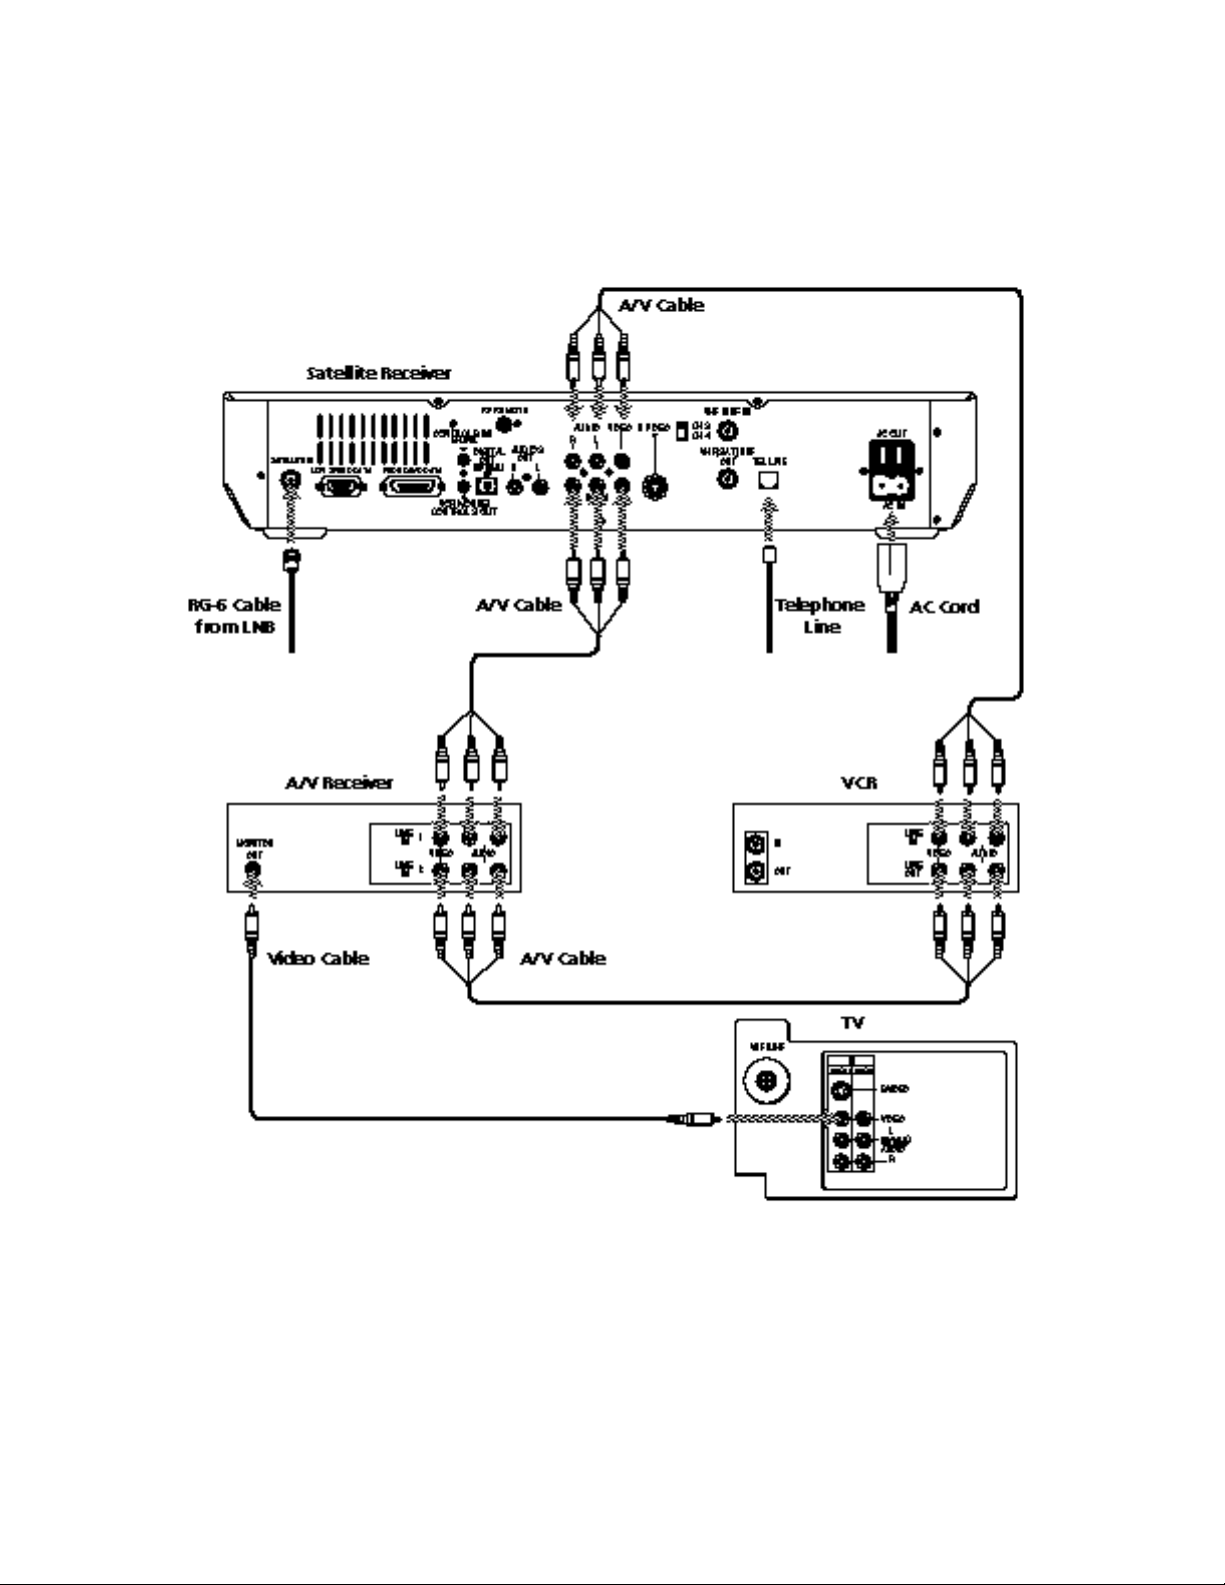
Home Entertainment System
(Hi-Fi TV, Hi-Fi VCR, Audio/Video Receiver)
Refer to the illustration on the opposite page (SAT-A2 receiver is
pictured).
1 Connect the RG-6 cable from the satellite antenna’s LNB to the DSS
receiver’s SATELLITE IN jack.
2 Connect the DSS receiver’s A/V jacks to the VCR and A/V
receiver’s A/V IN jacks.
3 Connect the VCR’s A/V OUT jacks to one set of the A/V receiver’s
A/V IN jacks.
4 Connect the A/V receiver’s MONITOR OUT jack to the TV’s
VIDEO IN jack.
5 Connect one end of the telephone line cord to the DSS receiver’s
TEL LINE jack. Connect the other end to your home’s modular
telephone outlet.
6 Connect one end of the AC power cord to the DSS receiver’s AC IN
jack. Connect the plug end to an AC outlet.
Some VCRs label this jack RF IN,
instead of VHF/UHF IN.
Optional Connections
If you have a cable input, cable box, or a terrestrial TV antenna,
connect it to the VCR’s VHF/UHF IN jack.
Best Connection: If your A/V receiver has an S-VIDEO jack, use an
S-VIDEO cable to connect the DSS receiver’s S-VIDEO jack to the
A/V receiver’s S-VIDEO IN jack. Then connect an S-VIDEO cable
from the A/V receiver to the TV’s S-VIDEO IN jack. This provides
the best picture quality. Then use audio cables to connect one set of
the DSS receiver’s audio jacks to the A/V receiver’s AUDIO IN
jacks.
If you are using the VCR Mouse, see page 20 for setup instructions.
Note
If the screen appears fuzzy, the program you are watching may be protected by
Macrovision. Turn the VCR off to improve the picture quality.
In this configuration, the A/V receiver must be turned on in order to pass the
video signals through to your TV.
18 Chapter 3: Connecting Your System
Page 19
2
1 2 6
4
3
5
SAT-A2 receiver is pictured, but connections
are identical for SAT-B2.
Chapter 3: Connecting Your System 19
Page 20
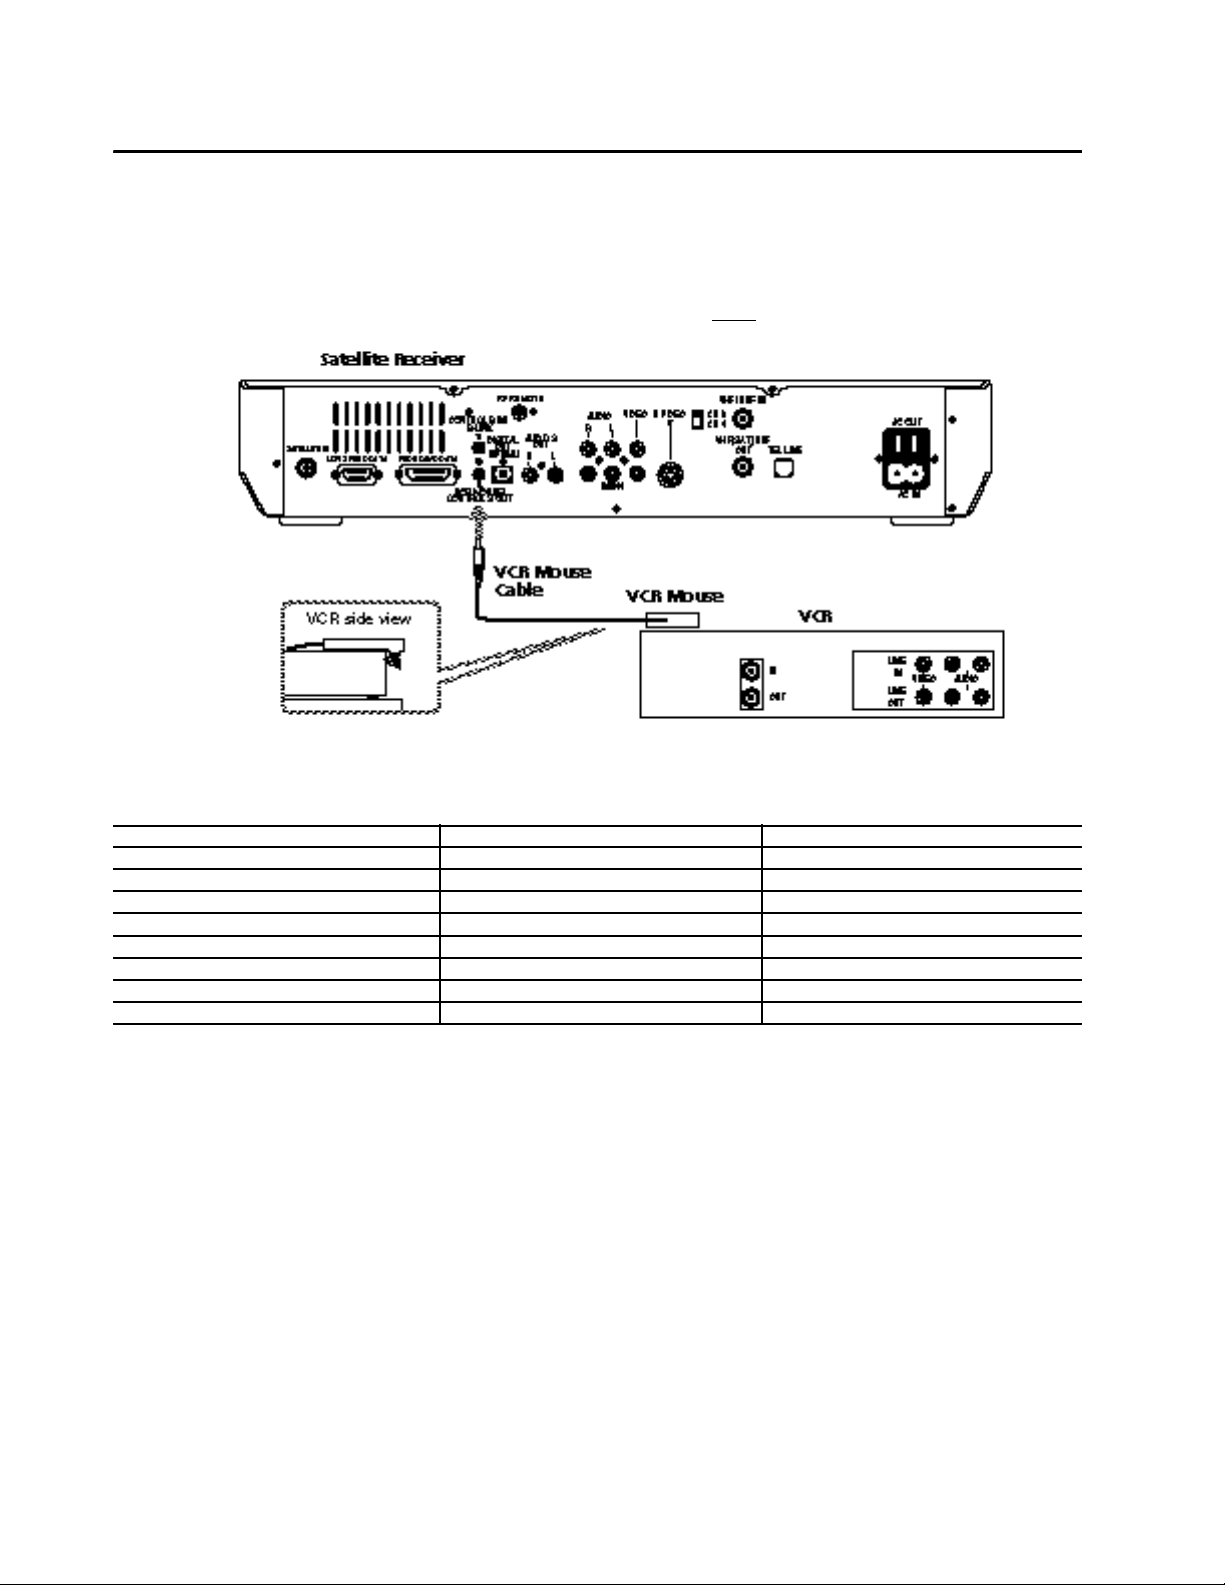
Connecting the VCR Mouse
SAT-A2 receiver is pictured, but
connections are identical for SAT-B2.
The VCR Mouse works with the DSS receiver’s Timer function to
automatically start and stop the recording function of your VCR.
1 Connect the VCR Mouse to the DSS receiver’s VCR MOUSE/
CONTROL S OUT jack. Then place the VCR Mouse on top of and
slightly overhanging the front
the VCR Mouse directly above the VCR’s IR receiving area.
of the VCR. For best results, place
2 Find the three-digit code number for your VCR in the table below.
If more than one code number is listed, use the number listed first
to complete step 3.
Manufacturer Code Manufacturer Code Manufacturer Code
Sony* 301, 302, 303 Hitachi 304, 305 Samsung 313, 321, 322
Bell & Howell 343 JVC 314 Scott 312
Daewoo 341 Magnavox 308, 309, 310 Sharp 327, 328
Emerson 316, 317, 318, 319, 320 Mitsubishi 323, 324, 325, 326 Shintom 315
Fisher 330, 333, 334, 335 NEC 336, 337 Symphonic 338
General Electric 304, 329 Panasonic 306, 307 Teknica 338, 342
Go-Video 339, 340 Philips 310 Toshiba 311
Goldstar 332 RCA 305 Zenith 331
*Code 301 is the default code for Sony VHS VCRs; for Sony 8mm VCRs, use code 302; for Sony Beta, ED VCRs, use code 303.
3 Using the buttons on the VCR Mouse: 1) Press the SET button,
2) Enter the three-digit code number, 3) Press the ENTER button.
If the VCR Mouse doesn’t seem to be
working correctly, first check that the
VCR Mouse is positioned directly above
the VCR’s IR receiving area. If it’s still not
working, try this procedure again using
the other codes listed for your VCR. For
more troubleshooting information, see
page 90.
4 To check that the code is correct, press the 1 button on the VCR
Mouse. If the VCR turns on and off each time you press 1, the code
number is correct.
To use the VCR Mouse:
1) Set the DSS Timer (page 38), 2) Turn on the VCR and set the VCR’s
line input to the DSS receiver, 3) Insert a tape, 4) Turn off the VCR.
20 Chapter 3: Connecting Your System
Page 21
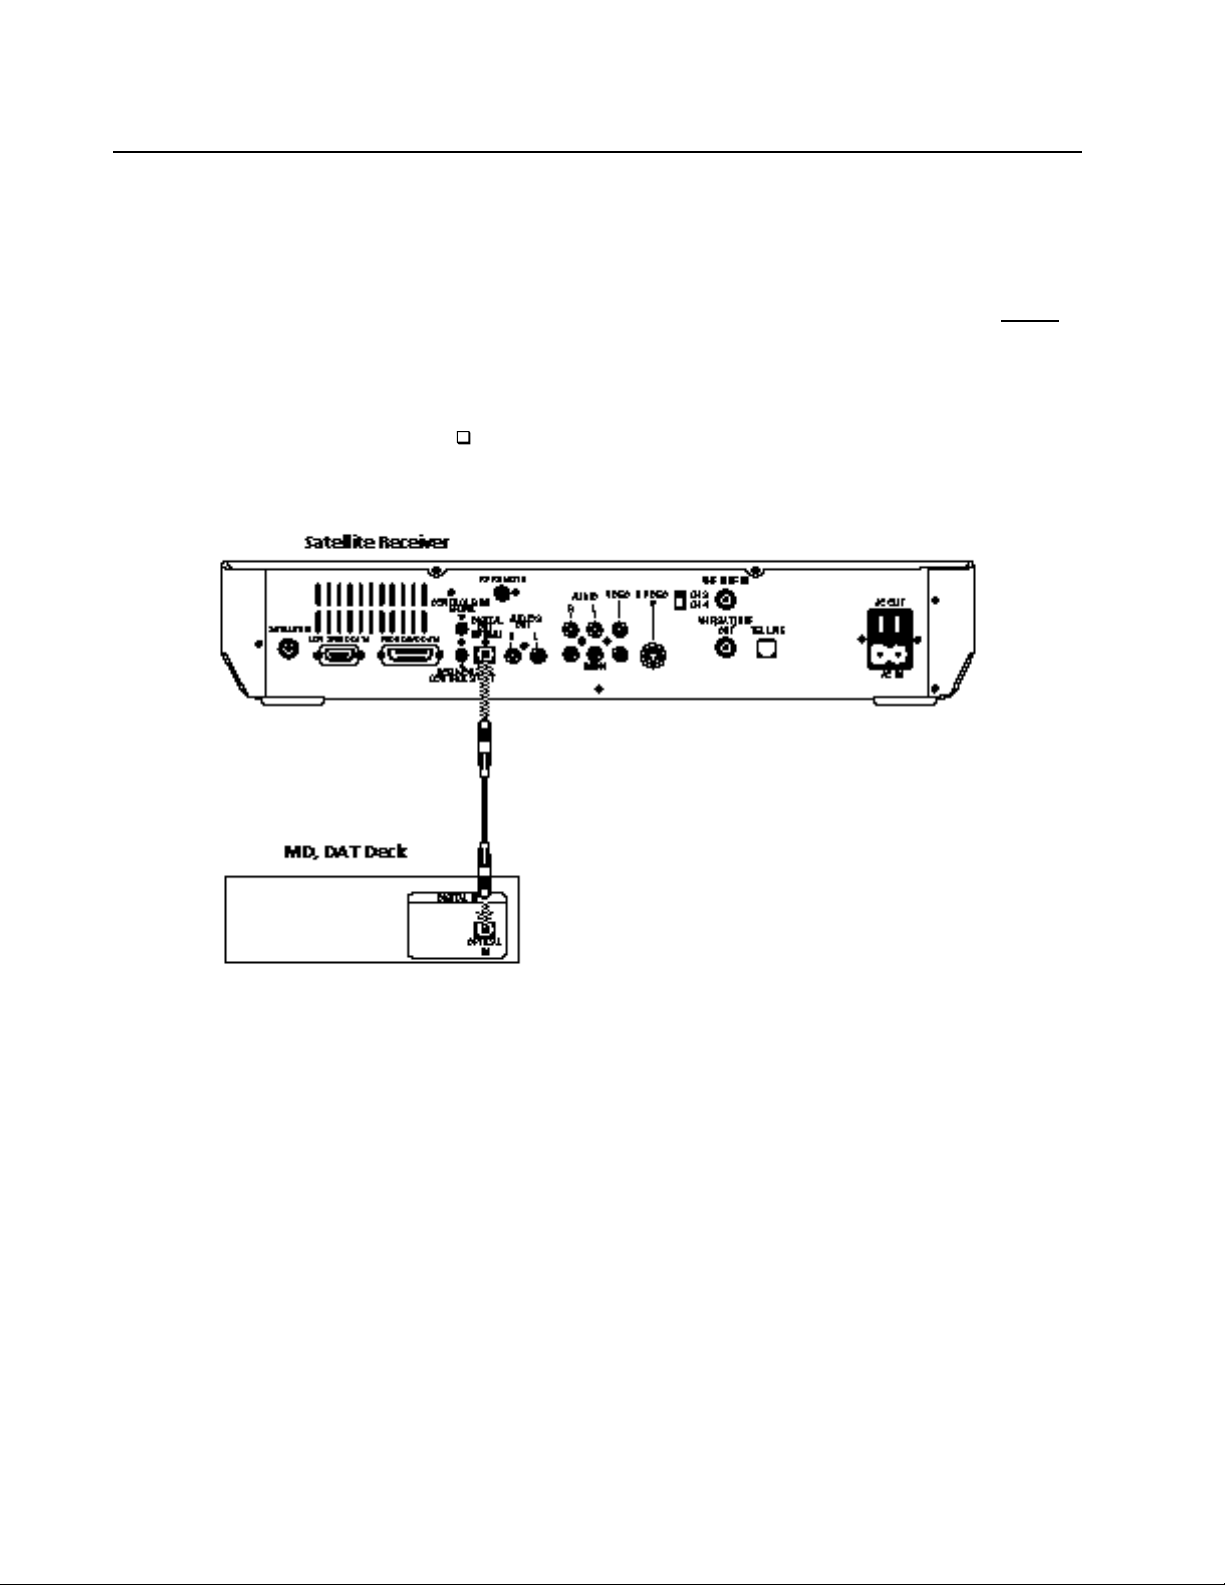
Connecting Digital Audio Components (SAT-A2 Only)
The digital audio output connector allows you to connect a digital
audio component that has a digital optical audio input connector, such
as a MiniDisc (MD) or digital audio tape (DAT) recorder.
Note
The digital audio component must have a digital input frequency of 48 kHz
Check your component’s instruction manual to determine the digital input
frequency of your component.
To connect a digital audio component:
Connect the DSS receiver’s DIGITAL OUT connector to the audio
component’s digital audio input connector, using the component’s
digital optical cable.
.
Chapter 3: Connecting Your System 21
Page 22
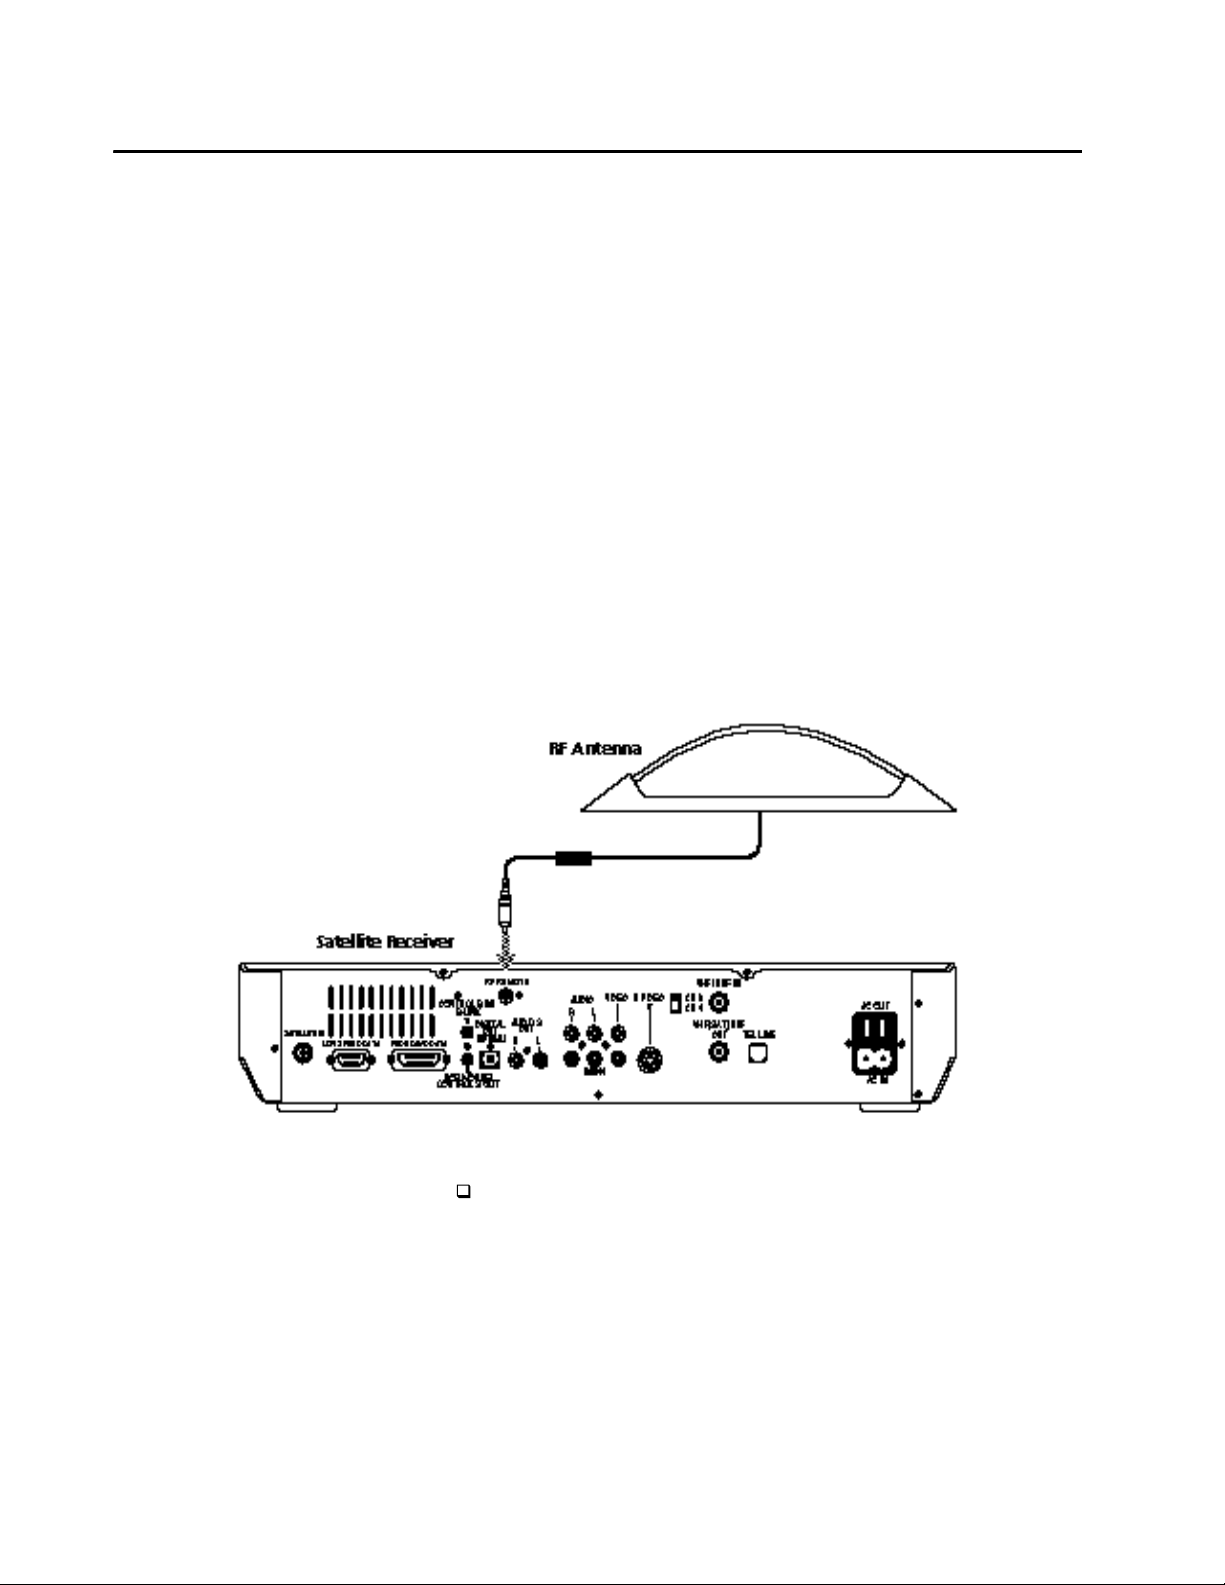
Setting Up the RF Antenna (SAT-A2 Only)
The RF (radio frequency) antenna enables the remote control to operate
the DSS receiver even if the receiver is located in another room or is
placed behind a cabinet door. In other words, with the RF feature, the
remote control does not require a direct line-of-sight to the front panel
of the DSS receiver.
Note
You must set up the RF antenna if you plan on using the RF feature.
To set up the RF antenna:
1 Connect the RF antenna to the DSS receiver’s RF REMOTE jack.
Do not place the RF antenna directly on
top of the DSS receiver or any other metal
object. For best results, place the RF
antenna in a visible location.
2 Place the RF antenna at least one foot away from the DSS receiver.
3 Use the on-screen displays to set up the DSS receiver to accept RF
transmission (RF ONLY). See “Setting Up the Remote Control” on
page 71 for details.
The DSS receiver is shipped with IR transmission enabled and RF transmission
disabled. To use the RF feature, you must first change the factory setting (IR
ONLY) to the RF setting (RF ONLY) using the on-screen displays, as described
on page 71.
The operating range of the DSS remote
control is about 100 ft. This may decrease
due to ambient radio wave conditions,
your room’s walls, weak batteries, etc.
Optional Setup
The RF antenna can be mounted to a wall using the enclosed
screws or by using two pieces of double-sided tape (supplied).
22 Chapter 3: Connecting Your System
Page 23

Setting Up Your DSS System
Viewing Satellite Programs
Viewing Cable or
Off-Air Programs
Recording Satellite
Programs While Watching
Cable or Off-Air Programs
1 Turn on the TV, and then set the TV’s line input to the DSS receiver.
(For example, set the TV to channel 3 or 4, if you used an RF
connection; or set to VIDEO1, etc., if you used an A/V connection.)
2 Turn on the VCR and A/V receiver, if you connected these
components. Then set their output switches accordingly.
3 Turn on the DSS receiver and select a station.
The following instructions apply only if you connected your cable TV or
terrestrial antenna to your DSS receiver.
1 Turn off your DSS receiver, or press the TV/DSS button to set the
DSS receiver to TV mode.
2 Turn on the TV and then:
If you have a cable box, turn it on and then tune the TV to the
output channel of your cable box, usually channel 3 or 4.
If you do not have a cable box, just tune your TV to the station
you want to watch.
The following instructions apply only if you connected your cable TV or
terrestrial antenna to your DSS receiver.
1 Turn on the TV and then:
If you have a cable box, turn it on and then tune the TV to the
output channel of your cable box, usually channel 3 or 4.
If you do not have a cable box, tune your TV to the station you
want to watch.
2 Turn on the DSS receiver, and tune to the program you want to
record. Then set the VCR to line input or channel 3 or 4, and start
recording, according to your VCR’s instruction manual.
3 Press the TV/DSS button to set the DSS receiver to TV.
The DSS receiver’s signal is sent to the VCR, while the off-air signal is
sent to your TV for you to watch.
Note
For information on using the DSS receiver’s automatic timer, see “Setting Up
the Timer” on page 38.
You cannot record one satellite program while watching another satellite
program (unless you have a second DSS receiver).
If the screen appears fuzzy, the program you are watching may be protected by
Macrovision. Turn the VCR off to improve the picture quality.
Chapter 3: Connecting Your System 23
Page 24

Chapter 4
Using the System Features
Read this chapter to learn how to use system features including the
Master program guide, Station Index, Favorite Station Guide, and the
ordering of pay-per-view programs.
Overview
This chapter provides detailed instructions for using the main features
of your DSS receiver. Topics include:
Checking to make sure your system is completely set up and ready
to be used (page 25).
Using Highlight and Select, the simple, two-step process for
operating the on-screen displays (page 26).
Displaying and navigating through the program guide (page 27).
Selecting subscription and pay-per-view programs from the
program guides (page 31).
Using the program list (page 32).
Selecting other program guides that are sorted by category and
subcategory (page 33).
Using the Station Index (page 36).
Setting the Timer (page 38).
Using the five Favorite Station Guides (page 40).
Displaying the Program Banner (page 43).
Using the DISPLAY feature (page 44).
24 Chapter 4: Using the System Features
Page 25

Before You Get Started ...
Make sure you (or your DSS system installer) have completed the
following procedures before you start using your DSS receiver:
1 Install the satellite antenna, as described in the Satellite Antenna
Installation Manual.
Note
Make certain that you (or your DSS system installer) have optimized the
signal strength. If the signal is not optimized, you may experience losses in
audio or video, especially during rain, snow, or other conditions that tend to
degrade signal performance. See the Satellite Antenna Installation Manual for
details on pointing the dish and optimizing the antenna’s signal strength.
2 Connect the satellite antenna to your DSS receiver. Then connect
the receiver to your television and telephone line. (See Chapter 3.)
Note
Your phone line must be connected to the DSS receiver in order for you to
purchase a pay-per-view program with the DSS remote control.
3 Make sure the access card is inserted into the DSS receiver. The
receiver comes with the card already inserted. (See page 68 for
details on inserting the access card.)
If Your System Is Not
Completely Installed ...
4 Call your program providers (DIRECTV and USSB) to activate
your service. You’ll need to provide information, including the
model and serial numbers of your DSS receiver and the access card
number.
DIRECTV® 1-800-DIRECTV (347-3288)
USSB 1-800-204-USSB (8772)
See the manual that came with the satellite antenna and Chapter 3 of
this manual for complete installation instructions. Or, see your DSS
dealer to arrange for a professional installation or the purchase of the
Sony-brand DSS Installation Kit.
Chapter 4: Using the System Features 25
Page 26
Using the On-Screen Displays: Highlight and Select
highlight
All of the features and functions of the DSS receiver can be operated
using a simple, two-step process: Highlight and Select. These two steps
are explained below.
Step 1: Highlight
To highlight, move the joystick (SAT-A2) or press the arrow buttons
(SAT-B2) on the remote to move the on-screen to the
item that you want to select.
Step 2: Select
After you’ve highlighted the item that you want, select it by
pressing the button.
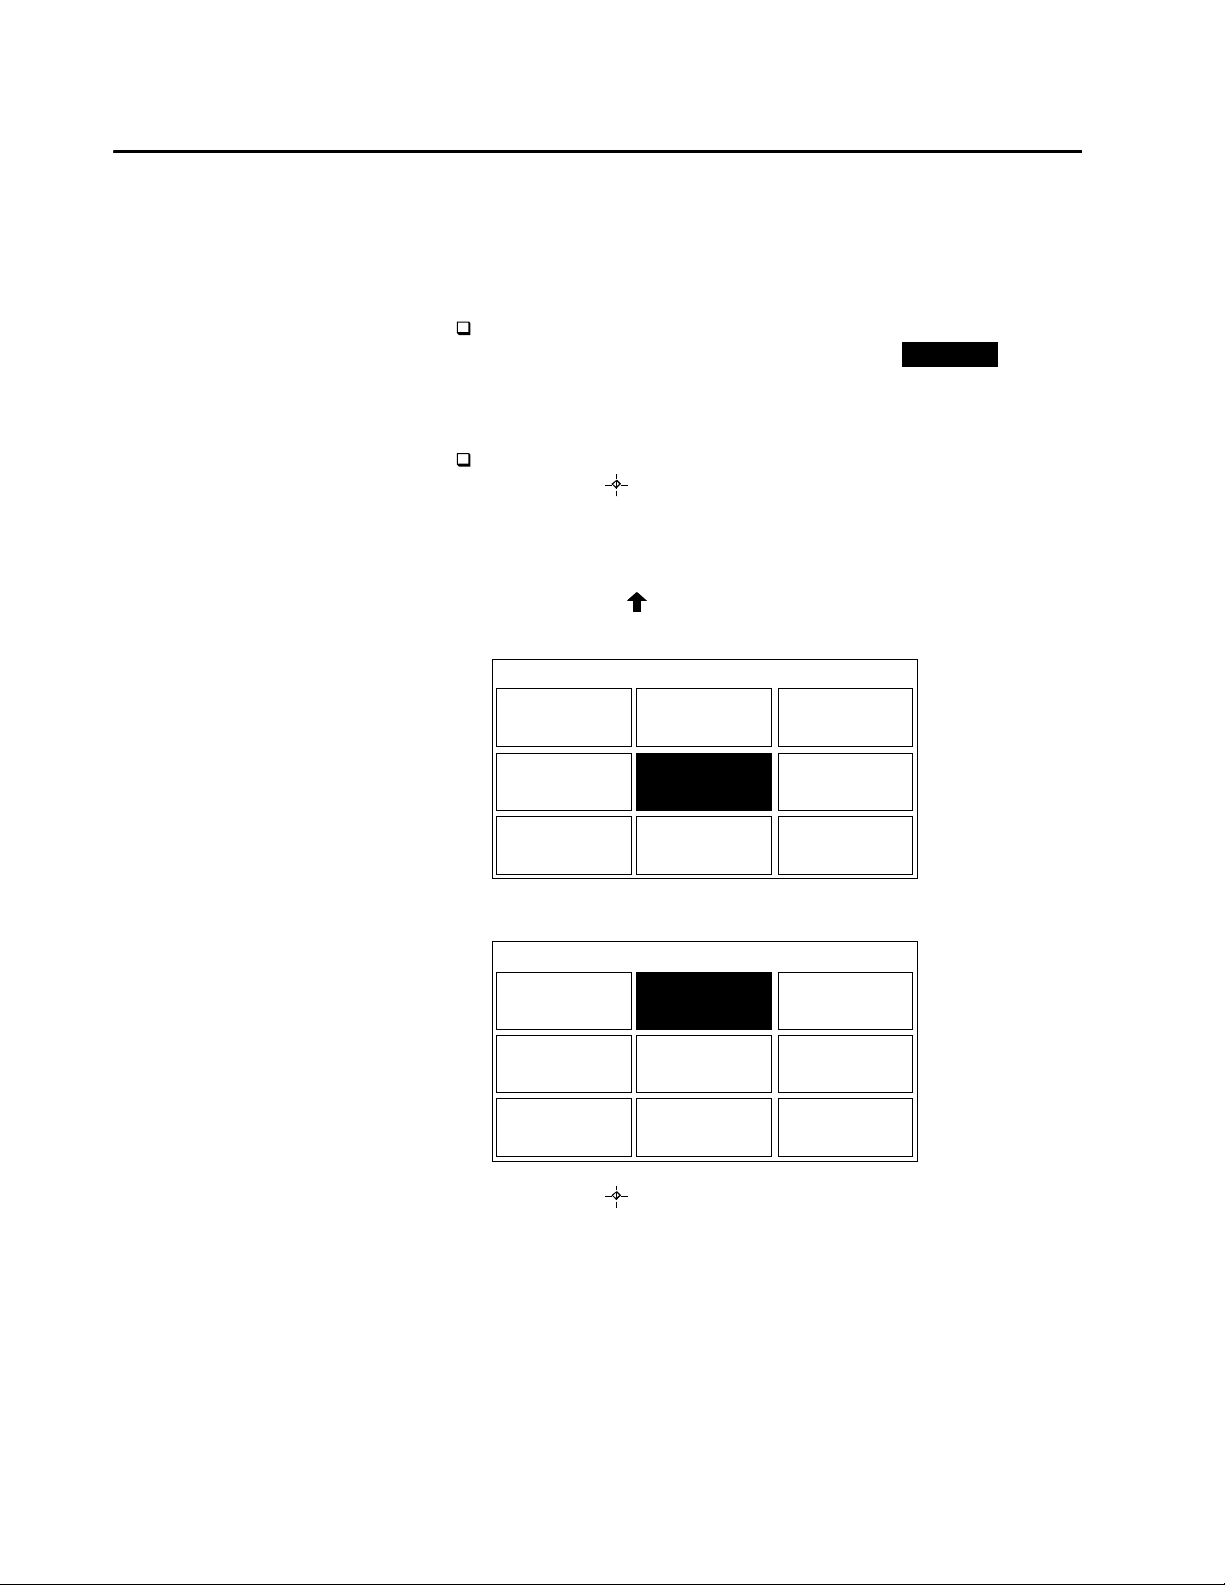
Example: Highlight and Select
1 In the sample menu that follows, moving the joystick up (SAT-A2)
or pressing the button (SAT-B2) moves the highlight from
ITEM 5...
Shortcut
(SAT-A2 Only)
In many of the on-screen displays you
can move the joystick in eight
directions: left, right, up, down, and
diagonally (up left, up right, down
left, and down right).
SAMPLE MENU
ITEM 1
ITEM 4
ITEM 7 ITEM 8
... to ITEM 2.
SAMPLE MENU
ITEM 1
ITEM 4
ITEM 7
ITEM 2
ITEM 5
ITEM 2
ITEM 5
ITEM 8
ITEM 3
ITEM 6
ITEM 9
ITEM 3
ITEM 6
ITEM 9
2 Pressing the button selects ITEM 2.
You can apply this basic operation of highlighting and selecting to
perform any of the system’s functions.
26 Chapter 4: Using the System Features
Page 27
Displaying the Program Guide
You can select programs using the CH+ and CH- buttons, or you can
enter the station number directly using the 0-9 buttons. However,
because DSS offers you such a variety of programming choices, you’ll
get the most out of the system by using one of the on-screen program
guides to find the programs you want to watch.
To display the Master Guide:
Press the MENU button to bring up the Main Menu. Then
highlight and select MASTER GUIDE from the menu.
Shortcut
You can select menu items directly by
pressing the corresponding number
button. For example, press 2 to select
the Master Guide from the Main
Menu.
MAIN MENU
1
4
7
MASTER
GUIDE
EXIT
TIMER
SETUP
2
5
8
SELECT
LIST
MOVIES
LIST
SETUP MENU
3
6
9
SELECT
GUIDE
MOVIES
GUIDE
OPTIONS MENU
Note
To bring up the Custom Guide, press the GUIDE button on the remote control.
See “Setting Up a List of Custom Stations” on page 57 for details.
Features of the program guide are discussed in more detail on the
following pages.
Chapter 4: Using the System Features 27
Page 28
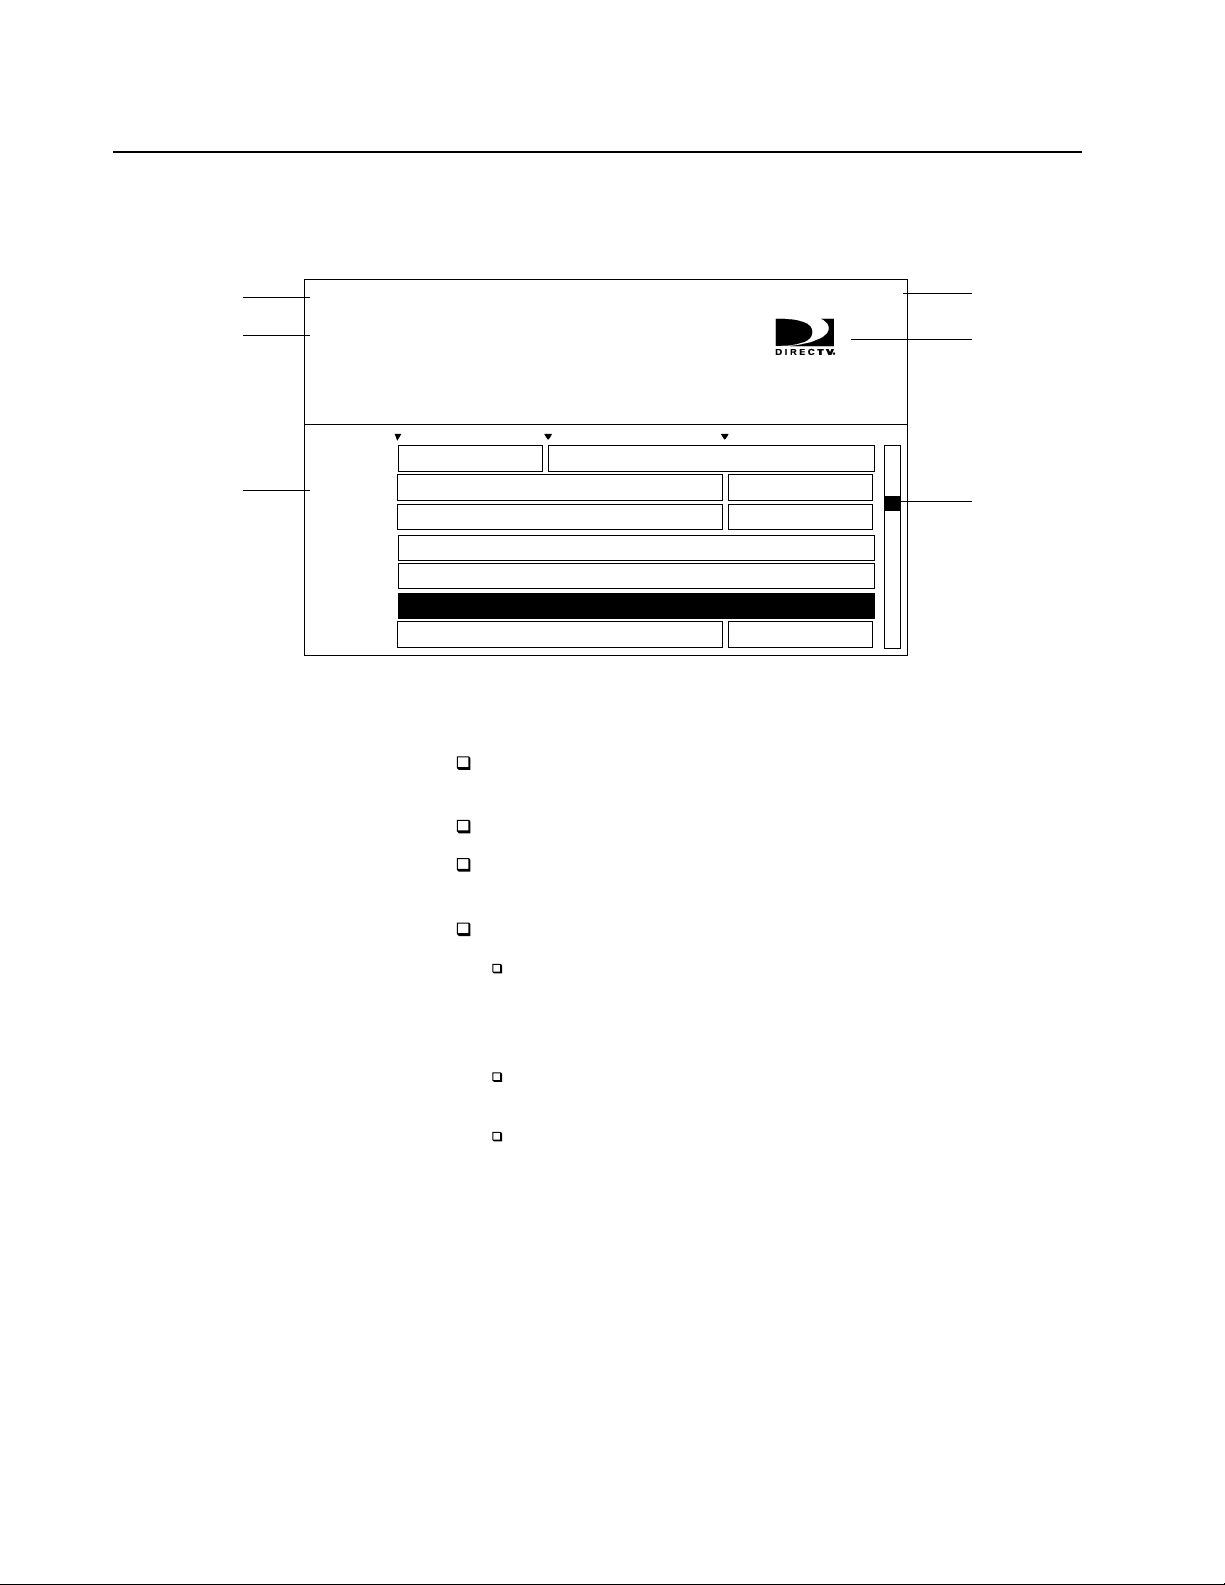
Features of the Program Guide
Jefferson in Par...Johnny Mnemoni
When you select a guide from the Main Menu or press the GUIDE
button on the remote, a program guide appears, similar to the
following:
Program Guide Title
Program
Description
Schedule Grid
MASTER GUIDE WED OCT 5 8:45 PM
First Knight
8:00 PM - 10:00 PM PG-13
Act. Adv. 1995 Richard Gere, Sean Connery, Julia
Ormond. Thrilling romance results when rogue knight
Lancelot becomes torn between his loyalty to King
Arthur and his love for Queen Guinevere (CC, ST) (A, V)
8:00 PM 8:30 PM 9:00 PMWED
BoxingSHO2987
MTV 989
The Alamo
Most Wanted ...MTV’s Best of the 90’s
COM 990 It’s Gary Shan...Tracy Ullman
USSB999
DTV 100
DTV 102
DTV 105
USSB Programming Highlights
Direct Ticket Previews
First Knight
c
Program guides, such as the Master Guide shown above, feature a
variety of elements, including:
Program guide title, such as Master Guide, Custom Guide, Movie
Guide, Sports Guide, etc.
Current day of the week, date and time.
Station logo (when available) and program description of the
currently highlighted station.
Day, Date, Time
Station logo
Page Indicator
Schedule grid, which includes:
Station names, numbers, and program titles. These appear in
ascending numerical order from top to bottom (unless you
have changed the listing to alphabetical order. See “Setting the
Station Order” on page 49 for details).
Time slots. These appear left to right, with the current time’s
programming in the leftmost position.
Page indicator. This shows you approximately which page
you’re on, relative to all the pages in the guide. The size of the
indicator is proportional to the overall size of the entire
program guide.
28 Chapter 4: Using the System Features
Page 29
Moving Through the Program Guide
The on-screen program guides are displayed only one page at a time.
Because the program guide usually contains many pages, you need to
move through the guide to see more of the programs contained in the
guide. You can move by scrolling, paging, and direct station tuning.
Scrolling
Paging Vertically
Through the Stations
Paging Through Later
Program Start Times
To scroll, use the remote control to move the highlight one position at a
time. You can scroll to different stations or time slots.
To move to other stations in the guide one station at a time:
SAT-A2: Move the joystick up or down.
SAT-B2: Press the up or down arrow buttons.
To move to other time slots in the guide:
SAT-A2: Move the joystick left or right.
SAT-B2: Press the left or right arrow buttons.
To page, use the PAGE buttons to move through the guide one page at
a time. This allows you to move through the guide more quickly than
scrolling.
To page through the guide:
Press the PAGE or PAGE buttons.
The PAGE button pages in the up direction. The PAGE button
pages in the down direction.
To display future time slots in the guide:
Press the GUIDE button.
Pressing the GUIDE button repeatedly cycles through all the available
time slots in the guide as they are made available by your program
providers (for example, THU 3:00 PM, THU 10:00 PM, FRI 3:00 AM,
etc.).
Direct Station Tuning
Note
To select a future program guide directly, press the MENU button and then
select SELECT GUIDE/TIME. See page 33 for details.
To move to a station directly:
Press the 0-9 buttons to specify the station number. Press the
ENTER button to change the station more quickly.
Chapter 4: Using the System Features 29
Page 30

Displaying Favorite Stations
To see your favorite stations at the top of the program guide:
Press the FAVORITE button.
Pressing the FAVORITE button repeatedly cycles through the stations
currently set for the five Favorite Station Guides (FAVORITE 1, 2, 3, 4,
5), and then back to the normal guide.
Note
See page 40 for instructions on setting up your favorite stations.
Changing the Appearance
of the Guide
Exiting the Guide
To toggle through the three variations of program guide:
Press the DISPLAY button repeatedly. (See “Using the DISPLAY
Feature” on page 44 for details.)
There are two ways to exit the program guide:
Select a program from the guide by pressing the button. (See
“Selecting a Program from the Guide” on page 31 for details.)
OR
Press the EXIT button on the remote. You will be returned to the
last program you were watching before the program guide was
displayed.
30 Chapter 4: Using the System Features
Page 31

Selecting a Program from the Guide
program provider to order the program.
For all programs except pay-per-view (PPV), you can select a program
from the guide just by pressing the button. If the program is
currently showing, the guide disappears and the program you selected
appears.
If the program has not yet started, a pop-up window appears, which
gives you the option of adding the program to the Timer list, returning
to the program guide, or tuning to the current program on that station.
See “Setting Up the Timer” on page 38 for details on using the Timer.
Watching a PPV program is similar, except it requires you to order the
program before you can watch it beyond the free preview period
(usually about five minutes after the program starts).
Ordering Pay-Per-View
Programs
Selecting RETURN returns you to the
previous screen, without purchasing the
program.
Selecting TIMES brings up a list of
additional show times that you can
choose from for the program you selected.
A PREVIEW button, which gives you a
free preview of the program, appears only
when the preview is available.
If the BUY button does not appear (and
the message “Purchase information not
available” appears), you must call your
To order a PPV program listed in the program guide:
1 Highlight the program name in the guide and press the button.
2 Select BUY from the Purchase Program screen.
PURCHASE PROGRAM
First Knight
WED OCT 5 8:00 PM - 9:30 PM
DTV 102 Rating:PG-13
Act. Adv. 1995 Richard Gere, Sean Connery, Julia
Ormond. Thrilling romance results when rogue knight
Lancelot becomes torn between his loyalty to King Arthur
and his love for Queen Guinevere (CC, ST, (A, V)
Price/View:$2.99
RETURN
BUY
TIMES
HELP
3 When the Confirm Purchase pop-up window appears, select YES
to confirm your purchase. Selecting NO returns you to the
Purchase Program screen, without purchasing the program.
If the program has not yet started, a pop-up window appears, which
gives you the option of adding the program to the Timer list, returning
to the program guide, or tuning to the current program on that station.
See “Setting Up the Timer” on page 38 for details on using the Timer.
To watch a PPV program you’ve purchased in advance, just tune to the
station when the program is about to start. Your program providers
will bill you automatically.
About Copy-Protection
Some PPV programs are copy-protected by Macrovision at the
discretion of the copyright owner. When watching a PPV program,
turn the VCR off to ensure a quality picture.
Chapter 4: Using the System Features 31
Page 32

Selecting a Program List
The Program List displays programs alphabetically by program title, as
opposed to the Guide format, which sorts the programs numerically by
station number. A sample Movies List is shown below.
The buttons that appear for each
program indicate start times.
For example, in this sample Movie
List, “First Knight,” with a start time
of 9:00PM, is highlighted.
To select a program, highlight the start
time button and then press the
button.
MOVIES LIST WED OCT 5 8:45 PM
First Knight
9:00 PM - 11:00 PM PG-13
Act. Adv. 1995 Richard Gere, Sean Connery, Julia
Ormond. Thrilling romance results when rogue knight
Lancelot becomes torn between his loyalty to King
Arthur and his love for Queen Guinevere (CC, ST) (A, V)
The Alamo
Aspen
Bad Boys
First Knight
Free Willy 2: The Adventure
Johnny Mnemonic
Judge Dredd (Letterbox)
To display a Program List, select MOVIES LIST from the Main Menu.
To set up a different program category for the Program List, see
“Selecting a Different Program Guide or List” on page 33.
9 PM 9:30 10 PM 10:30WED
To move to other programs in the list one program at a time:
SAT-A2: Move the joystick up or down.
SAT-B2: Press the up or down arrow buttons.
To move to other time slots in the list:
SAT-A2: Move the joystick left or right.
SAT-B2: Press the left or right arrow buttons.
To page through the list:
Press the PAGE or PAGE buttons.
To toggle through the three variations of lists:
Press the DISPLAY button repeatedly. (See “Using the DISPLAY
Feature” on page 44 for details.)
To exit the list:
Select a program from the list by pressing the button.
Or
Press the EXIT button on the remote. You will be returned to the
last program you were watching before the list was displayed.
32 Chapter 4: Using the System Features
Page 33

Selecting a Different Program Guide or List
You can use the SELECT GUIDE and SELECT LIST options in the Main
Menu to select subsets of the Master Guide in either the Guide or List
format.
1 Press the MENU button to bring up the Main Menu.
2 Select SELECT GUIDE or SELECT LIST from the Main Menu. The
Select Guide (or List) screen appears.
The GUIDE and TIME options are not
available when you select SELECT LIST.
Selecting RESET resets the screen to the
default guide (Custom/Current/Movies/
All).
SELECT GUIDE
GUIDE
TIME
CATEGORY
CUSTOM
CURRENT
MOVIES
OK
RETURN
RESET
HELP
Selecting a Guide Type
SUBCATEGORY
ALL
3 Select a different Guide, Time, Category, and Subcategory,
described as follows.
The GUIDE option lets you select from a list of alternative program
guides, which are made available by your program providers. These
guides may contain groups of stations with similar subjects, for
example, special promotions or pay-per-view programs.
To select a guide type:
1 Select GUIDE from the Select Guide screen.
2 Select the type of guide you want to display.
SELECT GUIDE
GUIDE
TIME
CATEGORY
SELECT GUIDE
CUSTOM
MASTER
SUBSCRIPTION
PPV
PROMO
MUSIC
OK
RETURN
RESET
HELP
SUBCATEGORY
3 Select OK to display the selected program guide, or select different
options for time, category, or subcategory.
Chapter 4: Using the System Features 33
Page 34

Selecting a Guide Time
The TIME option lets you select from a list of future program guides.
To select a future program guide:
1 Select TIME from the Select Guide screen.
2 Select the time you want to display.
SELECT GUIDE
Selecting a Guide Category
GUIDE
TIME
CATEGORY
SUBCATEGORY
SELECT TIME
CURRENT
SAT 5:00 PM
SAT 9:30 PM
SUN 2:00 AM
SUN 6:30 AM
SUN 11:00 AM
OK
RETURN
RESET
HELP
3 Select OK to display the selected program guide, or select different
options for guide, category, or subcategory.
The CATEGORY option lets you select from a list of program guide
categories.
To select a program guide category:
1 Select CATEGORY from the Select Guide screen.
2 Select the program category you want to display.
SELECT GUIDE
GUIDE
TIME
CATEGORY
SUBCATEGORY
SELECT CATEGORY
ALL
MOVIES
SPORTS
SPECIALS
SERIES
NEWS
OK
RETURN
RESET
HELP
3 Select OK to display the selected program guide, or select different
options for guide, time, or subcategory.
34 Chapter 4: Using the System Features
Page 35

Selecting a Guide
Subcategory
Selecting ALL places a checkmark beside all
the subcategories. Selecting NONE removes
the checkmark from all the subcategories.
Selecting CANCEL returns you to the
previous screen, without saving your
selections.
The SUBCATEGORY option lets you select from a list of program guide
subcategories, based on the selected program category.
Note
You cannot select SUBCATEGORIES if CATEGORY is set to ALL.
To select a program guide subcategory:
1 Select SUBCATEGORY from the Select Guide screen.
The Select Subcategory screen appears.
2 Select the program subcategories you want (you can select more
than one subcategory). A selected subcategory appears with a
checkmark (
again. The checkmark disappears. After you’ve made your
selections, select OK to return to the Select Guide screen.
SELECT MOVIES SUBCATEGORY
ACTION/
ADVENTURE
FANTASY HORROR MUSICAL
SCIENCE
FICTION
) beside it. To deselect a subcategory, just select it
CHILDREN COMEDY DRAMA
ROMANCE
WESTERN OTHER
OK
CANCEL
ALL
NONE
HELP
How SELECT GUIDE and
SELECT LIST Change the
Main Menu
Example: If you select the Sports
Guide using SELECT GUIDE,
button 4 of the Main Menu
automatically changes to SPORTS
GUIDE.
Similarly, button 6 of the Main
Menu automatically updates to the
last selection you made using
SELECT LIST.
3 Select OK to display the selected program guide, or select different
options for guide, category, or subcategory.
The next time you display the Main Menu, it will include the Guide or
List category that you selected. To change category selections, select
SELECT GUIDE or SELECT LIST from the Main Menu.
The selections you make using SELECT GUIDE and SELECT LIS T
affect the program categories displayed in the Main Menu. The
category you select using SELECT GUIDE changes button 4 of the
Main Menu. The category you select using SELECT LIST changes
button 6 of the Main Menu.
This feature allows you to recall the last program guide or list that you
selected.
MAIN MENU
1
4
7
MASTER
GUIDE
EXIT
TIMER
SETUP
2
5
8
SELECT
LIST
NEWS
LIST
SETUP MENU
3
6
9
SELECT
GUIDE
SPORTS
GUIDE
OPTIONS MENU
Chapter 4: Using the System Features 35
Page 36

Using the Station Index
The Station Index is an on-screen display that contains the station logo
(or call letters) of all the stations in the system.
Note
Before you can bring up the Station Index, you must first clear the program
guide from your TV screen. Pressing EXIT turns off the on-screen displays.
Also, you may need to change to another station if a message appears, which
requests that you press the button to purchase the program, etc.
To display the Station Index:
Press the button.
The Station Index appears. The station you are currently tuned to is
automatically highlighted and program title is displayed at the top.
Your Station Index may not look
exactly like this. The stations
displayed depend on the
programming you’ve ordered.
Moving Through
the Station Index
STATION INDEX Sports Center
206
216 220 222 224 225 226 227
229 230 232 233 235 236 240
207 208 209 211 212 215
DISC TLC
To move through the Station Index:
Move the joystick (SAT-A2) or press the arrow buttons
(SAT-B2) to move one station at a time.
Press the PAGE or PAGE buttons to page (move up or down
several rows at a time).
Enter the station number, using the 0-9 buttons and press ENTER.
36 Chapter 4: Using the System Features
Page 37

Displaying Favorite
Stations in the Station
Index
To display your favorite stations on the top row of the Station Index:
Press the FAVORITE button.
Pressing the FAVORITE button repeatedly cycles through the five
Favorite Station Guides.
The top row contains your seven
favorite stations from one of your five
Favorite Station Guides.
Changing the Appearance
of the Station Index
Selecting a Program from
the Station Index
FAVORITE 1 Matlock
HBO
240 989 212
216 220 227
229 230 232 233 235 236 240
Note
See page 40 for instructions on setting up your favorite stations.
980
222 224 225
198 256 233
DISC TLC
226
To toggle through the three variations of Station Index:
Press the DISPLAY button repeatedly. (See “Using the DISPLAY
Feature” on page 44 for details.)
To select a program:
Press the button to tune to the highlighted station. The Station
Index disappears.
To exit the Station Index without changing stations:
Press the EXIT button. The Station Index disappears, and you
return to the station you were watching before displaying the
Station Index.
Chapter 4: Using the System Features 37
Page 38

Setting Up the Timer
You can select from two ways to automate VCR recording of DSS
programs:
Setting the DSS Timer and then setting your VCR timer.
Setting the DSS Timer and using the Sony VCR Mouse to
automatically control the VCR (see “Connecting the VCR Mouse”
on page 20 for details).
Setting the Timer
If you’ve entered the Timer Setup
screen by selecting a future program
from a program guide, the Day, Start
and Stop times, Station, and program
title are displayed automatically.
However, if you make any changes to
the Timer Setup options, the program
title disappears (although the Timer
will still work as you’ve set it).
To set the timer:
1 Press the MENU button to bring up the Main Menu.
2 Select TIMER SETUP. The Timer Setup screen appears.
Shortcut
You can automatically add future programs to the Timer screen by just
selecting them from the program guide. See “Selecting a Program from the
Guide” on page 31 for details.
3 Select one of the 10 timer setting buttons. Then highlight the DAY
field (today’s date automatically appears).
TIMER SETUP
DAY START STOP STATION
11/9 SAT -:-- -:-- --- ----
1
-/-- -:-- -:-- --- ----
2
-/-- -:-- -:-- --- ----
3
-/-- -:-- -:-- --- ----
4
-/-- -:-- -:-- --- ----
5
OK
CANCEL
CLEAR
HELP
4 Set the day, start time, stop time, and station number as follows:
To set each item (day, time, etc.), move the joystick up or down
(SAT-A2) or press up or down arrow buttons (SAT-B2).
To move to the next or previous item, move the joystick right
or left (SAT-A2) or press the right or left arrow buttons (SAT-
B2).
Note
You can set the timer up to 30 days in advance. You can also set the timer for
every day or for the same day(s) every week. See “Setting the Daily/Weekly
Timer” on page 39.
5 Select OK to save your settings.
38 Chapter 4: Using the System Features
Page 39

Setting the Daily/Weekly
Timer
To set the timer for every day or for the same day(s) every week:
1 In step 4 (page 38), move the highlight down repeatedly to select
one of the DAY options, which are displayed in the following
sequence:
Current Date DAILY MON-FRI EVERY SAT ...
EVERY MON
EVERY SUN 1 Month Later (Cycles backward) Current Date
2 Set the start time, stop time, and channel, then select OK to save
your settings.
Changing/Checking/
Clearing Timer Settings
Notes on Using
the Timer
To change, check, or clear timer settings:
1 Bring up the Timer Setup screen, as described on page 38.
2 Check your settings.
If you don’t want to make any changes, select OK.
If you want to change or clear settings, select the numbered
button of the timer setting you want to change.
3 Change or clear the setting as follows:
To change the setting, highlight the item you want to change.
Then reset the item by moving the joystick up or down (SAT-
A2) or press up or down arrow buttons (SAT-B2).
To clear the setting, select CLEAR.
4 Select OK to save your settings.
After the timer is set, the TIMER indicator on the front panel lights,
indicating that the timer has been set.
To use the timer to record a PPV program, you must first purchase
it in advance of its showing. See “Ordering Pay-Per-View
Programs” on page 31.
If locks and limits are set (and the system is locked), check to make
sure they do not conflict with the program you’re trying to record.
About 60 seconds before the timer automatically tunes to the
specified channel, a message appears. To cancel the timer setting
and continue watching the current program, press the EXIT button.
If you set overlapping (conflicting) timer settings, the DSS receiver
handles these timer settings as follows:
If you set two timer settings to start at the same time, the timer
setting that’s listed first has priority over any other conflicting
timer settings. Conflicting timer settings are automatically
cleared from the Timer Setup screen when the first timer
setting is activated.
If you set a second timer setting to start before the first timer
setting is set to stop, the second timer setting will start before
the first timer setting stops.
Chapter 4: Using the System Features 39
Page 40

Using the Favorite Station Guides
The Favorite Station Guide is a program guide that includes up to
seven of your favorite stations. You can create up to five Favorite
Station Guides: FAVORITE 1, 2, 3, 4, 5.
Setting Up and Using the
Favorite Station Guides
Before you can bring up the Favorite
Station Guide, you must first clear the
program guide from your TV screen.
Pressing EXIT turns off any on-screen
displays.
To set up the Favorite Station Guide:
1 Press the FAVORITE button. The first Favorite Station Guide
appears (FAVORITE 1).
FAVORITE STATION GUIDE- FAVORITE 1 TITLE
1 2 3 4
5 6 7
EXIT TO CURRENT
STATION
The system is shipped with no favorite stations set, so the first time
you see this guide, the seven Favorite Station buttons are blank.
2 Highlight a Favorite Station button that you want to set. Then
press and hold
the button.
The Favorite Station Guide switches to edit mode: The station list
appears, the selected Favorite Station button flashes, and the
highlight moves to the current station in the station list.
EDIT FAVORITE STATION GUIDE- FAVORITE 1
1
BASKETBALL
5
40 Chapter 4: Using the System Features
206
CLEAR
STATION
2 3 4
206 207 208 209 211
212 215 216 220 222
6 7
EXIT TO
PRIOR STATION
Page 41

3 To assign a station to the flashing Favorite Station button, do one of
the following:
Select it from the station list by highlighting it and then
pressing the button.
Enter the station number (such as 206), using the 0-9 buttons
on the remote. Then press the button.
To clear a Favorite Station button that is
already assigned, select CLEAR
STATION.
EDIT FAVORITE STATION GUIDE - FAVORITE 1
1
206
BASKETBALL
CLEAR
STATION
5
The station list disappears, and the Favorite Station Guide
reappears with the stations you’ve set up.
FAVORITE STATION GUIDE - FAVORITE 1 TITLE
1
206
BASKETBALL
2 3 4
206 207 208 209 211
212 215 216 220 222
6 7
EXIT TO
PRIOR STATION
2 3 4
5
6 7
EXIT TO
PRIOR STATION
Chapter 4: Using the System Features 41
Page 42

To set other Favorite Station buttons:
Repeat steps 2 and 3.
To clear a Favorite Station button setting:
Overwrite the setting by repeating steps 2 and 3. Or, highlight the
button and then select CLEAR STATION.
To set up or display a different Favorite Station Guide:
Press the FAVORITE button repeatedly to select the Favorite
Station Guide you want (FAVORITE 1, 2, 3, 4, 5).
To tune to a Favorite Station (and exit the Favorite Station Guide):
Press the number button that represents the station. Or highlight
and then select the Favorite Station button that you want to tune to.
To exit the Favorite Station Guide without changing stations:
Select “Exit to Current Station,” which appears in the bottom right
corner of the Favorite Station Guide or press the EXIT button.
Creating a Custom Favorite
Station Guide Title
Selecting CANCEL returns you to the
previous screen, without saving your
selections.
Selecting CLEAR erases all the
characters in the title.
To create a custom title for the Favorite Station Guide:
1 Select TITLE from the Favorite Station Guide. The Set Favorite
Guide Title screen appears.
2 To edit the title, move the joystick up or down (SAT-A2) or press
the up or down arrow buttons (SAT-B2) to enter each character.
To move from character to character, move the joystick left or right
(SAT-A2) or press the left or right arrow buttons (SAT-B2).
SET FAVORITE GUIDE TITLE
OK
CANCEL
F A V O
R I T E 1
CLEAR
HELP
3 Select OK to save your new title and return to the Favorite Station
Guide.
42 Chapter 4: Using the System Features
Page 43

Displaying the Program Banner
The program banner provides useful information about the program
you’re currently watching.
Note
Before you can bring up the program banner, you must first clear the program
guide from your TV screen. Pressing EXIT turns off any on-screen displays.
Also, you may need to change to another station if a message appears, which
requests that you press the button to purchase the program, etc.
To display the program banner:
Press the DISPLAY button.
First Knight
8:00 PM - 10:00 PM PG-13
MON JUNE 24 2:36 PM ENGLISH
Act. Adv. 1995 Richard Gere, Sean Connery, Julia Ormond. Thrilling romance results
when rogue knight Lancelot becomes torn between his loyalty to King Arthur and his
love for Queen Guinevere (CC, ST) (A, V)
The program banner shows the program title, station name and
number, current date and time, start and end times, rating, and
program description. It may also include any of the following
indicators:
DTV 102
Symbol Indicates For Details See
Data services available page 63
New and unread messages page 61
Alternate audio tracks available page 59
System is locked page 52
System is temporarily unlocked page 55
To clear the program banner:
Press the DISPLAY or EXIT button or wait a few seconds for it to
automatically disappear.
Chapter 4: Using the System Features 43
Page 44

Using the DISPLAY Feature
You can use the DISPLAY button to change the appearance of the onscreen displays.
The chart below illustrates how the DISPLAY button toggles through
the three types of displays of Program Guides (and Lists), Station
Index, and Favorite Station Guide.
Program Guide/List Station Index Favorite Station Guide
7 stations with program description 3 rows
MASTER GUIDE WED OCT 5 8:45 PM
First Knight
8:00 PM - 10:00 PM PG-13
Act. Adv. 1995 Richard Gere, Sean Connery, Julia
Ormond. Thrilling romance results when rogue knight
Lancelot becomes torn between his loyalty to King
Arthur and his love for Queen Guinevere (CC, ST, (A, V)
8:00 PM 8:30 PM 9:00 PMWED
BoxingSHO2987
MTV989
COM990 It’s Gary Shan...Tracy Ullman
USSB999
USSB Programming Highlights
DTV100 Direct Ticket Previews
First KnightDTV102
DTV105
The Alamo
Most Wanted ...MTV’s Best of the 90’s
Jefferson in Par...Johnny Mnemonic
STATION INDEX Sports Center
206
207 208 209 211 212 215
216 220 222 224 225 226 227
229 230 232 233 235 236 240
DISC TLC
Display 5 stations with large text description Display 4 rows
MASTER GUIDE WED OCT 5 8:45 PM
First Knight
Act. Adv. 1995 Richard Gere, Sean Connery,
Julia Ormond. Thrilling romance results when
rogue knight Lancelot becomes torn between
his loyalty to King Arthur and his love for
Queen Guinevere (CC, ST, (A, V)
8:00 PM 8:30 PM 9:00 PMWED
COM990 It’s Gary Shan...Tracy Ullman
USSB Programming Highlights
USSB999
Direct Ticket Previews
DTV100
First KnightDTV102
DTV105
Jefferson in Par...Johnny Mnemonic
Display 9 stations with no program description
MASTER GUIDE WED OCT 5 8:45 PM
First Knight
8:00 PM - 10:00 PM PG-13
8:00 PM 8:30 PM 9:00 PMWED
Nobody’s FoolHB2W984
SHO2986 The Scout3 Ninjas Kick Back
BoxingSHOW987
MTV989
COM990 It’s Gary Shan...Tracy Ullman
USSB999
USSB Programming Highlights
DTV100 Direct Ticket Previews
First KnightDTV102
DTV105
The Alamo
Most Wanted ...MTV’s Best of the 90’s
Jefferson in Par...Johnny Mnemonic
STATION INDEX Sports Center
206
207 208 209 211 212 215
216 220 222 224 225 226 227
229 230 232 233 235 236 240
SCIFI CSPAN CSPAN2 BLOM CNBC AT TWC
241 242 243 244 245 246 247
DISC TLC
Display 2 rows Move to top of screen
STATION INDEX Sports Center
206
207 208 209 211 212 215
216 220 222 224 225 226 227
DISC TLC
Standard
FAVORITE STATION GUIDE
240
989
MUSIC VIDEOS
256
BIOGRAPHY
212
SHOGUN
233
TOM AND JERRY
NIGHT
GALLERY
198
PHILADELPHIA
Move to bottom of screen
FAVORITE STATION GUIDE
240
989
MUSIC VIDEOS
256
BIOGRAPHY
989
MUSIC VIDEOS
256
BIOGRAPHY
212
SHOGUN
233
TOM AND JERRY
212
SHOGUN
233
TOM AND JERRY
NIGHT
GALLERY
198
PHILADELPHIA
FAVORITE STATION GUIDE
240
NIGHT
GALLERY
198
PHILADELPHIA
980
THE NATURAL
967
EXIT TO
CURRENT STATION
980
THE NATURAL
967
EXIT TO
CURRENT STATION
980
THE NATURAL
967
EXIT TO
CURRENT STATION
HBO
HBO
HBO
Return to 7 stations with program description Return to 3 rows Return to Standard
44 Chapter 4: Using the System Features
Page 45

Chapter 5
Using the Options Menu
Read this chapter to get information about using the Options Menu to
customize the setup of the on-screen displays, review and cancel your
purchases, and read mail messages that have been sent to you.
Overview
This chapter describes how to:
Check and cancel pay-per-view programs you’ve ordered
(page 47).
Change the look of the program guides, including the color and
transparency level of the on-screen displays and the order in which
the stations are displayed (page 48).
Setting up and using the Jump Loop feature (pages 50–51).
Set system locks and limits, which allow you to control program
viewing by ratings, spending amount, and station (page 52).
Create a Custom Guide by selecting stations from the Master
Guide that you want to skip (page 57).
Select an alternate audio track for the program you’re currently
watching and set a default language for the audio of programs
(page 59).
Read mail messages that have been sent to your DSS receiver
(page 61).
Select a data service for stations that include data services offered
by your program providers (page 63).
Chapter 5: Using the Options Menu 45
Page 46

Displaying the Options Menu
To bring up the Options Menu:
1 Press the MENU button to bring up the Main Menu.
2 Select OPTIONS MENU.
MAIN MENU
SELECT
GUIDE
1
MASTER
GUIDE
SELECT
LIST
2
3
MOVIE
GUIDE
OPTIONS MENU
The Options Menu appears.
OPTIONS MENU
ALTERNATE
AUDIO
DISPLAY
OPTIONS
The following pages describe how to use the Options Menu to your
system’s setup.
4
7
1
4
EXIT
TIMER
SETUP
PURCHASES
EXIT
CUSTOM
STATIONS
MOVIE
LIST
5
SETUP MENU
8
2
5
8A
MESSAGES
LOCKS AND
LIMITS
6
9
3
6
46 Chapter 5: Using the Options Menu
Page 47

Checking and Cancelling PPV Purchases
Use the Review/Cancel Purchases screen to see a record of recent
purchases you’ve made through your DSS receiver. You can also use
this screen to cancel pay-per-view (PPV) programs you’ve ordered, but
haven’t yet watched.
Note
The Review/Cancel Purchases screen lists only purchases made using the DSS
receiver’s remote control. It doesn’t include purchases made by calling your
program provider.
To display the Review/Cancel Purchases screen:
1 Select PURCHASES from the Options Menu. The Review/Cancel
Purchases screen appears, which lists the programs purchased and
canceled.
If there are more than one page of
purchases, press the PAGE and
PAGE buttons to page through the
displays.
REVIEW/CANCEL PURCHASES
FIRST KNIGHT UPCOMING
JOHNNY MNEMONIC UPCOMING
SPEED CANCELLED
RETURN
REVIEW
CANCEL PPV
JEFFERSON IN PARIS UPCOMING
<NO TITLE AVAILABLE>
<NO TITLE AVAILABLE>
<NO TITLE AVAILABLE>
HELP
2 To review the details of a pay-per-view program you’ve purchased:
Select the program you want to review. Then select REVIEW.
To cancel a pay-per-view program you’ve ordered:
Select the program you want to cancel. Then select CANCEL
PPV.
3 Select RETURN to return to the Options Menu.
Note
Once you tune to a purchased program, you cannot cancel its purchase.
Chapter 5: Using the Options Menu 47
Page 48

Setting Display Options
The Set Display Options screen allows you to customize the look of the
on-screen displays and to select how you want the JUMP button to
function (Standard or Jump Loop).
To bring up the Set Display Options screen:
1 Select DISPLAY OPTIONS from the Options Menu.
2 Select an option from the screen (see the following descriptions) .
The Set Display Options screen appears, with the current settings
shown next to each button.
SET DISPLAY OPTIONS
Setting the Colors
Selecting CANCEL returns you to the
previous screen, without saving your
selections.
COLORS
TRANSPARENCY
STATION ORDER
JUMP
The COLORS option lets you change the color palette of the on-screen
displays. The default color is EMERALD.
EMERALD
MEDIUM
MEDIUM
NUMERICAL
STANDARD JUMP
RETURN
HELP
1 Select COLORS from the Set Display Options screen. The Set
Colors screen appears.
2 To preview a color, move the highlight. The Set Colors screen
automatically changes to reflect the color that’s highlighted.
SET COLORS
EMERALD MAJESTIC PACIFIC RUGBY
USA REGAL INDIGO
CANDY
OK
CANCEL
HELP
3 To change the color, select a different color and then select OK to
return to the Set Display Options screen.
4 Select RETURN to return to the Options Menu.
48 Chapter 5: Using the Options Menu
Page 49

Setting the Transparency
The TRANSPARENCY option lets you select from three levels of
transparency for the on-screen displays. The default setting is
MEDIUM.
1 Select TRANSPARENCY from the Set Display Options screen.
2 Select a transparency option.
SET DISPLAY OPTIONS
Setting the Station Order
ALPHABETICAL station order defines the
sequence of the stations according to their
call letters, such as ABC, CNN, etc. It does
not define the sequence of stations by
program name.
COLORS
TRANSPARENCY
STATION ORDER
JUMP
GREEN
SET TRANSPARENCY
SOLID
MEDIUM
LIGHT
STANDARD JUMP
RETURN
HELP
3 Select RETURN to return to the Options Menu.
The STATION ORDER option lets you change the order in which
stations are displayed in the program guides to alphabetical or
numerical. The default setting is NUMERICAL.
1 Select STATION ORDER from the Set Display Options screen.
2 Select NUMERICAL or ALPHABETICAL.
SET DISPLAY OPTIONS
COLORS
TRANSPARENCY
EMERALD
MEDIUM
RETURN
HELP
STATION ORDER
JUMP
SET STATION ORDER
NUMERICAL
ALPHABETICAL
3 Select RETURN to return to the Options Menu.
Chapter 5: Using the Options Menu 49
Page 50

Setting the Jump Mode
The JUMP option lets you select from two Jump modes:
Standard Jump, which sets the JUMP button to jump back and
forth between the two most recently selected stations.
Jump Loop, which sets the JUMP button to jump among as many
as 5 preset stations (see “Using the Jump Loop Feature” on page 51
for details on presetting stations).
To set the Jump Mode:
1 Select JUMP from the Set Display Options screen.
2 Select STANDARD JUMP or JUMP LOOP.
SET DISPLAY OPTIONS
COLORS
TRANSPARENCY
STATION ORDER
JUMP
EMERALD
MEDIUM
SET JUMP
STANDARD JUMP
JUMP LOOP
3 Select RETURN to return to the Options Menu.
RETURN
HELP
50 Chapter 5: Using the Options Menu
Page 51

Using the Jump Loop Feature
Standard Jump Vs.
Jump Loop Mode
Using Jump Loops
When the DSS receiver is set to Standard Jump mode, pressing the
JUMP button toggles back and forth between the two most recently
selected stations.
When the DSS receiver is set to Jump Loop mode, pressing the JUMP
button toggles among as many as 5 stations that you assign to a Jump
Loop. Once you assign a station to the Jump Loop, you can use the
JUMP button to quickly toggle through all the stations in the loop.
To set jump stations:
1 Set the DSS receiver to Jump Loop mode, as described on page 50.
(You need to do this only the first time you create a Jump Loop.)
2 Tune to a station you want to assign to the Jump Loop.
Note
You cannot set jump stations while a program guide, menu, etc., is being
displayed.
3 Press and hold the JUMP button. A message appears, indicating
that the station has been assigned to the Jump Loop.
4 To set additional jump stations, repeat steps 2 and 3 of this
procedure.
Note
If you set more than 5 jump stations, the sixth jump station automatically
overwrites the first jump station in the loop, and so on.
To jump through the Jump Loop:
Press the JUMP button repeatedly. The stations are displayed in the
order they were set.
To clear a station from the Jump Loop:
1 Tune to the station you want to clear from the Jump Loop.
Note
You cannot clear Jump stations while a program guide, menu, etc., is being
displayed.
2 Press and hold the JUMP button. A message appears, indicating
that the station has been cleared from the Jump Loop.
3 To clear additional Jump stations, repeat steps 1 and 2 of this
procedure.
Note
Jump Loops are cleared automatically when you shut off the DSS receiver.
Chapter 5: Using the Options Menu 51
Page 52

Setting Locks and Limits
The Locks and Limits feature gives you control over the use of your
system. You can restrict program viewing by cost, ratings, and station.
You can also set a lock to prevent the ordering of pay-per-view
programs.
To display the Locks and Limits screen:
1 Select LOCKS AND LIMITS from the Options Menu.
2 Select a lock or limit from the screen (see the descriptions below).
The Set Locks and Limits screen appears, with the current settings
shown next to each button.
If your system is locked, the padlock
symbol appears ( ), and you must
first unlock it before you can make any
changes to the locks and limits settings.
See “Unlocking Your System” on
page 56 for details.
SET LOCKS AND LIMITS
SPENDING LIMIT
RATINGS LIMIT
PAY-PER-VIEW
STATION LOCKS
$10.00
R
UNLOCKED
0 STATIONS CURRENTLY LOCKED
RETURN
LOCK
HELP
Note
Your DSS receiver is shipped to you unlocked, with the default settings as
described below.
Spending Limit Lets you set a maximum spending limit for a single
pay-per-view program.When the system is locked, you
cannot purchase a program that costs more than the
amount set. The default setting is $10.00.
Ratings Limit Allows you to set a maximum ratings limit. When the
system is locked, you cannot view programs rated
higher than the rating set. The default rating is R.
Pay-Per-View Allows you to prevent PPV purchases. When the
Station Locks Lets you prevent the viewing of stations that you lock.
Note
After you’ve set a lock or limit, you must lock the system before any locks or
limits take effect. Locking the system is described on page 55.
52 Chapter 5: Using the Options Menu
system and the PPV option are locked, pay-per-view
programs cannot be purchased. The default setting is
unlocked.
When the system is locked, programs that appear on
locked stations cannot be viewed. The default is no
stations locked.
Page 53

Setting a Spending Limit
To set a spending limit:
1 Select SPENDING LIMIT from the Set Locks and Limits screen.
2 Enter a spending limit, using the 0-9 buttons to enter the dollar
value. Then press the button.
SET LOCKS AND LIMITS
Setting a Ratings Limit
SPENDING LIMIT
RATINGS LIMIT
PAY-PER-VIEW
STATION LOCKS
SET SPENDING LIMIT
None
UNLOCKED
0 STATIONS CURRENTLY LOCKED
RETURN
LOCK
HELP
3 Select another lock or limit to set, or go to step 4.
4 Lock your system, as described in “Locking Your System” on
page 55.
To set a ratings limit:
1 Select RATINGS LIMIT from the Set Locks and Limits screen.
2 Select a rating, beyond which programs cannot be watched.
SET LOCKS AND LIMITS
SPENDING LIMIT
RATINGS LIMIT
PAY-PER-VIEW
STATION LOCKS
SET RATINGS LIMIT
PG-13
NR-CONTENT
R
R
NR-MATURE
NC17
RETURN
LOCK
HELP
3 Select another lock or limit to set, or go to step 4.
4 Lock your system, as described in “Locking Your System” on
page 55.
Chapter 5: Using the Options Menu 53
Page 54

Setting the
Pay-Per-View Lock
To set the pay-per-view lock:
1 Select PAY-PER-VIEW from the Set Locks and Limits screen.
2 Select LOCKED to prevent PPV program purchases. Select
UNLOCKED to allow PPV program purchases.
SET LOCKS AND LIMITS
Setting Station Locks
SPENDING LIMIT
RATINGS LIMIT
PAY-PER-VIEW
STATION LOCKS
SET PPV LOCK
UNLOCKED
LOCKED
RETURN
LOCK
HELP
3 Select another lock or limit to set, or go to step 4.
4 Lock your system, as described in “Locking Your System” on
page 55.
Note
You can also set a PPV lock by setting the spending limit to $0.00. See
“Setting a Spending Limit” on page 53 for details.
To set station locks:
1 Select STATION LOCKS from the Set Locks and Limits screen.
2 Select stations that you want to lock from viewing. A locked station
appears with a key ( ) beside it. For example, in the following
screen, stations 203, 204, 206, and 209 have been locked.
To unlock a station, just select it again. The key ( ) disappears.
To quickly unlock or lock all stations, select
ALL (to lock all) or NONE (to unlock all).
Selecting CANCEL returns you to the
previous screen, without saving your
selections.
You can use the PAGE and
PAGE buttons to quickly move through
the rows of stations. You can also use the 0-9
buttons to enter the station number directly.
SET STATION LOCKS
3 Select OK to return to the Set Locks and Limits screen.
4 Select another lock or limit to set, or go to step 5.
5 Lock your system, as described in “Locking Your System” on
page 55.
54 Chapter 5: Using the Options Menu
CNN
202
DTV
209
DTV
216
DTV
223
CRT
203
DTV
210
DTV
217
DIS2
224
HLN
204
DTV
211
DTV
218
DISC
225
DTV
205
TNT
212
DTV
219
TLC
226
ESPN
206
DTV
213
TCM
220
TOON
227
DTV
207
DTV
214
DTV
221
DTV
228
ESN2
208
E!
215
DIS1
222
USA
229
OK
CANCEL
ALL
NONE
HELP
Page 55

Locking Your System
To lock an unlocked system:
1 Select LOCK from the Set Locks and Limits screen.
2 Enter a four-digit passcode number. Use the 0-9 buttons to enter
the numerical value.
DON’T FORGET YOUR PASSCODE.
You’ll need this number to unlock your
system or to make any changes to the locks
and limits you’ve set. If you do forget your
passcode, call your program provider for
assistance.
Overriding the System Lock
SET LOCKS AND LIMITS
SPENDING LIMIT
RATINGS LIMIT
PAY-PER-VIEW
STATION LOCKS
Each number you enter appears as an asterisk ( ), which keeps
your passcode secret.
R
UNLOCKED
4 STATIONS LOCKED
LOCK SYSTEM
RETURN
LOCK
HELP
3 When prompted, enter your passcode again. (This confirms your
selection of a passcode number.)
Your system is now locked, as indicated by the closed padlock ( ) in
the Set Locks and Limits screen. All locks and limits you’ve set are now
in effect. The padlock also appears in the Program Banner to remind
you of the locked status.
You can temporarily override any locks or limits that have been set if
you know the system passcode.
For example, if you try to watch a program on a locked station, a
message identifies the lock or limit exceeded. After you press the
button, the Temporary Unlock window appears. By entering the
passcode and then selecting when you want the system to
automatically relock, you can temporarily unlock the system.
Note
If you override the system lock, you can reset the lock by turning the power off
and then on again. If you want to unlock the system on a more permanent
basis, follow the procedures under “Unlocking Your System” on page 56.
Chapter 5: Using the Options Menu 55
Page 56

Unlocking Your System
To unlock a locked system:
1 Select LOCKS AND LIMITS from the Options Menu.
The Set Locks and Limits screen appears, with the current settings
shown next to each button. The padlock ( ) indicates that the
system is currently locked.
2 Select UNLOCK.
3 Enter the passcode number you used to lock the system. Use the 0-
9 buttons to enter the numerical value.
SET LOCKS AND LIMITS
Determining the Status of
the System Lock
SPENDING LIMIT
RATINGS LIMIT
PAY-PER-VIEW
STATION LOCKS
Each number you enter appears as an asterisk ( ), which keeps
your passcode secret.
Your system is now unlocked, and all locks and limits previously set
are no longer in effect.
While you’re watching programs, you can check the status of the
system lock by pressing the DISPLAY button to bring up the Program
Banner, which includes the following lock symbols.
Symbol System Lock Status
No padlock
$10
PG
UNLOCKED
4 STATIONS LOCKED
Unlocked (default setting)
Locked
UNLOCK SYSTEM
RETURN
UNLOCK
HELP
56 Chapter 5: Using the Options Menu
Temporarily unlocked using the system lock
override
Page 57

Setting Up a List of Custom Stations
If there are stations listed in the Master Guide that you don’t subscribe
to or watch often, you can use the Custom Stations feature to specify
which stations from the Master Guide you want to skip. After you’ve
set skipped stations, they will not appear in the:
Custom Guide
Station Index
Stations that appear when you’re using the CH+/CH- buttons to
change channels
Note
Skipped stations will continue to be listed in the Master Guide, which you can
always access through the Main Menu.
To define a list of custom stations:
1 Select CUSTOM STATIONS from the Options Menu.
2 Select stations that you want to skip.
To quickly skip or “unskip” stations,
select ALL (to skip all) or NONE (to skip
none).
Selecting CANCEL returns you to the
previous screen, without saving your
selections.
A station that appears with a checkmark (
) beside it will be
skipped. For example, in the following screen, stations 203, 208,
and 213 are set to be skipped.
To set a station so that it is not skipped, just select it again. The
CRT
203
DTV
210
DTV
217
DIS2
224
) disappears.
HLN
DTV
204
205
DTV
TNT
211
212
DTV
DTV
218
219
DISC
TLC
225
226
ESPN
206
DTV
213
TCM
220
TOON
227
DTV
207
DTV
214
DTV
221
DTV
228
ESN2
208
E!
215
DIS1
222
USA
229
OK
CANCEL
AUTO
ALL
NONE
HELP
checkmark (
SET CUSTOM STATIONS
CNN
202
DTV
209
DTV
216
DTV
223
Note
Use the PAGE and PAGE buttons to quickly move through the rows of
stations. You can also use the 0-9 buttons to enter the three-digit station
number directly.
3 Select OK when you’re finished setting skipped stations.
To see the results of your Custom Stations settings:
Bring up Custom Guide, by pressing the GUIDE button, the Station
Index (see page 36), or use the CH+/CH- buttons.
Chapter 5: Using the Options Menu 57
Page 58

Using the AUTO
Skip Feature
Selecting STOP interrupts the Auto
Skip process and returns you to the
previous screen, which displays the
stations that have been set to be skipped
thus far.
When you select the AUTO button, the DSS receiver automatically
scans all the stations in the current Master Guide. During this scanning
process, the DSS receiver determines which stations you are not
authorized to watch and then sets these stations to be skipped. You can
use this feature as a starting point to creating your own list of custom
stations.
For example, if there are stations that appear in the Master Guide to
which you do not subscribe, the AUTO function automatically marks
these stations to be skipped. This saves you the trouble of having to
determine which of the 150+ stations in the Master Guide you cannot
view and then having to manually set each of these stations to be
skipped.
Note
The AUTO function does not skip pay-per-view stations.
To use the AUTO Skip feature:
1 Select CUSTOM STATIONS from the Options Menu.
2 Select the AUTO button.
The DSS receiver begins to evaluate all the stations in the Master
Guide, and displays a status bar, similar to the following.
SET CUSTOM STATIONS
STOP
28% completed
Note
This process may take a few minutes to complete.
When the DSS receiver is finished scanning, the station list
reappears, with checkmarks (
skipped.
3 Select OK to save your selections. Or select additional stations to be
skipped or unskipped.
Note
You may want to re-run the Auto skip procedure periodically in case your
program providers make changes or additions to their station lineups, or if you
order new program subscriptions.
58 Chapter 5: Using the Options Menu
Evaluating channel 150.
Please wait ...
) beside stations that are set to be
Page 59

Selecting Alternate Audio
Your program providers may broadcast multiple audio tracks with a
single video source. For example, a football game might use a different
audio track for each sports commentator or a movie might include both
English and Spanish language audio tracks.
How to Determine if
Alternate Audio Tracks Are
Available for a Program
Selecting an Alternate
Audio Track
To determine if an alternate audio track is available:
1 Tune to the program.
2 Press the DISPLAY button to bring up the Program Banner.
If the Program Banner includes the alternate audio symbol ( ), this
indicates that alternate audio tracks are available for that program.
Using the remote control (SAT-A2 only):
Press the ALTERNATE AUDIO button repeatedly on the remote
control. If more than two alternate audio tracks are available for the
current program, the Set Alternate Audio screen automatically
appears (see below).
Using the on-screen menus (SAT-A2/SAT-B2):
1 Press the MENU button to bring up the Main Menu.
2 Select OPTIONS MENU.
3 Select ALTERNATE AUDIO.
OPTIONS MENU
2
MESSAGES
3
ALTERNATE
AUDIO
PURCHASES
1
DISPLAY
OPTIONS
SERVICES 7
The Set Alternate Audio screen appears, which lists only the audio
tracks available for the program you are currently tuned to.
SET ALTERNATE AUDIO
ENGLISH 1 SPANISH 1
SCIENCE
FICTION
4
EXIT
CUSTOM
STATIONS
5
8
LOCKS AND
LIMITS
6
RETURN
DEFAULT
HELP
Chapter 5: Using the Options Menu 59
Page 60

4 To change the audio track for the current program, select an audio
track.
To change the default language for all programs, select DEFAULT.
Then see “Setting a Default Language” below.
5 To save your changes and return to the Options Menu, select OK.
Then select EXIT from the Options Menu to return to the program
you were watching.
Setting a Default Language
Use the DEFAULT button to specify the language you want to hear for
programs broadcast in multiple languages.
To set a default language:
1 Select DEFAULT from the Set Alternate Audio screen.
2 Select a default language.
SET ALTERNATE AUDIO
ENGLISH 1 SPANISH 1
SCIENCE
FICTION
SET DEFAULT LANGUAGE
ENGLISH
SPANISH
FRENCH
GERMAN
ITALIAN
JAPANESE
RETURN
DEFAULT
HELP
3 Select RETURN to return to the Options Menu.
Note
If the default language you select is not available for a program that you tune
to, you will not hear the default language. Instead, you’ll hear one of the
languages available for that program (usually English).
For example, if you set the default language to Spanish and a program is
broadcast in English only, you’ll automatically hear the audio in English.
60 Chapter 5: Using the Options Menu
Page 61

Reading Your Messages
Occasionally, your program providers will send messages to your DSS
receiver. These messages contain useful information about your
system, such as information about new services, program promotions,
or billing.
How to Determine When
You’ve Received Mail
Displaying Your Messages
There are several ways to tell if you have unread mail:
The DSS receiver’s front panel MESSAGE indicator blinks.
An envelope ( ) appears in the Program Banner, accessed by
pressing the DISPLAY button.
An envelope ( ) appears in menu item 7 (Options Menu) of the
Main Menu.
To display your messages:
1 Press the MENU button to bring up the Main Menu.
2 Select OPTIONS MENU.
3 Select MESSAGES.
OPTIONS MENU
ALTERNATE
AUDIO
DISPLAY
OPTIONS
A
SERVICES 7
PURCHASES
1
EXIT
4
CUSTOM
STATIONS
2
5
8
MESSAGES
LOCKS AND
LIMITS
3
6
The message’s date, along with the first few words of the message,
appear.
Chapter 5: Using the Options Menu 61
Page 62

Reading a Message
To read a message:
1 Select the envelope from the Messages screen. A selected message
appears with a checkmark (
MESSAGES
) beside it. Then select READ.
11/6 Sign up now for our special ...
11/8 Welcome to USSB ....
11/23 Happy Thanksgiving ....
The full text of the message appears.
READ MESSAGE
11/23
Happy Thanksgiving from
everyone at DIRECTV.
READ
RETURN
HELP
RETURN
ERASE
HELP
2 To erase a message after you’ve read it, select ERASE. To keep a
message after you’ve read it, select RETURN.
Note
Your mailbox can hold about 50 messages before exhausting the receiver’s
memory.
62 Chapter 5: Using the Options Menu
Page 63

Selecting Data Services
In the future, your program providers may provide data services,
which you can access through specific stations using the DSS receiver’s
wide band data and low-speed data ports. For details about using a
data port to access these data services, call your program providers.
How to Determine if Data
Services Are Available on a
Station
Selecting a
Data Service
DATA SERVICES appears only when
the station you’re tuned to includes
data services.
Selecting CANCEL returns you to the
previous screen, without saving your
selections.
The screen will be titled “Wide Band” or
“Low Speed,” depending on which type of
data service is available for that station.
The titles of the data services may be different,
based on the service being provided.
To determine if data services are available on a specific station:
1 Tune to the station.
2 Press the DISPLAY button to bring up the Program Banner.
If the Program Banner includes the data services symbol ( ), this
indicates that data services are available for that specific station.
To select a data service:
1 Select DATA SERVICES from the Options Menu.
OPTIONS MENU
2
5
8
MESSAGES
LOCKS AND
LIMITS
3
6
ALTERNATE
AUDIO
DISPLAY
OPTIONS
DATA
SERVICES
1
4
7
PURCHASES
EXIT
CUSTOM
STATIONS
2 The Data Services screen appears, which lists only the data services
that are available for the station you are currently tuned to.
WIDE BAND DATA
DATA 1 DATA 2 DATA 3 DATA 4
DATA 5 DATA 6 DATA 7
DATA 8
RETURN
DEFAULT
BAUD
HELP
Chapter 5: Using the Options Menu 63
Page 64

3 Select one of the following:
To Do This ... Do This ...
Changing the Default
Data Service
The titles of the data services may be
different, based on the service being
provided.
Change the data service for the
current station only
Change the data service for all
stations
Change the baud rate for the DSS
receiver’s wide band data port
Select the data service and then
select RETURN.
Select DEFAULT (then see
“Changing the Default Data
Service” below).
Select BAUD (then see “Setting
the Baud Rate” below).
Use the DEFAULT button to select a default data service for all stations
that provide data services.
To change the data service for all stations:
1 Select DEFAULT from the Data Services screen.
2 Select a default data service.
WIDE BAND DATA
DATA 1 DATA 2 DATA 3 DATA 4
DATA 5 DATA 6 DATA 7
DEFAULT DATA
DATA 1
DATA 2
DATA 8
DATA 3
DATA 4
DATA 5
DATA 6
RETURN
DEFAULT
BAUD
HELP
Setting the Baud Rate
To set the baud rate for the DSS receiver’s data port:
1 Select BAUD from the Data Services screen.
2 Select a baud rate for the data port.
The baud rates displayed may be
different, depending on which data port is
being used.
WIDE BAND DATA
64 Chapter 5: Using the Options Menu
DATA 1 DATA 2 DATA 3 DATA 4
DATA 5 DATA 6 DATA 7
SET BAUD RATE
2400
DATA 8
4800
9600
19200
RETURN
DEFAULT
BAUD
HELP
Page 65

Chapter 6
Using the Setup Menu
Read this chapter to set up your DSS receiver for the first time, check
the antenna’s signal strength, or to run a system test to diagnose any
difficulties you may be having with your system.
Overview
The Setup Menu includes several options you can use to set up and
troubleshoot your system.
Use the Setup Menu to:
Set up and point your satellite antenna (page 67).
Replace your access card (page 68).
Change the aspect ratio of the DSS receiver to match your TV
screen: standard or widescreen (page 70).
SAT-A2 Only: Change the DSS receiver to receive RF (radio
frequency) remote control signals or IR (infrared) remote control
signals (page 71).
Display a list of programmable codes for other components you
may want to operate using the DSS remote control (page 74).
Run a system test to check the operation of your system, including
the access card, phone line, satellite signal, and tuning (page 75).
Display helpful troubleshooting information (page 76).
Get hints and shortcuts on using your digital satellite system
(page 76).
Chapter 6: Using the Setup Menu 65
Page 66

Displaying the Setup Menu
To set up your system, first bring up the Setup Menu, as follows:
1 Press the MENU button to bring up the Main Menu.
2 Select SETUP MENU.
MAIN MENU
SELECT
GUIDE
1
MASTER
GUIDE
SELECT
LIST
2
3
MOVIES
GUIDE
OPTIONS MENU
EXIT
4
TIMER
SETUP
7
MOVIES
LIST
5
SETUP MENU
8
6
9
3 The Setup Menu appears:
SETUP MENU
REMOTE
CONTROL
ANTENNA
TROUBLE
SHOOTING
The following pages describe how to use the Setup Menu to set up
your system.
1
4
7
ACCESS
CARD
EXIT
SYSTEM
TEST
2
5
8
ASPECT
RATIO
TIPS AND
SHORTCUTS
6
9
66 Chapter 6: Using the Setup Menu
Page 67

Setting Up the Satellite Antenna
To install the satellite antenna, or to check the current signal level of the
antenna, use the Set Up Antenna screen.
Note
Make certain that the signal strength of the satellite antenna is optimized. If
the signal is not optimized, you may experience losses in audio or video,
especially during rain, snow, or other conditions that tend to degrade signal
performance. See the Satellite Antenna Installation Manual for details on
using the Set Up Antenna screen to point the dish and optimize the antenna’s
signal strength.
1 Select ANTENNA from the Setup Menu.
2 The Set Up Antenna screen appears.
Selecting RETURN returns you to
the Setup Menu.
SET UP ANTENNA
TRANSPONDER
RETURN
ZIP CODE
80
CURRENT LEVEL
LOCKED
To determine the elevation and azimuth settings for the satellite
antenna, select ZIP CODE or LAT/LONG.
ZIP CODE uses your five-digit zip code to determine the
elevation and azimuth settings.
LAT/LONG uses your location’s latitude and longitude to
determine the azimuth and elevation settings.
The Signal Strength Meter indicates the current signal
strength of the antenna.
The Transponder option allows you to select a transponder
number from 1 to 32. You should not need to change this
number (the default is 2) unless you’re instructed to do so by
your program provider.
See the Satellite Antenna Installation Manual for details on using the
Set Up Antenna screen to point the dish and optimize the antenna’s
signal strength.
LAT/LONG 2
85
PEAK LEVEL
HELP
3 Select RETURN to return to the Setup Menu.
Chapter 6: Using the Setup Menu 67
Page 68

Replacing Your Access Card
In the event that your program providers need to send you a new
access card, use the Access Card option to initialize your new card.
During this process, you'll follow the on-screen instructions to copy
information from the old card onto the new card. After you initialize
the new card, your old card becomes invalid.
To replace your access card:
1 Select ACCESS CARD from the Setup Menu.
SETUP MENU
REMOTE
CONTROL
1
ACCESS
CARD
2
Caution
Handle the access card door gently.
ANTENNA
TROUBLE
SHOOTING
4
7
EXIT
SYSTEM
TEST
5
8
ASPECT
RATIO
TIPS AND
SHORTCUTS
6
9
2 When the Replace Access Card screen appears, insert your old
access card, if you removed it, as follows:
Open the door to the access card: Place your fingertip in the
slot as shown (or carefully use the edge of a coin), and gently
pull the door down.
68 Chapter 6: Using the Setup Menu
Page 69

Selecting RETURN returns you to
the Setup Menu, without starting the
initialization process.
Insert the card, arrow side up, as shown, and gently push the
door up to close it.
3 Select OK from Replace Access Card screen.
REPLACE ACCESS CARD
OK
RETURN
Please insert OLD access card and select OK
to initialize NEW card.
CAUTION: After you select OK, you cannot
stop this process, and your OLD access card
will no longer be valid.
HELP
4 Follow the instructions as they are displayed to complete the
procedure.
When the message “Replace Access Card Procedure Complete”
appears, select OK to return to the Setup Menu.
Chapter 6: Using the Setup Menu 69
Page 70

Setting the Aspect Ratio
Use the Aspect Ratio option to set the DSS receiver’s display to match
your TV's picture.
To set the aspect ratio:
1 Select ASPECT RATIO from the Setup Menu.
2 Select one of the options, based on the type of TV you have:
Selecting CANCEL returns you to the
Setup Menu, without saving your
selection.
If you have a standard TV, select 4:3.
If you have a wide-screen TV, select 16:9.
SET ASPECT RATIO
4:3
16:9
OK
STANDARD
WIDE
3 Select OK to return to the Setup Menu.
CANCEL
HELP
70 Chapter 6: Using the Setup Menu
Page 71

Setting Up the Remote Control
SAT-A2 Only: The Set Up Remote screens let you set up the DSS
receiver to accept IR (infrared) or RF (radio frequency) signals from the
DSS remote control and to change the RF security code for the DSS
receiver.
You can also use this screen to display a list of codes you can use to
program the DSS remote control to operate other components, such as
TVs and cable boxes.
Selecting IR/RF Transmission
(SAT-A2 Only)
SAT-B2: REMOTE SIGNAL and RF
SECURITY CODE options are not
available.
In addition to having IR remote control capability, your DSS system
includes an RF feature, which enables the remote control to operate the
DSS receiver even if the receiver is located in another room or is placed
behind a cabinet door. In other words, with the RF feature, the remote
control does not require a direct line-of-sight to the front panel of the
DSS receiver.
Note
You must set up the RF antenna to take advantage of the RF feature. See
“Setting Up the RF Antenna (SAT-A2 Only)” on page 22 for details.
The DSS receiver is shipped with IR transmission enabled and RF transmission
disabled. To use the RF feature, you must change the factory setting (IR ONLY)
to the RF setting (RF ONLY).
To select IR or RF transmission:
1 Select REMOTE CONTROL from the Setup Menu.
2 Select REMOTE SIGNAL and select a transmission type (IR or RF).
SET UP REMOTE
REMOTE SIGNAL
RF SECURITY CODE
REMOTE CODES
REMOTE SIGNAL
IR ONLY
RF ONLY
OK
CANCEL
IDENTIFY
HELP
3 Select OK to save your selections and return to the Setup Menu.
Chapter 6: Using the Setup Menu 71
Page 72

Setting the Security Code
(SAT-A2 Only)
The DSS receiver and remote control
are shipped with the RF security code
set to 000.
If the DSS receiver is accepting or receiving signals from another RF
remote control in your home (or from a neighbor’s house), you can
eliminate this problem by changing the security codes for the DSS
receiver and remote control.
Note
As an alternative, you can eliminate this problem by disabling the RF
capability of the DSS receiver, if you have no need for RF transmission. See
“Selecting IR/RF Transmission (SAT-A2 Only)” on page 71 for details.
There are two steps to changing the RF security code: Step 1 is
changing the DSS receiver’s security code; step 2 is changing the DSS
remote control’s security code. Both the receiver and the remote control
must use the same three-digit security code.
Step 1: Select the DSS Receiver’s RF Security Code
1 Select REMOTE CONTROL from the Setup Menu.
2 Select RF SECURITY CODE and then select a different security
code.
SET UP REMOTE
REMOTE SIGNAL IR ONLY
RF SECURITY CODE
REMOTE CODES
000
RF SECURITY CODE
CODE 000
CODE 001
CODE 002
CODE 003
CODE 004
OK
CANCEL
IDENTIFY
HELP
3 Select OK to save your changes and return to the Setup Menu.
4 Go to “Step 2: Set the DSS Remote Control’s RF Security Code” on
72 Chapter 6: Using the Setup Menu
page 73 to continue.
Page 73

Step 2: Set the DSS Remote Control’s RF Security Code
1 Press the CODE SET button on the DSS remote control.
2 Using the number buttons on the DSS remote control, enter the
three-digit security code you selected for the DSS receiver in step 2
on page 72.
3 Press the ENTER button on the remote control.
The RF security code is now changed for both the DSS receiver and
remote control.
To Determine the Current
Security Code for the DSS
Remote Control
(SAT-A2 Only)
You can determine the current RF security code for the DSS remote
control using the IDENTIFY button in the Set Up Remote screen.
1 Bring up the Set Up Remote screen, as described on page 71.
2 Select IDENTIFY.
SET UP REMOTE
REMOTE SIGNAL
RF SECURITY CODE
REMOTE CODES
Press the joystick within 5 seconds.
IR ONLY
000
OK
CANCEL
IDENTIFY
HELP
3 When the message “Press the joystick within 5 seconds” appears,
press the joystick before the 5 seconds expire.
The current RF security code for the DSS remote control appears.
SET UP REMOTE
REMOTE SIGNAL
RF SECURITY CODE
REMOTE CODES
IR ONLY
000
OK
CANCEL
IDENTIFY
HELP
Your remote is currently set at 000.
Note
If the message, “Security code could not be identified” appears, check to make
sure that RF is enabled and that the RF antenna is connected properly. See
“Selecting IR/RF Transmission (SAT-A2 Only)” on page 71.
4 Select OK to return to the Setup Menu.
Chapter 6: Using the Setup Menu 73
Page 74

Displaying the
Programmable Codes
SAT-A2: The SAT-A2 remote control
can be programmed to control most
brands of TVs, cable boxes, VCRs, and
laserdisc (LDP) players.
SAT-B2: The SAT-B2 remote control
cannot be programmed to control
VCRs or laserdisc players.
You can also use the Setup Remote screen to display a list of codes you
can use to program the DSS remote control to operate other
components, such as TVs and cable boxes.
Note
These code numbers and instructions are also described in “Programming the
Remote Control” on page 85.
To display the list of programmable codes:
1 Select REMOTE CONTROL from the Setup Menu.
2 Select REMOTE CODES and then select the type of component you
want to use with the DSS remote.
SET UP REMOTE
REMOTE SIGNAL
RF SECURITY CODE
REMOTE CODES
IR ONLY
REMOTE CODES
TV CODES
CABLE BOX CODES
VCR CODES
LDP CODES
INSTRUCTIONS
OK
CANCEL
IDENTIFY
HELP
3 Scroll through the list that appears to find the remote codes for the
manufacturer of your component. Press the button to return to
the Set Up Remote screen.
4 To program the remote control, select INSTRUCTIONS and follow
the on-screen instructions.
5 Select OK to return to the Setup Menu.
74 Chapter 6: Using the Setup Menu
Page 75

Running a System Test
The System Test lets you check the integrity of your system's
components, including:
Use the System Test if you are experiencing problems with your
system.
To run the System Test:
1 Select SYSTEM TEST from the Setup Menu.
2 Select TEST.
Antenna signal
System tuning
Phone line
Access card
RUN SYSTEM TEST
If The System Test Reports
Any Problems...
SIGNAL
TUNING
PHONE
CARD
The System Test checks all the components automatically, and
displays the result of each test.
TEST
RETURN
HELP
3 Select RETURN to return to the Setup Menu.
Check your system for any of the following:
The access card test will fail if you have not yet called your
program providers to establish service. After your service has been
established, the access card test should pass.
Check that all cables are connected properly to the DSS receiver.
Check that the satellite antenna is installed correctly, and that the
signal has been optimized. See the manual that came with the
satellite antenna for details.
Check that the phone line connected to the DSS receiver is working
properly.
Check that the access card is inserted properly.
If you cannot resolve problems reported by the System Test, see
“Customer Support” on page 2.
Chapter 6: Using the Setup Menu 75
Page 76

Displaying Help, Tips, and Shortcuts
Displaying Troubleshooting
Information
Displaying Tips and
Shortcut Information
To display troubleshooting information:
1 Select TROUBLESHOOTING from the Setup Menu.
SETUP MENU
REMOTE
CONTROL
ANTENNA
TROUBLE
SHOOTING
1
4
7
ACCESS
CARD
EXIT
SYSTEM
TEST
2
5
8
ASPECT
RATIO
TIPS AND
SHORTCUTS
6
9
2 Select the topic for which you want information. Details of that
topic are displayed.
3 Press the button to return to the Troubleshooting screen.
4 Select RETURN to return to the Setup Menu.
To display tips and shortcut information:
1 Select TIPS AND SHORTCUTS from the Setup Menu.
SETUP MENU
REMOTE
CONTROL
ANTENNA
TROUBLE
SHOOTING
1
4
7
ACCESS
CARD
EXIT
SYSTEM
TEST
2
5
8
ASPECT
RATIO
TIPS AND
SHORTCUTS
6
9
2 Select the topic for which you want information. Details of that
topic are displayed.
3 Press the button to return to the Tips and Shortcuts screen.
4 Select RETURN to return to the Setup Menu.
76 Chapter 6: Using the Setup Menu
Page 77

Appendix
Other Information
This appendix includes supplementary information, including:
Locations and descriptions of the controls and indicators on the
front and back panels of the DSS receiver (page 78).
Remote control button descriptions (page 81).
Programming the remote to operate your TV and other video
components (page 85).
Troubleshooting information (page 88).
Precautions (page 91).
FCC Information (page 92).
Limited warranty (page 93).
Specifications (page 94).
Index (page 95).
Appendix: Other Information 77
Page 78

Location and Function of Controls
Front Panel
Button Description
POWER Button Turns the DSS receiver on and off.
MENU Button Brings up the Main Menu.
EXIT Button Clears all on-screen displays, including program
guides, menus, etc. If you press EXIT before you
complete your selections, the previous selections are
restored.
The arrow buttons highlight items in the on-screen
displays (program guides, menus, etc.). The button
selects highlighted items. When pressed during
normal DSS-viewing, the button brings up the
Station Index (unless a message appears).
TV/DSS Button Switches the output of the DSS receiver between TV
Power Indicator Indicates whether the DSS receiver is on or off.
Timer Indicator Indicates that the Timer is set.
Message Indicator Flashes to indicate you have an unread message.
(normal TV programs), if you’ve connected a TV cable
or antenna, and DSS programs.
78 Appendix: Other Information
Page 79

Back Panel (SAT-A2)
Connector Description Cable Type
SATELLITE IN Connects to the LNB on the satellite antenna. Solid Bare Copper
RG-6 Coaxial
(75-ohm/F-type)
LOW SPEED DATA Allows you to connect your DSS receiver to new technologies, as they are
introduced. Additional accessories may be required.
WIDE BAND DATA Allows you to connect your DSS receiver to new technologies (such as
high-definition television), as they are introduced. Additional accessories
may be required.
CONTROL-S IN/
S-LINK
VCR MOUSE/
CONTROL-S OUT
DIGITAL OUT
(OPTICAL)
RF REMOTE Connects to the RF antenna. RCA-type
AUDIO 3 OUT (R)/(L) Connects your DSS receiver to the right and left audio inputs of your
AUDIO (R)/(L)
OUT
VIDEO OUT Connects your DSS receiver to your TV or VCR’s video input. Video
S-VIDEO OUT Allows you to connect your DSS receiver directly to your TV (if your TV
CH3/CH4 Switch When you use an RF connection, this setting determines the TV channel
VHF/UHF IN Allows you to connect your DSS receiver to your normal (terrestrial) TV
VHF(SAT)/UHF OUT Connects to your TV or VCR. RG-59 Coaxial
TEL LINE Connects your DSS receiver to a telephone jack. This allows you to order
AC IN Connects your DSS receiver to a 120V AC outlet. AC
AC OUT Connects other components within a rating of AC 120V/300W/3A max. AC
Allows you to pass on remote control signals to another Sony infraredcontrolled audio or video component.
Allows you to pass on remote control signals to another Sony infraredcontrolled audio or video component. Also used to connect the Sony VCR
Mouse.
Allows you to connect your DSS receiver to a digital audio component
with a digital input frequency of 48 kHz.
audio or video component.
Connects your DSS receiver to the right and left audio inputs of your
audio or video component.
has S-VIDEO IN).
on which programs from the DSS receiver can be viewed.
or cable TV service.
pay-per-view programs.
Depends on future
applications
(D-sub 9 pin)
Depends on future
applications
(D-sub 15 pin)
Audio mono or stereo
miniplug
Audio mono or stereo
miniplug
Optical digital
mini-plug
Audio (2)
(RCA-type)
Audio (2)
(RCA-type)
(RCA-type)
S-Video
(4-pin mini DIN)
RG-59 Coaxial
(75-ohm/F-type)
(75-ohm/F-type)
Telephone (RJ-11)
Appendix: Other Information 79
Page 80

Back Panel (SAT-B2)
Connector Description Cable Type
SATELLITE IN Connects to the LNB on the satellite antenna. Solid Bare Copper
RG-6 Coaxial
(75-ohm/F-type)
WIDE BAND DATA Allows you to connect your DSS receiver to new technologies
(such as high-definition television), as they are introduced.
Additional accessories may be required.
CONTROL-S IN/
S-LINK
VCR MOUSE/
CONTROL-S OUT
AUDIO (R)/(L)
OUT
VIDEO OUT Connects your DSS receiver to your TV or VCR’s video input. Video
S-VIDEO OUT Allows you to connect your DSS receiver directly to your TV (if
CH3/CH4 Switch When you use an RF connection, this setting determines the TV
VHF/UHF IN Allows you to connect your DSS receiver to your normal
VHF(SAT)/UHF OUT Connects to your TV or VCR. RG-59 Coaxial
TEL LINE Connects your DSS receiver to a telephone jack. This allows you to
AC IN Connects your DSS receiver to a 120V AC outlet. AC
Allows you to pass on remote control signals to another Sony
infrared-controlled audio or video component.
Allows you to pass on remote control signals to another Sony
infrared-controlled audio or video component. Also used to
connect the Sony VCR Mouse (RM-VM101).
Connects your DSS receiver to the right and left audio inputs of
your audio or video component.
your TV has S-VIDEO IN).
channel on which programs from the DSS receiver can be viewed.
(terrestrial) TV or cable TV service.
order pay-per-view programs.
Depends on future
applications
(D-sub 15 pin)
Audio mono
miniplug
Audio mono
miniplug
Audio (2)
(RCA-type)
(RCA-type)
S-Video
(4-pin mini DIN)
RG-59 Coaxial
(75-ohm/F-type)
(75-ohm/F-type)
Telephone (RJ-11)
80 Appendix: Other Information
Page 81

Using the Remote Control
After you’ve installed the batteries and programmed the remote
control, use these procedures to operate your system components:
The FUNCTION buttons flash to indicate
which component the remote control is set
to operate.
1 Select the component that you want to use: To operate a cable box,
2 Aim the remote control at the component.
3 Press the POWER button of the component to turn it on and off.
To control other functions of the component, see the table that follows.
SAT-A2 Remote Control
Outside Panel (SAT-A2) Note
Buttons described in the following table can operate components other than the
DSS receiver only if you’ve programmed the remote and the component
supports the function described. See page 85 for instructions on programming
the DSS remote.
Button Operates Description
TV, or the DSS receiver, press the corresponding FUNCTION
button.
SAT-A2 Only: To operate a VCR or laserdisc player, open the lid on
the remote control and set the slide switch to the position that you
set for the component.
TV Mutes the volume. Press again to restore the
volume.
TV Automatically turns off the TV, after the time
DSS Selects an alternate audio track for the current
DSS Used for setting up and using the Favorite
period that you specify.
CABLE: Turns the cable box on and off.
TV: Turns the TV on and off.
DSS: Turns the DSS receiver on and off.
CABLE: Puts the remote in cable mode. In cable
mode, the remote operates your cable box.
TV: Puts the remote in TV mode. In TV mode,
the remote operates your TV.
DSS: Puts the remote in DSS receiver mode. In
DSS mode, the remote operates your DSS
receiver.
program, if one is available. See “Selecting an
Alternate Audio Track” on page 59 for details.
Station Guides. See “Using the Favorite Station
Guides” on page 40 for details.
Appendix: Other Information 81
Page 82

Button Operates Description
DSS Brings up the Custom Guide. If you’re already
in a program guide, pressing GUIDE repeatedly
brings up future time slots in the guide.
TV Switches the input of the TV.
DSS Switches the output of the DSS receiver to TV
(normal TV programs), if you’ve connected a
TV cable or antenna, or to DSS programs.
DSS
TV
Cable
to
DSS
TV
Cable
DSS
TV
DSS
TV
DSS
TV
DSS
TV
DSS: Used to tune to and set stations in the
Jump Loop (DSS). See “Using the Jump Loop
Feature” on page 51 for details. TV, Cable: Tunes
to the last station you were tuned to.
Specifies the station number. DSS: In menus,
selects the menu item with the corresponding
number. Also, in some screens, used to enter
numerical values (such as a spending limit or
passcode).
Toggles through the different displays of onscreen guides (DSS) or other display (TV). See
“Using the DISPLAY Feature” on page 44 for
details.
When moved forward, back, left, right, and
diagonally, highlights items in the on-screen
displays (program guides, menus, etc.). When
pressed, selects highlighted items. When
pressed during normal DSS-viewing, brings up
the Station Index (unless a message appears).
Clears all on-screen displays, including
program guides, menus, etc. If you press EXIT
before you complete your selections, the
previous selections are restored.
Moves to the next (+) or previous (-) station
during normal viewing. In DSS program guides
and some setup screens, these buttons page
through the on-screen displays.
82 Appendix: Other Information
Page 83

Inside Panel (SAT-A2)
Button Operates Description
VCR
Laserdisc
Switches to VCR or laserdisc mode, depending
on how you’ve set up the remote for these
positions.
VCR
Laserdisc
VCR
Laserdisc
VCR
Laserdisc
VCR
Laserdisc
VCR
Laserdisc
VCR Changes the VHF/UHF output of the VCR.
VCR
Laserdisc
VCR
Laserdisc
VCR Record
Eject (used only with Sony brand components)
Rewind
Play
Fast-forward
Turns the VCR or laserdisc player on and off.
Stop
Pause
VCR
Laserdisc
DSS Used for programming the remote to operate
DSS Used for setting up the remote commander to
Changes the channel (VCR) or chapter
(laserdisc).
your TV, cable box, VCR, laserdisc player, or
DSS receiver. Also used to change the RF
security code.
operate components that are not listed in
“Programmable Codes” on page 86.
Appendix: Other Information 83
Page 84

SAT-B2 Remote Control
Button Operates Description
CABLE: Turns the cable box on and off.
TV: Turns the TV on and off.
DSS: Turns the DSS receiver on and off.
CABLE: Puts the remote in cable mode. In cable
mode, the remote operates your cable box.
TV: Puts the remote in TV mode. In TV mode, the
remote operates your TV.
DSS: Puts the remote in DSS receiver mode. In DSS
mode, the remote operates your DSS receiver.
DSS Used for programming the remote to operate your
DSS Used for setting up and using the Favorite Station
TV Switches the input of the TV.
DSS Switches the output of the DSS receiver to TV
DSS
TV
Cable
DSS
to
TV
Cable
DSS
TV
DSS
TV
Cable box
TV or cable box.
Guides. See “Using the Favorite Station Guides” on
page 40 for details.
(normal TV programs), if you’ve connected a TV
cable or antenna, or to DSS programs.
DSS: Used to tune to and set stations in the Jump
Loop (DSS). See “Using the Jump Loop Feature” on
page 51 for details. TV, Cable: Tunes to the last
station you were tuned to.
Specifies the station number. DSS: In menus, selects
the menu item with the corresponding number.
Also, in some screens, used to enter numerical
values (such as a spending limit or passcode).
Toggles through the different displays of on-screen
guides (DSS) or other display (TV). See “Using the
DISPLAY Feature” on page 44 for details.
Used with 0-9 buttons to change stations without
any delay in tuning.
84 Appendix: Other Information
DSS
TV
DSS
TV
DSS Brings up the Custom Guide. If you’re already in a
DSS
TV
TV
DSS
Clears all on-screen displays, including program
guides, menus, etc. If you press EXIT before you
complete your selections, the previous selections
are restored.
Brings up the Main Menu (Sony-brand TVs only.)
program guide, pressing GUIDE repeatedly brings
up future time slots in the guide.
When moved up, down, left, and right, highlights
items in the on-screen displays (program guides,
menus, etc.). When pressed, selects highlighted
items. When pressed during normal DSS-viewing,
brings up the Station Index (unless a message
appears).
VOL: Increases and decreases the volume.
CH/PAGE: Moves to the next (+) or previous (-)
station during normal viewing. In DSS program
guides and some setup screens, these buttons page
through the on-screen displays.
Page 85

Programming the Remote Control
The DSS receiver’s remote control is preset at the factory to operate
Sony brand TVs.
If you have a TV other than Sony brand, or you have other video
components that you want to control with the DSS receiver’s remote,
use the following procedures to program the remote.
Note
Your components must have infrared (IR) remote control capability in order to
be used with the DSS receiver’s remote.
To program the DSS receiver’s remote:
You can also find these code numbers
using the on-screen displays. See
“Displaying the Programmable Codes” on
page 74.
You must perform step 3 within 10
seconds of step 2, or you must start again
from step 2.
You must perform step 4 within 10
seconds of step 3, or you must start again
from step 2. To cancel the operation, press
the ENTER button.
1 Turn to “Programmable Codes” on page 86, and find the three-
digit code number for your component. If more than one code
number is listed, use the number listed first to complete the
following procedures.
2 Press the CODE SET button.
3 Press the FUNCTION button (CABLE or TV) for the component
you’re setting up. SAT-A2 Only: To set up a VCR or laserdisc player,
set the slide switch to any position (VTR1/2/3/MDP).
4 Enter the three-digit code number.
5 Press the ENTER button.
To Check if the Code Number Works
Use the following procedure to make sure the code you’ve entered
works:
1 Aim the DSS receiver’s remote control at the component and press
the POWER button that corresponds to that component.
2 For TVs and cable boxes: If the component responds, try the CH+
and CH- buttons. If the component responds, you’re done.
3 If the code doesn’t work for your component:
Try programming the remote using the other codes listed for
your component.
If you cannot get your component to respond to the DSS
receiver’s remote — even after trying all the code numbers for
your component — your component may not be compatible
with the DSS receiver’s remote. If this happens, you must use
your component’s own remote to operate it. SAT-A2 Only: Try
using the Learn feature to program specific buttons. See
“Using the Learn Function (SAT-A2 Only)” on page 87.
Appendix: Other Information 85
Page 86

Programmable Codes
TV Codes
Manufacturer Code
Sony 101
Admiral (M.
Wards)
ABC 112
Bell & Howell
(M. Wards)
Brocsonic 103, 112
Craig 122, 123, 120, 121
Croslex 111
Curtis Mathis 103, 119, 123
Daewoo 135, 136, 103
Daytron 113
Emerson 122, 113, 120, 121,
Fisher 125
General Electric 102, 118, 103, 107
Goldstar 103, 113, 112, 130
Hitachi 131, 113, 103, 132
JC Penney 103, 102, 130, 107
JVC 128, 129
KTV 133, 113, 103, 123,
LXI (Sears) 102, 103 111, 125,
Magnavox 111, 112, 113, 107
Mitsubishi/MGA 124, 103, 112
NEC 103, 112
Panasonic 118, 116, 117, 107
Philco 111, 118, 109
Philips 111
Pioneer 137, 118, 119
Portland 103, 108
Quasar 110, 107
Radio Shack 102, 112, 124, 123
RCA/Proscan 102, 103, 104, 105,
Samsung 126, 112, 113, 103
Sanyo 125
Scott 123, 112
Sharp 114, 113, 115
Signature 2000
(M. Wards)
Sylvania 111, 112, 108
Symphonic 123, 139
Toshiba 119, 114
Videch 131, 103, 112
Wards 113, 103, 115, 112
Zenith 108, 110
102, 114, 109
114, 109, 138
123, 103, 115
134
119, 112
106, 107, 108
114, 109
Cable Box Codes
Manufacturer Code
Hamlin/Regal 222, 223, 224, 225,
Jerrold/G.I. 201, 202, 203, 204,
Oak 227, 228, 229
Panasonic 219, 220, 221
Pioneer 214, 215
Scientific Atlanta 209, 210, 211
Tocom 216, 217
228
205, 206, 207 208,
218
VCR Codes (SAT-A2 Only)
Manufacturer Code
Sony 301,302, 303
Aiwa 338
Audio Dynamic 314, 347
Bell & Howell
(M. Wards)
Brocsonic 319
Canon 309, 308
Citizen 332
Craig 315, 302, 332
Curtis Mathis 304, 338, 309
Daewoo 341, 312, 309
DBX 314, 336, 337
Dimensia 304
Emerson 319, 320, 316, 317,
Fisher 330, 334, 335, 333
Funai 338
General Electric 329, 304, 309
Goldstar 332
Hitachi 306, 304, 305
Instant Replay 309, 308
JC Penney 309, 305, 304, 330,
JVC 314, 336, 337
Kenwood 314, 336, 332, 337
LXI (Sears) 332, 305, 333, 334,
Magnavox 310, 308, 309
Marantz 314, 336, 337
Marta 332
Memorex 309, 335
Minolta 305, 304
Mitsubishi/
MGA
Multitech 325, 338, 321
NEC 314, 336, 337
Olympic 309, 308
Panasonic 308, 309, 306, 307
Pentax 305, 304
Philco 308, 309
Philips 310, 308, 309
330, 343
318
314, 336, 337
330, 335
323, 324, 325, 326
Manufacturer Code
Pioneer 308
Quasar 308, 309
RCA/Proscan 304, 305, 308, 309,
Realistic 309, 330, 328, 335,
Sansui 314
Singer 315
Samsung 322, 313, 321
Sanyo 330, 335
Scott 312, 313, 321, 335,
Sharp 327, 325
Shintom 315
Signature 2000
(M. Wards)
Sylvania 310, 308, 309, 338
Symphonic 338
Tashiro 332
Tatung 314, 336, 337
Teac 314, 336, 338, 337
Technics 309, 308
Toshiba 312, 311
Wards 327, 328, 335, 331,
Yamaha 330, 314, 336, 337
Zenith 331
310, 311, 312, 313
324, 338
323, 324, 325, 326
336, 327
332
Laserdisc Player Codes
(SAT-A2 Only)
Manufacturer Code
Sony 701
Kenwood 707
Magnavox 703
Marantz 702
Mitsubishi 702
Panasonic 704
Philips 703
Pioneer 702
RCA 702
Sanyo 706
Sharp 705
Yamaha 703
86 Appendix: Other Information
Page 87

Using the Learn Function (SAT-A2 Only)
You can program the DSS remote commander to learn the functions of
another component’s remote control. Use this function to operate
components that are not listed in “Programmable Codes” on page 86.
To use the Learn function:
1 Set the slide switch in the inside panel to VTR3 or MDP.
2 Place the DSS remote commander and the other component’s
remote control directly facing each other, about two inches apart.
Approx. 2 inches
3 Press the LEARN button. The Learn indicator lights.
About the Learn Function
4 Press the button on the DSS remote commander that you want to
learn a function. The Learn indicator flashes off, then on, indicating
that the DSS remote commander is now ready to learn.
5 Hold down the corresponding button on the other component’s
remote control. When the Learn indicator flashes off, then on,
release the button on the other component’s remote control.
If the indicator doesn’t flash, repeat steps 4 and 5.
6 To learn other functions, repeat steps 4 and 5.
The Learn function does not work in the VTR1 and VTR2 slide
switch positions.
During the learning procedure, do not move the remote controls.
If you press a button on this remote commander that cannot be
used for learning, the Learn indicator flashes four times.
To clear all learned signals from memory, set the slide switch inside
the lid to MDP, press the LEARN button, press the DSS POWER
button while holding down the VOL- button, and then press the
LEARN button again.
When you remove the batteries — to replace them, for example —
any codes you’ve set may be erased.
Appendix: Other Information 87
Page 88

Troubleshooting
Symptom Possible Causes and Remedies
No picture
(poor picture quality or loss of picture)
If you are receiving only a few stations, for example, stations 100, 205, and
999, call your program providers to have your programming activated.
Check to make sure the DSS receiver is on and set to DSS mode. See page 78.
Check to make sure your access card is inserted properly into the DSS
receiver.
Run the System Test to verify that your system is working properly. See
page 75.
Check the satellite antenna’s signal strength. See page 67.
Check the connections to your TV (and other components). See the Satellite
Antenna manual and Chapter 3 of this manual.
Check to make sure your TV (and other components) are set to receive the
DSS signal (channel 3 or 4, VIDEO1, etc.), as appropriate to the way your
system is connected. See Chapter 3.
Some pay-per-view programs may be protected by Macrovision copyprotection at the discretion of the copyright owner. To ensure a quality
picture, make sure that the signal is coming directly from the DSS receiver
and not through your VCR. Call your program providers for details.
Make sure the RG-6 cable is properly connected to the antenna’s LNB. If the
Signal Seeker is not flashing on the LNB when the Set Up Antenna screen is
displayed, there may be an electrical short in the RG-6 cable and you will
need to replace it.
In rare cases, the picture may be distorted if you connected a terrestrial TV
antenna to the UHF/VHF IN jack of the receiver. This distortion could
occur if the channel selector on the back of the receiver is set to a channel
that is normally received on channel 3 or 4 of your TV. For example, you can
receive a local station on channel 4, and the channel selector is set to channel
4. If this happens, set the channel selector to the other channel (3 or 4),
whichever one is not used on your TV.
Cannot access program
Cannot order pay-per-view program
Cannot find the station of the pay-perview program you’ve ordered
88 Appendix: Other Information
Check to make sure that you are subscribing to the station you are trying to
tune to. Call your program providers if you are not sure.
Check to make sure the system is not locked. See Chapter 5.
Check to make sure the station isn’t set to be skipped. See page 57.
Check to make sure you’ve connected the DSS receiver to a phone line.
It may be too late to purchase this program. Check for other show times. See
page 31.
If the message “Purchase information not available” appears, you must call
your program provider (DIRECTV or USSB) to order the program.
Check to make sure the PPV option is not locked. See Chapter 5.
Your access card may be full. Call your program provider.
See “Checking and Cancelling PPV Purchases” on page 47 to get
information (station, start times, etc.) about programs you’ve ordered.
Page 89

Symptom Possible Causes and Remedies
Cannot cancel a pay-per-view order
via the Purchase menu option
Program guide does not bring up the
program you’ve chosen
Cannot bring up the Station Index
( button)
Cannot display favorite stations
Ratings limit, spending limit, or payper-view lock not working properly
Cannot access locks or limits screens
You cannot cancel pay-per-view orders that you’ve watched or tuned to.
Also, you can cancel only programs you’ve ordered using the DSS remote
control. Call your program providers for details.
You must press the button to select the program you’ve highlighted.
Although the guide automatically tunes to current stations that you
highlight in any of the guides, you must press the button to complete
your selection.
You cannot bring up the Station Index while a program guide is displayed
or if a message such as, “Press to purchase” appears. Press the EXIT
button to clear any on-screen displays. Also, try switching to another nonPPV station.
You must set up your Favorite Station Guides before favorite stations can be
displayed. See page 40.
If you selected a program guide using SELECT GUIDE or SELECT LIST,
some of your Favorite Stations may not be displayed when you press the
FAVORITE button. This is probably because the program that’s on the
Favorite Station is in a program category that’s different from the category
or subcategory you selected for the displayed guide or list.
Check locks and limits. Then check that the system is locked. See Chapter 5.
The system must be unlocked before you can make changes to the locks and
limits. See Chapter 5.
Cannot lock or unlock the system
Alternate audio track is not available
Language of audio track is incorrect
Cannot record DSS program on VCR
Make sure you’ve entered the correct passcode. If you’ve lost or forgotten
your passcode, call your program provider. See “Customer Support” on
page 2.
Not all programs offer alternate audio tracks. See page 59.
Check default language setting. The program provider may not make
available all the languages displayed in the Set Default Language screen.
See page 60. Check alternate audio track setting. See page 59.
Check to make sure the VCR is connected correctly, and that the VCR is set
to receive the signal from the DSS receiver. See Chapter 3.
If you are using the automatic timer to facilitate the recording of programs,
make sure the program you are trying to record does not conflict with any
locks or limits that have been set. If you are using the timer for PPV
programs, you must purchase these programs in advance, which may
require that you call your program provider to order the program.
Make sure you are not trying to record a pay-per-view program that is
copy-protected by Macrovision. Some pay-per-view programs are copyprotected at the discretion of the copyright owner. Call your program
provider for details.
Appendix: Other Information 89
Page 90

Symptom Possible Causes and Remedies
VCR Mouse not working Check that the VCR Mouse is positioned directly above the VCR’s IR
receiving area. (The IR receiving area is located on the front panel of the
VCR, and it typically looks like a small black window. See your VCR
manual for details.) If you cannot locate the IR receiving area, try moving
the VCR Mouse to different positions on top of the VCR until the VCR
responds to the VCR Mouse.
Try setting up the VCR Mouse again, using the procedures described on
page 20. Then try the other codes listed for your VCR.
With some VCRs, the VCR Mouse may not be able to turn the VCR on and
off. If this is the case, leave the VCR on.
The VCR Mouse may not work properly, or at all, with some VCRs,
including VCRs that are available in the market after the VCR Mouse was
introduced. If your VCR is incompatible with the VCR Mouse, call the Sony
Digital Satellite System Information Center at 1-800-838-7669.
Main Menu, buttons 4 and 6, do not
include the program categories that
you want
Access card problems
Remote control doesn’t work
Use SELECT GUIDE to change the program category shown in button 4.
Use SELECT LIST to change the program category shown in button 6. See
page 35.
Check that the card is inserted properly. See page 68.
Call your program providers. See “Customer Support” on page 2.
To operate your TV or other video components, make sure you’ve
programmed the remote properly. See “Programming the Remote Control”
on page 85. Note: The remote codes may be erased whenever you remove
the batteries. Program the remote again if you’ve removed or replaced the
batteries.
Press the appropriate FUNCTION button (DSS, TV, CABLE) for the
component you want to operate. These buttons flash to indicate which
component the remote control is set to operate.
Check to make sure the batteries are inserted correctly, and that the batteries
are not dead. See page6.
SAT-A2 Only: If you are having problems with the RF function, check that
the RF antenna is connected properly and that you are using the remote
control within operating range of the DSS receiver (see “Setting Up the RF
Antenna (SAT-A2 Only)” on page 22). Make sure that RF transmission is
enabled (see “Selecting IR/RF Transmission (SAT-A2 Only)” on page 71).
Make sure the DSS receiver and remote control are using the same security
code (see“Setting the Security Code (SAT-A2 Only)” on page 72).
90 Appendix: Other Information
If you are unable to resolve problems with your system, please see
“Customer Support” on page 2 for customer support information and
telephone numbers.
Page 91

Precautions
On Safety
On Power Sources
If you spill or drop anything into the cabinet, unplug the receiver
and have it checked by qualified personnel before operating it any
further.
Operate the receiver only on 120 V AC.
For detailed safety precautions, see the “Important Safeguards”
leaflet that came with the receiver.
The receiver continues to draw power from the AC power source
as long as it is connected to the wall outlet, even if the receiver
itself has been turned off.
If you are not going to use the receiver for a long time, be sure to
disconnect the receiver from the wall outlet and cancel your
programming subscription. To disconnect the AC power cord,
grasp the plug itself; never pull the cord.
To further protect the receiver from damage caused by lightning or
power surges, connect a power surge protector to your telephone
line, AC power cord, and external antennas.
One blade of the plug is wider than the other for the purpose of
safety and will fit into the wall outlet only one way. If you are
unable to insert the plug fully into the outlet, contact your dealer.
On Placement
On Cleaning
On Repacking
If the AC power cord gets damaged and needs to be replaced, have
it done at a qualified service shop only.
Place the receiver in a location with adequate ventilation to prevent
heat build-up in the receiver and prolong the life of the receiver.
Do not place the receiver in a location where it will be exposed to
extreme hot or cold temperatures. Avoid direct sunlight and do not
place near heat sources.
Do not place the receiver in a location subject to excessive dust or
mechanical vibration. Protect from vibration at all times.
Do not place anything on top of the receiver, which might block the
ventilation holes and cause malfunctions.
Before connecting other components, be sure to turn off and
unplug the receiver.
Clean the cabinet, panel, and controls with a soft cloth slightly
moistened with a mild detergent solution. Do not use any type of
abrasive pad, scouring powder, or solvent such as alcohol or
benzine.
Keep the original cartons and packing materials to safely transport
the equipment in the future.
Appendix: Other Information 91
Page 92

FCC Regulations and Information
FCC Registration Information
Your digital satellite receiver has been registered by the Federal
Communication Commission (FCC) as not being harmful to the
telephone network when connected directly to the telephone lines.
In order to fully comply with the Rules of the FCC, the following
instructions should be read carefully and followed completely
where applicable:
1 The Federal Communication Commission (FCC) has
established Rules which permit this device to be directly
connected to the telephone network. Standardized jacks are
used for these connections. This equipment should not be
used on party lines or coin phones.
2 If this device is malfunctioning, it may also be causing harm
to the telephone network; this device should be disconnected
until the source of the problem can be determined and until
repair has been made. If this is not done, the telephone
company may temporarily disconnect service.
3 The telephone company may make changes in its technical
operations and procedures; if such changes affect the
compatibility or use of this device, the telephone company is
required to give adequate notice of the changes. You will be
advised of your right to file a complaint with the FCC.
4 If the telephone company requests information on what
equipment is connected to their lines, inform them of:
a The telephone number to which this unit is connected.
b. The ringer equivalence number.
c. The USOC jack required.
d. The FCC Registration Number.
5 Items (b) and (d) are indicated on the label. The Ringer
Equivalence Number (REN) is used to determine how many
devices can be connected to your telephone line. In most
areas, the sum of the RENs of all devices on any one line
should not exceed five (5). If too many devices are attached,
they may not ring properly.
Radio Interference Information
This equipment has been tested and found to comply with the
limits for a Class B digital device, pursuant to Part 15 of the FCC
Rules. These limits are designed to provide reasonable protection
against harmful interference in a residential installation. This
equipment generates, uses and can radiate radio frequency energy
and, if not installed and used in accordance with the instructions,
may cause harmful interference to radio communications.
However, there is no guarantee that interference will not occur in
a particular installation. If this equipment does cause interference
to radio or television reception (which you can determine by
turning the equipment off and on), you are encouraged to try to
correct the interference by one or more of the following measures:
Reorient or relocate the receiving antenna (the antenna for
radio or television that is receiving the interference)
Change the position of the DSS receiver with respect to the
radio or television equipment that is receiving the
interference
Move the DSS receiver away from the equipment that is
receiving the interference
Plug the DSS receiver into a different outlet so that the DSS
receiver and the equipment receiving the interference are on
different branch circuits
Shielded cables and I/O cords must be used for this equipment to
comply with the relevant FCC regulations. Changes or
modifications not expressly approved in writing by Sony
Electronics, Inc., void the user’s authority to operate this
equipment.
If these measures do not eliminate the interference, you should
consult your digital satellite system dealer or an experienced
radio/television technician for additional suggestions. In
addition, you may find the following booklet prepared by he
Federal Communications Commission helpful: “How to Identify
and Resolve Radio-TV Interference Problems.” This booklet is
available from the U.S. Government Printing Office, Washington,
D.C., 20402 Stock No. 004-000-00345-4.
Service Requirements
In the event of equipment malfunction, all repairs should be
performed by our Company or an authorized agent. It is the
responsibility of users requiring service to report the need for
service to our company or to one of our authorized agents. For
service, call 1-800-838-7669.
92 Appendix: Other Information
Canadian Residents
Le present appareil numerique n’emet pas de bruits
radioelectriques depassant les limites applicables aux appareils
numeriques de la class B prescrites dans le Reglement sur le
brouillage radioelectrique edicte par le ministere des
Communications du Canada.
Page 93

Limited Warranty
Digital Satellite Systems
SONY ELECTRONICS INC. (“SONY”) warrants this Product
(including any accessories) against defects in material or
workmanship as follows:
1 LABOR. For a period of 90 days from the original date of
purchase, if the Product is determined to be defective, SONY
will repair or replace the Product at no charge. After this 90
day period, you must pay for all labor charges.
2 PARTS. For a period of one (1) year from the original date of
purchase, SONY will supply, at no charge, new or rebuilt
replacements in exchange for defective parts. Any
replacements will be warranted for the remainder of the
original warranty period or ninety (90) days from installation
by SONY’s authorized facility, whichever is longer.
3 ACCESSORIES. Parts and labor for all accessories are for one
(1) year.
4 IN-HOME. For a period of one (1) year from installation
date, if the unit was professionally installed by an authorized
SONY Digital Satellite System Installer and the LNB
(Electronic Antenna Element) fails to function properly,
SONY will repair or replace the LNB with a new or rebuilt
part. Labor to repair or replace the LNB (after 90 days from
purchase) will be at your expense. If no problem is found, or
any other item fails, it will be your responsibility to pay the
installer their regular rate for an in-home service call.
To obtain warranty service, you must take the Product, or deliver
the Product freight prepaid, in either its original packaging or
packaging affording an equal degree of protection, to a SONY
authorized Digital Satellite System service facility. Please see the
telephone number at the end of this section for a number to call to
locate the closest facility.
This warranty does not cover customer instruction, installation,
setup adjustments or signal reception problems.
This warranty does not cover cosmetic damage or damage due to
acts of God, accident, misuse, abuse, negligence, commercial use,
or modification of, or to any part of the Product, including the
antenna. This warranty does not cover improper installation (if
self-installed), loss of use of the product, or wasted programming
charges due to product malfunction. This warranty does not cover
damage due to improper operation or maintenance, connection to
improper voltage supply, or attempted repair by anyone other
than a facility authorized by SONY to service the Product. This
warranty does not cover Products sold AS IS or WITH ALL
FAULTS. This warranty is valid only in the United States.
Proof of purchase in the form of a bill of sale or receipted invoice
which is evidence that the unit is within the Warranty period must
be presented to obtain warranty service.
REPAIR OR REPLACEMENT AS PROVIDED UNDER THIS
WARRANTY IS THE EXCLUSIVE REMEDY OF THE
CONSUMER. SONY SHALL NOT BE LIABLE FOR ANY
INCIDENTAL OR CONSEQUENTIAL DAMAGES FOR BREACH
OF ANY EXPRESS OR IMPLIED WARRANTY ON THIS
PRODUCT. IN NO EVENT SHALL SONY BE LIABLE FOR ANY
INCIDENTAL OR CONSEQUENTIAL DAMAGES
WHATSOEVER ARISING OUT OF THE USE OR INABILITY TO
USE THE PRODUCT. UNDER NO CIRCUMSTANCES SHALL
SONY’S LIABILITY, IF ANY, EXCEED THE PURCHASE PRICE
PAID FOR THE PRODUCT. EXCEPT TO THE EXTENT
PROHIBITED BY APPLICABLE LAW, ANY IMPLIED
WARRANTY OR MERCHANTABILITY OR FITNESS FOR A
PARTICULAR PURPOSE ON THIS PRODUCT IS LIMITED IN
DURATION TO THE DURATION OF THIS WARRANTY.
This warranty is invalid if the factory applied serial number has
been altered or removed from the Product.
Some states do not allow the exclusion or limitation of incidental
or consequential damages, or allow limitations on how long an
implied warranty lasts, so the above limitations or exclusions may
not apply to you. In addition, if you enter into a service contract
with the SONY Partnership within 90 days of the date of sale, the
limitation on how long an implied warranty lasts does not apply
to you. This warranty gives you specific legal rights, and you may
have other rights which vary from state to state.
For your convenience, SONY ELECTRONICS INC. has
established telephone numbers for frequently asked questions. To
locate the servicer or dealer nearest you, for assistance or
resolution of a service problem, or for product information or
operatio
For an accessory or part not available from your authorized
dealer, call
n, call:
SONY DIGITAL SATELLITE SYSTEM INFORMATION CENTER
1-800-838-7669 (Sony)
:
1-800-488-7669
About Sony Customer Support
Every Sony brand DSS unit comes with Sony’s Express Support at
no charge to you. In the event of a system failure, our Express
Support Program can have a replacement receiver on its way to
you via overnight Federal Express (for calls Monday-Friday until
11:00 pm; Saturday delivery depends upon zip code). All it takes
is a valid credit card to cover a security deposit, and Sony will pay
freight in both directions. Our Express Support continues with our
800 number, staffed by dedicated technical representatives who
can answer questions on dealer locations, system operation,
installation, hookup, accessories, and how to get the most out of
your home entertainment system. Sony’s Express Support
program: another expression of our commitment to excellence in
customer service.
Appendix: Other Information 93
Page 94

Specifications
Input Jacks UHF/VHF
Output Jacks S-VIDEO OUT
Input Frequency 950 - 1450 MHz
Power
Requirements
Power Consumption 20 W max
Dimensions
(w/h/d)
Weight Set: 5.2 kg
75 ohm f-type
Satellite Antenna
75 ohm f-type
RF Remote (SAT-A2)
CONTROL-S IN/S-LINK
(mini-jack) 5 Vp-p
AC Power (120V, 60 Hz)
4-pin mini DIN
VIDEO (RCA jacks) (2)
AUDIO R/L (RCA jacks)
3 (SAT-A2); 2 (SAT-B2)
VHF(SAT)/UHF, f-type
Low-Speed Data (SAT-A2)
9-pin D-Sub Female
Wide Band Data
15-pin D-Sub Female
TEL LINE
VCR MOUSE/CONTROL-S
(mini-jack)
OPTICAL DIGITAL OUT (SAT-A2)
AC Power Unswitched (SAT-A2)
(120V, 60 Hz)
AC 120 V
430 x 85 x 290 mm
16.9 x 3.2 x 10.8 inches
/11.4 lbs (SAT-A2)
4.9 kg/10.8 lbs (SAT-B2)
Unit: 3.0 kg/6.6 lbs (SAT-A2)
2.9 kg
/6.4 lbs (SAT-B2)
Supplied
Accessories
Optional
Sony-brand
DSS Accessories
Remote Control
RM-Y130 (SAT-A2)
RM-Y129 (SAT-B2)
Size AA Batteries (2)
Access Card (1)
Audio/Video Cable (1)
S-VIDEO Cable (1) (SAT-A2)
RF Antenna (1) (SAT-A2)
RF Cable (1)
Telephone Line Cord (1)
AC Power Cord (1)
Installation Kit
ANJ-DS1
Amplifier
EAC-DA1
Diplexer
EAC-DD1
Voltage Switch
EAC-DV1
Multi-Room Distribution System
MRD-D1
IR Target (for MRD-D1 System)
EAC-T1
Universal Remote Commander
RM-Y130
Flat Cable
SAK-F1
Coaxial Cable (25 ft.)
SAK-C25
Coaxial Cable (75 ft.)
SAK-C75
VCR Mouse
RM-VM101
Note
Design and specifications are subject to change without
notice.
94 Appendix: Other Information
Page 95

Index
0-9 buttons 7, 8, 27, 29, 82, 84
16:9 aspect ratio 70
4:3 aspect ratio 70
(alternate audio symbol) 43, 59, 95
(data services symbol) 43, 63
(lock symbol) 43, 95
(messages symbol) 43, 95
button 7, 8, 26, 78
A
access card, replacing 68
alternate audio 59
ALTERNATE AUDIO button 81
antenna
See also RF antenna.
setting up 67
signal level 67
arrow buttons
on front panel 78
on SAT-B2 remote control 8, 84
aspect ratio, setting 70
AUTO skip function 58
azimuth 67
B
back panel connectors
SAT-A2 79
SAT-B2 80
batteries, inserting into remote
control 6
baud rate, setting 64
VCR Mouse 20
CONTROL-S jack 11
Custom Guide 57
See also Master Guide
customer support numbers 2, 93
D, E
data services, setting 63
default language, setting 60
DISPLAY button 32, 37, 43, 61, 82, 84
Eject button 83
elevation 67
ENTER button 7, 8, 84
EXIT button 9, 10, 30, 32, 37, 78, 82, 84
Express Navigator 4
F
Fast-forward button 83
FAVORITE button 30, 40, 81, 84
Favorite Station Guide
changing the title 42
clearing a station 42
displaying and setting up 40
displaying different Favorite
Station Guides 42
exiting 42
using DISPLAY button with 44
features, described 4
front panel controls 78
FUNCTION buttons 81, 84
L
languages. See default language and
alternate audio.
latitude and longitude, for setting
antenna 67
LEARN button 83
Learn function 87
locking the system 55
locks and limits
overriding 55
setting 52–56
unlocking 56
with timer settings 39
M
Macrovision copy-protection 31
mail. See messages.
Main Menu 27
Master Guide
adding programs to the Timer 31
displaying favorite stations in 30
exiting 30, 32
selecting programs in 31
using DISPLAY button with 44
MENU button 27, 78, 84
messages
erasing 62
indicator 78
reading 62
receiving 61
MUTING button 81, 84
C
CH button 83
CH/PAGE buttons 7, 8, 82, 84
CODE SET button 83, 84
colors, setting 48
connecting
audio system 12, 13, 14
cable TV, terrestrial antenna 12,
13, 14, 16, 18
digital audio components 21
Hi-Fi A/V system 16
home entertainment system 18
RF antenna 22
TV and VCR 14
TV with A/V jacks 13
TV with RF jack 12
G
GUIDE button 7, 8, 9, 29, 82, 84
guides
selecting a guide category 34
selecting a guide subcategory 35
selecting a guide time 34
selecting a guide type 33
H, J
Highlight and Select, explained 26
joystick 7, 82
Jump
button 82, 84
Loop 50
mode 50
O
opening, access card door 68
Options Menu, displaying 46
overriding the system lock 55
P
paging 29, 32
passcode, setting 55, 56
Pause button 83
pay-per-view
cancelling programs 47
free preview 31
locking 54
reviewing purchases 47
watching programs 31
Play button 83
Appendix: Other Information 95
Page 96

POWER buttons 7, 8, 78, 81, 83, 84
power indicator 78
precautions 91
problems
diagnosing 75
troubleshooting 88
Program Banner 43, 61
Program guide. See Master Guide.
Program list 32
purchases. See pay-per-view.
R
ratings limit
explained 52
setting 53
REC button 83
recording DSS programs 23
with Timer 38
with VCR Mouse 20
remote control
inserting batteries 6
Learn function 87
programmable codes 74
programming 85
RF security code 72
SAT-A2 button descriptions 81
SAT-B2 button descriptions 84
setting IR and RF 71
troubleshooting 90
Rewind button 83
RF antenna 22
station order, setting 49
Stop button 83
S-VIDEO jack 11, 13, 14, 16, 18
system test, running 75
T
timer
checking and changing 39
indicator 39, 78
setting up 38
troubleshooting 89
tips and shortcuts 76
transparency, setting 49
transponder 67
troubleshooting 76, 88
TV/DSS button 78, 82, 84
TV/VIDEO button 82, 84
TV/VTR button 83
U, V
unlocking the system 56
VCR Mouse 20, 90
VOL button 84
VTR1/2/3/MDP switch 83
W, Z
Warranty 93
zip code, for setting antenna 67
S
satellite antenna, setting 67
scrolling 8, 29
SELECT button 7, 8, 26, 78
SELECT GUIDE 35
SELECT LIST 35
Setup Menu, displaying 66
SLEEP button 81
S-LINK feature 11
spending limit
explained 52
setting 53
Station Index
displaying 7, 8, 10, 36
displaying favorite stations in 37
exiting 37
selecting programs in 10, 37
using DISPLAY button with 44
station locks
setting 54
96 Appendix: Other Information
]Sony Corporation Printed in the U.S.A
 Loading...