

Network Speaker
Operating Instructions
Getting Started
Network Connections
Listening to Audio Content
Over Your Home Network
Enjoying Sony
Multiple-Room Products
Using AirPlay
Others
Troubleshooting
SA-NS310

WARNING
To reduce the risk of fire or electric
shock, do not expose this apparatus to
rain or moisture.
To reduce the risk of fire, do not cover the
ventilation opening of the apparatus with
newspapers, tablecloths, curtains, etc.
Do not place the naked flame sources such as lighted
candles on the apparatus.
For customers in the United
States and Canada
Owner’s Record
The model and serial numbers are located on the
bottom of the unit. Record these numbers in the
space provided below. Refer to them whenever you
call upon your Sony dealer regarding this product.
Model No.
Serial No.
For customers in the United
States
Do not install the appliance in a confined space, such
as a bookcase or built-in cabinet.
To reduce the risk of fire or electric shock, do not
expose this apparatus to dripping or splashing, and
do not place objects filled with liquids, such as
vases, on the apparatus.
As the main plug is used to disconnect the unit from
the mains, connect the unit to an easily accessible
AC outlet. Should you notice an abnormality in the
unit, disconnect the main plug from the AC outlet
immediately.
Do not expose batteries or apparatus with batteryinstalled to excessive heat such as sunshine, fire or
the like.
The unit is not disconnected from the mains as long
as it is connected to the AC outlet, even if the unit
itself has been turned off.
The dating code and the nameplate are located on the
bottom exterior.
On the battery for the remote
control
CAUTION
Danger of explosion if battery is incorrectly
replaced. Replace only with the same or equivalent
type.
Replace the battery with a Sony CR2025 lithium
battery.
Use of another battery may present a risk of fire or
explosion.
Important Safety Instructions
1) Read these instructions.
2) Keep these instructions.
3) Heed all warnings.
4) Follow all instructions.
5) Do not use this apparatus near water.
6) Clean only with dry cloth.
7) Do not block any ventilation openings. Install in
accordance with the manufacturer’s instructions.
8) Do not install near any heat sources such as
radiators, heat registers, stoves, or other
apparatus (including amplifiers) that produce
heat.
9) Do not defeat the safety purpose of the polarized
or grounding-type plug. A polarized plug has
two blades with one wider than the other. A
grounding type plug has two blades and a third
grounding prong. The wide blade or the third
prong are provided for your safety. If the
provided plug does not fit into your outlet,
consult an electrician for replacement of the
obsolete outlet.
10)Protect the power cord from being walked on or
pinched particularly at plugs, convenience
receptacles, and the point where they exit from
the apparatus.
11)Only use attachments/accessories specified by
the manufacturer.
12)Use only with the cart, stand, tripod, bracket, or
table specified by the manufacturer, or sold with
the apparatus. When a cart is used, use caution
when moving the cart/apparatus combination to
avoid injury from tip-over.
13)Unplug this apparatus during lightning storms or
when unused for long periods of time.
GB
2

14) Refer all servicing to qualified service personnel.
Servicing is required when the apparatus has
been damaged in any way, such as power-supply
cord or plug is damaged, liquid has been spilled
or objects have fallen into the apparatus, the
apparatus has been exposed to rain or moisture,
does not operate normally, or has been dropped.
The following FCC statement applies only to the
version of this model manufactured for sale in the
U.S.A. Other versions may not comply with FCC
technical regulations.
NOTE:
This equipment has been tested and found to comply
with the limits for a Class B digital device, pursuant
to Part 15 of the FCC Rules. These limits are
designed to provide reasonable protection against
harmful interference in a residential installation.
This equipment generates, uses and can radiate radio
frequency energy and, if not installed and used in
accordance with the instructions, may cause harmful
interference to radio communications. However,
there is no guarantee that interference will not occur
in a particular installation. If this equipment does
cause harmful interference to radio or television
reception, which can be determined by turning the
equipment off and on, the user is encouraged to try
to correct the interference by one or more of the
following measures:
– Reorient or relocate the receiving antenna.
– Increase the separation between the equipment
and receiver.
– Connect the equipment into an outlet on a circuit
different from that to which the receiver is
connected.
– Consult the dealer or an experienced radio/TV
technician for help.
CAUTION
You are cautioned that any changes or modifications
not expressly approved in this manual could void
your authority to operate this equipment.
Properly shielded and grounded cables and
connectors must be used for connection to host
computers and / or peripherals in order to meet FCC
emission limits.
This device complies with Part 15 of the FCC Rules.
Operation is subject to the following two conditions:
(1) this device may not cause harmful interference,
and (2) this device must accept any interference
received, including interference that may cause
undesired operation.
This equipment must not be co-located or operated
in conjunction with any other antenna or transmitter.
This equipment complies with FCC radiation
exposure limits set forth for an uncontrolled
environment and meets the FCC radio frequency
(RF) Exposure Guidelines in Supplement C to
OET65.
This equipment should be installed and operated
keeping the radiator at least 20 cm or more away
from person’s body (excluding extremities: hands,
wrists, feet and ankles).
For the State of California,
USA only
Perchlorate Material - special handling may apply,
See
www.dtsc.ca.gov/hazardouswaste/perchlorate
Perchlorate Material: Lithium battery contains
perchlorate.
GB
3

For customers in Canada
Properly shielded and grounded cables and
connectors must be used for connection to host
computers and / or peripherals.
Operation is subject to the following two conditions:
(1) this device may not cause interference, and (2)
this device must accept any interference, including
interference that may cause undesired operation of
this device.
This equipment c omplies with IC radiation exposure
limits set forth for an uncontrolled environment and
meets RSS-102 of the IC radio frequency (RF)
Exposure rules.
This equipment should be installed and operated
keeping the radiator at least 20 cm or more away
from person's body (excluding extremities: hands,
wrists, feet and ankles).
GB
4

Table of Contents
Features of this unit ...................................... 6
Setting up your home network ..................... 7
Getting Started
Guide to Parts and Controls ......................... 8
Main unit ................................................. 8
Remote control ...................................... 11
Checking the Supplied Accessories ........... 12
Preparing the Unit and the Remote
Control .................................................. 12
Connecting to an AC power source ...... 12
Preparing the remote control ................. 12
Turning the Unit On ................................... 13
Network Connections
How to Connect Your Network ................. 14
Setting Up for a Wireless Network ............ 14
Option 1: Method for using a supplied CD-
ROM and Windows PC ........................ 14
Option 2: Method for using a WPS push
button at the access point supporting
WPS ......................................................14
Option 3-1: Manual setting method using
an Access Point Scan (for PC/Mac) ...... 15
Option 3-2: Manual setting method using
an Access Point Scan (for Android
device) ................................................... 17
Option 3-3: Manual setting method using
an Access Point Scan (for iPhone/iPad/
iPod touch) ............................................ 18
Setting Up Wired Networks ....................... 19
Option 4: DHCP method .......................19
Listening to Audio Content
Over Your Home Network
Using DLNA (Digital Living Network
Alliance) ................................................ 20
Listening to audio content on a computer
with Windows 7 ....................................20
Listening to audio content on a computer
with Windows Vista/Windows XP .......22
Listening to audio content on a server ...23
Enjoying Sony
Multiple-Room Products
Using the PARTY STREAMING ..............24
Starting a PARTY .................................24
Joining a PARTY ..................................25
Connecting the Unit with DLNA-compliant
Devices ..................................................25
Enjoying audio content on a server using a
controller ...............................................25
Using AirPlay
Using AirPlay .............................................26
Others
Updating software ......................................28
Setting Screen on the Browser ...................28
Using the setting screen on
the browser ............................................28
Starting the browser with
Windows XP .........................................29
Specifications .............................................30
Precautions .................................................31
Glossary ......................................................33
Troubleshooting
Troubleshooting ..........................................35
Indicator information .............................39
GB
5
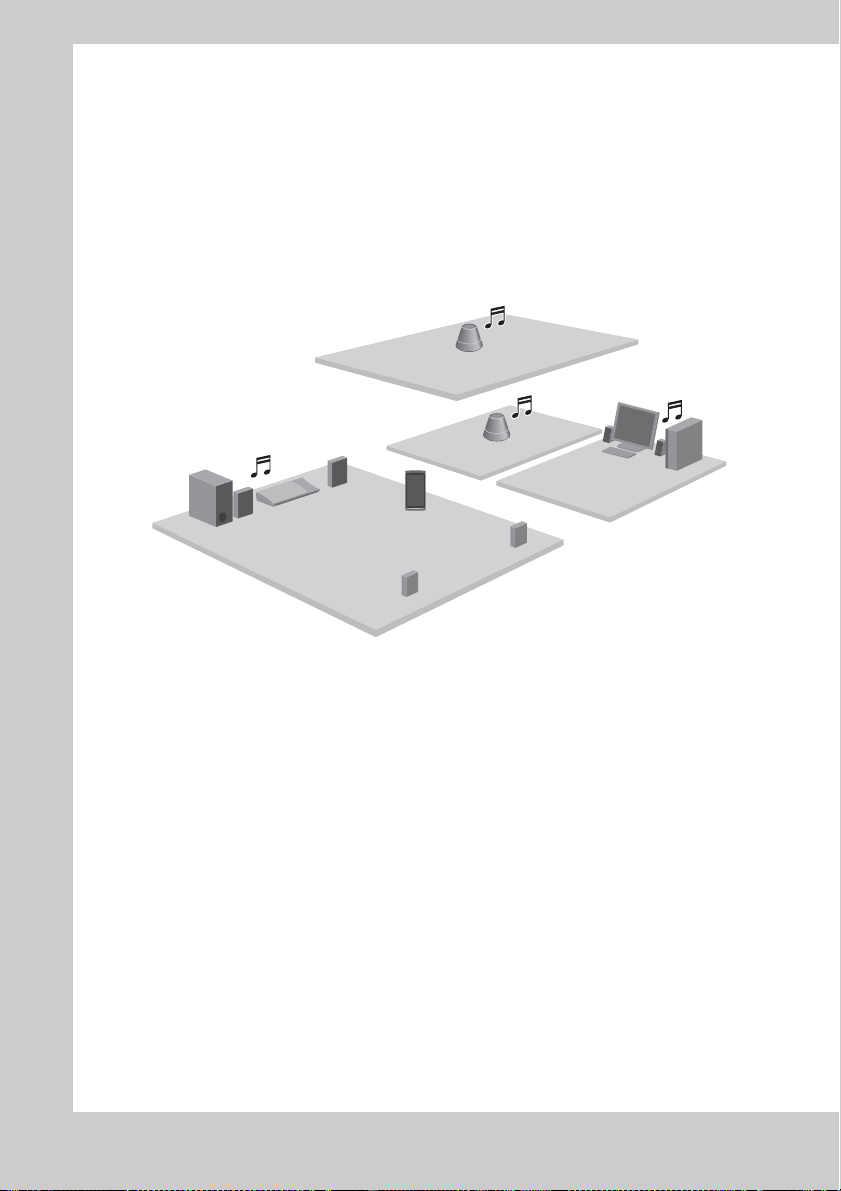
Features of this unit
You can enjoy music from anywhere in your home by connecting this DLNA (Digital Living
Network Alliance)-compliant unit to a network. For example, you can play back audio content
stored on the computer in the bedroom, using this unit in the living room (page 20).
PARTY STREAMING
PARTY STREAMING allows you to play back the same audio content with other devices
having to the PARTY STREAMING function at the same time (page 24).
AirPlay
You can play audio from on iPhone, iPod touch or iPad, and a Mac or PC with iTunes. You can
also control audio content from anywhere in your home (page 26).
Music Service
You can enjoy the Music Service on the Internet.
It will be supported by an update service.
We announce the time of update service at the following website:
http://www.esupport.sony.com/
Analog input supported
You can use this unit as a general active speaker without connecting to a network.
GB
6
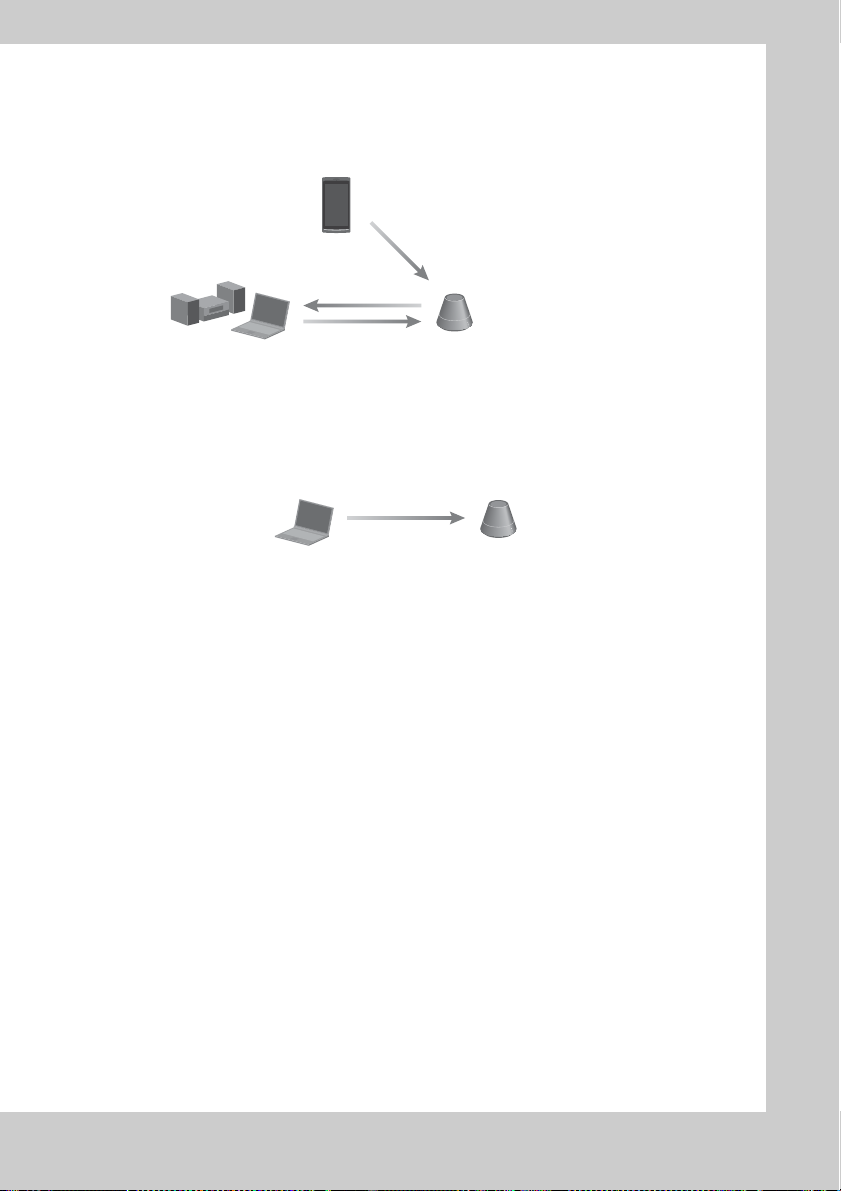
Listening to the music from a server
You need a DLNA-compliant digital media controller to find your favorite music content on
your server (computer, etc.), and send them to play on this unit. For details, see page 20.
Access
Deliver
*
Control
* Sony provides the controller
application "Network Audio
Remote" for free.
For details, refer to the following
URL:
http://www.esupport.sony.com/
DLNA controller
Server Network controlled player (this unit)
You can enjoy audio content using only this unit and a computer by using the computer as both
server and controller. Windows 7 has to be installed on your computer to use this function. For
details, see page 20.
Deliver
DLNA controller/Server
(Windows 7-based computer)
Network controlled player (this unit)
Setting up your home network
Refer to the following pages according to your network environment.
Wireless networks
. Set up your network using the supplied CD-ROM. Refer to the leaflet “Read
this first (Quick Setup Guide)” for details. When you set up your network
manually, see page 14.
WPS* compliant wireless networks
. Page 14
Wired networks
. Page 19
* WPS is a standard for easy and secure establishment of a wireless home network. Many
new wireless LAN router/access point come with this feature.
GB
7

Getting Started
Guide to Parts and Controls
Main unit
Front
For details on each indicator, see “Indicator information” (page 39).
A PARTY STREAMING indicator
Indicates the PARTY STREAMING status
(page 24).
Green: The unit is having a PARTY as
PARTY host.
Amber: The unit has joined a PARTY as
PARTY guest.
Red: An error has occurred.
B PARTY button
Press to use the PARTY STREAMING
function (page 24).
Tip
This button also receives signals from a remote
control.
Operate the remote control aiming at this point.
The remote signal reception of this unit may not
work correctly when the surface of this button is
dirty.
GB
8
C Illumination indicator
Indicates the playback status of audio
content.
Blue (lit): The unit has stopped playing
back audio content.
White (lit): The unit is in playback mode.
White (flashing): The unit is in preparation
for playback.
An error has occurred in the playback if it
is flashing quickly.
Note
This indicator flashes during start up. It
may take for a while.
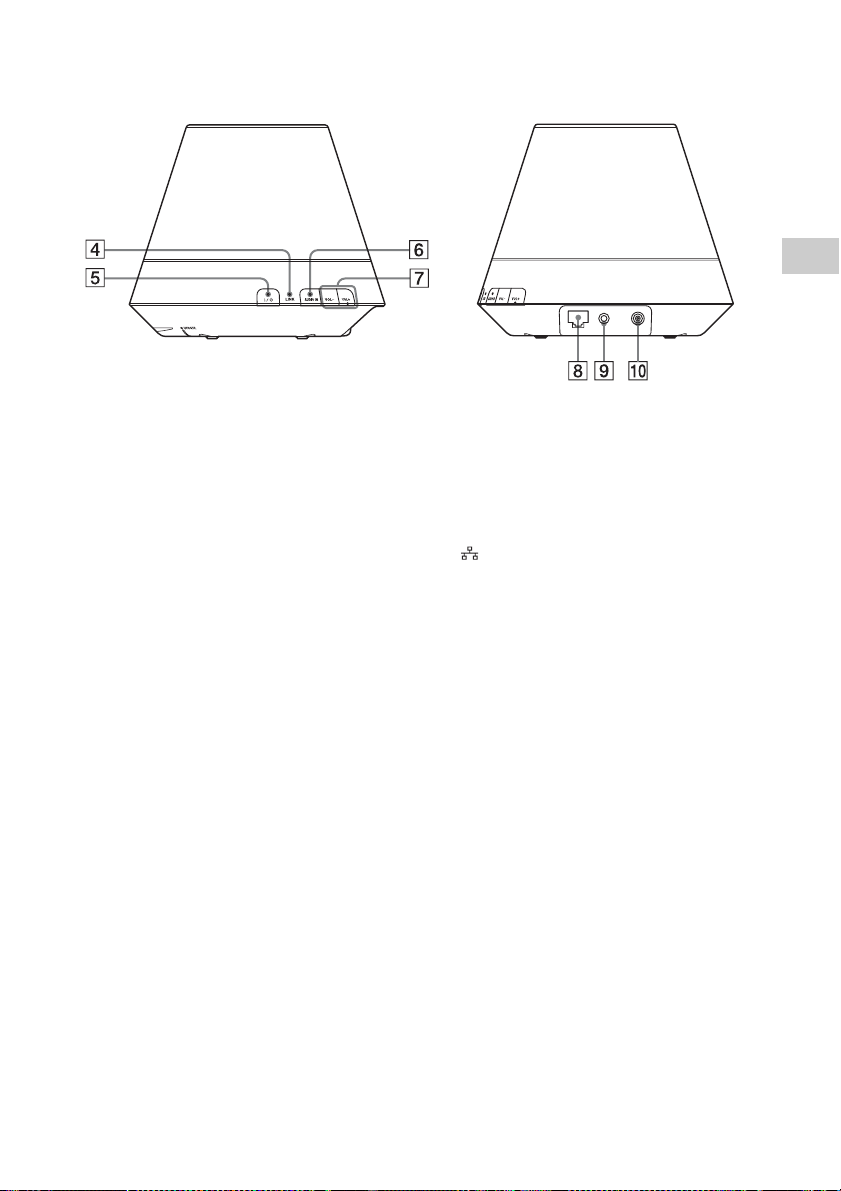
Side
For details on each indicator, see “Indicator information” (page 39).
Getting Started
D LINK indicator
Indicates the connection status of the
wired/wireless LAN.
Green: Wireless connection (page 14).
Amber: Wired connection (page 19).
Red: The following status have occurred.
– This unit cannot find the wireless
LAN access point.
– The security method/password
selected for the access point is wrong.
– An error has occurred.
Not lit: The wireless network setting
process is not finished.
E ?/1 (ON/Standby) button, indicator
Press to switch between power on and the
standby mode currently selected (page 13).
Indicates the power status of the unit
(page 13).
Green: The unit is turned on.
Amber: The unit is in the network standby
mode.
Red: The unit is in the standby mode.
F AUDIO IN button, indicator
1)
Press to switch the audio input on or off.
Lights in green when the audio input is on.
G VOL +
2)
/– buttons
Use to adjust the volume. The illumination
indicator flashes rapidly when the volume
level is set to either minimum or
maximum.
H (LAN) port
Use to connect the network (LAN) cable
(not supplied).
I AUDIO IN terminal
Use to connect the audio output jack of an
external component.
J DC IN terminal
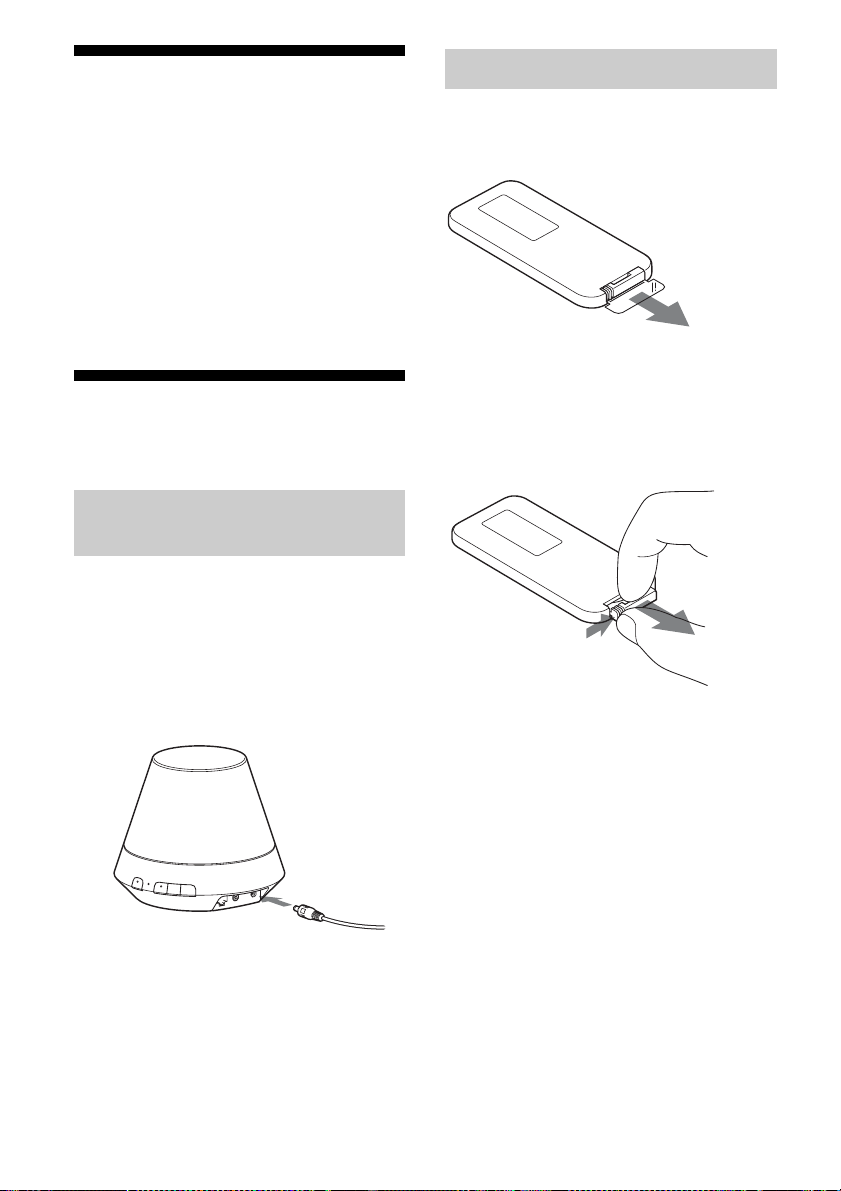
Use to connect the supplied AC adaptor
(page 12).
Rated output voltage of an AC adaptor: DC
13 V, 2 A
Note
The supplied AC adaptor and AC power cord
are exclusive for this unit. Do not use an AC
adaptor not supplied with this unit.
1)
Home network/AirPlay Service is selected
automatically when the AUDIO IN indicator is
off.
2)
The VOL+ button has a tactile dot. Use it as a
reference point for operations.
GB
9

Bottom
For details on each indicator, see “Indicator information” (page 39).
K NETWORK STANDBY / STANDBY
switch
Switch between the network standby mode
and the standby mode (page 13).
L WPS button
Use to make the network settings for the
WPS push button configuration (page 14).
M UPDATE button, indicator
Press to start updating the software of the
unit (page 28).
Indicates the update status of the unit.
Green (lit): The unit can be updated.
Green (flashing): The unit is updating.
Red (flashing): An error has occurred.
Not lit: The unit does not need updating.
N ALL RESET button
Press and hold for more than three seconds
to reset the unit to its factory default
settings when the unit is turned on.
Use a thin object, such as a small pin.
The previously registered settings or
information will be reset.
Note
Network settings are also reset when you
press ALL RESET button.
GB
10
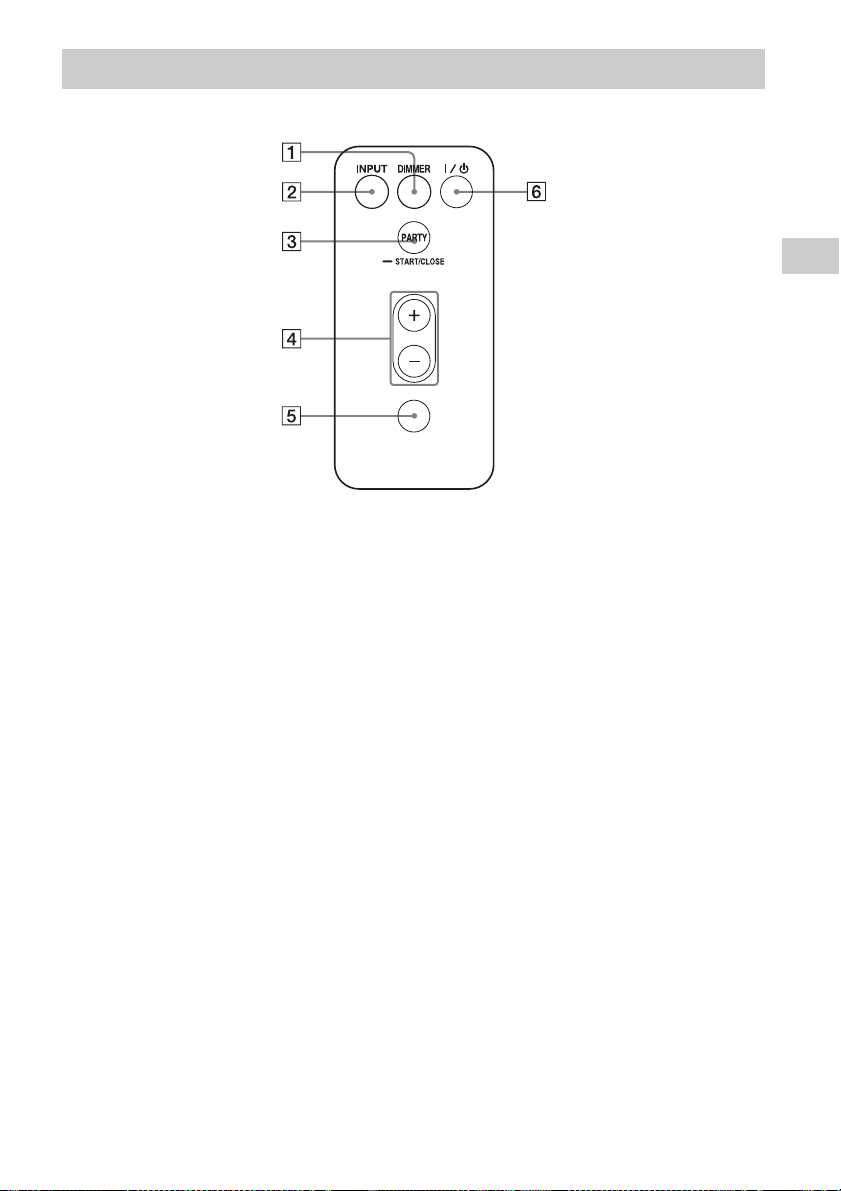
Remote control
A DIMMER button
Press to change the brightness of the
illumination indicator (normal/dark).
B INPUT button
Press to switch the audio input on or off.
C PARTY button
Press to use the PARTY STREAMING
function (page 24).
D VOLUME +/– buttons
Press to adjust the volume.
E MUTING button
Press to turn the sound off temporarily.
The illumination indicator blinks in blue
during muting.
VOLUME
MUTING
Getting Started
F ?/1 (ON/Standby) button
Press to switch between power on and the
standby mode currently selected (page 13).
11
GB
Checking the Supplied Accessories
Remote control (1)
AC adaptor (1)
AC power cord (1)
CD-ROM (“Network Speaker Wi-Fi Utility”)
(1)
Operating Instructions (this manual)
Read this first (Quick Setup Guide) (Leaflet)
Preparing the Unit and the Remote Control
Connecting to an AC power source
Connect the AC power cord to
1
the AC adaptor.
2 Plug the connector of the AC
adaptor into the DC IN terminal
on the unit.
Preparing the remote control
The supplied lithium battery (CR2025) has
already been inserted into the remote control.
Pull out the protective sheet before use.
Replacing the battery of the
remote control
If the remote control stops working, replace
the battery (CR2025) with a new one.
1 Pull out the battery holder.
2 Remove the old battery from the battery
holder and then insert a new battery.
3 Reinsert the battery holder into the remote
control.
3 Plug the AC power cord to a
wall outlet (the mains).
GB
12
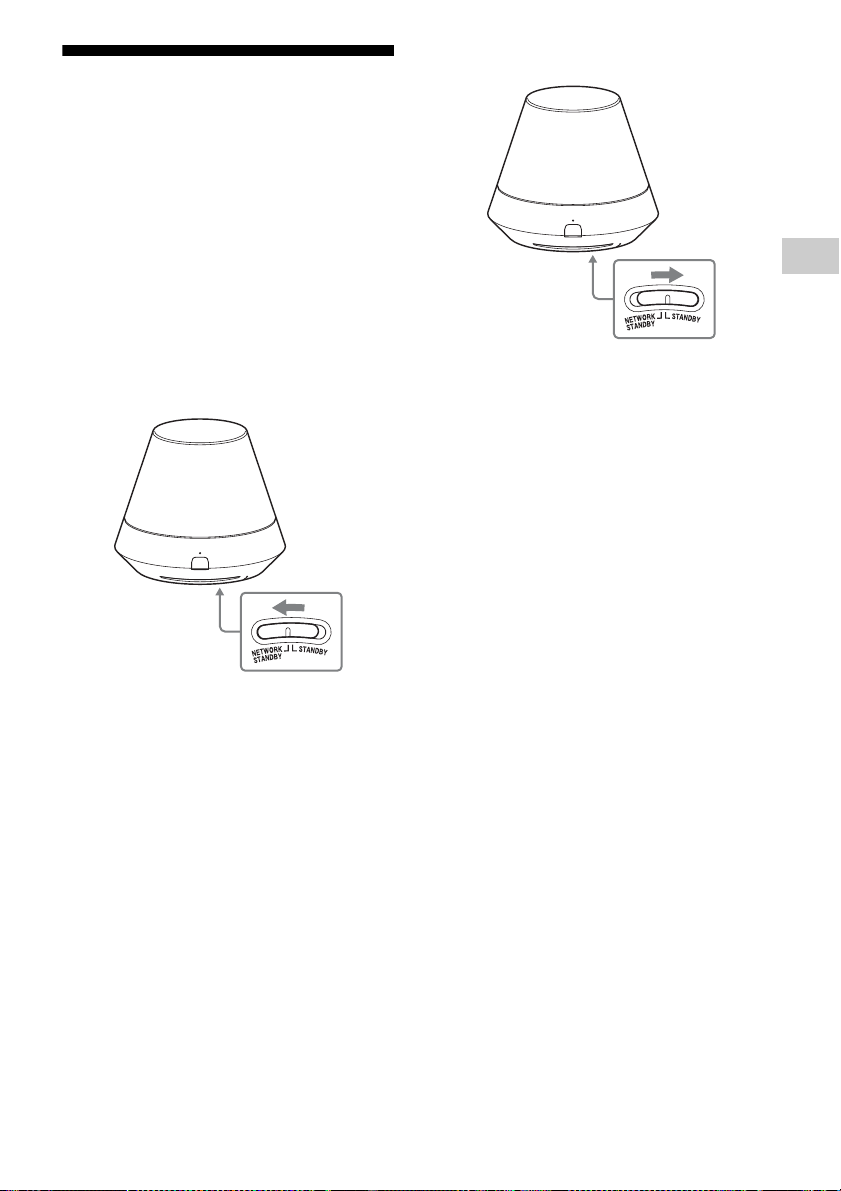
Turning the Unit On
Connect the unit to an AC power
source with the AC adaptor and the
AC power cord
The ?/1 (ON/Standby) indicator flashes in
green and the illumination indicator lights.
You can operate this unit when the ?/1 (ON/
Standby) indicator lights in green and the
illumination indicator lights. It may take a
while.
To set the standby mode
Getting Started
To set the network standby
mode
1 Set the NETWORK STANDBY/
STANDBY switch to NETWORK
STANDBY.
2 Press the ?/1 (ON/Standby) button.
The ?/1 (ON/Standby) indicator lights up in
amber.
Note
Keep this unit in the network standby mode so it can
be controlled from a controller on the network even
when you are not currently operating this unit.
Tips
• The NETWORK STANDBY/STANDBY switch
is set to STANDBY in the factory default settings.
• The unit can be controlled from the controller on
your network, etc., when the unit is in the network
standby mode. The unit turns on automatically
when the controller delivers audio content to this
unit.
1 Set the NETWORK STANDBY/
STANDBY switch to STANDBY.
2 Press the ?/1 (ON/Standby) button.
The ?/1 (ON/Standby) indicator lights up in
red.
Note
You cannot operate this unit via a home network
when the unit is in the standby mode. Set the unit to
the network standby mode when you want to operate
the unit via a home network.
To resume power from the
network standby mode or the
standby mode
Press the ?/1 (ON/Standby) button.
The ?/1 (ON/Standby) indicator lights up in
green and the illumination indicator lights up.
To turn the unit off
Disconnect the AC power cord when you need
to turn the unit off, such as when you not use it
for a long time.
13
GB
Network Connections
How to Connect Your
Setting Up for a Wireless Network
Network
Set up the network after checking your
network environment. Refer to the following
descriptions.
Setting Up for a Wireless
Network
• Option 1: Method for using a supplied CDROM and Windows PC (page 14)
• Option 2: Method for using a WPS push
button at the access point supporting WPS
(page 14)
• Option 3-1: Manual setting method using an
Access Point Scan (for PC/Mac) (page 15)
• Option 3-2: Manual setting method using an
Access Point Scan (for Android device)
(page 17)
• Option 3-3: Manual setting method using an
Access Point Scan (for iPhone/iPad/iPod
touch) (page 18)
Setting Up for a Wired Network
• Option 4: DHCP method (page 19)
Tip
About connecting the fixed IP address and
setting of the proxy server, display the Setting
Screen on a browser and set these referring to
”Option 3-1:Manual setting method using an
Access Point Scan (for PC/Mac)” (page 15).
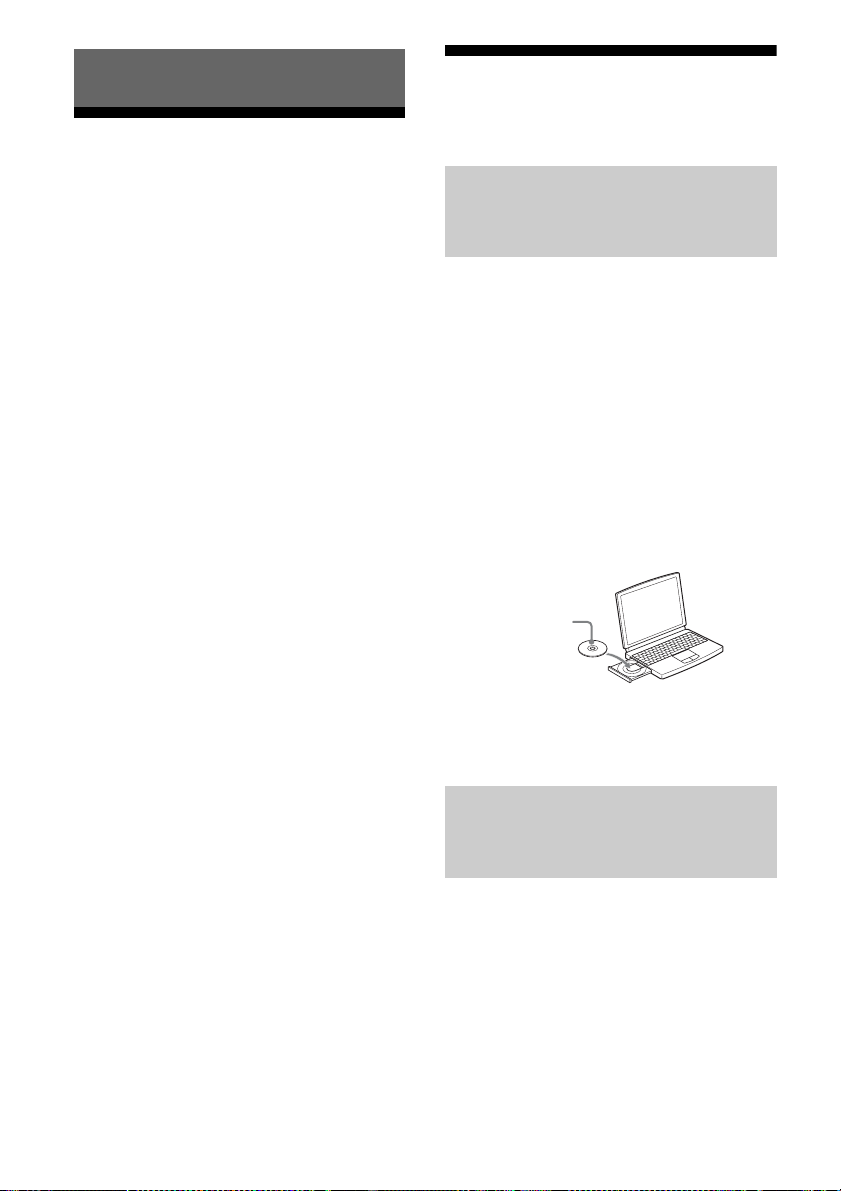
Option 1: Method for using a supplied CD-ROM and Windows PC
Note
Before operation, write down the SSID (Wireless
Network Name) and Security Key (WEP or WPA
key) of your wireless network.
1 Connect the AC adaptor to the
unit.
Check that the ?/1 (ON/Standby)
indicator changes from flashing in green
to lit in green.
2 Load the supplied CD-ROM into
the CD-ROM drive of your PC.
CD-ROM
3 Follow the instructions that
appear on the display.
Option 2: Method for using a WPS push button at the access point supporting WPS
When a problem occurs while
you are making the network
settings
Press ALL RESET button on the bottom of the
unit with a pointed object (such as a small pin)
(page 10).
GB
14
1 Check whether the network
(LAN) cable (not supplied) is
disconnected.
Disconnect the network (LAN) cable
while the AC power is disconnected if the
network (LAN) cable is connected.
 Loading...