

Sony SA-NA9ES Operating Instructions

Active Subwoofer System
Caisson de graves actif
4-289-035-11(2)
SA-NA9ES
Operating Instructions
Mode d’emploi
© 2012 Sony Corporation

English
WARNING
To reduce the risk of fire or electric shock, do not expose this apparatus to rain or
moisture.
To reduce the risk of fire or electric shock, do not expose this appliance to dripping
or splashing, and do not place objects filled with liquids, such as vases, on the
appliance.
To reduce the risk of fire, do not cover the ventilation opening of the appliance
with newspapers, tablecloths, curtains, etc.
Do not expose the appliance to naked flame sources (for example, lighted
candles).
As the main plug is used to disconnect the unit from the mains, connect the unit to
an easily accessible AC outlet. Should you notice an abnormality in the unit,
disconnect the main plug from the AC outlet immediately.
Do not install the appliance in a confined space, such as a bookcase or built-in
cabinet.
The unit is not disconnected from the mains as long as it is connected to the AC
outlet, even if the unit itself has been turned off.
For customers in the United States
Owner’s Record
The model and serial numbers are located on the rear of the unit. Record these
numbers in the space provided below. Refer to them whenever you call upon your
Sony dealer regarding this product.
Model No. Serial No.
This symbol is intended to alert the user to the presence of uninsulated
“dangerous voltage” within the product’s enclosure that may be of
sufficient magnitude to constitute a risk of electric shock to persons.
This symbol is intended to alert the user to the presence of important
operating and maintenance (servicing) instructions in the literature
accompanying the appliance.
Important Safety Instructions
1) Read these instructions.
2) Keep these instructions.
3) Heed all warnings.
4) Follow all instructions.
5) Do not use this apparatus near water.
6) Clean only with dry cloth.
7) Do not block any ventilation openings. Install in accordance with the
manufacturer’s instructions.
8) Do not install near any heat sources such as radiators, heat registers, stoves, or
other apparatus (including amplifiers) that produce heat.
9) Do not defeat the safety purpose of the polarized or grounding-type plug. A
polarized plug has two blades with one wider than the other. A grounding type
plug has two blades and a third grounding prong. The wide blade or the third
prong are provided for your safety. If the provided plug does not fit into your
outlet, consult an electrician for replacement of the obsolete outlet.
10) Protect the power cord from being walked on or pinched particularly at plugs,
convenience receptacles, and the point where they exit from the apparatus.
11) Only use attachments/accessories specified by the manufacturer.
12) Use only with the cart, stand, tripod, bracket, or table specified by the
manufacturer, or sold with the apparatus. When a cart is used, use caution when
moving the cart/apparatus combination to avoid injury from tip-over.
NOTE:
This equipment has been tested and found to comply with the limits for a Class B
digital device, pursuant to Part 15 of the FCC Rules. These limits are designed to
provide reasonable protection against harmful interference in a residential
installation. This equipment generates, uses and can radiate radio frequency
energy and, if not installed and used in accordance with the instructions, may
cause harmful interference to radio communications. However, there is no
guarantee that interference will not occur in a particular installation. If this
equipment does cause harmful interference to radio or television reception, which
can be determined by turning the equipment off and on, the user is encouraged
to try to correct the interference by one or more of the following measures:
-Reorient or relocate the receiving antenna.
-Increase the separation between the equipment and receiver.
-Connect the equipment into an outlet on a circuit different from that to which the
receiver is connected.
-Consult the dealer or an experienced radio/TV technician for help.
Properly shielded and grounded cables and connectors must be used for
connection to host computers and / or peripherals in order to meet FCC emission
limits.
CAUTION
You are cautioned that any changes or modifications not expressly approved in
this manual could void your authority to operate this equipment.
For customers in Canada
Properly shielded and grounded cables and connectors must be used for
connection to host computers and / or peripherals.
For customers in Europe
Notice for customers: the following information is only applicable to equipment
sold in countries applying EU directives.
This product has been manufactured by or on behalf of Sony Corporation, 1-7-1 Konan
Minato-ku Tokyo, 108-0075 Japan. Inquiries related to product compliance based on
European Union legislation shall be addressed to the authorized representative, Sony
Deutschland GmbH, Hedelfinger Strasse 61, 70327 Stuttgart, Germany. For any service or
guarantee matters, please refer to the addresses provided in the separate service or
guarantee documents.
Warning
The AC power cord is not intended to be used in Switzerland and Liechtenstein.
For customers in Europe and Australia
Disposal of Old Electrical & Electronic Equipment (Applicable in the
European Union and other European countries with separate
collection systems)
This symbol on the product or on its packaging indicates that this product
shall not be treated as household waste. Instead it shall be handed over to the
applicable collection point for the recycling of electrical and electronic
equipment. By ensuring this product is disposed of correctly, you will help
prevent potential negative consequences for the environment and human health, which
could otherwise be caused by inappropriate waste handling of this product. The recycling
of materials will help to conserve natural resources. For more detailed information about
recycling of this product, please contact your local Civic Office, your household waste
disposal service or the shop where you purchased the product.
13) Unplug this apparatus during lightning storms or when unused for long
periods of time.
14) Refer all servicing to qualified service personnel. Servicing is required when
the apparatus has been damaged in any way, such as power-supply cord or plug is
damaged, liquid has been spilled or objects have fallen into the apparatus, the
apparatus has been exposed to rain or moisture, does not operate normally, or
has been dropped.
The following FCC statement applies only to the version of this model
manufactured for sale in the U.S.A. Other versions may not comply with FCC
technical regulations.
GB
1
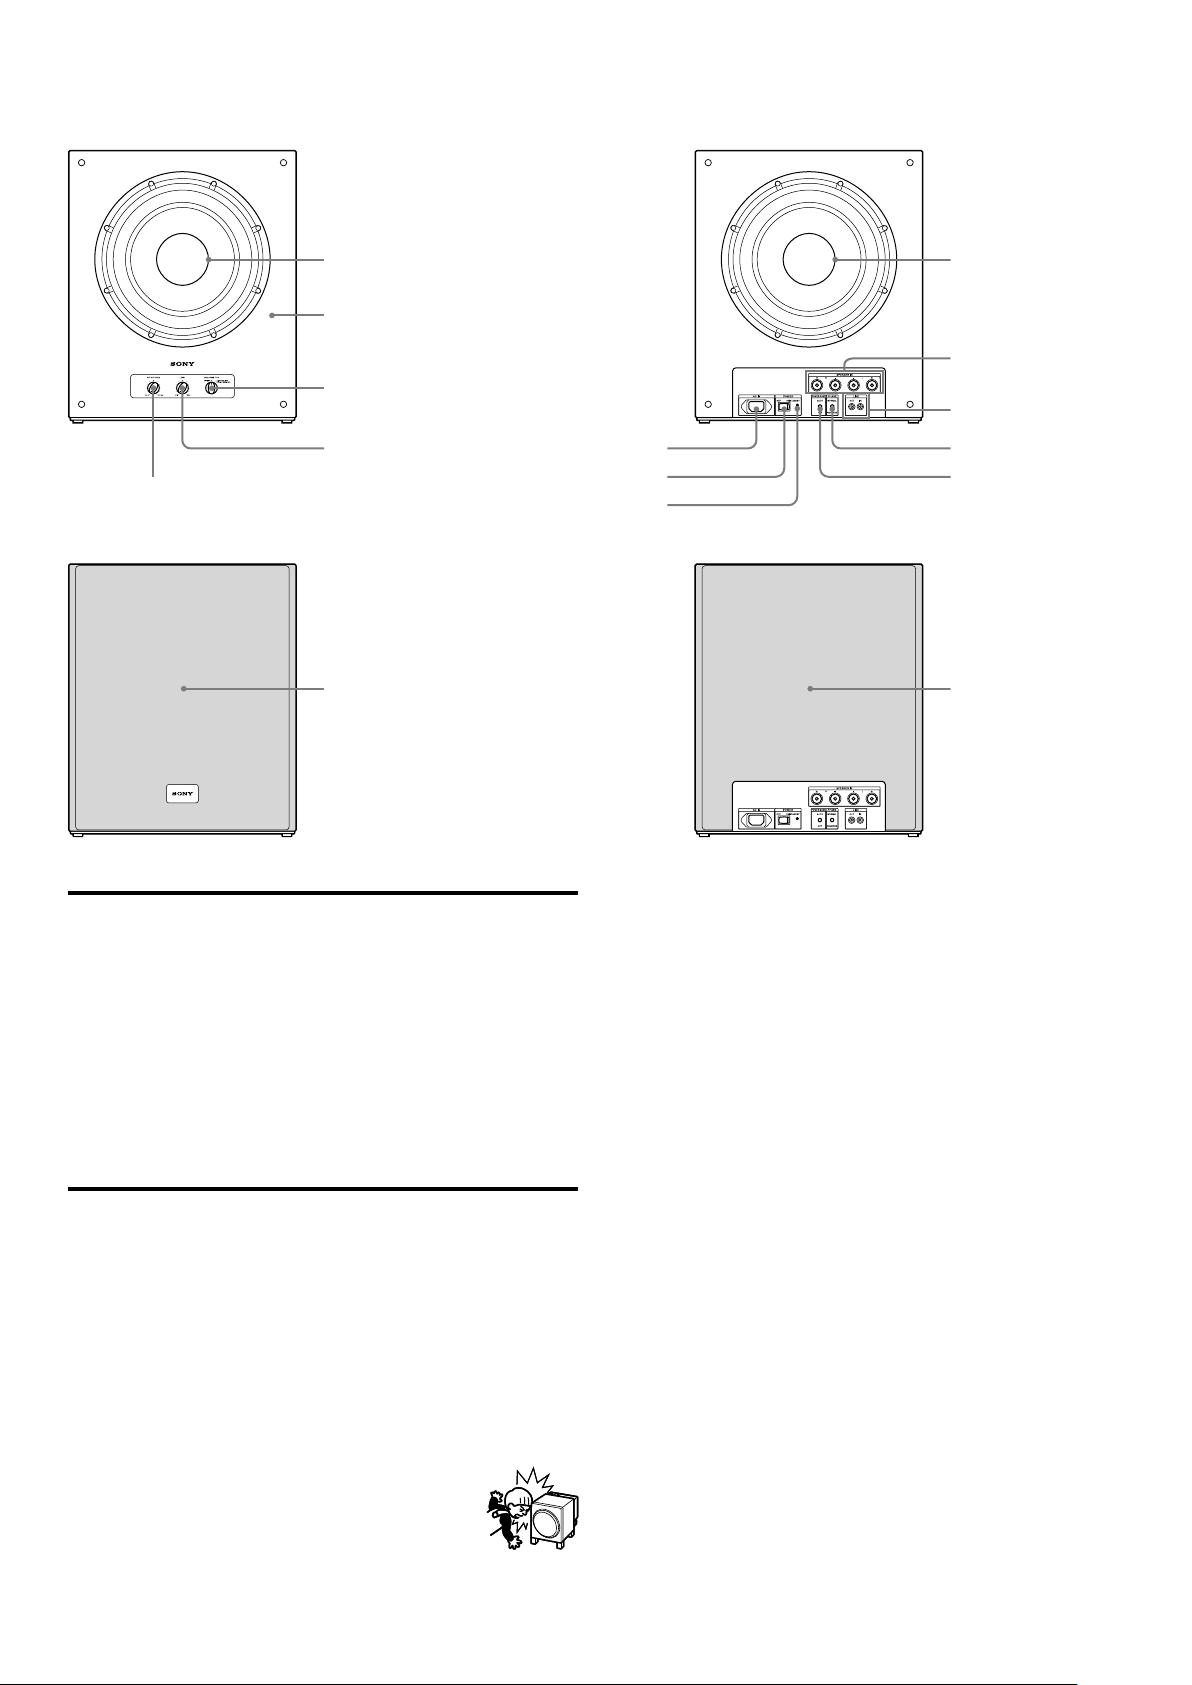
Index to speaker parts
Front
Rear
CUT OFF FREQ
With the grille frame attached*
Front
Front woofer unit
Enclosure
ENCLOSURE TYPE
LEVEL
1
Front grille frame
AC INLET
POWER
POWER indicator
Rear woofer unit
SPEAKER IN terminals
LINE OUT/IN jacks
PHASE
POWER SAVE
Rear
Rear grille frame
Index to speaker parts
Note on usage
Do not touch the diaphragm of either woofer unit.
The color and appearance (grain patterns) may vary among the enclosures because
natural wood is used. Depending on lighting conditions, the enclosures may look
different, but this does not indicate damage.
*1 Before attaching the grille frame, confirm its correct mounting orientation. When
attaching, press above the pin to firmly secure it. If the grille frame is protruding
outward (it will not come off), push it all the way in. Attaching the grille frames is
recommended even when not using the speakers in order to protect them from damage.
The speakers can be enjoyed with the grille frames attached, but superior performance
can be achieved by removing the grille frames. When removing the grille frame, take
care not to bend or distort its shape excessively.
Setting the speakers
Since the human ear cannot detect the direction and position where the bass sound being
reproduced by a subwoofer (below 200 Hz) comes from, you can install the subwoofer
wherever you like in your room. To obtain better bass reproduction, install the subwoofer
on a solid floor where resonance will not occur.
You can obtain sufficient heavy bass reproduction from a single subwoofer. However, using
multiple subwoofers will yield more effective bass reproduction.
Notes
Install the subwoofer vertically, 30 cm (12 in) away from walls.
Do not place any object on the subwoofer or sit on it.
Install the subwoofer near your front speaker.
For safety, install the subwoofer on a flat and firm floor.
If the subwoofer is installed in the center of a room, the bass may be extremely weakened.
Move the subwoofer away from the center of the room or install it near a bookshelf, etc.
Take care to avoid any possible injury on the corners of the subwoofer.
Do not place bound or folded cords which are connected to your TV/
other video devices behind the subwoofer. Video noise may occur.
Do not place the subwoofer in the following locations:
In places subject to high temperature or direct sunlight
In places subject to excessive dust and dirt
In places subject to high humidity
Near source components (CD players, record players, etc.)
Use caution when placing the subwoofer on a specially treated (waxed, oiled, polished,
etc.) floor, as staining or discoloration may result.
Near magnetic cards (credit cards, commuter passes, etc.)
Magnetic cards may fail due to the magnets in the woofer units.
Near televisions
The subwoofer is not magnetically shielded. Therefore, if you use the subwoofer near
CRT-based televisions, color shading occurs on the TV screen.
If color shading occurs, turn off the TV, then turn it on again after 15 or 30 minutes. If
the color shading persists, increase the distance between the subwoofer and TV.
GB
2

Connection using an audio connecting cord (not supplied)
This subwoofer
Amplifier
Signal flow
Audio connecting cord (not supplied)
Connection using speaker cords (not supplied)
This subwoofer
Amplifier
Binding post
Speaker cords (not supplied)
Selecting the amplifier
Excessive sound volume may damage the speakers, so be aware of the position of the
volume level knob on the amplifier and avoid excessive input.
Connecting to the amplifier
Use the LINE IN jacks or the SPEAKER IN terminals of the subwoofer when you connect
the amplifier.
If your amplifier has one of the following types of output jacks, connect the LINE IN jack
and the amplifier’s jack using the supplied audio connecting cord.
MONO OUT jack
MIX OUT jack
SUBWOOFER output jack(s)
SUPER WOOFER output jack(s)
If your amplifier does not have the above mentioned output jacks, connect the speaker
terminals of the amplifier to the SPEAKER IN terminals instead.
Before you get started
Turn off the power of the amplifier and the subwoofer before making any connection.
Use the audio connecting cords that are supplied to the respective equipment. If there are
not enough audio connecting cords to make the necessary connections, you need to
purchase some optional audio connecting cords.
Be sure to make connections firmly to avoid noise.
Connection using an audio connecting cord (not
supplied)
Connect the MONO OUT jack of your amplifier to the LINE IN jack of the subwoofer with
the audio connecting cord (not supplied).
Note
If the output level of your amplifier is not high enough, the sound may not be loud enough.
In this case, connect the speaker terminals of the amplifier directly to the SPEAKER IN
terminals of the subwoofer.
When using two or more subwoofers
This
subwoofer
Connection using speaker cords (not supplied)
Connect the SPEAKER IN R terminals to the right speaker terminals of the amplifier, and
connect the SPEAKER IN L terminals to the left speaker terminals of the amplifier.
Note
Tighten each binding post securely. Periodically checking the tightness of the binding posts
is recommended to prevent them from becoming loose as time passes.
When using two or more subwoofers
Install the subwoofers on both the left and right sides.
Connect the terminals of the right subwoofer and the front right speaker to the right
speaker terminals of the amplifier, and connect the terminals of the left subwoofer and the
front left speaker to the left speaker terminals of the amplifier.
Front right
speaker
Amplifier
: Signal flow
This subwoofer
(Right)
Amplifier
Another
subwoofer
This subwoofer
(Left)
Front left
speaker
Speaker cords (not supplied)
GB
3
 Loading...