

Page 1

Remote
Commander
Operating Instructions
3-858-330-11(1)
RM-SC200
11996 by Sony Corporation
Page 2
WARNING
This equipment has been tested and found
to comply with the limits for a Class B
digital device, pursuant to Part 15 of the
FCC Rules. These limits are designed to
provide reasonable protection against
harmful interference in a residential
installation. This equipment generates, uses,
and can radiate radio frequency energy and,
if not installed and used in accordance with
the instructions, may cause harmful
interference to radio communications.
However, there is no guarantee that
interference will not occur in a particular
installation. If this equipment does cause
harmful interference to radio or television
reception, which can be determined by
turning the equipment off and on, the user is
encouraged to try to correct the interference
by one or more of the following measures:
• Reorient or relocate the receiving antenna.
• Increase the separation between the
equipment and receiver.
• Connect the equipment into an outlet on a
circuit different from that to which the
receiver is connected.
• Consult the dealer or an experienced
radio/TV technician for help.
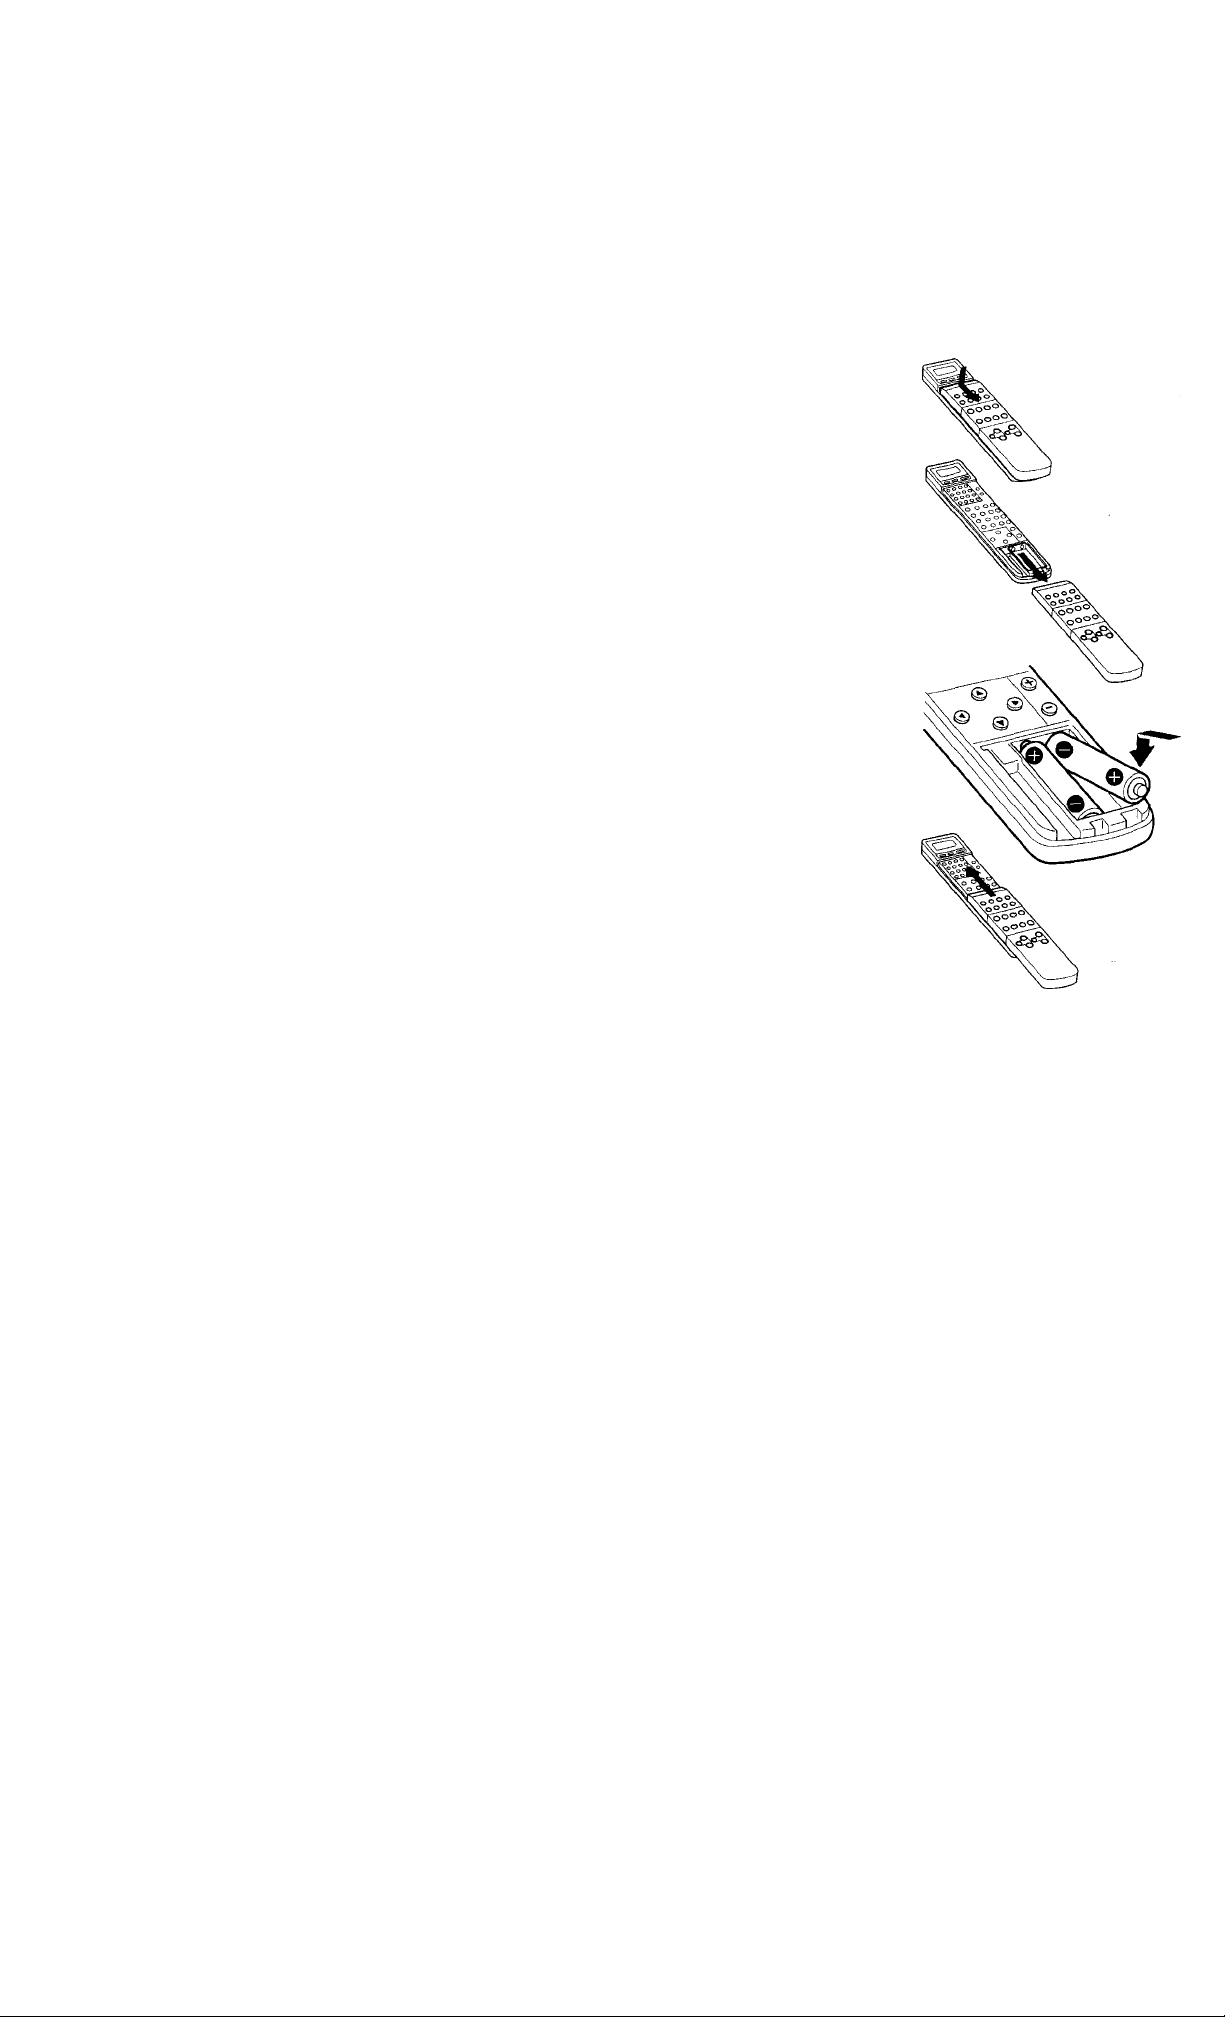
Installing the Batteries
Slide open the battery compartment and
install two size AA (R6) batteries matching
the O and
O on the battery compartment.
9 on the batteries with the O anc
You are cautioned that any changes or
modifications not expressly approved in this
manual could void your authority to operate
this equipment.
Page 3

Notes on the batteries
• Under normal conditions, batteries will
last up to three months. If the Remote
Commander does not operate properly,
the batteries might be worn out. When
replacing batteries, replace both of them
with new ones.
• Do not mix old batteries with new ones or
mix different types of batteries together.
• If you take a long time replacing the
batteries, or press any button during the
battery replacement, the setting may be
erased.
• If the electrolyte inside the battery should
leak, wipe the contaminated area of the
battery compartment with a cloth and
replace the old batteries with new ones.
To prevent the electrolyte from leaking,
remove the batteries when you plan to not
use the Commander for a long period of
time.
Page 4
About This Manual
This Remote Commander is designed -for
operating the Sony S-Link compatible
audio/video components.
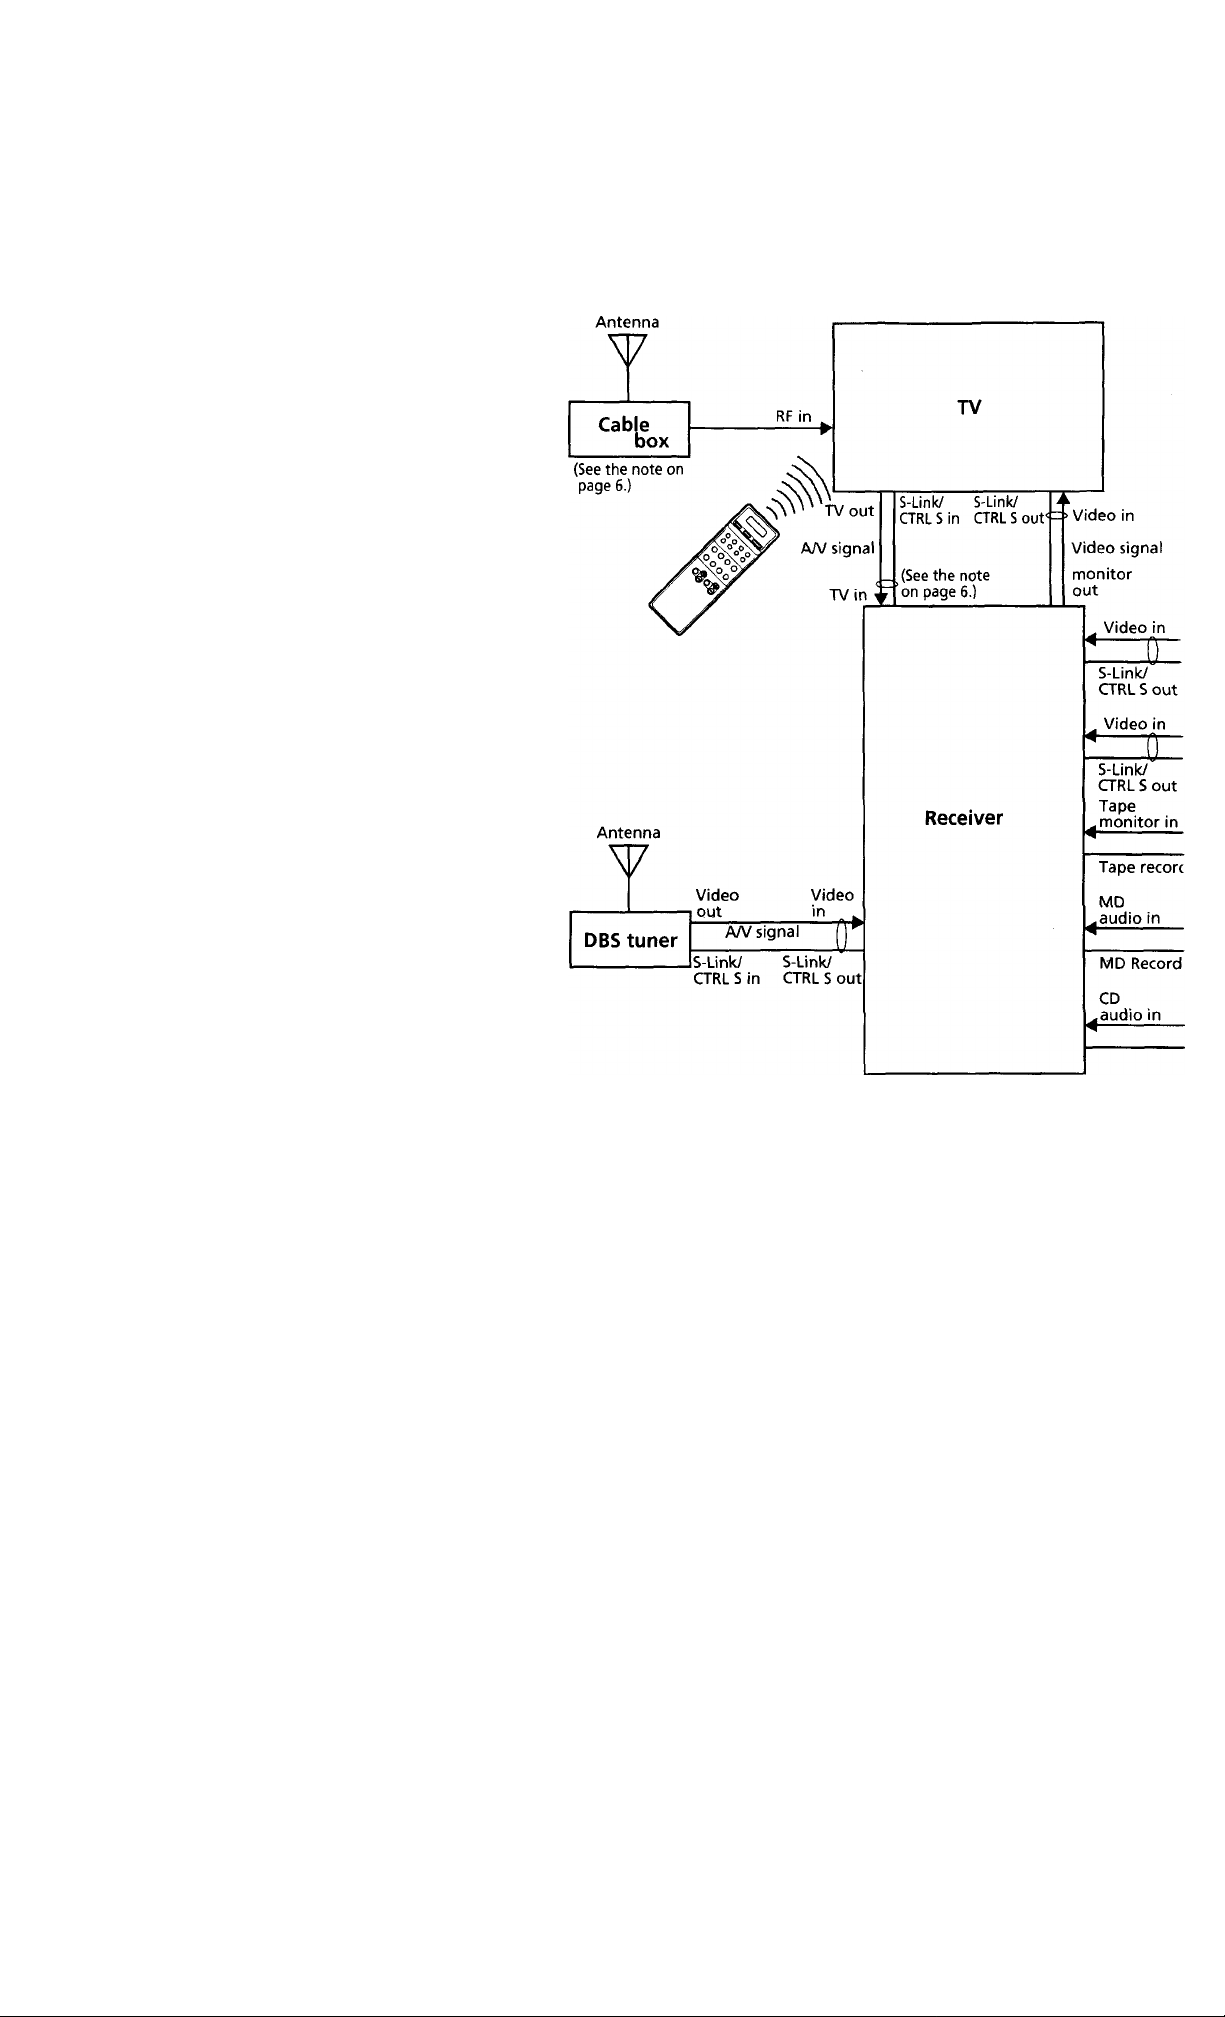
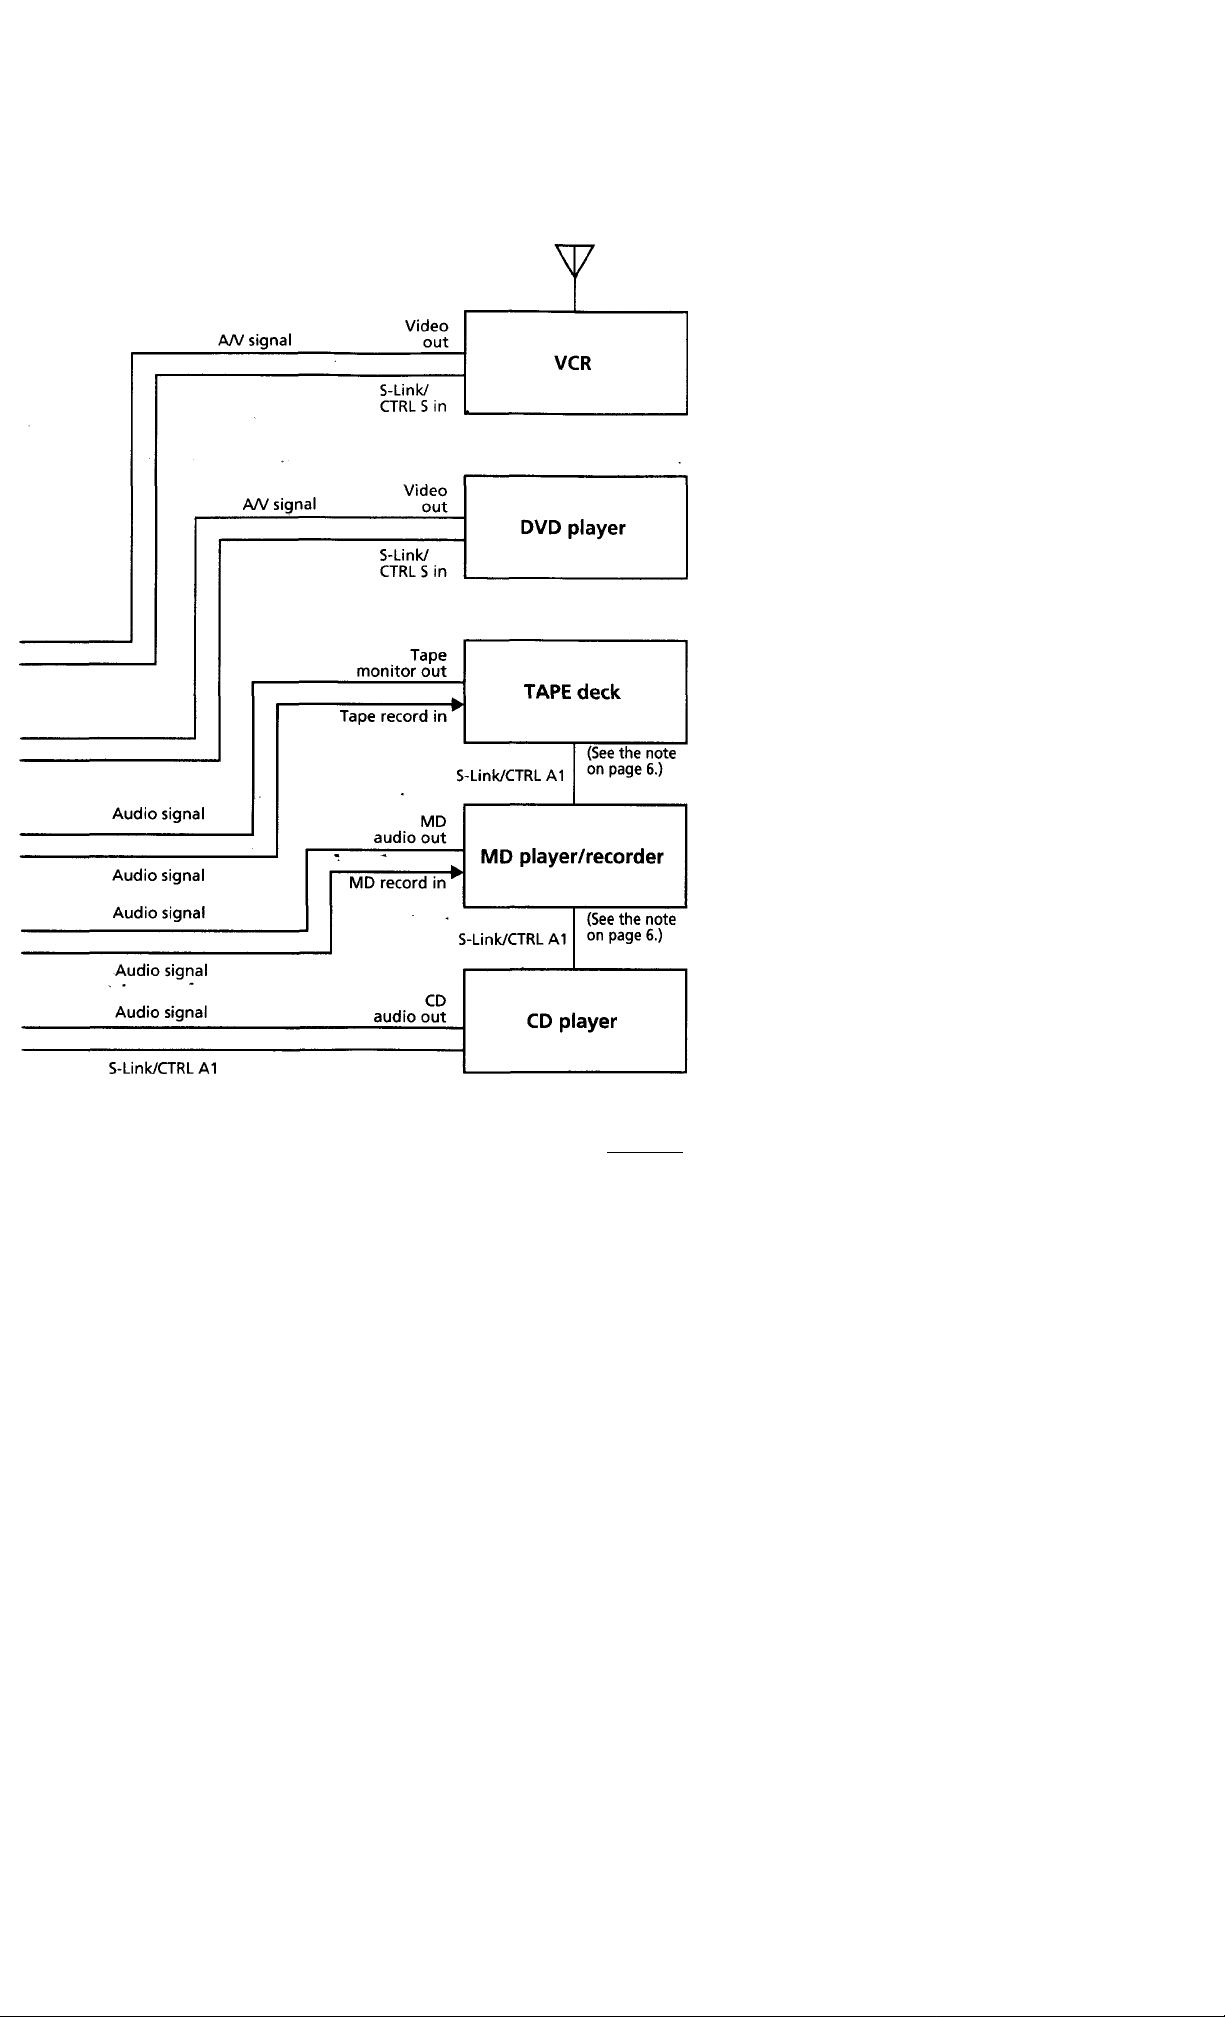
The recommended system connection diagram
This manual assumes that you connect thi
system as shown in the figure below.
Page 5
Antenna
(See the note
on page 6.)
Continued 5
Page 6
About This Manual
Notes
• When the audio/video components(VCR,
DVD player, and DBS tuner) are not
compatible with the S-Link system, switch
the input of the TV manually.
• Make sure to connect the audio
components to the receiver when the
components are not compatible with the SLink system.
• When the audio component (CD player,
MD player, or tape deck) has a
mechanical power switch, connect the
AC power cord of the audio component
to the switched AC outlet of the
receiver.
• Make sure that the power of the cable
box is always on.
• When the receiver is compatible with the
VisionTouch system, you do not have to
connect the S-Link/CTRL S in terminal of
the receiver to the TV.
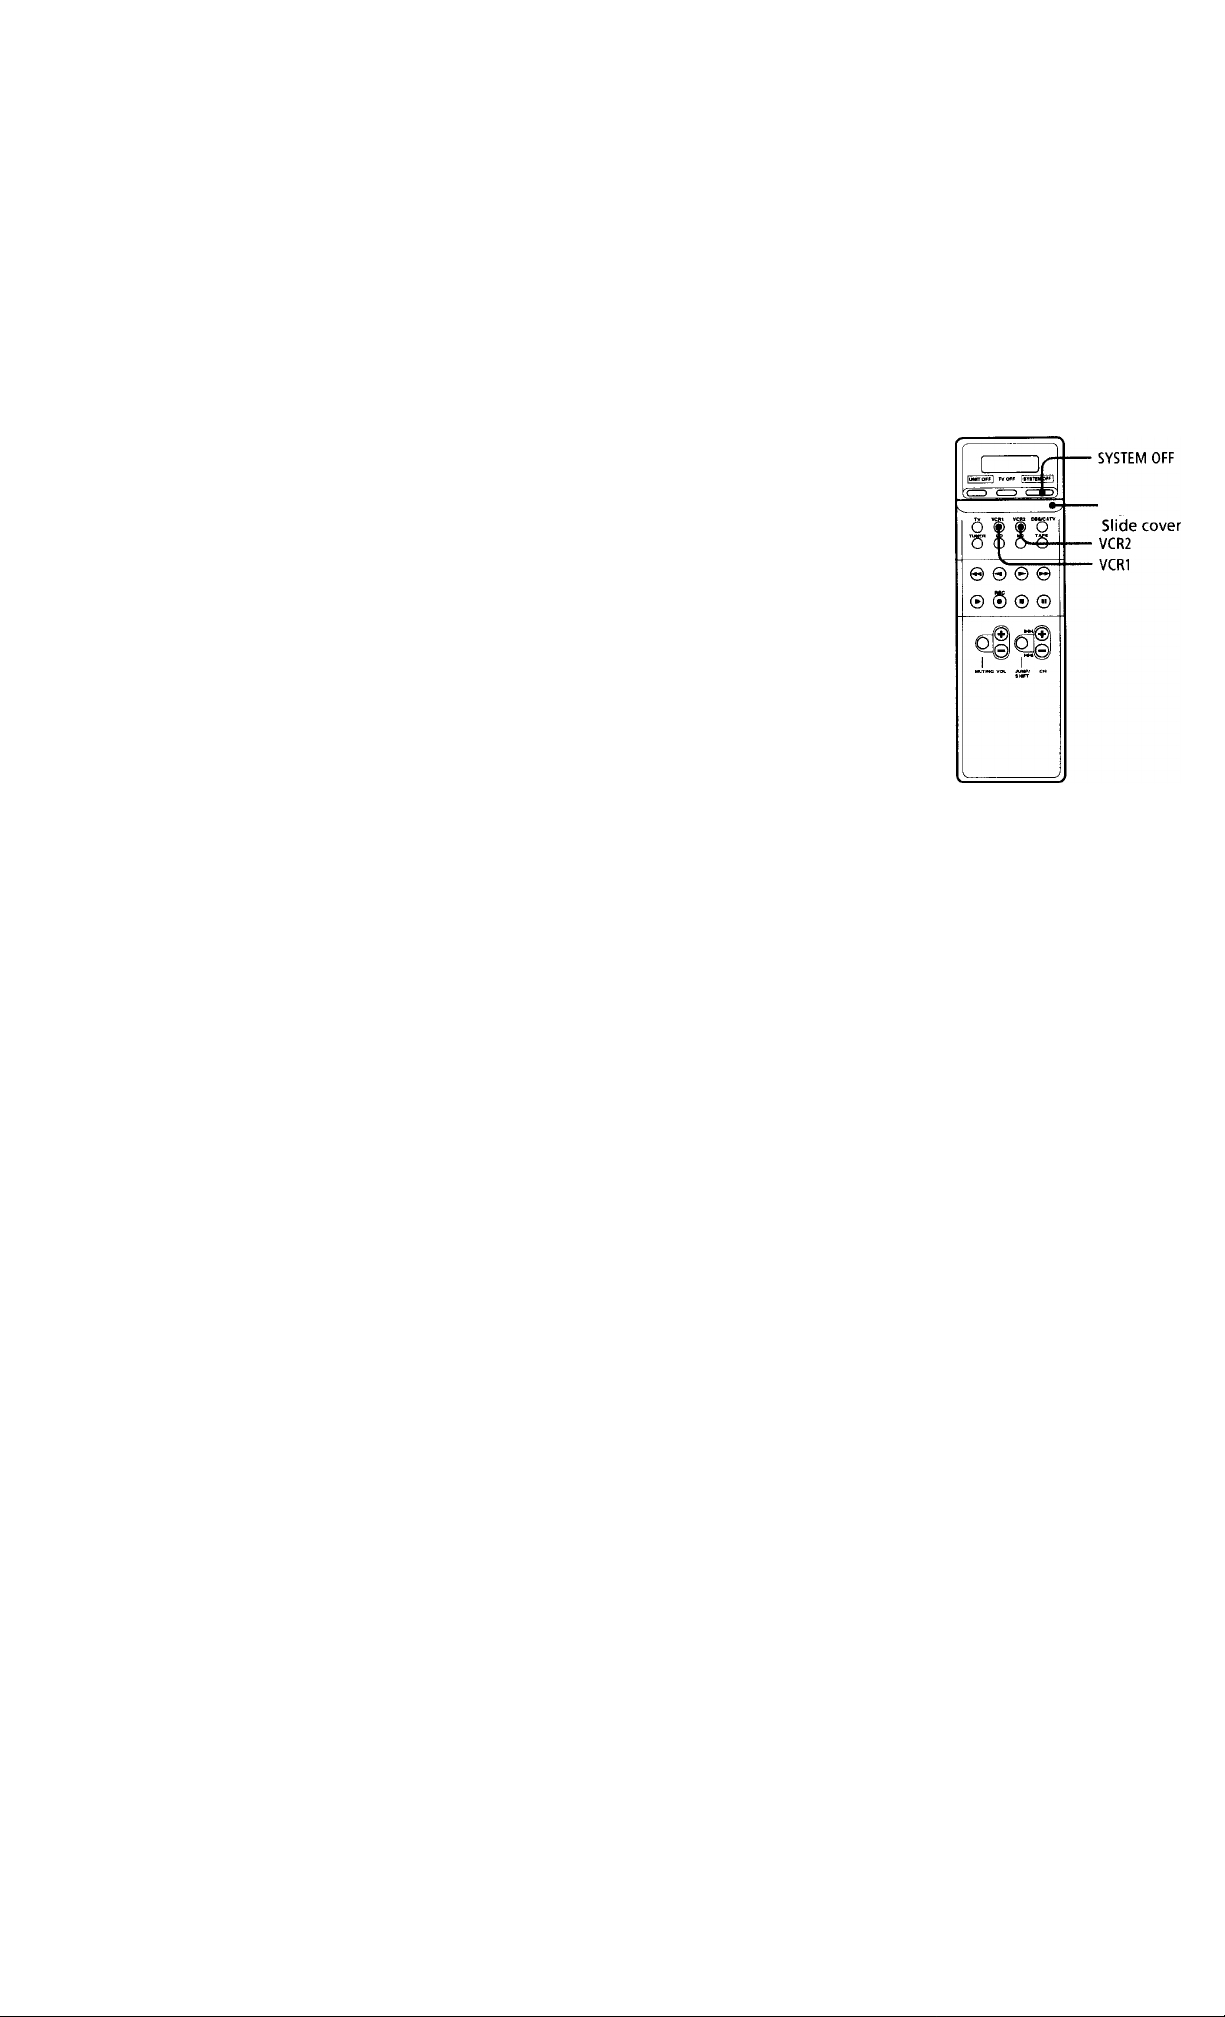
Setting up the
Commander
Before use, you need to set up the function
buttons (VCR 1, VCR 2, and DBS/CATV).
Setting up the VCR 1 and VCF 2 buttons
Assign the categories of your components t<
the VCR 1 and VCR 2 buttons.
1 Make sure that the slide cover is closed.
2 While pressing down the VCR 1 or VCR
2 button, press the SYSTEM OFF button
repeatedly.
Each time you press the SYSTEM OFF
button, the indication changes as follow
VTR 3 (for^VHS VCR)
VTR 2 (for 8mm VCR)
i
VTR 1 (for 1? VCR)
i
DVD (for Digital Video Disc player
Release the VCR 1 or VCR 2 button wht
the category you want to assign appear:
Page 7

Setting up the DBS/CATV button
Assign your component type to the DBS*/
CATV.
DBS: Digital Satellite System Tuner.
1 Make sure that the slide cover is closed.
2 While holding down the DBS/CATV
button, press the SYSTEM OFF button
repeatedly.
Each time you press the SYSTEM OFF
button, the indication changes between
"DBS" (for DBS tuner) and "CATV" (for
cable box).
3 Release the DBS/CATV button when the
component you want to assign appears.
Page 8
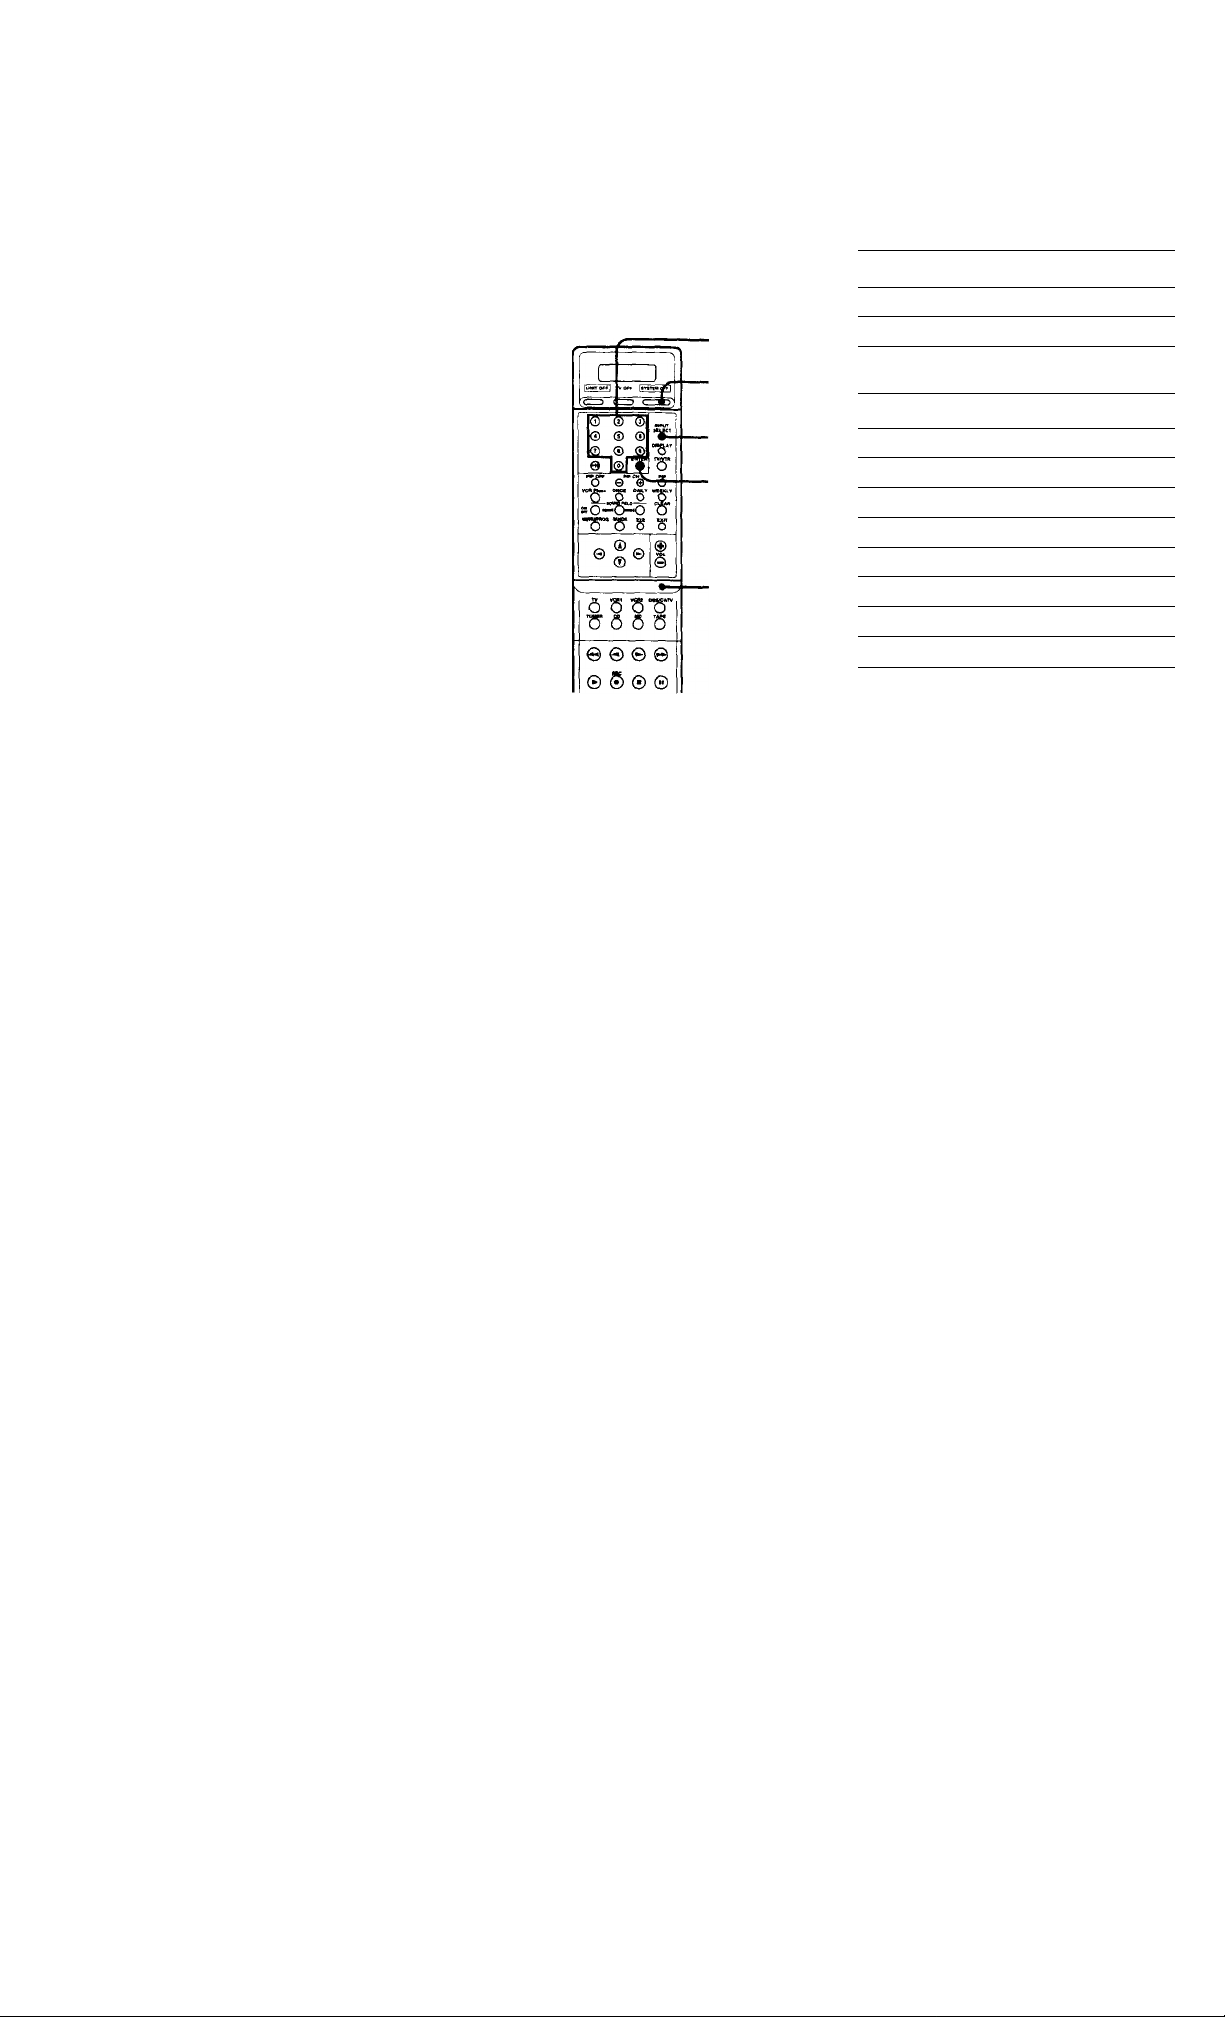
Setting the component code number
When you operate the DBS tuner or cable
box, you need to set the component code
number.
Numeric
buttons
SYSTEM OFF
INPUT SELECT
■ ENTER
Slide cover
Open the slide cover.
While pressing down the INPUT
SELECT button, press the SYSTEM OFF
button repeatedly.
Each time you press the SYSTEM OFF
button, the indication changes between
"DBS'' and "CATV."
Release the INPUT SELECT button when
the component you want appears.
See "Component Code Number", and
find the number in double figures for
your component.
If more than one code number is listed,
use the number that's listed first to
complete the steps that follow.
Enter the component's code number by
pressing the numeric buttons.
If you have made a mistake, enter the
number in double figures successively.
Press the ENTER button.
Component code number
DBS tuner codes
Brand
Sony 01
RCA
Cable box codes
Brand
Hamlin/Regai 22, 23,24,25,26
]errold/G.I. 01, 02, 03, 04, 05, 06, 07, 08, U
Oak 27, 28, 29
Panasonic
Pioneer
Scientific Atlanta
Tocom
Zenith 12,13
Code No.
02
Code No.
19, 20, 21
14,15
09,10,11
16,17
If the code listed above does not work, try
the code from 31 to 41. There may be the
code that works for your component.
Note
The setting mode will be canceled if you do
not press any of the buttons within 10
seconds during the mode setting procedure.
8
Page 9

Using the Commander
The Commander allows you to control most
of your components' functions.
The button functions at any time
Turning on the components
Press the function button for each
component.
Turning off the entire system
Press the SYSTEM OFF button.
Turning off the components
TV
Press the TV OFF button.
Other component
1 Press the UNIT OFF button.
The "UNIT" indication appears and
"OFF" appears.
2 Press the function button for each
component within five seconds.
Note
Hold down the UNIT OFF button and press
the desired function button; the respective
component will be on/off according to its
current on/off mode.
Note on VCR 1 and VCR 2 button
Press the VCR 1 or VCR 2 button. The
component turns on. When you press the ►,
or MENU/PROG button, the receiver input
switches to the component and the
component picture appears on the TV.
The function buttons except for the VCR 1
and VCR 2 button turn on each component
and switch the receiver input to the
components respectively.
When you turn on a cable box
When the power of the cable box is off, you
cannot power on the cable box with the
Commrmder, Make sure that the power of
the cable box is always on.
Continued
Page 10
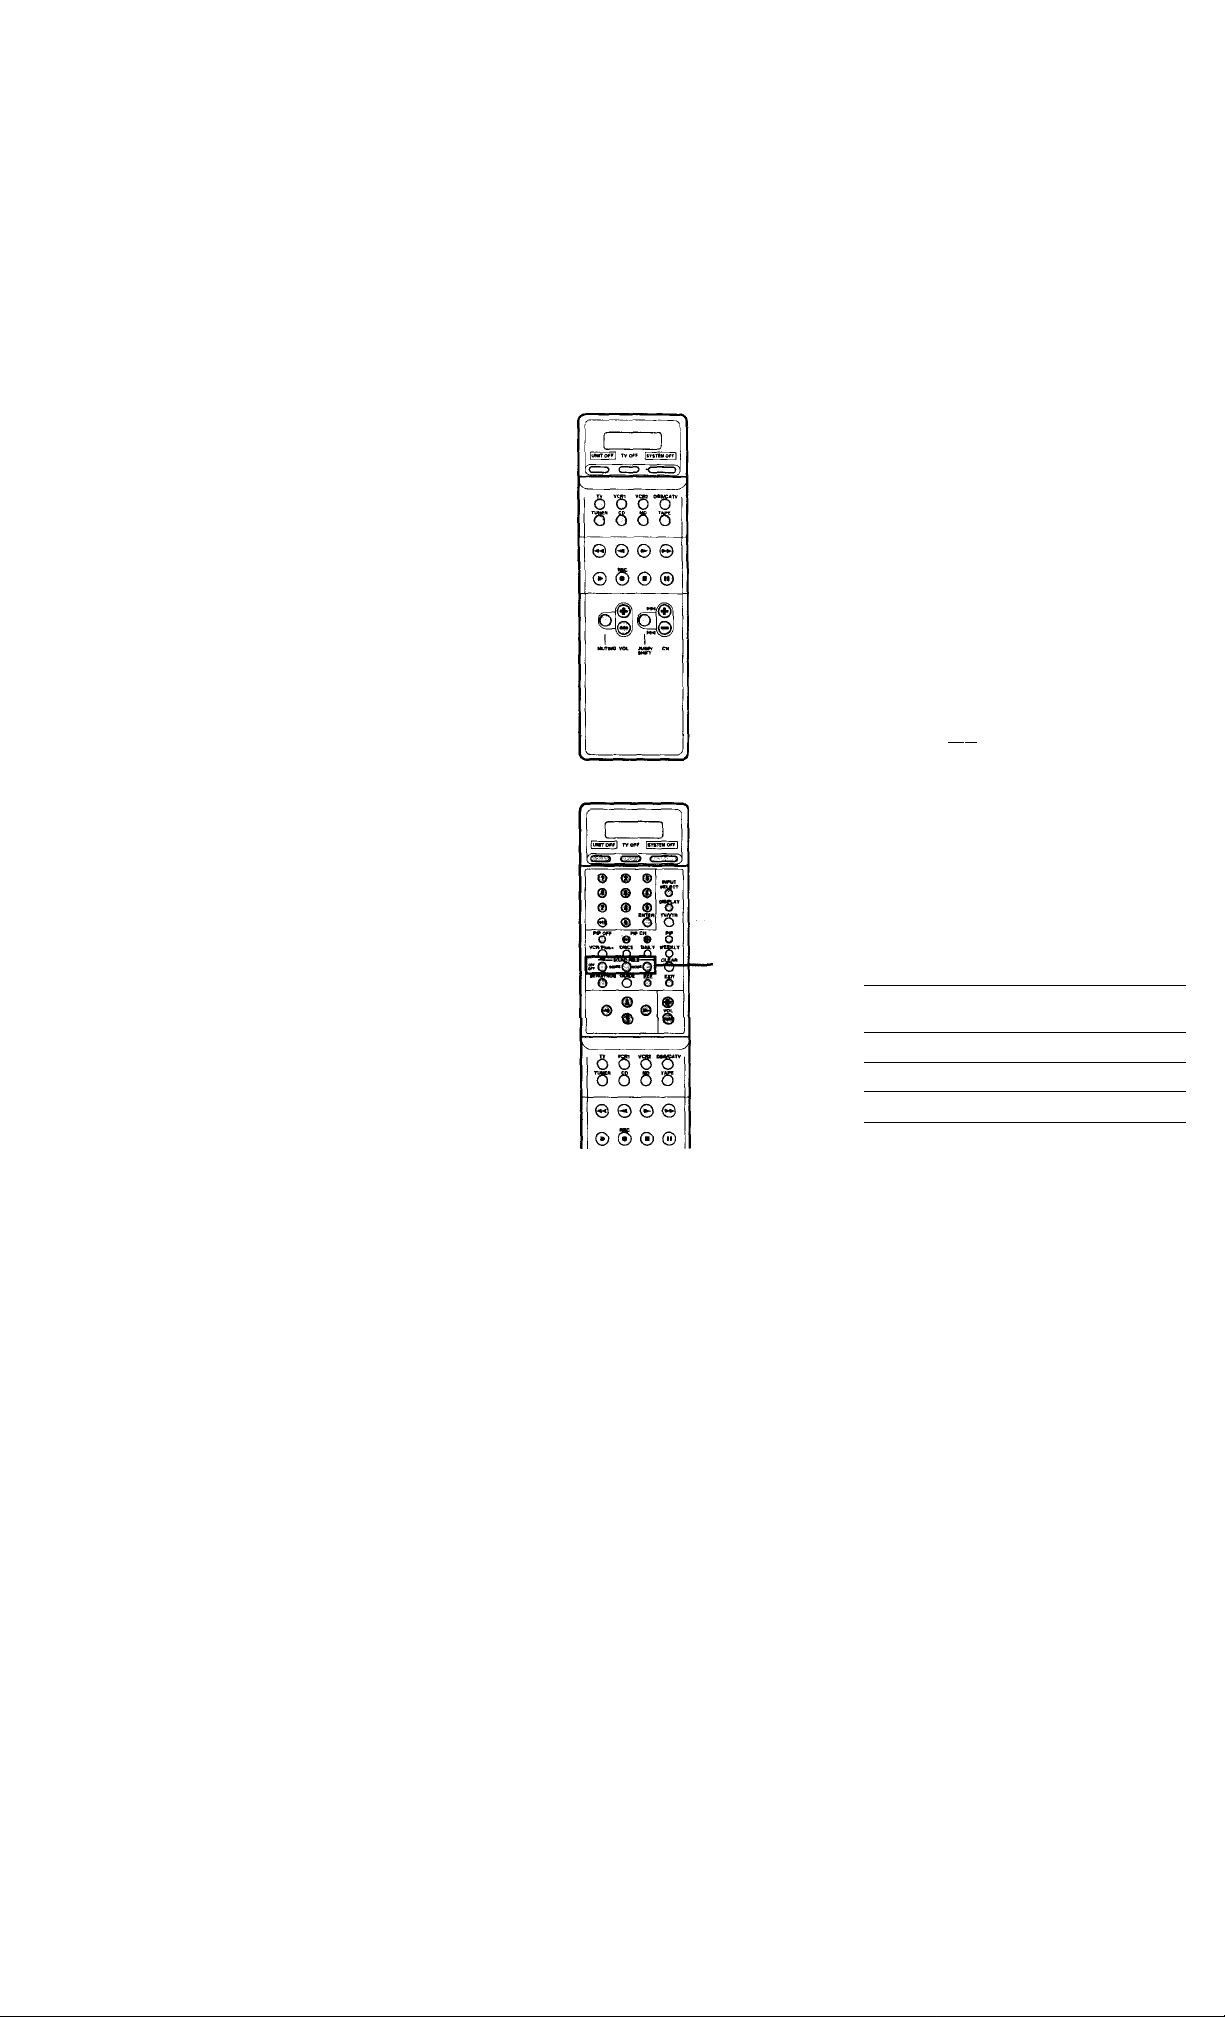
Using the Commander
The operative buttons for each component
For details, refer to the instructions manual
of each component.
The marked buttons function for respective
components.
TV
VCR
Ô S S’ô'"
■Ü 5 5 '5
© © © @
© ® ® ©
® ® (D
® ® ®
® ® ®
Q ®
© O 0 o
t»r
©
Buttons for
the TV
-Buttons for
the receiver
10
-Buttons for
the receiver
6 S
•C Ô 5 '5
© © © ©
© $ ® 0
When you Press the buttons
Start recording RFC and ►
Reviewing
Cueing
simultaneously.
► and
► and ►►
Page 11

DVD
o S ’5S"
rs 6 6'5
© © © ©
© ® © ©
Buttons for
the TV
■ SET UP
■ ANGLE
• DVD MENU
■ TITLE MENU
Buttons for
the receiver
DBS tuner
FAVORITE
■ Buttons for
the TV
. Button for
switching TV/DBS
■ FAVORITE
•ALT AUDIO
■ Buttons for
the receiver
When you
Switch the function mode
between DBS tuner and
cable box
Press the buttons
simultaniously.
DBS/CATV and
SYSTEM OFF
Continued
11
Page 12

Using the Commander
Cable box
Ô S So"
S' Ô Ô S
© © © ©
® ® © ®
© w W
» m
0 m
IÎ>
^ ¡5 g s
® S®
6 S S75"
^0 S S
©000
® $ ® ®
I
Buttons for
the TV
Buttons for
the receiver
Tuner/Receiver
® ® 31
® ® 0
0 0 0
Q «“gl
^
______
-ys s s
Ô S S75'
S' Ô 5 S
©00©
0 ® ® ®
"5"
1.
I
■ Buttons for
the TV
When you
Switch the function mode
between DBS tuner and
cable box
12
Press the buttons
simultaniously.
DBS/CATV and
SYSTEM OFF
Page 13

CD player
MD player
[ 1
6 S 575"
5 6 5 5
© © © ©
© ® © ©
Buttons for
the TV
Buttons for
the receiver
6 5 5 5"
5" 5 5 5
©00©
0 ® © ©
T»rW
• • •
® 9
® • #
S S
6 5 55”
5’ 5 6 5
©00©
0 $ © ©
. Buttons for
the TV
■ Buttons for
the receiver
When you
Start recording
Press the buttons
simultaneously.
REC and ►
Continued
13
Page 14
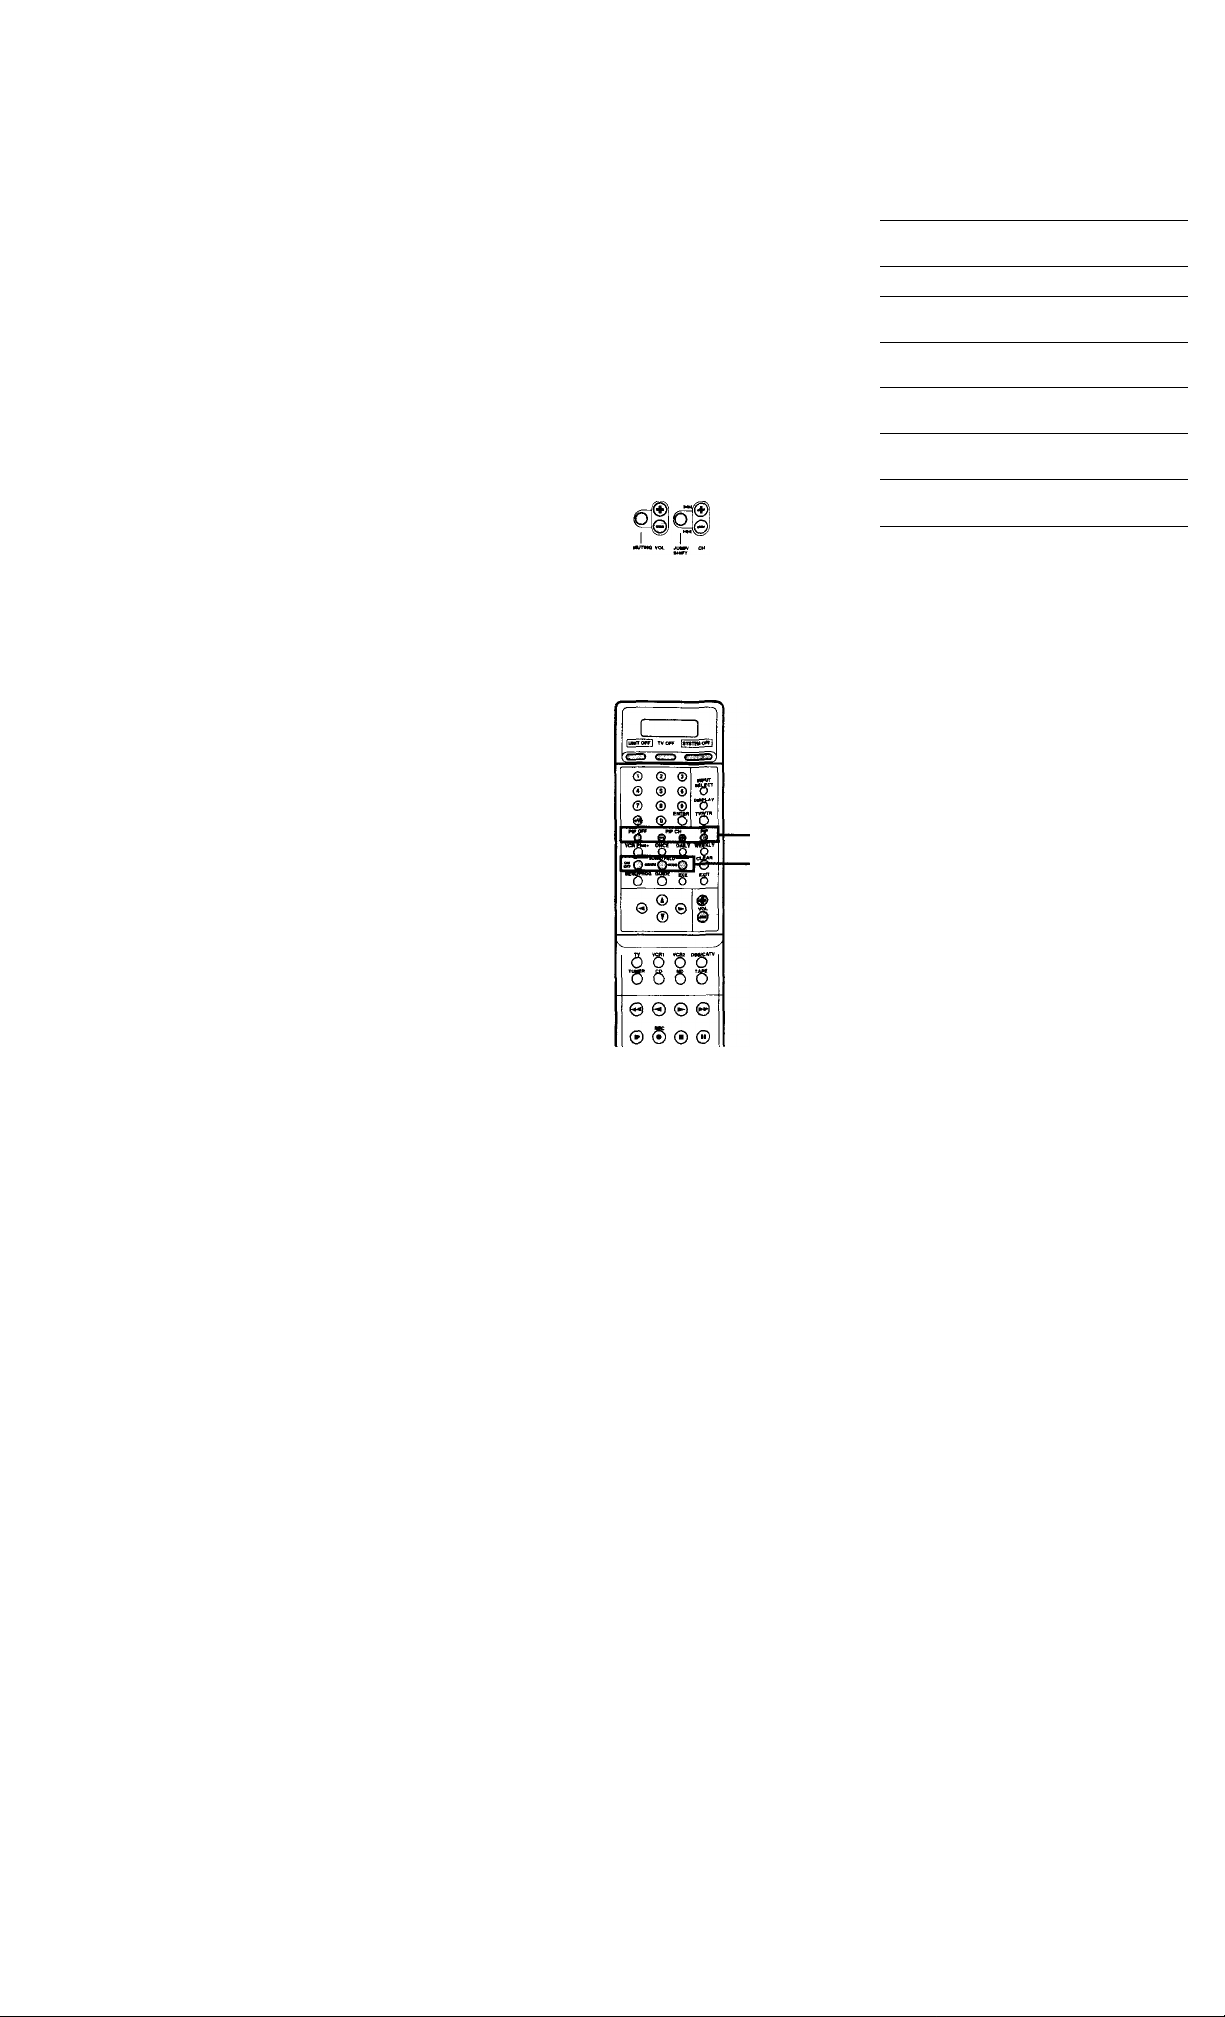
Using the Commander
Tape deck
□
Ô '5 ’S "Ô"
Ô’6
© © © ©
© $ ® ©
When you
Stand by for recording RFC only
Start recording on the
forward side
Start recording on the
rex erse side
Rewind and then start
playback
Forwarding and then start
playback
Switch the tape deck
between A and B
Press the buttons
simultaneously.
KEC and ►
REC and -4
and ►
and ◄
JUMP/SHIFTonI
14
Buttons for
the TV
Buttons for
the receiver
Page 15

Selecting the respective visual source component directly connected to the TV monitor
1 Press the TV button.
2 Open the slide cover,
3 While holding down the INPUT SELECT
button, press the desired numeric button.
Mr Ofrl non |IT»TtlllOW I
O O
© © © ©
0 iS © ®
o
■ Slide cover
TV
■Numeric
buttons
INPUT SELECT
Numeric buttons to be
pressed while holding
down the INPUT
SELECT button.
0 TV tuner
1
2
3
4
5
6
The visual source
components which are
connected to the input
jacks of the TV with the
following indications
will be selected.
VIDEO 1
VIDEO 2
VIDEO 3
VIDEO 4
VIDEO 5
VIDEO 6
Continued
15
Page 16

Using the Commander
Selecting a component directly connected to the receiver
■Slide cover
Ô S ST)*'
" 5 &'5
© © © ©
0 ® ® ©
TUNER
■Numeric
buttons
1 Press the TUNER button.
2 Open the slide cover.
3 While holding down the INPUT SELECT
button, press the desired numeric button.
Numeric buttons to be
pressed while holding
down the INPUT
SELECT button.
0 PHONO
1 VIDEO 1
2
3
4
5
6 TAPEl
7
8
9
+10
The components which
are connected to the
input jacks of the
receiver with the
following indications
will be selected.
VIDEO 2
VIDEOS
TUNER
CD
MD
TV
LD
DAT
16
INPUT SELECT
Page 17

Switching the volume controi function
Normally the VOL+ and - buttons function
for adjusting the receiver's sound volume.
You can switch the functions of the VOL+
and - buttons for adjusting the TV's sound
volume.
"Slide cover
TV
VOL+/-
Make sure that the slide cover is closed.
Press the TV button.
Press the TV, VOL+, and VOL- buttons
simultaneously.
To switch back to the receiver's sound
volume, repeat the same procedure as
above.
Precautions
• Do not open the cabinet. Refer servicing to
qualified personnel only.
• Do not leave the unit in a location near
heat sources, or in a place subject to direct
sunlight, excessive dust, moisture, rain or
mechanical shock.
• Do not use alcohol, benzine, or thinner to
clean the cabinet.
If you have any questions or problems
concerning your unit that are not covered in
this manual, please consult your nearest
Sony dealer.
Troubleshooting
If you hook up or set up any of your
components incorrectly, you may have
problems using your entertainment system,
including powering on/off components, or
making components respond incorrectly to
the commander. Try the following
suggestions to solve these problems.
Operational problems
If you have problems operating any of your
components, check the following:
• If you press a button on the commander
and the component does not respond,
_ point the commander directly at the TV
and press the button again. If the
component still doesn't respond, point the
commander at the receiver and press the
button again.
Continued
17
Page 18

Ttoublesfiooting
Power on/off problems
If you have problems powering on/off
components that have mechanical (push-in
type) power switches:
• Make sure these power switches are
always set to the "on" position (pushed
in).
• Check that each component's AC power
cord is connected to its respective switched
AC outlet of the receiver.
TV sound problems
If you do not hear the sound of the TV
speaker:
• Make sure you connected the TV's audio
output to the receiver's audio input.
• If your TV has both fixed and variable
audio inputs, make sure you used the fixed
audio input. Also, make sure your TV
speakers are turned off.
• You should hear the TV sound from the
system's loudspeakers via the receiver, not
the speakers of the TV. The receiver, not
the TV’s, controls the loudspeaker volume.
To control the TV volume, set up the
commander (see "Switching the volume
control function").
Cable box problems
If you have problems with your cable box:
• If the cable box still does not work, check
with your cable company to see if they can
provide you with a compatible box. (Some
cable companies disable the IR capability
of their boxes if you don't rent their
specific remote control. Contact your cable
company to make sure your cable box has
its IR capability enabled.)
• Make sure that the power of the cable box
is always on.
• When you power on/off the cable box, see
"Turning on the components."
If you have any other problems using your
cable box, check the following:
• When operating the cable box, point the
commander at the cable box.
Setting up problems
• If the code listed first for your component
doesn't work, try all the codes listed for
your component in the order in which they
were listed.
• Make sure the batteries you're using are
not worn out, and that they're inserted
correctly. Note that the setting may be
erased if you take a long time to replace
the batteries.
• Check that the component has infrared
capability. For example, if your
component didn't come with a remote
control, it probably isn't capable of being
controlled by a remote control.
• When you clear all the settings of the
commander, press and hold the VOL -,
SYSTEM OFF, and UNIT OFF buttons
successively.
Specifications
Operatable distance
Power requirements
Battery life Approx. 3 months
Dimensions 56 x 24.7x 196 mm (w/h/d)
Mass Approx. 135.5 g (5 oz.)
Design and specifications are subject to change
without notice.
Approx. 7 m (23 ft.)
(varies depending on the
component of each
manufacturer)
Two size AA (R6) batteries (not
supplied)
(varies depending on frequency
of use)
(2V4x1x7V4 in.)
(batteries not included)
18
 Loading...