

Page 1
Remote
Commander
3-864-230-11(1)
Operating Instructions
RM-PP401
1998 by Sony Corporation
Page 2

Precautions
About This Manual
On safety
Should any solid object or liquid fall into the cabinet, unplug the
receiver and have it checked by qualified personnel before
operating it any further.
On operation
Before connecting other components, be sure to turn off and
unplug the receiver.
On cleaning
Clean the cabinet, panel and controls with a soft cloth slightly
moistened with a mild detergent solution. Do not use any type of
abrasive pad, scouring powder or solvent such as alcohol or
benzine.
If you have any question or problem concerning your
receiver, please consult your nearest Sony dealer.
The instructions in this manual are for model RM-PP401.
Check your model number by looking at the lower right
corner of the front side.
Conventions
The following icon is used in this manual:
z Indicates hints and tips for making the task easier.
2
Page 3

Before You Use Your
Remote
TABLE OF CONTENTS
Check that you received the following item with the
remote:
R6 (size-AA) batteries (2)
Inserting batteries into the remote
Insert two R6 (size-AA) batteries with the + and –
properly oriented in the battery compartment. When
using the remote, point it at the remote sensor g on the
receiver.
]
}
z
When to replace batteries
Under normal conditions, the batteries should last for about 6
months. When the remote no longer operates the receiver,
replace both batteries with new ones.
}
]
Location of Parts and Basic Remote
Operations 4
Parts Description 4
Advanced Remote Operations 11
Changing the Factory Setting of a Function
Button 12
Operating Non-Sony Components 13
Additional Information 16
Troubleshooting 16
Specifications 17
Notes
• Do not leave the remote in an extremely hot or humid place.
• Do not use a new battery with an old one.
• Do not expose the remote sensor of the receiver to direct
sunlight or lighting apparatuses. Doing so may cause a
malfunction.
• If you don’t use the remote for an extended period of time,
remove the batteries to avoid possible damage from battery
leakage and corrosion.
3
Page 4

Location of Parts and Basic Remote Operations
This chapter provides information on
the location of buttons and how to use
them to perform basic operations.
Parts Description
AV
SLEEP
1/u
1
6
=
DISC
ON/OFF
BASS
BOOST
MUTING
1
4
7
SHIFT
10 - / - -
>
+
D.SKIP
VIDEO2VIDEO1
TAPETV
PHONOTUNER
SOUND FIELD
GENRE
2
5
8
ENTER
D.TUNING
0
P(9
0
ANT
TV/VTR
VIDEO3
MD
5.1 IN
MODE IR SET
MASTER
VOLUME
++
––
SYSTEM
STANDBY
3
6
9
p
)
r
DVD
CD
TV CONTROL
CH/PRESET
2
3
4
5
4
Page 5
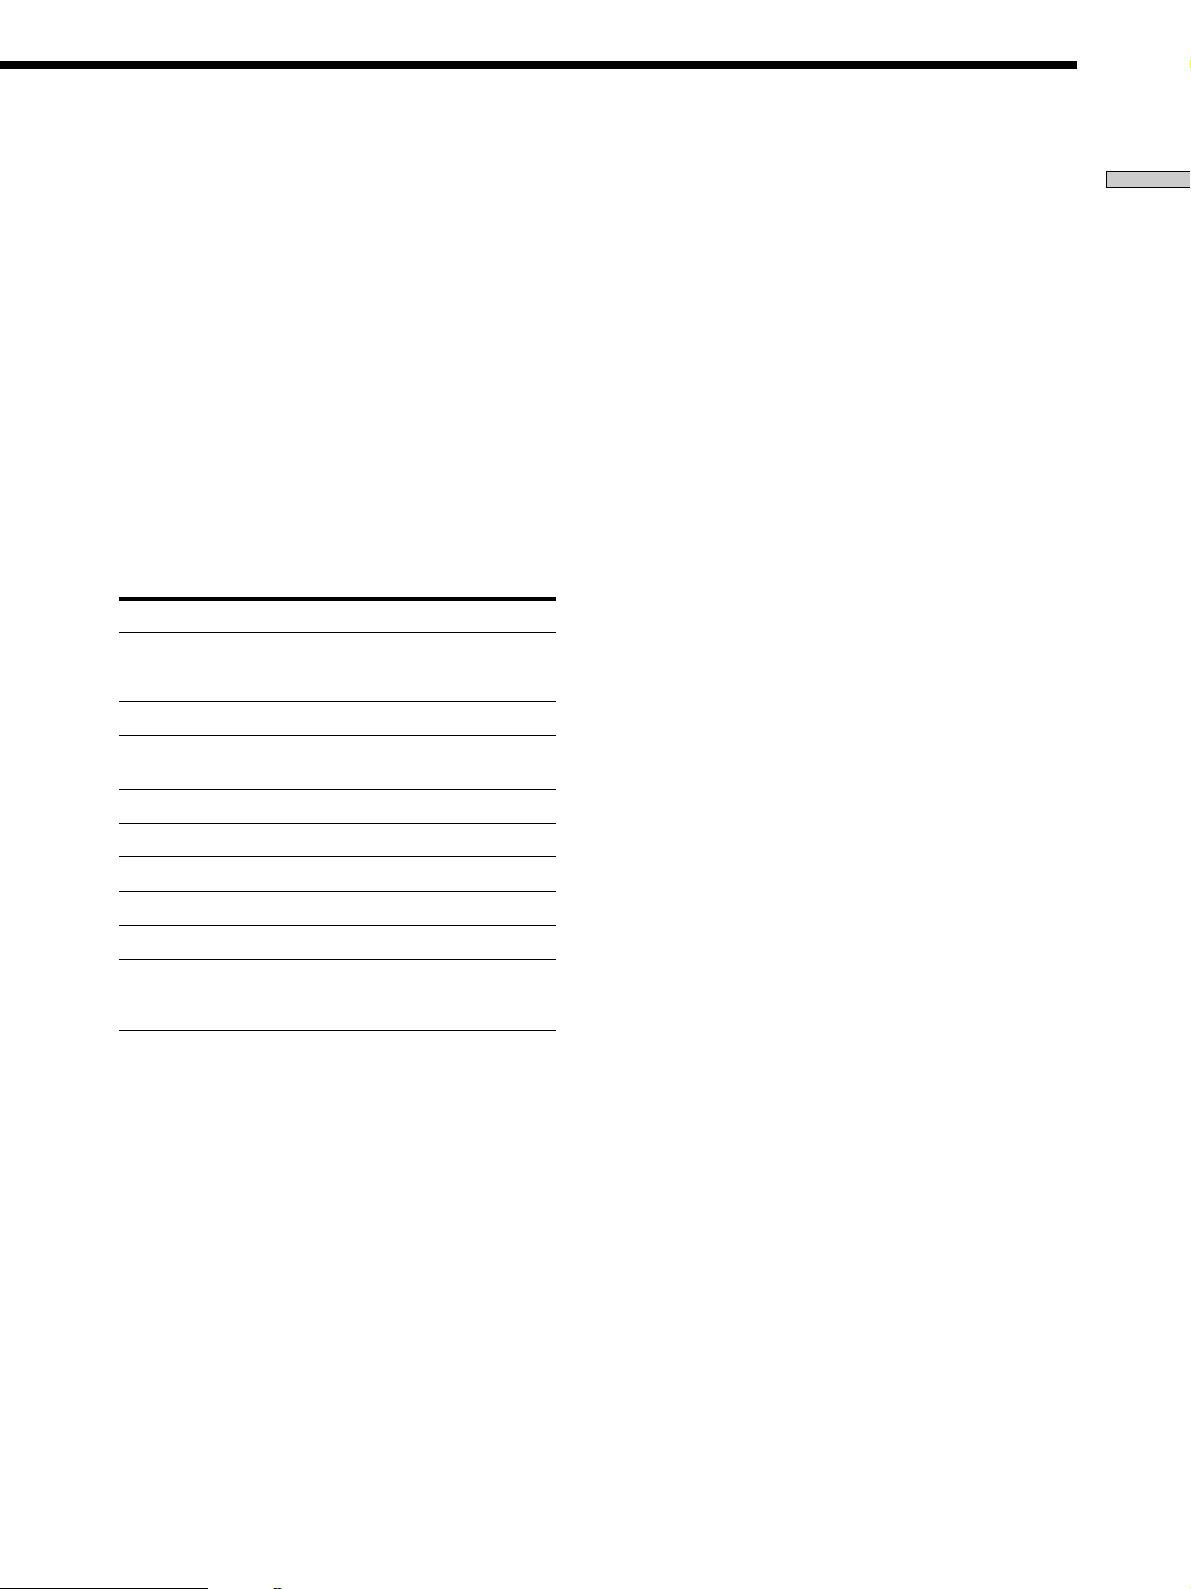
1 SLEEP button
Press repeatedly to activate the sleep function and the
duration which the receiver turns off automatically.
2 SYSTEM STANDBY switch
Press to turn off the receiver and other audio/video
components at the same time.
3 AV 1/u switch
Press to turn the audio and video components on or
off.
4 Function buttons
Press one of the buttons to select the component you
want to use. When you press a button, the receiver
and the selected component turn on. If the component
does not turn on, press the power switch on the
component.
To select Press
VCR VIDEO1 (VCR mode 3), VIDEO2
DVD player
TV, DBS tuner, or LD
b)
player
(VCR mode 1) , or VIDEO3 (VCR
a)
mode 2)
DVD
TV
Notes
• Before you turn on the receiver, make sure that you have
turned the MASTER VOLUME control on the receiver to
the leftmost position to avoid damaging your speakers.
• After you have selected VCR or DVD player, turn on the
TV and set the TV’s video input to match the component
you selected.
5 MASTER VOLUME +/– buttons
Press to adjust the volume level of all speakers at the
same time.
If you have pressed the TV CONTROL button:
Press to adjust the volume level of the TV speakers.
6 MUTING button
Press to mute the sound. The indicator to the left of
the MUTING button on the receiver lights up when
the sound is muted.
If you have pressed the TV CONTROL button:
Press to mute the sound from the TV.
Location of Parts and Basic Remote Operations
Tape deck TAPE
MD deck MD
CD player CD
Built-in tuner TUNER
Turntable PHONO
the component connected
to the 5.1/DVD INPUT
jacks on the receiver
a) Sony VCRs become operable when you press the VIDEO1, 2, or
3 button. These buttons correspond to VHS, Beta, and 8mm,
respectively.
b) TV or DBS tuner (Direct Broadcasting Satellite): USA,
Canadian, and Australian models only
TV or LD player: Models for all countries except the USA,
Canada, and Australia
5.1 IN
See the table on page 10 for information on the buttons
you can use to control each component.
Note that the function buttons are factory-set as
described in the table above. If you want to change
the factory setting of the buttons to match your
particular components, do the procedure “Changing
the Factory Settings of a Function Button” on page 12.
5
Page 6

Parts Description
Location of Parts and Basic Remote Operations
!™
MENU
GUIDE
TV/VIDEO
POSITION
DVD
MENU
DBS
DBS
TV
EFFECT/
DELAY
SWAPP IN P
JUMP
EXECUTE
ENTER
EXIT/RETURN
EQ/TONE
ON/OFF
+
REAR
–
VCR
MENU
CURSOR
MODE
DVD
TITLE
TEST
TONE
LEVEL
+
CENTER
–
Lift up the top cover.
V
SYSTEM
STANDBY
AV
SLEEP
1/u
1
2
3
4
5
6
8
!£
!ª
!•
=
DISC
ON/OFF
BASS
BOOST
MUTING
7
SHIFT
10 - / - -
>
+
D.SKIP
VIDEO2VIDEO1
TAPETV
PHONOTUNER
SOUND FIELD
GENRE
(9
9
ENTER
D.TUNING
0
P
0
ANT
TV/VTR
VIDEO3
MD
TV CONTROL
5.1 IN
MODE IR SET
MASTER
VOLUME
++
––
p
)
r
DVD
CD
CH/PRESET
8
97
0
!¡
!¢
!∞
!§
!¶
7 EFFECT/DELAY button
Press the button repeatedly to adjust the amount of
effect or delay time
“DELAY” appears on the display window on the receiver only
*
when the PRO LOGIC sound field is selected; “EFFECT”
appears when a sound field except PRO LOGIC is selected.
*.
Note
The EFFECT/DELAY button does not operate on receivers
that have the CURSOR MODE button.
8 CURSOR MODE button
Press this button repeatedly to select any of the
following three cursor modes. The indicator for the
selected cursor mode lights up to the left of the display
window on the receiver. The indicator turns off when
you press the SET UP button on the receiver.
When the cursor mode is You can
SURROUND Change the delay time and the
BASS/TREBLE or EQ Adjust the tone (bass/treble) of
INDEX Enter an index name for a preset
effect level
the front speakers. Press the EQ/
TONE ON/OFF button to
activate the tone effect.
station or program source
Note
The CURSOR MODE button does not operate on receivers
that have no cursor buttons.
9 EQ/TONE ON/OFF button
Press to turn the tone effect on or off. The TONE
indicator on the receiver lights up while the tone effect
is turned on.
Note that if you have adjusted the tone using the
CURSOR MODE button and cursor buttons, the
adjusted tone will be produced whenever you turn on
the tone effect.
0 TEST TONE button
After selecting the PRO LOGIC sound field, press to
output a test tone.
!¡ LEVEL CENTER +/– buttons
Press to adjust the volume level of the center speaker.
!™ LEVEL REAR +/– buttons
Press to adjust the volume level of the rear speakers.
6
Page 7
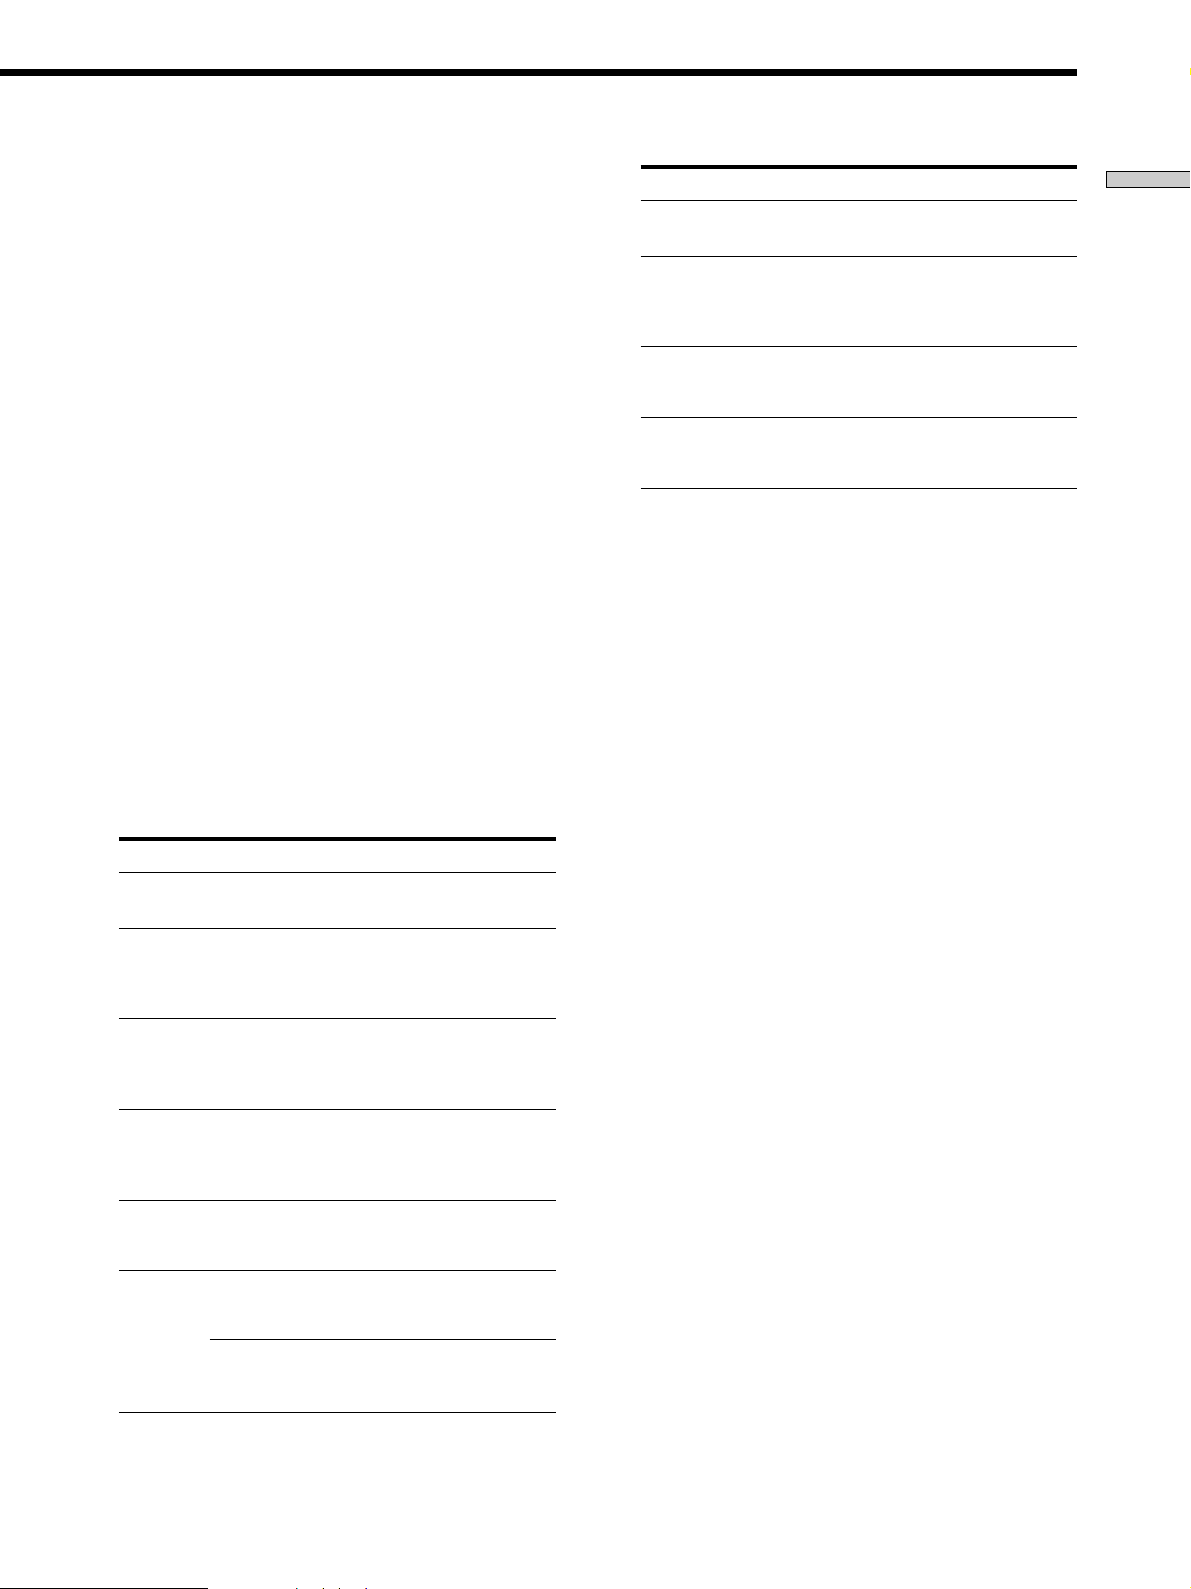
!£ SHIFT >10 -/-- button
If you have selected tuner:
Press repeatedly to select a memory page for
presetting radio stations or tuning to preset stations.
If you selected VCR, TV, LD player, tape deck, MD
deck, or CD player:
Press before inputting a channel or track number of
eleven or higher.
!¢ Numeric buttons (1 to 0)
Inputs the corresponding numeric value. When
inputting a channel, disc, or track number, 0 selects 10.
Button(s) Component(s) Function
r tape deck, MD deck,
r + ( (if
pressed
together)
DISC CD player Selects a disc (CD player
D.SKIP CD player Skips a disc (CD player
DAT deck
VCR, Tape deck, DAT
deck
Sets the tape deck in
recording standby
Starts recording. You
can press 9 for the tape
deck or DAT deck
instead of (.
with a multi-disc
changer only)
with a multi-disc
changer only)
Location of Parts and Basic Remote Operations
!∞ ENTER D.TUNING button
If you have selected tuner:
Press to enter direct tuning mode.
If you have selected VCR, DVD player, LD player,
TV, DBS tuner, tape deck, MD deck, or CD player:
After selecting a channel, disc, or track using the
numeric buttons, press to enter the value.
!§ Tape/disc operation buttons
The following table describes the component operated
by each button and the function of the buttons.
Button(s) Component(s) Function
9 Tape deck Starts play on the reverse
( VCR, DVD player,
LD player, tape deck,
MD deck, CD player,
DAT deck
P VCR, DVD player,
LD player, tape deck,
MD deck, CD player,
DAT deck
p VCR, DVD player,
LD player, tape deck,
MD deck, CD player,
DAT deck
=/+ VCR, DVD player,
LD player, MD deck,
CD player, DAT deck
0/) VCR, LD player, tape
deck, MD deck, DAT
deck
DVD player, CD
player
side of the cassette
Starts play on the front
side of the cassette
Pauses play or recording
or starts recording when
the component is in
recording standby
Stops play
Skips tracks
Fastwinds or rewinds
Searches tracks in the
forward or backward
direction
See the table on page 10 for information on the buttons
that you can use to control each component.
!¶ CH/PRESET +/– buttons
Press repeatedly to select a preset station or channel.
!• BASS BOOST button
Press to increase the bass of the front speakers. The
BASS BOOST indicator on the receiver lights up when
the function is turned on.
!ª SOUND FIELD ON/OFF button
Press to turn the sound field on or off.
GENRE button
Press to select the sound field group you want.
MODE button
Press to select a sound field from the group you
selected.
7
Page 8
Parts Description
Location of Parts and Basic Remote Operations
DVD
MENU
@º @¡
DBS
MENU
TV/VIDEO
DBS
GUIDE
EFFECT/
@§
@∞
@¢
POSITION
TV
EXECUTE
ENTER
EXIT/RETURN
DELAY
SWAPP IN P
JUMP
VCR
MENU
CURSOR
MODE
DVD
TITLE
EQ/TONE
TEST
ON/OFF
TONE
LEVEL
+
+
REAR
CENTER
–
–
Lift up the top cover.
V
SYSTEM
STANDBY
AV
SLEEP
1
4
7
SHIFT
10 - / - -
(9
+
D.SKIP
VIDEO2VIDEO1
TAPETV
PHONOTUNER
SOUND FIELD
GENRE
1/u
2
3
5
6
8
9
ENTER
D.TUNING
0
P
0
ANT
TV/VTR
VIDEO3
MD
TV CONTROL
5.1 IN
MODE IR SET
MASTER
VOLUME
++
––
p
)
r
DVD
CD
CH/PRESET
@¶
=
DISC
ON/OFF
BASS
BOOST
MUTING
>
@™
@£
@•
@ª
#º
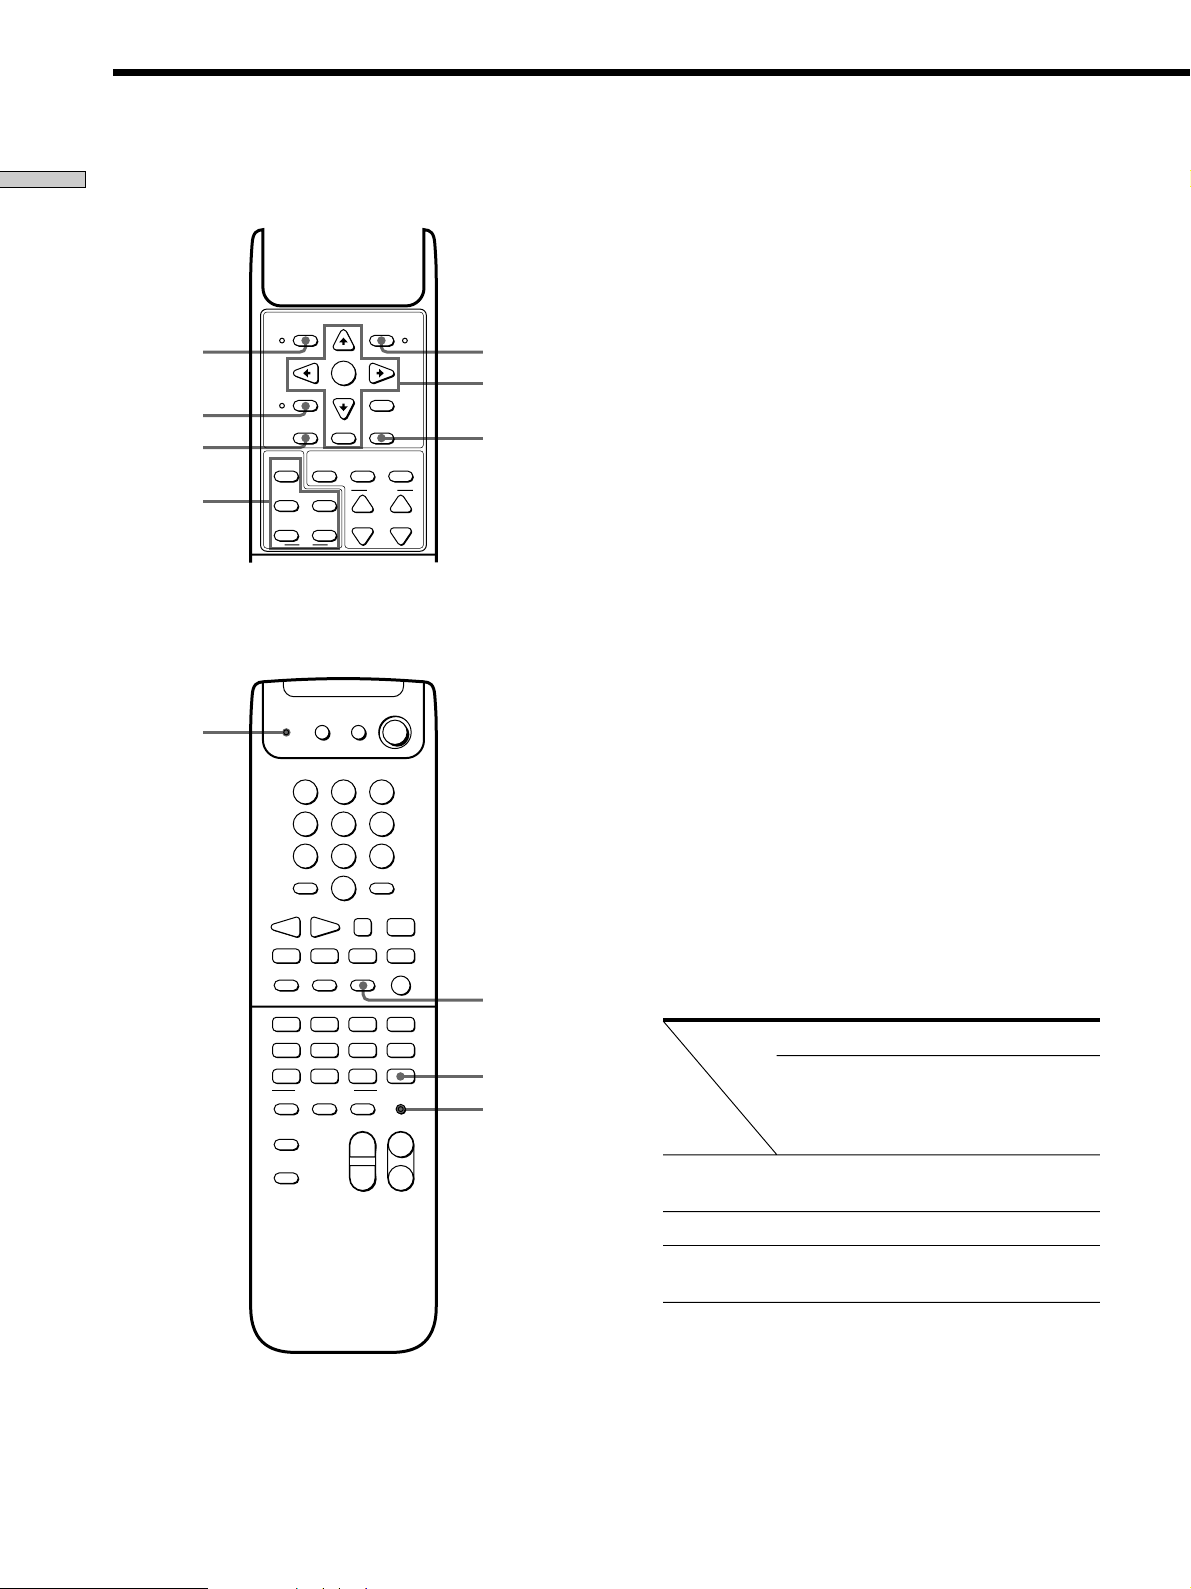
@º DVD MENU button
Press to display the DVD menu. Then use the cursor
buttons on the remote to perform the menu operations
(see “@™ Cursor buttons (V/v/B/b), ENTER button,
and EXIT/RETURN button” on this page).
@¡ VCR MENU button
Press to display the VCR menu on the TV screen.
Then use the cursor buttons on the remote to perform
the menu operations (see “@™ Cursor buttons (V/v/
B/b), ENTER button, and EXIT/RETURN button” on
this page).
Note
After you press the VCR MENU button, the remote is set to
control the VCR that corresponds with VCR 1. Before
pressing the button, make sure to set the VCR input mode to
VCR 1.
@™ Cursor buttons (V/v/B/b), ENTER button, and
EXIT/RETURN button
After pressing the CURSOR MODE button or SET UP
button on the receiver, use the cursor buttons to make
specific settings (see page 6).
After pressing the VCR MENU, DVD MENU, DVD
TITLE, DBS MENU, or DBS GUIDE button, use these
buttons to perform the following operations:
Cursor buttons: To select a menu item
ENTER button: To enter the selection
EXIT/RETURN button: To return to the previous
menu or exit the menu
Some of these buttons do not operate after a particular
button is pressed. See the table below to find out
which buttons operate after which button is pressed.
The button pressed first
CURSOR
MODE
Operable
buttons
Cursor
DBS
MENU
DBS
GUIDE
r
VCR
MENU
DVD
MENU
DVD
TITLE
rrr
buttons
ENTER
EXIT/
rrr
r
RETURN
r
8
Page 9

Note
Be sure to press the cursor buttons right after you press the
VCR MENU, DVD MENU, DVD TITLE, DBS MENU, or DBS
GUIDE button. The cursor buttons become inactive for menu
operations when:
— They are not pressed within five seconds
— You close the top cover of the remote
In either cases, the cursor buttons revert back to receiver
operations.
@£ DVD TITLE button
Press to display the DVD title menu. Then use the
cursor buttons on the remote to perform the menu
operations (see “@™ Cursor buttons (V/v/B/b),
ENTER button, and EXIT/RETURN button” on page
8).
@¢ TV/VIDEO button
Press to change the input mode of the TV.
P IN P button
Press to activate the picture-in-picture function
SWAP button
Press to swap the small and large pictures*.
@• ANT TV/VTR button
Press repeatedly to select the signal to be output from
Location of Parts and Basic Remote Operations
the antenna terminal of the VCR (TV signal or video
signal).
@ª TV CONTROL button
If you are using a Sony TV, you can use this remote to
operate the TV without turning on the receiver. When
you press this button, the TV turns on and switches to
TV input.
#º IR SET button
Use this button to program the remote with the signals
to control non-Sony components (see page 13).
*.
POSITION button
Press to change the position of the small picture*.
JUMP button
Press to toggle between the previous and the current
channels.
Only with Sony TVs with the picture-in-picture function.
*
@∞ DBS GUIDE button
Press to display the DBS guide. Then use the cursor
buttons on the remote to perform the menu operations
(see “@™ Cursor buttons (V/v/B/b), ENTER button,
and EXIT/RETURN button” on page 8).
@§ DBS MENU button
Press to display the DBS menu. Then use the cursor
buttons on the remote to perform the menu operations
(see “@™ Cursor buttons (V/v/B/b), ENTER button,
and EXIT/RETURN button” on page 8).
@¶ Program indicator
Lights up whenever any button on the remote is
pressed. Also lights up during programming (see
page 13).
9
Page 10
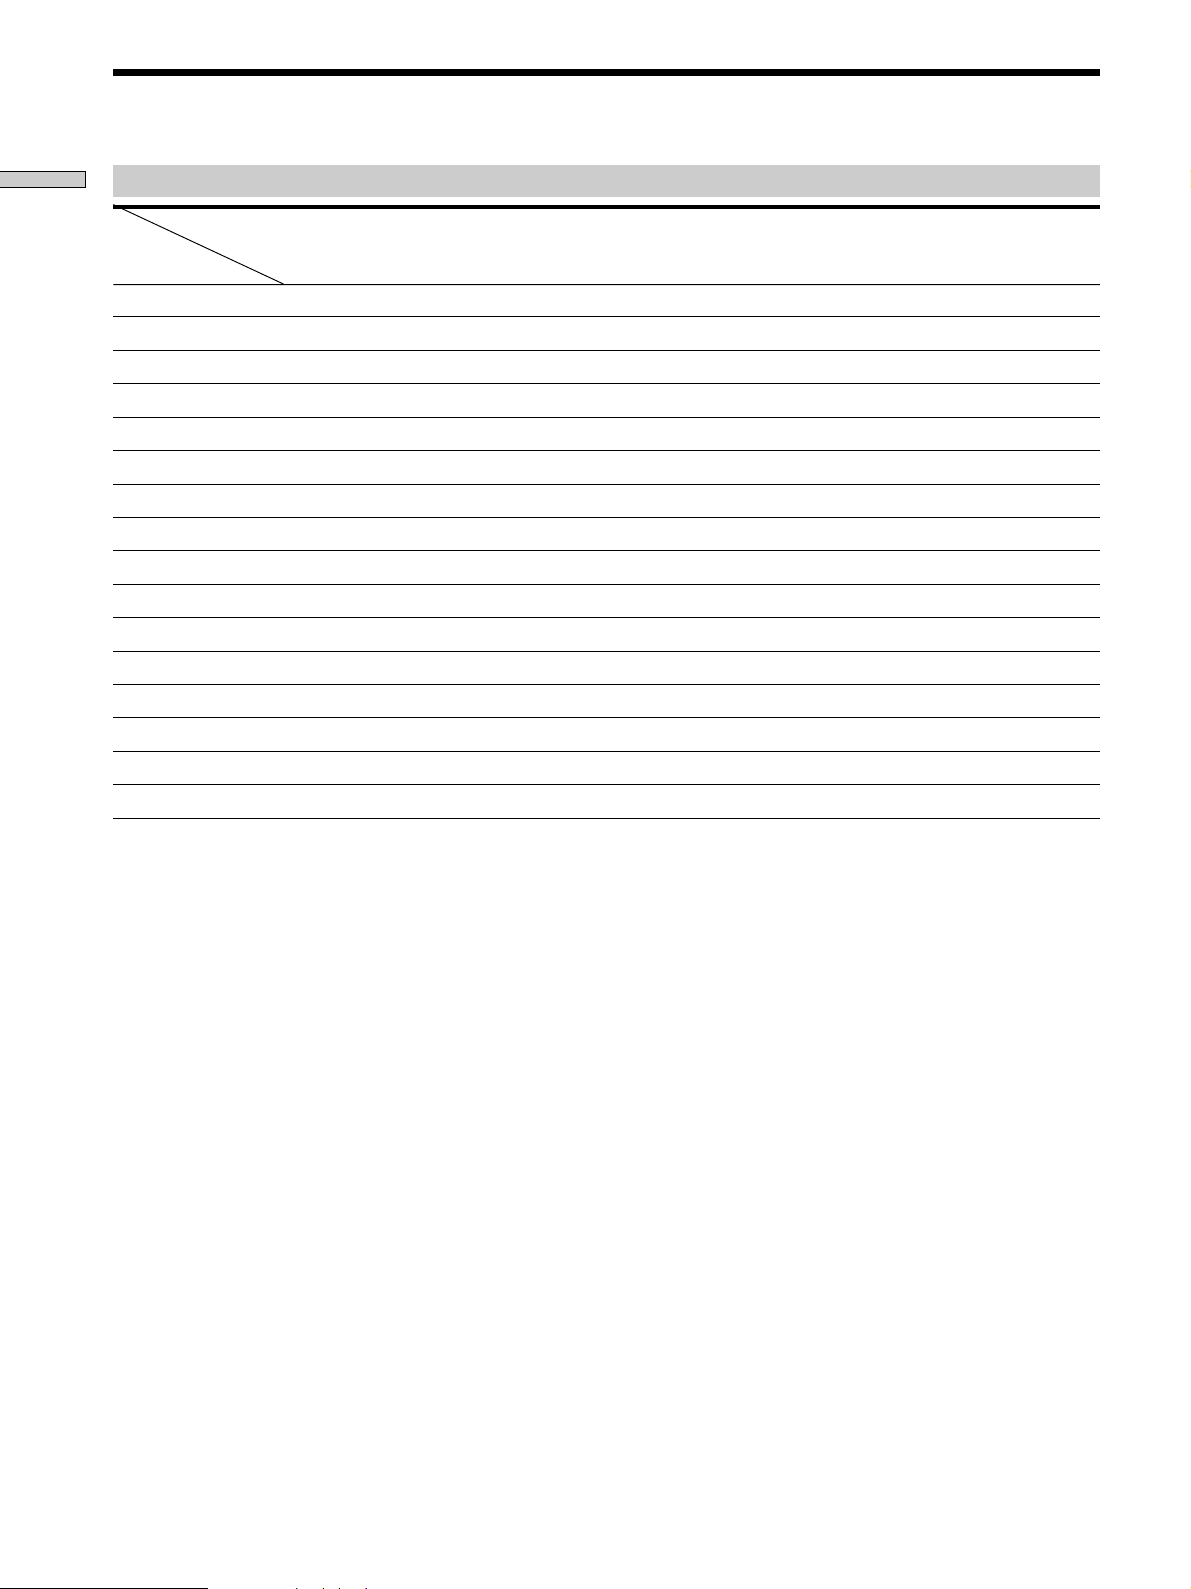
Parts Description
Location of Parts and Basic Remote Operations
Table of buttons that you can use to control each component
Component
CD player DAT deck MD deck Tape deck
Button(s)
AV 1/ur r rrrrr
Numeric buttons rrrrr rrrr
SHIFT >10 -/-- rrrrrr
ENTER D.TUNING rrrrrrrr
9r
( r rr rr r r
P r rr rr r r
p r rr rr r r
=/+rrr rr r
0/) r rr rr r r
DISC r*
D.SKIP r*
ANT TV/VTR rr r
rrrr
r + (rrr
r + 9r
(A and B)
LD player VCR (VHS,
Beta, 8mm)
TV DBS tuner DVD player
CD player with a multi-disc changer only.
*
z
If you press the TV CONTROL button
The remote is set to operate only Sony TVs. In this case, only the
following buttons are operable:
• TV/VIDEO button
• CH/PRESET +/– buttons
• MASTER VOLUME +/– buttons
• MUTING button
10
Page 11
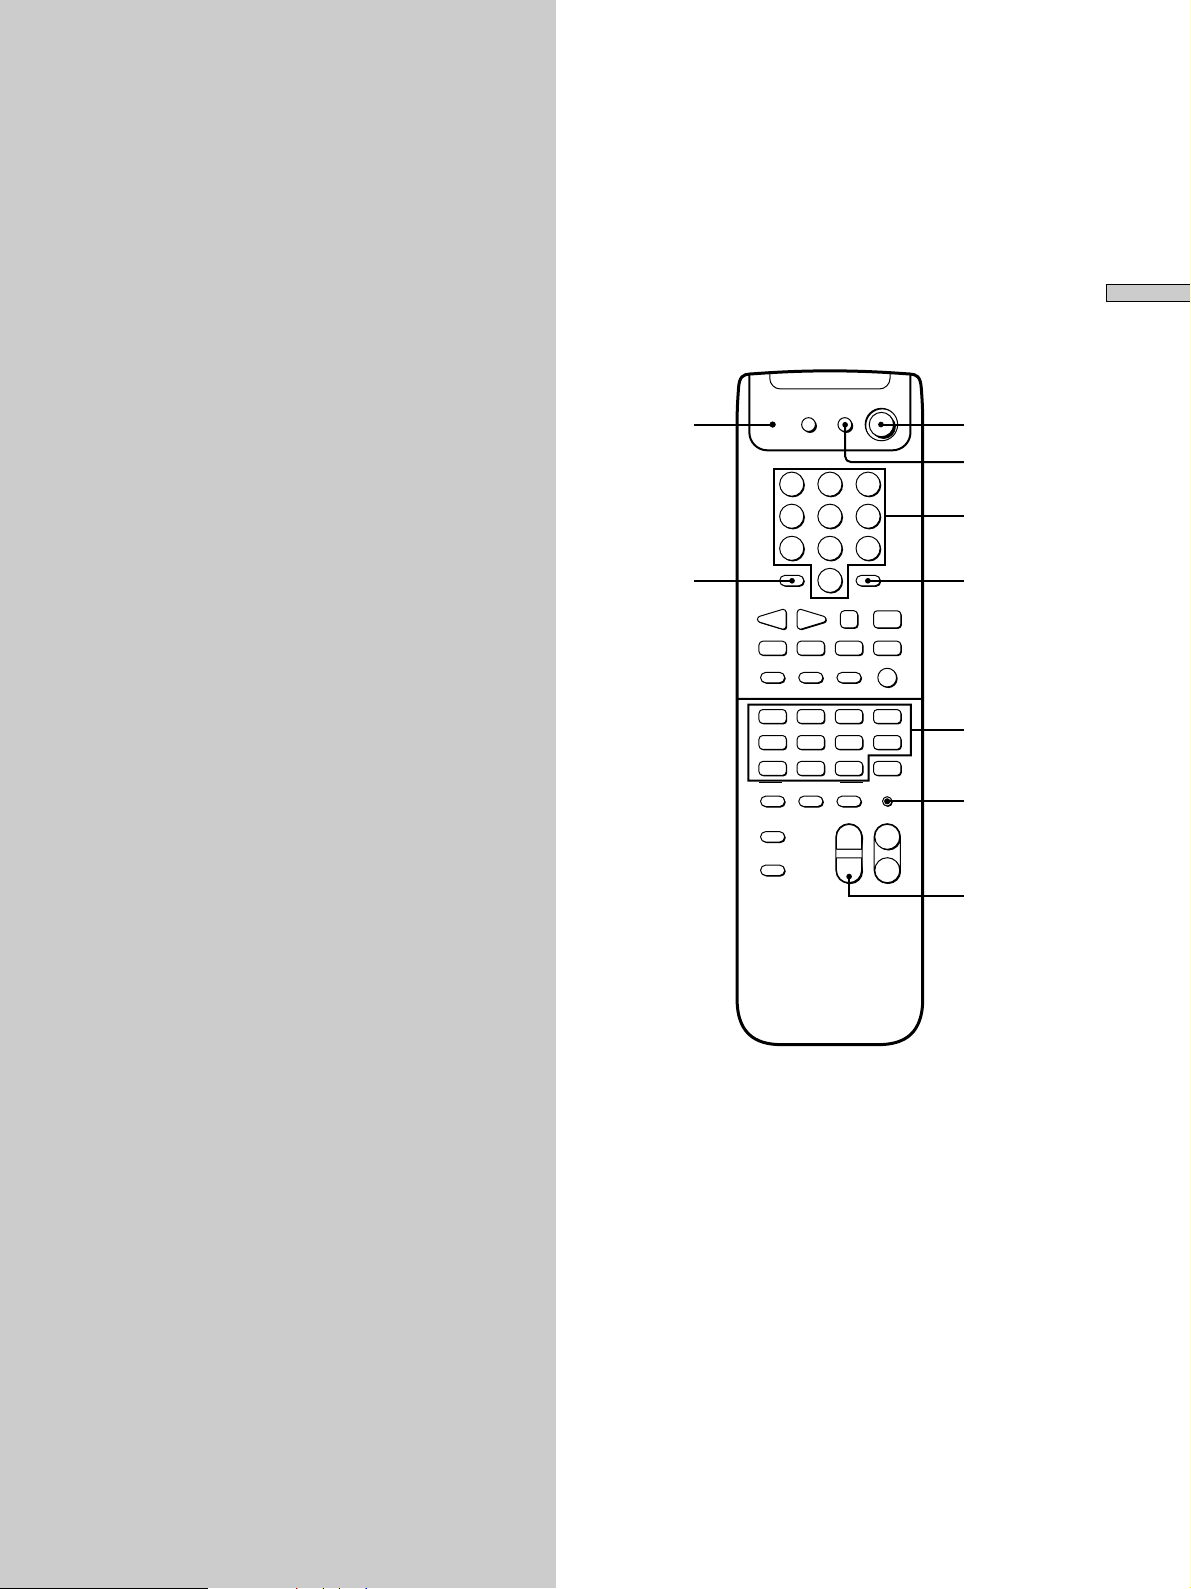
Advanced Remote Operations
This chapter describes how to change
the factory setting of a function button
and how to set the remote to control
non-Sony components.
Program
indicator
SHIFT
>10 -/- -
DISC
SHIFT
10 - / - -
>
1
4
7
SLEEP
+=
D.SKIP
2
5
8
0
AV
1/u
D.TUNING
P(9
0
ANT
TV/VTR
SYSTEM
STANDBY
3
6
9
ENTER
Advanced Remote Operations
SYSTEM
STANDBY
AV 1/u
Numeric
buttons
ENTER
D.TUNING
p
)
r
TV
ON/OFF
BASS
BOOST
MUTING
VIDEO2VIDEO1
PHONOTUNER
SOUND FIELD
GENRE
VIDEO3
DVD
MDTAPE
CD
TV CONTROL
5.1 IN
MODE IR SET
MASTER
VOLUME
CH/PRESET
++
––
Function
buttons
IR SET
MASTER
VOLUME –
11
Page 12

Brief descriptions of buttons used for
advanced remote operations
Program indicator: Lights up during programming
operations.
Changing the Factory Setting of a Function Button
SYSTEM STANDBY: Press this switch together with the
AV 1/u switch and MASTER VOLUME – button to reset
Advanced Remote Operations
all the function buttons to the factory settings or to clear
the programmed signals.
AV 1/u: Press this switch together with the SYSTEM
STANDBY switch and MASTER VOLUME – button to
reset all the function buttons to the factory settings or to
clear the programmed signals.
Numeric buttons: Used when changing the factory
settings of the function buttons or specifying the make of
the component that you want to control using the remote.
ENTER D.TUNING: Used when changing the factory
settings of the function buttons or programming the
remote.
Function buttons: Comes with factory settings that you
can change.
IR SET : Press to program the remote.
MASTER VOLUME –: Press this button together with the
SYSTEM STANDBY and AV 1/u switches to reset all the
function buttons to the factory settings or to clear the
programmed signals.
SHIFT >10 -/--: Used when changing the factory settings
of the function buttons.
You can change the factory settings of the function
buttons (page 5) to suit the components in your system.
For example, if you connect a Sony LD player to the
VIDEO 2 jacks on the receiver, you can set the VIDEO2
button on this remote to control the LD player.
Note, however, that the settings of the TUNER, PHONO,
and 5.1 IN buttons cannot be changed.
1 Press down the button corresponding to the
component you want to assign to a function
button (button 6 for the LD player, for example).
Each button and its corresponding components are
shown below.
Button Component
1 CD player
2 DAT deck
3 MD deck
4 Tape deck A
5 Tape deck B
6 LD player
7 VCR (Beta)
8 VCR (8 mm)
9 VCR (VHS)
0TV
SHIFT >10 -/-- DBS tuner, satellite tuner, or cable
box
ENTER D.TUNING DVD player
12
2 While pressing down the button corresponding to
the component, press down the function button
whose setting is to be changed (the VIDEO2
button, for example).
The VIDEO2 button is now set to control the Sony LD
player.
To reset a button to its factory setting
Repeat the procedure above.
To reset all function buttons to their factory
settings
First press down MASTER VOLUME –, then AV 1/u,
and then SYSTEM STANDBY.
Page 13

Operating Non-Sony Components
You can program the remote to control non-Sony
components. Once the control signals have been
memorized, you can use those components as part of your
system.
Furthermore, you can also program this remote for Sony
components that the remote is unable to control. Note
that the remote can control the components that accept
infrared wireless control signals only.
1 Do the procedure of “Changing the Factory Setting
of a Function Button” on page 12, if necessary.
2 Press IR SET.
The program indicator lights up.
3 Press the function button for the component you
want to control (except the 5.1 IN buttons).
For example, if you are going to control a CD player,
press CD.
4 Press the numeric buttons to enter the numeric
code (or one of the codes if more than one code
exist) corresponding to the component and the
make of the component you want to control.
See the tables on pages 14 and 15 for information on
the numeric code(s) corresponding to the component
and the make of the component.
Clearing all programmed signals
To clear all the programmed signals, do the following
procedure. The remote is reset to its factory-setting.
1 Press IR SET to turn on the program indicator.
Advanced Remote Operations
2 First press down MASTER VOLUME –, then AV 1/u,
and then SYSTEM STANDBY until the program
indicator flashes twice, then goes off.
5 Press ENTER D.TUNING.
When the program indicator goes off, the
component(s) can then be controlled using this
remote.
6 Repeat Steps 2 to 5 to control other components.
z If programming is unsuccessful, check the following:
• If the program indicator does not light up, the batteries are
weak. Replace both batteries.
• If you do not do Step 3 within one minute after pressing the IR
SET button in Step 2, the remote automatically exits learning
mode. Start again from Step 2.
Notes
• Programmed components will not turn on when you press a
function button. You have to turn on the component’s power
switch.
• The numeric codes are based on the latest information available
for each brand. There is a chance, however, that your
component will not respond to some or all of the codes.
• All of the functions on this remote may not be available when
used with your particular component.
13
Page 14
Operating Non-Sony Components
The numeric codes corresponding to the
component and the make of the
component
Use the numeric codes in the tables below to control non-
Advanced Remote Operations
Sony conponents and also Sony components that the
remote is normally unable to control. Since the remote
signal that a component accepts differs depending on the
model and year of the component, more than one numeric
code may be assigned to a component. If you fail to
program your remote using one of the codes, try using
other codes.
Notes
• The numeric codes are based on the latest information available
for each brand. There is a chance, however, that your
component will not respond to some or all of the codes.
• All of the functions on this remote may not be available when
used with your particular component.
To control a CD player
Make Code(s)
DENON 03, 04
FISHER 05, 06
JVC 07, 08, 09
KENWOOD 10, 11, 12
MAGNAVOX 13, 18
MARANTZ 18
ONKYO 14, 15, 16
PANASONIC 17
PHILIPS 18
PIONEER 19
RCA 20, 21, 22
SONY 01, 02
TECHNICS 17, 23, 24
YAMAHA 25, 26, 27
To control an MD deck
Make Code(s)
DENON 02
JVC 03
KENWOOD 04
SONY 01
To control a tape deck
Make Code(s)
DENON 02
FISHER 03
JVC 04, 05
KENWOOD 06, 07
NAKAMICHI 08
PANASONIC 13
PHILIPS 09, 10
PIONEER 11
SONY 01
TECHNICS 12, 13
YAMAHA 14, 15
To control an LD player
Make Code(s)
PANASONIC 05, 06, 07
PIONEER 08
SONY 01, 02, 03, 04
To control a DAT deck
Make Code(s)
PIONEER 02
SONY 01
14
Page 15

To control a VCR
Make Code(s)
AIWA 04, 05, 10, 50
AKAI 06, 07, 08, 09
BLAUPUNKT 40
EMERSON 11, 12, 13, 14, 15, 16, 50
FISHER 17, 18, 19, 20
GENERAL ELECTRIC 21, 22, 30
GOLDSTAR 23, 53
GRUNDIG 24
HITACHI 22, 25, 29, 41
ITT/NOKIA 17
JVC 26, 27, 28, 36
MAGNAVOX 30, 31, 38
MITSUBISHI/MGA 32, 33, 34, 35
NEC 36
PANASONIC 29, 30, 37, 38, 39, 40
PHILIPS 29, 30, 31
PIONEER 29
RCA/PROSCAN 22, 29, 30, 31, 41, 47
SAMSUNG 42, 43, 44, 45
SANYO 17, 20, 46
SHARP 48, 49
SONY 01, 02, 03
TELEFUNKEN 51, 52
TOSHIBA 47
ZENITH 54
To control a TV
Make Code(s)
DAEWOO 02, 04, 05, 06, 07, 15
FISHER 08
GOLDSTAR 02, 03, 11, 12, 15, 34
GRUNDIG 17, 34
HITACHI 02, 13, 14, 15
ITT/NOKIA 21, 22
JVC 16
MAGNAVOX 02, 03, 18
MITSUBISHI/MGA 02, 03, 19
NEC 02, 03, 20
PANASONIC 09, 24
PHILIPS 15, 18
PIONEER 09, 25, 26, 40
RCA/PROSCAN 02, 10, 27, 28, 29
SAMSUNG 02, 03, 15, 31, 32, 33, 34
SANYO 08
SHARP 35
SONY 01
TELEFUNKEN 23, 36, 37, 38
THOMSON 30, 37, 39
TOSHIBA 35, 40, 41
ZENITH 42, 43
To control a DBS tuner, satellite tuner, or cable
box
Make Code(s)
PANASONIC 03, 06, 07
PIONEER 08, 09
RCA 04, 05
SONY 01, 02
ZENITH 10, 11
Advanced Remote Operations
To control a DVD player
Make Code(s)
PANASONIC 02
PIONEER 03
SONY 01
TOSHIBA 04
15
Page 16

Additional
Troubleshooting
Information
If you experience any of the following difficulties while
using the receiver, use this troubleshooting guide to help
you remedy the problem. Should any problem persist,
consult your nearest Sony dealer.
The remote does not function.
/ Point the remote at the remote sensor g on the
receiver.
/ Remove any obstacles in the path between the
remote and the receiver.
/ Replace both batteries in the remote with new
ones, if they are weak.
/ Make sure you select the correct function on the
remote.
/ Pressing the TV CONTROL button sets the remote
to operate the TV only. If this mode is on, press a
function button on the remote or one of the
FUNCTION buttons on the receiver before
operating the receiver or another component.
16
Page 17

Specifications
General
Remote contr ol system Infrared control
Power r equir ements 3 V DC with two R6 (size-AA)
batteries
3
Dimensions 210 × 56 × 268 mm (8
Mass (appr ox.) 125 g (4.4 oz) excluding batteries
Design and specifications are subject to change without
notice.
11
/16 inches)
/8 × 21/4 ×
Additional Information
17
Page 18

Page 19

Page 20

Sony Corporation Printed in Malaysia
 Loading...