

Reader™ User Guide
1
Search
Search
Print
Top page
Getting started
Basic Operations
Adding/Getting Content
Browsing Content Lists
Reading
Organizing
Other Applications
Settings
Other Information
PRS-T2
User Guide
Use this manual if you encounter any problems, or have any questions about your Reader™.
Contents list
Copyright 2012 Sony Corporation
Go to page top
Reader™ User Guide
2
Search
Search
Top page > Getting started
Print
Getting started
Basic Operations
Adding/Getting Content
Browsing Content Lists
Reading
Organizing
Other Applications
Settings
Other Information
Contents list
Getting started
Welcome!
About your Reader™
Reader Features and Functions
Wireless Connectivity
Join a Wi- Fi® Network
Battery
Charging the Reader
Maximizing Battery Life
Installing Reader software (Reader for PC/Mac)
Installing Reader software (Reader for PC/Mac)
Turning the Power On/Off
Turning the Power On/Off
Parts and Controls
Overview
Buttons
microSD Card Slot
Copyright 2012 Sony Corporation
Go to page top

Reader™ User Guide
3
Search
Search
Top page > Basic Operations
Print
Getting started
Basic Operations
Adding/Getting Content
Browsing Content Lists
Reading
Organizing
Other Applications
Settings
Other Information
Basic Operations
[Home] Screen
Applications and the [Home] Screen
Touchscreen Operations
On-Screen Keyboard
Go to page top
Contents list
Copyright 2012 Sony Corporation
Reader™ User Guide
4
Search
Search
Top page > Adding/Getting Content
Print
Getting started
Basic Operations
Adding/Getting Content
Browsing Content Lists
Reading
Organizing
Other Applications
Settings
Other Information
Adding/Getting Content
Adding Content
Adding Content
Buying Books and Periodicals
Go to page top
Contents list
Copyright 2012 Sony Corporation
Reader™ User Guide
5
Search
Search
Top page > Browsing Content Lists
Print
Getting started
Basic Operations
Adding/Getting Content
Browsing Content Lists
Reading
Organizing
Other Applications
Settings
Other Information
Browsing Content Lists
Content Lists
Browsing Content List Pages
Browsing in Thumbnail View and List View
Using the Page Jump Panel in Content List Pages
Finding Content with a Keyword
Posting Book information to Facebook
Tools
Using (Menu) Items
Go to page top
Contents list
Copyright 2012 Sony Corporation

Reader™ User Guide
6
Search
Search
Top page > Reading
Print
Getting started
Basic Operations
Adding/Getting Content
Browsing Content Lists
Reading
Organizing
Other Applications
Settings
Other Information
Contents list
Reading
Reading Books
Opening a Book
Page Navigation
Appearance
Annotations
Uploading Highlighted Words on a Page to Evernote
Posting Highlighted Words on a Page to Facebook
Using the Dictionary
Finding Pages with a Keyword
Changing Book Page Settings
Using (Menu) Items
Reading Periodicals
Opening a Periodical Issue
Managing Periodicals*
Page Navigation
Go to page top
Copyright 2012 Sony Corporation
Reader™ User Guide
7
Search
Search
Top page > Organizing
Print
Getting started
Basic Operations
Adding/Getting Content
Browsing Content Lists
Reading
Organizing
Other Applications
Settings
Other Information
Contents list
Organizing
Organizing Your Content
Deleting a Single Item
Deleting Multiple Items at Once
Protecting a Single Item
Protecting Multiple Items at Once
Using Collections
Creating a Collection
Adding Items to a Collection
Removing Items from a Collection
Renaming a Collection
Deleting a Collection
Posting a Collection to Facebook
Using (Menu) Items
Go to page top
Copyright 2012 Sony Corporation

Reader™ User Guide
8
Search
Search
Top page > Other Applications
Print
Getting started
Basic Operations
Adding/Getting Content
Browsing Content Lists
Reading
Organizing
Other Applications
Settings
Other Information
Contents list
Other Applications
Public Libraries
Borrowing Books from Public Libraries
Web Browsing
Browsing the Web
Browsing Tools
Downloads
Multiple Windows
Bookmarks and History
Uploading an Address of a Website to Evernote
Browser Settings
Using (Menu) Items
All Notes
Finding Annotations Across All Books and Periodicals
Uploading Annotations Across All Books and Periodicals to Evernote
Posting Annotations Across All Books and Periodicals to Facebook
Dictionary
Using the Dictionary
Changing the Dictionary
Listing Previously Looked-up Words
Using (Menu) Items
Handwriting
Creating a Drawing
Editing an Existing Drawing
Deleting/Protecting a Drawing
Capturing a Screenshot
Using (Menu) Items
Text Memo
Creating a Text Memo
Editing an Existing Memo
Deleting/Protecting a Memo
Using (Menu) Items
Pictures
Viewing Pictures
Changing the Orientation
Zooming in on a Picture
Viewing Pictures in a Slideshow
Uploading a Picture to Evernote
Deleting Pictures
Using (Menu) Items
Evernote
Using Evernote

Creating a new account
Sign in to Evernote
9
Evernote Settings
Synchronizing in the Evernote list page
Facebook
Using Facebook
Log In to Facebook
Copyright 2012 Sony Corporation
Go to page top
Reader™ User Guide
10
Search
Search
Top page > Settings
Print
Getting started
Basic Operations
Adding/Getting Content
Browsing Content Lists
Reading
Organizing
Other Applications
Settings
Other Information
Contents list
Settings
Changing the Settings
Changing the Settings
General Settings
Wireless Network Settings
Application Preferences
Date and Time Settings
System Management
Initialization
About
Device Shutdown
Go to page top
Copyright 2012 Sony Corporation
Reader™ User Guide
11
Search
Search
Top page > Other Information
Print
Getting started
Basic Operations
Adding/Getting Content
Browsing Content Lists
Reading
Organizing
Other Applications
Settings
Other Information
Contents list
Other Information
Troubleshooting
Troubleshooting Tips
Support PC Web Site
Reader Device
Wireless Connectivity
Reading Books and Periodicals
Viewing Pictures
Connecting to your Computer
microSD Card
Precautions
Safety Information
Applications on the Reader
About Pre-installed Sample Content
Reader Disposal Reference
Additional Information for Customers in the US/Canada
Additional Information for Customers Outside the US/Canada
Notes on microSD Cards
Legal Notice
Legal Notice
Appendix
Specifications
Supported File Types
System Requirements
Copyright 2012 Sony Corporation
Go to page top
Reader™ User Guide
12
Search
Search
Top page > Contents list
Print
Getting started
Basic Operations
Adding/Getting Content
Browsing Content Lists
Reading
Organizing
Other Applications
Settings
Other Information
Contents list
Contents list
Getting started
Welcome!
About your Reader™
Reader Features and Functions
Wireless Connectivity
Join a Wi- Fi® Network
Battery
Charging the Reader
Maximizing Battery Life
Installing Reader software (Reader for PC/Mac)
Installing Reader software (Reader for PC/Mac)
Turning the Power On/Off
Turning the Power On/Off
Parts and Controls
Overview
Buttons
microSD Card Slot
Basic Operations
[Home] Screen
Applications and the [Home] Screen
Touchscreen Operations
On-Screen Keyboard
Adding/Getting Content
Adding Content
Adding Content
Buying Books and Periodicals
Browsing Content Lists
Content Lists
Browsing Content List Pages
Browsing in Thumbnail View and List View
Using the Page Jump Panel in Content List Pages
Finding Content with a Keyword
Posting Book information to Facebook
Go to page top
Go to page top
Go to page top

Tools
Using (Menu) Items
13
Reading
Reading Books
Opening a Book
Page Navigation
Appearance
Annotations
Uploading Highlighted Words on a Page to Evernote
Posting Highlighted Words on a Page to Facebook
Using the Dictionary
Finding Pages with a Keyword
Changing Book Page Settings
Using (Menu) Items
Reading Periodicals
Opening a Periodical Issue
Managing Periodicals*
Page Navigation
Go to page top
Go to page top
Organizing
Organizing Your Content
Deleting a Single Item
Deleting Multiple Items at Once
Protecting a Single Item
Protecting Multiple Items at Once
Using Collections
Creating a Collection
Adding Items to a Collection
Removing Items from a Collection
Renaming a Collection
Deleting a Collection
Posting a Collection to Facebook
Using (Menu) Items
Other Applications
Public Libraries
Borrowing Books from Public Libraries
Go to page top
Web Browsing
Browsing the Web
Browsing Tools
Downloads
Multiple Windows
Bookmarks and History
Uploading an Address of a Website to Evernote
Browser Settings

Using (Menu) Items
All Notes
14
Finding Annotations Across All Books and Periodicals
Uploading Annotations Across All Books and Periodicals to Evernote
Posting Annotations Across All Books and Periodicals to Facebook
Dictionary
Using the Dictionary
Changing the Dictionary
Listing Previously Looked-up Words
Using (Menu) Items
Handwriting
Creating a Drawing
Editing an Existing Drawing
Deleting/Protecting a Drawing
Capturing a Screenshot
Using (Menu) Items
Text Memo
Creating a Text Memo
Editing an Existing Memo
Deleting/Protecting a Memo
Using (Menu) Items
Pictures
Viewing Pictures
Changing the Orientation
Zooming in on a Picture
Viewing Pictures in a Slideshow
Uploading a Picture to Evernote
Deleting Pictures
Using (Menu) Items
Evernote
Using Evernote
Creating a new account
Sign in to Evernote
Evernote Settings
Synchronizing in the Evernote list page
Facebook
Using Facebook
Log In to Facebook
Go to page top
Settings
Changing the Settings
Changing the Settings
General Settings
Wireless Network Settings
Application Preferences
Date and Time Settings
System Management
Initialization

About
Device Shutdown
15
Other Information
Troubleshooting
Troubleshooting Tips
Support PC Web Site
Reader Device
Wireless Connectivity
Reading Books and Periodicals
Viewing Pictures
Connecting to your Computer
microSD Card
Precautions
Safety Information
Applications on the Reader
About Pre-installed Sample Content
Reader Disposal Reference
Additional Information for Customers in the US/Canada
Additional Information for Customers Outside the US/Canada
Notes on microSD Cards
Go to page top
Legal Notice
Legal Notice
Appendix
Specifications
Supported File Types
System Requirements
Copyright 2012 Sony Corporation
Go to page top
Reader™ User Guide
16
Search
Getting started
Search
Top page > Getting started > Welcome! > About your Reader™
Print
Basic Operations
Adding/Getting Content
Browsing Content Lists
Reading
Organizing
Other Applications
Settings
Other Information
Contents list
About your Reader™
Enjoy the most natural and intuitive reading experience Sony has to offer. This is e-reading.
Unplug and unwind. Wi-Fi
your Reader™.
Superior touchscreen. Bookmark, highlight and take notes on the high-contrast e-paper
screen. Read clearly under direct sunlight.
Zoom. Easily adjust the font size, or zoom into images for a closer look.
Dictionary and Wikipedia
learn more from the Wikipedia Web site.
You can also:
Personalize the standby screen with either your favorite pictures or the cover of the last-read
book.
Create your own collections and organize your books by bestsellers, favorites, genre and
more.
About this guide
Please read the Quick Start Guide and Important Product Information in this package to help you
get started.
This User Guide describes key features of your Reader. You can also find this guide in [Books]
on your Reader. You can find the User Guide in your language at the support PC Web site.
USA:
http://www.sony.com/readersupport
Canada:
http://www.sony.ca/readersupport
Europe:
http://support.sony-europe.com/eBook/PRS
Australia:
http://www.sony.com.au/support
New Zealand:
http://www.sony.co.nz/support
®
functionality lets you download books and periodicals directly via
®
. Simply tap and hold a word to look up its definition, translate it or
Note
Screenshots in the User Guide may depict screens different from your Reader.
Searching for a specific topic in this User Guide
Use the [Table of Contents] feature of your Reader to search for topics, and then tap a topic to
jump to it.
While viewing this User Guide on your Reader, press the
Page]
You can also tap the page number at the bottom of the screen
[Table of Contents] to view the Table of Contents.
(Menu) button tap [Navigate
tap [Table of Contents].
Jumping to a linked section in this User Guide
Tap the link to a chapter or section indicated with a highlight to open the page.
To return to the page you were previously viewing, while viewing a book or periodical, tap
after tapping a link.
To hide the / icons, press the (Back) button.
Changing the font size
You can adjust the font size to improve legibility. See Details.
Go to page top

Copyright 2012 Sony Corporation
17
Reader™ User Guide
18
Search
Getting started
Search
Top page > Getting started > Welcome! > Reader Features and Functions
Print
Basic Operations
Adding/Getting Content
Browsing Content Lists
Reading
Organizing
Other Applications
Settings
Other Information
Reader Features and Functions
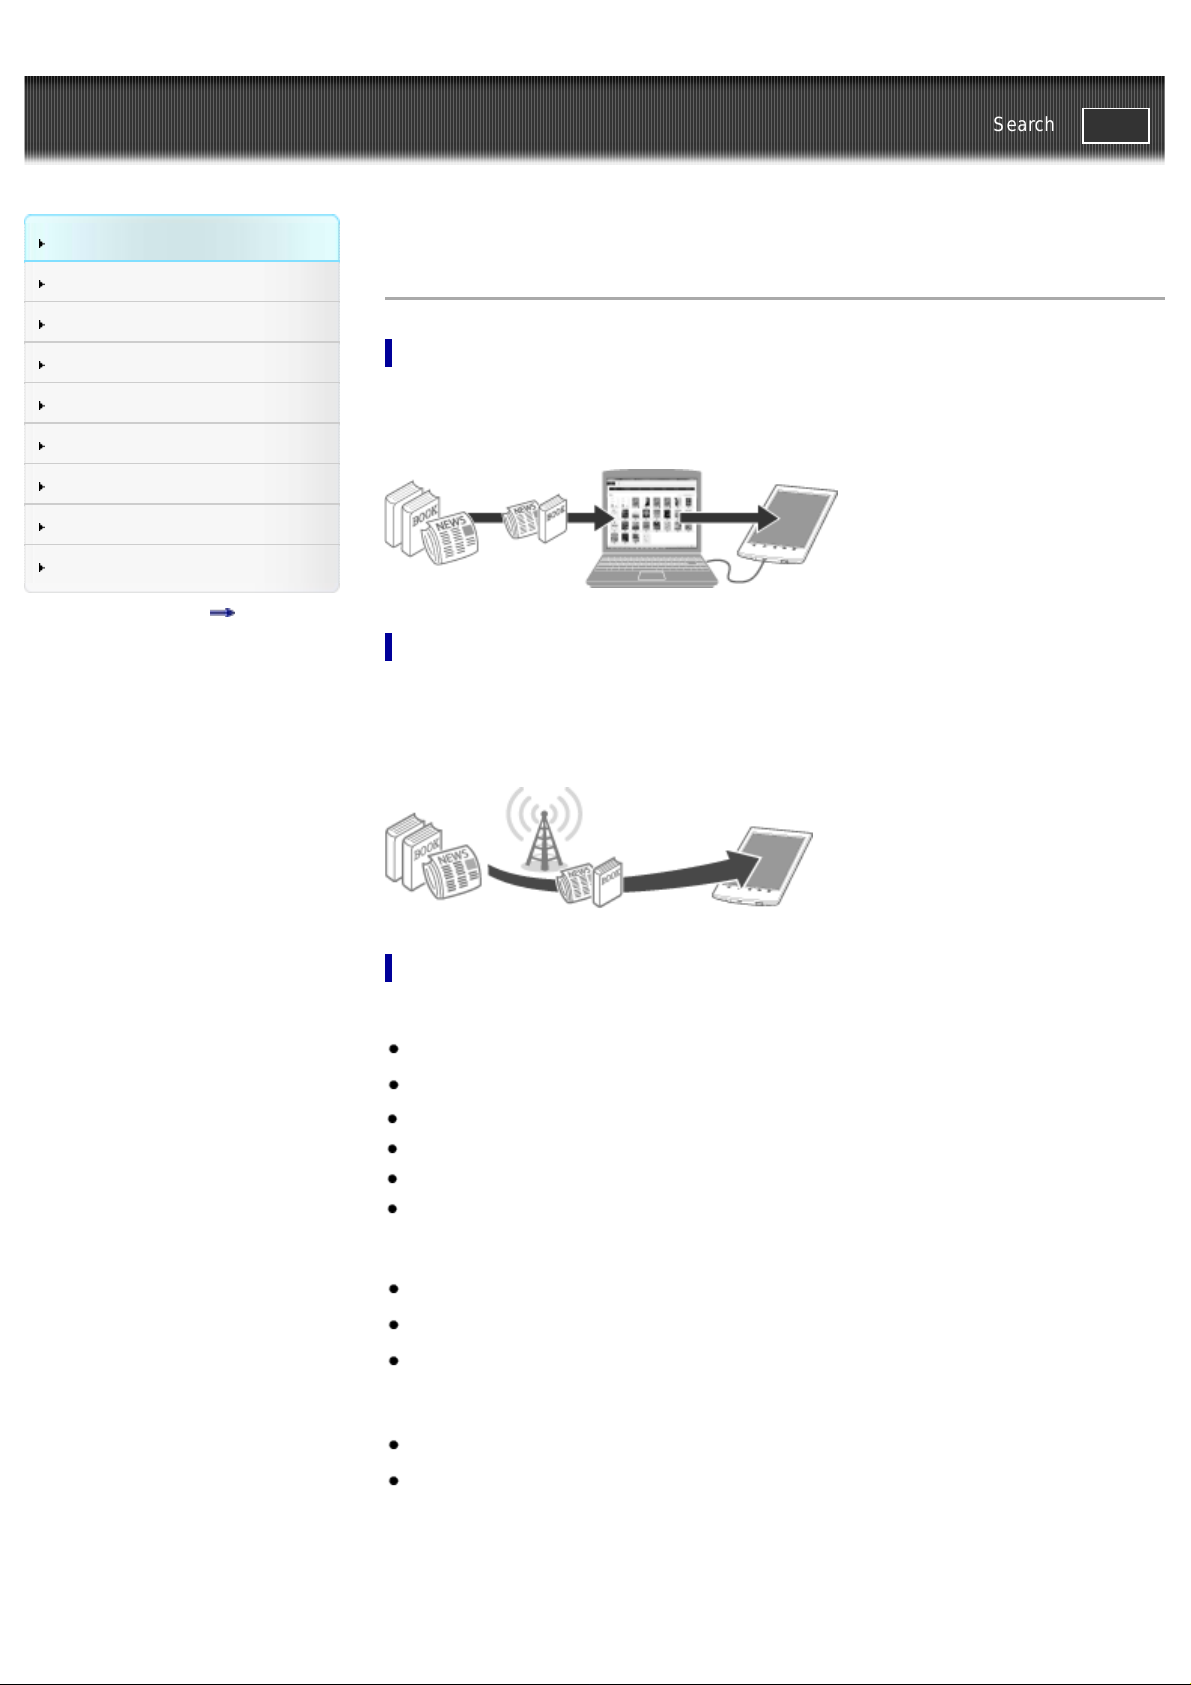
Transferring content from your computer
To enjoy books and pictures on the Reader, use the supplied Reader software to transfer them
from your computer to the Reader. See Details. You can also use the Reader software to backup
and manage the content on the Reader.
Contents list
Shopping for books at Reader™ Store
Visit Reader Store and find books that you are interested in from a large variety of titles and
genres. The [Reader Store] application may be found on the [Home] screen. The initial setup of
the country/region of the Reader will determine if Reader Store is available in your area. See
Details.
Useful features
Wi-Fi network access Details
Access Reader Store Details
Wikipedia Details
Use the Web browser for internet access Details
Check out books from public libraries for reading on the Reader Details
Use Evernote Details
Use Facebook Details
Annotation Details
Add bookmarks Details
Highlight words Details
Handwrite notes on a page Details
Resize
Adjust font size Details
Change the page view mode Details
Zoom in Details
Adjust content view Details

Search
Find notes Details
19
Find pages with a keyword Details
Search content via keyword Details
Jump to pages Details
Dictionary Details
Look up words while reading Details
Look up words in a dictionary Details
List previously looked-up words Details
Read periodicals Details
Collections Details
Supplementary applications
Handwriting Details
Text memo Details
Picture viewer Details
Evernote Details
Facebook Details
Copyright 2012 Sony Corporation
Go to page top
Reader™ User Guide
20
Search
Getting started
Search
Top page > Getting started > Wireless Connectivity > Join a Wi-Fi® Network
Print
Basic Operations
Adding/Getting Content
Browsing Content Lists
Reading
Organizing
Other Applications
Settings
Other Information
Contents list
Join a Wi-Fi® Network
To shop at Reader Store or connect to the internet wirelessly, set up a wireless (Wi-Fi®) internet
connection with the following steps.
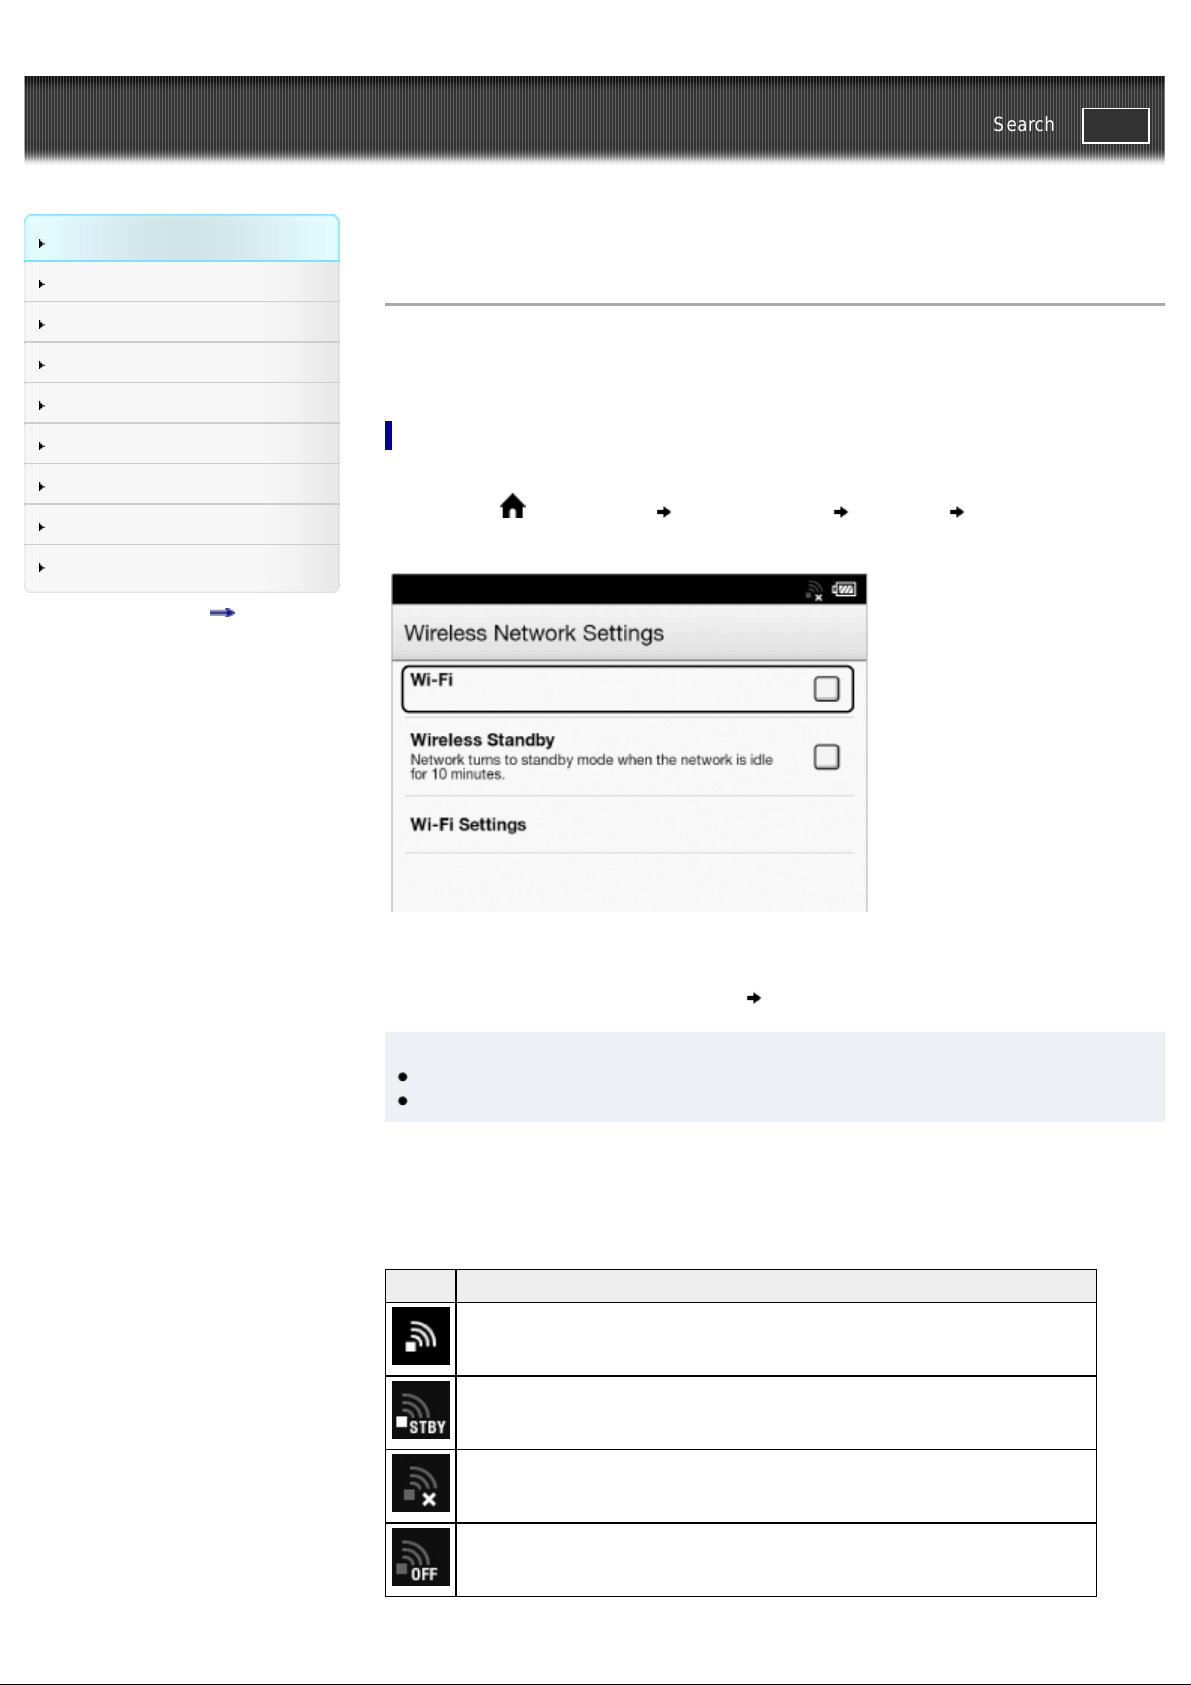
Preparing to set up a Wi- Fi connection
Before connecting to an access point, turn on [Wi-Fi] on the Reader.
1. Press the
Settings].
(Home) button tap [Applications] [Settings] [Wireless Network
2. Check the check box to the right of [Wi-Fi] to turn on the Wi-Fi network.
A check indicates that [Wi-Fi] is turned on. Wi-Fi is turned off by default.
Alternatively, you can tap the status bar [Wi-Fi]. See Details.
Tip
Turn off [Wi-Fi] when it is not in use in order to extend the battery life of the Reader.
Turn on [Wireless Standby] when you want to extend the battery life. See Details.
Wi-Fi status icons
The following icons in the status bar indicate the status of the Wi-Fi connection.
Icon Status
Wi-Fi is activated. The number of bars indicates the Wi-Fi signal strength.
The Wi-Fi network feature of the Reader is in standby mode. See Details.
There is no Wi-Fi access point. In this state, you cannot access Reader Store.
The [Wi-Fi] setting is turned off.
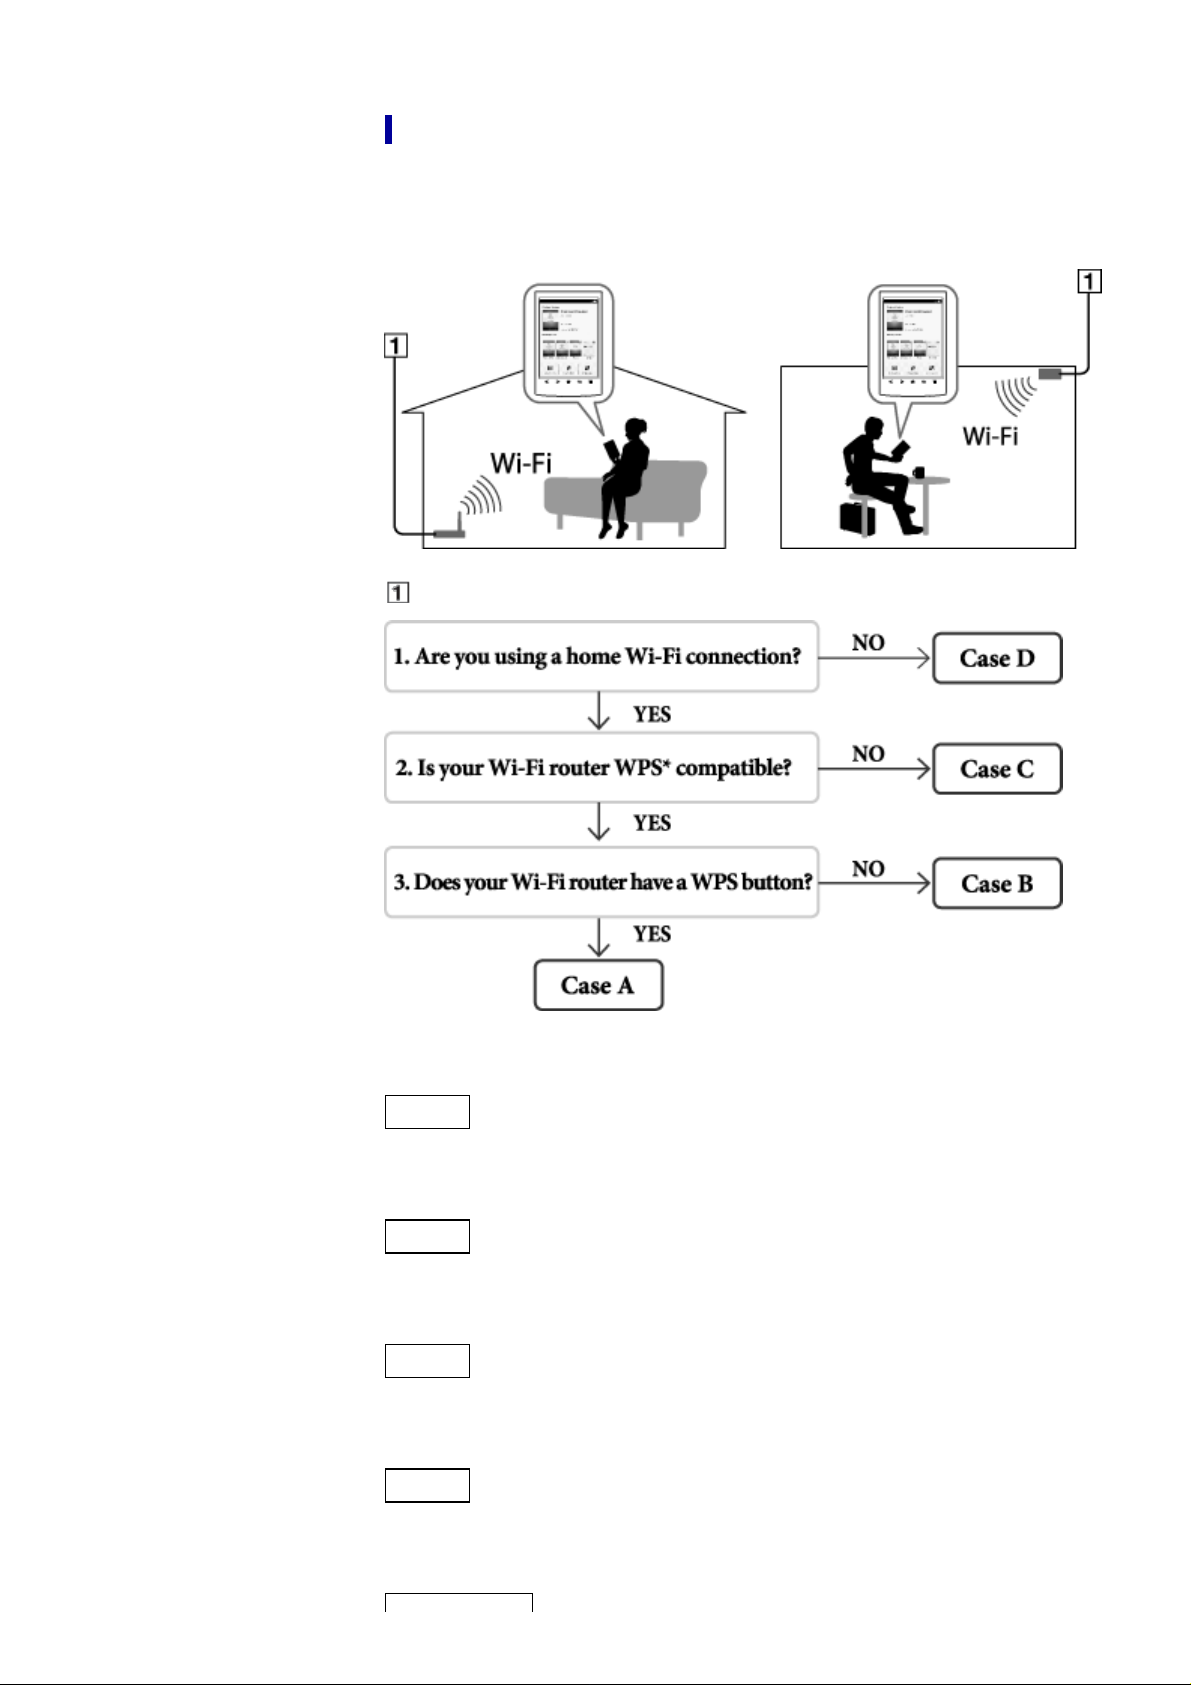
Choosing a connection type
21
Depending on your Wi-Fi environment, connect to an access point via one of the following
methods.
The following questions will determine the most suitable case for setting the Reader’s Wi-Fi
network connection.
Internet
*WPS: Wi-Fi Protected Setup
Case A
A WPS-compatible Wi-Fi router with WPS button Details
Case B
A WPS-compatible Wi-Fi router with PIN input Details
Case C
Connecting to a Wi-Fi router without WPS support Details
Case D
Connecting to an available Wi-Fi network Details
Manual setup
Set up a Wi-Fi network connection manually; connect to an access point for which the SSID is
22
set to be invisible. See Details.
Case A: A WPS - compatible Wi-Fi router with WPS button
The Reader is compatible with WPS (Wi-Fi Protected Setup), which lets you easily make a Wi-Fi
connection using the “WPS” or “Connect” button on your WPS-compatible Wi-Fi router. Make
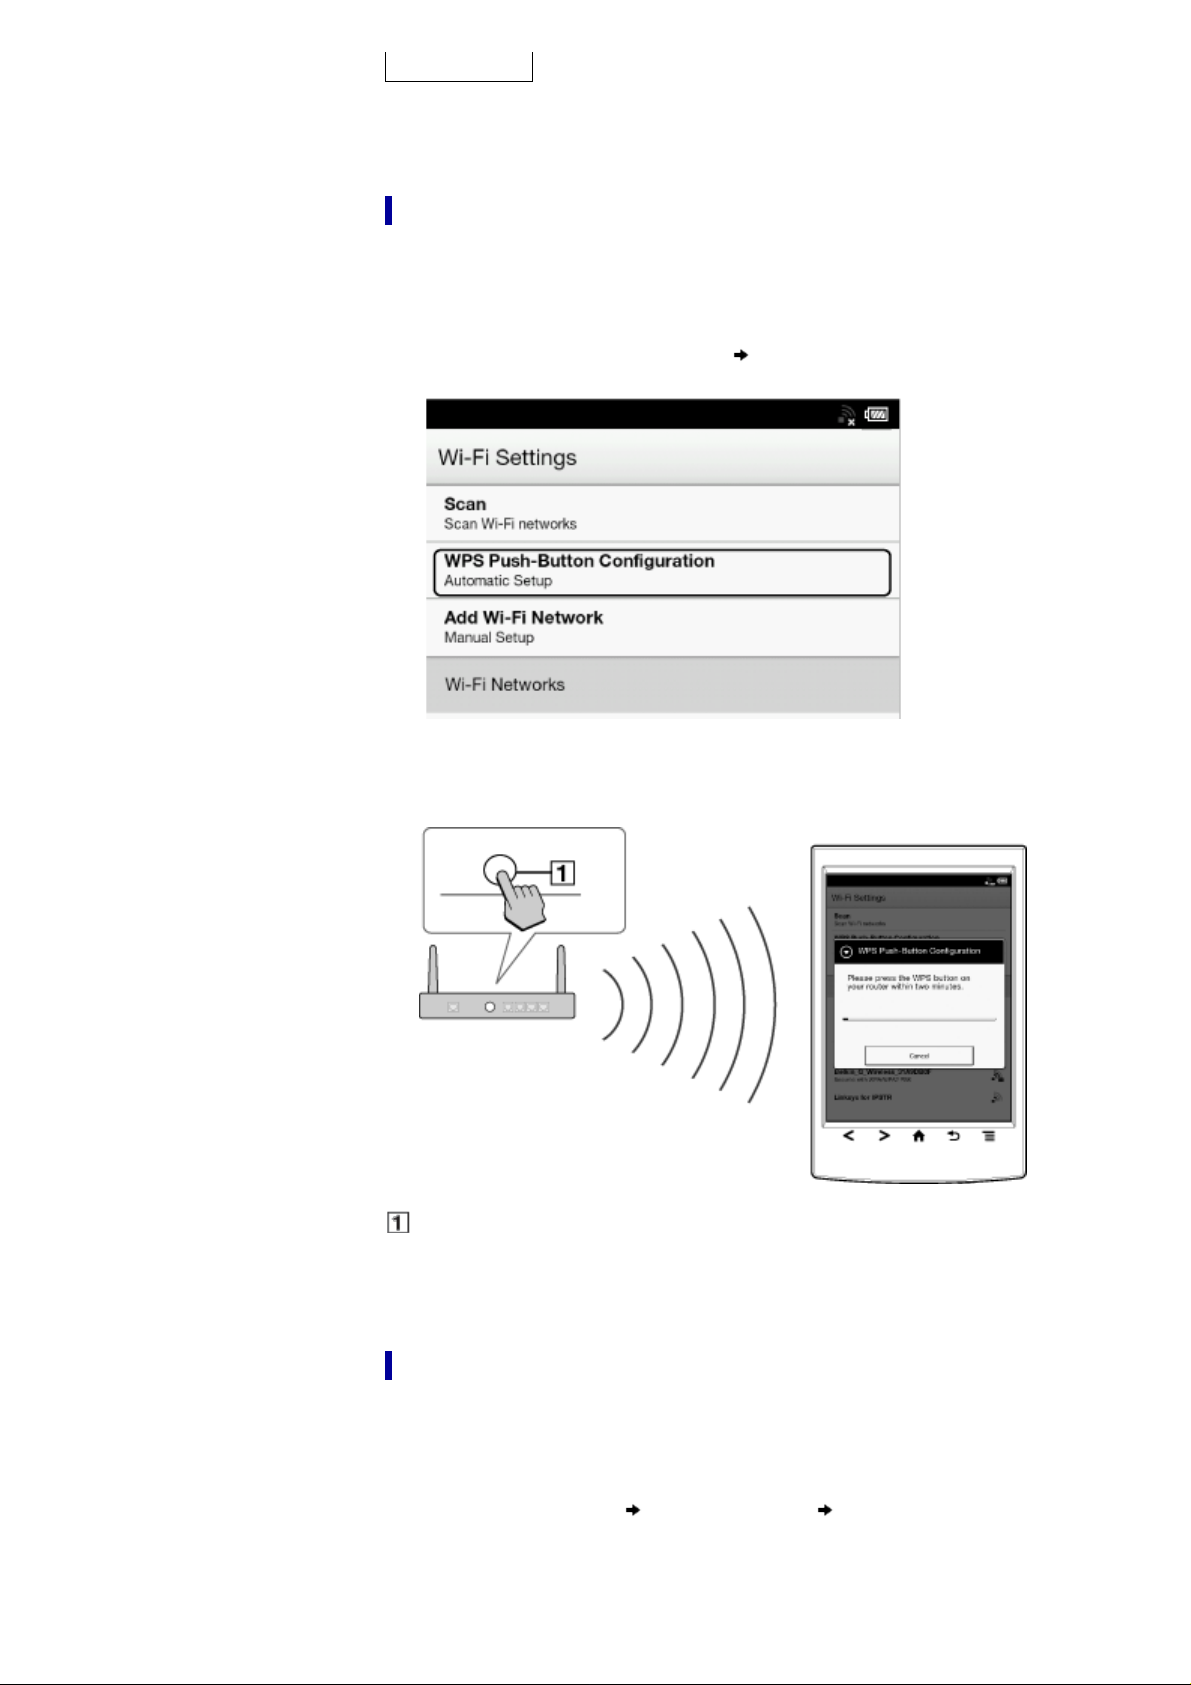
sure to turn on [Wi-Fi] and tap [Wi-Fi Settings] on the [Wireless Network Settings] screen.
Alternatively, you can turn on [Wi-Fi] by tapping the status bar and tapping [Wi-Fi Settings].
1. Tap [WPS Push-Button Configuration]
[Start].
2. On your Wi-Fi router, press the “WPS” or “Connect” button within 2 minutes.*
The Reader automatically attempts to establish a Wi-Fi connection.
* The name of the button on your Wi-Fi router may vary.
“WPS” or “Connect” button
3. After the Reader screen shows the setup completion, tap [OK].
The wireless connection status is displayed in the status bar. See Details.
For more technical notes, see Details.
Case B: A WPS - compatible Wi-Fi router with PIN input
If your WPS-compatible Wi-Fi router does not support push-button configuration, connect by
using a PIN (Personal Identification Number). Make sure to turn on [Wi-Fi] and tap [Wi-Fi
Settings] on the [Wireless Network Settings] screen. Alternatively, you can turn on [Wi-Fi] by
tapping the status bar and tapping [Wi-Fi Settings].
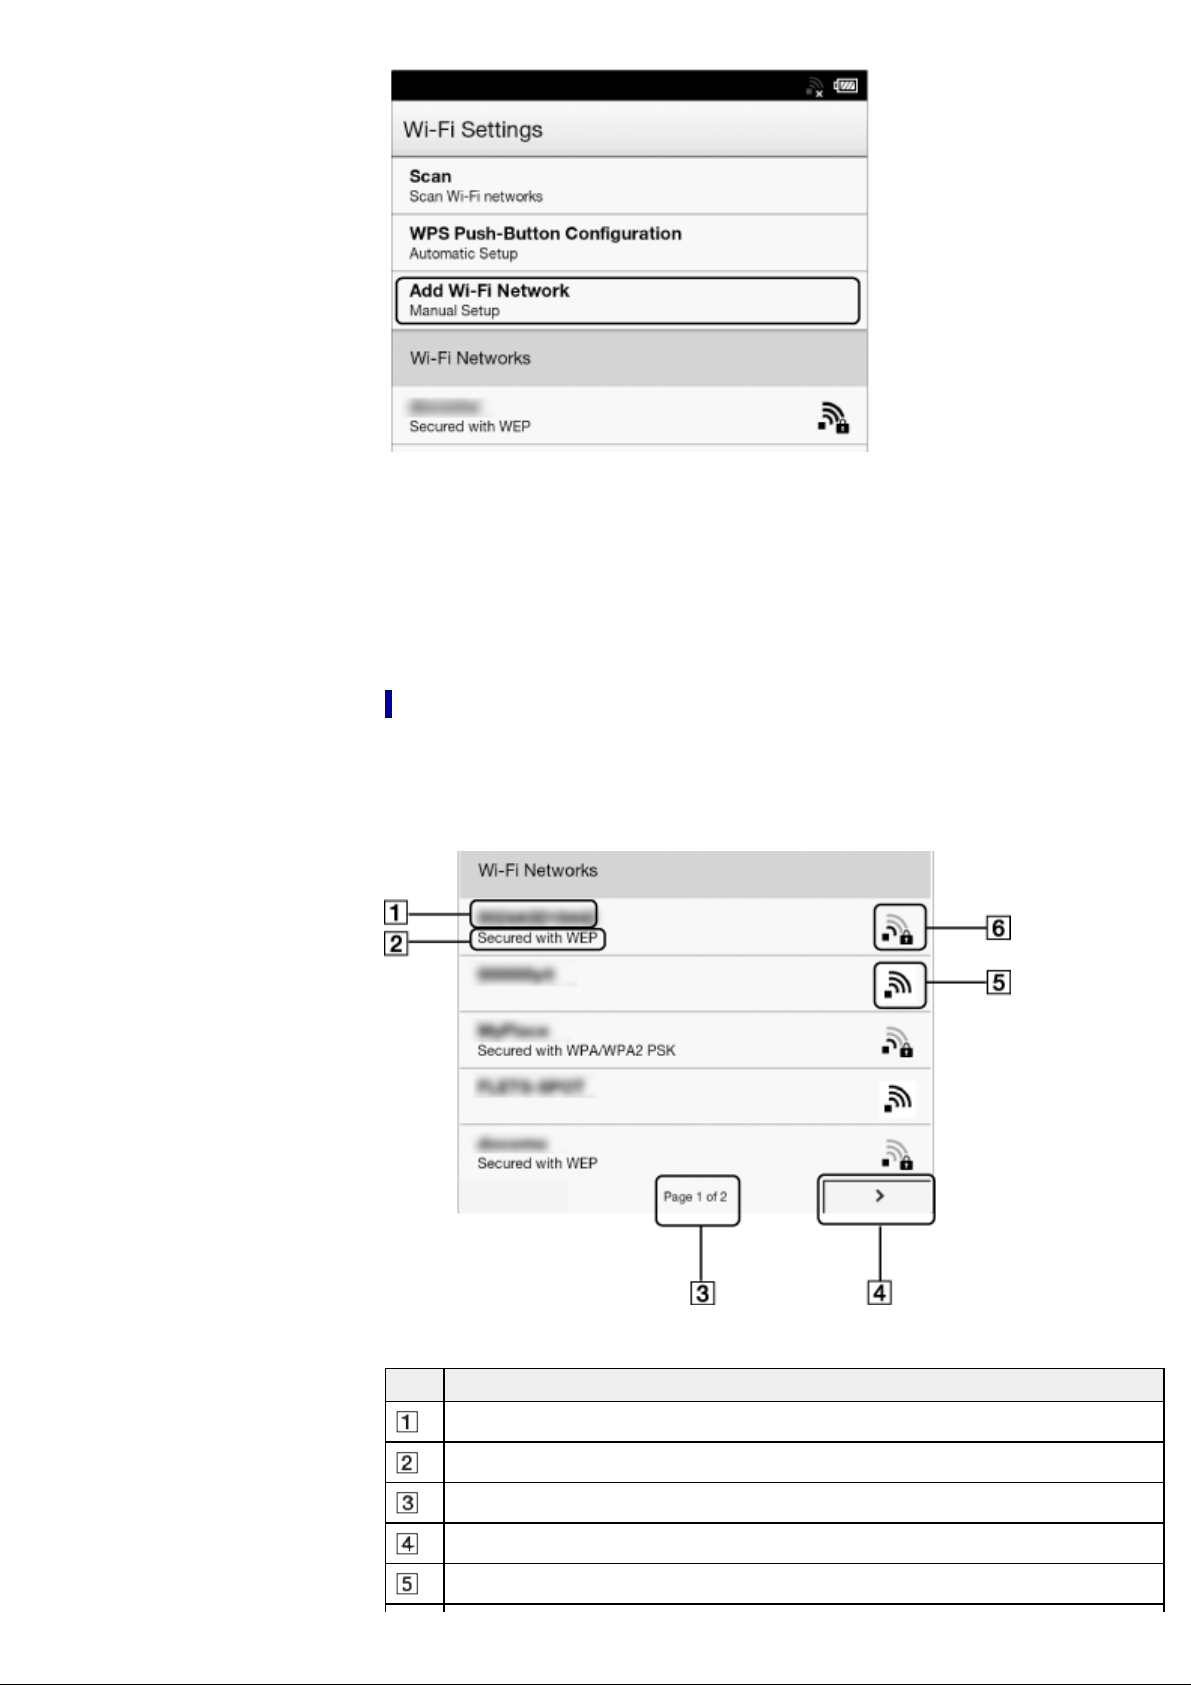
1. Tap [Add Wi-Fi Network]
[WPS PIN Method] [Start].
A PIN will be shown on the screen of the Reader.
23
Enter the PIN into your Wi-Fi router. Refer to your Wi-Fi router’s instruction manual for
further details.
2. After entering the PIN, tap [OK] on the Reader.
After a moment, the Reader connects to the wireless network automatically.
The wireless connection status is displayed in the status bar. See Details.
For more technical notes, see Details.
Case C: Connecting to a Wi - Fi router without WPS support
Make sure to turn on [Wi-Fi] and tap [Wi-Fi Settings] on the [Wireless Network Settings] screen.
Alternatively, you can turn on [Wi-Fi] by tapping the status bar and tapping [Wi-Fi Settings].
1. Tap [Scan].
The available access points are listed under [Wi-Fi Networks].
Item Description
Network SSID
Security type
Page indicator
Page turn icon
Wi-Fi is activated and the Reader detects an unsecured network.
Wi-Fi is activated and the Reader detects a secured network. The Wi-Fi router to which
you want to connect requires a password. A password may also be called a WEP
24
key/WPA key/encryption key/network key, etc.
2. Tap your Wi-Fi router’s SSID (Service Set Identifier) in the [Wi-Fi Networks] list. For details
on determining your Wi-Fi router’s SSID, refer to your Wi-Fi router’s instruction manual.
3. If prompted for a password, tap the input area and type in the password using the on-screen
keyboard.
4. Tap [Connect].
The Reader connects to the Wi-Fi network.
The wireless connection status is displayed in the status bar. See Details.
For more technical notes, see Details.
Case D: Connecting to an available Wi-Fi network
Some public wireless access points, or “hotspots”, are open and you can simply connect to
them. Make sure to turn on [Wi-Fi] and tap [Wi-Fi Settings] on the [Wireless Network Settings]
screen. Alternatively, you can turn on [Wi-Fi] by tapping the status bar and tapping [Wi-Fi
Settings].
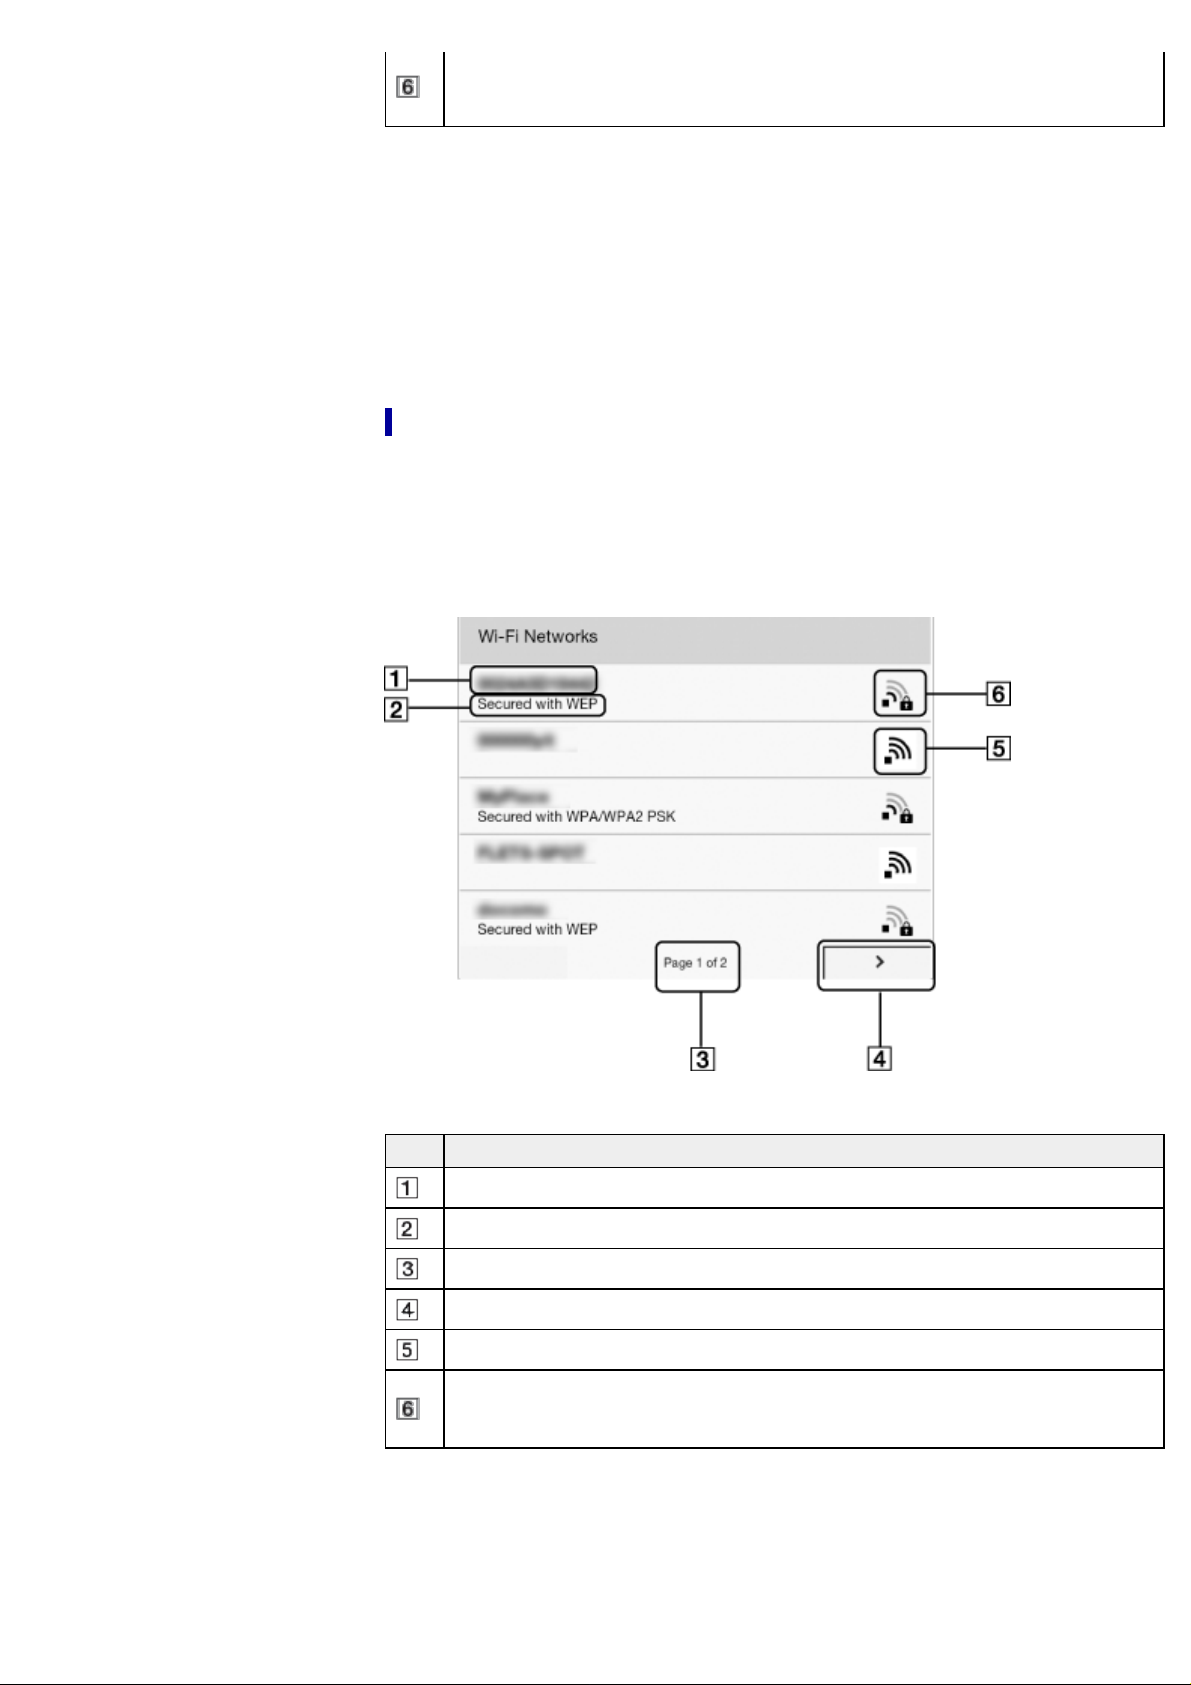
1. Tap [Scan].
The available access points are listed under [Wi-Fi Networks].
Item Description
Network SSID
Security type
Page indicator
Page turn icon
Wi-Fi is activated and the Reader detects an unsecured network.
Wi-Fi is activated and the Reader detects a secured network. The Wi-Fi router to which
you want to connect requires a password. A password may also be called a WEP
key/WPA key/encryption key/network key, etc.
2. Tap your Wi-Fi router’s SSID (Service Set Identifier) in the [Wi-Fi Networks] list.
3. If prompted for a password, tap the input area and type in the password using the on-screen
keyboard.
4. Tap [Connect].
The wireless connection status is displayed in the status bar.
5. The [Browser] application may start automatically to connect to a public access point.
25
Otherwise, start the [Browser] application manually; press the
[Applications]
6. The browser screen may show further information about completing the connection. Follow
any instruction(s) where applicable.
For more technical notes, see Details.
[Browser].
(Home) button, tap
Manually setting a Wi - Fi connection
You can set up a Wi-Fi network connection manually by inputting the required information for
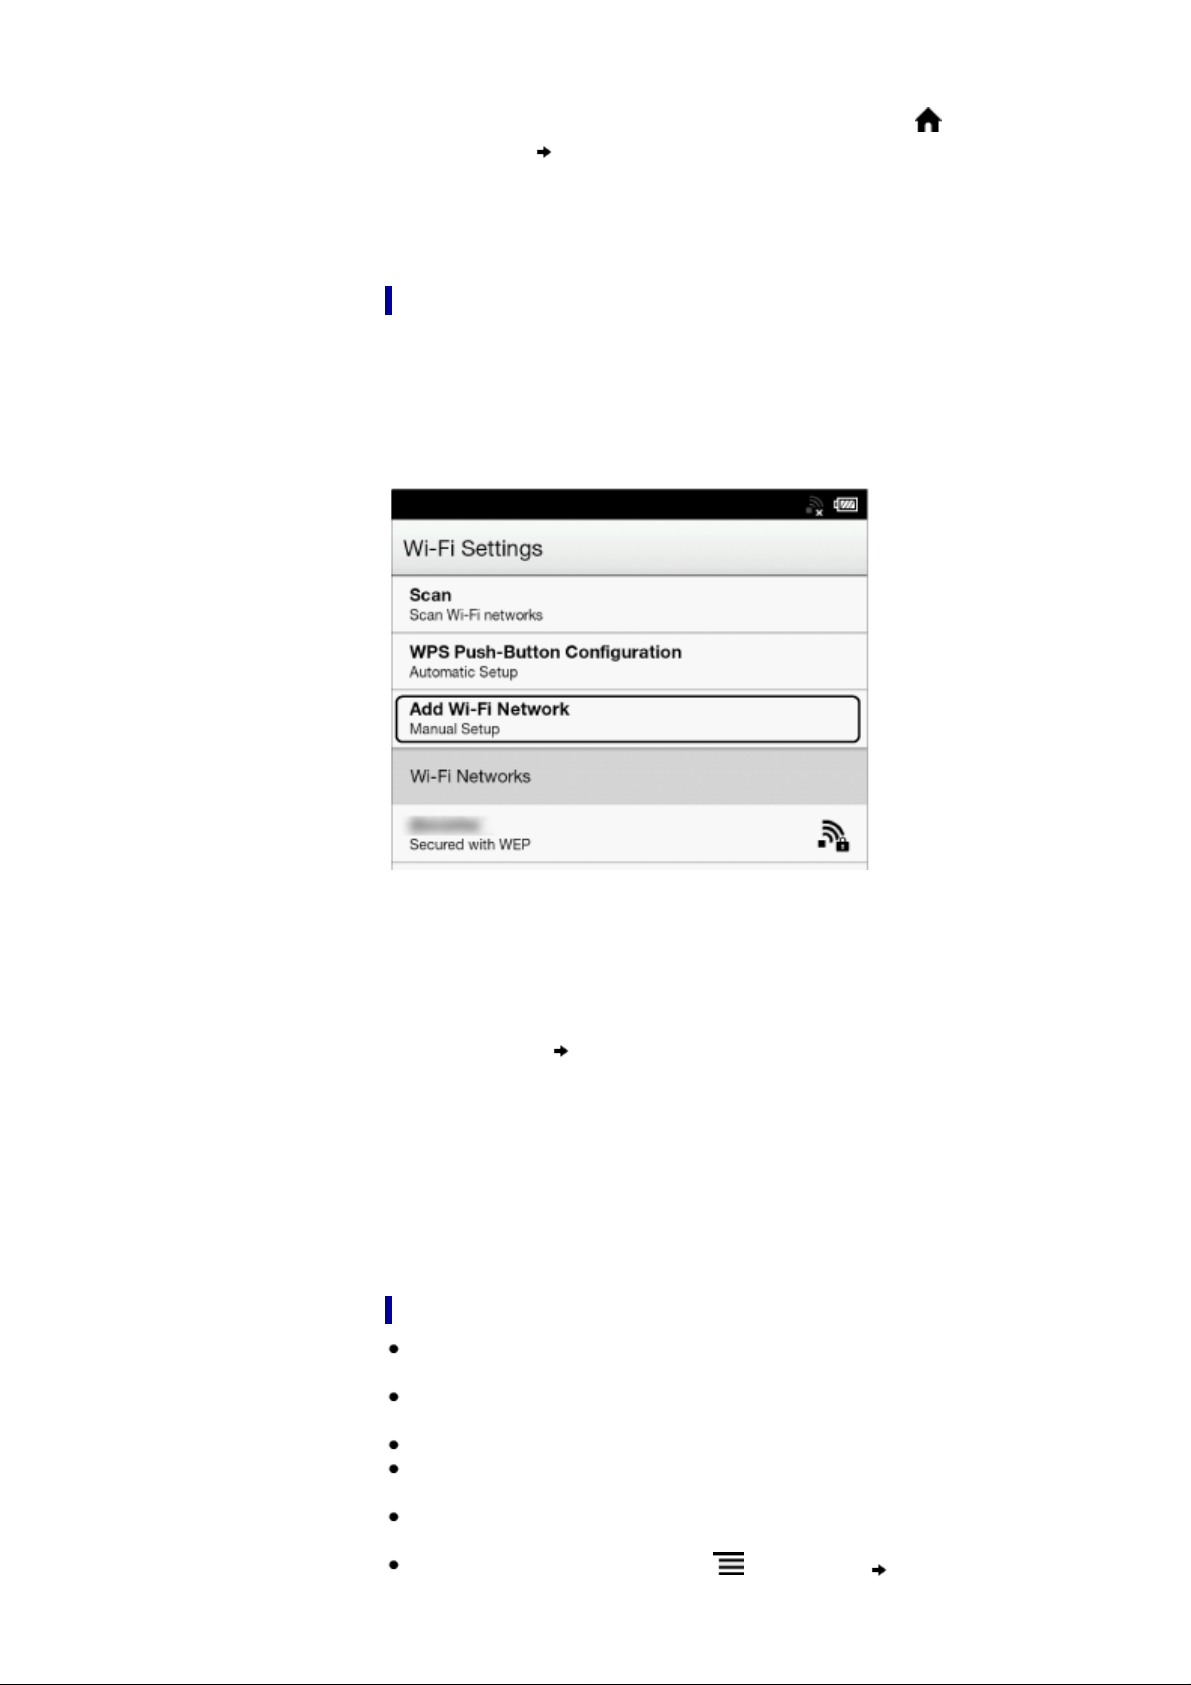
connection. Make sure to turn on [Wi-Fi] and tap [Wi-Fi Settings] on the [Wireless Network
Settings] screen. Alternatively, you can turn on [Wi-Fi] by tapping the status bar and tapping [WiFi Settings].
1. Tap [Add Wi-Fi Network].
2. Tap [Manual Registration].
3. Tap the [SSID] input area and type in using the on-screen keyboard.
4. Tap the [Security Method] menu (the default value is [Open]), and then tap the supported
security type.
5. Tap the [Password] input area and type in your password using the on-screen keyboard, and
then tap [Done] [Save].
6. Tap the saved network SSID in the [Wi-Fi Networks] list on the [Wi-Fi Settings] screen.
7. If prompted for a password, tap the input area and type in the password using the on-screen
keyboard.
8. Tap [Connect].
The Reader connects to the Wi-Fi network.
The Wi-Fi connection status is displayed in the status bar. See Details.
For more technical notes, see Details.
General notes on Wi - Fi connectivity
Tap and hold a network SSID in the [Wi-Fi Networks] list to display the access point’s status
and related information.
Before connecting to a wireless network, check all requirements, user name and/or password
details with the internet/Wi-Fi service provider.
You can configure up to 20 Wi-Fi network connections.
The Reader does not support certain custom Wi-Fi network security systems. For details,
contact the internet/Wi-Fi service provider.
If you edit the password of a Wi-Fi network to which you are currently connected, the Reader
will attempt to reconnect to the Wi-Fi network using the new password.
To use a static IP address, press the
Settings] tap [Use Static IP]. Do not change this setting unless instructed to by a network
(Menu) button tap [Advanced] in the [Wi-Fi

administrator, as the Wi-Fi network connection may not be established correctly.
26
If an access point’s SSID (Service Set Identifier) is private, enter Wi-Fi connection information
manually.
The access point may filter access by MAC address. Check the MAC address by pressing the
(Home) button tap [Applications] [Settings] [About] [Device Information],
then register the MAC address with the access point to establish a Wi-Fi connection.
When you are connected to a Wi-Fi network, you can also display speed, security and other
Wi-Fi network details by pressing the
in the [Wi-Fi Settings] screen.
An access point, once configured, can be connected to again simply by tapping it in the [Wi-Fi
Networks] list and tapping [Connect].
Copyright 2012 Sony Corporation
(Menu) button and tapping [Connection Information]
Go to page top

Reader™ User Guide
27
Search
Getting started
Search
Top page > Getting started > Battery > Charging the Reader
Print
Basic Operations
Adding/Getting Content
Browsing Content Lists
Reading
Organizing
Other Applications
Settings
Other Information
Charging the Reader
The charge/battery status icon at the right side of the status bar shows the battery level. See
Details.
If it is low, choose one of the methods in the following sections to charge the Reader.
Contents list
USB connector
Charge/Busy indicator
Charging via your computer
1. Power on your computer.
2. Connect the Reader to your computer with the supplied USB cable.
Wait until the below screen is displayed.
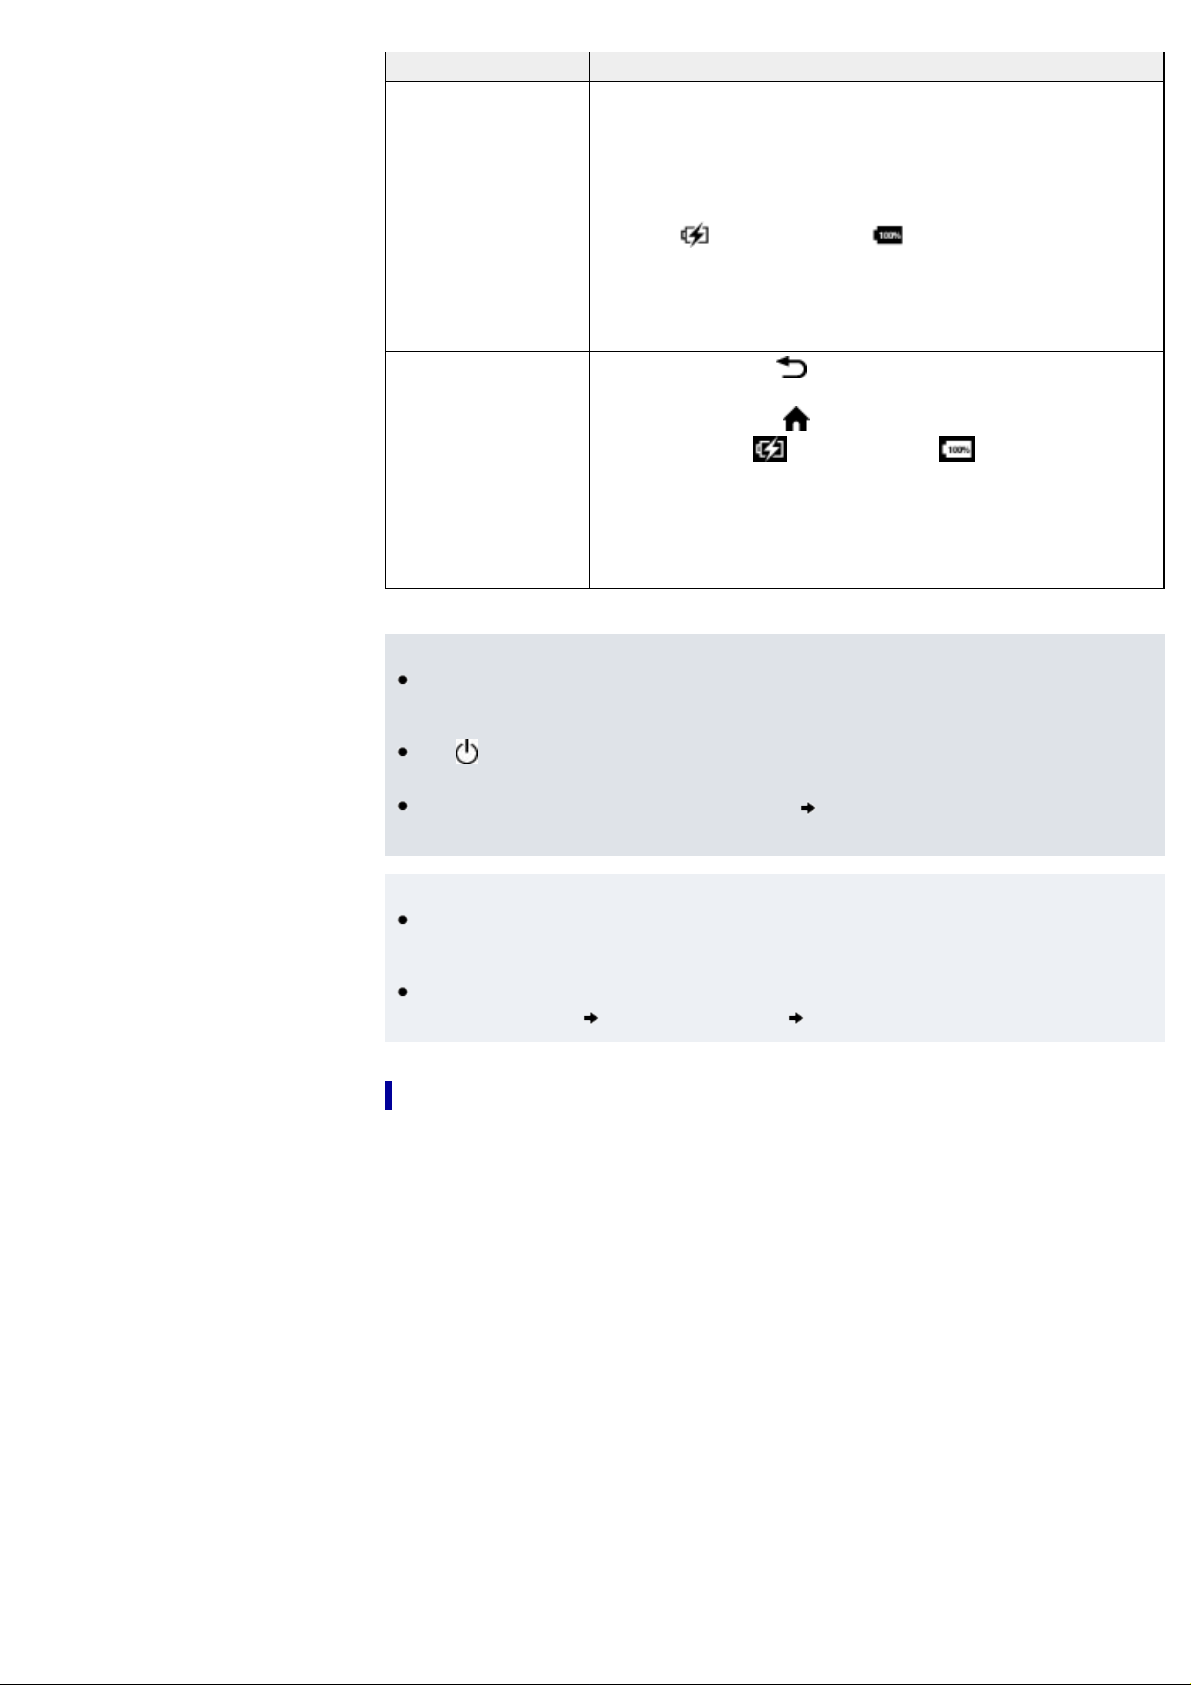
To Description
Tap [Yes] to install the Reader software, or transfer files from your
28
Install the Reader
software, or
transfer data
computer to the Reader while charging. The Reader cannot be
operated during transfer.
After the USB storage screen is displayed on the Reader, it is
detected on your computer, and the “READER” and “SETUP” drives
appear on your computer.
When the
When charging is complete, disconnect the USB cable from the
Reader and your computer.
After a short time, the [Home] screen will appear.
* This icon is only displayed when the Reader is in data transfer mode.
icon* turns into the icon, charging is complete.
Tap [No], or press the
screen.
Alternatively, press the
Charge the Reader
Note
Your computer must be turned on to charge the Reader. The Reader will not be charged if
your computer enters sleep mode or standby mode. Keep your computer turned on with a
stable and continuous power supply while charging the Reader.
The
(Power) button cannot be used when the Reader is connected to your computer and
charging.
If you turn off the Reader by tapping [Settings] [Device Shutdown] while in charging
mode, the Reader will stop charging.
Tip
You can also charge the Reader using the AC Adapter (PRSA-AC10/PRSA-AC1A, sold
separately). This method of charging will take approximately 2 hours to fully charge the
battery.
To change from charge mode to data transfer mode, tap the status bar to display the
notification window
appears. When the icon turns into the icon, charging is
complete.
In this mode, the Reader is not detected by your computer*. When
charging is complete, disconnect the USB cable from the Reader and
your computer.
* This situation may vary, depending on the settings of your computer.
tap [USB connected] [Yes].
(Back) button, to return to the previous
(Home) button. The [Home] screen
Charge/Battery status icon
The charge/battery status icon shows the charging status or approximate remaining charge of
the battery.
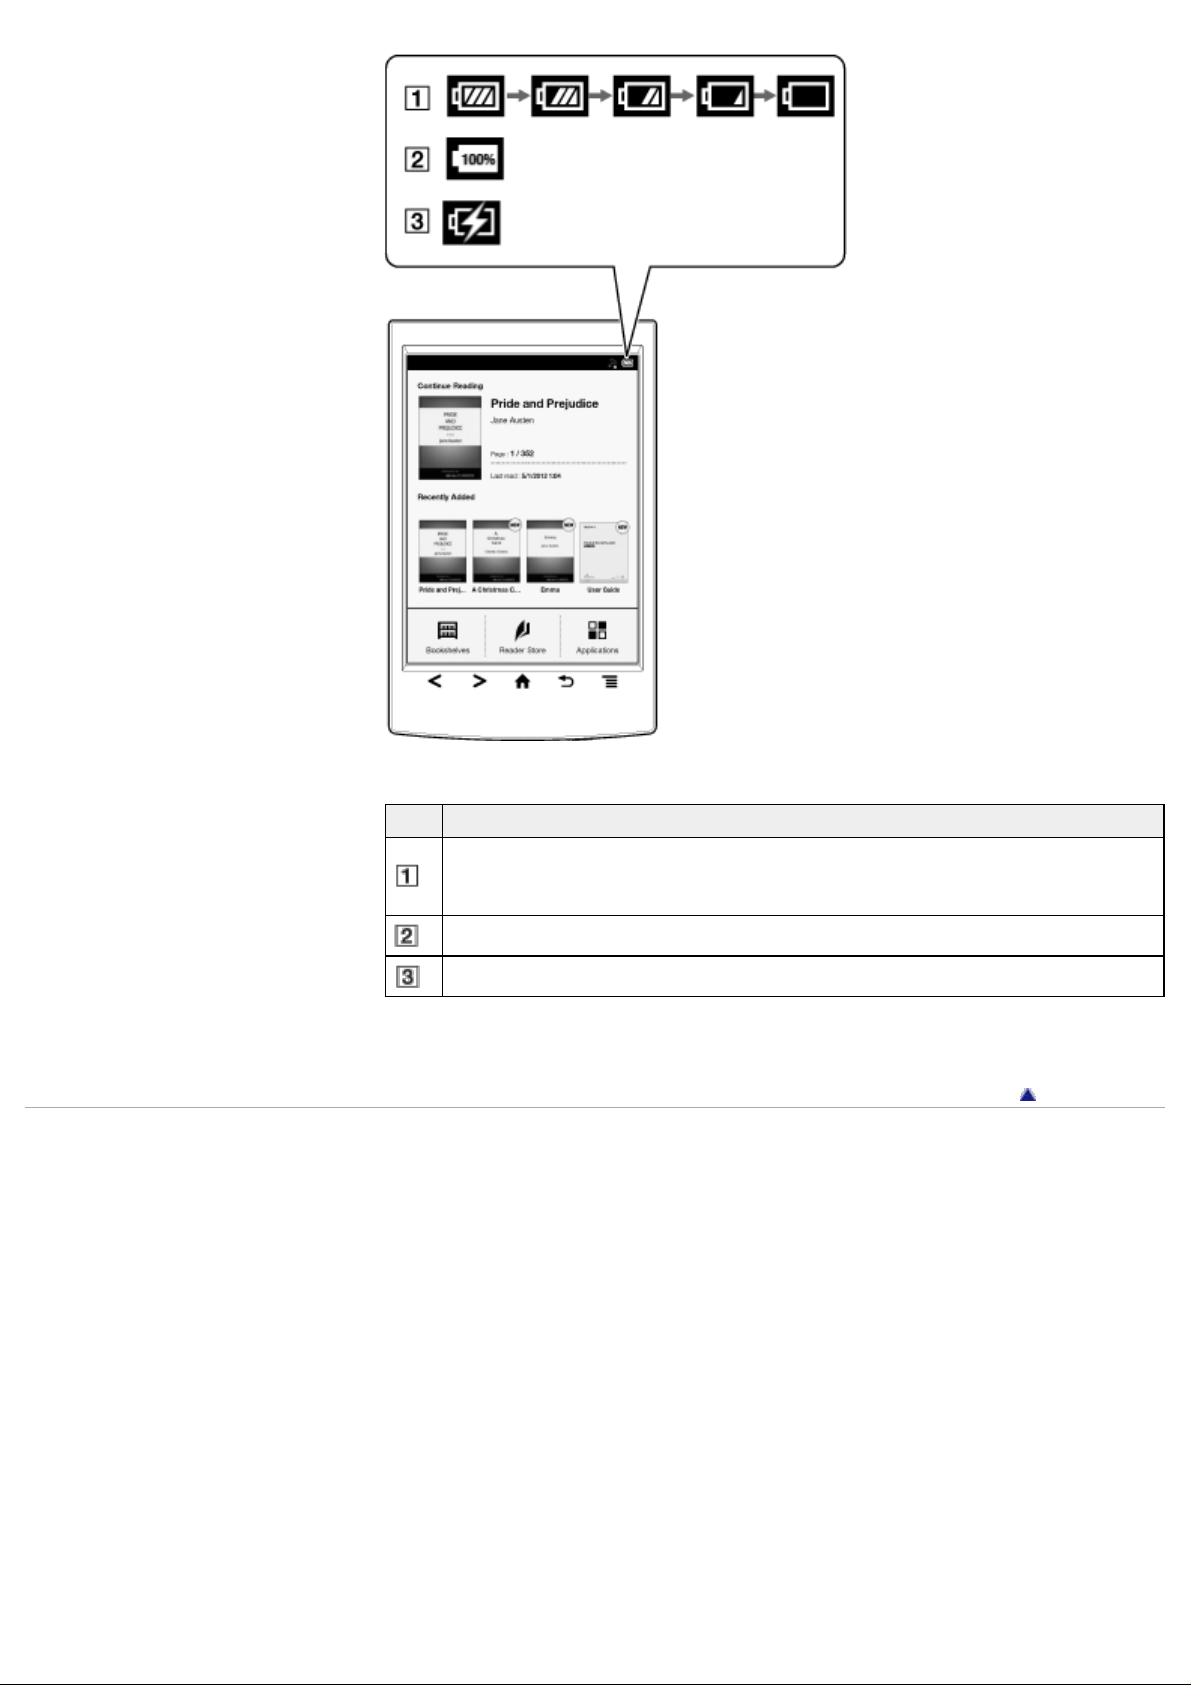
Icon Description
29
Four bars indicate a fully charged or almost-fully charged battery. The number of bars
decreases with the battery’s charge. Zero bars indicate that the battery has almost no
remaining charge.
The battery is fully charged.
The battery is charging.
Copyright 2012 Sony Corporation
Go to page top
Reader™ User Guide
30
Search
Getting started
Search
Top page > Getting started > Battery > Maximizing Battery Life
Print
Basic Operations
Adding/Getting Content
Browsing Content Lists
Reading
Organizing
Other Applications
Settings
Other Information
Contents list
Maximizing Battery Life
There are many ways to conserve battery power. To extend battery life:
If you have no plans to use the Reader, completely power off the Reader.
Do not leave the Reader with the battery depleted for a prolonged period of time. Battery
capacity may be affected.
Use and store the Reader at room temperature, or within the recommended temperature
range of 5°C to 35°C (41°F to 95°F).
Turn off Wi-Fi when no wireless communication is necessary.
Turn on [Wireless Standby] when you want to extend the battery life.
Power- consuming operations
The following may require more power than normal reading operations.
Wi-Fi communications
Constantly updating the [Wi-Fi Networks] list
Displaying graphic-intensive books, periodicals, files or Web sites
Displaying a slideshow with a short interval setting
Using a microSD card
Frequent insertion and removal of a microSD card
Having a large volume of content stored on a microSD card
Annotations, keyword searches and dictionary searches
The Wi-Fi network feature of the Reader is not in standby mode.
Copyright 2012 Sony Corporation
Go to page top
 Loading...