

Page 1

Reader
Jump to the table of contents
Consultation de la table des matières
User’s Guide/Guide de l’utilisateur
PRS-700
Portable Reader System
©2008 Sony Corporation
4-124-649-11(1)
Page 2

About the Manuals
Included with the Reader is the Quick Start Guide and this
User’s Guide. Additionally, after installing eBook Library
software from the supplied CD-ROM, you can refer to the
Help within eBook Library.
Browsing the User’s Guide
Browsing this Guide on your computer
Click the Start menu in the bottom left of the Desktop, then
select “All Programs” – “Reader” – “PRS-700 User’s Guide”
to start Adobe Reader and open the User’s Guide.
For details on how to use Adobe Reader, refer to Adobe
Reader Help.
Hint
To view the User’s Guide, Adobe Reader or Acrobat needs to be
installed. Adobe Reader can be downloaded for free from the
Adobe website (www.adobe.com).
US
US
2
Page 3

Using the eBook Library Help
Refer to the eBook Library Help for details about using
eBook Library, such as importing books to your computer
and transferring them to the Reader.
Follow the steps below to start eBook Library and browse
Help.
Click the Start menu from your computer, then
select “All Programs” – “Reader” – “eBook Library.”
Click “Help” – “eBook Library Help” on the Menu bar.
Help appears.
US
3
Page 4

Table of Contents
About the Manuals ........................................................................ 2
Browsing the User’s Guide ...........................................................2
Using the eBook Library Help .......................................................3
Introduction
What You Can Do with the Reader ................................................ 7
Guide to Parts and Controls ..
Basic Operations
Menu Operation .......................................................................... 14
About the Home menu ................................................................16
Guide to Operate the Touch Panel .
Charging the Reader ..
About charging ...........................................................................21
Turning on the Reader .
About the power management of the Reader .............................24
Calibrating the Touch Panel ........................................................26
Inserting a Memory Card .
Built-in Lighting Controls ..
................................................................. 21
Importing Content
Importing eBooks from “The eBook Store from Sony” ................. 34
Importing Content from Your Computer ..
Importing content files ................................................................37
........................................................ 8
.
............................................ 18
.
.............................................................. 23
.......................................................... 28
.
........................................................... 32
..................................... 36
Transferring Content
Transferring Content to Reader Connected with Your Computer
.................................................................................................. 38
Transferring content via a memory card .....................................41
Synchronizing content in Library with Reader ............................45
Continued
4
US
Page 5

Reading Books
Reading Books ............................................................................ 47
Selecting a book from the Book list ............................................47
Reading books on the Book page ..............................................49
Displaying the Option menu of a Book .......................................53
.
Selecting a book from the Collection list .
Displaying the Option menu of a collection .................................59
.
Jumping to Pages .
Using the Page jump bar ............................................................61
Jumping to the specified number page directly ..........................62
Reading previously displayed pages ..........................................63
Resizing and Zooming .
Adjusting the text size .................................................................65
Zooming in/out ............................................................................67
Switching screen orientation (vertical/horizontal) .
Searching for Books or Keywords ..
Searching for books ....................................................................74
Searching a book for keywords ...................................................76
Creating Notes on a Book Page .
Creating a bookmark on a Book page ........................................79
Highlighting words ......................................................................82
Hiding Notes (bookmark/highlight) .............................................84
Adding a Comment to a Note .
Opening a Page from a Notes List ..
Searching the Reader for Notes .................................................89
Displaying the Option menu of the All Notes list .........................90
Searching a book for Notes ........................................................91
Displaying the Option menu of the Notes List .............................93
Deleting a book .
..................................................................... 60
.
.............................................................. 64
............................................. 71
................................................ 78
.
.
.................................................... 85
........................................................................ 94
.
................................... 58
...................... 69
.
............................................ 88
Playing Audio Files
Playing Audio Files ...................................................................... 95
Playing audio files transferred from your computer ....................95
Continued
5
US
Page 6

Displaying the Option menu of the Audio....................................98
Viewing Pictures
Viewing Pictures ....................................................................... 100
Viewing pictures transferred from your computer .....................100
Displaying the Option menu of the Picture ...............................104
Settings
Changing Settings ..................................................................... 106
Settings menu items .................................................................109
Advanced Settings menu items ................................................112
Troubleshooting
Troubleshooting ......................................................................... 114
Restoring default settings .........................................................124
.
Uninstalling eBook Library .
...................................................... 125
Other Information
Updating the Reader Device Software ...................................... 126
About Books Pre-installed on Reader ..
Notes on Reader Disposal ..
Precautions ..
On safety ..................................................................................132
On installation ...........................................................................132
On heat build-up .......................................................................133
On the headphones ..................................................................133
Note on use ..............................................................................134
Notes on memory cards ...........................................................135
On software ..............................................................................137
On Cleaning .
On Copyrights ..
About GNU GENERAL PUBLIC LICENSE ...............................140
Specifications .
Index ......................................................................................... 143
............................................................................. 129
............................................................................ 138
.
......................................................................... 139
.
.......................................................................... 142
...................................................... 128
..................................... 127
6
US
Page 7
Introduction
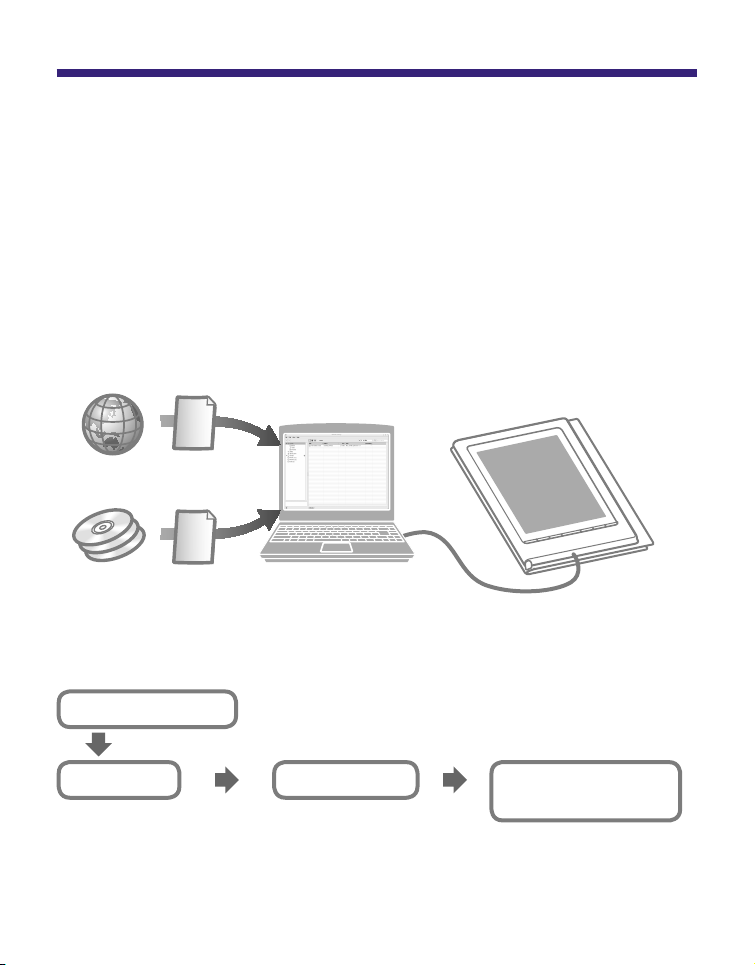
What You Can Do with the Reader
First, read the Quick Start Guide to prepare the Reader for
use. Initially after purchase, you need to charge the Reader
battery, and install the dedicated software “eBook Library”
on your computer.
Once initial preparation is complete, you can transfer
content from your computer to the Reader to take anywhere
you wish.
Downloaded
eBooks
1
*
2
*
*1 Online eBook store
*2 Book/Audio/Picture files that you already have
Getting Started
Importing
Downloaded eBooks from
“The eBook Store from
Sony.”
Charge the Reader, then install eBook Library
and Adobe Digital Editions.
Transferring
Transfer content from your
computer to the Reader
using eBook Library.
Reading/
Playing/Viewing
Enjoy content on the
Reader.
7
US
Page 8
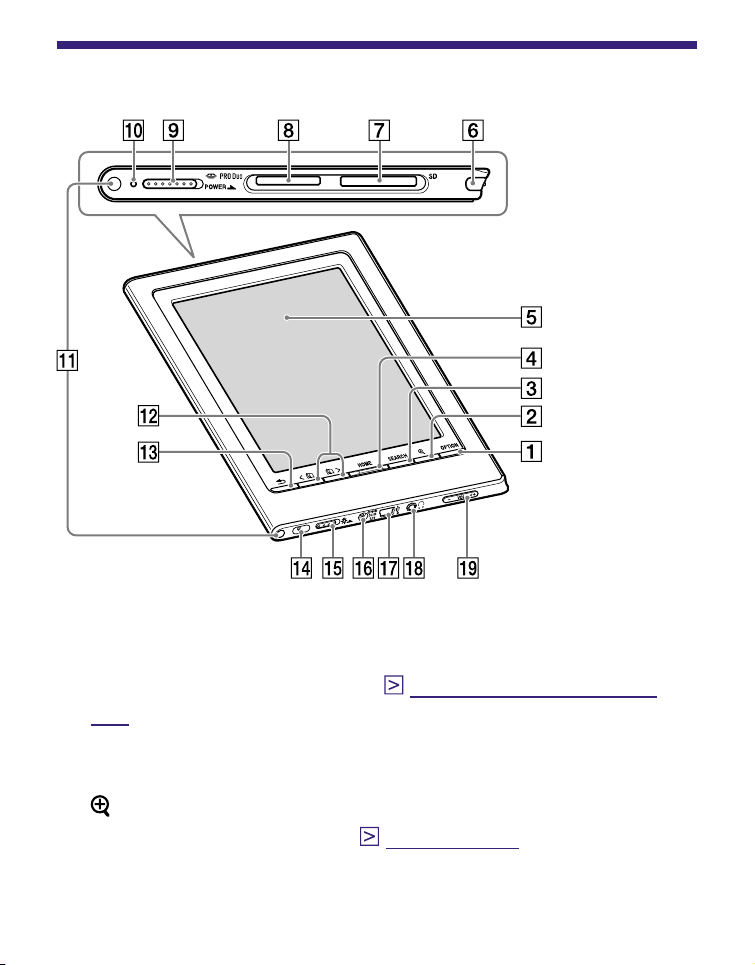
Guide to Parts and Controls
Front
OPTION button
Displays the Option menu. (
)
104
You can use various functions such as creating Notes,
jumping to a page, from the Option menu.
page 53, 59, 90, 93, 98,
(Size) button
Displays the Size menu. (
page 64, 103
)
You can adjust the text size and zoom in/out a page or
picture from the Size menu.
Continued
8
US
Page 9

SEARCH button
Displays the Search menu. (
page 71
)
The Search menu appears with the on-screen keyboard.
You can search for books or keywords by inputting a
word using the on-screen keyboard.
HOME button
Displays the Home menu. (
Touch panel
page 16
)
The touch panel gives you simple access to the various
functions on the Reader (
Stylus
page 18
).
The stylus enables you to perform precise operations
such as highlighting, on the touch panel (
).
114
SD Memory Card slot
Used to insert a SD Memory Card (optional). (
“Memory Stick Duo” slot
page 13, 18,
page 28
Used to insert a “Memory Stick Duo” Memory Card
(optional). (
page 28
)
)
POWER switch
Switches on/off the Reader. (
page 23
)
To shutdown the Reader, slide and hold it for more than
3 seconds (
Indicator
page 24
).
Lights up in red while charging, and goes off when
charging is complete. (
page 21
)
Flashes orange while the Reader is accessing your
computer via USB.
Also flashes in orange while switching the Reader on or
Continued
off.
9
US
Page 10
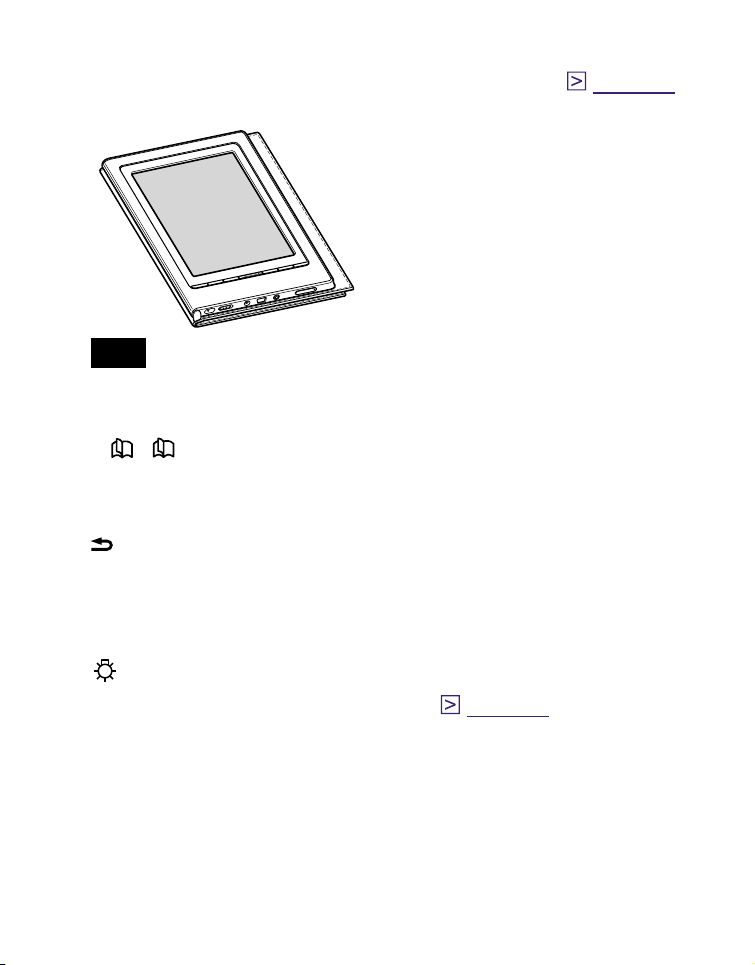
Holes for soft cover attachment
The soft cover is attached when purchased. (
Folds open in use
Note
Do not leave the Reader in high temperature conditions, as it
may damage the soft cover.
< / > (Page Turn) buttons
Turns pages. You can also turn pages using the touch
panel.
(Back) button
Returns to the previous menu.
Hole for hand strap
Used to attach the hand strap (optional).
page 12
)
(Light) Switch
Switches on/off the built-in light. (
DC IN jack
page 32
Used to connect the AC Adaptor for Reader (ACS5220E) (optional).
Hint
The Reader can be charged by connecting to a computer
using the supplied USB cable.
)
Continued
10
US
Page 11
USB connector
Used to connect the USB cable (supplied). (
(Headphones) jack
Used to connect headphones (optional). (
VOL –/+ button
Adjusts the volume. (
page 97
)
page 39
page 95
To mute the sound, press and hold either edges of the
VOL –/+ button. To restore the sound, press the VOL –/+
button again.
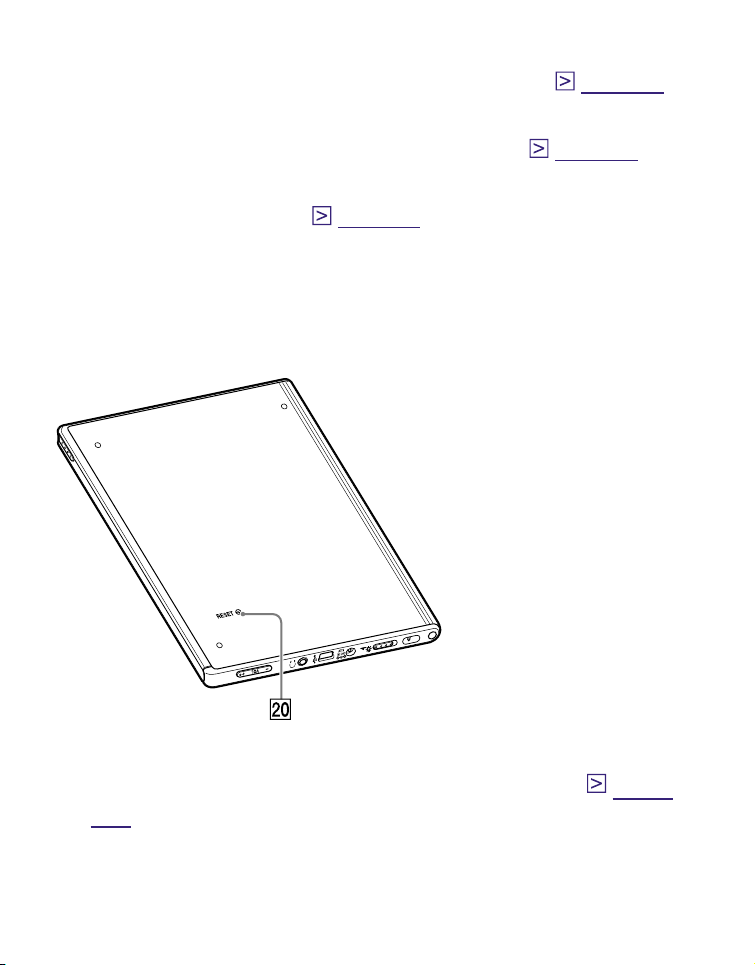
Rear
)
)
RESET button
Resets the Reader if no operation is possible. (
114)
page
Continued
11
US
Page 12
About the serial number
The serial number provided for the Reader is required for
the customer registration. The number is on the label on the
rear of the Reader. Do not remove the label.
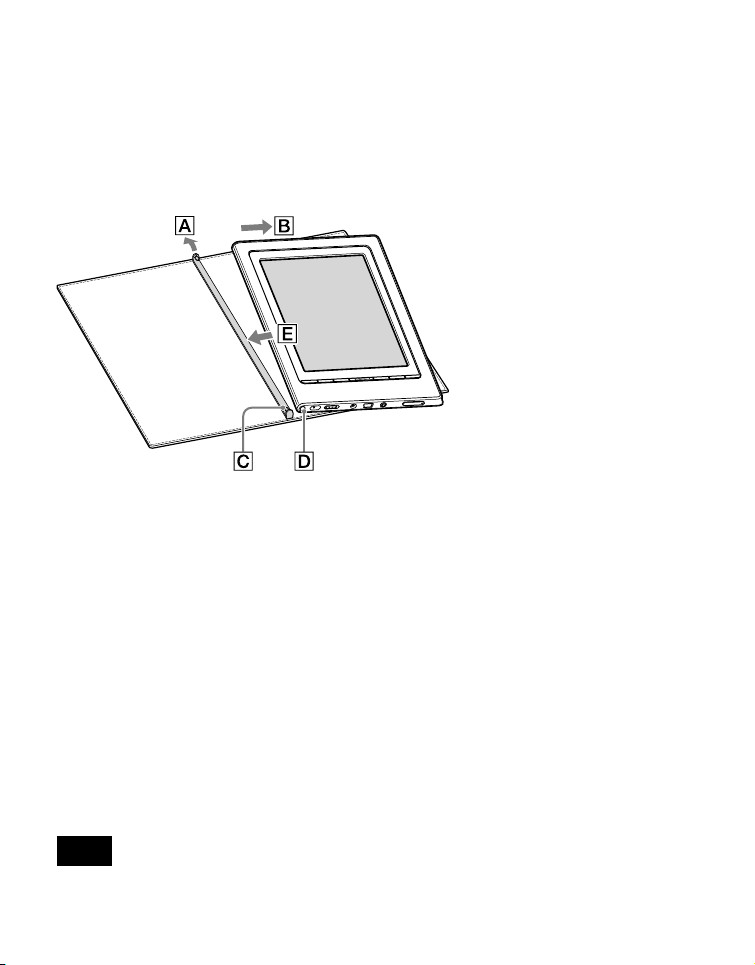
Removing/attaching the soft cover
Removing the soft cover
Pull the tab of the soft cov
er towards A.
Remove the Reader in the direction of B.
hing the soft cover
Attac
Insert the tab C of the soft cover in the hole D of the
Reader.
v
Pull the tab of the soft co
er towards A.
Insert the Reader in the direction of E to attach it to the
soft co
Chec
inser
ver.
k that the tabs of the soft cover are completely
ted in the holes of the Reader.
Note
Note that the tab of the soft cover may become deformed, if you
pull the tab too strongly.
Continued
12
US
Page 13
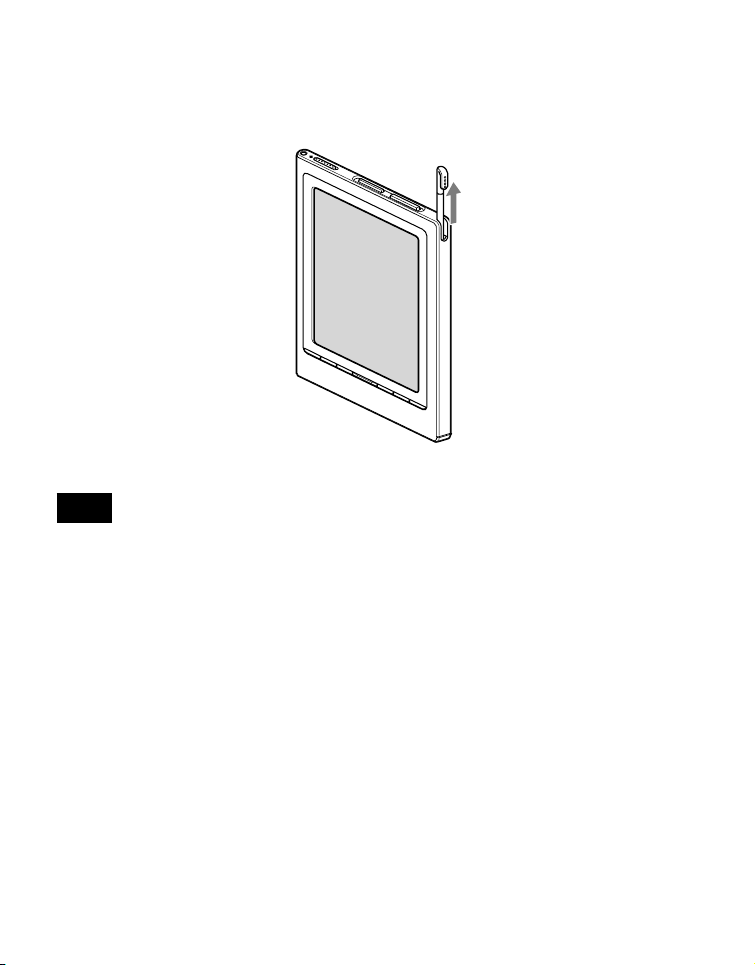
Removing the supplied stylus
The supplied stylus is stored on the right side of the Reader.
Pull it out from the top when you use it.
Note
When you put the supplied stylus back into the holder, make sure
to insert it fully to the bottom of the holder.
13
US
Page 14
Basic Operations
Menu Operation
You can operate the Reader using the touch panel and the
buttons on the Reader.
From the Home menu, you can read/play/view content, and
configure the settings.
The items/contents displayed on the screen can be selected
by tapping the touch panel. For details about using the touch
panel, refer to “Guide to Operate the Touch Panel.” (
)
18
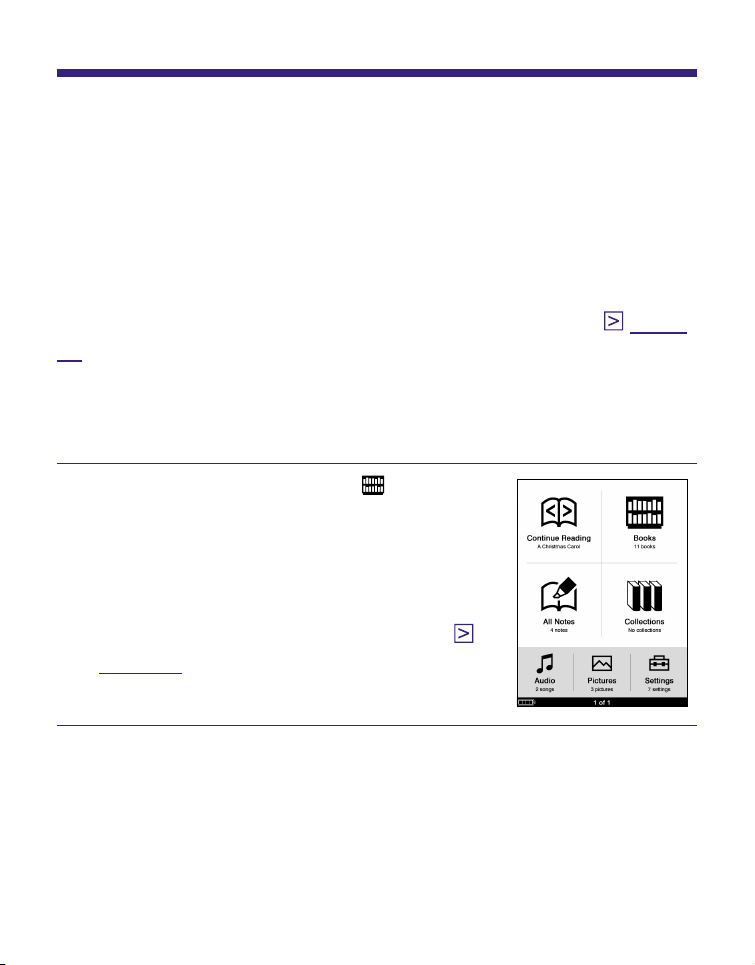
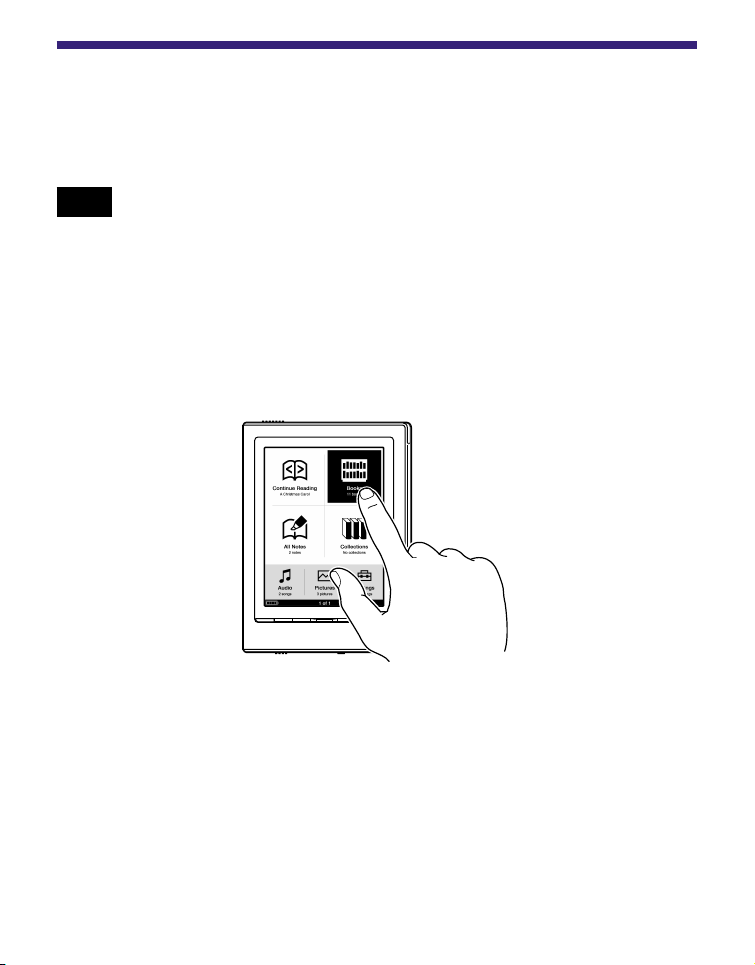
Menu flow
Example: reading a book
In the Home menu, tap (Books).
The Book list appears. By default,
books are sorted by the title in the
list.
For details about the Home menu,
refer to “About the Home menu.” (
page 16
)
page
Continued
14
US
Page 15
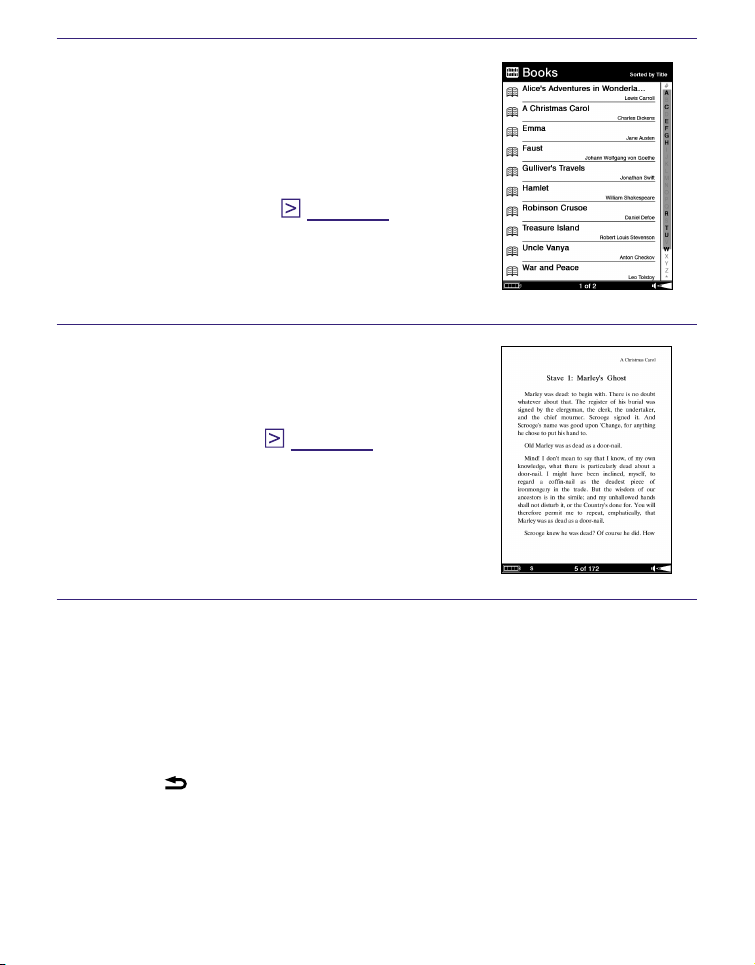
Tap the desired book on the
Book list.
The Book page appears.
For details about the Book list,
refer to “Selecting a book from
the Book list.” (
Read the book.
For details about the Book page,
refer to “Reading books on the
Book page.” (
page 47
page 49
)
)
To return to the Home menu
Press the HOME button.
To return to the previous screen
Press the (Back) button.
15
US
Page 16
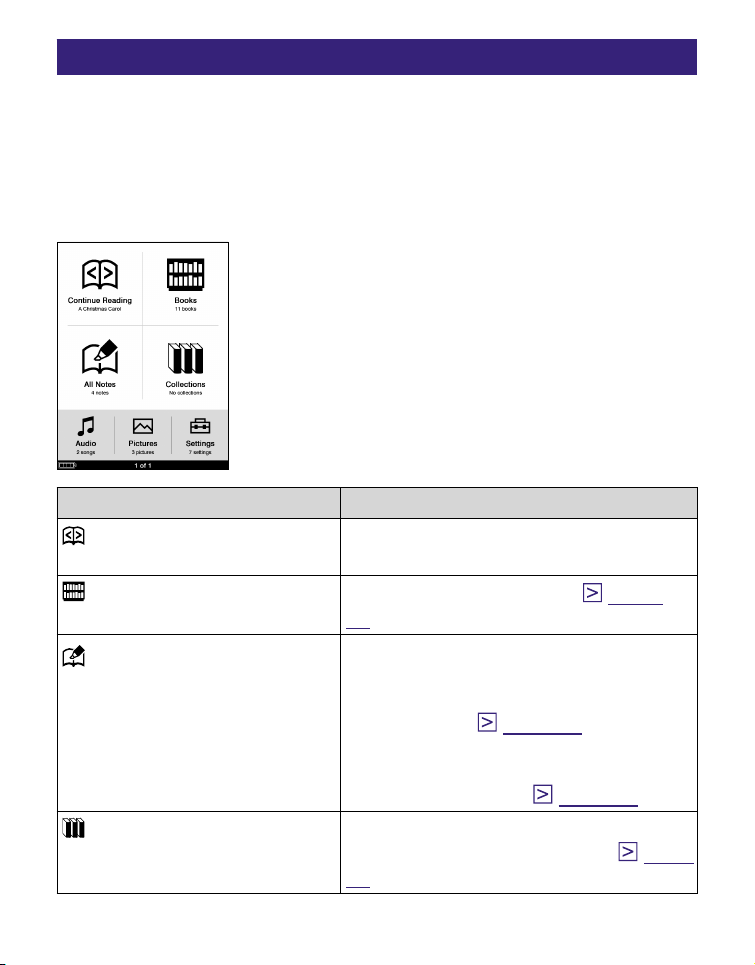
About the Home menu
The Home menu is the starting point to read/play/view
content and to configure the settings. You can select menu
items by tapping them.
The Home menu can be always displayed by pressing the
HOME button.
Menu item Description
(Continue Reading)
(Books)
(All Notes)
(Collections)
Continues reading from the last
displayed page.
Displays the Book list. (
47
)
page
Displays the list of all the
bookmarks, highlights and
comments created in Books within
the Reader. (
page 89
)
For details about bookmarks and
highlights, refer to “Creating Notes
on a Book Page.” (
page 78
)
Displays the list of collections
created by eBook Library. (
58
)
Continued
page
16
US
Page 17
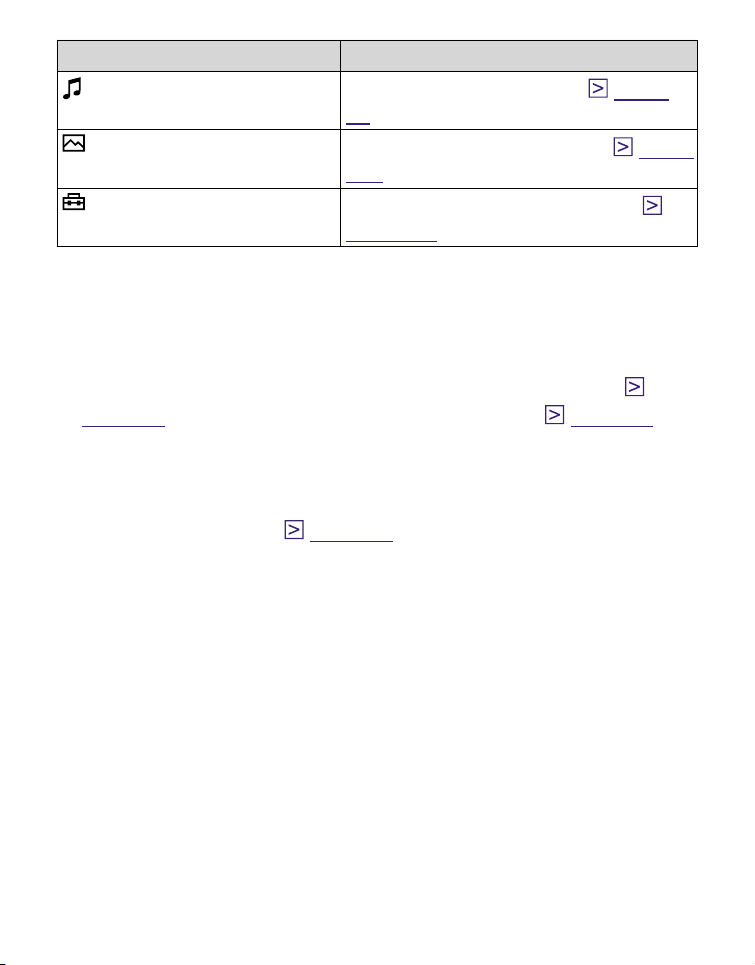
Menu item Description
(Audio)
(Pictures)
(Settings)
Displays the Audio list. (
95
)
Displays the Pictures list. (
100
)
Displays the Settings menu. (
page 106
)
page
Other available functions in the Home menu
The following functions are available in the Home menu.
The Option menu appears by pressing the OPTION
button. You can display the audio Playback screen (
page 97
), or change the screen orientation (
page 69
from the Option menu.
The Search menu appears by pressing the SEARCH
button. You can search for a book by title or author from
the Search menu. (
page 71
)
page
)
17
US
Page 18
Guide to Operate the Touch Panel
Using the touch panel, you can perform various operations
by using your finger or the supplied stylus.
Note
When you use the supplied stylus, make sure to use the pointed
end of it for tapping and dragging on the touch panel. Do not use a
writing pen, pencil, or other sharp object.
Tapping
By tapping on the touch panel, you can select an item on
the menu or list, etc.
Continued
18
US
Page 19
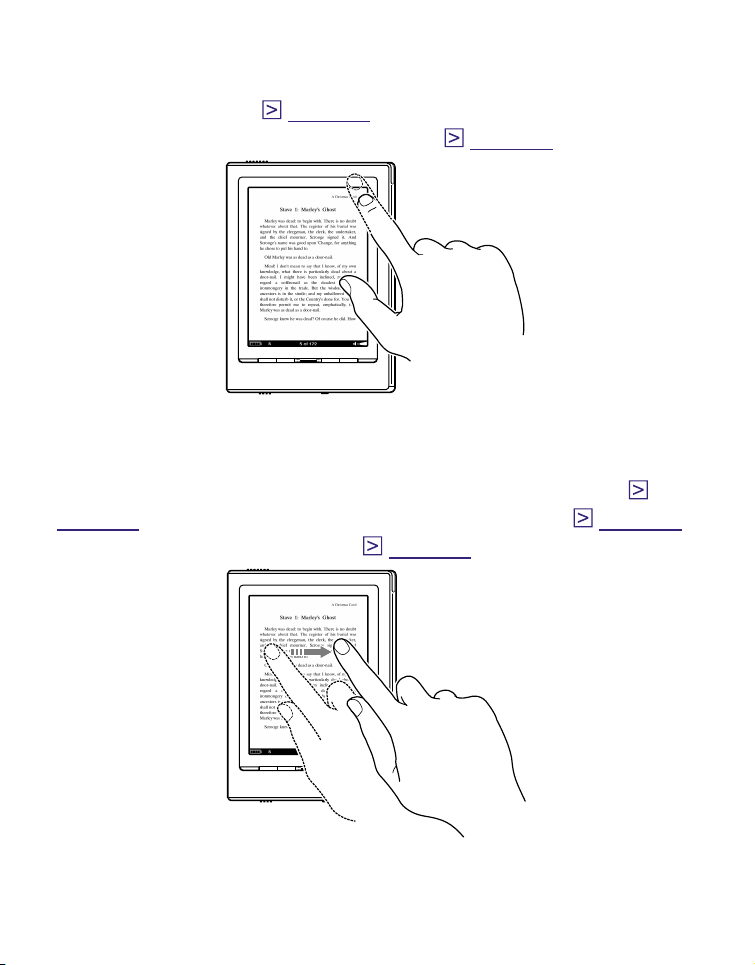
Double-tapping
By tapping twice (double-tap) on the touch panel, you can
create bookmarks (
page 79
page to search in the Search menu (
), select a word on a Book
page 71
), etc.
Dragging
By dragging on the touch panel, you can turn a page (
page 50
or select a word to highlight (
), drag a magnified page in Zoom mode (
page 82
).
page 68
)
Continued
19
US
Page 20
Dragging and Holding
By holding on the touch panel after dragging, you can turn
pages repeatedly. (
page 50
)
20
US
Page 21
Charging the Reader
About charging
Charging the Reader is required when using for the first time
or when the remaining battery power is running low. Turn on
the Reader, and then charge in one of the following two ways.
Connect to a computer via USB (Refer to the Quick Start Guide
and
page 39
(Charging time: approx. 4 hours*)
Connect to an AC outlet using the AC Adaptor for Reader (AC-
S5220E) (optional).
(Charging time: approx. 2.5 hours*)
* Approximate time required to fully charge the battery.
Notes
).
When you connect the Reader to your computer,
connection via USB) is displayed on the Reader’s screen. If the
battery has been fully depleted, it takes approximately 5 minutes
until
on the Reader by the POWER switch. In this case, wait until
displayed.
The charge indicator lights up in red while
while the Reader is charging.
If the remaining battery power of a connected notebook computer
is low, charging via USB connection may not be possible.
If you connect the Reader to a notebook computer which is not
connected to an AC outlet, the battery of the notebook computer
will be consumed. Do not leave the Reader connected to a
notebook computer which is not connected to an AC outlet for an
extended period.
Connecting the Reader via a USB hub or extension cable may not
work and is not supported. Connect the USB cable directly to the
computer.
is displayed, during which time you will not be able to turn
is not displayed,
(indicating
Continued
21
is
US
Page 22
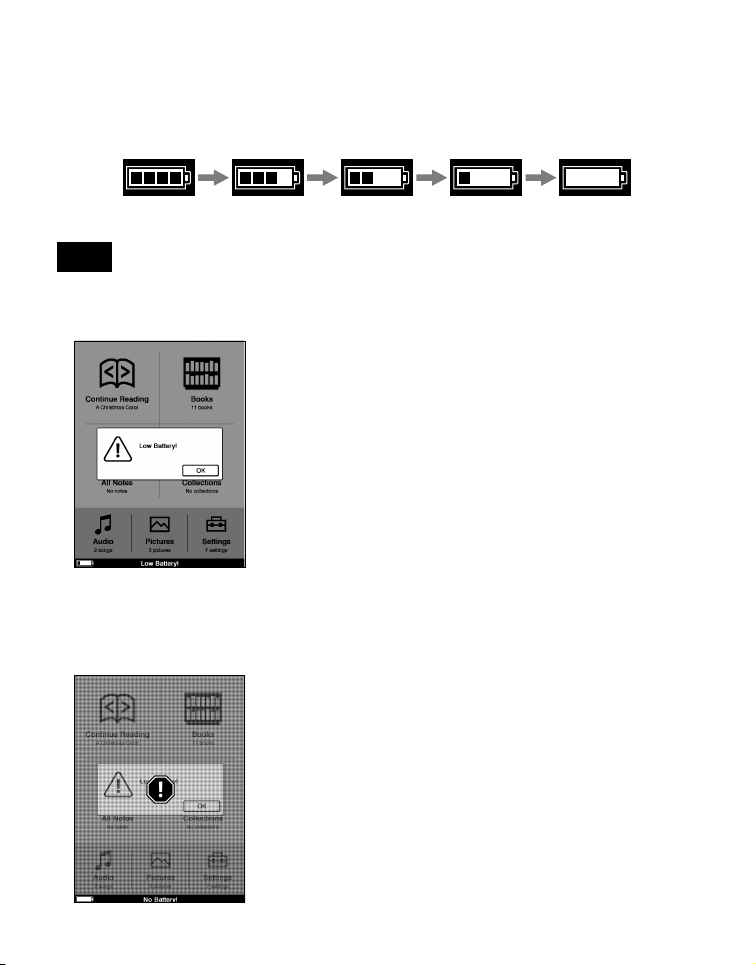
You can verify the remaining battery power by checking the
indicator in the bottom left of the screen. Charge the battery
when remaining power is low (the fewer black segments
indicated, the lower the remaining power).
Note
If the remaining battery power is low, the following warning
appears. Charge the battery.
If you continue to use without charging, the following warning
appears, and the Reader will shutdown automatically.
Charge the Reader and turn it on again.
US
22
Page 23
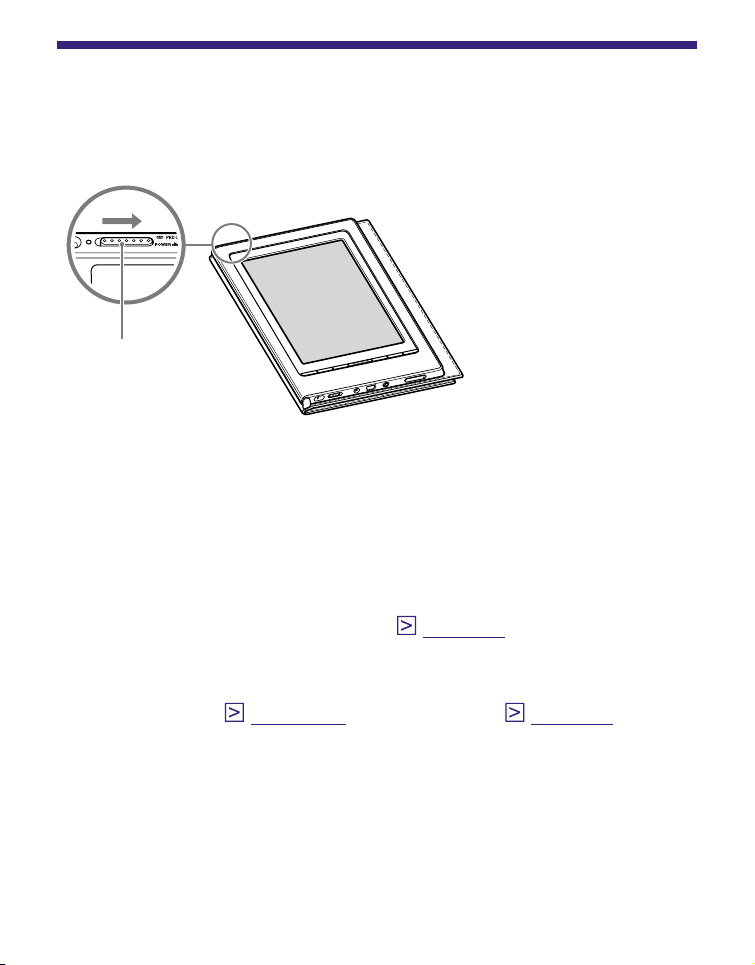
Turning on the Reader
Slide the POWER switch in the direction of to turn on the
Reader.
Slide the POWER
switch.
The Reader turns on. The indicator lights up in orange when
the Reader is turned on.
When the Reader is turned on for the first time after
purchase, the touch panel calibration screen appears.
Calibration is necessary to select targets accurately on
the touch panel. For details about calibration, refer to
“Calibrating the touch panel” (
It may take a few moments to turn on the Reader and the
page 26
start-up screen to appear when used for the first time,
after a reset (
page 114
) or shutdown (
when the battery has depleted.
).
page 25
), or
Continued
23
US
Page 24

To turn off the Reader
Slide the POWER switch in the direction of again.
The Reader turns off. After turned off, the Reader enters
sleep mode.
ou slide the PO
If y
WER switch and hold it for more than 3
seconds, the Reader is shutdown.
Hint
When the “Power Management” setting is set to “On” (
the Reader enters sleep mode after 60 minutes of inactivity even if
you do not turn off manually.
page 109
),
About the Power Management of the Reader
The Reader has a Power Management feature to avoid
unnecessary battery consumption. At purchase, the Power
Management is activated. The Power Management operates
as follows:
After 60 minutes of inactivity, the Reader enters sleep
mode automatically while the battery power is consumed
slightly.
After 5 days of inactivity, the Reader automatically
shutdown and stops consuming the battery power.
If the battery power is at a low level, the Reader will shutdown after
60 minutes of inactivity.
Continued
24
US
Page 25

Hint
You can activate/deactivate the Power Management from “Power
Management” in the Settings menu. (
Note
In the following states, the Reader does not enter sleep mode after
60 minutes of inactivity even if “Power Management” is set to “On.”
– When connected to the computer using the supplied USB cable
– When connected to the A
(optional) to charge
– When playing audio files
C Adaptor for Reader (AC-S5220E)
page 109
)
To shutdown the Reader manually
You can shutdown the Reader manually in one of the
following ways.
Slide the Power switch and hold it for more than
3 seconds.
Use “Device Shutdown” in the Advanced Settings menu.
page 113
(
)
25
US
Page 26
Calibrating the Touch Panel
When the Reader is turned on for the first time after
purchase, the touch panel calibration screen appears.
Calibration is necessary to select targets accurately on the
touch panel.
Hint
If you cannot select an item even if you tap the center of it,
calibrate the touch panel from “Touch Panel” in the Advanced
Settings menu. (
Note
Make sure to use the supplied stylus for the calibration.
Turn on the Reader.
page 112
The touch panel calibration screen appears. An ×
(target) is displayed at the upper left corner of the
screen.
)
Continued
26
US
Page 27
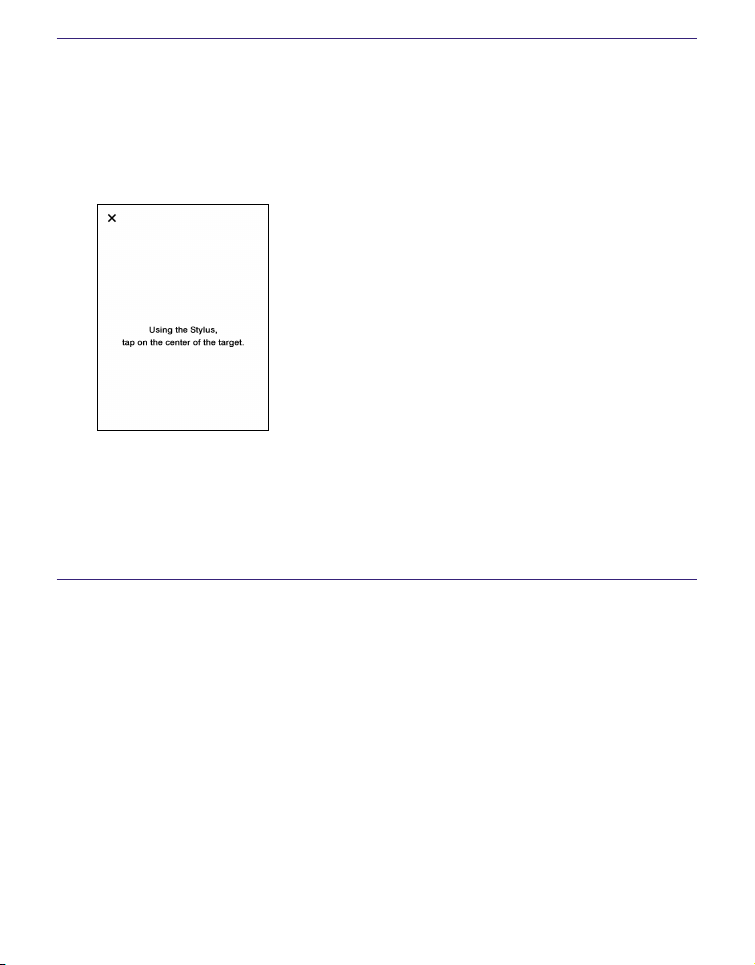
Tap the target using the supplied stylus.
The target moves to the lower right corner. Each time
you tap the target, the position of the target moves.
Continue to tap the target until the calibration process is
completed.
If your tap missed the center of target
If an error was detected during the calibration steps, a
message will appear and prompt you to restart the
calibration process again.
27
US
Page 28
Inserting a Memory Card
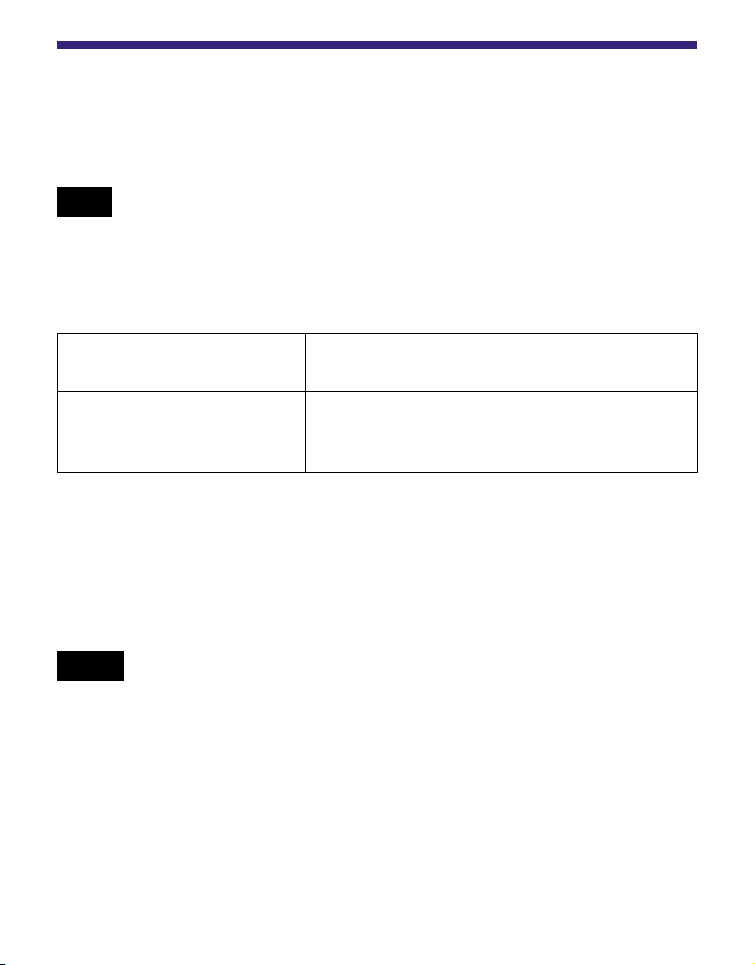
The following memory cards can be inserted in the Media
slots of the Reader.
Note
The Reader has separate slots for “Memory Stick Duo” Memory
Card and the SD Memory Card. Be sure to insert the memory card
in the correct slot. Inserting the memory card in the wrong slot may
damage the slot and the memory card.
“Memory Stick Duo”*1
Memory Card
SD Memory Card
*1 The Reader does not comply with MagicGate standard, and the data
requiring the copyright protection function cannot be copied or played
on the Reader.
*2 The Reader does not comply with copyright protection of SD Memory
Cards.
*3 miniSD Card adaptor (sold separately) required.
“Memory Stick Duo”
“Memory Stick PRO Duo”
*2
SD Memory Card
SDHC Memory Card
miniSD Card
*3
Notes
An operation check is performed when using a Sony’s “Memory
Stick Duo” Memory Card of up to 16 GB, however, operation of all
“Memory Stick Duo” is not guaranteed.
An operation check is performed when using an SD Memory Card
of up to 16 GB, however, operation of all SD Memory Cards is not
guaranteed.
When inserting the memory card into the Reader, it may take time
for the Reader to recognize the content files in the memory card if
the number of the content files stored on the memory card is large.
Continued
28
US
Page 29

Inserting a memory card into the Reader
Remove the Memory slot protective inserts from the
“Memory Stick Duo” slot and SD Memory Card slot.
The Memory slot protective inserts are inserted in the
“Memory Stick Duo” slot and the SD Memory Card slot
at purchase. When not using the memory card, insert
the Memory slot protective insert into the slot.
Note
If the Memory slot protective insert is not inserted in the slot,
foreign objects may enter the slot, and cause malfunction or
damage.
Continued
29
US
Page 30
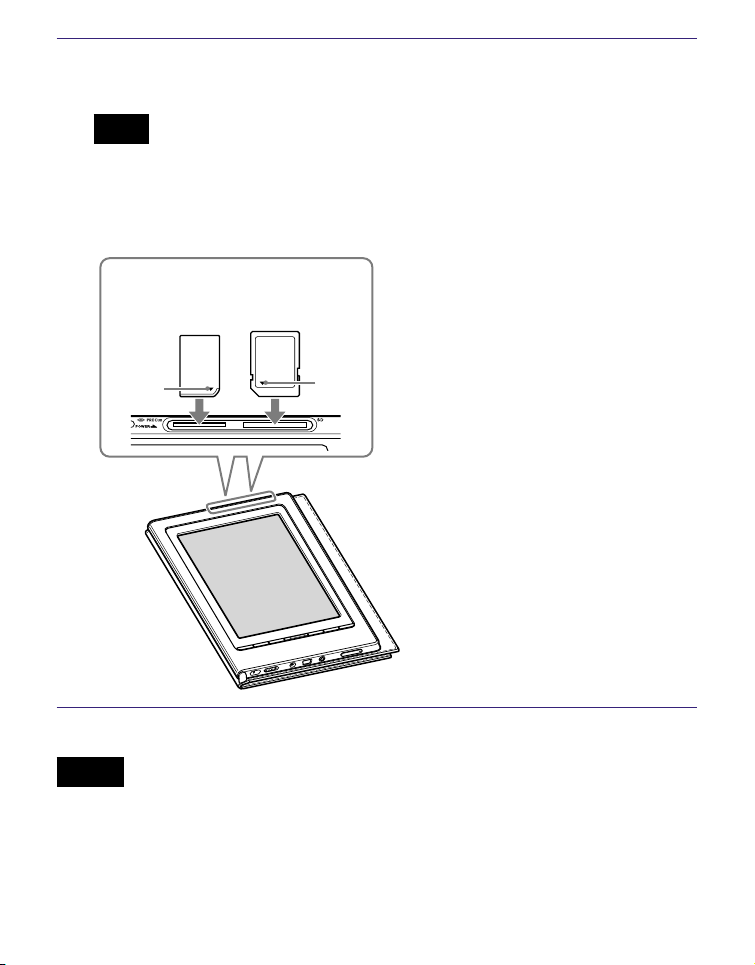
Insert a memory card in the direction with its label
side up until it clicks into the place.
Note
The Reader has separate slots for “Memory Stick Duo”
Memory Card and the SD Memory Card. Be sure to insert the
memory card in the correct slot. Inserting the memory card in
the wrong slot may damage the slot and the memory card.
“Memory
Stick Duo”
Mark
Notes
Be sure to insert the memory card in the correct direction. Forced
insertion may damage the slot.
Do not insert an incompatible memory card, as it may cause
malfunction.
Do not use a deformed memory card or adaptor.
SD Memory
Card
Mark
Continued
30
US
Page 31

Removing a memory card from the Reader
Gently push in the memory card.
You will hear a click, and the memory card pops out.
“Memory
Stick Duo”
Remove the memory card squarely from the
SD Memory
Card
“Memory Stick Duo” slot or the SD Memory Card
slot.
Notes
Do not remove a memory card or turn off the Reader while reading
or writing data, as data may be damaged.
For details on handling memory cards, refer to
page 135
.
31
US
Page 32

Built-in Lighting Controls
You can light up the screen by sliding the (Light) Switch.
Use the built-in light when you read books on the Reader in
dark locations.
(Light) Switch
Slide the (Light) Switch toward to light up
the screen.
The screen becomes brighter.
The brightness of the built-in light can be adjusted in 2
levels. Each time you slide the
brightness level is switched in the following order:
Off : The b
on the Reader, the built-in light is always
turned off at first.
Standard: The screen lights up
Bright: The screen lights up in bright mode
uilt-in light is off
(Light) Switch, the
. Whenever you turn
.
.
Continued
32
US
Page 33

Notes
Make sure to turn off the built-in light when its use is unnecessary
to avoid excessive battery consumption.
When you connect the Reader to the computer via USB, the built-
in light is turned off automatically. The built-in light is unavailable
during USB connection.
33
US
Page 34

Importing Content
Importing eBooks from “The eBook Store from Sony”
You can download eBooks from an online eBook store to
your computer.
Use the dedicated software eBook Library to access the
eBook Store.
Notes
To download eBooks, you need to prepare an Internet-accessible
environment on your computer.
You need to authorize your computer to the eBook Store to
download eBooks.
You also need to authorize the Reader to the eBook Store to
transfer and read downloaded eBooks on the Reader.
For details, refer to the eBook Library Help.
Double-click the eBook Library icon ( ) on
Windows desktop.
Hint
You can also start eBook Library by clicking the Start menu
and then selecting “All Programs” – “Reader” – “eBook
Library”.
Click “eBook Store” in the Source view.
The View area is switched to the Store view and “
eBook Store from Sony”
appears.
Continued
The
34
US
Page 35

Follow the page instructions to purchase
(download).
Downloaded eBooks are automatically imported to
“Library” in the Source view.
Library
Downloaded
content
Source view
Hint
Purchased eBooks are grouped under “Purchased” in the
collection.
Hints
eBooks can be read in eBook Library using your computer. For
details on eBook Library operations, refer to the eBook Library
Help.
The Source view appearance may vary depending on your
computer.
35
US
Page 36

Importing Content from Your Computer
You can import content files stored on your computer into
Library of eBook Library.
You can import the following content files.
Book
PDF file*
BBeB Book
Audio
MP3 and AAC f
Picture
Bitmap file, JPEG file, GIF file, PNG file
1
*
Adobe DRM protected PDF and EPUB files supported only if
Adobe Digital Editions 1.5 or later is installed and authorized on
your computer. For details on authorizing the Reader for Adobe
DRM protected content, refer to Adobe Digital Editions Help at:
http://www.adobe.com/go/digitaleditions_help_en
2
Word files will be automatically converted into RTF files during
*
transfer only if Microsoft Word is installed on your computer.
1
, EPUB file*1 Text file, RTF file, Word file (unsecured)*2,
ormat audio files (unsecured)
– MP3 file (.mp3 file extension)
The following specifications should be met in order to import an
MP3 file.
Bit rate: 32 to 320 kbps
Sampling frequency: 22.05, 44.1 kHz
– AAC file ( .mp4, .m4a, .mov, or .qt file extension)
The following specifications should be met in order to import an
AAC file.
Bit rate: 40 to 320 kbps
Sampling frequency: 24.0, 44.1, 48.0 kHz
Note
Movie files are not supported.
For details on content files you can import, refer to the
eBook Library Help.
36
US
Page 37

Importing content files
You can select content files stored on your computer and
import them into Library.
Click the Start menu, then select “All Programs” –
“Reader” – “eBook Library” to start eBook Library.
Click “Import Files” on the “File” menu.
The “Import Files” dialog box appears.
Click of the “Look in” list to select the folder
containing the content file(s) to be imported, as
necessary.
The content files in the selected folder are listed.
Hint
You can also double-click the folder (in the folder list) to display
the content files in the folder.
Select the content file to be imported.
To select multiple files, click the files while holding down
the Ctrl key.
Click “Open.”
The content file(s) is imported into Library.
Hint
You can import all the content files in a selected folder at the same
time into Library from “Import Folder” on the “File” menu.
37
US
Page 38

Transferring Content
Transferring Content to Reader Connected with Your Computer
You can transfer (copy) the content in the Library to the
Reader.
Note
If the Reader is locked, it will not be recognized on your computer
and content cannot be transferred. (
Reader to your computer, disconnect it and unlock the Reader by
inputting the password.
Hints
The book content can be grouped in the Library as a collection,
which can be transferred to the Reader. For details on how to
create or transfer a collection, refer to the eBook Library Help.
You can synchronize content in Library of eBook Library with the
Reader by specifying a folder (such as “Library” or the sub-items
under “Library”). (
updated to match the content in Library, when you connect it to
your computer.
page 45
) The Reader can be automatically
page 112
) If you connect the
Click the Start menu, then select “All Programs” –
“Reader” – “eBook Library” to start eBook Library.
Continued
38
US
Page 39

Connect the Reader to your computer using the
supplied USB cable.
To USB connector
USB cable
(supplied)
“Reader” appears in the Source view of eBook Library.
A screen appears on the Reader, indicating that it is
connected to the computer.
Notes
If “Reader” does not appear in the Source view after connecting
the Reader to your computer, disconnect the USB cable from
the Reader, then reconnect it after a while.
When you connect the Reader to your computer,
(indicating connection via USB) is displayed on the Reader’s
screen. If the battery has been fully depleted, it takes
approximately 5 minutes until
time you will not be able to turn on the Reader by the POWER
switch. In this case, wait until
The charge indicator lights up in red while
while the Reader is charging.
When you connect the Reader to the computer via USB, the
built-in light is turned off automatically. The built-in light is
unavailable during USB connection.
is displayed, during which
is displayed.
is not displayed,
Continued
39
US
Page 40

Click “Library” in the Source view, then click (List
view).
The View area is switched to the List view and all the
content in the Library is listed.
Hints
When you click “Books,” “Audio” or “Pictures” in the Source
view, only their respective content is displayed.
When you click
as thumbnails.
You can create a collection in the Library and the collection
can be transferred to the Reader. For details on how to create
or transfer a collection, refer to the eBook Library Help.
Select the content you want to transfer from the list.
(Thumbnail view), content can be displayed
To select multiple content, click the content while
holding down the Ctrl key.
Drag the content from the list to “Reader” in the
Source view.
The content is transferred to the Reader.
Reader
Continued
40
US
Page 41

Hint
You can store computer data into the built-in flash memory of the
Reader by transferring the data from your computer using Windows
Explorer.
Notes
If there is not enough free space on the memory of the Reader,
content may not be transferable. The memory of the Reader can be
increased in the following 2 ways.
Transfer any unnecessary content back to eBook Library, then
delete it to increase free space on the Reader. (
Delete any unnecessary book on the Reader. (
Do not delete files in the folder under “database,” and files in
“database,” using Windows Explorer. Perform data management
using eBook Library. For details on the eBook Library operations,
refer to the eBook Library Help.
page 43
page 94
)
)
Transferring content via a memory card
Content imported to eBook Library can be transferred to a
memory card on the Reader.
Hints
“Memory Stick Duo” Memory Card and SD Memory Card can be used.
You can synchronize content in Library of eBook Library with a
memory card on the Reader by specifying a folder (such as
“Library” or the sub-items under “Library”). (
on how to synchronize content with a memory card, refer to the
eBook Library Help.
page 45
) For details
Click the Start menu, then select “All Programs” –
“Reader” – “eBook Library” to start eBook Library.
Connect the Reader to your computer using the
supplied USB cable. (
page 39
)
“Reader” appears in the Source view of eBook Library.
Continued
41
US
Page 42

Insert a memory card into the Media slot of the
Reader. (
page 30
)
“Memory Stick/SD Card on Reader” appears in the
Source view.
Click “Library” in the Source view, then click (List
view).
The View area is switched to the List view and all the
content in Library is listed.
Hints
When you click “Books,” “Audio” or “Pictures” in the Source
view, only their respective content is displayed.
When you click
as thumbnails.
You can create a collection in Library and the collection can be
transferred to a memory card on the Reader. For details on
how to create or transfer a collection, refer to the eBook
Library Help.
Select the content you want to transfer from the list.
(Thumbnail view), contents can be displayed
To select multiple content, click the content while
holding down the Ctrl key.
Drag the content from the list to “Memory Stick/SD
Card on Reader” in the Source view.
The content is transferred to the memory card on the
Reader.
Continued
42
US
Page 43

Hint
You can store computer data into the memory card on the Reader
by transferring the data from your computer using Windows
Explorer.
Notes
If there is not enough free space on the memory card, content may
not be transferable. The memory of the memory card can be
increased in the following two ways.
Transfer any unnecessary content back to eBook Library, then
delete it to increase free space on the memory card.
Delete any unnecessary book on the Reader. (
Do not delete files in the folder under “Sony Reader,” and files in
“Sony Reader,” using Windows Explorer. Perform data
management on eBook Library. For details on eBook Library
operations, refer to the eBook Library Help.
page 94
)
To transfer content back to eBook Library
Click the Start menu, then select “All Programs” -
“Reader” - “eBook Library” to start eBook Library.
Connect the Reader to your computer using the
supplied USB cable. (
page 39
)
“Reader” appears in the Source view.
Continued
43
US
Page 44

Click “Reader” in the Source view, then click (List
view).
The View area is switched to the List view and all the
content in Library is listed.
Hints
When you click “Books,” “Audio” or “Pictures” in the Source
view, only their respective content is displayed.
When you click
as thumbnails.
You can create a collection in the Reader and a memory card
on the Reader, and the collection can be transferred to eBook
Library. For details on how to create or transfer a collection,
refer to the eBook Library Help.
Select the content you want to transfer back from
(Thumbnail view), contents can be displayed
the list.
To select multiple content, click the content while
holding down the Ctrl key.
Drag the content from the list to “Library” in the
Source view.
The content is transferred back to eBook Library.
44
US
Page 45

Synchronizing content in Library with Reader
You can synchronize content in the Library of eBook Library
with the Reader by specifying a folder (such as “Library” or
the sub-items under “Library”). The Reader can be
automatically updated to match the content in the Library,
when you connect it to your computer.
Note
To synchronize content in the Library of eBook Library with the
Reader, you need to specify a folder (such as “Library” or the subitems under “Library”). For details on how to specify a folder, refer
to the eBook Library Help.
Hint
When you want to synchronize content in the Library with the
Reader right away, you can also synchronize them manually. For
details on how to synchronize content manually, refer to the eBook
Library Help.
Click the Start menu, then select “All Programs” –
“Reader” – “eBook Library” to start eBook Library.
Connect the Reader to your computer using the
supplied USB cable. (
page 39
)
eBook Library starts synchronizing content in the
Library with the Reader automatically.
Continued
45
US
Page 46

Hints
eBook Library also starts synchronizing content in Library with the
Reader automatically in the following situations:
When you start eBook Library after connecting the Reader to
your computer.
After a period of time when any changes have been made to the
specified folder.
You can also synchronize content in the Library of eBook Library
with a memory card on the Reader. For details on how to
synchronize content with a memory card, refer to the eBook
Library Help.
You can also synchronize content in the computer drive with the
Reader by specifying a folder as a favorite folder. For details, refer
to the eBook Library Help.
46
US
Page 47

Reading Books
Reading Books
Selecting a book from the Book list
Follow the steps below to find books transferred from your
computer.
In the Home menu, tap (Books).
The Book list appears.
When there are more than 10 books, the index bar
appears on the right side of the list. The books are
stored alphabetically. If your desired book is not
displayed in the list, drag the index bar until the book
appears or tap the letter of the book.
Indicates that
content is
stored on a
memory card.
: “Memory
Stick Duo”
Memory
Card
: SD Memory
Card
Index bar
Indicator
Indicates the number of days remaining before
the expiration date of the book. If the book has
already expired, “Expired” is displayed in place of
the days.
Continued
47
US
Page 48

Hints
If you want to continue reading from the last displayed page, tap
(Continue Reading) in the Home menu. The last displayed
page appears.
The content on the memory card also appears in the Book list.
You can also display the next page of the list by pressing the
/ > (Page Turn) buttons.
<
If an invalid operation is performed,
of the screen.
If a book has an expiration date, the number of days remaining
before expiration is displayed in the Book list.
“Expired” is displayed, when the book has been expired.
Tap the desired book on the list.
appears at the bottom
The cover page of the book appears.
If you have read the book before, the last displayed
page of the book appears.
For details about operations on the Book page, refer to
“Reading books on the Book page.” (
page 49
)
Hint
The Option menu of the Book list appears by pressing the OPTION
button. For details about the Option menu of the Book list, refer to
“Displaying the Option menu of a Book.” (
page 53
)
48
US
Page 49

Reading books on the Book page
You can read books by selecting the desired book from the
Book list.
Tap the desired book on the Book list.
The Book page appears.
Size indicator Current page number/
Total page number
Hint
You can display the Page jump panel by tapping the page
number at the bottom of the screen. (
page 60
)
Continued
49
US
Page 50

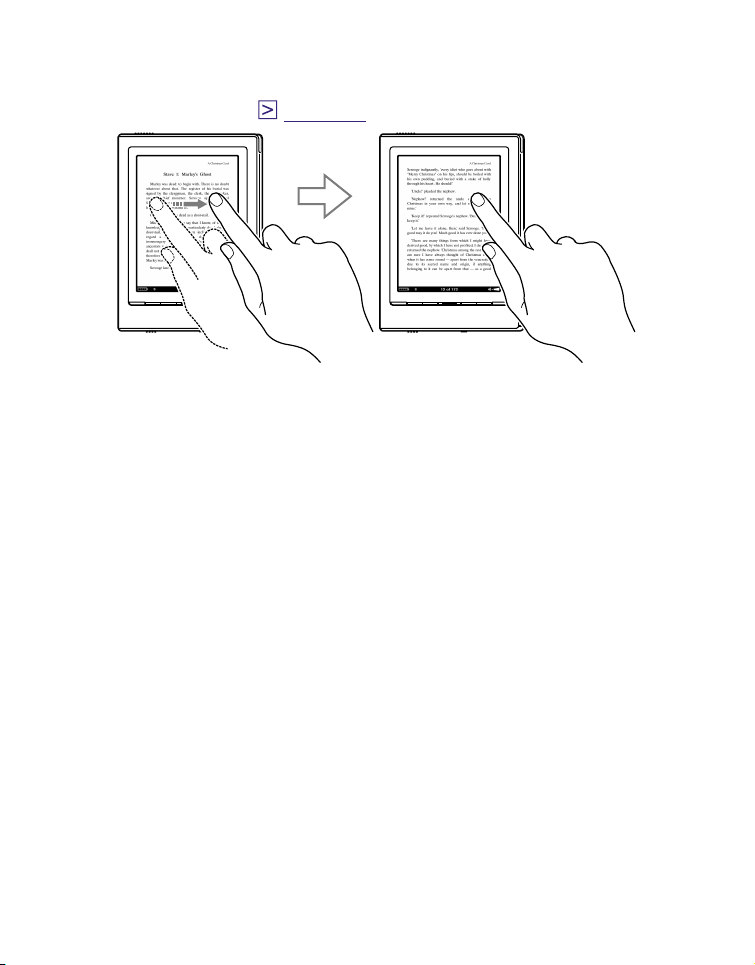
On the Book page, drag on the page or press the
/ > (Page Turn) button.
<
To go back to the previous page, drag on the page the
opposite direction or press the <
(Page Turn) button.
To turn pages repeatedly
If you hold on the touch panel after dragging, the pages
turn repeatedly.
Hints
You can jump pages using the Page jump panel. (
You can reverse the direction of dragging in the Settings menu.
page 110
(
)
Continued
page 60
50
)
US
Page 51

Hint
The Option menu of the Book page appears by pressing the
OPTION button. For details about the Option menu of the Book
page, refer to “Displaying the Option menu of a Book.” (
page 53
)
To close a book
Press the (Back) button.
To use the link tool of eBooks files on the
Reader
When an eBook file is displayed, you can use the embedded
link tool.
The link appears highlighted on the screen. Tap to open the
linked content or jump to the linked page.
Link
Hint
If you want to return to the previous page after you jumped to the
linked page, tap the page number at the bottom of the screen to
display the Page jump panel, and then tap
(Previous View).
Continued
51
US
Page 52

Book types supported by the Reader
The following are the book types supported by the Reader
and their characteristics.
BBeB file
(.lrf and .lrx file
extension)
PDF file*
1
(.pdf file
extension)
EPUB file*
1
(.epub file
A file in BBeB format used in digital books
and publications.
The link tool embedded in eBooks (page
jumps, etc.) can be used. (
page 51
)
A File in PDF format (Version 1.4 or before)
Bookmark and link tool on PDF files can
be used.
A file in EPUB format used in reflowable
digital books and publications.
extension)
Text file
(.txt file extension)
RTF file
(.rtf file extension)
*1 Adobe DRM protected PDF and EPUB files supported only if Adobe
Digital Editions 1.5 or later is installed and authorized on your
computer.
*2 Only if Microsoft Word is installed on your computer.
An RTF file (unsecured) that is
automatically converted from a Microsoft
Word file.*
2
52
US
Page 53

Displaying the Option menu of a Book
The Option menu appears by pressing the OPTION button.
You can use various functions from the Option menu.
Option menu of the Book list
Option item Description/Reference page
Sort Sorts the Book list “by Title,” “by Author” or “by
Date.”
View
Now
Playing*
Orientation
Switches the list display format. (
Goes to the audio Playback screen. (
1
Switches the screen orientation (vertical/
horizontal). (
page 69
)
page 55
page 97
)
)
*1 “Now Playing” appears only while a track is playing.
To close the Option menu
Tap , press the (Back) button or the OPTION button.
Continued
53
US
Page 54

Sorting a list
You can sort a list.
In the Option menu, tap “by Title,” “by Author” or “by Date” to
sort the list.
Author name
Transferred
date
Sorted “by Author”
Sorted “by Date”
Hints
The sorting list function is also available in the Collection list, the
All Notes list, the Notes list, the Audio list and the Picture list. The
sorting items vary depending on the list. The default sorting items
are following:
The Book list: “by Title”
The Collection list: “by Order”
The All Notes list: “by Date”
The Notes list: “by Page”
The Audio list: “by Title”
The Picture list: “by Title”
In the index bar, letters that have applicable books or authors will
be displayed in boldface.
In the index bar, books or authors that begin with a number will be
sorted under “#.” Those that begin with a symbol will be sorted
under “
.”
Continued
54
US
Page 55

Note
The appearance of the index bar differs depending on the sorting
item. For example, when the list is sorted “by Date,” letters do not
appear in the bar.
Switching list display format
You can choose to display the list format in either “List” or
“Thumbnail” view.
In the Option menu, tap “Thumbnail” of “View” to switch the
list display format.
“List” (default) “Thumbnail”
When you change the list display format, the Audio list and
the Pictures list are also switched to the selected format.
Notes
In the Book list and the Audio list, the thumbnail can be displayed
only if the book or the track has cover art information.
Some cover art cannot be displayed, depending on its file format.
If books or tracks do not have cover art information, the default
image will be displayed in “Thumbnail” list.
Continued
55
US
Page 56

Option menu of the Book page
Option item Description/Reference page
Go to Page
Create/Edit
Notes
Hide Notes/
Show Notes
Table of
Contents*
Book Info
Delete Book
Now
Playing*
2
Orientation
Displays the Page jump panel. (
Displays the tool bar to create/delete a bookmark/
highlight/comment. (
page 78
Hides/Displays the bookmark/highlight. (
84
)
Displays the table of contents.
1
Displays the book information. (
Deletes a book. (
page 94
Goes to the audio Playback screen. (
Switches the screen orientation (vertical/
horizontal). (
page 69
)
page 60
)
)
page
page 57
)
)
page 97
)
*1 The displayed items vary depending on the content.
*2 “Now Playing” appears only while a track is playing.
To close the Option menu
Tap , press the (Back) button or the OPTION button.
Continued
56
US
Page 57

Book information
You can check the book information, such as title, author,
book cover thumbnail, etc.
In the Option menu of the Book page, tap “Book Info” to
display the book information.
Options Description
Book cover
thumbnail*
Title Displays the title.
Author
Publisher*
Category*
eBook ID*
Kind Displays the file type.
Date Displays the latest update and creation date.
Size Displays the file size.
Location
Path Displays the file path location.
Digital
Rights*
Expiration
date*
*1 This option appears only when BBeB book is selected.
*2 This option appears only when PDF and EPUB files are selected.
1,*2
2
Displays the book cover thumbnail.
1
Displays the author.
1
Displays the publisher.
1
Displays the category.
1
Displays the Book ID.
Displays the memory location where the book is stored.
Internal memory: The book is stored on the Reader.
Memory Stick/ SD Memory Card: The book is
stored on a memory card.
Displays the following only if a book with DRM is
selected.
Full viewable: The entire book can be read.
Restricted: Some or all of the book cannot be read.
Displays the expiration date of a book if the book
with DRM has an expiration date.
57
US
Page 58

Selecting a book from the Collection list
You can select and read a book from the list of collections
created in eBook Library.
Hints
For details on how to create or transfer a collection, refer to the
eBook Library Help.
You can search the Collection list for a collection using the Search
menu.
For details about the Search menu, refer to “Searching for books.”
page 74
(
The Option menu of the Collection list appears by pressing the
OPTION button. You can switch the screen orientation from the
Option menu. (
You can also display the Option menu of a collection by pressing
the OPTION button while the Book list of a collection is displayed.
For details about the available menus, refer to “Displaying the
Option menu of a collection.” (
In the Home menu, tap (Collections).
The Collection list appears.
)
page 69
)
page 59
)
Tap the desired collection on the list.
The Book list appears.
Tap the desired book.
Continued
58
US
Page 59

Displaying the Option menu of a collection
The Option menu appears by pressing the OPTION button.
You can use various functions from the Option menu.
Option menu of a collection
Option item Description
Sort Sorts the list “by Order,” “by Title,”
“by Author” or “by Date.”
View
Now Playing*
Orientation
1
Switches the list display format.
(
page 55
)
Goes to the audio Playback
screen. (
page 97
)
Switches the screen orientation
(vertical/horizontal). (
page 69
)
*1 “Now Playing” appears only while a track is playing.
To close the Option menu
Tap , press the (Back) button or the OPTION button.
59
US
Page 60

Jumping to Pages
The Page jump panel appears by tapping “Go to Page” in
the Option menu of the Book page. With the Page jump
panel, you can skip pages and go to a page directly.
Hint
You can display the Page jump panel by tapping the page number
at the bottom of the screen.
In the Book page, press the OPTION button.
The Option menu appears.
Tap “Go to Page.”
The Page jump panel appears.
Enter Page #
(
page 62
)
Page jump bar (
(Previous View)/
(Next View)
(
page 63
page 61
)
)
To close the Page jump panel
Tap or the page number at the bottom of the screen. Or,
press the
(Back) button or the OPTION button.
60
US
Page 61

Using the Page jump bar
You can skip pages using the Page jump bar on the Page
jump panel.
Drag the slider, or tap a point on the Page jump bar.
The page is displayed based on the slider position in the
Page jump bar.
Slider
61
US
Page 62

Jumping to the specified number page
directly
You can jump directly to a page by inputting the page
number with the on-screen numeric keyboard.
Tap “Enter Page #” on the Page jump panel.
The numeric keyboard appears.
Input area
Number Keys
(Backspace) key
Tap the number key to input the page number.
The input number is displayed in the input area. To
delete the number, tap (Backspace) key.
Hint
Up to 10 numbers can be input.
Tap “Go.”
The input page appears.
62
US
Page 63

Reading previously displayed pages
The Reader stores previously displayed pages in the
memory for easy recall.
Tap (Previous View) on the Page jump panel.
The previously displayed page appears. To return to the
page before the jump, tap
(Next View).
63
US
Page 64

Resizing and Zooming
The Size menu appears by pressing the (Size) button. In
the Size menu, you can adjust the text size, and zoom in/out
a page.
In the Book page, press the (Size) button.
The Size menu appears.
Zoom In
(
page 67
)
Size icons (
page 65
)
To close the Size menu
Tap , or press the (Back) button or the (Size) button.
64
US
Page 65

Adjusting the text size
You can select from 5 different text sizes (S, M, L, XL or
XXL) in the Size menu. “S” (original size) is set by default.
Tap “M,” “L,” “XL” or “XXL.”
The text size is magnified to the selected size, and the
text is reflowed in the Book page. The selected size is
indicated at the bottom of the screen, and the original
page is divided into multiple divided sections.
Size indicator
Tap , press the (Back) button or the (Size)
button to close the Size menu.
After the Size menu is closed, the texts are displayed in
the selected size. To return the texts to the default size,
tap “S” in the Size menu.
Continued
65
US
Page 66

Hints
When viewing a PDF file in S size, you can magnify the text size by
switching the screen orientation to “Horizontal.” This should be
used only if retaining the original layout of the PDF file is required.
The text size of BBeB, PDF or EPUB files will be magnified at the
following ratios:
BBeB file: S(100%), M(120%), L(150%), XL(200%), XXL(260%)
PDF file: S(100%), M(200%), L(300%), XL(450%), XXL(600%)
EPUB file: S(100%), M(140%), L(180%), XL(230%), XXL( - )*
* XXL size is not available for EPUB files.
Notes
If the text size is magnified, the total page number displayed on the
Reader increases with the number of divided page sections.
However, if the text size of a PDF or EPUB file is magnified, the
total page number is not increased, and the current page number
is displayed using the same page number as the original scale.
PDF files viewed in M, L, XL and XXL sizes are displayed in reflow
mode. In certain situations, only text appears in these scales as
some tables and graphics may be reformatted and altered. In these
cases, viewing in S size will retain the original formatting.
Certain image-based pages such as a cover page of a book, or a
PDF file that are created as an image file, cannot be magnified to
M, L, XL or XXL size. In these cases, it is recommended to use the
Zoom Mode.
66
US
Page 67

Zooming in/out
The Book page enters zoom mode by tapping “ Zoom In”
on the size menu panel.
Tap “ Zoom In.”
The Zoom bar appears.
Zoom bar
Slider
Move the slider, or tap + or – of the Zoom bar
repeatedly until the page is zoomed to the desired
scale.
The page is zoomed in/out.
Hints
You can also zoom in/out a Book page by tapping a point in
the Zoom bar.
By double-tapping on a Book page in zoom mode, the page is
zoomed in and the double-tapped point is centered.
Continued
67
US
Page 68

To scroll the magnified page
When the Book page is zoomed in, / / / appear at the
edges of the screen. You can display the edge of the page
by tapping
/ / / .
You can also scroll the page by dragging it.
To exit the Zoom mode
Tap , press the (Back) button or the (Size) button.
The Zoom bar disappears and the Book page screen
returns to the original text size.
68
US
Page 69

Switching screen orientation (vertical/horizontal)
In the Option menu, you can switch the screen orientation
from vertical to horizontal or vice versa. Once the screen
orientation is switched, all the menus and the contents are
displayed in the selected orientation.
Hint
You can switch the screen orientation from any of the Option
menus.
Press the OPTION button.
The Option menu appears.
Tap “Orientation.”
The orientation is switched from vertical to horizontal.
Continued
69
US
Page 70

About screen division when screen orientation
is set to horizontal
When set to horizontal, the Book page is divided into 2 parts
(upper and lower). To display the lower part, drag the page
or press the
> (Page Turn) button.
Displaying
upper half
>
“Vertical” “Horizontal”
<
Position
indicator
Displaying
lower half
70
US
Page 71

Searching for Books or Keywords
The Search menu appears with the on-screen keyboard by
pressing the SEARCH button. With the on-screen keyboard,
you can search for books and keywords by inputting a word.
Press the SEARCH button.
The Search menu appears.
Search
Input area
On-screen keyboard
Continued
71
US
Page 72

Tap the on-screen keyboard to input the word.
The word appears in the input area.
Input areaCursor
Keyboard History
Character keys
/@#$
(Backspace)
Symbols/Abc
To edit an input word
Tap the input word directly to move the cursor.
To delete a character
Select the unnecessary character by dragging on it or
tap the unnecessary character to move the cursor to the
right of it, and then tap (Backspace).
To change the character displayed in the on-screen
keyboard
Tap “Symbols.” The keyboard is switched to the symbol
keyboard. To return to the alphabet keyboard, tap “Abc.”
To toggle the alphabet character between lower-case
and the upper-case, tap “.”
There are 2 patterns (high priority/low priority) of the
symbol keyboard. To switch to the other type of symbol
keyboard, tap “@#$.”
Continued
72
US
Page 73

Hints
Up to 48 characters can be input.
The previously typed words are displayed in the Keyboard
History area. As you input characters, only applicable words
remain. If you tap the word, it appears in the input area.
Notes
Words less than 3 letters or more than 16 letters are not
recorded in the Keyboard History.
Keyboard History records letters and hyphens. Numbers or
other symbols are not recorded.
Tap “Search.”
For details about searching for books or keywords, refer
to the following.
Searching for books (
Searching a book for keywords (
page 74
)
page 76
)
To close the Search menu
Tap , or press the SEARCH button or the (Back)
button.
73
US
Page 74

Searching for books
You can search for books by title or author in the Home
menu, Book list and Collection list.
Hints
You can also search a collection by collection name in the
Collection list.
You can also search for a Note by word in the All Notes list or the
Notes list. (
In the Home menu or the Book list, press the
page 88
SEARCH button.
The Search menu appears with the on-screen keyboard.
Input the word using the on-screen keyboard. (
page 72
)
)
Continued
74
US
Page 75

Tap “Search.”
The Search Results list appears.
Any books that have the input word included in the title/
author are displayed in the Search Results list.
Tap the desired book.
The Book page appears.
To close the Search Results list
Tap , or press the (Back) button.
75
US
Page 76

Searching a book for keywords
You can search for keywords by using the on-screen
keyboard. The keywords can be displayed in the input area
by the following two ways:
Double-tap a word on a Book page, and then press the
SEARCH button. The double-tapped word is displayed in
the input area.
Press the SEARCH button on a Book page. Input the
keyword using the on-screen keyboard.
In the Book page, press the SEARCH button.
The Search menu appears with the on-screen keyboard.
Input the word using the on-screen keyboard. (
page 72
To input a word on the Book page
Double-tap the word on the Book page to highlight
temporarily (to select consecutive words, including
punctuation, etc., drag across the phrase without lifting
after double-tapping), and then press the SEARCH button.
The tapped word (or phrase) is placed in the input area.
)
Tapped word
Input area
Continued
76
US
Page 77

Note
Highlights that are created by double-tapping can be erased in
the following ways:
Tapping on any area of the page other than the highlighted area
–
– Double-tapping another word
– Opening another book
Tap “Search.”
The search result page including the input word
appears. The words are highlighted on the page.
Tap (Next Search) to skip to the next page
which includes the word.
The next page which includes the input word appears.
To return the previous page which includes the input
word, tap
(Previous Search).
To exit the search result page
Tap , or press the (Back) button.
77
US
Page 78

Creating Notes on a Book Page
The tool bar appears by tapping “Create/Edit Notes” in the
Option menu of the Book page. With the tool bar, you can
create the following Notes.
Creating a bookmark (
Highlighting words (
Adding a comment (
In the Book page, press the OPTION button.
page 79
page 82
page 85
The Option menu appears.
Tap “Create/Edit Notes.”
The tool bar appears.
)
)
)
(Highlight)
(
page 82
(Eraser)
(
page 83
)
Notes
)
(
page 91
)
(Bookmark)
(
page 79
)
Continued
78
US
Page 79

To close the tool bar
Tap , or press the (Back) button.
Creating a bookmark on a Book page
You can create a bookmark on a Book page you may wish
to return to.
A bookmark can be created by the following two ways.
On the Book page, create a bookmark by double-tapping
a page.
On the Book page, create a bookmark using the tool bar.
To create a bookmark by double-tapping a
page
In the Book page, double-tap near the upper right
corner of the screen.
The bookmark appears in the upper right corner of the
current page.
Bookmark
Continued
79
US
Page 80

To create a bookmark using the tool bar
In the Book page, press the OPTION button.
The Option menu appears.
Tap “Create/Edit Notes.”
The tool bar appears.
Tap (Bookmark).
The bookmark appears in the upper right corner of the
current page, and the color of
in the tool bar is
reversed.
(Bookmark)
Bookmark
Hint
You can add a comment to a bookmark. For details, refer to
“Adding a Comment to a Note.” (
page 85
)
Continued
80
US
Page 81

To delete a bookmark
To delete a bookmark, double-tap the bookmark.
You can also delete a bookmark by tapping on the tool bar.
Hints
While you are viewing a comment of a bookmark in the Comment
viewer, you can delete both the bookmark and comment by tapping
“Delete.” (
You can delete all the Notes within a book from the Option menu of
the Notes list. (
Note
When you delete a bookmark with a comment, the comment will
also be removed. Tap “Yes” in the confirmation message to delete
both the bookmark and the comment.
page 87
)
page 93
)
To display a bookmarked page
You can display the bookmarked page from the All Notes list
and the Notes list. (
page 89, 91
)
81
US
Page 82

Highlighting words
You can highlight words on a Book page.
Tap (Highlight).
The color of
highlighting function becomes available.
Drag across the word on the Book page.
The word is highlighted.
Hint
You can add a comment to a highlight. For details, refer to
“Adding a Comment to a Note.” (
in the tool bar is reversed and the
(Highlight)
Highlighted word
page 85
)
Hints
You can also highlight a word with a hyperlink and add a comment
to it (
To highlight multiple lines of text all at once, drag across the lines
starting from the first character to the last character.
page 85
).
Continued
82
US
Page 83

Notes
When you tap a highlighted word with a hyperlink, the Comment
editor (
instead of jumping to a page. To enable the hyperlink, hide the
highlights using “Hide Notes” in the Option menu, or delete the
highlight.
You cannot highlight the cover page and pictures, as well as book/
chapter titles that are displayed at the upper right of a Book page.
page 85
) or the Comment viewer (
page 87
) appears
To delete a highlight
Tap (Eraser).
The color of
in the tool bar is reversed and the
highlight erase function becomes available.
Tap, or drag across the highlighted word on the
Book page.
The highlight is erased.
Hints
While you are viewing a comment of a highlight in the Comment
viewer, you can delete both the highlight and comment by tapping
“Delete.” (
You can delete all the Notes within a book from the Option menu of
the Notes list. (
page 87
)
page 93
)
Note
When you delete a highlight with a comment, the comment will also
be removed. Tap “Yes” in the confirmation message to delete both
the highlight and comment.
83
US
Page 84

Hiding Notes (bookmark/highlight)
Bookmarks or highlights in a book can be hidden/shown
from the Option menu of a Book page.
Tap “Hide Notes.”
All the bookmarks and the highlights within the book are
hidden temporally. To show them again, tap “Show
Notes.”
84
US
Page 85

Adding a Comment to a Note
You can add a comment to a bookmark or a highlighted
word using the on-screen keyboard in the Comment editor.
Tap the bookmark or the highlighted word.
The Comment editor appears.
Input screen
On-screen keyboard
Continued
85
US
Page 86

Enter your comment using the on-screen keyboard.
For details on how to use the on-screen keyboard, refer
to
page 72
.
The on-screen keyboard in the Comment editor has a
“Return” key. You can indent the line using this key.
Hint
Up to 2048 characters can be input in a comment.
Tap “Done.”
The Comment editor is closed, and
is attached to the
bookmark or the highlight.
Note
Make sure to tap “Done” when you finish inputting the
comment. If you tap , the comment will not be added.
Continued
86
US
Page 87

To view a comment
Tap (Bookmark and comment) or (Highlight and
comment) on a Book page. The Comment viewer appears.
/:
The arrows become available when
Page number of the
comment
the comment has multiple pages.
To display the previous/next page of
the comment, tap /.
Note
When you tap a highlighted word with a hyperlink, the Comment
editor (
jumping to a page. To enable the hyperlink, hide the highlights
using “Hide Notes” in the Option menu, or delete the highlight. (
page 83, 84
page 85
)
) or the Comment viewer appears instead of
To edit the comment
Tap “Edit” in the Comment viewer to display the Comment
editor. Edit the comment using the on-screen keyboard. (
page 72
)
To delete a comment
Tap “Delete” in the Comment viewer. The comment and the
bookmark/highlight will be deleted.
87
US
Page 88

Opening a Page from a Notes List
You can directly open a page with a bookmark or highlighted
words from the List screen.
Hints
Notes can also be created in eBook Library.
In eBook Library, you can set to merge the Notes of the Reader
and eBook Library while synchronizing. When merging the Notes, if
any inconsistent Notes are created for the same word, the older
Notes will be replaced with the latest Notes.
When you copy a book from eBook Library to the Reader, the
Notes of the Reader will be replaced with the ones of the eBook
Library (or vice versa).
The annotations of a book transferred from Adobe Digital Editions
1.5 or later are converted into the bookmarks on the Reader.
88
US
Page 89

Searching the Reader for Notes
By tapping (All Notes) in the Home menu, the All Notes
list appears. The All Notes list includes all the Notes of all
the books stored on the Reader and memory cards. You can
jump to a page by tapping an item in the list.
Hint
You can search the All Notes list for a Note using the Search menu.
In the Home menu, tap (All Notes).
The list of all the bookmarks and highlights on the
Reader appears.
Annotated date/Book title/Page number
Indicates type of the Note
(Bookmark): The first sentence of the page is displayed.
(Highlight): The highlighted word is displayed.
(Highlight with comment): The comment is displayed.
(Bookmark with comment): The comment is displayed.
Tap a Note.
The page that includes the Note is displayed.
89
US
Page 90

Displaying the Option menu of the All Notes list
The Option menu appears by pressing the OPTION button.
You can use various functions from the Option menu.
Option menu of the All Notes List
Option item Description
Sort Sorts the list “by Date,” “by Type”
or “by Comment.”
Now Playing*
Orientation
1
Goes to the audio Playback
screen. (
page 97
)
Switches the screen orientation
(vertical/horizontal). (
page 69
)
*1 “Now Playing” appears only while a track is playing.
To close the Option menu
Tap , press the (Back) button or the OPTION button.
90
US
Page 91

Searching a book for Notes
By tapping “ Notes” in the tool bar, the Notes list appears.
The Notes list includes all the Notes of the currently viewed
book. You can jump to a page by tapping an item in the list.
Hint
You can search the Notes list for a Note using the Search menu.
In the Book page, press the OPTION button.
The Option menu appears.
Tap “Create/Edit Notes.”
The tool bar appears.
Continued
91
US
Page 92

Tap “ Notes.”
The list of all the bookmarks and highlights in the
current book appears.
(Bookmark):
The first sentence of the page is
displayed.
(Highlight):
The highlighted word is displayed.
Indicates type of the Note
(Highlight with comment):
The comment is displayed.
(Bookmark with comment):
The comment is displayed
Page number
Tap a Note.
The page that includes the Note is displayed.
To delete all the Notes within a book
In the Option menu of the Notes list, tap “Delete Notes.”
92
US
Page 93

Displaying the Option menu of the Notes List
The Option menu appears by pressing the OPTION button.
You can use various functions from the Option menu.
Option menu of the Notes List
Option item Description
Sort Sorts the list “by Page,” “by Type”
or “by Comment.”
Delete Notes Deletes all the bookmarks,
highlights and comments within
the book.
Now Playing*
Orientation
1
Goes to the audio Playback
screen. (
page 97
)
Switches the screen orientation
(vertical/horizontal). (
page 69
)
*1 “Now Playing” appears only while a track is playing.
To close the Option menu
Tap , press the (Back) button or the OPTION button.
93
US
Page 94

Deleting a book
You can delete a book on the Reader or memory cards that
are inserted into the Reader.
In the Book page, press the OPTION button.
The Option menu appears.
Tap “Delete Book.”
The confirmation message appears.
Tap “Yes.”
The book is deleted and the screen goes to the Book
list.
Note
Confirm carefully before deleting the book.
94
US
Page 95

Playing Audio Files
Playing Audio Files
Playing audio files transferred from your
computer
MP3 and AAC files (unsecured) can be played back on the
Reader. You can also read books while listening to an audio
file. (
page 96
optional headphones to the headphone jack.
In the Home menu, tap (Audio).
The Audio list appears.
) When listening to audio files, connect the
Indicates that
content is stored
on a memory
card.
: “Memory
Stick Duo”
Memory Card
: SD Memory
Card
Thumbnails of
pictures (if
contained on files)
Indicator
Hints
The content on the memory card also appears in the Audio list.
When more than 10 tracks are stored, the index bar appears
on the right side of the list. You can display the next page of
the list by scrolling the bar, or pressing the
button.
If an invalid operation is performed, appears at the bottom of
the screen.
> (Page Turn)
Continued
95
US
Page 96

Tap the desired track.
Playback starts.
Then, succeeding tracks are played in the listed order.
To stop playback, tap on the screen.
To close the Audio list or the Playback screen
Press the (Back) button.
Hints
You can read a book while playing tracks. To do so, play the track
before you begin to read a book.
The Option menu of the Audio appears by pressing the OPTION
button. (
While a track is playing, the volume indicator appears at the bottom
right of the screen.
page 98
)
Continued
96
US
Page 97

Operations on the Playback screen
On the Playback screen, the following operations can be
performed.
1
Picture area
Play mode icon*
: Shuffle play
: Repeat (1 Song)
: Repeat (All Songs)
Track name
Artist name
Album name
Playback progress bar
Elapsed
playback time/
Total time of the
current track
Volume indicator
(stop)/(play)
Slider
Current track number/
total track number
*1 The play mode icons appear while tracks are playing in shuffle play or
repeat play. (
Button/Gesture Operation
Dragging (
/ (Page Turn)
page 99
page 19
)
Skips to the previous/next track.
)
buttons
Playback progress bar
Rewinds/Fast-forwards the track
by dragging the slider or tapping a
point of the Playback progress
bar.
/
VOL –/+ button
Stops/Restarts the playback.
Adjusts the volume.
Mutes on/off by pressing and
holding it.
97
US
Page 98

Displaying the Option menu of the Audio
The Option menu appears by pressing the OPTION button.
You can use various functions from the Option menu.
Option menu of the Audio list
Option item Description/Reference page
Sort Sorts the Audio list “by Title”or “by
Artist.”
View
Now Playing*
Orientation
1
Switches the list display format.
(
page 55
)
Goes to the audio Playback
screen.
page 97
)
(
Switches the screen orientation
(vertical/horizontal). (
page 69
)
*1 “Now Playing” appears only while a track is playing.
To close the Option menu
Tap , press the (Back) button or the OPTION button.
Continued
98
US
Page 99

Option menu of the Playback screen
Option item Description/Reference page
Repeat Off (default setting): Stops
playback after playing all tracks.
1 Song: Plays the current track
repeatedly.
All Songs: Plays all tracks
repeatedly.
Shuffle Off/On Plays all tracks in random order.
Continue Reading Goes to the Book page screen.
The last displayed page appears.
Orientation
Switches the screen orientation
(vertical/horizontal). (
page 69
)
To close the Option menu
Tap , press the (Back) button or the OPTION button.
99
US
Page 100

Viewing Pictures
Viewing Pictures
Viewing pictures transferred from your computer
BMP/JPEG/GIF/PNG files can be viewed on the Reader.
In the Home menu, tap (Pictures).
The Picture list appears.
Indicates that
content is stored
on a memory
card.
: “Memory
Stick Duo”
Memory
Card
: SD Memory
Card
Thumbnails
Indicator
Hints
The content on the memory card also appears in the Picture list.
When more than 10 pictures are stored, the index bar appears
on the right side of the list. You can display the next page of
the list by scrolling the bar, or pressing the
button.
If an invalid operation is performed, appears at the bottom of
the screen.
> (Page Turn)
Continued
100
US
 Loading...