

Page 1
How to get eBooks on Reader™
Click for instant access!
For Customers in USA/Canada
For Customers in Europe/Australia
©2010 Sony Corporation 4-259-024-11(1)
Page 2
For Customers in USA/Canada
For Customers in USA/Canada
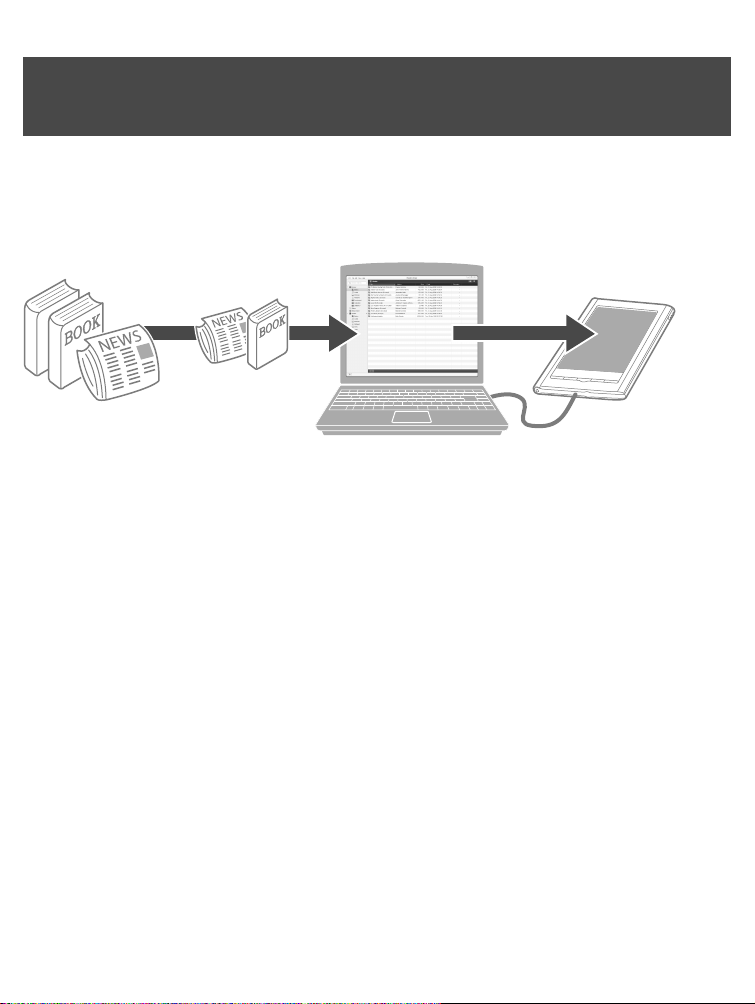
Getting eBooks
Reader Store
Reader Library software
Sony Reader™ Library software (Reader Library) will
allow you to shop and manage eBooks and other
content purchased from the Sony Reader™ Store
Reader device
(Reader Store).
Reader Library can also be used to manage eBooks
from other sources such as your local public library or
Google Books. For more details, check the Reader™
Store home page.
To help manage your eBooks, you may need to create
an account. You’ll be asked to do this during the
installation process.
2
Page 3
Getting eBooks
Installing Reader Library on to your PC or Mac is easy.
There are 3 simple steps to follow.
Step 1: Installing Reader Library ( 4)
Step 2: Creating an account and purchasing
eBooks ( 6)
S
tep 3: Transferring your eBooks to your Reader™
( 9)
Each of these steps is described in more detail in the
next section.
Reader Library has many helpful features. For more
information, refer to the Reader Library [Help] menu.
3
Page 4

Step 1: Installing Reader Library
Step 1:
Installing Reader Library
1 Connect your Reader to your computer using
the supplied USB cable.
Ensure that your Reader is turned on and your
computer is switched on, connected to the
Internet, and you have Administrator access.
2 For Windows users, go to the “Start” menu and
click “My Computer” (or “Computer” for
Windows Vista and Windows 7 users). Then
double-click the “SETTING” drive and then
double-click “Setup Reader Library for
Windows”.
To install on Macintosh computers:
When your Reader is connected to your Mac,
“SETTING” and “READER” will appear on the
desktop. Double-click the “SETTING” drive and then
double-click “Setup Reader Library for Mac”.
4
Page 5
Step 1: Installing Reader Library
3 Follow the on-screen instructions to complete
the installation of Reader Library.
A shortcut to Reader Library will be added to your
computer desktop (Windows only). Reader Library
may start automatically depending on which
option you choose just before finishing the
installation. If Reader Library does not start
automatically, double-click the shortcut to start
Reader Library.
You can navigate around the different sections of
Reader Library using the navigation menu on the
left-hand side. When your Reader is connected to
your computer, you will see [Reader] appear in the
list.
To learn how to create an account and purchase
eBooks, please read the following section.
5
Page 6
Step 2: Creating an Account and Purchasing eBooks
Step 2:
Creating an Account and
Purchasing eBooks
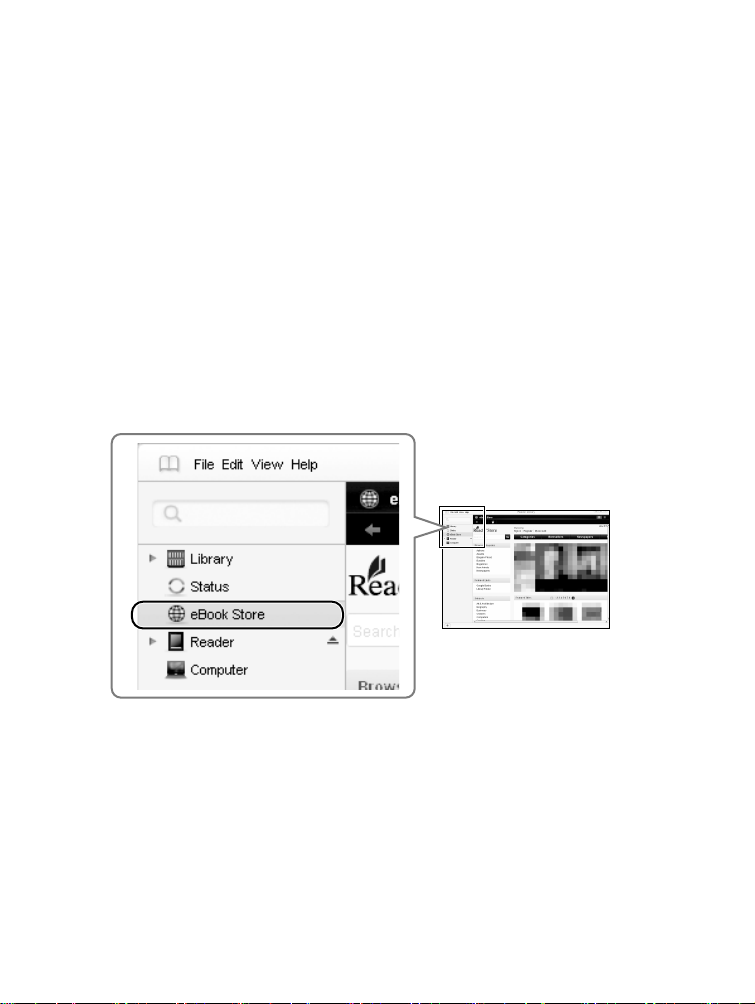
1 Visit Reader Store and create an account.
Click [eBook Store] in the left-hand menu
within Reader Library.
6
Page 7
Step 2: Creating an Account and Purchasing eBooks
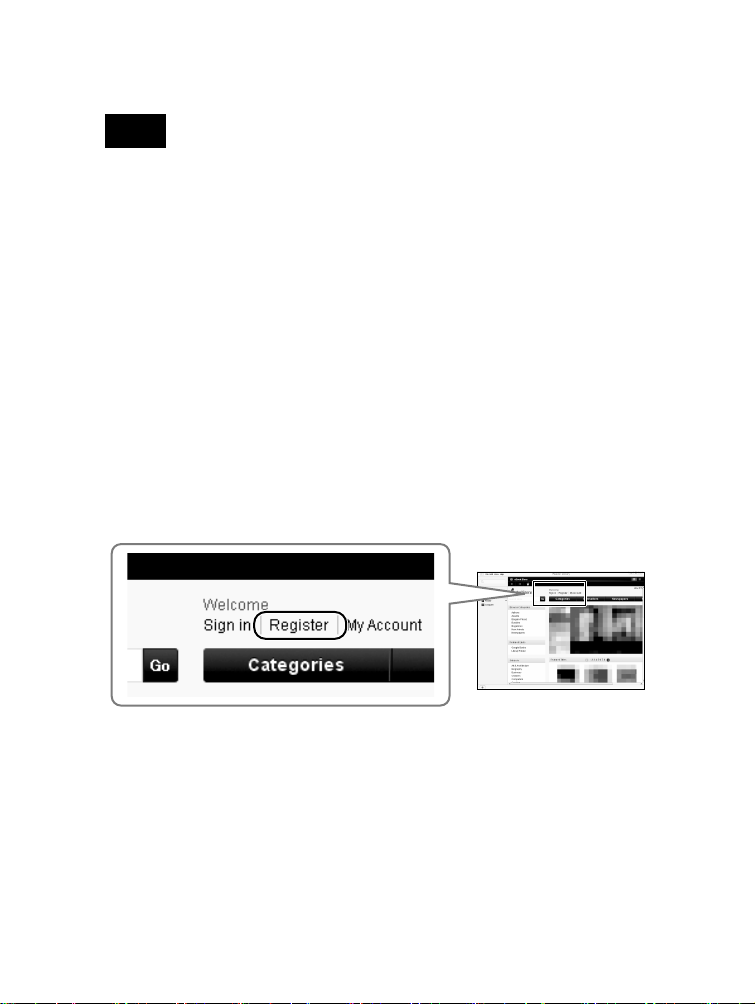
reate an account on the Reader Store.
C
Note
If you have already created an Adobe Account, use
your Adobe ID (this is usually your email address)
and password when creating your Reader Store
account.
Click the [Register] link. Follow the on-screen
instructions to create your Reader Store account
(note that the same account details will also be
automatically used to create an Adobe Account,
which you will need to access eBooks with
DRM).
7
Page 8
Step 2: Creating an Account and Purchasing eBooks
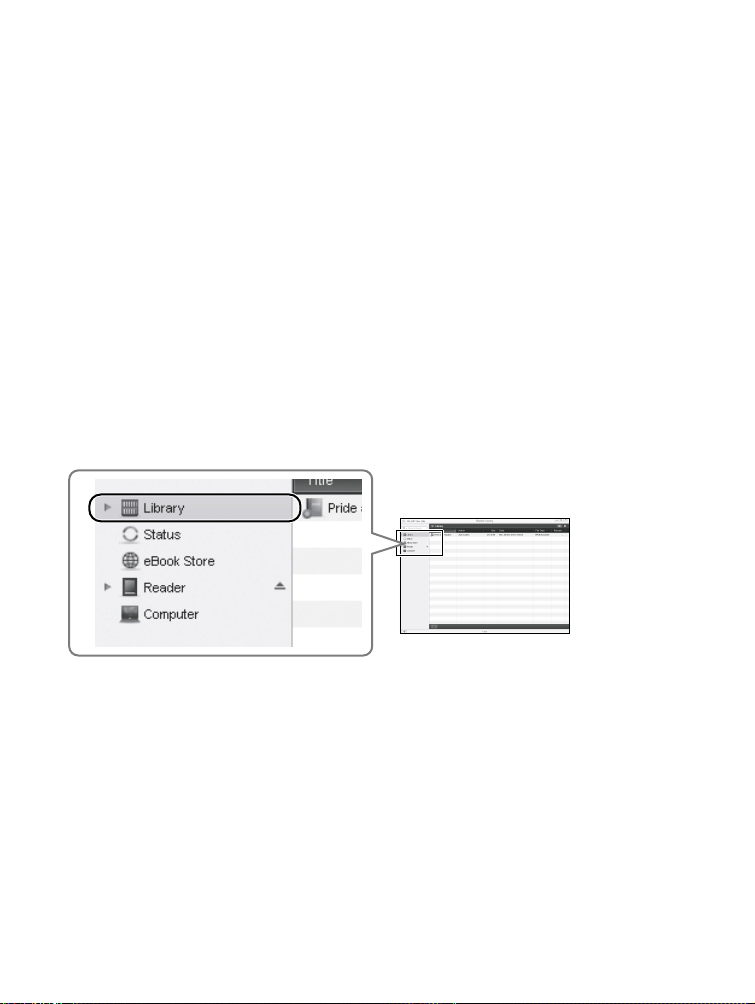
2 Purchase and download eBooks.
Once you set up your account, you can purchase
eBooks, subscribe to periodicals and search over 1
million titles from Google Books.
You can also borrow eBooks from your local public
libraries. For details, refer to the home page of
Reader Store.
All purchased eBooks, subscribed periodicals and
free downloads can be found in the [Library]
section in the left-hand menu within Reader
Library.
8
Page 9
Step 3: Transferring your eBooks to your Reader
Step 3:
Transferring your eBooks to
your Reader
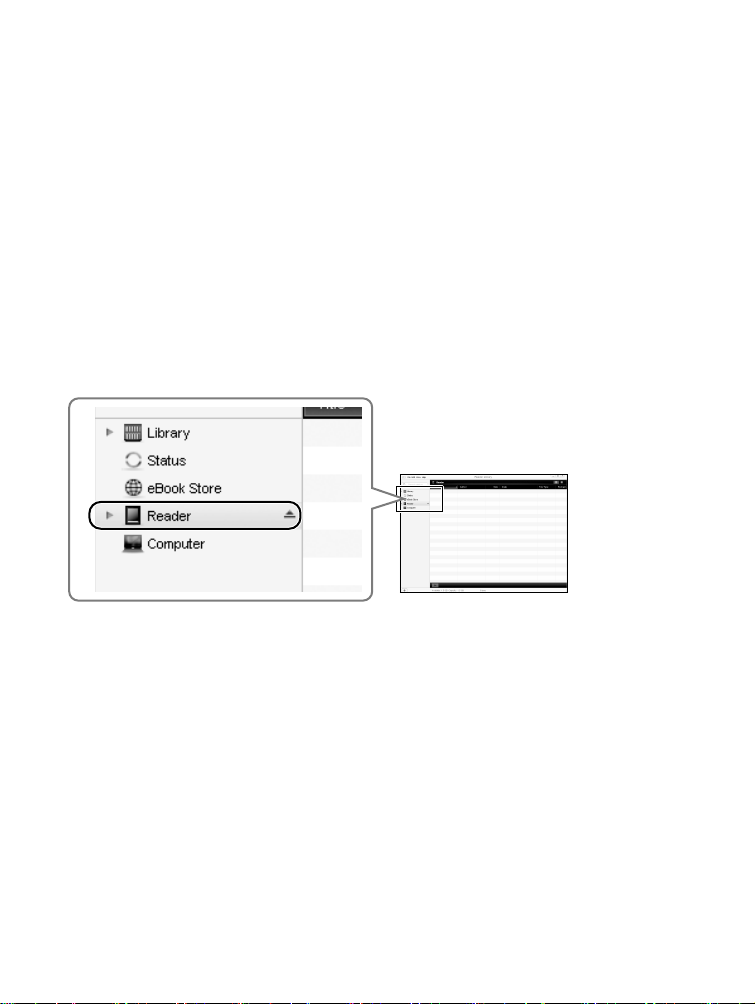
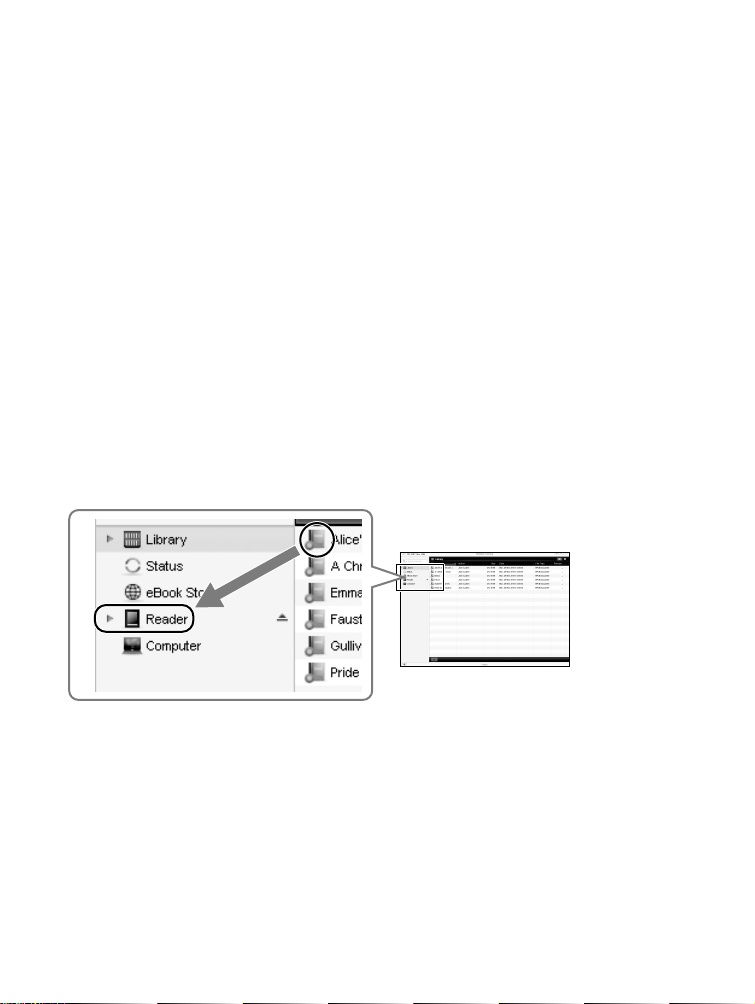
1 Click [Library] in the left-hand menu within
Reader Library.
2 Click on the eBook that you wish to transfer
and drag-and-drop it to [Reader] in the lefthand menu.
3 After a few moments, your eBook will be
transferred.
If the Reader Library does not function as expected,
refer to “Troubleshooting” in the Reader Library
[Help] menu.
9
Page 10

Step 3: Transferring your eBooks to your Reader
4 Close Reader Library and disconnect your
Reader from the computer.
Once Reader Library has closed, the on-screen
message on your Reader device will change from [Do
not disconnect] to [USB connected].
Once you see [USB connected], it is safe to disconnect
your Reader from your computer.
For more details about your Reader, refer to the User
Guide found on your Reader.
10
Page 11

For Customers in Europe/Australia
For Customers in Europe/Australia
Getting eBooks
eBookstore
Reader Library software
Sony Reader™ Library software (Reader Library) will
allow you to shop and manage eBooks and other
content purchased from online eBookstores.
Reader device
To help manage your eBooks, you may need to create
an Adobe account. You’ll be asked to do this during the
installation process.
11
Page 12

Getting eBooks
Installing Reader Library on to your PC or Mac is easy.
There are 4 simple steps to follow.
Step 1: Installing Reader Library ( 13)
Step 2: Creating an account and purchasing
eBooks ( 15)
S
tep 3: Authorize your computer and Reader™
(one time only) ( 18)
S
tep 4: Transferring your eBooks to your Reader
( 22)
Each of these steps is described in more detail in the
next section.
Reader Library has many helpful features. For more
information, refer to the Reader Library [Help] menu.
12
Page 13

Step 1: Installing Reader Library
Step 1:
Installing Reader Library
1 Connect your Reader to your computer using
the supplied USB cable.
Ensure that your Reader is turned on and your
computer is switched on, connected to the
Internet, and you have Administrator access.
2 For Windows users, go to the “Start” menu and
click “My Computer” (or “Computer” for
Windows Vista and Windows 7 users). Then
double-click the “SETTING” drive and then
double-click “Setup Reader Library for
Windows”.
To install on Macintosh computers:
When your Reader is connected to your Mac,
“SETTING” and “READER” will appear on the
desktop. Double-click the “SETTING” drive and then
double-click “Setup Reader Library for Mac”.
13
Page 14

Step 1: Installing Reader Library
3 Follow the on-screen instructions to complete
the installation of Reader Library.
A shortcut to Reader Library will be added to your
computer desktop (Windows only). Reader Library
may start automatically depending on which
option you choose just before finishing the
installation. If Reader Library does not start
automatically, double-click the shortcut to start
Reader Library.
You can navigate around the different sections of
Reader Library using the navigation menu on the
left-hand side. When your Reader is connected to
your computer, you will see [Reader] appear in the
list.
To learn how to create an account and purchase
eBooks, please read the following section.
14
Page 15

Step 2: Creating an Account and Purchasing eBooks
Step 2:
Creating an Account and
Purchasing eBooks
1 Visit online eBookstore and create an account.
lick [eBook Store] in the left-hand menu
C
within Reader Library.
lick a store logo.
C
Reader Library has links to a selection of
eBookstores. By clicking a store logo, your web
browser will open and show the selected online
eBookstore.
15
Page 16

Step 2: Creating an Account and Purchasing eBooks
reate an account.
C
In order to buy eBooks from your chosen
eBookstore, you will need to set-up an account.
Refer to the store’s online “Help” section for
more details.
2 Purchase and download eBooks.
IMPORTANT
Some eBookstores recommend that you install Adobe
Digital Editions in order to use their service. This is not
necessary if you are using Reader Library.
urchase eBooks.
P
Select the eBooks that you wish to purchase
from your chosen eBookstore.
16
Page 17

Step 2: Creating an Account and Purchasing eBooks
Download eB
ooks.
At the end of the eBook buying process, you will
be provided with a link on which you can click in
order to begin the download of your purchase.
IMPORTANT NOTE
You will be prompted to either [Open] or [Save] the
eBook download.
Please ensur
automatically download your eBook purchase
into Reader Library.
If you are shown a warning message relating to
Reader Library saying [A website wants to open
content using this program on your computer], click
[Allow].
e that you click [Open] as this will
Note
If you click [Save], return to your account on the
eBookstore and restart the download process
ensuring that you click [Open].
17
Page 18

Step 3: Authorize your Computer and Reader
Step3:
Authorize your Computer
and Reader
1 Create an Adobe ID and Password.
If this is the first time you have purchased an eBook,
Reader Library will prompt you to authorize your
computer.
Click [Yes] to continue.
18
Page 19

Step 3: Authorize your Computer and Reader
repare for Authorization.
P
If you already own an Adobe account, proceed
to step 2 ( 21).
If you need to create a new Adobe account, click
[Get Adobe ID].
You will then be taken to a web page that will
provide further information on the Adobe ID.
Click on the [Click here] link to continue to the
Adobe site, where you can set-up your account.
19
Page 20

Step 3: Authorize your Computer and Reader
reate an Adobe account.
C
Once you have the Adobe website displayed onscreen, you will see a link [Create an Adobe
Account].
Click on this to begin the set-up process. You
will receive step-by-step instructions as you
proceed through the registration process.
Make a note of your Adobe ID and password you will need this information later.
20
Page 21

Step 3: Authorize your Computer and Reader
2 Enter your Adobe ID and Password.
Return to Reader Library and enter the e-mail
address and password you used to create your
Adobe ID. Then click [OK] to continue.
Your eBook will now download to your computer.
You will find all of your purchased eBooks within
the [Library] section of Reader Library.
21
Page 22

Step 4: Transferring your eBooks to your Reader
Step 4:
Transferring your eBooks to
your Reader
1 Click [Library] in the left-hand menu within
Reader Library.
2 Select eBooks and drag-and-drop to [Reader].
elect an eBook.
S
Click on the eBook that you wish to transfer and
drag-and-drop it to [Reader] in the left-hand
menu.
22
Page 23

Step 4: Transferring your eBooks to your Reader
uthorize your Reader.
A
If this is the first time that you have transferred a
purchased eBook to your Reader, Reader Library
will prompt you to authorise your Reader.
Click [Yes] to continue.
Once authorised, the transfer will proceed.
If the Reader Library does not function as expected,
refer to “Troubleshooting” in the Reader Library
[Help] menu.
23
Page 24

Step 4: Transferring your eBooks to your Reader
3 Close Reader Library and disconnect Reader
from the computer.
Once Reader Library has closed, the on-screen
message on your Reader device will change from [Do
not disconnect] to [USB connected].
Once you see [USB connected], it is safe to disconnect
your Reader from your computer.
For more details about your Reader, refer to the User
Guide found on your Reader.
24
Page 25

Supported File Formats
Supported File Formats
The following file formats can be managed within
Reader Library and transferred to your Reader.
Book
EPUB file (.epub file extension)
EPUB (OPS version 2.0) supported
PDF file (.pdf file extension)
Support is based on the PDF 1.6 specification.
BBeB (.lrf or .lrx file extension)
Text file (.txt file extension)
RTF file (.rtf file extension)
Word file (.doc or .docx file extension)*
*1 In case of using Windows, you need Microsoft Word
installed on your computer. Word files will be
automatically converted to RTF files by Reader Library
during transfer to your Reader or a compatible memory
card.
1
25
Page 26

Supported File Formats
Audio
MP3 file (.mp3 file extension)
The following specifications should be met in order
to import an MP3 file.
– Bit rate: 32 to 320 kbps
– Sampling frequency: 22.05, 44.1 kHz
– File must be unsecured.
AAC file (.mp4, .m4a, .mov, or .qt file extension)
The following specifications should be met in order
to import an AAC file.
– Bit rate: 40 to 320 kbps
– Sampling frequency: 24.0, 44.1, 48.0 kHz
– File must be unsecured.
Picture
JPEG file (.jpg or .jpeg file extension)
GIF file (.gif file extension)*
PNG file (.png file extension)
BMP file (.bmp file extension)
* F
or an animation GIF file, only the first frame will be
shown.
26
Page 27

System Requirements
System Requirements
Reader Library will work with the following operating
systems.
OS Description
Microsoft Windows 7
(32/64 bit)
Microsoft Windows
ista (32/64 bit)
V
Microsoft Windows
XP (32 bit only)
Windows 7 Starter
Windows 7 Home Basic
Windows 7 Home Premium
Windows 7 Professional
Windows 7 Ultimate
Windows Vista Home Basic with
Service Pack 2 or later
Windows Vista Home Premium with
Service Pack 2 or later
Windows Vista Business with Service
Pack 2 or later
Windows Vista Ultimate with Service
Pack 2 or later
Microsoft Windows XP Home Edition
with S
Windows XP Professional with Service
P
Windows XP Media Center Edition
2004 & 2005 with S
later
ervice Pack 3 or later
ack 3 or later
ervice Pack 3 or
27
Page 28

OS Description
System Requirements
Apple Macintosh
(32 bit only)
ac OS X version 10.6.3 or later
M
Mac OS X version 10.5.8 or later
Mac OS X version 10.4.11 or later
CPU Windows: 800 MHz Celeron class
processor or better
acintosh: Intel, PowerPC G3, G4 or
M
G5 processor
RAM 128 MB or mor
e (minimum 512 MB
for Windows 7, Windows Vista)
Free space on hard
disc
Windows: 100 MB or more
acintosh: 60 MB or more
M
Depending on the content amount,
more space may be required.
Monitor H
igh Color or more, 1024 × 768 pixels
or more (True Color, 1280 × 1024
pixels, or more recommended)
Other devices USB port (High-Speed USB
Compatible), pointing device such as
mouse or track pad
Internet connection (broadband recommended, some fees
may apply) is also required on your computer.
28
Page 29

System Requirements
Reader Library is not supported by the following
environments:
– An operating system other than those included above
– Personally built computer or operating system
– Multi-boot environment
– Multi-monitor environment
29
 Loading...