


User guide
Xperia
F5122
™
X

Contents
Getting started...............................................................................7
About this User guide........................................................................7
Overview............................................................................................7
Assembly...........................................................................................8
Screen protection..............................................................................9
Starting your device for the first time.................................................9
Why do I need a Google™ account?...............................................10
Charging your device.......................................................................11
Device security.............................................................................13
Making sure your device is protected..............................................13
Screen lock......................................................................................13
Fingerprint Manager.........................................................................15
Unlocking your device automatically...............................................16
SIM card protection.........................................................................20
Using multiple SIM cards.................................................................20
Finding the identification number of your device.............................21
Finding a lost device .......................................................................21
Learning the basics......................................................................23
Using the touchscreen.....................................................................23
Locking and unlocking the screen...................................................24
Home screen....................................................................................25
Application screen...........................................................................26
Navigating applications....................................................................27
Widgets............................................................................................28
Shortcuts and folders......................................................................28
Background and themes..................................................................29
Battery and power management.....................................................30
Taking a screenshot.........................................................................31
Notifications.....................................................................................31
Icons in the status bar.....................................................................33
Applications overview......................................................................36
Downloading applications............................................................38
Downloading applications from Google Play™...............................38
Downloading applications from other sources................................38
Internet and networks..................................................................39
Browsing the web............................................................................39
Internet and MMS settings ..............................................................39
Wi-Fi®..............................................................................................40
Sharing your mobile data connection..............................................42
2
This is an Internet version of this publication. © Print only for private use.

Controlling data usage.....................................................................44
Selecting a SIM card for data traffic................................................45
Selecting mobile networks...............................................................45
Virtual private networks (VPNs)........................................................46
Synchronising data on your device..............................................47
Synchronising with online accounts................................................47
Synchronising with Microsoft® Exchange ActiveSync®.................47
Basic settings...............................................................................49
Accessing settings...........................................................................49
Volume settings...............................................................................49
Do not disturb mode settings..........................................................50
Screen settings................................................................................51
Application settings.........................................................................52
Resetting your applications.............................................................53
Daydream.........................................................................................54
Language settings............................................................................54
Date and time...................................................................................54
X-Reality™ for mobile......................................................................55
Super-vivid mode.............................................................................55
Enhancing the sound output............................................................55
Multiple user accounts.....................................................................56
Typing text...................................................................................59
On-screen keyboard........................................................................59
Phonepad.........................................................................................60
Entering text using voice input........................................................61
Editing text.......................................................................................61
Personalising the on-screen keyboard............................................62
Calling..........................................................................................64
Making calls.....................................................................................64
Receiving calls.................................................................................65
Ongoing calls...................................................................................67
Using the call log.............................................................................67
Forwarding calls...............................................................................68
Restricting calls................................................................................68
Multiple calls....................................................................................69
Conference calls..............................................................................70
Voicemail..........................................................................................70
Emergency calls...............................................................................71
Contacts.......................................................................................72
Transferring contacts.......................................................................72
Searching and viewing contacts......................................................73
Adding and editing contacts............................................................74
3
This is an Internet version of this publication. © Print only for private use.

Adding medical and emergency contact information......................75
Favourites and groups.....................................................................76
Sending contact information............................................................77
Avoiding duplicate entries in the Contacts application...................77
Backing up contacts........................................................................77
Messaging and chat.....................................................................79
Reading and sending messages......................................................79
Organising your messages..............................................................80
Calling from a message...................................................................81
Messaging settings..........................................................................81
Instant messaging and video chat...................................................81
Email.............................................................................................82
Setting up email...............................................................................82
Sending and receiving email messages..........................................82
Organising your email messages.....................................................83
Email account settings.....................................................................84
Gmail™............................................................................................84
Music............................................................................................86
Transferring music to your device...................................................86
Listening to music............................................................................86
Music home screen menu................................................................87
Playlists............................................................................................88
Sharing music..................................................................................89
Enhancing the sound.......................................................................89
Recognising music with TrackID™..................................................89
FM radio.......................................................................................91
Listening to the radio.......................................................................91
Favourite radio channels..................................................................92
Sound settings.................................................................................92
Camera.........................................................................................93
Taking photos and recording videos...............................................93
Face detection.................................................................................94
Using Smile Shutter™ to capture smiling faces..............................94
Adding geographical positions to your photos................................94
General camera settings..................................................................95
Still camera settings.........................................................................98
Video camera settings...................................................................101
Photos and videos in Album......................................................104
Viewing photos and videos............................................................104
Sharing and managing photos and videos....................................105
Editing photos with the Photo editor application...........................106
Editing videos with the Video editor application............................107
4
This is an Internet version of this publication. © Print only for private use.

Hiding photos and videos..............................................................107
Album home screen menu.............................................................108
Viewing your photos on a map......................................................109
Videos........................................................................................111
Watching videos in the Video application......................................111
Transferring video content to your device.....................................112
Managing video content................................................................112
Movie Creator................................................................................112
PS Video service............................................................................113
Connectivity...............................................................................114
Mirroring the screen of your device on a TV using a cable............114
Mirroring the screen of your device wirelessly on a TV.................114
Sharing content with DLNA Certified™ devices............................115
Connecting your device to USB accessories................................117
Connecting your device to a DUALSHOCK™ series wireless
controller........................................................................................117
NFC................................................................................................118
Bluetooth® wireless technology....................................................120
Smart apps and features that save you time.............................123
Using your device as a wallet........................................................123
Travel and maps.........................................................................124
Using location services..................................................................124
Google Maps™ and navigation.....................................................124
Using data traffic when travelling..................................................124
Using your device with a car infotainment system........................125
Airplane mode................................................................................125
Calendar and alarm clock..........................................................127
Calendar.........................................................................................127
Alarm and clock.............................................................................127
Accessibility...............................................................................130
Magnification gestures...................................................................130
Large text.......................................................................................130
Colour correction...........................................................................130
TalkBack........................................................................................130
Support and maintenance..........................................................132
Support for your device.................................................................132
Computer tools..............................................................................132
Updating your device.....................................................................133
Memory and storage......................................................................134
Managing files using a computer...................................................135
Backing up and restoring content.................................................135
Running diagnostic tests on your device.......................................138
5
This is an Internet version of this publication. © Print only for private use.

Restarting and resetting your device.............................................138
Warranty, SAR and usage guidelines............................................140
Limitations to services and features..............................................140
Legal information...........................................................................140
6
This is an Internet version of this publication. © Print only for private use.
Getting started
About this User guide
This is the
sure which software version your device is running, you can check it via the Settings
menu. For more information about software updates, see
page 133.
To check the current software version of your device
1
From your Home screen, tap .
2
Find and tap Settings > About phone > Android™ version.
Xperia™
X User guide for the Android™ 6.0 software version. If you're not
Updating your device
Overview
on
7
This is an Internet version of this publication. © Print only for private use.
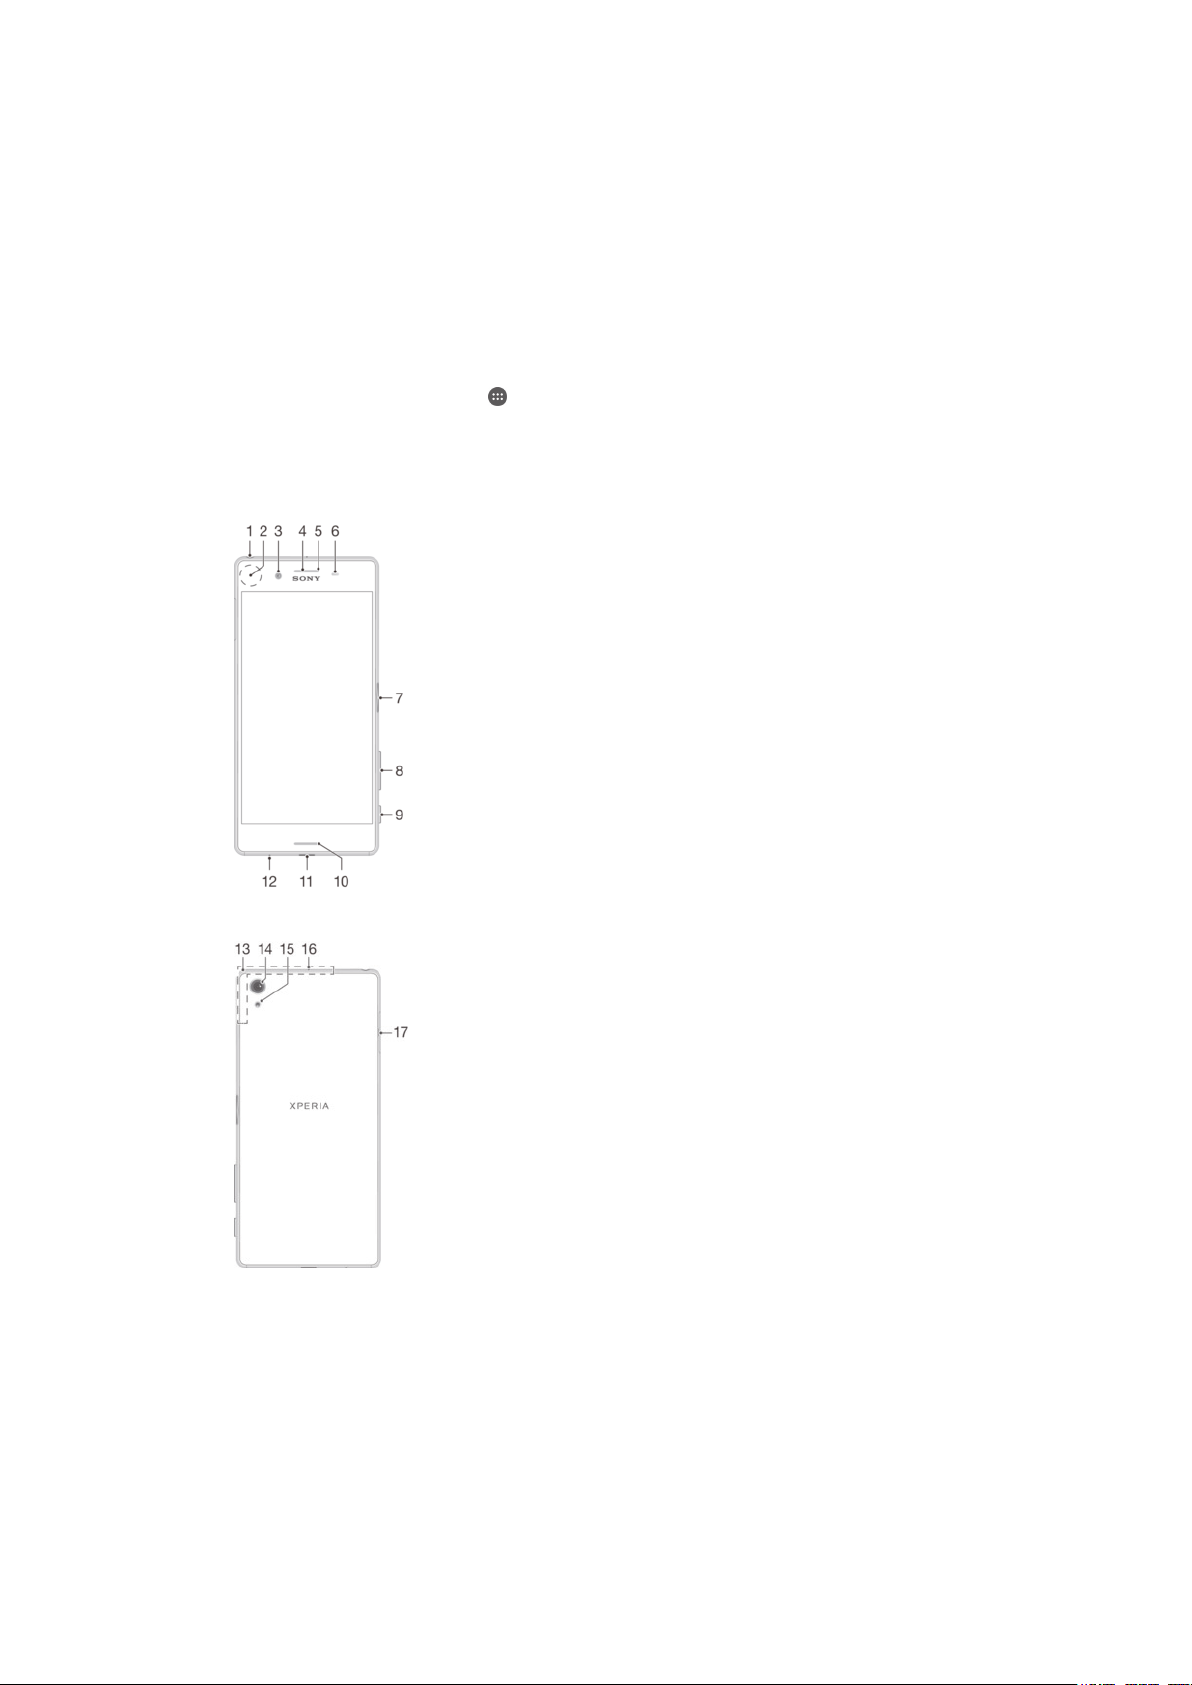
1. Headset jack
2. NFC™ detection area
3. Front camera lens
4. Ear speaker
5. Charging/Notification light
6. Proximity/Light sensor
7. Power key/Fingerprint sensor
8. Volume/Zoom key
10. Main loudspeaker
11. Charger/USB cable port
12. Main microphone
13. Wi-Fi/Bluetooth/GPS antenna area
14. Main camera lens
15. Main camera light
16. Second microphone
17. Nano SIM/Memory card slot cover
9. Camera key
Assembly
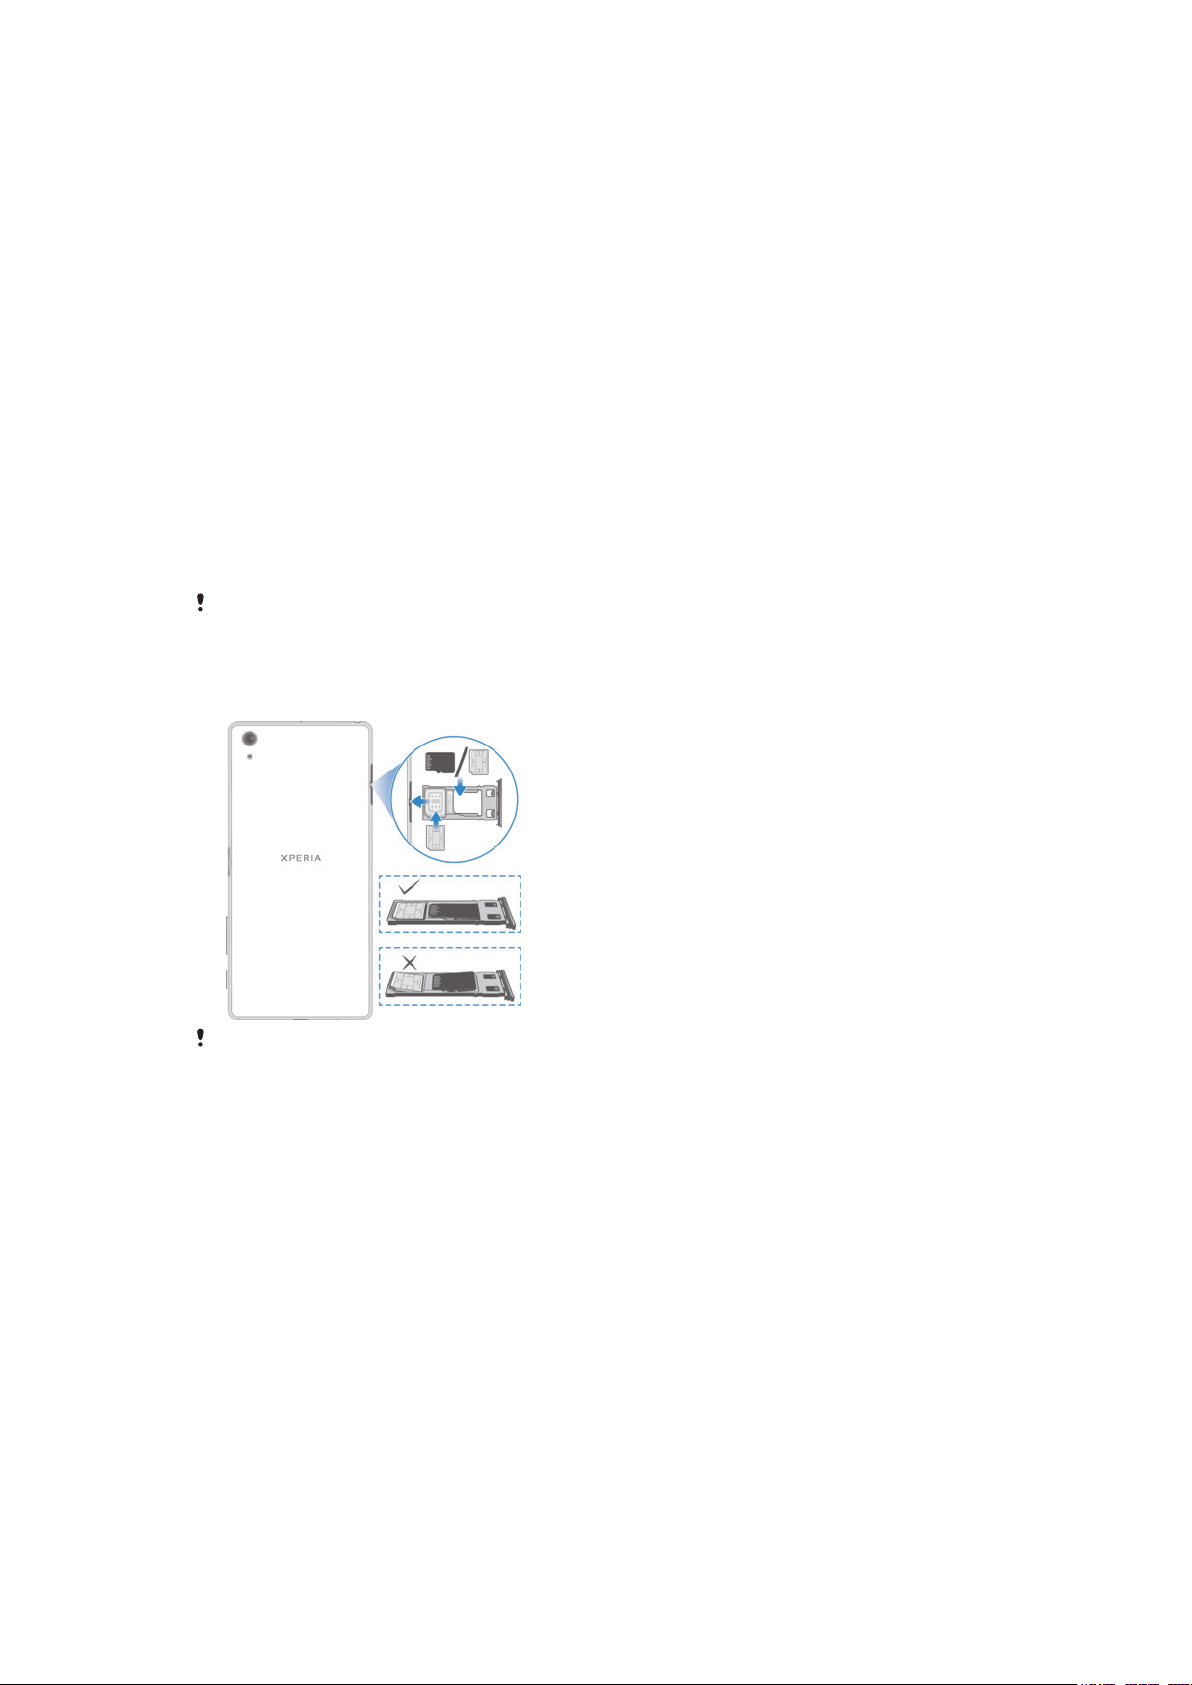
Your device only supports nano SIM cards. The nano SIM card and the memory card
share the same holder but have separate slots in the holder. Make sure you don’t
confuse the two. The combined SIM/Memory card slot allows you to use either a
memory card, or an additional SIM card.
To prevent data loss, make sure you turn off your device or unmount the memory card before
you drag out the holder to remove the nano SIM card (or cards) or memory card from the
device.
To insert one or two nano SIM cards
If you drag out the SIM/Memory card holder while the device is powered on, the device
restarts automatically.
1
With the screen facing down, drag out the SIM/Memory card holder using your
finger nail.
2
Firmly place a single SIM card in the correct orientation in position one as
shown in the illustration.
3
Firmly place the additional SIM card in the correct orientation in position two as
shown in the illustration.
4
Make sure all cards are placed horizontally in the holder.
5
Insert the holder into the slot, then close the cover.
To insert a memory card
1
With the screen facing down, open the nano SIM/Memory card slot cover.
2
Place the memory card in the memory card slot in the correct orientation, as
shown in the illustration.
3
Close the cover.
To remove the nano SIM card
8
This is an Internet version of this publication. © Print only for private use.

1
With the screen facing down, open the cover for the nano SIM card and
memory card slots.
2
Using your fingernail or a similar object, drag out the nano SIM card holder.
3
Remove the nano SIM card, then re-insert the holder.
4
Close the cover.
To remove the memory card
1
Turn off the device and with the screen facing down, open the cover for the
nano SIM card and memory card slot.
2
Using a fingernail or other similar object, drag out the holder for the nano SIM
card and memory card.
3
Remove the memory card from the memory card slot in the holder, then reinsert the holder.
4
Close the cover.
You can also remove the memory card without turning the device off in step 1. To use this
method, you must first unmount the memory card under
Advanced settings > Storage >
above.
next to SD card, then follow the rest of the instructions
Settings > Storage & memory > >
Screen protection
Before using your device, remove the transparent protection film by pulling up on the
protruding tab.
It is recommended to protect your device with a Sony-branded screen cover or
protector intended for your Xperia™ model. The use of third party screen protection
accessories may prevent your device from working by covering sensors, lenses,
speakers, or microphones and it can invalidate the warranty.
Starting your device for the first time
The first time you start your device, a setup guide opens to help you configure basic
settings, sign in to some accounts and personalise your device. For example, if you
have a Google™ account, you can sign in to it here and get set up straight away.
9
This is an Internet version of this publication. © Print only for private use.
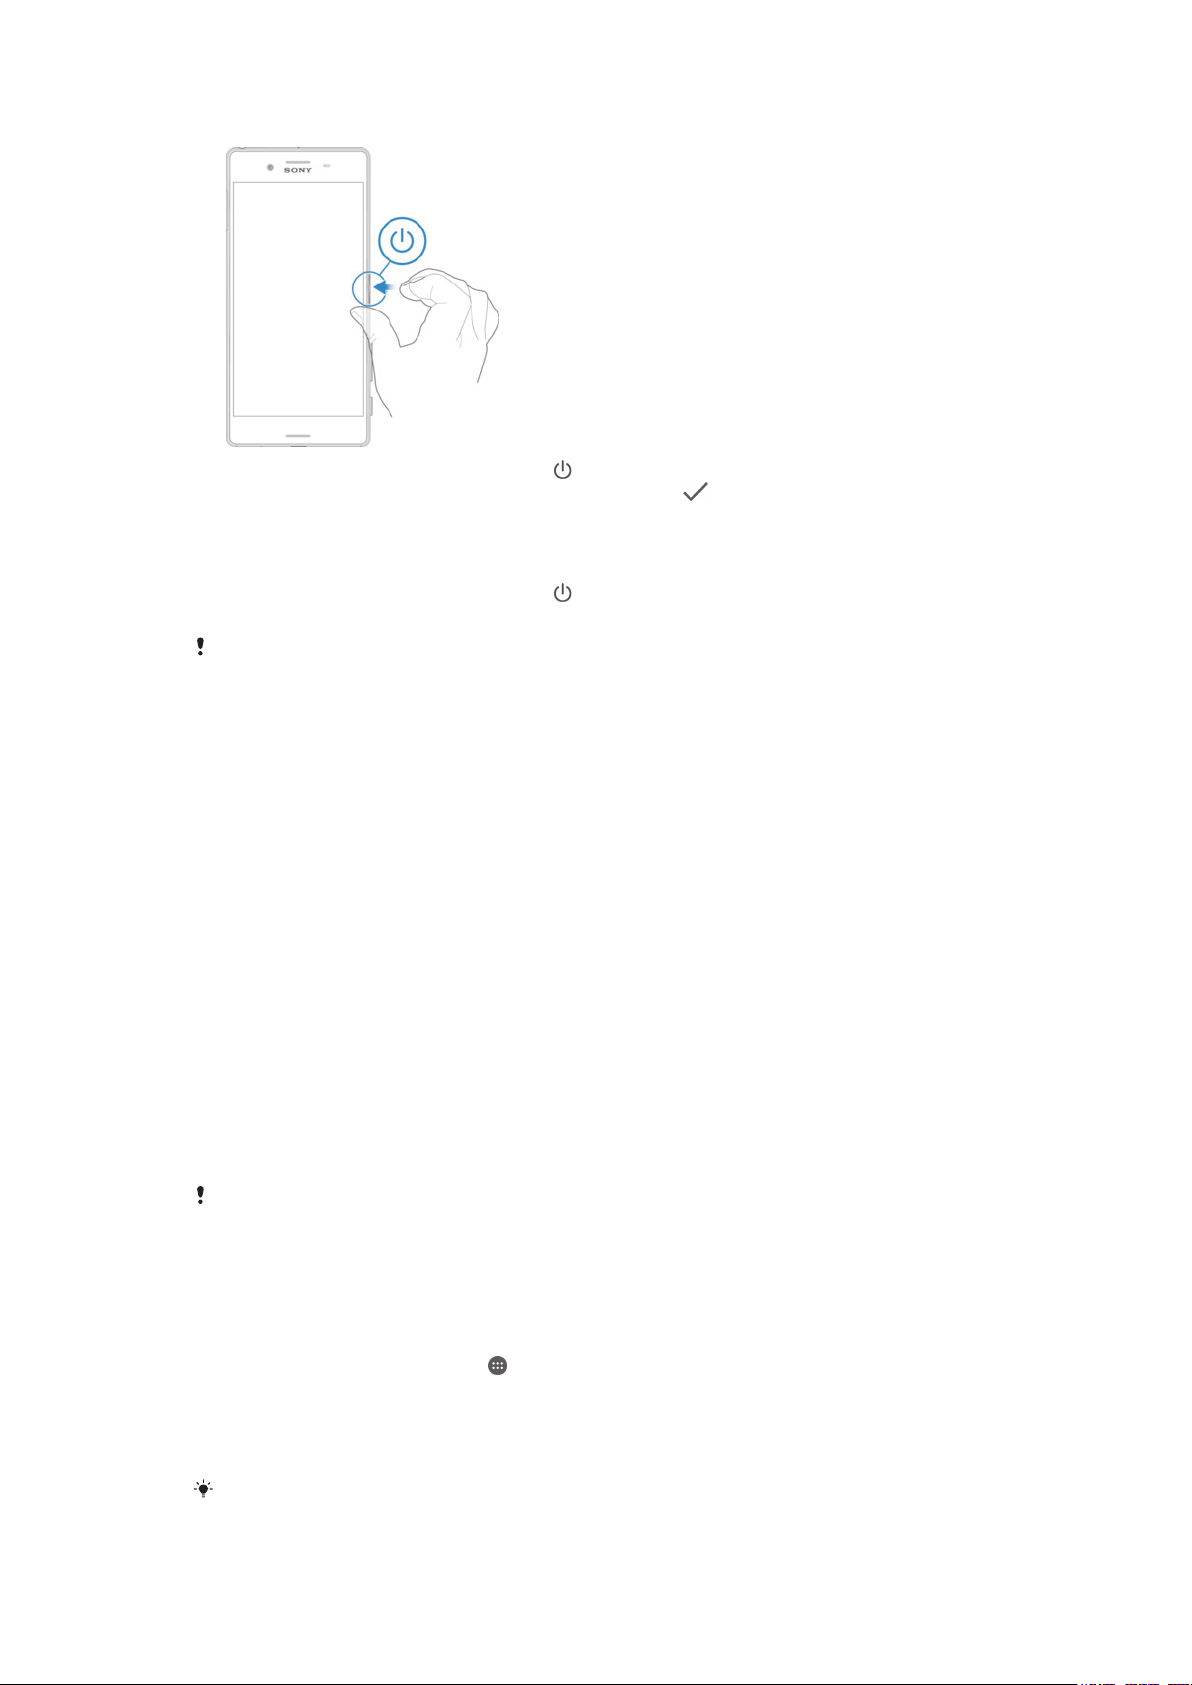
To turn on the device
1
Press and hold down the power key until the device vibrates.
2
Enter your SIM card PIN when requested, then tap .
3
Wait a while for the device to start.
To turn off the device
1
Press and hold down the power key until the options menu opens.
2
In the options menu, tap Power off.
It may take a while for the device to shut down.
Why do I need a Google™ account?
Your Xperia™ device from Sony runs on the Android™ platform developed by
Google™. A range of Google™ applications and services is available on your device
when you purchase it, for example, Gmail™, Google Maps™, YouTube™ and the
Play Store™ application, which gives you access to the Google Play™ online store
for downloading Android™ applications. To get the most out of these services, you
need a Google™ account. For example, a Google™ account is mandatory if you want
to:
•
Download and install applications from Google Play™.
•
Synchronise email, contacts and the calendar using Gmail™.
•
Chat with friends using the Hangouts™ application.
•
Synchronise your browsing history and bookmarks using the Google Chrome™ web
browser.
•
Identify yourself as the authorised user after a software repair using Xperia™
Companion.
•
Remotely find, lock or clear a lost or stolen device using the my Xperia™ or
Android™ Device Manager services.
For more information about Android™ and Google™, go to
http://support.google.com
It is crucial that you remember your Google™ account username and password. In some
situations, you may need to identify yourself for security reasons using your Google™ account.
If you fail to give your Google™ username and password in such situations, your device is
locked. Also, if you have more than one Google™ account, make sure to enter the details for
the relevant account.
.
To set up a Google™ account on your device
1
From your Home screen, tap .
2
Find and tap Settings > Accounts & services > Account sync > Add account >
Google.
3
Follow the registration wizard to create a Google™ account, or sign in if you
already have an account.
You can also sign in to or create a Google™ account from the setup guide the first time you
start your device. Or you can go online and create an account at
www.google.com/accounts
10
This is an Internet version of this publication. © Print only for private use.
.
To remove a Google™ account
1
From your Home screen, tap .
2
Tap Settings > Accounts & services > Account sync > Google.
3
Select the Google™ account that you want to remove.
4
Tap > Remove account.
5
Tap Remove account again to confirm.
If you remove your Google™ account, any security features that are linked to your Google™
account will no longer be available.
If you are lending your device to someone to use for an extended period, it is recommended
that you remove your Google™ account from the device.
Charging your device
Your device has an embedded, rechargeable battery that should be replaced only by
Sony or an authorised Sony repair centre. You should never try to open or take apart
the device yourself. Opening the device can cause damage that voids your warranty.
The battery is partly charged when the device is shipped from the factory. Depending
on how long your device was in the box before you purchased it, the battery level
may be quite low. It is therefore recommended that you charge the battery for at least
30 minutes before starting up your device for the first time. You can still use your
device while it is charging. To read more about how to improve the battery
performance, see
Battery and power management
on page 30.
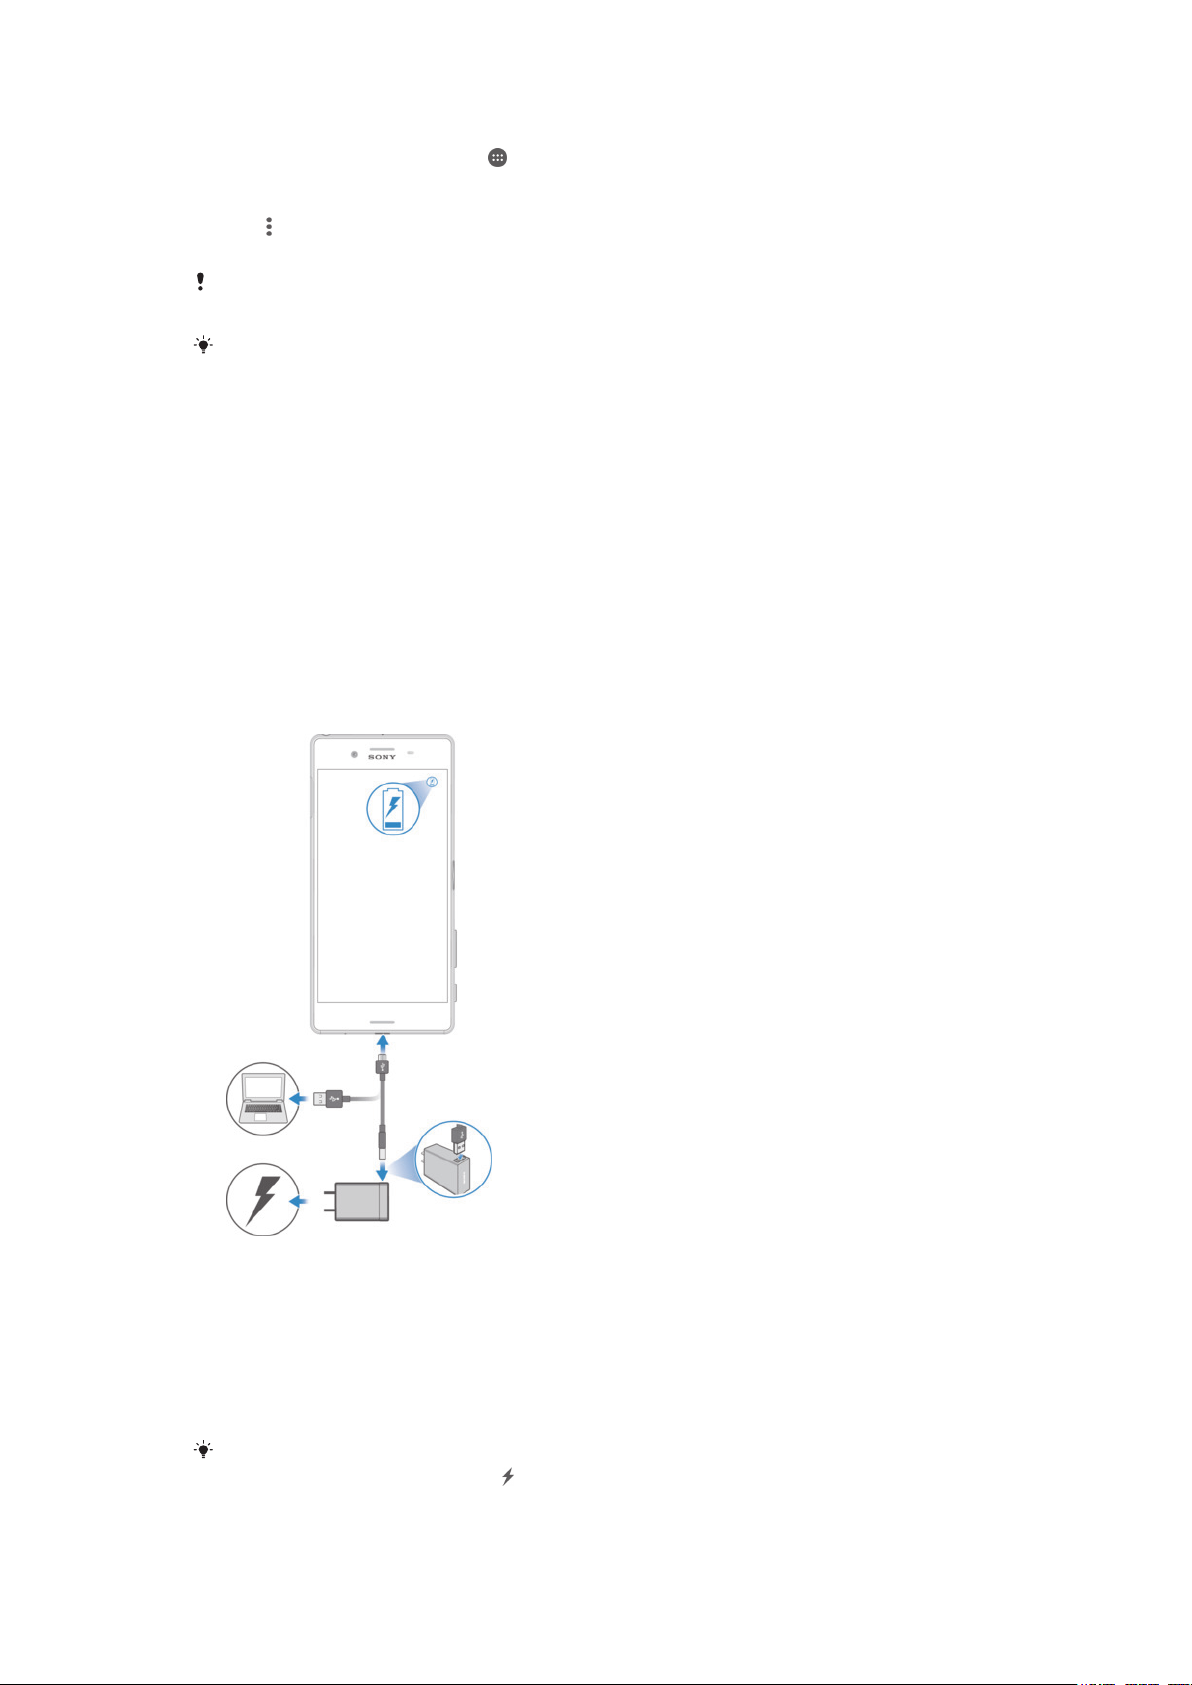
To charge your device
1
Plug the charger into a power outlet.
2
Plug one end of the USB cable into the charger (or into the USB port of a
computer).
3
Plug the other end of the cable into the micro USB port on your device, with
the USB symbol facing up. The notification light illuminates when charging
begins.
4
When the device is fully charged, disconnect the cable from your device by
pulling it straight outwards. Make sure not to bend the connector.
If the battery is completely discharged, it may take a few minutes before the notification light
illuminates and the charging icon
appears.
11
This is an Internet version of this publication. © Print only for private use.

Battery notification light status
Green The battery is charging and the battery charge level is greater than 90%
Red The battery is charging and the battery charge level is less than 15%
Orange The battery is charging and the battery charge level is less than 90%
12
This is an Internet version of this publication. © Print only for private use.

Device security
Making sure your device is protected
You can prevent other people from using your device without your permission. For
example, if your device is lost, stolen, or wiped, only someone with your Google™
account or screen lock information can use the device. To make sure that your device
is protected, it is important that you set a secure screen lock and add your Google™
account to your device. It is crucial that you remember both your screen lock
information and your Google™ account credentials. To make sure your device is
protected, you can:
•
Set a secure screen lock on your device, that is, a PIN, password, or pattern or
fingerprint screen lock to prevent anyone from resetting your device. For more
information, see
•
Add a Google™ account to prevent others from using your device if it gets stolen
Screen lock
and/or wiped. For more information, see
page 10.
•
Activate either the “Protection by my Xperia” or the Android™ Device Manager web
service. Using one of these services, you can remotely locate, lock or erase a lost
device. For more information, see
Verifying the ownership of your device
Certain protection features require you to either unlock your screen with your PIN,
password, pattern, or enter your Google™ account information. Below are examples
of protection features and some of the required credentials:
on page 13.
Why do I need a Google™ account?
Finding a lost device
on
on page 21 .
Factory Data Reset
protection
Protection by my
Xperia
Android™ Device
Manager
Software repair If you use the Xperia™ Companion software to perform a software repair, you’re
For Android™ Device Manager, it is necessary to enter information from a Google™ account.
This can be any Google™ account which you have set up on the device. If you cannot provide
the relevant account information during a setup process, you won't be able to use the device
at all.
You must unlock your screen before you are allowed to perform a Factory Data
Reset.
If you remotely reset your device using this service, you must enter the
username and password for a Google™ account associated with the service.
The device must be connected to the Internet before the setup process can be
completed. Otherwise, you will not be able to use your device after the reset.
If you remotely reset your device using this service, you must enter the
username and password for a Google™ account. The device must be connected
to the Internet before the setup process can be completed. Otherwise, you will
not be able to use your device after the reset.
asked to enter your Google™ account username and password when you start
the device after the repair is complete.
Screen lock
Fingerprint functionality is not available in the US market.
There are several ways to unlock the screen. The security level of each lock type is
listed below in order of weakest to strongest:
•
Swipe – no protection, but you have quick access to the Home screen.
•
Pattern – draw a simple pattern with your finger to unlock your device.
•
PIN – enter a numeric PIN of at least four digits to unlock your device.
•
Password – enter an alpha-numeric password to unlock your device.
13
This is an Internet version of this publication. © Print only for private use.

•
Fingerprint – place your registered finger on the power key to unlock your device
It is very important that you remember your screen unlock pattern, PIN or password. If you
forget this information, it may not be possible to restore important data such as contacts and
messages.
If you have set up a Microsoft® Exchange ActiveSync® (EAS) account on your Xperia™
device, the EAS security settings may limit the lock screen type to only a PIN or password.
This occurs when your network administrator specifies a specific lock screen type for all EAS
accounts for enterprise security reasons. Contact the network administrator of your company
or organisation to check what network security policies are implemented for mobile devices.
To create a screen lock pattern
1
From your Home screen, tap
2
Find and tap Settings > Lock screen & security > Screen lock > Pattern.
3
Follow the instructions on your device.
If you enter an incorrect lock pattern five times in a row, you must wait 30 seconds before
trying again.
.
To change screen lock type
1
From your Home screen, tap .
2
Find and tap Settings > Lock screen & security .
To change the screen lock pattern
1
From your Home screen, tap .
2
Find and tap Settings> Lock screen & security > Screen lock.
3
Draw your screen unlock pattern.
4
Tap Pattern and follow the instructions on your device.
To create a screen lock PIN
1
From your Home screen, tap
2
Find and tap Settings > Lock screen & security > Screen lock > PIN.
3
Enter a numeric PIN, then tap Continue.
4
Re-enter and confirm your PIN, then tap OK.
.
To create a screen lock password
1
From your Home screen, tap
2
Find and tap Settings > Lock screen & security > Screen lock > Password.
3
Enter a password, then tap Continue.
4
Re-enter and confirm your password, then tap OK.
.
To activate the Swipe unlock function
1
From your Home screen, tap
2
Find and tap Settings > Lock screen & security > Screen lock.
3
Draw your screen unlock pattern, or enter your PIN or password depending on
.
which of these screen lock types is enabled.
4
Tap Swipe.
Fingerprint unlock
Fingerprint functionality is not available in the US market.
You can use your fingerprint to quickly unlock your device. To use this feature, you
need to register a fingerprint and enable this feature in the Fingerprint Manager first.
For details on registering fingerprints, see
The PIN or password screen lock you set up serves as a backup unlock method if you enable
the Fingerprint unlock option. Selecting other screen lock types will clear all fingerprint
settings.
Fingerprint Manager
on page 15.
14
This is an Internet version of this publication. © Print only for private use.
 Loading...