


Draft
User guide
Product name variable is

This is a draft publication for internal use only.
Contents
Xperia™ V User guide....................................................................6
Getting started...............................................................................8
What is Android™?............................................................................8
Overview............................................................................................8
Assembly...........................................................................................9
Turning the device on and off .........................................................12
Screen lock......................................................................................13
Setup guide......................................................................................13
Accounts and services.....................................................................14
Getting to know your phone.........................................................16
Using the keys.................................................................................16
Battery..............................................................................................16
Using the touchscreen.....................................................................21
Using the lockscreen.......................................................................25
Home screen....................................................................................26
Accessing and using applications...................................................30
Status and notifications...................................................................36
Phone settings menu.......................................................................39
Typing text.......................................................................................39
Customising your device.................................................................48
Enhancing the sound output............................................................53
Memory............................................................................................54
Using a headset ..............................................................................55
Internet and messaging settings......................................................56
Controlling data usage.....................................................................58
Mobile network settings...................................................................59
Google Play™..............................................................................62
Getting started with Google Play™.................................................62
Downloading from Google Play™....................................................62
Clearing your application data.........................................................63
Permissions......................................................................................64
Installing applications not from Google Play™ ...............................65
Calling..........................................................................................66
Emergency calls...............................................................................66
Making and receiving calls...............................................................66
Rejecting calls..................................................................................69
Recent calls.....................................................................................70
Voicemail..........................................................................................71
Multiple calls....................................................................................72
2
This is an Internet version of this publication. © Print only for private use.

This is a draft publication for internal use only.
Setting up a conference call............................................................73
Call settings.....................................................................................74
Contacts ......................................................................................77
Getting contacts into your device....................................................77
Adding and editing contacts............................................................80
Searching and viewing contacts......................................................82
Favourites and groups.....................................................................84
Sending contact information............................................................85
Backing up contacts........................................................................86
Messaging....................................................................................88
Using text and multimedia messaging.............................................88
Text and multimedia message options............................................91
Google Talk™ .................................................................................92
Email.............................................................................................94
Getting started with Email................................................................94
Using email......................................................................................96
"WALKMAN" application ...........................................................102
About Music...................................................................................102
Transferring media files to your device .........................................103
Using the "WALKMAN" application ..............................................103
Getting more information about a track or artist...........................106
Using My music to organise your tracks ......................................107
Managing playlists.........................................................................109
"WALKMAN" application widget ..................................................111
Protecting your hearing..................................................................111
TrackID technology........................................................................112
FM radio.....................................................................................116
About the FM radio........................................................................116
Using your favourite radio channels..............................................118
Sound settings...............................................................................119
Identifying radio tracks using TrackID™........................................120
Camera.......................................................................................121
About the camera..........................................................................121
Using the still camera....................................................................122
Face detection...............................................................................124
Using Smile Shutter™ to capture smiling faces............................125
Adding the geographical position to your photos.........................125
Using still camera settings.............................................................126
Using the video camera.................................................................133
Album.........................................................................................141
About Album..................................................................................141
Viewing photos and videos in the Pictures tab .............................142
3
This is an Internet version of this publication. © Print only for private use.

This is a draft publication for internal use only.
Viewing photos and videos in the My albums tab ........................143
Viewing your photos on a map......................................................152
Viewing online albums...................................................................155
Movies........................................................................................157
About Movies.................................................................................157
Using Movies.................................................................................158
Video Unlimited..........................................................................161
About Video Unlimited...................................................................161
Renting or buying a video..............................................................163
Watching a video from Video Unlimited........................................165
Web browser..............................................................................167
About the web browser..................................................................167
Connectivity...............................................................................168
Connecting to wireless networks...................................................168
Sharing content with DLNA Certified™ devices............................174
NFC................................................................................................179
Bluetooth™ wireless technology...................................................183
Connecting your device to a computer.........................................186
Scanning barcodes with the NeoReader™ application.................191
Smart Connect...............................................................................194
Synchronising data on your phone............................................196
About synchronising data on your device.....................................196
Synchronising with Google™........................................................196
Synchronising your corporate email, calendar and contacts........197
Synchronising with Facebook™....................................................198
Maps and locations....................................................................200
About location services..................................................................200
Using GPS.....................................................................................200
Google Maps™..............................................................................201
Using Google Maps™ to get directions.........................................202
Calendar and alarm clock..........................................................203
Calendar.........................................................................................203
Alarm clock....................................................................................204
Support and maintenance..........................................................209
Updating your device.....................................................................209
Backing up and restoring phone content......................................211
Resetting your device....................................................................212
Locking and protecting your device..............................................212
Support application.......................................................................218
Recycling your phone....................................................................218
4
This is an Internet version of this publication. © Print only for private use.

This is a draft publication for internal use only.
Reference...................................................................................219
Settings overview...........................................................................219
Status and notification icons overview..........................................220
Application overview......................................................................226
Important information.................................................................231
Important information leaflet..........................................................231
Limitations to services and features..............................................231
Legal information...........................................................................231
Index...........................................................................................233
5
This is an Internet version of this publication. © Print only for private use.

This is a draft publication for internal use only.
Xperia™ V [] User guide
6
This is an Internet version of this publication. © Print only for private use.

This is a draft publication for internal use only.
ID: SCR-SONY-12NU-HTML-UG-FRONT
GUID GUID-E6E8CB91-86CA-4D8B-962F-F345E3A3EC1C
Title User guide - Front page
Changes Front page for XPERIA Care HTML UG
Version 1
Author AnnE
Status Released
7
This is an Internet version of this publication. © Print only for private use.
This is a draft publication for internal use only.
Getting started
GUID GUID-939577FB-1BE0-4C23-9106-0910EFDEC761
Title Getting started - heading only
Changes From Robyn RTL. Valid for eDream 3.0 - Home screen label changed.
Version 2
Author KomalL
Status Released
What is Android™?
Indexterm: "Android™"
Your Xperia smartphone from Sony runs on the Android platform. Android phones
can perform many of the same functions as a computer and you can customise them
to your own needs. For example, you can add and delete applications, or enhance
existing applications to improve functionality. On Google Play™ you can download a
range of applications and games from a constantly growing collection. You can also
integrate applications on your Android™ phone with other applications and with
online services that you use. For example, you can back up your phone contacts,
access your different email accounts and calendars from one place, keep track of
your appointments, and engage in social networking.
Android™ phones are constantly evolving. When a new software version is available
and your phone supports this new software, you can update your phone to get new
features and the latest improvements.
Your Android™ phone is pre-loaded with Google™ services. To get the most out of the
provided Google™ services, you should have a Google™ account and sign in to it when you
first start your phone. You also need to have Internet access to use many of the features in
Android™.
New software releases may not be compatible with all phones.
GUID GUID-F3EE4549-8847-4A4D-AA20-28FBC7647298
Title What is Android?
Changes
Version 1
Author JorgenL
Status Released
Overview
8
This is an Internet version of this publication. © Print only for private use.
This is a draft publication for internal use only.
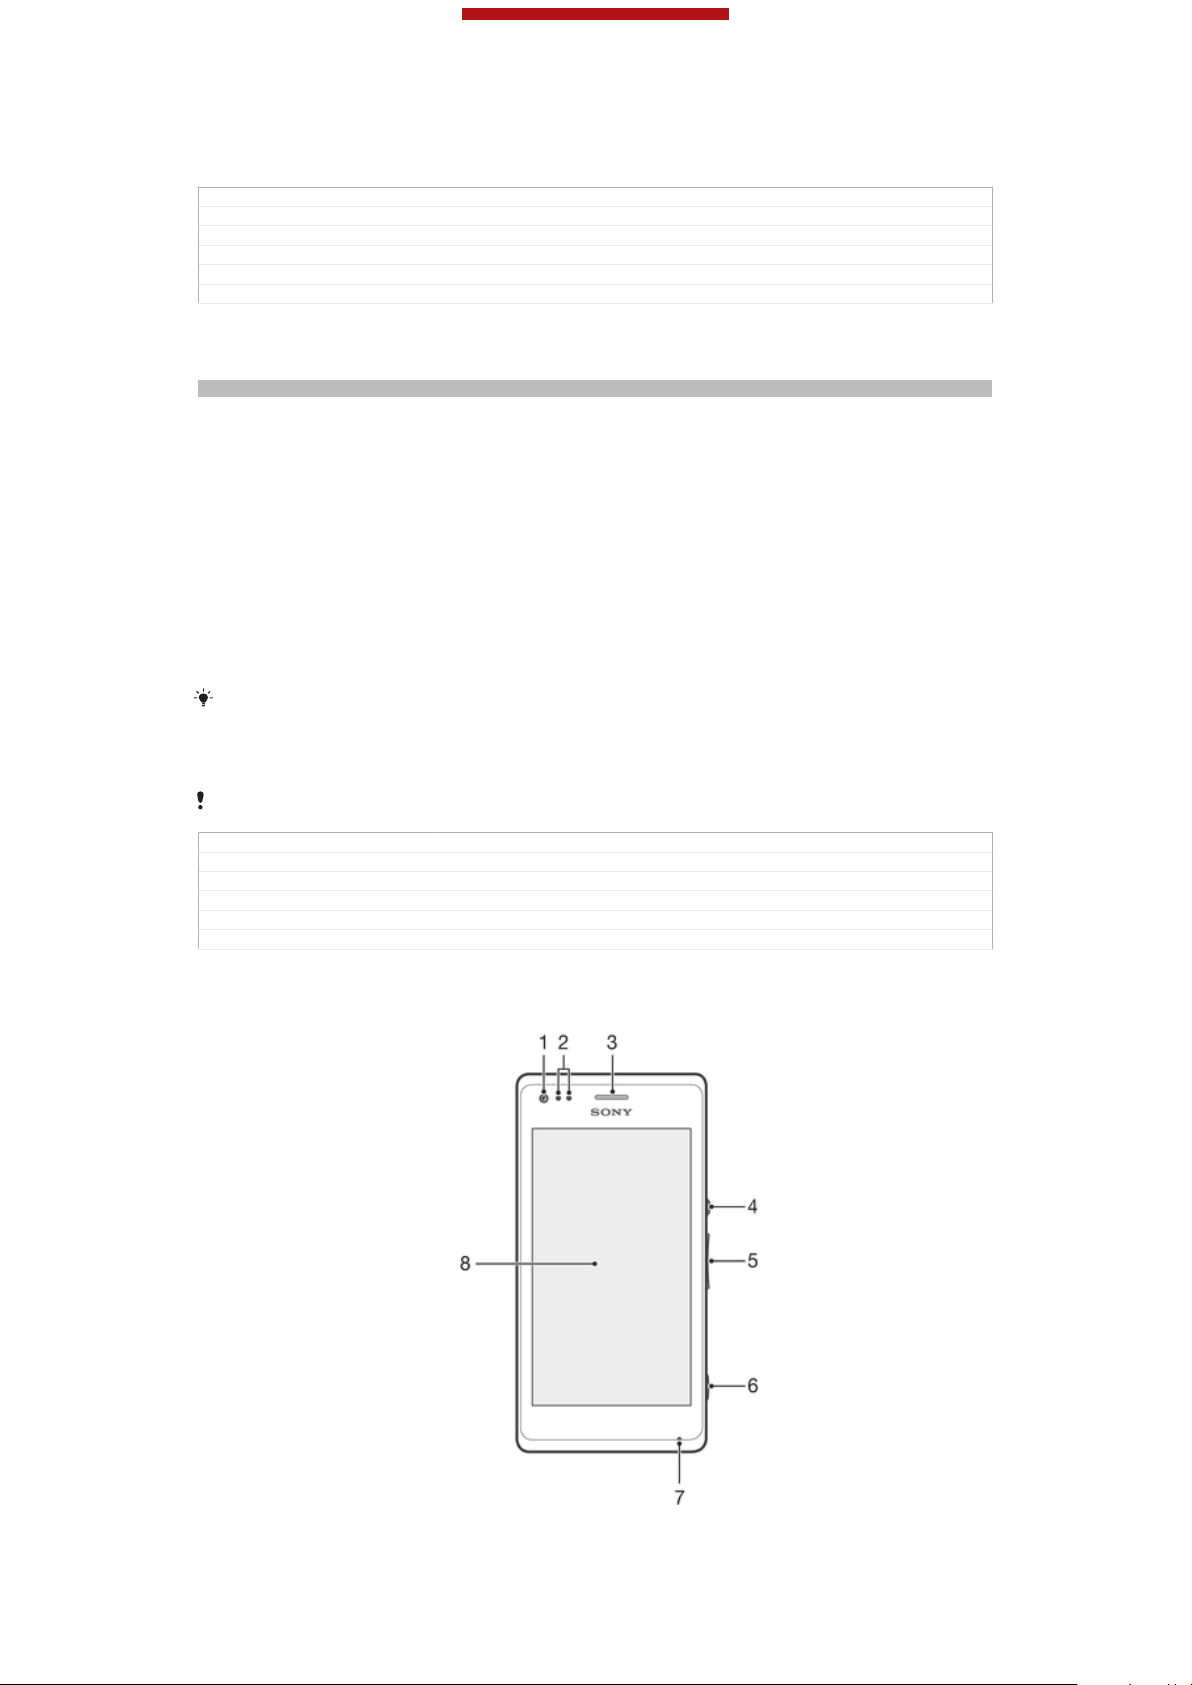
ID: ILL-SONY-13NY-FRONT-OVERVIEW
1 Front camera lens
2 Proximity/Light sensor
3 Ear speaker
4 Power key
5 Volume/Zoom key
6 Camera key
7 Microphone 1
8 Touchscreen
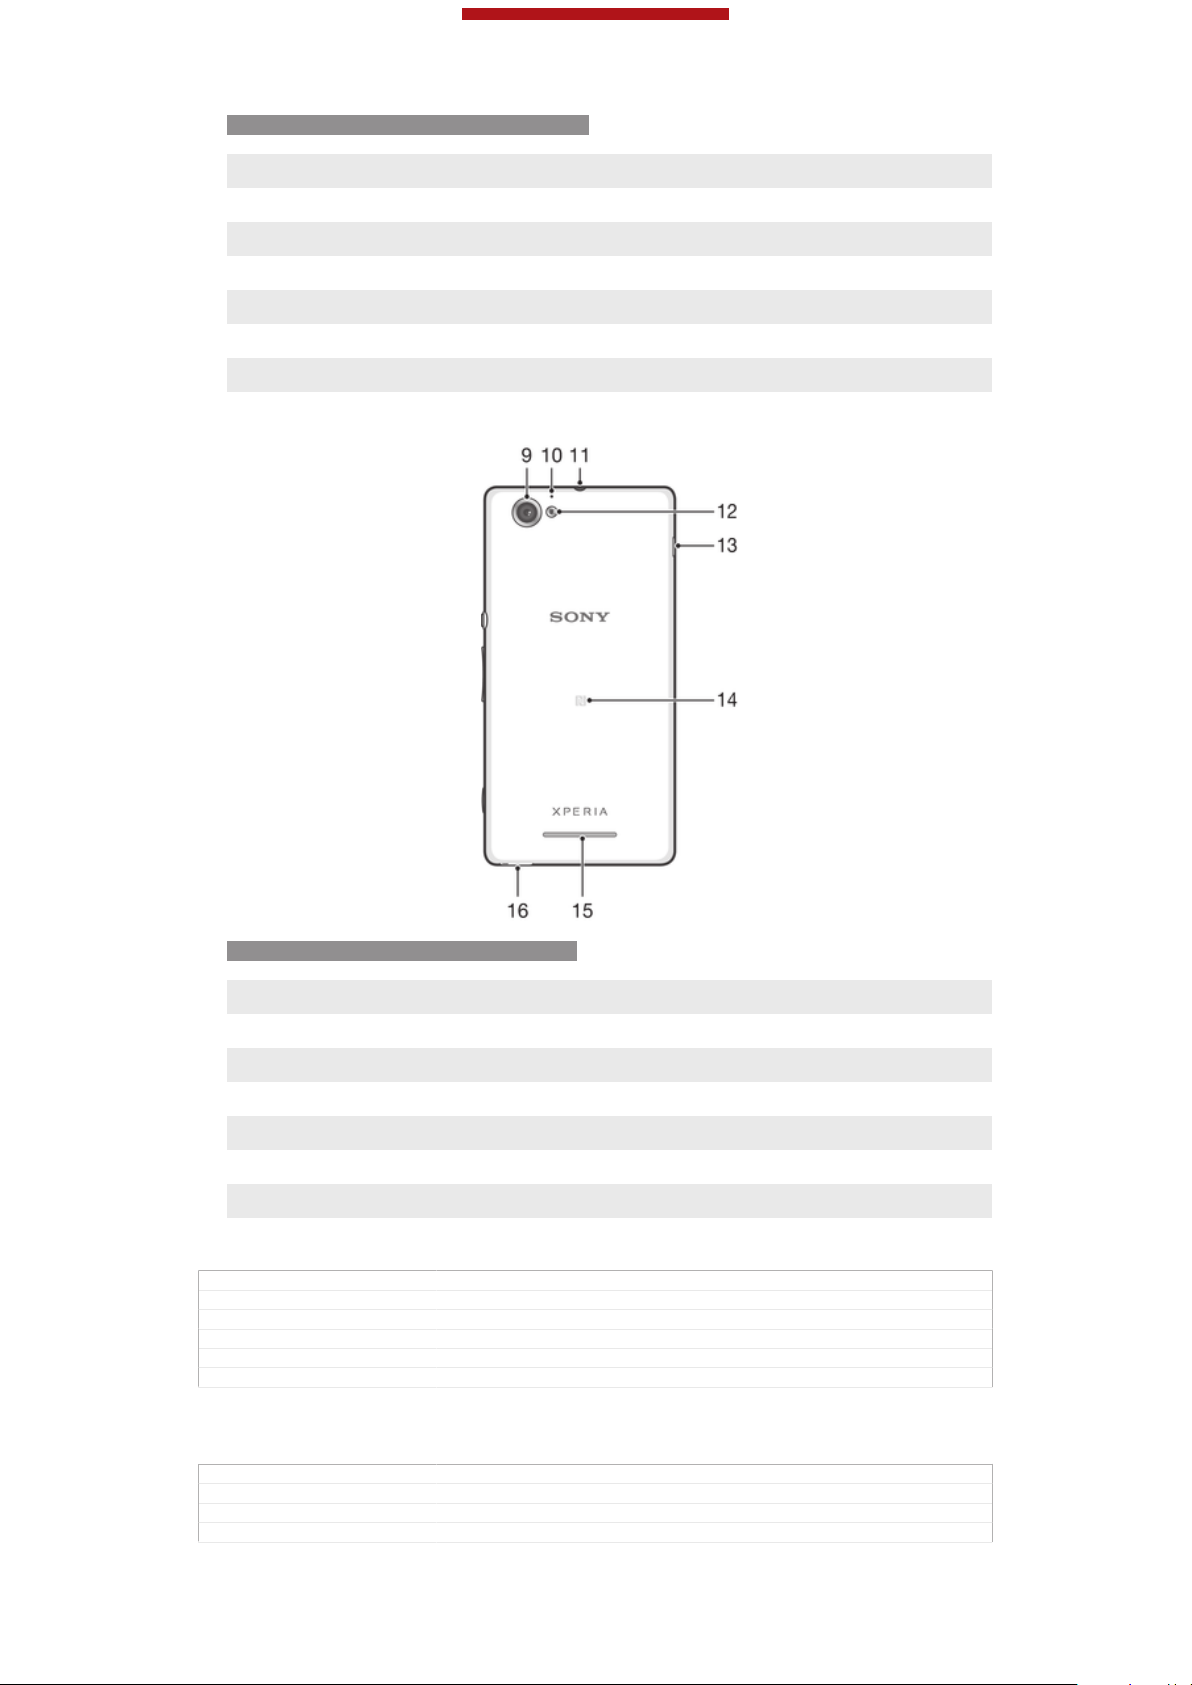
ID: ILL-SONY-13NY-BACK-OVERVIEW
9
Main camera lens
10 Microphone 2
11 Headset jack
12 Camera light
13 Port for charger/USB cable
14 NFC™ detection area
15 Speaker
16 Strap hole
GUID GUID-5CE66CCE-D5DA-422E-9290-40E257A0082E
Title Phone overview - Nicki
Changes Only for Nicki html guide - adjust the topic structure; no content change
Version 1.1.1
Author WangT
Status Draft
Assembly
GUID
Title Assembly - heading
Changes Generic
Version 1
GUID-A00623F6-271A-44C6-BACC-F441DAA2AB8C
9
This is an Internet version of this publication. © Print only for private use.
This is a draft publication for internal use only.
Author CarlosG
Status Released
To remove the back cover
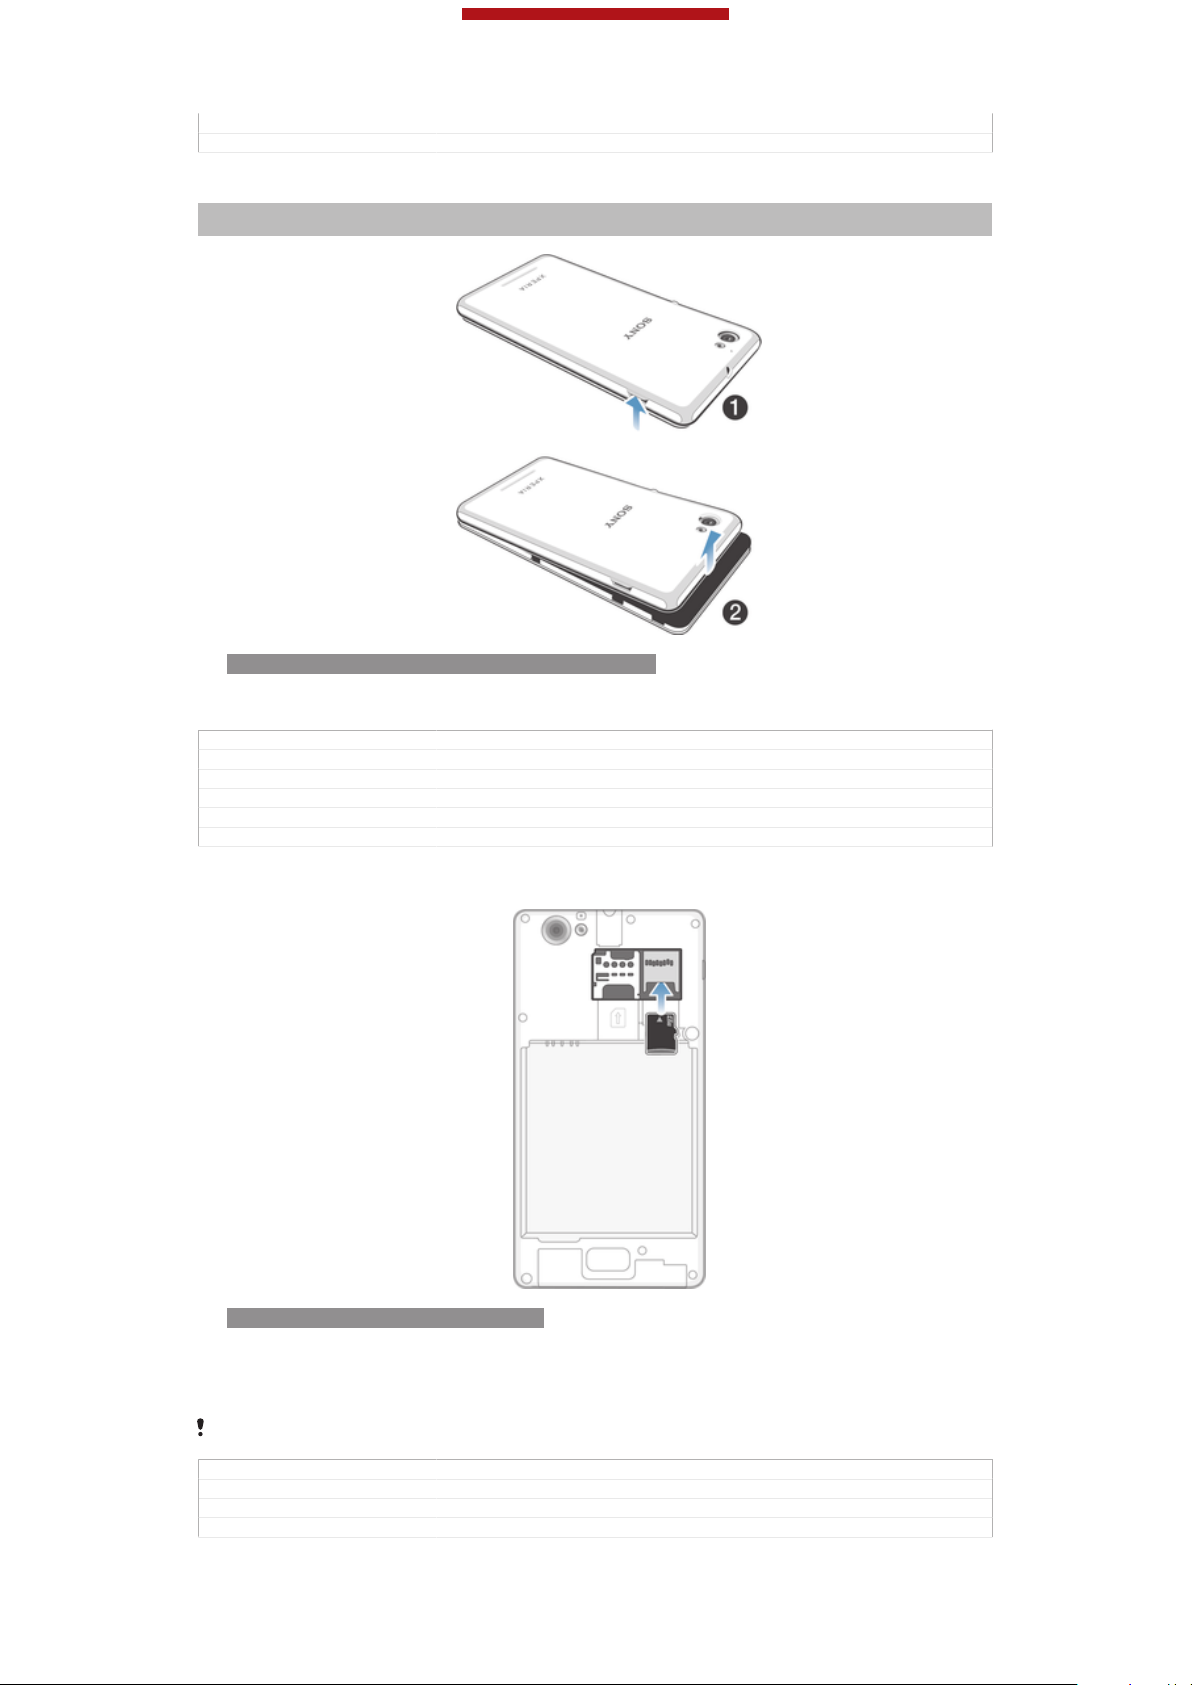
Indexterm: "back cover"
Sub-indexterm: "removing"
ID: ILL-SONY-13NY-REMOVING-BACK-COVER
•
Insert a thumbnail into the gap between the back cover and one side of your
device, then lift up the cover.
GUID
Title To remove the back cover
Changes Term change from "phone" to "device"
Version 4
Author WangT
Status Released*
GUID-512F5C21-6B2C-44AA-B2C3-E1B9C6CB9BBB
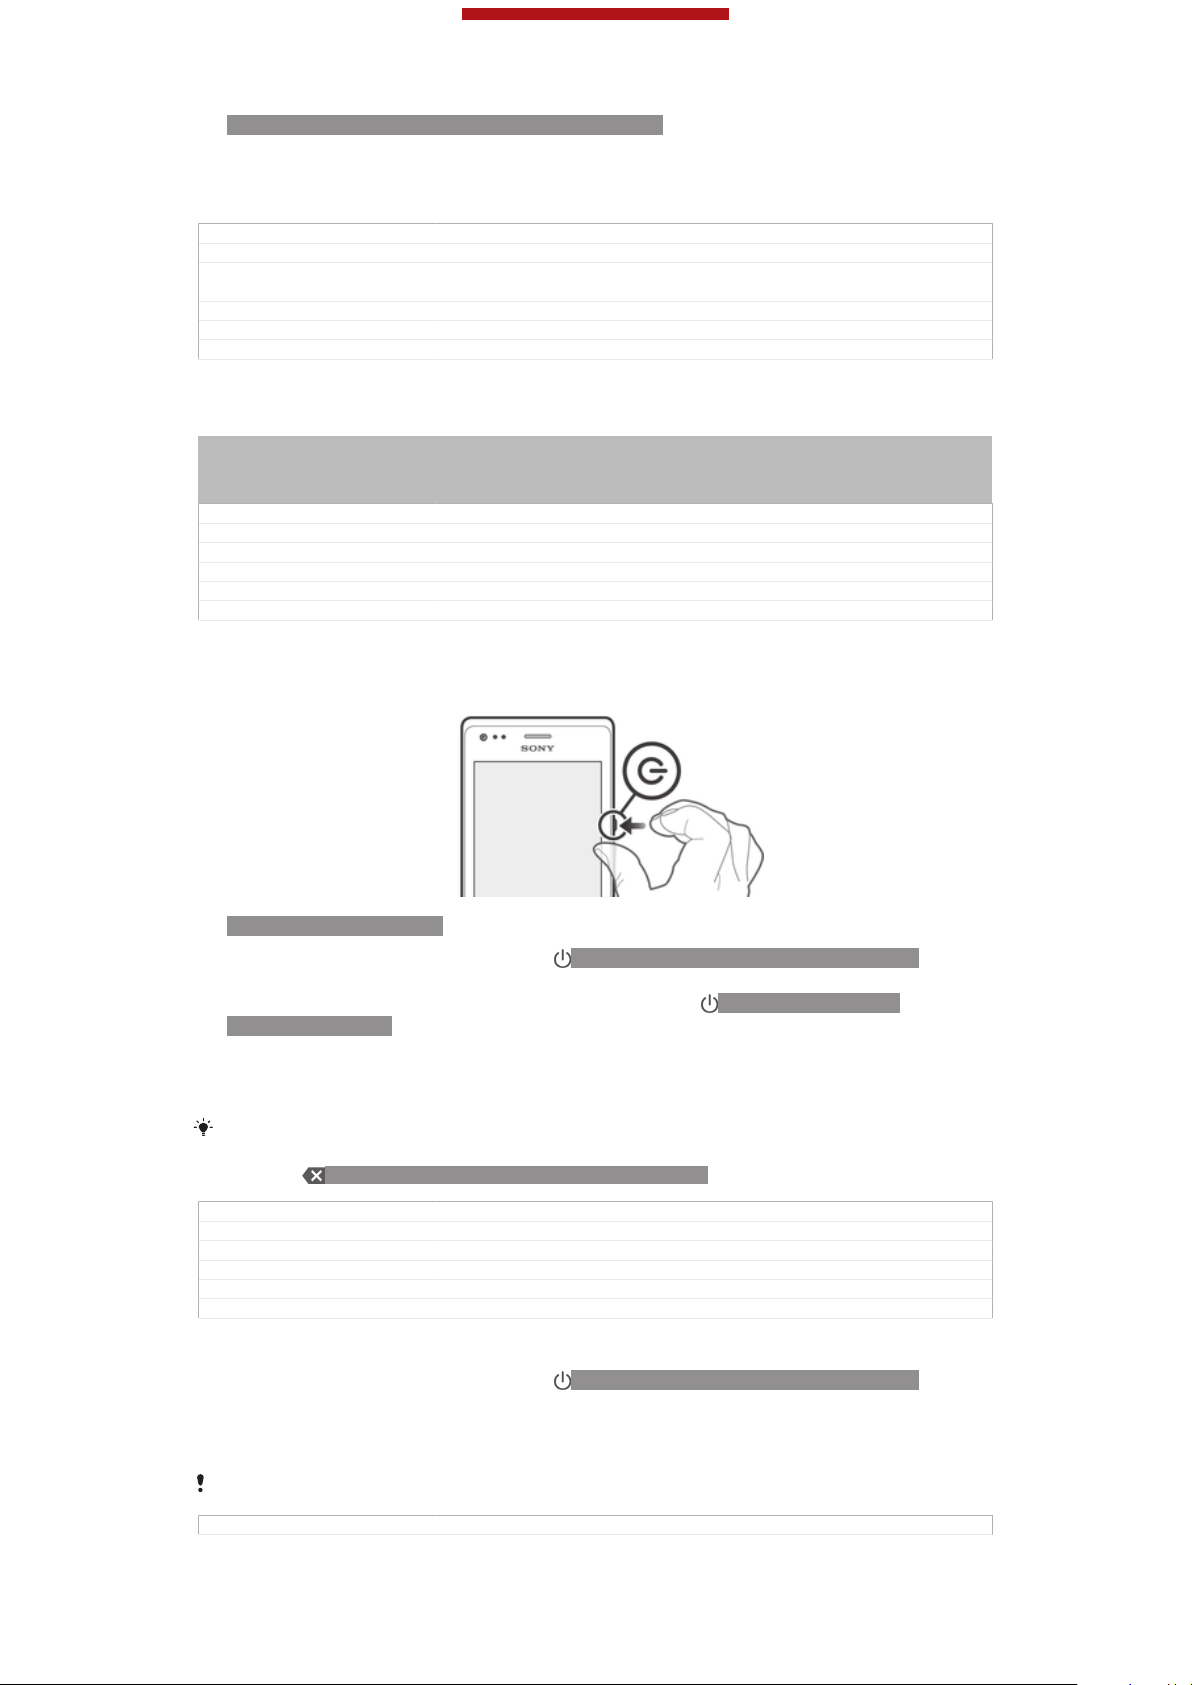
To insert the memory card
ID: ILL-SONY-13NY-INSERTSD-SS
1
Remove the back cover.
2
Insert the memory card into the memory card slot, with the gold-coloured
contacts facing down.
The memory card may not be included at purchase in all markets.
GUID GUID-481057C3-65CD-4FFD-B582-46EA6F8AA9B0
Title To insert the memory card
Changes Update for Nicki - add condition on the illus to differentiate SS and DS
Version 7.1.1
10
This is an Internet version of this publication. © Print only for private use.

This is a draft publication for internal use only.
Author WangT
Status Released
To insert the micro SIM card
Indexterm: "micro SIM card"
Sub-indexterm: "inserting"
ID: ILL-SONY-13NY-INSERT-SIM-SS
•
Remove the battery cover, then insert the micro SIM card into its slot with the
gold-coloured contacts facing down.
You must use a micro SIM card for your phone to work correctly. Some standard-sized SIM
cards allow you to detach an integrated micro SIM card. Once you detach the micro SIM card
from the standard-sized SIM card, you cannot reattach it and use the standard-sized SIM card
again. If you do not have a micro SIM card, or if your current SIM card does not contain a
detachable micro SIM card, contact your network operator for information on how to collect or
exchange your SIM card.
GUID GUID-E44925B5-53C5-401B-A805-846F0EB0D296
Title To insert the SIM card
Changes
Version 1
Author VikkiL
Status Released*
To attach the back cover
Indexterm: "back cover"
Sub-indexterm: "attaching"
11
This is an Internet version of this publication. © Print only for private use.
This is a draft publication for internal use only.
ID: ILL-SONY-13NY-ATTACHING-BACK-COVER
1
Place the back cover over the back of the device from the bottom side.
2
Moving from bottom to top, press down the sides of the cover until you hear
clicking noises as they lock into place.
GUID GUID-F642FE56-9AA2-4E63-8B4F-8172A84F30F2
Title To attach the back cover
Changes The direction to attach the back cover changed - first attach at the bottom
Version 5
Author WangT
Status Draft
and then press dowm from bottom to top - like Nicki
Turning the device on and off
Indexterm: "powering on"
Indexterm: "powering off"
Indexterm: "turning on"
Indexterm: "turning off"
GUID GUID-F3910263-29C3-4AC1-974D-7A25AA32A88F
Title Turning on or off the device - heading only
Changes device term change
Version 7
Author QianWang
Status Released
To turn on the device
ID: ILL-SONY-13NY-ON
1
Press and hold down the power key ID: ICN-SONY-KEY-AND-POWER-K90
until the device vibrates.
2
If your screen goes dark, briefly press the power key ID: ICN-SONY-KEYAND-POWER-K90 to activate the screen.
3
To unlock the screen, swipe up or down on the screen.
4
Enter your SIM card PIN when requested, then select OK [sim_enter_ok] .
5
Wait a while for the device to start.
Your SIM card PIN is initially supplied by your network operator, but you can change it later
from the Settings [settings_label] menu. To correct a mistake made while entering your SIM card
PIN, tap ID: ICN-SONY-DELETE-PHONE-NUMBER-BLK.
GUID GUID-69945514-1C19-44BC-A4B6-16499F44D9BB
Title To turn on the device
Changes For Togari; text changed; only change "drag" to "swipe" in step3.
Version 18
Author Tan Nellie
Status Draft
To turn off the device
1
Press and hold down the power key ID: ICN-SONY-KEY-AND-POWER-K90
until the options menu opens.
2
In the options menu, tap Power off [global_action_power_off] .
3
Tap OK [button_ok] .
It may take a while for the device to shut down.
GUID GUID-18CE50BE-7FF2-40F4-B93F-8CBB76E4AF3C
12
This is an Internet version of this publication. © Print only for private use.
This is a draft publication for internal use only.
Title To turn off the device
Changes changed a label id only no need ed review
Version 7
Author MikeCao
Status Released
Screen lock
Indexterm: "locks"
Sub-indexterm: "locking the screen"
Sub-indexterm: "activating the screen"
Sub-indexterm: "screen lock"
When your phone is on and left idle for a set period of time, the screen darkens to
save battery power, and locks automatically. This lock prevents unwanted actions on
the touch screen when you are not using it.
GUID GUID-257D8ADA-2FAB-46AB-AC65-0351FE70EC94
Title Screen lock
Changes Valid from 2.1. Valid for eDream 3.0.
Version 3
Author HannaB
Status Released*
To activate the screen
•
Briefly press the power key ID: ICN-SONY-KEY-AND-POWER-K90.
GUID GUID-0C3A14A1-C558-4C86-B6E1-45351B7F553D
Title To activate the screen
Changes From eDream6.0: updated based on editorial comments.
Version 7
Author VikkiL
Status Released*
To unlock the screen
ID: ILL-SONY-EDREAM-SCREEN-LOCK
•
Drag ID: ICN-SONY-EDREAM3-ANDROID-LOCK-UP up or drag ID: ICNSONY-EDREAM3-ANDROID-LOCK-DOWN down.
GUID
Title To unlock the screen
Changes Valid from Odin and Yuga (chagned the way to unlock the screen)
Version 5
Author PengLeon
Status Released*
GUID-5F698464-1BEC-40EC-976F-FED186599B31
To lock the screen manually
•
When the screen is active, briefly press the power key
ID: ICN-SONY-KEY-
AND-POWER-K90.
GUID
Title To lock the screen manually
Changes From eDream6.0: updated as per editor's comments
Version 5
Author VikkiL
Status Released
GUID-229DFA2D-0E19-4782-B952-ACEBB0E8C755
Setup guide
Indexterm: "setup guide"
The first time you start your device, a setup guide opens to explain basic functions
and help you enter essential settings. This is a good time to configure the device to
your specific needs. You can also access the setup guide later from the settings
menu.
GUID
Title Setup guide
Changes For JellyBean. Changed "the application screen" to "the settings menu". No
GUID-C9CE16A0-5953-4C4B-B27D-E546F04377B5
other text update.
13
This is an Internet version of this publication. © Print only for private use.
This is a draft publication for internal use only.
Version 12
Author QianWang
Status Released
To access the setup guide manually
1
From the Home screen [homescreen_strings_application_name_txt] , tap ID: ICN-SONYHOME-APPTRAY-NORMAL.
2
Tap Settings [settings_label] > Setup guide [setupguide_settings_title] .
GUID GUID-45BAC9AF-99A4-4D6C-979B-E6E88255911E
Title To access the setup guide manually
Changes For Jelly Bean projects. Steps changed.
Version 7
Author QianWang
Status Released
Accounts and services
Indexterm: "accounts"
Indexterm: "services"
Sign in to your online service accounts from your device to get easy access when
you're on the move. For example, you can integrate contacts from your Google™
account into your Contacts, so you have everything in one place. You can sign up to
new online services from your device as well as from a computer.
GUID GUID-59021D9A-ABD0-412C-A582-5DA4E43841EE
Title Services
Changes change phonebook to Contacts
Version 4
Author LuLinda
Status Released
Google™ account
Indexterm: "accounts"
Sub-indexterm: "Google™"
Having a Google™ account is key to using a range of applications and services with
your Android device. You need a Google™ account, for example, to use the Gmail™
[GOOGLE-GMAIL-PLAIN] application in your device, to chat with friends using Google Talk™,
and to synchronise the calendar application on your device with your Google
Calendar™. You also need a Google™ account to download applications and games,
music, movies and books from Google Play™.
GUID
Title Google account
Changes Update for Term change from phone to device
Version 5
Author PanL
Status Released
GUID-887CAF1C-9BBE-477E-B164-01220815B2AC
Microsoft® Exchange ActiveSync® account
Indexterm: "accounts"
Sub-indexterm: "Exchange Active Sync®"
Synchronise your device with your corporate Microsoft® Exchange ActiveSync
account. This way, you keep your work email, contacts and calendar events with you
at all times.
GUID
Title Exchange Active Sync account
Changes Update for Term change from phone to device
Version 5
Author PanL
Status Released
GUID-80919EF6-5273-4790-AEF0-EE09B4D8CD50
®
Facebook™ account
Indexterm: "accounts"
Sub-indexterm: "Facebook™"
This is an Internet version of this publication. © Print only for private use.
14

This is a draft publication for internal use only.
Facebook™ is a social networking service that connects you with friends, family and
colleagues around the world. Set up Facebook to work on your device so that you
can stay in touch from anywhere.
GUID GUID-63DB6971-BA62-4881-96C7-583E78F463F2
Title Facebook account
Changes Update for Term change from phone to device
Version 3
Author PanL
Status Released
15
This is an Internet version of this publication. © Print only for private use.
This is a draft publication for internal use only.
Getting to know your phone
GUID GUID-AA4FF55E-CC16-4F0C-8A77-A735D267BF46
Title Getting to know your phone - heading only
Changes Generic
Version 1
Author JorgenL
Status Released*
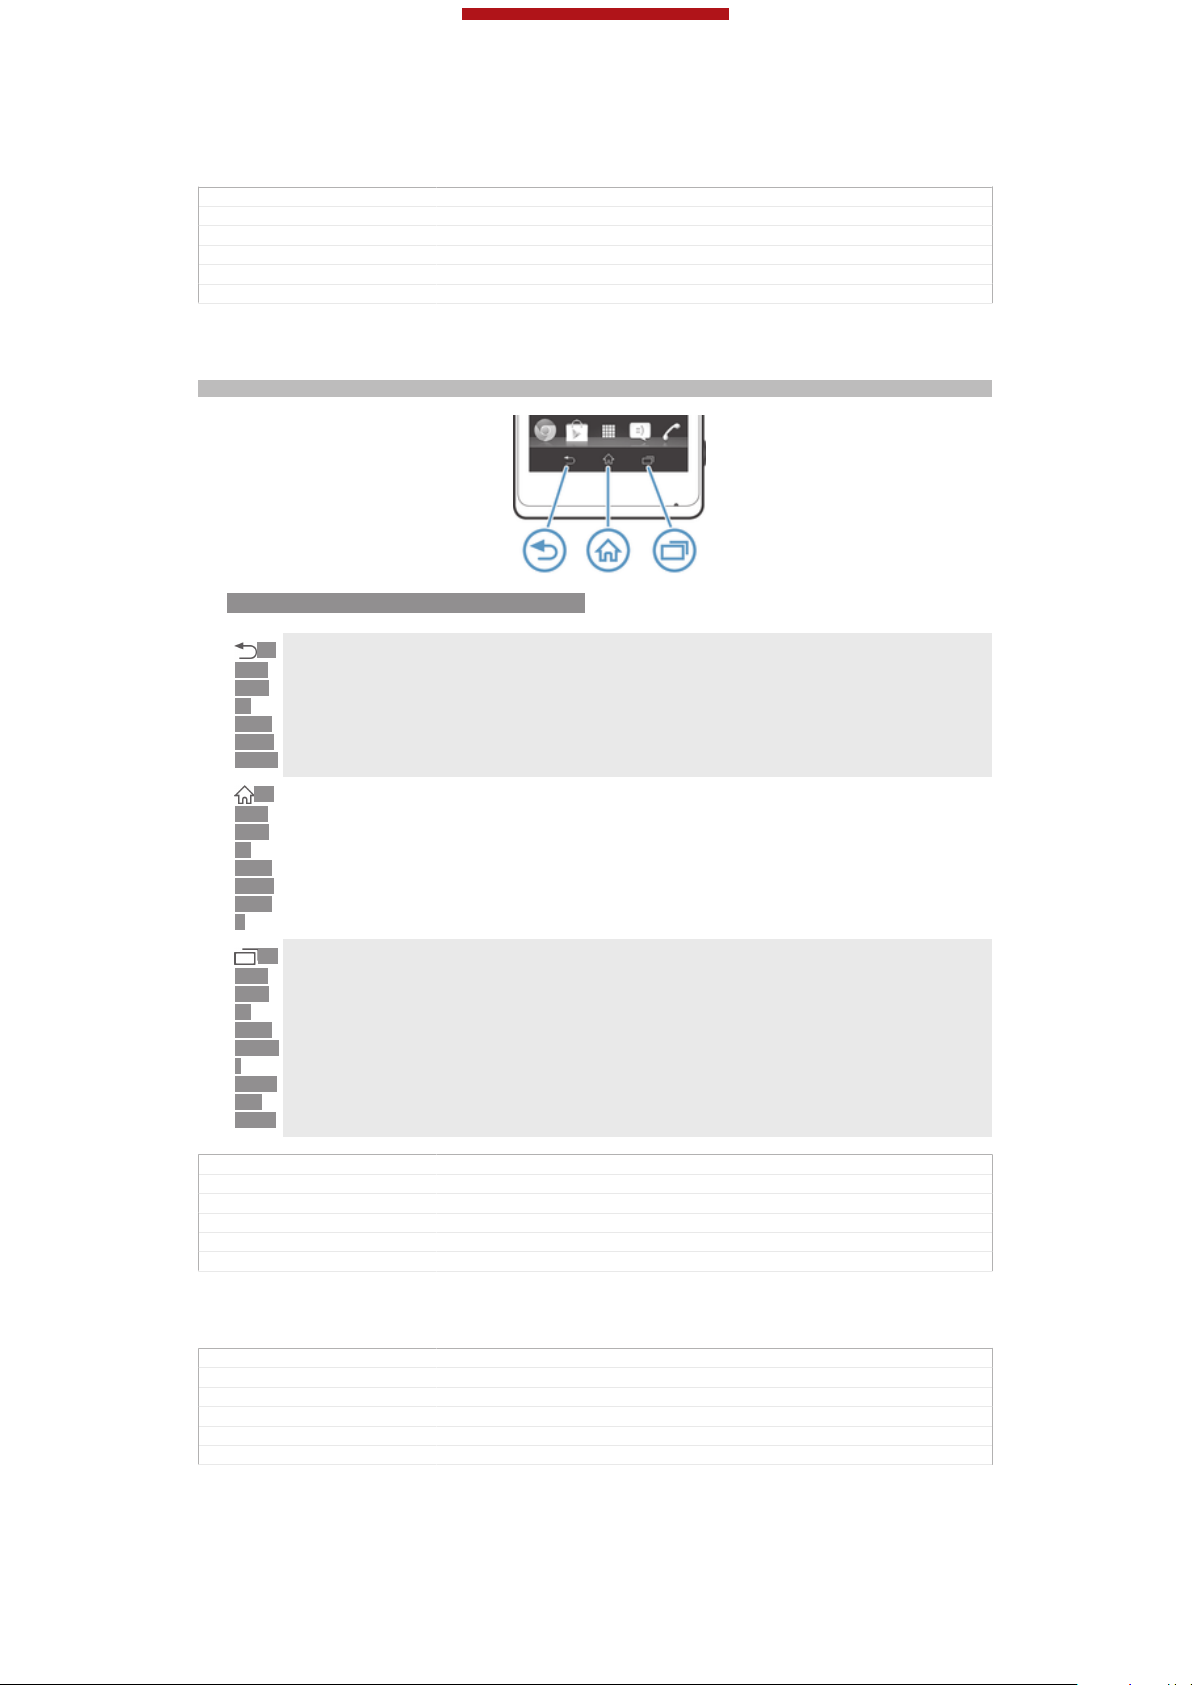
Using the keys
Indexterm: "keys"
ID: ILL-SONY-13NY-HARDWARE-KEYS
Back
ID:
•
ICNSON
YKEYANDBACK
ID:
ICNSON
YKEYANDHOM
E
ID:
ICNSON
YKEYOPEN
RECE
NTAPPS
GUID GUID-CA3D8D48-DDF0-40EB-8E9F-26C4BFB4D6DD
Title Using the hardware keys - Three keys
Changes Key update for Mint/Hayabusa
Version 5
Author Aiping
Status Released*
Go back to the previous screen
•
Close the on-screen keypad, a dialog box, an options menu, or the Notification panel
Home
•
Go to the Home screen [homescreen_strings_application_name_txt]
Task
•
Tap to open a window showing your most recently used applications and a small apps bar
Battery
GUID
Title Battery
Changes Device Term Change
Version 2
Author Gan Lu
Status Released
This is an Internet version of this publication. © Print only for private use.
GUID-08267A67-94DC-4C15-8A25-EAD0CE6D540A
16
This is a draft publication for internal use only.
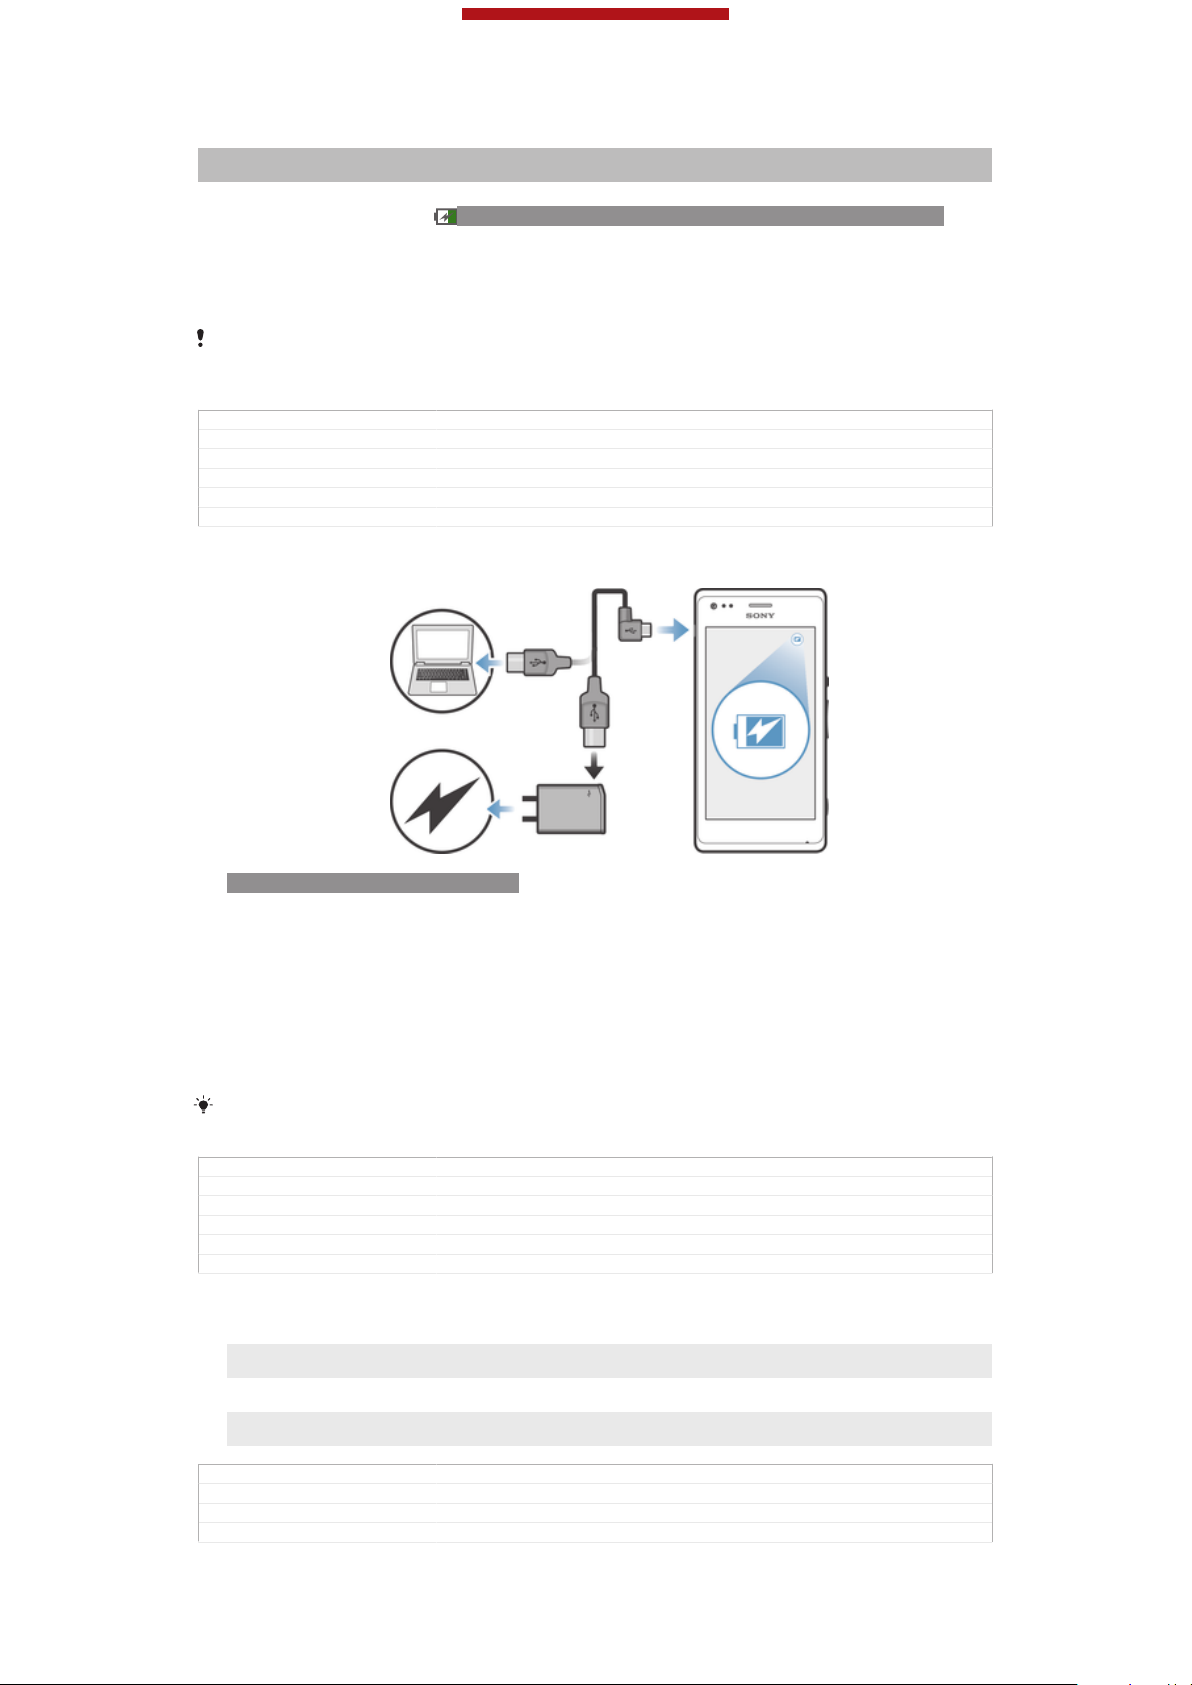
Charging the battery
Indexterm: "charging"
Indexterm: "battery"
Your battery is partly charged when you buy the device. It may take a few minutes
before the battery icon ID: ICN-SONY-STAT-SYS-BATTERY-CHARGE-ANIM3
appears on the screen when you connect the charger cable to a power source, such
as a USB port or a charger. You can still use your device while it is charging.
Charging your device over a long period of time, for example, overnight, does not
damage the battery or the device.
The battery will start to discharge a little after it is fully charged and then charges again after a
certain time when the charger is connected. This is to extend battery life and may result in the
charge status showing a level below 100 percent.
GUID GUID-391714A7-52F8-4D33-A3C0-4BB20F347FBF
Title Charging the battery
Changes Device Term Change
Version 11
Author Gan Lu
Status Released
To charge your device
ID: ILL-SONY-13NY-CHARGING
1
Plug the charger into a power outlet.
2
Plug one end of the USB cable into the charger (or into the USB port of a
computer).
3
Plug the other end of the cable into the micro USB port on your device, with
the USB symbol facing up. The notification light lights up when charging starts.
4
When the notification light is green, the device is fully charged. Disconnect the
USB cable from your device by pulling it straight outwards. Make sure not to
bend the connector when removing the cable from the device.
If the battery is completely discharged, it may take a few minutes before the notification light
lights up after you connect the charger cable to a power source.
GUID GUID-AB7653A6-94E4-487D-8E13-755BAC8DC744
Title To charge your device
Changes for Pollux html UG; remove 2 images
Version 11.1.1
Author Gan Lu
Status Released
Battery notification light status
Green
Flashing red The battery level is low
Orange The battery is charging. The battery level is between low and full
The battery is fully charged
GUID GUID-15D5D981-229B-451C-9F58-DEAE6FC82CDD
Title Battery LED status
Changes for Pollux; change "Battery LED" to "Notification light"
Version 3
17
This is an Internet version of this publication. © Print only for private use.

This is a draft publication for internal use only.
Author Gan Lu
Status Released
To check the battery level
1
From your Home screen [homescreen_strings_application_name_txt] , tap ID: ICN-SONYHOME-APPTRAY-NORMAL .
2
Find and tap Settings [settings_label_launcher] > About phone [about_settings<product="default">] >
Status [device_status] > Battery level [battery_level_title] .
GUID GUID-1769B484-1C7F-4F81-B850-45A7984995AB
Title To check the battery level
Changes For ICS update: changed the label for "About phone"
Version 4
Author VikkiL
Status Released*
Improving battery performance
Indexterm: "device"
Sub-indexterm: "battery"
Sub-indexterm: "performance"
The following tips can help you improve battery performance:
•
Charge your device often. This will not affect the lifetime of the battery.
•
Downloading data from the Internet is power consuming. When you're not using the
Internet, you can save power by disabling all mobile data connections from the
expanded status bar. This setting does not prevent your device from transmitting
data over other wireless networks.
•
Turn off Bluetooth™ and Wi-Fi® when you don't need these features. You can turn
them on and off more easily from the expanded status bar.
•
Use the STAMINA mode [extended_standby_mode_label] and Low battery mode [power_save_mode_label]
features to reduce battery consumption. You can select the power saving mode that
best suits the way you use your device. You can also customise the settings of each
power saving mode.
•
Set your synchronisation applications (used to synchronise your email, calendar and
contacts) to synchronise manually. You can also synchronise automatically, but
increase the synchronisation intervals.
•
Check the battery usage menu in your device to see which applications use the most
power. Your battery consumes more power when you use video and music streaming
applications, such as YouTube™. Some applications downloaded from Google
Play™ may also consume more power.
•
Close and exit applications that you are not using.
•
Lower the screen display brightness level.
•
Turn off your device or activate the Airplane mode [airplane_mode] setting if you are in an
area with no network coverage. Otherwise, your device repeatedly scans for available
networks, and this consumes power.
•
Use a Sony original handsfree device to listen to music. Handsfree devices demand
less battery power than your device's own loudspeakers.
•
Keep your device in standby mode whenever possible. Standby time refers to the
time during which your device is connected to the network and is not being used.
•
Disable any live wallpaper.
GUID
Title Improving battery performance
Changes From Togari; text changed; change the way of controlling Bluetooth™ and
Version 22.1.1.1.2
Author Tan Nellie
Status Draft
GUID-F9A76820-0B4C-41EA-A31F-152FE937C886
Wi-Fi®.
To access the battery usage menu
1
From your Home screen [homescreen_strings_application_name_txt] , tap
ID: ICN-SONY-
HOME-APPTRAY-NORMAL .
2
Find and tap Settings [settings_label_launcher] > Power management [power_settings_title] >
Battery usage [battery_label] .
GUID
Title To access the battery usage menu with eco mode
GUID-72DC8FCB-A113-4E57-88FB-5C55DCE9CFE3
18
This is an Internet version of this publication. © Print only for private use.
This is a draft publication for internal use only.
Changes for Odin & Yuga; update a label only
Version 2
Author Gan Lu
Status Released
Using STAMINA mode
Activate the STAMINA mode [extended_standby_mode_label] feature to pause your Wi-Fi®
[udoc_no_trans_wifi_wlan_plain] connection, data traffic and several power consuming
applications when your screen is inactive. When STAMINA mode is active, you can
still receive phone calls, and text and multimedia messages. You can also set up an
applications list to allow some applications to keep running when your screen is
inactive. Once the screen becomes active again, all paused functions are resumed.
GUID GUID-BAD9774F-09BB-4637-AE5C-C88606ADFD46
Title Using the STAMINA mode feature
Changes for Odin & Yuga; new feature
Version 1
Author Gan Lu
Status Released*
To activate STAMINA mode
1
From your Home screen [homescreen_strings_application_name_txt] , tap
HOME-APPTRAY-NORMAL .
2
Find and tap Settings [settings_label_launcher] > Power management [power_settings_title] .
3
Tap ID: ICN-SONY-LAGAN-SWITCH-OFF next to STAMINA mode [extended_stand-
by_mode_label] , then tap Activate [activate_txt] .
GUID
Title To activate STAMINA mode
Changes for Odin & Yuga
Version 1
Author Gan Lu
Status Released
GUID-18315E99-CD26-4905-ADE0-B8514A1912E8
ID: ICN-SONY-
To deactivate STAMINA mode
1
From your Home screen [homescreen_strings_application_name_txt] , tap ID: ICN-SONYHOME-APPTRAY-NORMAL .
2
Find and tap Settings [settings_label_launcher] > Power management [power_settings_title] .
3
Tap ID: ICN-SONY-LAGAN-SWITCH-ON next to STAMINA mode [extended_stand-
by_mode_label] .
GUID
Title To deactive the STAMINA mode
Changes for Odin & Yuga
Version 1
Author Gan Lu
Status Released
GUID-4A739D0C-9062-4D68-ADD9-75E89178E876
To change the settings for STAMINA mode
Indexterm: "STAMINA mode"
Sub-indexterm: "changing settings"
1
From your Home screen [homescreen_strings_application_name_txt] , tap ID: ICN-SONYHOME-APPTRAY-NORMAL.
2
Find and tap Settings [settings_label_launcher] > Power management [power_settings_title] .
3
To open the settings menu, tap STAMINA mode [extended_standby_mode_label] .
4
Add or remove applications, as desired.
5
When you're finished, tap Done [button_done] .
GUID
Title To change the settings for STAMINA mode
Changes for Odin & Yuga
Version 1
Author Gan Lu
Status Released
GUID-04D506B4-63EE-426D-8D1B-BD8C18C3DBB0
19
This is an Internet version of this publication. © Print only for private use.
This is a draft publication for internal use only.
Estimating the standby time of your device
Indexterm: "standby time"
Sub-indexterm: "estimating"
Standby time refers to the amount of time the battery can last when your device is
connected to the network but is not in active use, for example, to receive or make
phone calls. STAMINA mode, when activated, continuously evaluates the remaining
standby time, which can vary depending on how you use your device. STAMINA
mode is more effective in lengthening the standby time if you keep the screen of your
device locked. If you rarely lock the screen, you may not see much improvement in
battery performance.
When you use your device for the first time, the estimated standby time may not be accurate
since there is no previous usage history to estimate from.
GUID GUID-F75634BA-0777-4510-B021-E7A5AF6EAB76
Title Viewing the estimated standby time
Changes From Lotus & Nypon JB update; add this info due to CS request.
Version 1
Author Tan Nellie
Status Released*
To view the estimated standby time
1
From your Home screen [homescreen_strings_application_name_txt] , tap ID: ICN-SONYHOME-APPTRAY-NORMAL.
2
Find and tap Settings [settings_label_launcher] > Power management [power_settings_title] .
GUID
Title To view the standby time
Changes From Lotus & Nypon JB update
Version 1
Author Tan Nellie
Status Released
GUID-AEFF9658-539B-41D1-83FF-9BA660166F47
Using Low battery mode
You can activate the Low battery mode [power_save_mode_label] feature to save power when
the battery level is low. This feature helps you to adjust the settings for screen
brightness, data traffic and the vibrate function so that you can reduce battery
consumption.
GUID
Title Using Low battery mode
Changes From Togari; text changed; only change the description in the 1st sentence.
Version 2
Author Tan Nellie
Status Draft
To activate Low battery mode
1
From your Home screen [homescreen_strings_application_name_txt] , tap ID: ICN-SONYHOME-APPTRAY-NORMAL .
2
Find and tap Settings [settings_label_launcher] > Power management [power_settings_title] .
3
Tap ID: ICN-SONY-LAGAN-SWITCH-OFF next to Low battery mode [pow-
er_save_mode_label] , then tap Activate [activate_txt] .
GUID
Title To activate Low battery mode
Changes for Odin & Yuga
Version 1
Author Gan Lu
Status Released
GUID-9276E04F-3CB5-4764-BA73-5B99161CBEBD
GUID-E2DBA1A1-C68E-471F-982B-14BCBB074753
20
This is an Internet version of this publication. © Print only for private use.
This is a draft publication for internal use only.
To deactivate Low battery mode
1
From your Home screen [homescreen_strings_application_name_txt] , tap ID: ICN-SONYHOME-APPTRAY-NORMAL .
2
Find and tap Settings [settings_label_launcher] > Power management [power_settings_title] .
3
GUID GUID-E22485F8-EBCA-44F5-93F5-F9C449CC7A23
Title To deactivate the Low battery mode
Changes for Odin & Yuga
Version 1
Author Gan Lu
Status Released
ID: ICN-SONY-LAGAN-SWITCH-ON next to Low battery mode [pow-
Tap
er_save_mode_label] .
To change the settings for Low battery mode
1
From your Home screen [homescreen_strings_application_name_txt] , tap
ID: ICN-SONY-
HOME-APPTRAY-NORMAL.
2
Find and tap Settings [settings_label_launcher] > Power management [power_settings_title] .
3
To open the settings menu, tap Low battery mode [power_save_mode_label] .
4
Adjust the settings as desired.
5
When you're finished, tap
GUID GUID-DC6395BB-6010-4667-9E56-6E99F8E0DACC
Title To change the settings for Low battery mode
Changes for Odin & Yuga
Version 1
Author Gan Lu
Status Released
ID: ICN-SONY-KEY-AND-BACK.
Using the touchscreen
Indexterm: "screen"
Sub-indexterm: "glass"
Sub-indexterm: "cracked"
Sub-indexterm: "warranty"
Indexterm: "protective plastic sheet"
A protective plastic sheet is attached to the screen of your phone when you buy it.
You should peel off this sheet before using the touchscreen. Otherwise, the
touchscreen might not function properly.
When your phone is on and left idle for a set period of time, the screen darkens to
save battery power, and locks automatically. This lock prevents unwanted actions on
the touchscreen when you are not using it. You can also set personal locks to protect
your subscription and make sure only you can access your phone content.
Your phone screen is made from glass. Do not touch the screen if the glass is cracked or
shattered. Avoid trying to repair a damaged screen yourself. Glass screens are sensitive to
drops and mechanical shocks. Cases of negligent care are not covered by the Sony warranty
service.
GUID GUID-D59D1053-4072-417B-BFE8-E3918A3A263F
Title Using the touch screen
Changes From Nozomi and Aoba: added Sony brand condition
Version 8
Author VikkiL
Status Released*
To open or highlight an item
•
Tap the item.
GUID
Title To open or highlight an item
Changes esheep - Rachael. Valid for eDream 3.0.
Version 1
Author CarlosG
Status Released
GUID-4B6D2343-E130-4C7B-8ED3-DC492017558B
Marking options
Indexterm: "marking options"
This is an Internet version of this publication. © Print only for private use.
21
Marked checkbox
ID:
ICNSON
YSEM
CBTNCHE
CKON
Unmarked checkbox
ID:
ICNSON
YSEM
CBTNCHE
CKOFF
Switched on
ID:
ICNSON
YLAGA
NSWIT
CHON
Switched off
ID:
ICNSON
YLAGA
NSWIT
CHOFF
This is a draft publication for internal use only.
GUID GUID-05D9C0FB-AA3E-412D-98C4-9A9546F74EE9
Title Marking options
Changes
Version 1
Author JorgenL
Status Released
To mark or unmark options
•
Tap the relevant checkbox or the switch beside the option name.
GUID
Title To mark or unmark options
Changes For Tsubasa html User guide. Moved table to a separate reference topic to
Version 8.1.1
Author JorgenL
Status Released
GUID-A9C9B443-B48A-4567-9DC1-3C16D7F1316C
adjust bad table output.
Zooming
The zoom options available depend on the application you are using.
GUID
Title Zooming
Changes From eDream6.0: updated as per editorial comments
Version 3
Author VikkiL
Status Released
GUID-D1209E7D-44CB-4C13-A974-59E329DA156B
22
This is an Internet version of this publication. © Print only for private use.
This is a draft publication for internal use only.
To zoom
•
When available, tap ID: ICN-SONY-BTN-ZOOM-UP-NORMAL or ID: ICNSONY-BTN-ZOOM-DOWN-NORMAL to zoom in or out.
You may have to drag the screen (in any direction) to make the zoom icons appear.
GUID GUID-A9D127B5-9544-4829-A1DD-FBF2FE84EAA0
Title To zoom
Changes esheep - Rachael
Version 1
Author CarlosG
Status Released*
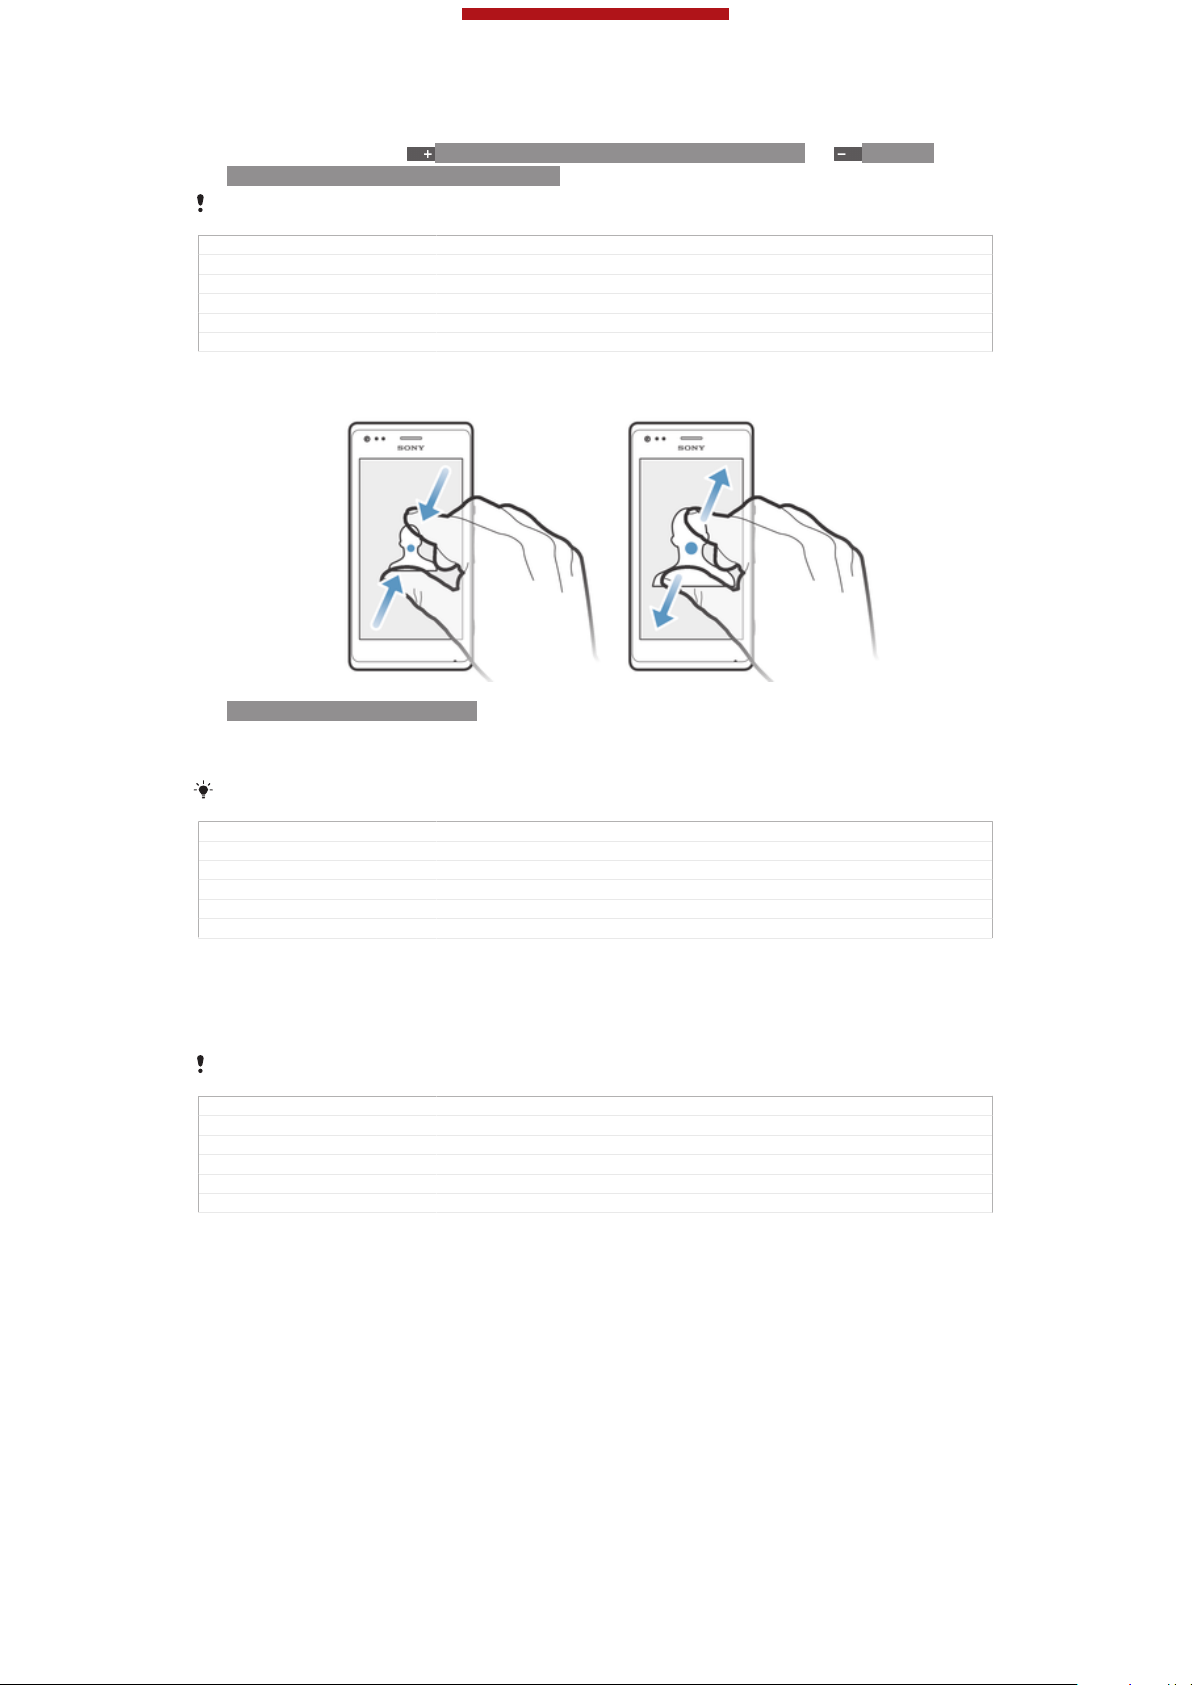
To zoom with two fingers
ID: ILL-SONY-13NY-PINCH
•
Place two fingers on the screen at once and pinch them together (to zoom out)
or spread them apart (to zoom in).
Use the zoom function when viewing photos and maps, or when browsing the web.
GUID GUID-AF988EC9-7FA1-48DD-917B-95A95C0F86CE
Title To zoom with two fingers
Changes From eD4.0: added the condition to remove the note for startup guide
Version 3
Author VikkiL
Status Released*
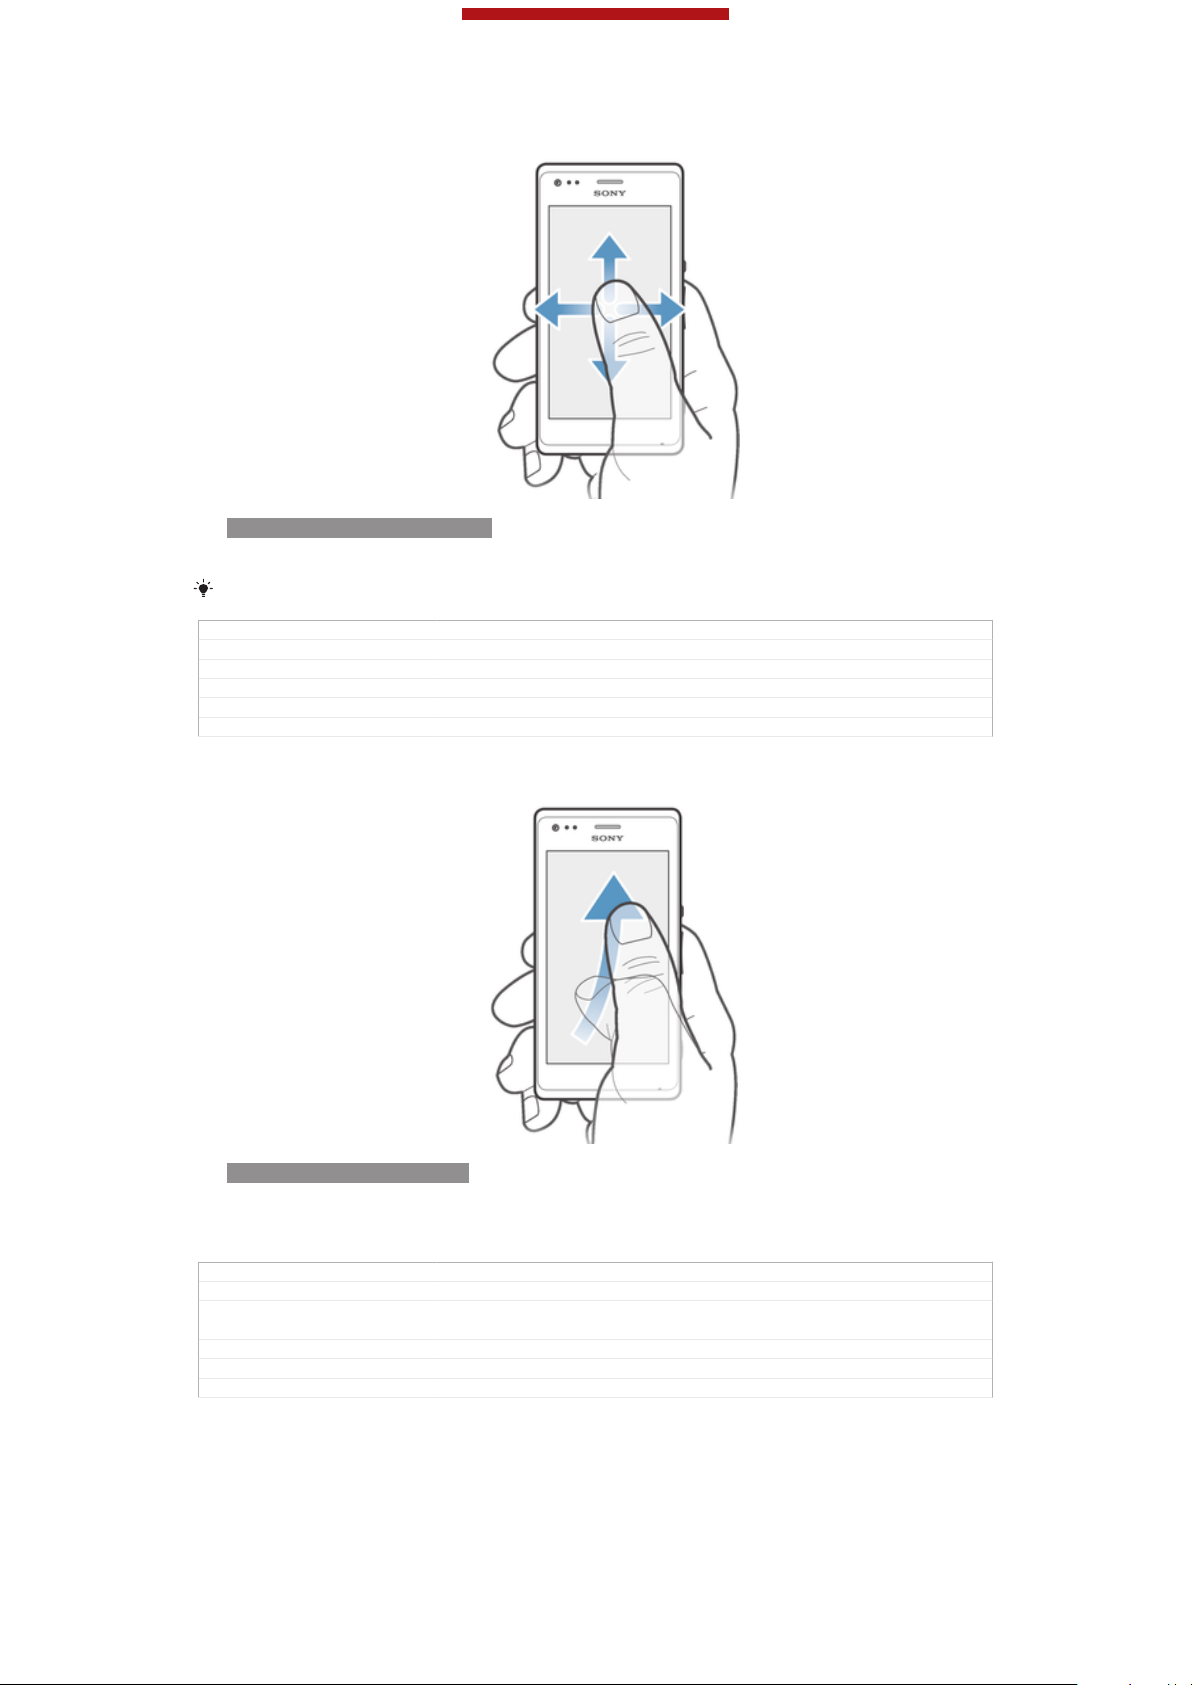
Scrolling
Scroll by moving your finger up or down on the screen. On some web pages you can
also scroll to the sides.
Dragging or flicking will not activate anything on the screen.
GUID GUID-3E94DC18-4F0D-4A82-AC50-1175DBD96056
Title Scrolling
Changes From Teacake new tone of voice Valid for eDream 3.0
Version 2
Author VikkiL
Status Released
23
This is an Internet version of this publication. © Print only for private use.
This is a draft publication for internal use only.
To scroll
ID: ILL-SONY-13NY-SCROLL
•
Drag or flick your finger in the direction you want to scroll on the screen.
To scroll more quickly, flick your finger in the direction you want to go on the screen.
GUID GUID-589997EB-983E-4E86-832D-75437CC06999
Title To scroll
Changes from eD4.0: removed the note for Startup guide
Version 5
Author VikkiL
Status Released
To flick
ID: ILL-SONY-13NY-FLICK
•
To scroll more quickly, flick your finger in the direction you want to go on the
screen. You can wait for the scrolling movement to stop by itself, or you can
stop it immediately by tapping the screen.
GUID
Title To flick
Changes Valid for eDream 3.0 Updated that you can flick in any direction. Not just up
Version 2
Author VikkiL
Status Released
GUID-9D531CF3-373B-4C29-A83F-1DD9FFD3ED62
and down.
Sensors
Your device has sensors that detect both light and proximity. The light sensor detects
the ambient light level and adjusts the brightness of the screen accordingly. The
proximity sensor turns the touch screen off during voice calls when your ear is close
24
This is an Internet version of this publication. © Print only for private use.
This is a draft publication for internal use only.
to the screen. This prevents you from unintentionally activating other functions on
your device when you are engaged in a call.
GUID GUID-CF3F851C-41A7-4353-9B04-8F57E6BA8251
Title Sensors
Changes Term change for Odin/Yuga
Version 5
Author Aiping
Status Released*
Using the lockscreen
On the lockscreen, you can play tracks, take photos and record videos without
unlocking the screen.
GUID GUID-7F914249-507B-4361-A5EA-BF223E1297D2
Title Using the lockscreen
Changes Device term change
Version 2
Author PengLeon
Status Released
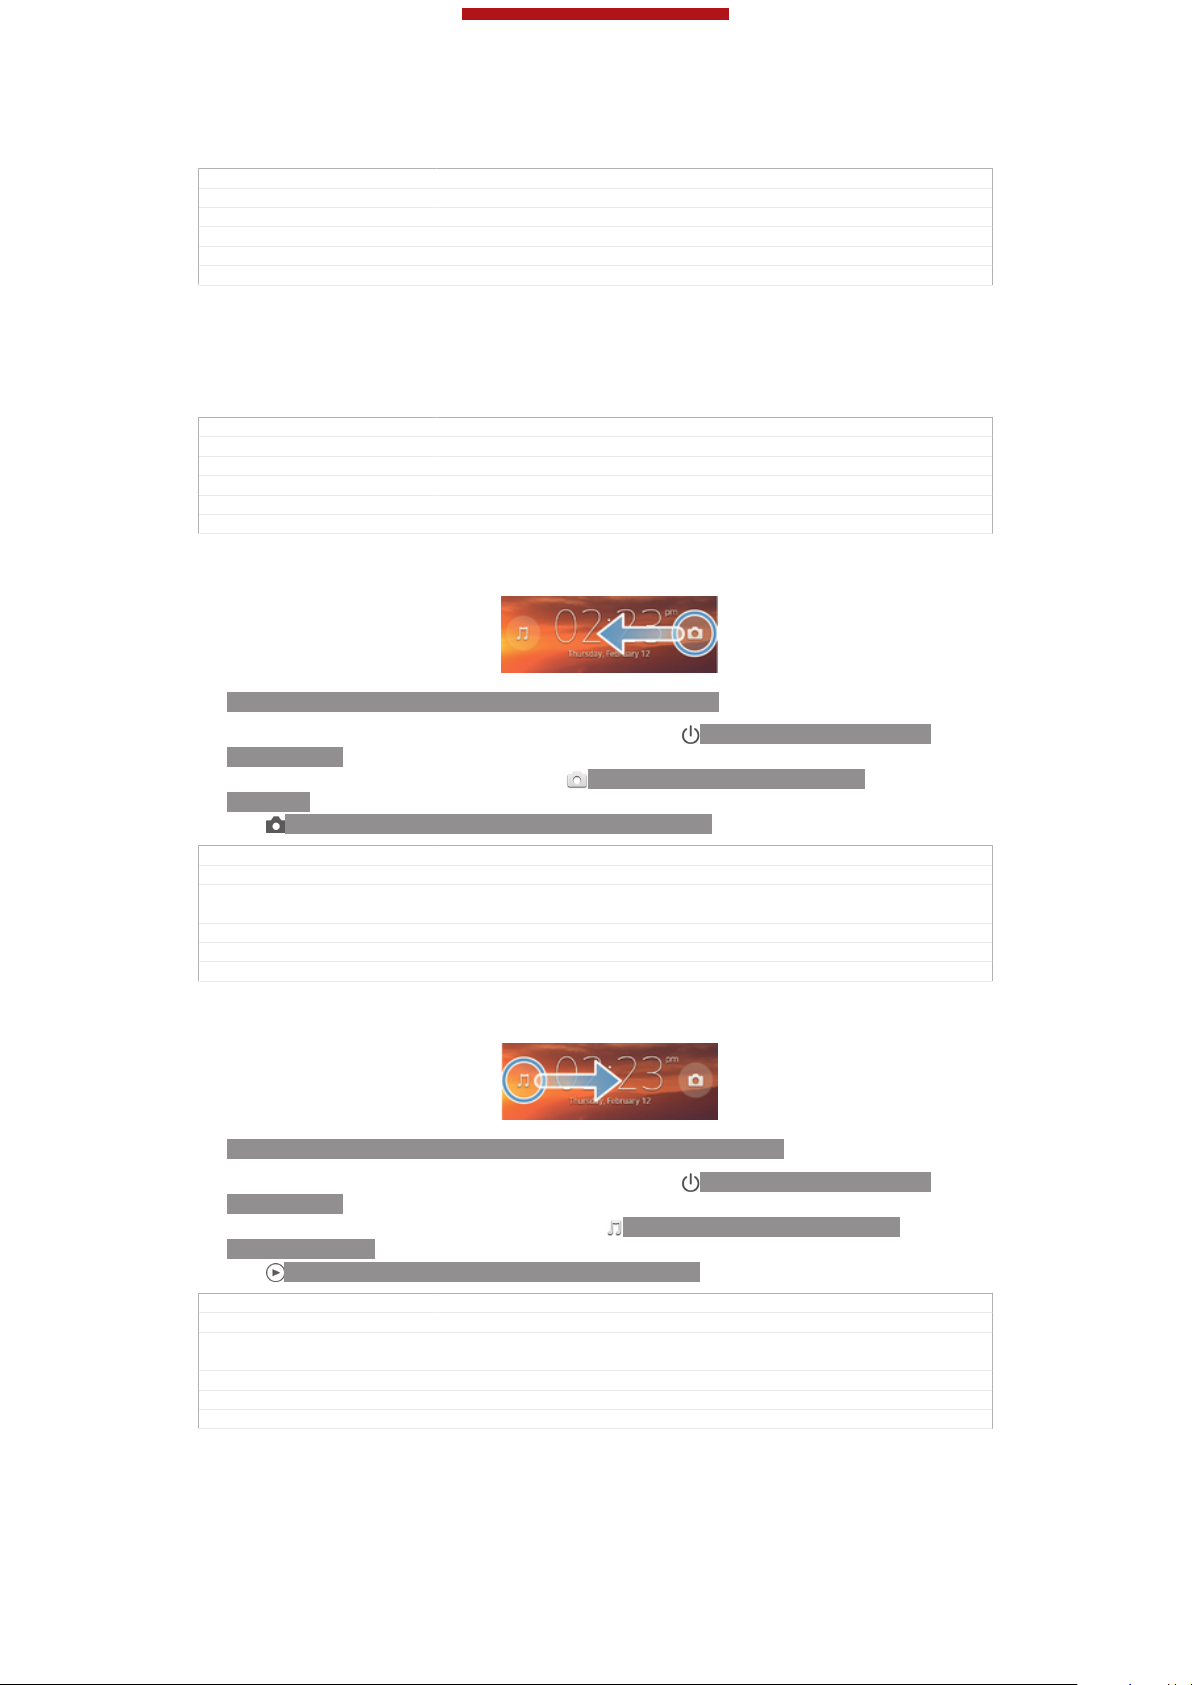
To take a photo from the lockscreen
ID: ILL-SONY-ACTIVATE-CAMERA-ON-LOCKSCREEN
1
To activate the screen, briefly press the power key ID: ICN-SONY-KEY-ANDPOWER-K90.
2
To activate the camera controls, drag ID: ICN-SONY-LOCKSCREENCAMERA to the left across the screen.
3
Tap ID: ICN-SONY-CAMERA-CAP-MODE-NORMAL.
GUID
Title To take a photo from the lockscreen
Changes Valid for Huashan (only changed the position of illustration according to Jor-
Version 2
Author PengLeon
Status Released
GUID-981E3E0B-ED63-40BC-9450-82D67F92A373
gen comments)
To play an audio track from the lockscreen
ID: ILL-SONY-ACTIVATE-MUSIC-PLAYER-ON-LOCKSCREEN
1
To activate the screen, briefly press the power key ID: ICN-SONY-KEY-ANDPOWER-K90.
2
To display the music player controls, drag ID: ICN-SONY-LOCKSCREENMUSIC-PLAYER to the right across the screen.
3
Tap ID: ICN-SONY-SEMC-MUSIC-PLAY-NORMAL.
GUID
Title To play an audio track from the lockscreen
Changes Valid from Huashan (only illustration position changed according ot Jorgen
Version 3
Author PengLeon
Status Released
GUID-C213F36C-06E8-4172-B07A-EA59A7ED5ABA
comments)
25
This is an Internet version of this publication. © Print only for private use.
This is a draft publication for internal use only.
To pause an audio track from the lockscreen
1
To activate the screen, briefly press the power key ID: ICN-SONY-KEY-ANDPOWER-K90.
2
When the music player controls appear, tap ID: ICN-SONY-SEMC-MUSICPAUSE-NORMAL.
GUID GUID-3B168A06-AFA8-4D87-8CBE-55C4F4C6B867
Title To pause a playing track from the lockscreen
Changes From ICS update: added another way of activating the screen
Version 2
Author VikkiL
Status Released
To change the currently playing audio track from the lockscreen
1
To activate the screen, briefly press the power key
ID: ICN-SONY-KEY-AND-
POWER-K90.
2
When the music player controls appear, tap ID: ICN-SONY-SEMC-MUSICPREVIOUS-NORMAL or ID: ICN-SONY-SEMC-MUSIC-NEXT-NORMAL.
GUID GUID-278C3FC9-2E03-46AC-9E1F-8F2671CBBC73
Title To change audio tracks from the lockscreen
Changes For ICS update: added one more way of activating the screen
Version 2
Author VikkiL
Status Released
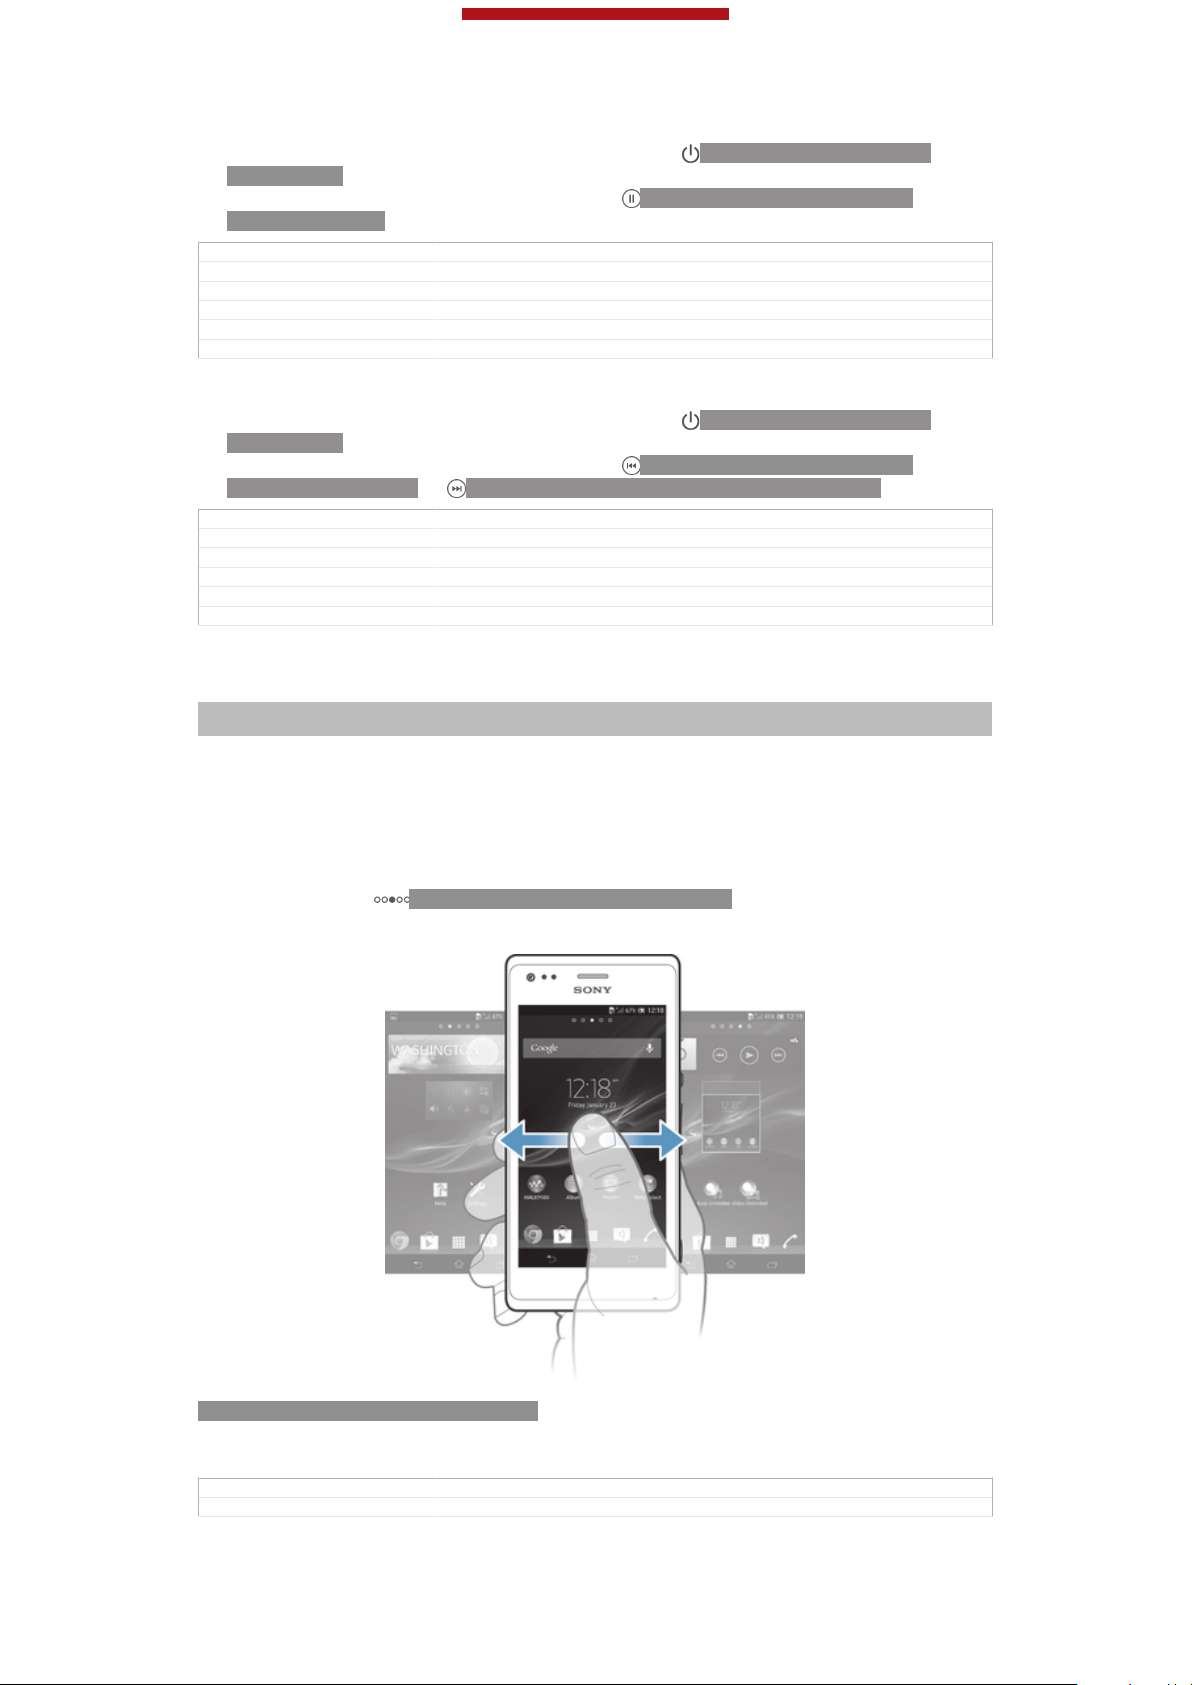
Home screen
Indexterm: "Home screen"
Indexterm: "extensions"
Your phone Home screen [homescreen_strings_application_name_txt] is the equivalent of the desktop
on a computer. It's your gateway to the main features in your phone. You can
customise your Home screen [homescreen_strings_application_name_txt] with widgets, shortcuts,
folders, themes, wallpaper and other items.
The Home screen [homescreen_strings_application_name_txt] extends beyond the regular screen
display width, so you need to flick left or right to view content in one of the screen's
four extensions. ID: ICN-SONY-HOME-PAGINATION shows which part of the
Home screen [homescreen_strings_application_name_txt] you are in.
ID: SCR-SONY-13NY-HOMESCREEN
The items in the bar at the bottom of the screen are always available for quick
access.
GUID
Title Home screen
GUID-8EB25E2F-8807-407D-B459-A8E350B6D7D8
26
This is an Internet version of this publication. © Print only for private use.
This is a draft publication for internal use only.
Changes From eDream 4.0 all products: added text about 4-corner UI with condition
Version 7
Author VikkiL
Status Released*
"UI size"
To go to the Home screen
•
Press ID: ICN-SONY-KEY-AND-HOME.
GUID GUID-05D1C81E-123C-471F-BD70-D65BF2E49B8A
Title To go to the Home screen
Changes Valid for eDream3.0 and Gingerbread.
Version 1
Author VikkiL
Status Released
To browse the Home screen
•
Flick right or left.
GUID GUID-A5C4ECEC-DED9-4FCB-B023-22DEA2CF2F2C
Title To browse the Home screen
Changes Valid for eDream3.0 and Gingerbread. Changed heading from "To view the
Version 4
Author VikkiL
Status Released
extended Home screen" to "To browse the Home screen"
To share an item from your Home screen
1
Press
screen_strings_application_name_txt] .
2
Touch and hold an item until it magnifies and the phone vibrates, then drag the
ID: ICN-SONY-KEY-AND-HOME to open your Home screen [home-
item to ID: ICN-SONY-DETAIL-SHARE-NORMAL.
3
Select an option and confirm, if necessary. You can now share the applications
and widgets you like with your friends so they can download and use them.
GUID
Title To share an item from your Home screen
Changes
Version 1
Author VikkiL
Status Released*
GUID-55FD963B-6AF2-4FC0-BA37-51D2AD4727A8
Widgets
Indexterm: "widgets"
Widgets are small applications that you can use directly on your Home screen [home-
screen_strings_application_name_txt] . For example, the “WALKMAN” widget allows you to start
playing music directly.
Some widgets are resizable, so you can expand them to view more content or shrink
them to save space on your Home screen [homescreen_strings_application_name_txt] .
GUID
Title Widgets
Changes For Taoshan: change music player widget to walkman widget
Version 10
Author WangT
Status Released
To add a widget to the Home screen
1
From your Home screen [homescreen_strings_application_name_txt] , press ID: ICN-SONYKEY-MENU.
2
Tap Add [home_menu_add_txt] > Widgets [home_option_add_widget_txt] .
3
Tap a widget.
GUID
Title To add a widget to the Home screen
Changes From 4.0.1 Urushi: Updated labels in the topic
Version 7
Author VikkiL
Status Released*
GUID-31FA03AF-3EA8-4F67-997F-72FC7043FC88
GUID-7AA3E1DD-C7DD-47D2-8DB4-4BB05D9E7686
27
This is an Internet version of this publication. © Print only for private use.
This is a draft publication for internal use only.
To resize a widget
Indexterm: "widgets"
Sub-indexterm: "resizing"
1
Touch and hold a widget until it magnifies and the phone vibrates, then release
the widget. If the widget can be resized, for example, the Calendar widget,
then a highlighted frame and resizing dots appear.
2
Drag the dots inward or outward to shrink or expand the widget.
3
To confirm the new size of the widget, tap anywhere on the Home screen [home-
screen_strings_application_name_txt] .
GUID GUID-379CF5F0-A8C7-4D6F-A96C-9D06316E050B
Title To resize a widget
Changes For Mint Amy. Added an example of resizable widget in step 1 as commen-
Version 3
Author Xiaxin Li
Status Released*
ted by ATT.
To get an overview of all widgets on your Home screen
•
Pinch on any area of your Home screen [homescreen_strings_application_name_txt] . All widgets
from different parts of your Home screen [homescreen_strings_application_name_txt] are now
displayed in one view.
When all Home screen [homescreen_strings_application_name_txt] widgets are combined in one view, tap
on any widget to go to the part of the Home screen [homescreen_strings_application_name_txt] containing
that widget.
GUID GUID-172CC58A-1942-4B8C-BD9E-816B85EA3BAA
Title To get an overview of the widgets on all Home screens
Changes From eDream 4.0: as per X-team comments
Version 2
Author VikkiL
Status Released
Rearranging your Home screen
Indexterm: "Home screen"
Sub-indexterm: "customising"
Customise the appearance of your Home screen and change the features that you
can access from it. Change the screen background, move items around, create
folders, and add shortcuts to contacts.
GUID
Title Rearranging your Home screen
Changes From eDream4.0: added UI size condition
Version 2
Author VikkiL
Status Released*
To open the options menu of your Home screen
You can open the Home screen [homescreen_strings_application_name_txt] options menu in two
ways:
•
From your Home screen [homescreen_strings_application_name_txt] , press
KEY-MENU.
•
Touch and hold on any part of your Home screen [homescreen_strings_application_name_txt] .
GUID
Title To open the options menu of your Home screen
Changes
Version 1
Author VikkiL
Status Released*
GUID-F0E2EDDE-9A6D-4354-BCE5-D2FFE325FC77
ID: ICN-SONY-
GUID-006FEB36-CD2E-4B2A-B429-E6FF72753075
28
This is an Internet version of this publication. © Print only for private use.
This is a draft publication for internal use only.
To add a shortcut to the Home screen
1
From your Home screen [homescreen_strings_application_name_txt] , press ID: ICN-SONYKEY-MENU.
2
Tap Add [home_menu_add_txt] > Shortcuts [home_option_add_shortcut_txt] .
3
Find and select a shortcut.
Add an application shortcut directly from the Application screen by touching and holding the
application.
GUID GUID-846B78FE-AD6C-47FE-9BF8-715A3CBB7B61
Title To add a shortcut to the Home screen
Changes From 4.0.1 Urushi: updated labels
Version 2
Author VikkiL
Status Released*
To move an item on the Home screen
1
Press
screen_strings_application_name_txt] .
2
Touch and hold an item until it magnifies and the phone vibrates, then drag the
ID: ICN-SONY-KEY-AND-HOME to open your Home screen [home-
item to the new location.
GUID GUID-E0065909-6DCC-4137-BC73-976CB447E526
Title To move an item on the Home screen
Changes from edream4.0: moved the tip to "To add a folder to your home screen"
Version 2
Author VikkiL
Status Released*
To delete an item from the Home screen
•
Touch and hold an item until it magnifies and the phone vibrates, then drag the
item to ID: ICN-SONY-MENU-DELETE.
GUID
Title To delete an item on the Home screen
Changes Created for eDream3.0
Version 1
Author VikkiL
Status Released*
GUID-B9D51246-2767-4FC7-B6A9-7F3A98343A35
To add a folder to the Home screen
1
From your Home screen [homescreen_strings_application_name_txt] , press
ID: ICN-SONY-
KEY-MENU.
2
Tap Add [home_menu_add_txt] > Folder [home_option_add_folder_txt] .
3
Enter a name for the folder and tap Done [gui_done_txt] .
Drag and drop an item on top of another item on your Home screen to create a folder
automatically.
GUID GUID-B4485B5D-75F7-46E8-A35F-7833E55CF1DC
Title To create a folder on the Home screen
Changes From 4.0.1 SZ and UG for coming products: functional change on folder cre-
Version 6
Author VikkiL
Status Released*
ation on HS
To add items to a folder
•
Touch and hold an item until it magnifies and the phone vibrates, then drag the
item to the folder.
GUID
Title To add items to a folder
Changes Valid for eDream3.0 and Gingerbread. Updated instruction text so it says
Version 2
Author VikkiL
Status Released*
GUID-59731CD1-AB4A-40AE-BCCC-5D64928E2B5E
"item" instead of "application icon" to make more generic and align with the
heading.
29
This is an Internet version of this publication. © Print only for private use.
This is a draft publication for internal use only.
To rename a folder
1
Tap the folder to open it.
2
Touch the folder's title bar to show the Folder name [home_folder_dialog_folder_name_txt]
field.
3
Enter the new folder name and tap Done [gui_done_txt] .
GUID GUID-D78DB4F3-D3D1-495D-B904-21104B8F19CA
Title To rename a folder
Changes From 4.0.1 Urushi: updated labels
Version 4
Author VikkiL
Status Released*
Changing the background of your Home screen
Indexterm: "animated wallpaper"
Indexterm: "live wallpaper"
Indexterm: "wallpaper"
Indexterm: "themes"
Adapt the Home screen [homescreen_strings_application_name_txt] to your own style using
wallpapers and different themes.
GUID GUID-ABAA5C9B-0C1F-41EE-8456-EDAF70D2BB98
Title Changing the background of your Home screen
Changes From eDr4.0.1.1: changed index term from "theme" to "themes"
Version 5
Author VikkiL
Status Released
To change your Home screen wallpaper
1
From your Home screen [homescreen_strings_application_name_txt] , press ID: ICN-SONYKEY-MENU.
2
Tap Wallpaper [home_menu_wallpaper_txt] , then select a wallpaper.
You can use a photo you have taken, or an animation. Go to Google Play™ and other sources
to download, for example, live wallpapers that change with the changing hours of the day.
GUID GUID-19E276DF-4D6A-44AF-8D86-5CAAFFD4BFDD
Title To change your Home screen wallpaper
Changes change Android Market™ to Google Play™ based on legal requirement
Version 7.1.1
Author WangT
Status Released
To set a theme
1
From your Home screen [homescreen_strings_application_name_txt] , press ID: ICN-SONYKEY-MENU.
2
Tap Theme [home_menu_theme_txt] , then select a theme.
When you change a theme, the background also changes in some applications.
GUID GUID-506DA76F-B990-4363-A85D-2F100F4C36A7
Title To set a theme
Changes From eDream4.0.1 Urushi: Changing theme is applicable and affects more
Version 3
Author VikkiL
Status Released*
than just Home screen - so update the topic accordingly
Accessing and using applications
Open applications from shortcuts on your Home screen [homescreen_strings_application_name_txt] or
from the Application screen.
GUID
Title Accessing and using applications
Changes Created for eDream3.0
Version 1
Author VikkiL
Status Released
This is an Internet version of this publication. © Print only for private use.
GUID-935DE265-ADC5-4C4D-8BD5-D097758DA59C
30

This is a draft publication for internal use only.
Application screen
Indexterm: "applications"
Sub-indexterm: "screen"
The Application screen, which you open from your Home screen [homescreen_strings_applica-
tion_name_txt] , contains the applications that come pre-installed on your device as well as
the applications you download.
The Application screen extends beyond the regular screen width, so you need to flick
left and right to view all content.
GUID GUID-F02CAFC3-E592-4B0D-AA00-E5631B4A9301
Title Application screen
Changes Device Term Change
Version 3
Author XuCindy
Status Released
To open the Application screen
ID: SCR-SONY-13NY-APPLICATIONS-SCREEN
•
From your Home screen [homescreen_strings_application_name_txt] , tap ID: ICN-SONYHOME-APPTRAY-NORMAL.
GUID
Title To open the Application screen
Changes Valid from eDream3.0. Index term removed.
Version 3
Author WangT
Status Released
GUID-A798DDA3-C3C7-49D5-975F-0D42DA2CB916
To browse the Application screen
•
From the Application screen, flick right or left.
GUID
Title To browse the application screens
Changes The content is same as version 3. Just changed "application" to "Applica-
Version 4
Author WangHerman
Status Released
GUID-76BB630C-11CA-44CF-A042-92465E3899FA
tion".
To create a shortcut to an application on the Home screen
1
From your Home screen [homescreen_strings_application_name_txt] , tap
ID: ICN-SONY-
HOME-APPTRAY-NORMAL .
2
Touch and hold an application icon until the screen vibrates, then drag the icon
to the top of the screen. The Home screen [homescreen_strings_application_name_txt] opens.
3
Drag the icon to the desired location on the Home screen [homescreen_strings_applica-
tion_name_txt] , then release your finger.
GUID
Title To create a shortcut to an application on the Home screen
Changes Updated from version 3. Step 2 description changes because of Odin and
Version 4
Author Vera Qu
Status Released*
GUID-1CB2F7C4-2E83-4EAB-AFFB-0957648C639D
Yuga's UI changes.
31
This is an Internet version of this publication. © Print only for private use.

This is a draft publication for internal use only.
To share an application from your Application screen
1
From your Home screen [homescreen_strings_application_name_txt] , tap ID: ICN-SONYHOME-APPTRAY-NORMAL.
2
Tap ID: ICN-SONY-KEY-MENU , then tap Share [share] . All applications which
can be shared are indicated by ID: ICN-SONY-HOME-APP-SHARE .
3
Tap the application that you want to share, then select an option and confirm,
if necessary. A link to a download of the application is sent to the people you
have selected.
GUID GUID-3626E628-C31A-4C0E-BCEC-07EB17CF2C3F
Title To share an application from your Application screen
Changes Updated from version1. Step 2 changes due to UI's change for Odin and Yu-
Version 2
Author Vera Qu
Status Released*
ga.
Opening and closing applications
GUID GUID-C41A794C-3079-4816-A08C-45D4DBEC5234
Title Opening and closing applications
Changes Valid for eDream3.0 and Gingerbread.
Version 1
Author VikkiL
Status Released
To open an application
•
From your Home screen [homescreen_strings_application_name_txt] or the Application screen,
tap the application.
GUID
Title To open an application
Changes Created for eDream3.0
Version 1
Author VikkiL
Status Released
GUID-A38931CB-ACFB-42B2-B95E-852ABB09E511
To close an application
•
Press ID: ICN-SONY-KEY-AND-BACK.
Some applications are paused when you press
ID: ICN-SONY-KEY-AND-HOME to exit,
while other applications may continue to run in the background. In the first case, the next time
you open the application, you can continue where you left off. Remember that some
applications may cause data connection charges when they are running in the background,
for example, social networking services.
GUID GUID-370B9F32-5544-4DA2-8DF2-414E9A7F69BA
Title To close an application
Changes From eDream6.0: added text about data usage for paused applications
Version 2
Author VikkiL
Status Released
Recently used applications window
Indexterm: "recently used applications window"
You can switch between recently used applications from this window. You can also
open small apps.
GUID
Title Recently used applications window
Changes From Blue 1.0: text changes made - added description about small apps
Version 2
Author VikkiL
Status Released
GUID-4E475135-9A16-4587-AB71-F73F430BE6A9
To open the recently used applications window
•
Press
GUID
Title To open the recently used applications window
Changes writing style update - delete the last sentence based on minimalism
ID: ICN-SONY-KEY-OPEN-RECENT-APPS .
GUID-A60AC121-B7D1-4A48-859B-F8CA4DC4C077
32
This is an Internet version of this publication. © Print only for private use.

This is a draft publication for internal use only.
Version 5
Author WangT
Status Released*
Using small apps
From the recently used applications window, you can get quick access to several
small apps at any time using the small apps bar. A small app only takes up a small
area of your screen. So you can interact with a small app and another application at
the same time on the same screen.
GUID GUID-2764F528-7A9A-401F-8523-DBB180E8235A
Title Using small apps
Changes
Version 1
Author VikkiL
Status Released*
To open the small apps bar
•
Press ID: ICN-SONY-KEY-OPEN-RECENT-APPS. The small apps bar
appears at the bottom of the screen.
GUID GUID-C4580F48-66EB-4E34-AB54-977834E6926B
Title To open the small apps bar
Changes For nxtstp UG
Version 4
Author JorgenL
Status Draft
To open a small app
1
To make the small apps bar appear, press ID: ICN-SONY-KEY-OPENRECENT-APPS .
2
Tap the small app that you want to open. A small app window appears.
GUID
Title To open a small app
Changes update for FAQ: add a condition for icon issue; add a small app bar image
Version 2
Author Vera Qu
Status Released*
GUID-53383553-C8C3-4EA0-8F4E-DA9CB7757BAE
due to ed comments (no effect for UG); no other change
To close a small app
•
Tap ID: ICN-SONY-BTN-CLOSE-NORMAL on the small app window.
GUID
Title To close a small app
Changes
Version 1
Author VikkiL
Status Released
GUID-99100D9A-1CCC-4DD4-ABC8-2B58F09F39AE
To move a small app
•
When the small app is open, touch and hold the top left corner of the small
app, then move it to the desired location.
GUID
Title To move a small app
Changes Updated from version 2. Change the icon to "the name field of the small app"
Version 3
Author Vera Qu
Status Released
GUID-E71EDE79-D34F-41C1-9300-ABE639400C0F
for Odin & Yuga.
To minimise a small app
•
When the small app is open, touch and hold the top left corner of the small
app, then drag it to the right edge or to the bottom edge of the screen.
GUID
Title To minimise a small app
Changes Updated from version 2. Change the icon to "the name field of the small app"
Version 3
GUID-3FA301BE-1DE5-4200-A944-FD66851191D2
for Odin & Yuga.
33
This is an Internet version of this publication. © Print only for private use.

This is a draft publication for internal use only.
Author Vera Qu
Status Released
To rearrange your small apps
1
To make the small apps bar appear, press ID: ICN-SONY-KEY-OPENRECENT-APPS.
2
Touch and hold a small app and drag it to the desired position in the small
apps bar.
GUID GUID-3830D3E3-63FD-4C72-A393-E6F5E8D58EA5
Title To arrange your small apps
Changes
Version 1
Author VikkiL
Status Released*
To remove a small app from the small apps bar
1
To make the small apps bar appear, press ID: ICN-SONY-KEY-OPENRECENT-APPS.
2
Touch and hold a small app icon and drag it away from the small apps bar.
GUID GUID-BF1EE6E5-D398-49CC-89A9-CCE7426CFF47
Title To remove a small app from the recently used applications window
Changes
Version 1
Author VikkiL
Status Released*
To restore a previously removed small app
1
To make the small apps bar appear, press ID: ICN-SONY-KEY-OPENRECENT-APPS.
2
Tap ID: ICN-SONY-BROWSER-ADD > Installed small apps [dialog_add_app_installed_ti-
tle] .
3
Select the small app that you want to restore.
GUID
Title To restore a previously removed small app
Changes
Version 1
Author VikkiL
Status Released*
GUID-1B077C5F-3405-4E30-BC25-453CECB522D9
To download a small app
1
To make the small apps bar appear, press ID: ICN-SONY-KEY-OPENRECENT-APPS.
2
Tap ID: ICN-SONY-BROWSER-ADD > ID: ICN-SONY-APP-MARKETPLACE.
3
Find a small app that you want to download, then follow the instructions to
complete the installation.
GUID
Title To download a small app from Play Store
Changes
Version 1
Author VikkiL
Status Released*
GUID-AE4A69D2-7CB5-44EF-BF20-90B0B35793CB
Application menu
You can open a menu at any time when you are using an application. The menu will
look different depending on which application you are using.
GUID
Title Application menu
Changes From Blue: for phones without the menu key - no text change and removed
Version 2
Author VikkiL
Status Released
This is an Internet version of this publication. © Print only for private use.
GUID-7ECF296C-1511-432D-A846-7C99F6F65764
the illustration only
34

This is a draft publication for internal use only.
To open a menu in an application
•
While using the application, press ID: ICN-SONY-KEY-MENU.
A menu is not available in all applications.
GUID GUID-C5E4E280-0AA6-4076-B7F6-8777FD219744
Title To open a menu in an application
Changes From Shakira
Version 1
Author AnnE
Status Released*
Rearranging your Application screen
Move the applications around on the Application screen according to your
preferences.
GUID GUID-3809890F-C0C3-438A-BA16-A3C7F978256A
Title Rearranging your Application screen
Changes Valid for eDream3.0
Version 1
Author VikkiL
Status Released
To arrange applications on the Application screen
Indexterm: "applications"
Sub-indexterm: "arranging"
Indexterm: "applications"
Sub-indexterm: "sorting"
1
From your Home screen [homescreen_strings_application_name_txt] , tap ID: ICN-SONYHOME-APPTRAY-NORMAL to go to the Application screen.
2
Tap the drop-down list on the top left of the screen and select an option.
GUID
Title To arrange your applications on the Application screen
Changes Updated from version 6. Step 2 changes for Odin & Yuga because the icon is
Version 7
Author Vera Qu
Status Released
GUID-115D9148-D5DC-49BA-8428-A1AD178487AF
not be used.
To move an application on the Application screen
1
Open the Application screen.
2
Touch and hold an item until it magnifies and the device vibrates, then drag the
item to the new location.
You can only move your applications when Own order [home_action_bar_option_free_sort_txt] is selected.
GUID GUID-EE508701-3826-449B-BD0F-61BABEEA74C3
Title To move an application on the Application screen
Changes Updated from version 5. Description changes due to UI changes. For Odin &
Version 6
Author Vera Qu
Status Released
Yuga.
To uninstall an application from the Application screen
1
From your Home screen [homescreen_strings_application_name_txt] , tap ID: ICN-SONYHOME-APPTRAY-NORMAL .
2
Tap ID: ICN-SONY-KEY-MENU , then tap Uninstall [uninstall_text] . All uninstallable
applications are indicated by ID: ICN-SONY-HOME-UNINSTALL .
3
Tap the application that you want to uninstall, then tap Uninstall [uninstall_text] .
GUID
Title To uninstall an application from the Application screen
Changes Updated from version 2. Step 2 and step 3 description changes due to Odin
Version 3
Author Vera Qu
Status Released*
GUID-553D1225-BF53-4ED7-A71D-7D887D7F3D2B
& Yuga's UI changes.
35
This is an Internet version of this publication. © Print only for private use.

This is a draft publication for internal use only.
Status and notifications
Indexterm: "status"
Sub-indexterm: "bar"
Indexterm: "notification"
Sub-indexterm: "light"
Indexterm: "settings"
Sub-indexterm: "quick settings"
The status bar at the top of your screen shows what's going on in your phone. To the
left you get notifications when there is something new or ongoing. For example, new
message and calendar notifications appear here. The right side shows the signal
strength, battery status, and other information.
ID: SCR-SONY-13NY-STATUSBAR
The status bar allows you to adjust basic settings on your phone, for example,
Wi-Fi®, Bluetooth™, data traffic, and sound. You can also open the settings menu
from the Notification panel to change other settings.
A notification light also gives you battery status information and some notifications.
For example, a flashing blue light means there is a new message or a missed call.
The notification light may not work when the battery level is low.
ID: ILL-SONY-13NY-NOTIFICATION-LAMP
GUID
Title Status and notifications
Changes For Tsubasa html User guide. Fixed bad image view by adding a p tag.
Version 6.1.1
Author JorgenL
Status Released
GUID-065ACA94-7931-42F2-AEB8-381F304937E1
Checking notifications and ongoing activities
Indexterm: "notification"
Sub-indexterm: "panel"
You can drag down the status bar to open the Notification panel and get more
information. For example, you can use the panel to open a new message or view a
calendar event. You can also open some applications that run in the background,
such as the music player.
GUID
Title Checking notifications and ongoing activities
Changes Changed "running applications" to "some applications that run in the back-
Version 4
Author PengLeon
Status Released
GUID-50D94BC7-3149-444A-88A6-86D400E5A76B
ground" according to TID's comments
36
This is an Internet version of this publication. © Print only for private use.

This is a draft publication for internal use only.
To open the Notification panel
ID: SCR-SONY-13NY-NOTIFICATION-PANEL
•
Drag the status bar downwards.
GUID GUID-8560FF8D-B09C-4CDE-9A2D-79856DE785EC
Title To open the Notifications panel
Changes From Robyn - Removed the tip
Version 2
Author KomalL
Status Released
To close the Notification panel
ID: SCR-SONY-13NY-NOTIFICATION-PANEL-CLOSE
•
Drag the tab at the bottom of the Notification panel upwards.
GUID
Title To close the Notification panel
Changes Valid for eDream3.0 and Gingerbread.
Version 3
Author VikkiL
Status Released
GUID-91179B0D-7B4D-48B3-B591-10D1868C3561
To open a running application from the Notification panel
•
Tap the icon for the running application to open it.
GUID
Title To open a running application from the Notification panel
Changes ICS update: editorial review comments - minimalism
Version 3
Author VikkiL
Status Released
GUID-1CC3ECCB-2344-4CC1-8764-29BD69172A3D
37
This is an Internet version of this publication. © Print only for private use.

This is a draft publication for internal use only.
To dismiss a notification from the Notification panel
•
Place your finger on a notification and flick left or right.
GUID GUID-967CAF72-88E4-4B35-ADD1-2B0EA7CF61A4
Title To dismiss a notification from the Notification panel
Changes
Version 1
Author VikkiL
Status Released
To clear the Notification panel
•
From the Notification panel, tap Clear [status_bar_clear_all_button] .
GUID GUID-DA62F1FF-BE58-4F3B-B236-8F2F85655D4F
Title To clear the Notification panel
Changes Valid for Rrobyn/Mimmi (change in label)
Version 2
Author KomalL
Status Released*
Setting your phone from the Notification panel
Indexterm: "notification"
Sub-indexterm: "panel"
Sub-indexterm: "setting"
You can open the settings menu from the Notification panel to adjust basic phone
settings. For example, you can turn on Wi-Fi®.
GUID GUID-001BB4C3-E0FB-4953-8605-57D48285C63C
Title Setting your device from the Notification panel
Changes
Version 1
Author PengLeon
Status Released*
To open the phone settings menu from the Notification panel
1
Drag the status bar downwards.
2
GUID
Title To open settings menu from the notification panel
Changes Valid from Mint (only Step 1 added)
Version 3
Author PengLeon
Status Released*
ID: ICN-SONY-MENU-SETTINGS .
Tap
GUID-DEDF9332-F8E7-4B61-BF9C-C58055553DBA
To adjust sound settings from the Notification panel
1
Drag the status bar downwards.
2
Tap ID: ICN-SONY-STAT-SYS-SPEAKERPHONE.
GUID
Title To adjust your sound settings from the Notification panel
Changes
Version 1
Author PengLeon
Status Released
GUID-379AC15A-BC4F-4496-A74F-090064D224AA
To control the Bluetooth™ function from the Notification panel
1
Drag the status bar downwards.
2
Tap ID: ICN-SONY-STAT-SYS-DATA-BLUETOOTH.
GUID
Title To turn on or off the Bluetooth™ function from the Notification panel
Changes
Version 1
Author PengLeon
Status Released
GUID-76B8B30E-0F68-45DE-A79C-2F11B0F0604A
38
This is an Internet version of this publication. © Print only for private use.

This is a draft publication for internal use only.
To control the Wi-Fi® function from the Notification panel
1
Drag the status bar downwards.
2
Tap ID: ICN-SONY-STAT-SYS-WIFI-SIGNAL-4.
GUID GUID-0E0F12AA-C120-4B5F-9977-A81FC38FC4D7
Title To turn on or off Wi-Fi® from the Notification panel
Changes
Version 1
Author PengLeon
Status Released*
To enable or disable data traffic from the Notification panel
1
Drag the status bar downwards.
2
GUID GUID-2E74E4DD-6C24-4177-9238-032630E89AAF
Title To enable or disable data traffic from the Notification panel
Changes
Version 1
Author PengLeon
Status Released*
ID: ICN-SONY-STAT-SYS-DATA-TRAFFIC.
Tap
Phone settings menu
View and change your phone settings from the Settings menu.
GUID GUID-99D19D2C-0BF8-4893-A15F-7CD052D96170
Title Phone settings menu
Changes Valid for eDream 3.0
Version 1
Author JessicaL
Status Released*
To access the phone settings
1
From the Home screen [homescreen_strings_application_name_txt] , tap
ID: ICN-SONY-
HOME-APPTRAY-NORMAL.
2
Tap Settings [settings_label] .
GUID
Title To access the phone settings
Changes Valid for Rachael/Robyn/Mimmi eDream 2.0. Valid for eDream 3.0.
Version 4
Author KomalL
Status Released*
GUID-A9F73FEB-FB36-4722-BF69-5ABA7B7B020B
Typing text
Indexterm: "keyboard"
Indexterm: "Phonepad"
Indexterm: "text input method"
Indexterm: "symbols"
Indexterm: "caps lock"
GUID
Title Typing text - keyboard and keypad
Changes Valid from eDream 4.0.
Version 5
Author RongrongZ
Status Released*
GUID-5EF956D7-B1A6-46E3-BE7A-206DBA9DAF00
On-screen keyboard
Indexterm: "on-screen keyboard"
Tap the keys of the on-screen QWERTY keyboard to enter text conveniently. Some
applications open the on-screen keyboard automatically. You can also open this
keyboard by touching a text field.
GUID
Title On-screen keyboard
Changes Valid from eDream 4.0.
Version 1
Author RongrongZ
This is an Internet version of this publication. © Print only for private use.
GUID-047240C9-CBE3-4076-B626-8838F1999489
39
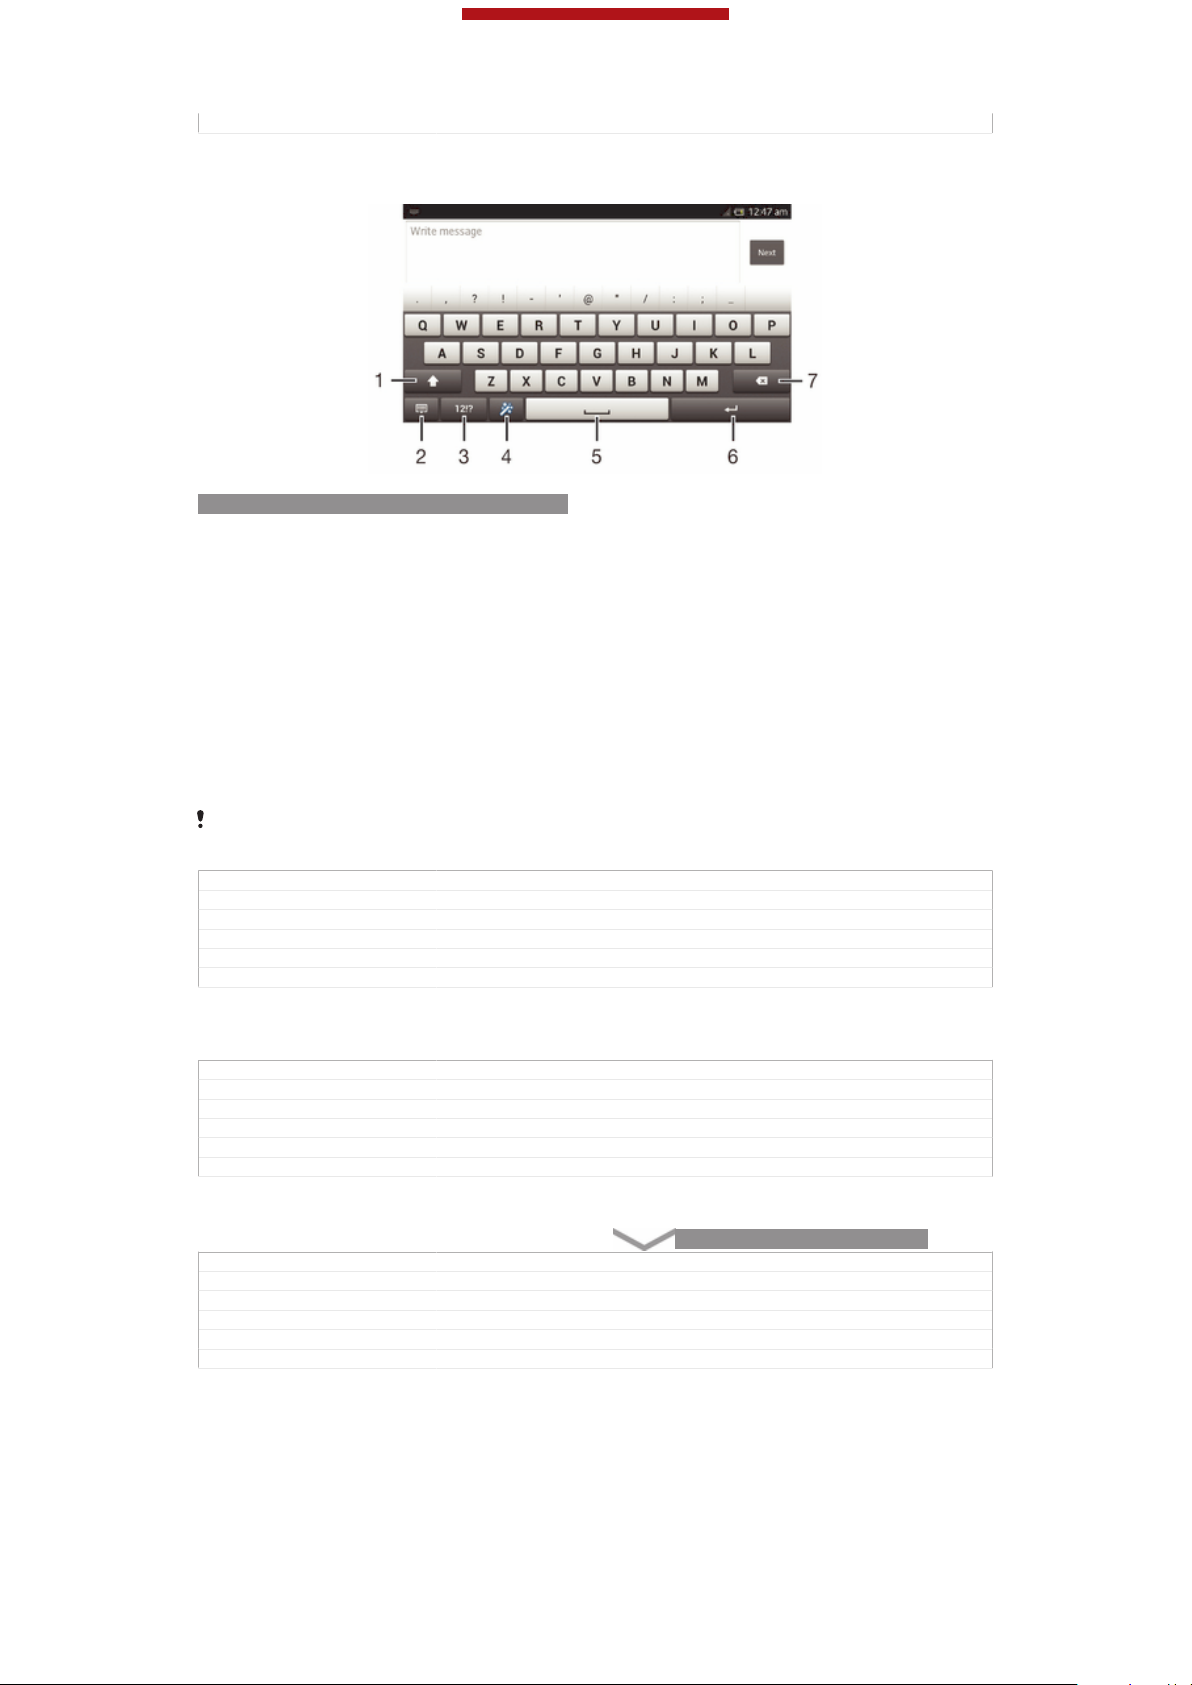
This is a draft publication for internal use only.
Status Released
Using the on-screen keyboard
ID: SCR-10AU-ON-SCREEN-KEYBOARD
1
Change the character case and turn on the caps lock. For some languages, this key is used to access
extra characters in the language.
2 Close the on-screen keyboard view. Note that this icon does not appear in portrait mode.
3 Display numbers and symbols.
4 Personalise your keyboard. This key disappears after the keyboard is personalised.
5 Enter a space.
6 Enter a carriage return or confirm text input.
7 Delete a character before the cursor.
All illustrations are for illustration purposes only and may not accurately depict the actual
device.
GUID GUID-C82BF299-B2B7-4FFE-911E-D0FC3A0B529E
Title Using on-screen keyboard
Changes Device term change
Version 8
Author Gan Lu
Status Released*
To display the on-screen keyboard to enter text
•
Tap a text entry field.
GUID
Title To display the keypad/keyboard to enter text
Changes Valid from eDream 4.0. Updated condition on keyboard-keypad.
Version 5
Author RongrongZ
Status Released
GUID-D53410B6-16DD-4BE2-8862-B460B3A8643F
To hide the on-screen keyboard
•
When the on-screen keyboard is open, tap
GUID
Title To hide the on-screen keyboard/Phonepad
Changes for Odin; change a key
Version 5
Author Gan Lu
Status Released
GUID-B60C1834-DDC9-421A-8F96-2E9038A514BE
ID: KEY-TEXT-INPUT-BACK.
40
This is an Internet version of this publication. © Print only for private use.

This is a draft publication for internal use only.
To personalise the on-screen keyboard
1
Open the on-screen keyboard, then tap ID: ICN-SONY-TEXT-INPUTSETUPGUIDE-WAND-FEEDBACK .
2
Follow the instructions to personalise your on-screen keyboard, for example,
mark the Smiley key [textinput_strings_settings_show_smiley] and Gesture input [textinput_strings_set-
tings_trace_input] checkboxes.
If you don't mark the Smiley key [textinput_strings_settings_show_smiley] checkbox when you personalise
the on-screen keyboard, the smiley icon will not appear.
GUID GUID-1833FEDD-7B56-4FD2-B800-187FF06AB7D9
Title To personalise the keyboard
Changes for pollux; add "gesture input" to step 2
Version 3
Author Gan Lu
Status Draft
To use the on-screen keyboard in landscape orientation
•
When you enter text, turn the device sideways.
For the keyboard to support this feature, landscape mode must be supported by the
application you are using, and your screen orientation settings must be set to automatic.
GUID GUID-E3D818B3-9DFF-4DDC-B279-5CD46A966698
Title To use the on-screen keyboard/keypad in landscape orientation
Changes Device Term Change
Version 5
Author Gan Lu
Status Released
To enter text using the on-screen keyboard
1
To enter a character visible on the keyboard, tap the character.
2
To enter a character variant, touch and hold a regular keyboard character to
get a list of available options, then select from the list. For example, to enter
"é", touch and hold "e" until other options appear, then, while keeping your
finger pressed on the keyboard, drag to and select "é".
GUID
Title To enter text using the on-screen keyboard
Changes Valid from eDream 4.0. Specified for on-screen keyboard.
Version 3
Author RongrongZ
Status Released
GUID-AD062D73-DE09-468F-8DCB-3F17D5A83CE9
To shift between upper-case and lower-case letters
•
Before you enter a letter, tap ID: ICN-SONY-TEXT-INPUT-SHIFT-FEEDBACK
to switch to upper-case ID: ICN-SONY-TEXT-INPUT-SHIFT-CAPSFEEDBACK, or vice versa.
GUID
Title To shift between upper-case and lower-case letters
Changes Updated as per FG comment. Valid for all eDream 2.1 products
Version 3
Author JuliaZ
Status Released
GUID-E5ADF539-526B-4CA6-BFB2-F17AECB73C5A
To turn on the caps lock
•
Before you type a word, tap
ID: ICN-SONY-TEXT-INPUT-SHIFT-FEEDBACK
or ID: ICN-SONY-TEXT-INPUT-SHIFT-CAPS-FEEDBACK until ID: ICNSONY-TEXT-INPUT-SHIFT-CAPS-LOCK-FEEDBACK appears.
GUID
Title To turn on the Caps lock
Changes Updated as per FG review comments. Valid for all eDream 2.1 products
Version 3
Author JuliaZ
Status Released*
GUID-CA02935F-2636-481C-8064-DC00F523D22D
41
This is an Internet version of this publication. © Print only for private use.
This is a draft publication for internal use only.
To enter numbers or symbols
•
When you enter text, tap ID: ICN-SONY-TEXTINPUT-NUMBERS-SYMBOLS.
A keyboard with numbers and symbols appears. Tap ID: ICN-SONYTEXTINPUT-SYMBOL-PAGES to view more options.
GUID GUID-829C61AB-3536-4122-80EF-E4D3C174FE52
Title To enter numbers or symbols using the keyboard/keypad
Changes Valid from eDream4.0. Added the page icon info.
Version 2
Author RongrongZ
Status Released
To enter common punctuation marks
1
When you finish entering a word, tap the space bar.
2
Select a punctuation mark from the candidate bar. The selected mark is
inserted before the space.
To quickly enter a full stop, tap the space bar twice when you finish entering a word.
GUID GUID-6589FC1E-1265-4100-93E5-7006D5DD1E0E
Title To enter common punctuations
Changes Valid from eDream 6.0.
Version 1
Author RongrongZ
Status Released
To delete characters
•
Tap to place the cursor after the character you want to delete, then tap ID:
ICN-SONY-DELETE-PHONE-NUMBER-BLK.
GUID
Title To delete characters
Changes
Version 1
Author JuliaZ
Status Released
GUID-A3C39984-81D4-419A-9F01-63DC364540FB
To enter a carriage return
•
When you enter text, tap
ID: ICN-SONY-TEXT-INPUT-LIGHT-ENTER to
enter a carriage return.
GUID
Title To turn to the next line in text
Changes Valid for eDream 3.0
Version 1
Author RongrongZ
Status Released
GUID-83E45AEE-6F56-4817-8260-CE9E7E139097
To select text
1
Enter some text, then tap and hold the text. The word you tap gets highlighted
by tabs on both sides.
2
Drag the tabs left or right to select more text.
GUID
Title To select text
Changes for Nanhu; change "double-tap" to "tap and hold"
Version 5
Author Gan Lu
Status Released
GUID-AE2DF08C-CE44-4038-A35A-347DBD2C5903
To edit text in landscape orientation
1
Enter some text, then double-tap the entered text.
2
Select the text you want to work with, then tap Edit... [extract_edit_menu_button] and
select an option.
GUID
Title To edit text in landscape orientation
Changes For Aoba Amy. Removed the note per editorial comment.
Version 3.1.1
Author QianWang
Status Released
GUID-E5B2A668-8E68-4FC8-948B-CB0BCFA0F634
42
This is an Internet version of this publication. © Print only for private use.

This is a draft publication for internal use only.
To edit text in portrait orientation
1
Enter some text, then double-tap the entered text to make the application bar
appear.
2
Select the text you want to edit, then use the application bar to make your
desired changes.
GUID GUID-570FACF3-512A-4631-82C7-DE1CC414CE8C
Title To edit text in portrait orientation
Changes For Aoba Amy ICS. Removed the note per editor's comment
Version 3.1.1
Author QianWang
Status Released
Application bar
ID: SCR-11ICS-TOOLBAR-EDITTEXT
1
2 Select all text
3 Cut text
4 Copy text
5 Paste text
Close the application bar
ID: ICN-SONY-MAGNIFIER-PASTE only appears when you have text stored on the
clipboard.
GUID GUID-3773B154-CF41-471F-9469-DC7CD5560CCB
Title Application bar
Changes
Version 1
Author Vera Qu
Status Released*
Using the Gesture input [textinput_strings_settings_trace_input] function to write words
Indexterm: "gesture input"
You can input text by sliding your finger from letter to letter on the on-screen
keyboard.
Gesture input [textinput_strings_settings_trace_input] is only available when you use the on-screen
keyboard.
GUID GUID-0D50805D-88A7-417D-BF39-293347812DD9
Title Gesture input
Changes Device Term Change
Version 4
Author Gan Lu
Status Released*
43
This is an Internet version of this publication. © Print only for private use.

This is a draft publication for internal use only.
To enter text using the Gesture input [textinput_strings_settings_trace_input] function
1
When you enter text using the on-screen keyboard, slide your finger from letter
to letter to trace the word you want to write.
2
Lift up your finger when you’ve finished entering a word. A word is suggested
based on the letters you have traced. If necessary, select the correct word in
the candidate bar.
3
To view more options, scroll right or left in the word candidate bar. If you
cannot find the desired word, tap
ID: ICN-SONY-DELETE-PHONENUMBER-BLK once to delete the entire word. Then try again to trace the word
using the Gesture input function, or tap each letter to enter the word.
4
If the Space between gestures [textinput_strings_settings_trace_auto_accept] setting is activated,
trace the next word that you want to enter. If not, tap the space bar and then
trace the next word you want to enter.
To enter joined compound words when the Space between gestures [textinput_strings_settings_trace_au-
to_accept] setting is activated, you may need to slide to enter the first part of the word, then tap
each letter to enter the rest of the word.
GUID GUID-70F1F614-D699-4D32-98AF-4E0CBE268385
Title To enter text using the Gesture input function
Changes Device Term Change
Version 5
Author Gan Lu
Status Released
To change the Gesture input [textinput_strings_settings_trace_input] settings
1
When you enter text using the on-screen keyboard, tap ID: ICN-SONYTEXTINPUT-NUMBERS-SYMBOLS.
2
Tap ID: ICN-SONY-MENU-SETTINGS, then tap Keyboard settings [textin-
put_strings_input_options_menu_item_personalize] .
3
Tap Text input settings [textinput_strings_settings_quick_text] .
4
Mark or unmark the Gesture input [textinput_strings_settings_trace_input] checkbox.
5
If you want to automatically add a space between gestures without having to
tap the space bar each time, mark the Space between gestures [textinput_strings_set-
tings_trace_auto_accept] checkbox.
GUID
Title To change the Gesture input settings
Changes Valid for Nozomi ICS; text changes made; operation steps changed
Version 4
Author WangT
Status Released*
GUID-3C41CA62-030A-483B-8C09-E1CB01CAF541
Phonepad
Indexterm: "Phonepad"
The Phonepad is similar to a standard 12-key telephone keypad. It gives you
predictive text and multi-tap input options. You can activate the Phonepad text input
method via the keyboard settings. The Phonepad is only available in portrait
orientation.
GUID
Title Phonepad
Changes Valid from eDream 4.0.
Version 1
Author RongrongZ
Status Released
GUID-9D94BF81-E127-4971-B769-92AF75781DAE
44
This is an Internet version of this publication. © Print only for private use.

This is a draft publication for internal use only.
Using the Phonepad
ID: SCR-11-PHONEPAD-OVERVIEW
1
Choose a text input option
2 Change the character case and turn on the caps lock
3 Display numbers
4 Display symbols and smileys
5 Enter a space
6 Enter a carriage return or confirm text input
7 Delete a character before the cursor
All illustrations are for illustration purposes only and may not accurately depict the actual
device.
GUID GUID-CF8AE6C3-3225-46D4-8632-18F2F4FD71EF
Title Using the Phonepad
Changes Device Term Change
Version 5
Author Gan Lu
Status Released
To open the Phonepad for the first time
1
Tap a text entry field, then tap ID: ICN-SONY-TEXTINPUT-NUMBERSSYMBOLS.
2
Tap ID: ICN-SONY-MENU-SETTINGS, then tap Keyboard settings [textin-
put_strings_input_options_menu_item_personalize] .
3
Tap Keyboard appearance [textinput_strings_settings_keyboard_appearance] > Keyboard layout
[textinput_strings_settings_keyboard_layout_title] .
4
Select the Phonepad.
The Phonepad can only be used in portrait mode.
GUID GUID-63194001-9DA2-43FD-98FC-B549C9D81580
Title To open the Phonepad for the first time
Changes Valid for Hikari: change an icon on step 1
Version 4
Author Gan Lu
Status Released*
45
This is an Internet version of this publication. © Print only for private use.

This is a draft publication for internal use only.
To enter text using the Phonepad
•
When ID: ICN-SONY-TEXT-INPUT-PHONEPAD-SINGLETAP-ON appears in
the Phonepad, tap each character key only once, even if the letter you want is
not the first letter on the key. Tap the word that appears or tap ID: ICN-SONYTEXT-INPUT-PREDICTION-ARROW-RIGHT to view more word suggestions
and select a word from the list.
•
When ID: ICN-SONY-TEXT-INPUT-PHONEPAD-SINGLETAP-OFF appears in
the Phonepad, tap the on-screen key for the character you want to enter. Keep
pressing this key until the desired character is selected. Then do the same for
the next character you want to enter, and so on.
GUID GUID-25EC71FC-8474-4FEB-99F5-ED0485C15922
Title To enter text using the on-screen keypad
Changes Remove incorrect usage of the context tag
Version 2
Author RongrongZ
Status Released
To enter numbers using the Phonepad
•
When the Phonepad is open, tap
ID: ICN-SONY-TEXTINPUT-NUMBERS-
HORIZONTAL. A Phonepad with numbers appears.
GUID GUID-99C92908-9500-4C3A-B3C1-FDC17779AE84
Title To enter numbers using the virtual keypad/keyboard
Changes Valid from eDream4.0 Smultron. On-screen keypad.
Version 4
Author RongrongZ
Status Released
To insert symbols and smileys using the Phonepad
1
When the Phonepad is open, tap ID: ICN-SONY-TEXT-INPUT-PHONEPADSYM-SMILEY. A grid with symbols and smileys appears.
2
Scroll up or down to view more options. Tap a symbol or smiley to select it.
GUID
Title To insert symbols and smileys using the keypad
Changes Valid from eDream4.0 Smultron - On-screen keypad.
Version 2
Author RongrongZ
Status Released*
GUID-A9123BFE-979A-40FB-9E68-904BDE6FF860
Keyboard and Phonepad settings
Indexterm: "keyboard"
Sub-indexterm: "settings"
Indexterm: "language"
Sub-indexterm: "writing"
You can select settings for the on-screen keyboard and the Phonepad, such as
writing language and automatic correction.
GUID
Title Keyboard/keypad settings
Changes Valid from eDream 4.0.
Version 2
Author RongrongZ
Status Released*
To access the on-screen keyboard and Phonepad settings
1
When you enter text using the on-screen keyboard or Phonepad, tap ID:
ICN-SONY-TEXTINPUT-NUMBERS-SYMBOLS or ID: ICN-SONYTEXTINPUT-NUMBERS-HORIZONTAL.
2
Tap ID: ICN-SONY-MENU-SETTINGS, then tap Keyboard settings [textin-
put_strings_input_options_menu_item_personalize] .
GUID
Title To access the on-screen keyboard and Phonepad settings
Changes Valid for Nozomi ICS; operation steps changes; text changes made
Version 4
Author WangT
Status Released*
GUID-3F81FB45-0DDC-4DE9-A7C4-8028057256A6
GUID-5AA8DA1C-44F4-4634-AF38-A2945CA7C238
46
This is an Internet version of this publication. © Print only for private use.

This is a draft publication for internal use only.
To add a writing language for text input
1
When you enter text using the on-screen keyboard or Phonepad, tap ID:
ICN-SONY-TEXTINPUT-NUMBERS-SYMBOLS or ID: ICN-SONYTEXTINPUT-NUMBERS-HORIZONTAL .
2
Tap ID: ICN-SONY-MENU-SETTINGS , then tap Keyboard settings [textin-
put_strings_input_options_menu_item_personalize] .
3
Tap Languages [textinput_strings_settings_language_options] > Writing languages [textinput_strings_set-
tings_language] and mark the relevant checkboxes. Tap OK [button_ok] to confirm.
GUID GUID-5EBAE597-1B8B-43E5-95D0-C1C8ABC27F9C
Title To add a writing language to the on-screen keyboard or the Phonepad
Changes for Nicki SS; change a label only; no text change
Version 13.1.1
Author Gan Lu
Status Draft
Text input settings
When entering text using the on-screen keyboard or the Phonepad, you can access a
text input settings menu that helps you set options for text prediction, automatic
spacing and quick fixes. For example, you can decide how word options are
presented and how words get corrected as you type. You can also set the text input
application to remember new words that you write.
GUID GUID-2FCD6D60-C03C-4055-90C7-97DC630B64B0
Title Text input settings
Changes Device term change
Version 5
Author Gan Lu
Status Released
To change the text input settings
1
When you enter text using the on-screen keyboard or the Phonepad, tap ID:
ICN-SONY-TEXTINPUT-NUMBERS-SYMBOLS or ID: ICN-SONYTEXTINPUT-NUMBERS-HORIZONTAL.
2
Tap ID: ICN-SONY-MENU-SETTINGS, then tap Keyboard settings [textin-
put_strings_input_options_menu_item_personalize] > Text input settings [textinput_strings_settings_quick_text]
and select the relevant settings.
GUID
Title To change text input settings
Changes for Hayabusa; add an icon on step 2
Version 5
Author Gan Lu
Status Released*
GUID-B505E8A0-AD82-4568-90AD-EC857B2CCDB0
Entering text using voice input
Indexterm: "voice input"
Indexterm: "voice recognition"
When you enter text, you can use the voice input function instead of typing the
words. Just speak the words that you want to enter. Voice input is an experimental
technology from Google™, and is available for a number of languages and regions.
GUID
Title Entering text using voice input
Changes for Taoshan; remove the note
Version 2
Author Gan Lu
Status Released
GUID-3948A877-17B6-4759-9BFC-0EFCA283BC8B
47
This is an Internet version of this publication. © Print only for private use.

This is a draft publication for internal use only.
To enable voice input
1
When you enter text using the on-screen keyboard or the Phonepad, tap ID:
ICN-SONY-TEXTINPUT-NUMBERS-SYMBOLS or ID: ICN-SONYTEXTINPUT-NUMBERS-HORIZONTAL .
2
Tap ID: ICN-SONY-MENU-SETTINGS , then tap Keyboard settings [textin-
put_strings_input_options_menu_item_personalize] .
3
Mark the Google voice typing key [textinput_strings_settings_voice_input_start_from_keyboard]
checkbox.
4
Press
ID: ICN-SONY-KEY-AND-BACK to save your settings. A microphone
icon ID: ICN-SONY-VOICE-INPUT-MIC-ONLY appears on your on-screen
keyboard or Phonepad.
GUID GUID-60824615-DA86-4535-89BA-E47AAEC235A1
Title To enable voice input
Changes update for FAQs: add a conditon for icon; no other changes;
Version 3.1.1
Author Vera Qu
Status Released
To enter text using voice input
1
Open the on-screen keyboard or the Phonepad.
2
ID: ICN-SONY-VOICE-INPUT-MIC-ONLY is available, tap it. If not, touch
If
and hold the input language key, for example, ID: ICN-SONY-VOICE-INPUTLANG-MIC.
3
When ID: ICN-SONY-VOICE-INPUT-MIC-CIRCLE appears, speak to enter
text. When you're finished, tap ID: ICN-SONY-VOICE-INPUT-MIC-CIRCLE
again. The suggested text appears.
4
Edit the text manually if necessary.
GUID
Title To enter text using voice input
Changes for Taoshan; remove step 1
Version 5
Author Gan Lu
Status Released*
GUID-4D762661-CFA9-4D74-9134-B58D18FEECFC
Customising your device
You can adjust several device settings to suit your own needs. For example, you can
change the language, add a personal ringtone, or change the screen brightness.
GUID
Title Customising your phone
Changes Device Term Change
Version 2
Author LisaY
Status Released*
Adjusting the volume
Indexterm: "volume"
Sub-indexterm: "key"
Indexterm: "silent mode"
You can adjust the ringtone volume for incoming calls and notifications as well as for
music and video playback.
GUID
Title Adjusting the volume
Changes Device Term Change from Odin
Version 2
Author LisaY
Status Released*
To adjust the ring volume with the volume key
•
Press the volume key up or down.
GUID
Title To adjust the ring volume with the volume key
Changes Valid for Robyn & Mimmi. Valid for eDream 3.0.
Version 2
GUID-D9CF5557-AC85-4B4C-BEF7-A7B1BF31128F
GUID-96B4FB24-5A76-42F9-9F7C-3804DF486237
GUID-56F76480-7BEC-4AEA-A7A0-D5C62695A7F4
48
This is an Internet version of this publication. © Print only for private use.

This is a draft publication for internal use only.
Author KomalL
Status Released
To adjust the media playing volume with the volume key
•
When playing music or watching video, press the volume key up or down.
GUID GUID-B0DBCBEE-A5CE-42D1-A138-9B6E57FA84B9
Title To adjust the media playing volume with the volume keys
Changes Valid for Android Rachael. Valid for eDream 3.0.
Version 1
Author SophieJ
Status Released
Adjusting the sound settings
You can adjust several sound settings. For example, you can set your device to silent
mode so that it doesn't ring when you're in a meeting.
GUID GUID-F97936DD-6D15-45A6-B517-7635755366D5
Title Adjusting the sound settings
Changes Device Term Change
Version 2
Author LisaY
Status Released*
To set your device to vibrate mode
•
Press the volume key down until ID: ICN-SONY-STATUSBAR-VIBRATE-ON
appears in the status bar.
You can also press and hold down the power key
and then tap ID: ICN-SONY-STATUSBAR-VIBRATE-ON in the menu that opens to set your
device to vibrate mode.
GUID GUID-3030B405-90E5-45F2-A0F7-30F1B3C9937D
Title To set the phone to vibrate mode
Changes Device Term Change and steps change for Odin
Version 3
Author LisaY
Status Released
ID: ICN-SONY-KEY-AND-POWER-K90
To set your device to silent mode
1
Press the volume key down until the device vibrates and
ID: ICN-SONY-
STATUSBAR-VIBRATE-ON appears in the status bar.
2
Press the volume key down again. ID: ICN-SONY-ICS-SOUND-SILENCT
appears in the status bar.
You can also press and hold down the power key
and then tap ID: ICN-SONY-ICS-SOUND-SILENCT in the menu that opens to set your
device to silent mode.
GUID GUID-DFB6F5BB-15B2-49A2-B023-828A4852DD0A
Title To set the phone to silent and vibrating mode
Changes steps change for huashan
Version 11
Author LisaY
Status Released*
ID: ICN-SONY-KEY-AND-POWER-K90
To set your device to vibrate and ring mode
1
From your Home screen [homescreen_strings_application_name_txt] , tap ID: ICN-SONYHOME-APPTRAY-NORMAL.
2
Find and tap Settings [settings_label_launcher] > Sound [sound_settings] .
3
Mark the Vibrate when ringing [vibrate_when_ringing_title] checkbox.
GUID
Title To set the phone to vibrate and ring mode
Changes Device Term Change and one label name change
Version 2
Author LisaY
Status Released
GUID-238E06D2-6988-439A-8711-90ED73016194
49
This is an Internet version of this publication. © Print only for private use.

This is a draft publication for internal use only.
Time and date
Indexterm: "time"
Indexterm: "date"
Sub-indexterm: "format"
You can change the time and date on your device.
GUID GUID-D9FE3D48-1528-4315-BFF7-BFB227CAB4C0
Title Time and date
Changes Device Term Change
Version 2
Author LisaY
Status Released
To set the date manually
1
From the Home screen [homescreen_strings_application_name_txt] , tap ID: ICN-SONYHOME-APPTRAY-NORMAL .
2
Find and tap Settings [settings_label_launcher] > Date & time [date_and_time_settings_title] .
3
Unmark the Automatic date & time [date_time_auto] checkbox, if it is marked.
4
Tap Set date [date_time_set_date] .
5
Adjust the date by scrolling up and down.
6
Tap Done [date_time_done] .
GUID GUID-813CD57B-7A26-4E14-BBED-243BEC6F048F
Title To set the date manually
Changes only one label changed for Odin
Version 9
Author LisaY
Status Released*
To set the time manually
1
From your Home screen [homescreen_strings_application_name_txt] , tap ID: ICN-SONYHOME-APPTRAY-NORMAL .
2
Find and tap Settings [settings_label_launcher] > Date & time [date_and_time_settings_title] .
3
Unmark the Automatic date & time [date_time_auto] checkbox if it is marked.
4
Tap Set time [date_time_set_time] .
5
Scroll up or down to adjust the hour and minute.
6
If applicable, scroll up to change am [udoc_trans_set_time_am ] to pm [udoc_trans_set_time_pm ] ,
or vice versa.
7
Tap Done [date_time_done] .
GUID
Title To set the time manually
Changes only one label changed for Odin
Version 13
Author LisaY
Status Released*
GUID-E9572FB8-BB60-4430-84D8-3F19D899681E
To set the time zone
1
From your Home screen [homescreen_strings_application_name_txt] , tap
ID: ICN-SONY-
HOME-APPTRAY-NORMAL.
2
Find and tap Settings [settings_label_launcher] > Date & time [date_and_time_settings_title] .
3
Unmark the Automatic time zone [zone_auto] checkbox, if it is marked.
4
Tap Select time zone [date_time_set_timezone] .
5
Select an option.
GUID
Title To set the time zone
Changes ICS update
Version 5
Author Xiaxin Li
Status Released*
GUID-0C804200-55DD-4779-BB20-7445141EC74C
Ringtone settings
Indexterm: "notification"
Sub-indexterm: "ringtone"
Indexterm: "vibration"
GUID
This is an Internet version of this publication. © Print only for private use.
GUID-36AE80F9-AAA9-408B-A8AE-5E58014B7377
50

This is a draft publication for internal use only.
Title Ringtone settings - heading
Changes Valid for Robyn & Mimmi. Valid for eDream 3.0
Version 2
Author KomalL
Status Released
To set a ringtone
1
From your Home screen [homescreen_strings_application_name_txt] , tap ID: ICN-SONYHOME-APPTRAY-NORMAL.
2
Find and tap Settings [settings_label_launcher] > Sound [sound_settings] > Phone ringtone [ring-
tone_title] .
3
Select a ringtone.
4
Tap Done [gui_done_txt] .
GUID GUID-2EB51A75-25CA-45E2-8D75-C0A2C484EC07
Title To set a phone ringtone
Changes Device Term Change
Version 9
Author LisaY
Status Released
To enable touch tones
1
From your Home screen [homescreen_strings_application_name_txt] , tap
ID: ICN-SONY-
HOME-APPTRAY-NORMAL.
2
Find and tap Settings [settings_label_launcher] > Sound [sound_settings] .
3
Mark the Dial pad touch tones [dtmf_tone_enable_title] and Touch sounds [sound_effects_ena-
ble_title] checkboxes.
GUID
Title To enable touch tones
Changes update the label Sound
Version 7
Author Xiaxin Li
Status Released*
GUID-8D4FF0B8-3A81-46F0-AE74-031B501F394E
To select the notification sound
1
From your Home screen [homescreen_strings_application_name_txt] , tap ID: ICN-SONYHOME-APPTRAY-NORMAL.
2
Find and tap Settings [settings_label_launcher] > Sound [sound_settings] > Default notification
[notification_sound_title] .
3
Select the sound to be played when notifications arrive.
4
Tap Done [gui_done_txt] .
GUID
Title To select a notification ringtone
Changes for Odin Yuga titile updated according to label changed to "Notification
Version 10
Author LisaY
Status Released*
GUID-2DC47BDA-6F13-480C-A3C6-10F11ADDE021
sound"
Screen settings
Indexterm: "brightness"
Indexterm: "screen"
GUID
Title Screen settings - heading
Changes Valid for Robyn. Valid for eDream 3.0. Changed index marker
Version 2
Author KomalL
Status Released
To adjust the screen brightness
Indexterm: "LCD backlight control"
GUID-EF960369-662D-46B3-9190-3ACD92FFE448
51
This is an Internet version of this publication. © Print only for private use.

This is a draft publication for internal use only.
Indexterm: "brightness"
1
From your Home screen [homescreen_strings_application_name_txt] , tap ID: ICN-SONYHOME-APPTRAY-NORMAL.
2
Find and tap Settings [settings_label_launcher] > Display [display_settings_title] > Brightness [bright-
ness] .
3
Drag the slider to adjust the brightness.
4
Tap OK [ok] .
The brightness level affects your battery performance. For tips on how to improve battery
performance, see Improving battery performance.
GUID GUID-6B929979-C7E3-45FB-85E0-C4A4BB05388A
Title To adjust the screen brightness
Changes for Odin Yuga Xperia Care removing the cross reference only no other text
Version 8.1.1
Author LisaY
Status Released
change
To set the screen to vibrate
1
From your Home screen [homescreen_strings_application_name_txt] , tap
ID: ICN-SONY-
HOME-APPTRAY-NORMAL.
2
Find and tap Settings [settings_label_launcher] > Sound [sound_settings] .
3
Mark the Vibrate on touch [haptic_feedback_enable_title] checkbox. The screen now
vibrates when you tap soft keys and certain applications.
GUID
Title To set the screen to vibrate
Changes update the label Sound
Version 5
Author Xiaxin Li
Status Released
GUID-C6A8795B-B37A-4FD6-8AE9-1CE841DFA98E
To adjust the idle time before the screen turns off
1
From your Home screen [homescreen_strings_application_name_txt] , tap ID: ICN-SONYHOME-APPTRAY-NORMAL.
2
Find and tap Settings [settings_label_launcher] > Display [display_settings_title] > Sleep [screen_time-
out] .
3
Select an option.
To turn off the screen quickly, briefly press the power key
ID: ICN-SONY-KEY-AND-
POWER-K90.
GUID GUID-76BAB77B-B3AF-421C-8D41-F7F3D7CEBFA6
Title To adjust the idle time before the screen turns off
Changes ICS update
Version 6
Author Xiaxin Li
Status Released
Language settings
Indexterm: "language"
You can select a default language for your device and change it again at a later time.
GUID
Title Phone language
Changes Device Term Change
Version 2
Author LisaY
Status Released
GUID-E1D54EB1-8E02-4EA8-B64D-F1D56D4EF18B
52
This is an Internet version of this publication. © Print only for private use.

This is a draft publication for internal use only.
To change the language
1
From the Home screen [homescreen_strings_application_name_txt] , tap ID: ICN-SONYHOME-APPTRAY-NORMAL.
2
Find and tap Settings [settings_label_launcher] > Language & input [language_settings] >
Language [language_picker_title] .
3
Select an option.
4
Tap OK [button_ok] .
If you select the wrong language and cannot read the menu texts, find and tap ID: ICNSONY-APP-SETTINGS. Then select the text beside ID: ICN-SONY-SETTINGS-LANGUAGE
and select the first entry in the menu that opens. You can then select the language you want.
GUID GUID-78FDB03D-5A9A-4DD3-B1EB-554524E573A7
Title To change the phone language
Changes Device Term Change
Version 11
Author LisaY
Status Released
Airplane mode
Indexterm: "Airplane mode"
Indexterm: "Flight mode - See Airplane mode"
In Airplane mode, the network and radio transceivers are turned off to prevent
disturbance to sensitive equipment. However, you can still play games, listen to
music, watch videos and other content, as long as all this content is saved on your
memory card or internal storage. You can also be notified by alarms, if alarms are
activated.
Turning on Airplane mode reduces battery consumption.
GUID GUID-4592770A-6B42-477E-9A27-8326386B4FC0
Title Airplane mode
Changes Device Term Change
Version 5
Author LisaY
Status Released
To turn on Airplane mode
1
From your Home screen [homescreen_strings_application_name_txt] , tap
ID: ICN-SONY-
HOME-APPTRAY-NORMAL .
2
Find and tap Settings [settings_label_launcher] > More… [radio_controls_title] .
3
Mark the Airplane mode [airplane_mode] checkbox.
You can also press and hold down the power key
and then select Airplane mode [airplane_mode] in the menu that opens.
GUID GUID-0D75D33F-E108-41F8-B61A-F27882DA3E55
Title To turn on Flight mode
Changes Device Term Change and rewrite the tip to avoid using the "phone options"
label
Version 10
Author LisaY
Status Released
ID: ICN-SONY-KEY-AND-POWER-K90
Enhancing the sound output
You can enhance the sound output that comes from the speakers in your device
using features such as Clear Phase™ and xLOUD™ technology.
GUID
Title Enhancing the sound quality
Changes
Version 1
Author LisaY
Status Released
GUID-91BE04C9-56A8-4A40-A15A-348947A469C8
53
This is an Internet version of this publication. © Print only for private use.

This is a draft publication for internal use only.
Using Clear Phase™ technology
Use Clear Phase™ technology from Sony to automatically adjust the sound quality
coming from your device's internal speakers and get a cleaner, more natural sound.
GUID GUID-48A17031-9A20-4C8C-9A02-0ACA60316D37
Title Using Clear Phase™ technology
Changes
Version 1
Author LisaY
Status Released
To enhance the speaker sound quality using Clear Phase™
1
From your Home screen [homescreen_strings_application_name_txt] , tap
HOME-APPTRAY-NORMAL.
2
Find and tap Settings [settings_label_launcher] > Sound [sound_settings] .
3
Mark the Clear Phase™ [udoc_no_trans_clear_phase] checkbox.
The activation of the Clear Phase™ feature has no effect on voice communication
applications.
GUID GUID-DA49322A-6A65-4A9F-BCD3-C4E5F450AEDF
Title To enhance the sound quality of the speaker using Clear Phase™
Changes remove "For example... voice call" in the tip for pollux windy
Version 3
Author LisaY
Status Released
ID: ICN-SONY-
Using xLOUD™ technology
Use xLOUD™ audio filter technology from Sony to enhance the speaker volume
without sacrificing quality. Get a more dynamic sound as you listen to your favourite
songs.
GUID
Title Using xLOUD™ technology
Changes
Version 1
Author LisaY
Status Released
To enhance the speaker volume using xLOUD™
1
From your Home screen [homescreen_strings_application_name_txt] , tap ID: ICN-SONYHOME-APPTRAY-NORMAL.
2
Find and tap Settings [settings_label_launcher] > Sound [sound_settings] .
3
Mark the xLOUD™ [XLOUD] checkbox.
The activation of the xLOUD™ feature has no effect on voice communication applications.
GUID GUID-DADE3E84-AFBD-453C-A218-747C2077F534
Title To enhance the speaker loudness using xLOUD™
Changes remove "For example... voice call" in the tip for pollux windy
Version 5
Author LisaY
Status Released
GUID-9BE06EDA-D4B0-41CC-9562-D89EBDDA4B01
Memory
You can save content to your device's internal storage and to a memory card.
GUID
Title Memory
Changes From Odin and Yuga: remove application memory; only keep internal memo-
Version 6
Author WangT
Status Released
This is an Internet version of this publication. © Print only for private use.
GUID-22B2F18B-DFF0-4F4E-9917-D71E95288CE9
ry and memory card
54

This is a draft publication for internal use only.
Memory card
Your device supports a microSD™ memory card, which is used for storing content.
This type of card can also be used as a portable memory card with other compatible
devices.
You may have to purchase a memory card separately.
GUID GUID-82618BF1-CEB4-4D17-9849-F6DC73B15314
Title Memory card
Changes For Odin and Yuga: remove the note
Version 5
Author WangT
Status Released
Formatting the memory card
You can format the memory card in your device, for example, to free up memory.
This means that you erase all data on the card.
All content on the memory card gets erased when you format it. Make sure you make backups
of everything you want to save before formatting the memory card. To back up your content,
you can copy it to your computer. For more information, refer to the chapter Connecting your
device to a computer on page 186.
GUID GUID-27E17DFC-86F3-4FAE-AC9E-3C1E0009971A
Title Formatting the memory card
Changes Created only for termchange
Version 3
Author CynthiaH
Status Released
Using a headset
Indexterm: "headset"
Indexterm: "music"
ID: ILL-SONY-13NY-HEADPHONES
Use the accessories provided with your device, or other compatible accessories, for optimal
performance.
GUID GUID-2815B6DC-4B35-4D59-AB4C-5200E6AFD31C
Title Stereo portable handsfree
Changes Created for termchange only
Version 6
Author WangT
Status Released
To use a headset
Indexterm: "headset"
Sub-indexterm: "using"
Indexterm: "music"
55
This is an Internet version of this publication. © Print only for private use.

This is a draft publication for internal use only.
Sub-indexterm: "using a headset"
1
Connect the headset to your device.
2
To answer a call, press the call handling key.
3
To end the call, press the call handling key.
If a headset is not included with the device, you may purchase one separately.
If you are listening to music, the music stops when you answer a call and resumes after you
end the call.
GUID GUID-804D9F4A-FDEA-40BE-BC7D-C6C3CE8DF02B
Title To use a handsfree
Changes Created for termchange only
Version 6
Author CynthiaH
Status Released
Internet and messaging settings
Indexterm: "Internet"
Sub-indexterm: "settings"
Indexterm: "settings"
Sub-indexterm: "Internet"
Indexterm: "settings"
Sub-indexterm: "messaging"
Sub-indexterm: "MMS"
Indexterm: "messages"
Sub-indexterm: "settings"
Indexterm: "Multimedia Messaging Service (MMS)"
Sub-indexterm: "settings"
Indexterm: "download"
Sub-indexterm: "Internet settings"
To send text and multimedia messages and to access the Internet, you must have a
mobile data connection and the correct settings. There are different ways to get
these settings:
•
For most mobile networks and operators, Internet and messaging settings come
preinstalled on your device. You can then start using the Internet and send messages
right away.
•
In some cases you will get the option to download Internet and messaging settings
the first time you turn on your device. It is also possible to download these settings
later from the Settings [settings_label_launcher] menu.
•
You can manually add and change Internet and network settings on your device at
any time. Contact your network operator for detailed information about Internet and
messaging settings.
GUID
Title Internet and messaging settings
Changes Update for Term change from phone to device
Version 7
Author PanL
Status Released
GUID-E108490D-17EF-4989-95D0-DB1F6F93AD07
To download Internet and messaging settings
1
From your Home screen [homescreen_strings_application_name_txt] , tap
ID: ICN-SONY-
HOME-APPTRAY-NORMAL.
2
Find and tap Settings [settings_label_launcher] > Xperia™ [sonyericsson_settings_title] > Internet
settings [r2r_settings_download_title_txt] .
3
Tap Accept [r2r_strings_cost_button_accept_txt] .
GUID
Title To download Internet and messaging settings
Changes added the last step based on v5 for Odin and Yuga
Version 8
Author MikeCao
Status Released
GUID-86823E16-0E31-4A88-AD3F-6BAFB84C490E
56
This is an Internet version of this publication. © Print only for private use.

This is a draft publication for internal use only.
To reset the default Internet settings
1
From the Home screen [homescreen_strings_application_name_txt] , tap ID: ICN-SONYHOME-APPTRAY-NORMAL.
2
Tap Settings [settings_label_launcher] > More… [radio_controls_title] > Mobile networks [network_set-
tings_title] > Access Point Names [ph_apn_settings] .
3
Tap ID: ICN-SONY-KEY-MENU.
4
Tap Reset to default [menu_restore] .
GUID GUID-C806ACFF-830E-4A1B-8232-CA132C88AE40
Title To reset to the default Internet settings
Changes only changed the word press to tap for OdinYuga
Version 7
Author MikeCao
Status Released
Access Point Names (APNs)
An APN is used to establish data connections between your device and the Internet.
The APN defines which type of IP address to use, which security methods to invoke,
and which fixed-end connections to use. Checking the APN is useful when you
cannot access the Internet, have no data connection, or cannot send or receive
multimedia messages.
GUID GUID-31CA14E0-F62F-48B1-AC9C-5E907E30A153
Title Access Point Names (APNs)
Changes Update for Term Change phone to device
Version 2
Author PanL
Status Released
To view the current APN
1
From your Home screen [homescreen_strings_application_name_txt] , tap ID: ICN-SONYHOME-APPTRAY-NORMAL.
2
Find and tap Settings [settings_label_launcher] > More… [radio_controls_title] > Mobile networks
[network_settings_title] .
3
Tap Access Point Names [apn_settings] .
If you have several available connections, the active network connection is indicated by a
marked button.
GUID GUID-D3CA1D1D-9D77-409E-B090-A9F34E50E7C4
Title To view the current Access Point Name (APN)
Changes From Mesona; only update the heading to use the acronym because a con-
Version 6
Author Tan Nellie
Status Released
cept topic about APN is added.
To add Internet settings manually
1
From the Home screen [homescreen_strings_application_name_txt] , tap ID: ICN-SONYHOME-APPTRAY-NORMAL .
2
Find and tap Settings [settings_label_launcher] > More… [radio_controls_title] > Mobile networks
[network_settings_title] > Access Point Names [apn_settings] .
3
Tap ID: ICN-SONY-KEY-MENU .
4
Tap New APN [menu_new] .
5
Tap Name [apn_name] and enter the name of the network profile that you want to
create.
6
Tap APN [apn_apn] and enter the access point name.
7
Enter all other information required by your network operator.
8
GUID
Title To configure Internet settings manually
Changes removed an icon based on v9 for Odin and Yuga
Version 12
Author MikeCao
Status Released
ID: ICN-SONY-KEY-MENU , then tap Save [menu_save] .
Tap
GUID-32B23CC9-D90A-4769-AC96-E84045CC67B5
57
This is an Internet version of this publication. © Print only for private use.

This is a draft publication for internal use only.
Controlling data usage
Indexterm: "settings"
Sub-indexterm: "data usage"
Indexterm: "data traffic"
Keep track of and control the amount of data transferred to and from your device
during a given period. For example, you can set data usage warnings and limits for
your device to avoid additional charges. You can also limit the amount of data used
by individual applications.
Adjusting data usage settings can help you keep greater control over data usage but cannot
guarantee the prevention of additional charges.
GUID GUID-C0566A1E-7656-4AA0-83CF-B16974F69C4C
Title Optimising data usage
Changes Update for Term change from phone to device
Version 3
Author PanL
Status Released
To access data usage settings
1
From your Home screen [homescreen_strings_application_name_txt] , tap ID: ICN-SONYHOME-APPTRAY-NORMAL.
2
Find and tap Settings [settings_label_launcher] > Data usage [account_settings_data_usage] .
GUID GUID-4AA02A5A-A8F4-4BD6-B3B2-4065096178D2
Title To access data usage settings
Changes For Tapioca; For newly added data usage feature
Version 1
Author Tan Nellie
Status Released
To turn data traffic on or off
1
From your Home screen [homescreen_strings_application_name_txt] , tap ID: ICN-SONYHOME-APPTRAY-NORMAL.
2
Find and tap Settings [settings_label_launcher] > Data usage [account_settings_data_usage] .
3
To turn data traffic on or off, tap the on-off switch beside Mobile data [data_us-
age_enable_mobile] accordingly.
You can also turn data traffic on or off by marking or unmarking the Mobile data traffic [data_en-
abled] checkbox under Settings [settings_label_launcher] > More… [radio_controls_title] > Mobile networks [network_settings_title] .
GUID GUID-AF0FB16B-F83D-452C-B097-C0BB9FC06865
Title To enable mobile data
Changes Nypon JB TRS update from version 2 (note added with a condition for UG
Version 3
Author Aiping
Status Released
use only)
To set a data usage warning
1
Make sure that you have turned on data traffic.
2
From your Home screen [homescreen_strings_application_name_txt] , tap ID: ICN-SONYHOME-APPTRAY-NORMAL.
3
Find and tap Settings [settings_label_launcher] > Data usage [account_settings_data_usage] .
4
To set the warning level, drag the lines to the desired values. You receive a
warning notification when the amount of data traffic approaches the level you
set.
GUID
Title To set a level for data usage warning
Changes For Tapioca; for the newly added data usage feature.
Version 1
Author Tan Nellie
Status Released
GUID-E984931A-1304-4ADC-93A5-1CA4FAB17CBE
58
This is an Internet version of this publication. © Print only for private use.

This is a draft publication for internal use only.
To set a data usage limit
1
Make sure that you have turned on data traffic.
2
From your Home screen [homescreen_strings_application_name_txt] , tap ID: ICN-SONYHOME-APPTRAY-NORMAL.
3
Find and tap Settings [settings_label_launcher] > Data usage [account_settings_data_usage] .
4
Mark the Set mobile data limit [data_usage_disable_mobile_limit] checkbox if it is not
marked, then tap OK [button_ok] .
5
To set the data usage limit, drag the lines to the desired values.
Once your data usage reaches the set limit, data traffic on your device will be turned off
automatically.
GUID GUID-387685B1-AC66-41E5-91FD-BAB3268E5AAF
Title To set data usage limit
Changes Update for Term change from phone to device
Version 2
Author PanL
Status Released
To control the data usage of individual applications
1
From your Home screen [homescreen_strings_application_name_txt] , tap
ID: ICN-SONY-
HOME-APPTRAY-NORMAL.
2
Find and tap Settings [settings_label_launcher] > Data usage [account_settings_data_usage] .
3
Find and tap the desired application.
4
Mark the Restrict background data [data_usage_app_restrict_background] checkbox.
5
To access more specific settings for the application, tap View app settings [da-
ta_usage_app_settings] and make the desired changes.
Specific settings for an application may not always be accessible.
The performance of individual applications may be affected if you change the related data
usage settings.
GUID GUID-16A3F307-2E86-443A-A431-7F192F049F2D
Title To change data usage settings by application
Changes removed description about changing the "data usage limit" or "restrict all da-
Version 2
Author MikeCao
Status Released
ta traffic" from Taoshan
Mobile network settings
Your device automatically switches between mobile networks depending on what
mobile networks are available in different areas. You can also manually set your
device to use a particular mobile network mode, for example, WCDMA or GSM.
GUID
Title Network settings
Changes Update for Term change from phone to device
Version 6
Author PanL
Status Released*
To select a network type
1
From your Home screen [homescreen_strings_application_name_txt] , tap ID: ICN-SONYHOME-APPTRAY-NORMAL.
2
Find and tap Settings [settings_label_launcher] > More… [radio_controls_title] > Mobile networks
[network_settings_title] .
3
Tap Network Mode [preferred_network_mode_title] .
4
Select a network type.
GUID
Title To select network mode
Changes For Tapioca DSDS; text changed; change the function-related description in
Version 3.1.1
GUID-03604570-8FDB-4743-A698-1DD36415FCED
GUID-D26F6D09-E741-4272-A36B-876F5D93772A
the note
59
This is an Internet version of this publication. © Print only for private use.
This is a draft publication for internal use only.
Author Tan Nellie
Status Released
To select another network manually
1
From the Home screen [homescreen_strings_application_name_txt] , tap ID: ICN-SONYHOME-APPTRAY-NORMAL.
2
Find and tap Settings [settings_label_launcher] > More… [radio_controls_title] > Mobile networks
[network_settings_title] > Service providers [networks] .
3
Tap Search mode [clh_settings_search_mode] > Manual [clh_settings_manual_selection] .
4
Select a network.
If you select a network manually, your device will not search for other networks, even if you
move out of range of the manually selected network.
GUID GUID-D7ED045F-09E8-437A-B0FA-7F20B36A7B9E
Title To select another network manually
Changes Update for Term change from phone to device
Version 10
Author PanL
Status Released
To activate automatic network selection
1
From the Home screen [homescreen_strings_application_name_txt] , tap ID: ICN-SONYHOME-APPTRAY-NORMAL.
2
Find and tap Settings [settings_label_launcher] > More… [radio_controls_title] > Mobile networks
[network_settings_title] > Service providers [networks] .
3
Tap Search mode [clh_settings_search_mode] > Automatic [select_automatically] .
GUID
Title To activate automatic network selection
Changes From Togari; no text changed; only merge the last two step into one step.
Version 7
Author Tan Nellie
Status Draft
GUID-9A348BA0-79C7-43D2-B4D1-CD1673E55076
Turning off data traffic
You can disable all data connections over mobile networks to avoid any unwanted
data downloads and synchronisations. Contact your network operator if you need
detailed information about your subscription plan and data traffic charges.
When data traffic is turned off, you can still use Wi-Fi® and Bluetooth™ connections. You can
also send and receive multimedia messages.
GUID GUID-742544F3-883A-46CC-AEB8-A348267E78B6
Title Turning off data traffic
Changes Update for Term change from phone to device
Version 6
Author PanL
Status Released
To turn off all data traffic
1
From your Home screen [homescreen_strings_application_name_txt] , tap ID: ICN-SONYHOME-APPTRAY-NORMAL.
2
Find and tap Settings [settings_label_launcher] > More… [radio_controls_title] > Mobile networks
[network_settings_title] .
3
Unmark the Mobile data traffic [data_enabled] checkbox.
GUID
Title To turn off all data traffic
Changes Label changed
Version 5
Author PengLeon
Status Released
GUID-CC611F89-1392-4026-8612-ED7FF9CE6536
60
This is an Internet version of this publication. © Print only for private use.

This is a draft publication for internal use only.
Data roaming
Some network operators allow mobile data connections via mobile networks when
you are outside of your home network (roaming). Note that data transmission charges
may apply. Contact your network operator for more information.
Applications may sometimes use the Internet connection in your home network without any
notification, for example, when sending search and synchronisation requests. Additional
charges may apply when such Internet connections are established while you are roaming.
Consult your network operator for more information.
GUID GUID-73201F09-74A4-4501-8A3D-A733BDC1C923
Title Data roaming
Changes Update from Tsubasa Gina LTE network description is rewritten
Version 5
Author PanL
Status Released
To activate data roaming
1
From the Home screen [homescreen_strings_application_name_txt] , tap
HOME-APPTRAY-NORMAL .
2
Find and tap Settings [settings_label_launcher] > More… [radio_controls_title] > Mobile networks
[network_settings_title] .
3
Mark the Data roaming [roaming] checkbox.
ID: ICN-SONY-
You can’t activate data roaming when data connections have been deactivated.
GUID GUID-C60097AE-0FB1-41C4-B18F-1FA5C7A7B8CC
Title To activate data roaming
Changes Add conditions for FAQ
Version 7
Author Vera Qu
Status Released
61
This is an Internet version of this publication. © Print only for private use.

This is a draft publication for internal use only.
Google Play™
GUID GUID-C30DF276-0F47-43A3-98AB-5696A071AD32
Title Google Play - heading only
Changes
Version 1
Author JorgenL
Status Released
Getting started with Google Play™
Open Google Play™ and enter a world of applications and games. You can browse
these applications and games through different categories. You can also rate an
application or game and send feedback on it.
To use Google Play™, you need to have a Google™ account. See To set up a
Google™ account in your phone on page 96.
Google Play™ may not be available in all countries or regions
GUID GUID-948C2660-2BA8-4007-BE93-4192F4B8B60A
Title Getting started with Google Play™
Changes Valid for Tapioca Phoenix eDream 6.0 Aoba ROW Nozomi ICS and onwards
Version 9
Author WangHerman
Status Released
Label updated and plain text Android Market changed to Google Play only
No text change and no need review
To open Google Play™
Indexterm: "Android Market™ - See Google Play™"
Indexterm: "Google Play™"
1
From the Home screen [homescreen_strings_application_name_txt] , tap ID: ICN-SONYHOME-APPTRAY-NORMAL.
2
Find and tap Play Store [android-market-market] .
GUID
Title To open Google Play
Changes Valid for Tapioca Phoenix eDream 6.0 Aoba ROW 6 Nozomi ICS and on-
Version 7
Author WangHerman
Status Released
GUID-A6466E9C-56BD-433F-BFEC-33CBCD2B6725
wards Index updated only No need review
Downloading from Google Play™
You can download all kinds of applications from Google Play™, including free
applications.
GUID
Title Downloading from Android™ Market
Changes Valid for Tapioca Phoenix eDream 6.0 Aoba ROW 6.0 STE Nypon Kumquat
Version 5
Author WangHerman
Status Released
GUID-49F15983-B569-4F3D-925B-068E32B35056
Pepper Nozomi ICS and onwards Plain text Android Market changed to Play
Shop only No text change and no need review
Before you download applications
Before you start downloading from Google Play™, make sure that you have a
working Internet connection.
Also, remember that you might incur data traffic charges when you download content
to your phone. Contact your operator for more information.
GUID
Title Before you download applications
This is an Internet version of this publication. © Print only for private use.
GUID-03BC5C4C-F4A2-43E2-841B-112DBE3EE81B
62

This is a draft publication for internal use only.
Changes Valid for Tapioca Phoenix eDream 6.0 Aoba ROW Nozomi ICS and onwards
Version 2
Author WangHerman
Status Released*
Plain text Android Market changed to Google Play only No text change and
no need review
To download a free application
1
In Google Play™, find an item you wish to download by browsing categories,
or by using the search function.
2
Tap the item to view its details, and follow the instructions to complete the
installation.
3
If the application you want to download requires access to your data or control
of any functions on your phone, an additional screen appears with details.
Read this screen carefully because the functionality of your phone may be
seriously affected if you proceed. Tap OK [ph_ok] if you agree, or Cancel [cancel] if
you wish to cancel the download.
GUID GUID-7F1229FC-3D9E-4AD7-B551-601E0A4FA6D0
Title To download a free application
Changes Valid for Tapioca Phoenix eDream 6.0 Aoba ROW Nozomi ICS and onwards
Version 5
Author WangHerman
Status Released*
Plain text Android Market changed to Google Play only No text change and
no need review
To download a paid application
1
In Google Play™, find an item you wish to download by browsing categories,
or by using the search function.
2
Tap the item to view its details, and follow the instructions in your phone to
complete your purchase.
3
If the application you want to download requires access to your data or control
of any functions on your phone, an additional screen appears with details.
Read this screen carefully because the functionality of your phone may be
seriously affected if you proceed. Tap OK [ph_ok] if you agree, or Cancel [cancel] if
you wish to cancel the download.
GUID
Title To download a paid application
Changes Valid for Tapioca Phoenix eDream 6.0 Aoba ROW Nozomi ICS and onwards
Version 6
Author WangHerman
Status Released*
GUID-177043C5-8E5C-422D-9FFA-F6589DA0B947
Plain text Android Market changed to Google Play only No text change and
no need review
To open a downloaded application
1
In Google Play™, press ID: ICN-SONY-KEY-MENU, then tap My Apps [android-mar-
ket-my-apps] .
2
Tap the downloaded application.
You can also access downloaded applications from the Application screen.
GUID GUID-EBFE0735-60B3-4E17-BE7F-C03345392F0F
Title To open a downloaded application
Changes Valid for Tapioca Phoenix eDream 6.0 Aoba ROW Nozomi ICS and onwards
Version 5
Author WangHerman
Status Released
Plain text Android Market changed to Google Play only No text change and
no need review
Clearing your application data
You may sometimes need to clear data for an application. This might happen if, for
example, the application memory becomes full, or you want to clear high scores for a
63
This is an Internet version of this publication. © Print only for private use.

This is a draft publication for internal use only.
game. You might also want to erase incoming email, text and multimedia messages
in some applications.
GUID GUID-EAF62666-1ACE-41A8-B75E-0BA17DE3F88D
Title Clearing your application data
Changes For Shakira and onwards
Version 1
Author AnnE
Status Released
To clear all cache for an application
1
From your Home screen [homescreen_strings_application_name_txt] , tap ID: ICN-SONYHOME-APPTRAY-NORMAL.
2
Find and tap Settings [settings_label_launcher] .
3
Tap Apps [applications_settings] .
4
Tap the application for which you want to clear all cache.
5
Tap Clear cache [clear_cache_btn_text] .
It is not possible to clear the cache for some applications.
GUID GUID-223FC104-FDE6-4850-B2BD-9B392F63ABAB
Title To clear all data for an application
Changes Valid for eDream 4.1 ICS update Urushi Ayame Haida. Step 3 "Applications"
Version 7
Author WangHerman
Status Released*
changed to "Apps" and removed "Manage applications"
To delete an installed application
1
From your Home screen [homescreen_strings_application_name_txt] , tap ID: ICN-SONYHOME-APPTRAY-NORMAL.
2
Find and tap Settings [settings_label] .
3
Tap Apps [applications_settings] .
4
Select the application that you want to delete.
5
Tap Uninstall [uninstall_text] .
It is not possible to delete some preinstalled applications.
GUID GUID-9CD7AFD4-1CA6-4816-9333-D43825F06633
Title To delete an installed application
Changes Valid for eDream 4.1 ICS update Urushi Ayame Haida. Step 3 "Applications"
Version 5
Author WangHerman
Status Released*
changed to "Apps" and removed "Manage applications"
Permissions
Some applications may need to access data, settings and various functions on your
device in order to work properly. If so, then they need the relevant permissions from
you. For example, a navigation application needs permissions to send and receive
data traffic, and access your location.
Some applications might misuse their permissions by stealing or deleting data, or by
reporting your location. Make sure you only install and give permissions to
applications you trust.
GUID
Title Permissions
Changes Updated from Togari and valid for all projects onwards Breaked the whole
Version 3
Author WangHerman
Status Draft
GUID-66ABAE3F-553A-4CC4-8ACA-88C9B976FF77
paragraph into two paragraphs according to concept team's request No text
change NO NEED REVIEW
64
This is an Internet version of this publication. © Print only for private use.

This is a draft publication for internal use only.
To view permissions of an application
1
From your Home screen [homescreen_strings_application_name_txt] , tap ID: ICN-SONYHOME-APPTRAY-NORMAL.
2
Find and tap Settings [settings_label] .
3
Tap Apps [applications_settings] .
4
Tap the desired application.
5
Scroll down to view the relevant details under Permissions [permissions_label] .
GUID GUID-5CA82138-A0F8-465B-B505-E2EDD4879535
Title To view permissions of an application
Changes Valid for eDream 4.1 ICS update Urushi Ayame Haida. Step 3 "Applications"
Version 5
Author WangHerman
Status Released
changed to "Apps" and removed "Manage applications"
Installing applications not from Google Play™
Installing applications of unknown or unreliable origin can damage your phone. By
default, your phone is set to block such installations. However, you can change this
setting and allow installations from unknown sources.
Sony does not warrant or guarantee the performance of any third-party applications or content
transferred via download or other interface to your phone. Similarly, Sony is not responsible for
any damage or reduced performance of your phone attributable to the transfer of third-party
content. Only use content from reliable sources. Contact the content provider if you have any
questions or concerns.
GUID GUID-4658ED14-9236-4B4B-80D8-EFB84089B731
Title Allowing applications from sources other than Google Play™
Changes Valid for Tapioca Phoenix eDream 6.0 Aoba ROW Nozomi ICS and onwards
Version 9
Author WangHerman
Status Released*
Plain text Android Market changed to Google Play only No text change and
no need review
To allow the installation of applications not from Google Play™
1
From your Home screen [homescreen_strings_application_name_txt] , tap ID: ICN-SONYHOME-APPTRAY-NORMAL.
2
Find and tap Settings [settings_label] > Security [security_settings_title] .
3
Mark the Unknown sources [install_applications] checkbox.
GUID
Title To allow the installation of applications from sources other than Google
Changes Valid for Tapioca Phoenix Nozomi ICS and onwards Plain text Android Mar-
Version 8
Author WangHerman
Status Released*
GUID-1931F6D3-8F6E-4208-9D9E-C78CA2753904
Play™
ket changed to Play Store only No text change and no need review
65
This is an Internet version of this publication. © Print only for private use.

This is a draft publication for internal use only.
Calling
Indexterm: "telephony - See calls"
Indexterm: "calls"
GUID GUID-71EA3573-EAE2-4B15-A2CF-DCED46EE7587
Title Calling - heading only
Changes Valid from Nypon ICS (justed remove the italics form of index terms)
Version 4
Author PengLeon
Status Released
Emergency calls
Indexterm: "calls"
Sub-indexterm: "emergency"
Indexterm: "SOS - See emergency numbers"
Indexterm: "emergency numbers"
Your device supports international emergency numbers, for example, 112 or 911.
You can normally use these numbers to make emergency calls in any country, with or
without the SIM card inserted if you are within range of a network.
GUID GUID-95D14376-6C16-4B4E-9B0D-8F78EFF123E6
Title Emergency calls
Changes Device term change
Version 6
Author PengLeon
Status Released
To make an emergency call
1
From your Home screen [homescreen_strings_application_name_txt] , tap
ID: ICN-SONY-
HOME-APPTRAY-NORMAL.
2
Find and Tap Phone [launcherDialer] .
3
Enter the emergency number and tap Call [spb_strings_dialer_call_txt] . To delete a
number, tap ID: ICN-SONY-INPUT-DELETE.
You can make emergency calls when no SIM card is inserted or when outgoing calls are
barred.
GUID GUID-1C4DC7B4-8DD8-4046-82B6-4DB57A2FBB93
Title To make an emergency call
Changes Changed "You can make emergency calls when no SIM card is inserted or all
Version 7
Author PengLeon
Status Released
outgoing calls are barred"
To make an emergency call while the SIM card is locked
1
Tap Emergency call [clh_emergency_enable_radio_dialog_title_txt] .
2
Enter the emergency number and tap Call [spb_strings_dialer_call_txt] . To delete a
number, tap ID: ICN-SONY-INPUT-DELETE.
GUID
Title To make an emergency call while the SIM card is locked
Changes Modify lable
Version 3
Author MaLijia
Status Released
GUID-D5A8FEA8-E9B6-4234-8D05-ADDA04F5BC2B
Making and receiving calls
You can make a call by manually dialling a phone number, by tapping a number
saved in your contact list, or by tapping the phone number in your call log view. You
can also use the smart dial feature to quickly find numbers from your contact list and
call logs.
66
This is an Internet version of this publication. © Print only for private use.

This is a draft publication for internal use only.
When you make a call, your device's main microphone works together with the
second microphone to suppress noise and background sound.
Do not cover the second microphone while you make a call.
GUID GUID-73E2425E-2DE6-4B9F-BC0A-F9473A8208B4
Title Call handling - heading
Changes Changed the healing only no extra text changed due to comments from con-
Version 7
Author CynthiaH
Status Draft
cept team
Contacts [contactsList] Ongoing call handling overview
ID: SCR-SONY-13TI-CALL HANDLING1
1
2 Decline a call
GUID GUID-5E4AF474-9E9F-4344-8156-2C7B64C59E0F
Title Ongoing call handling overview
Changes
Version 1
Author CynthiaH
Status Draft
Answer a call
Contacts [contactsList] Incoming call handling overview
ID: SCR-SONY-13TI-CALL HANDLING2
Mute the microphone during a call
1
2 Enter numbers during a call
3 End a call
4 Turn on the loudspeaker during a call
GUID GUID-D912EDDE-EAC1-4B36-BC45-CC568D8E32AC
Title Incoming call handling overview
Changes
Version 1
Author CynthiaH
Status Draft
67
This is an Internet version of this publication. © Print only for private use.

This is a draft publication for internal use only.
To make a call by dialling
1
From your Home screen [homescreen_strings_application_name_txt] , tap ID: ICN-SONYHOME-APPTRAY-NORMAL.
2
Find and tap Phone [launcherDialer] .
3
Enter the number of the recipient and tap Call [spb_strings_dialer_call_txt] . To delete a
number, tap ID: ICN-SONY-INPUT-DELETE.
GUID GUID-4FE375CD-48B9-4D81-8DA9-730361EE3AEC
Title To make a call
Changes For eDream 4.0
Version 6
Author PengLeon
Status Released*
To make a call using smart dial
1
From your Home screen [homescreen_strings_application_name_txt] , tap
ID: ICN-SONY-
HOME-APPTRAY-NORMAL.
2
Find and tap Phone [launcherDialer] .
3
Use the dialpad to enter letters or numbers that correspond to the contact you
want to call. As you enter each letter or number, a list of possible matches
appears.
4
Tap the contact you want to call.
GUID GUID-7A25E697-13EE-481C-89D0-229396708D57
Title To make a call using smart dial
Changes
Version 1
Author PengLeon
Status Released
To make an international call
1
From your Home screen [homescreen_strings_application_name_txt] , tap ID: ICN-SONYHOME-APPTRAY-NORMAL.
2
Find and tap Phone [launcherDialer] .
3
Touch and hold 0 until a “+” sign appears.
4
Enter the country code, area code (without the first 0) and phone number, then
tap Call [spb_strings_dialer_call_txt] .
GUID
Title To make an international call
Changes for eDream 4.0.1 (The number" 0" is changed after discussion
Version 6
Author PengLeon
Status Released
GUID-AFD0943A-BF5A-4F5D-8FF0-0A30C3B98669
To reject a second call
•
When you hear repeated beeps during a call, tap ID: ICN-SONY-CALLSLIDER-DISMISS.
GUID
Title To reject a second call
Changes Comments from TID. From Huashan,changed drag into tap also changed the
Version 4
Author CynthiaH
Status Released
GUID-20A61740-AB60-4D3D-BBF6-8191B6FEC058
icon.
To change the ear speaker volume during a call
•
Press the volume key up or down.
GUID
Title To change the ear speaker volume during a call
Changes eSheep Rachael
Version 1
Author OskarW
Status Released
GUID-E0A64910-7B0A-4319-8169-9E7E9630ED50
68
This is an Internet version of this publication. © Print only for private use.

This is a draft publication for internal use only.
To activate the screen during a call
•
Briefly press ID: ICN-SONY-KEY-AND-POWER-K90.
GUID GUID-9CB25B9D-B1B8-4A2C-B6B7-76163D97AB11
Title To activate the screen during a call
Changes Changed due to Ed comments just be more accurate
Version 4
Author CynthiaH
Status Released
To mute the ringtone for an incoming call
•
When you receive the call, press the volume key.
GUID GUID-166E8451-D0EE-4A20-8D11-A7DC0BBA7027
Title To mute the ringtone for an incoming call
Changes eSheep Rachael
Version 1
Author OskarW
Status Released*
Rejecting calls
GUID GUID-9CC9879B-B661-4EA1-A066-DA2827D97592
Title Rejecting calls
Changes Created it out due to comments from concept team
Version 1
Author CynthiaH
Status Draft
Rejecting a call with a message
Indexterm: "calls"
Sub-indexterm: "reject"
You can reject a call with a predefined message. When you reject a call with such a
message, the message is automatically sent to the caller and saved on your device.
Six messages are predefined on your device. You can select from these predefined
messages, which can also be edited if necessary.
GUID
Title Rejecting a call with a message
Changes Device term change
Version 2
Author PengLeon
Status Released
To reject a call with a predefined message
•
Drag Reject with message [call_reject_call_with_message] upward, then select a message.
GUID
Title To reject a call with a message
Changes
Version 1
Author PengLeon
Status Released
To reject a second call with a predefined message
•
When you hear repeated beeps during a call, drag Reject with message [call_re-
ject_call_with_message] upward, then select a message.
GUID
Title To reject a second call with a message
Changes
Version 2
Author PengLeon
Status Released
GUID-07BBFB8F-49E0-4484-B2DC-E4BCD9CD758F
GUID-CAB1C7B1-044E-4072-BBAF-709C1E0FD0C3
GUID-C7B2AAC2-90FE-4C43-A847-EDD862442B84
69
This is an Internet version of this publication. © Print only for private use.

This is a draft publication for internal use only.
To edit the message used to reject a call
1
From your Home screen [homescreen_strings_application_name_txt] , tap ID: ICN-SONYHOME-APPTRAY-NORMAL .
2
Find and tap Settings [settings_label_launcher] > Call settings [call_settings_title] > Reject call
with message [call_settings_reject_call_with_message] .
3
Tap the message you want to edit, then make the necessary changes.
4
When you're done, tap OK [button_ok] .
GUID GUID-BD89ACAE-CE3B-4176-9AB1-961828375848
Title To edit the message used to reject a call
Changes changed a label id no need ed review
Version 3
Author MikeCao
Status Released
Barring calls
Indexterm: "calls"
Sub-indexterm: "diverting"
Sub-indexterm: "barring"
You can bar all or certain categories of incoming and outgoing calls. When you use
call barring for the first time, you need to enter your PUK (Personal Unblocking Key)
and then a new password to activate the call barring function.
GUID GUID-B96C42F8-041D-4CA5-9C24-FAB3231F9BF6
Title Barring calls
Changes
Version 1
Author PengLeon
Status Released
To bar incoming or outgoing calls
1
From your Home screen [homescreen_strings_application_name_txt] , tap ID: ICN-SONYHOME-APPTRAY-NORMAL.
2
Find and tap Settings [settings_label_launcher] > Call settings [call_settings_title] > Call blocking
[labelCallBarring] .
3
Select an option.
4
Enter the password and tap Enable [enable] .
GUID
Title To bar incoming or outgoing calls
Changes
Version 1
Author PengLeon
Status Released*
GUID-7004AA90-417E-4304-85B9-6EB502561939
Recent calls
Indexterm: "calls"
Sub-indexterm: "log"
Sub-indexterm: "missed"
In the call log, you can view missed ID: ICN-SONY-CALL-LOG-HEADER-MISSEDCALL, received ID: ICN-SONY-CALL-LOG-HEADER-INCOMING-CALL and dialled
ID: ICN-SONY-CALL-LOG-HEADER-OUTGOING-CALL calls.
GUID
Title Recent calls
Changes Comments from TID changed an icon only for huashan
Version 3
Author CynthiaH
Status Released
GUID-40E5841D-C7A4-4B25-AC8D-3531B9D52AFC
To view your missed calls
1
When you have missed a call, ID: ICN-SONY-CALL-LOG-HEADER-MISSEDCALL appears in the status bar. Drag the status bar downwards.
2
Tap Missed call [notification_missedCallTitle] .
GUID
Title To view missed calls
GUID-590BA208-6CD8-42C2-9D38-C05755E3917B
70
This is an Internet version of this publication. © Print only for private use.

This is a draft publication for internal use only.
Changes Changed the varid for an icon only
Version 7
Author CynthiaH
Status Released
To show the call log
1
From your Home screen [homescreen_strings_application_name_txt] , tap ID: ICN-SONYHOME-APPTRAY-NORMAL.
2
Find and tap ID: ICN-SONY-APP-DIALER > ID: ICN-SONY-KEY-MENU.
3
Tap Show call log [spb_strings_show_call_log_txt] .
GUID GUID-ADDBBB5C-9B83-4C04-98D8-48FE46F95C39
Title To show the call log
Changes
Version 1
Author PengLeon
Status Released
To call a number from your call log
1
From your Home screen [homescreen_strings_application_name_txt] , tap
ID: ICN-SONY-
HOME-APPTRAY-NORMAL.
2
Find and tap Phone [launcherDialer] .The call log view appears on the upper part of
the screen.
3
To call a number directly, tap the number. To edit a number before calling,
touch and hold the number, then tap Edit number before call [recentCalls_editNumberBe-
foreCall] .
You can also call a number by tapping
BTN-NORMAL > Call back [callBack] .
GUID GUID-06B252C0-D4D0-476C-ABA4-5D809E1F1615
Title To call a number from the call log
Changes for ICS Wave2 update (Changed the way to call the number)
Version 8
Author PengLeon
Status Released
ID: ICN-SONY-SMARTSEARCH-CALLLOG-DETAIL-
To add a number from the call log to your contacts
1
From your Home screen [homescreen_strings_application_name_txt] , tap ID: ICN-SONYHOME-APPTRAY-NORMAL.
2
Find and tap Phone [launcherDialer] .The call log view appears on the upper part of
the screen.
3
Touch and hold the number, then tap Add to Contacts [recentCalls_addToContact] .
4
Tap the desired contact, or tap Create new contact [pickerNewContactHeader] .
5
Edit the contact details and tap Done [menu_done] .
GUID
Title To add a number from the call log to your contacts
Changes for ICS Wave 2 update (changed the way to view call log)
Version 7
Author PengLeon
Status Released
GUID-3511CFE2-B8CC-4CF9-93AC-53529E89BC56
Voicemail
Indexterm: "voicemail"
Indexterm: "answering service"
If your subscription includes a voicemail service, callers can leave voice messages for
you when you can't answer calls. Your voicemail service number is normally saved on
your SIM card. If not, you can get the number from your service provider and enter it
manually.
GUID
Title Voicemail
Changes Valid for R800x(CDMA condition added)
Version 5
Author PengLeon
GUID-C0B45CA8-3035-4A41-AF12-46F45200B8AA
71
This is an Internet version of this publication. © Print only for private use.

This is a draft publication for internal use only.
Status Released
To enter your voicemail number
1
From the Home screen [homescreen_strings_application_name_txt] , tap ID: ICN-SONYHOME-APPTRAY-NORMAL.
2
Find and tap Settings [settings_label_launcher] > Call settings [call_settings_title] > Voicemail [gen-
eral_dialpad_voicemail_txt] >Voicemail settings [voicemail_settings] > Voicemail number [voicemail_settings_number_label] .
3
Enter your voicemail number.
4
Tap OK [ok] .
GUID GUID-C89C34FD-27BE-4E69-A928-F67A90805CC9
Title To enter your voicemail number
Changes comments from TID added only one step in 2 no text changed
Version 5.1.1
Author CynthiaH
Status Released
To call your voicemail service
1
From your Home screen [homescreen_strings_application_name_txt] , tap ID: ICN-SONYHOME-APPTRAY-NORMAL.
2
Find and tap Phone [launcherDialer] .
3
Touch and hold 1.
GUID GUID-0C8C71F8-F089-4C9F-8CB4-AF024258D381
Title To call your voicemail service
Changes Remove incorrect usage of tag <b>
Version 7
Author PengLeon
Status Released
Multiple calls
Indexterm: "calls"
Sub-indexterm: "multiple"
If you have activated call waiting, you can handle multiple calls at the same time.
When it is activated, you will be notified by a beep if you receive another call.
GUID
Title Multiple calls
Changes Changed title from More than one call to Multiple calls - From Robyn
Version 2
Author OisinF
Status Released
To activate or deactivate call waiting
Indexterm: "calls"
Sub-indexterm: "waiting"
1
From the Home screen [homescreen_strings_application_name_txt] , tap ID: ICN-SONYHOME-APPTRAY-NORMAL.
2
Find and tap Settings [settings_label] > Call settings [call_settings_title] > Additional settings
[additional_gsm_call_settings] .
3
To activate or deactivate call waiting, tap Call waiting [labelCW] .
GUID
Title To activate or deactivate call waiting
Changes eDream 2.0 Robyn/Mimmi & Rachael
Version 3
Author UlrikaK
Status Released*
GUID-BFBB9A5A-25E5-4E72-9841-247169DEEB7A
GUID-1A9F7171-AD1D-443F-B906-7C346F87C151
To answer a second call and put the ongoing call on hold
•
When you hear repeated beeps during a call, tap ID: ICN-SONY-CALLSLIDER-ANSWER.
GUID
Title To answer a second call and put the ongoing call on hold
Changes Comments from TID. From Huashan,changed drag into tap also changed the
GUID-7C422C9D-1720-407E-A0C8-6D8B8EB6B19F
icon.
72
This is an Internet version of this publication. © Print only for private use.

This is a draft publication for internal use only.
Version 4
Author CynthiaH
Status Released
To make a second call
1
During an ongoing call, tap Dialpad [clh_large_icbp_dialpad_txt] .
2
Enter the number of the recipient and tap Call [spb_strings_dialer_call_txt] .
3
The first call is put on hold.
The same procedure applies to subsequent calls.
GUID GUID-0CE0A4D3-CA04-4D27-B17F-8973082C4EF3
Title To make a second call
Changes label changed
Version 6
Author PengLeon
Status Released
To switch between multiple calls
•
To switch to another call and put the current call on hold, tap ID: ICN-SONYCALL-SLIDER-ANSWER.
GUID GUID-1309D844-C17A-4A36-8E37-26A09CD358A2
Title To switch between multiple calls
Changes comments from TID for Huashan changed an icon only no extra text changed
Version 4
Author CynthiaH
Status Released
Setting up a conference call
Indexterm: "conference calls"
With a conference or multiparty call, you can have a joint conversation with two or
more persons.
For details on the number of participants you can add to a conference call, contact your
network operator.
GUID GUID-ED3A4BD7-2AAD-4A22-9486-AFBF100F1F0F
Title Setting up a conference call
Changes Created it out only changed the name no extra text changed due to com-
Version 4
Author CynthiaH
Status Draft
To make a conference call
1
During an ongoing call, tap Dialpad [clh_large_icbp_dialpad_txt] .
2
Dial the number of the second participant and tap Call [spb_strings_dialer_call_txt] . After
the second participant answers, the first participant is put on hold.
3
Tap ID: ICN-SONY-CALL-CONFERENCE to add the second participant to
the conference call.
4
Repeat steps 1 to 3 to add more call participants.
GUID
Title To make a conference call
Changes label changed
Version 7
Author PengLeon
Status Released
ments from concept team
GUID-29B1365F-B898-4DD3-A624-19FFCDE9FC4B
73
This is an Internet version of this publication. © Print only for private use.

This is a draft publication for internal use only.
To have a private conversation with a conference call participant
1
During an ongoing conference call, tap {0} participants [clh_large_conference_call_partici-
pants] .
2
Tap the telephone number of the participant with whom you want to talk
privately.
3
To end the private conversation and return to the conference call, tap ID:
ICN-SONY-CALL-CONFERENCE.
GUID GUID-7FEE24C8-B5B3-4172-8A13-343441E63304
Title To have a private conversation with a participant
Changes Changed due to Ed comments only.so that things are as clear as possible.
Version 8
Author CynthiaH
Status Released
To release a participant from a conference call
1
During an ongoing conference call, tap the button showing the number of
participants. For example, tap 3 participants [3_participants] if there are three
participants.
2
Tap ID: ICN-SONY-CALL-ONGOING-HANGUP next to the participant you
want to release.
GUID GUID-317CBA11-E778-4F0B-B2F6-16BE76B17DAE
Title To release a participant
Changes For eDream 4.0 (End call icon changed)
Version 4
Author PengLeon
Status Released
To end a conference call
•
During the call, tap ID: ICN-SONY-CALL-ONGOING-HANGUP.
GUID
Title To end a conference call
Changes From Robyn
Version 2
Author OisinF
Status Released*
GUID-B7DE81B4-2DAB-4D55-9A3B-EAACC2C86A9F
Call settings
Indexterm: "calls"
Sub-indexterm: "settings"
Indexterm: "settings"
Sub-indexterm: "call"
GUID
Title Call settings - heading
Changes Generic
Version 1
Author OskarW
Status Released
Forwarding calls
Indexterm: "calls"
Sub-indexterm: "diverting"
Sub-indexterm: "forwarding"
You can forward calls, for example, to another phone number, or to an answering
service.
GUID
Title Forwarding calls
Changes eSheep Rachael
Version 1
Author OskarW
Status Released
GUID-25809A0F-E933-4AFD-ACC1-43091E006C84
GUID-E1430643-8DEE-443C-8FD5-6DF310320AD0
74
This is an Internet version of this publication. © Print only for private use.

This is a draft publication for internal use only.
To forward calls
1
From your Home screen [homescreen_strings_application_name_txt] , tap ID: ICN-SONYHOME-APPTRAY-NORMAL.
2
Find and tap Settings [settings_label_launcher] > Call settings [call_settings_title] > Call
forwarding [labelCF] .
3
Select an option.
4
Enter the number you want to forward the calls to, then tap Enable [enable] .
GUID GUID-24FD3201-10EA-418F-9B73-240458B3EEC2
Title To forward calls
Changes label changed
Version 4
Author PengLeon
Status Released*
To turn off call forwarding
1
From your Home screen [homescreen_strings_application_name_txt] , tap
ID: ICN-SONY-
HOME-APPTRAY-NORMAL.
2
Find and tap Settings [settings_label_launcher] > Call settings [call_settings_title] > Call
forwarding [labelCF] .
3
Select an option, then tap Disable [disable] .
GUID GUID-89805283-2629-4D50-B89E-914E3EE2BCEA
Title To turn off call forwarding
Changes label changed
Version 4
Author PengLeon
Status Released*
Showing or hiding your phone number
You can select to show or hide your phone number on call recipients' devices when
you call them.
GUID
Title Showing or hiding your phone number
Changes From Robyn
Version 2
Author OisinF
Status Released*
GUID-32174486-684C-45E8-9877-5C21C6024A57
To show or hide your phone number
1
From your Home screen [homescreen_strings_application_name_txt] , tap
ID: ICN-SONY-
HOME-APPTRAY-NORMAL.
2
Find and tap Settings [settings_label_launcher] > Call settings [call_settings_title] > Additional
settings [additional_gsm_call_settings] > Caller ID [labelCallerId] .
GUID
Title To show or hide your phone number
Changes Valid for 4.0.1.1 ("Select an option" removed for it is not allowed to modify)
Version 6
Author PengLeon
Status Released*
GUID-A0B707E1-2F16-4FCC-8188-E5DEC180AF5C
Restricting outgoing calls
Indexterm: "calls"
Indexterm: "fixed dialling"
If you have received a PIN2 code from your service provider, you can use a list of
Fixed Dialling Numbers (FDN) to restrict outgoing calls.
GUID
Title Restricting outgoing calls
Changes Created it out only named changed no extra text changed due to comments
Version 6
Author CynthiaH
Status Draft
GUID-F19CDD47-158A-4E2A-B3A7-F9857F389BAB
from concept team
75
This is an Internet version of this publication. © Print only for private use.

This is a draft publication for internal use only.
To enable or disable fixed dialling
1
From your Home screen [homescreen_strings_application_name_txt] , tap ID: ICN-SONYHOME-APPTRAY-NORMAL.
2
Find and tap Settings [settings_label_launcher] > Call settings [call_settings_title] > Fixed dialing
numbers [fdn] .
3
Tap Activate fixed dialing [disable_fdn_ok] or Deactivate fixed dialing [enable_fdn_ok] .
4
Enter your PIN2 and tap OK [ok] .
GUID GUID-FCE85A8E-BBDA-4A95-9B47-320B4293A4AB
Title To enable or disable fixed dialing
Changes label changed
Version 4
Author PengLeon
Status Released*
To access the list of accepted call recipients
1
From your Home screen [homescreen_strings_application_name_txt] , tap
ID: ICN-SONY-
HOME-APPTRAY-NORMAL.
2
Find and tap Settings [settings_label_launcher] > Call settings [call_settings_title] > Fixed dialing
numbers [fdn] > Fixed dialing numbers [fdn] .
GUID GUID-9D6DE3C9-13A8-4BEE-B25F-E0B467FF8F29
Title To access the list of accepted call recipients
Changes label changed
Version 5
Author PengLeon
Status Released*
76
This is an Internet version of this publication. © Print only for private use.

This is a draft publication for internal use only.
Contacts [contactsList]
GUID GUID-116B5259-4FA2-46CC-A2EB-6B8073E1EDAD
Title Contacts - heading only
Changes
Version 1
Author JorgenL
Status Released
Getting contacts into your device
Indexterm: "contacts"
Indexterm: "personal information"
Use the Contacts application to store and manage all your numbers, email
addresses, and other contact data in one place.
You can add new contacts in your device and synchronise them with contacts saved
in your Google™ account, Microsoft® Exchange ActiveSync® account, or other
accounts that support synchronisation. The Contacts application automatically
creates new entries and also helps you match data such as email addresses with
existing entries.
GUID GUID-3BC3BC83-899E-4120-A755-E0E716E36061
Title Getting contacts into your device
Changes Updated from Togari based on concept team's request Title changed
Version 4
Author WangHerman
Status Draft
Transferring contacts using a PC
If you are transferring contacts using a PC, use the PC Companion program. It's free,
and the installation files are already saved on your new device. PC Companion also
offers a range of other features, including help to update your device software. You
can use a PC to transfer contacts from several device brands, including iPhone,
Samsung, HTC and Nokia.
You need:
•
An Internet-connected PC running Windows
•
A USB cable for your old device
•
A USB cable for your new Android™ device
•
Your old device
•
Your new Android™ device
GUID
Title Transferring contacts using a PC
Changes Updated from Togari and valid for all project onwards Combined "using the
Version 5
Author WangHerman
Status Draft
GUID-591E6477-5FDD-482B-BF11-A419FBCAE182
pc companion program to transfer contacts" into this topic
To transfer contacts to your new device using PC Companion
1
Make sure that PC Companion is installed on your PC.
2
Open the PC Companion program on the PC, then click Contacts Setup and
follow the instructions to transfer your contacts.
GUID
Title To transfer contacts to your new Sony Ericsson Android™ phone
Changes Device Term Change
Version 2
Author WangHerman
Status Released
GUID-27563B9B-6733-47AF-92B4-72F4B3A72B19
®
Transferring contacts using an Apple® Mac® computer
Indexterm: "contacts"
77
This is an Internet version of this publication. © Print only for private use.

This is a draft publication for internal use only.
Sub-indexterm: "transferring"
Indexterm: "transferring"
Sub-indexterm: "contacts"
If you are transferring contacts using an Apple® Mac® computer, use the Sony™
Bridge for Mac program. It's free and downloadable from Bridge for Mac. For detailed
instructions on how to use an Apple Mac computer to transfer contacts from your old
device, go to Transfer your contacts.
GUID GUID-FA1412DB-AA24-4B07-9646-FEF4F5BF258E
Title Transferring contacts using an Apple® Mac® computer
Changes Updated from Togari and valid for all projects onwards Added info about
Version 5
Author WangHerman
Status Draft
bridge for mac
To transfer contacts to your new device using Sony™ Bridge for Mac
1
Make sure the Sony™ Bridge for Mac application is installed on your Apple®
Mac® computer.
2
Open the Sony™ Bridge for Mac application on your Apple® Mac® computer.
3
Double-click the Sony™ Bridge for Mac icon in the Applications folder, then
follow the instructions to transfer your contacts.
GUID GUID-19A42BE7-8125-4DBB-98D0-883E3F8AEE3F
Title To transfer contacts to your new device using Sony™ Bridge for Mac
Changes Created from Togari and valid for all project onwards
Version 1
Author WangHerman
Status Released
Transferring contacts using synchronisation accounts
Indexterm: "contacts"
Sub-indexterm: "transferring"
Indexterm: "transferring"
Sub-indexterm: "contacts"
Your device works with popular online synchronisation accounts such as Google
Sync™, Microsoft® Exchange ActiveSync®or Facebook™. If you have synced the
contacts in your old device or your computer with an online account, you can transfer
your contacts to your new device using that account. For more detailed information
about synchronisation, see Synchronising your corporate email, calendar and
contacts on page 197.
GUID
Title Transferring contacts using synchronization accounts
Changes Updated from Odin Yuga HTML UG and valid for all projects onwards Device
Version 2.1.1.1.2
Author WangHerman
Status Released
To synchronise contacts on your device with a synchronisation account
1
From your Home screen [homescreen_strings_application_name_txt] , tap ID: ICN-SONYHOME-APPTRAY-NORMAL , then tap ID: ICN-SONY-APP-PHONEBOOK .
2
Tap ID: ICN-SONY-KEY-MENU , then tap Settings [spb_strings_gen_settings_txt] >
Accounts & sync [spb_strings_settings_accounts_and_sync_main_txt] .
3
If you have already set up a synchronisation account and you want to sync
with that account, tap the account, then tap ID: ICN-SONY-KEY-MENU , and
tap Sync now [sync_menu_sync_now] .
GUID
Title To synchronise your phone contacts with an account
Changes Device Term Change Also removed the first sentence in step3 Valid for Odin
Version 8
Author WangHerman
Status Released
GUID-CF308157-311E-475A-8477-81F42609A3C2
term updated only No need review
GUID-6252CC57-4654-44CA-8F5C-44B27DC1C425
and Yuga onwards
78
This is an Internet version of this publication. © Print only for private use.

This is a draft publication for internal use only.
Transferring contacts from a SIM card
Indexterm: "contacts"
Sub-indexterm: "transferring"
Indexterm: "transferring"
Sub-indexterm: "contacts"
GUID GUID-0B73987A-CFD6-4F26-805F-BCE6C92BCB9A
Title Transferring contacts from the SIM card - heading only
Changes Heading only Updated from Mint Hayabsa and valid for all ongoing projects
Version 1
Author WangHerman
Status Released
To import contacts from a SIM card
Indexterm: "SIM card"
Sub-indexterm: "importing contacts from"
Indexterm: "importing SIM contacts"
Indexterm: "contacts"
Sub-indexterm: "importing from SIM card"
1
From your Home screen [homescreen_strings_application_name_txt] , tap ID: ICN-SONYHOME-APPTRAY-NORMAL , then tap ID: ICN-SONY-APP-PHONEBOOK .
2
Press ID: ICN-SONY-KEY-MENU , then tap Import contacts [spb_strings_contacts_im-
port_txt] > SIM card [spb_strings_gen_sim_txt] .
3
If you have set up a synchronisation account, you can choose to add the SIM
card contacts under that account. Or you can choose to only use these
contacts on your device. Select your desired option.
4
To import an individual contact, find and tap the contact. To import all
contacts, tap Import all [spb_strings_import_all_txt] .
GUID
Title To import contacts from the SIM card
Changes Device Term Change
Version 12
Author WangHerman
Status Released*
GUID-18318225-441A-4DE5-8329-F7ED19BC1B61
Transferring contacts from a memory card
Indexterm: "contacts"
Sub-indexterm: "transferring"
Indexterm: "transferring"
Sub-indexterm: "contacts"
GUID
Title Transferring contacts from the memory card - heading only
Changes
Version 1
Author WangHerman
Status Released
To import contacts from a memory card
1
From your Home screen [homescreen_strings_application_name_txt] , tap
HOME-APPTRAY-NORMAL, then tap ID: ICN-SONY-APP-PHONEBOOK.
2
Press ID: ICN-SONY-KEY-MENU, then tap Import contacts [spb_strings_contacts_im-
port_txt] > SD card [spb_strings_gen_sd_card_txt] .
3
If you have set up a synchronisation account, you can add the imported
memory card contacts under that account. Or you can choose to only use the
imported contacts on your device. Select your desired option.
4
If you have more than one vCard file on the SD card, a list appears showing
different batches of contacts saved on your device, with the corresponding
dates for when they were created. Select the batch that you want to import.
GUID
Title To import contacts from the memory card
Changes Device Term Change
Version 8.1.1
Author WangHerman
Status Released
GUID-CEF617F7-395C-42BC-A841-1D43A977B424
ID: ICN-SONY-
GUID-CAFBA77B-691C-4AF1-9F60-B24534C33AA2
79
This is an Internet version of this publication. © Print only for private use.

This is a draft publication for internal use only.
Receiving contacts from other devices
Indexterm: "contacts"
Sub-indexterm: "transferring"
Indexterm: "transferring"
Sub-indexterm: "contacts"
GUID GUID-4012D9CB-D077-4966-A56D-B14DF8B3976F
Title Receiving contacts from other devices - heading only
Changes Heading only Updated from Mint Hayabusa and valid for all ongoing projects
Version 1
Author WangHerman
Status Released
To receive contact data sent using Bluetooth™ technology
1
Make sure you have the Bluetooth™ function turned on and your phone set to
visible. If not, then you cannot receive data from other devices.
2
When you are asked to confirm whether you want to receive the file, tap
Accept [incoming_file_confirm_ok] .
3
Drag down the Notification panel and tap the file you received to import the
contact data.
GUID GUID-23A7741C-808A-4745-84AB-82CEB7F6CD75
Title To receive contacts from another Bluetooth device
Changes Valid for eDream 3.0 and Zeus Verizon.
Version 3
Author RongrongZ
Status Released*
To receive contacts sent using a messaging service
1
When you receive a new text message, multimedia message, or email
message, open the message.
2
The received contact data appears as a vCard attachment. Tap, or touch and
hold the vCard file to open a menu so you can save the contact data.
GUID
Title To receive contacts sent using a messaging service
Changes Valid for eDream 2.1 Robyn Mimmi Shakira and Rachael. Moved note to main
Version 2
Author AnnaB
Status Released
GUID-4F2EE42C-BEA9-4F05-BA58-D1AACB381FBB
concept.
Adding and editing contacts
You can create, edit and synchronise your contacts in a few simple steps. You can
select contacts saved in different accounts and manage how you display them on
your device.
If you synchronise your contacts with more than one account, you can join contacts
on your device to avoid duplicates.
Some synchronisation services, for example, some social networking services, do not allow
you to edit contact details.
GUID GUID-D26AD4BF-CF50-4F48-A4E2-CB55941BB492
Title Adding and editing contacts
Changes Updated from Togari and valid for all projects onwards Title changed only
Version 4
Author WangHerman
Status Draft
based on concept team's request No other text change
80
This is an Internet version of this publication. © Print only for private use.

This is a draft publication for internal use only.
To add a contact
1
From your Home screen [homescreen_strings_application_name_txt] , tap ID: ICN-SONYHOME-APPTRAY-NORMAL, then tap ID: ICN-SONY-APP-PHONEBOOK.
2
Tap ID: ICN-SONY-BTN-ADD-CONTACT.
3
If you have synchronised your contacts with one or more accounts, select the
account to which you want to add the contact, or tap Local contact [account_phone]
if you want to keep the contact's information only on your device.
4
Enter or select the desired information for the contact.
5
When you are finished, tap Done [menu_done] .
GUID GUID-CE4A9D46-2505-4EAA-818C-FD7B9BDEB825
Title To add a contact
Changes Valid for Pollux Label updated only No need review
Version 11.1.1
Author WangHerman
Status Released
To edit a contact
1
From the Home screen [homescreen_strings_application_name_txt] , tap
ID: ICN-SONY-
HOME-APPTRAY-NORMAL, then tap ID: ICN-SONY-APP-PHONEBOOK.
2
Tap the contact you want to edit, then tap ID: ICN-SONY-INFINITEVIEWOPTIONMENU-EDIT-CONTACT.
3
Edit the desired information. When you are finished, tap Done [menu_done] .
GUID GUID-04C4AA81-EF48-47E7-8F7A-4EF3A3D03F4A
Title To edit a contact
Changes Valid for Tusbasa Gina Step2 updated due to SW change
Version 7
Author WangHerman
Status Released
To associate a picture with a contact
Indexterm: "contacts"
Sub-indexterm: "picture"
Indexterm: "photos"
Sub-indexterm: "associating with a contact"
1
From your Home screen [homescreen_strings_application_name_txt] , tap ID: ICN-SONYHOME-APPTRAY-NORMAL, then tap ID: ICN-SONY-APP-PHONEBOOK.
2
Tap the contact you want to edit, then tap ID: ICN-SONY-INFINITEVIEWOPTIONMENU-EDIT-CONTACT.
3
Tap ID: ICN-SONY-CONTACT-EDIT-ADD-PHOTO and select the desired
method for adding the contact picture.
4
When you have added the picture, tap Done [menu_done] .
You can also add a picture to a contact directly from the Album [album_app_name_txt] application.
GUID GUID-D8B5006C-48F5-4730-87AE-2730F0693F7E
Title To add a contact picture
Changes Valid for Tusbasa Gina Step2 updated due to SW change
Version 9
Author WangHerman
Status Released
To delete contacts
1
From your Home screen [homescreen_strings_application_name_txt] , tap ID: ICN-SONYHOME-APPTRAY-NORMAL, then tap ID: ICN-SONY-APP-PHONEBOOK.
2
Touch and hold the contact that you want to delete.
3
To delete all contacts, tap the downwards arrow to open the drop down menu,
then select Mark all [spb_strings_gen_mark_all_txt] .
4
Tap ID: ICN-SONY-MENU-DELETE, then tap OK [spb_strings_gen_ok_txt] .
GUID
Title To delete contacts
Changes Updated for Pollux Gina Rewrote step3 only No other text change
Version 7
Author WangHerman
Status Released
GUID-BF4AB0BA-7D03-4A81-B9B5-1F422A254EB0
81
This is an Internet version of this publication. © Print only for private use.

This is a draft publication for internal use only.
To edit contact information about yourself
1
From your Home screen [homescreen_strings_application_name_txt] , tap ID: ICN-SONYHOME-APPTRAY-NORMAL, then tap ID: ICN-SONY-APP-PHONEBOOK.
2
Tap Myself [spb_strings_contacts_long_press_option_title_myself_txt] , then tap ID: ICN-SONYINFINITEVIEW-OPTIONMENU-EDIT-CONTACT.
3
Enter the new information or make the changes you want.
4
When you are done, tap Done [menu_done] .
GUID GUID-B75E995D-3011-4ADA-9C38-647947BFA18C
Title To edit contact information about yourself
Changes Valid for Tusbasa Gina Step2 updated due to SW change
Version 6
Author WangHerman
Status Released
To create a new contact from a message
1
From your Home screen [homescreen_strings_application_name_txt] , tap
ID: ICN-SONY-
HOME-APPTRAY-NORMAL, then find and tap ID: ICN-SONY-APPMESSAGING.
2
Tap ID: ICN-SONY-CONTACT-EDIT-ADD-PHOTO > Save [gui_save_txt] .
3
Select an existing contact, or tap Create new contact [pickerNewContactHeader] .
4
Edit the contact information and tap Done [menu_done] .
GUID GUID-8AD5B8FF-018E-4A1E-A547-577913797FDA
Title To create a new contact from a message
Changes Updated from Togari and valid for all project onwards Title changed only
Version 14
Author WangHerman
Status Draft
based on concept team's request No other text change
Searching and viewing contacts
GUID
Title Searching and viewing contacts
Changes
Version 1
Author WangHerman
Status Draft
Contacts [contactsList] screen overview
GUID-01145D46-615D-4A67-943F-2197103D4F57
ID: SCR-SONY-EDREAM-PHONEBOOK
Shortcut tabs
1
2 Tap a contact to view its details
This is an Internet version of this publication. © Print only for private use.
82
This is a draft publication for internal use only.
3 Alphabetical index for browsing contacts
4 Tap a contact thumbnail to access the quick contact menu
5 Search for contacts
6 Create a contact
7 Open more options
GUID GUID-32585317-AD2B-4698-BAC3-DE5353ECF92D
Title Contacts screen overview
Changes Valid for Mint Hayabusa Added bullet 7 only
Version 8
Author WangHerman
Status Released*
To search for a contact
1
From your Home screen [homescreen_strings_application_name_txt] , tap
ID: ICN-SONY-
HOME-APPTRAY-NORMAL, then tap ID: ICN-SONY-APP-PHONEBOOK.
2
Tap ID: ICN-SONY-MENU-SEARCH and enter the first few letters of the
contact name in the Search contacts [searchHint] field. All contacts beginning with
those letters appear.
GUID GUID-EB8B497D-7462-4B6E-B63F-A5AC8DE42983
Title To search for a contact
Changes Valid for Tusbasa Gina Label updated only No text change No need review
Version 8
Author WangHerman
Status Released
To select which contacts to display in the Contacts application
1
From your Home screen [homescreen_strings_application_name_txt] , tap ID: ICN-SONYHOME-APPTRAY-NORMAL, then tap ID: ICN-SONY-APP-PHONEBOOK.
2
Press ID: ICN-SONY-KEY-MENU, then tap Filter [spb_strings_contacts_list_filter_txt] .
3
In the list that appears, mark and unmark the desired options. If you have
synchronised your contacts with a synchronisation account, that account
appears in the list. To further expand the list of options, tap the account.
4
When you are finished, tap OK [spb_strings_gen_ok_txt] .
GUID
Title To select which contacts to display
Changes Valid for eDream 6.0 Aoba Nozomi. Only removed one step no need review
Version 9
Author WangHerman
Status Released
GUID-7A65E1EE-85E9-4A76-8BFE-9CA005A82543
The quick contact menu
Tap a contact's thumbnail to view quick communication options for a particular
contact. Options include calling the contact, sending a text or multimedia message,
and starting a chat using the Google Talk™ application.
For an application to appear as an option in the quick contact menu, you may need to set up
the application in your device and be logged in to the application. For example, you need to
start the Gmail™ [GOOGLE-GMAIL-PLAIN] application and enter your login details before you can use
Gmail™ [GOOGLE-GMAIL-PLAIN] from the quick contact menu.
GUID GUID-A234170B-D4D1-4781-A7D3-C237647047BF
Title The quick contact menu
Changes Updated from Taoshan and valid for all HTML UG Device term change only
Version 7.1.2
Author WangHerman
Status Released
NO NEED REVIEW
Avoiding duplicate entries in the Contacts application
Indexterm: "contacts"
Sub-indexterm: "joining contact information"
83
This is an Internet version of this publication. © Print only for private use.

This is a draft publication for internal use only.
If you synchronise your contacts with a new account or import contact information in
other ways, you could end up with duplicate entries in the Contacts application. If this
happens, you can join such duplicates to create a single entry. And if you join entries
by mistake, you can separate them again later.
GUID GUID-FBC8BADE-40C7-48D2-ADF4-8C47C01F47DF
Title Join contact information
Changes Valid for eDream 4.0.1.1. Ayame Coconut Satsuma.
Version 3
Author WangHerman
Status Released
To link contacts
1
From your Home screen [homescreen_strings_application_name_txt] , tap
ID: ICN-SONY-
HOME-APPTRAY-NORMAL, then tap ID: ICN-SONY-APP-PHONEBOOK.
2
Tap the contact you want to link with another contact.
3
Press ID: ICN-SONY-KEY-MENU, then tap Link contact [spb_strings_edit_link_to_other_txt] .
4
Tap the contact whose information you want to join with the first contact, then
tap OK [ok] to confirm. The information from the first contact is merged with the
second contact, and the first contact is no longer displayed in the Contacts list.
GUID GUID-01136C21-4A7D-4E9B-93AA-1E74783486F3
Title To link contacts
Changes Valid for Tusbasa Gina Step2 updated due to SW change
Version 9
Author WangHerman
Status Released
To separate linked contacts
1
From your Home screen [homescreen_strings_application_name_txt] , tap ID: ICN-SONYHOME-APPTRAY-NORMAL, then tap ID: ICN-SONY-APP-PHONEBOOK.
2
Tap the linked contact you want to edit, then tap ID: ICN-SONYINFINITEVIEW-OPTIONMENU-EDIT-CONTACT.
3
Tap Unlink contact [spb_strings_edit_unlink_field_txt] .
4
Tap OK [ok] .
GUID
Title To separate linked contacts
Changes Valid for Tusbasa Gina Step2 updated due to SW change
Version 9
Author WangHerman
Status Released
GUID-740EA2F6-AFDC-4B00-93A9-4800C7DB325F
Favourites and groups
GUID
Title Favourites and groups - heading only
Changes
Version 1
Author WangHerman
Status Draft
Favourites
Indexterm: "contacts"
Sub-indexterm: "favourite"
You can mark contacts as favourites so that you can get quick access to them from
the Contacts application.
GUID
Title Favourites
Changes Valid for ICS update. Only removed "tab" no need review
Version 6
Author WangHerman
Status Released
GUID-731CD283-B219-4557-A6C9-D42EE59AEEFF
GUID-2F920924-BA47-4976-B2B6-66B670B3C210
84
This is an Internet version of this publication. © Print only for private use.

This is a draft publication for internal use only.
To mark or unmark a contact as a favourite
1
From the Home screen [homescreen_strings_application_name_txt] , tap ID: ICN-SONYHOME-APPTRAY-NORMAL, then tap ID: ICN-SONY-APP-PHONEBOOK.
2
Tap the contact you want to add to or remove from your favourites.
3
Tap ID: ICN-SONY-INFINITEVIEW-FAVORITE-BTN.
GUID GUID-E489EC2C-B886-4AF4-9A8E-49F9279D3DCE
Title To mark or unmark a contact as a favourite
Changes Valid for eDream 3.0 Anzu Hallon Zeus and eDream 4.0 Iyokan Mango Smul-
Version 5
Author WangHerman
Status Released
tron. Changing the Contacts label to the Contacts icon.
To view your favourite contacts
1
From your Home screen [homescreen_strings_application_name_txt] , tap ID: ICN-SONYHOME-APPTRAY-NORMAL, then tap ID: ICN-SONY-APP-PHONEBOOK.
2
Tap ID: ICN-SONY-INFINITEVIEW-FAVORITE-BTN.
GUID GUID-C33D067B-1E80-4FA2-83FD-5F70E4CFC561
Title To view your favourite contacts
Changes Update from Aoba Rita and valid for all ongoing project Remove one label
Version 2
Author WangHerman
Status Released
only in step 2 No other text changes No need review
Groups
Indexterm: "contacts"
Sub-indexterm: "groups"
You can assign contacts to groups to get quicker access to them from within the
Contacts application.
GUID
Title Groups
Changes Valid for ICS wave 1 and 2 Also for Phoenix and Tapioca onwards
Version 1
Author WangHerman
Status Released
To assign a contact to a group
1
In the Contacts application, tap the contact that you want to assign to a group.
2
Tap ID: ICN-SONY-INFINITEVIEW-OPTIONMENU-EDIT-CONTACT, then tap
the bar directly under Assign to group [spb_strings_assign_group] .
3
Mark the checkboxes for the groups to which you want to add the contact,
then tap Done [done] .
4
Tap Done [done] .
GUID
Title To assign a contact to a group
Changes Valid for Tusbasa Gina Step1&2 updated due to SW change
Version 3
Author WangHerman
Status Released
GUID-49883222-009C-43A5-86FB-3E645982B0EC
GUID-D97D0B85-FDA0-4486-AE31-1273993A1514
Sending contact information
Indexterm: "contacts"
Sub-indexterm: "sending"
Sub-indexterm: "sharing"
Indexterm: "sending"
Sub-indexterm: "contacts"
GUID
Title Sending contact information - heading only
Changes Created from Togari and valid for all projects onwards Title changed only
Version 2
Author WangHerman
Status Draft
This is an Internet version of this publication. © Print only for private use.
GUID-0A30E687-263E-4A63-A5F9-7D7583BBF0FE
based on concept team's request
85

This is a draft publication for internal use only.
To send your business card
Indexterm: "sending"
Sub-indexterm: "business cards"
Indexterm: "business cards"
Sub-indexterm: "sending"
1
From your Home screen [homescreen_strings_application_name_txt] , tap
ID: ICN-SONY-
HOME-APPTRAY-NORMAL, then tap ID: ICN-SONY-APP-PHONEBOOK.
2
Tap Myself [spb_strings_contacts_long_press_option_title_myself_txt] .
3
Press ID: ICN-SONY-KEY-MENU, then tap Send contact [infiniteview_menu_send_con-
tact_txt] > OK [spb_strings_gen_ok_txt] .
4
Select an available transfer method and follow the on-screen instructions.
GUID GUID-CB7E8C2B-D712-4088-A4AE-42D483C91B78
Title To send your business card
Changes Valid for eDream 6.0 Nozomi Aoba. Changed "myself" to "my info" in step 2
Version 6
Author WangHerman
Status Released
for Aoba.
To send a contact
1
From your Home screen [homescreen_strings_application_name_txt] , tap ID: ICN-SONYHOME-APPTRAY-NORMAL, then tap ID: ICN-SONY-APP-PHONEBOOK.
2
Tap the contact whose details you want to send.
3
Press ID: ICN-SONY-KEY-MENU, then tap Send contact [infiniteview_menu_send_con-
tact_txt] > OK [spb_strings_gen_ok_txt] .
4
Select an available transfer method and follow the on-screen instructions.
GUID
Title To send a contact
Changes Valid for eDream 4.0.1 Urushi. Label updated only.
Version 5
Author WangHerman
Status Released
GUID-B0257474-7B98-40F3-877B-13576B9911C7
To send several contacts at once
1
From your Home screen [homescreen_strings_application_name_txt] , tap ID: ICN-SONYHOME-APPTRAY-NORMAL, then tap ID: ICN-SONY-APP-PHONEBOOK.
2
Press ID: ICN-SONY-KEY-MENU, then tap Mark several [spb_strings_con-
tacts_list_menu_mark_mode_txt] .
3
Mark the contacts you want to send, or select all if you want to send all
contacts.
4
Tap ID: ICN-SONY-GALLERY-SHARE, then select an available transfer
method and follow the on-screen instructions.
GUID
Title To select contacts to send
Changes Valid for Tusbasa Gina Label updated only No need review
Version 5
Author WangHerman
Status Released
GUID-28D36493-2518-4620-B2E6-C045B077CF22
Backing up contacts
Indexterm: "contacts"
Sub-indexterm: "backing up"
Sub-indexterm: "copying"
Indexterm: "backing up"
Sub-indexterm: "contacts"
You can use a memory card, a SIM card or an online synchronisation tool such as
Microsoft® Exchange ActiveSync® to back up contacts.
GUID
Title Backing up contacts
Changes Changed from Tapioca Phoenix and valid for all projects onwards Index term
Version 5
Author WangHerman
Status Released
GUID-26F5D5F6-B693-490B-8EBE-3ED78954583B
updated onty No need review
86
This is an Internet version of this publication. © Print only for private use.

This is a draft publication for internal use only.
To export all contacts to a memory card
1
From your Home screen [homescreen_strings_application_name_txt] , tap ID: ICN-SONYHOME-APPTRAY-NORMAL, then tap ID: ICN-SONY-APP-PHONEBOOK.
2
Press ID: ICN-SONY-KEY-MENU, then tap Back up contacts [spb_strings_con-
tacts_list_menu_export_contacts_txt] > Memory Card [memory-card] .
3
Tap OK [spb_strings_gen_ok_txt] .
GUID GUID-A7D7643A-284D-4901-B031-AE32503C69F7
Title To export all contacts to the memory card
Changes Valid for Tapioca DS Changed SIM card to Memory card
Version 11
Author WangHerman
Status Released
To export contacts to a SIM card
Indexterm: "SIM card"
Sub-indexterm: "exporting contacts to"
1
From your Home screen [homescreen_strings_application_name_txt] , tap ID: ICN-SONYHOME-APPTRAY-NORMAL, then tap ID: ICN-SONY-APP-PHONEBOOK.
2
Press ID: ICN-SONY-KEY-MENU, then tap Back up contacts [spb_strings_con-
tacts_list_menu_export_contacts_txt] > SIM card [spb_strings_gen_sim_txt] .
3
Mark the contacts you want to export, or tap Mark all [spb_strings_gen_mark_all_txt] if you
want to export all your contacts.
4
Tap Back up [spb_strings_gen_export_txt] .
5
Select Add contacts [spb_strings_gen_add_contacts_txt] if you want to add the contacts to
existing contacts on your SIM card, or select Replace all contacts
[spb_strings_gen_replace_contacts_txt] if you want to replace the existing contacts on your
SIM card.
When you export contacts to a SIM card, not all information may get exported. This is due to
memory limitations on SIM cards.
GUID GUID-A6A460E6-AB1C-4F0D-80C4-675CA7DC8CD9
Title To export contacts to the SIM card
Changes Valid for eDream 3.0 Anzu Hallon Zeus and eDream 4.0 Iyokan Mango Smul-
Version 7
Author WangHerman
Status Released
tron. Changing the Contacts label to the Contacts icon.
87
This is an Internet version of this publication. © Print only for private use.

This is a draft publication for internal use only.
Messaging
GUID GUID-72D9B8E4-2AF0-4F04-9FCE-FBF5487484F5
Title Messaging - heading only
Changes Generic
Version 1
Author OskarW
Status Released*
Using text and multimedia messaging
You can send and receive text messages from your device using SMS (Short
Message Service). If your subscription includes MMS (Multimedia Messaging
Service), you can also send and receive messages that contain media files, for
example, pictures and videos. The number of characters you can send in a single text
message varies depending on the operator and the language you use. If you exceed
the character limit, then all your single messages are linked together and sent as one
message. You are charged for each single text message you send. When you view
your messages, they appear as conversations, which means that all messages to and
from a particular person are grouped together.
To send multimedia messages, you need the correct MMS settings on your device. See
Internet and messaging settings.
GUID GUID-74DA81D5-2211-43F7-B8C7-31CADCECBE9C
Title Using text and multimedia messaging
Changes Device Term Change
Version 7
Author MikeCao
Status Released
To create and send a message
1
From your Home screen [homescreen_strings_application_name_txt] , tap ID: ICN-SONYHOME-APPTRAY-NORMAL, then find and tap ID: ICN-SONY-APP-
MESSAGING.
2
Tap ID: ICN-SONY-CONV-NEW-MESSAGE.
3
Tap ID: ICN-SONY-BTN-ADD-CONTACT, then select the desired recipients
from the Contacts list. If the recipient is not listed as a contact, enter the
contact's number manually and tap ID: ICN-SONY-BROWSER-ADD.
4
When you are finished adding recipients, tap Done [spb_strings_select_done_txt] .
5
Tap Write message [conversations_strings_text_input_hint_txt] and enter your message text.
6
If you want to add a media file, tap ID: ICN-SONY-MENU-ATTACHMENT and
select an option.
7
To send the message, tap Send [gui_send_txt] .
If you exit a message before sending, it gets saved as a draft. The conversation gets tagged
with the word Draft: [conversations_strings_conversationlist_conversation_snippet_draftprefix_txt] .
GUID GUID-A6C2B682-0F30-475D-9682-33A737581FE9
Title To create and send a message
Changes update step 3 to immplement concept team's comment for Mint
Version 16
Author MikeCao
Status Released
88
This is an Internet version of this publication. © Print only for private use.

This is a draft publication for internal use only.
To read a received message
1
From your Home screen [homescreen_strings_application_name_txt] , tap ID: ICN-SONYHOME-APPTRAY-NORMAL, then find and tap ID: ICN-SONY-APP-
MESSAGING.
2
Tap the desired conversation.
3
If the message is not yet downloaded, tap and hold the message, then tap
Download message [conversations_strings_action_message_download_txt] .
You can also open messages from the status bar when ID: ICN-SONY-SYM-ACTION-SMS
appears there. Just drag down the bar and tap the message.
GUID GUID-5343B3D0-3140-41FE-BF7A-424395B15F40
Title To read a received message
Changes Valid from eDream 6.0. Changed the label to icon. Changed the wording of
Version 7
Author RongrongZ
Status Released
the tip.
To reply to a message
1
From your Home screen [homescreen_strings_application_name_txt] , tap ID: ICN-SONYHOME-APPTRAY-NORMAL, then find and tap ID: ICN-SONY-APP-
MESSAGING.
2
Tap the conversation containing the message.
3
Enter your reply and tap Send [gui_send_txt] .
GUID
Title To reply to a message
Changes Valid from eDream 6.0. Only replaced a label with an icon.
Version 4
Author RongrongZ
Status Released
GUID-B3F3CD74-24A7-4F3C-A344-9A3DA916D207
To forward a message
1
From your Home screen [homescreen_strings_application_name_txt] , tap
ID: ICN-SONY-
HOME-APPTRAY-NORMAL, then find and tap ID: ICN-SONY-APPMESSAGING.
2
Tap the conversation containing the message you want to forward.
3
Touch and hold the message you want to forward, then tap Forward message
[conversations_strings_action_message_forward_txt] .
4
Tap ID: ICN-SONY-BTN-ADD-CONTACT, then select a recipient from the
Contacts list. If the recipient is not listed as a contact, enter the contact's
number manually and tap ID: ICN-SONY-BROWSER-ADD.
5
When you are finished adding recipients, tap Done [spb_strings_select_done_txt] .
6
Edit the message, if necessary, and tap Send [gui_send_txt] .
In step 4, you can also tap To [message_compose_to_hint] and enter the recipient's phone number
manually.
GUID GUID-05F0456B-06EA-4A96-B35E-B114ADFDD14C
Title To forward a message
Changes valid for Nozomi 2 updated step 4
Version 7
Author MikeCao
Status Released
To delete a message
1
From your Home screen [homescreen_strings_application_name_txt] , tap
ID: ICN-SONY-
HOME-APPTRAY-NORMAL, then find and tap ID: ICN-SONY-APPMESSAGING.
2
Tap the conversation containing the message you want to delete.
3
Touch and hold the message you want to delete, then tap Delete message [con-
versations_strings_action_message_delete_txt] > Delete [gui_delete_txt] .
GUID
Title To delete a message
GUID-18644181-BE89-4B64-A303-91754CC902E4
89
This is an Internet version of this publication. © Print only for private use.

This is a draft publication for internal use only.
Changes only changed a label for Mint/Hayabusa
Version 7
Author MikeCao
Status Released*
To delete conversations
1
From your Home screen [homescreen_strings_application_name_txt] , tap ID: ICN-SONYHOME-APPTRAY-NORMAL , then find and tap ID: ICN-SONY-APP-
MESSAGING .
2
Press ID: ICN-SONY-KEY-MENU , then tap Delete conversations [conversa-
tions_strings_conversationlist_menu_deleteconversations_txt] .
3
Mark the checkboxes for the conversations that you want to delete, then tap
ID: ICN-SONY-MENU-DELETE > Delete [gui_delete_txt] .
GUID GUID-C3195918-C699-4A90-BEEE-730CA2F20750
Title To delete conversations
Changes update step3 based on v9 for Tubasa Gina
Version 11
Author MikeCao
Status Released*
To call a message sender
1
From your Home screen [homescreen_strings_application_name_txt] , tap
ID: ICN-SONY-
HOME-APPTRAY-NORMAL, then find and tap ID: ICN-SONY-APPMESSAGING.
2
Tap a conversation.
3
Tap the recipient name or number at the top of the screen, then select the
recipient name or number from the list that appears.
4
If the recipient is saved in your contacts, tap the phone number that you want
to call. If you have not saved the recipient in your contacts, tap ID: ICNSONY-BTN-DETAIL-CALL.
GUID
Title To call a message sender
Changes Valid from eDream 6.0. One step added.
Version 5
Author RongrongZ
Status Released
GUID-FE0F8257-CF1E-4EFA-90FA-2362196AE2C4
To save a file contained in a message you receive
1
From your Home screen [homescreen_strings_application_name_txt] , tap ID: ICN-SONYHOME-APPTRAY-NORMAL, then find and tap ID: ICN-SONY-APP-
MESSAGING.
2
Tap the conversation you want to open.
3
If the message has not been downloaded yet, tap and hold the message, then
tap Download message [conversations_strings_action_message_download_txt] .
4
Touch and hold the file you want to save, then select the desired option.
GUID
Title To save a file contained in a message you receive
Changes Valid from eDream 6.0. Only replaced one label with an icon.
Version 4
Author RongrongZ
Status Released
GUID-5F89D8FF-F03C-4F3C-9A7A-48170CF67FA1
To star a message
1
From your Home screen [homescreen_strings_application_name_txt] , tap ID: ICN-SONYHOME-APPTRAY-NORMAL, then find and tap ID: ICN-SONY-APP-
MESSAGING.
2
Tap the conversation you want to open.
3
In the message you want to star, tap ID: ICN-SONY-INFINITEVIEWFAVORITE-BTN.
4
To unstar a message, tap ID: ICN-SONY-INFINITEVIEW-FAVORITE-BTNSELECTED.
GUID
Title To star a message
GUID-4FC74355-8CC4-455B-ABFA-23DBA7F58E36
90
This is an Internet version of this publication. © Print only for private use.

This is a draft publication for internal use only.
Changes Valid from eDream 6.0.
Version 1
Author RongrongZ
Status Released
To view starred messages
1
From your Home screen [homescreen_strings_application_name_txt] , tap ID: ICN-SONYHOME-APPTRAY-NORMAL, then find and tap ID: ICN-SONY-APP-
MESSAGING.
2
Press ID: ICN-SONY-KEY-MENU, then tap Starred messages [conversa-
tions_strings_conversationlist_menu_starredmessage_txt] .
3
All starred messages appear in a list.
GUID GUID-950B1757-1EF2-4C8B-B38F-824EFFB7087D
Title To view starred messages
Changes Valid from eDream 6.0.
Version 1
Author RongrongZ
Status Released*
To search for messages
1
From your Home screen [homescreen_strings_application_name_txt] , tap
ID: ICN-SONY-
HOME-APPTRAY-NORMAL, then find and tap ID: ICN-SONY-APPMESSAGING.
2
Press ID: ICN-SONY-KEY-MENU, then tap Search [conversations_strings_conversation-
list_menu_search_txt] .
3
Enter your search keywords, then tap the confirm key.
GUID
Title To search for messages
Changes delete a step
Version 3
Author MikeCao
Status Released*
GUID-E70395B9-7B95-4170-B892-B843B89205C7
Text and multimedia message options
GUID
Title Text and multimedia message options - Heading
Changes eDream 2.1 Robyn/Mimmi/Shakira & Rachael. Valid for eDream 3.0.
Version 3
Author UlrikaK
Status Released
To change your message notification settings
1
From your Home screen [homescreen_strings_application_name_txt] , tap ID: ICN-SONYHOME-APPTRAY-NORMAL, then find and tap ID: ICN-SONY-APP-
MESSAGING.
2
Press ID: ICN-SONY-KEY-MENU, then tap Settings [conversations_strings_conversation-
list_menu_settings_txt] .
3
To set a notification sound, tap Notification tone [conversations_strings_settings_notification_ring-
tone_txt] and select an option.
4
For other notification settings, check or uncheck the relevant checkboxes.
GUID
Title To change your message notification settings
Changes Valid from eDream 6.0. Only replaced one label with an icon.
Version 5
Author RongrongZ
Status Released*
GUID-DE7D5E9D-9544-491A-9E63-86DFAA4136D1
(Changed topic name to be in line with heading.)
GUID-F5A156A0-322D-4AD0-AF78-BA71783F50AE
91
This is an Internet version of this publication. © Print only for private use.
This is a draft publication for internal use only.
To change the delivery report settings for outgoing messages
1
From your Home screen [homescreen_strings_application_name_txt] , tap ID: ICN-SONYHOME-APPTRAY-NORMAL, then find and tap ID: ICN-SONY-APP-
MESSAGING.
2
Press ID: ICN-SONY-KEY-MENU, then tap Settings [conversations_strings_conversation-
list_menu_settings_txt] .
3
Tap Delivery report [conversations_strings_settings_delivery_report_txt] to activate or deactivate
delivery reports.
GUID GUID-2EAC8C35-A3F3-49C0-9A88-B52E29082E5F
Title To change the delivery report settings for outgoing messages
Changes delete a note for Lotus
Version 5
Author MikeCao
Status Released*
To view messages saved on the SIM card
1
From your Home screen [homescreen_strings_application_name_txt] , tap
ID: ICN-SONY-
HOME-APPTRAY-NORMAL, then find and tap ID: ICN-SONY-APPMESSAGING.
2
Press ID: ICN-SONY-KEY-MENU, then tap Settings [conversations_strings_conversation-
list_menu_settings_txt] > SIM messages [conversations_strings_settings_sim_messages_txt] .
GUID GUID-C5D5AE02-B914-4668-97D7-478A77D77AB2
Title To view messages saved on the SIM card
Changes Valid from eDream 6.0. Only replaced a label with an icon.
Version 4
Author RongrongZ
Status Released*
Google Talk™
Indexterm: "chat"
Indexterm: "instant messaging"
Indexterm: "Google Talk™"
You can use the Google Talk™ instant messaging application on your device to chat
with friends who also use this application.
GUID
Title Google Talk
Changes Device Term Change.
Version 4
Author Xiaxin Li
Status Released*
To start Google Talk™
1
From your Home screen [homescreen_strings_application_name_txt] , tap
HOME-APPTRAY-NORMAL.
2
Find and tap Talk [GOOGLE-TALK-CLIENT] .
GUID
Title To start Google Talk
Changes Valid for eDream 3.0
Version 4
Author RongrongZ
Status Released*
To reply to an instant message with Google Talk™
1
When someone contacts you on Google Talk™,
CHAT appears in the status bar.
2
Drag the status bar downwards, then tap the message and begin to chat.
GUID
Title To reply to an instant message with Google Talk
Changes Add condition only for FAQ. Change Talk to Google Talk™ for editor's com-
Version 3
Author Vera Qu
GUID-1E9CFE8C-50B8-49B1-94FC-29AD426BC9E6
ID: ICN-SONY-
GUID-39156C72-B0A6-4488-9F61-198A160ED9F1
ID: ICN-SONY-NOTIFY-
GUID-52935D59-02B4-4CD1-8B46-9EB6ACF6D202
ments.
92
This is an Internet version of this publication. © Print only for private use.

This is a draft publication for internal use only.
Status Released
93
This is an Internet version of this publication. © Print only for private use.

This is a draft publication for internal use only.
Indexterm: "email"
GUID GUID-F40849F4-44EB-4AFE-BFB7-387364E8AE14
Title Email - heading only
Changes
Version 1
Author JorgenL
Status Released
Getting started with Email
Indexterm: "email"
Use the Email application in your phone to send and receive emails through your
regular email account or through your corporate account. Or you can do both. Your
phone can handle several email accounts at the same time. You can set up these
accounts to run through one combined inbox, or through separate inboxes. Note that
emails you receive to your Gmail™ [GOOGLE-GMAIL-PLAIN] account can be accessed in the
phone from both the Email and the Gmail™ [GOOGLE-GMAIL-PLAIN] applications.
Your corporate Microsoft® Outlook® email messages have to be stored on a
Microsoft® Exchange server for the functionality described above to work. See Synchronising
your corporate email, calendar and contacts on page 197 for more information.
GUID GUID-08D874D0-85C7-406B-95B1-EEB0903FCB6F
Title Getting started with Email
Changes
Version 1
Author JorgenL
Status Released*
Using email accounts
Indexterm: "email"
Sub-indexterm: "more than one account"
GUID
Title Using email accounts - heading
Changes eDream 2.1 Robyn/Mimmi/Shakira & Rachael
Version 2
Author UlrikaK
Status Released
To set up an email account in your phone
1
From your Home screen [homescreen_strings_application_name_txt] , tap ID: ICN-SONYHOME-APPTRAY-NORMAL.
2
Find and tap ID: ICN-SONY-APP-EMAIL.
3
Enter your email address and password, then tap Next [next_action] .
4
If the settings for the email account cannot be downloaded automatically,
complete the setup manually. If necessary, contact your email service provider
for detailed settings. For corporate email setup on your phone, select
Exchange Active Sync [account_setup_account_type_exchange_action] as the account type.
5
When you are prompted, enter a name for your email account, so that it is
easily identifiable. The same name shows in the emails you send from this
account. When you are finished, tap Next [next_action] .
GUID-83C8D331-63FE-4FD8-8DD8-BA39AEF13F88
You can set up more than one email account.
GUID GUID-6D8E1793-757A-4533-9EEE-EB05ED33EEFA
Title To set up an email account on your device
Changes For Tsubasas html User guide. Removed lnik.
Version 12.1.1
Author JorgenL
Status Released
94
This is an Internet version of this publication. © Print only for private use.

This is a draft publication for internal use only.
To set an email account as your default account
1
From your Home screen [homescreen_strings_application_name_txt] , tap ID: ICN-SONYHOME-APPTRAY-NORMAL.
2
Find and tap ID: ICN-SONY-APP-EMAIL.
3
Press ID: ICN-SONY-KEY-MENU, then tap Settings [settings_action] .
4
Tap the account you want to use as the default account for composing and
sending emails.
5
Mark the Default account [account_settings_default_label] checkbox. The inbox of the
default account appears every time you open the Email application.
If you only have one email account, this account is automatically the default account.
GUID GUID-B96CB0AB-5A56-4EC7-84C7-E0760681D683
Title To set an email account as your default account
Changes For eD4.1 ICS update.
Version 6
Author RongrongZ
Status Released*
To add an extra email account in your phone
1
From your Home screen [homescreen_strings_application_name_txt] , tap
ID: ICN-SONY-
HOME-APPTRAY-NORMAL.
2
Find and tap ID: ICN-SONY-APP-EMAIL.
3
Press ID: ICN-SONY-KEY-MENU, then tap Settings [settings_action] .
4
Tap Add account [add_account_action] .
5
Enter the email address and password, then tap Next [next_action] .
6
If the settings for the email account cannot be downloaded automatically,
complete the setup manually. If necessary, contact your email service provider
for detailed settings.
7
When prompted, enter a name for your email account so that it is easily
identifiable. The same name shows in the emails that you send from this
account.
8
When you are finished, tap Next [next_action] .
GUID
Title To add an extra email account on your device
Changes For eD4.1 ICS update.
Version 10
Author RongrongZ
Status Released*
GUID-74CB7D9A-D8E7-415A-B56A-6FF254D6705A
To remove an email account from your phone
1
From your Home screen [homescreen_strings_application_name_txt] , tap ID: ICN-SONYHOME-APPTRAY-NORMAL.
2
Find and tap ID: ICN-SONY-APP-EMAIL.
3
Press ID: ICN-SONY-KEY-MENU, then tap Settings [settings_action] .
4
Tap the account you want to remove.
5
Find and tap Remove account [account_settings_delete_account_label] > OK [okay_action] .
GUID
Title To remove an email account from your device
Changes For eD4.1 ICS update.
Version 9
Author RongrongZ
Status Released*
GUID-869BE5E7-A9F0-491E-B98C-0C9F2A2E36D3
Gmail™ [GOOGLE-GMAIL] and other Google™ services
Indexterm: "Gmail™"
If you have a Google™ account, you can use the Gmail™ [GOOGLE-GMAIL-PLAIN] application
in your phone to read, write and organise email messages. After you set up your
Google™ account to work in the phone, you can also chat to friends using the
95
This is an Internet version of this publication. © Print only for private use.

This is a draft publication for internal use only.
Google Talk™ application, synchronise your phone calendar application with your
Google Calendar™, and download applications and games from Google Play™.
The services and features described in this chapter may not be supported in all countries or
regions, or by all networks and/or service providers in all areas.
GUID GUID-7F044258-0B66-4E0E-95C6-A0946A3F377C
Title Google Mail/Gmail and other Google services
Changes Change from Phoenix Android Market changed
Version 10
Author CynthiaH
Status Released*
To set up a Google™ account in your phone
Indexterm: "Google™ account setup"
1
From your Home screen [homescreen_strings_application_name_txt] , tap ID: ICN-SONYHOME-APPTRAY-NORMAL.
2
Find and tap Settings [settings_label_launcher] > Accounts & sync [sync_settings] > Add
account [add_account_label] > Google [SYNC-ACCOUNTS-GOOGLE-TM] .
3
Follow the registration wizard to create a Google™ account, or sign in if you
already have an account. Your phone is now ready to use with Gmail™ [GOOGLE-
GMAIL-PLAIN] , Google Talk™ and Google Calendar™.
You can also sign in or create a Google™ account from the setup guide the first time you start
your phone. Or you can go online and create an account at www.google.com/accounts.
GUID GUID-BF97C658-8B71-43CE-B8CF-47DD6D0FC9A6
Title To set up a Google™ account on your device
Changes Only replaced "Gmail" with a new label.
Version 8
Author RongrongZ
Status Released*
To open the Gmail™ [GOOGLE-GMAIL] application
1
From the Home screen [homescreen_strings_application_name_txt] , tap ID: ICN-SONYHOME-APPTRAY-NORMAL.
2
Find and tap Gmail [GOOGLE-GMAIL-NO-TM] .
GUID
Title To open Gmail/Google Mail
Changes label with varid GOOGLE-MAIL is replaced with label with varid GOOGLE-
Version 4
Author Xiaxin Li
Status Released*
GUID-3E791330-5603-4425-BBC9-4EDDF20DE362
GMAIL-NO-TM
Using email
GUID
Title Using email - heading only
Changes Generic
Version 1
Author OskarW
Status Released
GUID-9B3A7116-6682-4D17-97B1-952D5D094A4B
96
This is an Internet version of this publication. © Print only for private use.

This is a draft publication for internal use only.
To create and send an email message
1
Make sure that you have set up an email account.
2
From your Home screen [homescreen_strings_application_name_txt] , tap ID: ICN-SONYHOME-APPTRAY-NORMAL, then find and tap Email [em_app_name] .
3
If you are using several email accounts, tap
ID: ICN-SONY-EMAIL-SELECTACCOUNT at the top of the screen and select the account that you want to
use.
4
Tap ID: ICN-SONY-CONV-NEW-MESSAGE, then tap To [message_compose_to_hint]
and start typing the recipient's name or email address, or tap
ID: ICN-SONYBTN-ADD-CONTACT and select one or more recipients from your Contacts
list.
5
Enter the email subject and message text, then tap ID: ICN-SONY-MENUSEND-HOLO-LIGHT.
GUID GUID-F0395077-1D6B-4C89-99DB-78251B848973
Title To create and send an email message
Changes As per the request from Henrik. Changed from verion 12 into a shorter ver-
Version 15
Author Xiaxin Li
Status Released
sion resembling version 14.
To receive email messages
1
From your Home screen [homescreen_strings_application_name_txt] , tap
ID: ICN-SONY-
HOME-APPTRAY-NORMAL.
2
Find and tap ID: ICN-SONY-APP-EMAIL. The inbox of your default email
account appears.
3
If you want to check another email account that you have set up on your
phone, tap the bar containing ID: ICN-SONY-SPINNER-AB-DEFAULTHOLO-LIGHT, then select the account you want to check. If you want to check
all your email accounts at once, tap the bar containing ID: ICN-SONYSPINNER-AB-DEFAULT-HOLO-LIGHT, then tap Combined view [mailbox_list_ac-
count_selector_combined_view] .
4
To download new messages, tap ID: ICN-SONY-IC-MENU-REFRESHHOLO-LIGHT.
If you have set up a corporate email account, you can set the check frequency to Automatic
(Push) [account_setup_options_mail_check_frequency_push] .
GUID GUID-02C2D920-6923-4830-96DE-028806F248A8
Title To receive email messages
Changes For eD4.1 ICS update.
Version 8
Author RongrongZ
Status Released*
To read your email messages
1
From your Home screen [homescreen_strings_application_name_txt] , tap
ID: ICN-SONY-
HOME-APPTRAY-NORMAL.
2
Find and tap ID: ICN-SONY-APP-EMAIL. The inbox of your default email
account appears. If you want to check another email account that you have set
up on your phone, tap the bar containing ID: ICN-SONY-SPINNER-ABDEFAULT-HOLO-LIGHT, and select the account you want to check.
3
In the email inbox, scroll up or down and tap the email you want to read.
4
In the body text field, spread two fingers apart, or pinch them together, to
zoom in or out.
5
Use the forward and backward arrows to read your next or previous message.
GUID
Title To read your email messages
Changes For eD4.1 ICS update.
Version 4
Author RongrongZ
Status Released*
GUID-FD9F4939-113D-4787-883B-F276208977B9
97
This is an Internet version of this publication. © Print only for private use.

This is a draft publication for internal use only.
To view an email message attachment
1
From your Home screen [homescreen_strings_application_name_txt] , tap ID: ICN-SONYHOME-APPTRAY-NORMAL.
2
Find and tap ID: ICN-SONY-APP-EMAIL. The inbox of your default email
account appears. If you want to check another email account that you have set
up on your phone, tap the bar containing ID: ICN-SONY-SPINNER-ABDEFAULT-HOLO-LIGHT, then select the account you want to check.
3
Find and tap the desired message in your email inbox. Emails with attachments
are identified by ID: ICN-SONY-MENU-ATTACHMENT.
4
Tap the attachment tab in the email body. All attachments appear in a list.
5
Tap Load [message_view_attachment_load_action] below an attachment item.
6
When the attachment is downloaded, tap View [message_view_attachment_view_action] or
Save [message_view_attachment_save_action] .
GUID GUID-6F871E93-8365-4B52-A027-F547C8999D86
Title To view an email message attachment
Changes For eD4.1 ICS update.
Version 6
Author RongrongZ
Status Released*
To save a sender's email address to your contacts
1
From your Home screen [homescreen_strings_application_name_txt] , tap
ID: ICN-SONY-
HOME-APPTRAY-NORMAL.
2
Find and tap ID: ICN-SONY-APP-EMAIL. The inbox of your default email
account appears. If you want to check another email account that you have set
up on your phone, tap the bar containing ID: ICN-SONY-SPINNER-ABDEFAULT-HOLO-LIGHT, then select the account you want to check.
3
Find and tap the desired message in your email inbox.
4
Tap the name of the sender.
5
Tap OK [ok] when you are prompted to add the name to your contacts.
6
Select an existing contact, or tap Create new contact [pickerNewContactHeader] if you
want to create a new contact.
7
Edit the contact information and tap Done [menu_done] .
GUID
Title To save a sender's email address to your contacts
Changes For eD4.1 ICS update.
Version 8
Author RongrongZ
Status Released*
GUID-2E75631A-CAE2-4121-AF6C-6EE69F5AF6B0
To reply to an email message
1
From your Home screen [homescreen_strings_application_name_txt] , tap ID: ICN-SONYHOME-APPTRAY-NORMAL.
2
Find and tap ID: ICN-SONY-APP-EMAIL. The inbox of your default email
account appears. If you want to check another email account that you have set
up on your phone, tap the bar containing ID: ICN-SONY-SPINNER-ABDEFAULT-HOLO-LIGHT, then select the account you want to check.
3
Find and tap the message you want to reply to, then tap ID: ICN-SONY-ICREPLY.
4
To reply to all, tap ID: ICN-SONY-MORE-ACTIONS-EMAIL, then tap Reply
all [reply_all_action] .
5
Enter your reply, then tap ID: ICN-SONY-MENU-SEND-HOLO-LIGHT.
GUID
Title To reply to an email message
Changes For eD4.1 ICS update.
Version 8
Author RongrongZ
Status Released*
GUID-004FD0FF-8AF0-4E74-855D-533F78929BB1
98
This is an Internet version of this publication. © Print only for private use.

This is a draft publication for internal use only.
To forward an email message
1
From your Home screen [homescreen_strings_application_name_txt] , tap ID: ICN-SONYHOME-APPTRAY-NORMAL.
2
Find and tap ID: ICN-SONY-APP-EMAIL. The inbox of your default email
account appears. If you want to check another email account that you have set
up on your phone, tap the bar containing ID: ICN-SONY-SPINNER-ABDEFAULT-HOLO-LIGHT, then select the account you want to check.
3
Find and tap the message you want to forward.
4
Tap ID: ICN-SONY-MORE-ACTIONS-EMAIL, then tap Forward [forward_action] .
5
Tap To [message_compose_to_hint] and enter the recipient's address.
6
Enter your message text, then tap
ID: ICN-SONY-MENU-SEND-HOLO-
LIGHT.
GUID GUID-887997C5-464E-4EC1-8783-06B4402A4008
Title To forward an email message
Changes For eD4.1 ICS update.
Version 9
Author RongrongZ
Status Released*
To delete an email message
1
From your Home screen [homescreen_strings_application_name_txt] , tap
ID: ICN-SONY-
HOME-APPTRAY-NORMAL.
2
Tap ID: ICN-SONY-APP-EMAIL. The inbox of your default email account
appears. If you want to check another email account that you have set up on
your phone, tap the bar containing ID: ICN-SONY-SPINNER-AB-DEFAULTHOLO-LIGHT, then select the account you want to check.
3
In your email inbox, mark the checkbox for the email you want to delete, then
tap ID: ICN-SONY-MENU-DELETE.
GUID
Title To delete an email message
Changes For eD4.1 ICS update.
Version 7
Author RongrongZ
Status Released*
GUID-730E5EA9-179D-443E-9A68-6608AA6E4712
To mark a read email as unread
1
From your Home screen [homescreen_strings_application_name_txt] , tap ID: ICN-SONYHOME-APPTRAY-NORMAL.
2
Find and tap ID: ICN-SONY-APP-EMAIL. The inbox of your default email
account appears. If you want to check another email account that you have set
up on your phone, tap the bar containing ID: ICN-SONY-SPINNER-ABDEFAULT-HOLO-LIGHT, then select the account you want to check.
3
Mark the checkbox for the desired email, then tap ID: ICN-SONY-SUPPORTMAIL-SE.
To mark an unread email as read, mark its checkbox, then tap
MARK-READ-HOLO-LIGHT.
GUID GUID-401CA411-0A1F-4A0E-9B2B-453A37EF0DDA
Title To mark a read email as unread
Changes From eD4.1 ICS update.
Version 1
Author RongrongZ
Status Released
ID: ICN-SONY-IC-MENU-
99
This is an Internet version of this publication. © Print only for private use.

This is a draft publication for internal use only.
To star an email
1
From your Home screen [homescreen_strings_application_name_txt] , tap ID: ICN-SONYHOME-APPTRAY-NORMAL.
2
Find and tap ID: ICN-SONY-APP-EMAIL. The inbox of your default email
account appears. If you want to check another email account that you have set
up on your phone, tap the bar containing ID: ICN-SONY-SPINNER-ABDEFAULT-HOLO-LIGHT, then select the account you want to check.
3
Mark the checkbox for the email that you want to star, then tap ID: ICNSONY-INFINITEVIEW-FAVORITE-BTN.
To unstar an email, mark it, then tap ID: ICN-SONY-INFINITEVIEW-FAVORITE-BTNSELECTED.
GUID GUID-7B44517D-C6F1-4D09-AB34-6F9B97705CCE
Title To star an email
Changes For eD4.1 ICS update.
Version 1
Author RongrongZ
Status Released
To view all starred emails
1
From your Home screen [homescreen_strings_application_name_txt] , tap ID: ICN-SONYHOME-APPTRAY-NORMAL, then find and tap ID: ICN-SONY-APP-EMAIL.
2
Tap ID: ICN-SONY-IC-LIST-FOLDER, then tap Starred [account_folder_list_summary_star-
red] . Starred emails from all your accounts appear in a list.
GUID
Title To view all starred emails
Changes For eD4.1 ICS update.
Version 1
Author RongrongZ
Status Released
GUID-70E72EE5-C600-4C03-8DEC-E8144982DB37
To manage your email in batches
1
From your Home screen [homescreen_strings_application_name_txt] , tap ID: ICN-SONYHOME-APPTRAY-NORMAL, then find and tap ID: ICN-SONY-APP-EMAIL.
The inbox of your default email account appears. If you want to check another
email account that you have set up on your phone, tap the bar containing ID:
ICN-SONY-SPINNER-AB-DEFAULT-HOLO-LIGHT, then select the account you
want to check.
2
Mark the checkboxes for the emails you want to select.
3
When you are finished, tap one of the icons in the tool bar to, for example,
move the selected emails to another folder.
GUID
Title To manage your email in batches
Changes For eD4.1 ICS update.
Version 2
Author RongrongZ
Status Released*
GUID-5AC2F609-65C5-4B19-A063-ED590A5935FF
To view all folders for one email account
1
From your Home screen [homescreen_strings_application_name_txt] , tap ID: ICN-SONYHOME-APPTRAY-NORMAL, then find and tap ID: ICN-SONY-APP-EMAIL.
The inbox of your default email account appears. If you want to check another
email account that you have set up on your phone, tap the bar containing ID:
ICN-SONY-SPINNER-AB-DEFAULT-HOLO-LIGHT, then select the account you
want to check.
2
Tap ID: ICN-SONY-IC-LIST-FOLDER to view all the folders in the account.
GUID
Title To view all folders for one email account
Changes For eD4.1 ICS update.
Version 2
Author RongrongZ
Status Released*
GUID-2C45BDBB-3267-4D66-826E-073CEBD6F135
100
This is an Internet version of this publication. © Print only for private use.
 Loading...