

Sony PEGT625C Clié, PEGT425 Clié User Manual

CLIÉ Operating
Instructions
PEG-T425/PEG-T625C
N

Read this first
CLIE Operating Instructions
nN
1
Read this first
Notice
This product contains software owned by Sony and licensed by third parties. Use of such software is subject to the terms and conditions
of license agreements enclosed with this product. Software specifications are subject to change without notice and may not necessarily
be identical to current retail versions.
© 2001 Sony Corporation. All rights reserved.
Reproduction in whole or in part without permission is prohibited.
Copyright laws prohibit reproducing the software or the software manual in whole or in part, or renting the software without the
permission of the copyright holder.
In no event will SONY be liable for any financial damage or loss of profits, including claims made by third parties, arising out of the use
of the software supplied with this player.
In the event a problem occurs with this software as a result of defective manufacturing, SONY will replace it at SONY ’s option or issue
a refund. However, SONY bears no other responsibility.
The software provided with this player cannot be used with equipment other than that which it is designated for use with.
Please note that, due to continued efforts to improve quality, the software specifications may be changed without notice.
Program © 2001 Sony Corporation, © 2001 Palm Inc. or its subsidiaries. All rights reserved.
Trademarks
Sony, Memory Stick™, the Memory Stick logo and PictureGear™ are trademarks of Sony Corporation.
®
Graffiti
subsidiaries.
IBM
Microsoft
MMX™ and Pentium
AvantGo
, HotSync® and Palm OS® are registered trademarks, and the HotSync logo and Palm™ are trademarks of Palm Inc. or its
®
and PC/AT are registered trademarks of International Business Machines Corporation.
®
Windows®, Outlook®, DirectX® and the Windows 98 logo are registered trademarks of Microsoft Corporation.
®
are registered trademarks of Intel Corporation.
®
, AvantGo Client™ and the AvantGo logo are registered trademarks of AvantGo Inc.
Read this first
CLIE Operating Instructions
nN
2
Pumatech®, the Pumatech logo, Intellisync® and Intellisync Lite® are trademarks of Pumatech Inc.that may be registered in some
jurisdictions.
®
QuickTime
Adobe
Documents To Go
This product includes fonts owned by TypeBank Co., Ltd. under license.
All other trademarks are trademarks of their respective owners.
Sample movies and music: cocoro.prc (from DVD Hawaiian Breeze - KOHALA Collection (CCBN-27013))
Music: Mango Cooler (Composed by Charles Michael Brotman. Performed by KOHALA)
Copyright © 2001 cocoronetworks Inc.
Copyright © 1998, 2001 Palm Records Inc.
All rights reserved.
http://www.cocoronet.com/en/
Please contact your nearest Sony dealer if you have any problems with your Sony product.
and the QuickTime logo® are trademarks used under license. QuickTime is registered in the U.S. and other countries.
®
and Adobe Acrobat® Reader™ are trademarks of Adobe Systems Incorporated.
®
is a trademark of DataViz, Inc.
Safety information
Opening the unit, for whatever reason, could lead to damages that are not covered by the guarantee.
To avoid electrical shock, do not open the cabinet. Refer servicing to qualified personnel only.
Picture distortion may occur if this equipment is positioned in close proximity to any equipment emitting
electromagnetic radiation.
To prevent fire or shock hazard, do not expose your CLIÉ handheld to rain or moisture.
Use your CLIÉ handheld only with the supplied AC adapter. To disconnect your CLIÉ handheld completely
from mains voltage, unplug the AC-adapter.
Please make sure that the socket outlet is easily accessible.
Read this first
nN
3
Owner's record
The product number and serial number are located on the back of the CLIÉ handheld. Record the serial
number in the space provided below. Refer to these numbers whenever you call your Sony dealer regarding
this product.
Product number: PEG-T425/PEG-T625C
Serial number: ______________
CLIE Operating Instructions
Warnings
General
To prevent fire or shock hazard, do not expose the unit to rain or moisture.
To avoid electrical shocks, do not open the cabinet.
Refer servicing to qualified personnel only.
The socket-outlet should be installed near the equipment and should be easily accessible.
Regulatory information
This product conforms to the following European Directives:
73/23/EEC (Low Voltage Directive)
89/336/EEC, 92/31/EEC (EMC Directives)
93/68/EEC (CE Marking Directive)
This product complies with EN 55022 Class B and EN 55024. For use in the following environments:
residential, commercial and light-industrial.
This product has been tested and found compliant with the limits set out in the EMC Directive for using
connection cables not longer than 3 metres (9.8 feet).
Read this first
CLIE Operating Instructions
nN
Disposal of lithium-ion polymer batteries
This product contains a rechargeable lithium-ion polymer battery that should not have to be replaced
during the lifetime of the product. For changing or removing this battery, please contact CLIÉ Technical
Support.
Do not handle damaged or leaking lithium-ion polymer batteries. Dispose of promptly and properly.
The battery pack used in this device may present a fire or chemical burn hazard if mistreated. Do not
disassemble, heat above 60°C (140°F) or incinerate. Dispose of used batteries promptly.
Keep away from children.
Dispose of properly at end-of-life.
In some areas the disposal of lithium-ion polymer batteries in households or business waste may be
prohibited. Please use the public collection system.
4
Welcome
CLIE Operating Instructions
nN
5
Welcome
Congratulations on your latest Sony purchase! The Personal Entertainment Organiser (hereafter referred to
as 'CLIÉ handheld') functions as a personal digital organiser where you can record addresses, events, memos
and much more. As well as these functions, the CLIÉ handheld also works as an information terminal with
an excellent extended ability to connect to other devices such as personal computers.
Enjoy the following major features of the CLIÉ handheld:
The Personal Digital Assistant applications: Date Book, Address Book, To Do List, Memo Pad and
Calculator.
Data exchange capabilities or data synchronization with your computer (HotSync®).
Playback of still or motion pictures working with PictureGear™ Lite software on your computer.
Data exchange with a computer or other CLIÉ handhelds using Memory Stick™ and Jog Dial™.
Extended features with the installation of add-on applications for the Palm Operating System (see the
Software Guide for more).
Getting Started
CLIE Operating Instructions
nN
6
Getting Started
This section is designed to complement the printed Read This First document. Consult the printed booklet
for details.
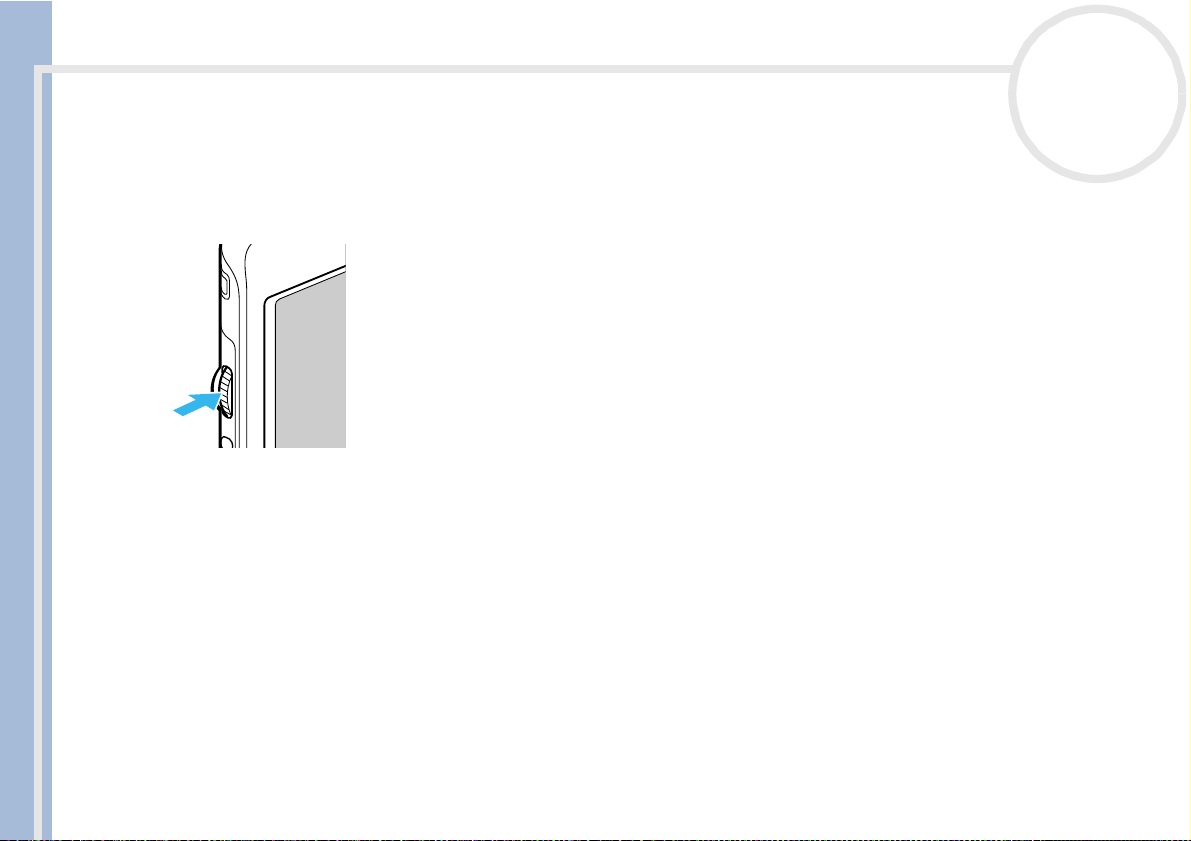
Turning your CLIÉ handheld on and off
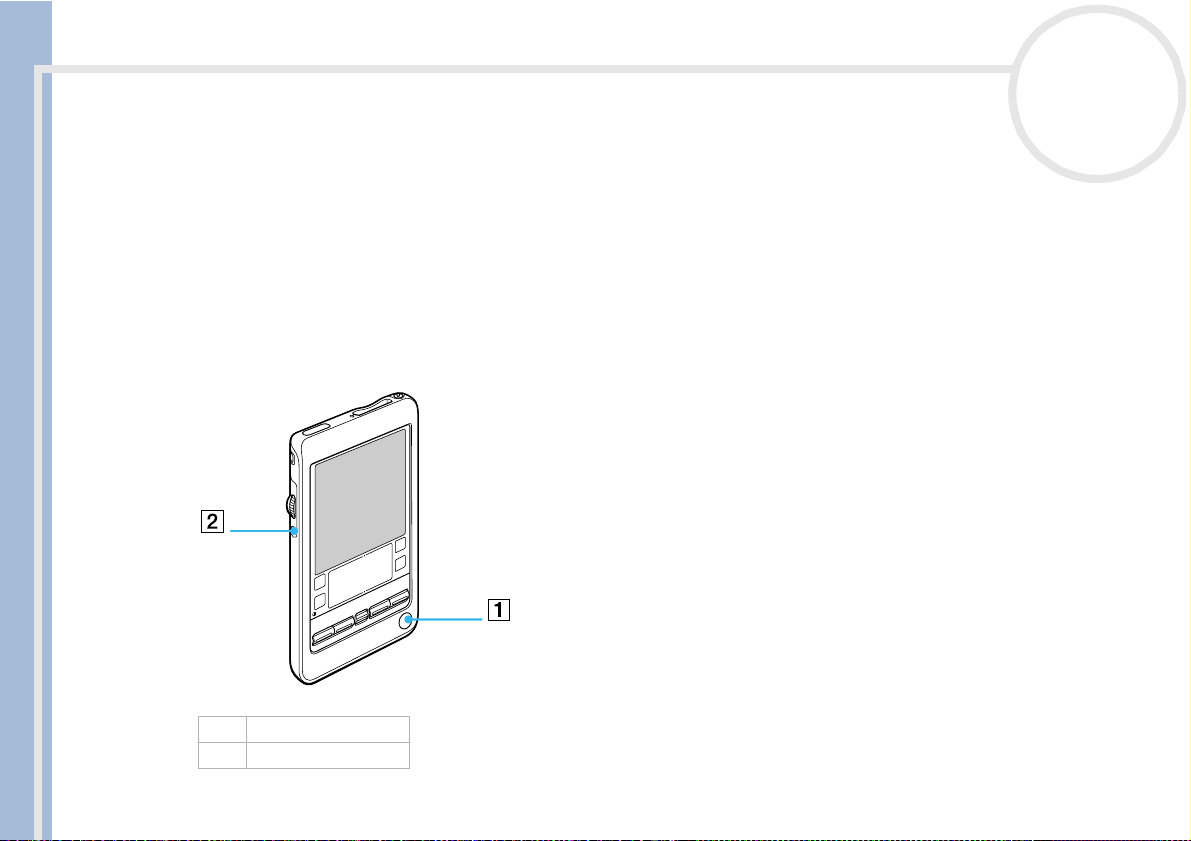
To turn on your CLIÉ handheld, proceed as follows:
1 Press the power button (1) as shown in the illustration.
Your CLIÉ handheld is turned on.
If this is the first time you are using your handheld, you will see the Setup screen.
1. Power button
2. Back button
Getting Started
nN
7
To turn off your CLIÉ handheld, proceed as follows:
Press the power button.
The power is turned off. You do not have to save data, quit an application or perform any of the other
shutdown procedures that your computer requires.
Holding the POWER button down for two seconds or longer will turn the screen's backlight on or off.
Using the stylus
CLIE Operating Instructions
With your CLIÉ handheld, you can use the supplied stylus to enter characters or to specify an application you
want to run.
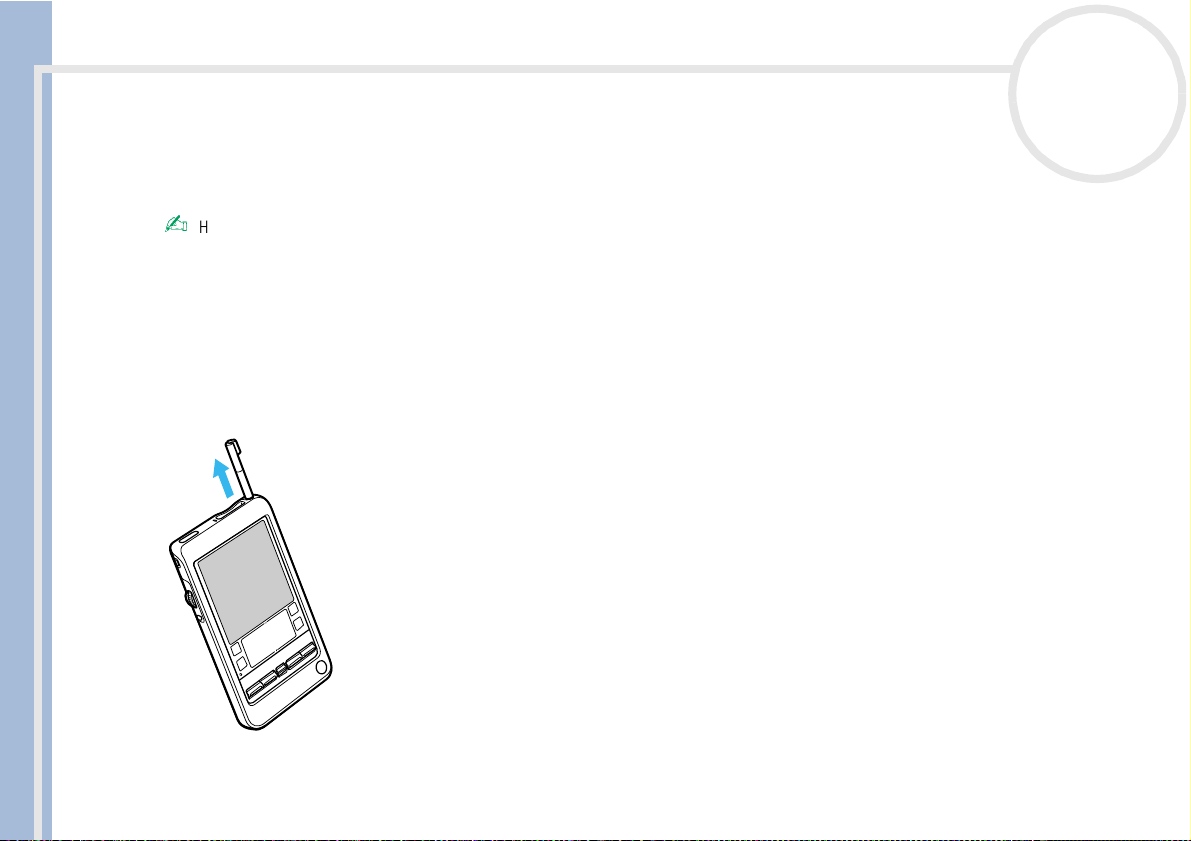
The stylus is stored in the holder at the back of your CLIÉ handheld. As shown below, simply pull it out when
needed. To avoid losing the stylus, always put it back in its holder after use.
Getting Started
CLIE Operating Instructions
nN
8
Tapping
To open an application or select an item, take the stylus and press the tip lightly on the icon or item on the
screen as shown.
This action is called tapping.
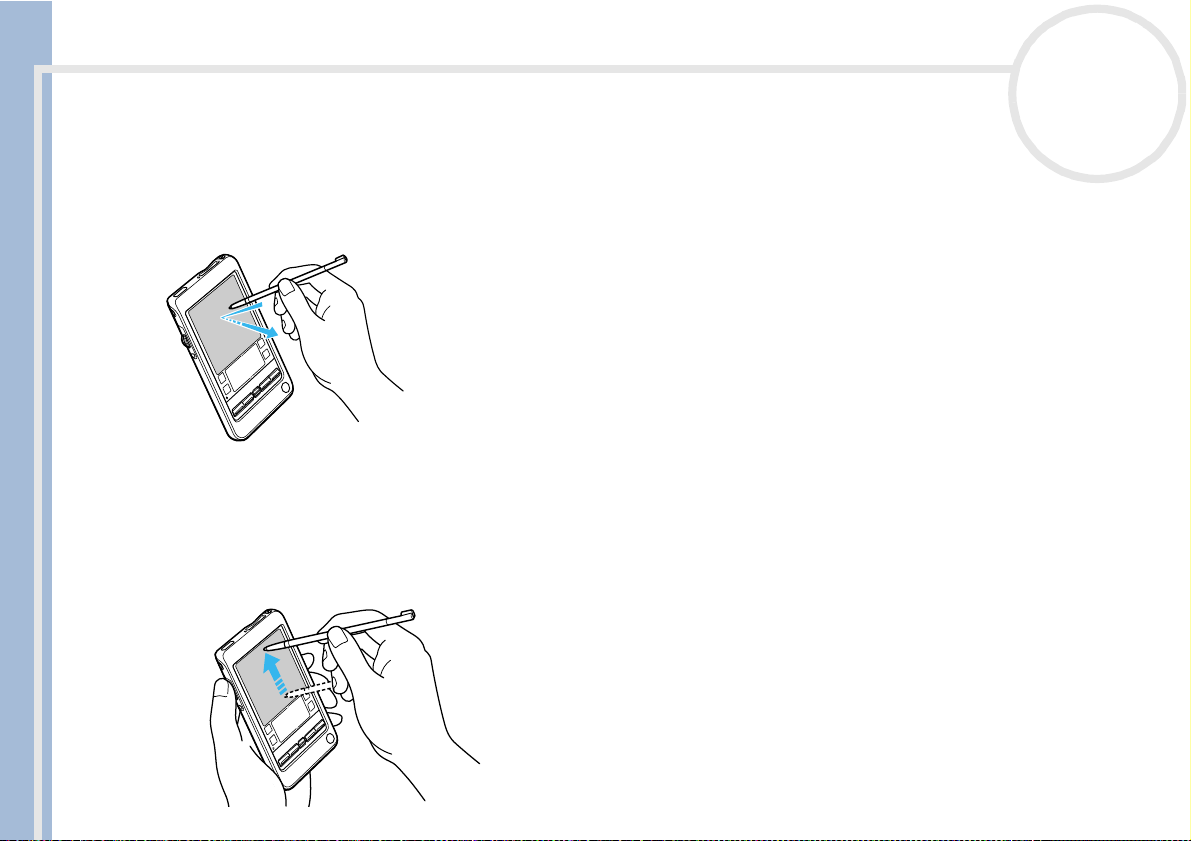
Dragging
Just as you can drag the mouse to move objects or text on your computer, you can use the stylus to drag an
item on the screen of your CLIÉ handheld.
To drag, press the stylus lightly on the item and move it along the screen surface to its new position.
Getting Started
nN
You can use the dragging action in the following scenarios:
To display data above or below the current viewing area on the screen, use the stylus to drag the slider
of any scroll bar.
To select multiple characters or items together, drag the stylus along all the required characters or items.
To display the onscreen Graffiti® Help, drag vertically the stylus from the bottom of the writing area to
the top of the screen.
You can assign the full-screen drag to another activity.
9
CLIE Operating Instructions
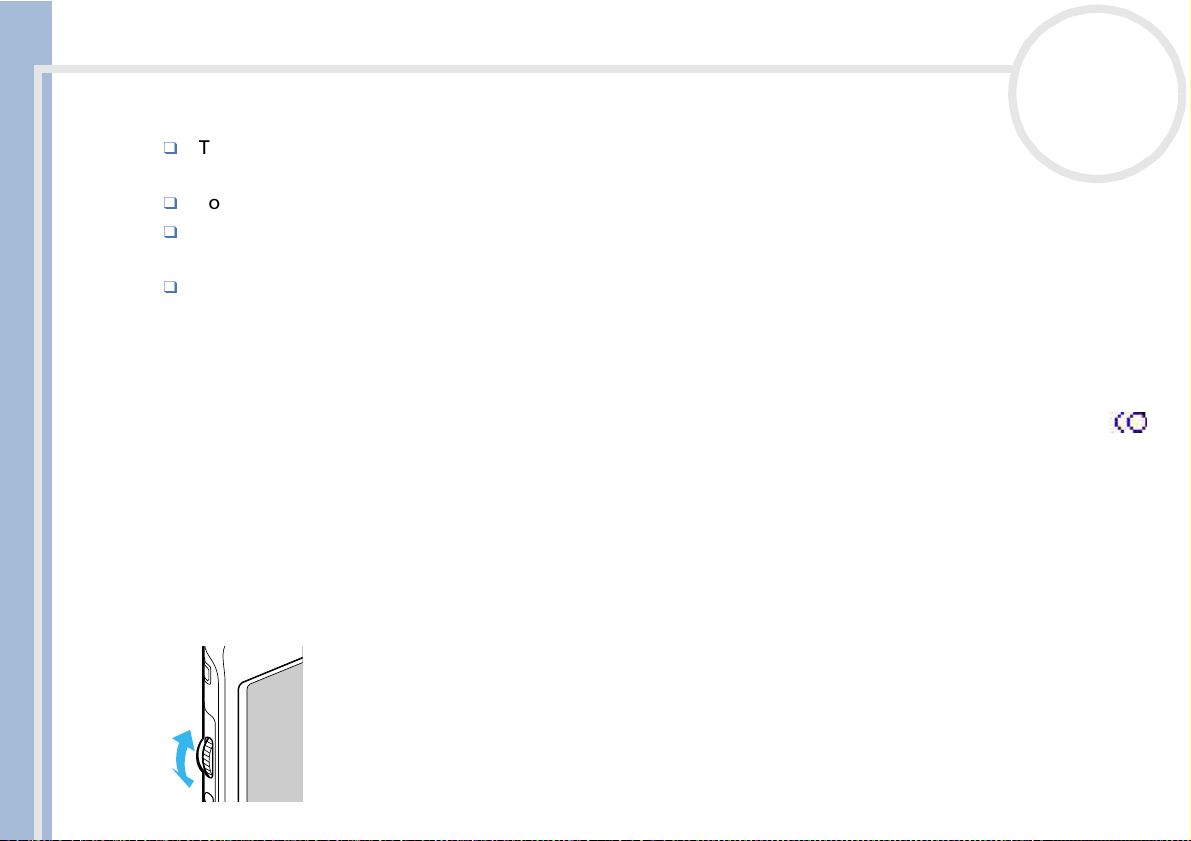
Using the Jog Dial™
Your CLIÉ handheld is equipped with a Jog Dial™, which allows you to perform all major operations without
the stylus. You can operate your CLIÉ handheld using the Jog Dial™ with just one hand.
The icon of any application that supports Jog Dial™ operations is marked with the Jog Dial™ symbol .
For other applications, you can also use the JogAssist function to enable Jog Dial™ operations. For details,
see Changing the Jog Dial™ preferences (page 121).
Rotating the Jog Dial™
Rotate the Jog Dial™ to select various items in succession or to select an application to start. The operations
you can perform by rotating the Jog Dial™ differ depending on the application you are using. For details,
refer to the instructions for each application.
Getting Started
CLIE Operating Instructions
nN
10
Pressing the Jog Dial™
Press the Jog Dial™ to highlight the item or to run the application you selected by rotating the Jog Dial™.
The operations you can carry out by pressing the Jog Dial™ differ depending on the application you are
using. For details, refer to the instructions for each application.
Pressing while rotating the Jog Dial™
Some applications support operations executed by rotating and pressing the Jog Dial™. For details, refer to
the instructions for each application.
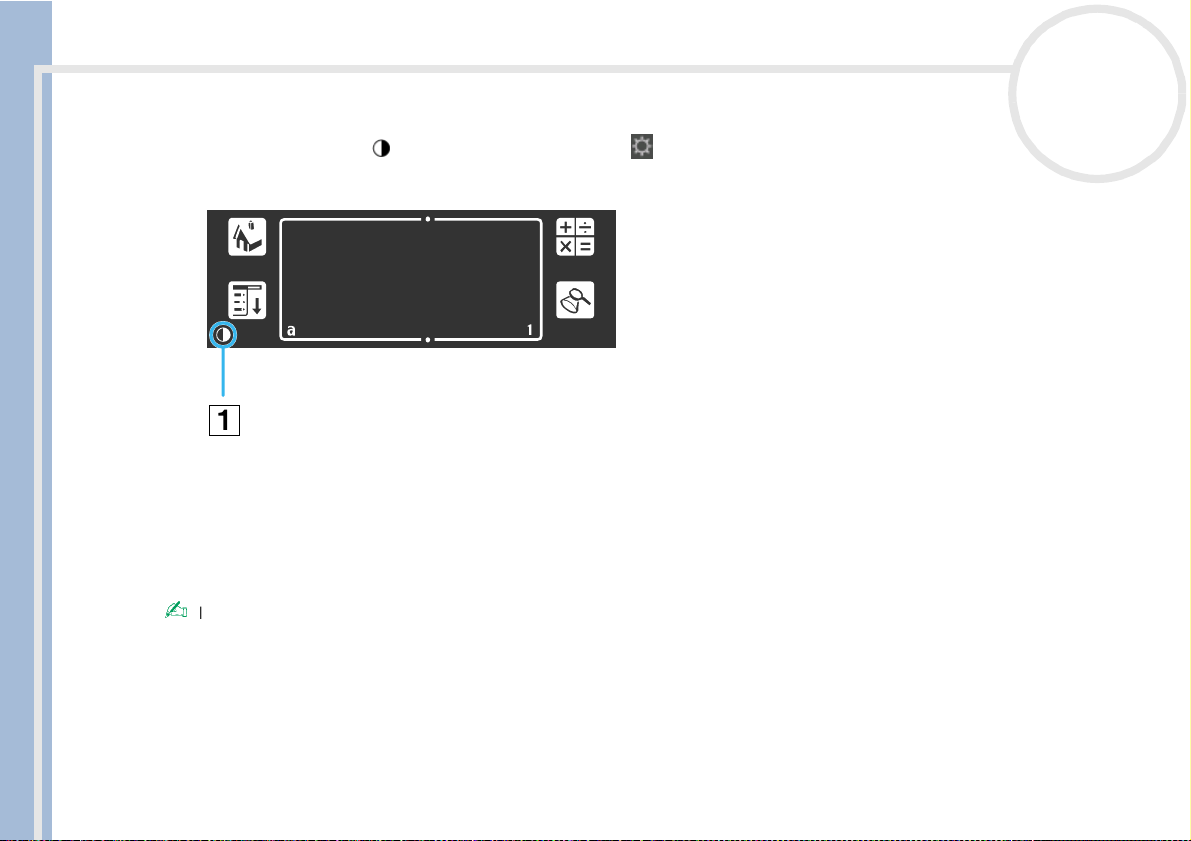
Adjusting the backlight
You can turn the backlight on the screen on or off, or adjust the contrast (PEG-T425) and/or brightness
(PEG-T625C only) according to the lighting conditions or temperature of the environment in which you are
using your CLIÉ handheld.
To turn the backlight on and off, press and hold down the power button for more than two seconds.
Even with the backlight on, you may need to further adjust the brightness (PEG-T625C only) on the screen.
Getting Started
CLIE Operating Instructions
nN
To adjust the brightness (PEG-T625C)/contrast level, proceed as follows:
1 Tap the contrast icon (1) (PEG-T425 only)/ brightness icon (1) (PEG-T625C only).
The adjustment control screen is displayed.
2 To change the brightness (PEG-T625C)/contrast (PEG-T425) level slightly, tap to the left or right.
3 To change the level considerably, drag the slider to the left or right.
You can also press the scroll button to move the slider gradually.
4 Tap Done.
The brightness (PEG-T625C)/contrast (PEG-T425) level is adjusted.
If the digitizer is not configured correctly, you may not be able to make the adjustments properly. For details, see Turning on your CLIÉ Handheld
for the first time in the Read This First manual.
The icon on the CLIÉ handheld shown on the illustration is the contrast icon of the PEG-T425.
11
Resetting your CLIÉ handheld
Resetting your CLIÉ handheld
Under normal circumstances, you will not have to reset your CLIÉ handheld.
On rare occasions, however, your CLIÉ handheld’s buttons or screen may no longer respond due to
insufficient memory or other reasons. In this case, you need to perform a reset to get your CLIÉ handheld
running again.
Performing a soft reset
nN
12
CLIE Operating Instructions
A soft reset tells your CLIÉ handheld to stop what it is doing and start over again. All records and entries
stored on your CLIÉ handheld are retained with a soft reset.
To perform a soft reset, proceed as follows:
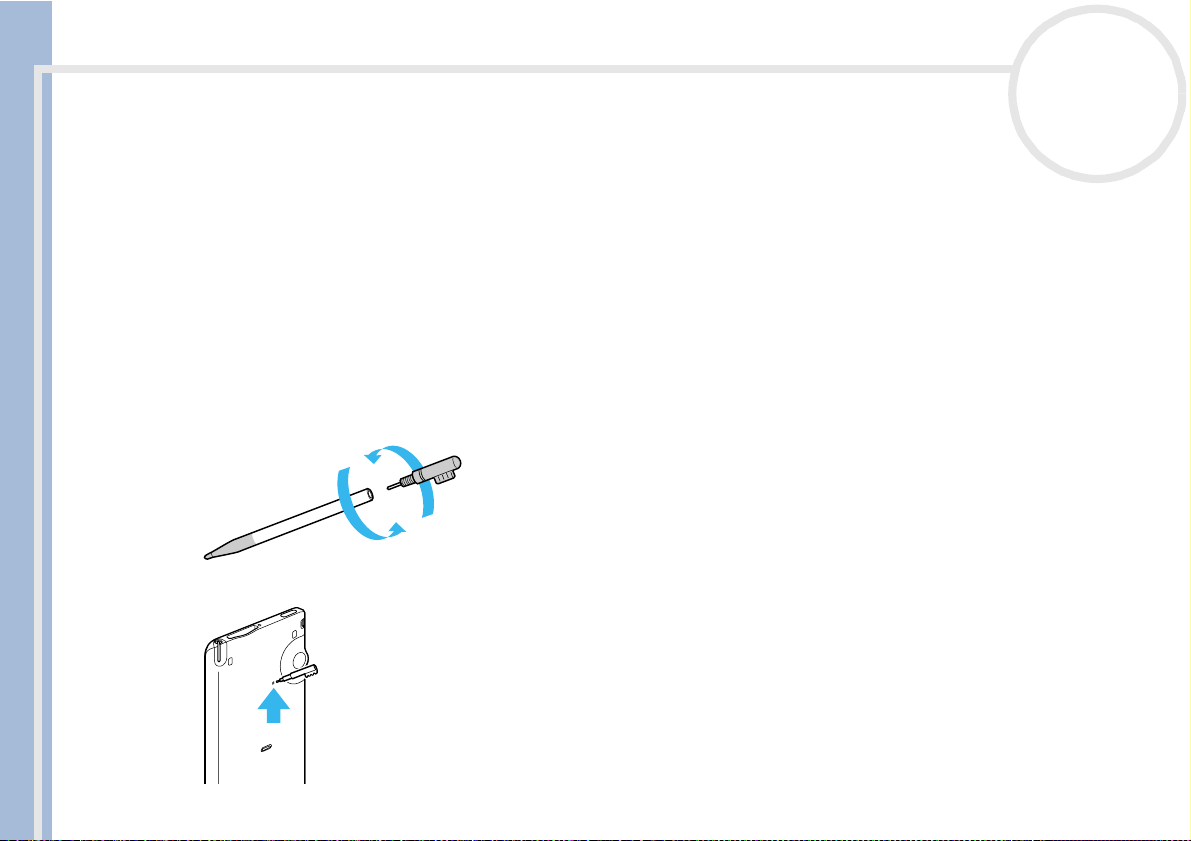
1 Take out the reset tip by unscrewing the metal barrel from the stylus quill, as shown below.
2 Use the reset tip to gently press the reset button inside the hole on the back panel of your CLIÉ handheld.
3 The system shuts down and then restarts.
After restarting, the system displays Palm Powered, CLIÉ, and Sony, followed by the
Preferences screen for setting the time and date.
Resetting your CLIÉ handheld
Performing a hard reset
Please be fully aware that following the procedure below will make you lose all the data you have saved on
your CLIÉ handheld!
If there is a problem that a soft reset cannot resolve, you need to perform a hard reset to restart your CLIÉ
handheld.
With a hard reset, all records and entries stored on your CLIÉ handheld are erased; only the current date
and time are retained. Formats, preferences, and other settings are restored to their factory default
CLIE Operating Instructions
settings.
Only perform a hard reset if a soft reset does not resolve your problem.
If you save a backup of your CLIÉ handheld data on your computer, you can restore any data previously
synchronized with your computer during the next HotSync
To perform a hard reset, proceed as follows:
1 Take the reset tip from the stylus (see Performing a soft reset (page 12)).
2 While holding down the power button, use the reset tip to gently press and release the reset button.
The Palm Powered window is displayed.
3 Release the power button.
You will see a message warning you that you are about to erase all the data stored on your CLIÉ
handheld.
4 Press the upper half of the scroll button on the front panel of your CLIÉ handheld.
Your CLIÉ handheld undergoes a hard reset and everything is erased apart from the current date and
time.
If the scroll button was used just prior to hard resetting, the hard reset may not work.
®
operation.
nN
13
Entering data
Entering data
There are three ways to enter data on your CLIÉ handheld:
Using Graffiti® writing
Using the onscreen keyboard
Using your computer keyboard
nN
14
CLIE Operating Instructions
Graffiti® writing
Your CLIÉ handheld includes Graffiti® writing software as the primary system for entering text and numbers.
With Graffiti
or numbers.
Most people find they can enter text quickly and accurately with only a few minutes of practice. Graffiti
writing includes any character you can type on a standard keyboard. The Graffiti
the upper case letters of the regular alphabet, which makes Graffiti
This section explains the procedures for creating letters, numbers, punctuation, and symbols, as well as
teaching you some Graffiti
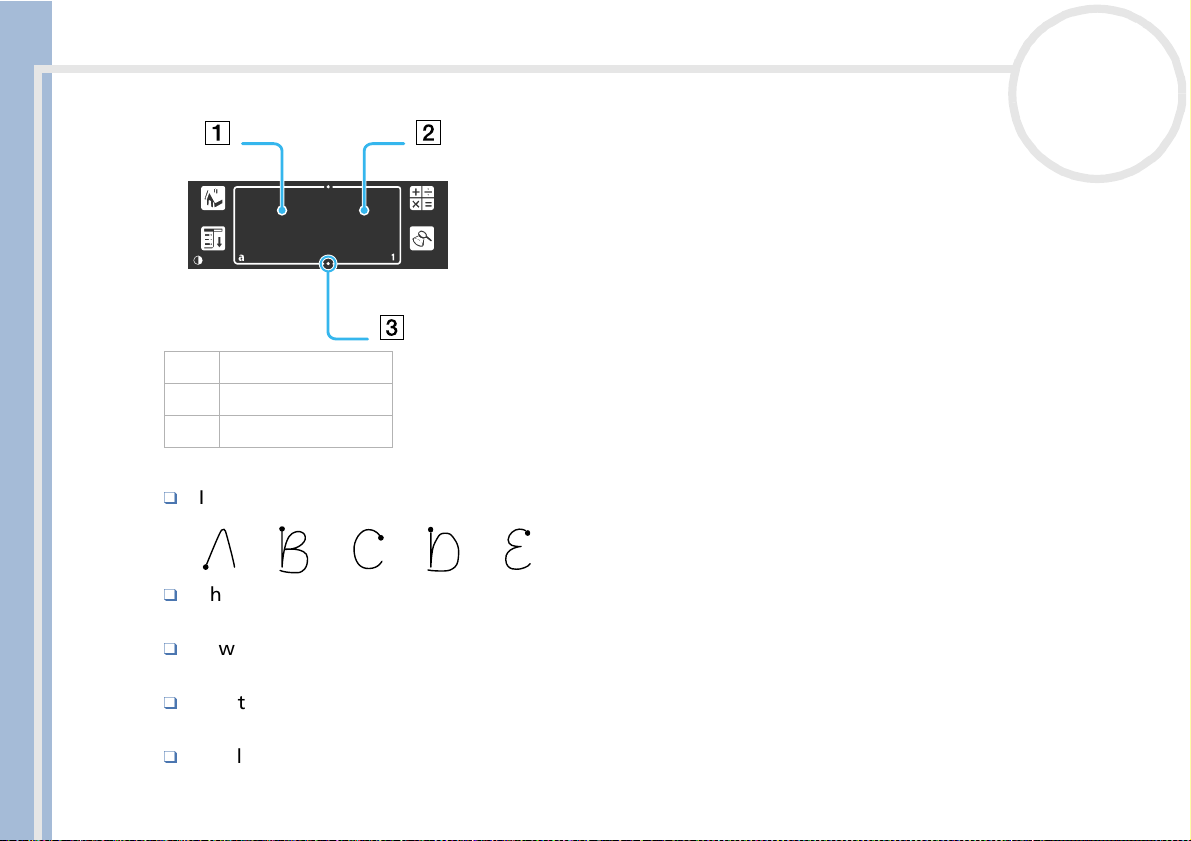
Writing Graffiti® letters
The Graffiti® writing area is divided into two parts: one for writing the letters of the alphabet (1) and one
for writing numbers (2). The small marks (3) at the top and bottom of the Graffiti
two areas.
®
writing, you write simple strokes with the stylus and they are instantly recognized as letters
®
strokes closely resemble
®
writing area indicate the
®
tips and tricks.
®
writing easy to learn.
Entering data
CLIE Operating Instructions
nN
1. Write letters here
2. Write numbers here
3. Division marks
There are five basic concepts for success with Graffiti® writing:
If you draw the character shape exactly as shown below, you can achieve 100% accuracy.
The heavy dot on each shape shows where to begin the stroke. Certain characters have similar shapes,
but different beginning and end points.
Always begin the stroke at the heavy dot (you should not create the heavy dot; it is only there to show
you where to begin the stroke).
Most characters require only a single stroke. When you lift the stylus from the Graffiti® writing area, your
CLIÉ handheld recognizes and displays the text character immediately.
To allow you to write an entire character with a single stroke, some Graffiti® strokes are portions of the
regular alphabet equivalents.
15
Entering data
CLIE Operating Instructions
nN
16
How to write Graffiti® letters?
To write Graffiti® letters, proceed as follows:
1 Tap where you want your text to go.
You need to tap above the Graffiti
the text.
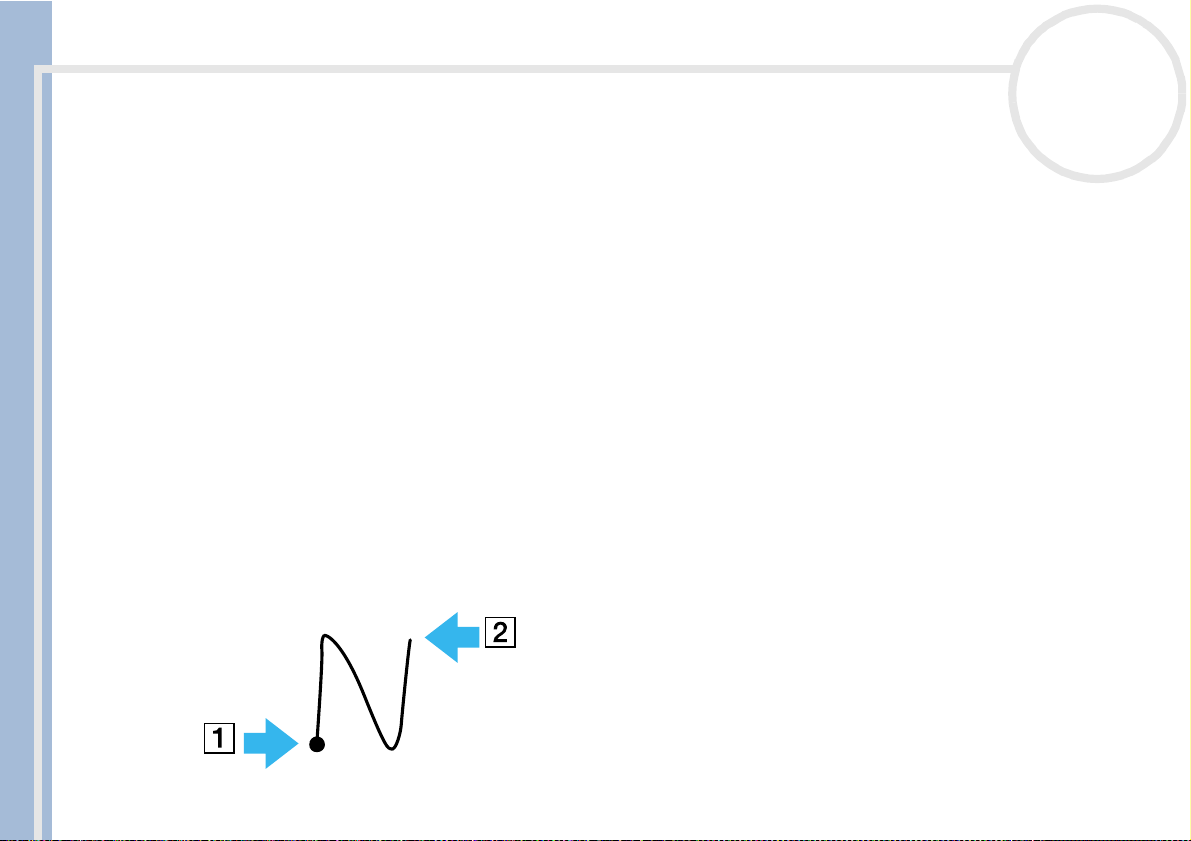
2 Use the tables on the following pages to find the stroke shape for the letter you want to create. For
example, the stroke shown below creates the letter "n".
There are two different stroke shapes available for some letters. For these letters, choose the one that is
easiest for you.
As you will see later, you use the same shape to create both the upper case and lower case version of a
letter.
3 Position the stylus in the left-hand side of the Graffiti
4 Start your stroke at the heavy dot (1) and draw the stroke shape as it appears in the tables.
5 Lift the stylus from the screen at the end of the stroke shape (2).
That is all there is to it. When you lift the stylus from the screen, your CLIÉ handheld recognizes your
stroke immediately and prints the letter at the insertion point on the screen.
As soon as you lift the stylus from the screen, you can begin the stroke for the next character you want
to write.
®
writing area, and you must see a flashing cursor before you write
®
writing area.
Entering data
CLIE Operating Instructions
nN
®
To display the Graffiti
Drag the stylus from the bottom of the writing area to the top of the screen. Graffiti
of screens that show the complete Graffiti
You must begin the character strokes in the Graffiti® writing area. If you do not make Graffiti® strokes in the Graffiti® writing area, your CLIÉ handheld
does not recognize them as text characters.
Accuracy improves when you write large characters. You should draw strokes that nearly fill the Graffiti® writing area.
To delete characters, simply set the insertion point to the right of the character you want to delete and make the backspace stroke (a line from right
to left) in the Graffiti
Write at natural speed. Writing too slowly can generate recognition errors.
Do not write on a slant. Vertical strokes should be parallel to the sides of the Graffiti® writing area.
Press firmly.
onscreen help, proceed as follows:
®
character set.
®
writing area.
®
Help opens a series
17
Entering data
CLIE Operating Instructions
nN
18
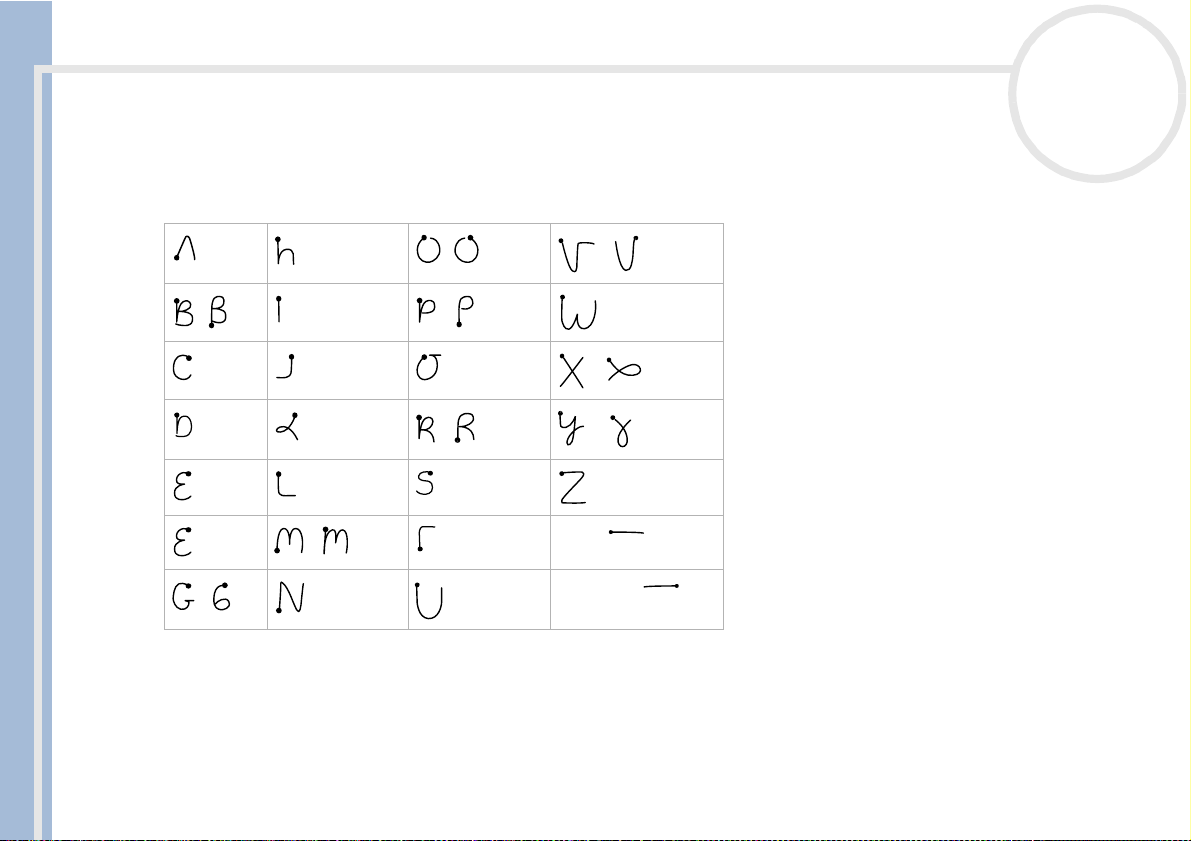
Writing Graffiti® alphabet
Write Graffiti® letters corresponding to the letters of the alphabet, as shown below, in the left-hand side of
the Graffiti
A H O V
C J Q X
D K R Y
E L S Z
F M T Space
®
writing area.
B I P W
G N U BackSpace

Entering data
CLIE Operating Instructions
nN
19
Writing capital letters
To write capital letters, proceed as follows :
Shift to caps and then you can make capital letters with the same stroke shapes as the basic alphabet
characters.
To draw the first letter of a word as a capital letter, use the Caps Shift stroke .
To return to the lower case, use the Backspace stroke .
To enter only capital letters (Caps Lock) Use the Caps Lock stroke .
To return to the lower case, use the Caps Shift stroke .
When you create a new sentence or a new record (by tapping New or a blank line), the first letter is automatically capitalized in most applications.
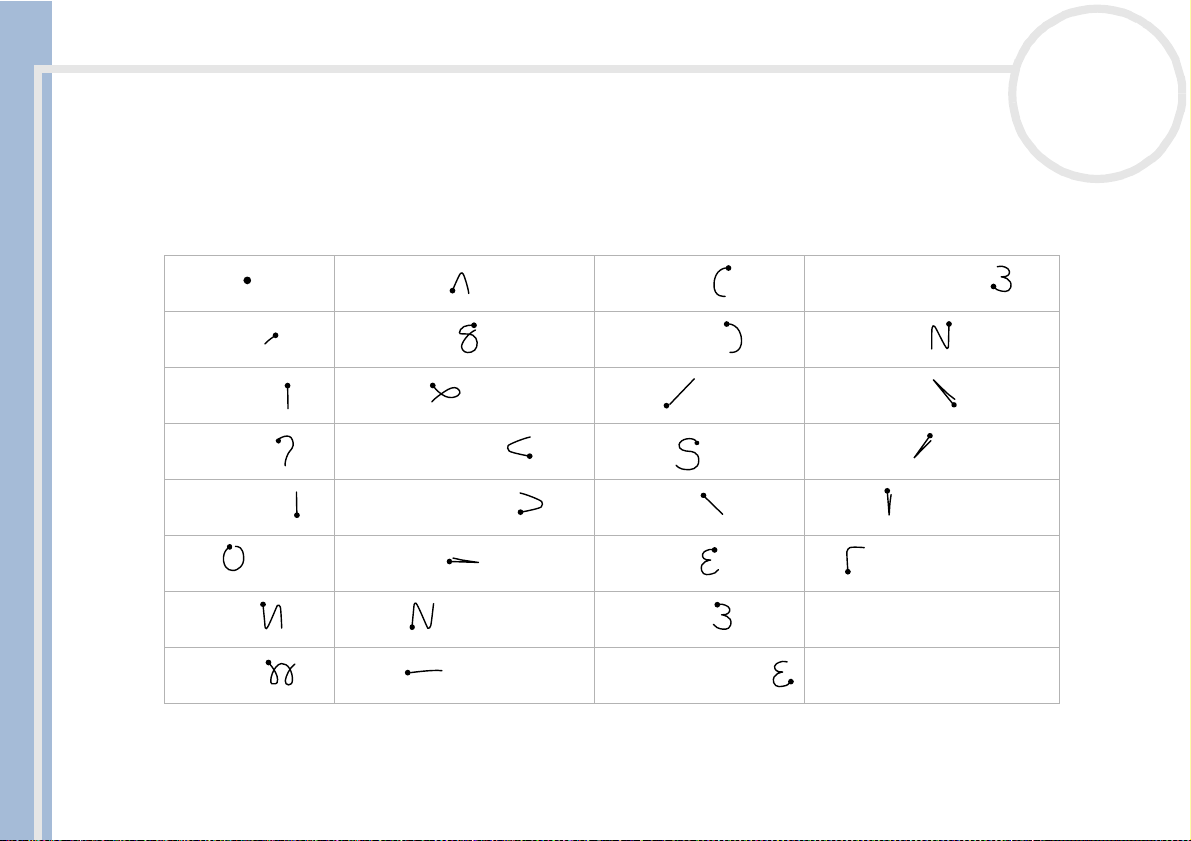
Writing numbers
Write the following Graffiti numbers on the right-hand side (numbers side) of the Graffiti writing area.
0 3 6 9
1 4 7
2 5 8
Entering data
Writing punctuation marks
Make a single tap on the Graffiti® writing area to activate Punctuation Shift.
®
The next stroke you make anywhere in the Graffiti
mark.
(.) Period (^) Circumflex ( ( ) Left Paren (]) Right square bracket
area (the letters or numbers side) creates a punctuation
nN
20
CLIE Operating Instructions
(,) Comma (&) Ampersand ( ) ) Right Paren (~) Swung dash
(‘) Apostrophe (*) Asterisk (/) Slash (`) Grave accent
(?) Question (<) Left angle bracket ($) Dollar (;) Semicolon
(!) Exclamation (>) Right angle bracket (\) Back slash (: ) Colon
(@) At (_) Under bar ({) Left brace Tab
(#) Number (“) Ditto (}) Right brace
(%) Percent (-) Dash ([) Left square bracket
Entering data
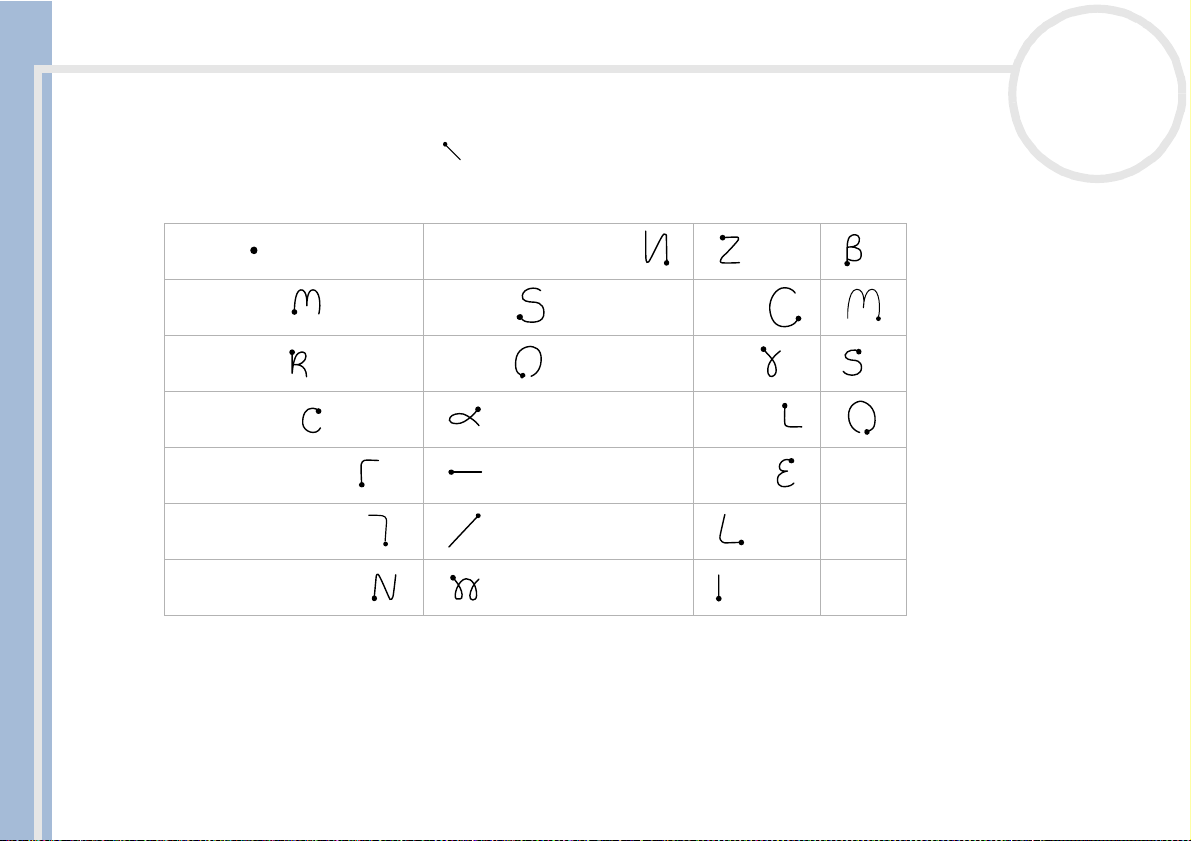
Writing symbols and extended characters
Make a Symbol Shift stroke on the Graffiti
set, creates a symbol or extended character.
®
nN
21
writing area to activate Symbol Shift. The next stroke you
(.) Bullet (“) Right double quotation = ß
(™)
Trademark (§) Section (¢) Cent µ
CLIE Operating Instructions
(®) Registered (°) Degree (¥
(©) Copyrighted + (£) Pound ø
(‘) Left single quotation
(‘) Right single quotation x ¿
(“) Left double quotation ÷ i
± (€ ) Euro
) Yen f
Entering data
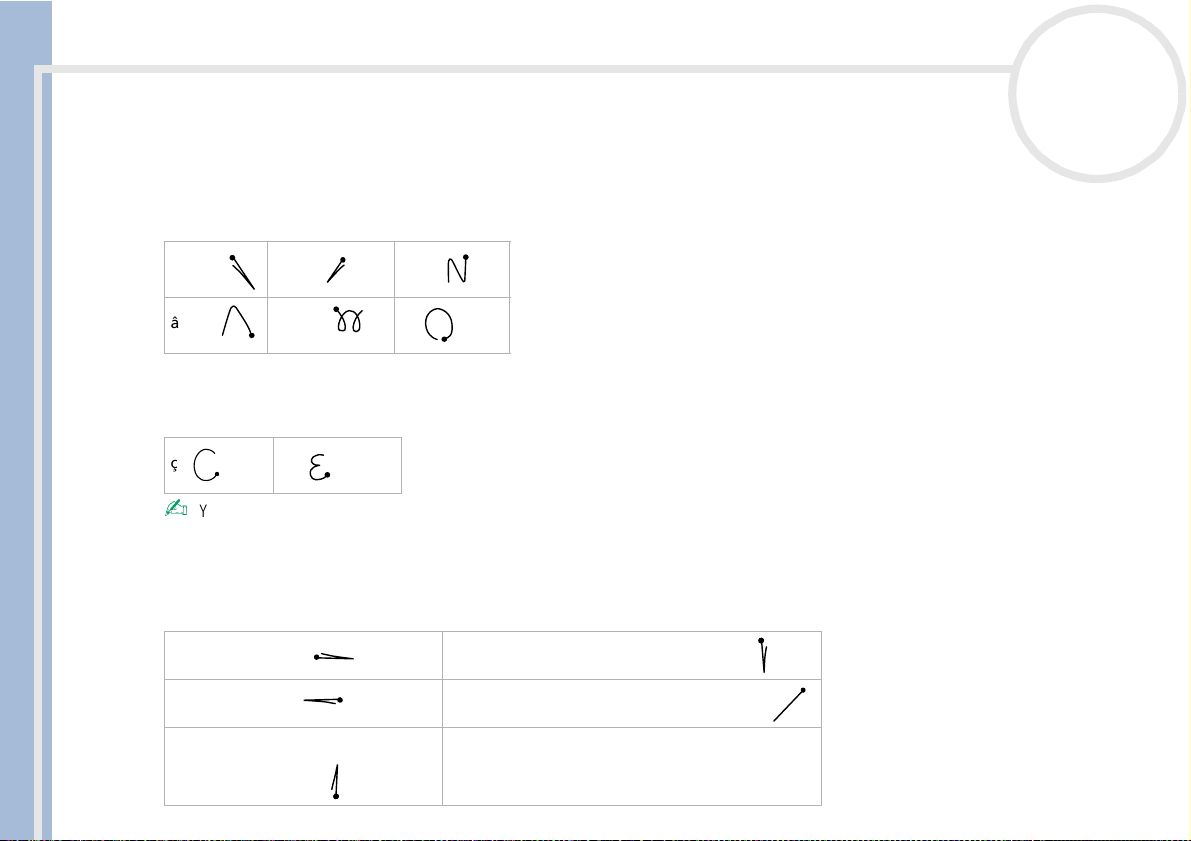
Writing accented characters and non-English characters
To create accented characters, proceed as follows:
Draw the stroke normally used to create the letter, followed by an accent stroke. Graffiti
the accent to the letter.
аимтщ áé íóúý ãõñ
nN
22
®
writing then adds
CLIE Operating Instructions
вкофы длпцья å
To write non-English characters, proceed as follows:
You can write the following characters without any special punctuation or shifting:
ç æ
You must write these non-English characters on the left side of the Graffiti® writing area.
Using navigation strokes
In addition to character symbols, Graffiti writing includes special strokes that you can use to navigate within
text or fields in your applications.
Move cursor right Go to the next field (Address Book only)
Move cursor left Open Address Record (Address Book only)
Go to the previous field
(Address Book only)
Entering data
CLIE Operating Instructions
nN
23
Using Graffiti® shortcuts
Graffiti® ShortCuts, similar to the glossary or autotext features of some word processors, allow you to enter
commonly used words or phrases quickly and easily. In addition to the following predefined ShortCuts, you
can create your own ShortCuts for your name or the header of a memo.
Each ShortCut can represent up to 45 characters.
To use a ShortCut, draw the ShortCut stroke followed by the ShortCut characters. When you draw the
ShortCut stroke, the ShortCut symbol appears at the insertion point to show that you are in ShortCut mode.
When you enter and dts ( , , and ), you can enter date and time stamps.
Date stamp ds
Time stamp ts
Date/time stamps dts
Meeting me
Breakfast br
Lunch lu
Dinner di

Entering data
nN
24
Keyboards
Using the onscreen keyboard
You can open the onscreen keyboard any time you need to enter text or numbers into your CLIÉ handheld.
Note that you cannot enter Graffiti
To use the onscreen keyboard, proceed as follows:
1 Open any application in which you want to enter text (such as Memo Pad).
CLIE Operating Instructions
2 Tap any record, or tap New.
3 Tap <a> to open the alphabetic keyboard, or tap <1> to open the numeric keyboard.
The selected keyboard is displayed. You can toggle between the international, alphabetic and numeric
keyboards, as shown in the next sections.
4 On the keyboard, simply tap the characters to enter text and numbers.
You can use the online keyboard in the same way as the keyboard of your computer. For example, to
enter capital letter, tap <cap> and then tap the character button. To delete a character, tap <←>.
5 When you have finished, tap Done to close the onscreen keyboard and place the text in the record.
®
characters while using the onscreen keyboard.
Entering data
CLIE Operating Instructions
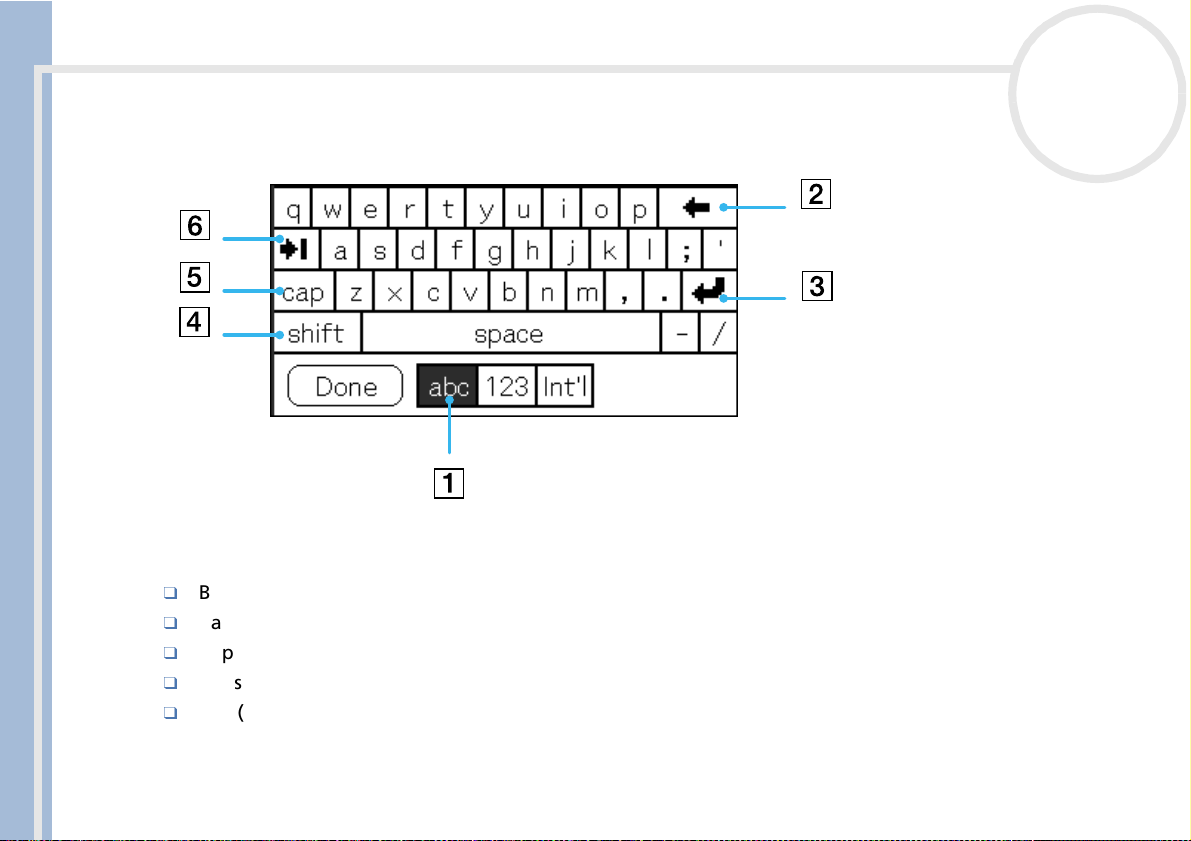
Alphabetic keyboard
On any keyboard screen, tap abc to go to the alphabetic keyboard (1).
The main buttons are as follows:
Backspace (2)
Carriage return (3)
Caps shift (4)
Caps lock (5)
Tab (6)
nN
25
Entering data
CLIE Operating Instructions
nN
26
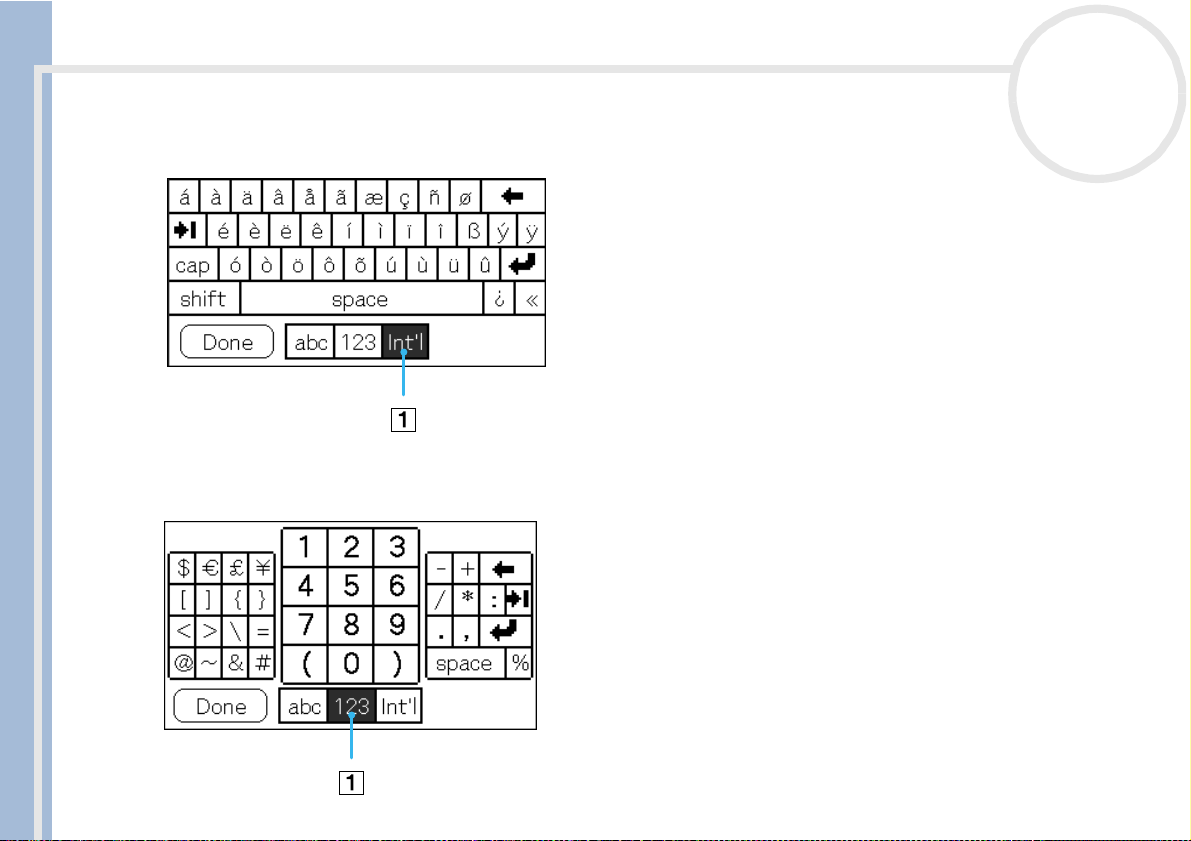
International keyboard
On any keyboard screen, tap Int'l (1) to go to the international keyboard.
Numeric keyboard
From any keyboard screen, tap 123 (1) to go to the numeric keyboard, as shown below.

Entering data
nN
27
Using your computer keyboard
If you have a lot of data to enter, or prefer to use the computer keyboard, you can use the Palm™ Desktop
for CLIÉ software or any other supported personal information manager (PIM), such as Microsoft
to enter information. You can then perform a HotSync
®
operation to synchronize the information on your
®
Outlook®,
computer with the information on your CLIÉ handheld.
All the main applications on your CLIÉ handheld are also available in the Palm™ Desktop for CLIÉ software
and in most PIMs, so you do not need to learn different applications.
CLIE Operating Instructions
Refer to the Palm™ Desktop for CLIÉ software online Help for more information on entering data on your
computer.
If you have data stored in computer applications such as spreadsheets, and databases, or if you want to
import data from another handheld, you can transfer the data to your CLIÉ handheld and use it without
entering data manually. Save the data in a compatible file format (.csv,.txt,.tab,.tsv,.dba,.aba,.tda,.mpa),
import it into your Palm™ Desktop for CLIÉ software, and then perform a HotSync
®
operation to transfer
the data to your CLIÉ handheld. See Using HotSync® operations (page 82) for details.
Performing common tasks
Performing common tasks
This section describes how to perform tasks that you can do in most or all of the basic applications.
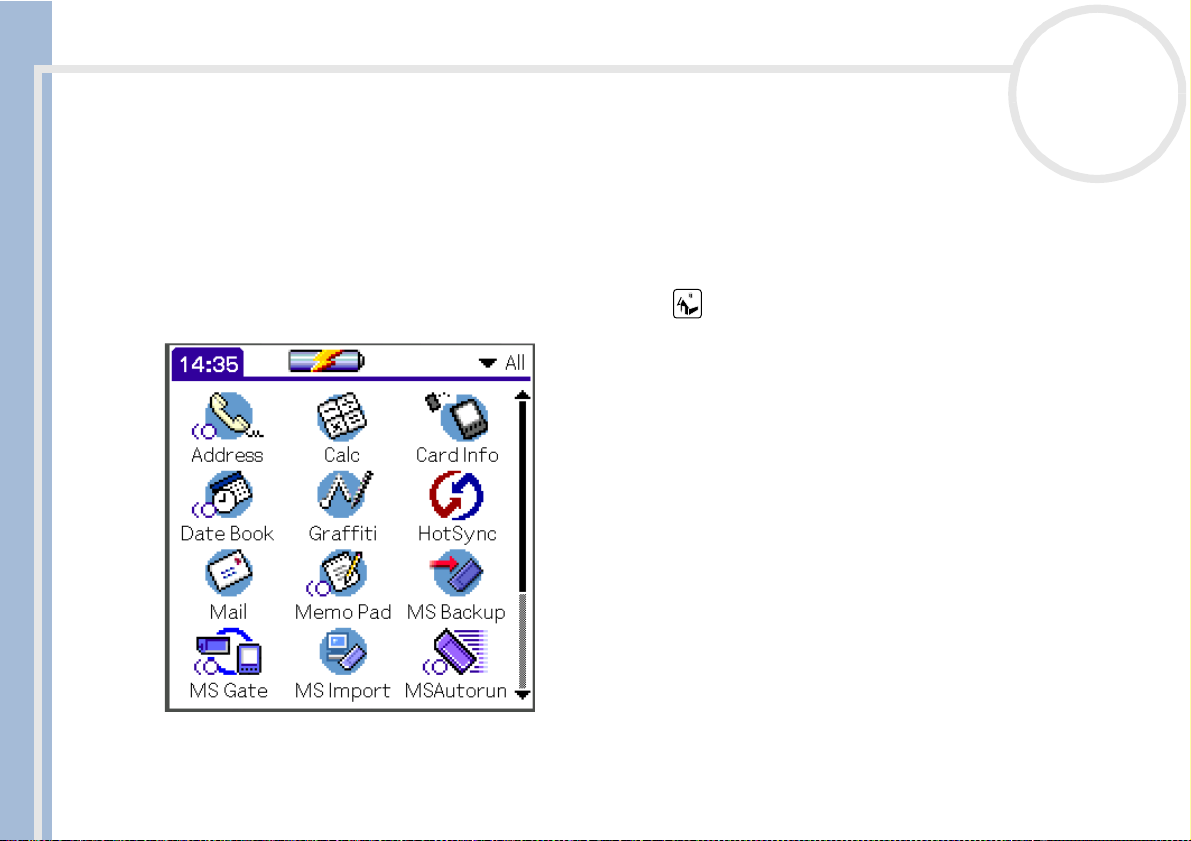
The Application Launcher
The Application Launcher displays all the default applications available on the CLIÉ handheld. You can
also display selected applications by arranging them into categories.
CLIE Operating Instructions
To start the Application Launcher, tap the Home icon .
nN
28
As well as being your gateway to all the applications, the Application Launcher screen displays the current
time, battery level, and application category.

Performing common tasks
Opening applications
To open an application, proceed as follows:
Tap the icon of the application you want to open.
If you have many applications installed on the CLIÉ handheld, tap the scrollbar to see all the available
applications.
Or
CLIE Operating Instructions
1 Tap the Home icon.
2 Rotate the Jog Dial™ to select the application.
3 Push the Jog Dial™ to launch the selected application.
Or
Press an application button (1) on the front panel to display the selected application immediately.
nN
29
Date Book
Address Book
To Do list
Memo Pad
 Loading...