

Sony PEGS360 Clié User Manual

Operating
Instructions
Chapter 1
Basic operations of your
Sony CLIÉ Handheld
Chapter 2
Using basic applications
Chapter 3
Exchanging and updating
data using a HotSync
operation
®
Chapter 4
Communicating using
your Sony CLIÉ Handheld
Personal Entertainment Organizer
PEG-S360
© 2001 Sony Corporation
Chapter 5
Customizing your Sony
CLIÉ Handheld
(Preferences)
Chapter 6
Additional information

WARNING
To prevent fire or shock hazard, do
not expose the unit to rain or
moisture.
To avoid electrical shock, do not open
the cabinet. Refer servicing to
qualified personnel only.
Owner’s Record
The model number and serial number are
located at the rear of the product. Record the
serial number in the space provided below.
Refer to them whenever you call upon your
Sony dealer regarding this product.
Model No. PEG-S360
Serial No.______________
The socket-outlet shall be installed near the
equipment and shall be easily accessible.
If you have question about this product, call the
Sony Customer Information Center at keep on
next line 1-877-760-7669; or write to the Sony
Customer Information Center at 12451 Gateway
Boulevard, Fort Myers, FL 33913. The number
below is for FCC-related matters only.
Declaration of Conformity
Trade Name: SONY
Model No.: PEG-S360
Responsible Party: Sony Electronics Inc.
Address: 680 Kinderkamack Road, Oradell,
NJ 07649 USA
Telephone No.: 201-930-6972
This device complies with part 15 of the FCC
Rules.
Operation is subject to the following two
conditions:
(1) This device may not cause harmful
interference, and
(2) This device must accept any interference
received, including interference that
may cause undesired operation.
CAUTION
You are cautioned that any changes or
modifications not expressly approved in this
manual could void your authority to operate
this equipment.
NOTE
This equipment has been tested and found to
comply with the limits for a Class B digital
device, pursuant to Part 15 of the FCC Rules.
These limits are designed to provide reasonable
protection against harmful interference in a
residential installation. This equipment
generates, uses, and can radiate radio frequency
energy and, if not installed and used in
accordance with the instructions, may cause
harmful interference to radio communications.
However, there is no guarantee that interference
will not occur in a particular installation. If this
equipment does cause harmful interference to
radio or television reception, which can be
determined by rotating the equipment off and
on, the user is encouraged to try to correct the
interference using one or more of the following
measures:
– Reorient or relocate the receiving antenna.
– Increase the separation between the
equipment and receiver.
– Connect the equipment into an outlet on a
circuit different from that to which the
receiver is connected.
– Consult the dealer or an experienced radio/
TV technician for help.
The supplied interface cable must be used with
the equipment in order to comply with the
limits for a digital device pursuant to Subpart B
of Part 15 of FCC Rules.
On the supplied software
• Copyright laws prohibit reproducing the
software or the software manual in whole or
in part, or renting the software without the
permission of the copyright holder.
• In no event will SONY be liable for any
financial damage or loss of profits,
including claims made by third parties,
arising out of the use of the software
supplied with this player.
• In the event a problem occurs with this
software as a result of defective
manufacturing, SONY will replace it at
SONY’s option or issue a refund. However,
SONY bears no other responsibility.
• The software provided with this product
cannot be used with equipment other than
that which it is designated for use with.
• Please note that, due to continued efforts to
improve quality, the software specifications
may be changed without notice.
Program © 2001 Sony Corporation, © 2001 Palm,
Inc. or its subsidiaries. All rights reserved.
Documentation © 2001 Sony Corporation
2

Sony is a registered trademark of Sony
Corporation, Japan.
Memory Stick, the Memory Stick logo, Jog Dial,
OpenMG, and PictureGear are trademarks of
Sony Corporation, Japan.
Graffiti, HotSync, Palm Modem, and Palm OS
are registered trademarks, and the HotSync logo
and Palm are trademarks of Palm, Inc. or its
subsidiaries.
IBM and PC/AT are registered trademarks of
International Business Machines Corporation.
Microsoft, Windows, Outlook and the Windows
98 logo are registered trademarks of Microsoft
Corporation.
MMX and Pentium are registered trademarks of
Intel Corporation.
AvantGo, the AvantGo Client and the AvantGo
logo are registered trademarks of AvantGo, Inc.
Pumatech, the Pumatech logo, Intellisync and
Intellisync Lite are trademarks of Pumatech, Inc.
that may be registered in some jurisdictions.
Adobe and Adobe Acrobat Reader are
trademarks of Adobe Systems Incorporated.
QuickTime and the QuickTime logo are
trademarks used under license. QuickTime is
registered in the U.S. and other countries.
This product includes fonts owned by TypeBank
Co., Ltd. under license.
All other trademarks are trademarks of their
respective owners.
CAUTION
Please contact your nearest Sony dealer
regarding the problem you are experiencing
with your Sony product.
Notes
• Sony does not support third-party add-on
applications. If you are having a problem
with a third-party application, please
contact the developer or publisher of that
software.
• The illustrations in this manual may differ
from the actual software.
• Explanations in this manual assume that
you are familiar with basic operations of
Windows®. For how to use your computer
and operating system, please refer to their
respective manuals.
Before using your CLIÉ handheld, be sure to
read the accompanying
End-User’s License Agreement.
3
Continued on next page
Table of contents
About this manual ............................ 7
Chapter 1
Basic operations of your Sony CLIÉ
Handheld
Turning on and off your Sony CLIÉ
Handheld ........................................... 9
Using the stylus............................... 10
™
Using the Jog Dial
Entering data into your Sony CLIÉ
Handheld ......................................... 13
Using Graffiti® writing to enter data ...
Using the onscreen keyboard ............ 22
Using your computer keyboard ......... 24
Adjusting the screen ....................... 25
Resetting your Sony CLIÉ Handheld 26
Performing a soft reset ..................... 26
Performing a hard reset .................... 27
navigator ....... 12
13
Chapter 2
Using basic applications
Managing schedules and events
(Date Book) .............................. 29
Scheduling an event ......................... 29
Checking schedules .......................... 36
Editing Date Book events.................. 42
Using the Date Book menus ............. 47
Managing addresses and phone
numbers (Address Book) .......... 49
Creating a new Address Book entry .. 49
Viewing Address Book entries .......... 51
Editing Address Book entries ............ 55
Using the Address Book menus ........ 61
Managing tasks and things to do
(To Do List) ............................... 63
Creating To Do List items .................. 63
Viewing To Do List items .................. 64
Checking off a To Do List item .......... 65
Working with To Do List ................... 66
Using the To Do List menus .............. 70
Creating memos
(Memo Pad) .............................. 71
Creating a new memo ...................... 71
Reviewing memos............................. 73
Editing memos .................................. 76
Using the Memo Pad menus ............. 78
Using Calculator (Calc) ............. 79
Calculating with Calculator............... 79
Using the Calculator buttons ............ 80
Using the Calculator menus .............. 80
Performing common tasks .............. 81
Using the Application Launcher ........ 81
Categorizing records ......................... 85
Finding records ................................. 88
Protecting your data (Security) ......... 92
Attaching notes ................................ 99
Purging records ............................... 100
Using the Edit menu ....................... 101
Choosing fonts ................................ 102
4

Table of contents
Chapter 3
Exchanging and updating data using
a HotSync® operation
What is a HotSync® operation? .... 104
Performing a local HotSync
®
operation with the USB cable ....... 105
Using the Palm™ Desktop for
CLIÉ software ................................ 107
Starting the Palm Desktop for
CLIÉ software .................................. 107
Basic operations of the Palm Desktop
for CLIÉ software ............................ 107
Locating the Palm Desktop for
CLIÉ components ............................ 108
®
Advanced HotSync
Setting the HotSync® setup options ..
operations ... 109
109
Customizing HotSync application
settings (Conduit) ........................... 111
Conducting an IR HotSync operation .
113
Conducting a HotSync operation
via modem ...................................... 116
Conducting a HotSync operation
via a network .................................. 122
Importing data from a Windows
application ...................................... 127
Synchronizing with external data
(File Link) ........................................ 129
Chapter 4
Communicating using your Sony
CLIÉ Handheld
Beaming between your Sony CLIÉ
Handheld and another PalmOS
PDA ............................................... 131
What you can do with beaming ...... 131
®
Beaming information ...................... 132
Receiving beamed information ....... 133
Tips on beaming information .......... 133
Using “Memory Stick
What is “Memory Stick
™
” media .... 134
™
” media? . 134
Inserting and removing “Memory
Stick” media ................................... 135
Protecting the data in “Memory
Stick” media ................................... 137
Starting an application in “Memory
Stick” media ................................... 138
Starting an application automatically
when “Memory Stick” media
is inserted ....................................... 138
Viewing information of the inserted
“Memory Stick” media (Card Info) ..
Formatting “Memory Stick” media .
Exchanging data via “Memory
™
” media .............................. 142
Stick
Starting Memory Stick Gate (MS Gate) ..
Creating the default folder in
“Memory Stick” media ................... 145
Copying your CLIÉ handheld data
to “Memory Stick” media ............... 146
Copying data in “Memory Stick”
media to your CLIÉ handheld .......... 148
Deleting data in “Memory Stick”
media.............................................. 151
Using the MS Gate menus .............. 153
How to read the online manual ...... 154
Installing applications to/from
“Memory Stick” media without
using MSGate ................................. 155
Continued on next page
139
140
142
5

Table of contents
Chapter 5
Customizing your Sony CLIÉ
Handheld (Preferences)
What you can do with
Preferences ................................... 158
Changing the Buttons preferences ..
Assigning applications to buttons ... 160
Changing the full-screen pen stroke
activities ......................................... 161
Assigning applications to HotSync
buttons ........................................... 162
Changing the Jog Dial
preferences ................................... 163
Setting the display format of the time,
date, and numbers (Formats)........ 164
Selecting a region default ............... 164
Selecting the time, date, and
numbers formats............................. 165
Setting the Date & Time preferences .
Setting the date .............................. 166
Setting the time .............................. 167
Setting the time zone and daylight
saving time ..................................... 168
Setting the General preferences... 169
Setting the automatic shut-off time 169
Setting sounds ................................ 170
Turning on or off the Beam Receive
feature ............................................ 171
Entering owner information ......... 172
Creating Graffiti
Changing the Network preferences..
Selecting a service .......................... 175
Entering a user name ...................... 176
Entering a password ....................... 176
™
navigator
®
ShortCuts ........ 173
160
®
166
175
Selecting a connection .................... 177
Adding telephone settings .............. 177
Creating additional service templates ..
Adding detailed information to
a service template........................... 180
Creating log in scripts ..................... 181
Using the Network preferences menus ..
179
184
Chapter 6
Additional information
Backing up data of your Sony
CLIÉ Handheld ............................... 186
Backing up data in your computer
using a HotSync operation .............. 186
Backing up your CLIÉ handheld data
using “Memory Stick” media ......... 187
Using data of another Sony
CLIÉ Handheld ............................... 189
Using the Palm Desktop for CLIÉ
software to transfer data ................ 189
Using “Memory Stick” media to
transfer data ................................... 191
Performing HotSync between your old
CLIÉ handheld and the new Palm
Desktop for CLIÉ software .............. 193
Precautions ................................... 194
Notes on use ................................... 194
Battery considerations .................... 195
Troubleshooting – Frequently Asked
Questions ...................................... 197
If you still cannot perform a HotSync
operation ........................................ 211
Getting Help.................................. 212
Specifications ................................ 213
Index ............................................. 214
6

About this manual
Welcome to the Sony Personal Entertainment Organizer (referred to as the
“CLIÉ handheld” in this manual).
Your CLIÉ handheld comes with three manuals:
Read This First
Read This First gives an overview of your CLIÉ handheld’s features,
hardware and software setup, installation instructions, and other important
details. Before reading the rest of the manuals, read the Read This First
manual.
Operating Instructions (this manual)
This manual describes all you need to know about how to use your CLIÉ
handheld and the Personal Information Management applications that come
with it.
The manual shows you how to:
■ Turn your CLIÉ handheld on and off, reset your CLIÉ handheld, and
enter data, explained in greater detail (Chapter 1)
■ Use Personal Information Management applications: Date Book,
Address Book, To Do List, Memo Pad, and Calculator (Chapter 2)
■ Perform a HotSync
■ Exchange data with another handheld by beaming or via “Memory
■ Personalize your CLIÉ handheld with your own preferences settings
■ Maintain your CLIÉ handheld and work with the Troubleshooting
™
Stick
” media (Chapter 4)
(Chapter 5)
guide and other technical information (Chapter 6)
®
operation with your computer (Chapter 3)
Add-on Application Guide
The Add-on Application Guide describes how to install and use the supplied
add-on applications which include:
■ PictureGear Pocket/PictureGear 4.3Lite
■ gMovie
■ MS Autorun
7

Chapter 1
Basic operations of your Sony CLIÉ Handheld
This chapter describes how to turn on and off your CLIÉ handheld, enter data, and
perform other basic operations.
Contents
Turning on and off your Sony CLIÉ Handheld ................................................ 9
Using the stylus ...........................................................................................10
Using the Jog Dial™ navigator ...................................................................12
Entering data into your Sony CLIÉ Handheld ............................................... 13
Using Graffiti® writing to enter data ...................................................... 13
Using the onscreen keyboard .................................................................22
Using your computer keyboard .............................................................. 24
Adjusting the screen ...................................................................................25
Resetting your Sony CLIÉ Handheld ............................................................26
Performing a soft reset .......................................................................... 26
Performing a hard reset .........................................................................27
Turning on and off your Sony CLIÉ Handheld
Turning on your CLIÉ handheld
Press the POWER button.
Your CLIÉ handheld is turned on, and the last screen you viewed is
displayed.
Press the POWER button.
When you turn on your CLIÉ handheld for the first time, the Setup screen
appears.
Turning off your CLIÉ handheld
Press the POWER button again.
The power is turned off. You do not have to save data, quit an application
or perform any of the other shutdown procedures that your computer
requires.
Note
If you press the POWER button and hold it down for two seconds or longer, you can
turn the backlight of the screen on or off.
Chapter1 Basic operations of your Sony CLIÉ Handheld
9
Using the stylus
With your CLIÉ handheld, you can use the supplied stylus to enter
characters or specify an application you want to run.
Taking out the stylus
The stylus is stored in the holder on the back panel of your CLIÉ handheld.
Pull it out when using your CLIÉ handheld.
Take out the stylus.
To avoid losing the stylus, always put it back into its holder on your CLIÉ
handheld after use.
Tapping
When you enter characters on the screen keyboard of your CLIÉ handheld,
open an application, or select an item, press lightly on the desired button or
icon with the stylus.
Press lightly (tap) on the screen
This action is called “tapping.”
Chapter1 Basic operations of your Sony CLIÉ Handheld
10
Using the stylus
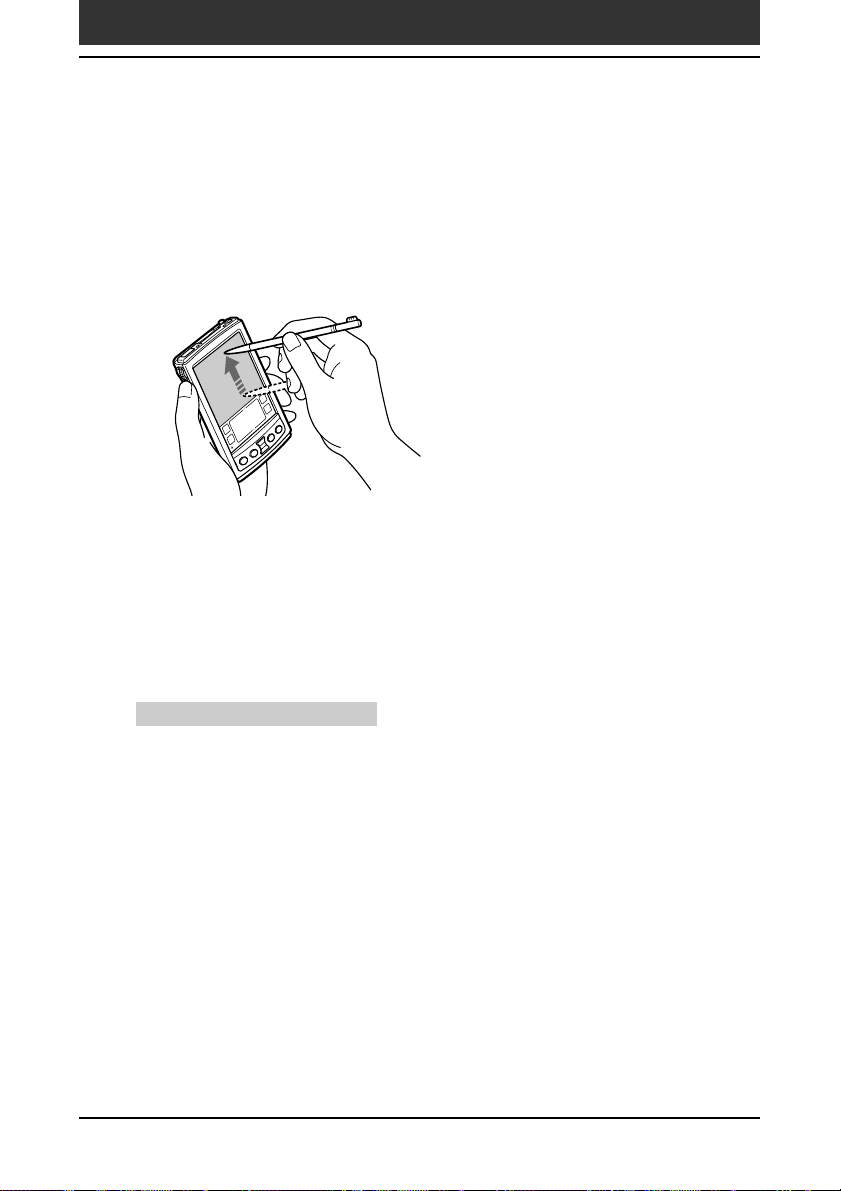
Dragging
Just as you can drag the mouse to select (and drag) text or move objects on
your computer, you can also use the stylus to drag an item on the screen of
your CLIÉ handheld. Press the stylus lightly on the item and move it along
the screen surface.
Touch the desired item on the screen
with the stylus and move it along the
screen surface (drag).
Examples of dragging:
To display data above or below the current viewing area on the screen, use
the stylus to drag the slider of any scroll bar.
To select multiple characters or items together, use the stylus to drag along
the desired characters or items.
Tip on full-screen dragging
By default, full-screen dragging from the bottom of the writing area to the
top of the screen displays the Graffiti
the full-screen dragging to another activity. See page 161 for details.
®
Help on the screen. You can assign
Chapter1 Basic operations of your Sony CLIÉ Handheld
11
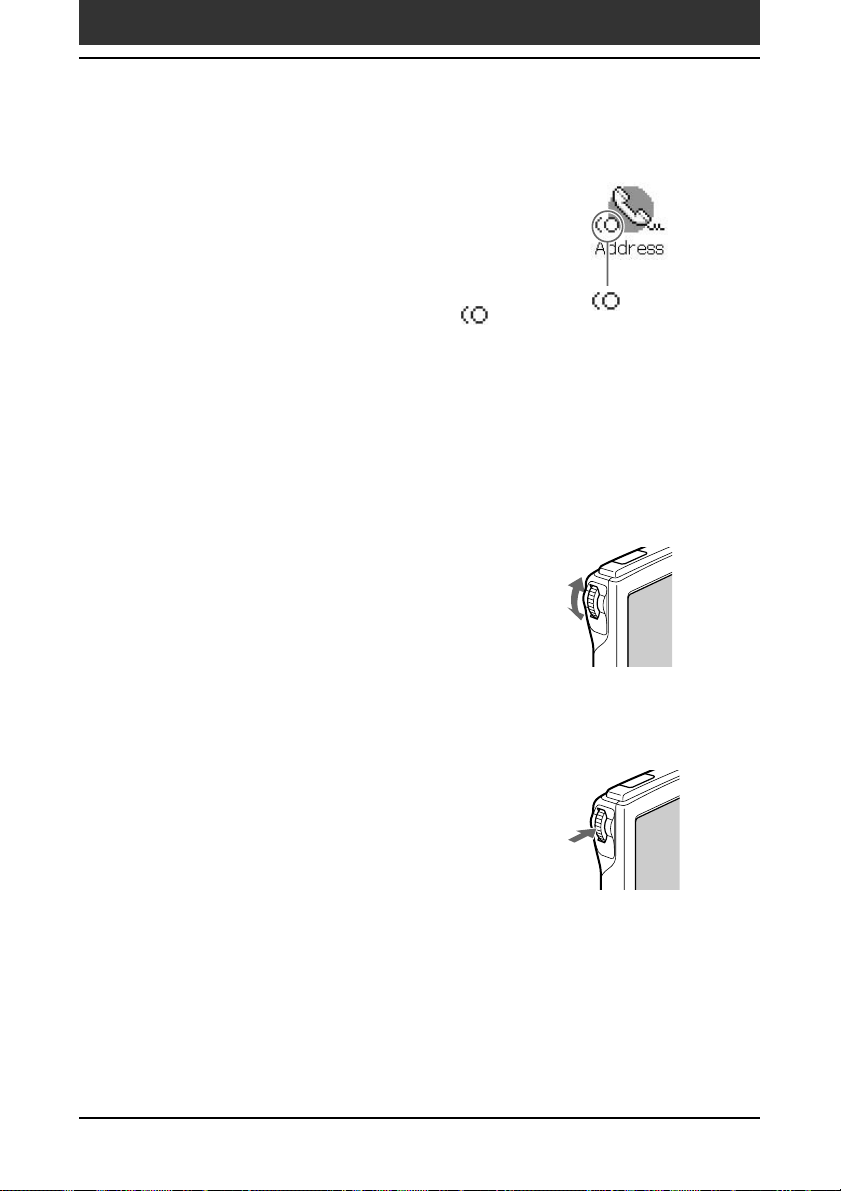
Using the Jog Dial™ navigator
Jog
™
mark
Your CLIÉ handheld is equipped with a Jog Dial
navigator, which allows you to perform all major
operations without the stylus. You can operate
your CLIÉ handheld using the Jog Dial navigator
with just one hand.
The icon of any application that supports Jog Dial
navigator operations is marked with the
Dial navigator mark.
For other applications, you can also use the JogAssist function to enable Jog
Dial navigator operations. For details, see “Changing the Jog Dial™
navigator preferences” on page 163.
Rotating the Jog Dial navigator
Rotate the Jog Dial navigator to select various
items in succession or to select an application to
start.
The operations you can perform by rotating the
Jog Dial navigator differ depending on the
application you are using. For details, refer to
the instructions for each application.
Pressing the Jog Dial navigator
Press the Jog Dial navigator to highlight the
item selected by rotating the Jog Dial navigator,
or to run the selected application.
The operations you can do by pressing the Jog
Dial navigator differ depending on the
application you are using. For details, refer to
the instructions for each application.
Rotating while holding down the Jog Dial navigator
Some applications support operations executed by rotating and pressing the
Jog Dial navigator. For details, refer to the instructions for each application.
Chapter1 Basic operations of your Sony CLIÉ Handheld
12
Entering data into your Sony CLIÉ Handheld
Using Graffiti® writing to enter data
This section describes the procedures for creating letters, numbers, punctuation,
and symbols, as well as teaching you some Graffiti
®
tips and tricks.
What is Graffiti writing?
Most people find they can enter text quickly and accurately with only
minutes of practice. Graffiti writing includes any character you can type on a
standard keyboard. The Graffiti strokes closely resemble the upper case
letters of the regular alphabet, which makes Graffiti writing easy to learn.
There are four basic concepts for success with Graffiti writing:
• If you draw the character shape exactly as shown in the tables later in this
chapter (like the shapes shown in the following diagram), you can
achieve 100% accuracy.
Graffiti writing examples:
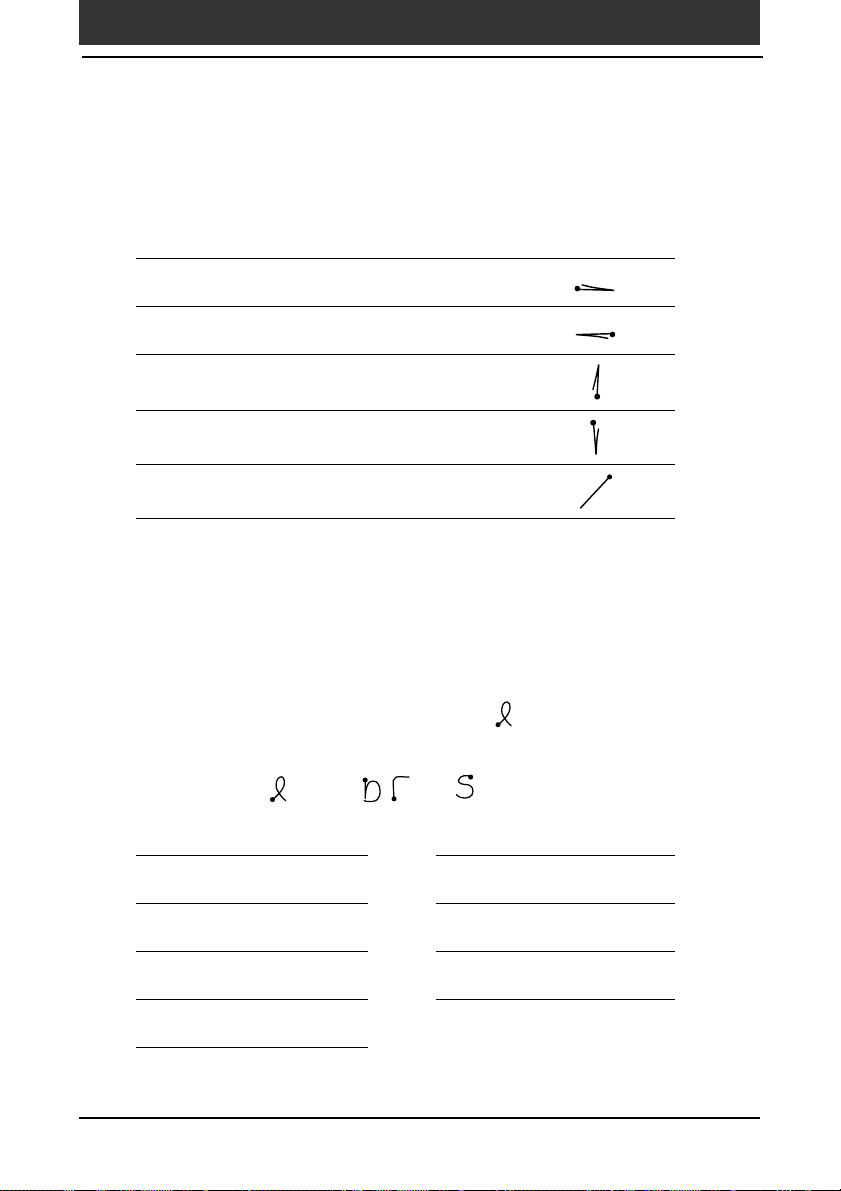
A, B, C, D, and E
• The heavy dot on each shape shows where to begin the stroke. Certain
characters have similar shapes, but different beginning and end points.
Always begin the stroke at the heavy dot (you should not create the
heavy dot; it is only there to show you where to begin the stroke).
• Most characters require only a single stroke. When you lift the stylus from
the Graffiti writing area, your CLIÉ handheld recognizes and displays the
text character immediately.
To allow you to write an entire character with a single stroke, some
Graffiti strokes are portions of the regular alphabet equivalents.
• The Graffiti writing area is divided into two parts: one for writing the
letters of the alphabet and one for writing numbers. The small marks at
the top and bottom of the Graffiti writing area separate the two areas.
Write letters here
Chapter1 Basic operations of your Sony CLIÉ Handheld
Write numbers here
Division marks
13
Entering data in your Sony CLIÉ Handheld
Writing Graffiti letters
Tap where you want your text to go.
1
Note
You need to tap above the Graffiti writing area, and you must see a flashing
cursor before you write the text.
Use the tables on the following pages to find the stroke
2
shape for the letter you want to create. For example, the
stroke shown below creates the letter "n".
Note
There are two different stroke shapes available for some letters. For these letters,
choose the one that's easiest for you.
Start stroke at heavy dot
As you will see later, you use the same shape to create both the upper
case and lower case version of a letter.
Lift stylus here
Position the stylus in the left-hand side of the Graffiti writing
3
area.
Start your stroke at the heavy dot and draw the stroke shape
4
as it appears in the tables.
Lift the stylus from the screen at the end of the stroke shape.
5
That is all there is to it. When you lift the stylus from the screen, your
CLIÉ handheld recognizes your stroke immediately and prints the letter
at the insertion point on the screen.
As soon as you lift the stylus from the screen, you can begin the stroke for
the next character you want to write.
Chapter1 Basic operations of your Sony CLIÉ Handheld
Position the stylus
Continued on next page
14

Entering data in your Sony CLIÉ Handheld
Note
You must begin the character strokes in the Graffiti writing area. If you do not
make Graffiti strokes in the Graffiti writing area, your CLIÉ handheld does not
recognize them as text characters.
Tips on Graffiti writing
• Accuracy improves when you write large characters, You should draw strokes that
nearly fill the Graffiti writing area.
• To delete characters, simply set the insertion point to the right of the character you
want to delete and make the backspace stroke (a line from right to left) in the
Graffiti writing area.
• Write at natural speed. Writing too slowly can generate recognition errors.
• Do not write on a slant. Vertical strokes should be parallel to the sides of the Graffiti
writing area.
• Press firmly.
To display the Graffiti onscreen help
Drag the stylus from the bottom of the writing area to the top of the screen. Graffiti
Help opens a series of screens that show the complete Graffiti character set.
Chapter1 Basic operations of your Sony CLIÉ Handheld
15
Entering data in your Sony CLIÉ Handheld
Writing Graffiti alphabet
Draw Graffiti letters according to the following alphabet in the left-hand
side of the Graffiti writing area.
A N
B O
C P
D Q
E R
F S
G T
H U
I V
J W
K X
L Y
M Z
Space BackSpace
CarriageReturn Period Tap twice
Chapter1 Basic operations of your Sony CLIÉ Handheld
16
Entering data in your Sony CLIÉ Handheld
To write capital letters
Shift to caps and then you can make capital letters with the same stroke
shapes as the basic alphabet characters.
■ To draw the first letter of a word as a capital letter
Use the Caps Shift stroke
To return to the lower case, use the Backspace stroke
Note
When you create a new sentence or a new record (by tapping New or a blank
line), the first letter is automatically capitalized.
■ To enter only capital letters (Caps Lock)
Use the Caps Lock stroke .
.
Caps Shift
Caps Lock
.
To return to the lower case, use the CapsShift stroke
.
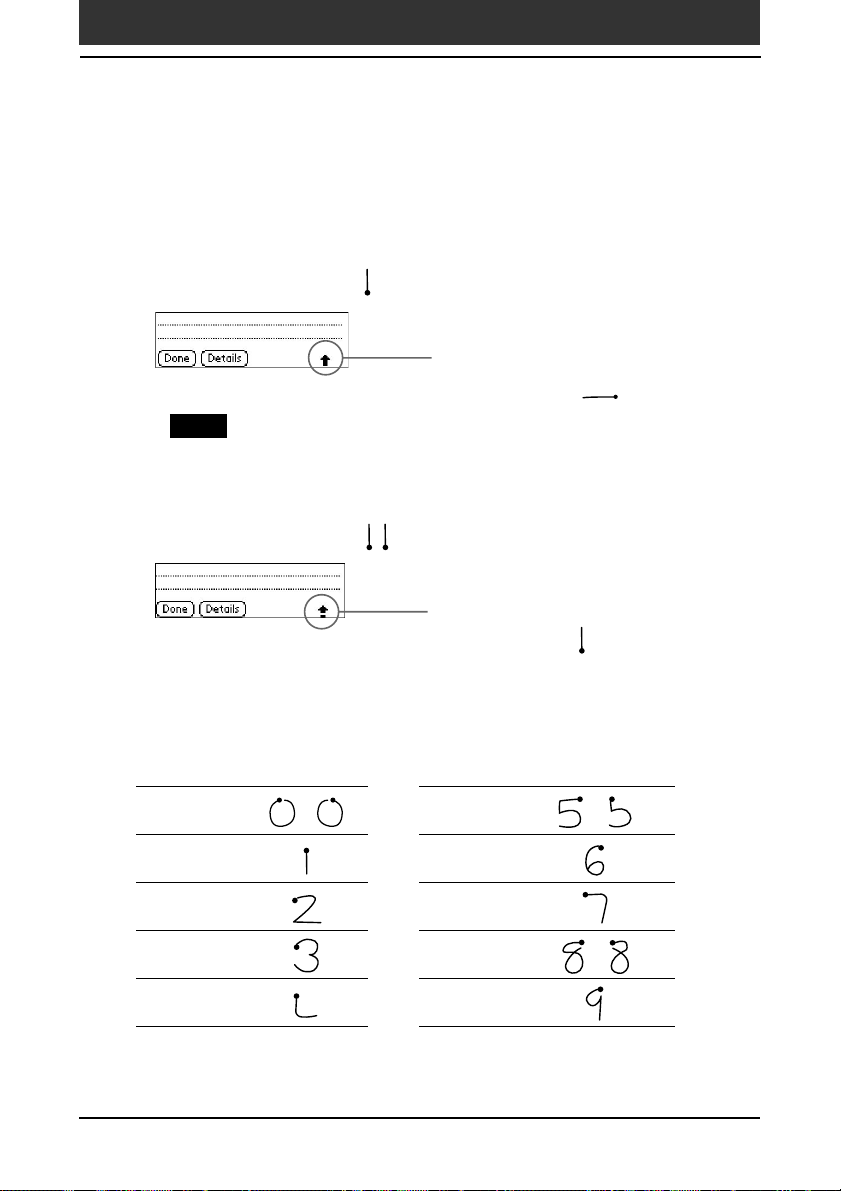
Writing numbers
Write the following numbers on the right-hand side (numbers side) of the
Graffiti writing area.
0 5
1 6
2 7
3 8
4 9
Chapter1 Basic operations of your Sony CLIÉ Handheld
17
Entering data in your Sony CLIÉ Handheld
Writing punctuation marks
Make a single tap on the Graffiti writing area to activate Punctuation Shift.
The next stroke you make anywhere in the Graffiti area (the letters or
numbers side) creates a punctuation mark.
Punctuation Shift
(.) Period (—) Dash
(,) Comma ( ( ) Left Paren
(‘) Apostrophe ( ) ) Right Paren
(?) Question (/) Slash
(!) Exclamation ($) Dollar
(@) At (\) Back slash
(#) Number ({) Left brace
(%) Percent (}) Right brace
(^) Circumflex ([)
(&) Ampersand (])
(*) Asterisk (-) Swung dash
(<)
Left angle bracket
(>)
Right angle bracket
(_) Under bar (:) Colon
(“) Ditto Tab
(\) Grave accent
(;) Semicolon
Chapter1 Basic operations of your Sony CLIÉ Handheld
Left square bracket
Right square bracket
18
Entering data in your Sony CLIÉ Handheld
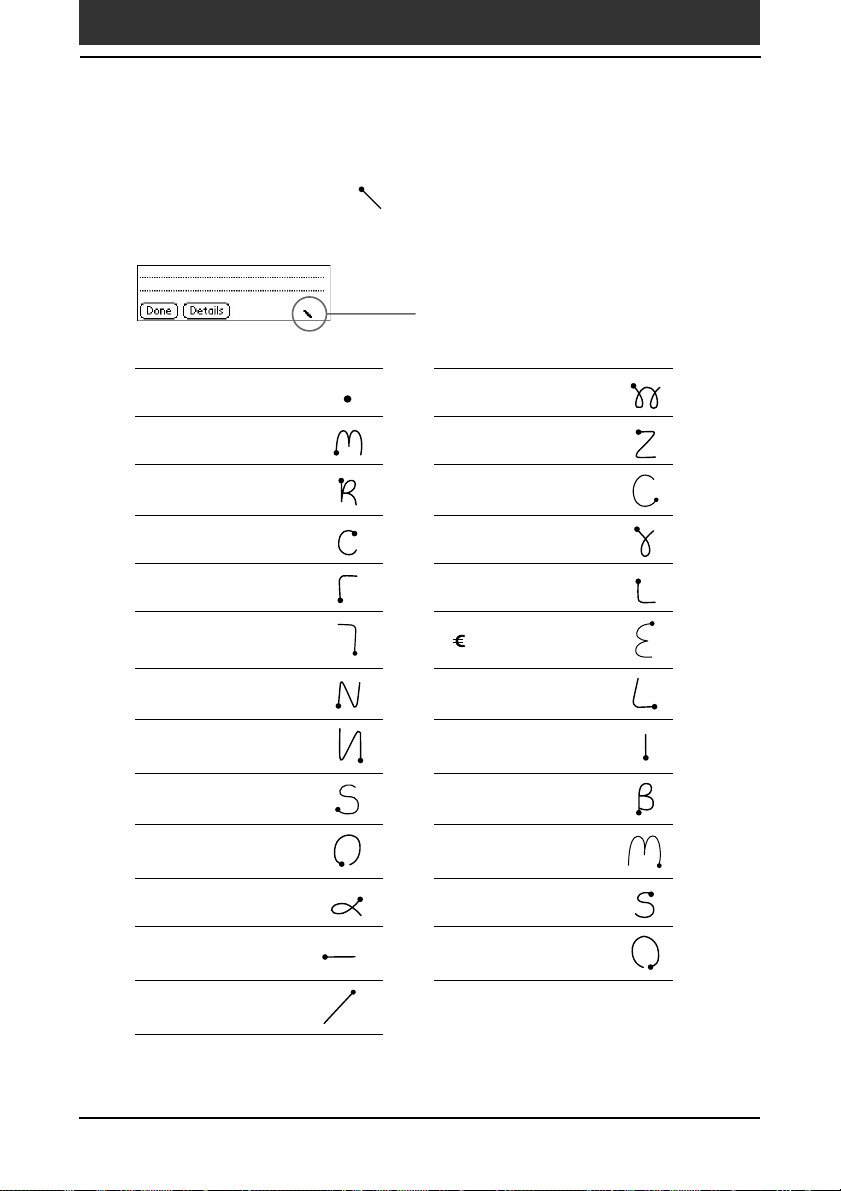
Writing symbols and extended characters
Make a Symbol Shift stroke on the Graffiti writing area to activate
Symbol Shift. The next stroke you make creates a symbol or extended
character.
Symbol Shift
(•) Bullet ÷
(™) Trademark =
(®) Registered (¢) Cent
(©) Copyrighted (¥) Yen
(‘)
Left single quotation
(£) Pound
(’) Right
(“)
(”)
(§) Section ß
(º) Degree µ
+ ƒ
± ø
x
single quotation
Left double quotation
Right double quotation
¡
Chapter1 Basic operations of your Sony CLIÉ Handheld
( ) Euro
¿
19
Entering data in your Sony CLIÉ Handheld
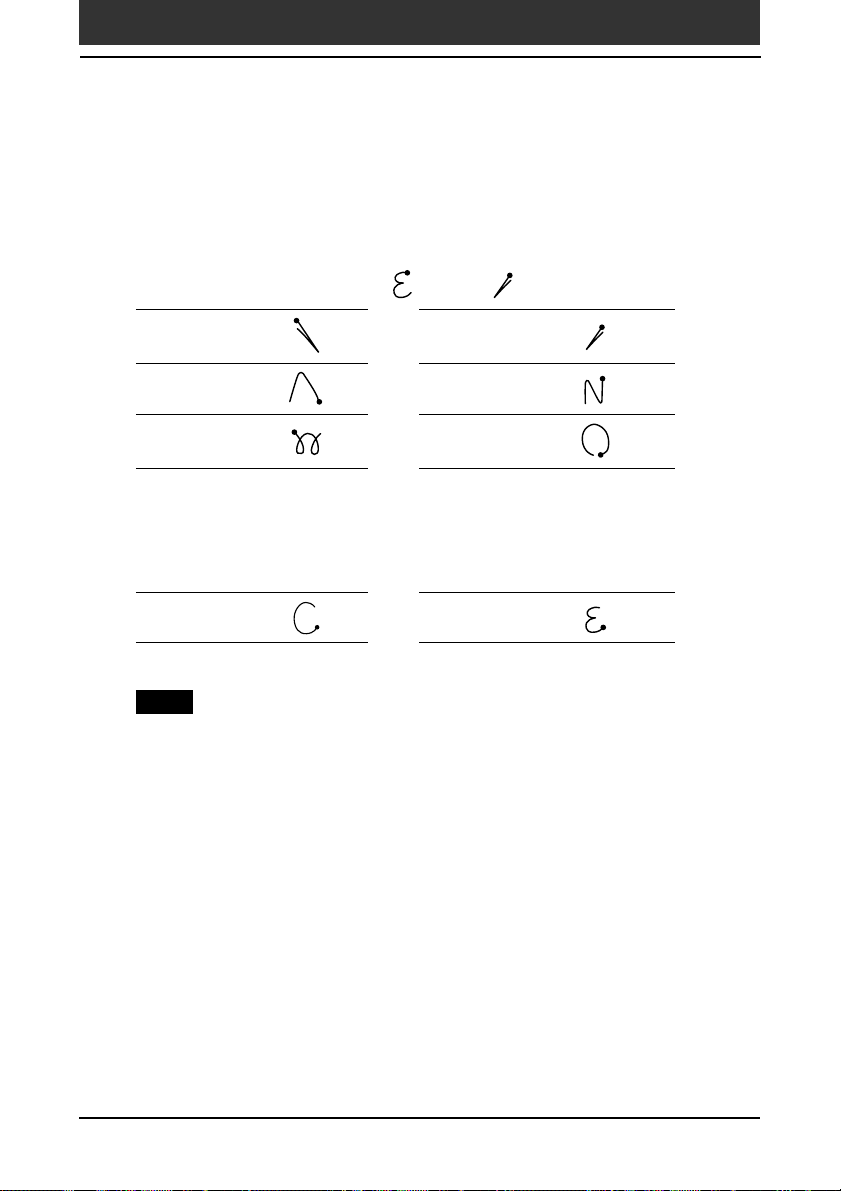
Writing accented characters and non-English characters
To create accented characters, draw the stroke normally used to create the
letter, followed by an accent stroke. Graffiti writing then adds the accent to
the letter.
To enter “é,” for example, draw
and then .
à è ì ò ù á é í ó ú ´y
â ê î ô û ã õ ñ
ä ï ö ü ÿ å
To write non-English characters
You can write the following characters without any special punctuation or
shifting:
ç æ
Note
You must write these non-English characters on the left side of the Graffiti writing
area.
Chapter1 Basic operations of your Sony CLIÉ Handheld
20
Entering data in your CLIÉ handheld
Using Navigation strokes
In addition to character symbols, Graffiti writing includes special strokes
that you can use to navigate within text or fields in your applications.
Move cursor right
Move cursor left
Go to the previous field (Address Book only)
Go to the next field (Address Book only)
Open Address Record (Address Book only)
Using Graffiti ShortCuts
Graffiti ShortCuts, similar to the glossary or autotext features of some word
processors, allow you to enter commonly used words or phrases quickly and
easily. In addition to the following predefined ShortCuts, you can create
your own ShortCuts for your name or the header of a memo (page 173).
Each ShortCut can represent up to 45 characters.
To use a ShortCut, draw the ShortCut stroke
characters. When you draw the ShortCut stroke, the ShortCut symbol
appears at the insertion point to show that you are in ShortCut mode.
When you enter
stamps.
and dts ( , , and ) , you can enter date and time
followed by the ShortCut
Date stamp ds Breakfast br
Time stamp ts Lunch lu
Date/time stamps dts Dinner di
Meeting me
Chapter1 Basic operations of your Sony CLIÉ Handheld
21
Continued on next page
Entering data in your Sony CLIÉ Handheld
Using the onscreen keyboard
You can open the onscreen keyboard any time you need to enter text or
numbers into your CLIÉ handheld. Note that you cannot enter Graffiti
characters while using the onscreen keyboard.
To use the onscreen keyboard:
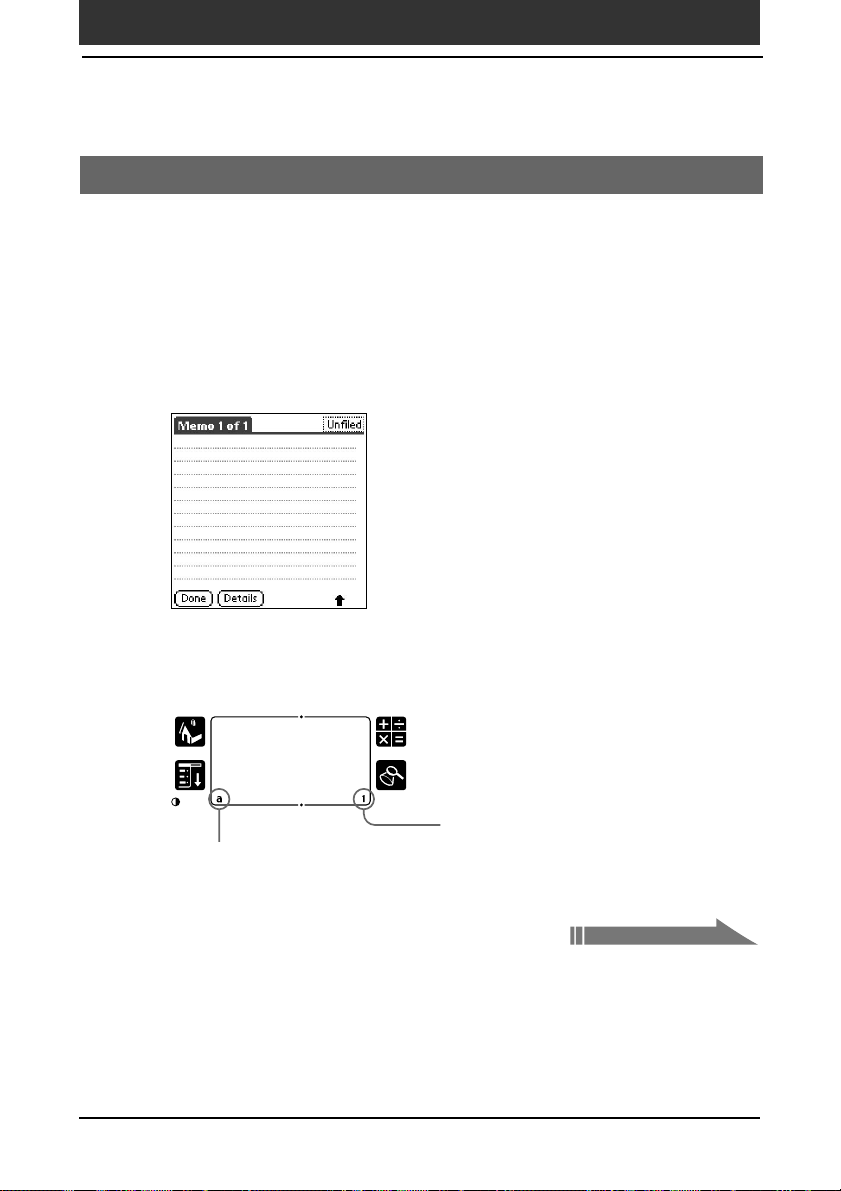
Open any application (such as Memo Pad).
1
Tap any record, or tap New.
2
Tap "a" to open the alphabetic keyboard, or tap "1" to open
3
the numeric keyboard.
The selected keyboard is displayed.
Chapter1 Basic operations of your Sony CLIÉ Handheld
Tap here for the numeric keyboard
Tap here for the alphabetic keyboard
22

Entering data in your Sony CLIÉ Handheld
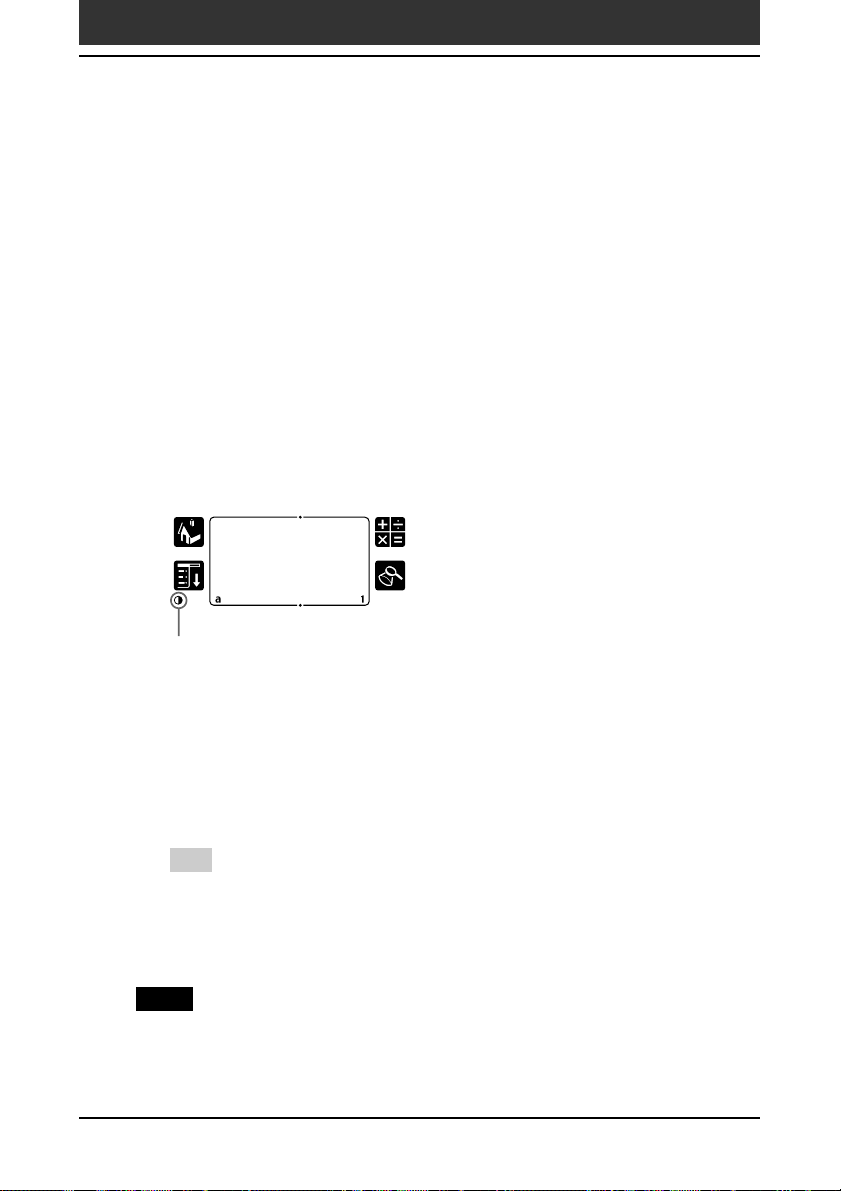
Tab
Caps lock
Caps shift
Numeric International
Tap here to display numeric
keyboard
Select the desired keyboard and tap the characters to enter
4
Alphabetic
Backspace
Carriage return
Tap here to display alphabetic keyboard
Tap here to display international
keyboard
text and numbers.
You can use the onscreen keyboard in the same way as in the keyboard of
your computer. To enter capital letter, tap cap and then tap the character
button. To delete a character, tap B.
After you finish, tap Done to close the onscreen keyboard
5
and place the text in the record.
Chapter1 Basic operations of your Sony CLIÉ Handheld
23

Entering data in your Sony CLIÉ Handheld
Using your computer keyboard
If you have a lot of data to enter, or prefer to use the computer keyboard,
you can use Palm™ Desktop for CLIÉ software or any other supported
personal information manager (PIM), such as Microsoft
information. You can then perform a HotSync
®
operation to synchronize the
information on your computer with the information on your CLIÉ handheld.
All the main applications on your CLIÉ handheld are also available in Palm
Desktop for CLIÉ software and in most PIMs, so you don't need to learn
different applications.
Refer to the Palm Desktop for CLIÉ software online Help for more
information on entering data on your computer.
To import data from your computer or another handheld
If you have data stored in computer applications such as spreadsheets, databases, or if
you want to import data from another handheld, you can transfer the data to your
CLIÉ handheld and use it without entering data manually. Save the data in a
compatible file format (.csv, .txt, .tab, .tsv, .dba, .aba, .tda, .mpa), import it into your
Palm Desktop for CLIÉ software, and then perform a HotSync operation to transfer
the data to your CLIÉ handheld. For details, see “Chapter 3: Exchanging and
updating data using a HotSync® operation.”
®
Outlook®, to enter
Chapter1 Basic operations of your Sony CLIÉ Handheld
24
Adjusting the screen
You can turn the backlight of the screen off or on or adjust the contrast
according to the lighting conditions or temperature of the environment
where you use your CLIÉ handheld.
Turning the backlight off and on
Press and hold down the POWER button for more than two seconds to turn
the backlight off or on.
Adjusting the contrast level
Even with the backlight on, you may need to further adjust the contrast of
the screen.
You can use the onscreen contrast control to adjust it.
Tap 6.
1
Tap this icon.
The adjustment control screen is displayed.
To change the level in small increments, tap to the left or
2
right.
To change the contrast level in larger increments, drag the
slider to the left or right.
Tip
You can also press the scroll button or rotate the Jog Dial navigator to move the
slider incrementally.
Tap Done.
3
Note
If the digitizer is not configured correctly, you may not be able to make the
adjustments properly. For details, see “Turning on your Sony CLIÉ handheld for the
first time” in the Read This First manual.
Chapter1 Basic operations of your Sony CLIÉ Handheld
25
Resetting your Sony CLIÉ Handheld
Under normal circumstances, you do not have to reset your CLIÉ handheld.
On rare occasions, however, your CLIÉ handheld may no longer respond to
buttons or the screen due to insufficient memory or other reasons. In this
case, you need to perform a reset to get your CLIÉ handheld running again.
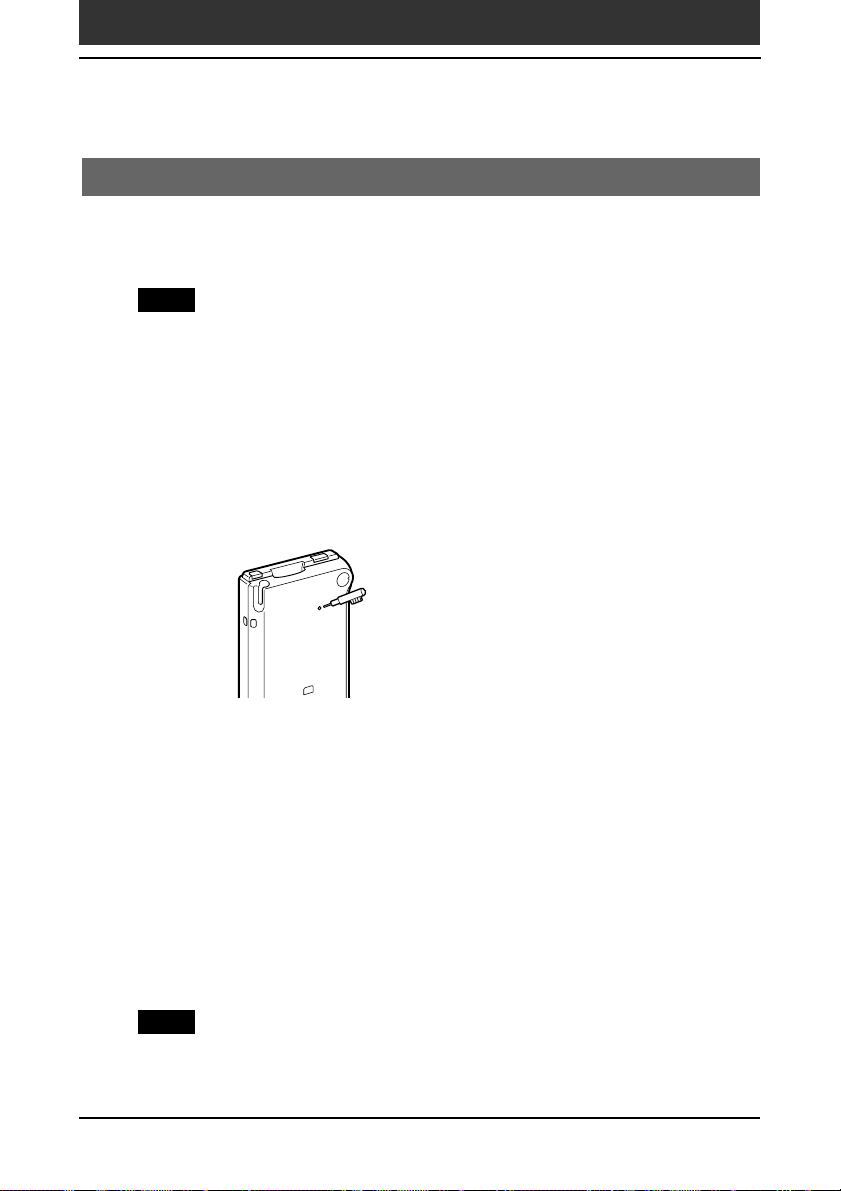
Performing a soft reset
A soft reset tells your CLIÉ handheld to stop what it’s doing and start over
again. All records and entries stored in your CLIÉ handheld are retained in a
soft reset.
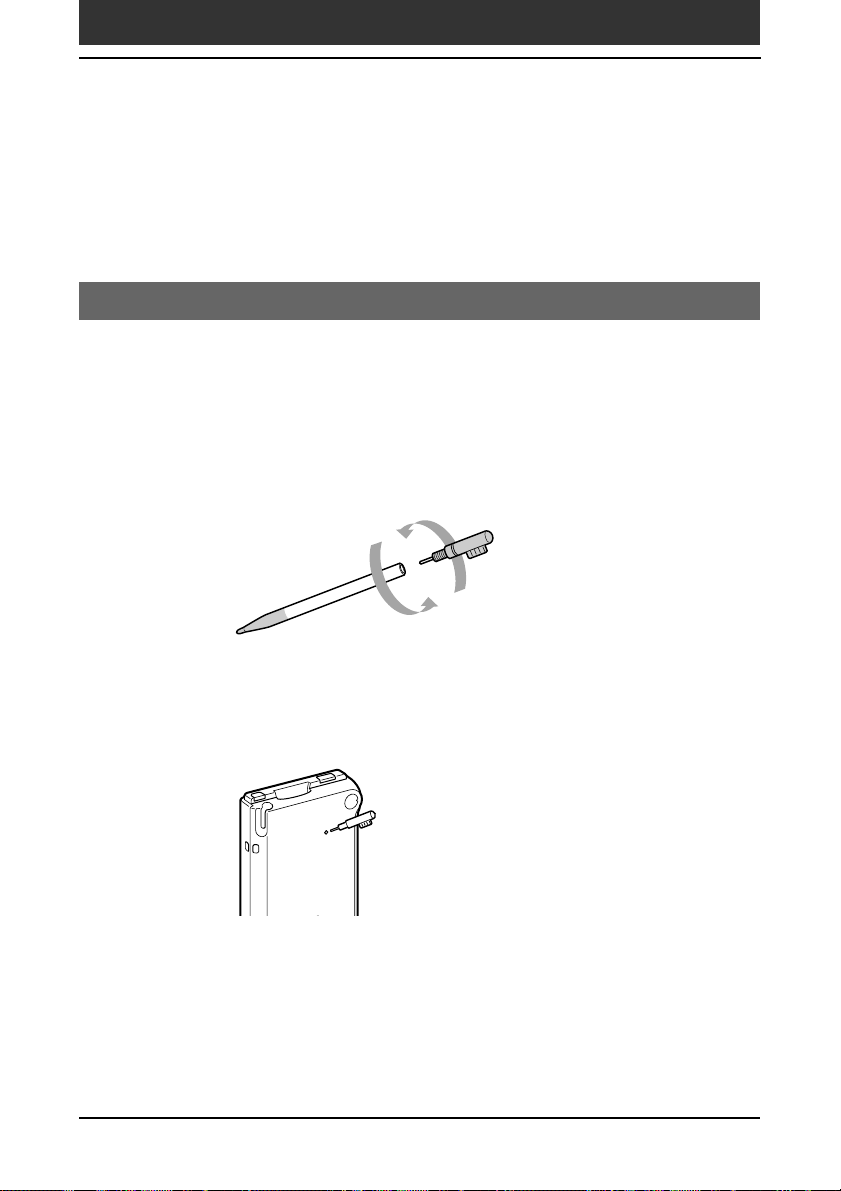
Take out the reset tip by unscrewing the metal barrel from
1
the stylus quill.
Use the reset tip to gently press the reset button inside the
2
hole on the back panel of your CLIÉ handheld.
The system shuts down and then restarts.
After restarting, the system displays “palm powered,” “CLIÉ,” and
“SONY,” followed by the preferences screen for setting the time and
date.
Chapter1 Basic operations of your Sony CLIÉ Handheld
26
Resetting your Sony CLIÉ Handheld
Performing a hard reset
If the soft reset does not solve the problem, you need to perform a hard reset
to restart your CLIÉ handheld.
Note
With a hard reset, all records and entries stored in your CLIÉ handheld are erased.
Only perform a hard reset if a soft reset does not solve your problem.
If you save a backup of your CLIÉ handheld data on your computer, you can restore
any data previously synchronized with your computer during the next HotSync
operation.
Hold down the POWER button on your CLIÉ handheld.
1
While holding down the POWER button, use the reset tip to
2
gently press and release the reset button.
®
The Palm Powered logo screen is displayed.
Release the POWER button.
3
A message warning that you are about to erase all the data stored on
your CLIÉ handheld is displayed.
Press the upper half of the scroll button on the front panel of
4
your CLIÉ handheld.
Your CLIÉ handheld undergoes a hard reset.
After a hard reset, only the current date and time are retained. Formats,
Preferences, and other settings are restored to their factory default
settings.
Note
If the scroll button was used just prior to hard-resetting, the hard-reset may not be
performed.
Chapter1 Basic operations of your Sony CLIÉ Handheld
27
Chapter 2
Using basic applications
This chapter describes how to do tasks that are specific or common to the basic
applications of your CLIÉ handheld: Date Book, Address Book, To Do List, Memo Pad,
and Calculator.
Contents
Managing schedules and events (Date Book).......................................29
Managing addresses and phone numbers (Address Book) ...................49
Managing tasks and things to do (To Do List) ...................................... 63
Creating memos (Memo Pad) ............................................................... 71
Using Calculator (Calc) .........................................................................79
Performing common tasks...........................................................................81
Using the Application Launcher ............................................................. 81
Categorizing records..............................................................................85
Finding records......................................................................................88
Protecting your data (Security) ...............................................................92
Attaching notes ..................................................................................... 99
Purging records ...................................................................................100
Using the Edit menu ............................................................................101
Choosing fonts ....................................................................................102
Continued on next page
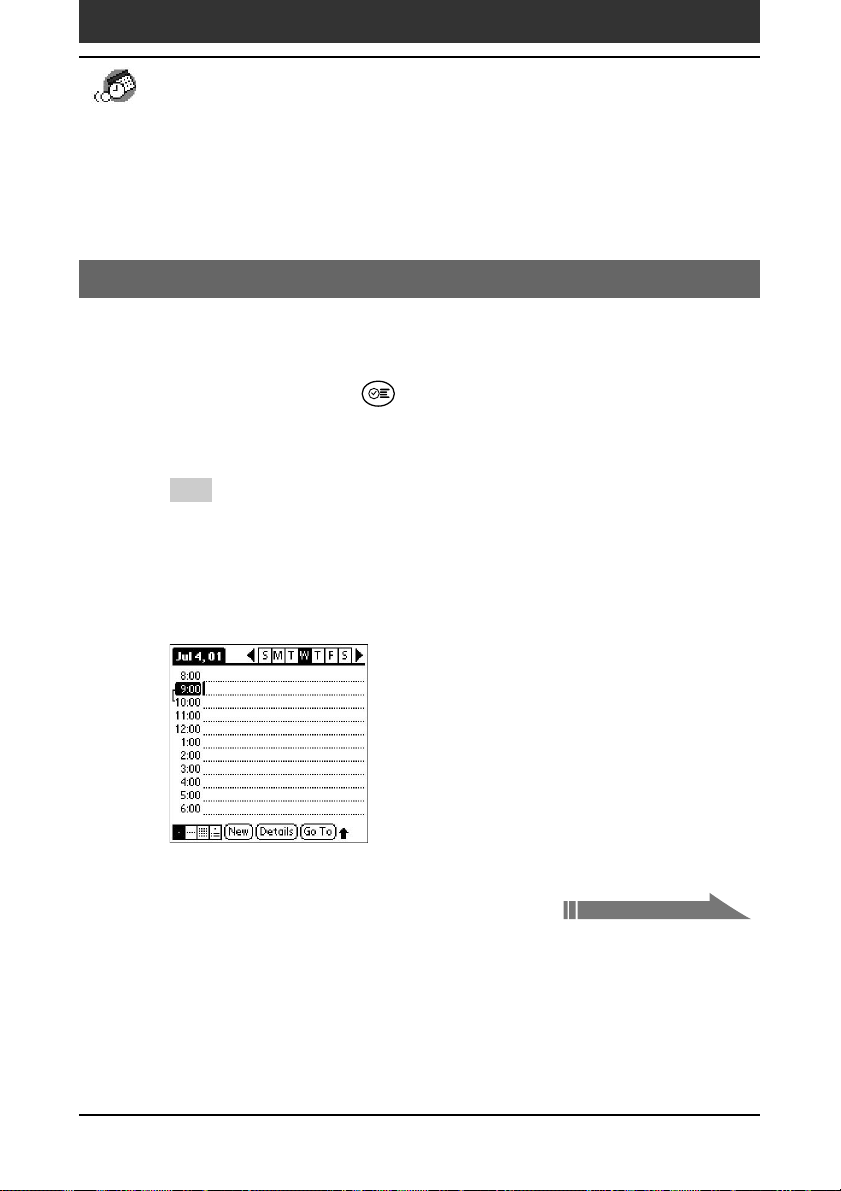
Managing schedules and events (Date Book)
Date Book lets you quickly and easily schedule appointments or any activity
associated with a date or a date and time. A record in Date Book is called an
“event.”
Scheduling an event
Scheduling an event for the current date
Press the Date Book button on the front panel.
1
Date Book starts up. Today’s schedule is displayed with a list of times for
a standard business day.
Tip
Press the Date Book button repeatedly to cycle through the Day, Week, Month,
and Agenda views. The Date Book views are displayed at the bottom left of the
screen.
Tap the time line that corresponds to the beginning of the
2
event.
Chapter2 Using basic applications
29

Managing schedules and events (Date Book)
Enter a description of the event.
3
You can enter a description or a note of up to 255 characters in length.
If the event is one hour long, skip to Step 7. If the event is
4
longer or shorter than one hour, tap the time of the event to
open the Set Time dialog box.
Do one of the following to set the duration of the event:
5
• Tap the time columns on the right side of the Set Time dialog box to
set the Start Time, and tap the End Time box. Then tap the time
columns to set the End Time.
• Tap All Day to automatically insert the start and end time of the
event as defined in your Date Book preferences.
Tap OK.
6
Tap a blank area of the screen to deselect the event.
7
A vertical line appears next to the time, indicating the duration of the
event.
Chapter2 Using basic applications
Continued on next page
30
 Loading...