

Page 1
4-676-912-11(1)
Wireless LAN Converter
(IEEE 802.11g: 2.4 GHz/54 Mbps)
Quick Start Guide
Capabilities
Wireless access to the Internet for devices with Ethernet
connectors
The 2.4 GHz Wireless LAN Converter PCWA-DE30 (hereafter referred to as the Wireless LAN
Converter) is designed to allow devices such as desktop computers or printers equipped with Ethernet
connectors to become part of a wireless network.
Notes
• Only use an Ethernet cable to connect the Wireless LAN Converter to the Ethernet device.
• The Wireless LAN Converter does not function as an Access Point.
• When setting up the Wireless LAN Converter without the Quick Setup switch, a computer running the Windows Me,
Windows 2000, or Windows XP operating system is required.
• Only one device can be connected to the Wireless LAN Converter. You cannot use a hub to connect to several devices.
• You cannot use the Wireless LAN Access Point PCWA-A500, the Wireless LAN Converter PCWA-DE50, or the Wireless
LAN PC Card PCWA-C500 to communicate with the Wireless LAN Converter PCWA-DE30.
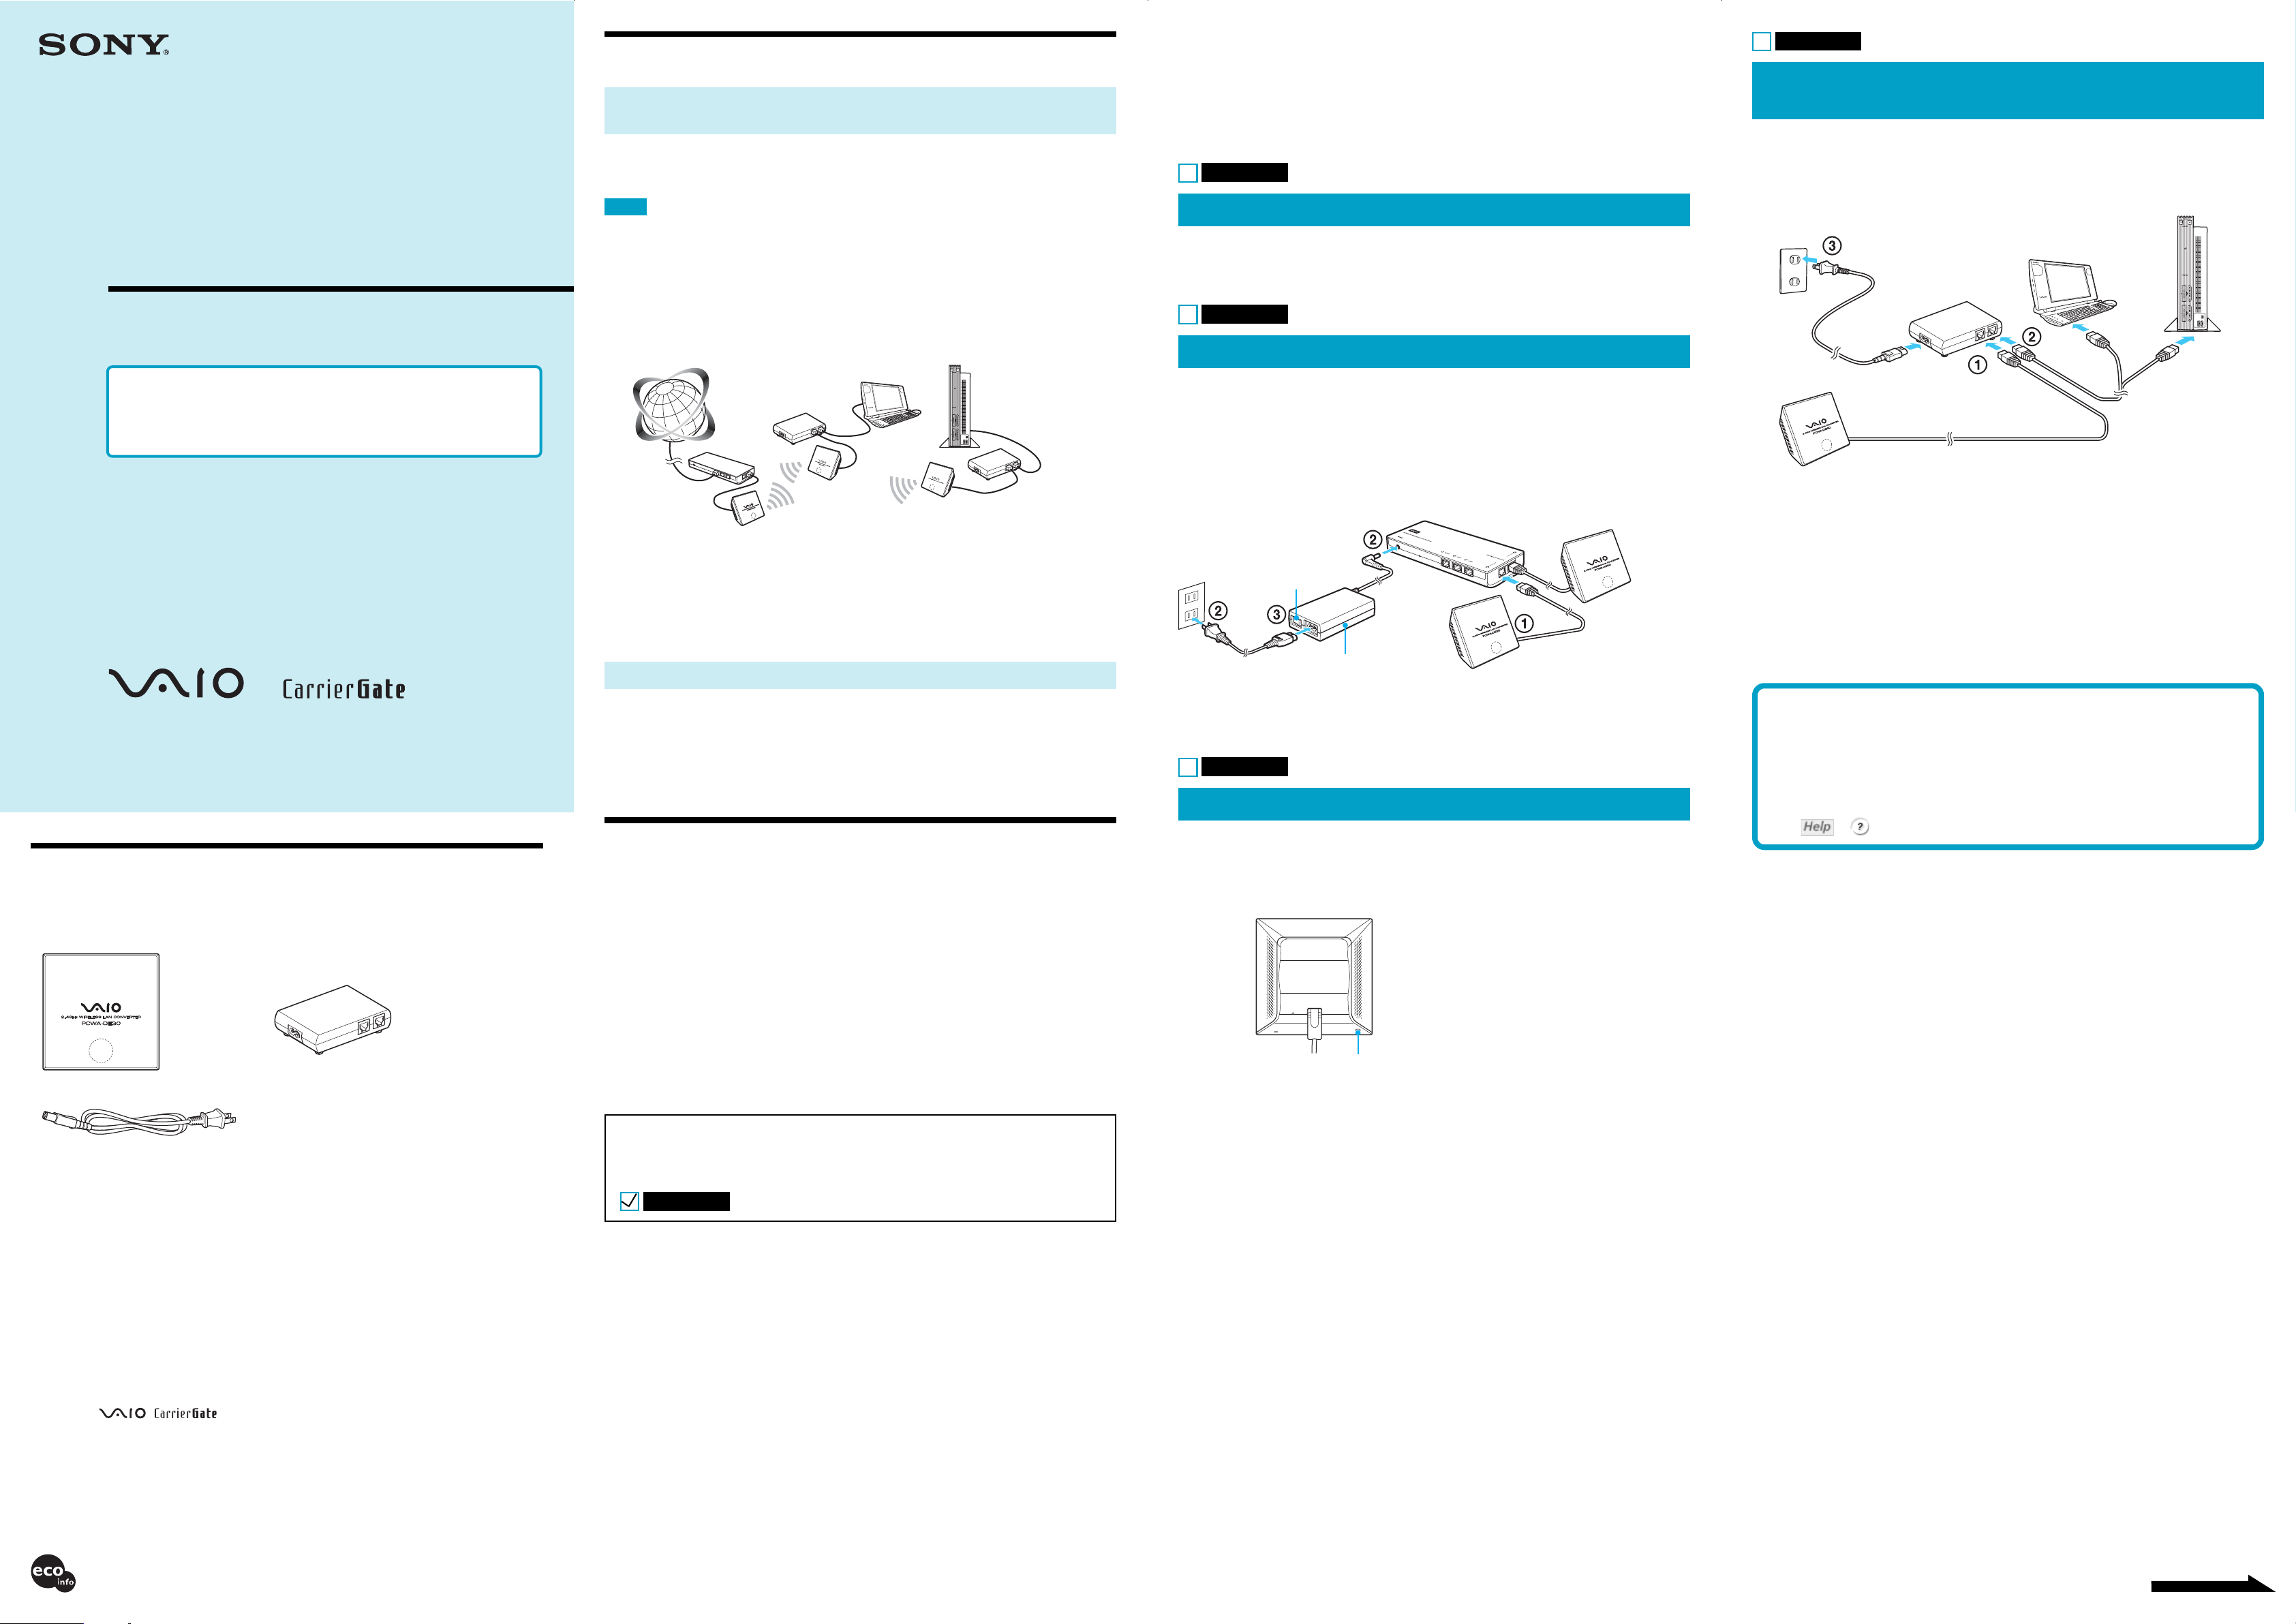
Connection example
Configuration with the Quick Setup
Switch
When the Wireless LAN Converter is connected to the PCWA-AR300, you can use the Quick Setup
switch to configure it. When the Wireless LAN Converter is connected to another type of access point,
see “Configuration with the Utility Software” overleaf.
Procedure 1
Complete the Access Point setup
Refer to the documentation of your Access Point for details about how to complete the setup. If your
Access Point data encryption (WEP) is not configured, we strongly suggest that you configure it before
proceeding.
Procedure 2
Connect the PCWA-AR300
Procedure 4
Connect the Wireless LAN Converter to the device
that you want to use for wireless communication
1 Connect the Wireless Unit and Power Unit.
2 Connect the Power Unit to the computer or other device capable of wireless communication using
an Ethernet cable.
3 Connect the Power Unit to an AC outlet using the power cord.
Power Unit
Power cord
or
Before reading this guide, be sure to read the “Read This First”
supplement.
This guide provides an overview of the Wireless LAN Converter
PCWA-DE30 features and the necessary configuration.
PCWA-DE30
Sony Corporation ©2003 Printed in Japan
Unpacking
When you unpack the unit, make sure that all the following items are present.
• Wireless Unit • Power Unit
Device equipped with
an Ethernet connector
Router or similar
Internet
Access Point
Wireless LAN
Converter
Wireless LAN Converter
z Hint
The Wireless LAN Converter also allows computers equipped with Wireless LAN Converters to communicate directly when
using the Peer to Peer Network connection mode, without using a Wireless LAN Access Point.
The Access Point Network connection mode settings are described in this document. Refer to Help for information about the
Peer to Peer Network connection mode settings.
Configuring the Wireless LAN Converter with the Quick Setup switch
You can use the settings of the Sony Wireless Broadband Router PCWA-AR300 to automatically
configure the hardwired (Ethernet) Wireless LAN Converter by using the Quick Setup switch.
The Access Point sends the following to the Wireless LAN Converter.
• Network Name (SSID)
• Encryption key (WEP key)
Configuring the Wireless LAN Converter
You can configure the Wireless LAN Converter by performing one of the following.
•With the Quick Setup switch
When the Wireless LAN Converter is connected to the Wireless Broadband Router PCWA-AR300,
you can use the Quick Setup switch to configure the Wireless LAN Converter. For details, see
“Configuration with the Quick Setup Switch”.
PCWA-AR300
1 Connect the Wireless Unit of the Wireless LAN Converter to a Wireless Unit/LAN connector of the
PCWA-AR300 Router Unit.
2 Connect the AC adapter to the PCWA-AR300 and the power outlet.
3 Press the power switch to turn on the AC adapter.
Router Unit of the Wireless Broadband Router
PCWA-AR300 (PCWA-R1)
Power switch
AC adapter
Wireless Unit of the Wireless
Broadband Router PCWA-AR300
(PCWA-AR320)
Wireless Unit of the Wireless
LAN Converter PCWA-DE30
z Hint
The connections above are used in configuring the Wireless LAN Converter with the Quick Setup switch. For details about
connections to use the Wireless LAN Converter in wireless communication, see procedure 4.
Procedure 3
Perform Quick Setup
1
Wait until the PCWA-AR300, and the Wireless LAN Converter start.
2
Press the Quick Setup switch of the PCWA-AR300 Wireless Unit for at
least one second.
When the status indicator on the PCWA-AR300 starts flashing red, it is ready for quick setup.
Wireless Unit
Wireless Unit cable
Ethernet cable
(not included)
z Hints
• The Wireless LAN Converter does not have a power switch.
• You can use an Ethernet cable with straight-through or crossover wiring.
When the status indicator of the Wireless LAN Converter changes to white when you connect the
wireless communication device, configuration is complete.
zHints
• If you change the Access Point settings, see “If You Change the Access Point Settings”, overleaf.
• If you want to reset the Wireless LAN Converter, see “Reset to Factory Defaults”, overleaf.
For details about the Wireless LAN Converter setup, refer to
the Help.
To display Help
Click the “Start” button, point to “Programs” (when using the Windows XP operating system,
point to “All Programs”), point to “Wireless LAN”, and then click “Converter Setup Help”.
To display Help for the Wireless LAN Converter Setup Page
Click
or on the Wireless LAN Converter Setup Page.
• Power cord
• CD-ROM (Setup disc)
• Read This First
• Quick Start Guide (this document)
• Troubleshooting Guide
• Limited Warranty
•With the utility software
When the Wireless LAN Converter is connected to an access point other than the PCWA-AR300,
you cannot use the Quick Setup switch to configure the Wireless LAN Converter. For details, see
“Configuration with the Utility Software” overleaf.
z Hint
You can use the utility software to configure the Wireless LAN Converter even if it is connected to the PCWA-AR300.
z Hint
In this document, each procedure is preceded by a box. Before proceeding to the next procedure, confirm that you
performed all the necessary tasks by ticking the box.
Example:
Procedure 1
Quick Setup switch
z Hint
• The Wireless LAN Converter only remains in Quick Setup standby mode for 30 seconds.
• Press the Quick Setup switch one more time for at least one second to cancel the procedure.
3
Press the Wireless LAN Converter Quick Setup switch for at least one
second.
When the Status indicator on the PCWA-AR300 stops flashing red and the Wireless LAN
Converter’s begins flashing white, quick setup is complete.
4
Turn off the Wireless LAN Converter.
• Sony, VAIO, , , and the Eco Info logo are trademarks of Sony Corporation.
• Microsoft and Windows are registered trademarks of Microsoft Corporation in the United States and/or other countries.
• In this manual, Microsoft® Windows® Millennium Edition is referred to as Windows Me, Microsoft® Windows® 2000
Professional is referred to as Windows 2000, Microsoft® Windows® XP Home Edition and Microsoft® Windows® XP
Professional are referred to as Windows XP.
• Netscape is registered trademark of Netscape Communications Corporation.
• All other names of systems, products and services are trademarks of their respective owners.
• In the manual, the ™ or ® marks are not specified.
Printed on 100% recycled paper using VOC (Volatile Organic Compound)-free vegetable oil
based ink.
Continued on next page
Page 2
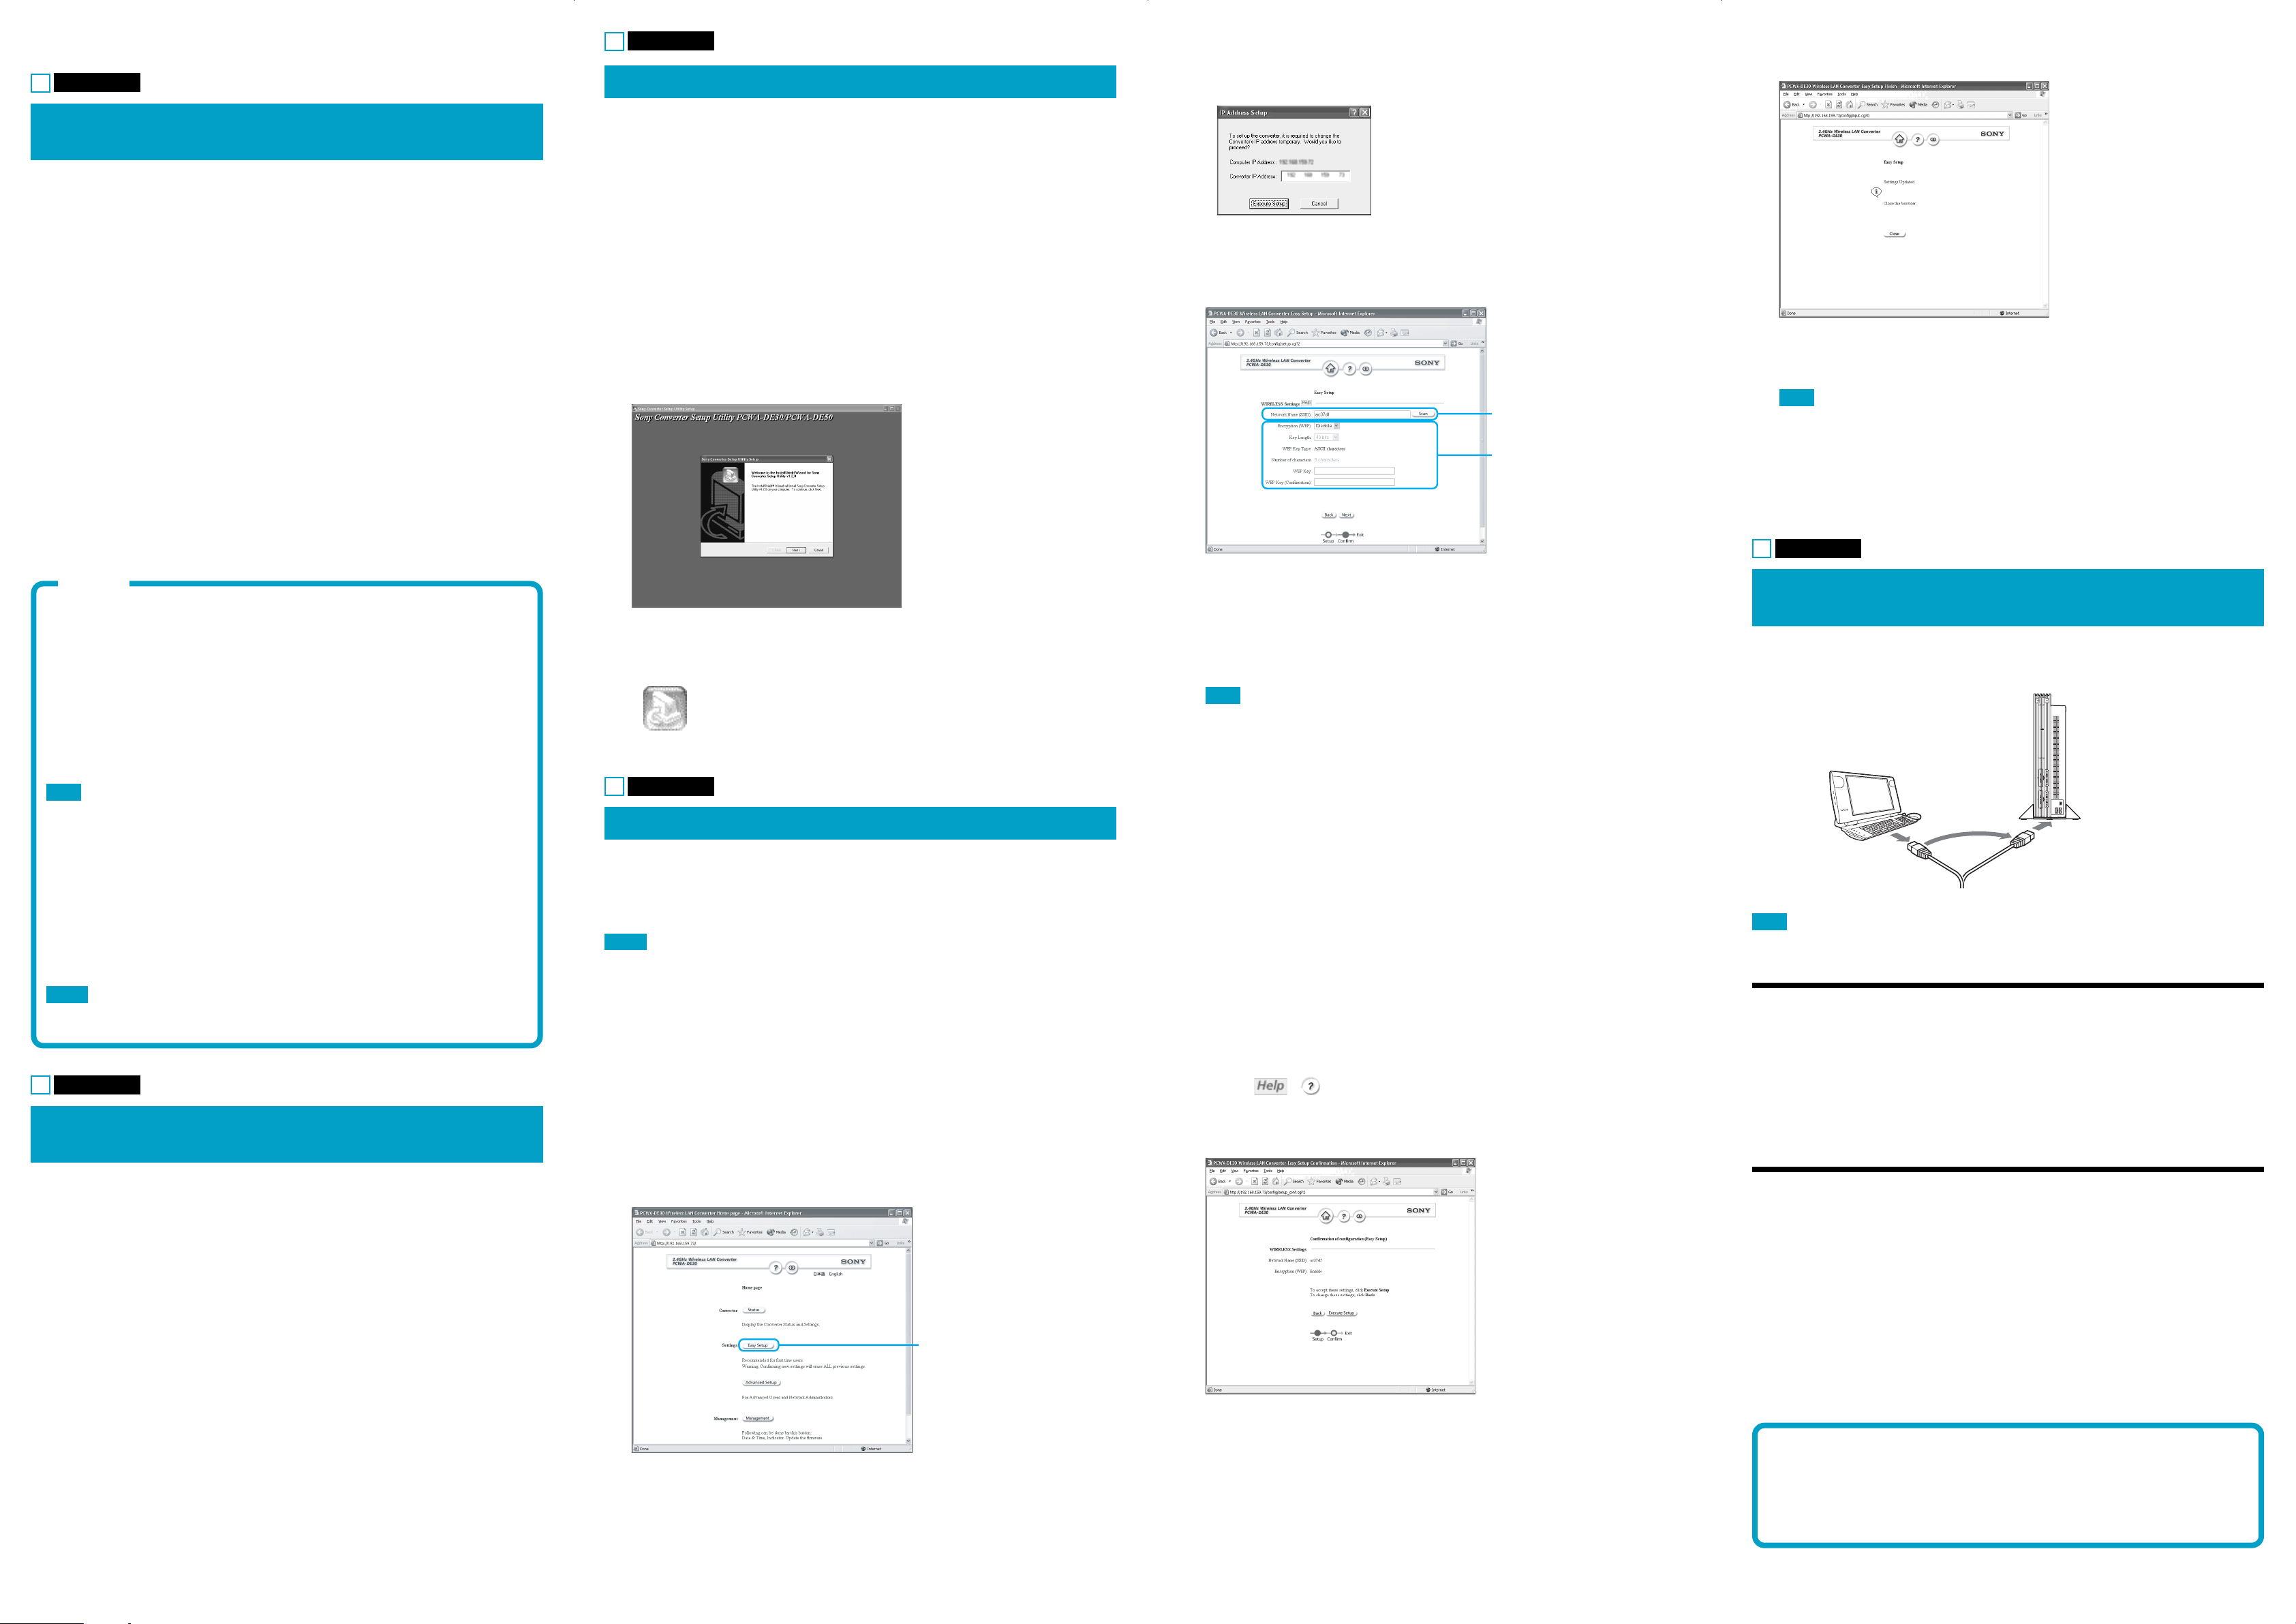
Configuration with the Utility Software
Procedure 1
Verifying the computer used for setup and the
Access Point, and configuring necessary settings
Before starting setup of the Wireless LAN Converter with the Converter Setup Utility, verify the
following points.
Procedure 3
Installing the utility software
Install the utility software to configure the Wireless LAN Converter (Converter Setup Utility) on the
computer used for setup.
1
Insert the supplied CD-ROM into the CD-ROM drive of the computer
where the Wireless LAN Converter is connected.
z Hints
• If the “IP Address Setup” dialog box appears, temporarily change the converter IP address to the one in the dialog
box. However, if you are using several devices to build a network, make sure that the new IP address does not
duplicate the address of another device or computer on the network. If it does, you will not be able to open the
Wireless LAN Converter Setup Page. Change the IP address as necessary before clicking “Execute Setup”.
6
Make sure that the settings are as desired, and click “Execute Setup”.
The setup completion page appears.
Verify the Ethernet connector of computer used for setup
Verify the Ethernet connector of the computer to be used for setup and provide the required Ethernet
cable.
z Hint
You can use an Ethernet cable with straight-through or crossover wiring.
Verify the Access Point
Make sure that the 2.4 GHz Wireless LAN Access Point to be used is on. Also verify the Network
Name (SSID) and Encryption (WEP) key settings of the Access Point.
Network Name (SSID) : ___________________
Encryption (WEP) key : ___________________
If your Access Point data encryption (WEP) is not configured, we strongly suggest that you configure it
before proceeding.
Adjust the firewall settings of your computer
If you are using the Windows XP “Internet Connection Firewall” function or a personal firewall
provided by virus scanning software, it may be necessary to adjust its security level. For details, see
below.
Note
Computer Firewall Functions
When using the Windows XP “Internet Connection Firewall”
function
Enabling the Windows XP “Internet Connection Firewall” function may prevent you from
accessing your computer through wireless communication. (With the Windows XP operating
system, this function is disabled by default.) Because of this, you may not be able to connect to
your network when you change your Wireless LAN Converter and/or Access Point settings. If
this happens, disable the “Internet Connection Firewall” function, connect to the network, and
then reactivate the function. For details, refer to Windows XP Help.
Note
Network security is an important issue. You are urged to consider carefully how best to protect your computer.
When using a personal firewall provided by virus scanning or
network security software
Virus scanning and network security software sometimes includes a function called a “personal
firewall” that is designed to prevent illegal access by outside entities. Depending on the software,
the security level of this function may be initially set to a high level. If this high security level
setting is left in effect, it may be impossible for an outside entity to access your computer. This
can cause problems such as not being able to connect to the network when changing the Wireless
LAN Converter or Access Point settings. In this event, lower the security level in order to allow
network connection. For details, refer to the manuals provided with your software.
Notes
• Network security is an important issue. You are urged to consider carefully how best to protect your computer.
• For details about firewall functions or other inquiries, contact your software manufacturer.
Procedure 2
Connecting the Wireless LAN Converter to the
computer used for setup
Connect the Wireless LAN Converter and the computer.
zHint
For details about how to connect the device that you want to use for wireless communication, see “Configuration with the
Quick Setup Switch”, procedure 4.
2
With computers running the Windows Me or Windows 2000 operating
system, double-click the “My Computer” icon on your desktop.
With computers running the Windows XP operating system, click “Start”
and click “My Computer”.
3
In the “My Computer” window, double-click “Setup.exe” on the supplied
CD-ROM.
The installation program starts. Follow the instructions on the screen and install the utility
software.
z Hints
• Depending on the settings of your computer, the file name “Setup.exe” may be displayed as “Setup”. If there are
multiple files named “Setup” in the same folder, double-click the one with the following icon.
• To exit the installation program, click “Cancel”.
Procedure 4
Configuring the Wireless LAN Converter
Display the Wireless LAN Converter Setup Page and configure the necessary settings.
Compatible browsers:
Internet Explorer 5.5 or later
Netscape 6.1 or later
Notes
• To display the Wireless LAN Converter Setup Page with the Converter Setup Utility software, use one of the Web
browsers above.
• If your Web browser is configured to use a proxy server, set the browser proxy settings so that the browser does not use a
proxy sever for the IP address of the Wireless LAN Converter and the 2.4 GHz Wireless LAN devices such as the Access
Point. For details about how to disable proxy settings, see “Case 4: Cannot display the Wireless LAN Converter Setup
Page with the Converter Setup Utility” in the Troubleshooting Guide.
z Hints
• The Wireless LAN Converter Setup Page is saved in the internal memory of the Wireless LAN Converter.
• The page displayed may differ slightly depending on the firmware version of the Wireless LAN Converter.
1
Click “Start”, point to “Programs” (when using the Windows XP operating
system, point to “All Programs”), point to “Wireless LAN”, and then click
“Converter Setup”.
The Converter Setup Utility starts and automatically displays the Wireless LAN Converter Setup
Page.
• If an error occurs, refer to the Troubleshooting Guide or Help.
2
Click “Easy Setup”.
The Easy Setup page appears.
Enter the Network Name (SSID) of
your Access Point.
Configure these settings to match
those of your Access Point.
3
Enter the Network Name (SSID) of the Access Point.
• If the Access Point setup is complete:
Use the same Network Name (SSID) as the one set for the Access Point.
• If the Access Point setup is not complete:
Refer to the documentation provided with your Access Point and enter the default Network
Name (SSID).
Note
The Network Name (SSID) is an identifier used to identify the wireless network. It is required for communication
with the Access Point.
z Hint
To search for active Access Points in the vicinity, click the “Scan” button.
4
Configure the “Encryption (WEP)”, “Key Length”, and “WEP Key”
settings.
• If the Access Point setup is complete:
Use the same values as the one set for the Access Point.
• If the Access Point setup is not complete:
Refer to the documentation of the Access Point and enter the default values.
Encryption (WEP) : Select whether to use data encryption or not.
Key Length : Select the Encryption (WEP) key length. The number of characters for
the key string depends on this setting.
WEP Key : Enter a character string to be used as the Encryption (WEP) key. The
length of the string must match the encryption key length setting.
For verification, the string must be entered once more in the “WEP Key
(Confirmation)” field.
z Hints
• Encryption of wireless communications data (as selected by “Encryption (WEP)”) is used to prevent unauthorized
access by a third party. The Encryption (WEP) key becomes the password necessary to join a network using data
encryption.
• Clicking or displays Help.
5
When setup is complete, click “Next”.
The setup confirmation page appears.
When you click “Execute Setup”, the Wireless LAN Converter restarts.
If the status indicator on the front panel of the Wireless Unit flashes slowly white, communication
with the Access Point is established.
Note
If the read-in condition continues after you click “Execute Setup”, check the status indicator on the front panel of the
Wireless Unit. If the indicator flashes slowly white, setup is complete and wireless communication is possible.
z Hint
If the status indicator flashes red, communication with the Access Point cannot be established. Refer to Read This
First or Help.
7
Close the Web browser.
Procedure 5
Connecting to a device equipped with Ethernet
connector
This procedure is unnecessary if you plan to perform wireless communications with the computer used
for setup. If not, disconnect the Wireless LAN Converter from the computer used for setup and connect
it to the wireless communication device.
Device equipped with an
Ethernet connector
Note
If you disconnect the Ethernet cable from the computer used for setup while it is still on, wait at least 10 seconds before
connecting it to the wireless communication device.
If You Change the Access Point Settings
If you change the settings of your Access Point, the connection to the Wireless LAN Converter is
severed. Reconfigure the Network Name (SSID) and Encryption key (WEP key) of the Wireless LAN
Converter to match the values of your Access Point. If the Wireless LAN Converter is connected to the
PCWA-AR300, perform procedures 2 and 3 of “Configuration with the Quick Setup Switch”, overleaf.
If the Wireless LAN Converter is connected to a device other than the PCWA-AR300, see
“Configuration with the Utility Software”, overleaf.
Reset to Factory Defaults
1
Turn on the Wireless LAN Converter.
Click in Step 2.
2
Press the reset switch on the bottom of the Wireless Unit with the end of
a paper clip or a similar object for at least one second.
3
When the status indicator begins flashing red, release the reset switch.
The Wireless LAN Converter restarts automatically, and all settings revert to their factory default
values.
For details about the factory default settings of the Wireless LAN Converter, refer to the
Troubleshooting Guide.
For more about the following, refer to Read This First.
• Names of parts and functions
• Installation precautions
• Operating precautions
• Specifications
 Loading...