


Wireless LAN
Converter
PCWA-DE30
Quick Start Guide
Kurzeinführung
Manuel de mise en route
www.vaio-link.com
4-676-912-21

CONTENTS
English -
Quick Start Guide . . . . . . . . . . . . . . . . .page 3
Deutsch -
Kurzeinführung . . . . . . . . . . . . . . . . . .Seite 21
Français -
Manuel de mise en route. . . . . . . . . . .page 41
© 2003 Sony Corporation. Printed in Japan.
4-676-912-21


Wireless LAN Converter
Quick Start Guide
3

Trademarks
● Sony, VAIO, the logo, the and the Eco Info logo
are trademarks of Sony Corporation.
● Microsoft and Windows are registered trademarks of Microsoft
Corporation in the United States and/or other countries.
● In this manual, Microsoft
Windows
● All other names of systems, products and services are trademarks of their
®
XP Professional are referred to as Windows XP.
respective owners. In this manual the
®
Windows® XP Home Edition and Microsoft®
TM
or ® marks are not specified.
™
4
Introduction
This document provides an overview of the Wireless LAN Converter
PCWA-DE30 features and the necessary configuration steps.
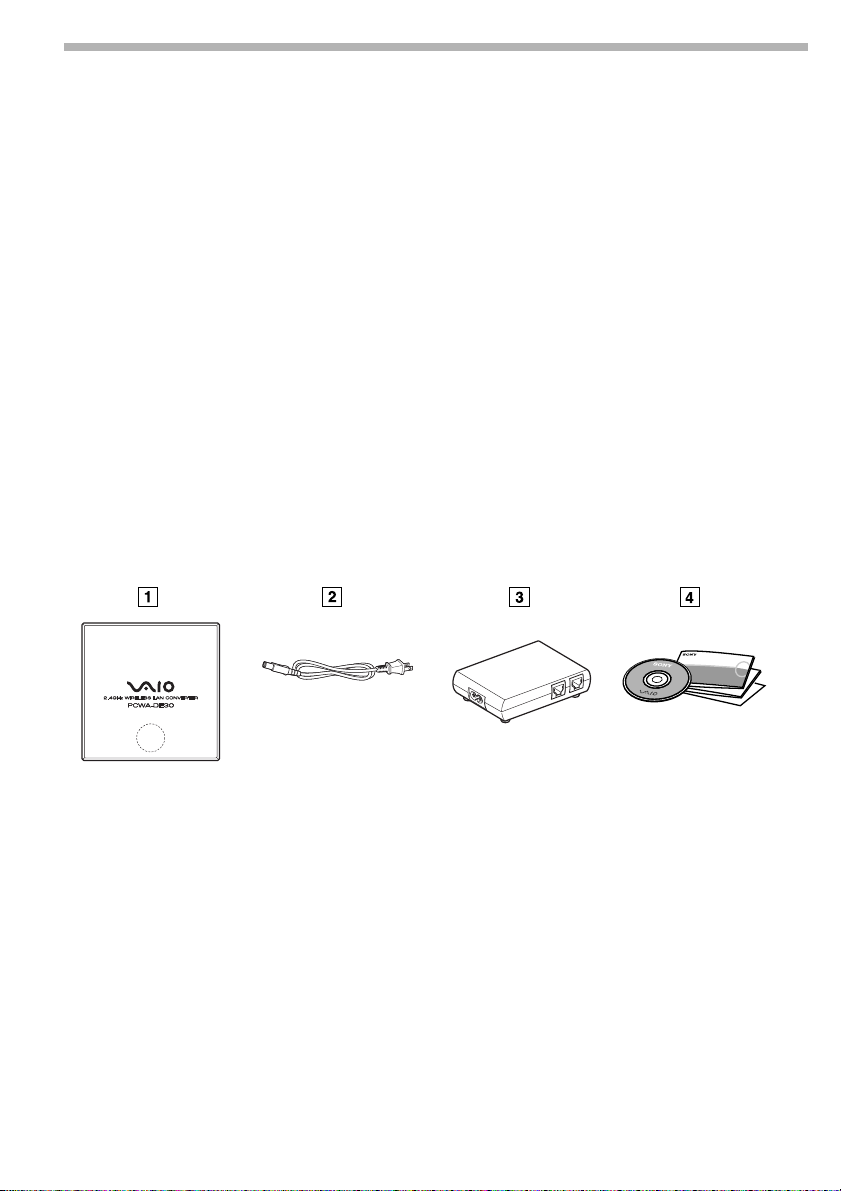
Unpacking your Access Point
Once you have unpacked the unit, make sure that all of the following items
are present:
● Wireless Unit (1)
● Power cord (2)
● Power Unit (3)
● Adapter plug*
● CD-ROM (setup disc) (4)
● Quick Start Guide (4)
● Troubleshooting Guide (4)
● Warranty leaflet (4)
● Regulatory Leaflet (4)
*Depending on your country.
5

Names of parts and functions
Wireless Unit
STATUS indicator (1) Indicates the status of the Wireless Converter.
White flashing
(9 sec. lit, 1 sec. out)
White flashing
(5 sec. lit, 1 sec. out)
White flashing
(2 sec. lit, 1 sec. out)
White flashing
(1 sec. lit, 9 sec. out)
White flashing
(half second intervals)
White flashing
(0.2 sec. intervals)
Pink lit Communicating in Peer to Peer Network connection mode.
Red flashing (6 sec.
intervals)
Red flashing (3 sec.
intervals)
Red flashing (1.6 sec.
intervals)
Red flashing (1 sec.
intervals)
Wireless network connection status: good (strong signal).
Wireless network connection status: Fair (medium signal).
Wireless network connection status: Poor (weak signal).
Nothing connected to the NETWORK connector or connected
devices off.
Startup in progress.
Wait until startup is complete.
Wireless LAN Converter quick setup successful with the Quick
Setup switch.
Wireless LAN Converter quick setup failed with the Quick Setup
switch because it could not acquire setup information from the
Access Point of the PCWA-A320.
Search for wireless network in progress.
Communication is not yet possible because connection is not
established. If this condition continues for a long time, check the
settings of the Wireless LAN Converter and the connection target
(2.4 GHz Wireless LAN Access Point, etc.)
Wireless LAN Converter in Quick Setup standby mode.
Wireless LAN Converter firmware update failed. You must update
the firmware again.
6
Red flashing (half sec.
intervals)
Reset switch (2) Returns the Wireless LAN Converter settings to their factory
LINK/ACT indicator (3) Lights when an Ethernet cable is connected to the NETWORK
Wireless unit cable (4) Connects to the WIRELESS UNIT connector on the Power Unit.
Rear cover (5) Remove this cover if you want to hang the Wireless Unit to a wall
Wall mounting holes (6) Use these holes to hang the Wireless Unit to the wall.
MAC address label (7) The Wireless LAN Converter MAC address is printed here.
Quick Setup switch (8) Use this switch to set up the Wireless LAN Converter.
Unit is resetting: When you release the reset switch, the Wireless
LAN Converter restarts automatically and reverts to its factory
default settings.
Firmware update in progress: Firmware is being updated. Never
turn off the power in this condition.
defaults.
connector on the Power Unit.
and to verify the MAC address.
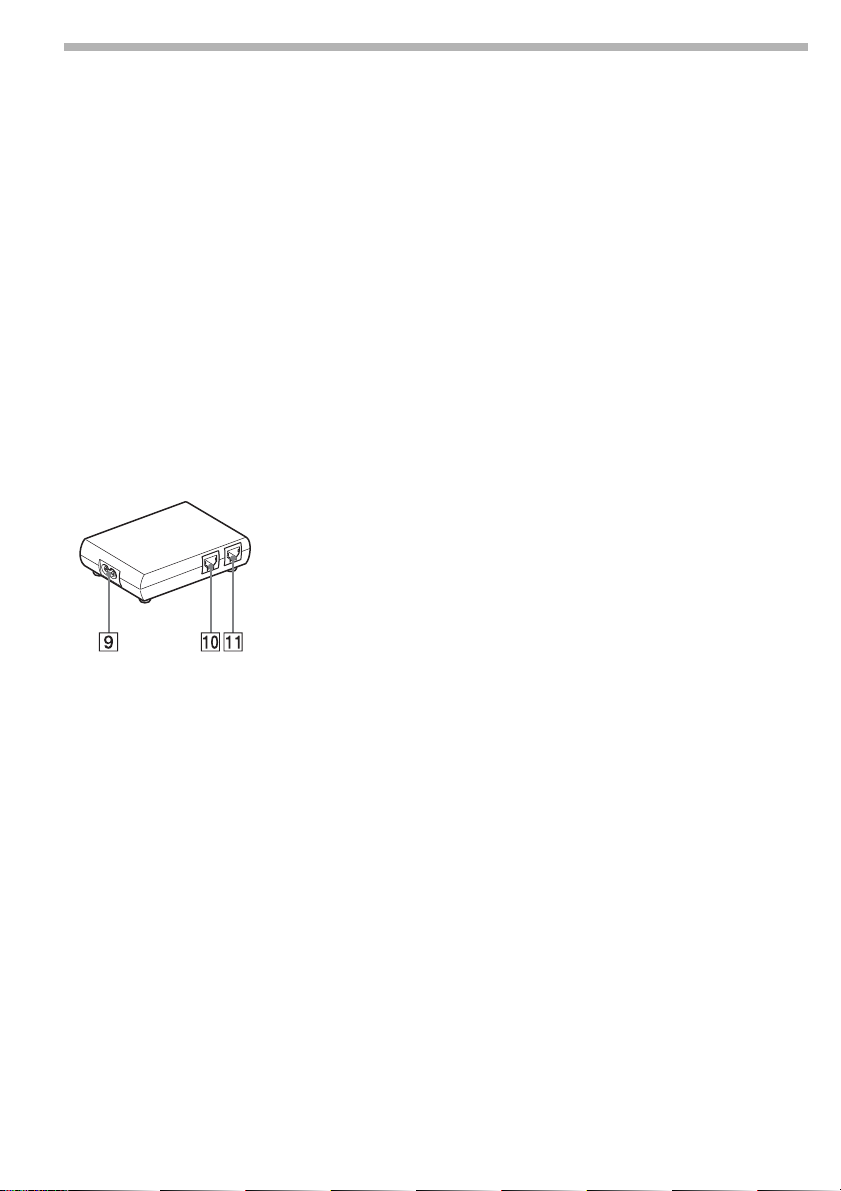
Power Unit
100-240 V AC jack (9) Connect the supplied power cord here.
WIRELESS UNIT connector (10) Connect the Wireless Unit cable here.
NETWORK connector (11) Connect the Wireless Unit to your computer or other device
using an Ethernet cable.
Use a straight-through or crossover Ethernet cable.
Reset to factory default values
To reset to the Wireless LAN Converter factory default settings, proceed as
follows:
1 Turn on the Wireless LAN Converter.
2 Press the reset switch on the bottom of the Wireless Unit with the end of
a paper clip or a similar object for at least one second.
3 When the status indicator begins flashing red, release the reset switch.
The Wireless LAN Converter restarts automatically, and all settings revert
to their factory default values.
● For details about the factory default settings of the Wireless LAN Converter, refer to the
Troubleshooting Guide.
7
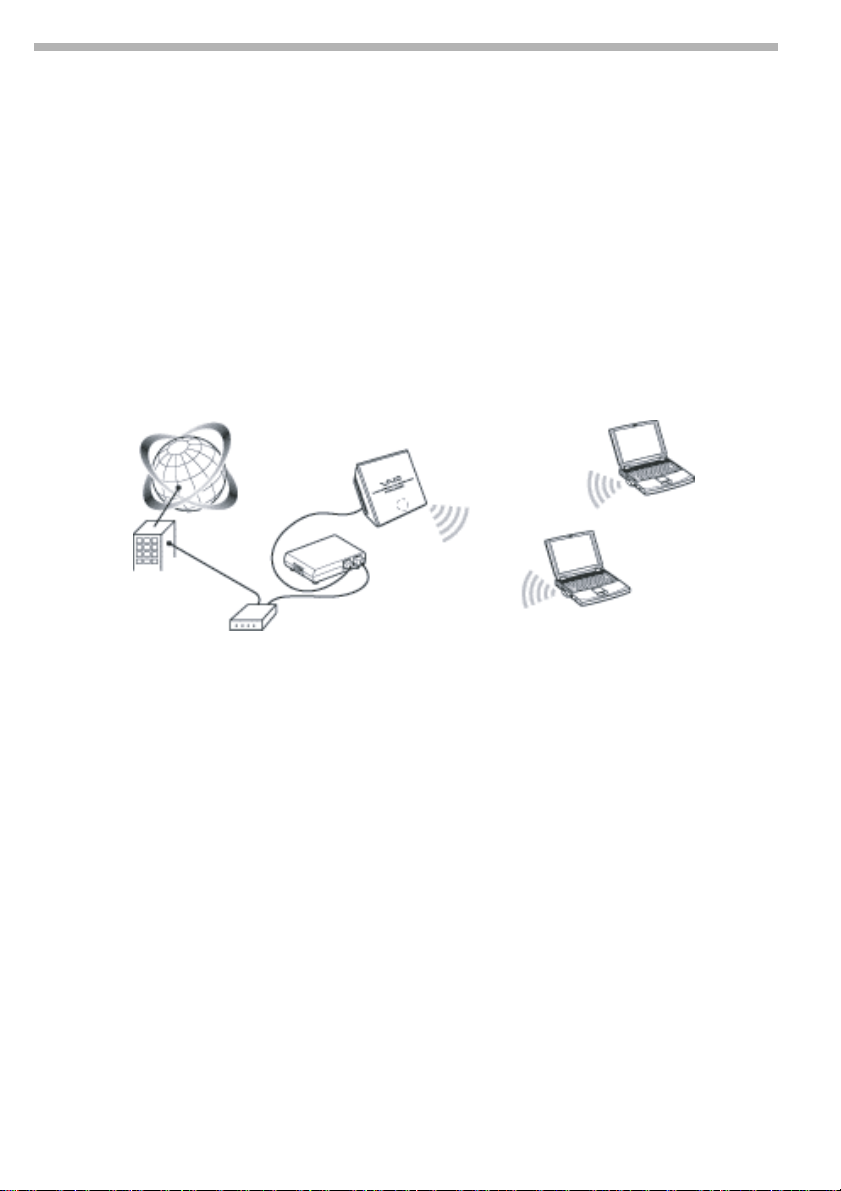
Capabilities
Wireless access to the Internet for devices with Ethernet connector
The 2.4 GHz Wireless LAN Converter PCWA-DE30 (hereafter referred to as the
Wireless LAN Converter) is designed to allow devices such as desktop
computer or printers equipped with Ethernet connectors to become part of a
wireless network.
● Only use an Ethernet cable to connect the Wireless LAN Converter to the Ethernet device.
The Wireless LAN Converter does not function as an Access Point.
When setting up the Wireless LAN Converter without the Quick Setup switch, a computer
running Windows Me, Windows 2000, or Windows XP is required.
Only one device can be connected to the Wireless LAN Converter. You cannot use a hub
to connect to several devices.
● The Wireless LAN Converter also allows computers equipped with Wireless LAN
Converters to communicate directly when using the Peer to Peer Network connection
mode, without using a Wireless LAN Access Point.
The Access Point Network connection mode settings are described in this document.
Refer to Help for information about the Peer to Peer Network connection mode settings.
Configuring the Wireless LAN Converter
You can configure the Wireless LAN Converter by performing one of the
following.
With the Quick Setup switch
When the Wireless LAN Converter is connected to the Access Point PCWAA320, you can use the Quick Setup switch to configure the Wireless LAN
Converter.
You can use the settings of the Sony Access Point PCWA-A320 to automatically
configure the hardwired (Ethernet) Wireless LAN Converter by using the
Quick Setup switch. The Access Point send the following information to the
Wireless LAN Converter.
● Network Name (SSID)
● Encryption key (WEP key)
8

With the utility software
When the Wireless LAN Converter is connected to an access point other than
the PCWA-A320, you cannot use the Quick Setup switch to configure the
Wireless LAN Converter. For details, see Configuration with the Utility
Software below.
● You can use the utility software to configure the Wireless LAN Converter even if it is
connected to the PCWA-A320.
Configuration with the Quick Setup Switch
When the Wireless LAN Converter is connected to the PCWA-A320, you can
use the Quick Setup switch to configure it. When the Wireless LAN Converter
is connected to another type of access point, see Configuration with the
Utility Software below.
Procedure 1 - Completing the Access Point setup
Refer to the documentation of your Access Point for details about how to
complete the setup. If your Access Point data encryption (WEP) is not
configured, we strongly suggest that you configure it before proceeding.
Procedure 2 - Performing a Quick Setup
1 Wait until the PCWA-A320, and the Wireless LAN Converter starts.
2 Press the Quick Setup switch of the PCWA-A320 Wireless Unit for at least
one second.
When the status indicator on the PCWA-A320 starts flashing red, it is ready
for Quick Setup.
The Wireless LAN Converter only remains in Quick Setup standby mode for
30 seconds.
Press the Quick Setup switch one more time for at least one second to
cancel the procedure.
3 Press the Wireless LAN Converter Quick Setup switch for at least one
second.
When the Status indicator on the PCWA-A320 stops flashing red and the
Wireless LAN Converter begins flashing white, quick setup is complete.
4 Turn off the Wireless LAN Converter.
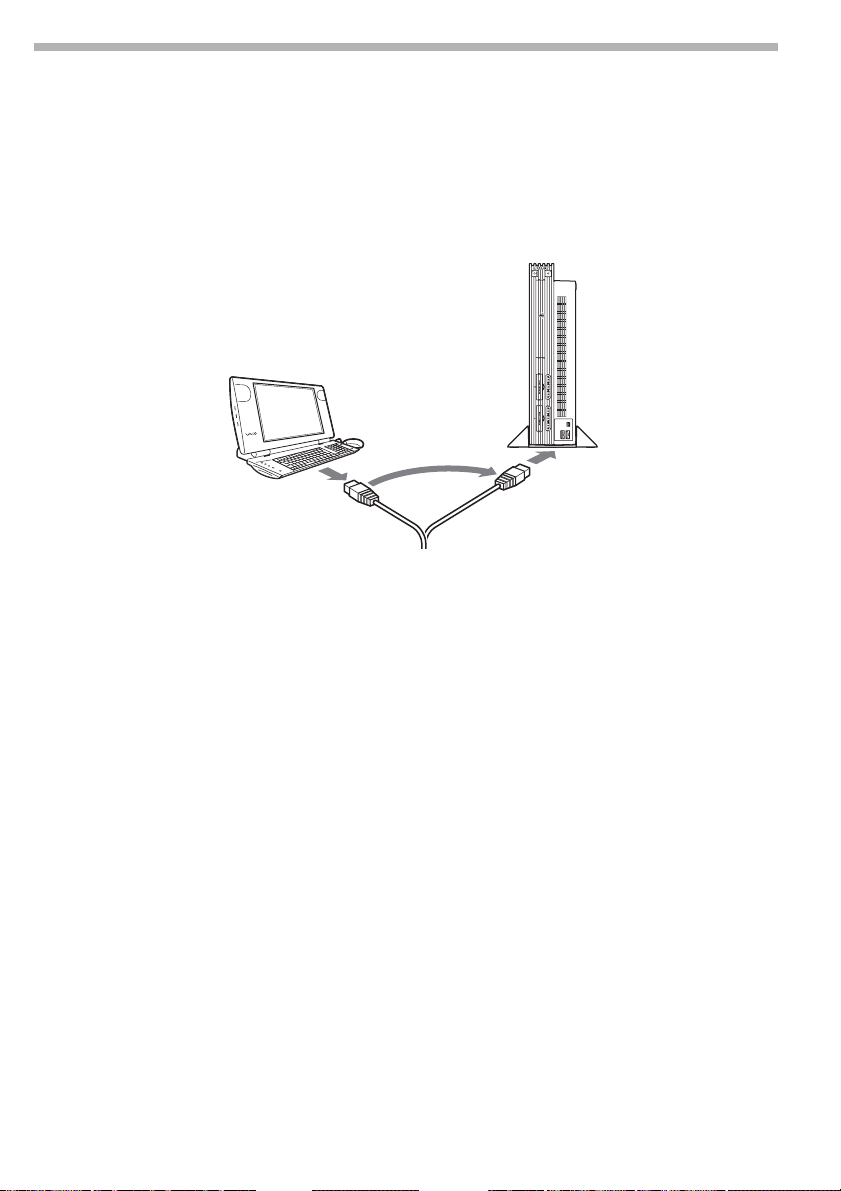
Procedure 3 - Connecting the Wireless LAN Converter to the
device that you want to use for wireless communication
1 Connect the Wireless Unit and Power Unit.
2 Connect the Power Unit to the computer or other device capable of
wireless communication using an Ethernet cable.
9
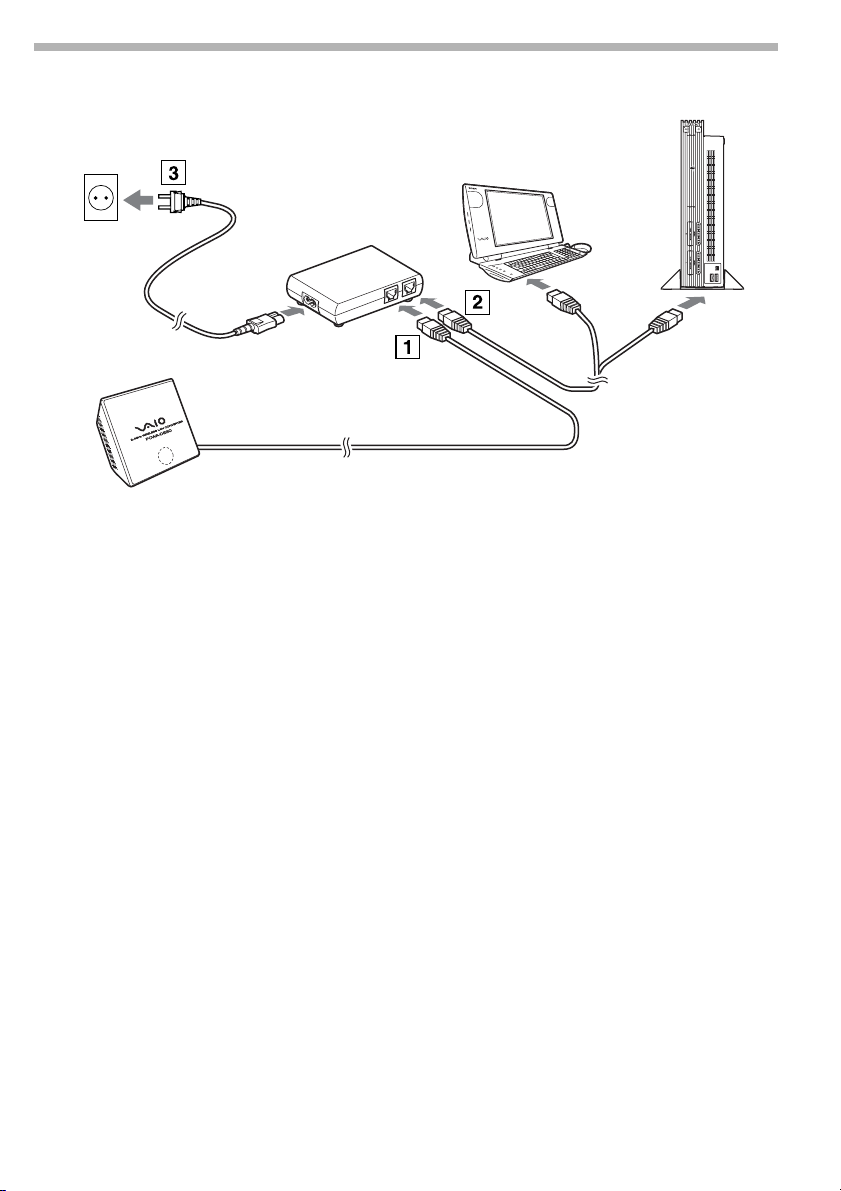
3 Connect the Power Unit to an AC outlet using the power cord.
● The Wireless LAN Converter does not have a power switch.
You can use an Ethernet cable with straight-through or crossover wiring.
When the status indicator of the Wireless LAN Converter changes to white
when you connect the wireless communication device, configuration is
complete.
Configuration with the Utility Software
Procedure 1 - Verifying the computer used for setup and the
Access Point, and configuring the necessary settings
Before setting up the Wireless LAN Converter with the Converter Setup Utility,
verify the following points.
● Verify the Ethernet connector of the computer used for setup and provide
the required Ethernet cable.
You can use an Ethernet cable with straight-through or crossover wiring.
● Verify the Access Point
Make sure that the 2.4 GHz Wireless LAN Access Point to be used is on. Also
verify the Network Name (SSID) and Encryption (WEP) key settings of the
Access Point.
If your Access Point data encryption (WEP) is not configured, we strongly
suggest that you configure it before proceeding.
10

● Adjust the firewall settings of your computer
If you are using the Windows XP Internet Connection Firewall function
or a personal firewall provided by virus scanning software, it may be
necessary to adjust its security level. For details, see below.
Computer Firewall Functions
When using the Windows XP Internet Connection Firewall function:
enabling the Windows XP Internet Connection Firewall function may prevent
you from accessing your computer through wireless communication (with the
Windows XP operating system, this function is disabled by default). Because
of this, you may not be able to connect to your network, when you change
your Wireless LAN Converter and/or Access Point settings. If this happens,
disable the Internet Connection Firewall function, connect to the network,
and then reactivate the function. For details, refer to Windows XP Help.
● Network security is an important issue. You are urged to consider carefully how best to
protect your computer.
When using a personal firewall provided by virus scanning or network security
software: virus scanning and network security software sometimes included a
function called a personal firewall that is designed to prevent illegal access
by outside entities. Depending on the software, the security level of this
function may be initially set to a high level. If this high security level setting is
left in effect, it may be impossible for an outside entity to access your
computer. This can cause problems such as not being able to connect to the
network when changing the Wireless LAN Converter or Access Point settings.
In this event, lower the security level in order to allow network connection.
For details, refer to the manuals provided with your software.
● Network security is an important issue. You are urged to consider carefully how best to
protect your computer.
For details about firewall function or other inquiries, contact your software
manufacturer.
Procedure 2 - Connecting the Wireless LAN Converter to the computer used for setup
Connect the Wireless LAN Converter and the computer.
● For details about how to connect the device that you want to use for wireless
communication, see procedure 4.
Procedure 3 - Installing the utility software
Install the utility software to configure the Wireless LAN Converter (Converter
Setup Utility) on the computer used for setup.
1 Insert the supplied CD-ROM into the CD-ROM drive of the computer
where the Wireless LAN Converter is connected.
11

2 With computers running Windows Me or Windows 2000, double-click the
My Computer icon on your desktop.
With computers running Windows XP, click Start and My Computer.
3 In the My Computer window, double-click Setup.exe on the supplied
CD-ROM.
The installation programs starts. Follow the instructions on the screen and
install the utility software.
● Depending on the settings of your computer, the file Setup.exe may be displayed as
Setup.
To exit the installation program, click Cancel.
Procedure 4 - Configuring the Wireless LAN Converter
Display the Wireless LAN Converter Setup Page and configure the necessary
settings.
Compatible browsers:
● Internet Explorer 5.5 or later
● Netscape 6.1 or later
● To display the Wireless LAN Converter Setup Page with the Converter Setup Utility
software, use one of the Web browsers above.
If your Web browser is configured to use a proxy server, set the browser proxy settings
so that the browser does not use a proxy server for the IP address of the Wireless LAN
Converter and the 2.4 GHz Wireless LAN devices such as the Access Point. For details
about how to disable proxy settings, see Case 4 in the Troubleshooting Guide.
● The Wireless LAN Converter Setup Page is saved in the internal memory of the Wireless
LAN Converter.
● The page displayed may differ slightly depending on the firmware version of the
Wireless LAN Converter.
1 Click Start, point to Programs (All Programs in Windows XP), point to
Wireless LAN, and then click Converter Setup.
The Converter Setup Utility starts and automatically displays the Wireless
LAN Converter Setup Page.
● If the IP Address Setup dialog box appears, temporarily change the converter IP
address to the one in the dialog box. However, if you are using several devices to build a
network, make sure that the new IP address does not duplicate the address of another
device or computer on the network. If it does, you will not be able to open the Wireless
LAN Converter Setup Page. Change the IP address as necessary before click Execute
Setup.
If an error occurs, refer to the Troubleshooting Guide or Help.
2 Click Easy Setup.
The Easy Setup page appears.
● You can select the interface language for the setup.
12

3 Enter the Network Name (SSID) of your Access Point.
If the Access Point setup is complete: use the same Network name (SSID)
as the one set for the Access Point.
If the Access Point setup is not complete: refer to the documentation
provided with your Access Point and enter the default Network Name
(SSID).
The Network name (SSID) is an identifier used to identify the wireless
network. It is required for communication with the Access Point.
To search for active Access Points in the vicinity, click the Scan button.
4 Configure the Encryption (WEP), Key Length, and WEP key settings.
If the Access Point setup is complete: use the same values as the one set
for the Access Point.
If the Access Point setup is not complete: refer to the documentation of
the Access Point and enter the default values.
Encryption (WEP) Select whether to use data encryption or not.
Key Length Select the Encryption (WEP) key length. The number of characters for
the key string depends on this setting.
WEP Key Enter a character string to be used as the Encryption (WEP) key. The
length of the string must match the encryption ley length setting.
For verification, the string must be entered once more in the WEP
Key (Confirmation) field.
Encryption of wireless communications data (as selected by Encryption
(WEP)). The length of the string must match the encryption key length
setting.
For verification, the string must be entered once more in the WEP Key
(Confirmation) field.
Clicking Help or ? displays Help.
5 When setup is complete, click Next.
The Setup confirmation page appears.
6 Make sure that the settings are as desired, and click Execute Setup.
The setup completion page appears.
When you click Execute Setup, the Wireless LAN Converter restarts.
If the status indicator on the front panel of the Wireless Unit flashes
slowly, communication with the Access Point is established.
If the read-in condition continues after you click Execute Setup, check
the status indicator on the front panel of the Wireless Unit. If the indicator
flashes slowly white, setup is complete and wireless communication is
possible.
If the status indicator flashes red, communication with the Access Point
cannot be established. Refer to the Troubleshooting Guide or Help.
7 Close the Web browser.
13
Procedure 5 - Connecting to a device equipped with an Ethernet connector
This procedure is unnecessary if you plan to perform a wireless
communication session with the computer used for setup. If not, disconnect
the Wireless LAN Converter from the computer used for setup and connect it
to the wireless communication device.
If you disconnect the Ethernet cable from the computer used for setup while it is still on,
wait at least 10 seconds before connecting it to the wireless communication device.
If You Change the Access Point Settings
If you change the settings of your Access Point, the connection to the Wireless
LAN Converter is severed. Reconfigure the Network Name (SSID) and
Encryption key (WEP key) of the Wireless LAN Converter to match the values
of your Access Point. If the Wireless LAN Converter is connected to the PCWAA320, perform procedures 2 and 3 of Configuration with the Quick Setup
Switch. If the Wireless LAN Converter is connected to a device other than the
PCWA-A320, see Configuration with the Utility Software.
If you change the Access Point settings, see If You Change the Access Point
Settings above.
If you want to reset the Wireless LAN Converter, see Reset to Factory
Defaults above.
For details about the Wireless LAN Converter setup, refer to the Help.
To display Help, proceed as follows:
● Click Start, point to Programs (All Programs in Windows XP), point to
Wireless LAN, and then click Converter Setup Help.
14

To display Help for the Wireless LAN Converter Setup Page, proceed as
follows:
Click Help or ? on the Wireless LAN Converter Setup Page.
15
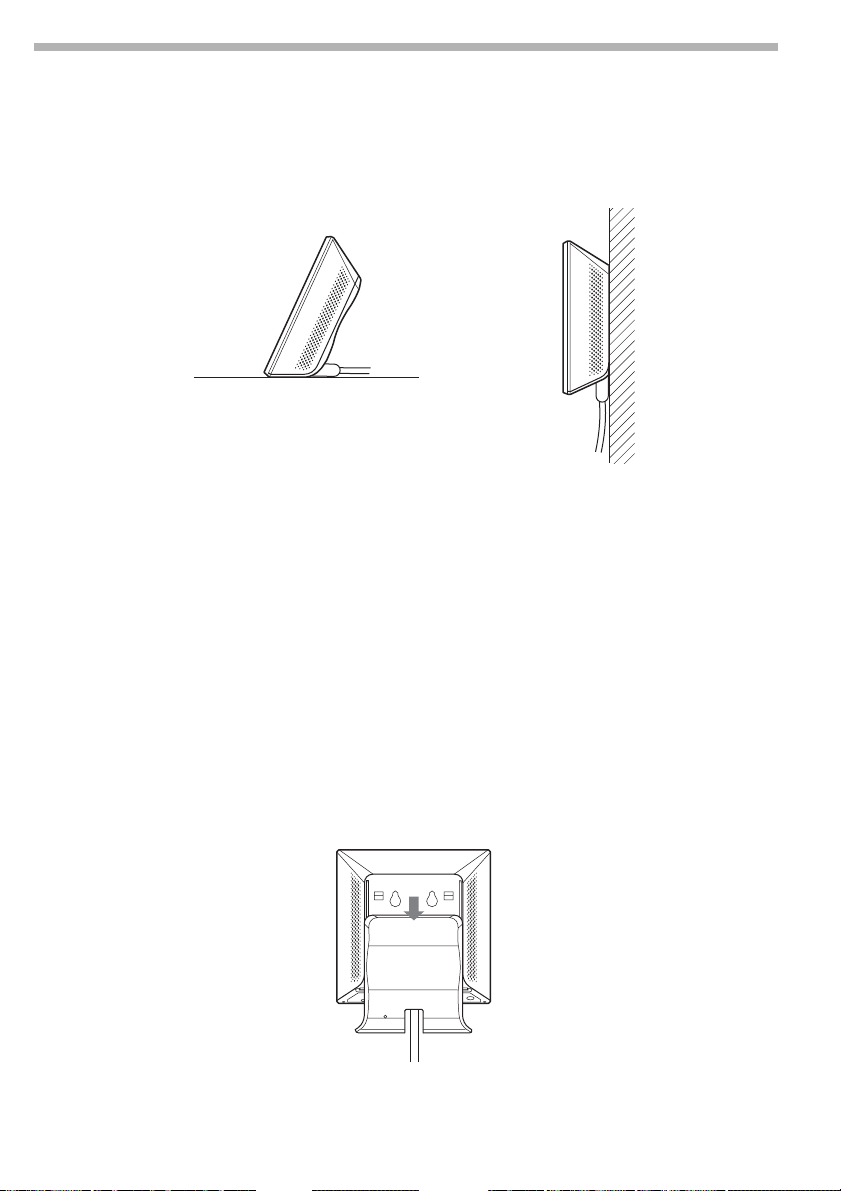
Installation precautions
Installation
Select a secure location for the Wireless Unit where it cannot drop or fall over.
Route the cable to the Wireless Unit to suit the installation location.
● Do not install the Wireless Unit or the Power Unit in insecure locations.
Do not install in a location where the Wireless Unit could fall as a result of shock or
vibration, such as on the edge of a shelf.
Do not install the Wireless Unit in a location where it or its cables may hinder normal
movement.
Prevent the Wireless Unit or the Power Unit from coming into contact with water.
Hanging the Wireless Unit
1 Remove the rear cover of the Wireless Unit by sliding it in the direction of
the arrow.
Be cautious when removing and replacing the rear cover of the Wireless
Unit.
To replace the rear cover of the Wireless Unit, align the rails on the rear of
the Wireless Unit with the grooves in the rear cover, and slide it upwards.
16
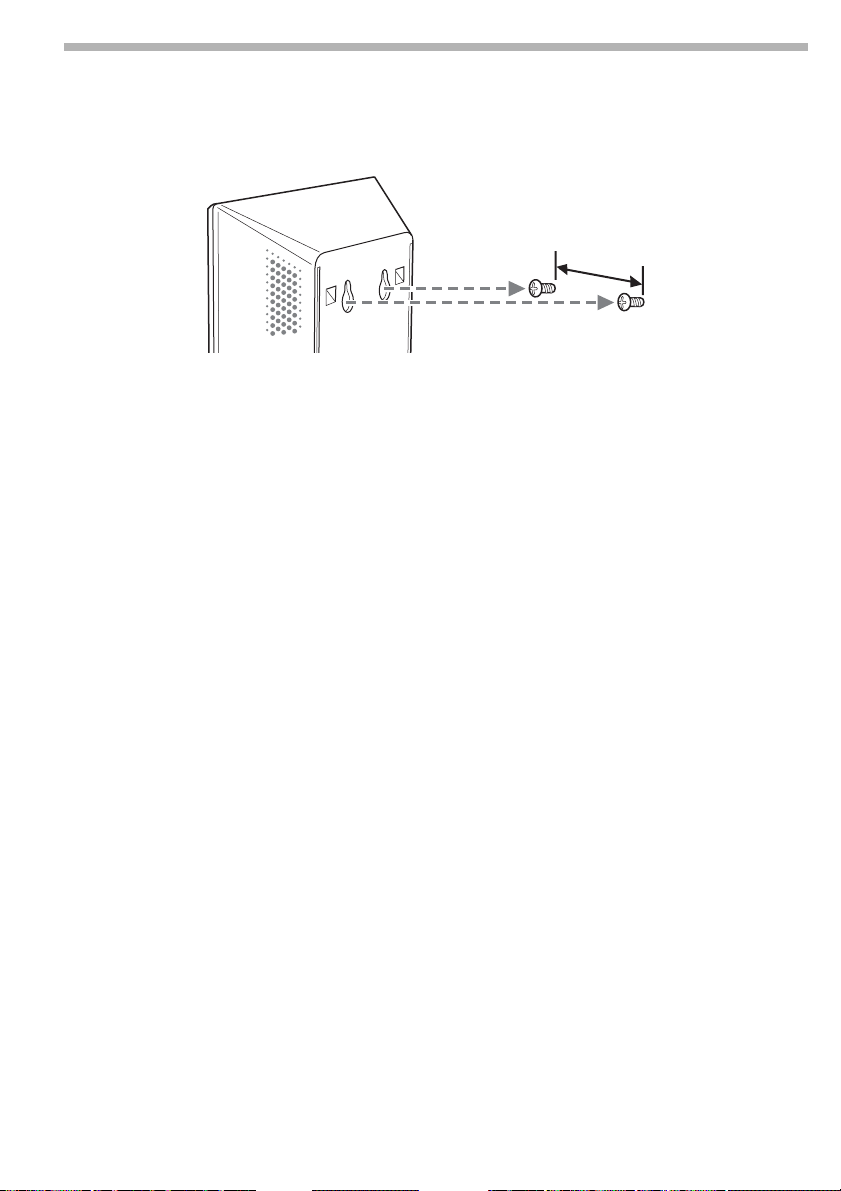
2 Using screws or nails, hang the unit to a wall.
The Wireless Unit does not come with any sort of fittings used to hang it.
Use screws of sufficient strength to support it.
Always use two screws or nails and make sure that the unit is secure on the
wall.
Select a location that will hold the weight of the Wireless Unit when
hanging it to a wall. If the selected location cannot hold the weight of the
unit, it may fall resulting in damage and/or injury.
When hanging the unit to walls made of plasterboard or other brittle
material, make sure that the material is strong enough to support the
unit’s weight and use special screw fasteners or other fixtures designed for
use with that material. If the unit is hung with ordinary screws, it may fall.
When hanging the Wireless Unit to a wall, be careful not to drop the unit
or the tools used for doing the work. Dropping the Wireless Unit or tools
could result in damage and/or injury.
17

Operating Precautions
For more information on regulatory and safety issues, please read the Safety
Regulations flyer before use.
Power Unit
Use the Power Unit supplied with the Wireless Unit. Using a different power
unit may result in damage and/or injury.
Safety
Avoid exposing this product to strong impact, as it could result in damage
which will not be covered by the guarantee.
Installation
Do not install the Wireless LAN Converter where it is exposed to the following
conditions:
● Closed environments (such as closed cars);
● Magnetic fields (near magnets, speakers, or television);
● Microwaves (near microwaves ovens);
● Excessive dust;
● Unstable or uneven surfaces;
● Frequent vibration;
● High humidity (such as a bathroom);
● Poor ventilation;
● Locations where the transmission of radio waves may be obstructed by
metal plates or concrete walls.
Operation
Exposure to rapid changes in temperature or very damp environments can
cause condensation on internal parts. This may prevent the Wireless LAN
Converter from operating properly.
If this should happen, disconnect the Wireless LAN Converter from the
converter or other device to which it may be connected, and discontinue
operation for two or three hours.
Emergencies
In case of an emergency, stop the wireless functions by unplugging the power
cord.
18

Specifications
Power AC100-240V, 5O/60Hz
Power consumption approx. 5 W
Interfaces 100BASE-TX/10BASE-T (automatic MDI/MDI-X detection)
Maximum external dimensions
Wireless Unit:
Power Unit:
Mass
Wireless Unit:
Power Unit:
Maximum connection distance Line of sight, approx. 100 m
Supported protocol TCP/IP
approx. 110 x 25 x 70 mm. (W x H x D)
approx. 98 x 98 x 33 mm (W x H x D)
approx. 320 g (including connection cable)
approx. 130 g
(The actual connection distance depends on the
environment)
Standard compliance IEEE 802.11b
Radio frequency 2.4 GHz wireless network: 2.4 to 2.4835 GHz (ISM band)
WEP (data encryption) 64 bits/128 bits
Modulation methods DS-SS
Operating temperature 5° C to 35° C (no condensation)
Storage temperature -20° C to 60° C (no condensation)
IEEE 802.11g
OFDM
Design and specifications are subject to change without notice.
19

Sony’s support options
This section describes how to get help and support from Sony.
● Quick Start Guide (this manual) : explains how to install the Wireless LAN
Converter.
● Troubleshooting Guide : provides solutions to the most common problems
users have with their Wireless LAN Converter.
● Online Help for the Wireless LAN Converter Setup Page : explains how to
configure the Wireless LAN Converter.
● Sony’s support website : http://www.vaio-link.com provides the latest
information on your Wireless LAN Converter.
20

Wireless LAN Converter
Kurzeinführung
21

Marken
● Sony, VAIO, das VAIO- Logo und das Eco Info-
Logo sind Marken der Sony Corporation.
● Microsoft und Windows sind eingetragene Marken der Microsoft
Corporation in den USA und/oder in anderen Ländern.
● In diesem Handbuch werden Microsoft
Microsoft
● Alle anderen System-, Produkt- und Dienstleistungsnamen sind Marken
®
Windows® XP Professional als Windows XP bezeichnet.
ihrer jeweiligen Inhaber. Auf die Kennzeichnung
®
Windows® XP Home Edition und
TM
oder ® wird in diesem
Handbuch verzichtet.
™
22

Einführung
Dieses Dokument bietet eine Übersicht über Funktionen des Wireless LAN
Converter PCWA-DE30 und die erforderlichen Schritte zur Konfiguration.
Auspacken des Access Point
Wenn Sie das Gerät ausgepackt haben, prüfen Sie, dass folgende
Komponenten vorhanden sind.
● Wireless-Einheit (1)
● Netzkabel (2)
● Netzeinheit (3)
● Adapter-Stecker*
● CD-ROM (Installations-CD-ROM) (4)
● Kurzeinführung (4)
● Handbuch zur Fehlerbehebung (4)
● Garantieerklärung (4)
● Erklärung zu Sicherheitsstandards (4)
* Je nach Land.
23

Bezeichnungen und Funktionen der Teile
Wireless-Einheit
Kontrollleuchte (1) Zeigt den Status des Wireless Converter an.
Weiß blinkend
(ca. 9 s an, 1 s aus)
Weiß blinkend
(ca. 5 s an, 1 s aus)
Weiß blinkend
(ca. 2 s an, 1 s aus)
Weiß blinkend
(ca. 1 s an, 9 s aus)
Weiß blinkend
(Intervalle von einer halben
Sekunde)
Weiß blinkend
(Intervalle von 0,2 s)
Rosa leuchtend Kommunizieren im Verbindungsmodus "Peer-to-Peer-Netzwerk".
Rot blinkend (Intervalle
von 6 s)
Rot blinkend (Intervalle
von 3 s)
Rot blinkend (Intervalle
von 1,6 s)
Verbindungsstatus des drahtlosen Netzwerks: gut (starkes Signal).
Verbindungsstatus des drahtlosen Netzwerks: durchschnittlich
(mittelmäßig starkes Signal).
Verbindungsstatus des drahtlosen Netzwerks: schlecht (schwaches
Signal).
Es ist kein Gerät an den NETZWERK-Anschluss angeschlossen oder
die angeschlossenen Geräte sind ausgeschaltet.
Startvorgang aktiv.
Warten Sie, bis dieser Vorgang abgeschlossen ist.
Die Schnelleinrichtung des Wireless LAN Converter über den
Schalter für Schnellkonfiguration war erfolgreich.
Die Schnelleinrichtung des Wireless LAN Converters über den
Schalter für Schnellkonfiguration schlug fehl, da keine SetupInformationen vom Access Point des PCWA-A320 eingeholt
werden konnten.
Es wird nach einem drahtlosen Netzwerk gesucht.
Eine Kommunikation ist noch nicht möglich, da keine Verbindung
hergestellt ist. Besteht dieser Zustand über einen längeren
Zeitraum hinweg, prüfen Sie die Einstellungen des Wireless LAN
Converters und des Ziels (2,4 GHz Wireless LAN Access Point, etc.)
Der Wireless LAN Converter befindet sich im
Schnellkonfigurations-Standbymodus.
24

Rot blinkend (Intervalle
von 1 s)
Rot blinkend (Intervalle
von einer halben Sekunde)
Schalter zum Zurücksetzen
(2)
LINK/ACT-Leuchte (3) Blinkt, wenn ein Ethernet-Kabel an den NETZWERK-Anschluss
Kabel der Wireless-Einheit
(4)
Abdeckung an der
Rückseite (5)
Montagelöcher zur
Befestigung an der Wand
(6)
Etikett mit MAC-Adresse
(7)
Schalter für
Schnellkonfiguration (8)
Das Firmware-Update für Wireless LAN Converter ist
fehlgeschlagen. Aktualisieren Sie die Firmware erneut.
Das Gerät wird zurückgesetzt: Wenn Sie den Reset-Schalter
entriegeln, wird der Wireless LAN Converter automatisch neu
gestartet und auf die werksseitigen Standardeinstellungen
zurückgesetzt.
Firmware-Update wird durchgeführt: Die Firmware wird gerade
aktualisiert. Schalten Sie in diesem Zustand das Gerät nie ab.
Setzt den Wireless LAN Converter auf die werkseitigen
Standardeinstellungen zurück.
oder an die Netzeinheit angeschlossen ist.
Stellt eine Verbindung zur WIRELESS-EINHEIT oder zur
Netzeinheit her.
Entfernen Sie die Abdeckung, wenn Sie die Wireless-Einheit an
der Wand anbringen oder die MAC-Adresse prüfen möchten.
An diesen Löchern können Sie die Wireless-Einheit an der Wand
aufhängen.
Die MAC-Adresse des Wireless LAN Converters ist hier
aufgedruckt.
Mit diesem Schalter können Sie den Wireless LAN Converter
einrichten.
Netzeinheit
Eingangsbuchse für
100-240 V WS (9)
Anschluss der
WIRELESS-EINHEIT (10)
NETZWERK-Anschluss (11) Schließen Sie die Wireless-Einheit an den Computer oder ein
Verwenden Sie das mitgelieferte Netzanschlusskabel.
Schließen Sie das Kabel der Wireless-Einheit hier an.
anderes Gerät mit einem Ethernet-Kabel an.
Verwenden Sie ein durchgängiges Kabel oder ein CrossoverEthernetkabel.
25

Zurücksetzen auf werksseitige Standardeinstellungen
Um den Wireless LAN Converter auf die werksseitigen Standardeinstellungen
zurückzusetzen, gehen Sie wie folgt vor.
1 Schalten Sie den Wireless LAN Converter ein.
2 Drücken Sie den Reset-Schalter unten an der Wireless-Einheit mit der
Spitze einer Büroklammer oder einem ähnlichen Gegenstand mindestens
1 Sekunde nach unten.
3 Wenn die Kontrollleuchte rot blinkt, lassen Sie den Reset-Schalter los.
Der Wireless LAN Converter wird automatisch neu gestartet, und alle
Einstellungen werden auf die werkseitigen Standardeinstellungen
zurückgesetzt.
● Informationen über die werkseitigen Standardeinstellungen des Wireless LAN Converter
finden Sie im Handbuch zur Fehlerbehebung.
Funktionen
Drahtloser Zugriff auf das Internet für Geräte mit EthernetAnschluss
Mit dem 2,4 GHz-Wireless LAN Converter des Modells PCWA-DE30
(nachstehend als Wireless LAN Converter bezeichnet) können Geräte wie
Desktop-Computer oder Drucker, die über Ethernet-Anschlüsse verfügen,
Bestandteil eines drahtlosen Netzwerks werden.
● Verwenden Sie ein Ethernet-Kabel nur, um den Wireless LAN Converter an das Ethernet-
Gerät anzuschließen.
Wireless LAN Converter kann nicht als Access Point verwendet werden.
Wenn Sie den Wireless LAN Converter ohne den Schalter für die Schnellkonfiguration
einstellen, ist ein Computer mit Windows Me, Windows 2000 oder Windows XP
erforderlich.
Es kann nur ein einziges Gerät an den Wireless LAN Converter angeschlossen werden. Sie
können keinen Hub verwenden, um mehrere Geräte anzuschließen.
26

● Mithilfe des Wireless LAN Converter können Computer mit Wireless LAN Converter
direkt kommunizieren, wenn Sie den Peer-to-Peer-Netzwerk-Verbindungsmodus
verwenden und das ohne Wireless LAN Access Point.
Die Einstellungen für den Access Point-Netzwerk-Verbindungsmodus sind in diesem
Dokument beschrieben. Weitere Informationen zum Peer-to-PeerNetzwerksverbindungsmodus finden Sie in der Hilfe.
Konfigurieren des Wireless LAN Converters
Sie können den Wireless LAN Converter folgendermaßen konfigurieren:
Mit dem Schalter für die Schnellkonfiguration
Ist der Wireless LAN Converter an den Access Point PCWA-A320
angeschlossen, können Sie den Schalter zur Schnellkonfiguration zur
Konfiguration des Wireless LAN Converters verwenden.
Sie können die Einstellungen des Sony Access Point PCWA-A320 verwenden,
um den Ethernet(Hardwire oder Funk)-Wireless LAN Converter mit dem
Schalter für die Schnellkonfiguration automatisch zu konfigurieren. Der
Access Point sendet folgende Informationen an den Wireless LAN Converter.
● Netzwerkname (SSID)
● Chiffrierschlüssel (WEP-Schlüssel)
Mithilfe der Utility-Software
Ist der Wireless LAN Converter an einen anderen Access Point als den PCWAA320 angeschlossen, können Sie den Schalter zur Schnellkonfiguration zur
Konfiguration des Wireless LAN Converters nicht verwenden. Weitere
Informationen finden Sie im nachstehenden Abschnitt Konfiguration mit
der Utility-Software.
● Sie können die Utility-Software zur Konfiguration des Wireless LAN Converters auch
verwenden, wenn das Gerät an PCWA-A320 angeschlossen ist.
Konfiguration mit dem Schalter für die Schnellkonfiguration
Ist der Wireless LAN Converter an den Access Point PCWA-A320
angeschlossen, können Sie den Schalter zur Schnellkonfiguration zur
Konfiguration verwenden. Ist der Wireless LAN Converter an einen anderen
Access Point-Typ angeschlossen, finden Sie im nachstehenden Abschnitt
Konfiguration mit der Utility-Software Informationen.
Schritt 1 – Fertig stellen der Access Point-Einstellungen
Informationen über das Fertig stellen des Setups finden Sie in der
Dokumentation Ihres Access Point. Ist der Access Point mit
Datenverschlüsselung (WEP) nicht konfiguriert, raten wir Ihnen dringend, ihn
zu konfigurieren, bevor Sie fortfahren.
27

Schritt 2 – Durchführen einer Schnellkonfiguration
1 Warten Sie, bis PCWA-A320 und der Wireless LAN Converter starten.
2 Drücken Sie den Schalter zur Schnellkonfiguration der Wireless-Einheit
PCWA-A320 mindestens eine Sekunde lang.
Blinkt die Kontrollleuchte des PCWA-A320 rot, können Sie mit der
Schnellkonfiguration beginnen.
Der Wireless LAN Converter bleibt nur für 30 Sekunden im
Schnellkonfigurations-Standbymodus.
Drücken Sie den Schalter für die Schnellkonfiguration erneut mindestens
eine Sekunde lang, um den Vorgang abzubrechen.
3 Drücken Sie den Schalter zur Schnellkonfiguration des Wireless LAN
Converters mindestens eine Sekunde lang.
Blinkt die Kontrollleuchte des PCWA-A320 nicht mehr rot und blinkt der
Wireless LAN Converter weiß, ist die Schnellkonfiguration fertig gestellt.
4 Schalten Sie den Wireless LAN Converter aus.
Schritt 3 – Verbinden des Wireless LAN Converters an das Gerät,
das Sie für die drahtlose Kommunikation verwenden möchten.
1 Schließen die Wireless-Einheit an die Netzeinheit an.
2 Schließen Sie die Netzeinheit an den Computer oder ein anderes Gerät an,
das mit einem Ethernet-Kabel eine drahtlose Kommunikation herstellen
kann.
3 Schließen Sie die Netzeinheit mit dem Netzkabel an eine Steckdose an.
● Der Wireless LAN Converter hat keinen Netzschalter.
Sie können ein durchgängiges Kabel oder ein Crossover-Ethernetkabel verwenden.
28

Leuchtet die Kontrollleuchte des Wireless LAN Converters weiß, wenn Sie das
drahtlose Kommunikationsgerät anschließen, ist die Konfiguration
abgeschlossen.
Konfiguration mit der Utility-Software
Schritt 1 – Prüfen des für die Konfiguration verwendeten
Computers und Access Point und Konfiguration der
erforderlichen Einstellungen
Bevor Sie den Wireless LAN Converter mit Converter Setup Utility einstellen,
sollten Sie Folgendes prüfen:
● Prüfen Sie die Ethernet-Anschlüsse des für das Setup verwendeten
Computers, und stellen Sie das erforderliche Ethernet-Kabel bereit.
Sie können ein durchgängiges Ethernet-Kabel oder ein CrossoverEthernetkabel verwenden.
● Prüfen Sie den Access Point
Stellen Sie sicher, dass der zu verwendende Wireless LAN-Access Point (2,4
GHz) eingeschaltet ist. Stimmen die Einstellungen des Netzwerknames
(SSID) und des Chiffrierschlüssels (WEP) mit denen des Access Point überein?
Ist der Access Point mit Datenverschlüsselung (WEP) nicht konfiguriert,
raten wir Ihnen dringend, ihn zu konfigurieren, bevor Sie fortfahren.
● Passen Sie die Firewall-Einstellungen Ihres Computers an
Verwenden Sie die Firewall der Internetverbindung von Windows XP
oder eine persönliche Firewall einer Virenscanner-Software, müssen Sie
möglicherweise das Sicherheitsniveau anpassen. Weitere Informationen
finden Sie nachstehend.
Firewall-Funktionen des Computers
Wenn Sie die Firewall der Internetverbindung unter Windows XP
verwenden: wenn Sie die Firewall-Funktion der Internetverbindung unter
Windows XP verwenden, haben Sie möglicherweise mithilfe der
Funkkommunikation keinen Zugriff auf Ihren Computer (unter dem
Betriebssystem Windows XP ist diese Funktion standardmäßig deaktiviert). Sie
können aufgrund dieser Funktion Ihren Wireless LAN Converter
möglicherweise nicht an Ihr Netzwerk anschließen, wenn Sie die Access PointEinstellungen ändern. Deaktivieren Sie in diesem Fall die Firewall-Funktion
der Internetverbindung, stellen Sie eine Netzwerkverbindung her, und
aktivieren Sie dann die Funktion erneut. Weitere Informationen entnehmen
Sie bitte der Hilfe zu Windows XP.
● Die Netzwerk-Sicherheit ist ein wichtiger Aspekt. Sie sollten sich Gedanken darüber
machen, wie Sie Ihren Computer am besten schützen.
29

Wenn Sie eine persönliche Firewall einer Virenscanner-Software oder
Netzwerksicherheitssoftware verwenden: die Virenscanner- oder
Netzwerksicherheitssoftware umfasst manchmal die individuelle Firewall-
Funktion, die unbefugten Zugriff durch Dritte verhindert. Je nach Software
ist die Sicherheitsstufe dieser Funktion ursprünglich sehr hoch eingestellt.
Wird die Sicherheitsstufe auf diesem hohen Niveau belassen, können Dritte
möglicherweise nicht auf Ihren Computer zugreifen. Dies kann Probleme
verursachen. Sie können möglicherweise keine Netzwerkverbindung
herstellen, wenn Sie die Einstellungen für Wireless LAN Converter oder Access
Point ändern. Setzen Sie die Sicherheitsstufe in diesem Fall auf ein niedrigeres
Niveau, damit Sie eine Netzwerkverbindung herstellen können. Weitere
Informationen finden Sie in den Handbüchern zur Software.
● Die Netzwerk-Sicherheit ist ein wichtiger Aspekt. Sie sollten sich Gedanken darüber
machen, wie Sie Ihren Computer am besten schützen.
Zu weiteren Informationen über die Firewall-Funktion oder anderen Fragen wenden Sie
sich an Ihren Software-Hersteller.
Schritt 2 – Anschließen des Wireless LAN Converter an den für das Setup verwendeten Computer
Verbinden Sie den Wireless LAN Converter und den Computer miteinander.
● Weitere Informationen über das Anschließen des für die Funkverbindung zu
verwendenden Geräts finden Sie unter Schritt 4.
Schritt 3 – Installation der Utility-Software
Installieren Sie die Utility-Software zur Konfiguration des Wireless LAN
Converter (Converter Setup Utility) auf dem für das Setup zu verwendenden
Computer.
1 Legen Sie die mitgelieferte CD-ROM in das CD-ROM-Laufwerk des
Computers ein, an das der Wireless LAN Converter angeschlossen ist.
2 Verwendet der Computer das Betriebssystem Windows Me oder Windows
2000, doppelklicken Sie auf Arbeitsplatz auf dem Desktop.
Bei Computern mit dem Betriebssystem Windows XP klicken Sie auf Start
und Arbeitsplatz.
3 Im Fenster Arbeitsplatz doppelklicken Sie auf Setup.exe auf der
gelieferten CD-ROM.
Die Installation wird gestartet. Befolgen Sie die Anweisungen auf dem
Bildschirm, und installieren Sie die Utility-Software.
● Je nach Computereinstellungen wird die Datei Setup.exe möglicherweise als Setup
angezeigt.
Klicken Sie auf Abbrechen, um das Installationsprogramm zu verlassen.
30

Schritt 4 – Konfigurieren des Wireless LAN Converters
Zeigen Sie die Wireless LAN Converter Setup-Seite an, und konfigurieren Sie
die erforderlichen Einstellungen.
Kompatible Browser:
● Internet Explorer 5.5 oder höher
● Netscape 6.1 oder höher
● Verwenden Sie einen der oben genannten Webbrowser, um die Wireless LAN Converter
Setup-Seite mit Converter Setup Utility anzuzeigen.
Ist Ihr Webbrowser für die Verwendung eines Proxy-Servers konfiguriert, legen Sie die
Browser-Proxy-Einstellungen so fest, dass der Browser keinen Proxy-Server für die IPAdresse des Wireless LAN Converter und der 2,4 GHz-Wireless LAN-Geräte wie den Access
Point verwendet. Weitere Informationen zur Deaktivierung der Proxy-Einstellungen
finden Sie unter Fall 4 im Handbuch zur Fehlerbehebung.
● Die Wireless LAN Converter Setup-Seite wird im internen Speicher des Wireless LAN
Converter gespeichert.
● Je nach Firmware-Version von Wireless LAN Converter kann die angezeigte Seite etwas
anders aussehen.
1 Klicken Sie auf Start, zeigen Sie auf Programme (Alle Programme
unter Windows XP), zeigen Sie auf Wireless LAN, und klicken Sie dann
auf Converter Setup.
Converter Setup Utility wird gestartet und zeigt automatisch die Wireless
LAN Converter Setup-Seite.
● Wird das Dialogfeld Einrichtung der IP-Adresse angezeigt, ändern Sie die IP-Adresse
vorübergehend, und verwenden Sie die in dem Dialogfeld angezeigte IP-Adresse.
Verwenden Sie zum Aufbau eines Netzwerks mehrere Geräte, müssen Sie sicher stellen,
dass die neue IP-Adresse nicht mit der Adresse anderer Geräte oder Computer im
Netzwerk identisch ist. Ist dies der Fall, können Sie den Bildschirm "Wireless LAN
Converter-Setup" nicht aufrufen. Ändern Sie gegebenenfalls die IP-Adresse, bevor Sie
auf Setup ausführen klicken.
Wenn Fehler auftreten, finden Sie Informationen dazu im Fehlerhandbuch oder in der
Hilfe.
2 Klicken Sie auf die Registerkarte Einfaches Setup.
Die Seite für das einfache Setup wird angezeigt.
● Sie können die Sprache für das Setup wählen.
3 Geben Sie den Netzwerknamen (SSID) für den Access Point an.
Ist die Konfiguration des Access Point abgeschlossen: Verwenden Sie
denselben Netzwerknamen (SSID) wie für den Access Point.
Ist die Konfiguration des Access Point nicht abgeschlossen: Lesen Sie
Informationen in der Dokumentation Ihres Access Point nach, und geben
Sie den Standard-Netzwerknamen (SSID) ein.
Der Netzwerkname (SSID) dient zur Identifizierung des drahtlosen
Netzwerks. Er ist für die Kommunikation mit dem Access Point
31

erforderlich.
Klicken Sie zur Suche nach aktiven Access Points auf die Schaltfläche
Durchsuchen.
4 Konfigurieren Sie den Chiffrierschlüssel (WEP), die Länge des
Schlüssels und die Einstellungen des WEP-Schlüssels.
Ist die Konfiguration des Access Point abgeschlossen: Verwenden Sie
denselben Wert wie für den Access Point.
Ist die Konfiguration des Access Point nicht abgeschlossen: Lesen Sie in der
Dokumentation des Access Point nach, und geben Sie die Standardwerte
ein.
Verschlüsselung
(WEP)
Schlüssellänge Wählen Sie die Länge des Chiffrierschlüssels (WEP). Die für den
WEP-Schlüssel Geben Sie die Zeichenfolge für den Chiffrierschlüssel (WEP) ein. Die
Wählen Sie aus, ob die Daten verschlüsselt werden sollen oder nicht.
Schlüssels zu verwendende Anzahl an Zeichen hängt von diesen
Einstellungen ab.
Länge der Zeichenfolge muss der in den Einstellungen für die
Verschlüsselung festgelegten entsprechen.
Zum Bestätigen muss die Zeichenfolge erneut in das Feld WEP-
Schlüssel (Bestätigung) eingegeben werden.
Verschlüsselung der Funkkommunikationsdaten (wie bereits für die
Verschlüsselung (WEP)) gewählt. Die Länge der Zeichenfolge muss der
in den Einstellungen für die Verschlüsselung festgelegten entsprechen.
Zum Bestätigen muss die Zeichenfolge erneut in das Feld WEP-Schlüssel
(Bestätigung) eingegeben werden.
Klicken Sie auf Hilfe oder ? werden die Hilfethemen eingeblendet.
5 Ist das Setup abgeschlossen, klicken Sie auf Weiter.
Die Seite für die Bestätigung des Setups wird angezeigt.
6 Stellen Sie sicher, dass die Einstellungen korrekt sind, und klicken Sie auf
Setup ausführen.
Die Seite, dass das Setup abgeschlossen ist, wird angezeigt.
Klicken Sie auf die Option "Setup ausführen", wird Wireless LAN
Converter gestartet.
Blinkt die Statusanzeige an der Vorderseite der Wireless-Einheit langsam,
wurde die Kommunikation mit dem Access Point ermöglicht.
Wird der Einlesevorgang forgesetzt, wenn Sie auf Setup ausführen
geklickt haben, prüfen Sie die Kontrollleuchte vorne an der WirelessEinheit. Blinkt die Anzeige langsam weiß, ist das Setup abgeschlossen, und
die Funkkommunikation möglich.
Blinkt die Kontrollleuchte rot, kann keine Kommunikation mit dem Access
Point hergestellt werden. Weitere Informationen finden Sie im
Fehlerhandbuch oder der Hilfe.
32

7 Schließen des Web-Browsers.
Schritt 5 – Anschließen an ein Gerät mit Ethernet-Anschluss
Dieses Verfahren ist nicht erforderlich, wenn Sie eine FunkKommunikationssitzung mit dem für das Setup verwendeten Computer
durchführen möchten. Ist dies nicht der Fall, trennen Sie den Wireless LAN
Converter von dem für das Setup verwendeten Computer, und stellen Sie eine
Verbindung mit dem Gerät für die Funkkommunikation her.
Trennen Sie das Ethernet-Kabel vom für das Setup verwendeten Computer, wenn der
Computer noch eingeschaltet ist, müssen Sie mindestens zehn Sekunden warten, bevor sie
es an das Gerät für die Funkkommunikation anschließen.
Falls Sie die Access Point-Einstellungen ändern
Ändern Sie die Einstellungen des Access Point, ist die Verbindung zum
Wireless LAN Converter schlecht. Konfigurieren Sie den Netzwerknamen
(SSID) und den Chiffrierschlüssel (WEP-Schlüssel) des Wireless LAN Converters
erneut, damit diese mit den Werten des Access Point übereinstimmen. Ist der
Wireless LAN Converter an das PCWA-A320-Gerät angeschlossen, führen Sie
die Schritte 2 und 3 unter Konfiguration mit dem Schalter für die
Schnellkonfiguration aus. Ist der Wireless LAN Converter an ein anderes
Gerät als das PCWA-A320 angeschlossen, finden Sie Informationen hierüber
im Abschnitt Konfiguration mit der Utility-Software.
Im Abschnitt Falls Sie die Access Point-Einstellungen ändern finden Sie
Informationen über die Folgen des Änderns der Access Point-Einstellungen.
Informationen über das Zurücksetzen des Wireless LAN Converters finden Sie
unter Zurücksetzen auf werksseitige Standardeinstellungen.
Weitere Informationen über das Setup des Wireless LAN Converters finden Sie
in der Hilfe.
33

So zeigen Sie die Hilfe an:
● Klicken Sie auf Start, zeigen Sie auf Programme (Alle Programme unter
Windows XP), zeigen Sie auf Wireless LAN, und klicken Sie dann auf
Converter Setup-Hilfe.
So zeigen Sie die Hilfe für die Wireless LAN Converter Setup-Seite an:
Klicken Sie auf
Hilfe oder ? auf der Wireless LAN Converter Setup-Seite.
34

Warnhinweise zur Installation
Installation
Wählen Sie einen sicheren Ort für die Wireless-Einheit aus, an dem das Gerät
nicht herunterfallen kann und niemand darüber stolpern kann. Verlegen Sie
das Kabel zur Wireless-Einheit, damit es für den Installationsort geeignet ist.
● Installieren Sie die Wireless-Einheit oder die Netzeinheit an einem sicheren Ort.
Installieren Sie die Wireless-Einheit nicht an einem Ort, an dem es Erschütterungen oder
Vibrationen ausgesetzt werden kann, wie am Rand eines Regals.
Installieren Sie die Wireless-Einheit nicht an einem Ort, an dem die Kabel stören könnten.
Schützen Sie die Wireless-Einheit oder die Netzeinheit vor Wasser.
Aufhängen der Wireless-Einheit
1 Entfernen Sie die hintere Abdeckung von der Wireless-Einheit, indem Sie
sie in Pfeilrichtung bewegen.
Seien Sie vorsichtig, wenn Sie die hintere Abdeckung der Wireless-Einheit
entfernen und wieder einsetzen.
Um die hintere Abdeckung der Wireless-Einheit wieder einzusetzen,
passen Sie die Ausrichteschiene auf der Rückseite der Wireless-Einheit in
die Führungsnuten der hinteren Abdeckung ein, und schieben Sie sie nach
oben.
35

2 Hängen Sie die Einheit mit Schrauben oder Nägeln an der Wand auf.
Die Wireless-Einheit wird ohne Anbringvorrichtung für das Gerät
geliefert. Verwenden Sie entsprechend robuste Schrauben, die das Gerät
halten können.
Verwenden Sie immer zwei Schrauben oder Nägel, damit das Gerät sicher
an der Wand angebracht werden kann.
Wählen Sie einen Ort, der das Gewicht der Wireless-Einheit tragen kann,
wenn es an der Wand hängt. Ist der Ort dafür nicht geeignet, kann das
Gerät herunterfallen und beschädigt werden oder jemanden verletzen.
Wenn Sie das Gerät an eine Gipswand oder weniger stabile Wand
anbringen, muss das Material trotzdem robust genug sein, um das
Gewicht des Geräts tragen zu können. Verwenden Sie spezielle
Schraubenzieher oder anderes für die Anbringung geeignetes Werkzeug.
Wird das Gerät an gewöhnlichen Schrauben aufgehängt, kann es
herunterfallen.
Achten Sie darauf, dass Sie die Wireless-Einheit oder das für die
Anbringung verwendete Werkzeug nicht fallen lassen, wenn Sie das Gerät
an der Wand befestigen. Dadurch könnte die Wireless-Einheit oder das
Werkzeug jemanden verletzen oder beschädigt werden.
36

Bedienhinweise
Weitere Informationen zu den Sicherheitsvorschriften entnehmen Sie bitte
vor der Verwendung dem Sicherheitsleitfaden.
Netzeinheit
Verwenden Sie die Netzeinheit, die Sie mit der Wireless-Einheit erhalten
haben. Wenn Sie eine andere Netzeinheit verwenden, kann das Gerät
beschädigt werden oder jemanden verletzen.
Sicherheit
Setzen Sie das Gerät keinen starken Einwirkungen von außen aus, da dadurch
das Gerät beschädigt werden kann und jegliche Garantieansprüche erlöschen.
Installation
Installieren Sie den Wireless LAN Converter nicht unter folgenden
Bedingungen:
● Geschlossenen Umgebungen (geschlossene Farhzeuge);
● bei magnetischer Strahlung (in der Nähe von Magneten, Lautsprechern
oder Fernsehgeräten);
● bei Mikrowellen (in der Nähe von Mikrowellenherden);
● bei übermäßig viel Staub;
● bei instabilen oder unebenen Oberflächen;
● bei häufig auftretenden Vibrationen;
● bei hoher Luftfeuchtigkeit (wie in einem Badezimmer);
● bei schlechter Luftzirkulation;
● an Orten, an denen die Funkwellenübertragung durch Metallplatten oder
Betonwände gehindert werden könnte.
Betrieb
Bei schnellen Temperaturschwankungen oder sehr feuchten Umgebungen
kann sich im Geräteinneren Kondensation niederschlagen. Der Wireless LAN
Converter funktioniert dann möglicherweise nicht mehr einwandfrei.
Trennen Sie in diesem Fall den Wireless LAN Converter vom Adapter oder dem
Gerät, an das der Wireless LAN Converter angeschlossen ist, und unterbrechen
Sie für zwei bis drei Stunden den Betrieb.
Notfälle
Stecken Sie in Notfällen die Wireless-Einheit aus.
37

Technische Daten
Netzbetrieb 100-240 V WS, 5O/60 Hz
Stromverbrauch Ca. 5 W
Schnittstellen 100BASE-TX/10BASE-T (automatische MDI/MDI-X-
Erkennung)
Max. externe Abmessungen
Wireless-Einheit:
Netzeinheit:
Gewicht
Wireless-Einheit:
Netzeinheit:
Maximale
Kommunikationsentfernung
Unterstütztes Protokoll TCP/IP
Standardmäßige Kompatibilität IEEE 802.11b
Funkfrequenz 2,4 GHz Funknetzwerk: 2,4 bis 2,4835 GHz (ISM-Band)
Datenverschlüsselung (WEP) 64 Bit/128 Bit
Modulationsverfahren DS-SS
Betriebstemperatur 5° C bis 35° C (nicht kondensierend)
Lagertemperatur -20° C bis 60° C (nicht kondensierend)
Ca. 110 x 25 x 70 mm (B x H x T)
Ca. 98 x 98 x 33 mm (B x H x T)
Ca. 320 g (mit Anschlusskabel)
Ca. 130 g
Sichtweite, ca. 100 m
(Die genaue Kommunikationsentfernung hängt von der
Umgebung ab.)
IEEE 802.11g
OFDM
Aufbau und technische Daten können ohne vorherige Ankündigung geändert werden.
38

Sony-Kundendienstoptionen
In diesem Abschnitt wird beschrieben, wie Sie von Sony Hilfe erhalten können.
● Die Kurzeinführung (dieses Dokument): erläutert die Installation des
Wireless LAN Converters.
● Das Handbuch zur Fehlerbehebung: liefert Lösungen für häufige Probleme,
die beim Wireless LAN Converter auftreten.
● Die Hilfe für den Bildschirm Wireless LAN Converter-Setup: erläutert die
Installation des Wireless LAN Converters.
● Sony-Kundendienstoptionen: http://www.vaio-link.com bietet die neuesten
Informationen zum Wireless LAN Converter.
39

Wireless LAN Converter
Manuel de mise en route
41

Marques commerciales
● Sony, VAIO, le logo , et le logo Eco Info sont des
marques commerciales de Sony Corporation.
● Microsoft et Windows sont des marques commerciales de Microsoft
Corporation, déposées aux États-Unis et/ou dans d’autres pays.
● Microsoft
®
Windows® XP Édition familiale et Microsoft® Windows® XP
Professionnel sont ci-après nommés Windows XP.
● Tous les autres noms de systèmes, de produits et de services sont des
marques commerciales de leurs propriétaires respectifs. Dans le présent
document, les symboles
TM
et ® ne sont pas indiqués.
™
42

Présentation
Ce document propose une vue d’ensemble des caractéristiques du Wireless
LAN Converter PCWA-DE30 et donne les étapes de configuration requises.
Déballage de votre point d’accès (AP)
Sortez l’unité de son emballage et assurez-vous que tous les éléments cidessous sont présents :
● Unité sans fil (1)
● Cordon d’alimentation (2)
● Unité d’alimentation (3)
● Adaptateur secteur*
● CD-ROM (disque d’installation) (4)
● Guide de mise en route (4)
● Guide de dépannage (4)
● Dépliant Garantie (4)
● Dépliant Réglementations (4)
* En fonction de votre pays.
43

Noms et fonctions des éléments
Unité sans fil
Indicateur d’ÉTAT (1) Indique l’état du convertisseur sans fil.
Lumière blanche
clignotante
(allumée 9 s, éteinte 1 s)
Lumière blanche
clignotante
(allumée 5 s, éteinte 1 s)
Lumière blanche
clignotante
(allumée 2 s, éteinte 1 s)
Lumière blanche
clignotante
(allumée 1 s, éteinte 9 s)
Lumière blanche
clignotante
(à intervalles d’une demiseconde)
Lumière blanche
clignotante
(à intervalles de 0,2 s)
Lumière rose fixe Communication en mode de connexion réseau d’égal à égal.
Lumière rouge clignotante
(à intervalles de 6 s)
Lumière rouge clignotante
(à intervalles de 3 s)
État de la connexion réseau sans fil : bon (signal puissant).
État de la connexion réseau sans fil : moyen (signal moyen).
État de la connexion réseau sans fil : mauvais (signal faible).
Aucun périphérique n’est branché sur le port RÉSEAU ou les
périphériques connectés sont éteints.
Démarrage en cours.
Attendez la fin du démarrage.
La procédure de configuration rapide du convertisseur LAN sans fil
s’est exécutée avec succès.
La procédure de configuration rapide du convertisseur LAN sans fil
a échoué car les informations de configuration sont inaccessibles
à partir du point d’accès (AP) PCWA-A320.
Recherche d’un réseau sans fil en cours.
La communication n’est pas encore possible car la connexion n’a
pas été établie. Si cette situation persiste, vérifiez les paramètres
du convertisseur LAN sans fil et de la cible de la connexion [point
d’accès (AP) LAN sans fil (2,4 GHz), etc.]
44

Lumière rouge clignotante
(à intervalles de 1,6 s)
Lumière rouge clignotante
(à intervalles de 1 s)
Lumière rouge clignotante
(à intervalles d’une demiseconde)
Bouton de réinitialisation
(2)
Indicateur LINK/ACT de
LIAISON/d’ACTIVITÉ (3)
Câble de l’unité sans fil (4) Se branche sur le port de l’UNITÉ SANS FIL de l’unité
Panneau arrière (5) Retirez ce panneau pour fixer l’unité sans fil à un mur ou vérifier
Chevilles pour montage
mural (6)
Étiquette avec l’adresse
MAC (7)
Configuration rapide (8) Appuyez sur ce bouton pour configurer le convertisseur LAN sans
Le convertisseur LAN sans fil est en mode de mise en veille de la
Configuration rapide.
La mise à jour du micrologiciel du convertisseur LAN sans fil a
échoué. Vous devez recommencer la procédure de mise à jour du
micrologiciel.
L’unité est en cours de réinitialisation : lorsque vous relâchez le
bouton de réinitialisation, le convertisseur LAN sans fil redémarre
automatiquement et les paramètres d’usine sont rétablis.
La mise à jour du micrologiciel est en cours : la procédure de mise
à jour du micrologiciel est en cours. Ne mettez jamais le
convertisseur hors tension lorsque cette procédure est en cours.
Permet de revenir aux paramètres d’usine du convertisseur LAN
sans fil.
S’allume lorsqu’un câble Ethernet est branché sur le port RÉSEAU
de l’unité d’alimentation.
d’alimentation.
l’adresse MAC.
Utilisez ces chevilles pour fixer l’unité sans fil à un mur.
L’adresse MAC du convertisseur LAN sans fil est imprimée ici.
fil.
Unité d’alimentation
Prise 100-240 V CA (9) Branchez ici le cordon d’alimentation fourni.
Port de l’UNITÉ SANS FIL (10) Branchez ici le câble de l’unité sans fil.
Port RÉSEAU (11) Branchez l’unité sans fil sur votre ordinateur ou sur un autre
périphérique à l’aide d’un câble Ethernet.
Utilisez un câble Ethernet droit ou inverseur.
45

Réinitialisation des paramètres d’usine
Pour réinitialiser les paramètres d’usine du convertisseur LAN sans fil,
procédez comme suit :
1 Mettez le convertisseur LAN sans fil sous tension.
2 À l’aide d’un trombone ou d’un objet similaire, appuyez pendant au moins
une seconde sur le bouton de réinitialisation situé sur la face inférieure de
l’unité sans fil.
3 Lorsque l’indicateur d’état commence à clignoter (lumière rouge),
relâchez le bouton de réinitialisation.
Le convertisseur LAN sans fil redémarre automatiquement et tous les
paramètres d’usine sont restaurés.
● Pour plus d’informations sur les paramètres d’usine du convertisseur LAN sans fil,
consultez le Guide de dépannage.
Fonctionnalités
Accès sans fil à Internet pour les périphériques dotés d’un port Ethernet
Le Wireless LAN Converter PCWA-DE30 à 2,4 GHz (repris ci-après sous la
dénomination du convertisseur LAN sans fil) est conçu pour permettre
d’intégrer des périphériques tels que des imprimantes ou des ordinateurs de
bureau équipés de ports Ethernet à un réseau sans fil.
● Seul un câble Ethernet doit être utilisé pour brancher le convertisseur LAN sans fil sur un
périphérique Ethernet.
Le convertisseur LAN sans fil ne fonctionne pas comme un point d’accès (AP).
Si vous n’utilisez pas la Configuration rapide pour configurer le convertisseur LAN sans
fil, un ordinateur doté de Windows Millennium Edition, Windows 2000 ou Windows XP
est requis.
Un seul périphérique peut être branché sur le convertisseur LAN sans fil. Vous ne pouvez
pas installer de concentrateur et brancher plusieurs périphériques.
46

● Le convertisseur LAN sans fil permet également aux ordinateurs dotés de tels
convertisseurs de communiquer directement en mode de connexion réseau d’égal à égal,
sans avoir recours à un point d’accès (AP) LAN sans fil.
Les paramètres du mode de connexion réseau du point d’accès (AP) sont décrits dans le
présent document. Pour plus d’informations sur les paramètres du mode de connexion
réseau d’égal à égal, consultez l’Aide.
Configuration du convertisseur LAN sans fil
Pour configurer le convertisseur LAN sans fil, procédez de l’une des façons
suivantes.
À l’aide de la Configuration rapide
Lorsque le convertisseur LAN sans fil est branché sur le point d’accès (AP)
PCWA-A320, vous pouvez le configurer à l’aide de la Configuration rapide.
Vous pouvez utiliser les paramètres du point d’accès (AP) PCWA-A320 de Sony
pour configurer automatiquement le convertisseur LAN sans fil câblé
(Ethernet) à l’aide de la Configuration rapide. Le point d’accès (AP) transmet
les informations suivantes au convertisseur LAN sans fil.
● Nom de réseau (SSID)
● Clé de cryptage (clé WEP)
À l’aide du logiciel utilitaire
Lorsque le convertisseur LAN sans fil est branché sur un point d’accès (AP) qui
n’est pas du type PCWA-A320, vous ne pouvez pas le configurer à l’aide de la
Configuration rapide. Pour plus d’informations, reportez-vous à la section
Configuration à l’aide du logiciel utilitaire ci-après.
● Par contre, vous pouvez utiliser le logiciel utilitaire pour configurer le convertisseur LAN
sans fil même si ce dernier est branché sur un point d’accès (AP) PCWA-A320.
Configuration à l’aide de la Configuration rapide
Lorsque le convertisseur LAN sans fil est branché sur le point d’accès (AP)
PCWA-A320, vous pouvez utiliser la Configuration rapide pour le configurer.
Lorsque le convertisseur LAN sans fil est branché sur un autre type de point
d’accès (AP), reportez-vous à la section Configuration à l’aide du logiciel
utilitaire ci-après.
Procédure 1 : Configuration du point d’accès (AP)
Pour obtenir des informations sur la procédure de configuration du point
d’accès (AP), reportez-vous à la documentation de ce dernier. Si le cryptage
des données (WEP) n’est pas configuré au niveau du point d’accès (AP), nous
vous recommandons vivement d’effectuer cette configuration avant de
poursuivre.
47

Procédure 2 : Configuration rapide
1 Attendez la fin du démarrage du point d’accès (AP) PCWA-A320 et du
convertisseur LAN sans fil.
2 Appuyez pendant au moins une seconde sur le bouton de configuration
rapide de l’unité sans fil PCWA-A320.
Lorsque l’indicateur d’état de l’unité sans fil PCWA-A320 commence à
clignoter (lumière rouge), vous pouvez lancer la Configuration rapide.
Le mode de mise en veille de la Configuration rapide du convertisseur LAN
sans fil ne dure que 30 secondes.
Pour annuler la procédure, appuyez de nouveau sur le bouton de
configuration rapide pendant au moins une seconde.
3 Appuyez pendant au moins une seconde sur le bouton de configuration
rapide du convertisseur LAN sans fil.
Lorsque la lumière rouge de l’indicateur d’état de l’unité sans fil PCWAA320 ne clignote plus et que la lumière blanche commence à clignoter sur
le convertisseur LAN sans fil, la procédure de configuration rapide est
terminée.
4 Mettez le convertisseur LAN sans fil hors tension.
Procédure 3 : Branchement du convertisseur LAN sans fil sur le
périphérique à utiliser pour les communications sans fil
1 Branchez l’unité sans fil et l’unité d’alimentation.
2 Utilisez un câble Ethernet pour brancher l’unité d’alimentation sur
l’ordinateur ou sur un autre périphérique prenant en charge les
communications sans fil.
3 Branchez l’unité d’alimentation sur une prise secteur à l’aide du cordon
d’alimentation.
48

● Aucun interrupteur n’est présent sur le convertisseur LAN sans fil.
Vous pouvez utiliser un câble Ethernet droit ou inverseur.
Lorsque la lumière de l’indicateur d’état du convertisseur LAN sans fil passe au
blanc lors du branchement du périphérique de communication sans fil, la
configuration est terminée.
Configuration à l’aide du logiciel utilitaire
Procédure 1 : Vérification du point d’accès (AP) et de l’ordinateur
utilisé pour la configuration, et configuration des paramètres
requis
Avant de configurer le convertisseur LAN sans fil à l’aide du programme
Converter Setup Utility, vérifiez les points suivants.
● Contrôlez le port Ethernet de l’ordinateur utilisé pour la configuration et
préparez le câble Ethernet requis.
Vous pouvez utiliser un câble Ethernet droit ou inverseur.
● Contrôlez le point d’accès (AP).
Assurez-vous que le point d’accès (AP) LAN sans fil (2,4 GHz) à utiliser est
sous tension. Vérifiez également les paramètres de nom de réseau (SSID) et
de clé de cryptage (WEP) du point d’accès (AP).
Si le cryptage des données (WEP) n’est pas configuré au niveau du point
d’accès (AP), nous vous recommandons vivement d’effectuer cette
configuration avant de poursuivre.
● Réglez les paramètres du pare-feu de l’ordinateur.
Si vous utilisez la fonction Pare-feu de connexion Internet sous Windows
XP ou un pare-feu personnel fourni par un logiciel antivirus, vous devrez
peut-être en régler le niveau de sécurité. Pour plus d’informations, voir plus
loin.
Fonctions de pare-feu
Si vous utilisez la fonction Pare-feu de connexion Internet sous Windows
XP : l’activation de la fonction de pare-feu de connexion Internet sous
Windows XP risque d’empêcher l’accès à votre ordinateur via des
communications sans fil (cette fonction est désactivée par défaut sous le
système d’exploitation Windows XP). Elle peut vous empêcher d’établir une
connexion au réseau lors de la modification des paramètres du convertisseur
LAN sans fil et/ou du point d’accès (AP). Le cas échéant, désactivez la fonction
de pare-feu de connexion Internet, connectez-vous au réseau, puis réactivez
cette fonction. Pour plus d’informations, consultez l’Aide de Windows XP.
● La sécurité réseau est primordiale. Voilà pourquoi il est important de trouver la meilleure
manière de protéger l’ordinateur.
49

Si vous utilisez un pare-feu personnel fourni par un logiciel antivirus ou de
sécurité réseau : les logiciels antivirus et de sécurité réseau comportent parfois
une fonction appelée pare-feu personnel, conçue pour empêcher les accès
extérieurs non autorisés. En fonction du logiciel, il se peut que le niveau de
sécurité par défaut de cette fonction soit élevé. Si ce niveau de sécurité élevé
reste en vigueur, l’accès à l’ordinateur à partir d’une entité externe peut
s’avérer impossible. L’utilisateur peut se trouver, entre autres, face à
l’impossibilité d’établir une connexion réseau lors de la modification des
paramètres du convertisseur LAN sans fil ou du point d’accès (AP). Le cas
échéant, diminuez le niveau de sécurité afin de permettre d’établir la
connexion au réseau. Pour plus d’informations, reportez-vous à la
documentation logicielle fournie.
● La sécurité réseau est primordiale. Voilà pourquoi il est important de trouver la meilleure
manière de protéger l’ordinateur.
Pour plus d’informations sur la fonction de pare-feu ou autre, contactez l’éditeur de
votre logiciel.
Procédure 2 : Branchement du convertisseur LAN sans fil sur
l’ordinateur à utiliser pour la configuration
Reliez le convertisseur LAN sans fil et l’ordinateur.
● Pour plus d’informations sur la procédure de branchement du périphérique à utiliser
pour les communications sans fil, reportez-vous à la procédure 4.
Procédure 3 : Installation du logiciel utilitaire
Installez sur l’ordinateur utilisé pour la configuration le logiciel utilitaire de
configuration du convertisseur LAN sans fil (Converter Setup Utility).
1 Insérez le CD-ROM fourni dans le lecteur de CD-ROM de l’ordinateur
auquel est relié le convertisseur LAN sans fil.
2 Sous Windows Millennium Edition ou Windows 2000, double-cliquez sur
l’icône Poste de travail sur le Bureau.
Sous Windows XP, cliquez sur Démarrer et sélectionnez Poste de travail.
3 Dans la fenêtre Poste de travail, double-cliquez sur le fichier Setup.exe
enregistré sur le CD-ROM fourni.
Le programme d’installation démarre. Suivez les instructions à l’écran et
installez le logiciel utilitaire.
● En fonction des paramètres de l’ordinateur, le fichier Setup.exe peut être affiché sous
la forme Setup.
Pour quitter le programme d’installation, cliquez sur Annuler.
Procédure 4 : Configuration du convertisseur LAN sans fil
Affichez la page de configuration du convertisseur LAN sans fil et configurez
les paramètres requis :
50

Navigateurs compatibles :
● Internet Explorer version 5.5 ou ultérieure
● Netscape version 6.1 ou ultérieure
● Pour afficher la page de configuration du convertisseur LAN sans fil avec le logiciel
Converter Setup Utility, utilisez l’un des navigateurs Web ci-dessus.
Si votre navigateur Web est configuré pour utiliser un serveur proxy, définissez ses
paramètres proxy de sorte qu’il n’utilise pas un serveur proxy pour l’adresse IP du
convertisseur LAN sans fil et pour les périphériques LAN sans fil (2,4 GHz) tels que le point
d’accès (AP). Pour plus d’informations sur la procédure de désactivation des paramètres
du serveur proxy, reportez-vous au cas 4 du Guide de dépannage.
● La page de configuration du convertisseur LAN sans fil est enregistrée dans la mémoire
interne du convertisseur LAN sans fil.
● La page affichée peut être légèrement différente, en fonction de la version du
micrologiciel du convertisseur LAN sans fil.
1 Dans le menu Démarrer, pointez sur Programmes (Tou s le s
programmes sous Windows XP), puis sur Wireless LAN, et sélectionnez
Converter Setup.
Le programme Converter Setup Utility démarre et affiche
automatiquement la page de configuration du convertisseur LAN sans fil.
● Si la boîte de dialogue Configuration de l’adresse IP apparaît, remplacez
temporairement l’adresse IP du convertisseur par celle indiquée dans cette boîte de
dialogue. Toutefois, si vous utilisez plusieurs périphériques pour créer un réseau, assurezvous que cette nouvelle adresse IP ne reprend pas l’adresse d’un autre périphérique ou
ordinateur du réseau. Le cas échéant, vous ne pourrez pas ouvrir la page de
configuration du convertisseur LAN sans fil. Avant de cliquer sur le bouton Appliquer,
modifiez l’adresse IP en conséquence.
Si une erreur se produit, consultez l’Aide ou le Guide de dépannage.
2 Cliquez sur Configuration simplifiée.
La page Configuration simplifiée apparaît.
● Pour la configuration, vous pouvez choisir la langue de l’interface.
3 Entrez le nom de réseau (SSID) du point d’accès (AP).
Si la configuration du point d’accès (AP) est terminée : saisissez le nom de
réseau (SSID) que vous avez défini pour le point d’accès (AP).
Si la configuration du point d’accès (AP) n’est pas terminée : reportez-vous
à la documentation fournie avec le point d’accès (AP) et saisissez le nom
de réseau (SSID) par défaut.
Le nom de réseau (SSID) est un identifiant qui permet d’identifier le réseau
sans fil. Il est requis pour les communications avec le point d’accès (AP).
Pour rechercher les points d’accès (AP) actifs du voisinage réseau, cliquez
sur le bouton Analyser.
4 Configurez les paramètres Cryptage (WEP), Longueur de clé et Clé
WEP.
Si la configuration du point d’accès (AP) est terminée : saisissez les mêmes
valeurs que celles définies pour le point d’accès (AP).
51

Si la configuration du point d’accès (AP) n’est pas terminée : reportez-vous
à la documentation du point d’accès (AP) et saisissez les valeurs par défaut.
Cryptage (WEP) Activez ou désactivez le cryptage des données.
Longueur de clé Sélectionnez la longueur de la clé de cryptage (clé WEP). Ce
paramètre définit le nombre de caractères autorisés pour la chaîne de
la clé.
Clé WEP Saisissez la chaîne de caractères à utiliser en tant que clé de cryptage
(clé WEP). La longueur de la chaîne doit correspondre au paramètre
de longueur de clé de cryptage.
Pour vérification, cette chaîne doit être de nouveau saisie dans le
champ Clé WEP (confirmation).
Cryptage des données dans le cas des communications sans fil [tel que
défini par le paramètre Cryptage (WEP)]. La longueur de la chaîne doit
correspondre au paramètre de longueur de la clé de cryptage.
Pour vérification, cette chaîne doit être de nouveau saisie dans le champ
Clé WEP (confirmation).
Cliquez sur Aide ou sur ? pour afficher l’Aide.
5 Une fois la configuration terminée, cliquez sur Suivant.
La page de confirmation de la configuration s’affiche.
6 Vérifiez la bonne définition des paramètres et cliquez sur Appliquer.
La page de la fin de la configuration s’affiche.
Lorsque vous cliquez sur Appliquer, le convertisseur LAN sans fil
redémarre.
Si l’indicateur d’état situé sur la face avant de l’unité sans fil clignote
lentement, la communication avec le point d’accès (AP) est établie.
Si la procédure de mise en mémoire se poursuit une fois que vous avez
cliqué sur Appliquer, vérifiez l’indicateur d’état sur la face avant de
l’unité sans fil. Si l’indicateur clignote lentement (lumière blanche), la
configuration est terminée et des communications sans fil peuvent être
établies.
Si l’indicateur d’état clignote (lumière rouge), il est impossible d’établir la
communication avec le point d’accès (AP). Consultez l’Aide ou le Guide de
dépannage.
7 Fermez le navigateur Web.
52

Procédure 5 : Branchement sur un périphérique équipé d’un port Ethernet
Cette procédure est inutile si vous envisagez d’utiliser l’ordinateur qui a servi
à la configuration pour effectuer une session de communication sans fil. Dans
le cas contraire, débranchez le convertisseur LAN sans fil de l’ordinateur utilisé
pour la configuration et branchez-le sur le périphérique de communication
sans fil.
Si vous débranchez le câble Ethernet de l’ordinateur utilisé pour la configuration alors que
ce dernier est toujours sous tension, attendez au moins 10 secondes avant de le rebrancher
sur le périphérique de communication sans fil.
En cas de modification des paramètres du point d’accès (AP)
Si vous modifiez les paramètres de votre point d’accès (AP), la connexion avec
le convertisseur LAN sans fil est interrompue. Reconfigurez les paramètres
Nom de réseau (SSID) et Clé de cryptage (clé WEP) du convertisseur LAN sans
fil pour qu’ils correspondent aux valeurs définies pour le point d’accès (AP). Si
le convertisseur LAN sans fil est branché sur le point d’accès (AP) PCWA-A320,
effectuez les procédures 2 et 3 de la section Configuration à l’aide de la
Configuration rapide. Si le convertisseur LAN sans fil est branché sur un
autre point d’accès (AP) que le PCWA-A320, reportez-vous à la section
Configuration à l’aide du logiciel utilitaire.
Si vous modifiez les paramètres du point d’accès (AP), reportez-vous à la
section En cas de modification des paramètres du point d’accès (AP) cidessus.
Pour réinitialiser le convertisseur LAN sans fil, reportez-vous à la section
Réinitialisation des paramètres d’usine précédente.
53

Pour plus d’informations sur la configuration du convertisseur LAN sans fil,
consultez l’Aide.
Pour afficher l’Aide, procédez comme suit :
● Dans le menu Démarrez, pointez sur Programmes (To u s l es
programmes sous Windows XP), puis sur Wireless LAN, et sélectionnez
Aide de Converter Setup.
Pour afficher l’Aide de la page de configuration du convertisseur LAN sans fil,
procédez comme suit :
Dans la page de configuration du convertisseur LAN sans fil, cliquez sur Aide ou sur ?.
54

Précautions d’installation
Installation
Choisissez, pour installer l’unité sans fil, un endroit sûr d’où elle ne pourra pas
tomber et où vous ne pourrez pas la renverser. Tenez compte de la
configuration de l’endroit d’installation pour acheminer le câble vers l’unité
sans fil de la meilleure façon qui soit.
● N’installez pas l’unité sans fil ou l’unité d’alimentation dans des endroits peu fiables.
N’installez pas l’unité sans fil dans un endroit sujet à des chocs ou à des vibrations (sur le
bord d’une étagère, par exemple) qui pourraient la faire tomber.
N’installez pas l’unité sans fil dans un endroit où le déplacement normal du ou des câbles
serait entravé.
Empêchez tout contact entre l’unité sans fil ou l’unité d’alimentation et de l’eau.
Fixation de l’unité sans fil au mur
1 Retirez le panneau arrière de l’unité sans fil en le faisant glisser dans le
sens de la flèche.
Retirez et replacez le panneau arrière de l’unité sans fil avec le plus grand
soin.
Pour replacer le panneau arrière de l’unité sans fil, placez les rails de
guidage sur l’arrière de l’unité sans fil dans l’alignement des rainures
situées sur le panneau arrière, et faites coulisser le panneau vers le haut.
55

2 Fixez l’unité au mur à l’aide de vis ou de clous.
L’unité sans fil est livrée sans aucun élément permettant de la fixer au mur.
Utilisez des vis suffisamment solides pour supporter son poids.
Utilisez toujours deux vis ou deux clous, et assurez-vous que l’unité est
solidement fixée au mur.
Choisissez un endroit qui supportera le poids de l’unité sans fil une fois
fixée au mur. Si l’endroit choisi ne supporte pas le poids de l’unité, celle-ci
peut tomber, et entraîner des dommages et/ou blesser une personne.
Lorsque vous fixez l’unité sur un mur à base de plâtre ou d’un autre
matériau fragile, assurez-vous que ce matériau est suffisamment robuste
pour supporter le poids de l’unité et utilisez des vis d’assemblage spéciales
ou d’autres dispositifs de fixation conçus spécialement pour ce type de
matériau. Si vous fixez l’unité avec des vis ordinaires, elle risque de tomber.
Lorsque vous utilisez des outils pour fixer l’unité sans fil au mur, faites bien
attention à ne pas lâcher l’appareil ni ces outils. En tombant, l’unité sans
fil ou les outils peuvent entraîner des dommages et/ou blesser une
personne.
56

Précautions au cours du fonctionnement
Avant utilisation, pour plus d’informations sur les réglementations et les
consignes de sécurité, consultez le dépliant concernant les Règlements de
sécurité.
Unité d’alimentation
Utilisez l’unité d’alimentation fournie avec l’unité sans fil. Si vous utilisez une
autre unité d’alimentation, cela peut entraîner des dommages et/ou causer
des blessures.
Sécurité
Évitez de soumettre ce produit à des chocs violents risquant de provoquer des
dommages qui ne seront pas couverts par la garantie.
Installation
N’installez pas le convertisseur LAN sans fil à un endroit où il serait exposé à
l’un des éléments suivants :
● Environnements confinés (tels que des voitures fermées) ;
● Champs magnétiques (à proximité d’aimants, de haut-parleurs ou d’un
poste de télévision) ;
● Micro-ondes (à proximité d’un four à micro-ondes) ;
● Poussière excessive ;
● Surfaces non stables ou irrégulières ;
● Vibrations fréquentes ;
● Taux d’humidité important (comme dans une salle de bains) ;
● Aération insuffisante ;
● Endroits où la transmission des ondes radio est menacée par la présence de
parois métalliques ou de murs en béton.
Fonctionnement
Les environnements soumis à des variations chaud-froid rapides et à une forte
humidité sont susceptibles d’entraîner la formation de condensation sur les
composants internes. Ce phénomène risque d’entraîner des
dysfonctionnements du convertisseur LAN sans fil.
Le cas échéant, débranchez le convertisseur LAN sans fil du convertisseur ou
de tout autre appareil auquel il est relié, et attendez deux ou trois heures
avant de l’utiliser à nouveau.
Cas d’urgence
En cas d’urgence, débranchez le cordon d’alimentation pour arrêter le
dispositif sans fil.
57

Fiche technique
Alimentation CA 100-240 V, 5O/60 Hz
Consommation d’énergie approx. 5 W
Interfaces 100BASE-TX/10BASE-T (détection MDI/MDI-X
automatique)
Dimensions externes maximales
Unité sans fil :
Unité d’alimentation :
Poids
Unité sans fil :
Unité d’alimentation :
Distance de raccordement
maximale
Protocole pris en charge TCP/IP
Conformité aux normes IEEE 802.11b
Fréquence radio Réseau sans fil (2,4 GHz) : 2,4 à 2,4835 GHz (bande ISM)
WEP (cryptage des données) 64 bits/128 bits
Méthode de modulation : DS-SS
Température de fonctionnement de +5°C à +35°C (sans condensation)
Température de stockage de -20°C à +60°C (sans condensation)
approx. 110 x 25 x 70 mm (L x H x P)
approx. 98 x 98 x 33 mm (L x H x P)
approx. 320 g (câble de connexion compris)
approx. 130 g
Sans obstacles, approx. 100 m
(La longueur de raccordement réelle dépend de
l’environnement.)
IEEE 802.11g
OFDM
La conception et les caractéristiques techniques sont susceptibles d’être modifiées sans
préavis.
58

Formules d’assistance de Sony
Cette section vous explique la procédure à suivre pour obtenir aide et
assistance auprès de Sony.
● Guide de mise en route (ce document) : il explique la procédure à suivre
pour installer le convertisseur LAN sans fil.
● Guide de dépannage : il propose des solutions aux problèmes les plus
fréquemment rencontrés par les utilisateurs du convertisseur LAN sans fil.
● Aide en ligne de la page de configuration du convertisseur LAN sans fil : elle
explique la procédure de configuration du convertisseur LAN sans fil.
● Site Web d’assistance de Sony : vous trouverez sur le site
http://www.vaio-link.com des informations de dernière minute à propos de
votre convertisseur LAN sans fil.
59
 Loading...