

Page 1
PCWA-C500/C700
4-670-763-11(1)
5 Graph scale
This controls the scale for indication of transmission and reception link rate and throughput. Normally, the transmission and reception throughput will be
about half the link rate.
6 “Streaming Mode” button
This button is shown only when using Windows XP. It allows you to temporarily suspend the Windows XP wireless configuration functions (Wireless
Zero Configuration service) in order to optimize throughput for real-time playback of streaming data over the wireless network.
Note
When playback of streaming data is finished, do not forget to set the “Streaming Mode” button to Off. If the setting is left at On, network switching is not possible.
7 “Renew IP” button
Clicking this button causes the computer to obtain a new IP address.
The button can be used when the setting for automatically assigning an IP address is activated.
Wireless LAN Quick Guide
• Optimizing your wireless LAN with Wireless Panel
• Building a Peer to Peer Network
Sony Corporation © 2003 Printed in Japan
Optimizing your wireless LAN with Wireless Panel
Notes
• When a fixed IP address has been assigned to the computer, this function cannot be used.
• Under Windows Me, this function cannot be used.
8 “AP Setting” button
Clicking this button starts your Web browser and displays the Access Point home page (setup page). This function is available when the Wireless LAN
Access Point PCWA-A500* or another Access Point that supports the function is used (*As of February, 2003). The function is not available in a Peer to
Peer network.
9 “Show Graph/Hide Graph” button
Lets you turn the status graph (0) on an off. The default setting is off.
0 Graph
Shows the reception level, RX link rate, and TX throughput. These parameters are useful for finding the optimum location of computer and Access
Point, and for measuring throughput.
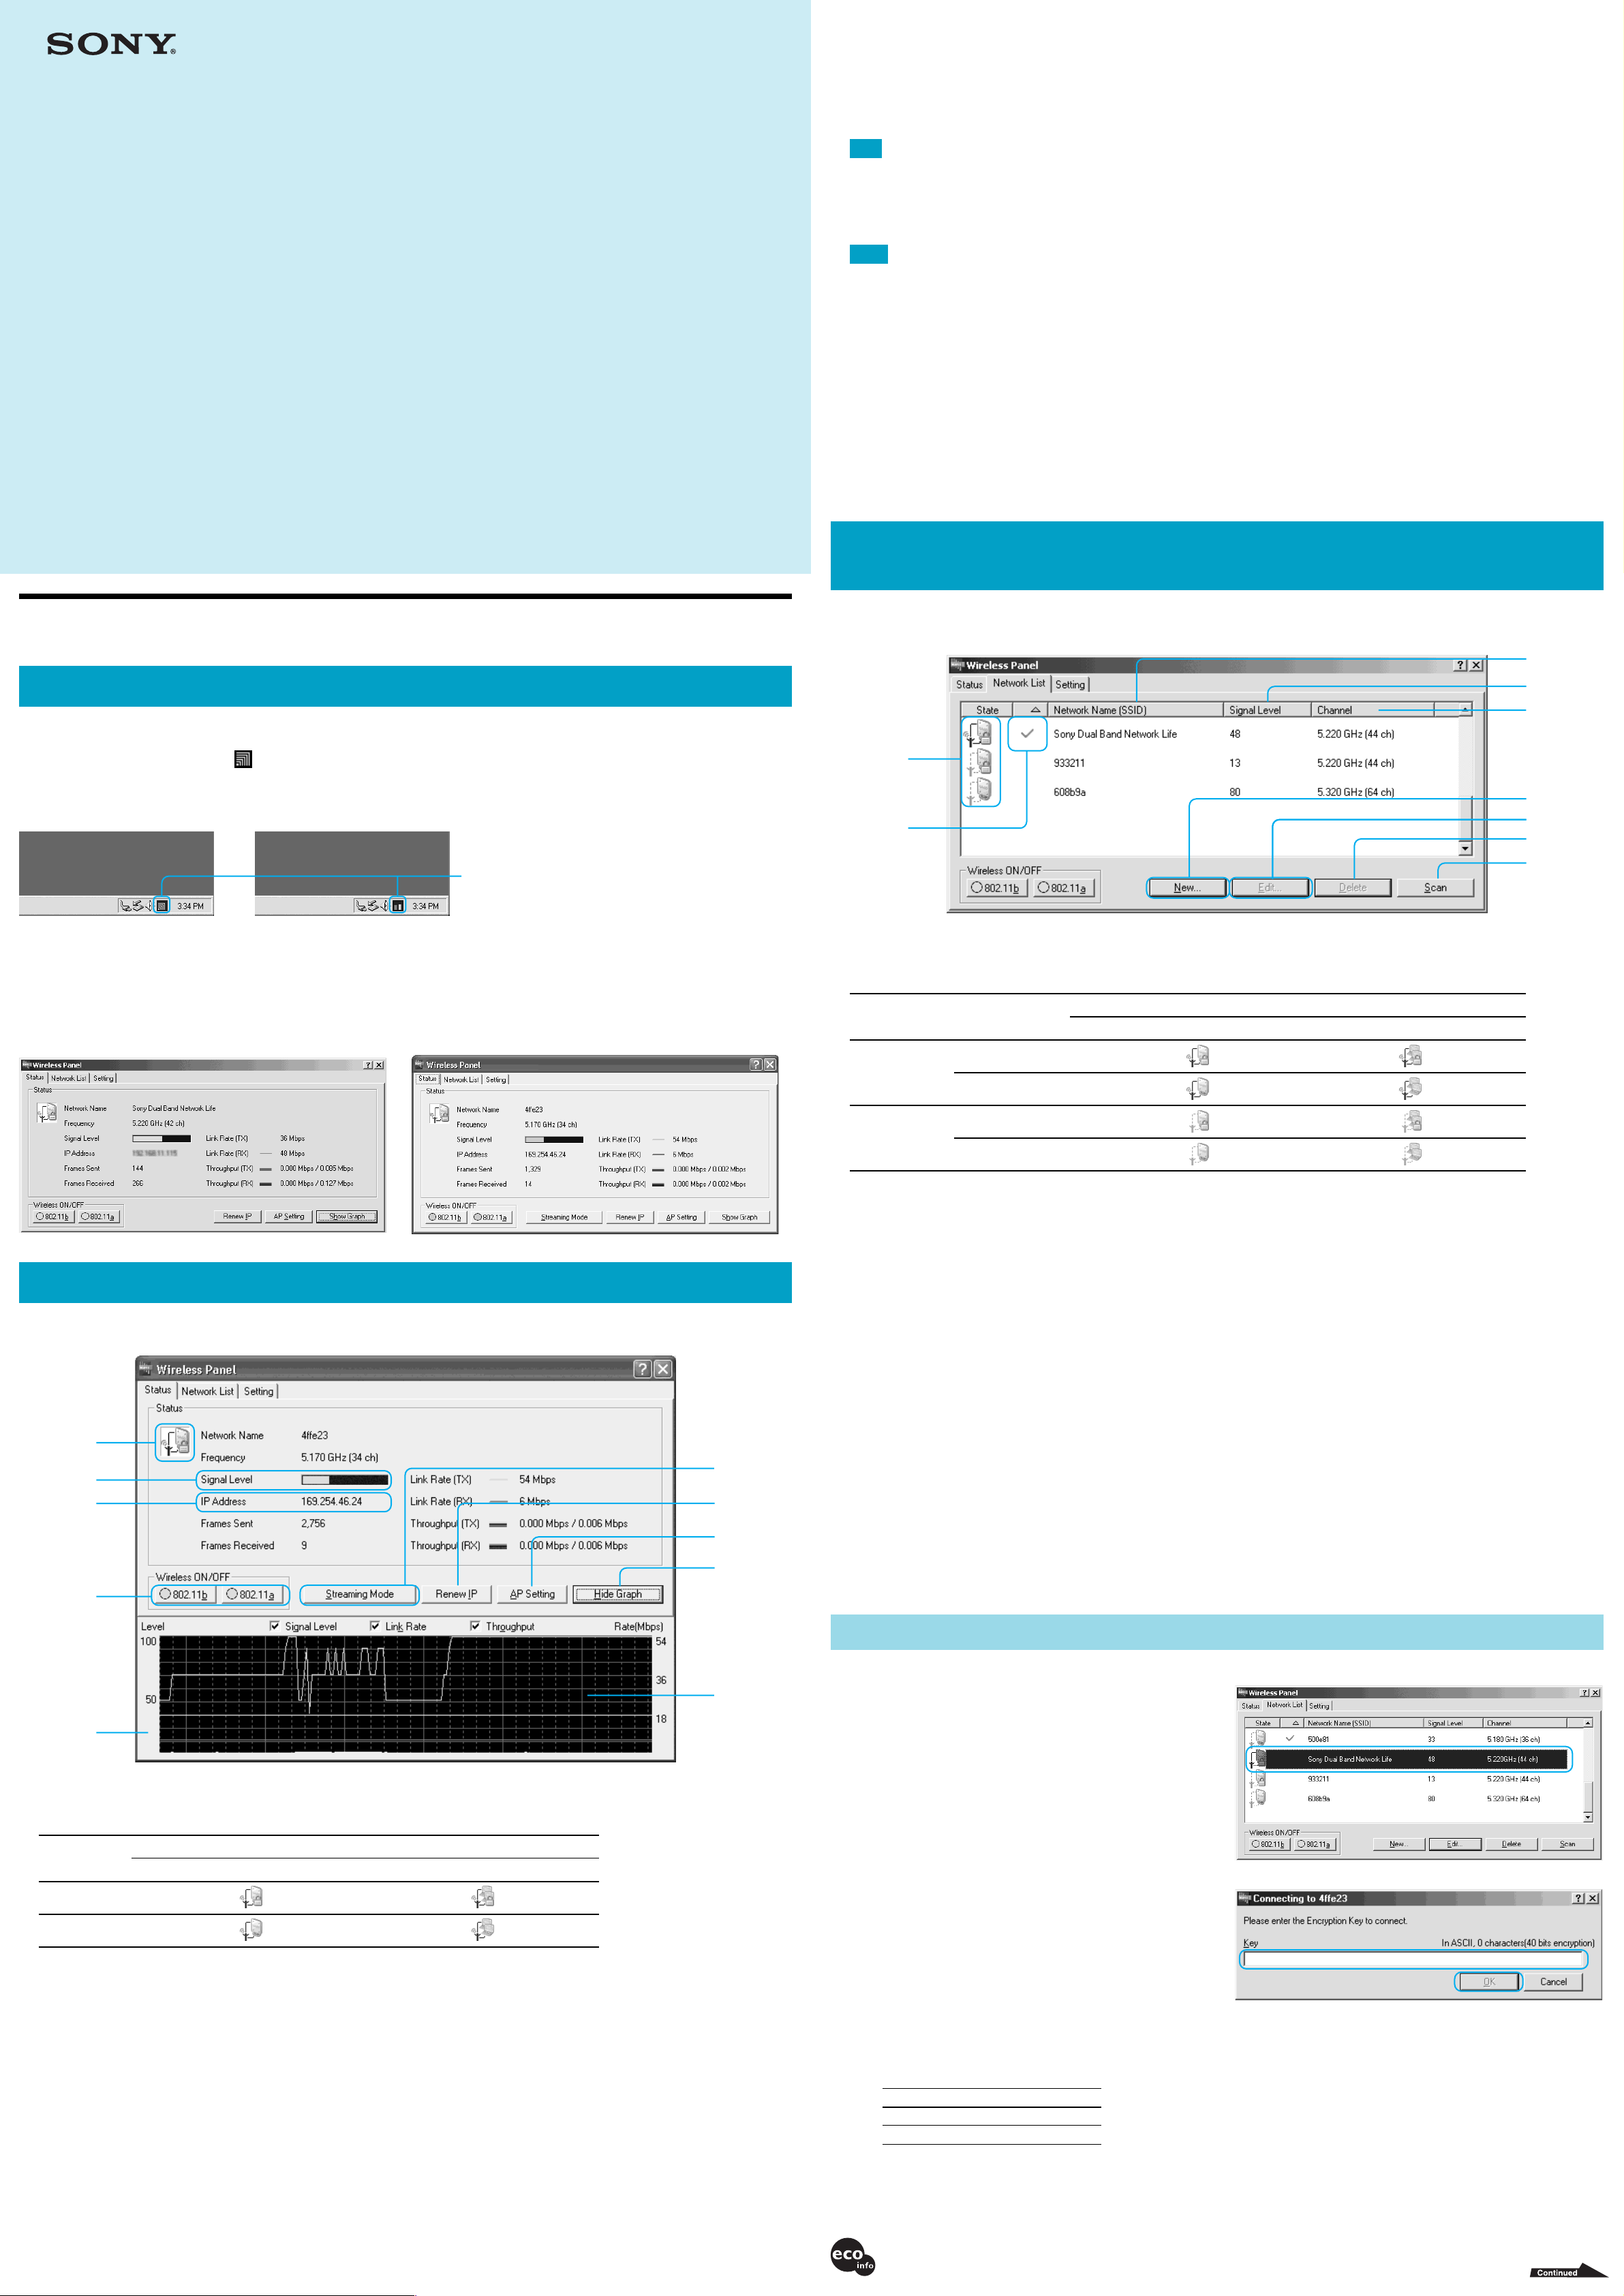
Connecting to a wireless network/registering network
settings
The “Network List” tab shows a list of 802.11b/802.11a wireless networks operating within communication range of the computer, found as the result of a
scan. Under Windows Me and Windows 2000, you can select a network from this list to connect to, and you can register networks for the computer.
What is the Wireless Panel?
Wireless Panel is a software utility supplied with the Wireless LAN PC Card PCWA-C500/C700. This utility lets you configure the computer for wireless
connection and monitor the network status.
After installation of the Wireless Panel, the
z Hint
The appearance of the icon will change depending on the signal condition and on the display setting selected for the icon. For details, refer to the documentation of the Wireless
LAN PC Card.
When you double-click the icon, the main screen of the “Wireless Panel” appears. This screen lets you check the network status and configure various
settings. (When using the PCWA-C500, some functions are not available.)
z Hint
The PCWA-C700 complies to the IEEE 802.11a and 802.11b wireless LAN standards. The PCWA-C500 only complies to the IEEE 802.11a standard.
Wireless Panel main screen
Under Windows 2000 and Windows Me Under Windows XP
icon becomes resident in the taskbar.
Icon differs according to Wireless Panel setting.
1
9
1 Status display icon
The status of registered networks is shown as an icon.
Access Points within communication range are shown as colored icons, and Access Points outside communication range are shown as gray icons.
Connection mode
Status
Data encryption On
Connected
Data encryption Off
Access Point Network Peer to Peer Network
2
3
4
5
676
8
Checking the wireless network status
The “Status” tab lets you check various performance aspects of the currently connected network. (The screen example is from Windows XP.)
1
2
3
6
7
8
Data encryption On
Not connected
Data encryption Off
2 “Network Name (SSID)”
The unique network IDs of 802.11b/802.11a wireless networks operating within communication range are shown here.
To change the settings for a network with Windows Me or Windows 2000, select the network here.
3 “Signal Level”
Shows the signal level (field strength) of the received radio signal. Higher numbers mean better reception.
4 “Channel”
Shows the channel used by the respective network. If multiple networks use the same channel, communication may be impaired.
5 “New” button (Windows Me, Windows 2000 only)
The “New” button is used to create new profiles.
6 “Register”/“Edit” button (Windows Me, Windows 2000 only)
• When you select a network from the list, the button indication changes to “Register”.
• When you select a registered network from the list, the button indication changes to “Edit”.
7 “Delete” button (Windows Me, Windows 2000 only)
This can be used to delete settings for a registered network. (The currently connected network cannot be deleted.)
8 “Scan” button
Clicking this button causes the computer to scan again for 802.11b (2.4 GHz)/802.11a (5 GHz) wireless networks operating within communication
range. The network list is updated according to the results of the scan.
4
5
1 Status indicator icon
The icon type indicates the type of network to which the computer is connected.
Data
encryption
On
Off
Access Point Network Peer to Peer Network
Network mode
9
0
9 “Registered” check mark (Windows Me, Windows 2000 only)
Indicates that a network setting has been registered in Wireless Panel.
Connecting to a wireless network (Windows Me, Windows 2000)
1
2
Double-click on the network to which you want to
connect.
If data encryption is not enabled for the selected network, the
connection will be established.
If data encryption is enabled for the selected network,
enter the encryption key (WEP key) and click “OK”.
Consult the administrator of the Access Point regarding the proper
settings.
2 “Signal Level”
Indicates the signal level as a bar graph.
Install the computer and Access Point so that the signal level displayed here is as high as possible.
3 “IP Address”
Indicates the computer’s IP address.
In Access Point Network connection mode, if an IP address starting with “169.254. ...” or if “0.0.0.0” is shown here, the Access Point and computer are
not connected, or the Access Point is not connected to the Internet. For details, refer to the Troubleshooting Guide “Case 1 – Cannot connect to the
Internet”.
4 Wireless ON/OFF
Wireless signal transmission can be switched On/Off independently for the 802.11b (2.4 GHz) and 802.11a (5 GHz) band. Select the On/Off status
according to the environment you are in. Take special care if you are using your computer in locations where radio emissions are prohibited, such as
outdoors (802.11b band) or within an aircraft (802.11a and 802.11b bands). Be sure to set wireless signal transmission to Off with these buttons in such
cases.
You cannot switch between 802.11b and 802.11a when you use the PCWA-C500.
The connection will be established. The encryption key is also
registered at this stage.
z Hints
• The encryption key is also called WEP key or network key.
• Unless the exact encryption key is input, connection to the network is not possible.
• The required number of characters for the encryption key is as follows.
ASCII Hex
40 bits 5 characters 10 digits
104 bits 13 characters 26 digits
Printed on 100% recycled paper using VOC (Volatile Organic Compound)-free vegetable oil based ink.
Page 2
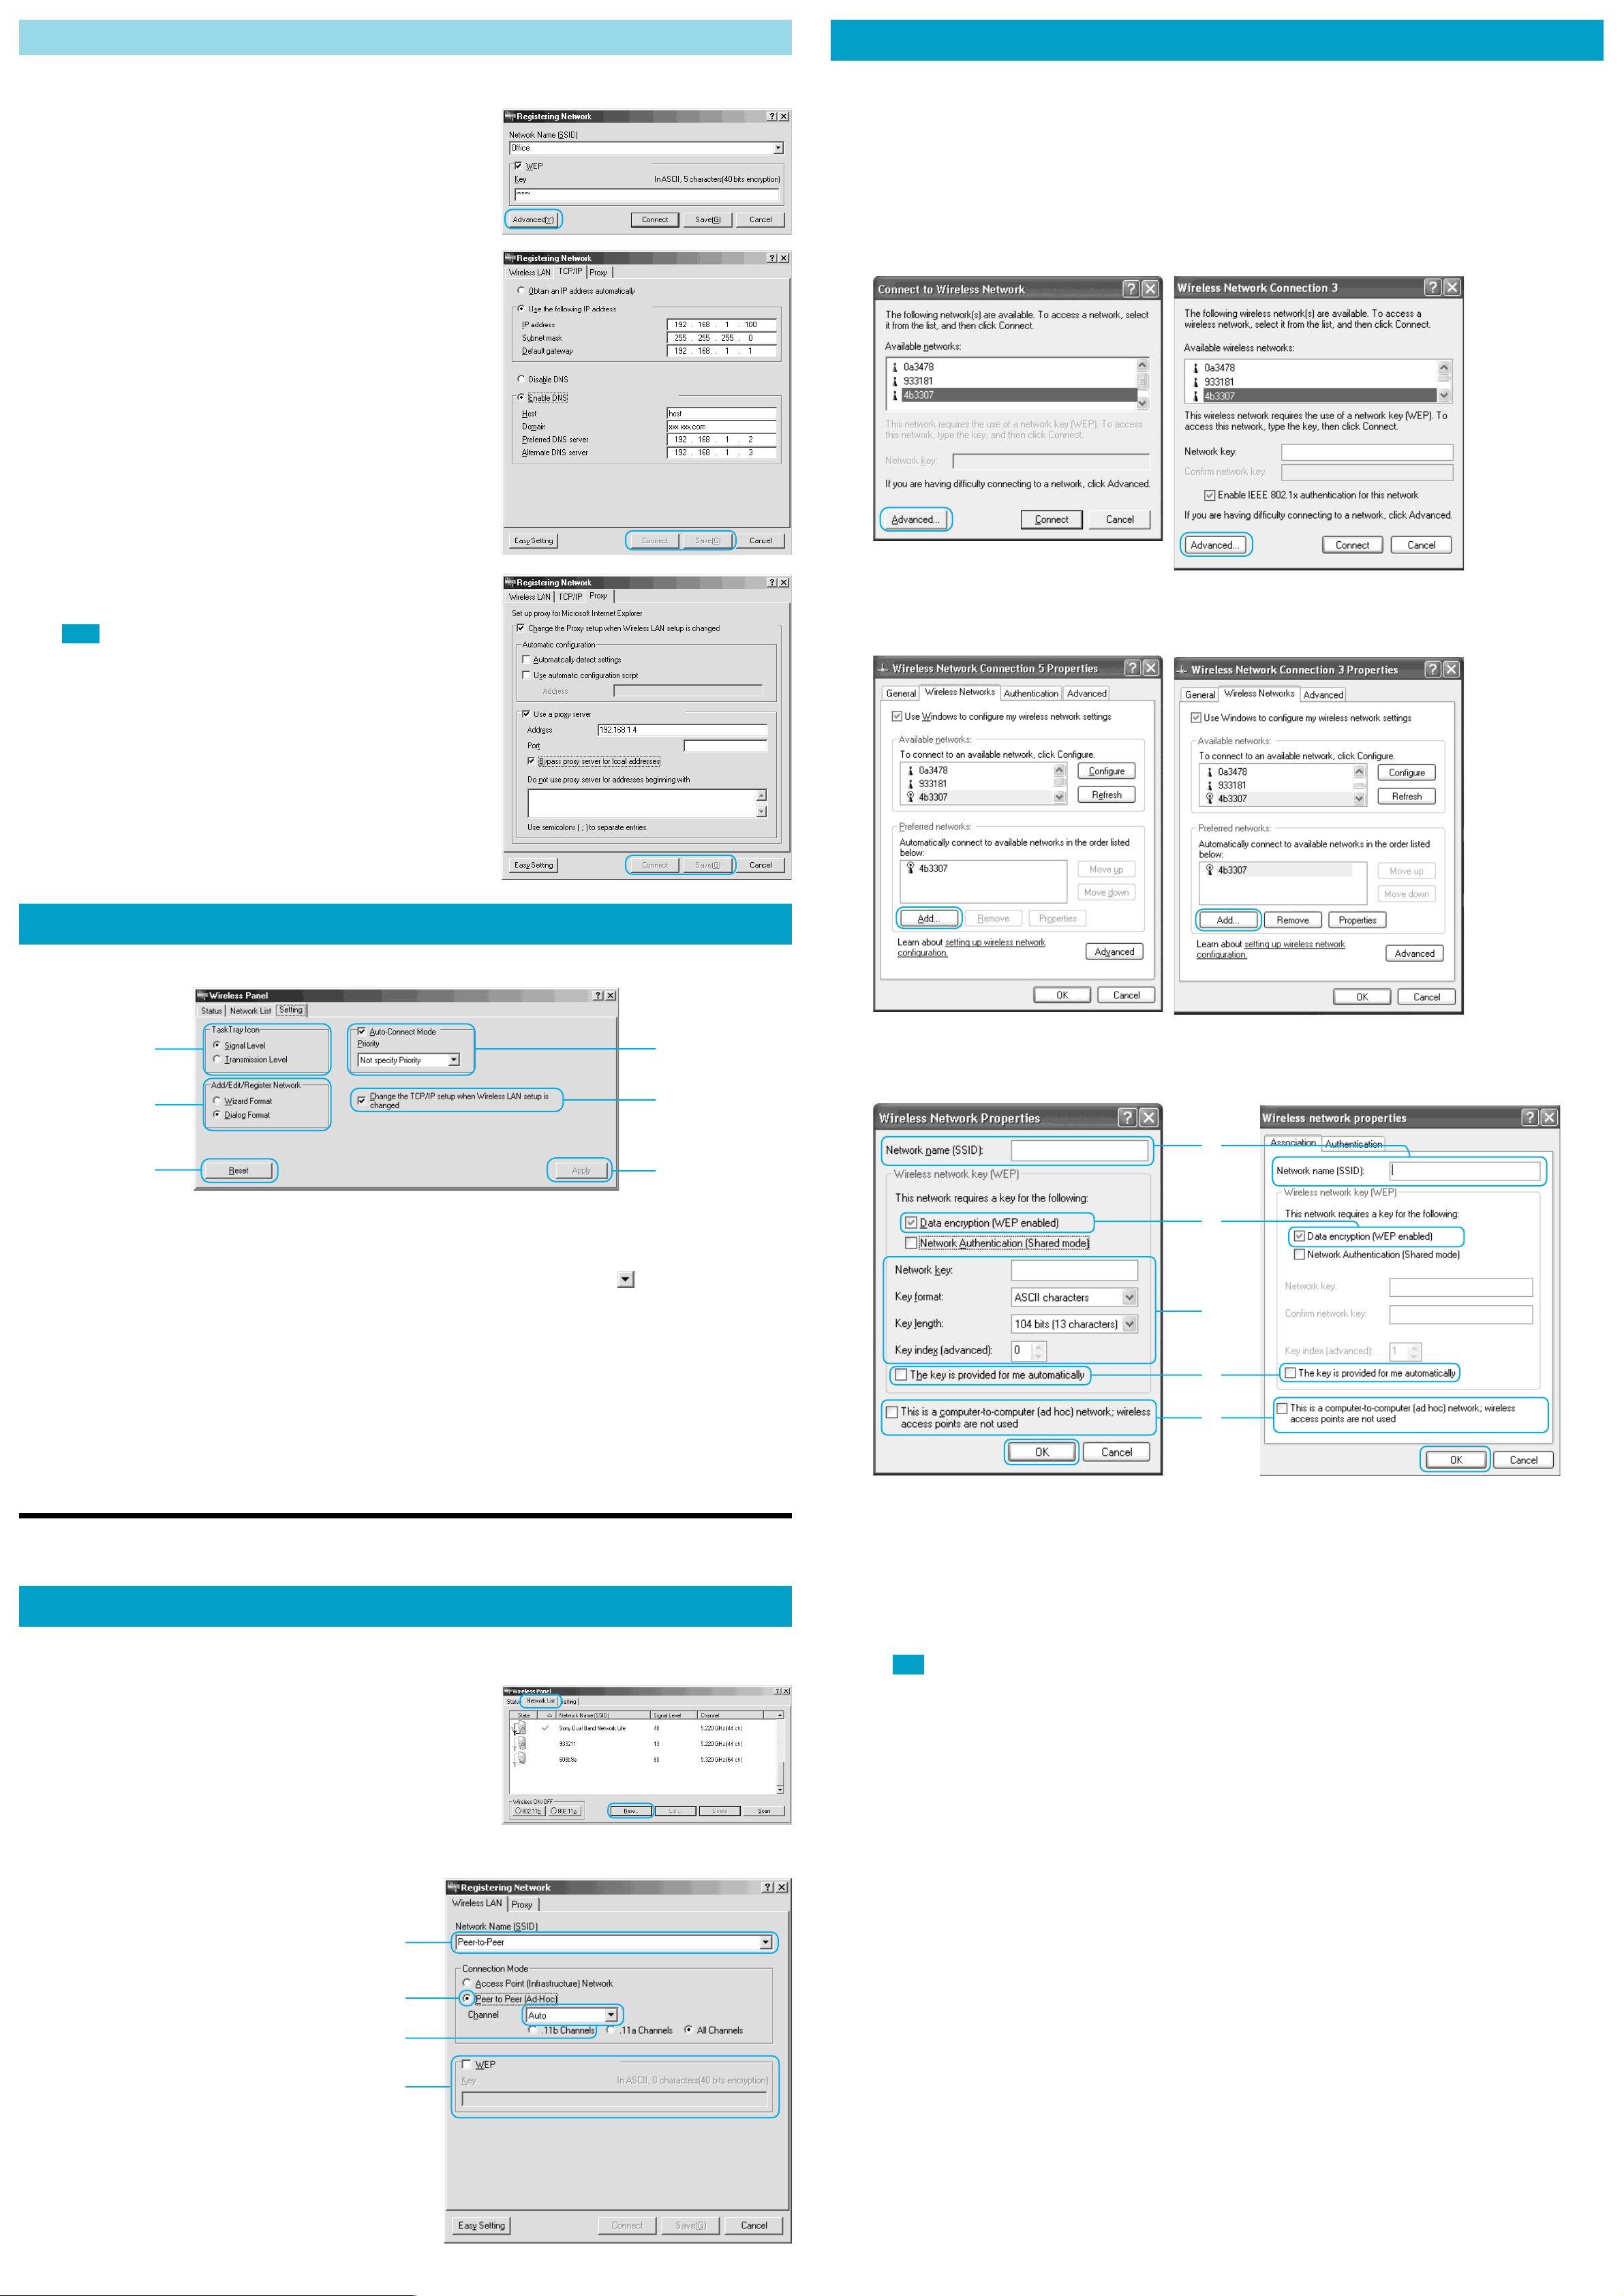
Configuring more detailed settings
If you use a wireless network at the office and at home and want to store detailed settings (such as IP address and proxy) for each network, proceed as
follows.
Windows XP
The following description is an example for connecting two computers in Peer to Peer Network connection mode.
1
2
After configuring the wireless network in the “Registering Network”
dialog box, click “Advanced”.
z Hint
If the “Registering Network” dialog box (right) does not appear, select “Dialog Format” in
“Add/Edit/Register Network” on the “Setting” tab of the Wireless Panel.
Select the desired settings and then click “Connect” or “Save”.
Under the “TCP/IP” tab, you can make TCP/IP related settings for each network.
z Hint
The “TCP/IP” tab is shown if you have checked the box “Change the TCP/IP setup when
Wireless LAN setup is changed” under “Setting” on the Wireless Panel main screen.
z Hint
For information on the Access Point Network connection mode settings, refer to the Operating Instructions.
1
In the “Connect to Wireless Network” dialog box, click “Advanced”.
z To display the “Connect to Wireless Network” dialog box
1 Click “Start”, and then click “Connect to” – “Show all connections”.
2 Right-click “Wireless Network connection *” (“*” is a number that differs according to the computer settings), and then click “View available Wireless Networks”
on the shortcut menu.
With Windows XP Service Pack 1
(This screen is from Windows Me.)
Under the “Proxy” tab, you can make proxy server related settings for each network.
These are used when connecting to the Internet.
Notes
• The proxy server settings apply only to Internet Explorer. When using Netscape, the settings
have no effect.
• When Internet Explorer is currently open, you must close all screens and reopen Internet
Explorer to activate the proxy settings.
2
The “Wireless Network Connection * Properties” dialog box appears. (“*” is a number that differs according to the computer settings.)
Click “Add”.
With Windows XP Service Pack 1
Changing Wireless Panel settings
The “Setting” tab gives access to various Wireless Panel settings.
1
2
3
1 “Task Tray Icon”
Lets you change the icon in the system tray (task tray).
2 “Add/Edit/Register Network” (Windows Me and Windows
2000 only)
This item lets you select whether various utility procedures such as
registering a wireless network are performed in wizard style or dialog
box style (as used in this documentation).
3 “Reset” button
Resets the settings on the “Settings” tab to their defaults.
4 Auto-Connect Mode (Windows Me and Windows 2000
5 When this box is checked, you can configure TCP/IP
4
5
6
only)
When this box is checked, the computer will automatically connect to
the registered network with the strongest signal if the current
connection is interrupted. Clicking brings up a list in which you
can specify the priority for automatic connection. Scanning starts
automatically after about 30 seconds. The following priority selections
are available.
• Not specify Priority
• 802.11b (2.4GHz) Priority
• 802.11a (5GHz) Priority
settings for each wireless network connection (under
“Advanced”). (Windows Me, Windows 2000 only)
3
The “Wireless Network Properties” dialog box appears.
Select the desired settings, and click “OK”.
With Windows XP Service Pack 1
1
2
4
3
5
6 “Apply” button
Applies the new settings.
Building a Peer to Peer Network
Windows Me, Windows 2000
To newly configure a Peer to Peer network, set up the first computer using the steps described below. Then follow the procedure in the section “Connecting
to a wireless network/registering network settings” for the second and subsequent computers.
1
2
Click “Network List” tab of the Wireless Panel, and click “New”.
The “Registering Network” dialog box appears when you select “Dialog Format” on
the “Setting” tab.
z Hint
If you select “Wizard Format” on the “Setting” tab, follow the wizard’s instructions to perform
the necessary settings. For details about the settings, see step 3.
Click “Advanced”.
4
5
1 Enter the Network Name (SSID) for this network. (Up to 32 alphanumeric characters or symbols can be used.)
For example, you could use “peer-to-peer”.
2 Check the box “Data encryption (WEP enabled)”.
3 Remove the check mark from the box “The key is provided for me automatically”.
4 Enter the encryption key (WEP key) in the “Network key” field. (5 alphanumeric characters or symbols can be used.)
When Windows XP Service Pack 1 is installed, the same string must be entered once more in the “Confirm network key” field.
The “Key format” field shows “ASCII” and the “Key length” field shows “104 bits (13 characters)”. (With Windows XP Service Pack 1, there
is no “Key format” and “Key length” field.)
Note
Make sure to remember the encryption key (WEP key).
5 Check this box.
The “Wireless Network Connection * Properties” dialog box appears again.
Click “Advanced”.
The “Advanced” dialog box appears.
Check the box “Computer-to-computer (ad hoc) networks only”, and click “Close”.
The “Wireless Network Connection * Properties” dialog box appears again.
3
4
Select the desired settings.
1 “Network Name (SSID)”
Enter a name to identify the network. The name should be
different from any other network operating in the vicinity.
2 “Connection Mode”
Select “Peer to Peer (Ad-Hoc)”.
3 “Channel”
A drop-down list appears which lets you select the radio
channel to use. You should choose a channel that is not
extensively used by other networks in the vicinity.
(Automatic selection is also possible.)
4 “WEP”
For security reasons, it is highly recommended to enable
data encryption. When this item is checked, you must enter
the encryption key (WEP key) in the “Network key” field.
z Hint
Make a note of the encryption key so as not to forget it. The key is
required for other computers to participate in the network.
Click “Connect”.
After some time, the connection will be established.
1
2
3
4
6
The Peer to Peer Network connection mode is now established.
Microsoft and Windows are registered trademarks of Microsoft Corporation in the United States of America and other countries.
• In this manual, Microsoft® Windows® Millennium Edition is referred to as Windows Me.
• In this manual, Microsoft® Windows® 2000 Professional is referred to as Windows 2000.
• In this manual, Microsoft® Windows® XP Professional and Microsoft® Windows® XP Home Edition are referred to as Windows XP.
Click “OK”.
Perform Steps 1 - 5 again at the other computer.
 Loading...