


© 2003 Sony Corporation
http://www.vaio-link.com
Operating Instructions
Benutzerhandbuch
Mode d’emploi
Wireless LAN PC Card
(IEEE 802.11g: 2.4 GHz/54 Mbps)
PCWA-C300S

WARNING
To prevent fire or shock hazard, do not
expose the unit to rain or moisture.
Owner’s Record
The model and serial numbers are located on the
back of the unit. Record the serial number in the
space provided below. Refer to them whenever
you call upon your Sony dealer regarding this
product.
Model No. PCWA-C300S
Serial No.______________
You are cautioned that any changes or
modifications not expressly approved in this
manual could void your authority to operate this
equipment.
Safety Information
WARNING
• Opening the product, for whatever reason,
could lead to damages that are not covered by
the warranty.
• Do not use this product on hospital premises.
Doing so may cause medical devices to
malfunction.
• If using the product near a pacemaker, make
sure it is at least 9 inches (22 cm) away from
the pacemaker.
• Do not use this product in an aircraft, as doing
so could cause the aircraft's equipment to
malfunction. Make sure you remove the
equipment from the PC card slot before
carrying your computer onto an aircraft.
• Do not apply unnecessary physical strain on the
product when it is inserted in your computer as
this could damage the product and/or your
computer.
Regulatory Information
Please consult the Wireless LAN Regulations
Guide provided with this Product.
About the supplied software
THE SUPPLIED SOFTWARE IS SUPPLIED
PURSUANT TO THE APPLICABLE ENDUSER LICENSE AGREEMENT.
• Copyright laws prohibit reproducing the
software or the software manual in whole or in
part, or renting the software without the
permission of the copyright holder.
• In no event will SONY be liable for any
financial damage or loss of profits, including
claims made by third parties, arising out of the
use of the software supplied with this product.
• In the event a problem occurs with this software
as a result of defective manufacturing, SONY
will replace it at SONY’s option or issue a
refund; however, SONY bears no other
responsibility.
• The software provided with this product cannot
be used with equipment other than that which is
designated for use with.
• Please note that, due to continued efforts to
improve quality, the software specifications
may be changed without notice.
Program © 2001, 2002, 2003 Sony Corporation,
© 2000-2003 Atheros Communications, Inc., All
Rights Reserved
Documentation © 2003 Sony Corporation
Sony, VAIO, , , and the
Eco Info logo are trademarks of Sony
Corporation.
Microsoft and Windows are registered trademarks
of Microsoft Corporation in the United States of
America and/or other countries.
MMX and Pentium are registered trademarks of
Intel Corporation.
All other trademarks are trademarks of their
respective owners.
2

Table of contents
Overview ................................................ 4
Capabilities ..................................... 4
System requirements ...................... 7
Documentation and Help file....................
Getting started
Unpacking............................................. 10
Supplied software ......................... 10
Installing the supplied software ............ 11
Making Access Point Connection
Settings ............................................ 16
Windows Me or Windows 2000
operating system ....................... 16
Windows XP operating system .... 19
Removing the Wireless LAN PC Card and
Precautions When Inserting it .......... 23
To remove the Wireless LAN PC
Card .......................................... 23
If your computer has two PC Card
slots ........................................... 23
Wireless LAN connection
Checking the communication status ..... 24
Checking the wireless signal
strength ..................................... 24
Checking network information .... 24
Using the Wireless Panel ...................... 25
Opening the Wireless Panel ......... 25
Additional information
Manually installing, verifying, and
removing the supplied software ....... 26
Installing the Wireless LAN PC Card
driver manually ......................... 26
Installing the Wireless Panel
manually ................................... 28
Connecting to the Access Point with
Wireless Panel (Windows Me/
2000 operating system) ............. 30
Verifying Wireless LAN PC Card
driver installation ...................... 31
Uninstalling the Wireless LAN PC
Card driver ................................ 38
Uninstalling the Wireless Panel ... 41
Precautions ........................................... 44
Specifications ....................................... 45
Getting help .......................................... 45
Glossary ................................................ 46
Troubleshooting .................................... 47
• In this manual, Microsoft® Windows® Millennium Edition is referred to as Windows Me.
• In this manual, Microsoft® Windows® 2000 Professional is referred to as Windows 2000.
• In this manual, Microsoft® Windows® XP Professional and Microsoft® Windows® XP Home Edition are
referred to as Windows XP.
Notes
• The user interface of the Sony supplied software may differ slightly from that shown in this manual.
• This manual is written based on the assumption that you are familiar with basic operations of the
Windows operating system. For computer operations, refer to manuals that come with your computer.
3
Overview
Capabilities
The Wireless LAN PC Card (IEEE 802.11g: 2.4 GHz/54 Mbps)
PCWA-C300S is a PC Card type wireless network card. With this card, you
can build a wireless LAN, allowing multiple computers to communicate
and exchange data without needing any physical connection. The supplied
Wireless Panel software lets you easily configure the card for multiple
networks. For example, you can store different settings required for
networking at the office and at home, or quickly switch between Access
Point (Infrastructure) Network connection mode and Peer to Peer (Ad-Hoc)
Network connection mode. This greatly facilitates use of the card in various
environments and for a range of applications.
Hints
• The network mode can easily be switched using the supplied Wireless Panel software.
• To use the card in Access Point Network connection mode, an IEEE 802.11g or IEEE
802.11b compliant Wireless LAN Access Point* (available separately) is necessary.
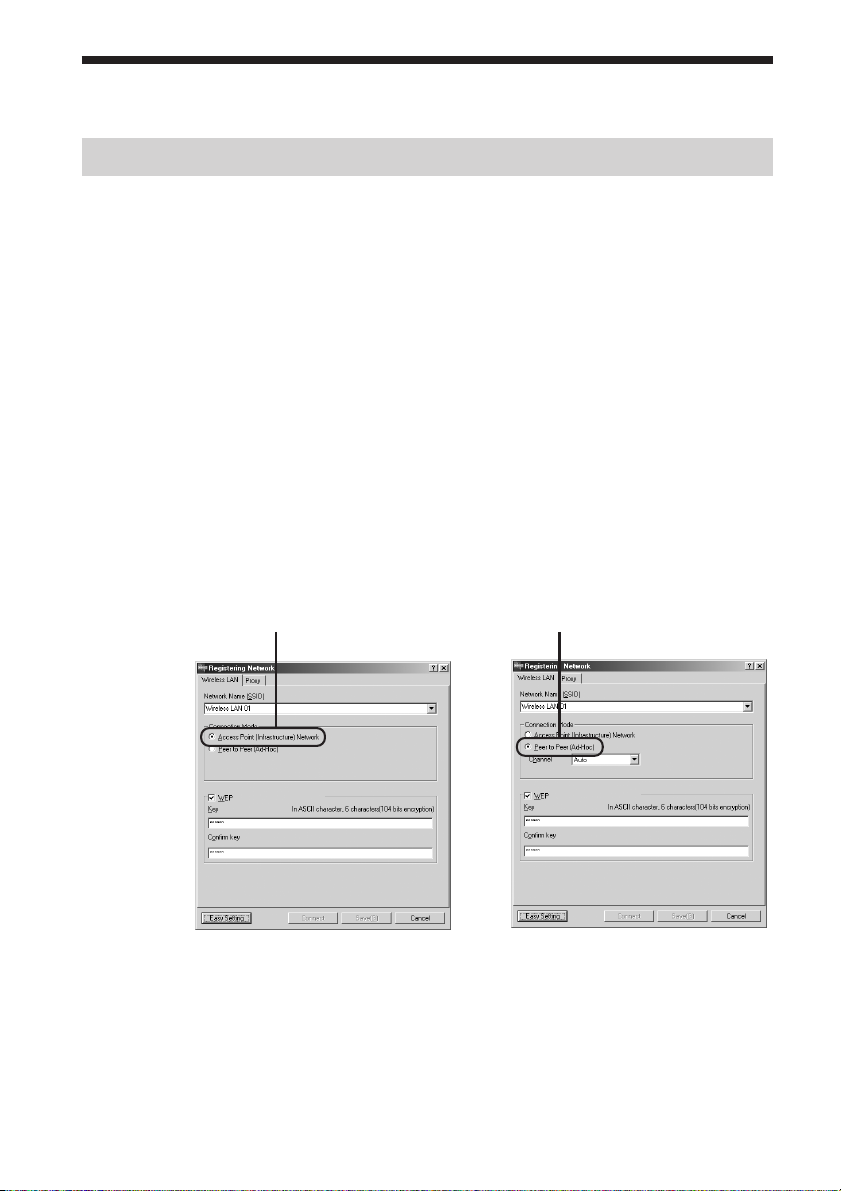
With the Windows Me or Windows 2000 operating system:
Access Point (Infrastructure) Network
connection mode
Peer to Peer (Ad-Hoc) Network
connection mode
*
If using the separately available Wireless LAN Access Point PCWA-A320, also refer to
the documentation supplied with the unit.
4
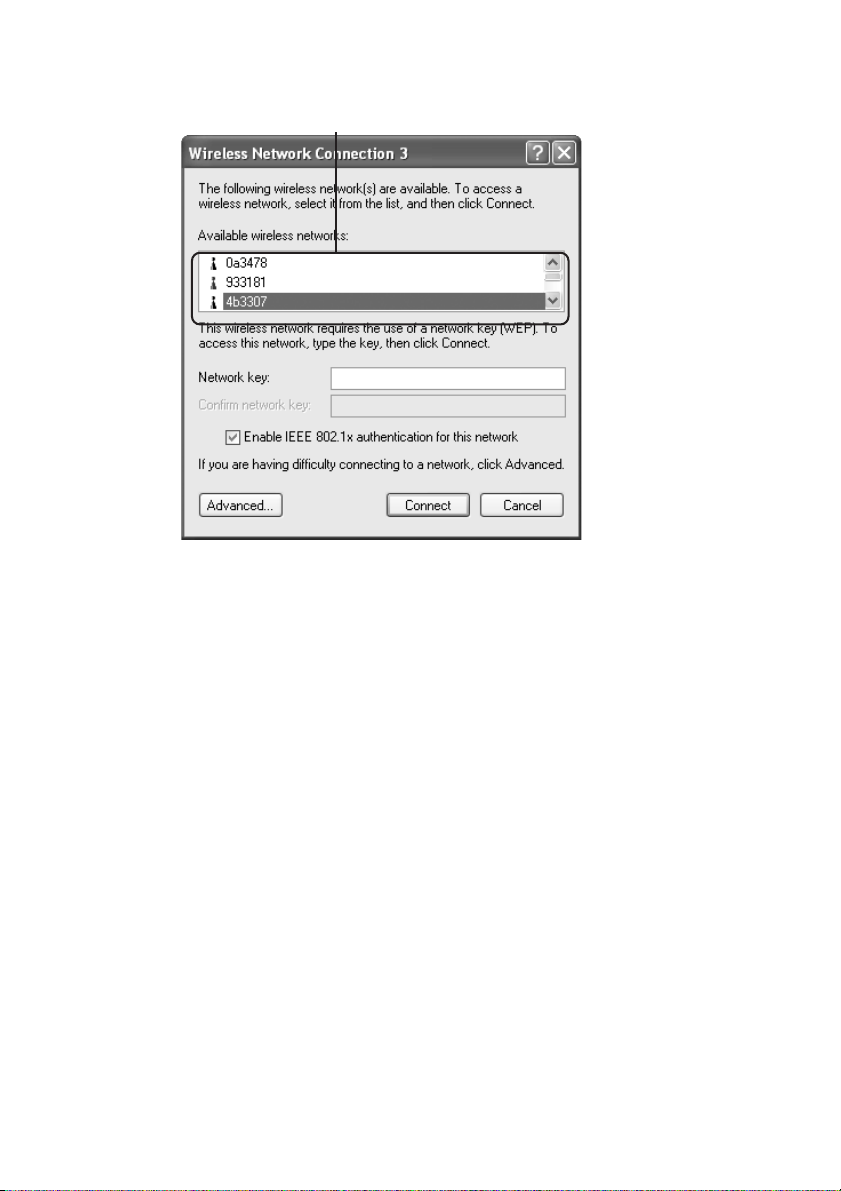
Windows XP Service Pack 1:
Available Wireless Networks
In Windows XP, this dialog box might be slightly different.
5
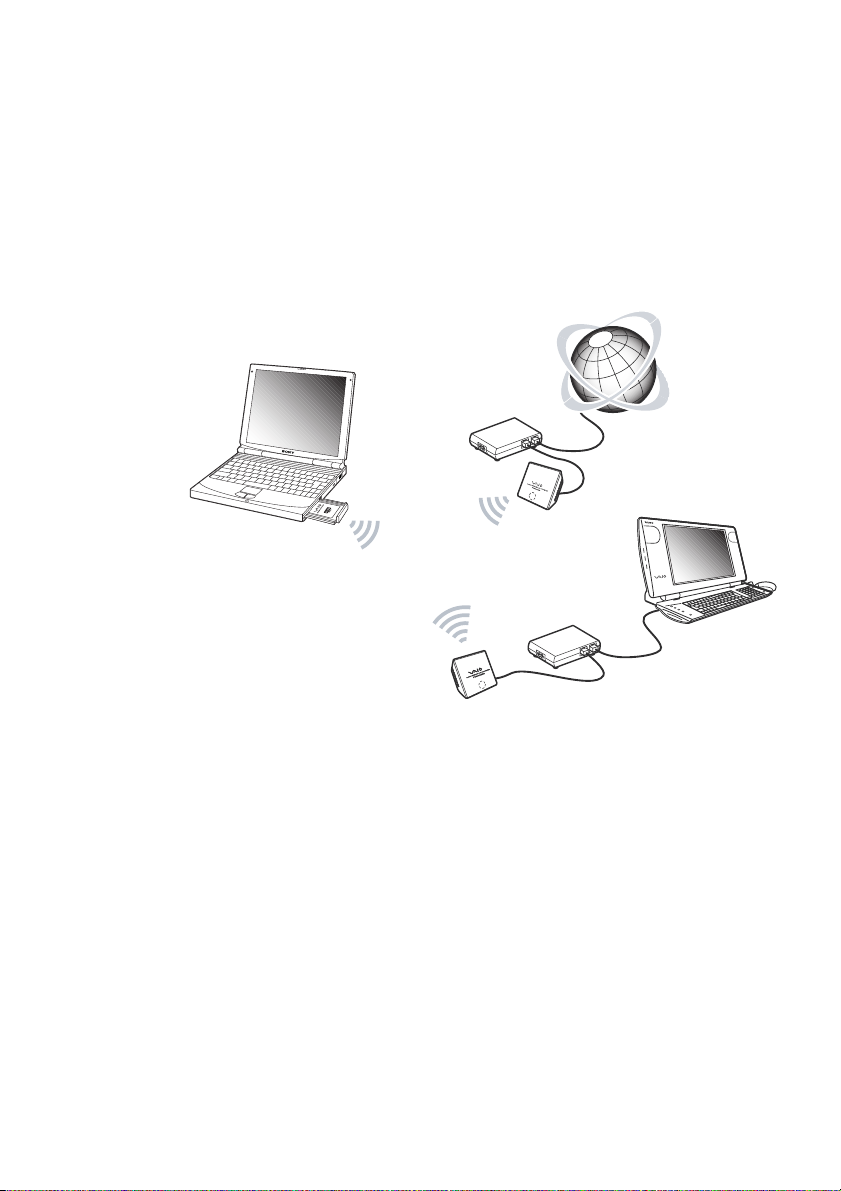
Accessing the Internet from various points within your
home (Access Point Network connection mode)
With a separately available Access Point you can easily build a wireless
network. By connecting a DSL modem, cable modem, or ISDN router to
the Access Point, you can access the Internet from the living room,
bedroom, or any other convenient location in the house. Equipping multiple
computers with a Wireless LAN PC Card also allows you to exchange files
between the computers via the Access Point.
ADSL modem
etc.
Hint
The illustration above gives an example of a system configuration using the Access Point
Infrastructure connection mode. Two computers equipped with Wireless LAN PC Cards
establish a communication with the Wireless Access Point PCWA-A320. The Wireless
Access Point is connected to a ADSL/Cable router modem/router, therefore it is possible
to access the Internet through this wireless connection. If your ADSL/Cable modem does
not include the router function, make sure you have a router device between the ADSL/
Cable modem and the Wireless Access Point.
6
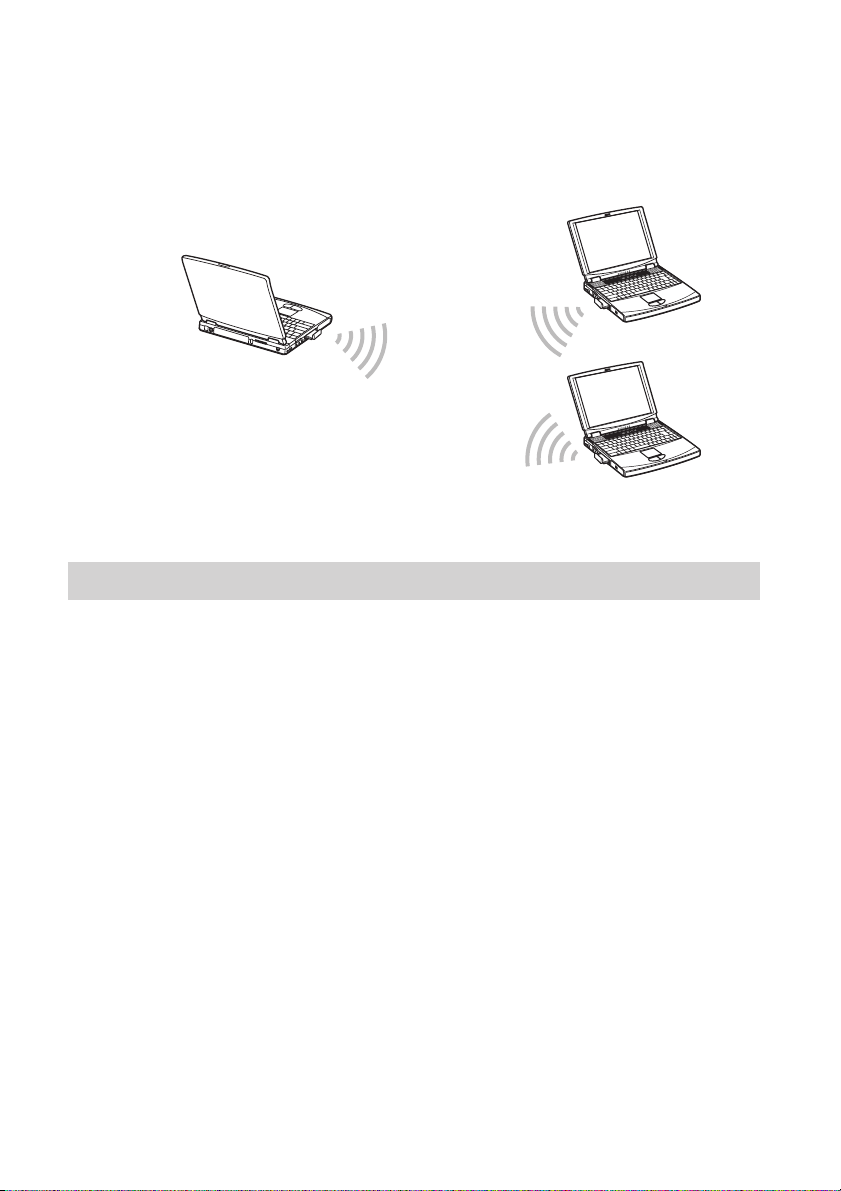
Direct communication between computers
(Peer to Peer Network connection mode)
The Peer to Peer Network connection mode enables computers equipped
with Wireless LAN PC Cards to communicate directly. This allows file
sharing in locations where the Wireless LAN Access Point is not present.
System requirements
To use the supplied software, the following system requirements must be
met:
®
❑ Windows
– 128 MB RAM or more
– Card Bus compliant PC Card slot
– CD-ROM drive (for software installation)
❑ Operating system:
– Microsoft
– Microsoft
– Microsoft
– Microsoft
❑ Display:
High color (16-bit color) or higher, 800 × 480 pixels or higher
-compatible PC:
®
Windows® Millennium Edition
®
Windows® 2000 Professional
®
Windows® XP Home Edition
®
Windows® XP Professional
7
Notes
• Correct operation is not assured for all computers, even if satisfying the above system
requirements.
• Correct operation in an OS upgrade environment is not assured, except for factory
provided Windows XP operating system upgrade packages for Sony VAIO® series
computers.
• For Internet access via the wireless LAN, an IEEE 802.11g or IEEE 802.11b compliant
Wireless LAN Access Point (available separately) is necessary.
• An Internet Service Provider (ISP) is required for Internet access.
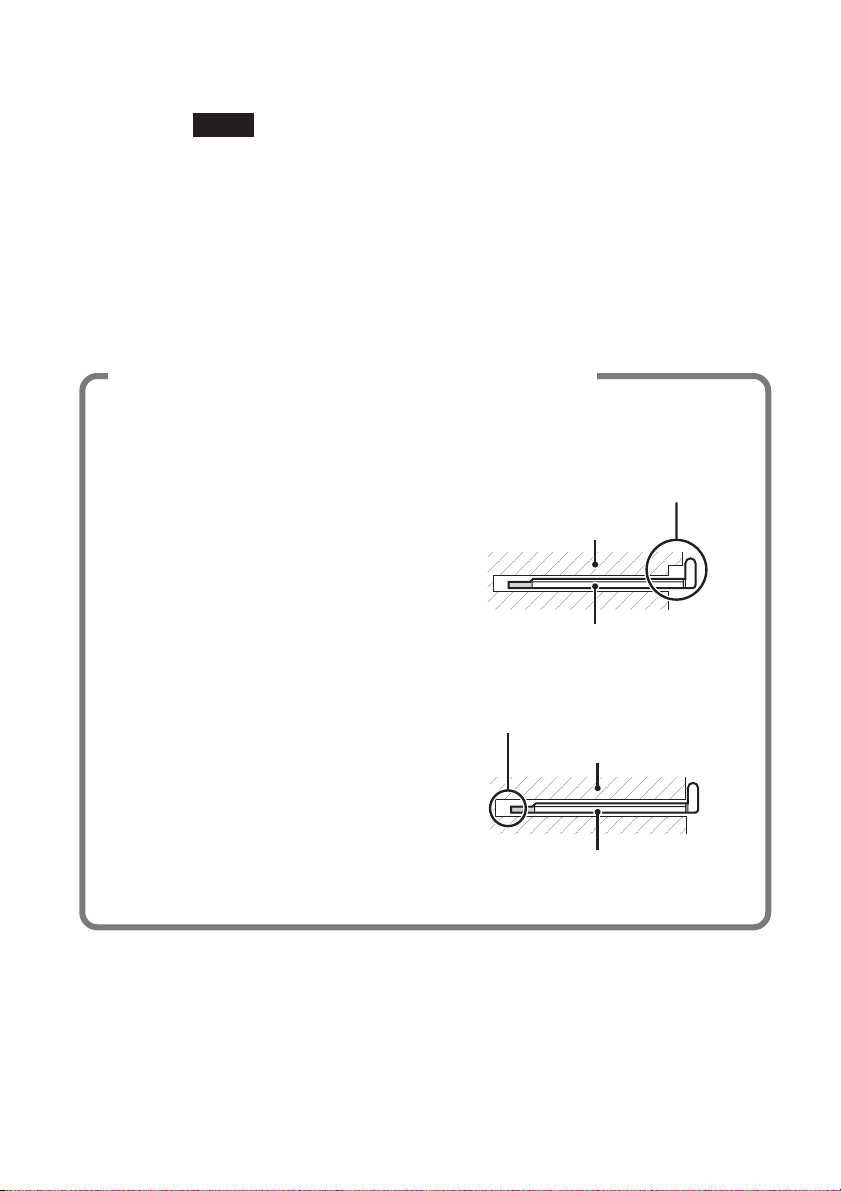
Precaution when using the PCWA-C300S
Because of the particular shape of the PCWA-C300S, it may not be possible to insert
it into all computers.
1 The PCWA-C300S has an antenna
protruding up 0.4 in. (9 mm). If
obstructions 0.6 in. (15 mm) in length or
more come in contact with it when you
insert the PCWA-C300S into the PC card
slot, you cannot fully insert the wireless
LAN PC card into the slot.
2 If the PC card slot of your computer is
more than 3.3 in. (85 mm) in length, you
cannot fully insert the PCWA-C300S into
the slot.
The antenna is obstructed. The
PCWA-C300S cannot be inserted.
Computer
Wireless LAN PC Card PCWA-C300S
The PC card slot is longer than
3.3 in. (85 mm). The PCWA-C300S
cannot be inserted.
Computer
Wireless LAN PC Card PCWA-C300S
8

Documentation and Help file
This product comes with the following documentation and help files.
❑ Operating Instructions (this document)
Explains how to install the Wireless LAN PC Card and how to configure
all settings of the card.
❑ Quick Start Guide
This document explains how to install software required to use the
Wireless LAN PC Card (IEEE 802.11g: 2.4 GHz/54 Mbps)
PCWA-C300S.
❑ Troubleshooting Guide
This document contains answers to frequently asked questions and
common problems.
❑ Wireless Panel Online Help
This is the Online Help of the supplied Wireless Panel software. Refer to
it for instructions on how to use the software.
Access the Wireless Panel Online Help as follows.
■ Access from the Easy Installation Wizard
1 On the main menu of the Easy Installation Wizard, click
“Documents”.
2 On the screen that opens, click “Wireless Panel Online Help”.
■ Access from Wireless Panel
1 Install the Wireless Panel software, following the instructions in this
manual.
2 Start the Wireless Panel.
3 Right-click the Wireless Panel icon on your Windows operating
system taskbar and click Help on the shortcut menu.
Hint
You can also access Help by clicking on the Wireless Panel title bar.
9

Unpacking
Your Wireless LAN PC Card comes with the following items:
• Wireless LAN PC Card
Supplied software
The supplied CD-ROM contains the following software.
❑ Wireless LAN PC Card driver
This device driver is necessary to the operation of the Wireless LAN PC
Card.
❑ Wireless Panel
Wireless Panel is a utility software that lets you configure the computer
for the wireless LAN and monitor the communication status. The
software is also used to switch between networks.
Normally, the Wireless Panel appears as an icon on your Windows
operating system taskbar, which shows the communication status.
• CD-ROM (Setup disc)
• Quick Start Guide
• Warranty card
10
When using the card for the first time, see page 11 for
information on how to install the Wireless LAN PC Card driver
and the Wireless Panel.

Installing the supplied software
This section explains how to use the supplied CD-ROM to install the
Wireless LAN PC Card device driver and Wireless Panel. You must insert
the Wireless LAN PC Card into your computer before installing the device
driver and Wireless Panel.
The installation procedures are performed with an easy-to-use wizard.
Before you start, verify the following.
• The wizard located on the CD-ROM supplied with the Wireless LAN PC
Card. Make sure that your CD-ROM drive is ready for use.
• When using the Wireless LAN PC Card in Access Point Network
Connection mode, you must install the Access Point and make the
necessary settings before proceeding. For details about these procedures,
refer to your Access Point user’s guide.
Notes
• To install the supplied software on a computer running the Windows 2000 operating
system, log on with a user account listed in “Administrators”. To install the supplied
software on a computer running the Windows XP operating system, log on with a user
account with administrator access privileges. You cannot install the software or modify
settings when logged on with any other account.
• To change any of the Wireless Panel settings on a computer running the Windows 2000
operating system, log on with a user account listed in “Administrators”. You cannot
modify settings when logged on with any other account.
• Exit all other Windows operating system programs.
Getting started
11

Important
Computer Firewall Functions
When using the Windows XP “Internet Connection Firewall” function
Enabling the Windows XP “Internet Connection Firewall” function may prevent
you from being able to access your computer through wireless communication. (This
function is inactive under the Windows XP operating system default settings.)
Because of this function, you may not be able to connect to your network when you
change your Access Point settings. If this happens, deactivate the “Internet
Connection Firewall” function, connect to the network, and then reactivate the
function. For details, refer to Windows XP Help.
Note
Network security is an important issue. You are urged to consider carefully how best to protect your
computer.
When using a personal firewall function provided by virus scanning
or network security software
Virus scanning and network security software sometimes includes a function called
a “personal firewall” that is designed to prevent illegal access by outside entities.
Depending on the software, the security level of this function may be initially set to
a high level. If this high security level setting is left in effect, it may be impossible
for an outside entity to access your computer. This can cause problems such as not
being able to connect to the network when changing the Access Point’s settings. In
this event, lower the security level in order to permit the network connection. For
details, refer to the manuals provided with your software.
Notes
• Pay special attention to security issues.
• For questions regarding firewall functions, please contact your firewall software manufacturer.
12

1 When using the Wireless LAN PC Card in Access Point
Network Connection mode, turn on the Access Point.
2 Insert the supplied CD-ROM into the CD-ROM drive of your
computer.
The Easy Installation Wizard starts automatically.
Hint
If the Easy Installation Wizard does not appear when you insert the supplied
CD-ROM into your CD-ROM drive, double-click “Setup.exe” ( ) on the
CD-ROM. Depending on the settings of your computer, the file name may be
“Setup”.
3 When the installation message appears, click “OK”.
4 Click the button that corresponds to your type of CD-ROM
drive (i.e., Built-in or External).
If you are using an external CD-ROM drive, follow the instructions on
the screen and copy the contents of the CD-ROM to your hard disk.
When the copy is complete, click “Main Menu”.
The Main Menu of the Easy Installation Wizard appears.
5 Click “Install Driver”.
Insert the Wireless LAN PC Card and follow the instructions on the
screen to install the device driver.
Getting started
13
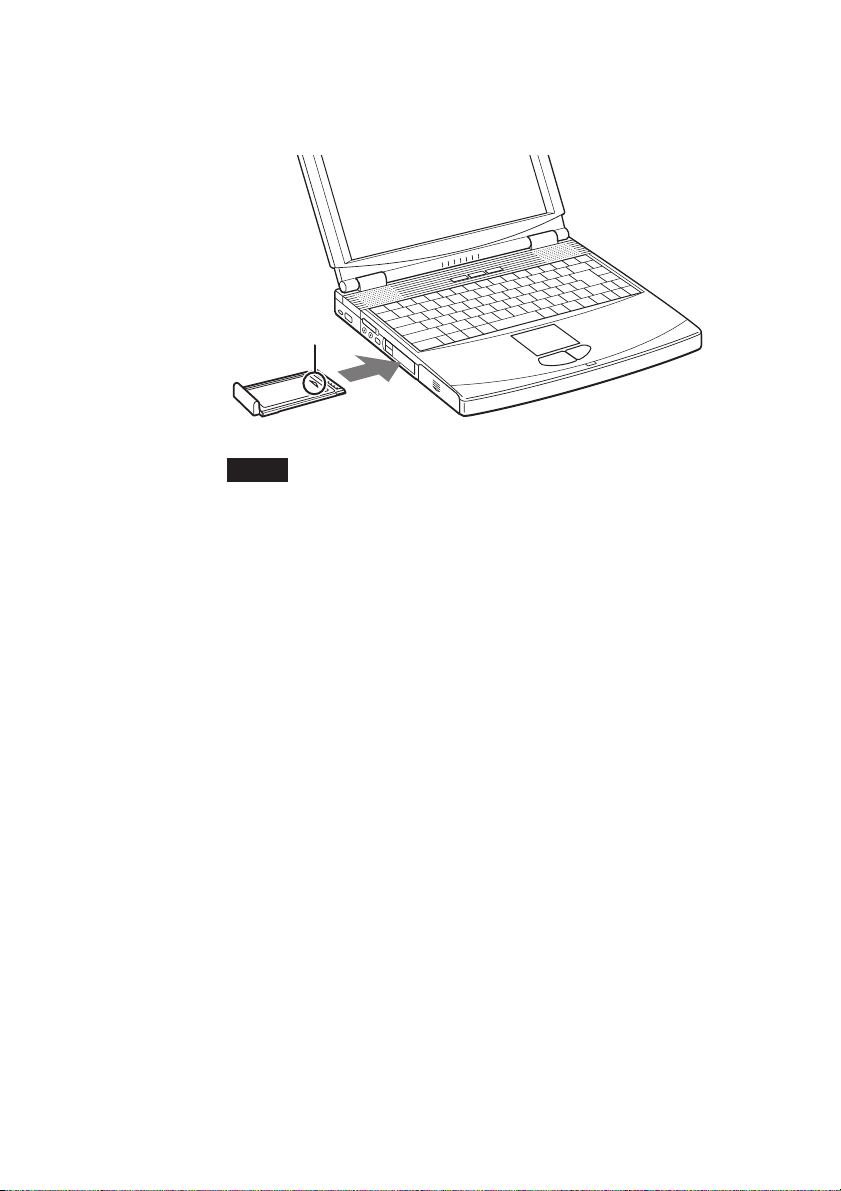
6 Insert the Wireless LAN PC Card in the PC card slot.
You do not need to turn off your computer when you insert the
Wireless LAN PC Card.
Insert in arrow
direction
To PC Card slot
Notes
• If your computer has two PC Card slots, insert the Wireless LAN PC Card into the
top slot. If inserted into the bottom slot, the antenna of the Wireless LAN PC Card
will block the top slot. See section “If your computer has two PC Card slots” on
page 23.
• Depending on the depth and configuration of PC card slots on your computer, you
may not be able to insert the Wireless LAN PC Card.
Push the Wireless LAN PC Card into the slot until it is firmly seated. If
the card does not fit easily, do not force it in. Take the card out and try
reinserting it.
When you insert the Wireless LAN PC Card, the device driver installed
automatically. When installation is complete, proceed to step 7.
14

7 At the end of the installation process, click "Continue".
8 Click “Install Software Utility”.
The utility installation starts.
9 Follow the instructions on the screen to complete the
installation.
This completes the installation of the software.
Once Wireless Panel is installed,
system taskbar.
What to do next
Make Access Point connection settings.
When using the Windows Me or Windows 2000 operating system, proceed
to page 16.
When using the Windows XP operating system, proceed to page 19.
Hint
When using the Windows XP operating system, click “Main Menu” as necessary to return
to the first screen of the wizard, or click to close the Easy Installation Wizard.
appears on your Windows operating
Getting started
15
Making Access Point Connection Settings
After installing the necessary software, you must make the necessary
settings to establish a connection with the Access Point.
If you want to establish a connection in Peer to Peer Network connection
mode, refer to the Wireless Panel Help for details about the necessary
settings.
Windows Me or Windows 2000 operating system
1 Click “Connect to Access Point”.
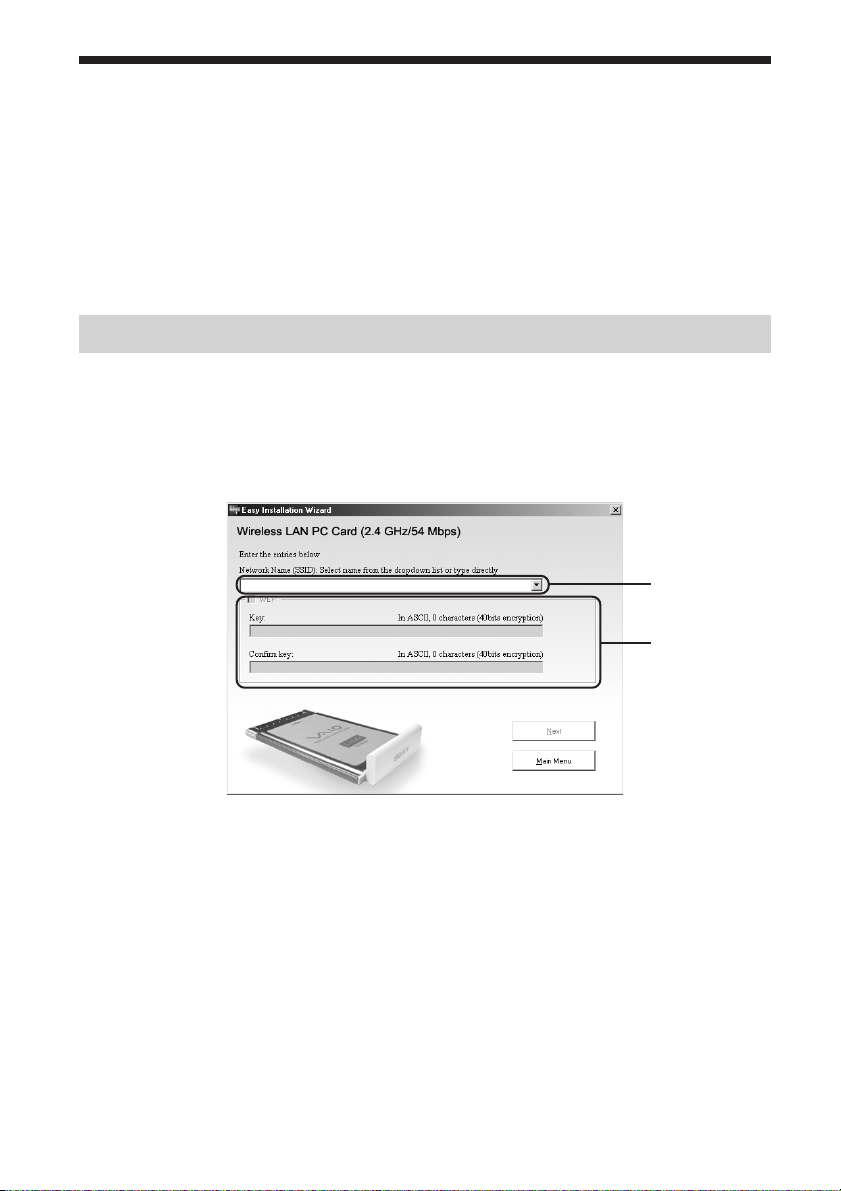
2 Make the appropriate settings.
c
d
16

c Network Name (SSID)
This is a unique ID used to identify wireless networks. The setting
can be made individually for Access Point Network connection
mode and Peer to Peer Network connection mode. When connecting
to an existing network, consult your network administrator
regarding the proper settings. When changing an existing Network
Name, you can use up to 32 alphanumeric characters (including
symbols).
Hints
• Opening the “Network Name” drop-down list will show the Network Names
of any Access Points within range. You can then select a Network Name from
the list.
• When using the Wireless LAN Access Point PCWA-A320, the default
Network Name (SSID) of the Access Point is shown on the ID label of the
Access Point. For details on the position of the label and other information,
refer to the manuals provided with the Access Point.
d WEP
If Data Encryption (WEP) is enabled for the Access Point to which
you connect, select this item. When this item is selected, you also
need to enter the encryption key (WEP key) in the “Key” and
“Confirm key” fields.
The data encryption function serves to prevent unauthorized access
to the network. For security reasons, it is strongly recommended
that you enable this feature. The setting can be configured
individually for Access Point Network connection mode and Peer to
Peer Network connection mode. When connecting to an existing
network, consult your network administrator regarding the proper
settings. For information on how to control this setting at the Access
Point, refer to the manuals of the Access Point.
Getting started
17

Key
If data encryption (WEP) is enabled for the Access Point, enter the
encryption key (WEP key) here. Because this key functions as a
password that enables communication with the network, the key
entered here must be exactly the same as that set for the Access
Point. Only computers for which the key has been configured
correctly can join the network. The number of characters depends
on the “ASCII/Hex” and “Length” settings (see table below).
ASCII Hexadecimal
Permissible characters Alphanumeric characters 0 to 9, A to F, a to f
Maximum number 5 or 13 characters 10 or 26 characters
of characters
Confirm key
Re-enter the encryption key that you entered in the “Key” box.
Hint
This product supports a function called “roaming” which allows the creation of a
wireless network with multiple Access Points for wider coverage. When using
this function, configure all Access Points to the same Network Name (SSID) and
Data Encryption (WEP) settings.
3 When you are done, click “Next”.
The following screen appears.
18
4 Make sure that the settings are correct, and then click
“Connect”.
Wait until the Wireless LAN PC Card connects to the Access Point.
When the Wireless LAN PC Card establishes the connection with the
Access Point, a message appears explaining that the computer is
connected to the office.
This completes the Access Point connection settings procedure.
Hint
You can change the connection settings and network connection mode from
Wireless Panel. For details about how to use Wireless Panel, refer to the Wireless
Panel Help.

Windows XP operating system
After installing the necessary software, you must make the necessary
settings to establish a connection with the Access Point.
If you want to establish a connection in Peer to Peer Network connection
mode, refer to the Wireless Panel Help for details about the necessary
settings.
Note
Before configuring the Wireless LAN PC Card
Perform the following steps to confirm that the “Use Windows to configure my wireless
network settings” check box is selected. This option is selected by default.
1 Click “Start”, “Control Panel”, and double-click “Network
Connections”.
Hint
If “Network Connections” is not displayed, click “Switch to Classic View”.
2 Right-click “Wireless Network Connection *” (“*” is a
number that differs according to the computer settings),
and click “Properties” on the shortcut menu.
3 Click the “Wireless Network” tab.
4 Confirm that the “Use Windows to configure my wireless
network settings” check box is selected. If not, select it.
Getting started
1 Click “Start”, point to “Connect To”, and click “Show all
connections”.
The “Network Connections” window appears.
2 Right-click “Wireless Network Connection *” (“*” is a number
that differs according to the computer settings), and click
“View Available Wireless Networks” on the shortcut menu.
The “Connect to Wireless Network” dialog box appears.
19

Hints
• If the computer is not connected to a wireless network, an “x” is shown for the
“Wireless Network Connection *” icon in the “Network Connections” window.
• If you have installed Windows XP Service Pack 1, see page 21.
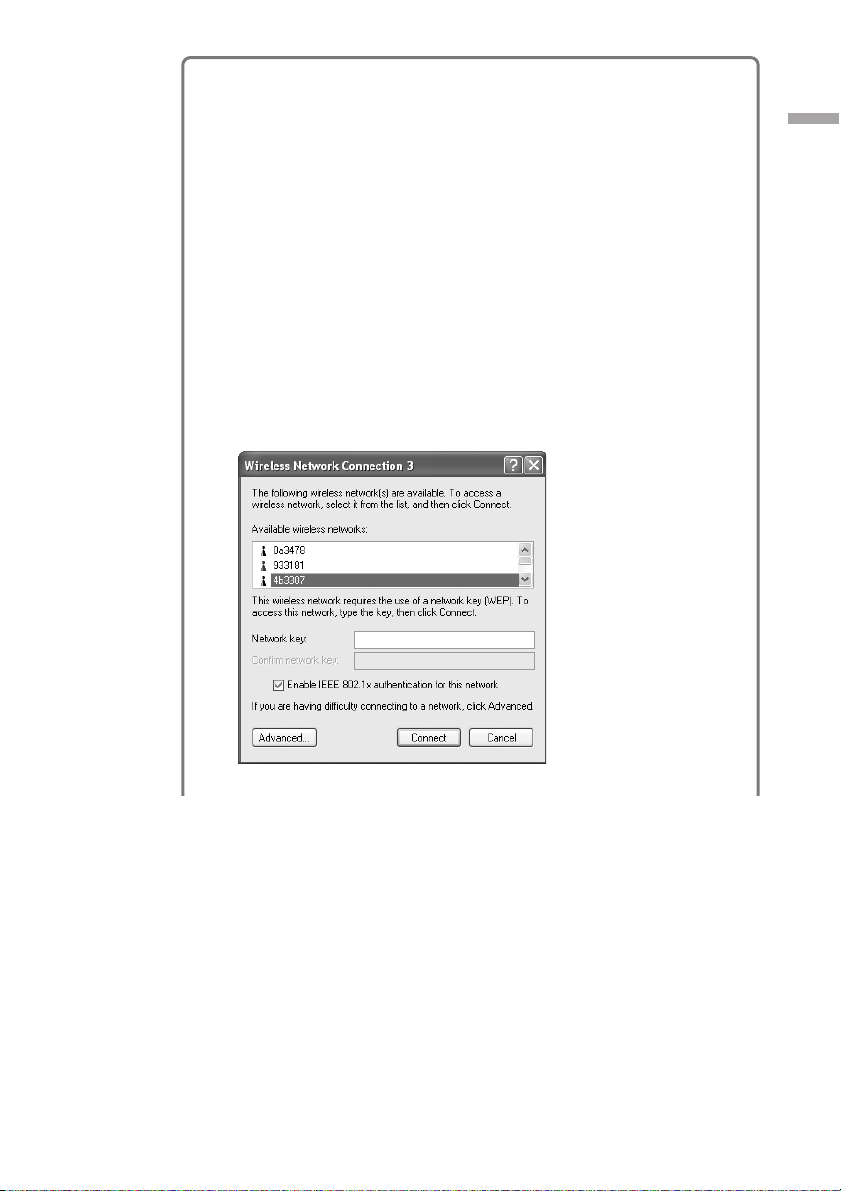
3 From the “Available Wireless Networks” list in the “Connect
to Wireless Network” dialog box, select the Access Point to
which you want to connect.
Hint
The “Available Wireless Networks” list shows the names of Access Points within
communication range of the computer. When using the Wireless LAN Access Point
PCWA-A320, the default Network Name (SSID) of the Access Point is shown on
the ID label of the card. For details on the position of the label and other
information, refer to the manuals of the Access Point. Because the Network Name of
an Access Point may have been changed, consult your network administrator if you
are not sure.
4 If Data Encryption (WEP) is enabled for the Access Point,
enter the encryption key (WEP key) in the “Network key”
field.
The key entered here must be exactly the same as that set for the
Access Point. Permissible characters and their maximum number are
detailed below.
ASCII Hexadecimal
Permissible characters Alphanumeric characters 0 to 9, A to F, a to f
Maximum number 5 or 13 characters 10 or 26 characters
of characters
20
Hints
• ASCII and hexadecimal characters are automatically identified.
• The data encryption (WEP) function serves to prevent unauthorized access to the
network. When the function is enabled, only computers configured with the
correct encryption key (WEP key) can join the network. For security reasons, it is
strongly recommended that you enable this feature. The setting can be made
individually for Access Point Network connection mode and Peer to Peer Network
connection mode. When connecting to an existing network, consult your network
administrator regarding the proper settings. For information on how to control this
setting at the Access Point, refer to the manuals of the Access Point.
❑ When using Service Pack 1
If you installed Windows XP Service Pack 1, steps 3 and 4 must be
performed as follows.
3 From the “Available Wireless Networks” list in the
“Connect to Wireless Network” dialog box, select the
Access Point to which you want to connect.
4 Depending on the Data Encryption (WEP) settings of the
Access Point, proceed as follows.
• Data Encryption (WEP) at selected Access Point is
enabled
Enter the encryption key (WEP key) in the “Network key” field.
(The input is shown only as asterisks.) For verification, the same
string must be entered once more in the “Confirm network key”
field.
Getting started
21
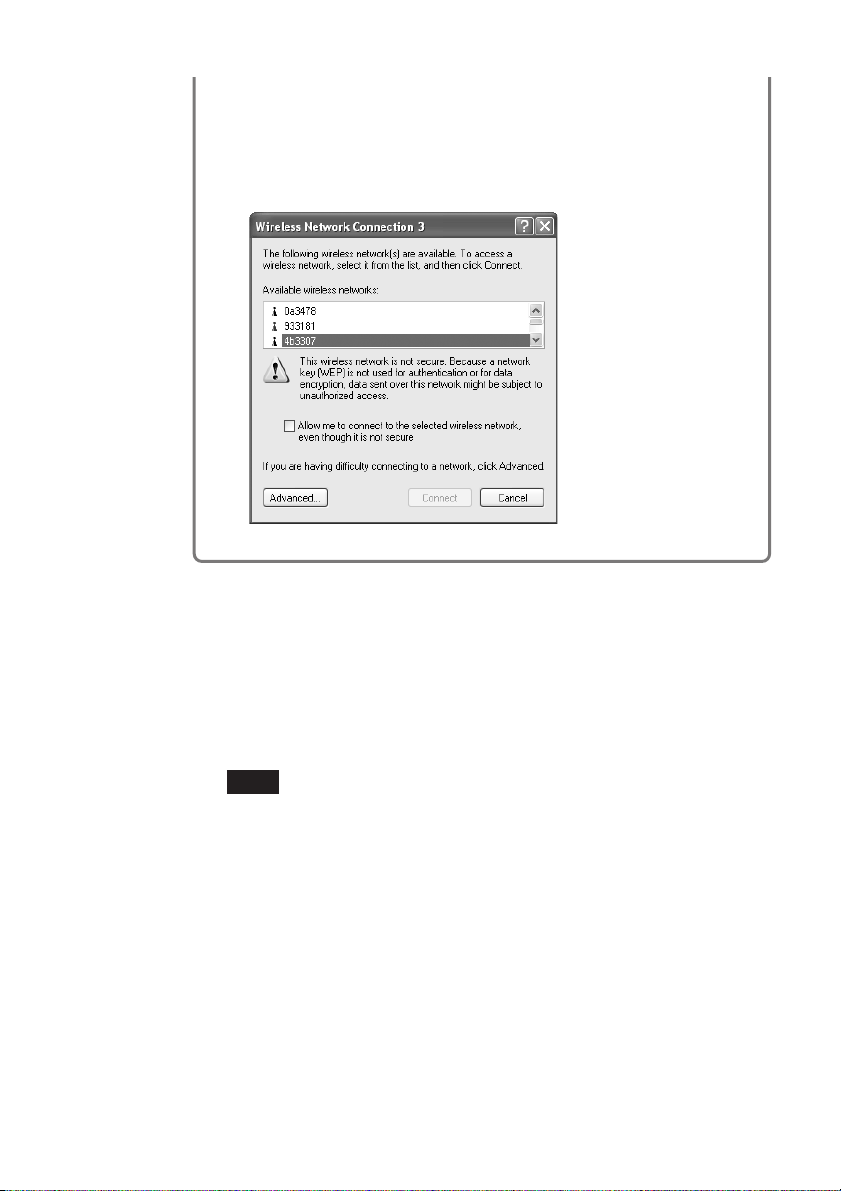
• Data Encryption (WEP) at selected Access Point is
disabled
Select the “Allow me to connect to the selected wireless network,
even though it is not secure” check box. (For security reasons,
enabling data encryption is recommended.)
5 Click “Connect”.
Connection to the Access Point is established.
If the Access Point has already been configured, the setup procedure is
now complete.
If you want to change the Access Point settings, refer to the manuals of
the Access Point for information on how to proceed.
22
Note
To use an Access Point to connect to the Internet, you must change the Access Point
default settings.
Hint
For additional information on the wireless network capabilities of the Windows XP
operating system, refer to Windows XP “Help and Support”. (Click “Start”, and
click “Help and Support”, enter “wireless” into the Search field, and click the green
arrow icon.) You may also wish to consult the Windows XP operating system
documentation.

Removing the Wireless LAN PC Card
and Precautions When Inserting it
This section explains how to remove the Wireless LAN PC Card and
outlines precautions when inserting the card in a computer with two card
slots arranged one above the other.
Hint
You do not need to turn off your computer when you insert or remove the Wireless LAN
PC Card.
To remove the Wireless LAN PC Card
1 Quit any software accessing the wireless LAN (e.g. Internet
Explorer).
2 Click on your Windows operating system taskbar.
3 Click “Safely remove Sony 802.11g Wireless LAN Adapter”
or “Stop Sony 802.11g Wireless LAN Adapter” on the
shortcut menu that appears.
Getting started
If your computer has two PC Card slots
Notes
• When using a computer which has two PC Card slots arranged vertically (one above the
other), insert the Wireless LAN PC Card into the top slot. If inserted into the bottom
slot, the antenna of the Wireless LAN PC Card will block the top slot.
• If you insert the Wireless LAN PC Card into a slot other than the one you usually use,
the computer treats the card as a new device and automatically begins installing device
drivers for it. Completing the driver installation makes it possible to use the Wireless
LAN PC Card in that slot. Installation is performed automatically by the installation
wizard. (For instructions on how to uninstall the Wireless LAN PC Card driver, see
page 38.)
Hint
If you are using the Windows Me or Windows 2000 operating system, you can register up
to 32 networks for each PC card slot. However, you have to register each network
individually. You cannot share the settings across slots.
23
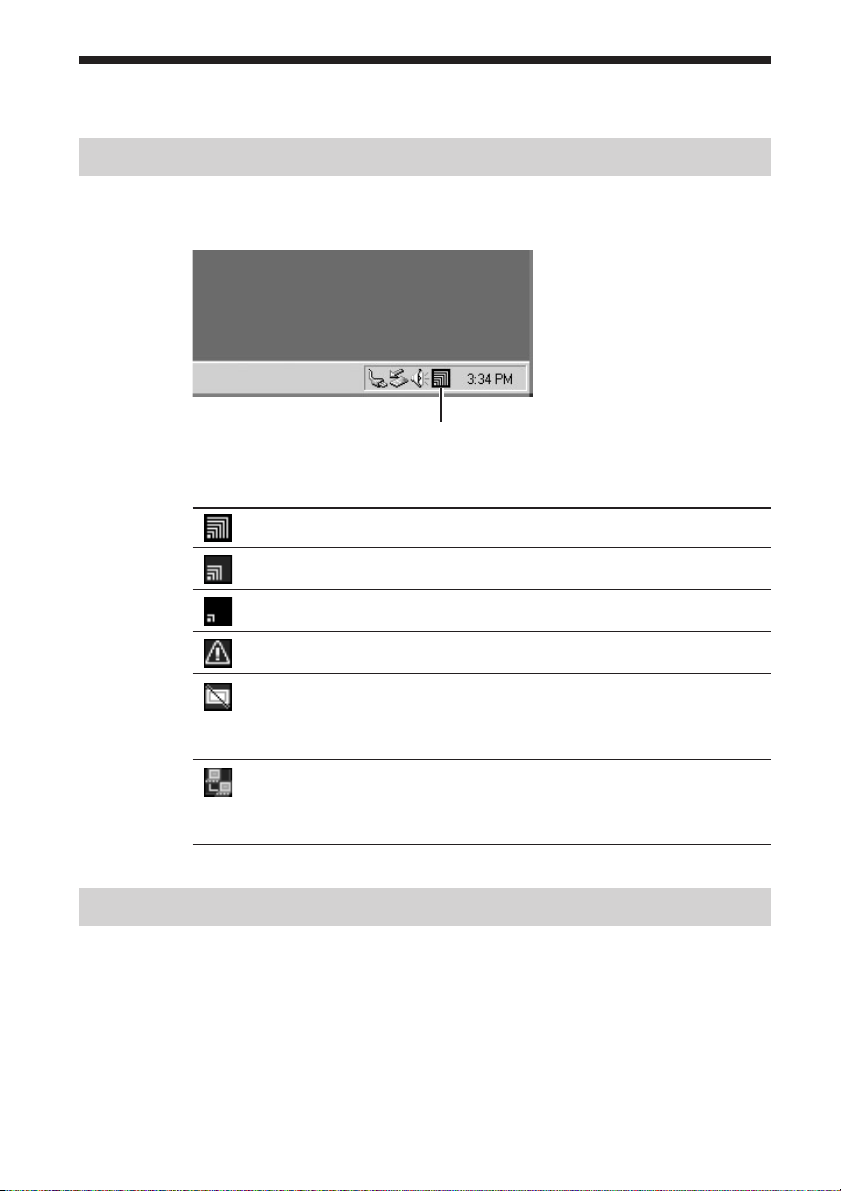
Checking the communication status
Checking the wireless signal strength
The communication status is shown by the signal level indicator on your
Windows operating system taskbar.
Signal level indicator
Meaning of indicator appearance
Excellent
Good
Poor
Out of range
Card not inserted
(Wireless LAN PC Card is not inserted or not
recognized correctly)
Peer to Peer
(Communicating in Peer to Peer Network connection
mode)
Checking network information
To obtain information about the network to which you are connected,
proceed as follows.
Double-click the signal level indicator on your Windows operating system
taskbar.
The Wireless Panel main screen appears, and information about the
network connection is shown. For details, refer to the Wireless Panel Help.
24

Using the Wireless Panel
The Wireless Panel is a software application that shows information about
the communication status of the computer connected to the wireless
network. Normally, the Wireless Panel runs in the background and only
shows the radio signal condition by means of the signal level indicator on
your Windows operating system taskbar. The main screen of the Wireless
Panel contains more detailed information. When running under operating
systems other than Windows XP, communication setup and network
switching are also performed using the Wireless Panel.
Notes
• To use the Wireless Panel under the Windows 2000 operating system to modify
communication settings, log on with a user account listed in “Administrators”. You
cannot modify settings when logged on with any other account.
• On a computer running the Windows XP operating system, communication setup and
network switching are not performed with the Wireless Panel but with built-in
functions of the Windows XP operating system. However, the Wireless Panel can be
used to check the communication status.
Opening the Wireless Panel
To open the Wireless Panel, proceed as follows.
Wireless LAN connection
Double-click the signal level indicator on your Windows operating
system taskbar.
The Wireless Panel appears.
Hints
• For information on the signal level indicator, see “Checking the wireless signal
strength” on page 24.
• When you move the mouse pointer over an item in the Wireless Panel screen, a short
description of that item appears.
• For details about how to use Wireless Panel, refer to the Wireless Panel Help. For
details about how to access Help, see page 9.
25

Manually installing, verifying, and
removing the supplied software
Installing the Wireless LAN PC Card driver manually
Notes
• To install the supplied software on a computer running the Windows 2000 operating
system, log on with a user account listed in “Administrators”. To install the supplied
software on a computer running the Windows XP operating system, log on with a user
account with administrator access privileges. You cannot install the software or modify
settings when logged on with any other account.
• Exit all other Windows operating system programs.
1 Insert the supplied CD-ROM into the CD-ROM drive of your
computer.
2 In the Easy Installation Wizard dialog box, click “Exit”.
3 If your computer has only one PC card slot and it is currently
used, copy the “Driver” folder from the supplied CD-ROM to
the hard disk of your computer before inserting the Wireless
LAN PC Card.
The following explanation assumes that a folder called “temp” was
created on drive C and that the data was copied to this folder.
26
4 Insert the Wireless LAN PC Card into the PC Card slot of the
computer.
5 Install the Wireless LAN PC Card driver.
The actual procedure differs slightly, depending on whether you are
using the Windows Me, Windows 2000, or Windows XP operating
system. See the section specific to your operating system.

Windows Me operating system:
1 Select “Specify the location of the driver” and click “Next”.
2 Select the “Specify a location” check box.
3 Click “Browse” and specify the location of the driver in the
dialog box that appears.
Hint
If the “Driver” folder from the CD-ROM has been copied to the “temp” folder on
drive C, enter “C:\temp\Driver\WinMe”.
4 Click “OK”.
5 Click “Next”.
6 Click “Next”.
The driver is installed.
7 Click “Finish”.
Restart the computer.
Windows 2000 operating system:
1 Click “Next”.
2 Select “Search for a suitable driver for my device” and click
“Next”.
3 Select the “Specify a location” check box and click “Next”.
4 Click “Browse” and specify the location of the driver in the
dialog box.
Hint
If the “Driver” folder from the CD-ROM has been copied to the “temp” folder on
drive C, enter “C:\temp\Driver\WinXP2K”.
5 Click “OK”.
Additional information
6 Click “Next”.
The driver is installed.
7 Click “Finish”.
27

Windows XP operating system:
1 Select “Install from a list or specific location” and click
“Next”.
2 Select the “Include this location in the search” check box
and click “Browse”.
3 In the dialog box that appears, select the folder that
contains the driver and click “OK”.
Hint
If the “Driver” folder from the CD-ROM has been copied to the “temp” folder on
drive C, select “C:temp\Driver\WinXP2K”.
4 Click “OK”.
5 Click “Next”.
6 Click “Finish”.
Installing the Wireless Panel manually
Note
When using the Windows 2000 operating system, log on with a user account listed in
“Administrators”. When using the Windows XP operating system, log on with a user
account with administrator access privileges.
28
Before installation
• Install the Access Point and connect it to a power outlet when using the
Access Point Network connection mode.
• Complete installation of the Wireless LAN PC Card driver. (See page 26)
• Exit all other Windows operating system programs.
1 Insert the supplied CD-ROM into the CD-ROM drive of your
computer.
2 In the Easy Installation Wizard dialog box, click “Exit”.

3 If your computer has only one PC card slot and it is currently
used, copy the “WPanel” folder from the supplied CD-ROM
to the hard disk of your computer before inserting the
Wireless LAN PC Card.
The following explanation assumes that a folder called “temp” was
created on drive C and that the data was copied to this folder.
4 Go to the “WPanel” folder copied from the CD-ROM and
double-click “Setup.exe”.
Depending on your computer’s settings, the file name “Setup.exe” may
be displayed as “Setup”. If there are multiple files named “Setup” in
the same folder, double-click the one with the following icon.
5 Click “Next”.
6 The “License Agreement” dialog box appears. Click “Yes” to
accept.
The “Choose Destination Location” dialog box appears.
Additional information
7 Click “Next”.
The Wireless Panel software is installed.
8 Click “Finish”.
Once Wireless Panel is installed, appears on your Windows operating
system taskbar.
If you installed Wireless Panel manually, see the following for details about
how to connect to the Access Point.
• With the Windows Me and Windows 2000 operating systems, see
“Connecting to the Access Point with Wireless Panel (Windows Me/2000
operating system)” on page 30.
• With the Windows XP operating system, see “Making Access Point
Connection Settings” on page 16.
29
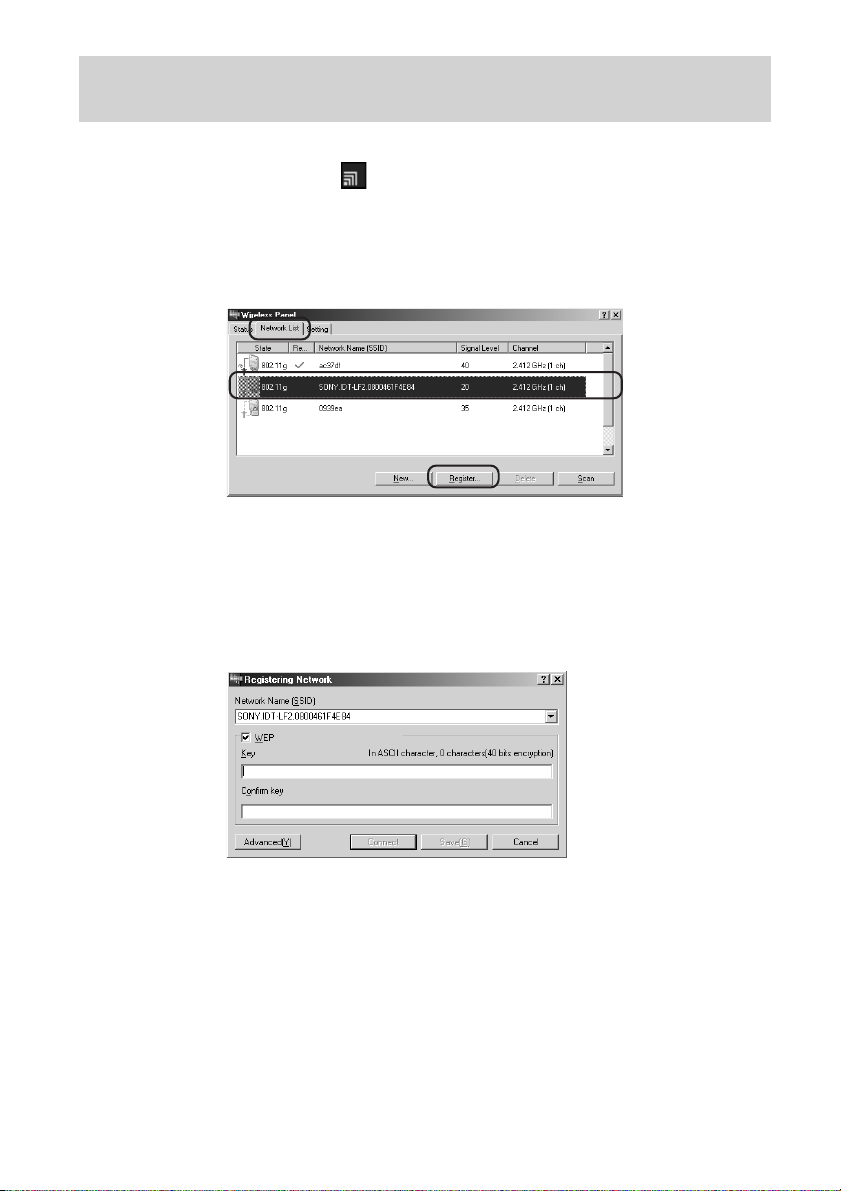
Connecting to the Access Point with Wireless Panel
(Windows Me/2000 operating system)
1 Double-click on your Windows operating system taskbar.
The Wireless Panel screen appears.
2 Click the “Network List” tab, select a wireless network from
the list, and click “Register”.
The “Registering Network” dialog box appears.
3 If data encryption (WEP) is enabled for the Access Point,
select the “WEP” check box, enter the encryption key in the
“Key” box, and then confirm it by entering it again in the
“Confirm key” box.
30
4 Click “Connect”.
The Wireless LAN PC Card connects to the Access Point.
 Loading...