


4-658-604-11(1)
Operating Instructions
© 2001 Sony Corporation
Wireless LAN PC Card
PCWA-C100
For Microsoft® Windows® XP Home Editon
Microsoft
®
Windows® XP Professional
Users

Owner’s Record
The model and serial numbers are located at the
back side. Record the serial number in the space
provided below. Refer to them whenever you call
upon your Sony dealer regarding this product.
Model No. PCWA-C100
Serial No.______________
CAUTION
You are cautioned that any changes or
modifications not expressly approved in this
manual could void your warranty.
FCC ID: IMRWLPCE24H
Exposure to Radio Frequency Radiation.
The radiated output power of the Wireless LAN
PC Card* is far below the FCC radio frequency
exposure limits.
Nevertheless, the Wireless LAN PC Card* shall
be used in such a manner that the potential for
human contact during normal operation is
minimized.
* FCC ID of the Wireless LAN PC Card is
IMRWLPCE24H.
NOTE:
This equipment has been tested and found to
comply with the limits for a Class B digital
device, pursuant to Part 15 of the FCC Rules.
These limits are designed to provide reasonable
protection against harmful interference in a
residential installation. This equipment generates,
uses, and can radiate radio frequency energy and,
if not installed and used in accordance with the
instructions, may cause harmful interference to
radio or communications. However, there is no
guarantee that interference will not occur in a
particular installation. If this equipment does
cause harmful interference to television reception,
which can be determined by turning the equipment
off and on, the user is encouraged to try to correct
the interference by one or more of the following
measures:
– Reorient or relocate the receiving antenna.
– Increase the separation between the equipment
and receiver.
– Connect the equipment into an outlet on a
circuit different from that to which the receiver
is connected.
– Consult the dealer or an experienced radio/TV
technician for help.
This device compiles with Part 15 of the FCC
Rules. Operation is subject to the following two
conditions: (1) This device may not cause harmful
interference, and (2) this device must accept any
interference received, including interference that
may cause undesired operation.
You are cautioned that any changes or
modifications not expressly approved in this
manual could void your authority to operate this
equipment.
NOTE:
Install and connect the Access Point by following
descriptions in its Operating Instructions manual
before using it.
About the supplied software
SUPPLIED SOFTWARE IS SUPPLIED
PURSUANT TO THE APPLICABLE END
USER LICENSE AGREEMENT.
• Copyright laws prohibit reproducing the
software or the software manual in whole or in
part, or renting the software without the
permission of the copyright holder.
• In no event will SONY be liable for any
financial damage or loss of profits, including
claims made by third parties, arising out of the
use of the software supplied with this product.
• In the event a problem occurs with this software
as a result of defective manufacturing, SONY
will replace it at SONY’s option or issue a
refund; however, SONY bears no other
responsibility.
• The software provided with this product cannot
be used with equipment other than that which is
designated for use with.
• Please note that, due to continued efforts to
improve quality, the software specifications
may be changed without notice.
2

Program © 2000 2001 Sony Corporation,
© 2000 Lucent Technologies, Copyright 1998 by
Carnegie Mellon University.
CMU DISCLAIMS ALL WARRANTIES WITH
REGARD TO THIS SOFTWARE, INCLUDING
ALL IMPLIED WARRANTIES OF
MERCHANTABILITY AND FITNESS, IN NO
EVENT SHALL CMU BE LIABLE FOR ANY
SPECIAL, INDIRECT OR CONSEQUENTIAL
DAMAGES OR ANY DAMAGES
WHATSOEVER RESULTING FROM LOSS OF
USE, DATA OR PROFITS, WHETHER IN AN
ACTION OF CONTRACT, NEGLIGENCE OR
OTHER TORTIOUS ACTION, ARISING OUT
OF OR IN CONNECTION WITH THE USE OR
PERFORMANCE OF THIS SOFTWARE.
Documentation © 2001 Sony Corporation
Sony, VAIO, the VAIO logo are trademarks of
Sony Corporation.
Microsoft, Windows, Windows Me, and Windows
NT are registered trademarks of Microsoft
Corporation in the United States of America and
other countries.
MMX and Pentium are registered trademarks of
Intel Corporation.
All other trademarks are trademarks of their
respective owners.
Safety Information
WARNING
• Opening the unit, for whatever reason, could
lead to damages that are not covered by the
guarantee.
• To prevent fire or shock hazard, do not expose
your Sony Wireless LAN PC Card to rain or
moisture.
NOTES:
• The Sony supplied software may show screens
slightly different from those included in this
manual.
• This manual is written based on the assumption
that you are familiar with basic operations of
the Windows operating system. For computer
operations, refer to manuals that come with
your computer.
• In this manual, Microsoft Windows 98 Second
Edition is referred to as Windows 98 Second
Edition.
• In this manual, Microsoft Windows Me is
referred to as Windows Me.
• In this manual, Microsoft Windows XP
Professional and Microsoft Windows XP Home
Edition are referred to as Windows XP.
3

Table of contents
Overview ............................................... 5
What you can do with your Wireless
LAN PC Card ................................ 5
Task flow....................................... 7
System requirements ..................... 8
About this manual..................................9
Opening the Help files .................. 9
Unpacking............................................11
Getting started
Indicators ............................................. 12
Inserting the Wireless LAN
PC Card........................................... 13
To remove the Wireless LAN
PC Card ....................................... 14
Software setup
Setting up the connection environment..
15
To establish communication with
the Access Point .......................... 15
To set the computer name and
workgroup ................................... 17
Installing software ............................... 19
Registering your Wireless LAN
Access Point/ Wireless LAN PC
Card ............................................. 20
To modify the installed
software ....................................... 20
To start the software.................... 21
To uninstall software................... 21
NOTES:
• The illustrations in this manual may differ
from the actual software.
• Explanations in this manual assume that
you are familiar with basic operations of
Windows. For how to use your computer
and operating system, please refer to their
respective manuals.
Wireless LAN connection
Verifying communication with the
Access Point....................................23
Setting up the Access Point ................. 24
Phone mode
(PCWA-A100 only) .................... 27
Cable Modem, LAN, and
Local Only................................... 28
DSL Modem (PPPoE) mode ....... 29
Transferring files using drag and drop
(WirelessCapsule)........................... 31
Operation on the sending
computer...................................... 31
Operation on the receiving
computer...................................... 33
Connecting to the Internet ................... 34
Phone mode
(PCWA-A100 only) .................... 34
LAN (ISDN Router).................... 35
Cable Modem/DSL Modem
(PPPoE) ....................................... 36
Additional information
Confirm your Access Point
firmware version ............................. 37
Precautions .......................................... 38
Safety...........................................38
Installation................................... 38
Operation..................................... 38
Cleaning ...................................... 38
Specifications ...................................... 39
Getting Help ........................................ 39
Glossary ............................................... 40
Troubleshooting................................... 42
Limited Warranty Statement ............... 45
4
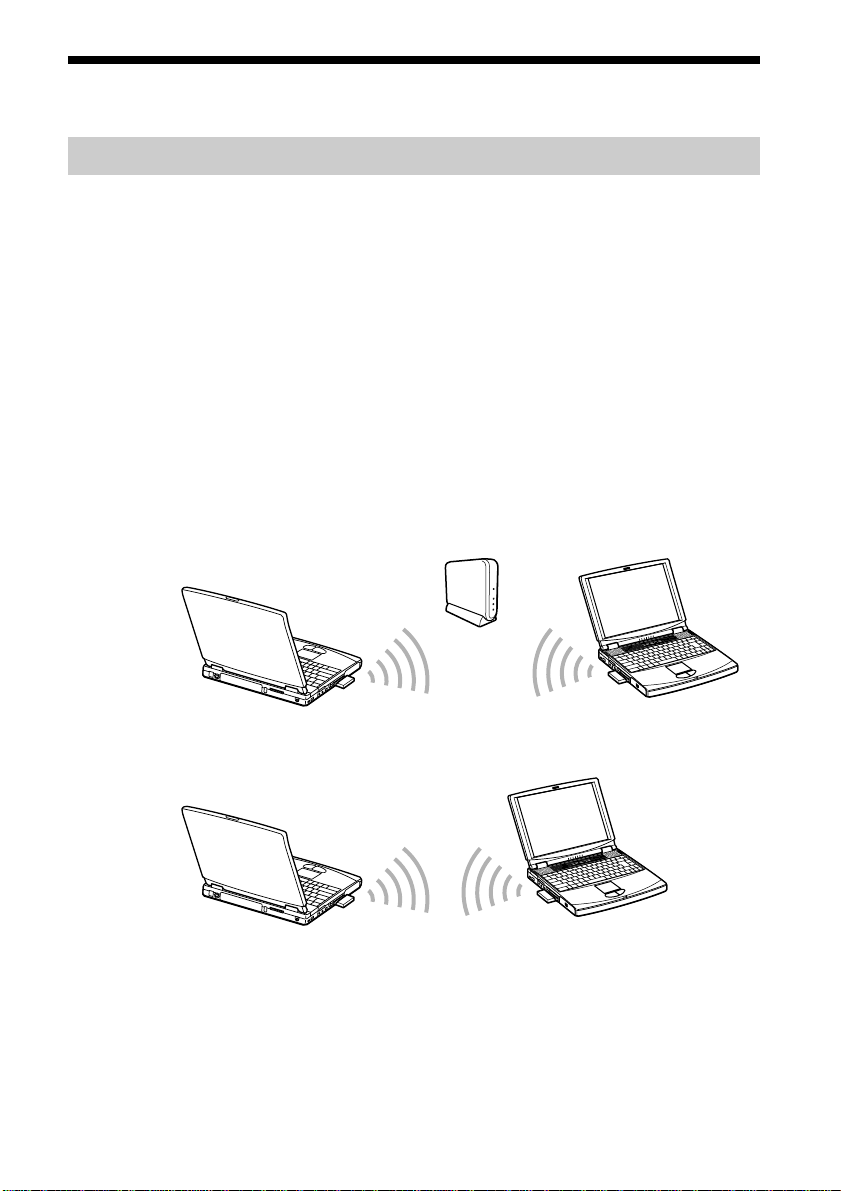
Overview
What you can do with your Wireless LAN PC Card
You can build a Wireless LAN (Local Area Network) using the Wireless
LAN PC Card, PCWA-C100. The Wireless LAN PC Card can be used with
or without the Wireless LAN Access Point, PCWA-A100/A200
(hereinafter referred to as the Access Point). With the Access Point, you
can build a wireless LAN between multiple computers that are equipped
with the Wireless LAN PC Card and gain access to the Internet. You can
achieve direct communication (Peer to Peer mode) between computers
without using the Access Point.
z Tip
Although you can connect up to 49 client computers to a wireless LAN, the maximum
recommended number is 16 or less.
Communication through the Access Point
Direct communication between computers (Peer to Peer mode)
z Tip
For details about peer-to-peer connections with Windows XP, see the
Wireless Palette Help or Windows Help.
5

About the supplied software
The Wireless LAN PC Card comes with the following software:
• Wireless Palette:
You can see the status of communications between the computer
mounted with the Wireless LAN PC Card and the Access Point, and
transfer files using this software.
• Basic Access Point Setup Utility (Basic Setup Utility):
You can set up the Access Point for Internet access. This dialog-driven
utility covers basic setups for Internet access.
• Custom Access Point Setup Utility (Custom Setup Utility):
You can make advanced configurations of the Access Point. You can
specify optional features for Internet access with this utility.
• Access Point Firmware Upgrade Utility:
This is the software for upgrading Access Point firmware.
If you are using an old version, some functions will be unavailable. For
example, the DSL Modem (PPPoE) mode cannot be selected, and
roaming cannot be used. In this case, it is recommended that you
upgrade both your Access Point firmware and Wireless LAN Utility.
See page 37 for how to check the version. For procedures for upgrading
the Access Point firmware, see the Access Point Firmware Upgrade
Utility Help.
6

Task flow
To build a wireless LAN environment, you must configure both the Access
Point and the Wireless LAN PC Card.
Required tasks depend on the state of your Access Point and Wireless LAN
PC Card. The table below lists the states of the Access Point and Wireless
LAN PC Card, and the tasks required for building a wireless LAN
environment.
Wireless LAN PC Card
New In use
Access
Point
New
In use
1. Connect the Access Point.
(*1)
2. Insert the Wireless LAN
PC Card into a computer.
(*2)
3. Establish communication
with the Access Point.
(*3)
4. Set up the computer name
of your computer. (*4)
5. Install the software. (*5)
6. Configure the Access
Point using the Basic
Setup Utility. (*6)
1. Insert the Wireless LAN
PC Card into a computer.
(*2)
2. Establish communication
with the Access Point.
(*3)
3. Set up the computer name
of your computer. (*4)
4. Install the software. (*5)
1. Connect the Access Point.
(*1)
2. Establish communication
with the Access Point.
(*3)
3. Configure the Access
Point using the Basic
Setup Utility. (*6)
• To communicate with an
Access Point previously
used in another wireless
LAN environment from a
computer containing the
Wireless LAN PC Card.
1. Establish communication
with the Access Point.
(*3)
*1 See “Connections” on page 13 in the Access Point Operating Instructions manual.
*2 See “Inserting the Wireless LAN PC Card” on page 13 and following sections in this
manual.
*3 See “To establish communication with the Access Point” on page 15 and succeeding
sections in this manual. For further information, see the Wireless Palette Help file.
*4 See “To set up the computer name and workgroup” on page 17 in this manual.
*5 See “Installing software” on page 19 in this manual.
*6 See “Setting up the Access Point” on page 24 and following sections in this manual.
7

System requirements
• A computer satisfying the following requirements.
CPU: MMX
RAM: With Windows 98 Second Edition, Windows Me, or Windows
CD-ROM drive
Default built-in PCMCIA Type II slot
• Operating system: For best results, use a computer with one of the
preinstalled operating systems below.
– Windows 98 Second Edition, English version
– Windows Me, English version
– Windows 2000, English version
– Windows XP, English version
(Does not operate under the Windows 98, 95 or 3.1 versions or under the
Windows NT version. Operation is not guaranteed under all upgraded
environments. This does not apply to computers upgraded to Windows
XP with a valid upgrade from your computer maker.)
• Display: SVGA (800 × 600 pixels) and above, [supports High Color (16
bit) and above]
®
Pentium® 233 MHz and above
2000:
64 MB or more
With Windows XP:
128 MB or more
Notes
• We do not assure trouble-free operation for all computers satisfying the
system requirements.
• The Wireless LAN Access Point PCWA-A100/A200 is required to gain
access to the Internet.
• An Internet Service Provider (ISP) is required for Internet access.
8

About this manual
Note
When using the Access Point, connect and configure the Access Point as
explained in the operating instructions included with the Wireless LAN
Access Point.
This manual explains the operation of the Wireless LAN PC Card and the
installation and setup of the supplied software. For details on using the
Wireless Palette and the Custom Access Point Setup Utility software
supplied with the Wireless LAN PC Card, refer to the software's Help files.
The Wireless LAN PC Card has three Help files:
• Wireless Palette Help
• Custom Access Point Setup Utility Help
• Upgrade Manual
The Upgrade Manual explains procedures for upgrading the Access
Point's firmware, the Wireless LAN PC Card Driver, and the Basic/
Custom Access Point Setup Utility.
Opening the Help files
• Wireless Palette Help
– With the Wireless Palette running, click the Wireless Palette icon
(reception level indicator icon) on the taskbar, and select Help from the
menu displayed.
• Custom Access Point Setup Utility Help
– Start the Custom Access Point Setup Utility, and click Help.
• Upgrade Manual (Access Point Firmware Upgrade Utility Help)
– Start the Access Point Firmware Upgrade Utility, and click Help.
9

Selecting a topic from the contents
From the Contents list, select the desired topic.
Searching using a Keyword
1 To search using a Keyword, select the Index tab from the
Help dialog box.
The Keyword list appears.
2 Enter the keyword you want to apply, or scroll down the
Keyword list.
3 Select a topic, then click Display.
Topics related to the Keyword appear.
10

Unpacking
Your Wireless LAN PC Card comes with the following items.
• Wireless LAN PC Card
• PC card case
• CD-ROM (Setup disc)
• Operating Instructions
• END-USER LICENSE AGREEMENT
• Other printed materials
11
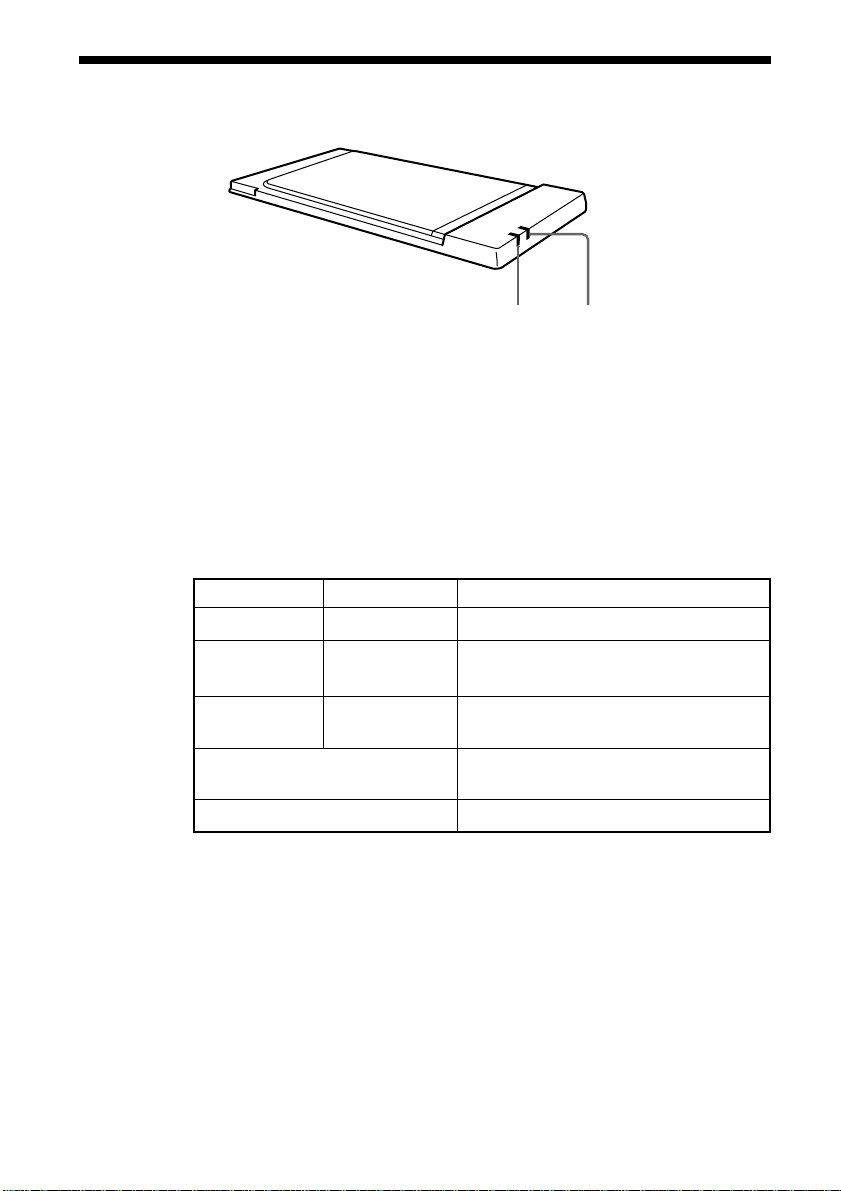
Indicators
1 DATA indicator
Lights while data exchange is in progress.
2 LINK indicator
Lights while your computer is connected to the wireless LAN.
Description on the indicators
DATA LINK Description
Flashing (green) Lit (green) Normal communications.
Fast Flashing Lit (green) Peer to Peer mode
(green)
Off Lit (green) The PC card is powered, but no
Flashing at 10 sec intervals The PC card is operating, but no connection
is established.
Off The PC card is powered off.
12
communication is taking place.
12
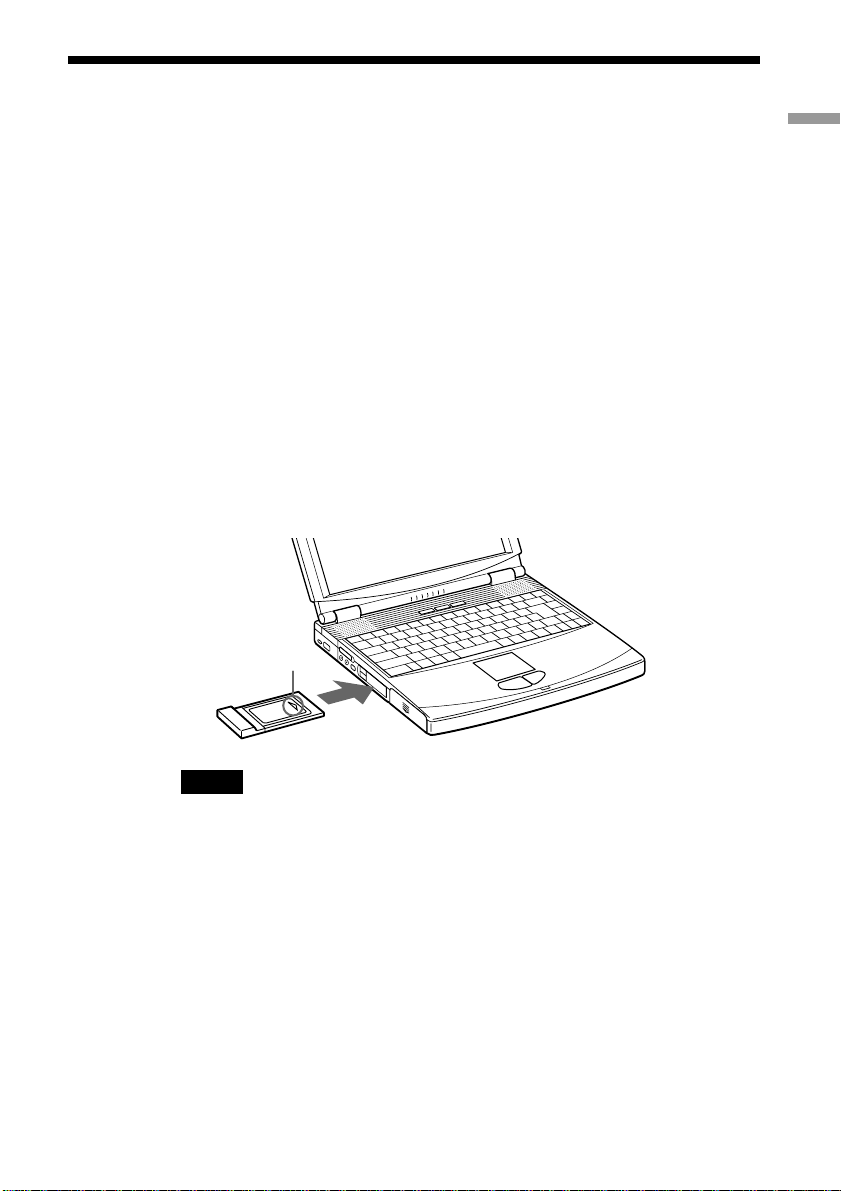
Inserting the Wireless LAN PC Card
This section explains how to insert and remove the Wireless LAN PC Card
from your computer.
You do not need to turn off your computer when inserting the Wireless
LAN PC Card.
1 Remove the PC card slot protector from the computer.
(Some computers contain the PC card slot protector to prevent damage
to the slot while not in use.)
2 Insert the Wireless LAN PC Card in the PC card slot.
Push the Wireless LAN PC Card into the slot until it is firmly seated.
Inserting the card will extend the eject button.
If the card does not fit easily, do not force it in. Take the card out and
try reinserting.
Insert the card
in the direction
of the arrow.
Getting started
To the PC card slot.
Notes
• Do not install the PC Card Driver that is included in the 1WinMe, 2Win2k or 3Win98
folder of the CD-ROM supplied with the Wireless LAN PC Card. Windows XP has a
suitable device driver for the Wireless LAN PC Card, and it is automatically installed
when you insert the Wireless LAN PC Card into your computer.
• If your computer has two PC card slots, insert the Wireless LAN PC Card into the top
slot. Inserting it into the bottom slot blocks the top slot with its antenna.
• Before using the Wireless LAN PC Card, turn off System Suspend mode or System
Hibernation mode using the PowerPanel software.
• While the computer is in System Suspend mode or System Hibernation mode, the
Wireless LAN PC Card may not be recognized when it is removed and reinserted.
13

To remove the Wireless LAN PC Card
1 Close the software that uses the Wireless LAN.
2 Stop PC Card Services on the taskbar.
3 Remove the Wireless LAN PC Card, following the
instructions in your computer's manual.
14

Setting up the connection environment
Perform the following procedure to set up a wireless LAN environment
with the Access Point.
1 Establish communication with Access Point (page 15).
Register the Access Point on each computer in the wireless LAN and
establish wireless communication with the Access Point. (Make
settings 1 to 4 on every computer in the wireless LAN).
2 Set the computer name and workgroup name (page 17).
Set the computer name and workgroup name for every computer used
in the wireless LAN.
3 Install the software (page 19).
Install the required software.
4 Verify communication with the Access Point (page 23).
Use Wireless Palette to verify communication with the Access Point.
5 Make the Access Point settings (page 24).
Use the Basic Setup Utility or Custom Setup Utility to make the
Access Point settings. Make these settings from any one of the
computers in the wireless LAN.
Software setup
To establish communication with the Access Point
On every computer you want to connect to the wireless LAN, establish
communication with the Access Point.
Before establishing a wireless LAN environment:
15

• Check the six-digit Access Point ID on the bottom surface of the Access
Point.
Access Point ID
Factory default Encryption KEY
• Install and connect the Access Point. (Refer to the Access Point
Operating Instructions manual.)
• Insert the Wireless LAN PC Card into the computer.
Note
Make sure that the Use Windows to configure my wireless network settings check box is
checked. This option is checked by default.
To Select the Use Windows to configure my wireless network
settings:
1 From the start menu, click Control Panel, and then double-click
Network Connections.
2 Right-click Wireless Network Connection and then click Properties.
3 Click Wireless Networks tab.
4 Select the Use Windows to configure my wireless network settings
check box.
16
1 Right-click the Wireless Network Connection icon on the
taskbar, then select View Available Wireless Networks from
the shortcut menu.
The Connect to Wireless Network dialog box appears.

2 Enter the Encryption Key in Network key field, then click
Connect.
You will connect to the Access Point.
z Tip
For details, refer to Windows Help.
To set the computer name and workgroup
Computer names are displayed on the status indication window of the
Wireless Palette.
Note
• When you set the computer name or workgroup, log on to Windows XP as an
Administrator.
1 From the start menu, select Control Panel.
The Control Panel window appears.
2 Click the System icon.
The System Properties dialog box appears.
Software setup
z Tip
If the System icon is not displayed, click Switch to Classic View.
17

3 Click the Computer Name tab, then click Change.
The Computer Name Changes dialog box appears.
(This dialog box is from Windows XP Professional.)
4 Specify the Computer name and Workgroup for your
computer.
18
Notes
• Assign a unique name of up to 15 alphanumeric characters to every computer
connected to the same LAN. Duplication of names will result in various problems,
such as WirelessCapsule (page 31) sending files to both computers.
• The workgroup indicates the name of a group of computers sharing files. Assign
the same workgroup name for all computers that share files.
5 Click OK.
The message “You must restart this computer for the changes to take
effect” is displayed.
6 Click OK.
The System Properties dialog box reappears.
7 Click OK, then click Yes to restart the computer.

Installing software
Before Installing the software:
• Install and connect the Access Point.
• Insert the Wireless LAN PC Card. (page 13)
• Quit all Windows programs.
Once you set up the connection environment, install the Wireless Palette,
the Basic Setup Utility, and the Custom Setup Utility software.
1 From the start menu, click Run.
The Run dialog box appears.
2 Enter the name of the installer.
• If the computer has an internal CD-ROM drive, enter
“E:\SETUP.EXE”. (“E” indicates the name of the internal CD-ROM.
Your CD-ROM drive may be identified with a different letter.)
• If you have copied the Wireless LAN folder from the supplied CDROM to your computer’s hard disk, enter the file name and its
location. (example: C:\Temp\WirelessLAN\SETUP.EXE)
Software setup
3 Click OK.
The Wireless LAN Utility 2.2 Setup dialog box appears.
4 Click Next.
The License Agreement dialog box appears.
5 Read the agreement and click Yes to accept.
The Choose Destination Location dialog box appears.
6 Select the folder where you want to install the software and
click Next.
The Setup Type dialog box appears.
19

z Tip
If you want to install the software into another folder, click Browse and select the
folder or directly enter the folder name.
7 Select Standard Setup then click Next.
Software installation begins.
After a short while, the InstallShield Wizard Complete dialog box will
appear. Make sure to select Yes, I want to restart my computer now.
z Tip
If you want to select specific software applications, select Custom setup then click
Next.
8 Click Finish.
Installation is complete and your computer restarts.
Registering your Wireless LAN Access Point/ Wireless LAN
PC Card
If you can access the Internet from a computer on which Wireless Palette is
installed, you can register products via the Internet. From the start menu,
select All Programs, Wireless LAN, then click Wireless LAN Registration
and register the product. With registration, warranty for wireless LAN
hardware is extended to one year. For details on customer registration, refer
to the supplied Customer Registration for the Wireless LAN Access Point/
Wireless LAN PC Card.
Caution
To protect your personal data, Sony uses SSL (an encryption protocol) for communication
between your browser and the Sony WWW server. If you are accessing the Internet from
inside an enterprise LAN, you may not be able to use SSL due to the proxy server of the
LAN. In such a case, contact your network administrator.
To modify the installed software
You can install/uninstall a specific software application.
1 Display the Wireless LAN Utility 2.2 Setup dialog box.
See steps 1 though 3 on page 19 for details.
20

2 Select Modify then click Next.
The Select Components dialog box appears.
3 Select the software applications you want to install, then
click Next.
The software installation begins.
z
To uninstall a specific software application, uncheck the application you want to
uninstall.
4 Click Close.
To start the software
Select All Programs, Wireless LAN from the start menu, and then select the
software you want to launch.
To uninstall software
Before you perform this procedure, close the Wireless LAN Utility.
Software setup
1 From the start menu, click Control Panel.
The Control Panel window appears.
2 Double-click the Add or Remove Programs icon.
The Add or Remove Programs dialog box appears.
3 Select Wireless LAN Utility 2.2 from the list of currently
installed programs, then click Change/Remove.
The Wireless LAN Utility 2.2 Setup dialog box appears.
4 Select Remove, then click Next.
The Confirm File Deletion dialog box appears.
21

z Tip
To uninstall a specific software application, select Modify and click Next. See “To
modify the installed software” on page 20 for more information.
5 Click OK.
Notes
• When the Locked file detected dialog box appears, click Reboot. The computer
restarts once uninstallation is completed and all files in use are deleted.
• If the Shared file detected dialog box appears, it is recommended that you click
No and keep shared files.
6 Click Close.
22

Verifying communication with the
Access Point
Follow the steps below to verify that if the Wireless LAN PC Card has a
connection with the Access Point.
1 Double-click the reception level indicator icon on the
taskbar.
The Wireless Palette status window appears.
Computer Name
Network name for the Access
Point
Reception Level/ Indicator
z Tip
The reception level indicator icon may also appear as or .
If the icon appears as or , no communication is taking place with the Access
Point. Check the Access Point's configuration. For further information, refer to the
Wireless Palette Help file.
Wireless LAN connection
2 Verify the Network name for the Access Point.
3 The Network name for the connected Access Point appears.
The reception level indicator ( / / ) indicates the condition of the
communications with the Access Point.
communication. When
taking place between the Access Point and the computer. Check the
Access Point configuration. For more information, refer to Help.
or is displayed, no communication is
indicates the optimum
4 Verify the Computer Name.
The computer name is the name that you specified on page 17.
23

Setting up the Access Point
You can change the Access Point settings by using the Basic Setup Utility.
Changes to the settings may also be made by using the Custom Setup
Utility.
This operation must be performed on a single computer on the wireless
LAN.
Note
With Windows XP, you can change Access Point settings only when you logged on to
Windows as Administrator.
z Tips
• To launch the Custom Setup Utility, click the Start button and select All Programs,
Wireless LAN, then Custom Access Point Setup Utility.
• When using the roaming function, you cannot change settings using the Basic Access
Point Setup Utility. Use the Custom Access Point Setup Utility. For information on the
usage of the Custom Access Point Setup Utility, see its Help.
1 From the start menu, select All Programs, Wireless LAN,
then Basic Access Point Setup Utility.
The Basic Setup Utility starts.
24
2 Confirm that the Access Point ID displayed belongs to the
Access Point that you want to configure, then enter the
Setup Password and click SCAN.
By default, “public” appears for Setup Password.

The Access Point ID is a six-digit number on the label attached on the
bottom surface of the Access Point. If the Access Point ID displayed
is different from the one on the label, enter the correct ID.
Access Point ID
Factory default Encryption KEY
Note
If an error message appears, click OK then confirm the following and repeat step 2.
• The Access Point is powered.
• The correct Access Point ID is displayed.
• The password is correct.
• The Access Point and the computer are located within a range of approximately
100 m (330 feet).
3 In Common Parameters, select the Channel Number and
enter the Encryption Key.
Select the channel that the Access Point uses for wireless
communications for Channel Number. You can use Channel 1, 4, 7, or
10.
Enter any 5 characters of the ASCII character set (letters, numbers,
and symbols) for Encryption Key.
Wireless LAN connection
The Phone option is not displayed if you are using the PCWA-A200.
(This figure is from the PCWA-A100 screen.)
25

Note
Using the Wireless Palette, enter the same Encryption Key on every computer in the
wireless LAN, as specified for the Access Point.
z Tips
• If there are two or more Access Points close together, assign a unique channel
number to avoid radio interference.
• The factory-set Encryption Key of the access point is the last five digits of the
Access Point ID.
In order to prevent unauthorized external access, it is strongly recommended that
you change the Encryption Key. However, be sure to make a note of the new
Encryption Key so that you will not forget it.
4 Select a type of connection method from Connection Mode,
then click NEXT.
Select a destination to connect the Access Point. Available options are
Cable Modem, LAN, DSL (PPPoE) Modem and Local Only. If you are
using the PCWA-A100, the Phone option is also available. The dialog
box that appears next depends on your selection.
Notes
• If you have accidentally selected a wrong access method, click BACK and select
the correct one.
• In order to make PPPoE connection via the DSL modem, select the DSL Modem
(PPPoE) mode. If you are using the DSL modem but the connecting Internet
service provider does not support PPPoE, select the Cable Modem mode. If your
DSL modem is a router type modem, select the LAN mode. Consult your Internet
service provider about PPPoE support and DSL modem.
26
Note
If you are using the Access Point and are connecting within an existing LAN that already
has a DHCP server, do not use the Phone or Local Only connection modes. Select Cable
Modem or LAN connection modes instead.
When the Wireless LAN Access Point is using Phone and/or Local Only connection
modes, the Access Point acts as a DHCP server.
An Access Point that is connected to a LAN that has another DHCP server may
experience the following problem while using the Phone or Local Only connection mode:
A client computer within the LAN may acquire an invalid IP address from the Access
Point, not from the regular DHCP server. If this happens, the client computer may not be
able to access the network because the IP address supplied by the Access Point is a
private IP address (10.0.1.2 - 17, by default).
Contact your network administrator before connecting a Wireless LAN Access Point to
an existing LAN.

Phone mode (PCWA-A100 only)
The Setup of Phone Connection Parameters dialog box appears.
1 Enter the Account ID, Password, Password (re-enter),
Phone Number 1 and Phone Number 2 to your provider and
select or configure the options of Dialing Mode, Hangup
After and Dial Tone Detect.
z Tips
• Phone Number 2 is the alternate telephone number to use when a call to Phone
Number 1 is not completed. This is not a necessary item.
• Your Internet service provider may specify the DNS server(s). In this case, enter
data for DNS Server 1 (DNS Server 2).
• Hangup After specifies how many seconds until the telephone line is
automatically hung-up when there is no data being communicated over the
Internet. Change this setting to your requirements.
Wireless LAN connection
Note
Select Yes in the Dial Tone Detect if you hear a tone signal when you pick up the
receiver. If not, select No.
2 Click NEXT.
Settings made in the Setup of Phone Connection Parameters dialog box
are displayed.
27

3 Make sure that you have made the correct settings, then
click NEXT.
Notes are displayed regarding the Phone mode; be sure to read them
carefully.
4 Click UPLOAD.
The settings are uploaded to the Access Point. Wait for about 30
seconds until the Access Point POWER indicator lights green.
Note
The indicators on the Access Point flash while changes to the settings are being
processed.
When the confirmation dialog box appears, click FINISH to exit.
When you change the Access Point Network Name or
Encryption Key:
After changing the Access Point Network Name or Encryption Key, you
must update the computer settings and reconnect to the Access Point. For
details on how to connect to the Access Point, see “To establish
communication with the Access Point” on page 15.
Cable Modem, LAN, and Local Only
28
The confirmation dialog box appears.
Note
If you select Cable Modem or LAN, set up the device for an Internet connection.
1 Confirm that the Access Point connection mode is correct
and click Next.
Notes are displayed regarding the selected mode; be sure to read them
carefully.
2 Click UPLOAD.
The settings are uploaded to the Access Point. Wait until the Access
Point's POWER indicator turns green.
Note
The indicators on the Access Point flash while changes to the settings are processed.
When the confirmation dialog box appears, click FINISH to exit.

When you change the Access Point Network Name or
Encryption Key:
After changing the Access Point Network Name or Encryption Key, you
must update the computer settings and reconnect to the Access Point. For
details on how to connect to the Access Point, see “To establish
communication with the Access Point” on page 15.
DSL Modem (PPPoE) mode
The Setup of DSL (PPPoE) Connection Parameters dialog box appears.
Wireless LAN connection
1 Enter the Account ID and Password provided by your
Internet service provider, then choose the Connection Mode
option from the drop-down list.
z Tips
• Your Internet service provider may specify the DNS server(s). In this case, enter
the DNS Server information into the DNS Server 1 and DNS Server 2 fields.
• In Connection Mode, you can choose the method of connection to the Internet. If
you choose Always Connected, Wireless Palette will connect to the Internet and
stay connected. If you choose Auto Connect, Wireless Palette will automatically
connect to the Internet when you check your email or run the Web browser. It
will automatically disconnect after some period of time has passed with no data
transmitted through the Internet. This period of time can be specified in Hangup
After.
• Some Internet service providers specify a service name. In that case, enter the
service name using the Custom Access Point setup Utility.
29

2 Click NEXT.
Settings made in the Setup of DSL (PPPoE) Connection Parameters
dialog box are displayed.
3 Make sure that you have made the correct settings, then
click NEXT.
Notes are displayed regarding the DSL Modem (PPPoE) mode; be sure
to read them carefully.
4 Click UPLOAD.
The settings are uploaded to the Access Point. Wait until the Access
Point's POWER indicator turns green.
Note
The indicators on the Access Point flash while changes to the settings are being
processed.
When the confirmation dialog box appears, click FINISH to exit.
This completes the software setup. The Wireless LAN environment is
complete.
When you change the Access Point Network Name or
Encryption Key:
30
After changing the Access Point Network Name or Encryption Key, you
must update the computer settings and reconnect to the Access Point. For
details on how to connect to the Access Point, see “To establish
communication with the Access Point” on page 15.
Now you can copy a file from another computer on the Wireless LAN
(page 31) or connect to the Internet (page 34).

Transferring files using drag and drop
(WirelessCapsule)
You can transfer files to other computers that are connected to the Wireless
LAN by dragging and dropping files onto the Wireless Palette. This
function is called the “WirelessCapsule.”
z Hint
Right-click the reception level indicator icon on the taskbar, click on Capsule Setup to
view the WirelessCapsule Setup screen and confirm that Enable the WirelessCapsule is
selected.
(The reception level indicator icon may also appear as or .)
Operation on the sending computer
1 Double-click the reception level indicator icon on the
taskbar.
The Wireless Palette status screen appears, showing up to 8 computers
that are connected to the LAN.
If the WirelessCapsule is enabled, the display appears as shown below.
Your computer: White (with a yellow dot)
Other computers whose WirelessCapsule is enabled: White
Other computers whose WirelessCapsule is disabled: Blue
If the WirelessCapsule is disabled, all computers are displayed in blue.
Wireless LAN connection
31

2 If the computer that is the destination of the transfer does
not appear, click to display it.
3 Drag the file you want to transfer onto the name of the
computer to which you want to transfer it.
The transmission confirmation screen is displayed.
Destination (Computer Name)
32
File Location
Filename
z Hints
• If Confirm before sending is not selected in the WirelessCapsule Setup, the file
will be transferred as it is without displaying the confirmation screen.
• If you drag and drop a file onto the Access Point, it will be transferred to all
computers that have file reception enabled on the same Wireless LAN system.
When you drag and drop a file onto the Access Point, “Broadcast” is displayed at
the destination.

Note
The following restrictions apply when transferring files using drag and drop.
• If you send a file with the read-only attribute, the read-only attribute is lost when
the file arrives at the receiving computer.
• Folders cannot be transferred.
• The maximum total size of files that can be transferred is approximately 100 MB.
• The maximum number of files that can be transferred is 256.
• File transfer is not possible if the amount of available hard disk drive space at the
destination is less than approximately 175 MB.
• File transfer is not possible if files are named using double-byte characters (such
as those used in Japanese and Chinese.)
4 Confirm the destination and the filename and click OK.
The name of the destination computer changes to yellow. The name of
the Access Point also changes to yellow when you drag and drop
(Broadcast) a file onto the Access Point.
Operation on the receiving computer
1 When a file is receiving, the name of the sending computer
changes to yellow.
2 Double-click on the name of the computer on the Wireless
Palette.
The WirelessCapsule folder is displayed. When necessary, move or
copy the file to the appropriate location.
z Hints
• Files that received are saved in the “WirelessCapsule” folder.
• When you first start the Wireless Palette, the “WirelessCapsule” folder is created
directly below the startup drive. However, you can change that through settings.
• Right-click the reception level indicator icon on the taskbar, click on Capsule
Setup to view the WirelessCapsule Setup screen. (The reception level indicator
icon may also appear as or .)
• If the name of the file to be received is the same as the name of a file in the
“WirelessCapsule” folder, by default that file is overwritten. However, if you
select “Save with different,” that file will be saved under a different name.
Wireless LAN connection
33

Connecting to the Internet
When you are through with all settings described in “Setting up the
connection environment” on page 15, you can connect to the Internet.
Phone mode (PCWA-A100 only)
1 Double-click the reception level indicator icon on the
taskbar.
z Tip
The icon may appear as or .
2 Click To Connect.
Connection to the Internet service provider is established.
34
z Tip
Further, you can select the connection point from the ISP list. Click the Wireless
Palette's Phone icon to display the ISP list. To find out about setting up several
connecting sites, refer to the “Registering multiple Internet service providers”
section of the Wireless Palette Help.
3 Launch your Web browser.
A Web site is displayed.
4 Click To Disconnect.
The dial-up connection is disconnected.

Notes
• The Access Point is configured with the manual connection mode at the time of
shipment. Clicking To Connect initiates the dial-up connection.
• Note that automatic disconnection may not work due to unexpected packets sent
from the Internet. Click To Disconnect to disconnect the connection when you are
through with the Internet access.
z Tips
• When the Access Point is in the automatic connection mode, starting an e-mail or
browser application causes a dial-up attempt to be made. To place the Access
Point in the automatic connection mode, use the Custom Setup Utility. For more
information, see the Custom Access Point Setup Utility Help.
• The Access Point does not automatically disconnect a connection to the Internet
when an e-mail or browser application is closed on a single computer in order to
allow multiple computers to have simultaneous Internet access. Thus, to
disconnect the dial-up connection, you must follow the steps above.
With the factory default setting, the connection is automatically terminated after
two minutes.
You can change the automatic disconnection time by changing the Hangup After
setting.
LAN (ISDN Router)
Wireless LAN connection
1 Start your browser and make the connection through your
ISDN router. (For detials, see the ISDN router manual.)
The connection is made to your provider.
Note
When the ISDN router is in use, the To Connect/To Disconnect function of the
Wireless Palette is disabled.
2 Launch your Web browser.
A Web site is displayed.
35

Cable Modem/DSL Modem (PPPoE)
1 Launch your Web browser.
A home page is displayed.
The cable modem holds open the connection to the Internet. When the
computer is connected to the Access Point, it is also connected to the
Internet.
Notes
• Check your modem’s ability to make an Internet connection.
• When the cable modem’s is in use, To Connect/To Disconnect is not displayed on
the Wireless Palette.
36

Confirm your Access Point firmware
version
If you are using an older Access Point firmware version, you must upgrade
to the latest version. Check the version and upgrade if necessary as follows.
Note
If you continue to use the old version, some of the functions will be limited. For example,
the DSL Modem (PPPoE) mode cannot be selected, and roaming cannot be used. Also, if
both the new and old versions exist on the same network, this may cause problem.
How to confirm the version
1 Establish communications with the Access Point.
2 Right-click on the Wireless Palette icon on the taskbar.
3 Click on Version from the menu that is displayed.
The latest version of Wireless Access Point is 3.83. If the version you
are using is older than this, be sure to upgrade the Access Point
firmware.
z
For details on how to upgrade, refer to the Upgrade Manual (Access Point Firmware
Upgrade Utility Help).
Additional information
37

Precautions
Safety
Do not drop or cause a mechanical shock
to the Wireless LAN PC Card, as this may
damage the unit.
Installation
Do not expose the Wireless LAN PC Card
to the following conditions:
• Unstable surface
• High humidity or poor ventilation
• Excessive dust
• Direct sunlight or extreme heat
• Closed cars
• Magnetized location (near magnets,
speakers, or televisions)
• Locations exposed to frequent vibration
• Locations where the transmission of
radio waves may be obstructed by metal
plates or concrete walls
Cleaning
Clean the casing with a soft cloth, lightly
moistened with water or a mild detergent
solution. Do not use any type of abrasive
pad, scouring powder or solvent such as
alcohol or benzene as it may damage the
finish of the casing.
Operation
If the Wireless LAN PC Card is moved
directly from a cold location to a warm
locations, or if it is placed in a very damp
environment, moisture may condense on
the parts inside. The Wireless LAN PC
Card may not operate properly if moisture
condensation occur.
38

Specifications
Getting Help
Protocol support
TCP/IP compliant
Standard
IEEE802.11b/IEEE802.11
Radio frequency
2.4 GHz
Modulation method
DS-SS (IEEE802.11 compliant)
Encryption (WEP)
64-bit encryption
(However the actual length of the key that can be
entered is 40 bits, or 5 characters.)
General
Power requirements
5 V AC (supplied from the computer through
the PC card adapter)
Current
Peak current at transmission: 280 mA
Peak current at reception: 180 mA
Connector
PC card slot Type-II
Dimensions (approx.)
Approx. 118 × 5 × 54 mm
(approx. 4 3/4 × 7/32 × 2 1/4 inches) (w/h/d)
(Antenna height: 8.7 mm (11/32 inches))
Mass
Approx. 55 g (approx. 2 oz)
Operating temperature
5°C to 35°C (41°F to 95°F) (not condensed)
Environment temperature
-20°C to 60°C (-4°F to 140°F) (not
condensed)
Supplied accessories
See “Unpacking” on page 11.
This section describes how to get help and
support from Sony, as well as
troubleshooting tips for your Wireless
LAN PC Card.
About Sony’s Support Options
Sony provides several support options for
your Wireless LAN PC Card.
❒This guide explains how to use your
Wireless LAN PC Card.
❒The Sony Wireless LAN PC Card
support Web site
http://www.sony.com/
wirelesslansupport/ provides the
latest information on your Wireless
LAN PC Card. On this Web site, you
will find:
• Answers to Frequently Asked
Questions (FAQs)
• An electronic version of the Operating
Instructions
• Help files
• Installation information
• Software upgrades
❒The Sony e-mail support service
answers your questions by electronic
mail. Just send your question in an email message and a customer service
representative will reply. To send a
question to Sony e-mail support, fill out
the e-mail form at
http://www.sony.com/
wirelesslansupport/
Additional information
Design and specifications are subject to change
without notice.
39

❒The Sony fax-back service provides
you with answers to commonly asked
questions. You can use this automated
service to request a list of available
topics then select the topics you want to
receive. To contact the Sony fax-back
service, call
1-877-760-7669.
❒The Sony Customer Information
Services Center offers information
about your Access Point, Wireless LAN
PC Card, and other Sony products that
work with your computer. To contact
the Sony Customer Information
Services Center, call 1-877-760-7669.
Open 24 hours/day, 7 days/week.
Glossary
Channel number
The frequency used for wireless
communications.
Wireless communications are available
only among client computers and Access
Points that use the same channel.
Client
A computer connected to a LAN (Local
Area Network). Also may be called a
client computer.
DHCP (Dynamic Host
Configuration Protocol)
DHCP lets network administrators
centrally manage and automate
assignment of IP addresses with a network
environment.
40
DNS (Domain Name System)
A system that translates host names into
IP addresses.
Networks that use the TCP/IP protocol,
such as the Internet, use a set of numbers
like 192.168.0.1 (IP address) to identify a
computer.
However, since the IP address is rather
hard to memorize, DNS was developed to
allow a name like “www.sony.com” to
identify a computer for convenience.
DNS servers manage these translations
from host names into IP addresses.

Encryption Key
IEEE802.11-compliant security system.
Using the Encryption Key as the
password, only client computers and
Access Points that have the same ID and
password may log onto the same wireless
LAN for file sharing.
LAN (Local Area Network)
TCP/IP (Transmission Control
Protocol/Internet Protocol)
TCP is a connection-oriented protocol for
establishing reliable, sequenced data
transfer. TCP ensures that data reaches its
destination.
IP assembles and addresses data packets
for transmission to their network
destinations.
A network which is accessible only to its
members, unlike the Internet which is
open to an unlimited number of people.
A LAN may be built for different
purposes. For example, you can build an
office LAN that is accessible only to
members of the same department or a
home LAN that is accessible only to
family members.
PPPoE (PPP over Ethernet)
PPPoE is a software protocol that uses a
DSL modem to access the Internet.
With PPPoE, the client does not set a
static IP address. Instead, an IP address is
assigned dynamically whenever the client
accesses the Internet.
Protocol
The formal specifications that define the
procedures for computers to follow when
transmitting and receiving data.
WAN (Wide Area Network)
A network that interconnects remote
LANs through the Internet or telephone
lines.
Additional information
41

Troubleshooting
Read this Troubleshooting section, and Troubleshooting in the Wireless
Palette Help and Custom Access Point Setup Utility Help to resolve
problems that may occur. If, after referring to the above listed resources,
you still cannot resolve a problem, call Sony Customer Information
Services.
To access the Wireless Palette Help and Custom Access Point
Setup Utility Help:
From the start menu, select All Programs, Wireless LAN, then Wireless
Palette or Custom Access Point Setup Utility to start the program. After the
program is started, click the Help button. Troubleshooting is provided in
the “Additional Information” section of the Help files.
Note
Troubleshooting in the Wireless Palette Help and the Custom Access Point Setup Utility
Help contain the same information.
On the overall wireless communications
Symptom Cause/Remedy
My computer does not
detect the Wireless
LAN PC Card.
Other computers on
the wireless LAN are
not displayed.
I cannot access the
Internet.
c The Wireless LAN PC Card may not be properly inserted
into the PC card slot of your computer. Check that the
Wireless LAN PC Card is inserted in the proper direction,
then push it in as far as it will go.
c You did not enter the password when Windows started.
Enter the user name and the password requested on
Windows startup, then log onto the LAN.
c No other computers are logged onto the wireless LAN.
c The Access Point is not connected. Follow the instructions
in the Access Point Operating Instructions to connect it
properly.
c The Wireless LAN PC Card is not properly inserted into
your computer. See the instructions on page 13 of this
manual to insert it properly.
c Communication between the Access Point and your
computer are not established. Check the communication
status using the Wireless Palette.
42

Symptom Cause/Remedy
I cannot access the
Internet.
The data transfer
speed is slow.
I cannot remember the
Encryption Key.
I cannot restore
communication with
the Access Point even
by doing a software
reset.
The Wireless Palette
still shows the
previous computer
name after a change.
c The Access Point is not properly configured. Configure
the Access Point with the connection mode of your choice
using one of the Access Point setup utilities.
c The Access Point and your computer are too far apart
[more than approximately 100 m (330 feet), in direct line
of sight]. When the Wireless Palette shows the icon,
move your computer closer to the Access Point.
c There is radio interference with another Access Point. Try
assigning another channel number using one of the Access
Point setup utilities.
c There are too many clients logging on to the Access Point.
Try later.
1 Set the Access Point in the Software Reset mode.
2 Change the Encryption Key using the Access Point Setup
Utility.
For further information about the Software Reset mode,
see the “Troubleshooting” section of the Wireless Palette
Help file or the Custom Access Point Setup Utility Help
file.
c Use the following steps to reset the Access Point.
1 Use the Access Point Firmware Upgrade Utility to restore
the factory default settings of the Access Point.
How to Reset
– Connect the Access Point to the power supply while
pressing the reset switch on the bottom side of the
Access Point.
– Release the switch when the orange POWER indicator
lights.
For details, refer to the Custom Access Point Setup
Utility Help. Select Additional information, Helpful
information, then Reset mode and Software Reset
mode.
2 Use the Wireless Palette to register the settings of the
Access Point and establish communications with it.
3 Use the Access Point Setup Utility to make settings for the
Access Point.
c The Access Point has not yet recognized the new
computer name. Right-click the Wireless Network
Connection icon on the taskbar, then select View
Available Networks from the shortcut menu. Select the
network you want to access from the list, enter the
Encryption Key in Network key field and then click
Connect.
Additional information
43

Symptom Cause/Remedy
The communication
band is supposed to be
11 Mbps, but MPEG2
data transfer fails.
No communication is
available even though
my computer is
located within 100 m
(330 feet) of the
Access Point.
The data transfer
speed has become
slower.
On the dial-up connection
Symptom Cause/Remedy
When using the dialup connection, the
Internet connection is
unintentionally
disconnected.
When the automatic
connection feature is
enabled, a connection
to the Internet is
unintentionally
established.
The dial-up
connection is disabled
for awhile after
disconnection by
clicking To
Disconnect.
c 11 Mbps is a logical value. The actual value is
approximately 4 to 5 Mbps. This occurs with almost all
IEEE 802.11 compliant products. The high-speed stream
transfer of MPEG2, may cause a short of the
communication band.
c The actual communication distance depends on the
installation site and surrounding conditions. Move your
computer closer to the Access Point.
c The actual data transfer speed may change depending on
the distance and quality of the link. The natural data
transfer speed is 11 Mbps (maximum) but may fall to 5.5
Mbps, 2Mbps, or 1 Mbps in certain conditions.
c The automatic disconnection feature is enabled. If no
communication takes place for two minutes, the Access
Point automatically disconnects the dial-up connection by
default. To change this setting, use the Custom Access
Point Setup Utility. For further information, see the
Custom Access Point Setup Utility Help.
c Some e-mail applications periodically check incoming
mail. Windows also periodically establishes a connection
to the Internet for update notices.
c The Access Point does not accept a connection command
issued by clicking To Connect for one minute after manual
disconnection. Wait approximately one minute after
disconnection, then try again.
44

Limited Warranty
Statement
Sony Wireless LAN PC Card Warranty
The limited warranty on your hardware
covers parts and labor against defects in
material or workmanship for a period of
three months from the original date of
purchase. You can extend the warranty
period for an additional nine months by
registering your Wireless LAN PC Card.
See “Registering your Wireless LAN
Access Point/Wireless LAN PC Card” on
page 20. Once you register your Wireless
LAN PC Card, the limited warranty period
is twelve months from the original date of
purchase.
For the purpose of this Limited Warranty
“SONY” means SONY ELECTRONICS
INC. for Products purchased in the United
States of America. SONY warrants this
Wireless LAN PC Card product (“the
Product”) against defects in material or
workmanship as follows:
1.Labor: For a period of ninety (90)
calendar days from the original date of
purchase from SONY or a SONY
authorized reseller, SONY will repair
defects in material or workmanship in
the Product at no charge, or pay the
associated labor charges to a SONY
authorized service facility. The ninety
(90) day warranty period is extendible
only to the original purchaser, for an
additional period of nine (9) months, for
a total of twelve (12) months from date
of purchase when the Product is
registered electronically prior to the
expiry of ninety (90) days from the
original date of purchase. After the
applicable period, you must pay for all
labor charges.
2.Parts: For a period of ninety (90)
calendar days from the original date of
purchase from SONY or a SONY
authorized reseller, SONY will supply,
at no charge, new or rebuilt, at SONY’s
option, replacement parts in exchange
for defective parts. Any replacement
parts will be warranted for the
remainder of the original warranty
period or ninety (90) calendar days from
installation by SONY’s authorized
service facility, whichever is longer.
The ninety (90) day warranty period is
extendible only to the original
purchaser, for an additional period of
nine (9) months, for a total of twelve
(12) months from date of purchase
when the Product is registered within
ninety (90) days from the original date
of purchase. All defective parts
replaced under this Limited Warranty
will become the property of SONY.
This Limited Warranty covers only the
hardware components packaged with the
Product. It does not cover the technical
assistance for hardware or software usage,
and it does not cover any software
products whether or not contained in the
Product; SONY excludes all warranties
express or implied in respect of any
software provided with the product and
any such software is provided “AS IS,”
unless expressly provided for in any
enclosed software limited warranty. Please
refer to the End User License Agreements
included with the Product for your rights
and obligations with respect to the
software.
Additional information
45

This Limited Warranty is nontransferable. Proof of purchase in the form
of a bill of sale (which is evidence that the
Product is within the warranty period)
must be presented to obtain warranty
service. In addition, if replacement parts
are required and you wish to receive the
most expedient service available, you will
be required to provide SONY with a credit
card authorization to bill your credit card
in the event you fail to return the original
parts in the postage-paid envelope we
provide. The credit card will only be
charged for SONY’s list price for the part
if the original part has not been returned
within thirty (30) days.
With respect to certain components you
may be entitled to express warranty
service during the warranty period, subject
to certain restrictions. Please contact
SONY for further information.
SONY will not be responsible for any
damage to or loss of any programs, data or
other information stored on any media or
any part of any Product serviced
hereunder or any consequential damages
resulting therefrom.
Be sure to remove all third party
hardware, software, features, parts,
options, alterations, and attachments not
warranted by SONY prior to sending the
Product to SONY for service. SONY is
not liable for any loss or damage to these
items.
This Limited Warranty does not cover any
consumable items supplied with this
Product; cosmetic damages; damage or
loss to any software programs, data, or
media; or damage due to (1) acts of God,
accident, misuse, abuse, negligence,
commercial use or modifications of this
Product; (2) improper operation or
maintenance of this Product; (3)
connection to improper voltage supply; or
(4) attempted repair by any party other
than a SONY authorized service facility.
This Limited Warranty does not apply
when the malfunction results from the use
of this Product in conjunction with
accessories, products or ancillary or
peripheral equipment, or where it is
determined by SONY that there is no fault
with the Product itself. This Limited
Warranty is valid only in the United States
of America. This Limited Warranty is
invalid if the factory-applied serial
number has been altered or removed from
the product.
Repair or replacement of defective parts or
hardware as provided under this Limited
Warranty is the exclusive remedy of the
consumer. SONY SHALL NOT BE
LIABLE FOR ANY INCIDENTAL OR
CONSEQUENTIAL DAMAGES OR
OTHER DAMAGES INCLUDING BUT
NOT LIMITED TO, LOSS OF PROFITS,
LOSS OF REVENUE, LOSS OF DATA,
LOSS OF USE OF THE PRODUCT OR
ANY ASSOCIATED EQUIPMENT,
DOWNTIME AND PURCHASER'S
TIME. FOR BREACH OF ANY
EXPRESS OR IMPLIED WARRANTY,
BREACH OF CONTRACT,
NEGLIGENCE, STRICT LIABILITY OR
ANY OTHER LEGAL THEORY
RELATED TO THIS PRODUCT.
EXCEPT TO THE EXTENT
PROHIBITED BY APPLICABLE LAW,
46

ANY IMPLIED WARRANTY OF
MERCHANTABILITY OR FITNESS
FOR A PARTICULAR PURPOSE ON
THIS PRODUCT IS LIMITED IN
DURATION TO THE DURATION OF
THIS WARRANTY.
Some states do not allow the exclusion or
limitation of incidental or consequential
damages, or allow limitations on how long
an implied warranty lasts, so the above
limitations or exclusions may not apply to
you. This Limited Warranty gives you
specified legal rights, and you may have
other rights which vary from state to state.
Technical Support: Although technical
support is not provided free of charge
under this Limited Warranty, SONY has
established a telephone number for
technical support. Charges may apply for
technical support, unless and to the extent
that free technical support for a limited
period is provided in writing as a feature
of your Product. Prior to placing you call,
please have available the model and serial
numbers for your Product, date of
purchase, a list of all options installed in
your Product and a detailed description of
the problem.
© 2000, 2001 Sony Corporation
Reproduction in whole or in part without
written permission is prohibited. All rights
reserved. SONY is a registered trademark
of Sony.
Additional information
For Product support, online knowledge
base, frequently asked questions, and free
upgrades via the Internet:
http://www.sony.com/wirelesslansupport/
For Product information, service
assistance, resolution of a service
problem, or technical assistance, call
1-877-760-7669.
Save this for future reference.
47

❒ The Sony e-mail support service answers your questions
by electronic mail. Just send your question in an e-mail message
and a customer service representative will reply. To send a
question to Sony e-mail support, fill out the e-mail
http://www.sony.com/wirelesslansupport/
❒ The Sony fax-back service provides you with answers to
commonly asked questions. You can use this automated service
to request a list of available topics and then select the topics you
want to receive. To contact the Sony fax-back service, call
1-877-760-7669.
❒ The Sony Customer Information Services Center offers
information about your Access Point, Wireless LAN PC Card,
and other Sony products that work with your computer. To
contact the Sony Customer Information Services Center, call
1-877-760-7669.
Open 24 hours/day, 7 days/week.
Printed in Japan
form at
 Loading...