

5GHz
Wireless LAN Access Point
4-660-142-11(1)
Applications
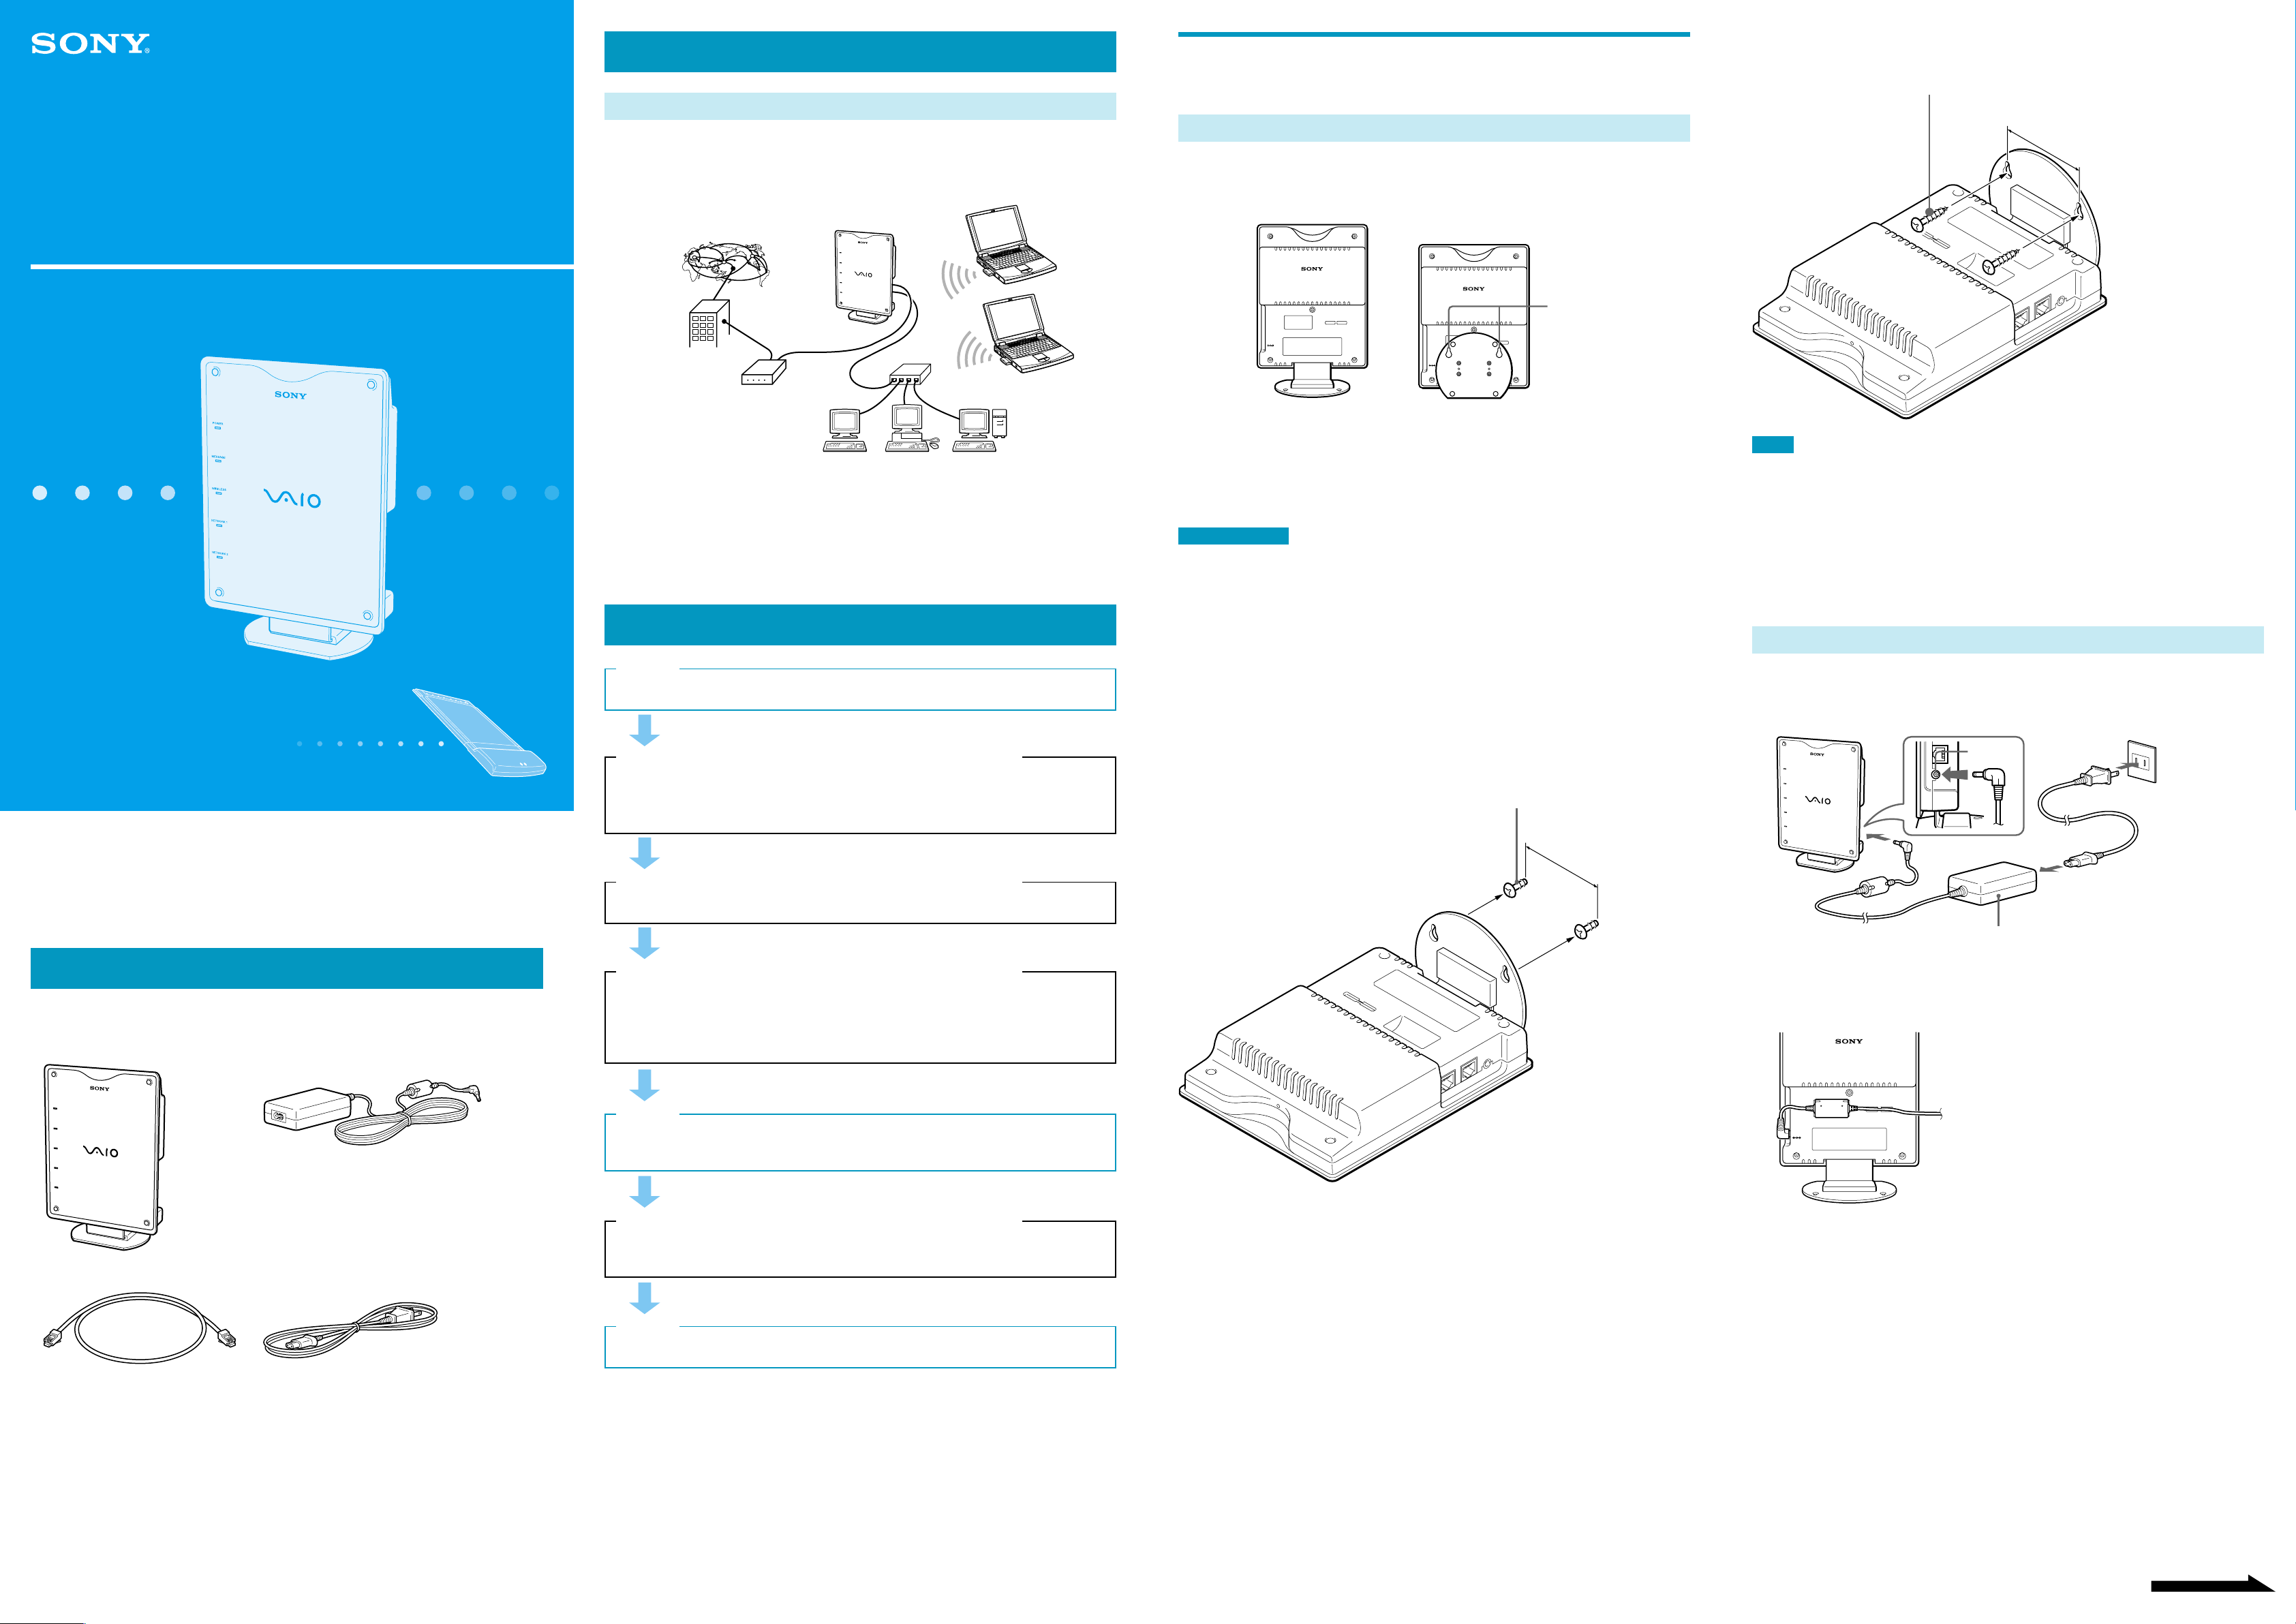
Accessing the Internet from various places in the house
By using a computer with a Wireless LAN PC Card, you can communicate with the Access Point and
share files with other computers via the Access Point. Furthermore, if you connect the Access Point to a
DSL modem, cable modem, or ISDN router, you can access the Internet from various places in the
house.
Step 1
Set up the Access Point and connect power
Locating
The Access Point stand is hinged, so it can be lowered or raised. It serves as a normal stand when
lowered or as a wall-mount adapter when raised.
Stand lowered
(standing)
Stand raised
(for wall-mounting)
Fastening the Access Point to a wall with screws:
Body diameter: 0.14 to 0.29 inches (3.5 to 7.5 mm)
Length: 1.2 inches or more (30 mm or more)
2.82 inches
(71.5 mm)
PCWA-A500 Quick Start Guide
This guide provides an overview of the functions of the 5GHz Wireless LAN Access
Point PCWA-A500 and the necessary preparations before use.
Please read first.
P
OW
ER
M
E
S
S
A
G
E
W
I
R
E
L
E
S
S
N
E
T
W
O
R
K
1
N
E
T
W
O
R
K
2
z Hint
This guide describes installation procedures for connecting the Access Point to a DSL modem, cable modem,
or ISDN router. Please refer to the Operating Instructions for the Ethernet connection procedure.
Installation and setup procedure
Step 1
Set up the Access Point and connect power.
NETWORK 1
NETWORK 2
DC IN 10V
NETWORK 1
NETWORK 2
DC IN 10V
Wall-mounting
Holes
Using in the normal standing position
The stand supports the Access Point on a horizontal surface.
For optimum performance, use the stand to keep the front face of the Access Point vertical during
operation.
Installation Notes
• Install the Access Point on a stable surface.
• Do not install it on a shelf or other place where jarring or vibration might cause it to fall.
• Do not install the Access Point in any location where passers-by might accidentally come in contact with the
Access Point or its cabling.
Using the stand as a wall-mount adapter
When mounting the Access Point on a wall, the size and spacing of mounting holes is as follows. Note
that no brackets are provided for mounting the Access Point on a wall.
Use screws or nails that meet the following requirements.
Notes
• Using two screws or other fasteners, ensure that the Access Point is securely set on the wall. When fastening the
Access Point to a wall with screws, retighten them after mounting the Access Point.
• Select a location that will hold the weight of the Access Point when mounting it on the wall. If the location cannot
hold the weight of the Access Point, the Access Point may drop and cause an accident.
• When mounting the Access Point on walls made of plasterboard or other fragile material, make sure that the
material is strong enough to support the unit's weight and use special screw fasteners or other fixtures that are
made for use with that material. If the unit is fastened with ordinary screws, there is a danger that it may fall.
• When mounting the Access Point on the wall, be careful not to drop the Access Point or the tools used for doing
the work. Dropping the unit or tools could result in unforeseeable accidents.
Connecting power
1
Connect power to the Access Point as shown below.
The following illustrations show the normal standing position.
PCWA-A500
Sony Corporation ©2002 Printed in Japan
This guide for the 5GHz Wireless LAN Access Point PCWA-A500 is intended to be read together with
the manuals provided with the 5GHz Wireless LAN PC Card PCWA-C500 (sold separately).
Unpacking
While unpacking the product, confirm that the following items are present.
• Access Point • AC adapter
P
O
W
E
R
M
E
S
S
A
G
E
W
I
R
E
L
E
S
S
N
E
T
W
O
R
K
1
N
E
T
W
O
R
K
2
Step 2
(Described in Wireless LAN PC Card Quick Start Guide)
Insert the Wireless LAN PC Card into the computer, and install the Wireless LAN PC
Card driver. This process is described in the Wireless LAN PC Card Quick Start Guide
that comes with your Wireless LAN PC Card.
Step 3
(Described in Wireless LAN PC Card Quick Start Guide)
Install the Wireless Panel software supplied with the Wireless LAN PC Card.
Step 4
(Described in Wireless LAN PC Card Quick Start Guide)
Configure the appropriate computer communications settings.
z Hint
Select Access Point Connection Mode.
Step 5
Configure the appropriate communications and Internet connection settings for the
Access Point.
Hanging the Access Point from screws set in a wall:
Head diameter: 0.24 to 0.29 inches (6.0 to 7.5 mm)
Body diameter: 0.14 to 0.15 inches (3.5 to 4.0 mm)
Length: 1.2 inches or more (30 mm or more)
2.82 inches
(71.5 mm)
Power Outlet
DC IN
PO
W
E
R
M
ES
SA
G
E
W
I
R
E
L
E
S
S
N
E
T
W
O
R
K
1
N
E
T
W
O
R
K
2
10V
AC Adapter
2
Fit the ferrite core (thick cylindrical part) of the AC Adapter cable into the
recess on the back of the Access Point, and insert the cable in the cable
securing groove.
NETWORK 1
NETWORK 2
DC IN 10V
• Ethernet cable (straight-through wiring) • Power cord
• Operating Instructions
• Quick Start Guide (this sheet)
• Warranty card
• Other printed materials
Step 6
(Described in Wireless LAN PC Card Quick Start Guide)
Configure the computer communications settings to match the settings configured
in Step 5.
Step 7
Connect the Access Point to the DSL modem, cable modem, or ISDN router.
z Hint
There is no power switch on the Access Point.
Continued on next page
Step 2
Insert the Wireless LAN PC Card into the computer, and install
the Wireless LAN PC Card driver
Refer to the Wireless LAN PC Card Quick Start Guide for details.
Step 3
Install the Wireless Panel software supplied with the Wireless
LAN PC Card
Refer to the Wireless LAN PC Card Quick Start Guide for details.
Step 4
Configure the appropriate computer communications settings
Refer to the Wireless LAN PC Card Quick Start Guide for details.
Step 5
Configure the appropriate communications and Internet
connection settings for the Access Point.
Settings are configured using a computer with a Wireless LAN PC Card connected without wires the
Access Point or using a computer connected via Ethernet to the NETWORK 2 connector on the Access
Point.
Before setting up the Access Point
Perform the following procedures as needed.
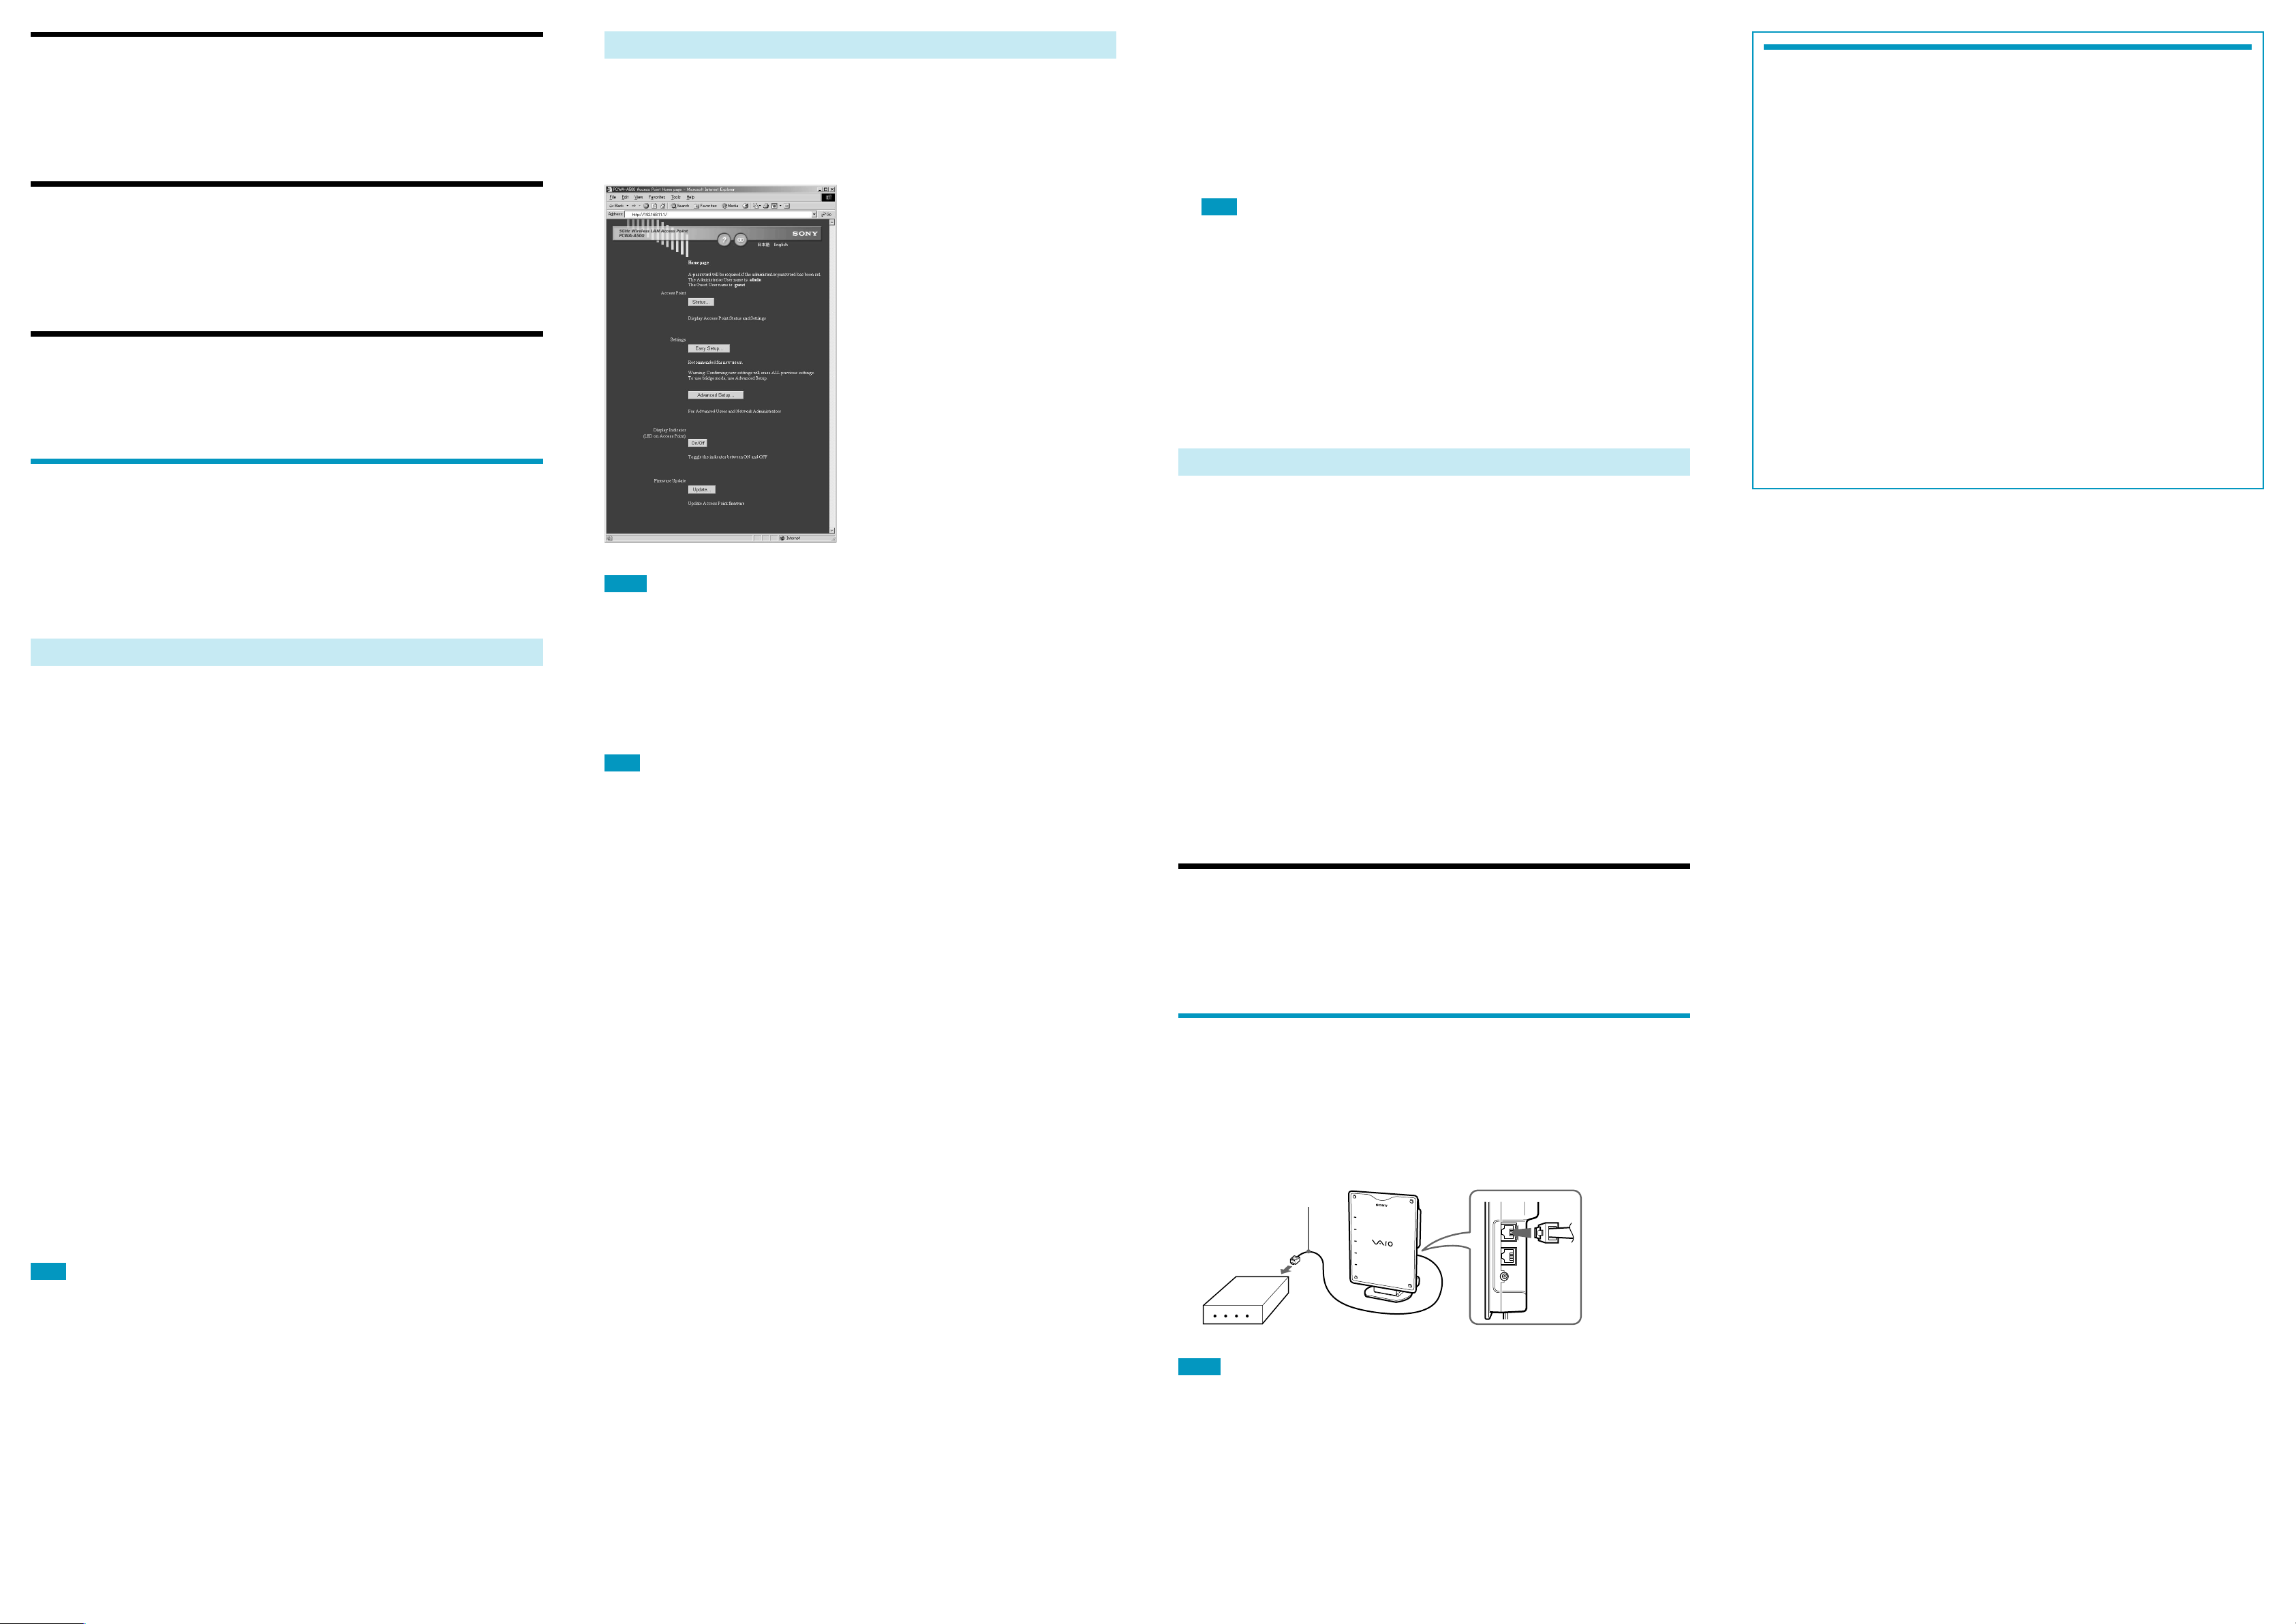
Display the Access Point setup page
Access Point settings are configured on the Access Point setup page. This Setup page can be displayed
in three methods.
z Hint
The Setup page and Access Point settings are stored in memory within the Access Point, so it can be
displayed without being connected to the Internet.
Notes
• If your web browser is configured to use a web proxy server, set the browser proxy settings so the browser does
not use a proxy server for the Access Point IP address. (The factory default setting for the Access Point IP address
is 192.168.11.1.)
• The displayed screen may differ from the above, depending on the firmware version of the Access Point.
• Your web browser version should be Internet Explorer 5 or later, or Netscape Communicator 4.75 or later.
Access Point settings can be made in the following two ways:
s Easy Setup
This method is recommended for those who are unfamiliar with computer networks. However, if
the Access Point is connected to a router-type DSL modem or to an ISDN router, the Advanced
Setup procedure must be used.
• The Access Point operates as a NAT router
• Easy Setup can generally be used to make all required settings when the ISP provides a PPPoE
connection over DSL modem or when a cable modem is used.
Note
If Easy Setup is performed after finishing Advanced Setup, the settings made with Advanced Setup are
lost, and settings are changed to those made with Easy Setup.
s Advanced Setup
This method is used to perform detailed settings for the Access Point. Also, Access Point operation
can be selected from the following two modes.
(1) NAT Router Mode
As with Easy Setup, the Access Point operates as a NAT router, but with more detailed settings
available.
(2) Bridge Mode
In this mode, the Access Point operates as a network bridge. Select this mode when a routertype DSL modem is used.
When connecting to the Internet
When using a DSL modem with a PPPoE connection or a cable modem, either Easy Setup or Advanced
Setup can be used. The Easy Setup is described here. When using a router-type DSL modem, the
Advanced Setup must be used.
Setting up a PPPoE connection with a DSL modem
Select “Connect using DSL” and enter the settings determined previously.
Setting up a connection with a cable modem
1
Depending on the connection method (IP address setting method) of the ISP,
select “Obtain an IP address automatically (DHCP)” or “Use the following IP
address”, and enter the settings determined previously.
Getting help
This section describes how to get help and support from Sony.
About Sony’s Support Options
Sony provides several support options for your Wireless LAN Access Point. When you have
questions about your Wireless LAN Access Point, check these options for answers:
❒ This guide explains how to install the Wireless LAN Access Point.
❒ Operating Instructions explains how to use your Wireless LAN Access Point.
❒ Access Point Online Help explains how configure your Wireless LAN Access Point.
❒ The Sony Wireless LAN PC Card support Web site
http://www.sony.com/wirelesslansupport/ provides the latest information on your
Wireless LAN PC Card.
❒ The Sony e-mail support service answers your questions by electronic mail. Just send
your question in an e-mail message and a customer service representative will reply. To send a
question to Sony e-mail support, fill out the e-mail form at
http://www.sony.com/wirelesslansupport/
❒ The Sony fax-back service provides you with answers to commonly asked questions. You
can use this automated service to request a list of available topics and then select the topics you
want to receive. To contact the Sony fax-back service, call
1-877-760-7669.
❒ The Sony Customer Information Services Center offers information about your Access
Point, Wireless LAN PC Card, and other Sony products that work with your computer. To
contact the Sony Customer Information Services Center, call 1-877-760-7669.
Open 24 hours/day, 7 days/week.
When connecting the Access Point to the Internet
Confirm the following items first.
s If connecting through a DSL modem
From the information provided by your ISP (Internet Service Provider) and your DSL modem
operating manual, determine whether the connection to your ISP is a PPPoE connection or if your
DSL modem supports a router-type connection. Then confirm the following according to the
connection type determined.
For PPPoE connection:
Determine the following items from the information provided by your ISP:
(1) Your account ID (called “User Account” or “User ID”)
(2) The password corresponding to your account ID.
(3) Service name (if specifically provided by your ISP)
(4) Access Concentrator name (if specifically provided by your ISP)
For router-type DSL modem connection:
No particular information needs to be determined beforehand.
s If connecting through a cable modem
From the information provided by your ISP and your cable modem operating manual, determine
whether the connection to your ISP is a DHCP connection (computer IP address assigned
automatically) or a connection by a fixed IP address (computer IP address entered manually). Then
confirm the following according to connection type.
For a DHCP connection (computer IP address assigned automatically):
Determine the “DHCP Client ID” from the information provided by your ISP (if specifically
provided).
For a fixed IP address (computer IP address entered manually):
Determine the IP address to be assigned to your computer from the information provided by your
ISP.
s If using an ISDN router
No particular information needs to be determined beforehand.
Note
In some cases, your ISP may not permit connecting the Access Point to a DSL or cable modem as a router.
Please obey the terms of your contract with your ISP.
Display through a Wireless LAN PC Card using the Wireless
Network Easy Setup Wizard
Note
This method can only be used with Windows® Millennium Edition or Windows® 2000 Professional.
1
Start the Wireless Connection Easy Setup Wizard.
z Hint
To Start the Wireless Connection Easy Setup Wizard, install the Wireless Panel and follow the onscreen
instructions. However, you can start the Wireless Network Easy Setup Wizard any time you like.
For details, refer to the Wireless LAN PC Card Quick Start Guide.
2
Follow the Wizard to configure the computer communications settings.
When finished configring the computer communications settings, continue following the on-screen
instructions to display the Access Point setup page.
Display from Wireless Panel
1
Run Wireless Panel, double-click the Wireless Panel icon (Received Signal
Level indicator) in the taskbar.
The Wireless Panel main screen appears.
z Hint
Refer to the Wireless LAN PC Card Quick Start Guide for details.
2
Click the AP Setting button.
The web browser starts with the Access Point setup page displayed.
Display by entering the IP address
1
Start up your web browser.
2
Type “http://192.168.11.1/” in the URL entry field, then press Enter.
The Access Point setup page appears.
z Hint
The IP address above is the factory default setting for the Access Point. Contact your network
administrator if it has been changed.
When the setup page appears, follow the screens to configure the appropriate settings.
Please refer to the Operating Instructions (separate booklet) or the online Help if you need further
clarification.
2
If you selected “Use the following IP address”, enter the IP address
determined previously.
Setting up a connection with a router-type DSL modem or an
ISDN router
Select Bridge Mode under Advanced Setup.
Step 6
Configure the computer communications settings to match the
settings made in Step 5
Refer to the Wireless LAN PC Card Quick Start Guide for details.
Step 7
Connect the Access Point to the DSL modem, cable modem,
or ISDN router
Connect the DSL modem, cable modem, or ISDN router to the Access Point NETWORK 1 connector
using Ethernet cable as shown below.
Connecting the DSL or
cable modem to the
NETWORK 1 connector
P
O
W
E
R
M
E
S
S
A
G
E
W
I
R
E
L
E
S
S
N
E
T
W
O
R
K
1
N
E
T
W
O
R
K
2
Notes
• Use Category 5 Ethernet cable for connections
• In most cases, Ethernet cable with straight-through wiring is used, but for some communications devices,
crossover wiring may be needed. Use the same type of cable as would be used when connecting a computer to the
communications device (the supplied Ethernet cable has straight-through wiring).
Basic setup for wireless communications is finished.
 Loading...