

PCWA-A100 - Wireless Lan Access Point,PCWA-A200 - Wireless Lan Access Point,PCWA-A220 - Wireless Lan Access Point
Sony PCWA-A100 - Wireless Lan Access Point,PCWA-A200 - Wireless Lan Access Point,PCWA-A220 - Wireless Lan Access Point Getting Started
Getting started
The Wireless Palette is a software application for monitoring the communication status between the Wireless LAN PC Card and the
Wireless LAN Access Point (hereinafter referred to as the Access Point). It resides on a client computer and is also used for switching
an Access Point into use when multiple Access Points are present. The reception level is typically indicated on the task tray.
You can also view the Internet connections status with the communication status window.
This Help file is verified trouble-free with Microsoft Internet Explorer 5.0.
With the older versions, some parts including step numbers may not be properly displayed.
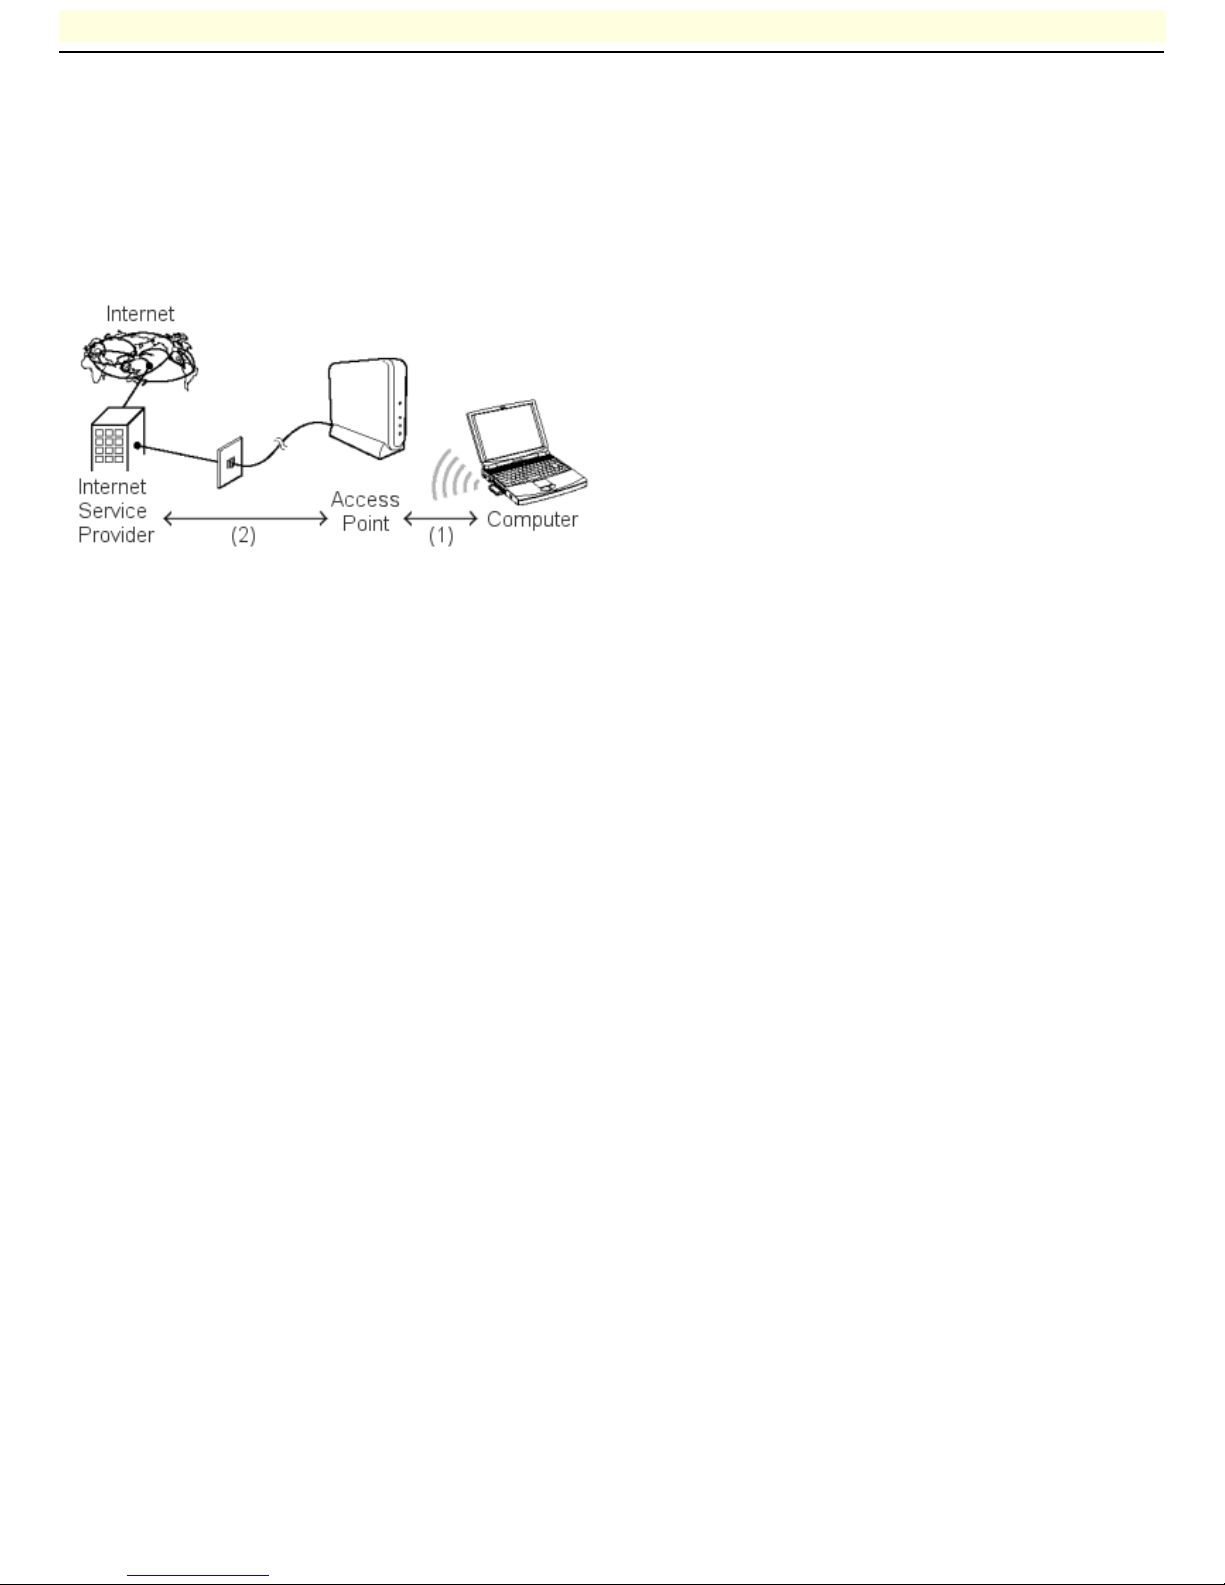
Roles of the Wireless Palette and the Access Point Setup Utilities
(1) Use the Wireless Palette to make settings required for communications between the computer and the Access Point.
(2) Use the Basic Access Point Setup Utility or the Custom Access Point Setup Utility to make settings required for connection
between the Access Point and the Internet Service Provider (ISP).
The utility must be used on one of the computers on the wireless LAN.
Page 1
Wireless Palette
Window components
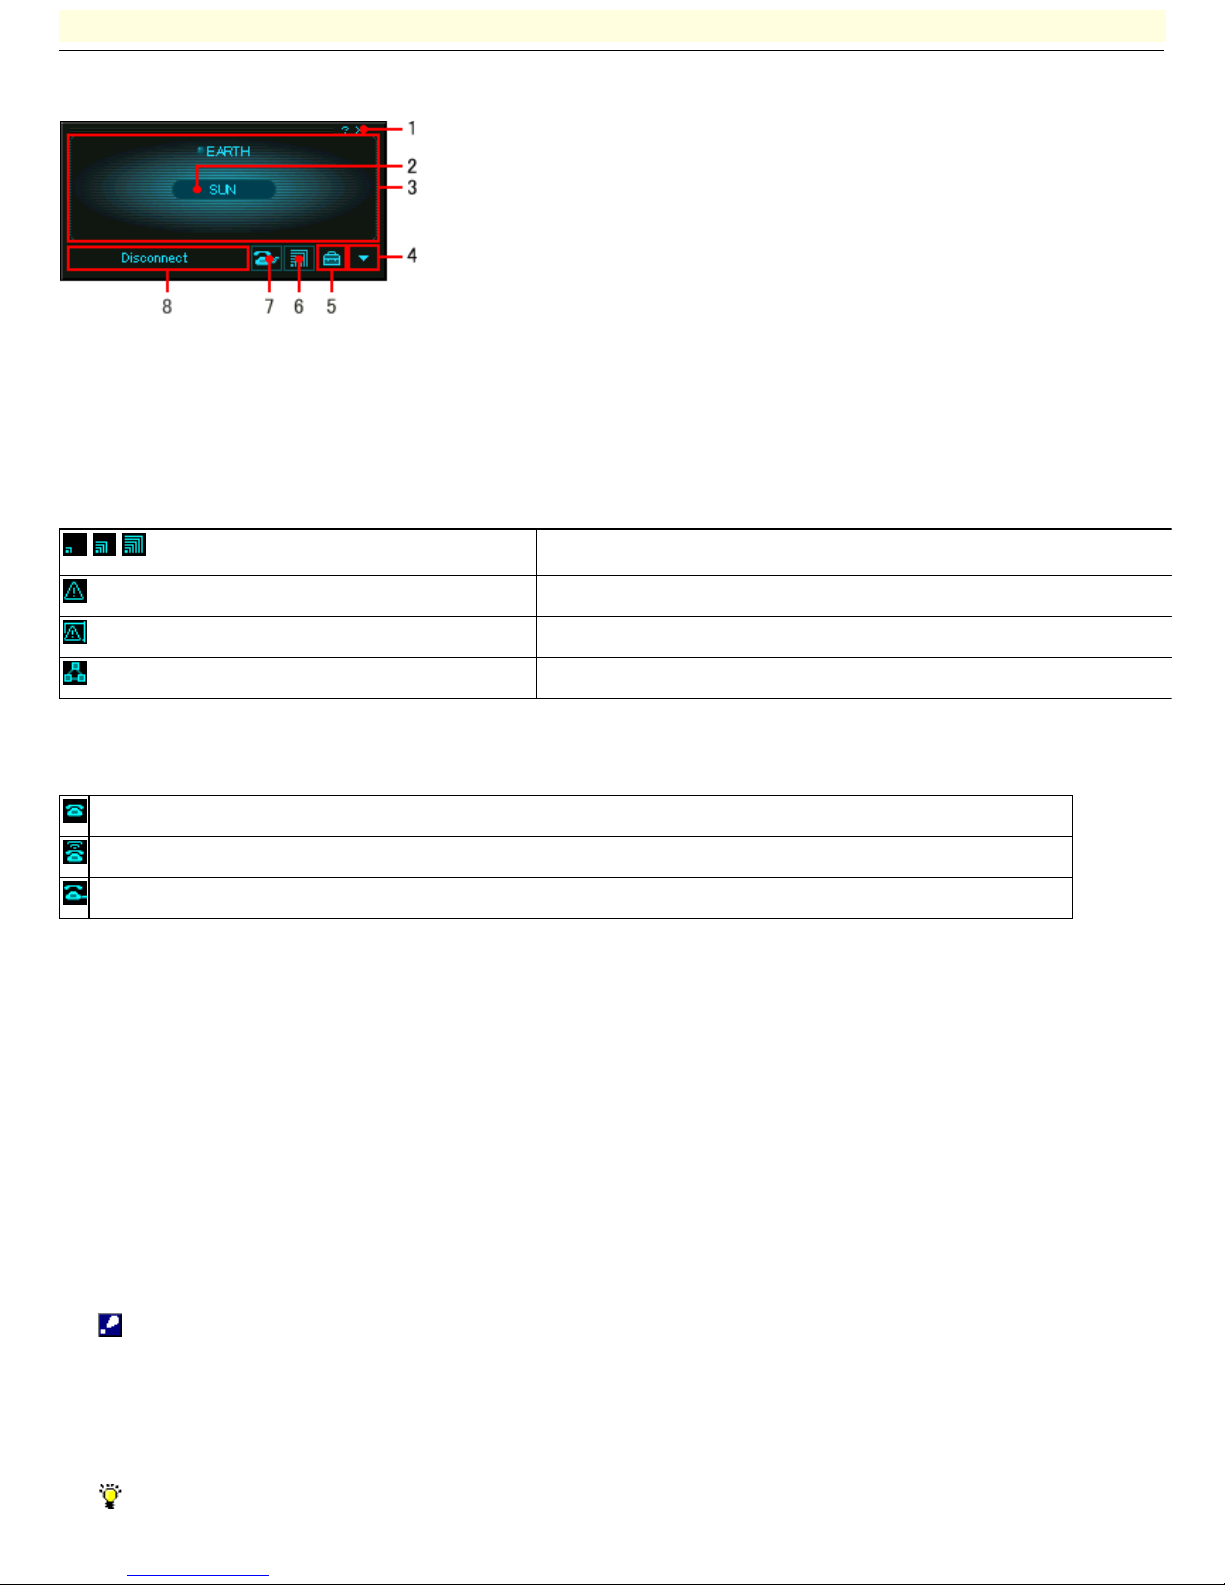
The figure below details the various components of the Wireless Palette.
1.
Back to Task Tray button
Minimizes the Wireless Palette to the task tray.
When the Wireless Palette is minimized to the task tray, two icons are displayed: one indicating the communication status with
the Access Point and the other indicating the dial-up connection status.
Icon indicating the com m unication status w ith the Access Point.
/ /
Indicates the reception level.
Indicates that your computer is located out of the communication range.
Indicates that the Wireless LAN PC Card is not inserted or w orking properly.
Indicates that the Wireless LAN PC Card is communicating in the Peer to Peer mode.
Icon indicating the dial-up conne ction s tatus.
Indicates that connection to the ISP is not established.
Indicates that a call to the ISP is attempted.
Indicates that connection to the ISP is established.
2.
Nickname of the selected Access Point
The nickname specified when the Access Point was registered.
3.
Clients connected to the Access Point
The names of computers connected to the Access Point.
The computer name displayed here is the name assigned to the computer in Windows.
Note
o
When the Wireless Palette is displayed in a window, it periodically updates the client names. It may display names of the
clients that are not connected depending on the update timing.
o
The correct client names may not be displayed if a third-party wireless LAN card is in use.
Hint
If the number of clients is nine or more, the Wireless Palette lists their names in a scrollable window.
Page 2

4.
Advanced button
Click this button to expand the window downward and view the wireless connection status and Advanced information about the
Access Point.
5.
Tool Box button
Click this button to display the Tool Box dialog box.
This dialog box allows you to view and change the Access Point and the Wireless LAN PC Card settings.
Access Point List
A list of registered Access Points is displayed in the Wireless Palette.
Select
Selects an Access Point to use. Select the Access Point you want to use from the Access Point List and click this button.
Add
Adds a new Access Point to the Wireless Palette. For details on the operation, see Registering the Access Point.
Delete
Deletes an Access Point from the Wireless Palette that is no longer required. Select the Access Point you want to delete in
the Access Point List and click this button.
6.
Reception level indicator
The reception level indicator icon indicates whether or not your computer is communicating with the Access Point. When this
indicator appears as , no communications are taking place between your computer and the Access Point. If the computer is
located close enough to the Access Point for communications but the same indicator appears, check the Access Point setting.
7.
Dial-up status indicator
When Phone Connection is the selected Connection Mode of the Access Point, either one of three statuses is indicated:
Disconnected , Dialing , or Connecting .
8.
Dial-up Connect/Disconnect button
When Phone Connection is the selected Connection Mode of the Access Point, the Connect or Disconnect buttons is displayed.
Click Connect to connect to the ISP or Disconnect to disconnect from the ISP.
Note
o
This button is enabled for the dial-up connection only and not displayed in the other connection modes.
o
Clicking Disconnect disables Connect for a minute.
o
Clicking Disconnect may not notify other clients of your disconnected status.
Page 3

Monitoring the communication status
The Wireless Palette allows you to monitor the communication status between the Access Point and the Wireless LAN PC Card, and
the connection status to the Internet.
1.
Double-click the Wireless Palette icon on the task tray.
The Wireless Palette appears.
2.
Click the Advanced button .
The Advanced information is displayed.
Page 4
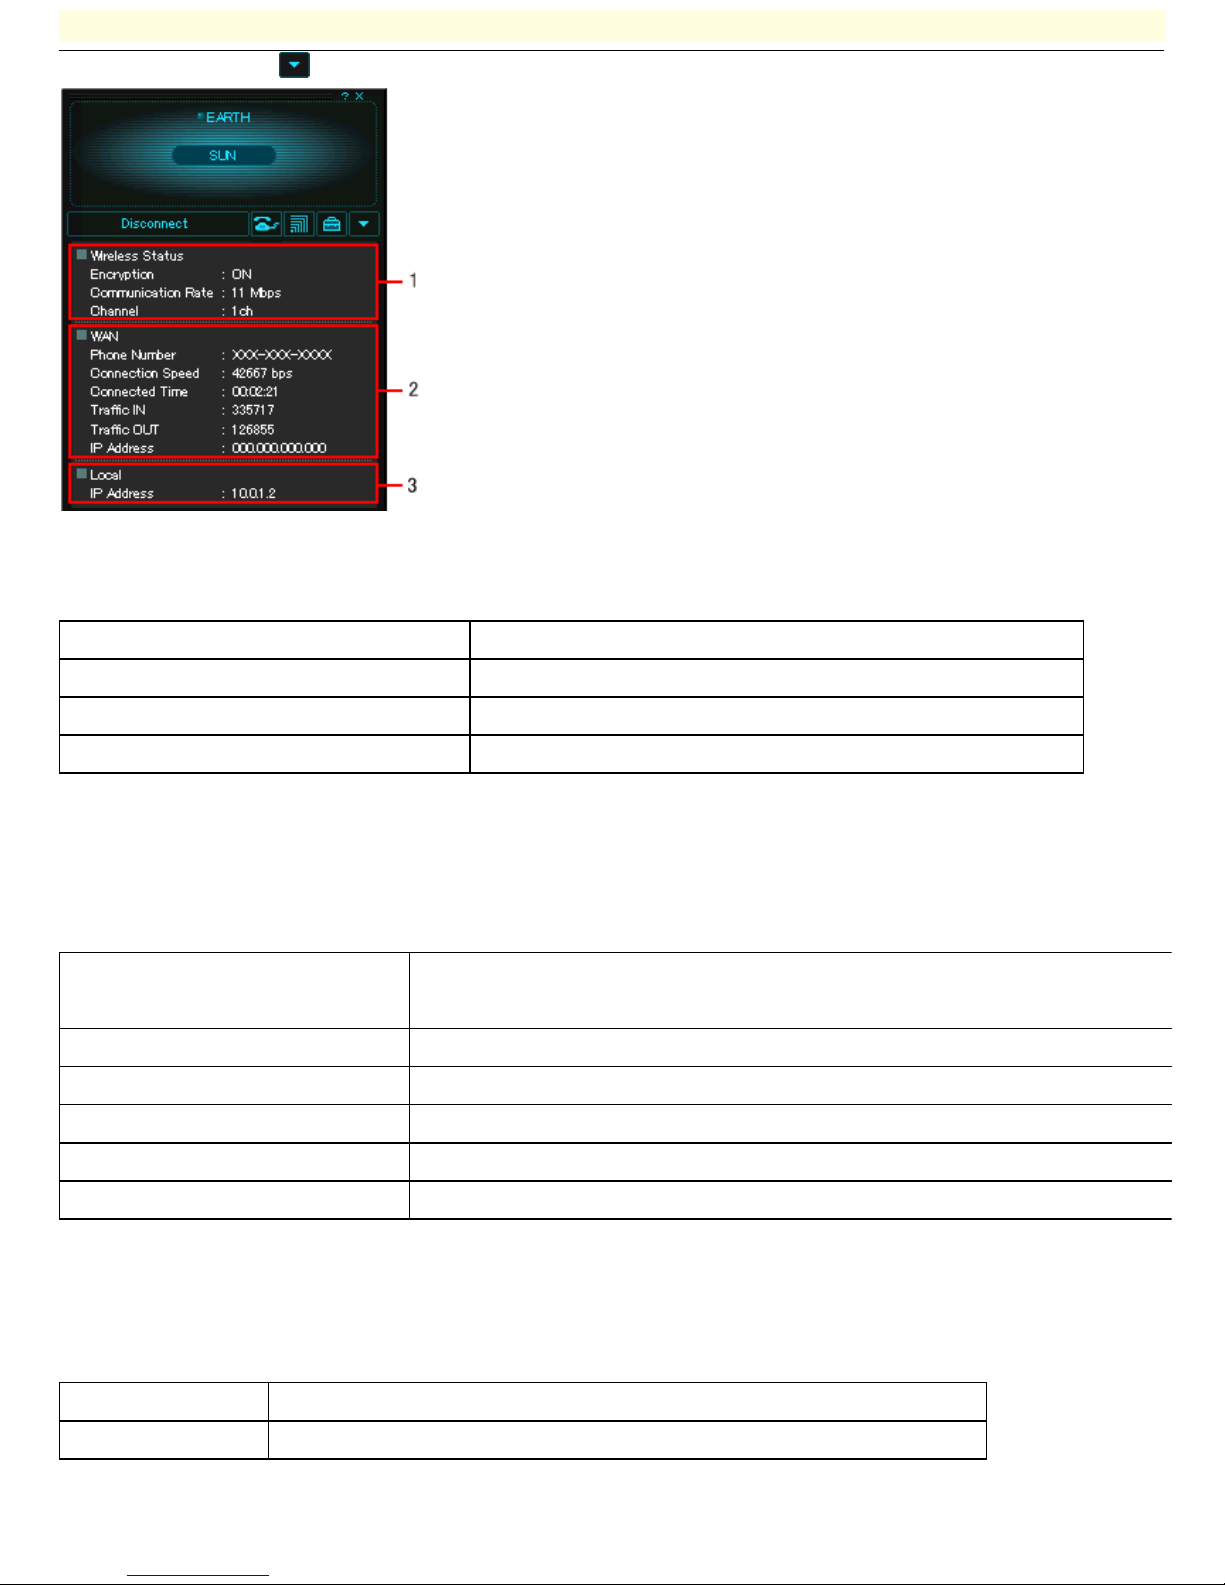
Advanced information
Click the Advanced button on the Wireless Palette to display advanced information about the Access Point.
1.
Wireless Status
Item
De s cription
Encryption ON/OFF
Displays w hether encryption mode is enabled/disabled.
Communication Rate
Displays the w ireless communication rate.
Channel
Displays the channel number.
2.
3.
WAN
Displays information about the Access Point. This information varies depending on the Connection Mode of the Access Point.
Item
De s cription
Information display
Phone Conne ction
Cable M ode m /xDSL
ISDN Router/LAN
Local Only
Phone Number
Displays the telephone number.
Yes
No
No
No
Connection Speed
Displays the connection speed of your modem to the ISP.
Yes
No
No
No
Connected Time
Displays the length of time the Access Point is connected to the ISP.*
Yes
No
No
No
Traffic
Displays the amount of data exchanged in bytes. IN indicates the amount of data received; OUT indicates the amount of data transmitted.
Yes
No
No
No
IP Address
Displays the IP address assigned to the Access Point.
Yes
Yes
No
No
* If your acc ess to the Acces s Point has already es tablished a dial-up connection to the ISP, the correc t connected time may not be displayed.
4.
Local
Displays information about the Access Point on the LAN.
Item
De s cription
IP Address
Displays the IP address of the Access Point assigned on the LAN.
Page 5

Registering the Access Point
Register the Access Point to use for communication on the Wireless Palette. When you have two or more Access Points, you can
select the Access Point you want to use by registering every Access Point. You may register up to four Access Points.
1.
Double-click the Wireless Palette icon on the task tray.
The Wireless Palette appears.
2.
Click the Tool Box button .
The Tool Box dialog box appears.
3.
Click Add.
The Add New Access Point dialog box appears.
4.
Specify the Nickname, Access Point ID, and Encryption Key.
Nickname
Enter the nickname for the Access Point. You may enter up to eight alphanumeric characters.
Access Point ID
Enter the ID for the Access Point that you want to register. The Access Point ID is printed on the ID label on the bottom
surface of the Access Point.
If you have checked Peer to Peer, enter a string of up to 32 alphanumeric characters.
Encryption Key
Enter the Encryption Key specified for the Access Point you are registering with Access Point Setup Utilities, if you want
encrypted wireless communication.
If the Encryption Key is not specified for the Access Point, no wireless communications are encrypted. If so, leave this field
blank.
Notes
o
Enter the Encryption Key that you specified using one of the Access Point Setup Utilities for Encryption Key on the Wireless
Palette.
o
Ask your Access Point manager for the Encryption Key.
Hint
Change the Encryption Key as follows:
o
Change the Encryption Key using one of the Access Point Setup Utilities.
o
When you have changed the Encryption Key, register the Access Point as a new entry using the Wireless Palette.
(1)If only one Access Point is registered on the Wireless Palette,
Page 6
 Loading...