

Page 1
Getting started
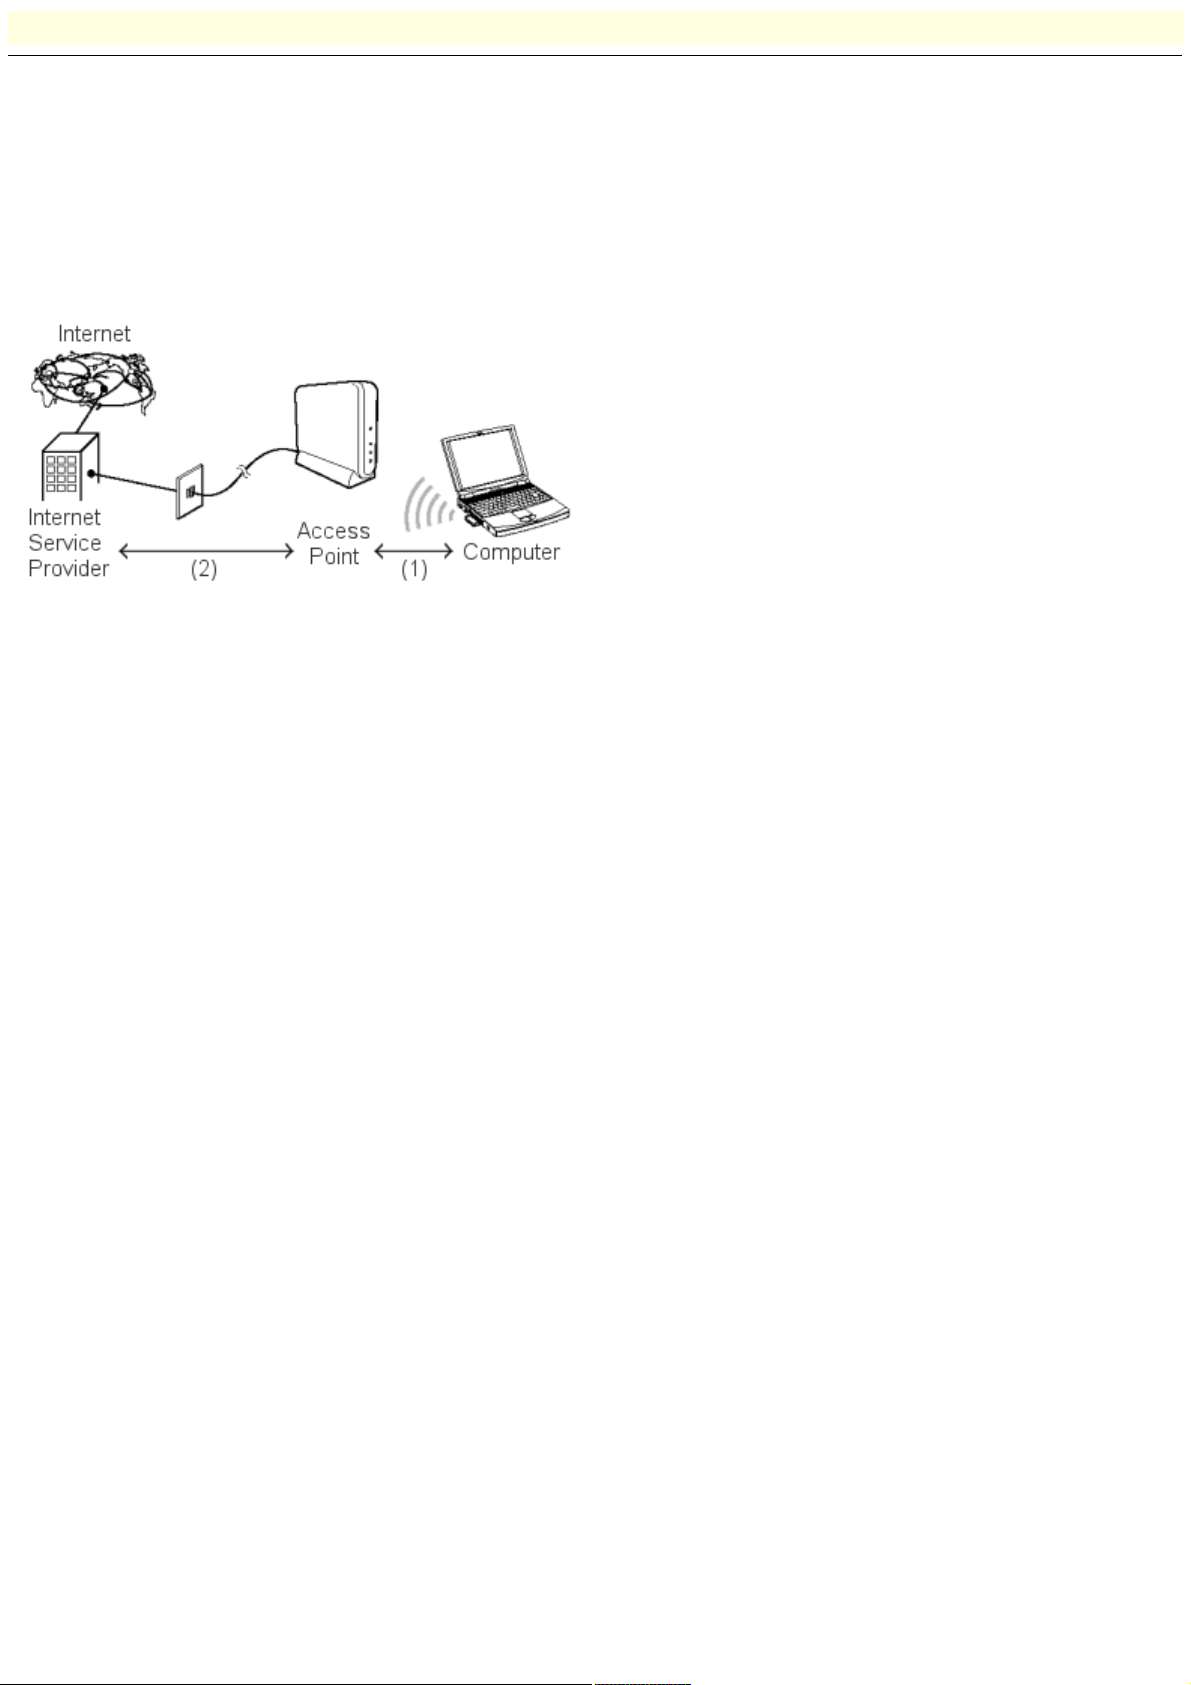
The Wireless Palette is a software application for monitoring the communication status between the Wireless LAN PC Card and the
Wireless LAN Access Point (hereinafter referred to as the Access Point). It resides on a client computer and is also used for switching
an Access Point into use when multiple Access Points are present. The reception level is typically indicated on the task tray.
You can also view the Internet connections status with the communication status window.
This Help file is verified trouble-free with Microsoft Internet Explorer 5.0.
With the older versions, some parts including step numbers may not be properly displayed.
Roles of the Wireless Palette and the Access Point Setup Utilities
(1) Use the Wireless Palette to make settings required for communications between the computer and the Access Point.
(2) Use the Basic Access Point Setup Utility or the Custom Access Point Setup Utility to make settings required for connection
between the Access Point and the Internet Service Provider (ISP).
The utility must be used on one of the computers on the wireless LAN.
Page 1
Page 2
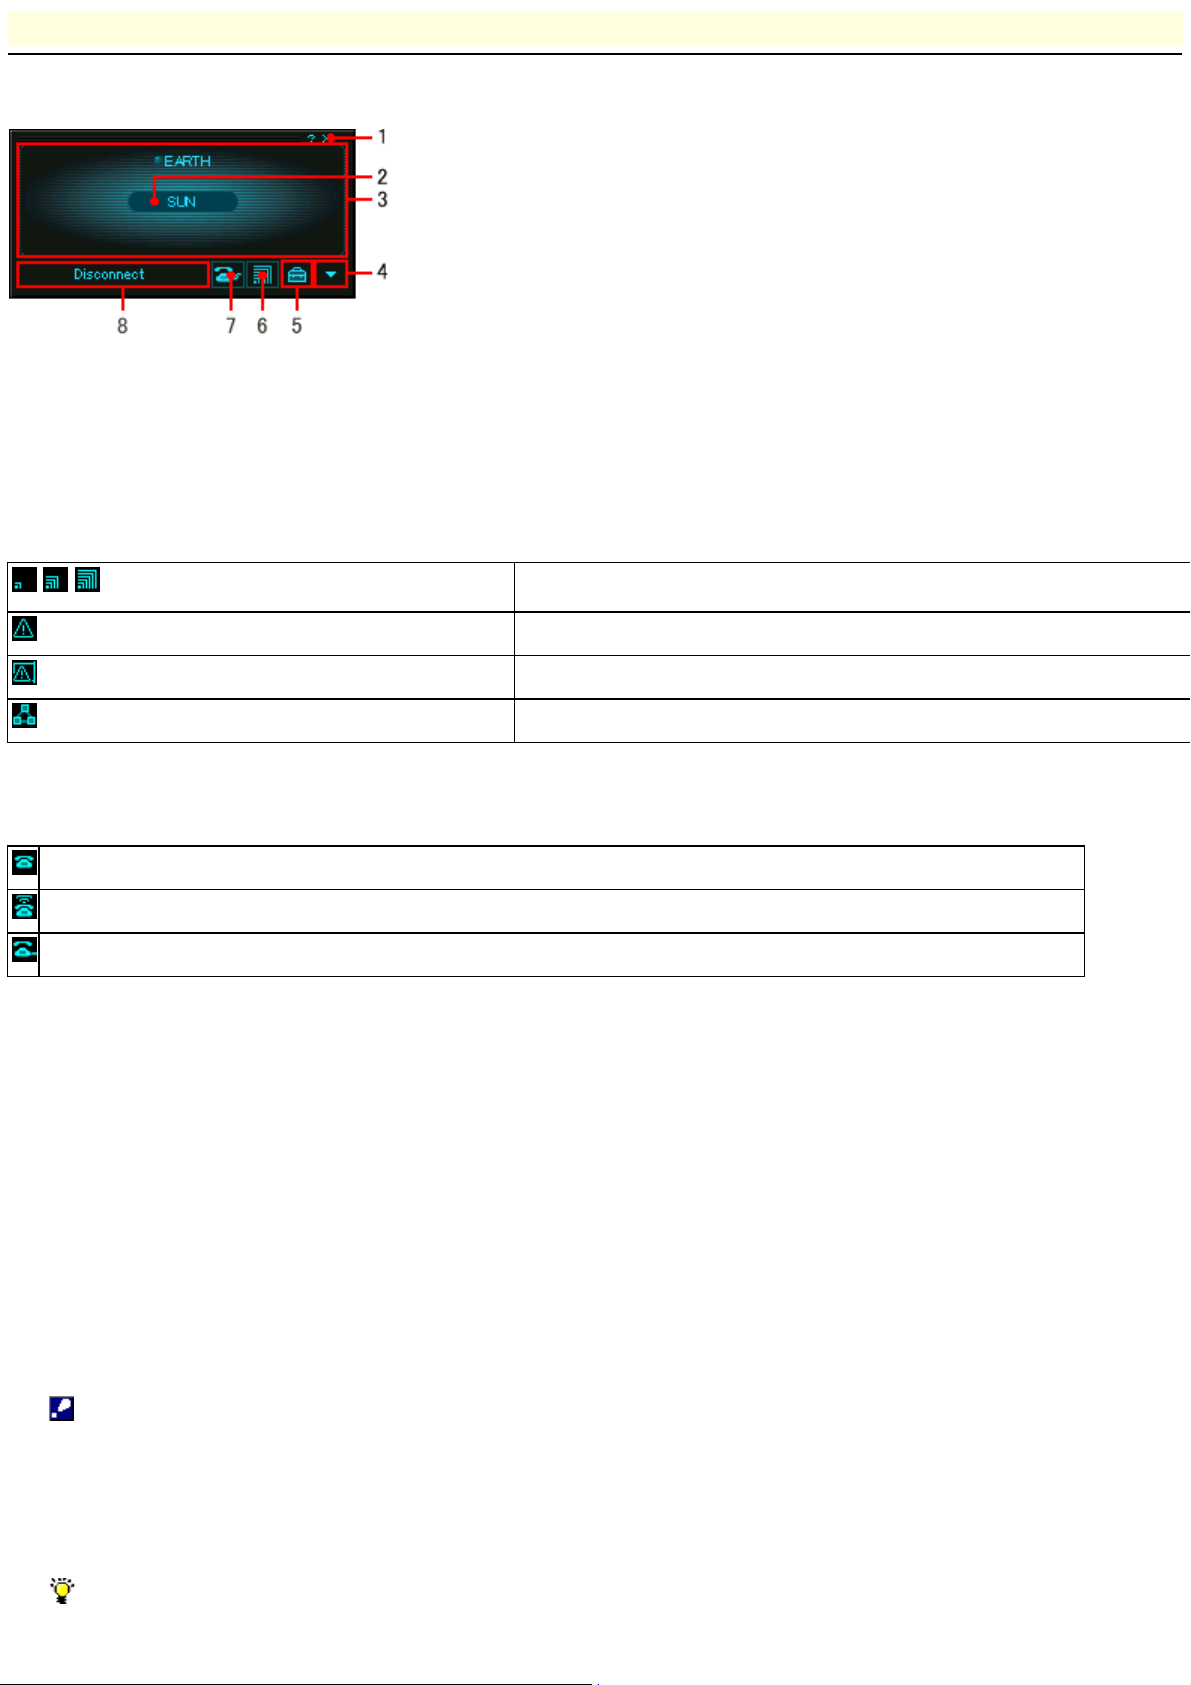
Wireless Palette
Icon indicating the com m unication status w ith the Acce s s Point.
/ /
Indicates the reception level.
Indicates that your computer is located out of the communication range.
Indicates that the Wireless LAN PC Card is not inserted or w orking properly.
Indicates that the Wireless LAN PC Card is communicating in the Peer to Peer mode.
Icon indicating the dial-up conne ction s tatus .
Indicates that connection to the ISP is not established.
Indicates that a call to the ISP is attempted.
Indicates that connection to the ISP is established.
Window components
The figure below details the various components of the Wireless Palette.
Back to Task Tray button
1.
Minimizes the Wireless Palette to the task tray.
When the Wireless Palette is minimized to the task tray, two icons are displayed: one indicating the communication status with
the Access Point and the other indicating the dial-up connection status.
Nickname of the selected Access Point
2.
The nickname specified when the Access Point was registered.
Clients connected to the Access Point
3.
The names of computers connected to the Access Point.
The computer name displayed here is the name assigned to the computer in Windows.
Note
When the Wireless Palette is displayed in a window, it periodically updates the client names. It may display names of the
o
clients that are not connected depending on the update timing.
The correct client names may not be displayed if a third-party wireless LAN card is in use.
o
Hint
If the number of clients is nine or more, the Wireless Palette lists their names in a scrollable window.
Page 2
Page 3

Advanced button
4.
Click this button to expand the window downward and view the wireless connection status and Advanced information about the
Access Point.
Tool Box button
5.
Click this button to display the Tool Box dialog box.
This dialog box allows you to view and change the Access Point and the Wireless LAN PC Card settings.
Access Point List
A list of registered Access Points is displayed in the Wireless Palette.
Select
Selects an Access Point to use. Select the Access Point you want to use from the Access Point List and click this button.
Add
Adds a new Access Point to the Wireless Palette. For details on the operation, see Registering the Access Point.
Delete
Deletes an Access Point from the Wireless Palette that is no longer required. Select the Access Point you want to delete in
the Access Point List and click this button.
Reception level indicator
6.
The reception level indicator icon indicates whether or not your computer is communicating with the Access Point. When this
indicator appears as , no communications are taking place between your computer and the Access Point. If the computer is
located close enough to the Access Point for communications but the same indicator appears, check the Access Point setting.
Dial-up status indicator
7.
When Phone Connection is the selected Connection Mode of the Access Point, either one of three statuses is indicated:
Disconnected , Dialing , or Connecting .
Dial-up Connect/Disconnect button
8.
When Phone Connection is the selected Connection Mode of the Access Point, the Connect or Disconnect buttons is displayed.
Click Connect to connect to the ISP or Disconnect to disconnect from the ISP.
Note
This button is enabled for the dial-up connection only and not displayed in the other connection modes.
o
Clicking Disconnect disables Connect for a minute.
o
Clicking Disconnect may not notify other clients of your disconnected status.
o
Page 3
Page 4

Monitoring the communication status
The Wireless Palette allows you to monitor the communication status between the Access Point and the Wireless LAN PC Card, and
the connection status to the Internet.
Double-click the Wireless Palette icon on the task tray.
1.
The Wireless Palette appears.
Click the Advanced button .
2.
The Advanced information is displayed.
Page 4
Page 5
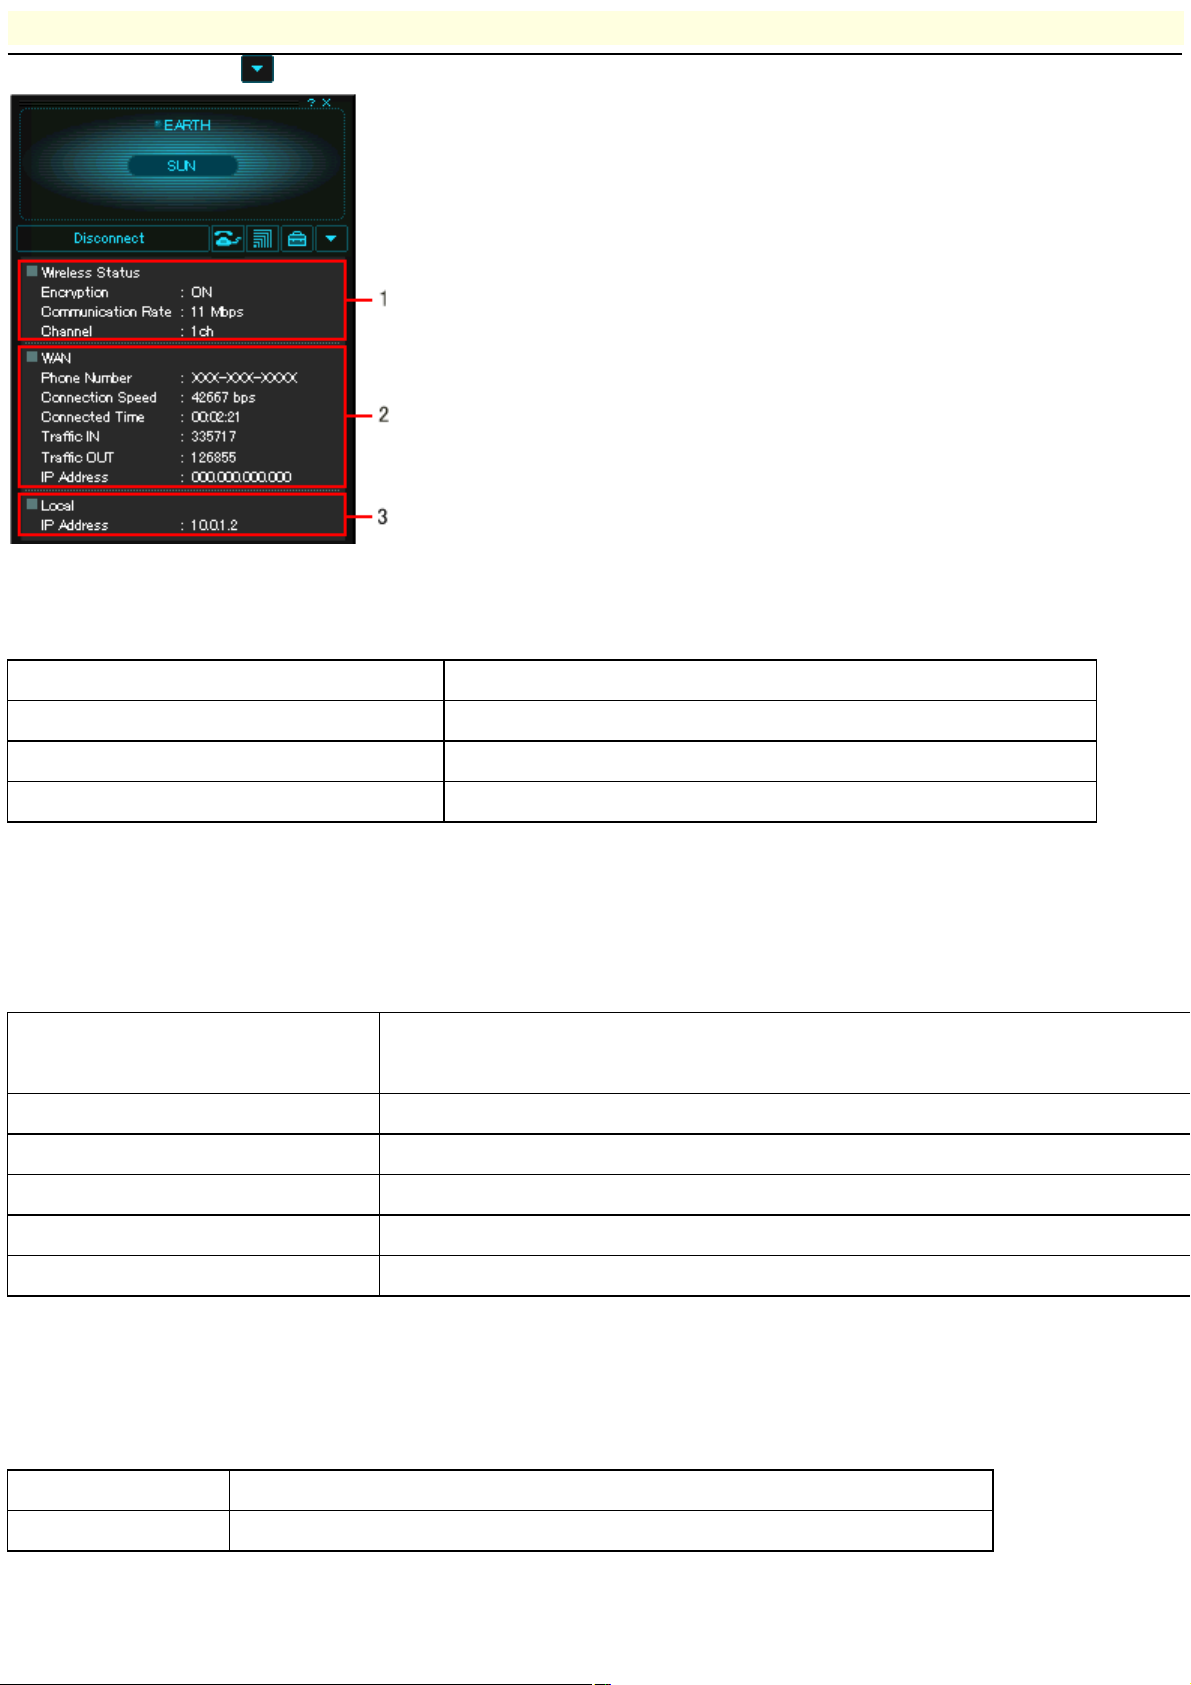
Advanced information
Item
De s cription
Encryption ON/OFF
Displays w hether encryption mode is enabled/disabled.
Communication Rate
Displays the w ireless communication rate.
Channel
Displays the channel number.
Item
De s cription
Information display
Phone Conne ction
Cable M odem /xDSL
ISDN Router/LAN
Local Only
Phone Number
Displays the telephone number.
Yes
No
No
No
Connection Speed
Displays the connection speed of your modem to the ISP.
Yes
No
No
No
Connected Time
Displays the length of time the Access Point is connected to the ISP.*
Yes
No
No
No
Traffic
Displays the amount of data exchanged in bytes. IN indicates the amount of data received; OUT indicates the amount of data transmitted.
Yes
No
No
No
IP Address
Displays the IP address assigned to the Access Point.
Yes
Yes
No
No
Item
De s cription
IP Address
Displays the IP address of the Access Point assigned on the LAN.
Click the Advanced button on the Wireless Palette to display advanced information about the Access Point.
Wireless Status
1.
2.
WAN
3.
Displays information about the Access Point. This information varies depending on the Connection Mode of the Access Point.
* If your acc ess to the Acces s Point has already establis hed a dial-up connection to the ISP, the c orrect c onnected time may not be displayed.
Local
4.
Displays information about the Access Point on the LAN.
Page 5
Page 6

Registering the Access Point
Register the Access Point to use for communication on the Wireless Palette. When you have two or more Access Points, you can
select the Access Point you want to use by registering every Access Point. You may register up to four Access Points.
Double-click the Wireless Palette icon on the task tray.
1.
The Wireless Palette appears.
Click the Tool Box button .
2.
The Tool Box dialog box appears.
Click Add.
3.
The Add New Access Point dialog box appears.
Specify the Nickname, Access Point ID, and Encryption Key.
4.
Nickname
Enter the nickname for the Access Point. You may enter up to eight alphanumeric characters.
Access Point ID
Enter the ID for the Access Point that you want to register. The Access Point ID is printed on the ID label on the bottom
surface of the Access Point.
If you have checked Peer to Peer, enter a string of up to 32 alphanumeric characters.
Encryption Key
Enter the Encryption Key specified for the Access Point you are registering with Access Point Setup Utilities, if you want
encrypted wireless communication.
If the Encryption Key is not specified for the Access Point, no wireless communications are encrypted. If so, leave this field
blank.
Notes
Enter the Encryption Key that you specified using one of the Access Point Setup Utilities for Encryption Key on the Wireless
o
Palette.
Ask your Access Point manager for the Encryption Key.
o
Hint
Change the Encryption Key as follows:
Change the Encryption Key using one of the Access Point Setup Utilities.
o
When you have changed the Encryption Key, register the Access Point as a new entry using the Wireless Palette.
o
(1)If only one Access Point is registered on the Wireless Palette,
Page 6
Page 7

Register a new Access Point.
1.
Select the new Access Point.
2.
Delete the old Access Point.
3.
(2)If multiple Access Points are registered and you have another Access Point available for wireless communications,
Select another Access Point.
4.
Delete the old Access Point.
5.
Register a new Access Point.
6.
Select the new Access Point.
7.
(The Encryption Key of the computer on which you used one of the Access Point Setup Utilities is automatically changed.
There is no need to re-register the Access Point.)
Peer to Peer
Check this option to build a wireless LAN environment without the Access Point where direct communications among
computers are enabled.
Note
Make sure to check Peer to Peer only on the first computer you register the Access Point using the Wireless Palette.
Channel
This option becomes available for selection when Peer to Peer is checked. When other wireless LANs exist in close proximity,
specify a unique channel for each LAN to avoid radio interference.
Click OK.
5.
A new Access Point is registered. To use the new Access Point, you must select it as the Access Point to use.
To change the registration data of the Access Point
Delete the registered Access Point, then register a new one.
Page 7
Page 8

Selecting an Access Point
With multiple Access Points registered, you can switch from one to another in accordance with your needs.
Double-click the Wireless Palette icon on the task tray.
1.
The Wireless Palette appears.
Click the Tool Box button .
2.
The Tool Box dialog box appears.
From the Access Point List, select the Access Point to which you want to connect.
3.
Click Select.
4.
The registration data of the selected Access Point is displayed.
Note
You cannot change the registration data here.
To change the registration data, re-register the Access Point, select the re-registered data, then delete the old data.
Click OK.
5.
The selected Access Point is used for the wireless communications.
Note
If an error message appears during the operation and the Access Point is not switched, verify the following:
If switching the Access Point fails, the previous Access Point is still selected.
The Wireless LAN PC Card is inserted in your computer.
o
The Access Point is powered.
o
The computer containing the Wireless LAN PC Card and the Access Point are placed close enough to communicate with each
o
other (within approximately 50 m (165 feet)).
Ask a person who configured the Access Point with one of the Access Point Setup Utilities if he changed the Encryption Key of
o
the Access Point.
To use a new Access Point, do the following:
Register a new Access Point using the Wireless Palette.
o
Select the new Access Point following the above procedure.
o
If necessary, use one of the Access Point Setup Utilities to change the Access Point configuration on one of the computers on
o
the wireless LAN.
For how to use the Basic Access Point Setup Utility, refer to the Operating Instructions manual that comes with the Wireless LAN
Page 8
Page 9

PC Card.
For how to use the Custom Access Point Setup Utility, see the Custom Access Point Setup Utility Help.
Page 9
Page 10

Deleting an Access Point
To delete a registered Access Point, follow the steps below.
Double-click the Wireless Palette icon on the task tray.
1.
The Wireless Palette appears.
Click the Tool Box button .
2.
The Tool Box dialog box appears.
From the Access Point List, select an Access Point you want to delete.
3.
Click Delete.
4.
The setting for connecting to the selected Access Point is deleted.
Note
You cannot delete the setting for the Access Point to which you are connected.
Page 10
Page 11

Manually connecting/disconnecting the dial-up connection
If the telephone line is used for Internet access, you can manually connect or disconnect the dial-up connection to the Internet.
To establish the dial-up connection (make a call)
Double-click the Wireless Palette icon on the task tray.
1.
The Wireless Palette appears.
Click Connect.
2.
The dial-up connection is established.
To disconnect the dial-up connection (hang up)
Double-click the Wireless Palette icon on the task tray.
1.
The Wireless Palette appears.
Click Disconnect.
2.
The dial-up connection is disconnected.
Note
The Access Point allows multiple computers simultaneous access to the Internet, but does not automatically disconnect the dial-up
connection when an e-mail or browser application is closed.
If no communications are made for two minutes, the Access Point will automatically disconnect the dial-up connection.
The time period allowed before automatic disconnection may be changed using the Custom Access Point Setup Utility.
Note that automatic disconnection may not work due to unexpected packets sent from the Internet. Click Disconnect to disconnect the
connection when you are through with the Internet access.
See the description on hangup after in the Custom Access Point Setup Utility Help for more information.
Hint
You can set your computer to automatically connect to the Access Point when an e-mail or browser application is launched. See
the description on automatic connection in the Custom Access Point Setup Utility Help for more information.
If the dial-up connection fails, you can point the mouse cursor to the dial-up status indicator ( etc.) to see the cause.
Page 11
Page 12

Additional information
Troubleshooting
Glossary
Trademarks
Page 12
Page 13

Troubleshooting
The name of the same Access Point displayed on the Wireless Palette varies depending on the computer.
The Wireless Palette displays the nickname that each user assigned when registering the Access Point using the Wireless
Palette. Therefore, the nickname of a single Access Point varies depending on the user.
I don't remember the Encryption Key
Use the Sony-supplied Access Point Firmware Upgrade Utility to resume the factory-set configuration of the Access Point.
Next, use the Wireless Palette to register the Access Point and establish communications with it. Then, use one of the
Access Point Setup Utilities to configure the Access Point.
For further information about how to use the Access Point Firmware Upgrade Utility, from the start menu, select VAIO Wireless LAN - Access Point Firmware Upgrade - Manual to see its on-line manual.
The Wireless Palette still shows the previous computer name after change.
The Access Point has not yet recognized the new computer name. Click the Nickname of the Access Point to connect in the
Tool Box window of the Wireless Palette and click Select. If the correct information is displayed, click OK.
I named the Access Point on the Wireless Palette. Why is the Access Point ID left unchanged?
The Wireless Palette registers a nickname for the Access Point on your computer. It does not change the Access Point
configuration. The Access Point ID is fixed and cannot be modified.
I want to change the Encryption Key.
Use one of the Access Point Setup Utilities on a computer containing the Wireless LAN PC Card to change the Encryption
Key. Communications between the Access Point and the above computer are maintained because the change in the
Encryption Key is simultaneously reflected on the computer. On any other computers connected to the same Access Point,
however, you must use the installed Wireless Palette to modify the Access Point's configuration (the Encryption Key in this
case).
Note that access to the Wireless LAN Access Point fails if the modification is not performed.
I cannot control the dial-up connection from a computer on the Ethernet network.
Not supported.
I use the Access Point in the Phone Connection mode. When I launch my browser or e-mail application, the Dial-up
Connection dialog box appears and I cannot connect to the Internet.
You need to change the Internet connection settings.
Follow the steps below.
Microsoft Internet Explorer
Click Settings on the Dial-up Connection dialog box.
1.
Confirm that the Connections tab is selected.
2.
Check Never dial a connection.
3.
Click LAN Settings.
4.
Check Automatically detect settings under Automatic configuration.
5.
Click OK.
6.
Click OK.
7.
Click Refresh in the browser window.
8.
Netscape Communicator
Launch Netscape Communicator.
1.
Click Preferences from the Edit menu.
2.
Click Advanced.
3.
Click Proxies, then check "Direct connection to the Internet."
4.
Page 13
Page 14

Click OK. The Preferences dialog box closes.
5.
Click Reload in the browser window.
6.
Your browser application may have been timed out.
Click Update (Internet Explorer) or Reload (Netscape Communicator) to see what happens.
I don't know the MAC address of the Access Point Ethernet network.
Follow the steps below to view the MAC address.
Right-click the Wireless Palette icon on the task tray
1.
Select Version from the menu.
2.
Check the number displayed under Wireless Access Point Ethernet Address.
3.
It takes time to switch to the Peer to Peer mode.
Switching to the Peer to Peer mode causes Windows to search the DHCP server on the wireless network to obtain an IP
address. Thus, it will take longer if no DHCP server exists. If no response is returned from the DHCP server, an unused IP
address in the range of 169.254.0.0 to 169.254.255.255 is assigned (Windows Auto IP feature).
No communications are available in the Peer to Peer mode.
The AutoIP may have assigned an IP address in the range from 169.254.0.0 to 169.254.255.255 to other interfaces including
Ethernet and i.LINK (SmartConnect). Follow the steps below for checkup.
For Windows 98 Second Edition
Select Run from the Start menu and enter "winipcfg."
1.
Click OK.
2.
Select an interface other than Sony PCWA-C100 Wireless PC Card.
3.
Check the IP address.
4.
Verify that no IP address in the range of 169.254.0.0 to 169.254.255.255 is assigned.
For Windows 2000
Select Accessories - Command Prompt from the Start menu.
1.
Enter "ipconfig /all."
2.
Check the IP address of interfaces other than Sony PCWA-C100 Wireless PC Card.
3.
Verify that no IP address in the range of 169.254.0.0 to 169.254.255.255 is assigned.
If you find any interface that is assigned with one of the addresses in the range of 169.254.0.0 to 196.254.255.255, follow the
steps below to disable the interface.
Select Settings - Control Panel from the Start menu.
1.
Click System.
2.
Select the Device Manager tab.
3.
Double-click the device that you want to disable (e.g. Intel 8255x-based PCI Ethernet Adapter(10/100) for PCG-Z505JX).
4.
Check "Disable with this hardware profile."
5.
Click OK.
6.
The disabled devices are indicated with a cross mark.
Page 14
Page 15

Changing the IP address setting of the Access Point disabled communications from the computer.
It appears that the IP address is not matched between the Access Point and the computer. Try either of the following.
Re-select the Access Point in the Tool Box window of the Wireless Palette.
Restart the computer.
Remove and re-insert the Wireless LAN PC Card.
Follow the steps below to release and re-obtain the IP address running winipcfg (or ipconfig).
For Windows 98 Second Edition
Select Run from the Start menu and enter "winipcfg."
1.
Click OK.
2.
Select Sony PCWA-C100 Wireless Card.
3.
Click Release.
4.
Click Renew. Check if the re-obtained IP address is suitable for your network environment.
5.
For Windows 2000
Select Programs - Accessories - Command Prompt from the Start menu.
6.
Enter "ipconfig /release" and press the Enter key.
7.
Enter "ipconfig /renew" and press the Enter key. This re-obtains the IP address.
8.
Enter "ipconfig /all." Check if the IP address obtained is suitable for your network environment.
9.
I want to connect to multiple Access Points.
You can register up to four Access Point connection settings with the Wireless Palette. This way, you can switch connection
from one PCWA-A100 Wireless LAN Access Point to another without being troubled with reconfiguration each time you change
the destination. However, you cannot connect simultaneously to multiple Access Points.
Page 15
Page 16

Glossary
Channel number
Frequency used for wireless communications.
Wireless communications are available only among client computers and Access Points that use the same channel.
Client
Computer on a wireless LAN. It may be called a client computer as well.
DNS (Domain Name System)
A system that translates host names into IP addresses.
Networks that use the TCP/IP protocol, such as the Internet, use a set of numbers like 192.168.0.1 (IP address) to identify a
computer.
However, since the IP address is rather hard to remember, DNS was developed to allow a name like "www.sony.com" to
identify a computer for convenience.
DNS servers manage these translations from host names into IP addresses.
Encryption Key
Key used in the IEEE802.11-compliant security system (WEP).
Using the Encryption Key as the password, only client computers and Access Points that have the same ID and password
may log onto the same wireless LAN for file sharing.
LAN (Local Area Network)
A network which is accessible only to its members, unlike the Internet which is open to an unlimited number of people.
A LAN may be built for different purposes. For example, you can build an office LAN that is accessible only to members of the
same department or a home LAN that is accessible only to family members.
SSID (Service Set ID)
IEEE802.11-compliant wireless LAN group identifier.
The Access Point uses the Access Point ID for the SSID.
WAN (Wide Area Network)
A network that interconnects remote LANs through the Internet or telephone lines.
Page 16
Page 17

Trademarks
Program Copyright 2000 Sony Corporation, Copyright 2000 Lucent Technologies, Copyright 1998 by Carnegie Mellon University
CMU DISCLAIMS ALL WARRANTIES WITH REGARD TO THIS SOFTWARE, INCLUDING ALL IMPLIED WARRANTIES OF
MERCHANTABILITY AND FITNESS, IN NO EVENT SHALL CMU BE LIABLE FOR ANY SPECIAL, INDIRECT OR CONSEQUENTIAL
DAMAGES OR ANY DAMAGES WHATSOEVER RESULTING FROM LOSS OF USE, DATA OR PROFITS, WHETHER IN AN ACTION
OF CONTRACT, NEGLIGENCE OR OTHER TORTIOUS ACTION, ARISING OUT OF OR IN CONNECTION WITH THE USE OR
PERFORMANCE OF THIS SOFTWARE.
Documentation Copyright 2000 Sony Corporation
VAIO is a trademark of Sony Corporation.
Microsoft and Windows are registered trademarks of Microsoft Corporation in the United States and other countries.
Netscape and the Netscape N and Ship's Wheel logos are registered trademarks of Netscape Communications Corporation in the
United States and other countries.
All other trademarks are trademarks of their respective owners.
Page 17
 Loading...