

Page 1

Welcome
Thank you for purchasing your Sony VAIO® computer! Your new computer is a superb blend of high technology and
easy-to-use functionality. The information provided here is designed to help you to become familiar with the hardware and
software programs included with your system.
View the Electronic Flyer, which provides updates and supplemental information about your computer.
Go to the Sony Online Support Web site, to view the VAIO® Computer Specifications which lists your computer's
hardware specifications and preinstalled software information.
For Sony software information, click Start and Welcome to VAIO Life.
Page 1
Page 2

Getting Started
Congratulations on your purchase of the Sony VAIO® computer! Your new, high-performance, multimedia computer combines
state-of-the-art computer functionality with the latest audio, video and information technology features.
Unpacking your Computer
Planning An Ergonomic Work Space
Page 2
Page 3

Unpacking your Computer
Your computer may not be supplied with all of the accessories shown, depending on the system configuration you
purchased. For details on the accessories supplied with your computer, see the online Specifications sheet.
Your VAIO® computer is not supplied with System or Application Recovery CDs. Use the VAIO Recovery utility to recover
your computer's operating system and preinstalled software.
Computer and supplied accessories
Giga Pocket Personal Video Recorder accessories
Manuals
VAIO® Computer Quick Start — Provides basic information on setting up and registering your computer. The Quick
Start also provides resources for technical support, safety guidelines, and owner's information.
Online Documentation
VAIO® Computer User Guide — Contains information on the hardware and preinstalled software programs included
with your system.
To access the online User Guide:
1.
Click Start in the Windows taskbar, then click Help and Support.
2.
From the VAIO Help and Support Center menu, click VAIO User Guide.
Specifications — This online specifications sheet describes the hardware and software configuration of your VAIO
computer. To view this online information, see the online Specifications sheet.
VAIO Software — Provides specific information on the preinstalled software on your computer.
To access this online software information:
Page 3
Page 4

1.
Click Start in the Windows® taskbar.
2.
Click Welcome to VAIO Life.
Hard Disk Drive Recovery
Your computer is equipped with a utility program that recovers your computer's operating system and preinstalled
software.
For more information about hard disk recovery
1.
Click Start in the Windows® taskbar, then click Help and Support.
2.
From the VAIO Help and Support Center menu, click VAIO Recovery Options.
Other
A software library containing the Microsoft® software and Sony end-user license agreements.
Page 4
Page 5

Planning An Ergonomic Work Space
Before you set up your new computer, find the best location for your new computer and plan your work space. There are
several ergonomic factors to consider when you arrange your work space:
Stable work surface — Use a stable work surface large enough to support the computer and other peripheral
equipment.
Ventilation — Leave at least eight inches of space on both sides of your computer and at least 5 inches of clearance
for the back.
Placement of the mouse and other input devices — Place your computer, mouse, or other input devices so that
your arms and hands are in a relaxed, comfortable position. The computer's keyboard should be directly in front of
you. Keep your wrists in a relaxed position when you are using the keyboard — not angled up or down. Position the
mouse at the same level as the keyboard. Hold the mouse with a relaxed hand, and use your whole arm to move it.
Take breaks during sessions with your computer. Excessive use of the mouse or a joystick may strain muscles or
tendons.
Furniture and posture — Sit in a chair with good back support and armrests. Adjust the level of the chair so your
feet are flat on the floor. A footrest may make you more comfortable. Sit with relaxed, upright posture — avoid
slouching forward or leaning far backward.
Viewing angle of the display — Position the unit so that the display is 18 to 26 inches directly in front of you, with
the top of the screen at or a little below eye level. Use the display's tilting feature to find the best position. You can
reduce eye strain and muscle fatigue by placing the display in the proper position.
Lighting — Choose a location where windows and lights do not create glare and reflection on the display. Use
indirect lighting to avoid bright spots on the display. You can also purchase accessories for your display that help
reduce glare. Proper lighting adds to your comfort and work effectiveness.
Page 5
Page 6

Locating Controls And Ports
This section is intended to familiarize you with the controls, ports, and jacks that are available on your computer. To view
the specific hardware configuration for your system, see the online Specifications sheet.
About the Front Panel
About the Side Panels
About the Back Panel
About the Keyboard
About the Mouse
About the Remote Control
Page 6
Page 7
About the Front Panel
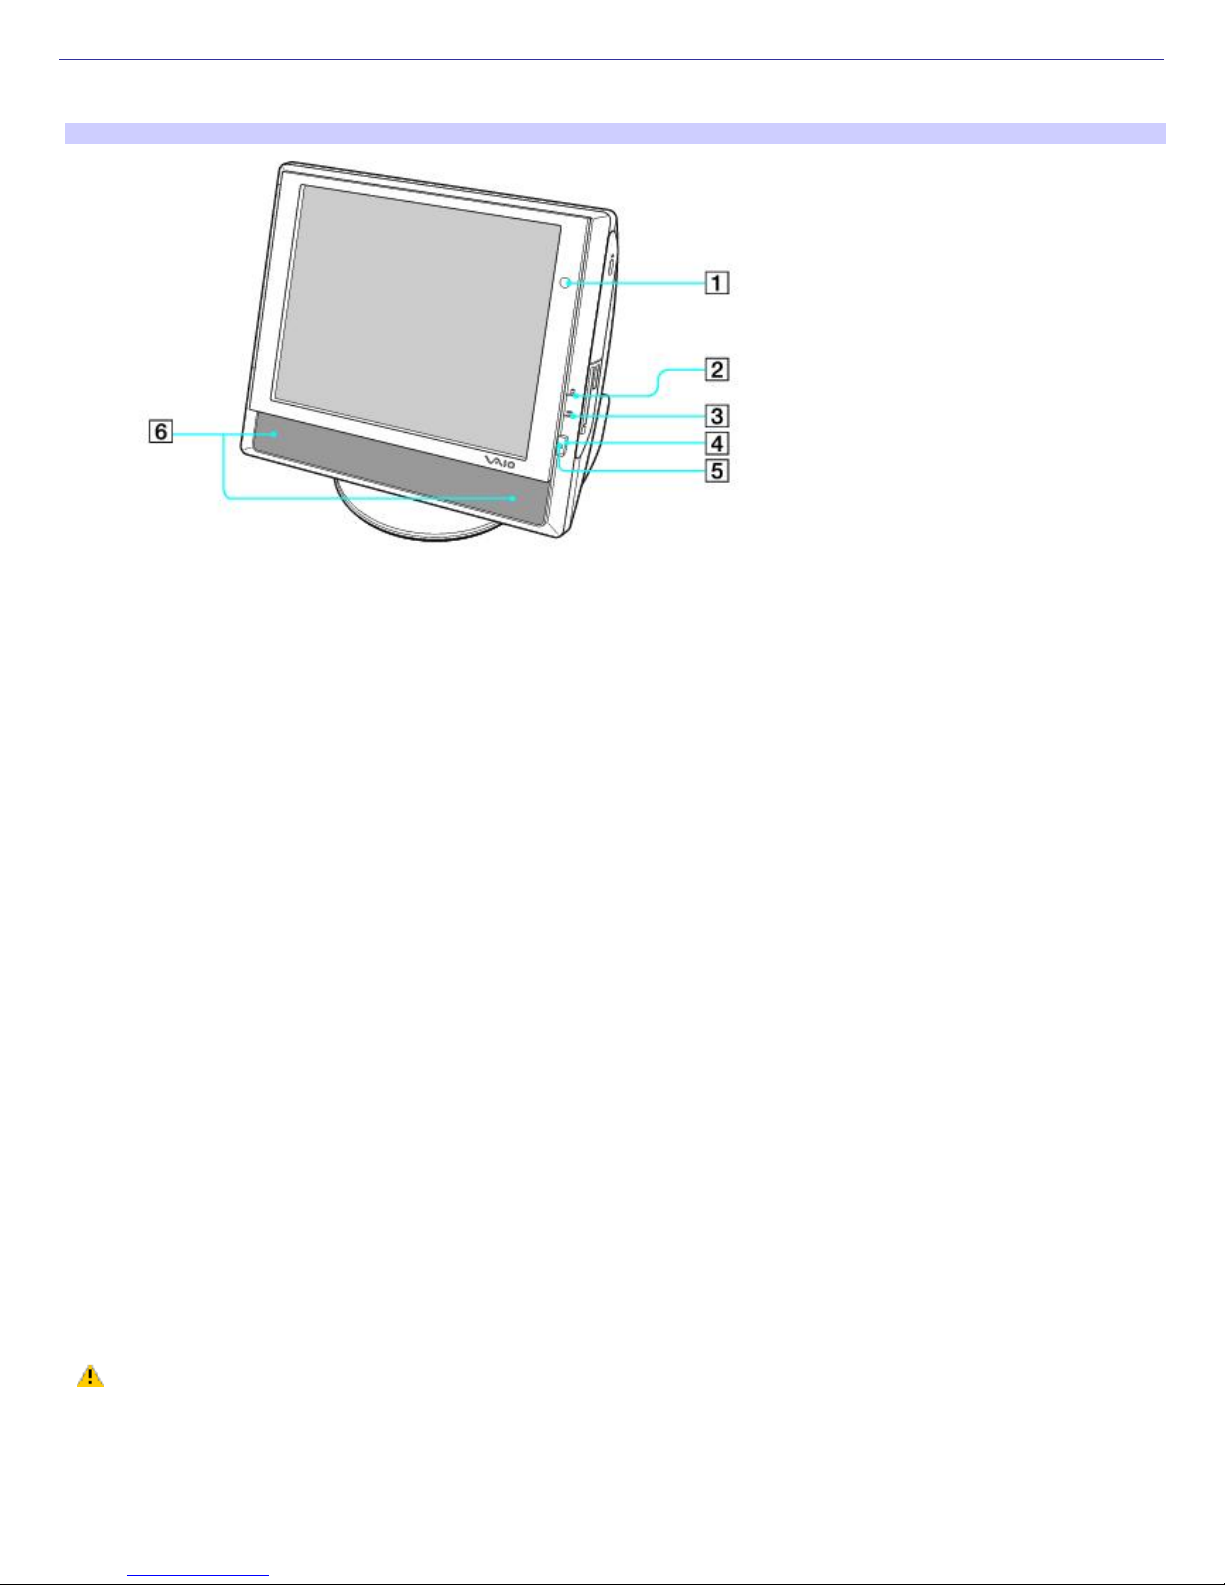
The front panel of your VAIO® computer is equipped with built-in stereo speakers and indicator lights.
Front panel
1 Infrared Receiver
Communicates with the remote control (supplied), to turn on TV, change TV channels, and raise or lower volume.
2 Optical disc and hard disk drive access indicator
Light is amber while reading and writing data.
3 Memory Stick® media access indicator
Light is amber when the Memory Stick media slot is in use.
4 Power button
Press button from the right side to turn the computer on and off.
5 Power indicator
Light is green while the power is on and amber when the computer is in Stand by mode.
6 Stereo speakers (built-in)
The stereo speakers provide sound for software, audio, and video media.
Do not press the Power button incorrectly, as this may cause damage to this control.
Page 7
Page 8
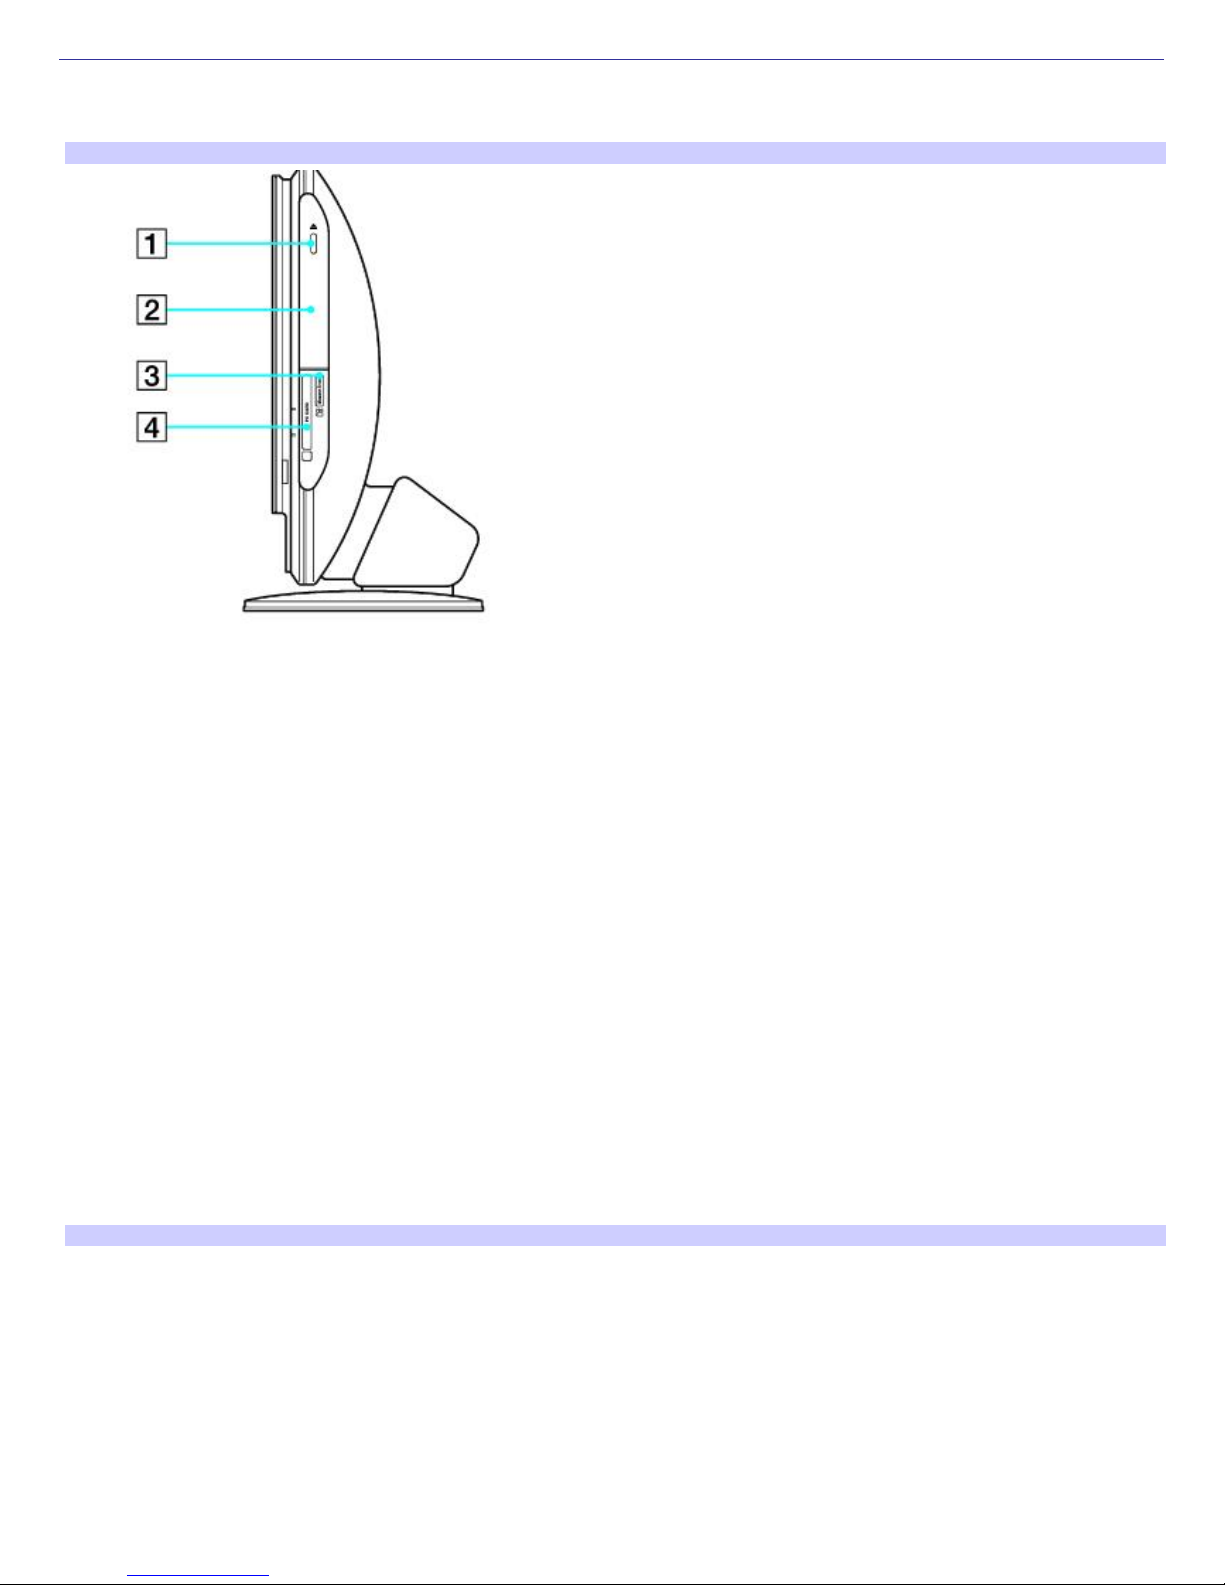
About the Side Panels
The side panels of your computer contain the connections for supplied and optional accessories. The icons on the side
panels help you locate and identify the connections on your computer.
Right panel
1 CD-RW/DVD-ROM combo drive eject button
Ejects a disc from the combination optical drive.
2 CD-RW/DVD-ROM combo drive
Reads data from compatible DVD or CD media. Writes data to a
CD-RW or CD-R media.
3 Memory Stick® media slot
Reads and writes data from a Memory Stick media.
4 PC Card slot
A PC Card (PCMCIA Card) can be inserted into this slot to increase your computer's functional capabilities.
Left panel
Page 8
Page 9
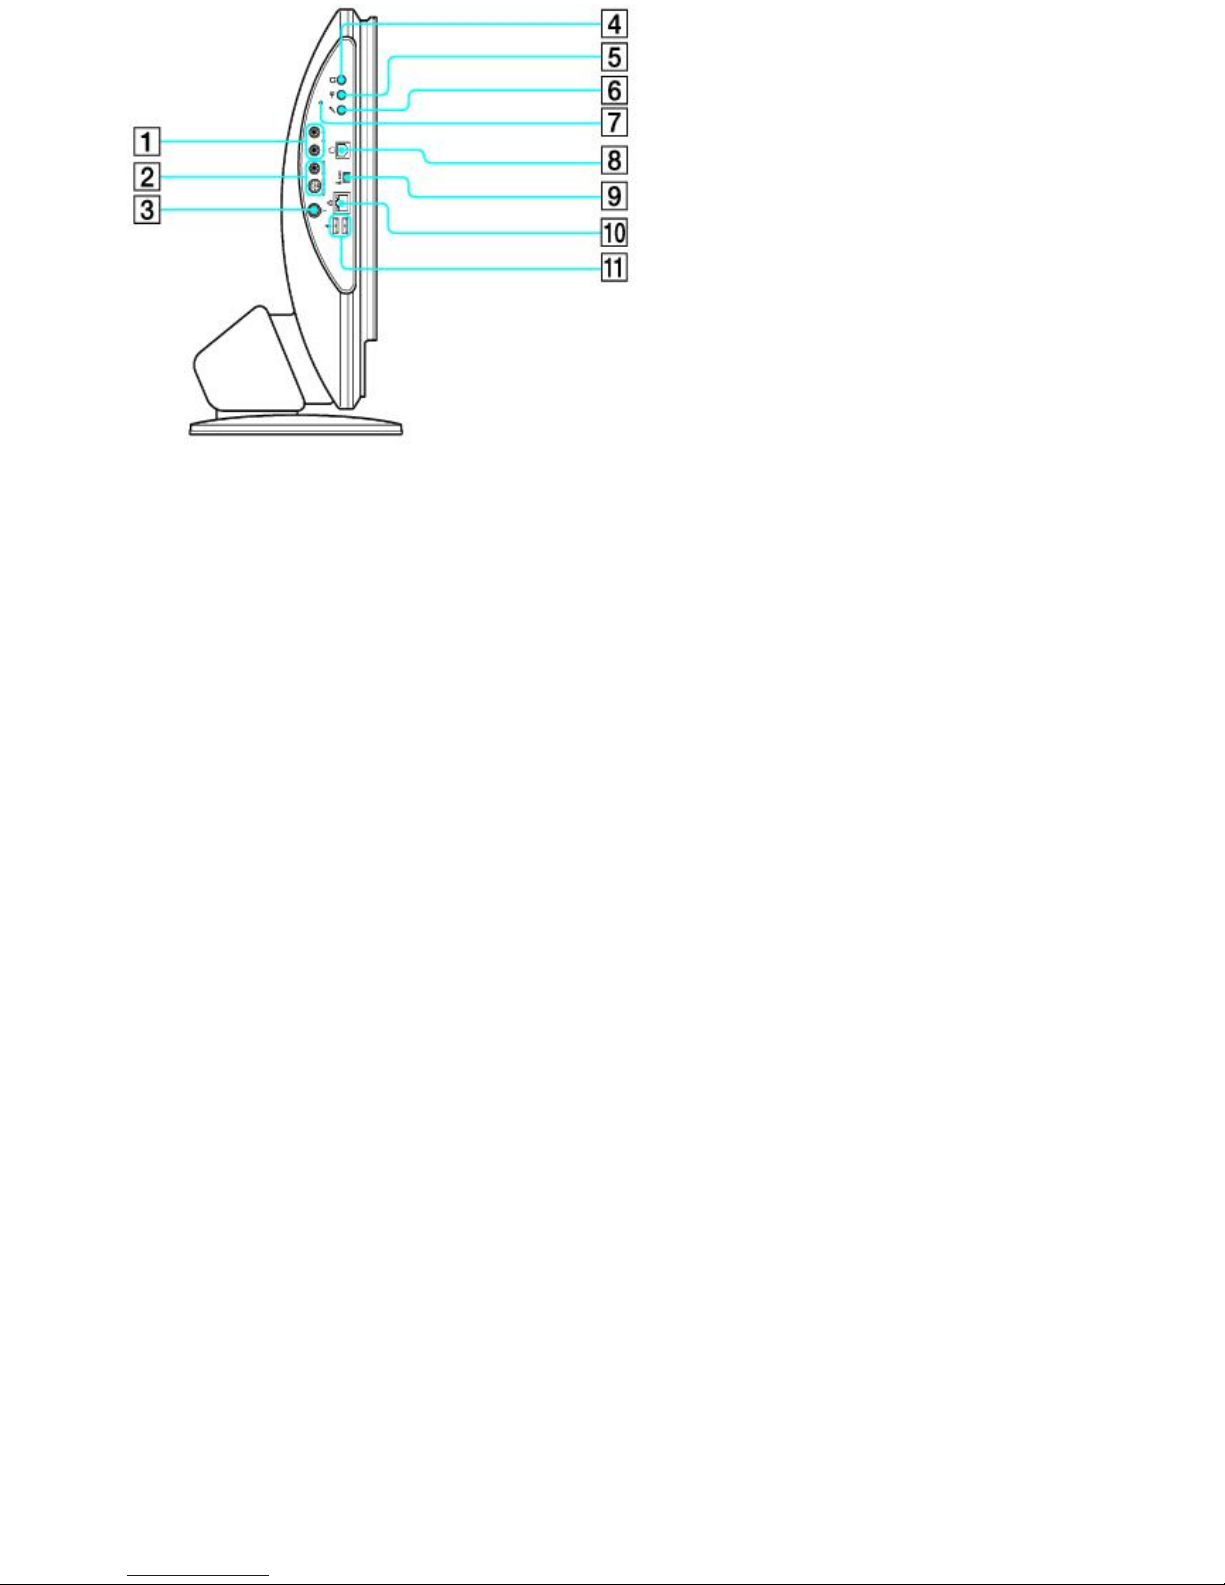
1 Composite audio L In jack
Connection for an audio or stereo dubbing cable (optional).
Composite audio R In jack
Connection for an audio or stereo dubbing cable (optional).
2 Composite video In jack
Connection for a digital video or stereo A/V dubbing cable (optional).
S-video In jack
Connection for an S-video cable (optional).
3 VHF/UHF port
Connection for a TV coaxial cable (supplied).
4 Headphones jack
Connection for optional speakers or headphones.
5 Line In jack
Connection for an audio device.
6 Microphone jack
Connection for a microphone (optional).
7 Connect button
Page 9
Page 10

Press to enable the system unit to communicate with the wireless keyboard and optical mouse.
8 Modem line jack1
Connection for the modem cable (supplied) to the wall jack.
9 i.LINK 4-pin S400 port
Connection for i.LINK compatible digital devices (IEEE 1394).
10 Ethernet port
Connection for a 10BASE-T/100BASE-TX Ethernet.
(The port marked with (Network) is for LAN connections only.)
11 Universal Serial Bus (USB 2.0) ports (2)
Connections for compatible high/full/low-speed USB devices.
1
A n optional "1 -to-2" jack adapter device (splitter) is required to connect both a telephone and modem line to your computer.
i.LINK is a trademark of Sony used only to designate that a product contains an IEEE 1394 connection. The i.LINK
connection may vary, depending on the software programs, operating system, and compatible i.LINK devices. All products
with an i.LINK connection may not communicate with each other.
Please refer to the documentation that came with your compatible i.LINK device for information on operating conditions and
proper connection. Before connecting compatible i.LINK devices to your system, such as an optical or hard disk drive,
confirm their operating system compatibility and required operating conditions.
Page 10
Page 11
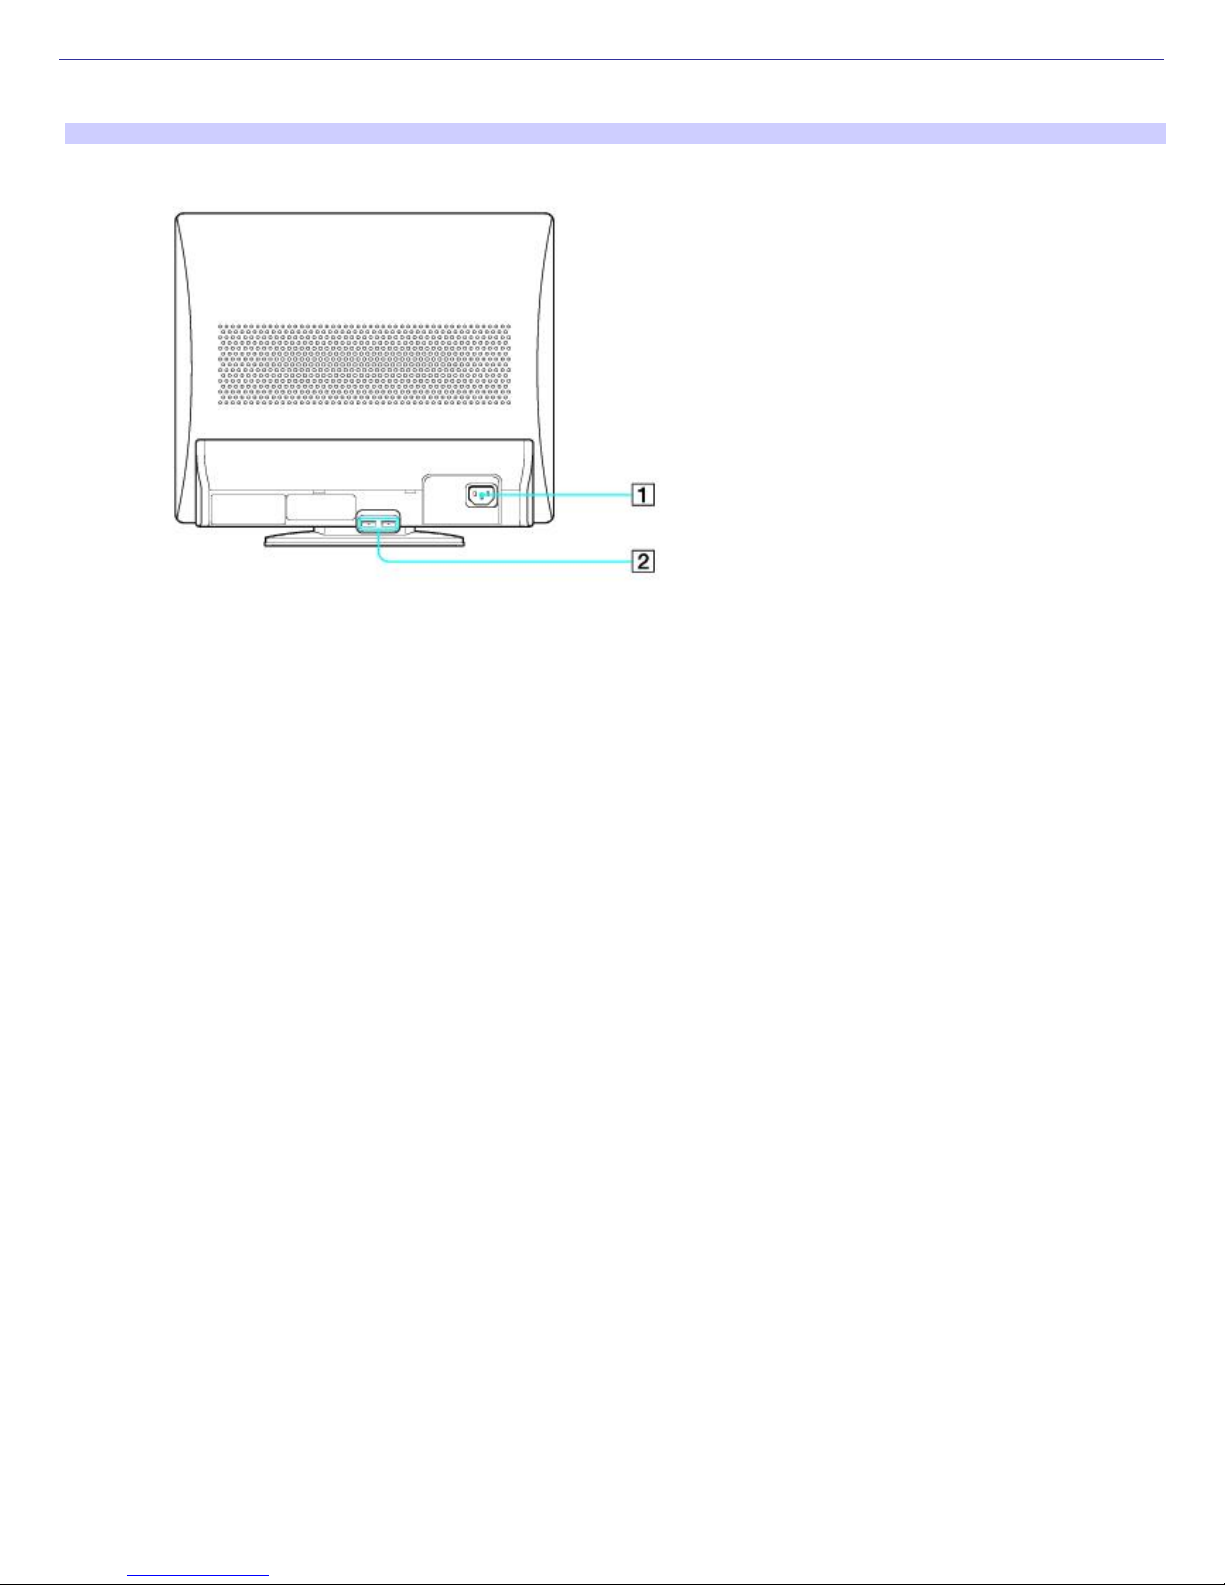
About the Back Panel
The back panel of your computer contains the AC power port and connections for your USB devices.
Back panel
1 AC Input port
Connection for the supplied power cord.
2 Universal Serial Bus (USB 2.0) ports (2)
Connections for compatible high/full/low-speed USB devices.
Page 11
Page 12
About the Keyboard
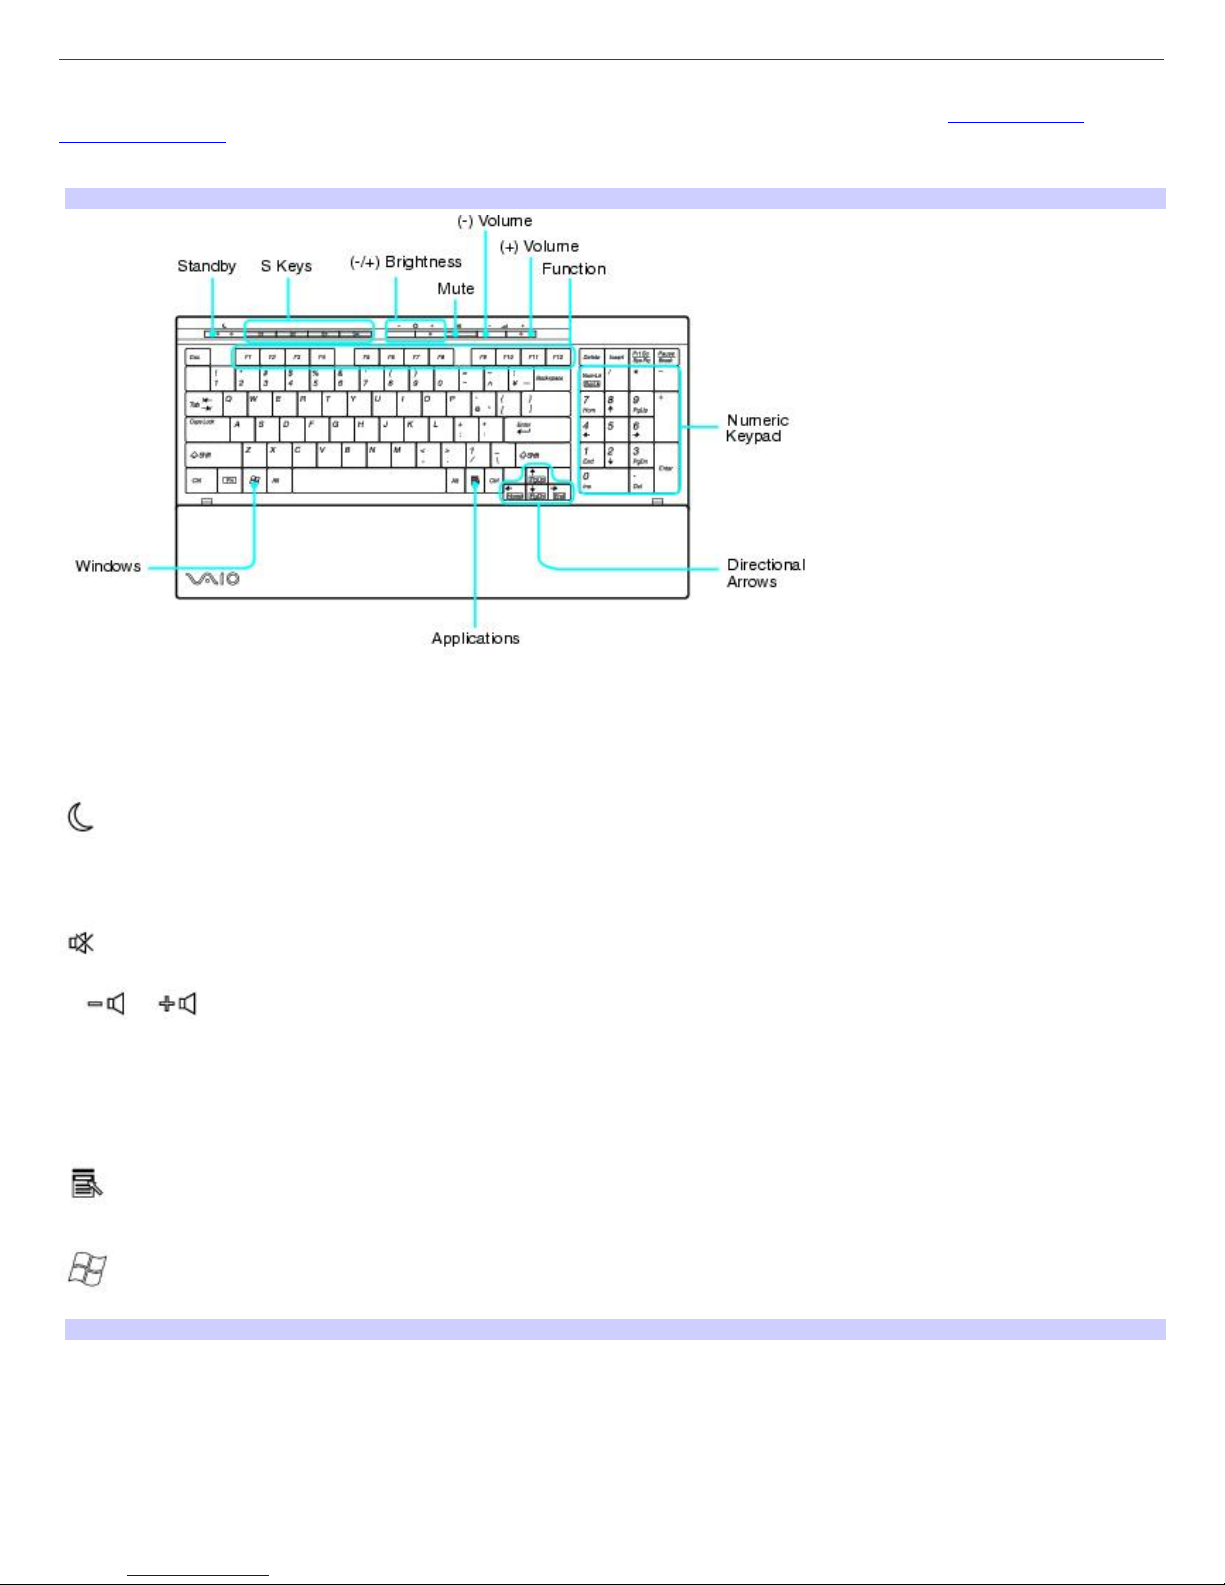
Your VAIO® computer is supplied with a wireless keyboard that has a standard key arrangement and additional keys that
perform specific functions. Before attempting to use the wireless keyboard with your computer, see Connecting the
Wireless Keyboard.
.
Wireless keyboard (Top)
KEY DESCRIPTION
Standby
Press the button to place the computer in Standby mode. Press the Power button or Standby key briefly
to resume normal operation.
S Keys Press the S key buttons to activate specific applications.
Brightness Controls Press a button to increase (+) or decrease (-) the brightness of the monitor screen.
Mute
Press the button to turn off the speaker sound. Press the Mute button again to restore sound.
Volume Control
Press a button to increase (+) or decrease (-) the volume of the speakers.
Function The 12 function keys along the top of the keyboard are used to perform certain tasks. The task
associated with each function key may vary from one application to the next.
Numeric Keypad Use the numeric keypad to type numbers or to perform basic math calculations. Press the Num Lock key
to activate the numeric keypad. (The Num Lock indicator lights.) Press the Num Lock key again to deactivate the numeric
keypad.
Directional Arrows The Up, Down, Left, and Right arrow keys move the pointer on the screen.
Applications
The Applications key displays a shortcut menu in certain software programs. Pressing this key is
equivalent to clicking the right mouse button.
Windows
The Microsoft® Windows® key, displays the Start menu. Pressing this key is equivalent to clicking Start on
the taskbar.
Wireless keyboard (Bottom)
Page 12
Page 13
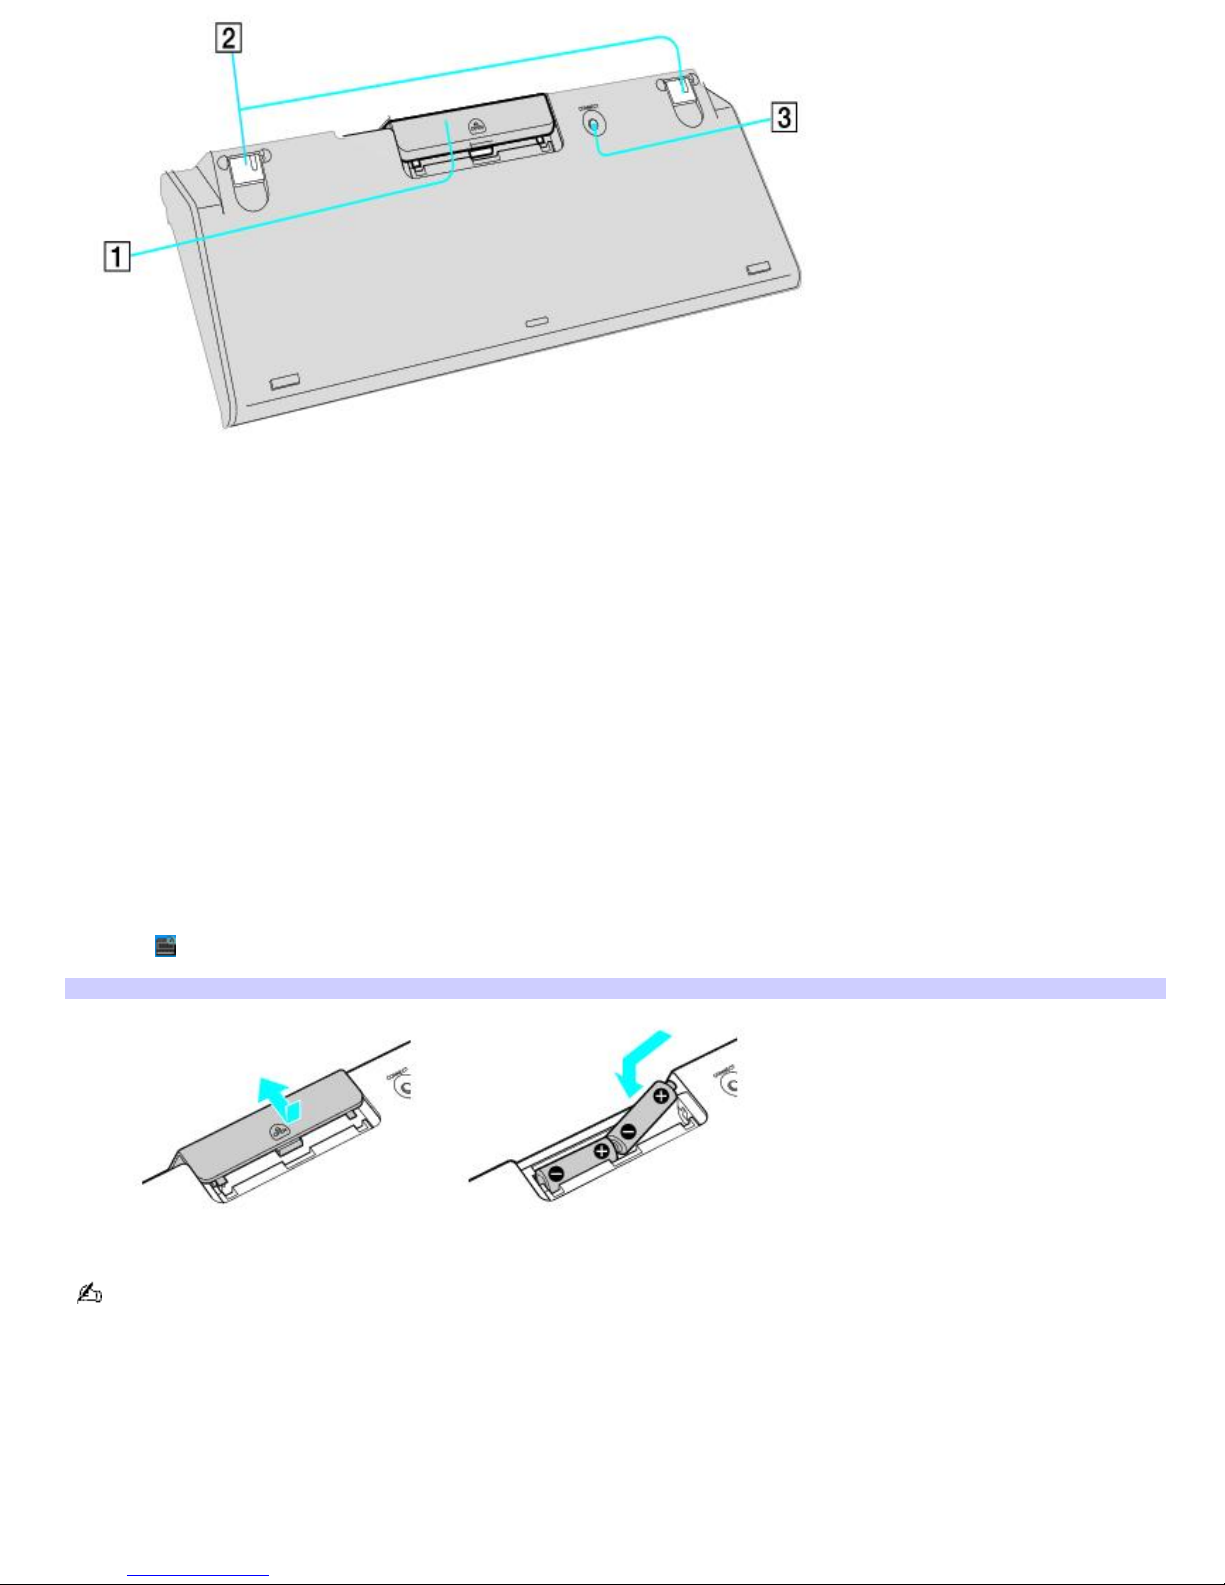
1 Battery compartment
Storage compartment for the supplied AA batteries.
2 Keyboard feet
Extend to adjust the keyboard height.
3 Connect button
Press to enable the keyboard to communicate with the system unit.
To set up the wireless keyboard
Insert two AA batteries (supplied) into the wireless keyboard as shown. You can check your keyboard's battery power level
by clicking (Wireless Keyboard icon), located in the Windows® taskbar notification area.
Inserting batteries into the wireless keyboard
If your wireless keyboard does not operate properly, the batteries may need to be replaced. If your wireless
keyboard is not being used for extended periods of time, remove the batteries to avoid possible damage from battery
leakage.
Page 13
Page 14

About the Mouse
Your VAIO® computer is supplied with a wireless optical mouse. Before attempting to use the wireless optical mouse with
your computer, see Connecting the Wireless Mouse.
Wireless mouse (Top)
1 Left mouse button
Press to perform specific mouse functions.
2 Wheel button
Rotate the wheel to scroll up and down on the display.
3 Right mouse button
Press to perform specific mouse functions.
Wireless mouse (Bottom)
1 Power switch
Slide switch to turn the mouse on and off.
2 Connect button
Press to enable communication between your VAIO computer and the wireless mouse.
To set up the wireless mouse
Insert two AA batteries (supplied) into the wireless mouse as shown. You can check your mouse's battery power level by
Page 14
Page 15
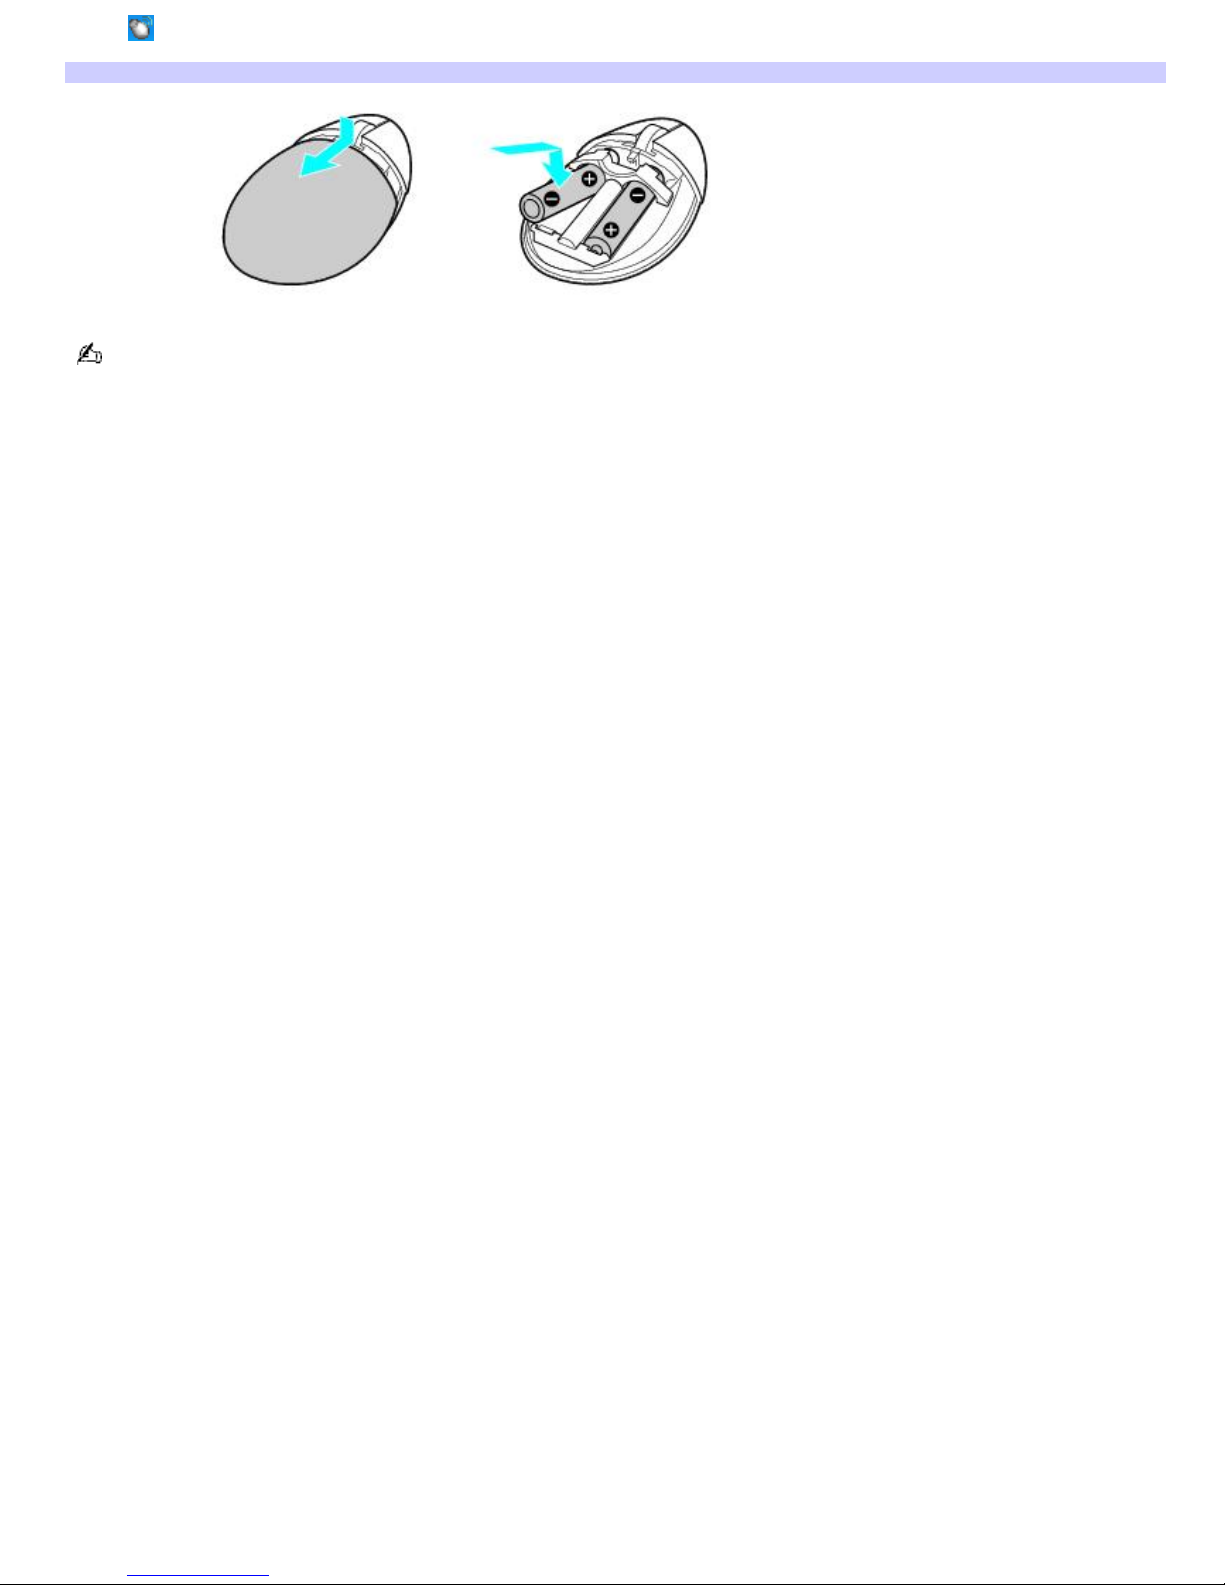
clicking (Wireless Mouse icon), located in the Windows® taskbar notification area.
Inserting batteries into the wireless mouse
If your wireless mouse does not operate properly, the batteries may need to be replaced. If your wireless mouse is
not being used for extended periods of time, remove the batteries to avoid possible damage from battery leakage.
Page 15
Page 16
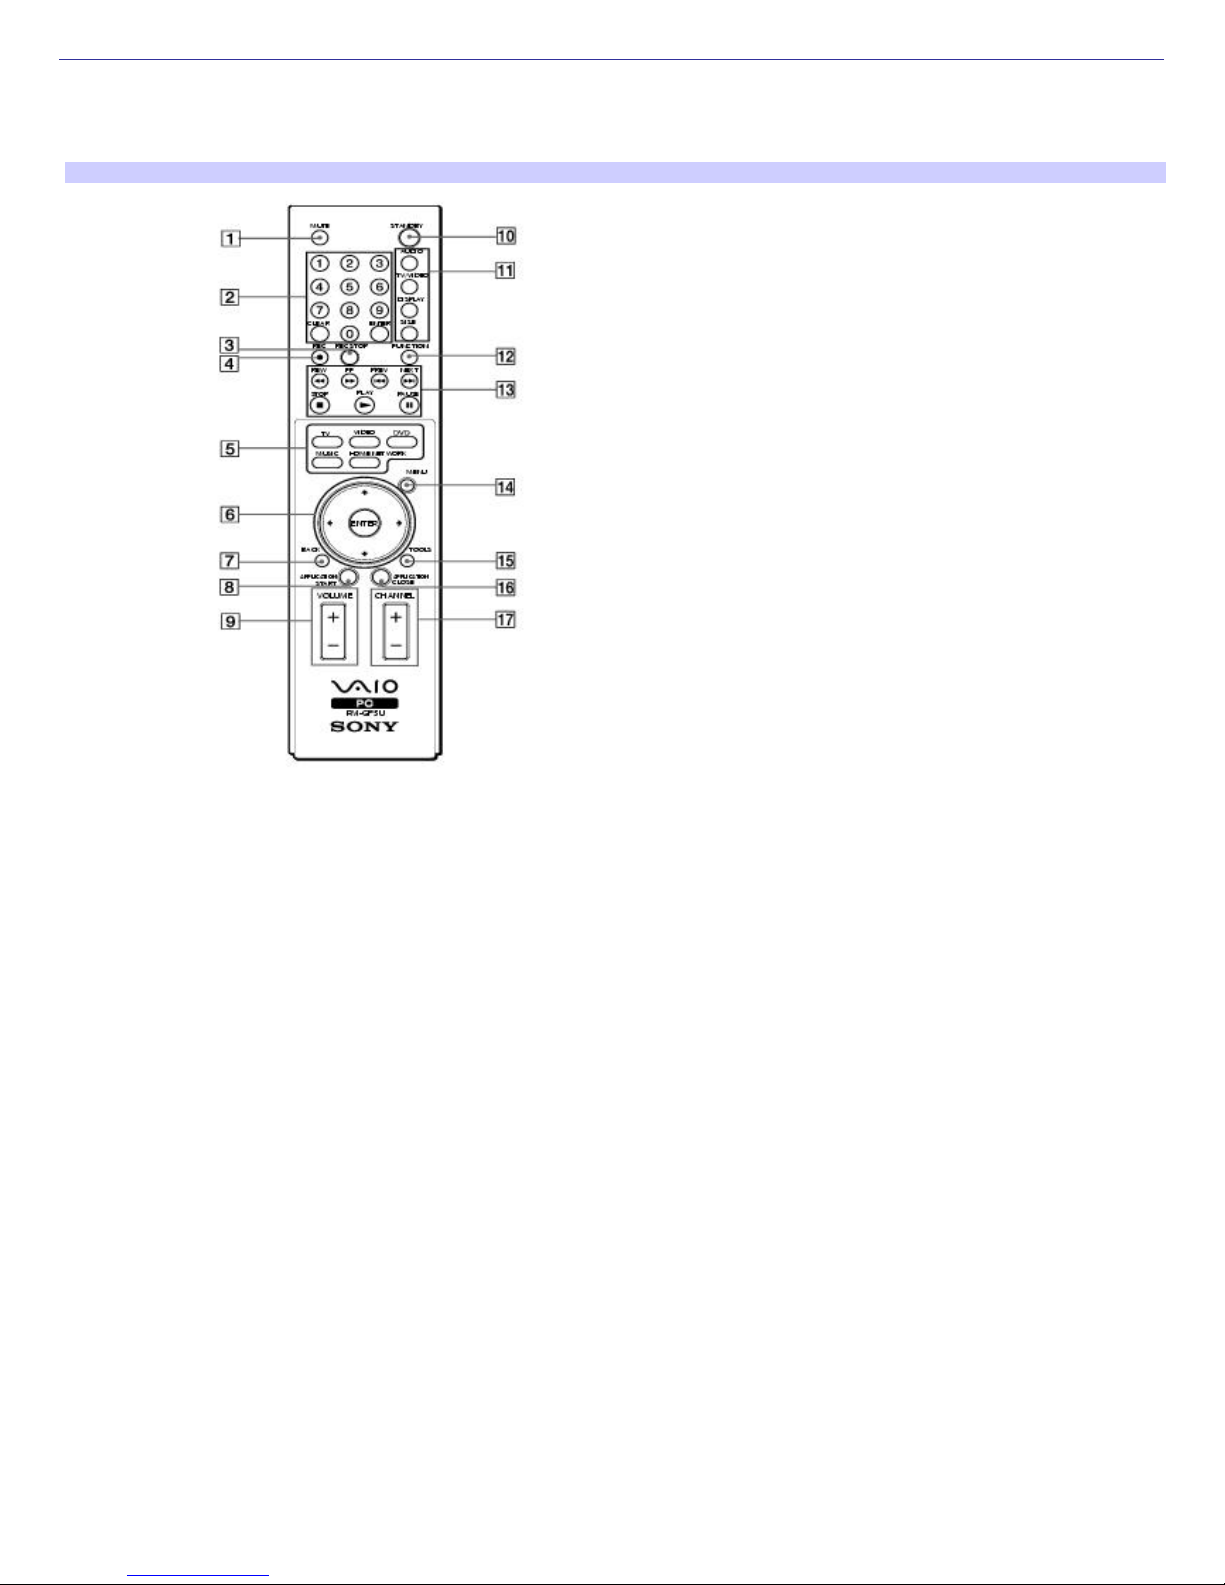
About the Remote Control
Giga Pocket Personal Video Recorder features are controlled with the remote control. The remote control can start and
stop video recording and playback, select channels, and set viewing preferences. This section describes the basic functions
of your remote control.
Remote control
1 MUTE button
Press to turn off the sound. Press again to restore the sound.
2 Channel number buttons (1-9)
Press to select specific channels.
(Press the ENT button to activate channel selection.)
JUMP button
Press to go to the previous channel. Press again to return to the current channel.
ENT button
Press to activate channel selection. See Channel number buttons.
3 REC STOP button
Press to stop recording.
(Note: The REC STOP function is available for Giga Pocket software only.)
Page 16
Page 17

4 REC button
Press to begin recording.
(Note: The REC function is available for Giga Pocket software only.)
5 TV button
Press to switch from the on-screen image to the TV/Recording deck.
VIDEO button
Press to change to the external video equipment, such as your VCR.
(Note: You cannot change the input source while recording.)
DVD button
Press to switch to an external DVD device, such as a DVD player.
MUSIC button
Press to start the SonicStage software.
HOME NETWORK button
Press to start the VAIO Media.
6 Direction and ENTER buttons
Press a direction arrow to navigate. Press ENTER to select.
7 BACK button
Press to return to the previous screen.
(Note: This function is not available for Giga Pocket software.)
8 APPLICATION START button
Press to start the Giga Pocket software.
9 VOLUME button
Press to increase or decrease the volume.
10 STANDBY button
Page 17
Page 18

Press to place the system into Stand by mode.
(Note: You cannot place the computer into Stand by mode when certain Giga Pocket functions are running.)
11 AUDIO button
Press to view available sound mode options on the monitor/display.
TV/VIDEO button
Press to change the on-screen image from the TV/Recording deck to external video equipment, such as your VCR.
(Note: You cannot change the input source while recording.)
DISPLAY button
During DVD playback in full screen mode, press to show the settings window. When using Giga Pocket software, press to
display the TV/Recording deck and playback deck screens. Press again to hide these views.
SIZE button
Press to view the current software in full-screen size. Press again to return the view to its original size.
12 FUNCTION button
When Giga Pocket software is selected with the Menu button, press to switch from the TV/recording deck to the playback
deck.
When using SonicStage software, press to change from the music drive (hard disk drive) to the CD.
13 REW and FF buttons
Press to rewind or fast-forward.
PREV and NEXT buttons
Press to move back to the previous screen or forward to the next screen.
STOP button
Press to stop playback.
PLAY button
Press to begin playback.
PAUSE button
Page 18
Page 19

Press to pause playback.
14 MENU button
Press to view a shortcut menu of available software programs. Press again to hide this menu.
(Note: For Giga Pocket software, the Select Video Capsules window displays. Press the button again to hide this window.)
15 TOOLS button
The function of this button may vary between DVD media. See the DVD player software instructions for details.
16 APPLICATION CLOSE button
Press to close the Giga Pocket software.
17 CHANNEL button
Press to change channels automatically (no number input required).
(Note: This function is available for Giga Pocket software only.)
For more details about the function buttons on your remote control, see the Giga Pocket Help.
To set up the remote control
Insert two AA batteries (supplied) into the remote control as shown.
Inserting batteries into the remote control
If your remote control does not operate properly, you may need to replace the batteries. If your remote control is not
being used for extended periods of time, remove the batteries to avoid possible damage from battery leakage.
Page 19
Page 20

Setting Up Your Computer
You can set up your system quickly and easily with the instructions provided in this section. For details on your system's
hardware configuration, see the online specifications sheet.
Connecting the Power Cord
Connecting the Wireless Keyboard
Connecting the Wireless Mouse
Connecting the Modem Cable
Turning on your Computer
Registering your Computer
Page 20
Page 21
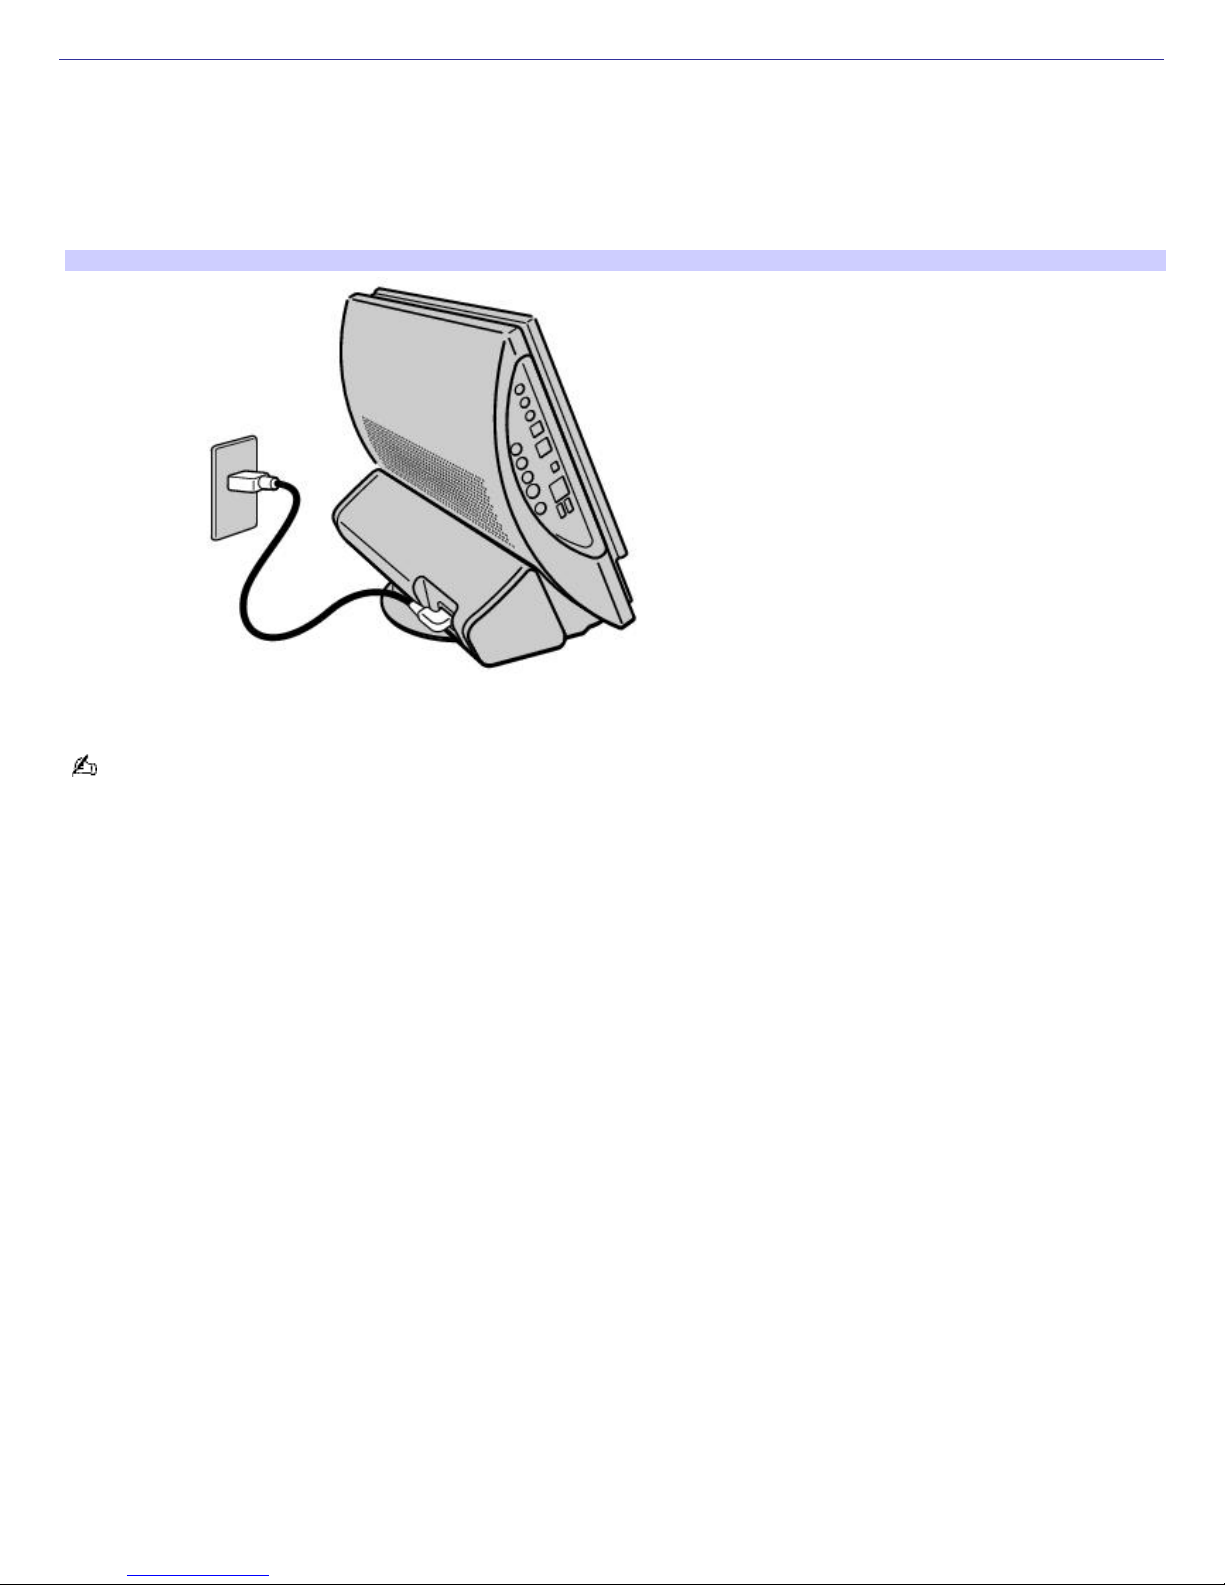
Connecting the Power Cord
The computer's power cord must be plugged into an AC power source, such as an AC wall outlet, surge protector, or
Uninterruptible Power Supply (UPS), before you can establish communication with your wireless keyboard and wireless
mouse.
1.
Plug the power cord into the AC input port on the back panel of the computer.
2.
Plug the power cord into a grounded AC wall outlet, surge protector, or UPS.
Connecting the power cord
Install your computer so you can easily reach the power outlet in the event of an emergency.
Page 21
Page 22

Connecting the Wireless Keyboard
Your VAIO® computer is supplied with a wireless keyboard. Before attempting to use the wireless keyboard, you must
enable communication between the computer and the keyboard.
When attempting to connect the wireless keyboard, confirm that the AA batteries (supplied) are properly inserted into
the keyboard before your computer is turned on.
Page 22
Page 23
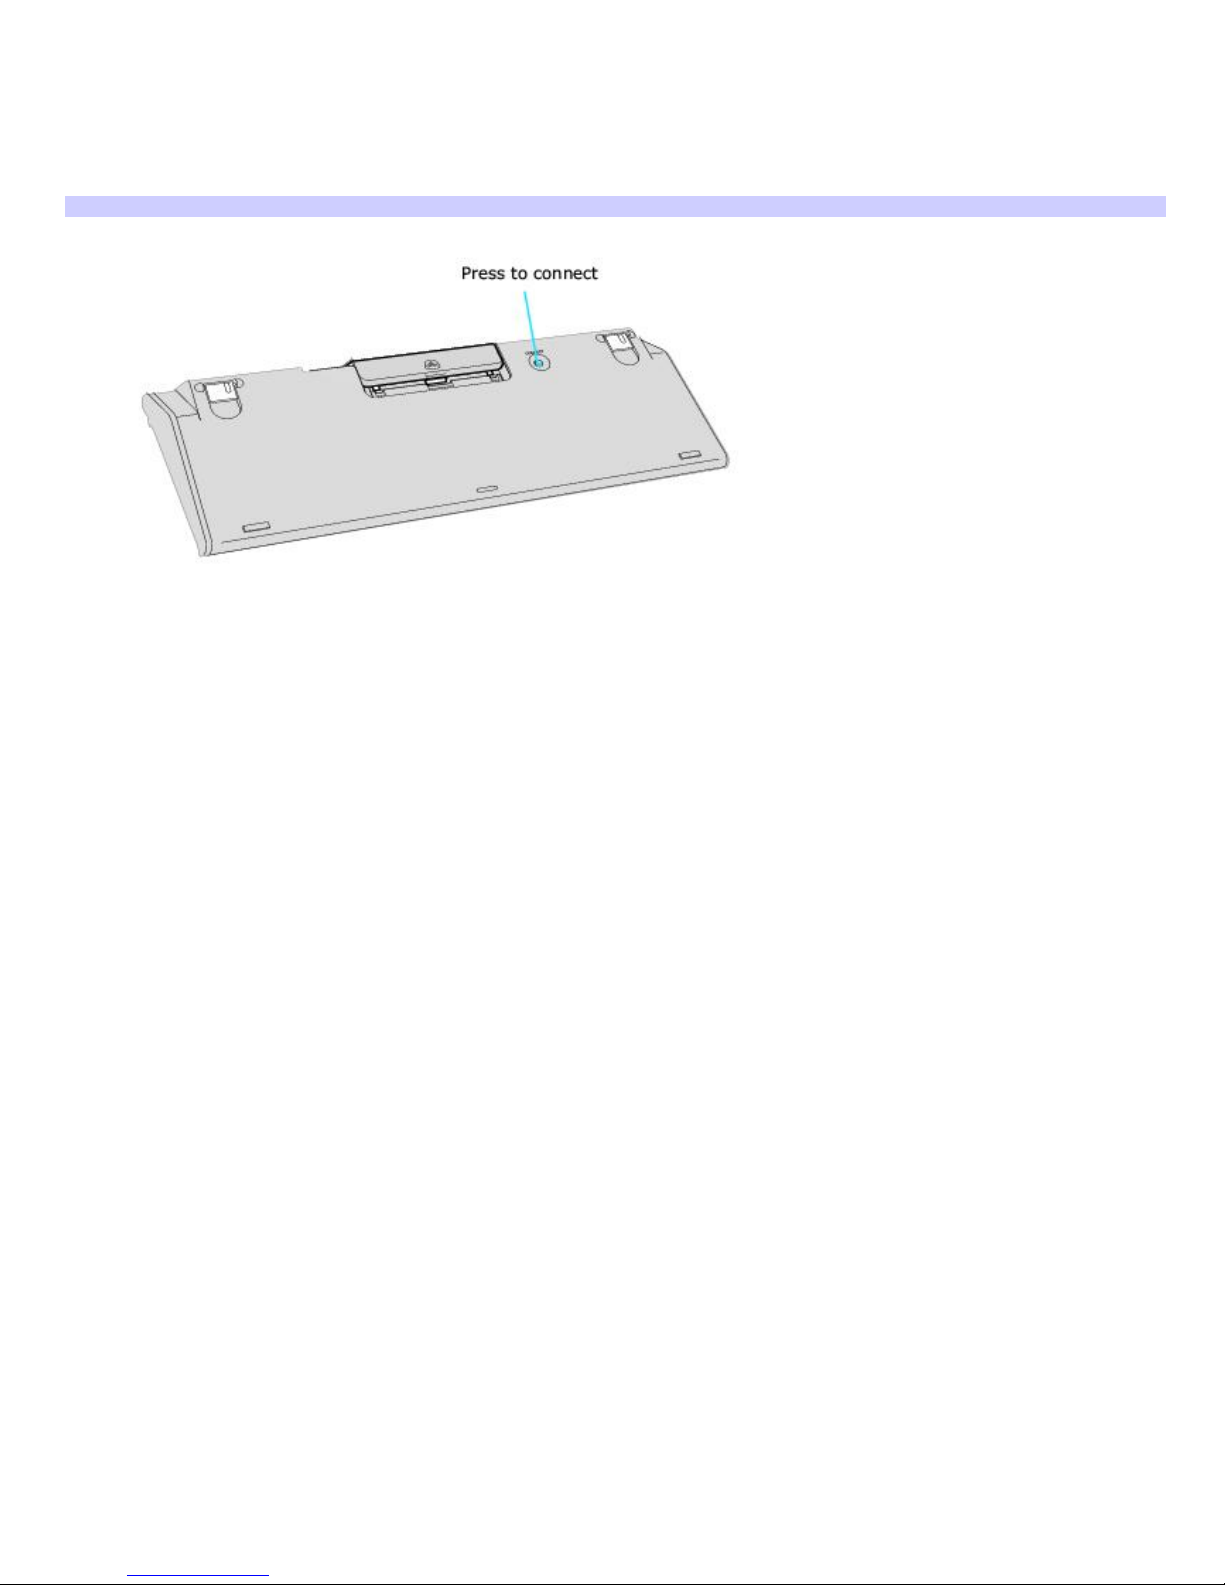
To connect the wireless keyboard
1.
Press the CONNECT button on the left panel of the computer.
2.
Turn the wireless keyboard over.
3.
Press the CONNECT button to activate communication between the wireless keyboard and the computer
Connecting the keyboard
Additional information about the wireless keyboard
The wireless keyboard requires unobstructed communication with the system unit for proper operation.
Do not exceed a maximum distance of 2 feet between your VAIO® computer and your wireless keyboard.
Confirm that the supplied AA batteries are properly installed.
Press the CONNECT buttons located on the left panel of the computer and on the bottom of the keyboard, to
establish communication between the equipment.
Page 23
Page 24

Connecting the Wireless Mouse
Your VAIO® computer is supplied with a wireless mouse. Before attempting to use the wireless mouse, you must enable
communication between the computer and the mouse.
When attempting to connect the wireless mouse, confirm that the AA batteries (supplied) are properly inserted into
the mouse before your computer is turned on.
Page 24
Page 25
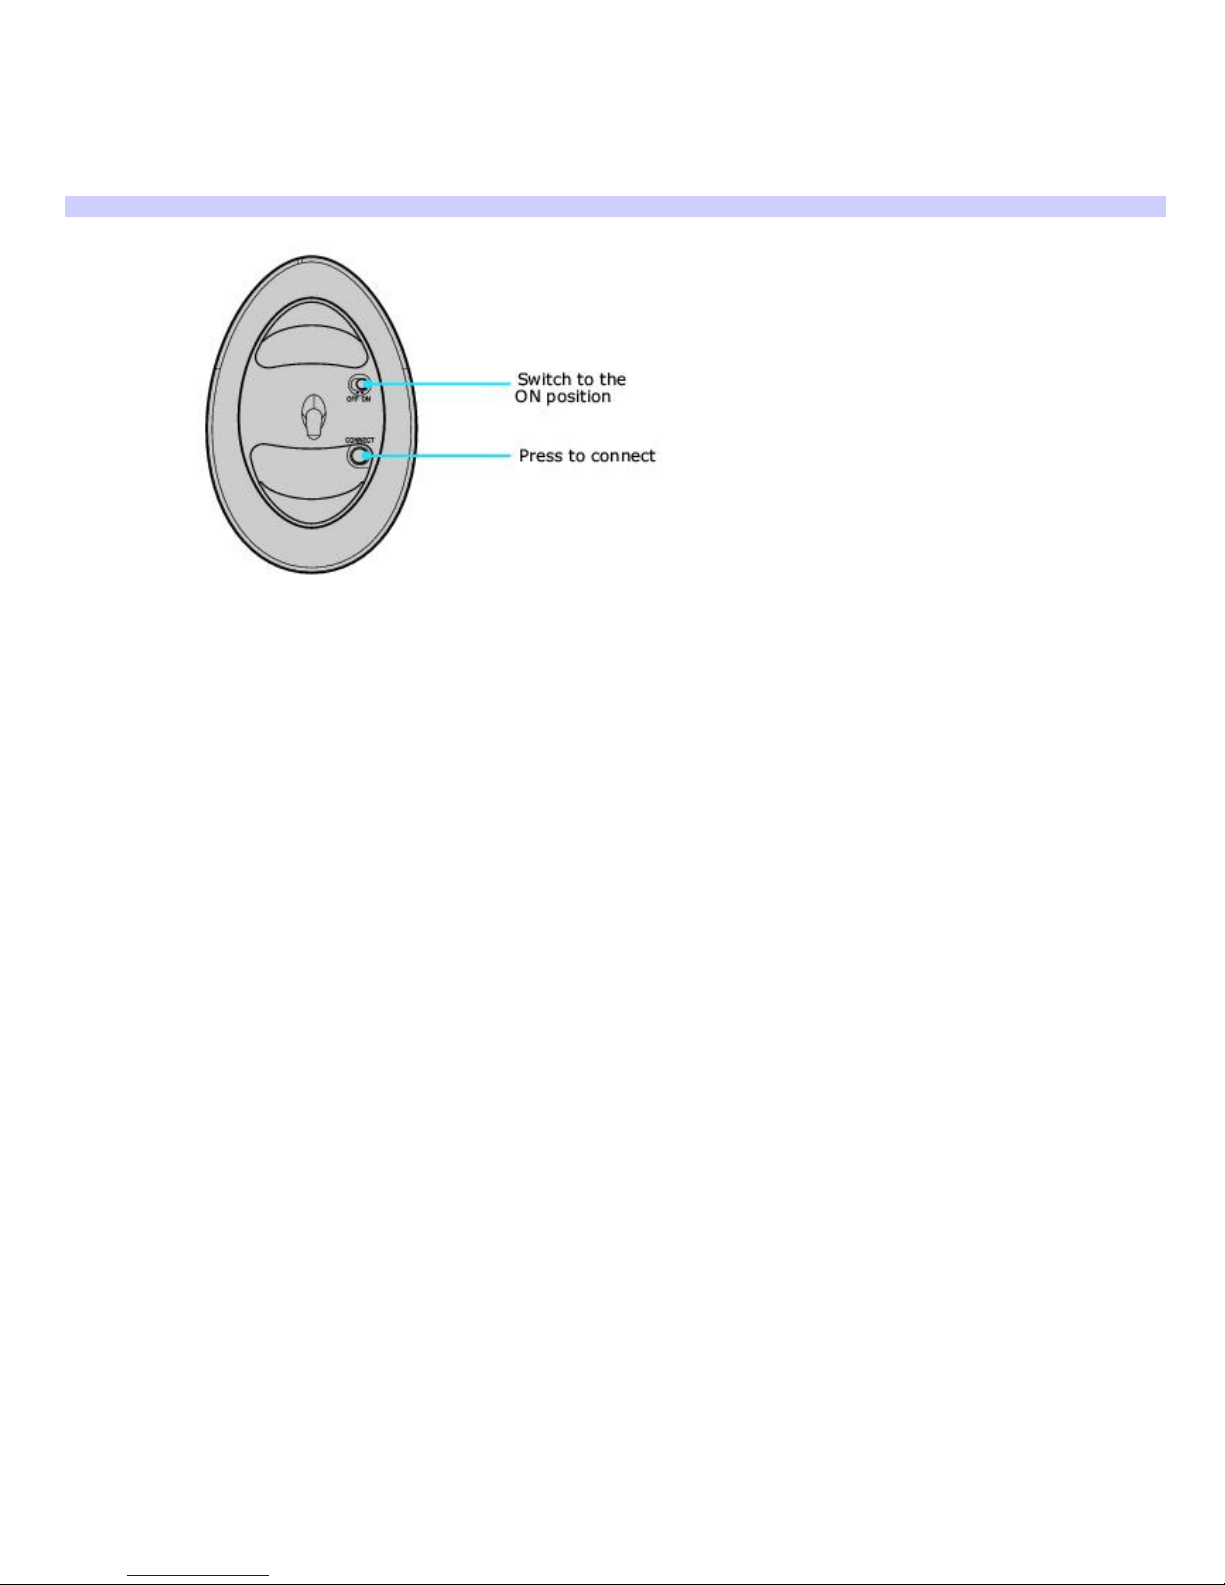
To connect the wireless optical mouse
1.
Press the CONNECT button on the left panel of the computer.
2.
Turn the wireless mouse over.
3.
Slide the power button to the ON position and press the CONNECT button.
Connecting the mouse
4.
Place the optical mouse on an appropriate surface to enable tracking.
Additional information about the wireless optical mouse
The wireless optical mouse requires an ideal surface texture in order to provide precision pointing and tracking.
Use surfaces such as plain paper, card stock, or fabric that have minimal repetitive patterns.
Avoid surfaces such as mirrors, smooth glass, or magazines that have half- tone printing.
The wireless optical mouse requires unobstructed communication with the system unit for proper operation.
Do not exceed a maximum distance of 2 feet between your VAIO® computer and your wireless mouse.
Confirm that the supplied AA batteries are properly installed.
Press the Connect buttons located on the left panel of the computer and on the bottom of the mouse, to establish
the communication between the equipment.
Verify the infrared receiver on the computer's front panel is free of obstructions that may prevent proper operation.
Page 25
Page 26

Connecting the Modem Cable
Your computer is equipped with a single modem line jack to connect the supplied modem cable to your telephone wall jack.
To use your wall jack for your telephone and modem lines, purchase a "1-to-2" jack adapter device (splitter).
Page 26
Page 27
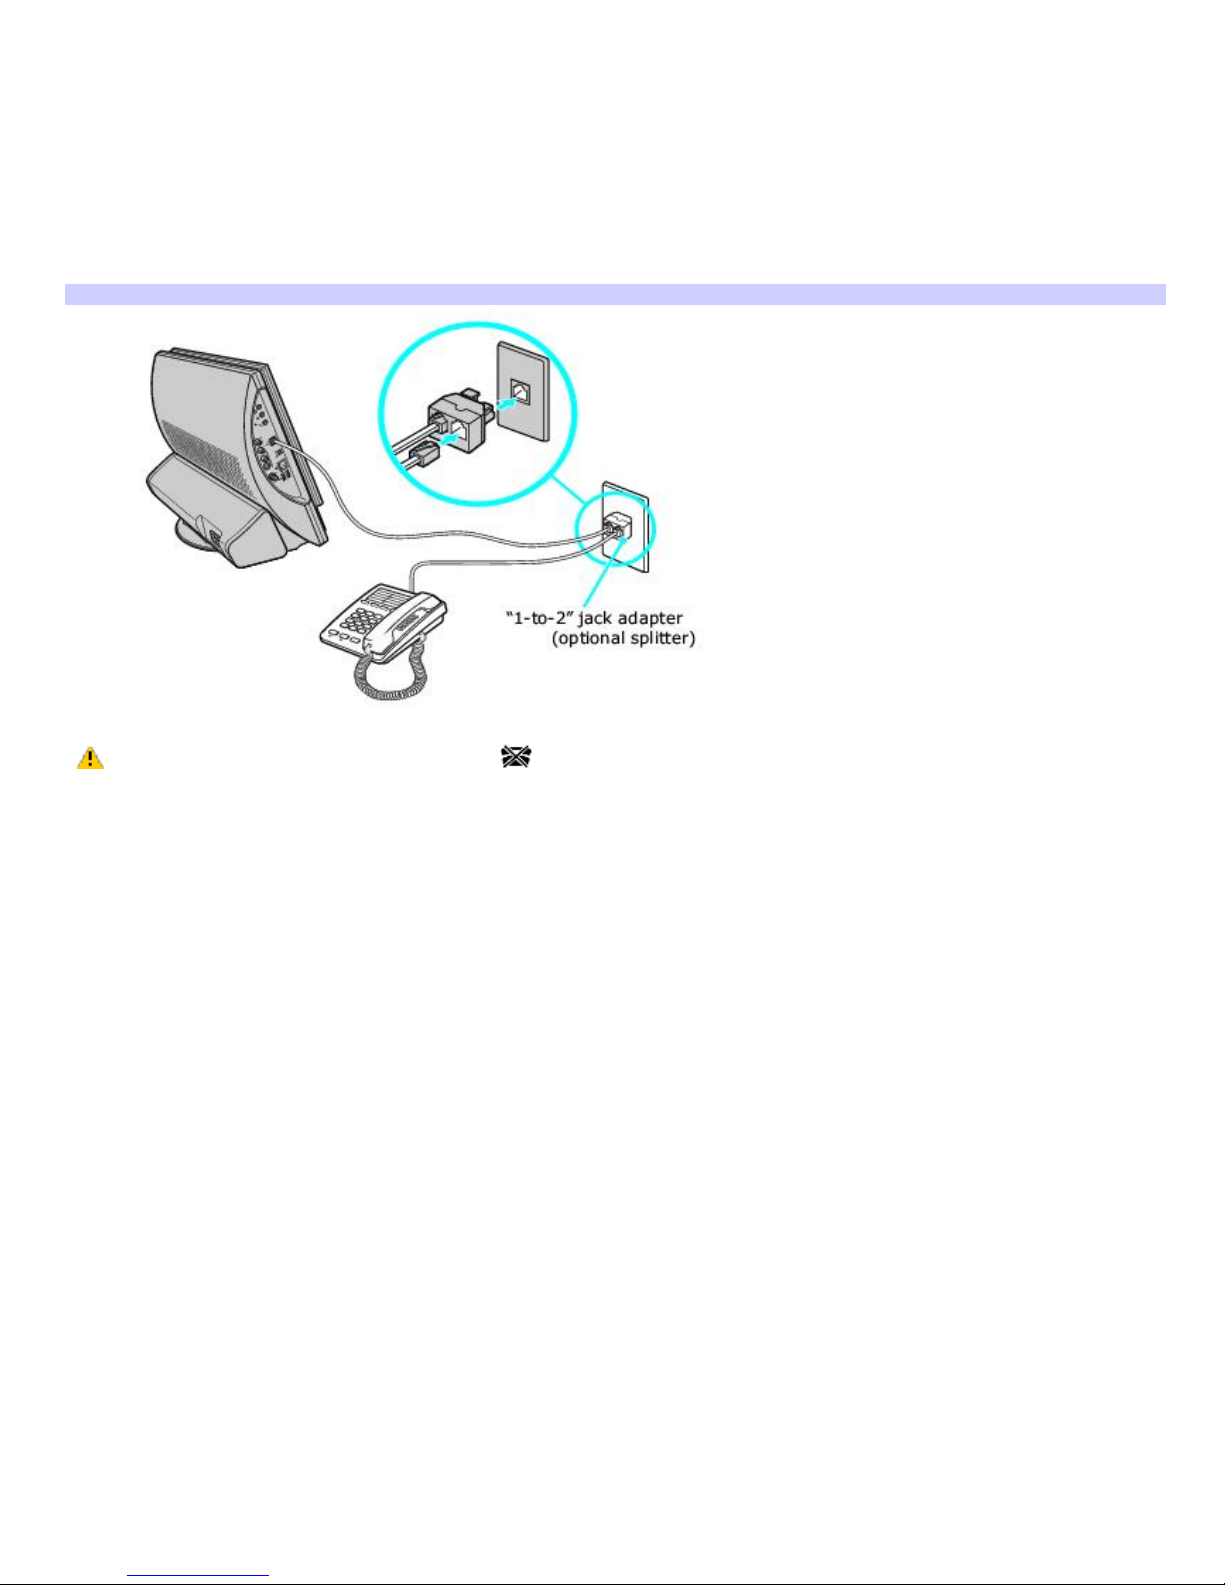
To connect the modem cable
1.
Unplug your telephone cable from the wall jack.
2.
Insert the telephone cable into one of the RJ-11 jacks on a splitter device (optional).
3.
Insert one end of the modem cable (supplied) into the other RJ-11 jack on the splitter device.
4.
Insert the plug end of the splitter device into the wall jack.
5.
Plug the modem cable into the modem line jack on the computer.
Connecting the modem cable
Your computer has a protective sticker covering the Ethernet port located on the rear panel. Connect only
10BASE-T and 100BASE-TX cables to the Ethernet port. Using other cables or a telephone cable may result in an
electric current overload that can cause a malfunction, excessive heat, or fire in the port. For help on connecting to a
network, see your network administrator.
Page 27
Page 28
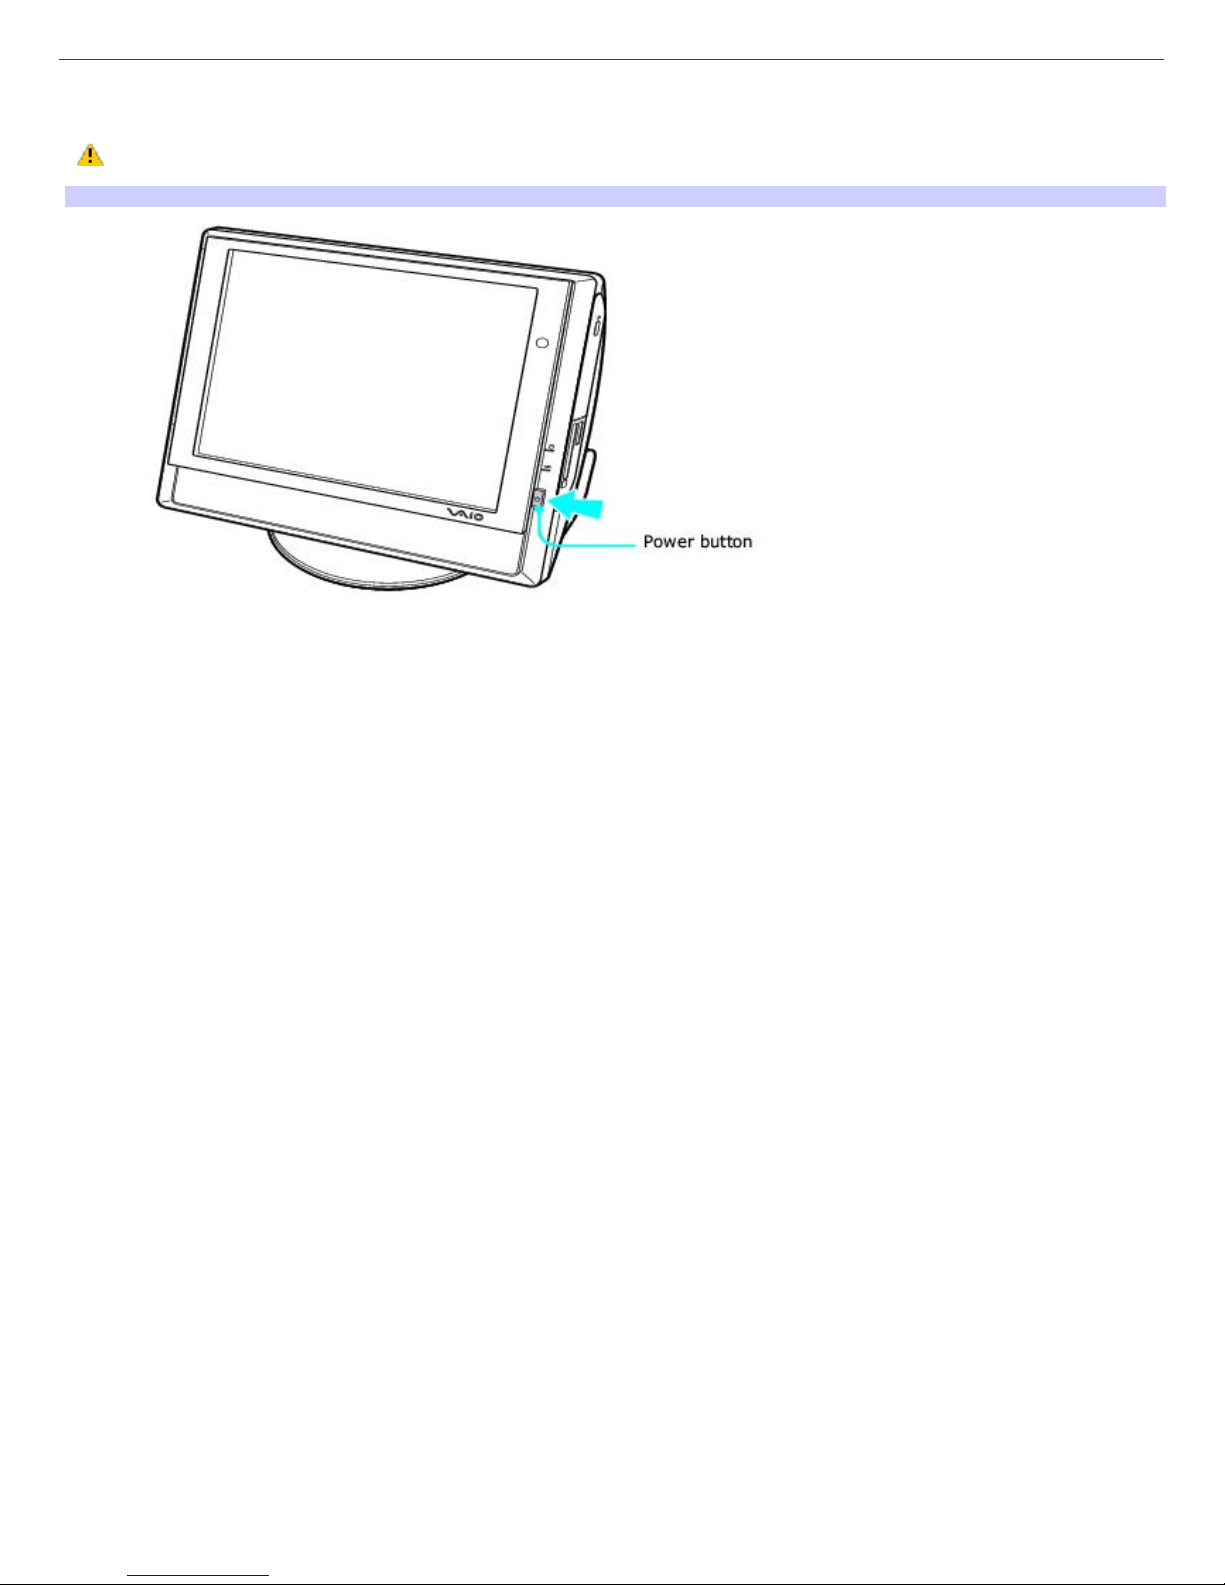
Turning on your Computer
Press button from the right side to turn the computer on and off.
Do not press the Power button incorrectly, as this may cause damage to this control.
Turning on your computer
When you start your computer, it may detect new hardware and prompt you to restart your computer. Respond to this
prompt immediately.
Page 28
Page 29

Registering your Computer
Take advantage of Sony's commitment to quality customer support and receive these benefits by registering your
computer:
Sony Customer Support — Communicate with a Support Representative to troubleshoot problems you may be
having with your computer.
Limited warranty — Protect your investment. See the Limited Warranty Card for more details.
You are prompted to register your computer the first time you turn it on. Follow the on-screen instructions to complete
the registration process. If you are not able to register your computer during the first session, you are provided with
additional registration opportunities later.
Page 29
Page 30

Giga Pocket Personal Video Recorder
Giga Pocket Personal Video Recorder is a suite of interactive Sony audio and video components that are designed to
create, capture, and play back video files derived from television and your personal videos.1
Giga Pocket Personal Video Recorder hardware and software programs are not available on all VAIO® computers. See
your computer's online specification sheet for details on your system configuration.
About Giga Pocket Personal Video Recorder
Setting Up Giga Pocket Personal Video Recorder
Setting Up Giga Pocket Software
Giga Pocket
Timer Recording Wizard
Timer Recording Manager
Giga Pocket Explorer
CLIÉ Converter
Glossary
Internet Electronic Program Guide Service
1
U nauthorized duplication of audio or video files is a violation of applicable laws.
Page 30
Page 31

About Giga Pocket Personal Video Recorder
Giga Pocket Personal Video Recorder is a unique set of tools that enhance your VAIO® computer's capabilities. Giga Pocket
gives you a wide range of video viewing, recording, and playback capabilities, such as:
Watching and recording television programs from your computer.
Viewing and recording TV programming simultaneously.
Setting and managing daily/weekly timer recording schedules.
Managing Video Capsules (recorded video contents) on your computer.
Recording personal video content from a videotape.
Playing your Video Capsules on other computers.
Operating Giga Pocket functions with a remote control device.
Sharing Giga Pocket features and functions with other computers on a network.
Transforming Video Capsules into gMovie format for viewing on your CLIÉ handheld.
For an explanation of Giga Pocket terms, see the Glossary.
Page 31
Page 32

Giga Pocket Personal Video Recorder includes:
Giga Pocket — This application enables you to watch TV programs on your computer's display and record them onto
the hard disk drive as Video Capsules for later playback.
Timer Recording Manager — The Timer Recording Manager keeps track of all TV program recordings you have
scheduled. This program also enables you to modify timer recordings.
Timer Recording Wizard — The Wizard interface guides you through setting up a timer recording schedule. You can
program one-time recordings and set up daily or weekly recurring recording schedules.
Giga Pocket Explorer — The Giga Pocket Explorer program functions as your video file management system, and
stores recorded Video Capsules as well as modified Playlists. Giga Pocket Explorer contains export/import functions
for file format conversions.
Giga Pocket Server — The Giga Pocket Server enables multiple computers on a network to use certain Giga Pocket
software functions.
CLIÉ Converter — The CLIÉ Converter is a plug-in application that enables the conversion of Video Capsules into
gMovie format. You can change the format your Giga Pocket contents and transfer them onto a Memory Stick
®
media for viewing with your Sony CLIÉ Handheld.
Accessing the Giga Pocket Help
For more information about Giga Pocket Personal Video Recorder, follow these steps:
1.
Click Start in the Windows® taskbar and select All Programs.
2.
Select Giga Pocket, Help, and click Giga Pocket Help.
Giga Pocket Personal Video Recorder maintains information about the software and Video Capsules on your
computer's drive D, in a folder named D:\Giga Pocket V5. This folder and its contents are not designed for your direct
maintenance. Please do not move, modify or delete the Giga Pocket Folder or any of its contents. Any alteration to this
folder or its contents may cause your Giga Pocket software and Video Capsules to stop working properly.
Page 32
Page 33

Setting Up Giga Pocket Personal Video Recorder
This section illustrates how to set up the cables and connections for your Giga Pocket Personal Video Recorder system.
The hardware configuration of your computer may vary from the illustrations shown. To view the specific hardware
configuration for your computer, see the online Specifications sheet.
Page 33
Page 34

To set up TV connections
The best method of connecting your computer system, TV monitor or display, and cable service access, depends on the type
of cable connection available in your home.
Your VAIO® computer is supplied with certain audio and video cables. Your in-home cable access may require extra
cables, adapters or connection equipment not supplied with your computer.
Connecting to standard cable access (CATV)
Option 1
1.
Connect one end of the TV coaxial cable (supplied) to your cable service access.
2.
Connect the other end of the TV coaxial cable to the VHF/UHF port on the left panel of your computer.
To connect in CATV mode (Option 1)
Option 2
1.
Connect one end of a TV coaxial cable (optional) to your cable service access. Connect the other end to the
single-connection end of a splitter adapter.
2.
Connect the TV coaxial cable (supplied) to the double-connection end of the splitter adapter. Connect the other
end to the VHF/UHF port on the left panel of your computer.
3.
Connect a third TV coaxial cable (optional) to the double-connection end of the splitter adapter. Connect the
other end to the VHF/UHF port on the rear of your TV monitor or display.
To connect in CATV mode (Option 2)
Page 34
Page 35

Connecting to a standard antenna (air)
You can connect your Giga Pocket system to an indoor/outdoor antenna system, using Option 1 or 2 from the previous
section, Connecting to standard cable access (CATV). Depending on the type of antenna system in your home, your
connection may require a VHF/UHF RF combiner/transformer (optional) to connect your computer and the indoor/outdoor
antenna system.
If you are connecting to an indoor/outdoor antenna, you may need to reorient the antenna for best reception.
Option 1
1.
Connect one end of a TV coaxial cable (optional) to your antenna outlet. Connect the other end to a VHF/UHF RF
combiner/transformer (optional).
2.
Connect the TV coaxial cable (supplied) from the combiner/transformer to the VHF/UHF port on the left panel of
your computer.
Option 2
1.
Connect both ends of the antenna's twin lead cable to the screw-type grips on the combiner/transformer.
2.
Connect the TV coaxial cable (supplied) from the combiner/transformer to the VHF/UHF port on the left panel of
your computer.
To connect in standard antenna mode (air)
Page 35
Page 36

Your VAIO® computer is supplied with certain audio and video cables. Depending on your in-home cable access, you
may require extra cables, adapters or connection equipment not supplied with your computer.
Connecting with a cable or satellite set-top box (STB)
You can connect your Giga Pocket system to cable service access that uses a set-top box (cable or satellite).
Option 1
1.
Connect one end of a TV coaxial cable (optional) to your cable service access. Connect the other end to the In
jack on the back panel of your set-top box (STB).
2.
Connect a second TV coaxial cable (optional) to the Out jack on your STB. Connect the other end to the
single-connection end of a splitter adapter (optional).
3.
Connect a third TV coaxial cable (supplied) to the double-connection end of the splitter adapter. Connect the
other end to the VHF/UHF port on the left panel of your computer.
4.
Connect a fourth TV coaxial cable (optional) to the double-connection end of the splitter adapter. Connect the
other end to the VHF/UHF port on the rear of your TV monitor or display.
To connect in STB mode (Option 1)
Page 36
Page 37

Option 2
1.
Connect one end of the TV coaxial cable (supplied) to your cable service access. Connect the other end to the In
jack on the back panel of your set-top box (STB).
2.
Connect a second TV coaxial cable (optional) to the Out jack on your STB unit. Connect the other end to the
VHF/UHF port on the rear of your TV monitor or display.
3.
Connect one end of the stereo A/V dubbing cables with triple RCA jacks (optional) to the Video Out and
Audio-OUT (L/R) jacks on the back panel of your STB unit, matching the plug and jack colors.
4.
Connect the other RCA jacks of the stereo dubbing cable into the Audio-R (IN), Audio-L (IN), and Composite video
(IN) jacks on the left panel of your computer, matching the plug and jack colors.
To connect in STB mode (Option 2)
Page 37
Page 38

Page 38
Page 39

Setting up additional equipment
This section illustrates how to set up additional equipment with the Giga Pocket Personal Video Recorder System.
To connect a compatible VCR or camcorder
Your VAIO® computer has both audio and video connection capability. You can locate the connections on the left panel of the
system unit. You can connect a VCR or camcorder, using the audio jacks and video ports. Your VCR or camcorder may have
either standard video or S-video connection capability.
To connect with an S-video cable
Connect an S-video cable (optional) directly into the composite S-video jack on the left panel of your computer. Connect the
other end of the S-video cable into the appropriate port on your compatible VCR or camcorder.
To connect with an S-video cable
Connect an audio cable with double RCA plugs at each end (optional) into the composite audio L and R jacks, located on the
left panel of your computer. Connect the other ends of the audio cable into the appropriate ports on your compatible VCR or
camcorder.
To connect with a stereo A/V dubbing cable (Triple RCA plugs)
Connect a stereo A/V dubbing cable with triple RCA plugs at each end (optional) directly into the composite video In port,
composite audio L and R In jacks, located on the left panel of your computer. Connect the other ends of the stereo A/V
dubbing cable into the appropriate jacks on your compatible VCR or camcorder.
To connect a VCR or camcorder
About the infrared receiver
The infrared receiver, located on the front panel of your computer, communicates with the Giga Pocket remote control. The
infrared receiver must be visible in a line-of-sight with your remote control in order to function properly.
Page 39
Page 40

Setting Up Giga Pocket Software
Giga Pocket Personal Video Recorder software features and functions are detailed in this section, enabling you to begin
viewing or recording TV programs.
Page 40
Page 41

To set up TV viewing
When you start Giga Pocket Personal Video Recorder for the first time, you are automatically prompted to set the video
input source for watching TV or cable TV (CATV) programs on your computer.
Starting Giga Pocket for TV Setup (For first time setup)
1.
Verify that the computer time and date settings as displayed in the taskbar are correct.
To adjust these settings:
1.
Right-click with your mouse. A shortcut menu appears.
2.
Select Adjust Date/Time, and a dialog box appears.
3.
Correct the date and time, if necessary.
2.
Click Start in the Windows taskbar, point to All Programs, point to Giga Pocket, point to All Software, and then
click TV Setup.
The TV Setup Wizard appears.
TV Setup Wizard
3.
Depending on your cable service access, select Standard CATV, Standard antenna, or set-top box (STB).
1.
Standard CATV (C1-C125) without STB — For this connection, you must use a coaxial cable directly
(without an STB) to your computer. The default setting for this connection option is STD. Depending on
your local connection requirements, HRC and IRC are also available.
2.
Standard antenna (2-69) — Select this option if you connect an aerial antenna's coaxial cable directly to
your computer for watching TV programs.
3.
STB (Set top box) — Select this option if the broadcast signal is received from a set top box (STB) such
as a digital cable box or a satellite cable box. Make sure that the Input channel on your STB (Ch. 3, Ch.
4, etc.) matches the Input channel listed in the Giga Pocket TV Setup dialog box.
If you are not sure of the type of cable connection to use (Standard, HRC, or IRC), contact your cable provider for
information.
Page 41
Page 42

4.
Click Next. The wizard displays a dialog box that enables you to customize the channel listings.
5.
Click Auto Scan.
You can view the channel reception in the pop-up TV Setup - Monitor window.
TV Setup Wizard - Customize the channel listing
If your computer is connected to the Internet, you can click Go to Web Site... and download channel listings from
the iEPG listing site.
6.
Connect to the Internet.
7.
Click Go to Web Site... and download channel listings by clicking Download all Channel Settings.
8.
Click Next. For the first time setup, you are prompted to set your Giga Pocket Server password.
TV Setup Wizard - Giga Pocket Server password
Page 42
Page 43

9.
Type in a password and click Finish.
Setting up your display (monitor)
When using Giga Pocket Personal Video Recorder, set your display settings as follows:
Colors — Use the default factory settings (32-bit).
Screen area — Use the default video resolution.
If you change the default settings, you may experience poor image quality on your display.
Microsoft® Windows® XP operating system supports a single Giga Pocket user at any given time. Even if a different
user logs on using the fast switch feature, Giga Pocket is not available to any other user account. For more information,
see the Giga Pocket Help.
Page 43
Page 44

Giga Pocket
Giga Pocket enables you to watch a TV program on your computer display while recording it onto your hard disk drive. Using
the Giga Pocket Slip Play feature, you can view a program from the beginning even while it is being recorded.
Page 44
Page 45

Starting Giga Pocket
1.
Click Start in the Windows® taskbar, point to All Programs, point to Giga Pocket, then click Giga Pocket. The
Giga Pocket window appears.
Giga Pocket window
The current television broadcast is displayed, based on the selected channel.
Page 45
Page 46

Using the TV/Recording deck and Playback deck
Giga Pocket features two decks on the main interface window: the TV/Recording deck and the Playback deck.
TV/Recording deck (detail)
Use the TV/Recording deck to view programs and record Video Capsules. You can use the Playback deck of your Giga Pocket
to play back a prerecorded Video Capsule.
Playback deck (detail)
Page 46
Page 47

Recording a Video Capsule
Giga Pocket stores recorded images as Video Capsules. The Video Capsules provide file recording information, which can be
viewed through Giga Pocket Explorer. Manage your Video Capsules with Giga Pocket Explorer.
You cannot record a program into a previously recorded Video Capsule. All new content is recorded into a new Video
Capsule.
1.
Select your program by switching to the appropriate channel. Use the channel buttons located at the bottom of
the Giga Pocket window, or use the right and left direction arrows on your keyboard.
2.
Click Record , located at the bottom of the window, to begin recording your Video Capsule.
3.
When your program has completed or you wish to end the Video Capsule, click Stop .
To pause your recording session, click Pause . Click on it again to resume recording.
Using the Slip Play feature
While a program is being recorded on the TV/Recording deck, you can watch that same program from the beginning, using
the Playback deck. You can begin using Slip Play to view your recording, beginning approximately ten seconds after your
recording session begins.
1.
From the menu bar, click Functions.
2.
Select Start Slip Play.
Additional information about Giga Pocket
Giga Pocket can be used for external video recording. Depending on conditions, not all video images can be
recorded or displayed.
Video input from game consoles may not be recorded or displayed in Giga Pocket.
When you input an image from a video player device, such as a VCR that is connected to your computer, the
following images may not record or display:
The still images of a paused playback screen.
A screen without images, such as a blue screen.
The menu screens of the attached video player device.
The Giga Pocket software's displayed image or images from a prerecorded Video Capsule may be interrupted or
distorted under the following circumstances:
If you change the channel on an attached video player device.
If you switch input during the analog input from an attached video player device.
If you attempt to play back a damaged video tape.
If you press Pause during the recording process.
When you play a Video Capsule for a few seconds from the end of the film roll using the scroll bar, you may not be
able to see a displayed image.
The computer's response may decrease when you attempt to play a Video Capsule while recording a TV program
using Giga Pocket.
Giga Pocket may interrupt or stop playback to allocate system resources for the timer recording event, if there are
other applications running simultaneously. If this occurs, wait until Giga Pocket finishes recording before playing the
Video Capsule.
The timer recording may fail due to an "Event buffer of audio overflow" error in the following circumstances:
The input cable (coaxial or video cable) is disconnected after recording starts.
Page 47
Page 48

You record a TV channel that has no broadcast content.
You record video content from an old video tape with poor signal quality.
The on-screen display may shift and split under some circumstances. If this occurs, switch the TV/Recording deck
and the playback deck, or switch the channel. The recording proceeds even if the on-screen display shifts.
Giga Pocket does not operate properly if used concurrently with other video applications, such as DVgate or
MovieShaker software.
Page 48
Page 49

Using the TV Program Web site
1.
Click Start in the Windows taskbar, point to All Programs, point to Giga Pocket, and then select Zap2it.
You can also go directly to the Web site at http://www.sony.com/vaiotv.
Timer Recording requires an Internet connection. See the section, To set up your Internet Electronic Program
Guide service, for information on setting up for first-time use.
Internet Electronic Program Guide Web site
The appearance of the online channel guide Web site, its contents, and the accuracy of the TV listings are
controlled by the TV listing provider and may change without notice. Pay-per-view channels can be accessed
when making payments directly to the appropriate TV program provider.
You can schedule up to 100 timer recordings using Giga Pocket Personal Video Recorder.
From the online channel guide, click on the REC icon to select the program you wish to record. The Timer
Recording Wizard begins and the New Timer Recording - Set Channel and Start Date and Time window
appears.
Timer recordings create virtual containers for the recorded content that are called Video Capsules.
Accessing the Giga Pocket Help
For more information about Giga Pocket Personal Video Recorder, follow these steps:
1.
Click Start in the Windows® taskbar and select All Programs.
2.
Select Giga Pocket, Help, and click Giga Pocket Help.
Page 49
Page 50

Timer Recording Wizard
With the Timer Recording Wizard, you can set, adjust, and cancel the timer recording settings.
Page 50
Page 51

Using the Timer Recording Wizard
1.
Click Start in the Windows taskbar, select All Programs, then select Giga Pocket.
2.
Select Timer Recording Wizard. The Timer Recording Wizard dialog box appears.
Timer Recording Wizard
3.
Select the desired option from the Select Timer Recording Settings menu and click Next. Follow the on-screen
instructions. Click Help for assistance.
New Timer Recording - Set Channel and Start Date and Tim e
4.
Verify that the information is correct and click Next. The programming station and time information is
Page 51
Page 52

automatically programmed into the appropriate Timer Recording Wizard fields.
5.
You can set the stop time for your timer recording and select the recording mode. The stop time is automatically
programmed into the Timer Recording Wizard. Verify the stop time, choose a recording mode, and then click Next
.
Recording Mode Description
Standard Play (SP) Standard recording mode (MPEG-2).
High Quality (HQ) Image quality is improved, but recording requires more space on the hard disk drive as
compared to using SP or LP recording modes (MPEG-2).
Long Play (LP) Image quality is reduced, but recording requires less space on the hard disk drive as compared to
using HQ recording mode (MPEG-1).
New Timer Recording - Set Stop Tim e and Recording Mode
6.
From the New Timer Recording - Set Details dialog box, you can customize the timer recording schedule. Select
how often you want to record the program.
New Timer Recording - Set Details
Page 52
Page 53

7.
Select a date for the recorded program to be automatically deleted from your hard disk drive, using the
Expiration date of Video Capsule drop-down list.
To maintain adequate space on your hard disk drive, Giga Pocket Personal Video Recorder enables you to set an
expiration date for your Video Capsules to be automatically deleted.
8.
Click Decide to review your setting preferences. The New Timer Recording - Confirm dialog box appears. Click
Next.
New Timer Recording - Confirm
9.
The New Timer Recording - Completed dialog box appears. Click Finish.
New Timer Recording - Com pleted dialog box
Page 53
Page 54

Additional information about the Timer Recording Wizard
Timer recording requires approximately 30 seconds (pre-recording) preparation time prior to beginning each
recording session. Please keep this in mind when setting up multiple, back-to-back recording sessions. Giga Pocket
software stops the current timer recording, pauses to prepare, and then begins the next timer recording according
to the set start time. The length of your first Video Capsule is approximately 30 seconds shorter than the actual
time set.
You may experience some timing problems with multiple recording sessions when the second timer recording is
preset as a daily or weekly recorded event. The first timer recording may end as early as 60 seconds sooner than
the set stop time.
Scheduled daily or weekly timer recording sessions do not occur if your hard disk drive does not have sufficient
space. Giga Pocket software does not allow a new Video Capsule to be created if there is less than 100 MB of free
space on the hard disk drive. These scheduled events resume at their scheduled time, as hard disk drive space
becomes available.
Approximately three minutes before Giga Pocket begins a timer recording and during a timer recording, you must
avoid:
Starting up or using other software programs.
Setting up, changing, or deleting timer recordings.
All activities that may access the hard disk drive, such as copying files.
Accessing the Giga Pocket Help
For more information about Giga Pocket Personal Video Recorder, follow these steps:
1.
Click Start in the Windows® taskbar and select All Programs.
2.
Select Giga Pocket, Help, and click Giga Pocket Help.
Page 54
Page 55

Timer Recording Manager
The Timer Recording Manager keeps track of all scheduled TV recordings. Your computer settings, by default, are set to start
Timer Recording Manager automatically when the computer is turned on.
Timer recordings are being performed when the Timer Recording Manager icon (Timer Recording Manager) is visible in the
Windows taskbar. The timer recording does not start unless the Timer Recording Manager application is available. For the
Timer Recorder Manager application to be available, your computer should be in Stand by or Hibernate mode, if the system
is not in active use. You can schedule up to 100 programs at a time, for timer recording with the Timer Recording Manager.
Microsoft® Windows® XP operating system supports a single Giga Pocket user at any given time. If a different user logs
on using the fast switch feature, the Timer Recording feature is not available to another user account. The Timer Recording
Manager icon appears in the taskbar of the first user to log on.
Page 55
Page 56

Using the Timer Recording Manager
1.
Click Start in the Windows® taskbar, select All Programs, select Giga Pocket, and then click All Software.
2.
Click Timer Recording Manager. The Timer Recording Manager dialog box appears:
Windows Stand by button — Places the Windows operating system into Stand by mode when the preset
timer recording is set to begin, or if a Video Capsule is set to expire. Windows automatically starts and
performs the appropriate action.
Interrupt Current Recording button — Stops the current timer recording. Use this option when you wish
to end the current recording session.
Timer Recording List — Displays a list of timer recordings that have been performed, as well as pending
timer recordings. If a daily/weekly timer recording is set, only the current recording session is shown.
The total number of timer recordings displayed does not exceed 100.
Timer Recording Manager dialog box
Double-click on a recorded timer recording to play it back on Giga Pocket.
3.
Click Hide to restore Timer Recording Manager to the taskbar.
If you turn off your computer, the timer recording function is disabled.
Page 56
Page 57

Viewing your selected program recording schedule
You can easily view the programs you have selected to record, using Giga Pocket Personal Video Recorder. The Timer
Recording Manager feature enables you to change or cancel your timer recording at any time.
To view your scheduled timer recordings, follow these steps:
1.
Double-click on the Timer Recording Manager icon located in the Windows® taskbar.
Review your scheduled timer recordings and make any desired changes or cancellations.
2.
Click Hide to return the icon to the taskbar.
You do not have to be connected to the Internet to use the Timer Recording Manager feature.
Additional information about the Timer Recording Manager
When creating a timer recording, it is important to remember the following information:
The timer recording function is disabled if you turn your computer off.
Your computer should be in Stand by or Hibernate mode, if the system is not in active use.
Disable screensavers and any other applications that may access your computer's hard disk drive during the
timer recording.
If you are using a set-top box (STB), make sure it is turned on and set to the channel you want to record.
When you set up a timer recording using Giga Pocket software, always use the Timer Recording Manager. If the
Timer Recording Manager is not set up, the recording does not start, even if you set the timer recording settings
with the Timer Recording Wizard.
Your computer's default setting enables Timer Recording Manager to start automatically when the computer is
started.
The timer recording starts a few seconds earlier than the specified recording start time.
Under certain circumstances, a daily or weekly timer recording may not be executed the second and subsequent
times.
A timer recording may fail if the computer's clock setting is changed right before the preset recording time. Before
changing the computer's clock setting, verify that there are no timer recordings set to begin.
Close the Time Recording Manager before changing the computer's clock setting. Restart Timer Recording Manager
after you have changed the time setting.
If a different user logs on, using the fast switch or switch user features, the Timer Recording feature is not available
to another user account. The Timer Recording Manager icon appears in the taskbar of the first user to log on.
Accessing the Giga Pocket Help
For more information about Giga Pocket Personal Video Recorder, follow these steps:
1.
Click Start in the Windows® taskbar and select All Programs.
2.
Select Giga Pocket, Help, and click Giga Pocket Help.
Page 57
Page 58

Giga Pocket Explorer
The Giga Pocket Explorer application serves as a file manager for your Video Capsules. Video Capsules and saved Playlists
are managed in Cabinets.
Giga Pocket Explorer enables you to play back Video Capsules using Giga Pocket. You can import MPEG files, that were
created with compatible Sony applications, and export Video Capsules as AVI or MPEG files.
Using Giga Pocket Explorer
1.
Click Start in the Windows taskbar, point to All Programs, point to Giga Pocket, point to Giga Pocket Explorer.
The Giga Pocket Explorer main window appears.
2.
Click on the desired Cabinet to see a list of saved Video Capsules and Playlists.
Giga Pocket Explorer main window
Using the Giga Pocket Explorer Toolbar functions
From the Giga Pocket Explorer toolbar, you can:
Start Giga Pocket to play a selected Video Capsule or Playlist.
Start Timer Recording Wizard to set up timer recordings.
Start Click to DVD software to burn Video Capsules to DVD recordable media. See Click to DVD software Help for
more details.
Start DVgate Plus software to edit your Video Capsules.
Start Giga Pocket Help to obtain further assistance.
Change the display views for your video contents, and edit recording information.
Accessing the Click to DVD software Help
For additional information about using Click to DVD software features, follow these steps to access the software Help.
1.
Click Start in the Windows taskbar, point to All Programs.
2.
Point to Click to DVD and click Click to DVD Help.
Accessing the DVgate Plus software Help
Page 58
Page 59

For additional information about using DVgate Plus software features, follow these steps to access the software Help.
1.
Click Start in the Windows taskbar, point to All Programs.
2.
Point to DVgate Plus and click DVgate Plus Help.
Page 59
Page 60

Recording Video Capsules onto recordable DVD media
You can record Video Capsules to DVD-R/DVD-RW media with the Make DVD feature.
The Click to DVD software must be installed in order to burn Video Capsules to recordable DVD media.
1.
From the Giga Pocket Explorer main window, select the Video Capsules you want to burn onto a DVD.
2.
On the Giga Pocket Explorer Toolbar, click Make DVD.
3.
The Click to DVD software starts. Follow the on-screen instructions.
Page 60
Page 61

Exporting Video Capsules
You can export your Video Capsules as MPEG-1, MPEG-2, or AVI file formats for viewing on external media.
1.
In the list area, right-click the Video Capsule you want to export. A shortcut menu appears.
2.
Select Export. The Export dialog box appears.
Export dialog box
3.
Enter an output name for the file you want to export and specify the location for the exported file.
You can select the option, Delete Video Capsule after export. If you do not want to delete the Video Capsule
after export, leave the option disabled.
4.
In the section, "Export Video Capsule As:", select to convert to an AVI, MPEG-1, or MPEG-2 format.
5.
Click Run to begin exporting.
Some conversion formats may not be available, depending on the recording mode that was used to create the Video
Capsule.
Additional information about using Giga Pocket Explorer
Video Capsules that are recorded using High Quality (HQ) or Standard Play (SP) mode can be converted and
exported as MPEG-1, MPEG-2, and AVI files.
MPEG-2 files need a specific system environment for playback:
A VAIO computer that has Giga Pocket Personal Video Recorder installed.
A VAIO computer that has a DVD-ROM or DVD-RW drive.
If you wish to play your Video Capsule in a different system environment, you can convert and export your Video
Capsule using MPEG-1 format.
Video Capsules that are recorded using Long Play (LP) mode can be converted and exported as MPEG-1 files.
You can convert an imported MPEG file into a Video Capsule, only if the file was created using DVgate Assemble or
other VAIO AV applications.
Page 61
Page 62

Using Network Cabinets
Giga Pocket Explorer enables you to connect to Video Capsules in network cabinets located on other computers in the
network. These network cabinets can be accessed through the Giga Pocket Explorer main window when you are connected
to the network.
Connecting to Network Cabinets
1.
On the Giga Pocket Explorer menu, select Network and then Connect/Disconnect. The Connect/Disconnect
Server dialog box appears.
Connect/Disconnect Server dialog box
2.
Select the server you want to connect to from the Server list on the left side.
3.
Click Connect to add the selected server to the Connected Server list, then click OK. The server is connected.
4.
To disconnect, repeat step 1, then select the server you want to disconnect from the Connected Server list on
the right.
5.
Click Disconnect, then click OK. The server is disconnected.
Accessing the Giga Pocket Help
For more information about Giga Pocket Personal Video Recorder, follow these steps:
1.
Click Start in the Windows® taskbar and select All Programs.
2.
Select Giga Pocket, Help, and click Giga Pocket Help.
Page 62
Page 63

CLIÉ Converter
The CLIÉ Converter is a plug-in application that enables the conversion of Video Capsules into gMovie format. You are
able to convert your Giga Pocket contents and HotSync® onto a Memory Stick® media for viewing with your Sony CLIÉ
Handheld. In order to use the CLIÉ Converter plug-in application, make sure you have install all required software for the
CLIÉ handheld.
The Sony CLIÉ Handheld personal entertainment organizers provide a rich and compelling handheld computing
experience. Powered by the Palm operating system, the CLIÉ handheld is ready to deliver music and video with amazing
clarity. For more information on this exciting device, go to the Sony Style Web site at http://sonystyle.com/vaio/clie.
Page 63
Page 64

Starting CLIÉ Converter
1.
Click Start in the Windows taskbar and point to All Programs.
2.
Point to Giga Pocket, point to Plug-ins, and then click CLIÉ Converter. The Giga Pocket -> CLIÉ Converter
dialog box appears.
Giga Pocket -> CLIÉ Converter m ain
Page 64
Page 65

Converting Video Capsules
1.
From the Giga Pocket -> CLIÉ Converter dialog box, click the Setting... button. The Settings dialog box
appears. Enter your desired settings and click OK.
2.
Start Giga Pocket Explorer as follows:
1.
Click Start in the Windows taskbar, and then select All Programs.
2.
Select Giga Pocket, and then click Giga Pocket Explorer.
3.
Resize the Giga Pocket Explorer window so that the Giga Pocket -> CLIÉ Converter dialog box is
visible.
4.
Click on the Cabinet icon to display the contents in the list area.
5.
Drag the Video Capsule from the Giga Pocket Explorer window and drop it in the list area of the Giga
Pocket -> CLIÉ Converter main dialog box. The Video Capsule automatically converts into a video file.
During conversion, the Convert to CLIÉ dialog box appears, displaying the conversion status. When
conversion is complete, the dialog box automatically closes.
The conversion process may take time, depending on the settings selected.
To convert multiple Video Capsules, hold down the Ctrl key while selecting Video Capsules in Giga Pocket Explorer. Drag
and drop all selected capsules to the Giga Pocket -> CLIÉ Converter main window.
Page 65
Page 66

Transferring converted video files to a Memory Stick media
1.
Insert a Memory Stick® media into the Memory Stick media slot on your computer.
2.
From the Giga Pocket -> CLIÉ Converter main window, click to select the videos you want to transfer to the
Memory Stick media.
3.
Click Send To. The Send To dialog box appears.
4.
Select Using Memory Stick as the transfer destination. Click OK.
During transfer, the Forwarding dialog box appears, displaying the transfer status. When transfer is complete,
the GP2CLIE window appears. Click OK.
Your converted video files can be played back on CLIÉ Handhelds that support the use of a Memory Stick media.
Transferring converted video files using the HotSync® operation
You can transfer your converted video files directly to your CLIÉ Handheld, when you start a HotSync operation.
1.
From the Giga Pocket -> CLIÉ Converter main window, click to select the videos you want to transfer using the
HotSync operation.
2.
Click Send To. The Send To dialog box appears.
3.
Select Using HotSync as the transfer destination. Designate a user name, if applicable to your handheld's
configuration. Click OK.
4.
The "Send to HotSync" message box appears. Follow the on-screen instructions and click OK.
For more information about the HotSync operation, see the information supplied with your CLIÉ Handheld.
Accessing the CLIÉ Converter Help
For more information about using the CLIÉ Converter plug-in application, follow these steps:
1.
Click Start in the Windows taskbar and point to All Programs.
2.
Point to Giga Pocket, point to Help, and then click CLIÉ Converter Help.
Page 66
Page 67

Glossary
The most common terms for Giga Pocket Personal Video Recorder software are defined below.
Cabinet A cabinet acts as a container for Video Capsules in Giga Pocket Explorer. A network cabinet is located on
other computers in a network environment.
CATV Refers to Community Access Television, otherwise known as cable television.
Clip A clip is a Video Capsule when it is stored in a Playlist.
Cut A cut is a selected scene taken from a previously recorded Video Capsule.
Expiration date A Video Capsule is stored on the hard disk drive for a preset period of time. When this time has expired,
the Video Capsule is automatically deleted.
Film roll During Video Capsule playback, a snapshot view of the scenes are captured on a film roll. You can scroll
freely through the film roll to view different scenes.
GOP Group of Pictures (GOP) are the smallest unit of measure for the images captured on a Video Capsule. A
single GOP is approximately 0.5 to 1 second in length.
HotSync® Registered trade name for the method of linking between a handheld device and a larger computer, such
as a desktop or notebook computer.
Management information Management information contains the creation date of Video Capsules and their thumbnails.
This information is required for preview.
MPEG file A file that contains compressed moving pictures using the MPEG standard, with.mpg as the file name
extension.
Safety Tab Removing the safety tab from a Video Capsule prevents accidental erasing of your video data.
Slip play This feature allows you to view delayed video playback. While your recording is in progress, you are able
to view the recording from the beginning.
Snapshot A snapshot is a miniature view displayed on the film roll in Giga Pocket, Playlist Builder, and the preview
monitor in Giga Pocket Explorer.
Stand by mode Stand by mode is a power saving mode that is set up by using the Windows® operating system. Your
computer stays in this power saving mode until approximately 5 minutes before the timer recording is due to begin.
STB Refers to set-top box, otherwise known as a cable box.
Thumbnail A thumbnail is a miniature view on recorded Video Capsules or in playback by Giga Pocket. The main
thumbnail is displayed in calendar view or in the Giga Pocket Explorer list area.
Timer recording A timer recording is a preset video recording event.
Video Capsule A Video Capsule is a virtual container that holds the video images recorded with Giga Pocket Recorder. A
Video Capsule is created on your computer hard disk drive and managed with Giga Pocket Explorer.
Page 67
Page 68

Accessing the Giga Pocket Help
For more information about Giga Pocket, follow these steps:
1.
Click Start in the Windows taskbar and point to All Programs.
2.
Point to Giga Pocket, point to Help, and then select Giga Pocket Help.
Page 68
Page 69

Internet Electronic Program Guide Service
Internet Electronic Program Guide is a free, online service that enables quick and easy access to your local TV listings. You
can use the Internet Electronic Program Guide service with your Giga Pocket Personal Video Recorder for a "one-click" set
up of timer recordings and record your favorite TV programs1.
Giga Pocket Personal Video Recorder must be set up and configured correctly before you can use the Internet Electronic
Program Guide service.
You must read and accept the User Agreement before accessing the Internet Electronic Program Guide Web site
(first time only).
The Internet Electronic Program Guide service is available only to users in the United States.
1
U nauthorized duplication of audio or video files is a violation of applicable laws.
Page 69
Page 70

To set up your Internet Electronic Program Guide service
You must be connected to the Internet, before setting up your Internet Electronic Program Guide service.
Sony recommends using Microsoft® Internet Explorer as your Web browser to access the Internet Electronic Program
Guide service.
To set up Internet Electronic Program Guide service, follow these steps:
1.
Click Start in the Windows® taskbar and point to All Programs.
2.
Point to Giga Pocket, then click TV Program Web site. Microsoft® Internet Explorer starts, and you are directed
to the Internet Electronic Program Guide Web site.
3.
The Terms of Use window appears. Click I accept, to continue.
The Welcome and Registration window appears.
Internet Electronic Program Guide Welcome and Registration window
4.
In the Welcome! section, enter your 5-digit zip code and click Continue. The Choose Your Provider window
appears, listing all TV providers or TV services available in your area.
5.
Select your TV provider and then click Confirm Channel Lineup. The Confirm Lineup window appears, listing
available channels by number and name.
6.
Click Yes if the channel lineup is correct. Otherwise, click No and repeat steps 3 and 4 until you locate the correct
channel lineup.
7.
Your TV listings appear in table format, organized by time and channel. Click Download All Channel Settings to
set your channels. The Channel Information Converter window appears, if this is the first time you have used
this download feature. Click OK.
Close all Giga Pocket applications before downloading your TV listings.
If you are using set-top box (STB) mode, you do not need to click Download All Channel Settings.
8.
Verify the channel settings and click OK.
9.
Your personal channel settings appear whenever you access the Internet Electronic Program Guide Web site.
If your TV provider adds new channels or changes existing channels, an Update icon appears next to Download All
Channel Settings. Click Update to add the new or updated channels to your personal channel setting.
Page 70
Page 71

Configuring Your VAIO Computer
This section provides basic information about using i.LINK devices, Memory Stick media, PC Cards, and changing default
settings.
About i.LINK Compatibility
VAIO Action Setup
About the Memory Stick Media Slot
About the PC Card Slot
Page 71
Page 72

About i.LINK Compatibility
Your VAIO® computer may be equipped with a 4-pin and/or a 6-pin i.LINK® port, depending on the system configuration
purchased. A 4-pin i.LINK port cannot supply power to a connected i.LINK device. A 6-pin i.LINK port can supply power (10V
to 12V) to a connected i.LINK device, if the device is equipped with a 6-pin connector.
To view the hardware configuration for your computer, see the online Specifications sheet.
The total power supplied by the 6-pin i.LINK port cannot exceed 6 watts.
For PCV-W series models only
Your PCV-W series computer has two 4-pin i.LINK ports available to connect your digital devices. The 4-pin i.LINK ports do
not supply power to a connected i.LINK device.
For PCV-V series models only
Your PCV-V series computer has one 4-pin i.LINK port available to connect your digital devices. The 4-pin i.LINK port does
not supply power to a connected i.LINK device.
i.LINK is a trademark of Sony used only to designate that a product contains an IEEE 1394 connection. The i.LINK
connection may vary, depending on the software programs, operating system and compatible i.LINK devices. All products
with an i.LINK connection may not communicate with each other.
Please refer to the documentation that came with your compatible i.LINK device for information on operating conditions and
proper connection. Before connecting compatible i.LINK devices to your system, such as an optical or hard disk drive,
confirm their operating system compatibility and required operating conditions.
Connecting an i.LINK (IEEE 1394) device
1.
Use the symbol to locate the i.LINK port on your compatible i.LINK device and on your computer. Plug the i.LINK
cable connector into this port.
2.
Plug the other end of the cable into the corresponding 4- or 6-pin i.LINK port on your computer.
See the instructions that came with your i.LINK device for more information on installation and use.
Page 72
Page 73

VAIO Action Setup
VAIO® Action Setup manages the settings for your computer's Shortcut keys (S Keys).
Shortcut keys
The programmable S Keys are set to start the following software programs:
S1 Video — Giga Pocket Personal Video Recorder
S2 Internet — Microsoft® Internet Explorer
S3 Mail — Microsoft® Outlook® Express
S4 Help — VAIO Help Center
Wireless keyboard
Changing the settings of the S keys
You can reprogram the S keys to start other software programs.
1.
Click Start in the Windows® taskbar and select All Programs.
2.
Select S-key settings (VAIO Action Setup), then click VAIO Action Setup.
You can also double-click the VAIO Action Setup icon, located in the Windows taskbar, to start VAIO Action
Setup.
3.
Click the S Key you want to change.
4.
From the Select Application dialog box, click the option for the desired type of function. The corresponding
software programs appear in the list box on the right.
5.
Select a software program from the list. Click Next.
You can drag a software program to place it into the list box.
6.
The Confirmation Application Name window appears. Click Next.
7.
You may now type a new name and description, if desired. Click Finish.
Page 73
Page 74

About the Memory Stick Media Slot
Your VAIO® computer is equipped with a Memory Stick® slot that supports certain types of Memory Stick® media.
About Memory Stick media
Memory Stick® media are a compact, portable, and versatile data storage media designed for exchanging and sharing digital
data with compatible devices. The following types of Memory Stick media are available, but compatibility with your computer
can vary.
MagicGate Memory Stick® media (MagicGate Memory Stick media) — Provides copyright protection with
authentication and encryption, using Sony® MagicGate technology. Authentication ensures that protected content is
only transferred between compliant devices and media. Protected content can be recorded and transferred in an
encrypted format that prevents unauthorized duplication or playback. You can store different data formats on a
single Memory Stick media.
Memory Stick PRO media — Provides MagicGate copyright protection and high-speed data transfer features
when used with compatible Memory Stick PRO devices. VAIO® computers support Memory Stick PRO media for data
storage purposes only. Currently, high-speed data transfer and the MagicGate technology features, such as
authentication and encryption, are not available. You can store different data formats on a single Memory Stick
media.
Memory Stick® media — Provides data storage only. The Memory Stick media does not provide MagicGate
technology or high-speed data transfer. You can store different data formats on a single Memory Stick media.
Currently, Sony® SonicStage and OpenMG software are not compatible with the new Memory Stick PRO media. Sony
suggests using only MagicGate Memory Stick media to store and transfer any data created with SonicStage or OpenMG
software.
Visit the Sony Online Support Web site at http://www.sony.com/pcsupport regularly for the latest information on Memory
Stick® media.
Memory Stick media do not support video file playback directly from the media. Copy the video file to your hard disk
drive and then play back the file.
To insert a Memory Stick media
1.
Insert the Memory Stick® media into the Memory Stick media slot, located on the right panel.
Inserting a Memory Stick media
2.
If the media does not insert easily, remove it from the slot and verify that it is not upside-down or backwards.
Carefully reinsert the Memory Stick media, but do not force it into the slot.
To remove a Memory Stick media
A small portion of the Memory Stick® media remains extended when it is inserted into the Memory Stick media slot.
Page 74
Page 75

1.
Press the extended Memory Stick media to release it from the Memory Stick slot. The media extends further,
enabling you to grasp it.
Remov ing a Mem ory Stick Media
2.
Carefully remove the Memory Stick media from the slot.
Do not remove the Memory Stick media while the media access indicator light is on. The media or its
data may become damaged.
Memory Stick media do not support AVI file playback. Copy the AVI file to your hard disk drive before attempting to
play back the file.
Protecting data on Memory Stick media
Memory Stick media contain a write-protect tab. The write-protect tab prevents accidental changes to information recorded
on your Memory Stick media. When you slide the write-protect tab to the LOCK position, your Memory Stick media is
write-protected. You cannot delete, copy, or save information on the media while the write-protect tab is in the LOCK
position. When you slide the tab to the un-LOCK position, you can write to or modify your Memory Stick media's contents.
Locking the Memory Stick Media
Page 75
Page 76

About the PC Card Slot
Your computer has a card bus PC Card slot that supports Type I or Type II PC (PCMCIA) Cards. You do not need to shut
down your computer when inserting a PC Card. For more information, see the instructions supplied with your PC Card.
Inserting a PC Card
1.
With the label facing up, insert the PC Card into the PC Card slot.
Inserting a PC Card
2.
Push the PC Card gently into the slot. The card is automatically detected and the Safely Remove Hardware
icon appears in the Windows® taskbar.
If the PC Card does not insert easily, remove it from the PC Card slot and verify that it is not upside-down or
backwards. Carefully reinsert the PC Card, without forcing it into the slot.
Removing a PC Card
1.
Close all software programs that may access the PC Card, to avoid data loss.
2.
Double-click the Safely Remove Hardware icon in the Windows® taskbar.
3.
Click to select the name of the card that you want to eject and click Stop. The Stop a Hardware Device window
appears. Click OK.
4.
When the message "Safe to Remove Hardware" appears, push the PC Card Eject button on the right panel of
the computer. Extend the Eject button out from the computer before attempting to eject the card.
Remov ing a PC Card
Page 76
Page 77

5.
When the PC Card ejects from the PC Card slot, remove the card by holding the edges and pulling it out
carefully.
If you remove the PC Card incorrectly, your computer may not work properly.
Page 77
Page 78

Upgrading and Maintaining your VAIO Computer
In the future you may want to increase the functionality of your VAIO® computer. This section provides information about
upgrading your system's memory.
Overview
Installing Memory
Installing a Hard Disk Drive
Replacing the Lithium Battery
Page 78
Page 79

Overview
Sony recommends contacting your local dealer for upgrade or maintenance of your new computer. Your local dealer is
knowledgeable of this specialized personal computer and familiar with the safety practices and regulatory compliance
required for modifying electronic equipment.
To view the hardware configuration for your computer, see the online Specifications sheet.
Page 79
Page 80

Installing Memory
The amount of preinstalled memory may vary, depending on the system configuration you purchased. Your computer may
ship with all available memory slots filled. See the online Specifications sheet for details about the memory installed in your
computer.
Do not attempt to remove or replace the memory modules. Contact your local dealer for memory replacement
and upgrades.
Page 80
Page 81

Installing a Hard Disk Drive
Your computer has an installed ATA-100, 3½-inch hard disk drive. Do not attempt to replace the hard drive. Contact your
local dealer for replacement or upgrade of the hard disk drive.
Page 81
Page 82

Replacing the Lithium Battery
The lithium battery weakens after several years and the system settings, such as the date and time stored in CMOS RAM,
may become inaccurate. If this occurs, contact your local dealer to replace the lithium battery.
There is danger of the battery exploding if it is replaced incorrectly. Contact your local dealer to replace
the lithium battery. Replace the battery only with a CR2032-type lithium battery.
Dispose of the lithium battery properly. In some areas, the disposal of lithium batteries in household or business trash
may be prohibited. You can return your unwanted lithium batteries to your nearest Sony Service Center or Factory
Service Center. To locate a Service Center near you, visit the Sony Computing Web site at
http://www.sony.com/pcsupport.
Page 82
Page 83

Troubleshooting
This section describes how to troubleshoot common problems. You can also find helpful information on how to use your
computer's hardware features and preinstalled software. Your computer may not be equipped with all of the features or
software discussed in this section, depending on the system configuration purchased.
About VAIO Computer Functions
About Giga Pocket Personal Video Recorder
About Using the Optical Disc Drive(s)
About the Mouse and Keyboard
About the Modem
About the Speakers
About Using a Microphone
About Using Peripheral Equipment
Page 83
Page 84

About VAIO Computer Functions
My computer does not start.
Verify that the computer is plugged into a power source and that it is turned on. Check that the power indicator is lit
on the front panel of the computer.
Confirm that a disk is not in the floppy disk drive1 (unless you are using a bootable floppy disk).
Confirm that a CD is not in an optical drive (unless you are using a bootable CD).
Confirm that the power cord and all cables are connected firmly.
If you plugged the computer into a power strip or Uninterruptible Power Supply (UPS), make sure the power strip or
UPS is turned on and working.
Verify that the monitor is plugged into a power source and turned on.
If your system has a built-in monitor, confirm that it is plugged into an appropriate power source and that the
system is turned on.
Verify that the brightness or contrast control dials are adjusted correctly. (See the manual that came with your
display for details.)
Confirm that the computer is not in stand by mode by pressing any key on the keyboard.
1
C ertain V A I O c omputers are not equipped with a floppy disk drive. You c an purc has e this equipment separately.
Page 84
Page 85

About VAIO Computer Functions
My computer does not start.
Verify that the computer is plugged into a power source and that it is turned on. Check that the power indicator is lit
on the front panel of the computer.
Confirm that a disk is not in the floppy disk drive1 (unless you are using a bootable floppy disk).
Confirm that a CD is not in an optical drive (unless you are using a bootable CD).
Confirm that the power cord and all cables are connected firmly.
If you plugged the computer into a power strip or Uninterruptible Power Supply (UPS), make sure the power strip or
UPS is turned on and working.
Verify that the monitor is plugged into a power source and turned on.
If your system has a built-in monitor, confirm that it is plugged into an appropriate power source and that the
system is turned on.
Verify that the brightness or contrast control dials are adjusted correctly. (See the manual that came with your
display for details.)
Confirm that the computer is not in stand by mode by pressing any key on the keyboard.
1
C ertain V A I O c omputers are not equipped with a floppy disk drive. You c an purc has e this equipment separately.
Page 85
Page 86

Why did my computer or software stop responding?
You can try to locate and close the software application that has stopped responding.
1.
Press the Ctrl+Alt+Delete keys. The Windows Task Manager window appears.
2.
From the Applications tab, locate the application that has the status message, "Not responding."
3.
Select the application that has a Not Responding status and click End Task. Windows attempts to close the
application.
If your computer does not respond or the application does not close, try the following steps:
1.
Save any open files, if possible.
2.
Press the Alt+F4 keys. The Turn Off Computer window appears.
3.
Click Restart.
If your computer still does not respond and you cannot restart, shut down your computer by pressing and holding the
power button for more than six seconds.
If the software application continues to stop responding or causes your computer to stop responding, contact the software
publisher or designated technical support provider.
Pressing and holding the power button for more than six seconds may result in the loss of data from files that
are currently open.
Page 86
Page 87

Why does the Windows operating system stop responding during shutdown?
The Windows operating system may not shut down properly for many reasons, including incompatible or conflicting drivers,
damaged files, or non-responsive hardware. For troubleshooting information, you can search Windows Help.
1.
Click Start in the Windows taskbar and select Help and Support. The VAIO Help And Support Center menu
appears.
2.
Select Fixing a Problem and then select Startup and Shut Down problems. A list of specific problem topics
appears on the right side of the dialog box.
3.
Select Startup and Shutdown Troubleshooter. Follow the on-screen instructions according to your specific
situation.
Page 87
Page 88

Why is my system running slowly?
The system responsiveness varies depending with the number of applications that are open and running. Close any
applications that you are not currently using.
Increasing the system memory may also help. For information on installing memory, please see the online VAIO User
Guide.
To access the online User Guide:
1.
Click Start in the Windows taskbar, and then click Help and Support.
2.
From the VAIO Help And Support Center menu, click VAIO User Guide.
Page 88
Page 89

How do I change the video resolution of my display?
1.
Click Start in the Windows taskbar, and then select Control Panel.
2.
Select Appearance and Themes, and then select Change the screen resolution.
3.
Click the Settings tab.
4.
Change the Screen resolution and Color quality to the desired levels.
5.
Click Apply and then click OK.
Page 89
Page 90

About Giga Pocket Personal Video Recorder
This section describes how to troubleshoot common problems you may encounter when using Giga Pocket Personal Video
Recorder functions. Many problems have simple solutions, so try these suggestions before you contact Sony Customer
Support.
Page 90
Page 91

Why can't I see an image or an image that is displayed properly when I am using a VCR?
Some images from an externally-connected video player device or a video game console, may not display or are not
displayed correctly. These images include:
Images from a playback screen that is in pause mode.
Menu screens of the connected video player device.
The end of the film roll being played back using the scroll bar.
Video output from a video game console.
Video output from a VCR, using a coaxial cable.
Giga Pocket cannot record or display all video images from this source.
Page 91
Page 92

Why does my Giga Pocket viewing window or the images played back from a Video Capsule, appear
distorted or corrupted?
There are some situations where screen or image distortion may occur, such as:
When you change the channel on the video player device.
If there is a damaged section on your video tape.
When using Giga Pocket Personal Video Recorder, set your display settings as follows:
Colors — Use the default factory settings (32-bit).
Screen area — Set your video resolution to 1024 x 768 pixels.
If you use other settings, you may experience poor image quality on your display.
Page 92
Page 93

Why does my system seem to slow down when I play a Video Capsule?
Your computer may respond slower if you try to play back a Video Capsule while recording a TV program with Giga Pocket.
During a timer recording, Giga Pocket may interrupt or stop your Video Capsule playback to prioritize your computer's
resources for the timer recording. If this occurs, wait until the timer recording session has completed, and then play back
the Video Capsule.
Page 93
Page 94

Why did I get the error message, "Event buffer of audio overflow?"
The timer recording may fail in certain situations, such as:
The coaxial cable (input) is disconnected after recording has started.
The TV channel has lost broadcast signal during the recording session.
Video content being recorded has poor signal quality.
Page 94
Page 95

Why did my on-screen display shift or split?
Your on-screen display may shift or split in rare instances. If this should occur, switch the TV/Recording deck and the
playback deck, or try switching the channel. Your timer recording continues even if the on-screen display has shifted or
split.
Page 95
Page 96

Why did Giga Pocket stop allowing me to create new Video Capsules?
You cannot create a new Video Capsule when the remaining free space on your hard disk drive reaches approximately 100
MB. Delete any unnecessary Video Capsules or files to increase the free space on your hard drive.
Page 96
Page 97

About Using the Optical Disc Drive(s)
Your computer may not be equipped with all of the hardware features listed in this section. To view the specific hardware
configuration for your system, see the online Specifications sheet.
Page 97
Page 98

Why doesn't my optical drive tray open?
To use the Eject button
1.
Make sure the computer is turned on.
2.
Press the Eject button on the drive.
To use the My Computer icon
1.
Click Start in the Windows taskbar, then select My Computer.
2.
Right-click the appropriate optical drive icon.
3.
Select Eject from the shortcut menu.
Avoid using adhesive labels to identify your CD or DVD media. Adhesive labels may come off while the CD or DVD media
is in use in your optical drive(s) and may cause damage to the unit.
Page 98
Page 99

Why can't I play a DVD or CD media?
After inserting your CD or DVD, wait a few seconds for the system to detect it before trying to access it.
Confirm that the disc is in the tray with the label side facing up.
Install your CD or DVD software according to the manufacturer's instructions.
If your drive reads some DVDs or CDs, but not others, check the shiny side of the disc for dirt or scratches.
The preinstalled CD or DVD software may not be working properly. To recover this software, see the online guide,
VAIO Recovery Options, for more information.
To access VAIO Recovery Options, follow these steps:
1.
Click Start in the Windows® taskbar and click Help and Support.
2.
From the VAIO Help And Support Center menu, click VAIO Recovery Options.
Page 99
Page 100

Why isn't my DVD playing properly?
If a region code warning appears when you are using the DVD player application, it may be that the region code of
the DVD you are trying to play is incompatible with the region code setting of your optical drive. A region code is
listed on the disc packaging. Region code indicators such as "1" or "ALL" are labeled on some DVDs to indicate the
type of player that can play the disc. Unless a "1" or "ALL" appears on the DVD or on its packaging, you cannot play
the disc on this system.
If you hear audio but cannot see video, your computer's video resolution may be set too high. To improve video
resolution, verify that your screen area is set to 1024 x 7681, using 32-bit color (preset factory default). To verify or
change your video resolution:
1.
Click Start in the Windows taskbar and then select Control Panel.
2.
Select Appearance and Themes, then select Change the screen resolution.
3.
Click the Settings tab.
4.
Change the Screen resolution and Color quality to the desired levels.
5.
Click Apply and then click OK.
If you see video but cannot hear audio, check all of the following:
1.
Verify that your DVD player's mute feature is turned off.
2.
Check the master volume setting in the Audio Mixer.
3.
Check the volume settings on your computer speakers.
4.
Check the connections between your speakers and the computer.
5.
Verify that drivers are installed properly, by following these steps:
1.
Click Start in the Windows taskbar, then select Control Panel.
2.
Click Performance and Maintenance and then click Systems. The System Properties dialog box
appears.
3.
Select the Hardware tab and then select the Device Manager button to view installed drivers.
A dirty or damaged disc may also cause the computer to stop responding while it tries to read the disc. If necessary,
remove the disc and check that it is not dirty or damaged.
The preinstalled CD or DVD software may not be working properly. To recover this software, see the online guide,
VAIO Recovery Options, for more information.
To access VAIO Recovery Options, follow these steps:
1.
Click Start in the Windows® taskbar and click Help and Support.
2.
From the VAIO Help And Support Center menu, click VAIO Recovery Options.
1
T he V A I O "W" series c omputer uses 12 8 0 x 7 6 8 for the default video res olution s etting.
Page 100
 Loading...