

Page 1

VAIO Digital Studio® AIO Digital Studio® IO Digital Studio® O Digital Studio® Digital Studio® Digital Studio® igital Studio® gital Studio® ital Studio® tal Studio® al Studio® l Studio® Studio® Studio® tudio® udio® dio® io® o® ®
Computer Quick Startomputer Quick Startmputer Quick Startputer Quick Startuter Quick Startter Quick Starter Quick Startr Quick Start Quick StartQuick Startuick Startick Startck Startk Start StartStarttartartrtt
PCV-RZ40 (G/Y) Series
Page 2

Notice
© 2003 Sony Electronics Inc. Reproduction in whole or in part without written permission is prohibited. All rights
reserved. This manual and the software described herein, in whole or in part, may not be reproduced, translated, or
reduced to any machine-readable form without prior written approval.
SONY ELECTRONICS INC. PROVIDES NO WARRANTY WITH REGARD TO THIS MANUAL, THE
SOFTWARE, OR OTHER INFORMATION CONTAINED HEREIN AND HEREBY EXPRESSLY DISCLAIMS
ANY IMPLIED WARRANTIES OF MERCHANTABILITY OR FITNESS FOR ANY PARTICULAR PURPOSE
WITH REGARD TO THIS MANUAL, THE SOFTWARE, OR SUCH OTHER INFORMATION. IN NO EVENT
SHALL SONY ELECTRONICS INC. BE LIABLE FOR ANY INCIDENTAL, CONSEQUENTIAL, OR
SPECIAL DAMAGES, WHETHER BASED ON TORT, CONTRACT, OR OTHERWISE, ARISING OUT OF OR
IN CONNECTION WITH THIS MANUAL, THE SOFTWARE, OR OTHER INFORMATION CONTAINED
HEREIN OR THE USE THEREOF.
SONY CANNOT WARRANT THAT THE FUNCTIONS DESCRIBED IN THIS GUIDE WILL BE
UNINTERRUPTED OR ERROR-FREE. SONY ALSO ASSUMES NO RESPONSIBILITY, AND SHALL NOT
BE LIABLE FOR ANY DAMAGES TO, OR VIRUSES THAT MAY INFECT, YOUR COMPUTER
EQUIPMENT, OR OTHER PROPERTY ON ACCOUNT OF YOUR ACCESS TO, USE OF, OR BROWSING IN
ANY DESCRIBED WEB SITE, OR YOUR DOWNLOADING OF ANY MATERIALS, DATA, TEXT, IMAGES,
VIDEO, OR AUDIO FROM ANY DESCRIBED WEB SITE. WEB SITE INFORMATION IS OBTAINED FROM
VARIOUS SOURCES AND MAY BE INACCURATE. COPIES OF COPYRIGHTED INFORMATION MAY
ONLY BE MADE FOR LEGALLY PERMISSIBLE PURPOSES.
Sony Electronics Inc. reserves the right to make any modification to this manual or the information contained herein
at any time without notice. The software described herein is governed by the terms of a separate user license
agreement.
This product contains software owned by Sony and licensed by third parties. Use of such software is subject to the
terms and conditions of license agreements enclosed with this product. Some of the software may not be transported
or used outside the United States. Software specifications are subject to change without notice and may not
necessarily be identical to current retail versions.
Certain product(s) included with this computer may include features such as copy protection and content
management technology. USE OF THE SOFTWARE PRODUCT(S) REQUIRES AGREEMENT TO
APPLICABLE END USER AGREEMENTS AND FULL COMPLIANCE WITH APPLICABLE PRODUCT
ACTIVATION PROCEDURES. Product activation procedures and privacy policies will be detailed during initial
launch of the software product(s), or upon certain reinstallations of the software product(s), or reconfigurations of
the computer, and may be completed by Internet or telephone (toll charges may apply).
Updates and additions to software may require an additional charge. Subscriptions to online service providers may
require a fee and credit card information. Financial services may require prior arrangements with participating
financial institutions.
Important information for Canadian customers: Your new VAIO computer includes certain software versions or
upgrades, and Internet services or offers that are available to U.S. customers only.
Sony, VAIO, the VAIO logo, VAIO Digital Studio, VAIO Media, VAIO Media Music Server, VAIO Media Photo
Server, VAIO Media Video Server, Click to DVD, DVgate, Handycam, MagicGate, Memory Stick, the Memory
Stick logo, OpenMG, MICROMV, SonicStage, PictureGear, ImageStation, ATRAC3, and i.LINK are trademarks or
registered trademarks of Sony.
Intel and Pentium are trademarks or registered trademarks of the Intel Corporation. Microsoft, Windows, and the
Windows logo are trademarks or registered trademarks of the Microsoft Corporation. PS/2 is a registered trademark
of the IBM Corporation.
All other trademarks are trademarks or registered trademarks of their respective owners.
2
Page 3
As an ENERGY STAR® Partner, Sony Corporation has
determined that this product meets the ENERGY STAR®
guidelines for energy efficiency.
The International ENERGY STAR® Office Equipment Program is an international program that promotes energy
saving through the use of computers and other office equipment. The program backs the development and
dissemination of products with functions that effectively reduce energy consumption. It is an open system in which
business proprietors can participate voluntarily. The targeted products are office equipment such as computers,
displays, printers, facsimiles and copiers. Their standards and logos are uniform among participating nations.
ENERGY STAR is a U.S. registered trademark of the Environmental Protection Agency.
Owner’s Record
The model number and serial number are located on the back panel of your Sony VAIO® computer. Record the
model and serial number in the space provided here, and keep in a secure location. Refer to the model and serial
numbers when you call your Sony Service Center.
Model Number:
Serial Number:
3
Page 4
Safety Information and Caution
Your computer’s installed optical drives may vary, depending on the system configuration you have purchased. See
the online specifications sheet for details on your installed optical drives. For questions regarding your product or
for the Sony Service Center nearest you, visit the Sony Computing Support Web site at
http://www.sony.com/pcsupport.
❑ To prevent fire or shock hazard, do not expose your desktop to rain or moisture.
❑ To avoid electrical shock, do not open the cabinet. Refer servicing to qualified personnel only.
❑ Never install modem or telephone wiring during a lightning storm.
❑ Never install telephone jacks in wet locations unless the jack is specifically designed for wet locations.
❑ Never touch uninsulated telephone wire or terminals unless the telephone line has been disconnected at the
network interface.
❑ Use caution when installing or modifying telephone lines.
❑ Avoid using the modem during an electrical storm.
❑ Do not use the modem or a telephone to report a gas leak in the vicinity of the leak.
❑ The socket outlet shall be installed near the equipment and shall be easily accessible.
To change the backup battery, please contact your nearest Sony Service Center.
Caution—The use of optical instruments with this product will increase eye hazard. As
the laser beam used in this product is harmful to the eyes, do not attempt to
disassemble the drive cabinet. Refer servicing to qualified personnel only.
Danger—Visible and invisible laser radiation when open. Avoid direct exposure to
beam.
For DVD-RW: Danger—Visible and invisible laser radiation when open. Avoid direct
exposure to beam.
For CD-RW: Danger—Invisible laser radiation when open. Avoid direct exposure to
beam.
Caution—For ADSL and V.90 modem models; to reduce the risk of fire, use only No. 26
AWG or larger telecommunication line cord.
4
Page 5
❑ Pour prévenir tout risque d’incendie ou d’électrocution, garder cet appareil à l’abri de la pluie et de
l’humidité.
❑ Pour prévenir tout risque d’électrocution, ne pas ouvrir le châssis de cet appareil et ne confier son entretien
qu’à une personne qualifiée.
❑ Ne jamais effectuer l’installation de fil modem ou téléphone durant un orage électrique.
❑ Ne jamais effectuer l’installation d’une prise téléphonique dans un endroit mouillé à moins que la prise soit
conçue à cet effet.
❑ Ne jamais toucher un fil téléphonique à découvert ou un terminal à moins que la ligne téléphonique n’ait été
débranché de l’interface réseau.
❑ Soyez très prudent lorsque vous installez ou modifiez les lignes téléphoniques.
❑ Évitez d’utiliser le modem durant un orage électrique.
❑ N'utilisez pas le modem ni le téléphone pour prévenir d'une fuite de gaz vous êtes près de la fuite.
❑ L’appareil doit être le plus près possible d’une prise murale pour en faciliter l’accès.
Pour changer la pile de rechange, veuillez contacter votre centre de service Sony le plus
près.
Avertissement: L'utilisation d'instruments optiques avec ce produit augmente les risques
pour les yeux. Puisque le faisceau laser utilisé dans ce produit est dommageable pour
les yeux, ne tentez pas de désassembler le boîtier. Adressez-vous à un agent de service
qualifié.
Danger: Radiation laser visible et invisible si ouvert. Évitez l’exposition directe au
faisceau.
Pour les DVD-RW: Danger—Radiation laser visible si ouvert. Évitez l'exposition directe
au faisceau.
Pour les CD-RW: Danger—Radiation laser visible et invisible si ouvert. Évitez
l'exposition directe au faisceau.
Attention: Pour ADSL et V.90 modele modem; afin de réduire les risques d'incendie,
n'utilisez qu'un cordon de communication N0. 26 AWG ou plus gros.
5
Page 6
Regulatory Information
Declaration of Conformity
Trade Name: SONY
Model No.: PCV-1132
Responsible Party: Sony Electronics Inc.
Address: 680 Kinderkamack Rd. Oradell, NJ 07649
Telephone: 201-930-6972
This phone number is for FCC-related matters only.
This device complies with Part 15 of the FCC rules. Operation is subject to the following two conditions:
(1) This device may not cause harmful interference, and
(2) this device must accept any interference received, including interference that may cause undesired operation.
Model No.: PCVA-IMB5A (For models equipped with Giga Pocket features)
This device complies with Part 15 of the FCC rules. Operation is subject to the following two conditions:
(1) This device may not cause harmful interference, and
(2) this device must accept any interference received, including interference that may cause undesired operation.
This equipment has been tested and found to comply with the limits for a Class B digital device, pursuant to Part 15
of the FCC Rules. These limits are designed to provide reasonable protection against harmful interference in a
residential installation. This equipment generates, uses, and can radiate radio frequency energy and, if not installed
and used in accordance with the instructions, may cause harmful interference to radio communications. However,
there is no guarantee that interference will not occur in a particular installation. If this equipment does cause harmful
interference to radio or television reception, which can be determined by turning the equipment off and on, the user
is encouraged to try to correct the interference by one or more of the following measures:
❑ Reorient or relocate the receiving antenna.
❑ Increase the separation between the equipment and the receiver.
❑ Connect the equipment into an outlet on a circuit different from that to which the receiver is connected.
❑ Consult the dealer or an experienced radio/TV technician for help.
You are cautioned that any changes or modifications not expressly approved in this manual could void your
authority to operate this equipment.
Only peripherals (computer input/output devices, terminals, printers, etc.) that comply with FCC Class B limits may
be attached to this computer product. Operation with noncompliant peripherals is likely to result in interference to
radio and television reception.
All cables used to connect peripherals must be shielded and grounded. Operation with cables, connected to
peripherals, that are not shielded and grounded, may result in interference to radio and television reception.
6
Page 7

FCC Part 68
This equipment complies with Part 68 of the FCC rules and the requirements adopted by the ACTA. On the modem
card is a label that contains, among other information, a product identifier in the format US:AAAEQ##TXXXX. If
requested, this number must be provided to the telephone company.
This modem uses the USOC RJ-11 telephone jack.
A telephone plug and jack used to connect this equipment to the premises wiring and telephone network must
comply with the applicable FCC Part 68 rules and requirements adopted by the ACTA. The REN is used to
determine the quantity of devices which may be connected to the telephone line.
Excessive RENs on the telephone line may result in the devices not ringing in response to an incoming call. In most,
but not all areas, the sum of the RENs should not exceed five (5.0). To be certain of the number of devices that may
be connected to the line, as determined by the total RENs, contact the telephone company. For products approved
after July 23, 2001, the REN for this product is part of the product identifier that has the format
US:AAEQ##TXXXX. The digits represented by ## are the REN without a decimal point (e.g. 03 is a REN of 0.3).
For earlier products, the REN is separately shown on the label.
If this equipment causes harm to the telephone network, the telephone company will notify you in advance that
temporary discontinuance of service may be required. But if advance notice is not practical, the telephone company
will notify the customer as soon as possible. Also, you will be advised of your right to file a complaint with the FCC
if you believe it is necessary.
The telephone company may make changes in its facilities, equipment, operations or procedures that could affect the
operations of the equipment. If this happens, the telephone company will provide advance notice in order for you to
make the necessary modifications in order to maintain uninterrupted service.
If trouble is experienced with this equipment, for repair or warranty information, please contact the Sony Customer
Information Service Center at 1-888-4-SONY-PC (1-888-476-6972), or write to the Sony Customer Information
Center, 12451 Gateway Blvd., Fort Myers, FL 33913, or find Sony Customer Service on the Web at
http://www.sony.com/pcsupport. If this equipment is causing harm to the telephone network, the telephone company
may request that you disconnect the equipment from the network until the problem is resolved.
Repair of this equipment should be made only by a Sony Service Center or Sony authorized agent. For the Sony
Service Center nearest you, call 1-888-4-SONY-PC (1-888-476-6972), or visit the Sony Computing Web site at
http://www.sony.com/pcsupport.
Connection to Party Line Service is subject to state tariffs. Contact the state public utility commission, public service
commission, or corporation commission for information.
If your home has specially wired alarm equipment connected to the telephone line, ensure the installation of this
equipment does not disable your alarm equipment. If you have questions about what will disable alarm equipment,
consult your telephone company or a qualified installer.
Please use a surge arrestor against electrical surges.
7
Page 8
Telephone Consumer Protection Act of 1991 (United States)
The Telephone Consumer Protection Act of 1991 makes it unlawful for any person to use a computer or other
electronic device, including FAX machines, to send any message unless such message clearly contains, in a margin
at the top or bottom of each transmitted page or on the first page of the transmission, the date and time it is sent and
an identification of the business, other entity, or individual sending the message, and the telephone number of the
sending machine or such business, other entity, or individual. (The telephone number provided may not be a 900
number or any other number for which charges exceed local or long distance transmission charges.)
In order to program this information into your facsimile machine, see your fax software documentation.
Telephone Consumer Guidelines (Canada)
Please refer to your telephone directory under ‘Privacy Issues’ and/or ‘Terms of Service.’ For more detailed
information, please contact:
CRTC
Terrasses de la Chaudiére
Tour centrale 1 promenade du Portage
5 étage Hull PQ K1A 0N2.
This Class B digital apparatus complies with Canadian ICES-003.
Cet àppareil numérique de la classe B est conforme à la norme NMB-003 du Canada.
Disposal of Lithium Battery
You can return your unwanted lithium batteries to your nearest Sony Service Center or Factory Service Center.
✍ In some areas the disposal of lithium batteries in household or business trash may be prohibited.
For the Sony Service Center nearest you, call 1-888-476-6972 in the United States or 1-800-961-7669 in Canada.
Do not handle damaged or leaking lithium batteries. In some areas, the disposal of
lithium batteries in household or business trash may be prohibited.
Danger of explosion if battery is incorrectly replaced. Replace only with the same or
equivalent type recommended by the manufacturer. Discard used batteries according to
the manufacturer’s instructions.
The battery pack used in this device may present a fire or chemical burn hazard if
mistreated. Do not disassemble, heat above 212
used battery promptly. Keep away from children.
°F (100°C), or incinerate. Dispose of
Ne pas manipuler les batteries au lithium qui fuient ou sont endommagées.
Une batterie non conforme présente un danger d'explosion. La remplacer seulement par
une batterie identique ou de type équivalent recommandé par le fabricant. Évacuer les
batteries usées selon les directives du fabricant.
La manutention incorrecte du module de batterie de cet appareil présente un risque
d'incendie ou de brûlures chimiques. Ne pas démonter, incinérer ou exposer à une
température de plus de 100°C. Évacuer promptement la batterie usée. Garder hors de
portée des enfants.
8
Page 9

Industry Canada Notice
This equipment meets the applicable Industry Canada technical specifications.
The Ringer Equivalence Number (REN) is an indication of the maximum number of devices allowed to be
connected to a telephone interface. The termination on an interface may consist of any combination of devices
subject only to the requirement that the sum of the RENs of all the devices does not exceed 5.
Avis de L’Industrie Canada
Le presént matériel est conforme aux spécifications techniques applicables d’Industrie Canada.
L’indice d’équivalence de la sonnerie (IES) sert à indiquer le nombre maximal de terminaux qui peuvent être
raccordés à une interface téléphonique. La terminaison d’une interface peut consister en une combinaison
quelconque de dispositifs, à la seule condition que la somme d’indices d’équivalence de la sonnerie de tous les
dispositifs n’excède pas 5.
Macrovision license
This product incorporates copyright protection technology that is protected by U.S. patents and other intellectual
property rights. Use of this copyright protection technology must be authorized by Macrovision, and is intended for
home and other limited viewing uses only, unless otherwise authorized by Macrovision. Reverse engineering or
disassembly is prohibited.
Licence Macrovision
Ce produit intègre une technologie de protection de la loi sur le droits de propriéte intellectuelle couverts par la
législation américaine. L’utilisation de cette technologie doit être autorisée par Macrovision. Elle est uniquement
destinée à un usage privé et à d’autres fins de visualisation limitée, sauf autorisation contraire de la part de
Macrovision. Tout désossage ou désassemblage est formellement interdit.
9
Page 10

10
Page 11

Contents
Getting Started ..........................................13
Unpacking your Computer........................................14
Locating Controls And Ports ...................177
About the Front Panel ...............................................18
About the Back Panel................................................21
About the Sub-woofer ...............................................24
About the Keyboard ..................................................25
About the Remote Control ........................................28
Setting Up Your Computer .......................33
Connecting a Display (Monitor) ...............................34
Connecting the Speakers and Sub-woofer Unit ........36
Connecting the Keyboard and Mouse .......................39
Connecting the Telephone and Modem cables .........40
Connecting the Power Cords.....................................41
Turning On your Computer.......................................42
Registering your Computer .......................................42
Turning Off your Computer ......................................43
11
Page 12

Setting Up Microsoft Windows XP soft Windows XP
Media Center Edition ................................455
Microsoft Windows XP Media Center Edition......... 46
Setting Up TV Connections...................................... 48
Connecting a Cable or Satellite Set-top Box ............52
Connecting the Remote Sensor.................................55
Setting Up Additional Equipment............................. 58
Getting Started with Media Center ........................... 61
Exploring Media Center............................................ 64
Starting the Media Center Setup Wizard .................. 66
Using the Sound Blaster
Audigy ES Sound CardES Sound Card.............................73
Installing Sound Blaster Audigy Software ...............73
About Creative Software Programs .......................... 75
Troubleshooting........................................77
Support Optionspport Options........................................81
Immediate Help and Support .................................... 81
Resources for Additional Help and Support............. 82
12
Page 13

Getting Startedd
Congratulations on your purchase of the Sony VAIO® computer! Your
new, high-performance, multimedia computer combines state-of-the-art
computer functionality with the latest audio, video and information
technology features.
13
Page 14
VAIO Digital Studio Computer Quick Start
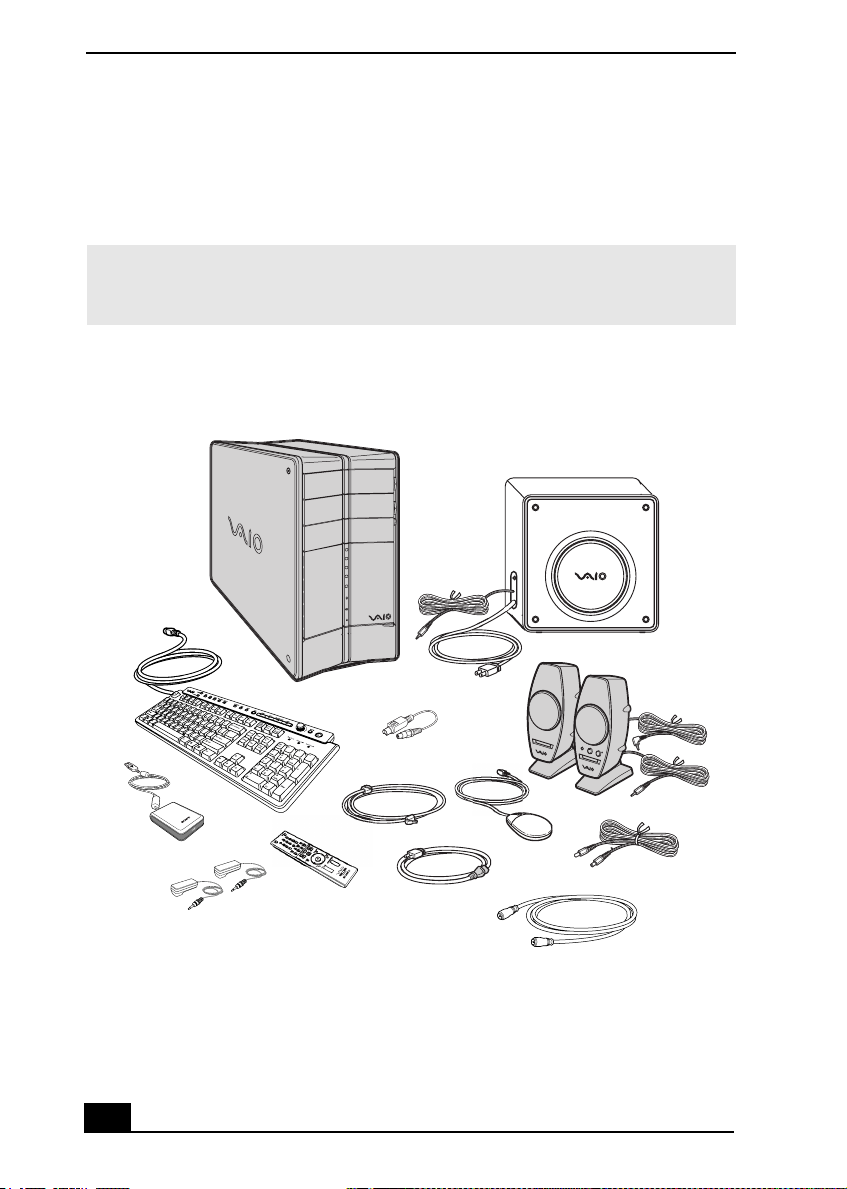
Unpacking your Computer
Your computer may not be supplied with all of the accessories shown, depending
on the system configuration you purchased. For details on the accessories
supplied with your computer, see the online Specifications sheet.
✍ Your VAIO® computer is not supplied with System or Application Recovery CDs. Use
the VAIO Recovery Wizard utility to recover your computer's operating system and
preinstalled software.
Computer and supplied accessories
System unit
Sub-woofer
Remote
sensor
14
Keyboard
Remote sensor
controls (2)
Remote
control
Video adapter
Modem cable
Power cord
Speakers (PCVA-SP4)
Mouse
Speaker power cable
TV coaxial cable
Page 15

Unpacking your Computer
Manuals
❑ VAIO® Computer Quick Start — Provides basic information on setting up
and registering your computer. The Quick Start also provides resources for
technical support, safety guidelines and owner information.
Online Documentation
❑ VAIO® Computer User Guide — Contains features and specifications of
your computer. It also includes information on the Microsoft® Windows®
XP Media Center Edition operating system, the software programs included
with your system, and solving common problems.
To access the online User Guide:
1 Click Start in the Windows taskbar, then click Help and Support.
2 From the VAIO Help and Support Center menu, click VAIO User
Guide.
❑ Specifications — This online specification sheet describes the hardware and
software configuration of your VAIO computer. To access this information,
go to the online Specifications sheet.
❑ VAIO So ftwar e — Provides specific information on certain preinstalled
software on your computer.
To access this online software information:
1 Click Start in the Windows® taskbar.
2 Click Welcome to VAIO Life.
Hard Disk Drive Recovery
Your computer is equipped with the VAIO Recovery Wizard utility program that
recovers your computer’s operating system and preinstalled software. For more
information about hard disk drive recovery:
1 Click Start in the Windows® taskbar, then click Help and Support.
2 From the VAIO Help And Support Center, click VAIO Recovery
Options.
Other
A software library, containing the Microsoft® software and Sony® end-user
license agreements.
15
Page 16

VAIO Digital Studio Computer Quick Start
16
Page 17

Locating Controls And PortsAnd Ports
This section is intended to familiarize you with the controls, ports and
jacks on your computer. Your computer may not be equipped with all of
these hardware features, and the location of the controls, ports, and jacks
may vary from the illustrations shown in this section. To view the specific
connection capabilities for your system, see the online specifications
sheet.
17
Page 18
VAIO Digital Studio Computer Quick Start
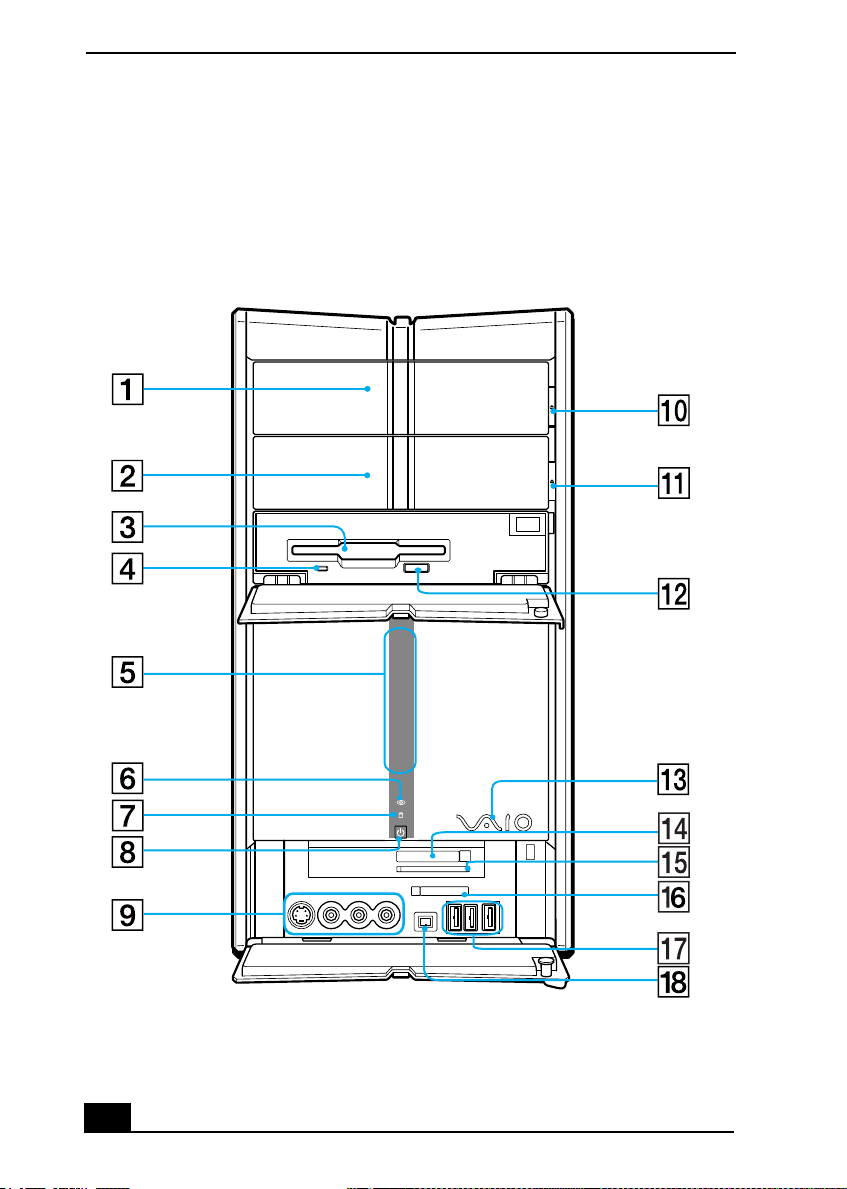
About the Front Panel
The front panel of your VAIO® Computer enables access to drives, media slots,
ports and jacks that enable you to connect compatible peripheral devices.
Front panel
TV
GUIDE
MUSIC
PICTURE
18
VIDEO
Page 19

1 Optical drive 1
See the online Specifications sheet for optical drive information.
2 Optical drive 2
See the online Specifications sheet for optical drive information.
3 Floppy disk drive
Reads and writes data from and to a 3.5-inch floppy disk.
4 Floppy disk drive access indicator
Light is green while reading and writing data from and to a floppy disk.
5 Media Center indicator
Light is blue when a specific Media Center feature is active.
6 Optical drive access indicator
Light is amber while reading and writing data from and to the optical
drives.
7 Hard disk drive access indicator
Light is amber while reading and writing data from and to the hard disk.
About the Front Panel
8 Power switch and Stand by indicator
Turns the computer on and off. The indicator light is amber when the
computer is placed in Stand by mode.
9 S-video In jack
Connection for an S-video cable (optional).
Composite video In jack
Connection for a video cable (optional).
Composite audio L In jack
Connection for an audio cable (optional).
Composite audio R In jack
Connection for an audio cable (optional).
10 Optical drive 1 eject button
Ejects a disc from Optical drive 1.
19
Page 20
VAIO Digital Studio Computer Quick Start
11 Optical drive 2 eject button
Ejects a disc from Optical drive 1.
12 Floppy disk eject button
Ejects a floppy disk from the floppy disk drive.
13 Power indicator (VAIO)
Light is white while the computer is on. The indicator turns off when the
computer is in Stand by mode or turned off.
14 CompactFlash® and Microdrive media slot
Reads and writes data from and to CompactFlash and MicroDrive
media.
15 SmartMedia
TM
media slot
Reads and writes data from and to SmartMedia cards.
16 Memory Stick® media slot and access indicator
Reads and writes data from and to a Memory Stick® media. The access
indicator light is amber when reading or writing data.
17 Universal Serial Bus (USB 2.0) ports (3)
Connections for compatible high/full/low-speed USB devices.
18 i.LINK (4-pin) S400 port (IEEE 1394)
Connection for a compatible digital device.
✍ i.LINK is a trademark of Sony used only to designate that a product contains an
IEEE 1394 connection. The i.LINK connection may vary, depending on the software , depending on the software
programs, operating system, and compatible i.LINK devices. All products with an
i.LINK connection may not communicate with each other.
Please refer to the documentation that came with your compatible i.LINK device for
information on operating conditions and proper connection. Before connecting
compatible i.LINK devices to your system, such as an optical or hard disk drive,
confirm their operating system compatibility and required operating conditions.
20
Page 21
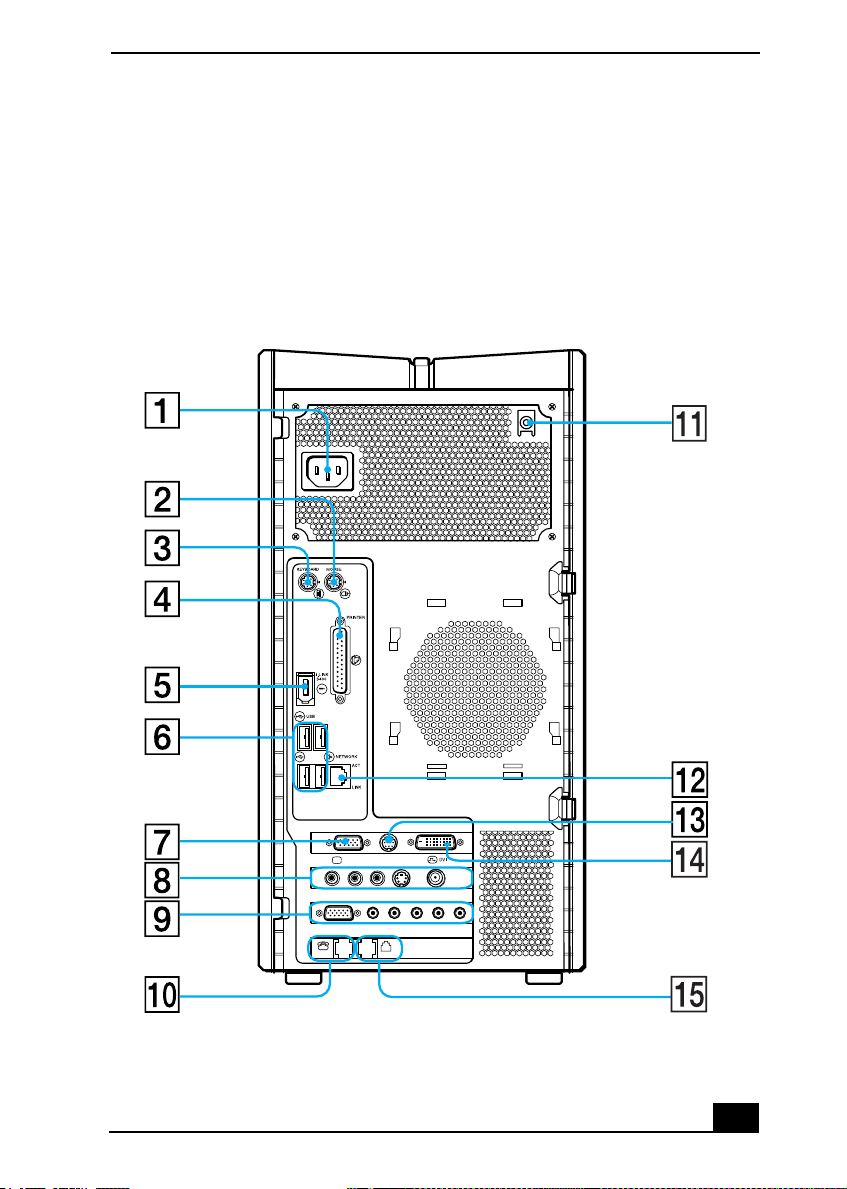
About the Back Panel
About the Back Panel
The back panel of your computer contains the ports for supplied and optional
accessories. The icons on the back panel locate and identify the ports on your
computer. The location of certain ports and jacks may vary from the illustration,
based on the computer model purchased.
Back panel
USB
MONITOR
AUDIO AUDIO
JOYSTICK/MIDI
COMPOSITE
REAR OUT
S VIDEO/VIDEO-
–
VIDEO1 INPUT
LINE OUT
LINEPHONE
S VIDEO
VHF/UHF
–
D/A OUT
MIC IN
LINE IN
21
Page 22

VAIO Digital Studio Computer Quick Start
1 AC Input port
Connection for the supplied power cord.
2Mouse port
Connection for a PS/2® mouse.
3 Keyboard port
Connection for a PS/2 keyboard.
4 Printer port
Connection for a parallel device, such as a printer or scanner.
5 i.LINK 6-pin S400 port (IEEE 1394)
Connection and power for a compatible digital device, such as a Sony
Digital Handycam® camcorder.
6 Universal Serial Bus (USB 2.0) ports (4)
Connections for compatible high/full/low-speed USB devices.
7 Monitor port
*
Connection for a standard display.
8 Composite audio R In jack
Connection for an audio cable (optional).
Composite audio L In jack
Connection for an audio cable (optional).
Composite video In jack
Connection for a video cable (optional).
S-video In jack
Connection for an S-video cable (optional)
VHF/UHF port
Connection for a TV coaxial cable (supplied).
9 Joystick/MIDI port
Connection for a joystick or MIDI device.
Rear Out jack
Connection for optional speakers or external amplifier.
Line Out jack
†
Connection for the supplied sub-woofer, or optional speakers or
headphones.
Microphone In jack
Connection for a microphone (optional).
22
Page 23
About the Back Panel
9
continued
Line In jack
Connection for an audio device.
Analog/Digital Out jack
Connection for external digital devices or digital speaker systems.
10 Telephone jack
Connection for a telephone cable (optional) to the computer.
11 Speaker DC Out jack
Connection for the speaker power cable (supplied).
12 Ethernet port
Connection for a 10BASE-T/100BASE-TX/1000BASE-TX Ethernet.
(The port marked with (Network) is for LAN connections only.)
13 TV Out (S-video/video) jack
Connection for an S-video cable.
14 Monitor (DVI) port
*
Connection for a DVI monitor.
15 Modem line jack
Connection for the modem (supplied) cable to the wall jack.
* The location of this monitor port may vary, depending on the computer model purchased.
† Certain VAIO computers are supplied with a sub-woofer unit. See the Specifications sheet for
information on your computer’s supplied accessories.
23
Page 24
VAIO Digital Studio Computer Quick Start
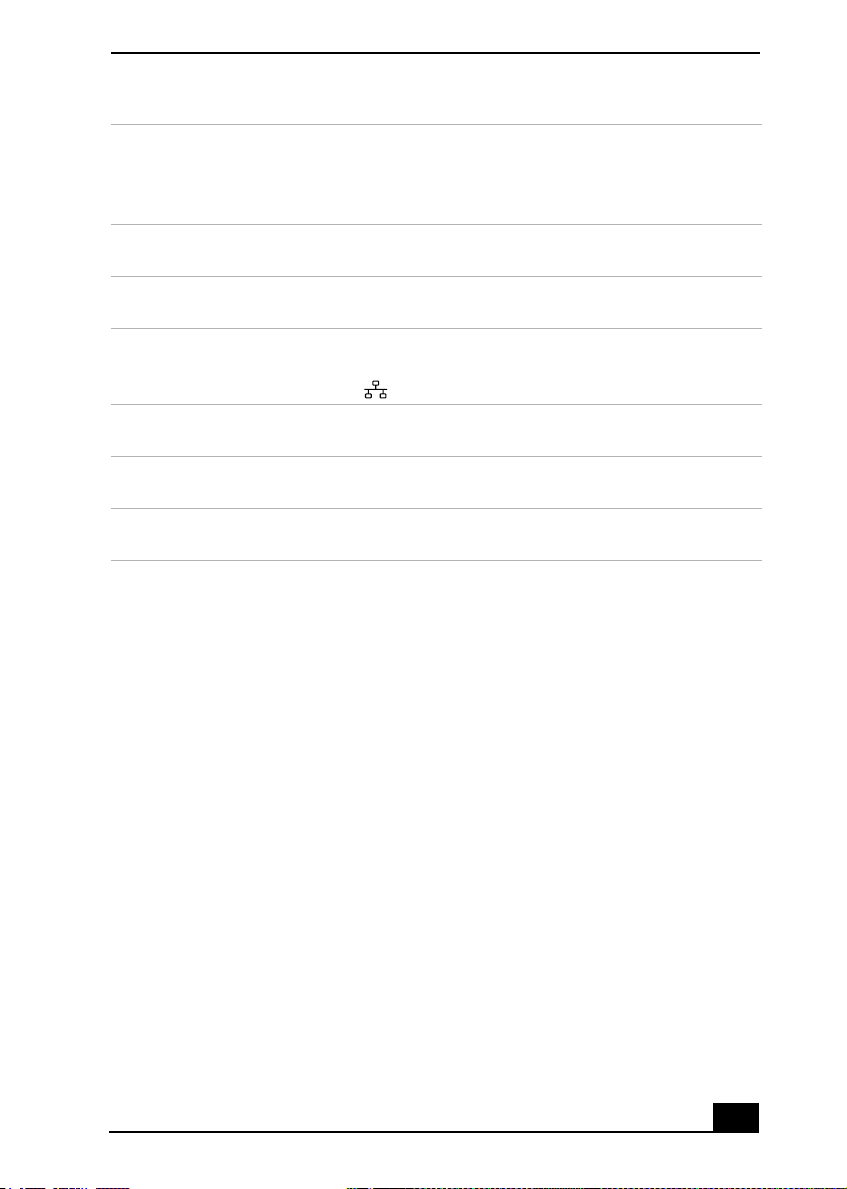
About the Sub-wooferwoofer
Certain VAIO® computers are supplied with a sub-woofer unit to enhance your
system’s sound capability.
Sub-woofer unit
Right side
Left side
1 Port
The port extends the low frequency response to extend the volume output
of the sub-woofer unit.
2 Power knob/volume control
Rotate the knob clockwise to turn on the sub-woofer unit. Control the
volume by rotating the knob until the desired volume is reached. Rotate
the knob counter-clockwise to turn off the sub-woofer unit.
3 Power indicator
Light is green while the power is on.
4 Speaker jack
Connection for the speaker cable (RCA plug).
5 Sub-woofer unit cable
Connects the sub-woofer unit to the computer’s Line Out jack.
6 AC power cord
Connects the sub-woofer unit to a grounded AC wall outlet or power
strip.
Front panel
24
Page 25
About the Keyboard
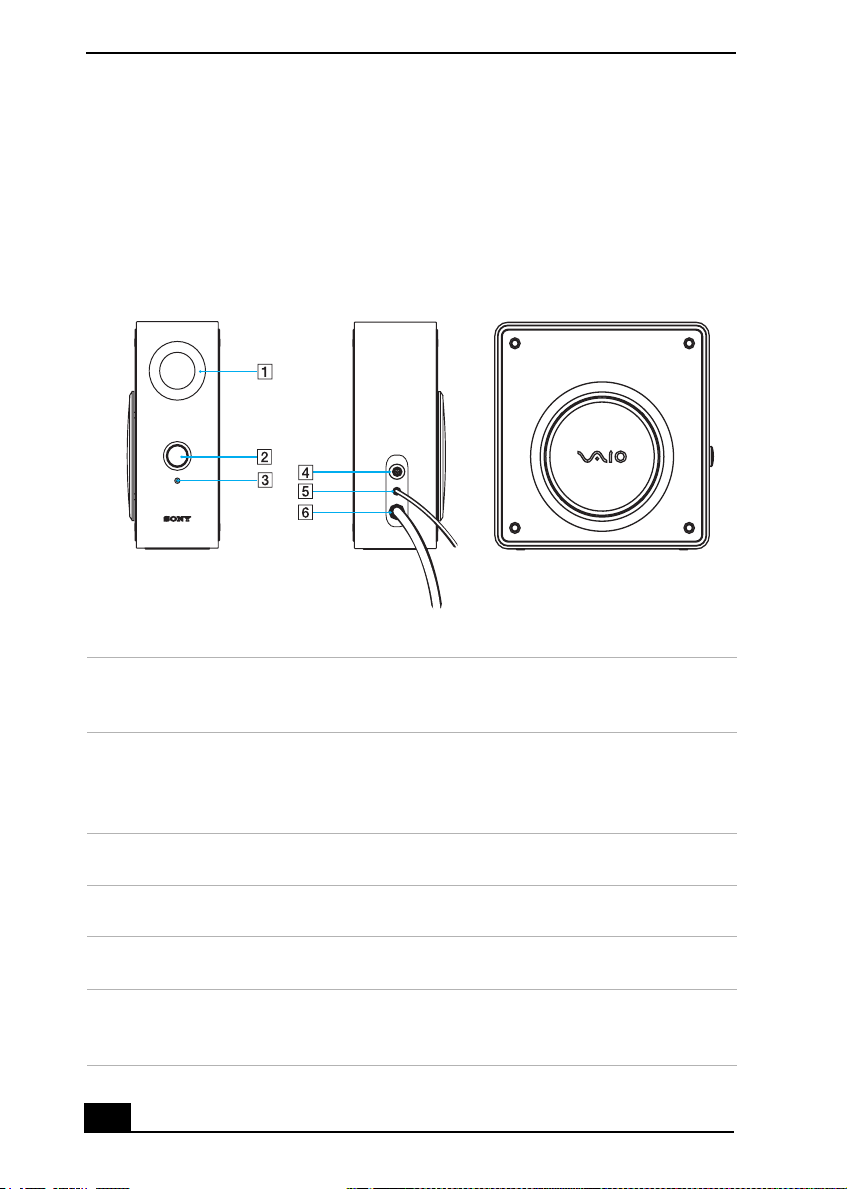
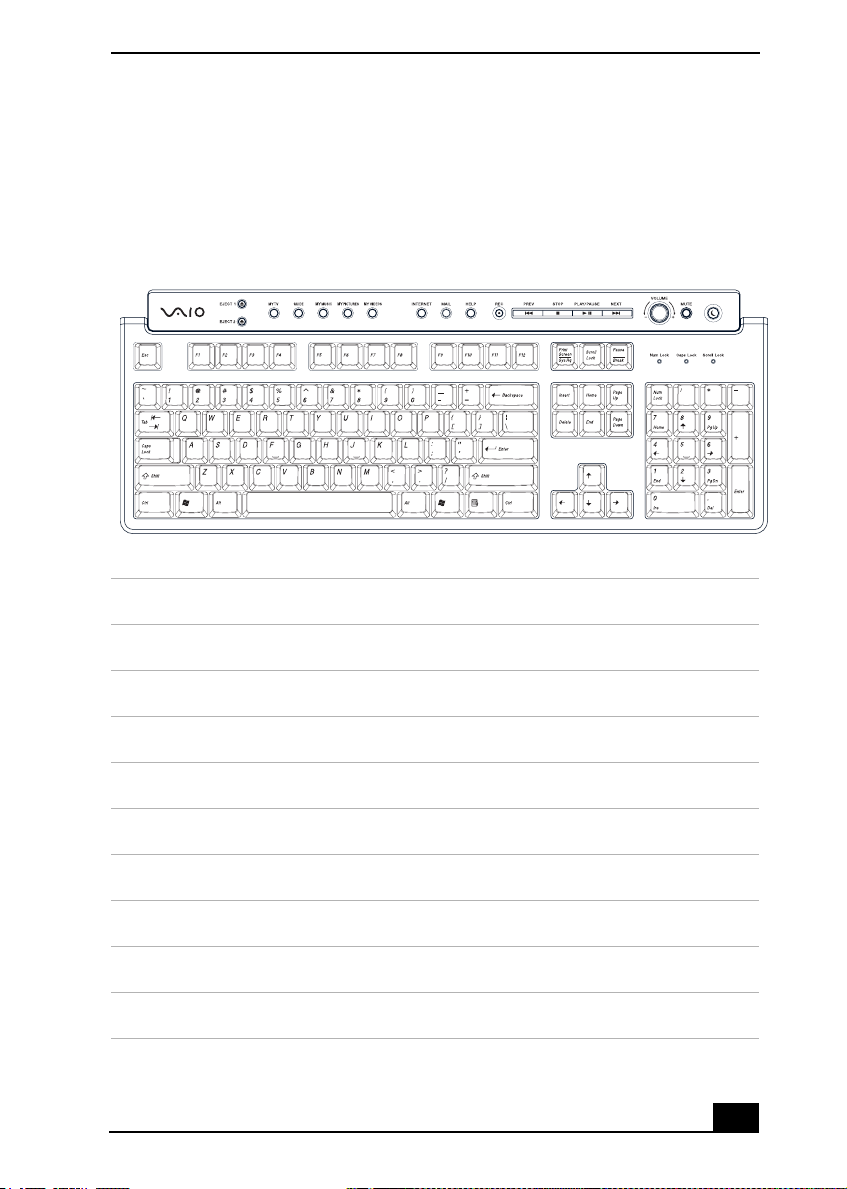
About the Keyboard
Your VAIO® keyboard uses a standard key arrangement with additional keys that
perform specific functions.
VAIO keyboard with Media Center features
BUTTON DESCRIPTION
EJECT 1 Opens the optical drive 1 tray.
EJECT 2 Opens the optical drive 2 tray.
MY TV Opens the My TV window of Windows® Media Center.
GUIDE Opens the TV program guide of Media Center.
MY MUSIC Opens the My Music window of Media Center.
MY PICTURES Opens the My Pictures window of Media Center.
MY VIDEOS Opens the My Videos window of Media Center.
INTERNET Opens the Internet browser.
MAIL Opens the e-mail software program.
25
Page 26
VAIO Digital Studio Computer Quick Start
BUTTON DESCRIPTION
HELP Opens the Media Center Help guide.
REC Records TV programs.
PREV Press once to return to the beginning of the DVD chapter,
video track, or audio track.
Press twice to return to the previous DVD chapter, video
track, or audio track.
STOP Stops media recording or playback.
PLAY/PAUSE Pauses the movie, video, slide show, or audio track. Press
again to resume playback.
NEXT Advances to the next DVD chapter, video track, or audio
track.
VOLUME knob Increases (+) and decreases (-) the volume as you turn the
knob.
MUTE Turns the sound off. Press again to restore sound.
STANDBY Places the computer in Stand by mode to reduce power
consumption. Press any key briefly to resume normal
operation.
26
Page 27

About the Keyboard
KEY DESCRIPTION
Function The 12 function keys along the top of the keyboard are used
to perform certain tasks. The task associated with each
function key may vary between software programs.
Numeric keypad Use the numeric keypad area to type numbers or to perform
basic math calculations. Press the Num Lock key to activate
the numeric keypad. (The Num Lock indicator lights.) Press
the Num Lock key again to deactivate the numeric keypad.
Directional
Arrows
The Up, Down, Left, and Right arrow keys move the pointer
on the screen.
Applications The Applications key displays a shortcut menu in certain
software programs. Pressing this key is equivalent to clicking
the right mouse button.
Windows The key with the Microsoft® Windows® logo, displays the
Start menu. Pressing this key is equivalent to clicking Start on
the taskbar.
INDICATORS FUNCTION
Num Lock The Num Lock indicator lights when the numeric keypad is
activated. When the indicator is off, the directional arrow and
correction keys on the numeric keypad area are active.
Caps Lock The Caps Lock indicator lights to advise you that the
keyboard is set to type letters in uppercase. When the
indicator is off, the letters appear in lower case as you type.
Scroll Lock The Scroll Lock indicator lights to advise you that your
screen’s scrolling pattern has changed. When the indicator is
off, the screen scrolls normally. This function is not available
with all software programs.
27
Page 28

VAIO Digital Studio Computer Quick Start
About the Remote Control
The Windows® XP Media Center Edition features are controlled with the
supplied remote control. The remote control can start and stop video recording
and playback, select channels, and set viewing preferences. This section
describes the basic functions of your remote control.
Remote Control
MUTE
GHI JKL MNO
PQRS TUV
CLEAR
REC STOP PLAY PAUSE
MY TV MY MUSIC MY PICTURES
GUIDE MY VIDEOS
LIVE TV
BACK
VOLUME CHAN/PAGE
STANDBY
DEFABC
WXYZ
ENTER
DVD MENU
OK
SKIPREPLAYFFREW
MORE
INFO
28
RM-MC1
Page 29

1 MUTE button
Press to turn off the sound. Press again to restore the sound.
2 Channel number buttons (0-9)
Press to select specific channels or enter text.
(Press OK to activate the channel selection.)
3 CLEAR button
Use as a backspace key to delete entered text.
4 REW button
Press to move media backward at two speeds.
FF button
Press to fast-forward media at three speeds.
REPLAY button
Press to move media backward, for example, one audio track, one DVD
chapter, and seven seconds of TV or video.
SKIP button
Press to move media forward, for example, one audio track, one DVD
chapter, and 30 seconds of recorded TV or video.
5 MY TV button
Press to change from the on-screen image to the TV.
MY MUSIC button
Press to view and listen to your music playlists.
MY PICTURES button
Press to view pictures or a slide show.
GUIDE button
Press to view the TV program guide for your area.
START button
Press to open the Media Center Start menu.
MY VIDEOS button
Press to view videos from your video collection.
6 LIVE TV button
Press to view TV in full-screen mode.
7 Directional arrows
Press the Up, Down, Left, and Right arrow keys to move the pointer on
the screen.
OK button
Press OK to select the desired action or window option. If watching fullscreen TV press OK to return to the previous channel. Press OK again to
toggle channels.
About the Remote Control
29
Page 30

VAIO Digital Studio Computer Quick Start
8 BACK button
Press to return to the previous window
9 VOLUME button
Press to increase (+) or decrease (-) the volume.
10 STANDBY button
Press to place the computer in Standby mode to reduce power
consumption. Press any key briefly to resume normal operation.
11 ENTER button
Press to stop recording.
12 REC button
Press to begin recording.
STOP button
Press to stop media playback.
PLAY button
Press to begin media playback.
PAUS E bu tto n
Press to pause media playback. Press again to resume playback.
13 DVD MENU button
Press to open the main menu on a DVD.
14 MORE INFO button
Press to view any available information about the selected media.
15 CHAN/PAGE button
Press to change, page up and down channels automatically (no number
input required).
30
Page 31

About the Remote Control
To set up the remote control
Insert two AA batteries (supplied) into the remote control as shown.
Inserting batteries into the remote control
✍ If your remote control does not operate properly, you may need to replace the
batteries. If your remote control is not being used for extended periods of time,
remove the batteries to avoid possible damage from battery leakage.
31
Page 32

VAIO Digital Studio Computer Quick Start
32
Page 33

Setting Up Your Computerg Up Your Computerer
This section describes how to set up your computer and peripheral
equipment. Your computer may not be equipped with all of the hardware
features described in this section, and the location of the controls, ports,
and jacks may vary from the illustrations shown.
33
Page 34

VAIO Digital Studio Computer Quick Start
Connecting a Display (Monitor)play (Monitor)
1 Plug the display’s cable into the monitor port.
2 If necessary, plug the display’s cable into the rear of the display.
To connect a display
MONITOR
34
Page 35

To connect a DVI display
Connecting a Display (Monitor)
✍ Install your equipment so that you can easily reach the power outlet in the event of an
emergency.
35
Page 36

VAIO Digital Studio Computer Quick Start
Connecting the Speakers and Sub-woofer UnitUnit
1 Plug the cable attached to the back of the left speaker into the L Out jack on
the back of the right speaker.
2 Insert the yellow plug of the speaker power cable into the DC In jack
(yellow) on the back of the right speaker.
3 Insert the black plug of the speaker power cable into the DC Out jack located
on the back panel of your computer.
To connect the computer, speakers, and sub-woofer unit
Speaker power cable
(black plug)
System unit
Connect to
sub-woofer
R-sp eaker
L-s pe aker
36
Speaker power cable
(yellow plug)
L-speaker cable
Page 37

Connecting the Speakers and Sub-woofer Unit
4 Insert the RCA plug of the cable that is attached to the right speaker into the
speaker jack, located on the left side of the sub-woofer unit.
To connect the sub-woofer unit
Sub-woofer unit
Connect to
DC-Out jack
on computer’s
back panel
Connect to Line Out
jack on computer’s
back panel
AC Power
(wall outlet)
R-sp eaker
L-s pe aker
37
Page 38

VAIO Digital Studio Computer Quick Start
5 Insert the RCA plug of the sub-woofer unit’s cable into the Line Out jack,
located on the back panel of your computer.
6 Plug the sub-woofer unit’s power cord into a grounded AC wall outlet or
power strip.
To connect the sub-woofer to the computer
System unit
COMPOSITE
AUDIO AUDIO
AC Power
(wall outlet)
VHF/UHF
S VIDEO
–
–
VIDEO1 INPUT
Sub-woofer unit
38
Page 39

Connecting the Keyboard and Mouse
KEYBOARD MOUSE
PRINTER
i.LINK
S400
Connecting the Keyboard and Mouse
1 Plug the keyboard cable into the keyboard port on the back of the computer.
2 Plug the mouse cable into the mouse port on the back of the computer.
To connect the keyboard and mouse
Using an optical mouse
An optical mouse requires an ideal surface texture in order to provide precision
pointing and tracking.
❑ Use surfaces such as plain paper, card stock, or fabric that have minimal
repetitive patterning.
❑ Avoid surfaces such as mirrors, smooth glass, or magazines that have
halftone printing.
39
Page 40

VAIO Digital Studio Computer Quick Start
Connecting the Telephone and Modem cables
1 Unplug your telephone from the wall jack and plug it into the telephone jack,
located on the back panel of your computer.
2 Plug the modem cable (supplied) into the Modem line jack, located on the
back panel of your computer.
3 Plug the other end of the modem cable into the wall jack.
To connect the telephone and modem cables
COMPOSITE
–
VIDEO1 INPUT
VHF/UHF
S VIDEO
–
AUDIO AUDIO
40
Your computer has a protective sticker covering the Ethernet port located
on the rear panel. Connect 10BASE-T, 100BASE-TX or 1000BASE-TX cables to
the Ethernet port. Using other cables or a telephone cable may result in an
electric current overload that can cause a malfunction, excessive heat, or fire
in the Ethernet port. For help on connecting to a network, see your network
administrator.
Page 41

Connecting the Power Cords
KEYBOARD MOUSE
PRINTER
Connecting the Power Cordswer Cords
1 Plug the power cord into the back of the computer.
2 Plug both the display and computer power cords into a grounded AC wall
outlet or a power strip.
To connect the power cords
41
Page 42

VAIO Digital Studio Computer Quick Start
Turning On your Computer
When you start your system for the first time, your computer may detect new
equipment and display a dialog box that prompts you to restart your computer.
Respond to this prompt immediately.
✍ Before turning on your computer, set up your Sony VAIO® Media Center cables and
connections. For detailed instructions, see “Setting Up Microsoft Windows XP Media
Center Edition,” on page 45, 45,
1 Press the power switch on the computer to turn on the power.
2 Press the power switch on the display to turn on the power.
3 Press the power switch on the right speaker to turn on the power.
To turn on your computer
Registering your Computer
Take advantage of Sony’s commitment to quality customer support and receive
these benefits by registering your computer:
❑ Sony Customer Support — Communicate with a Support Representative to
troubleshoot problems you may be having with your computer.
❑ Limited warranty — Protect your investment. See the Limited Warranty
Card for more details.
✍ You are prompted to register your computer the first time you turn on the unit. Follow
the on-screen instructions to complete the registration process. If you are not able to
register your computer during the first session, you are provided with additional
registration opportunities later.
42
Page 43

Turning Off your Computer
Turning Off your Computer
Follow these steps when you are ready to turn off your computer for an extended
period of time.
To avoid loss of data, do not use the Power button to turn off the computer.
Turning off your computer
1 Click Start in the Windows taskbar, then select Turn Off Computer.
The Turn Off Computer dialog box appears.
2 Select the Turn O ff option.
✍ Respond to any prompts about saving your documents.
3 Wait for your computer to turn off automatically—the power indicator light
turns off.
4 Turn off any peripheral devices connected to your computer.
✍ If you plan to turn off your computer for a short period of time, use Stand by mode.
About the power buttonbout the power button
If your system stops responding, press and hold the Power button for more than
six seconds to force your system to shut down. You may need to repeat this
procedure if your system does not shut down on the first attempt.
43
Page 44

VAIO Digital Studio Computer Quick Start
44
Page 45

Setting Up Microsoft Windows XP osoft Windows XP
Media Center Edition
Welcome to a new and exciting experience in home entertainment, with
your VAIO Digital Studio® computer and the Microsoft® Windows® XP
Media Center Edition. Media Center provides you with a wide range of
TV, DVD, and video viewing, as well as music recording and playback.
This section provides information about setting up Media Center, your
computer, TV, cable or satellite set-top box, and other peripheral
equipment.
45
Page 46

VAIO Digital Studio Computer Quick Start
Microsoft Windows XP Media Center EditionP Media Center Edition
Microsoft® Windows® XP Media Center Edition combines the multimedia
features of a personal computer with the convenience of a home entertainment
center. Media Center enables you to view, organize, store, and browse your
photos, video/movie libraries, music playlists, and recorded TV programs, while
running other software programs.
Media Center enables you to perform many functions, such as:
❑ Viewing and recording TV programs
❑ Playing CDs, DVDs, and digital videos
❑ Creating music playlists and listening to music files
❑ Viewing digital photos individually or as a slide show with background
music
❑ Enjoying TV, DVDs, or your favorite music, while performing other tasks on
your computer
Your VAIO Digital Studio Computer and Media Center
Your VAIO Digital Studio® computer compliments this exceptional operating
system with preinstalled multimedia software programs, superior graphics and
audio capability, and a DVD±RW drive that burns and plays DVD and CD
media.
Your computer comes equipped with features that enhance Media Center. You
can:
❑ Set up a home network to share media content
❑ Edit and organize digital images
❑ Save your favorite recorded TV programs to DVD media
❑ Play and edit your home videos
❑ Create DVDs by capturing video content straight from a digital video device
❑ Burn music files to CD media
46
Page 47

Microsoft Windows XP Media Center Edition
Before You Begin Using Media Center
There are several tasks to complete before you are ready to use Media Center.
Read this checklist before you use the Media Center program, to enable full use
of all the features.
❑ Set up your VAIO® Media Center computer, accessories, and peripheral
equipment correctly.
❑ Evaluate your home environment to determine the best way to connect your
TV, set-top box (cable or satellite), Internet, and computer.
❑ Establish an active Internet connection.
❑ Connect your computer to the TV signal source.
❑ Insert two AA batteries into the Media Center remote control.
❑ Plug the remote sensor unit into a USB port on your computer and place it in
a location that enables direct communication with the remote control.
❑ Connect the remote sensor control between your cable or satellite set-top
box, and the remote sensor unit.
✍ An Internet connection and TV signal source are not required to use some features,
but Sony recommends using these options to fully experience Media Center.
47
Page 48

VAIO Digital Studio Computer Quick Start
Setting Up TV Connections
The best method of connecting your computer, TV monitor or display, and TV
programming access, is determined by the type of cable service connection
available in your home. Your computer’s hardware configuration may vary from
the illustrations shown in this section. See the online Specifications sheet for
details about your computer’s hardware configuration.
✍ Your VAIO Digital Studio ® computer is supplied with certain video cables. Depending
on your in-home cable access, you may require extra cables, adapters or connection
equipment not supplied with your computer.
Connecting to standard cable access (CATV)cting to standard cable access (CATV)
Option 1
1 Connect one end of the TV coaxial cable (supplied) to your cable service
access.
2 Connect the other end of the TV coaxial cable to the VHF/UHF port on the
back panel of your computer.
To connect in CATV mode (Option 1)
Cable service access
(wall outlet)
48
VHF/UHF port
VHF/UHF
TV coaxial cable
(supplied)
Page 49

Setting Up TV Connections
Option 2
1 Connect one end of a TV coaxial cable (optional) to your cable service
access. Connect the other end to the single-connection side of a splitter
adapter.
2 Connect the TV coaxial cable (supplied) to the double-connection side of the
splitter adapter. Connect the other end to the VHF/UHF port on the back
panel of your computer.
3 Connect a third TV coaxial cable (optional) to the double-connection side of
the splitter adapter. Connect the other end to the VHF/UHF port on the back
of your TV monitor or display.
To connect in CATV mode (Option 2)
TV coaxial cable
(optional)
Splitter
(optional)
Cable service access
(wall outlet)
TV coaxial cable
(optional)
TV coaxial cable
(supplied)
VHF/UHF port
VHF/UHF
49
Page 50

VAIO Digital Studio Computer Quick Start
Connecting to a standard antenna (air) system
You can connect your computer to an indoor/outdoor antenna system, using
Option 1 or 2 from the previous section, “Connecting to standard cable access
(CATV)” on page 48. The antenna system in your home may require a VHF/UHF
RF combiner/transformer (optional) to connect your computer and the
indoor/outdoor antenna system.
✍ If you are connecting to an indoor/outdoor antenna system, you may need to reorient
the antenna for better reception.
Option 1
1 Connect one end of a TV coaxial cable (optional) to your antenna outlet.
Connect the other end to a VHF/UHF RF combiner/transformer (optional).
2 Connect the TV coaxial cable (supplied) from the combiner/transformer to
the VHF/UHF port on the back panel of your computer.
Option 2
1 Connect both ends of the antenna’s twin lead cable to the screw-type grips
on the combiner/transformer.
2 Connect the TV coaxial cable (supplied) from the combiner/transformer to
the VHF/UHF port on the back panel of your computer.
50
Page 51

To connect in standard antenna mode (air)
Option 1
Antenna
system
Option 2
Antenna
system
(Air)
TV coaxial cable
(optional)
300-ohm
Twin lead cable
(optional)
VHF/UHF RF
Combiner/Transformer
(optional)
TV coaxial cable
(supplied)
Setting Up TV Connections
VHF/UHF port
✍ Your VAIO Digital Studio® computer is supplied with certain video cables. Depending
on your in-home cable access, you may require extra cables, adapters or connection
equipment not supplied with your computer.
51
Page 52

VAIO Digital Studio Computer Quick Start
Connecting a Cable or Satellite Set-top Boxx
You can connect your computer to cable or satellite service that requires a set-top
box.
Option 1
1 Connect one end of a TV coaxial cable (optional) to your cable service
access. Connect the other end to the In jack on the back panel of your set-top
box.
2 Connect a second TV coaxial cable (optional) to the Out jack on your set-top
box. Connect the other end to the single-connection end of a splitter adapter
(optional).
3 Connect a third TV coaxial cable (supplied) to the double-connection end of
the splitter adapter. Connect the other end to the VHF/UHF port on the back
panel of your computer.
4 Connect a fourth TV coaxial cable (optional) to the double-connection end
of the splitter adapter. Connect the other end to the VHF/UHF port on the
rear of your TV monitor or display.
52
Page 53

Connecting a Cable or Satellite Set-top Box
To connect in set-top box mode (Option 1)
TV coaxial cable
(optional)
Cable service
access
(wall outlet)
Splitter
(optional)
TV coaxial cable
(optional)
VHF/UHF port
VHF/UHF
IN
VHF/UHF
OUT
TV coaxial cable
Set-top box
TV coaxial cable
(optional)
(supplied)
VHF/UHF port
53
Page 54

VAIO Digital Studio Computer Quick Start
Option 2
1 Connect one end of the TV coaxial cable (supplied) to your cable service
access. Connect the other end to the In jack on the back panel of your set-top
box.
2 Connect a second TV coaxial cable (optional) to the Out jack on your set-top
box. Connect the other end to the VHF/UHF port on the rear of your TV
monitor or display.
3 Connect one end of the stereo A/V dubbing cables with triple RCA jacks
(optional) to the Video Out and Audio-OUT (L/R) jacks on the back panel of
your set-top box, matching the plug and jack colors.
4 Connect the other RCA jacks of the stereo dubbing cable into the Audio-R
(IN), Audio-L (IN), and Composite video (IN) jacks on the back panel of
your computer, matching the plug and jack colors.
To connect in set-top box mode (Option 2)
Stereo A/V dubbing cables
with triple RCA plugs
(optional)
Cable
service
access
TV
coaxial
cables
(1-supplied)
Audio R-IN
Audio L-IN
Composite
Video
Video
OUT
Audio-OUT
(L/R)
VHF/UHF
IN
-
VHF/UHF
OUT
VHF/UHF port
✍ You can connect your computer to a set-top box using an S-video cable (optional)
instead of a stereo A/V dubbing cable (optional). See “Setting Up Additional
Equipment” on page 58.8.
54
Page 55

Connecting the Remote Sensor
Connecting the Remote Sensor
The remote sensor communicates with the Media Center remote control,
enabling you to change channels and to perform other functions. If you are using
a cable or satellite set-top box, you can connect the remote sensor control to the
remote sensor, which enables you to control the set-top box with the remote
control.
1 Connect the remote sensor unit to a USB port located on either the front or
back panel of your computer. Place the remote sensor in a position that
enables it to communicate with your remote control.
Connecting the remote sensor (back panel)
Remote sensor
(supplied)
55
Page 56

VAIO Digital Studio Computer Quick Start
2 Plug the remote sensor control’s cable into a jack (1 or 2) located on the back
of the remote sensor.
✍ When you attach the remote control sensor to a cable or satellite set-top box, you can
control the set-top box functions with your remote control.
Connecting the remote sensor and remote sensor control
Remote sensor
control cable
Remote sensor
2
1
56
Page 57

Connecting the Remote Sensor
3 Place the remote sensor control above the set-top box’s infrared port:
1 Attach the double-sided adhesive tape to the top of the set-top box.
2 Press the remote sensor control onto the tape, ensuring that the front
edge extends over the front of the box, as shown in the following
illustration.
Connecting the remote sensor control cable to a cable or satellite set-top box
Adhesive
tape
Remote sensor
control
Cable or satellite
set-top box
Infrared
port
Remote sensor
✍ The remote sensor unit must be visible in a line-of-sight with your remote control in
order to function properly.
57
Page 58

VAIO Digital Studio Computer Quick Start
Setting Up Additional Equipment
This section illustrates how to set up additional equipment with your VAIO
Digital Studio® computer.
Connecting a VCR or camcorder with an audio cable
Your computer has both audio and video connection capability. You can locate
the appropriate connections behind the lower bottom panel on the front of the
computer or on the back panel. You can connect a VCR or camcorder, using the
composite audio In jacks and video ports.
1 Connect a dual audio cable (optional) to the composite audio L and R In
jacks, located on the either the front or rear panels of your computer.
2 Connect the other ends of the dual audio cable to your VCR or camcorder.
Connecting devices with an S-video or video cable
Your VCR or camcorder may have either standard video or S-video connection
capability.
Option 1
1 Connect an S-video cable (optional) directly into the S-video jack on either
the front or back panel of your computer.
2 Connect the other end of the S-video cable into the appropriate port on your
compatible VCR or camcorder.
3 Connect an audio cable with double RCA plugs at each end (optional) into
the composite audio L and R jacks.
58
Page 59

To connect a VCR or camcorder (Option 1)
Video cassette recorder (VCR)
Setting Up Additional Equipment
Compatible camcorder
S-video cable
(optional)
Dual audio cable
(optional)
Option 2
1 Connect a stereo A/V dubbing cable with triple RCA plugs at each end
(optional) directly into the composite video port, composite audio L and R
jacks, located on either the front or back panel of your computer.
2 Connect the other ends of the stereo A/V dubbing cable into the appropriate
jacks on your compatible VCR or camcorder.
59
Page 60

VAIO Digital Studio Computer Quick Start
Connecting a TV monitor (display)
1 Connect the video connector end of the video cable adapter (supplied) to the
TV Out (S-video/video) jack on the back panel of your computer.
2 Connect the jack end of the video cable adapter to either end of a video cable
(optional). Connect the other end of the video cable to the Video-In jack on
your TV monitor or display, located on either the side or back of your TV
monitor/display.
3 Connect the single-jack end of an audio cable (optional) to the Line In jack
on the back panel of your computer. Connect the double-jack end of the
audio cable to the Audio-In (L/R) on your TV monitor or display. (The
Audio-In jacks may be located on the side or rear of your TV
monitor/display.)
Connecting a TV monitor or display
Video cable adapter
(supplied)
VHF/UHF
Video cable
(optional)
V
I
D
V
E
I
D
O
E
I
N
O
P
U
T
L
(
M
O
N
O
)
R
Audio cable (L/R)
(optional)
✍ The video adapter is not needed, if you use an S-video cable to connect your TV to the
computer’s TV out (S-video/video) jack.
60
Page 61

Getting Started with Media Center
Getting Started with Media Center
You can start Microsoft® Windows® XP Media Center edition and switch
between different functions by pressing a button on the remote control, using
your computer’s keyboard, or clicking the mouse. You can also record TV, watch
videos, play music, and use other software programs.
Starting Media Center using the remote control
1 Point the remote control at the remote sensor and press .
✍ The remote control must be used within 26 feet (8 meters) of the front of remote
sensor unit.
2 Use the arrow buttons on the remote control to navigate and select menu
items. Press the OK button to activate your selection.
Starting Media Center using your keyboard and mousekeyboard and mouse
1 Click Start from the Windows taskbar and select Media Center from the
Start menu. The Media Center main window appears.
2 Use the directional arrows on the keyboard, or move the mouse, to navigate
and select menu items. Press Enter on the keyboard or left-click the mouse
to activate your selection.
61
Page 62

VAIO Digital Studio Computer Quick Start
Media Center Start
1
2
3
17
16
15
1 Media Center Start Menu
Returns Media Center to the Start menu.
2 Back button
Returns Media Center to the previous window.
45
6
7
8
9
10
11
12
13
14
3 Media Center Help
Opens the Media Center Help guide.
4 Minimize button
Minimizes the Media Center window and places the Media Center icon
and name on the taskbar.
5 Maximize button
Enlarges the View window to full-screen.
62
Page 63

6 Close Window button
Closes the Media Center window.
7 My Videos
Plays and sorts home videos.
8 My Pictures
Displays and sorts digital images and slide shows.
9My TV
Plays and records TV programs.
10 My Music
Plays and sorts music files and music CDs.
11 Create DVD
Creates and writes videos to DVD media.
12 More Programs
Displays additional programs that are available through Media Center.
13 Scroll Arrows
Moves the Start menu items up and down.
Getting Started with Media Center
14 Settings
Sets or changes your Media Center preferences, including parental
controls, recording settings, and more.
15 Media Playback Controls
Plays, records, rewinds, replays, and stops selected media.
16 Inset Window
Displays current playback window.
17 Log Off button
Logs off from this computer, or enables you to switch users.
63
Page 64

VAIO Digital Studio Computer Quick Start
Exploring Media Center
You can use several options to explore Media Center, switch screens, locate
controls, and start functions.
Selecting items in Media Center
Selected items, such as folders, files, or menu options, are outlined with a green
border.
❑ Use the arrow buttons on the remote control to select an item, and then press
OK to activate your selection.
❑ To switch between inset window and full screen modes, use the arrow keys
on the remote control to select the inset window, and then press OK.
Switching between Media Center and the desktop
You can view the desktop without closing Media Center.
❑ Select the Minimize button with your remote control or mouse to display
the desktop.
❑ To return to Media Center, press on the Windows® taskbar.
Displaying or hiding the Media Center controls
❑ You can use your mouse to display the Media Playback Controls.
❑ You can use the remote control to hide the Media Playback Controls.
64
Page 65

Media Center — Media Playback Controls
Exploring Media Center
1
2
4
3
1 Channel Up and Down buttons
Changes the TV channel up (+) or down (-).
2 Play button
Plays the selected media.
3 Stop button
Stops playback of selected media.
4 Record button
Records TV programs and stores them on the hard disk.
5 Replay/Rewind button
Moves TV programs and selected media backward.
6 Skip/Fast Forward button
Moves selected media ahead.
5
67 8
7Mute button
Turns computer sound off.
8 Volume Up and Down buttons
Increases (+) and decreases (-) sound.
65
Page 66

VAIO Digital Studio Computer Quick Start
Starting the Media Center Setup Wizard
The setup wizard requires you to provide certain information about your
equipment and home environment. To make the setup process easier, be prepared
to:
❑ Log on to Windows® operating system as the administrator. For more
information, go to the VAIO Help and Support Center.
❑ Establish a working Internet connection to enable the download of your local
television program guide.
❑ Provide your Zip code or Postal Code.
❑ Provide the name of your TV programming provider or the name of your
subscription package, if using cable or satellite service.
❑ Identify the brand name for your set-top box, if your TV service requires
one.
✍ To get assistance with the Media Center setup wizard at any time during the setup
process, click Help button.
66
Page 67

Starting the Media Center Setup Wizard
Using the setup wizard
The first time you start the Media Center, a setup wizard appears. Follow the
steps in Media Center setup wizard to properly activate and configure Media
Center. The setup wizard tests your remote control, configures your Internet
connection and TV broadcast signal, and sets up the Television Program Guide
for your local area.
Media Center - Getting Started
✍ If you decide to skip any of the setup wizard steps, you can complete them later in the
Settings window in Media Center.
67
Page 68

VAIO Digital Studio Computer Quick Start
❑ Check Remote Control — The Media Center uses this interactive step to
verify that the remote control is communicating with the remote sensor. The
LED on the remote control blinks when a button is pressed.
Media Center - Check Your Remote Control
✍ Verify that your remote control has two AA batteries installed.
68
Page 69

Starting the Media Center Setup Wizard
❑ Set up Internet Connection — The Media Center setup wizard uses an
active Internet connection to set up and update your local Television
Program Guide. If you have already established an Internet connection, you
are asked to choose a download method. Select the appropriate download
option, and follow the onscreen instructions.
Media Center - Download Method
✍ The Internet connection provides information about your music CDs and other media.
If you skip this step, you can complete them later in the Settings window in Media
Center.
69
Page 70

VAIO Digital Studio Computer Quick Start
❑ Set up Television Signal — The Media Center setup wizard verifies that
your computer is receiving the correct TV signal and local TV Program
Guide. If you are using a cable or satellite set-top box, this step programs
your remote to the box, enabling you to view premium channels.
Media Center - Choose Your TV Signal
✍ Verify that your TV signal source is connected to the computer.
70
Page 71

Starting the Media Center Setup Wizard
❑ Set up Television Program Guide — The Media Center setup wizard
enables your computer to automatically connect to the Internet to update
your Television Program Guide. The Guide displays available channels,
network, and program information.
Media Center - Program Guide
The message, “No data available” is displayed in the Television Program
Guide when:
❑ The Guide has not been set up.
❑ You have not agreed to the Television Program Guide’s Terms of
Service.
❑ The Media Center cannot connect to the Internet and download new
Guide information.
❑ Guide information is not available for your location, from the Microsoft
TV listings service provider.
❑ Media Center has determined that the existing Guide information on
your computer is expired or corrupted.
71
Page 72

VAIO Digital Studio Computer Quick Start
72
Page 73

Using the Sound Blaster d Blaster
Audigy ES Sound Cardy ES Sound Card
Congratulations! You’ve purchased the Sound Blaster Audigy ES sound
card that delivers Dolby® Digital 5.1 surround sound. You can begin
enjoying cinema-quality sound immediately, as your sound card and
drivers are preinstalled in your new VAIO® computer.
Installing Sound Blaster Audigy Software Blaster Audigy Software
Install the software programs provided on the supplied Sound Blaster Audigy CD
before you begin using your new sound card, to experience fully enhanced digital
or analog sound. You can install any or all of these programs as desired. See the
section, “About Creative Software Programs” for a description of the software
programs that are available on this companion CD.
Installing from the Sound Blaster Audigy CD
The Sound Blaster Audigy CD supports Microsoft® Windows® Autoplay mode
and starts automatically when the CD is inserted into your computer’s optical
drive. If it does not start automatically, follow these instructions to install the
software programs:
1 Before installing the Sound Blaster Audigy CD, close any open audio card
software programs.
2 Click Start in the Windows® taskbar and click Control Panel. The Control
Panel window appears.
3 Click Add or Remove Programs. The Add or Remove Programs window
appears.
4 In the left frame, click Add New Programs. The InstallShield Wizard dialog
box appears.
73
Page 74

VAIO Digital Studio Computer Quick Start
5 From the InstallShield Wizard, click a check box to select software
program(s) you want to install, or clear a checkbox to stop installation of an
application.
6 Click Next. After installation, you are prompted to restart your computer.
✍ If you perform a hard drive recovery using the VAIO Recovery Wizard utility, you
cannot reinstall the Sound Blaster software programs using the wizard’s application
recovery feature. Reinstall these programs using the Sound Blaster Audigy CD.
Starting Creative softwareve software
1 Click Start in the Windows taskbar, point to All Programs, and then point
to Creative. A drop-down list of software programs appears.
Creative software programs (partial list detail)
2 Point to the desired software and click to start the software program.
74
Page 75

About Creative Software Programs
About Creative Software Programs
The Creative CD contains many software programs that make it easy for you to
create, customize and listen to MP3/WMA files, set up properties for audio
devices, and record sounds or music from various sources. The following
programs are most important for the operation of your audio card.
❑ Creative Taskbar — Use this handy way to perform many tasks by
simply selecting a feature.
❑ Sound Blaster Audigy Quick Start — Begin with the Quick Start, for
details about your Sound Blaster Audigy card. The Quick Start contains
interactive demos that explain different features, like listening to digital
music, experiencing digital gaming, connecting equipment, and performing
tasks.
❑ Online Manual — See the Online Manual for helpful information about
connecting and using your Sound Blaster Audigy card.
❑ Sound Blaster Audigy Experience — Try this program to get the full
impact of your Sound Blaster Audigy card for gaming, music listening, and
music mixing.
❑ EAX Goldmine — View an informative demonstration that describes
EAX ADVANCED HD technologies. This feature includes a ReadMe file
for more details about its interactive mode.
❑ Creative Diagnostics — Test your audio card’s playback capability,
recording functionality, and speaker output.
❑ Creative Surround Mixer — Use either the Basic or Advanced modes
to test your speakers, mix audio from various input sources or select audio
effects.
75
Page 76

VAIO Digital Studio Computer Quick Start
❑ Creative Audio HQ — View, audition, or set up the audio properties for
one or more audio devices, using this software control center. Creative
Audio HQ contains these features:
❑ SoundFont Control — Configure audio files and instruments.
❑ Device Controls — Configure audio devices for multiple and
simultaneous Wave playback.
❑ Creative Keyboard —Try this virtual keyboard to audition or play
musical notes through MIDI devices.
❑ MIDI Input — Use external MIDI input devices to audition your MIDI
banks and instruments.
❑ EAX Control — Adjust the Sound Blaster Audigy processor’s effects to
deliver realistic sound.
❑ Creative WaveStudio — Perform sound editing functions to play, edit,
record, or enhance your audio files.
❑ Creative PlayCenter™ — Manage your favorite MP3 and WMA files
on your computer, using this audio CD and digital audio player. Creative
PlayCenter enables you to rip your favorite audio CD tracks into compressed
digital audio files.
❑ Creative Recorder — Record sounds or music from various input
sources, such as an audio CD or microphone, saving as .WAV files.
❑ Creative MiniDisc Center — Play back and organize music from audio
CDs or other audio formats and record to your MiniDisc recorder device.
❑ Creative Restore Defaults — Reset all audio settings to the original,
default settings.
For details on using these software programs, see the specific program’s Help.
You can also access the User’s Guide (PDF format) and Help from the All
Programs menu, by clicking on .
76
Page 77

Troubleshooting
This section describes how to troubleshoot common problems. You can
also find helpful information on how to use your computer's hardware
features and preinstalled software. Your computer may not be equipped
with all of the features or software discussed in this section, depending on
the system configuration purchased.
My computer does not start.
❑ Verify that the computer is plugged into a power source and that it is turned
on. Check that the power indicator is lit on the front panel of the computer.
❑ Confirm that a disk is not in the floppy disk drive
bootable floppy disk).
❑ Confirm that a CD is not in an optical drive (unless you are using a bootable
CD).
❑ Confirm that the power cord and all cables are connected firmly.
❑ If you plugged the computer into a power strip or Uninterruptible Power
Supply (UPS), make sure the power strip or UPS is turned on and working.
❑ Verify that the monitor is plugged into a power source and turned on.
If your system has a built-in monitor, confirm that it is plugged into an
appropriate power source and that the system is turned on.
*
(unless you are using a
❑ Verify that the brightness or contrast control dials are adjusted correctly. (See
the manual that came with your display for details.)
❑ Confirm that the computer is not in stand by mode by pressing any key on
the keyboard.
* Certain VAIO computers are not equipped with a floppy disk drive. You can purchase this equipment
separately.
77
Page 78

VAIO Digital Studio Computer Quick Start
Why did my computer or software stop responding?
You can try to locate and close the software application that has stopped
responding.
1 Press the Ctrl+Alt+Delete keys. The Windows Task Manager window
appears.
2 From the Applications tab, locate the application that has the status message,
“Not responding.”
3 Select the application that has a Not Responding status and click End Task.
Windows attempts to close the application.
If your computer does not respond or the application does not close, try the
following steps:
1 Save any open files, if possible.
2 Press the Alt+F4 keys. The Turn Off Computer window appears.
3 Click Restart.
If your computer still does not respond and you cannot restart, shut down your
computer by pressing and holding the power button for more than six seconds.
If the software application continues to stop responding or causes your computer
to stop responding, contact the software publisher or designated technical support
provider.
78
Pressing and holding the power button for more than six seconds may result in
the loss of data from files that are currently open.
Page 79

Troubleshooting
Why can’t I hear sound when using the SP/DIF option for
digital output?
If your computer has a preinstalled Sound Blaster Audigy ES sound card*, the
Play Control settings must be changed to support digital sound. Follow these
steps to change the settings:
1 From the Windows taskbar notification area, double-click on .
The Play Control dialog box appears.
2 Click Options, and then click Advanced Controls. Click the Advanced
button.
The Advanced Controls for Play Control dialog box appears.
3 In the Other Controls box, click to select the option, 1 Digital Output
Only.
4 Click Close, and then close the Play Control dialog box.
✍ If you plan to use your own speaker system, you may experience some difficulty using
the mute feature during DVD playback. Use the mute function of your speaker system
instead of the keyboard or software program functions.
* The Sound Blaster Audigy ES sound card is available with certain VAIO® computers. See your online
Specifications sheet for information about your computer’s hardware configuration.
79
Page 80

VAIO Digital Studio Computer Quick Start
80
Page 81

Support Options
Sony provides several options to help solve common problems or to locate
support for your VAIO® computer. This section describes all available
resources and offers suggestions on how to access this information for
maximum results.
Immediate Help and Supportp and Support
You can locate helpful information immediately by consulting your hard copy
guides and supplements, or by accessing the online Computer User Guide and the
individual software Help files.
Your computer is supplied with these support options:
❑ VAIO® Computer Quick Start — The Quick Start contains information on
how to set up your computer quickly and easily. You can find instructions on
how to plan an ergonomic work space, connect power cords, cables and
peripheral devices, register your computer with Sony, and establish a dial-up
connection to the Internet. The Quick Start can also provide troubleshooting
support, if problems occur.
❑ VAIO® Computer User Guide — The online User Guide provides
information about configuring, maintaining, and upgrading your computer.
This support resource offers a variety of available topics, enabling you to
quickly view specific information using context-sensitive search features. To
access the online manual:
1 Click Start in the Windows® taskbar, then click Help and Support.
2 From the VAIO Help And Support Center menu, click VAIO User
Guide.
❑ Specifications — The online specifications sheet describes the hardware
and software configuration of your VAIO computer. To view this online
information go to http://www.sony.com/pcsupport.
81
Page 82

VAIO Digital Studio Computer Quick Start
❑ Preinstalled software Help files — Each preinstalled software application
provides online Help within the software, that describes the software’s
features. In these Help files, you can find tutorials that teach you to use the
software and locate troubleshooting support, should problems occur. To
access software Help files:
1 Click Start in the Windows taskbar and point to All Programs. A
submenu appears, listing all preinstalled software programs.
2 Click the desired software application.
*
The software’s main window
appears.
3 From the menu bar, click Help. The Help file appears.
❑ VA I O S o f tware — Provides specific information on preinstalled software
on your computer.
To access this online software information
1 Click Start in the Windows taskbar.
2 Click Welcome to VAIO Life.
Resources for Additional Help and Support
If the information provided with your VAIO® computer does not offer an
immediate solution, or you would like to get direct support, try these additional
help and support resources.
Sony Online Support Web siteOnline Support Web site
Online help and support are available 24 hours a day, seven days a week, when
you visit the Sony Online Support Web site. You can access the Web site at
http://www.sony.com/pcsupport.
The Sony Online Support Web site provides:
❑ Information about your specific model computer, such as:
❑ hardware and software specifications.
❑ upgrade and maintenance procedures.
❑ safety and legal information.
❑ quick solutions to common problems.
* You can locate the online Help for Sony software programs by pointing to the individual application’s icon
and selecting Help from the submenu.
82
Page 83

Resources for Additional Help and Support
❑ An automated tutorial library that contains interactive, easy-to-understand
lessons on using your computer’s hardware and software features.
❑ Links that enable you to:
❑ quickly find the nearest Sony service center locations.
❑ arrange for repairs or check repair status.
❑ review warranty information.
❑ e-mail your question or comments to the Sony Customer Information
Services Center.
❑ check pricing and availability for products, accessories and parts, as
well as purchase online.
❑ access the Sony Solutions Knowledge Base, a database that contains
answers to many frequently asked questions.
Sony Customer Information Services Center
If other support options do not resolve your issue, you can contact a Sony
Support representative directly.
Before making a call to the Sony Customer Information Services Center, have
this basic information readily available.
1 VAIO® computer system type.
2 Model number.
3 Serial number
*
.
Example:
4 Operating system.
5 Hardware feature or software application that has a problem. (See
“Resources for Additional Help and Support” on page 82, for the appropriate
software contact information.)
6 Brief description of the issue.
For VAIO® computers purchased in the U.S. and Canada, contact a Sony
Support representative at 1-888-476-6972.
* The serial number is located on the back panel of your computer. The serial number is on a white barcode
label.
83
Page 84

4-678-826-01 © 2003 Sony Electronics Inc. Printed in USA
 Loading...