

Page 1
3-866-873-13(1)
Ster eo
Turntable System
Operating Instructions
Mode d’emploi
OWNER‘S RECORD
The model and serial numbers are located at the rear. Record the serial number in the
space provided below. Refer to them whenever you call upon your Sony dealer regarding
this product.
Model No. PS-LX250H Serial No. _______________
GB
FR
PS-LX250H
© 1999 Sony Corporation
GB
1
Page 2
WARNING
Precautions
To prevent fire or shock
hazard, do not expose
the unit to rain or
moisture.
Do not install the
appliance in a confined
space, such as a bookcase
or built-in cabinet.
For the customers in the
U.S.A.
This symbol is intended to alert the user
to the presence of uninsulated
“dangerous voltage” within the
product’s enclosure that may be of
sufficient magnitude to constitute a risk
of electric shock to persons.
This symbol is intended to alert the user
to the presence of important operating
and maintenance (servicing) instructions
in the literature accompanying the
appliance.
On safety
• Before operating the unit, check that
the operating voltage of your unit is
identical with that of your local
power supply.
• Should any solid object or liquid fall
into the cabinet, unplug the unit and
have it checked by qualified
personnel before operating it any
further.
• Unplug the unit from the wall outlet
if it is not to be used for an extended
period of time. To disconnect the
cord, pull it out by the plug. Never
pull the cord itself.
• The unit is not disconnected from the
AC power source (mains) as long as it
is connected to the wall outlet, even if
the unit itself has been turned off.
• The nameplate indicating operating
voltage, power consumption, etc. is
located on the rear exterior.
On placement
• Place the unit on a level surface.
• Avoid placing the unit near electrical
appliances (such as a television, hair
dryer, or fluorescent lamp) which
may cause hum or noise.
• Place the unit where it will not be
subject to any vibration, such as from
speakers, slamming of doors, etc.
• Keep the unit away from direct
sunlight, extremes of temperature,
and excessive dust and moisture.
On repacking
Keep the carton and packing materials.
They provide an ideal container to
transport the unit.
CAUTION
You are cautioned that any changes or
modification not expressly approved in
this manual could void your authority
to operate this equipment.
If you have any question or problem
concerning your unit that is not covered
in this manual, please consult your
nearest Sony dealer.
For the customers in Canada
CAUTION:
TO PREVENT ELECTRIC SHOCK, DO
NOT USE THIS POLARIZED AC PLUG
WITH AN EXTENSION CORD,
RECEPTACLE OR OTHER OUTLET
UNLESS THE BLADES CAN BE FULLY
INSERTED TO PREVENT BLADE
EXPOSURE.
GB
2
Page 3

Welcome!
Thank you for purchasing the Sony
Stereo Turntable System. Before
operating the unit, please read this
manual thoroughly and retain it for
future reference.
TABLE OF CONTENTS
Getting Started
Unpacking 3
Assembling the Turntable 4
Hooking up the Turntable 4
Convention
The following icon is used in this
manual:
Indicates hints and tips for
making the task easier.
Operations
Playing a Record 5
Additional Information
Maintenance 6
Troubleshooting 7
Specifications 7
Parts and Controls 8
GB
Unpacking
Check that you received the following items with your turntable:
• Platter (with drive belt) (1)
• Rubber mat (1)
• Dust cover (with hinges) (1)
• 45 r/min adaptor (1)
GB
3
Page 4
Getting Started
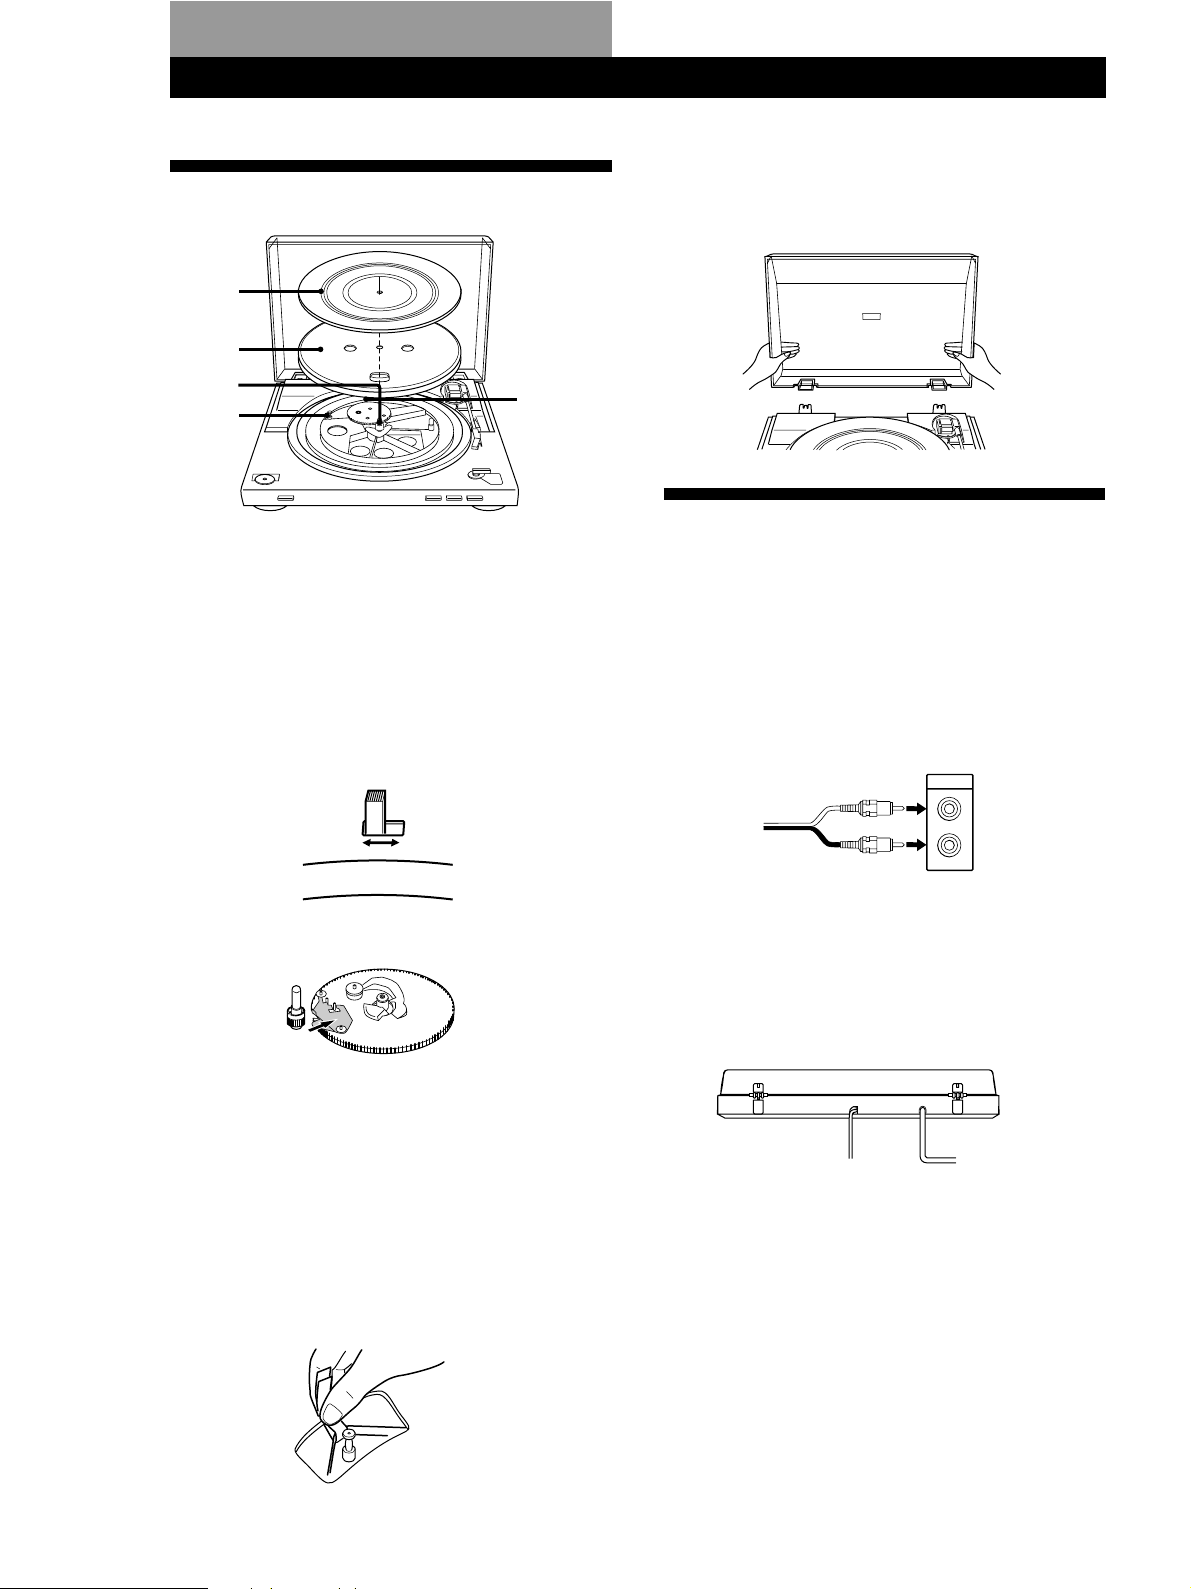
Assembling the Turntable
5
3
Installing the dust cover
Insert the hinges on the dust cover into the hinge
pockets on the rear of the cabinet.
2
4
1 Set the EQ switch according to the jacks of your
stereo system (amplifier).
• When your stereo system (amplifier) has
PHONO input jacks (connect to PHONO input
jacks)
nset to OFF.
• When your stereo system (amplifier) does not
have PHONO input jacks (connect to AUX,
VIDEO input jacks, etc.)
nset to ON.
ON OFF
2 Move the metallic parts inside the larger gear in
the direction of arrows.
1
Hooking up the Turntable
The phono cables come attached to the rear of the
cabinet.
1 Connect the cable with the white plug to the
white (L) jack and connect the cable with the red
plug to the red (R) jack. Make sure to insert the
plugs firmly into the jacks. If the plugs are not
inserted firmly, noise may be occured.
Amplifier
L
R
It is necessary to set the EQ switch according to
the connected jacks. For details, refer to step 1 in
“Assembling the Turntable”.
PHONO IN
L
R
Mains lead hookups
Connect the mains lead to an AC wall outlet after
completing all of the previous connections.
When the power is supplied after assembling or
moving the turntable
The turntable sometimes rotates and the torn arm
descends to the platter even if START is not pressed.
If this occurs, press STOP to return the tone arm to the
arm stand.
/ to a wall outlet
3 Carefully, place the platter on the spindle.
4 Using the ribbon, loop the drive belt around the
motor pully. After looping the belt, do not forget
to remove the ribbon.
5 Place the rubber mat on the platter.
GB
4
Page 5

Operations
Playing a Record
1
2
5
4
3
To stop playing
Press STOP.
To pause playback
Press the UP/DOWN button to raise the stylus off the
record.
To listen to a different part of the record
1 Press UP/DOWN button.
2 Move the tone arm to the position you desire.
3 Press UP/DOWN button.
The tone arm descends to the record.
UP/DOWNSTOP
1 Place a record on the platter.
Note
Place only one record on the platter at a time. If two or
more records are stacked on the platter, the stylus will
not make proper contact with the grooves and the
quality of reproduction will be impaired.
2 Press the Speed select button to select the speed.
3 Set the SIZE SELECTOR to 17 or 30.
4 Turn the protective cover to expose the stylus,
and close the dust cover.
To play a 17-cm record
Place the supplied 45 r/min adaptor on the spindle.
When you have finished using the adaptor, put it back
in the adaptor tray.
5 Press START.
The platter starts rotating.
6 Adjust the volume on your amplifier.
GB
5
Page 6

Additional Information
Maintenance
Stylus and Record Care
In order to prevent premature stylus and record wear,
the stylus and record should be cleaned before
playback.
To clean the stylus, brush it from back to front using a
good quality stylus cleaning brush. Do not clean the
stylus with your finger tip. When using a fluid stylus
cleaner, make sure not to moisten the stylus too much.
To clean your records, wipe thoroughly using a good
quality record cleaner.
Cleaning the Cabinet and Dust Cover
Clean the cabinet and dust cover periodically using a
soft dry cloth. If stains are difficult to remove, use a
cloth moistened with a mild detergent solution. Do not
use solvents such as alcohol, benzine or thinner, since
they will damage the finish.
Replacing the Stylus
The life expectancy of the stylus tip is about 500 hours.
To preserve maximum sound quality and avoid
damage to your records, we recommend replacing the
stylus within this time limit.
For a replacement stylus, consult your nearest Sony
dealer.
To replace the stylus
1 Turn off the amplifier.
2 Protect the stylus with the stylus cover.
Stylus cover
3 Grasp the stylus holder and pull it away from the
body of the cartridge.
Stylus holder
4 Insert the new stylus by pushing it into the
cartridge receptacle.
GB
6
Page 7

Additional Information
Troubleshooting
Before going through the check list below, first make
sure that:
• The power cord is securely connected.
• The speaker cords are securely connected.
Should any problem persist after you have made these
checks, consult your nearest Sony dealer.
The tone arm skips, skates or does not advance.
b The turntable is not level. Place the turntable on a
level surface.
b The record is dirty or scratched.
Clean the record with a commercially available
record cleaning kit, or replace the record.
Poor sound quality, excessive noise, intermittent sound,
etc…
b The stylus is dirty or worn. Remove dust on the
stylus using a stylus cleaning brush, or replace the
worn stylus (see page 6).
b Dust or dirt has collected on the record. Clean the
record using a good quality record cleaner.
Rumble or low-frequency howl*.
b The turntable is placed too close to speakers. Move
speakers away from the turntable.
Tempo is incorrect.
b Incorrect r/min. Set the r/min setting to match the
one indicated on the record. (Select “33” for 33 1/
r/min records or “45” for 45 r/min records.)
The drive belt is deteriorated.
b Replace the drive belt. For details, please make a
contact with Sony dealer.
Platter does not rotate.
b Make sure the power cord is inserted all the way into
an AC wall outlet.
The drive belt is broken.
b Replace the drive belt. For details, please make a
contact with Sony dealer.
Sound is too low or distorted.
b The turntable is not connected to the PHONO IN
inputs on the amplifier (see page 4).
3
Specifications
Motor and Platter
Drive system Belt-drive
Motor DC motor
Platter 295 mm dia. (aluminum, die-cast)
Speeds 33
Wow and flutter Less than 0.25% (WRMS)
Signal to noise ratio More than 50 dB (DIN-B)
Tone Arm
Type Dynamic balanced straight shaped with
Effective arm length 195 mm
General
Power requirements U.S.A. and Canada: 120 V AC, 60 Hz
Power consumption 2 W
Dimensions Approx. 420 x 100 x 342 mm (w/h/d)
Mass 2.7 kg
Supplied Accessories
45 r/min adaptor (1)
Platter (with drive belt) (1)
Rubber mat (1)
Dust cover (1)
Design and specifications are subject to change without notice.
1
/3 and 45 r/min, 2 speed
soft damping control
European countries: 230 V, 50/60 Hz
* This phenomenon, called “acoustic feedback”, occurs
when vibrations from the speakers are transmitted
through the air or via solid objects (such as shelves, a
cabinet, or the floor) to the turntable where they are
picked up by the stylus, amplified and reproduced
through the speakers.
GB
7
Page 8

Additional Information
Parts and Contr ols
1 EQ switch
2 Spindle
3 45 r/min adaptor
4 Speed select button
5 Rubber mat
6 Platter
7 Cartridge and headshell
8 START button
9 Insulator
1
2
0
Dust cover
!¡ Hinge
!™ Tone arm
!£ Arm stand
!¢ Finger lift
!∞ SIZE SELECTOR
!§ STOP button
!¶ UP/DOWN button
0
!¡
3
4
5
6
7
8
9
!™
!£
!¢
!∞
!§
!¶
GB
8
Page 9

GB
9
Page 10

AVERTISSEMENT
Précautions
Afin d’éviter tout risque
d’incendie ou
d’électrocution, ne pas
exposer cet appareil à la
pluie ou à l’humidité.
N’installez pas l’appareil
dans un espace confiné
comme dans une
bibliothèque ou un
meuble encastré.
A l’attention de la clientèle
canadienne
ATTENTION:
POUR PREVENIR LES CHOCS
ELECTRIQUES. NE PAS UTILISER
CETTE FICHE POLARISEE AVEC UN
PROLONGATEUR. UNE PRISE DE
COURANT OU UNE AUTRE SORITIE
DE COURANT. SAUF SI LES LAMES
PEUVENT ETRE INSEREES A FOND
SANS EN LAISSER AUCUNE PARTIE
A DECOUVERT.
Sécurité
• Avant d’utiliser la platine, vérifiez
que sa tension de fonctionnement est
identique à celle du courant secteur
local.
• Si un solide ou un liquide tombait
dans le coffret, débranchez la platine
et faites-la vérifier par un technicien
qualifié avant de la remettre en
service.
• Débranchez la platine de la prise
secteur si vous prévoyez de ne pas
l’utiliser pendant un certain temps.
Pour débrancher le cordon, tirez sur
la fiche et non pas sur le cordon.
• La platine n’est pas déconnectée de la
source d’alimentation secteur tant
qu’elle reste branchée sur la prise
secteur, même si elle a été mise hors
tension.
• La plaque signalétique indiquant la
tension de fonctionnement, la
consommation ou autres paramètres,
se trouve à l’arrière de la platine.
Installation
• Installez la platine sur une surface de
niveau.
• Evitez d’installer la platine près d’un
appareil électrique (télévision, sèchecheveux ou lampe fluorescente) qui
pourrait provoquer un
bourdonnement ou des parasites.
• Ne pas placer la platine dans un
endroit exposé à des vibrations, par
exemple près d’enceintes ou d’une
porte qui risque de claquer.
• Protégez la platine des rayons du
soleil, des températures extrêmes et
d’une poussière ou humidité
excessive.
Remballage
Ne pas jeter le carton ni les matériaux
d’emballage. Ils offrent une protection
idéale pour le transport de la platine.
Pour toute question ou tout problème
au sujet de cet appareil, non couverts
dans ce manuel, veuillez consulter votre
revendeur Sony le plus proche.
FR
2
Page 11

Bienvenue !
Merci d’avoir choisi cette platine
tourne-disque stéréo Sony. Avant de la
mettre en service, veuillez lire
attentivement le mode d’emploi et le
conserver pour toute référence future.
TABLE DES MA TIÈRES
Préparatifs
Déballage 3
Assemblage de la platine tourne-disque 4
Raccordement de la platine tourne-disque 4
Convention
L’icône suivante est utilisée dans le
mode d’emploi:
Elle indique des conseils et
suggestions qui facilitent les
opérations.
Fonctionnement
Lecture d’un disque 5
Informations complémentaires
Entretien 6
Guide de dépannage 7
Spécifications 7
Nomenclature (Dos)
FR
Déballage
Vérifiez si tous les éléments suivants se trouvent dans l’emballage:
• Plateau (avec courroie) (1)
• Contre-plateau (1)
• Couvercle (avec charnières) (1)
• Adaptateur 45 tours (1)
FR
3
Page 12

Préparatifs
Assemblage de la platine
tourne-disque
5
3
5
Posez le contre-plateau sur le plateau.
Installation du couvercle
Insérez les charnières sur le couvercle dans les gonds à
l’arrière de la platine.
2
4
1 Réglez le commutateur EQ selon les prises de
votre chaîne stéréo (amplificateur).
• Si votre chaîne stéréo (amplificateur) a des prises
d’entrée PHONO (connexion aux prises d’entrée
PHONO)
nréglez-le sur OFF.
• Si votre chaîne stéréo (amplificateur) n’a pas de
prises d’entrée PHONO (connexion aux prises
d’entrée AUX, VIDEO, etc.)
nréglez-le sur ON.
ON OFF
2 Déplacez les pièces métalliques à l’intérieur de la
roue la plus grosse dans le sens de la flèche.
1
Raccordement de la platine
tourne-disque
Les cordons à fiches cinch sont fixés à l’arrière de la
platine.
1 Raccordez le cordon avec la fiche blanche à la
prise blanche (L) et le cordon avec la fiche rouge à
la fiche rouge (R). Veillez à insérer les fiches à
fond dans les prises. Si elles ne sont pas insérées à
fond, du bruit pourra se produire.
Amplificateur
L
R
PHONO IN
L
R
Il est nécessaire de régler le commutateur EQ en
fonction des prises raccordées. Pour les détails,
voir l’étape 1 de “Assemblage de la platine
Si l’alimentation est fournie après l’assemblage ou
le changement de place de la platine tourne-disque
La platine tourne-disque peut se mettre à tourner et la
tête de lecture descendre sur le plateau bien que vous
n’avez pas appuyé sur START.
Si le cas se présente, appuyez sur STOP pour remettre le
bras de lecture sur le repose-bras.
tourne-disque”.
Raccordement au secteur
Raccordez le cordon secteur à une prise murale lorsque
toutes les connexions sont terminées.
3 Posez avec précaution le plateau sur l’axe.
/ à une prise
4 A l’aide du ruban, faites passer la courroie
derrière la poulie de moteur. Quand la courroie
est en place, n’oubliez pas de retirer le ruban.
FR
4
murale
Page 13

Fonctionnement
Lecture d’un disque
1
2
5
4
3
Pour arrêter la lecture
Appuyez sur STOP.
Pour interrompre la lecture
Appuyez sur la touche UP/DOWN pour relever le
bras du disque.
Pour écouter une autre partie du disque
1 Appuyez sur la touche UP/DOWN.
2 Amenez le bras de lecture à la position souhaitée.
3 Appuyez sur la touche UP/DOWN.
Le bras descend sur le disque.
UP/DOWNSTOP
1 Posez un disque sur le plateau.
Remarque
Ne poser qu’un seul disque à la fois sur le plateau. Si
vous posez plusieurs disques les uns sur les autres, le
saphir ne touchera pas correctement les sillons et la
reproduction du son ne sera pas bonne.
2 Appuyez sur la touche de sélection de la vitesse
pour sélectionner la vitesse.
3 Réglez le sélecteur SIZE SELECTOR sur 17 ou 30.
4 Tournez le cache qui protège le saphir pour
l’ouvrir et fermez le couvercle.
Pour écouter un 45 tours
Posez l’adaptateur 45 tours fourni sur l’axe.
Quand vous avez terminé, rangez l’adaptateur à
l’emplacement réservé.
5 Appuyez sur START.
Le plateau se met à tourner.
6 Ajustez le volume sur l’amplificateur.
FR
5
Page 14

Informations complémentaires
Entretien
Nettoyage du saphir et des disques
Pour éviter une usure prématurée du saphir et des
disques, nettoyez-les avant la lecture.
Pour nettoyer le saphir, brossez-le de l’arrière vers
l’avant avec une petite brosse spéciale saphirs de
bonne qualité. Ne nettoyez pas le saphir avec les
doigts. Si vous utilisez un liquide de nettoyage spécial,
n’imprégnez pas trop le saphir de liquide.
Pour nettoyer les disques, essuyez-les bien avec un
liquide spécial disques de bonne qualité.
Nettoyage du coffret et du couvercle
Nettoyez régulièrement le coffret et le couvercle avec
un chiffon doux et sec. Pour enlever les tâches rebelles,
utilisez un chiffon imprégné d’une solution détergente
neutre. Ne jamais utiliser de solvants, tels que de
l’alcool, de la benzine ou du diluant, qui pourraient
abîmer la finition.
Remplacement du saphir
La durée de vie d’un saphir est de 500 heures environ.
Pour obtenir le meilleur son possible et éviter
d’endommager vos disques, il est conseillé de respecter
cette limite.
Pour le remplacement du saphir, adressez-vous à votre
revendeur Sony.
Pour remplacer le saphir
1 Mettez l’amplificateur hors tension.
2 Protégez le saphir avec le cache de saphir.
Cache de saphir
3 Saisissez le bloc saphir et sortez-le de la
cartouche.
Support de
saphir
4 Insérez le nouveau saphir dans la douille de la
cartouche.
FR
6
Page 15

Informations complémentaires
Guide de dépannage
Avant de passer en revue la liste suivante, vérifiez que:
• Le cordon d’alimentation est correctement branché.
• Les cordons des enceintes sont correctement
branchés.
Si un problème persiste après les vérifications
suivantes, consultez votre revendeur Sony.
La tête de lecture glisse, patine ou n’avance pas.
b La platine n’est pas installée de niveau. Installez-la de
niveau.
b Le disque est sale ou rayé.
Nettoyez le disque avec un kit de nettoyage en vente
dans le commerce ou changez de disque.
Son de mauvaise qualité, bruit excessif, son intermittent,
etc.
b Le saphir est sale ou usé. Enlevez la poussière sur le
saphir avec une petite brosse douce, ou remplacez le
saphir usé (voir page 6).
b De la poussière ou saleté s’est accumulée sur le
disque. Nettoyez le disque avec un liquide de
nettoyage de bonne qualité, spécial disques.
Bourdonnement ou hurlement de basse fréquence*.
b La platine est installée trop près des enceintes.
Eloignez les enceintes de la platine.
Le tempo n’est pas correct.
b Vous n’avez pas choisi la vitesse correspondant au
disque. (Sélectionnez “33” pour les disques 33 1/
tours et “45” pour les 45 tours.)
La courroie est abîmée.
b Remplacez-la. Pour les détails, veuillez contacter
votre revendeur Sony.
Le plateau ne tourne pas.
b Assurez-vous que le cordon d’alimentation est bien
inséré dans la prise murale.
La courroie s’est rompue.
b Remplacez-la courroie. Pour les détails, veuillez
contacter votre revendeur Sony.
Le son est trop faible ou déformé.
b La platine n’est pas raccordée aux entrées PHONO de
l’amplificateur (voir page 4).
3
Spécifications
Moteur et plateau
Système d’entraînement Courroie
Moteur Moteur CC
Plateau 295 mm de diamètre, alliage
Vitesses 2 vitesses, 33
Pleurage et scintillement Inférieur à 0,25% (WRMS)
Rapport signal sur bruit Supérieur à 50 dB (DIN-B)
Bras de lecture
Type Bras droit à équilibre dynamique avec
Longueur effective du bras
Généralité
Alimentation électrique Modèle pour les Etats-Unis et le
Consommation 2 W
Dimensions Env. 420 x 100 x 342 mm (l/h/p)
Poids Env. 2,7 kg
Accessoires fournis
Adaptateur 45 tours (1)
Plateau avec courroie (1)
Contre-plateau (1)
Couvercle (1)
La conception et les spécifications peuvent être modifiées sans
préavis.
d’aluminium moulé
réglage doux de l’amortissement
195 mm
Canada: secteur 120 V, 60 Hz
Modèle pour les pays européens:
secteur 230 V, 50/60 Hz
1
/3 tpm, 45 tpm
*
Ce phénomène est appelé “rétroaction acoustique” et il se
produit quand des vibrations provenant des enceintes sont
transmises par l’air ou des objets solides (étagère, coffret,
sol, etc.) à la platine où elles sont captées par le saphir,
amplifiées et reproduites à nouveau par les enceintes.
FR
7
Page 16

Informations complémentaires
Nomenclature
1 Commutateur d’égaliseur (EQ)
2 Axe
3 Adaptateur 45 tours
4 Sélecteur de vitesse
5 Contre-plateau
6 Plateau
7 Cartouche et tête de lecture
8 Touche de marche (START)
9 Pied isolant
1
2
0 Couvercle
!¡ Charnière
!™ Bras de lecture
!£ Repose-bras
!¢ Onglet
!∞ Sélecteur de disque SIZE SELECTOR
!§ Touche STOP
!¶ Touche UP/DOWN
!º
!¡
3
4
5
6
7
8
9
!™
!£
!¢
!∞
!§
!¶
Sony Corporation Printed in China
FR
8
 Loading...