

Page 1
Visual Communication Camera
PCGA-UVC11A
Operating Instructions / Manual de instrucciones
/
IMPORTANTE!
POR FAVOR LEA DETALLADAMENTE ESTE MANUAL DE
INSTRUCCIONES ANTES DE CONECTAR Y OPERAR ESTE
EQUIPO.
RECUERDE QUE UN MAL USO DE SU APARATO PODRIA
ANULAR LA GARANTIA.
Page 2

English
WARNING
To prevent fire or shock hazard,
do not expose the unit to rain or
moisture.
Owner’s Record
The model number and the serial number are located
on the bottom of the camera. Record the serial
number in the space provided below. Refer to this
number whenever you call your Sony dealer
regarding this product.
Model No. PCGA-UVC11A
Serial No. ________________________________
For customers in the U.S.A.
This equipment has been tested and found to comply
with the limits for a Class B digital device, pursuant
to Part 15 of the FCC Rules. These limits are
designed to provide reasonable protection against
harmful interference in a residential installation. This
equipment generates, uses, and can radiate radio
frequency energy and, if not installed and used in
accordance with the instructions, may cause harmful
interference to radio communications. However,
there is no guarantee that interference will not occur
in a particular installation. If this equipment does
cause harmful interference to radio or television
reception, which can be determined by turning the
equipment off and on, the user is encouraged to try to
correct the interference by one or more of the
following measures:
– Reorient or relocate the receiving antenna.
– Increase the separation between the equipment and
receiver.
– Connect the equipment into an outlet on a circuit
different from that to which the receiver is
connected.
– Consult the dealer or an experienced radio/TV
technician for help.
The shielded interface cable recommended in this
manual must be used with this equipment in order to
comply with the limits for a digital device pursuant to
subpart B of Part 15 of the FCC Rules.
You are cautioned that any changes or modifications
not expressly approved in this manual could void
your authority to operate this equipment.
For questions regarding your product or for the Sony
Service Center nearest you, call 1-888-476-6972 in
the United States or 1-800-961-7669 in Canada.
The number below is for FCC related matters only.
Declaration of Conformity
Trade Name: SONY
Model No.: PCGA-UVC11A
Responsible Party: Sony Electronics Inc.
Address: 16450 W. Bernardo Dr,
Telephone No.: 858-942-2230
The device complies with Part 15 of the FCC
Rules. Operation is subject to the following two
conditions: (1) This device may not cause
harmful interference, and (2) this device must
accept any interference received, including
interference that may cause undesired operation.
San Diego, CA 92127
U.S.A.
For customers in Canada
This Class B digital apparatus complies with
Canadian ICES-003.
Pour les utilisateurs au Canada
AVERTISSEMENT
Pour prévenir tout risque
d’incendie ou d’électrocution,
gardez cet appareil à l’abri de la
pluie et de l’humidité.
Cet appareil numérique de la classe B est conforme à
la norme NMB-003 du Canada.
GB
2
Page 3

• Sony, VAIO, , and the Eco Info logo
are trademarks of Sony Corporation.
• Microsoft and Windows are registered trademarks
of Microsoft Corporation in the United States and/
or other countries.
• All other names of systems, products, and services
are trademarks of their respective owners.
• In this manual, the ™ or ® marks are not
specified.
• In this manual, Microsoft® Windows® 2000
Professional is referred to as Windows 2000.
• In this manual, Microsoft® Windows® Millennium
Edition is referred to as Windows Me.
• In this manual, Microsoft® Windows® XP Home
Edition, Microsoft® Windows® XP Professional
and Microsoft® Windows® XP Media Center
Edition* are referred to as Windows XP.
* Support for Microsoft® Windows® XP Media
Center Edition is provided only in the U.S.A. and
Canada.
Table of Contents
Before Using This Product .................... 4
Introduction ........................................... 4
Supplied Accessories............................. 5
Names of Parts.......................................6
Setting Up the Camera...........................7
Installing the driver and
the software .................................. 7
Installing the Wireless LAN
driver .......................................... 12
Connecting the Camera ....................... 14
When mounting directly ............... 14
When you cannot mount
directly ....................................... 15
Using the mounting adapter.....15
Fastening using an adhesive
sheet.......................................17
Setting horizontally .................18
Attaching the camera to a
tripod ..................................... 19
Disconnecting the camera ............20
Using the Camera ................................ 21
Capturing images with the
camera ........................................ 21
Capturing images backward ......... 23
Setting the camera microphone
volume........................................23
If you cannot record with the
camera microphone .................... 24
Precautions ..........................................26
Maintenance ........................................27
Getting Help ........................................ 28
Specifications ......................................29
Troubleshooting...................................30
GB
GB
3
Page 4

Before Using This Product
This camera is designed for use with Sony VAIO computers running the
preinstalled Windows 2000, Windows Me, or Windows XP operating
systems, or VAIO computers that are Windows XP Ready and have been
upgraded with Windows XP upgrade software provided by Sony
Corporation (hereafter referred to as “computers upgraded to the Windows
XP operating system”). The camera is not designed for use with any other
computer.
Introduction
You can use this camera to capture still images and movies, which are then
saved on your computer. Using the Network Smart Capture software allows
you to share images and movies captured with the camera with your friends
and family through e-mail. You can also capture still images with the Web
Camera mode of the camera at the interval that you specify. These images
can be uploaded to a Web site in real time. You can also use the camera to
video chat with Windows Messenger or NetMeeting.
z Hint
For details, refer to the Network Smart Capture software help.
GB
4
Page 5
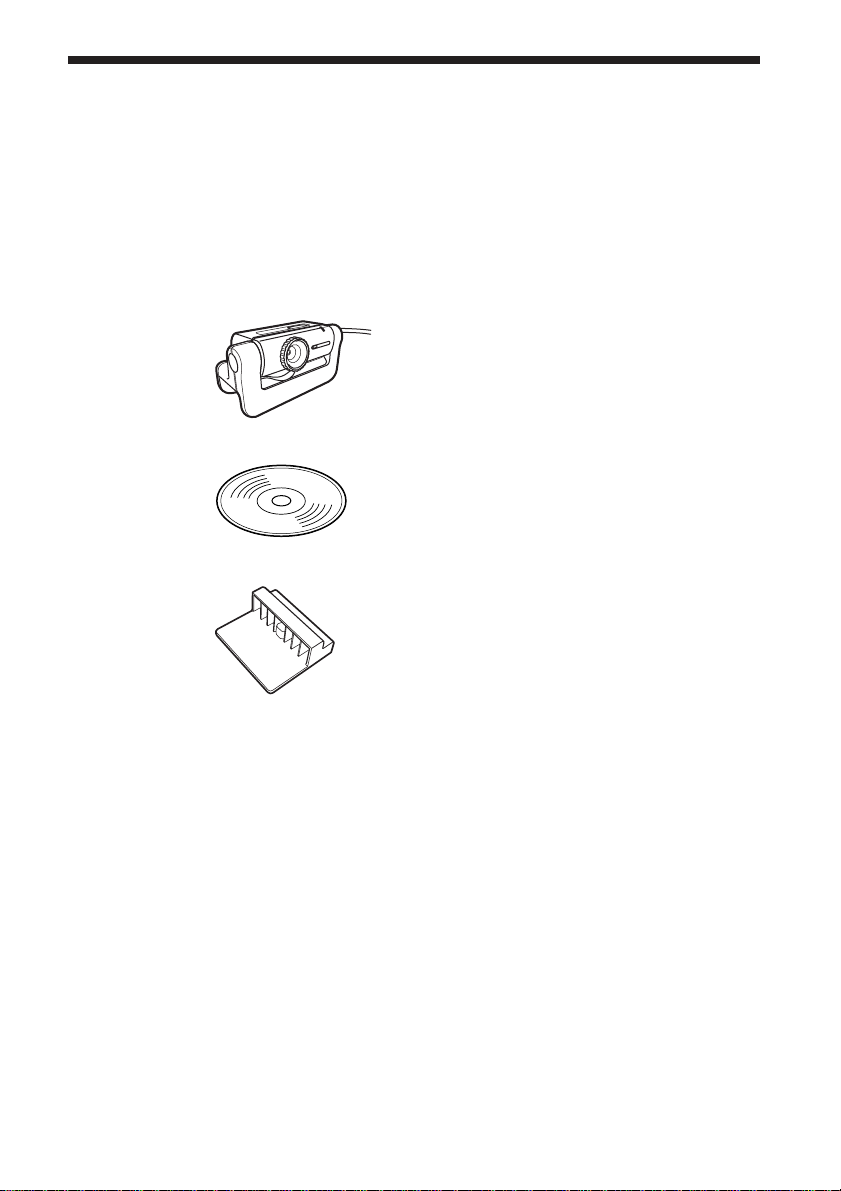
Supplied Accessories
Remove the camera from the box and make sure that the box contains the
accessories listed below.
If any of the accessories are missing, contact the Sony dealer where you
purchased this product or a Sony service representative in your area.
• Visual Communication Camera (PCGA-UVC11A)
• PCGA-UVC11A installation disc (CD-ROM)
• Mounting adapter
• Adhesive sheet (Large/medium/small)
• Operating instructions (this document)
• Warranty*
• End User Software License Agreement
* The accessories included vary according to country and region.
GB
5
Page 6
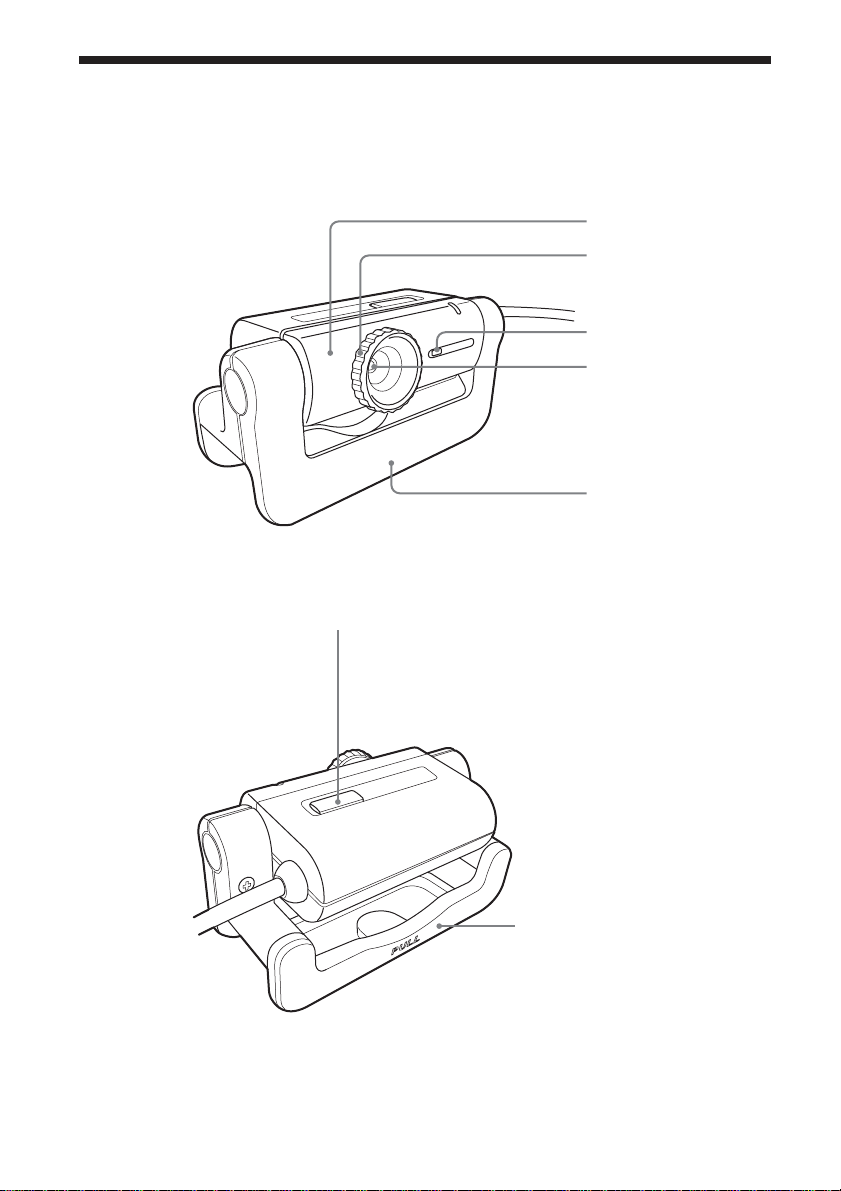
Names of Parts
Front
Rear
CAPTURE button
Camera
Focus ring
Microphone
Lens
Arm plate
Arm
GB
6
Page 7

Continued on next page
Setting Up the Camera
Before using the camera, you must install the required driver and software
on your computer using the supplied installation disc.
Notes
• Make sure that the optical drive (CD-ROM or DVD drive) is available for use on your
computer. In this document, the CD-ROM drive or other disk drive is referred to as “the
CD-ROM drive.” For details on how to connect an external CD-ROM drive, refer to the
manuals provided with your computer or the CD-ROM drive.
• Before connecting the camera to your computer, make sure that you install the driver
and the software as explained in this document.
• If the “Add New Hardware Wizard” dialog box appears, click “Cancel”, then
disconnect the camera from your computer and reinstall it.
• The preinstalled Wireless LAN driver for Sony VAIO computer models
PCG-SRX55TC/SRX55TH/SRX55TL/VX89/VX89P is incompatible when using the
PCGA-UVC11A USB camera.
For proper use, Sony recommends installing and using the Wireless LAN driver
supplied with the PCGA-UVC11A USB camera. Follow the instructions below. In the
U.S.A, for more information visit http://www.sony.com/pcsupport.
Installing the driver and the software
Install the PCGA-UVC11A device driver and the Network Smart Capture
software.
Note
On a computer running the Windows 2000 operating system, log on as Administrator
before installing the driver and the software. On a computer running the Windows XP
operating system, log on as an administrator before installing the driver and the software.
1 Turn on the computer. The Windows operating system
starts. Close all other programs and insert the supplied
installation disc into the CD-ROM drive.
The installation program starts automatically and the “Sony Visual
Communication Camera PCGA-UVC11A Application Installer Setup”
screen appears.
2 Select your area from the list.
GB
7
Page 8

3 Make sure that the software that you want to install is
selected, and then click “Next”.
z Hint
If the software is already installed, the check box does not appear.
4 Follow the on-screen instructions. Click “Next” or “Previous”
until the setup finishes and the display closes.
z Hint
When the installation is complete, a message prompting you to restart your computer
may appear. If it does, click “Yes”.
5 Connect the camera to your computer.
The necessary driver and software are automatically installed. If the
message prompting you to restart your computer appears, click “Yes”.
After your Windows operating system restarts, you can begin using the
camera.
Checking that the driver is installed
1 Connect the camera to your computer.
For connection details, see “Connecting the Camera” (page 14).
2 With the Windows XP operating system, click “Start”,
right-click “My Computer”, and then click “Properties”.
The “System Properties” dialog box appears. Go to Step 4.
For operating systems other than the Windows XP operating
system, click “Start”, point to “Settings”, and then click
“Control Panel”.
“Control Panel” appears.
3 Double-click “System”.
The “System Properties” dialog box appears.
4 Click the “Hardware” tab, and then click the “Device
Manager” button. Your operating system may require you to
click the “Device Manager” tab.
The “Device Manager” window appears.
GB
8
Page 9

Continued on next page
5 Click the plus symbol (+) to the left of “Imaging Device” in
the “Device Manager” window.
If “Sony Visual Communication Camera PCGA-UVC11” appears, the
driver is properly installed.
6 Click the plus symbol (+) to the left of “Sound, Video, and
Game Controllers” in the “Device Manager” window.
If “Sony USB Microphone (PCGA-UVC11)” appears, the driver is
properly installed.
7 Click the plus symbol (+) to the left of “USB Controllers”, or
“Universal Serial Bus controllers” on some systems, in the
“Device Manager” window.
If “Sony Visual Communication Camera (PCGA-UVC11)” appears,
the driver is properly installed.
8 Close the “Device Manager” window. Click “OK” in the
“System Properties” dialog box. Your operating system may
require you to click “OK” in the “System Properties” dialog
box.
Note
If a driver is not displayed or an exclamation mark (!) appears next to it, the driver is not
installed properly. Follow the steps for “Uninstalling a driver,” and after you have deleted
the driver, reinstall it.
Uninstalling the driver
If the driver is not installed correctly, follow the steps below to uninstall,
and then reinstall the driver.
Notes
• On a computer running the Windows 2000 operating system, log on as Administrator
before uninstalling the driver. On a computer running the Windows XP operating
system, log on as an administrator before uninstalling the driver.
• Before uninstalling the driver, close the software application used with the camera.
1 Connect the camera to your computer.
For connection details, see “Connecting the Camera” (page 14).
9
GB
Page 10

2 With the Windows XP operating system, click “Start”,
right-click “My Computer”, and then click “Properties”.
The “System Properties” dialog box appears. Go to Step 4.
For operating systems other than the Windows XP operating
system, click “Start”, point to “Settings”, and then click
“Control Panel”.
“Control Panel” appears.
3 Double-click “System”.
The “System Properties” dialog box appears.
4 Click the “Hardware” tab, and then click the “Device
Manager” button. Your operating system may require you to
click the “Device Manager” tab.
The “Device Manager” window appears.
5 Click the plus symbol (+) to the left of “USB Controllers”, or
“Universal Serial Bus controllers” on some systems, in the
“Device Manager” window.
6 Click “Sony Visual Communication Camera (PCGA-UVC11)”
or “USB Composite Device”, and then click “Uninstall”or
“Remove”.
The “Confirm Device Removal” dialog box appears.
7 Click “OK”.
8 Close the “Device Manager” window. Click “OK” in the
“System Properties” dialog box. Your operating system may
require you to click “OK” in the “System Properties” dialog
box.
Uninstalling the software
If you do not want to use the Network Smart Capture software or need
more space on the hard disk of your computer, you can remove the software
by performing the following procedure.
Note
On a computer running the Windows 2000 operating system, log on as Administrator
before uninstalling the software. On a computer running the Windows XP operating
system, log on as an administrator before uninstalling the software.
GB
10
Page 11

Continued on next page
1 Close the Network Smart Capture software.
2 With the Windows XP operating system, click “Start”, and
then click “Control Panel”.
With other operating systems, click “Start”, point to
“Settings”, and then click “Control Panel”.
“Control Panel” appears.
3 With the Windows XP operating system, click
“Add or Remove Programs”.
With other operating systems, double-click “Add/Remove
Programs”.
The “Add or Remove Programs” window, “Add/Remove Programs”
window, or “Add/Remove Program Properties” dialog box appears.
4 With the Windows XP and Windows 2000 operating
systems, in the list of installed software, select “Network
Smart Capture”, and then click “Change/Remove”.
With the Windows Me operating system, in the list of
installed software, select “Network Smart Capture”, and then
click “Add/Remove”.
A confirmation message appears.
5 Click “OK”.
Follow the instructions on the screen to complete the procedure.
11
GB
Page 12

Installing the Wireless LAN driver
Only necessary for the PCG-SRX55TC/SRX55TH/SRX55TL/VX89/
VX89P.
Note
Do not perform the following procedure with models other than the ones mentioned
above.
1 Click “Start”, right-click “My Computer”, and then click
“Properties”.
The “System Properties” dialog box appears.
2 Click the “Hardware” tab, and then click the “Device
Manager” button.
The “Device Manager” window appears.
3 Click the plus symbol (+) to the left of “Network adapters”,
right-click “ORiNOCO Mini PCI Card”, and then click “Update
Driver” on the shortcut menu.
The hardware update wizard starts.
4 In the dialog box, select “Install from a list or specific location
(Advanced)”, and then click “Next”.
12
5 Select “Don’t search. I will choose the driver to install”, and
then click “Next”.
6 In “Network adapters”, click “Have Disk”.
7 Click “Browse”, select the UPDATE\WirelessLAN folder on
the CD-ROM, and then click “OK”.
8 Click “Next”.
9 Click “Finish”.
GB
Page 13

Confirming the installation of the Wireless LAN driver
1 Click “Start”, right-click “My Computer”, and then click
“Properties”.
The “System Properties” dialog box appears.
2 Click the “Hardware” tab, and then click the “Device
Manager” button.
The “Device Manager” window appears.
3 Click the plus symbol (+) to the left of “Network adapters”,
right-click “ORiNOCO Mini PCI Card”, and then click “Update
Driver” on the shortcut menu.
4 Click the “Driver” tab.
If the version of the driver is “7.16.0.189”, then it was installed
properly.
13
GB
Page 14
Connecting the Camera
This section describes how to connect the camera to your computer.
Notes
• When using the camera for the first time, make sure that you install the driver and the
software before connecting the camera to your computer. For installation details, see
“Setting Up the Camera” (page 7).
• Do not connect or disconnect the camera’s USB cable while your Windows operating
system is starting or shutting down. Doing so may cause the camera or your computer
to malfunction.
• Do not disconnect and then quickly reconnect the camera’s USB cable. Doing so may
result in unstable operation of your computer.
• This camera is designed to constantly secure a fixed amount of USB bandwidth for data
transfer to display high-quality images. Therefore, if you use a USB hub to connect
multiple USB devices simultaneously, the amount of bandwidth available for data
transfer may be insufficient to support proper operation.
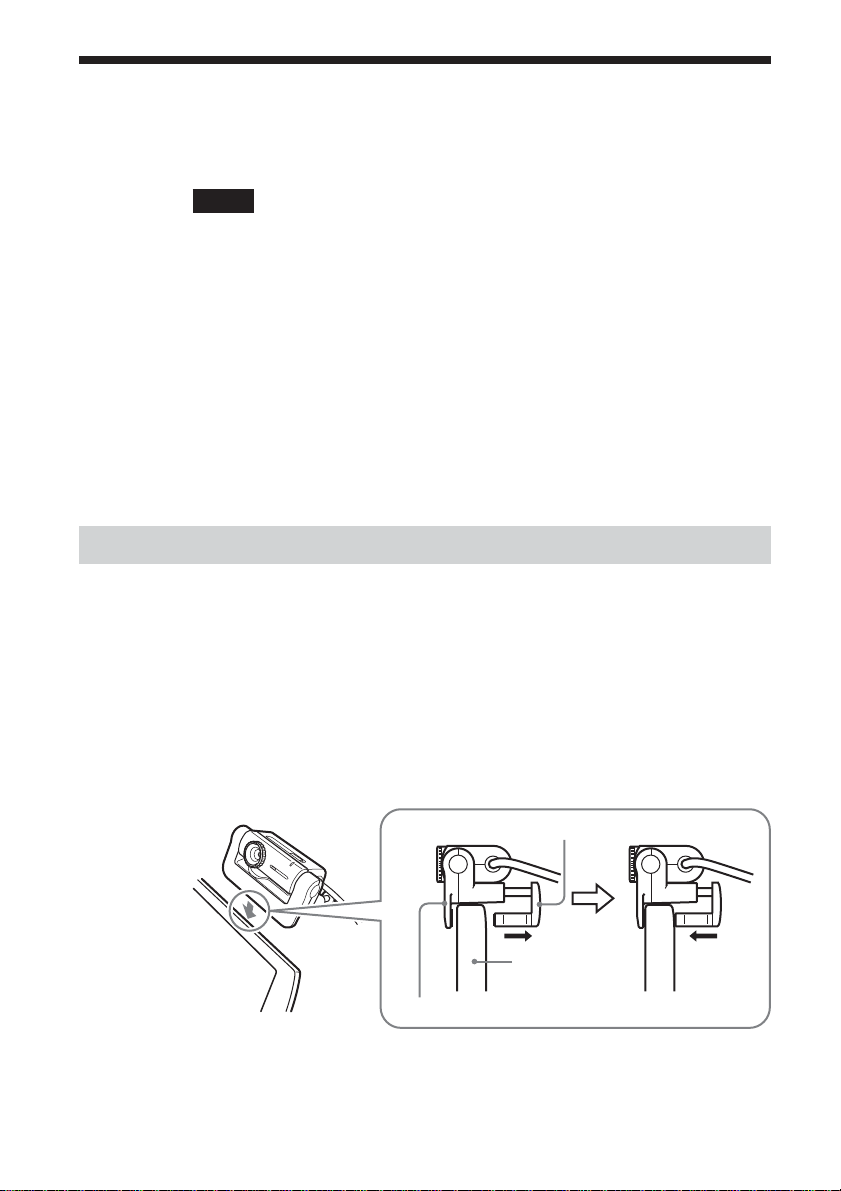
When mounting directly
To mount to a computer that use a raised type display panel, such as those
found on notebook computer or LCD unitized desktop model, the camera
can be mounted directly by fitting the camera arm onto the display panel, as
shown below.
14
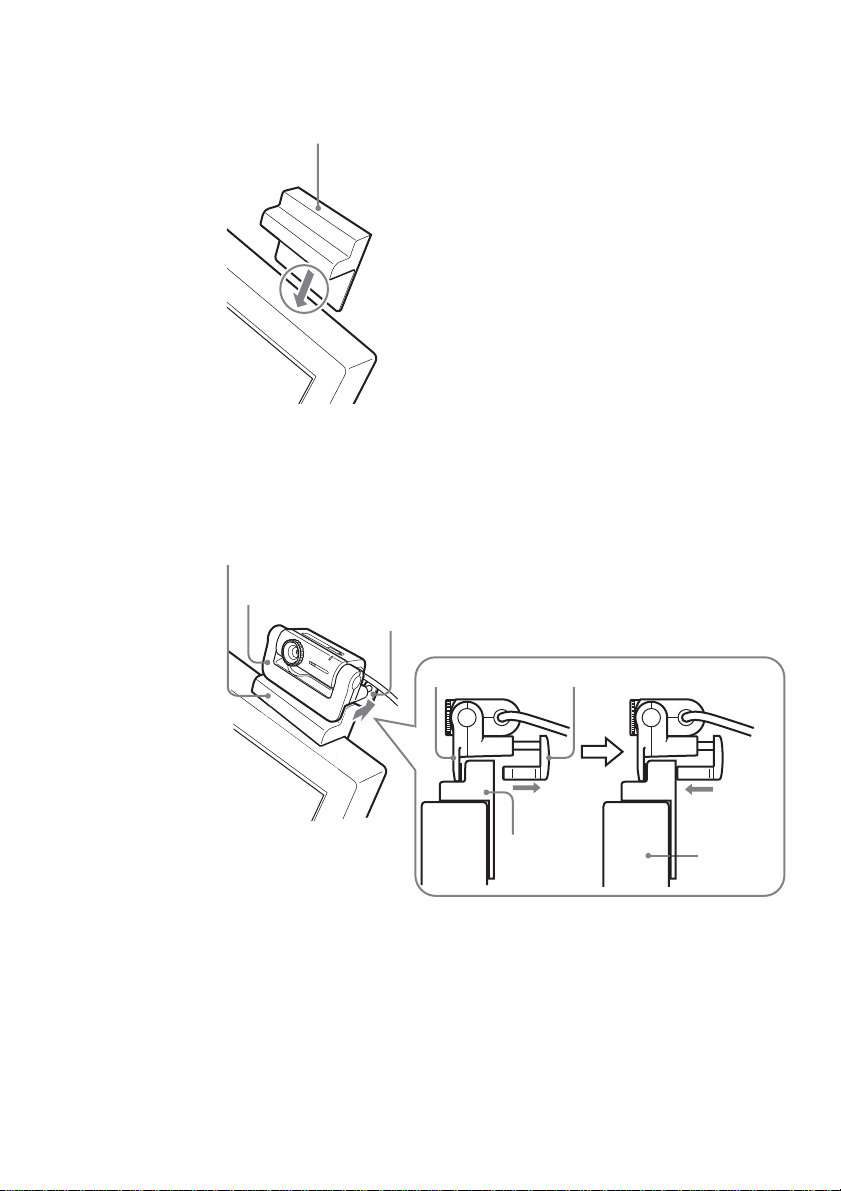
1 Mount the camera onto the display panel.
Holding the arm plate, pull out the rear arm as shown in the illustration
below, and hang the camera on top of the display panel.
Arm
Display Panel
Arm plate
GB
Page 15
Continued on next page
2 Connect the camera USB cable to the computer’s USB
connector.
Refer to the operating instructions manual that came with your
computer or the electronic manual to locate the position of the USB
connector on your computer.
z Hint
Depending on the type of computer you use, this camera sometimes cannot be connected
directly.
If that is the case, see the section “When you cannot mount directly” below for details.
When you cannot mount directly
If the camera cannot be mounted directly by its arm, mount the camera
using one of the steps outlined below.
• Using the mounting adapter (see page 15)
• Fastening using an adhesive sheet (see page 17)
• Setting horizontally (see page 18)
• Attaching the camera to a tripod (see page 19)
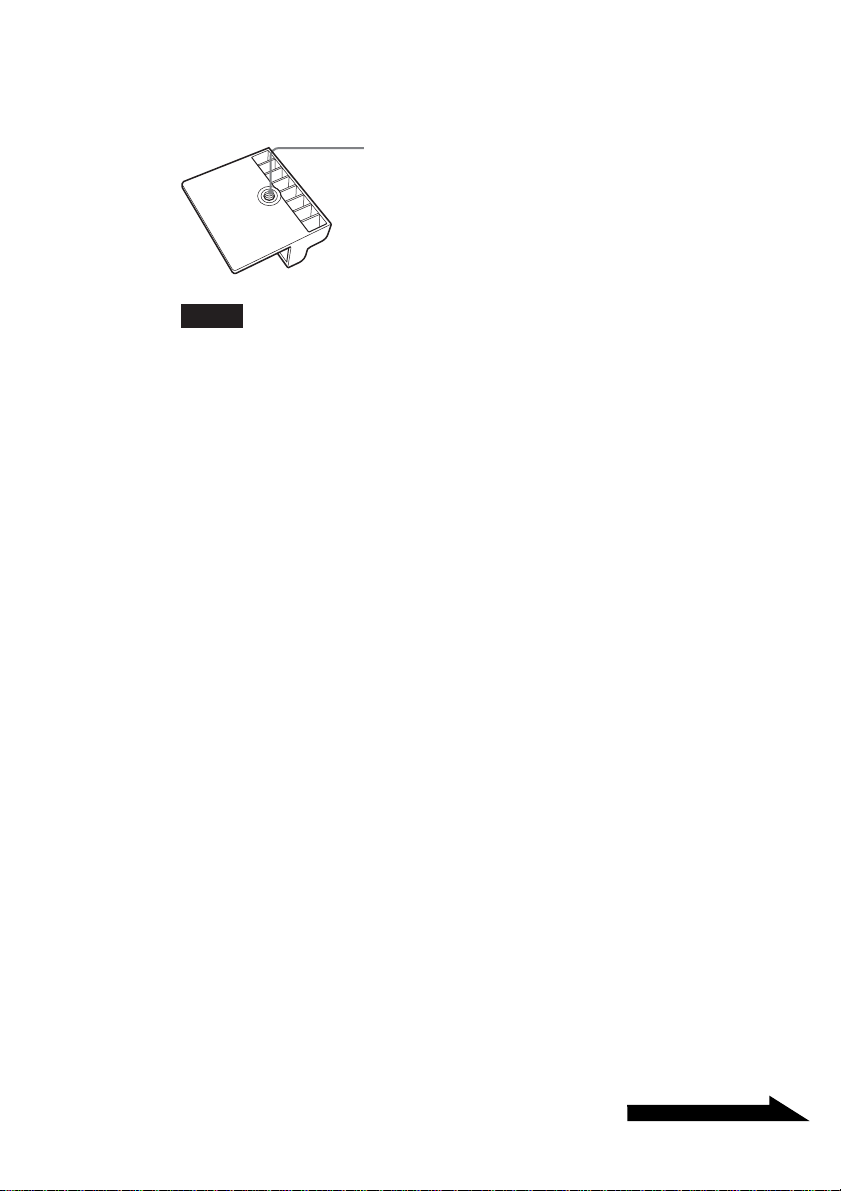
Using the mounting adapter
If your computer does not allow the camera to be mounted directly because
the display panel is too thick, then the camera cannot be mounted using its
arm. In this case, use the mounting adapter and adhesive sheet (large and
medium) as shown below.
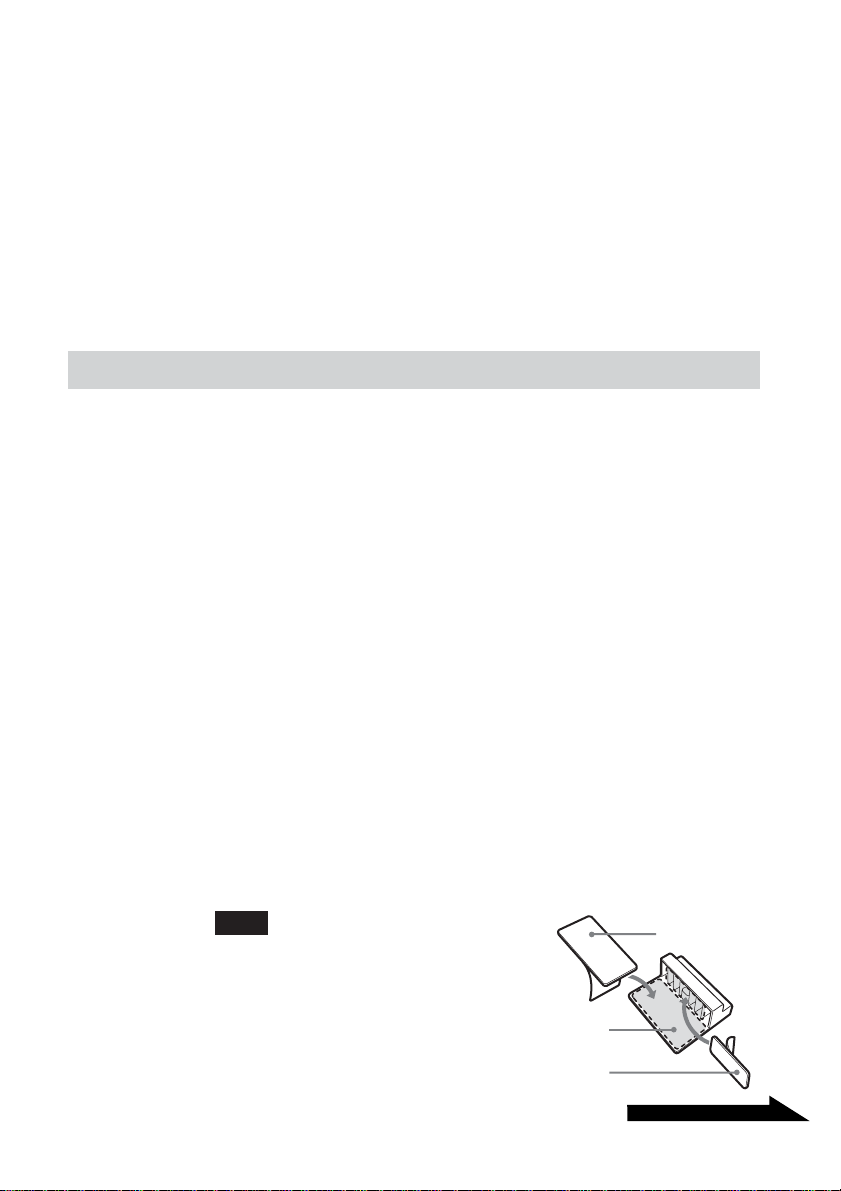
1 Apply the adhesive sheet (large and medium) to the
mounting adapter.
Peel off the cover of the two sided tape and apply the adhesive sheet
(large and medium) to the mounting adapter. Then, peel off the
protective cover on the top of the adhesive sheet.
Note
When applying the adhesive sheet to the mounting
adapter, make sure that the camera and the mounting
adapter are free of dust and dirt.
Mounting adapter
Adhesive sheet
(medium)
Adhesive sheet
(large)
GB
15
Page 16
2 Fasten the mounting adapter to location where the camera
will be mounted.
Mounting adapter
3 Mount the camera to the mounting adapter.
Holding the arm plate, pull out the rear arm as shown in the illustration
below, and hang the camera on top of the mounting adapter.
Mounting
adapter
Arm plate
Arm
16
Mounting
adapter
Arm
Display
Panel
Arm plate
4 Connect the camera USB cable to the computer’s USB
connector.
Refer to the manuals provided with your computer to locate the
position of the USB connector on your computer.
GB
Page 17
Continued on next page
Fastening using an adhesive sheet
The camera can be fastened to any flat surface, such as the top of an LCD
monitor, using the supplied adhesive sheet (small).
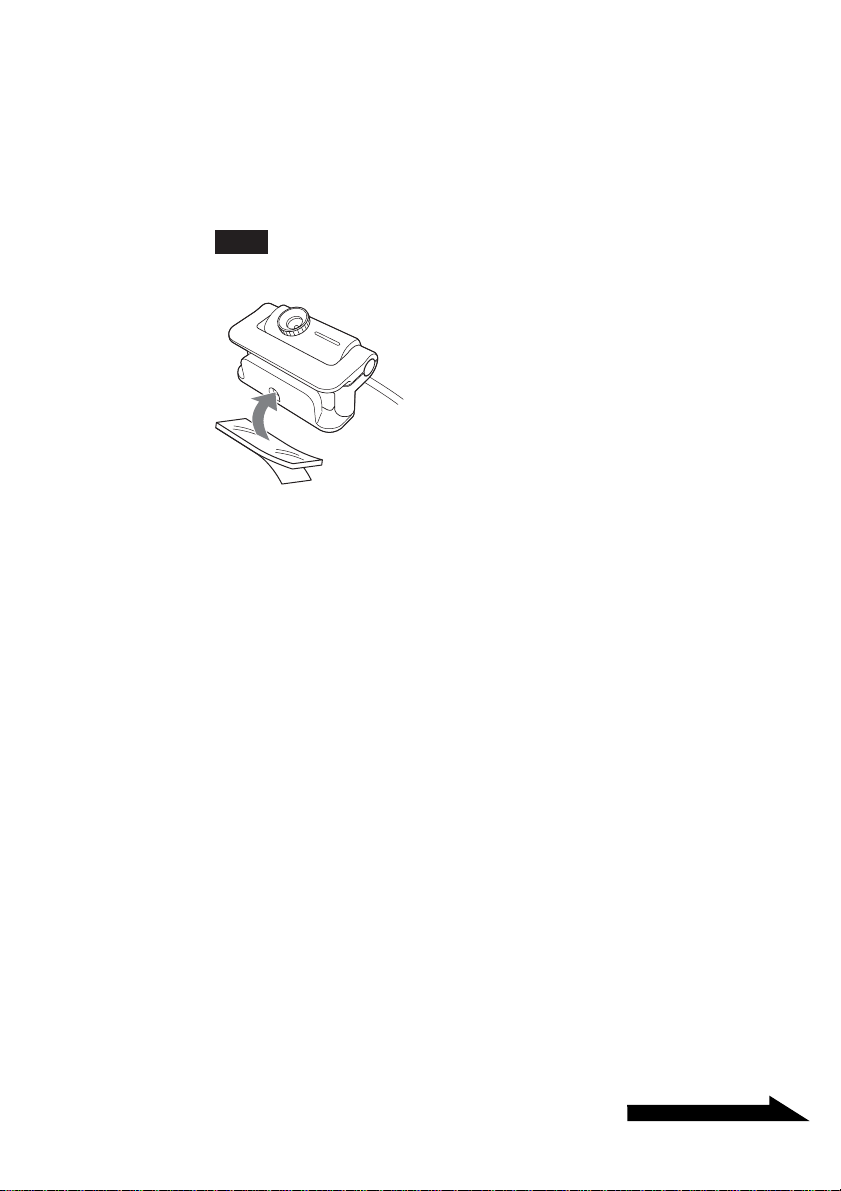
1 Peel off the cover of the two sided tape and apply the
adhesive sheet (small) to the bottom side of the camera.
Note
When applying the adhesive sheet, make sure that the camera is free of dust and dirt.
2 Peel off the protective cover on the top of the adhesive sheet
and apply the camera to the location to mount the camera.
3 Connect the camera USB cable to the computer’s USB
connector.
Refer to the manuals provided with your computer to locate the
position of the USB connector on your computer.
17
GB
Page 18
Setting horizontally
Use the mounting adapter as shown below to set the camera horizontally on
a flat and steady surface, such as the CRT display or the top of your
computer.
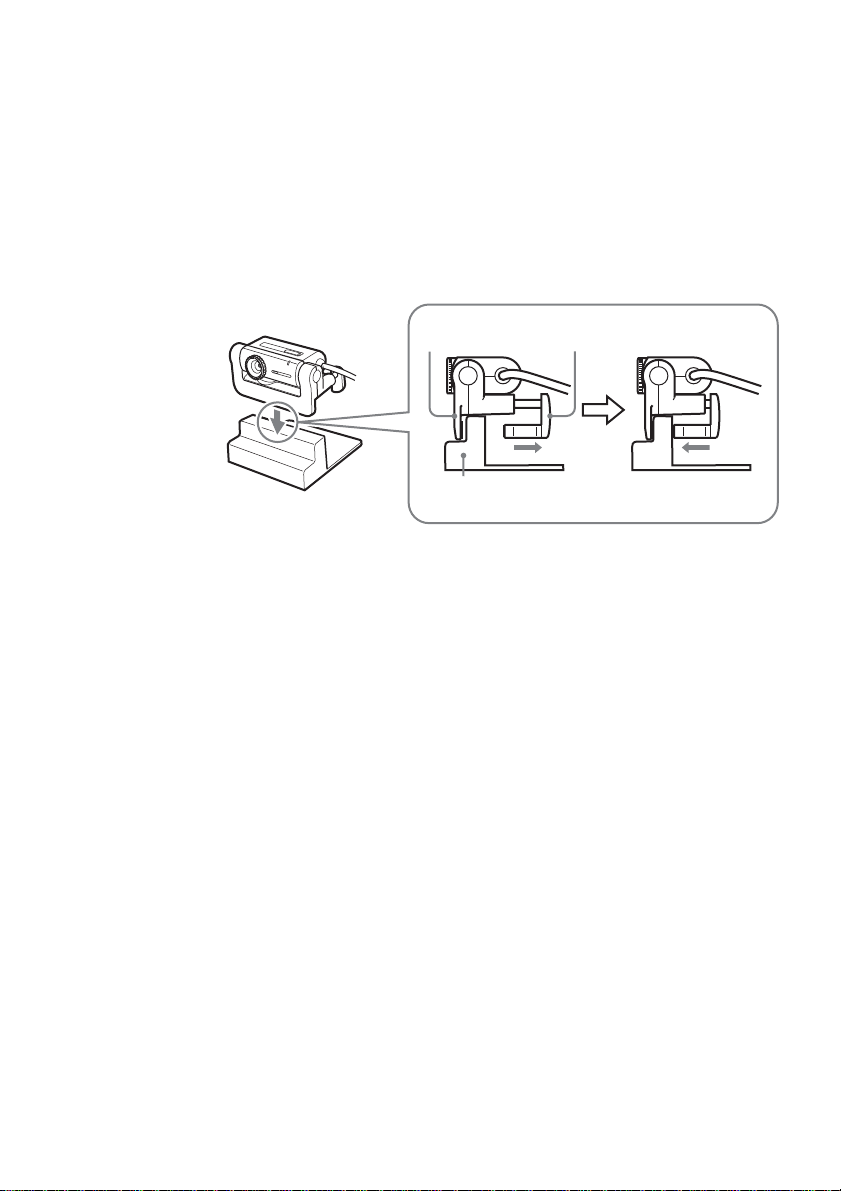
1 Attach the camera to the mounting adapter.
Holding the arm plate, pull out the rear arm as shown in the illustration
below, and attach the camera to the mounting adapter. Make sure that
you place the mounting adapter on a level, stable surface.
2 Connect the camera USB cable to the computer’s USB
connector.
Refer to the manuals provided with your computer to locate the
position of the USB connector on your computer.
ArmArm plate
Mounting adapter
18
GB
Page 19
Continued on next page
Attaching the camera to a tripod
You can attach the camera to a tripod to capture images.
Tripod screw
Notes
• Do not walk around with the camera when it is attached to the tripod. If
the camera falls, it could be damaged.
• Do not use a tripod with a screw that exceeds 0.28 inches (7 mm) in
length. If you use a tripod with a screw longer than 0.28 inches (7 mm) in
length, the camera will not be stable when it is attached, and it may be
damaged.
• When attaching the camera, first make sure that the tripod is stable, then
attach the camera so that it is horizontal. If the camera is tilted, it could
fall.
• When adjusting the position of the camera, protect it from falling by
supporting both the tripod handle and the camera with your hands.
• When adjusting the camera angle, focus, or positioning of the USB cable,
make sure you support the camera with your hand.
• When operating the capture button on the camera, make sure you support
the camera with your hand.
• Make sure you use a tripod that is big enough to support the weight of the
camera without tipping.
1 Attach the tripod screw hole on the mounting adapter to the
tripod screw.
2 Attach the camera to the mounting adapter.
3 Connect the camera USB cable to the computers USB
connector.
Refer to the manuals provided with your computer to locate the
position of the USB connector on your computer.
19
GB
Page 20

Disconnecting the camera
Notes
• If you disconnect the camera while the computer is on, follow the steps below. If you
do not follow these steps the computer may malfunction.
• When your computer is off, you do not need to perform step 1 below. However, if you
disconnect the USB cable while your computer is in power-saving mode, and then
connect it again, the camera may not be detected.
1 Close the software used by the camera.
2 Disconnect the USB cable, and then remove the camera.
Notes
• If you pull on the cable itself when disconnecting the USB cable, you may damage
the cable. Make sure that you hold onto the connector when disconnecting the
cable.
• When removing the camera from the mounting adapter, spread the arm plate with
your hand, and then remove the camera.
20
GB
Page 21
Continued on next page
Using the Camera
This section describes how to use the camera.
Notes
• When using the camera for the first time, make sure that you install the driver and the
software before connecting the camera to your computer. For installation details, see
“Setting Up the Camera” (page 7).
• When using software such as Network Smart Capture that can be used with this camera,
do not disconnect the cameras USB cable while running the software or when starting
up or quitting. Doing so can cause the computer to become unstable. Disconnect the
USB cable after all software have been shut down.
For Customers Using DVgate Motion
Before using DVgate Motion, make sure that you remove the cameras USB cable
from the USB connector of your computer.
Capturing images with the camera
You can use the Network Smart Capture software to capture images with
the camera. For details about how to install the Network Smart Capture
software, see “Installing the driver and the software” (page 7).
For operational details, refer to the Network Smart Capture software help.
1 Connect the camera to your computer.
The camera’s USB cable can be connected or disconnected while your
computer is on.
For details, see “Connecting the Camera” (page 14).
2 Start the Network Smart Capture software.
21
GB
Page 22
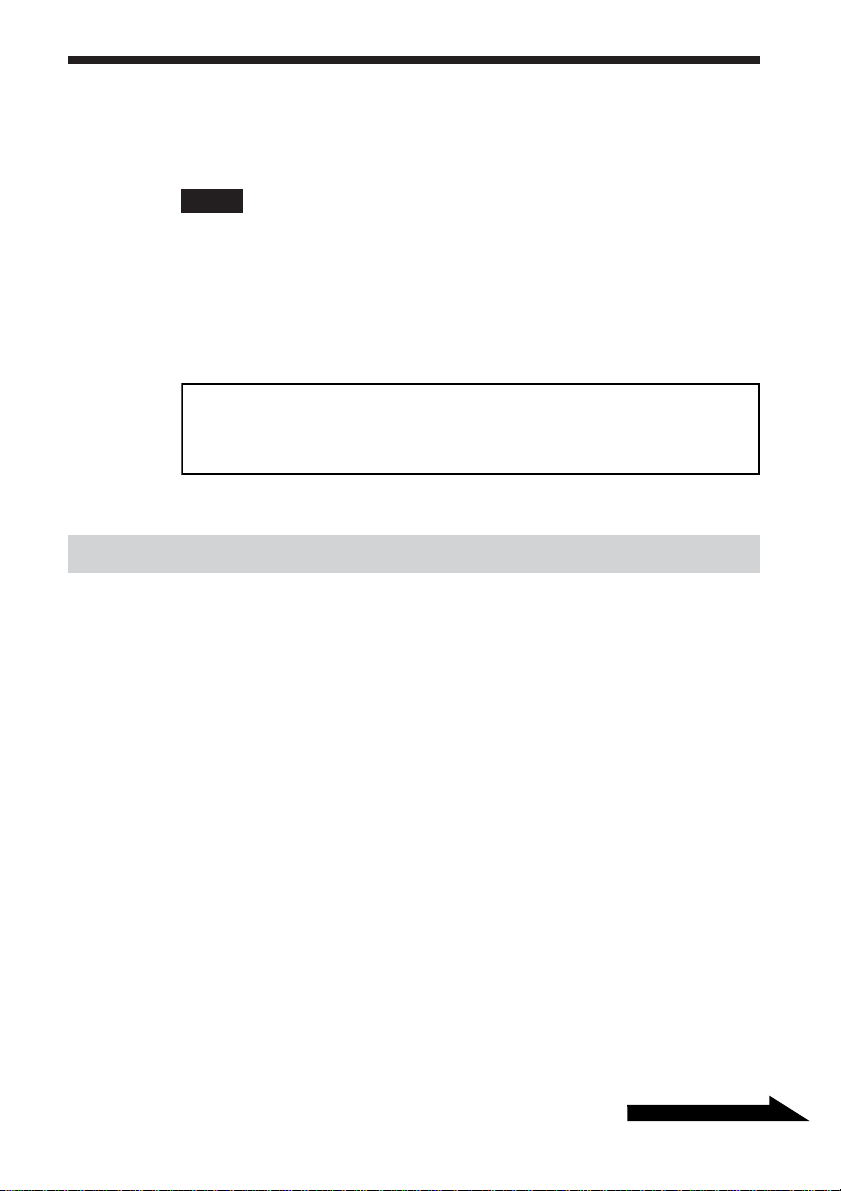
3 Turn the focus ring to adjust the focus.
4 Press the CAPTURE button to capture the image.
In addition to attaching the camera to your computer, you can hold it in
your hand as shown in the illustration to capture images from a variety
of angles.
z Hint
If you want to use the camera while holding it in your hand, we recommend that you
cancel the Network Smart Capture software mirror display function.
22
Note
Make sure that the Network Smart Capture software mirror display function was
canceled before using the camera in this manner.
z Hint
If the background is too bright or the subject too dark, for example, we recommend that
you enable the Network Smart Capture software backlight compensation function.
GB
Page 23
Continued on next page
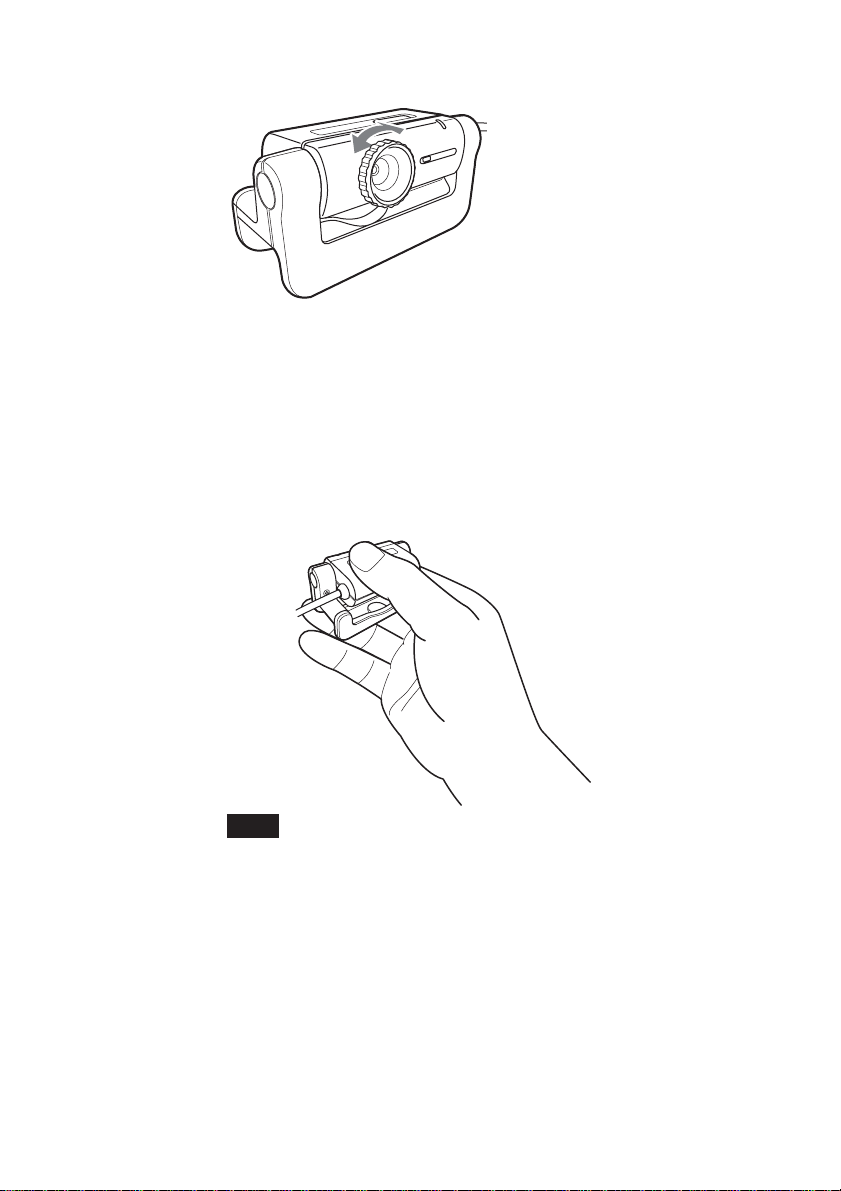
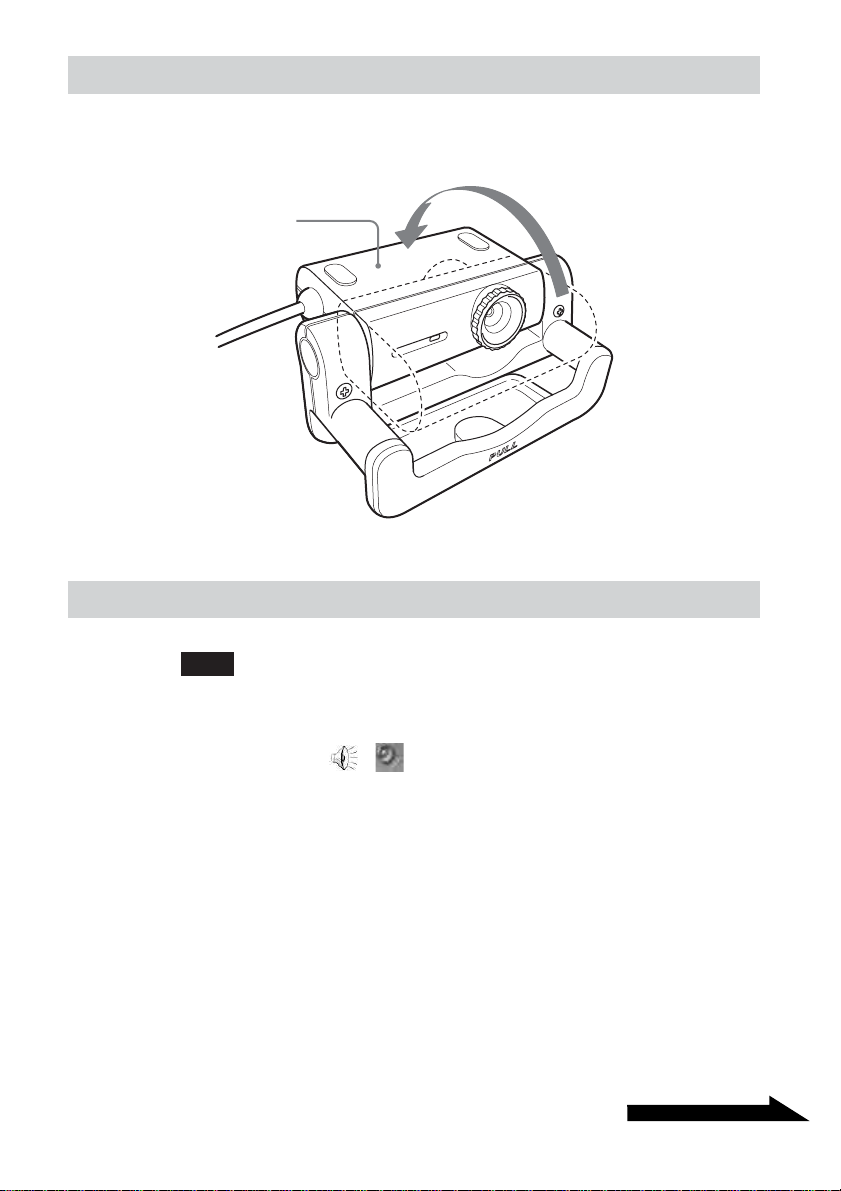
Capturing images backward
You can rotate the camera as illustrated below, allowing you to capture
images backward without having to reposition the camera.
Camera
Setting the camera microphone volume
Note
Names and screens displayed may differ depending on the operating system that you are
using.
1 Double-click ( depending on your operating system)
on the taskbar at the bottom of the screen.
The “Volume Control” window appears.
2 On the “Options” menu, click “Properties” (or “Options”,
depending on the operating system that you are using).
The “Properties” dialog box appears.
23
GB
Page 24

3 Select “Sony PCGA-UVC11” in the Mixer device list, and
then click “OK”.
The “Capture” dialog box appears.
z Hint
If the “Capture” dialog box does not appear, the driver may not be properly
installed. See “Checking that the driver is installed” (page 8), and check whether the
driver is properly installed.
4 Make sure that audio input from the camera microphone is
enabled.
Make sure that the “Mute all” check box is not selected. If it is, clear it.
5 Adjust the volume of camera microphone input.
Move the slider for the controller in step 4 to adjust the volume.
Make a video or audio recording using your software. If the audio plays
back correctly, the settings are complete.
If you cannot record with the camera microphone
Depending on your software, you may have to set the audio input device
manually. Follow the procedures below to set audio input device to the
camera microphone, according to your operating system.
z Hint
If you are using the Network Smart Capture software, you do not need to perform the
procedures below.
With the Windows XP operating system
1 Click “Start”, and then click “Control Panel”.
“Control Panel” appears.
2 Click “Sounds, Speech and Audio Devices”.
The “Sounds, Speech, and Audio Devices” window appears.
3 Click “Sounds and Audio Devices”.
The “Sounds and Audio Devices Properties” dialog box appears.
GB
24
Page 25

4 On the “Audio” tab, under “Sound recording”, select “Sony
PCGA-UVC11” from the “Default device” list.
5 Click “OK” to close the “Sounds and Audio Devices
Properties” dialog box.
With the Windows Me operating system
1 Click “Start”, point to “Settings”, and then click “Control
Panel”.
“Control Panel” appears.
2 Double-click “Sounds and Multimedia”.
The “Sounds and Multimedia Properties” dialog box appears.
z Hint
If “Sounds and Multimedia” does not appear in “Control Panel”, click “view all
Control Panel options” on the left of the window.
3 On the “Audio” tab, under “Sound Recording”, select “Sony
PCGA-UVC11” from the “Preferred device” list.
4 Click “OK” to close the “Sounds and Multimedia Properties”
dialog box.
With the Windows 2000 operating system
1 Click “Start”, point to “Settings”, and then click “Control
Panel”.
“Control Panel” appears.
2 Double-click “Sounds and Multimedia”.
The “Sounds and Multimedia Properties” dialog box appears.
3 On the “Audio” tab, under “Sound Recording”, select “Sony
PCGA-UVC11” from the “Preferred device” list.
4 At the bottom of the “Sounds and Multimedia Properties”
dialog box, select the “Use only preferred devices” check
box.
5 Click “OK” to close the “Sounds and Multimedia Properties”
dialog box.
25
GB
Page 26
Precautions
Usage and storage
locations
after moving it from a cold location to a
warm location, or after the ambient
temperature has risen drastically.
Otherwise, condensation may occur
inside the camera. Let the camera stand
for a moment before using it.
Do not use or store this product in the
following locations. Doing so may
damage the camera.
• Locations subject to abnormally
high temperatures
During periods of hot weather or the
summer season, the temperature inside
closed vehicles becomes especially
high, and if the camera is left in such a
location, it may warp or be damaged.
• Locations subject to direct
sunlight or next to heating
appliances
The camera may warp or be damaged.
• Sandy locations, such as the
beach
Do not place the camera in a location
where sand may be present, such as the
beach or other sandy areas. Doing so
may damage the camera, and in some
cases, repair may not be possible.
• Do not point the lens at the sun.
This could cause burn-in or other lens
damage. Be careful when leaving the
camera next to a window or outdoors.
Lens
Do not touch the lens.
Notes on discs
Note the following in order to protect data
stored on discs.
• If the edge of the label on the disc is off
the disc surface or the label is not sticky
enough to stay on the disc surface, the
label may stick to the interior of the disc
drive and cause a malfunction of your
computer. Make sure that the label is
properly fixed on the disc surface before
using the disc.
Sony assumes no liability for any
malfunction of your computer or
damage to the media caused by
improper labeling. Please thoroughly
read instruction notes of your label
software and label sheets.
Operation
• Do not remove the camera’s USB cable
during operation. Doing so may cause
the camera to malfunction.
• Do not place any objects on top of the
camera.
• Avoid placing the camera in locations
subject to sudden temperature changes.
Do not use the camera immediately
GB
26
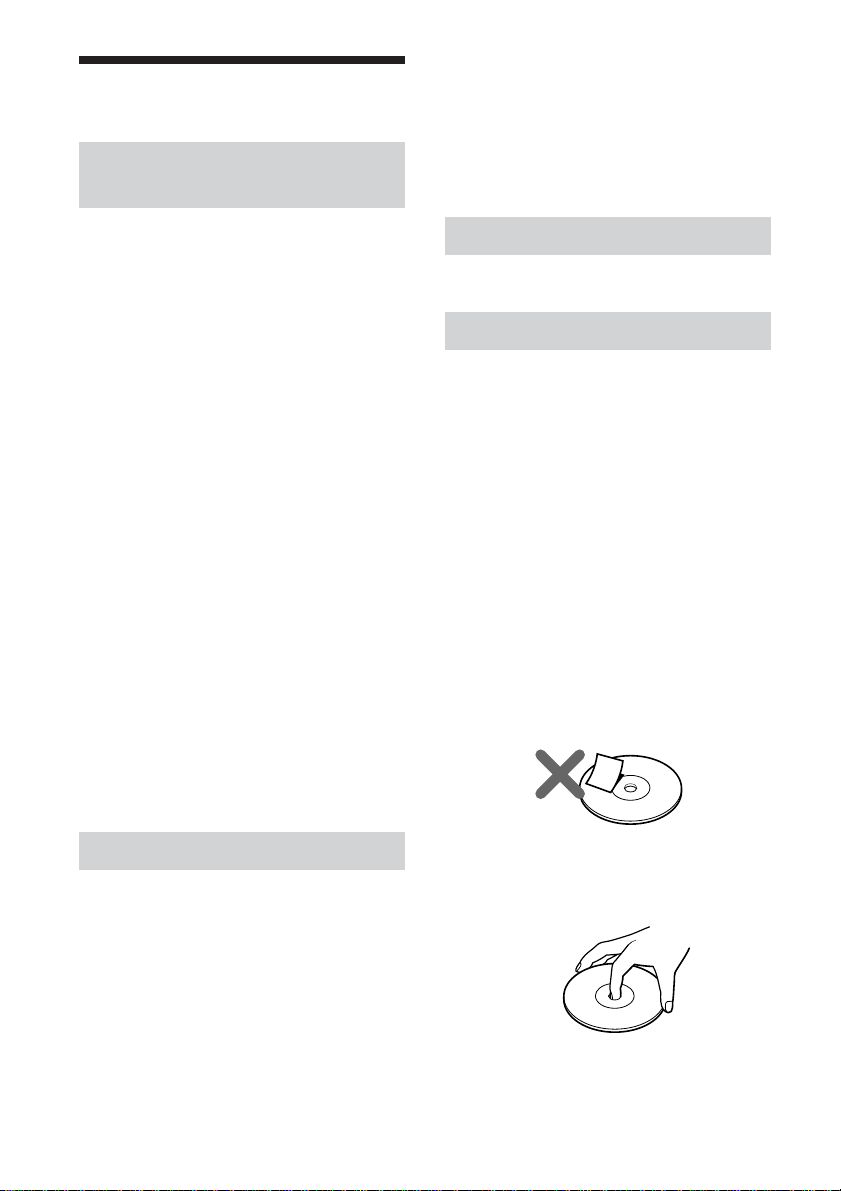
• Do not touch the data side of the disc
(opposite the label), and hold the disc as
shown below.
• Do not scratch the disc.
Page 27
• Do not store the disc in locations subject
to high humidity, high temperatures,
direct sunlight, or high levels of dust.
• Take care not to spill any liquid on the
disc.
• Return the disc to its case when not in
use in order to prevent data damage.
• Use an oil-based felt pen when writing
on a disc.
Maintenance
Cleaning the cabinet
Wipe the outside of the camera with a
soft, dry cloth. To remove stubborn stains,
moisten the cloth with a mild, neutral
detergent. Do not use solvents, cleaning
alcohol, benzine or other substances that
may damage the finish.
Cleaning the lens
Remove any dust from the front of the
lens using a blower brush or soft brush.
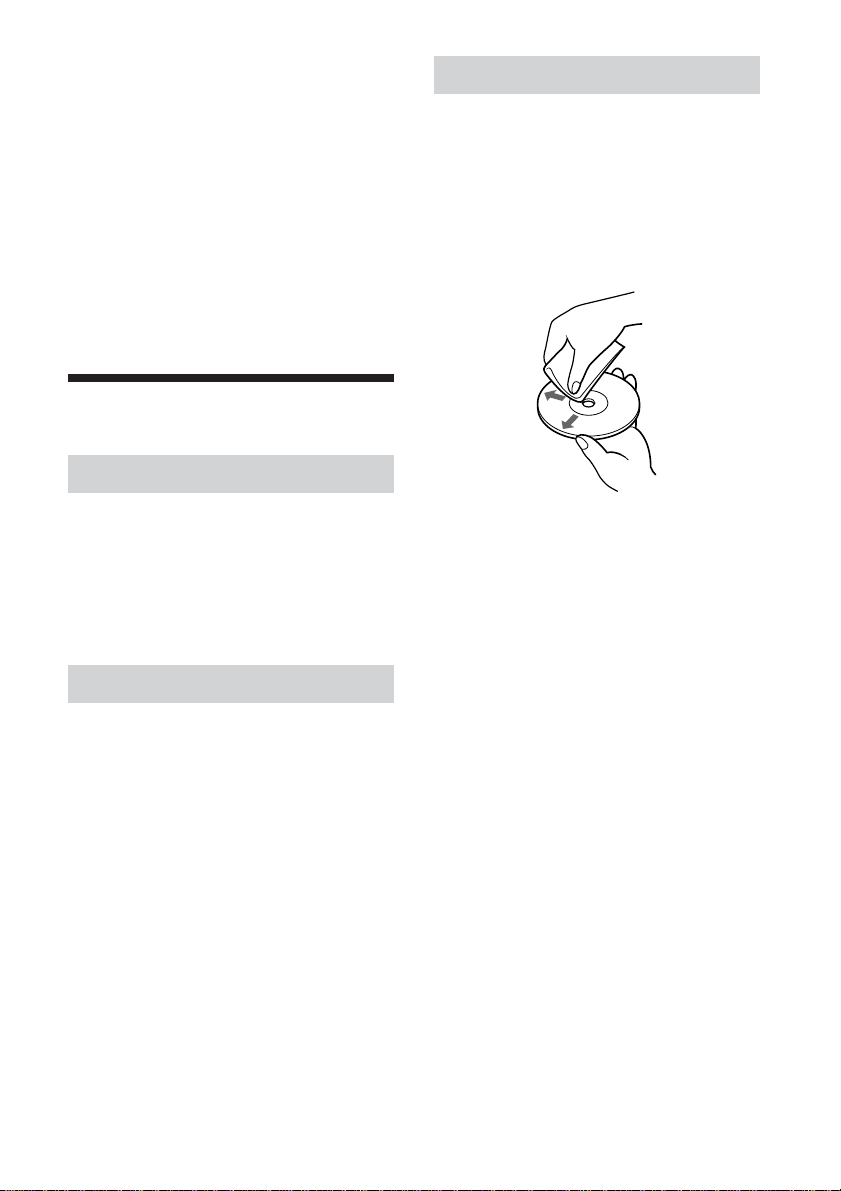
Cleaning the disc
• Fingerprints and other contamination on
the disc surface can lead to reading
errors. Always keep the disc clean.
• To clean the disc, lightly wipe it from
the center outwards.
• To remove stubborn stains, lightly
moisten the cloth before wiping the
disc, and use a dry cloth afterwards.
• Do not use benzine, record cleaning
liquid, antistatic fluids or other
substances that may damage the surface
of the disc.
• Never use cleaners on an unused disc.
Use specific CD cleaners to take off
dust.
• You may not be able to write on the
discs if there are scratches or dust on the
unrecorded area. Be careful not to
damage the discs.
27
GB
Page 28

Getting Help
This section provides information on how
to get help and support from Sony, and on
troubleshooting tips for your Visual
Communication Camera.
About Sony’s support
options
Sony provides several support options for
your Visual Communication Camera.
When you have questions about your
camera or the software, refer to the
following:
❑This guide explains how to use your
camera.
For customers in the United
States and Canada
❑The Sony Customer Information
Service Center offers information
about your notebook and other Sony
products that work with your computer.
To contact Sony Cusotmer Information
Service Center, call 1-888-4SONYPC
(1-888-476-6972).
❑Sony Online Support
This service provides instant access to
information on commonly encountered
problems. Type a description of the
problem and the Knowledge Database
searches for the corresponding solutions
online. You can visit Sony Online
Support at
http://www.sony.com/pcsupport .
For customers in other
countries and regions
❑VAIO Web site provides Frequently
Asked Questions and solutions.
vaio-online.sony.com/
28
GB
Page 29

Specifications
Visual Communication
Camera
Image pickup
1/5.5” 370,000-pixel (310,000 effective pixels)
color CMOS progressive scanning image sensor.
Lens
2 groups of 2 lenses, F3.4
Focal length f=2.8 mm (0.1 inch)
(equivalent to a 35 mm (1.4 inch) camera at
f=40 mm (1.6 inch))
Focus range 30 mm to ∞ (1.2 inch to ∞)
Angular field of view Horizontal approx. 47°
Vertical approx. 36°
White balance
Auto/Indoors/Outdoors/Hold
Shutter speed
Auto/Hold
Flicker cancel function
Auto/50 Hz/60 Hz
Video capture format
YUY2/RGB24 bits
Sizes
80 × 60, 160 × 120, 320 × 240, 640 × 480,
176 × 144, 352 × 288
Number of display frames
Maximum: 30 frames/sec*
* This rate differs depending on the specifications
of your computer and the application you are
using.
Camera rotational range
Approx. 220°
Power consumption
Approx. 0.5 W
Interface
USB (powered directly from the VAIO computer)
Connector
USB type A
Dimensions
Approx. 2.4 × 1.4 × 1.3 inches (60 × 34 × 33 mm)
(W × H × D)
Cable length
Approx. 39.4 inches (100 cm)
Weight
Approx. 1.6 oz. (43 g) (main unit only)
Operating environment
Operating temperature
41°F to 95°F (5°C to 35°C)
(temperature gradient less than 18°F (10°C)/hour)
Operating humidity
20% to 80% (not condensed),
provided that humidity is less than 65% at 95°F
(35°C)
(hygrometer reading of less than 84°F (29°C))
Storage temperature
–4°F to 140°F (–20°C to 60°C)
(temperature gradient less than 18°F (10°C)/hour)
Storage humidity
10% to 90% (not condensed),
provided that humidity is less than 20% at 140°F
(60°C)
(hygrometer reading of less than 95°F (35°C))
Supplied accessories
• PCGA-UVC11A installation disc
(CD-ROM × 1)
• Mounting adapter (1)
• Adhesive sheet (3)
• Operating instructions (1)
• Warranty (1)*
• End User Software License Agreement (1)
* The accessories included vary according to
country and region.
Design and specifications are subject to change
without notice.
29
GB
Page 30

Troubleshooting
If a problem occurs during operation of the unit, refer to the information
provided in this section. If the problem persists, consult your nearest Sony
dealer. For contact information, see “Getting Help” on page 28. Also refer
to the manuals provided with your computer.
Symptom Cause/Remedy
The camera is not
recognized by your
computer.
Images appear grainy
in the Network Smart
Capture finder
• The USB cable is not connected properly.
c Close the currently open software, and reconnect the
cable.
• The driver is not installed.
c Check whether the driver is installed, and if the device
does not display properly, install the driver. For details,
see “Setting Up the Camera” (page 7).
• The driver was not installed properly.
c Uninstall the driver, then restart your computer and
install it again. For details, see “Uninstalling the driver”
(page 9) and “Installing the driver and the software”
(page 7).
• The USB root hub is not recognized by your computer.
c Reinstall your Windows operating system properly.
• USB cannot be used.
c Check the system properties for your computer.
• The camera is connected to your computer via a USB hub,
and the power supplied by the USB hub is insufficient.
c Use a USB hub that is capable of supplying 500 mA to
the port.
• If your computer is equipped with multiple USB
connectors, connect the camera to another USB connector
and check whether it is recognized properly.
• If the camera is connected to the USB connector on the
display, the display and your computer are not connected
properly.
c Check the connection method.
When a fast-moving subject is displayed in the finder,
horizontal banding may occur in the image, or horizontal
lines may occur through the moving part of the image.
However, this does not indicate a malfunction.
30
GB
Page 31

Continued on next page
Symptom Cause/Remedy
Still images and movie
images downloaded
from the camera
appear grainy on the
display.
You cannot adjust the
speaker volume using
the Fn key.
When downloading
movies from the
camera, frame dropout
occurs and sound is
interrupted.
Images downloaded
from the camera stop
for a few seconds.
Images downloaded
from the camera are
not displayed.
Sound is not recorded
even though the
microphone is
connected.
• Light may be reflected in images captured under
fluorescent light.
• If the downloaded image contains dark patches, red or
green noise may appear.
• The lens is dirty.
c Clean the lens.
• The image is out of focus.
c Focus the image using the focus ring.
Depending on the computer you are using, you may not be
able to use the Fn key to adjust the volume when the camera
is connected to your computer. Open the volume control from
the taskbar or notification area and adjust the volume (page
23).
• Depending on the Network Smart Capture effect settings,
frame dropout may occur. For details, refer to the Network
Smart Capture help.
• If multiple software applications are open concurrently, the
processing speed of your computer may be exceeded. Close
any software applications you are not using.
• Your computer’s power management function is enabled.
c Check the CPU speed setting for your computer. For
setting details, refer to the manuals provided with your
computer.
Images may stop for a few seconds in the following
situations. However, this is not a defect.
• When a keyboard shortcut that uses the Fn key is
performed.
• When the CPU load is too heavy.
• Multiple software applications are running concurrently.
c Close one of the software applications.
• Depending on the screen mode and number of colors your
computer is using, as well as other conditions of use,
available video memory may be insufficient.
c Reduce the resolution, or reduce the number of colors
used.
• If you perform the above procedure and the images still do
not appear, restart your computer.
• Check whether the recording control (or audio recording
control) is set properly (page 23).
• If the device driver is not installed, sound may not be
recorded even though the microphone is connected. Follow
the procedure described in “Installing the driver and the
software” (page 7) to install the driver.
• Depending on your software, you may have to set the
microphone as the audio input method manually. For
details about this setting, refer to your software’s
documentation or to “If you cannot record with the camera
microphone” (page 24).
31
GB
Page 32

Symptom Cause/Remedy
When you connect the
USB cable, the “Add
New Hardware
Wizard” dialog box
appears on your
computer screen.
Operation does not
shift to the powersaving mode, and
Windows operation
becomes unstable.
The LCD on your
computer appears dark
or enters power-saving
mode while you are
using the camera.
The computer does not
return from the video
standby mode.
The white balance is
incorrect.
When downloading
still images, the image
does not download
immediately after you
press the CAPTURE
button. (An image
occurring after the
point when you
pressed the
CAPTURE button is
downloaded.)
Images downloaded
from the camera
appear white.
The device driver is not installed.
c Click “Cancel” in the “Add New Hardware Wizard” dialog
box and, after disconnecting the USB cable from the USB
connector, follow the procedure described in “Installing the
driver and the software” (page 7) to install the driver.
Close all software applications currently in use and restart
your computer. If you cannot restart your computer, refer to
the manuals provided with your computer, and turn off the
power.
c Operating the computer’s touch pad, mouse, or keyboard
brings the computer out of the power-saving mode.
c You can adjust the settings on the “Power Schemes” tab of
the “Power Options” dialog box so that your computer does
not go on standby. It is also possible to modify power
options with independent power management applications.
For details, refer to the manuals provided with your
computer.
Operating the computer’s touch pad, mouse, or keyboard
returns the computer from the power-saving mode. For
details, refer to the manuals provided with your computer.
If you close Network Smart Capture while “Hold” is selected
for “White Balance” in the Network Smart Capture settings,
the next time you start your computer, the white balance
setting may not be adjusted properly.
c If you select “Auto” for “White Balance” in the Network
Smart Capture settings and wait a moment, the white
balance will be adjusted automatically.
Depending on the CPU speed of your computer, the
processing load, and image size, the change in camera
operation mode that occurs during download of still images
may cause a lag between the time when you press the
CAPTURE button and the time the image is actually
downloaded .
If “Hold” is selected for “Shutter Speed” in the Network
Smart Capture settings, the appropriate shutter speed is not
set, and images may appear white.
c If you select “Auto” for “Shutter Speed” in the Network
Smart Capture settings and wait a moment, the appropriate
shutter speed will be set.
32
GB
Page 33

Symptom Cause/Remedy
Compared to the
background, the
subject is dark.
When using the
NetMeeting software,
audio is choppy and
difficult to hear.
You can see the block
noise on the images
from the camera.
If the background is too bright of the subject to dark, for
example, we recommend that you enable the backlight
compensation function. For details about this function, refer
to the Help provided with the Network Smart Capture
software.
Depending on your network environment, the communication
bandwidth may not be sufficient. Connect to a network with a
higher bandwidth.
If you connect the camera with devices equipped with zoom/
rotation buttons or other such buttons and you use the buttons
while using the camera, you may be able to see the block
noise on the images from the camera.
c Wait until the problem corrects itself or restart the software
used with the camera, correcting the problem.
c Before using these buttons, close the software used with
the camera.
33
GB
Page 34

Español
Nombre del producto:
Cámara de comunicación visual
Modelo: PCGA-UVC11A
ADVERTENCIA
Para evitar el riesgo de
incendios o electrocuciones, no
exponga la unidad a la lluvia ni
a la humedad.
• Sony, VAIO, y el logotipo Eco Info
son marcas comerciales de Sony Corporation.
• Microsoft y Windows son marcas comerciales
registradas propiedad de Microsoft
Corporation en Estados Unidos y/u otros
países.
• Todos los demás nombres de sistemas,
productos y servicios son marcas comerciales
de sus respectivos propietarios.
• En este manual no se especifican las marcas
™ o ®.
• En este manual, se hace referencia a
Microsoft® Windows® 2000 Professional como
Windows 2000. En este manual se hace
referencia a Microsoft® Windows
Millennium Edition como Windows Me.
• En este manual se hace referencia a
Microsoft® Windows® XP Home Edition y
Microsoft® Windows® XP Professional como
Windows XP.
ES
2
®
Índice
Antes de utilizar este producto .............. 3
Introducción........................................... 3
Accesorios suministrados ...................... 4
Nombres de las piezas ........................... 5
Puesta en funcionamiento de
la cámara ............................................ 6
Instalación del software y el
controlador ................................... 6
Instalación del controlador de la red
inalámbrica.................................11
Conexión de la cámara ........................ 13
Si instala la cámara
directamente ............................... 13
Si no puede instalar la cámara
directamente ............................... 14
Utilización del adaptador de
montaje .................................. 14
Sujeción de la cámara con
cinta adhesiva ........................ 16
Ajuste de la cámara en
posición horizontal ................ 17
Conexión de la cámara a un
trípode ...................................18
Desconexión de la cámara............ 19
Uso de la cámara .................................20
Captura de imágenes con
la cámara .................................... 20
Captura de imágenes
posteriores .................................. 22
Ajuste del volumen del
micrófono de la cámara..............22
Si no puede grabar con el
micrófono de la cámara..............23
Precauciones ........................................ 26
Mantenimiento.....................................27
Obtención de ayuda ............................. 28
Especificaciones .................................. 29
Solución de problemas ........................30
Page 35

Antes de utilizar este producto
Esta cámara está diseñada para utilizarse con equipos Sony VAIO que
funcionen con los sistemas operativos Windows 2000, Windows Me o
Windows XP preinstalados, o equipos VAIO preparados para Windows XP
y que se han optimizado con el software de actualización de Windows XP
que proporciona Sony Corporation (en adelante “equipos actualizados al
sistema operativo Windows XP”). No está diseñada para utilizarse con
ningún otro equipo.
Introducción
Utilice esta cámara para capturar películas e fotos que, posteriormente,
podrá guardar en el equipo. El software Network Smart Capture permite
enviar las imágenes y películas capturadas con la cámara a amigos y
familiares a través del correo electrónico. También es posible capturar fotos
con un intervalo especificado mediante el modo Web Camera de la cámara.
Estas imágenes pueden cargarse en un sitio Web en tiempo real. Asimismo,
la cámara permite celebrar conversaciones con vídeo mediante Windows
Messenger, o NetMeeting.
ES
z Sugerencia
Si desea obtener más información, consulte la ayuda del software Network Smart
Capture.
ES
3
Page 36

Accesorios suministrados
Saque la cámara de la caja y compruebe que dispone de todos los
accesorios que se enumeran a continuación.
Si falta algún componente, póngase en contacto con el distribuidor de Sony
al que adquirió este producto o con un representante del servicio técnico de
Sony de su zona.
• Cámara de comunicación visual (PCGA-UVC11A)
• Disco de instalación de PCGA-UVC11A (CD-ROM)
• Adaptador de montaje
• Cinta adhesiva (Grande/mediana/pequeña)
• Manual de instrucciones (este documento)
• Garantía*
• CONTRATO DE LICENCIA DE SOFTWARE PARA USUARIO
FINAL
* Los accesorios incluidos varían según el país y región.
ES
4
Page 37

Nombres de las piezas
Parte frontal
Parte posterior
Botón Captura
Cámara
Anillo de enfoque
Micrófono
Lente
Abrazadera
Brazo
ES
5
Page 38

Puesta en funcionamiento de la cámara
Antes de utilizar la cámara, instale el software y el controlador necesarios
en el equipo mediante el disco de instalación suministrado.
Notas
• Asegúrese de que la unidad óptica (unidad DVD o CD-ROM) del equipo está
disponible. En este documento se hace referencia a la unidad de CD-ROM u otra
unidad de disco como “la unidad de CD-ROM”. Para obtener más información acerca
de cómo conectar una unidad de CD-ROM externa, consulte los manuales del equipo o
de la unidad de CD-ROM.
• Antes de conectar la cámara al equipo, instale el controlador y el software como se
describe en este documento.
• Si aparece el cuadro de diálogo “Asistente para agregar nuevo hardware”, haga clic en
“Cancelar”, desconecte la cámara del equipo y vuelva a instalarla.
• El controlador de la red inalámbrica preinstalado para los modelos PCG-SRX55TC/
SRX55TH/SRX55TL/VX89/VX89P del equipo Sony VAIO es incompatible con la
cámara PCGA-UVC11A USB.
Sony recomienda instalar y utilizar el controlador de la red inalámbrica que se
suministra con la cámara PCGA-UVC11A USB. Siga las instrucciones que se
proporcionan a continuación. Si desea obtener más información, visite la página
http://www.ita.sel.sony.com/support/lapc.
Instalación del software y el controlador
Instale el controlador de dispositivos PCGA-UVC11A y el software
Network Smart Capture.
Nota
En un equipo que funcione con el sistema operativo Windows 2000, inicie una sesión
como Administrador antes de instalar el controlador y el software. En un equipo que
funcione con el sistema operativo Windows XP, inicie una sesión como Administrador
antes de instalar el controlador y el software.
1 Encienda el equipo. Se inicia el sistema operativo Windows.
Cierre los demás programas e inserte el disco de instalación
suministrado en la unidad de CD-ROM.
El programa de instalación se inicia automáticamente y aparece la
pantalla “Sony Visual Communication Camera PCGA-UVC11A
Application Installer Setup”.
2 Seleccione su área en la lista.
ES
6
Page 39

3 Asegúrese de que selecciona el software que desea instalar
y, a continuación, haga clic en “Next”.
z Sugerencia
Si el software ya está instalado, la casilla de verificación no aparecerá.
4 Siga las instrucciones que aparecen en pantalla. Haga clic
en “Next” o “Previous” hasta que finalice la instalación y se
cierre la pantalla.
z Sugerencia
Al finalizar la instalación, es posible que aparezca un mensaje indicándole que
reinicie el equipo. En ese caso, haga clic en “Yes”.
5 Conecte la cámara al equipo.
Se instalará automáticamente el controlador y el software
correspondientes. Si aparece el mensaje indicándole que debe reiniciar
el equipo, haga clic en “Yes”. Tras reiniciar el sistema operativo
Windows, podrá empezar a utilizar la cámara.
Confirmación de la instalación del controlador
1 Conecte la cámara al equipo.
Si desea obtener más información acerca de la conexión, consulte
“Conexión de la cámara” (página 13) .
2 En el sistema operativo Windows XP, haga clic en “Inicio” y,
con el botón derecho del ratón, haga clic en “Mi PC” y
seleccione “Propiedades”.
Aparecerá el cuadro de diálogo “Propiedades del sistema”. Vaya al
paso 4.
Para otros sistemas operativos que no sean Windows XP,
haga clic en “Inicio”, seleccione “Configuración” y, a
continuación, haga clic en “Panel de control”.
Aparecerá la ventana “Panel de control”.
3 Haga doble clic en “Sistema”.
Aparecerá el cuadro de diálogo “Propiedades del sistema”.
Continúa
7
ES
Page 40

4 Haga clic en la ficha “Hardware” y, a continuación, en el
botón “Administrador de dispositivos”. Es posible que el
sistema operativo solicite que haga clic en la ficha
“Administrador de dispositivos”.
Aparecerá la ventana “Administrador de dispositivos”.
5 Haga clic en el símbolo más (+) que aparece a la izquierda
de “Dispositivo de Imaging” en la pantalla “Administrador de
dispositivos”.
Si aparece “Sony Visual Communication Camera PCGA-UVC11”,
significa que el controlador se ha instalado correctamente.
6 Haga clic en el símbolo más (+) que aparece a la izquierda
de “Dispositivos de sonid, video y juegos” en la pantalla
“Administrador de dispositivos”.
Si aparece “Sony USB Microphone (PCGA-UVC11)”, significa que el
controlador se ha instalado correctamente.
7 Haga clic en el símbolo más (+) que aparece a la izquierda
de “Controladora USB”, (o “Controladoras de bus serie
universal” en algunos sistemas) en la pantalla
“Administrador de dispositivos”.
Si se muestra la pantalla “Sony Visual Communication Camera
(PCGA-UVC11)”, significa que el controlador se ha instalado
correctamente.
8 Cierre la ventana “Administrador de dispositivos”. Haga clic
en “Aceptar” en el cuadro de diálogo “Propiedades del
sistema”. Es posible que el sistema operativo solicite que
haga clic en “Aceptar” en el cuadro de diálogo “Propiedades
del sistema”.
Nota
Si en la pantalla no aparece ningún controlador, o se muestra un signo de exclamación (!),
significa que el controlador no se ha instalado correctamente. Siga los pasos que se
describen en el apartado “Desinstalación de un controlador”, y una vez eliminado el
controlador pertinente, vuélvalo a instalar.
ES
8
Page 41

Desinstalación de un controlador
Si el controlador no se ha instalado correctamente, siga los pasos que se
describen a continuación para desinstalarlo y vuélvalo a instalar.
Notas
• En un equipo con Windows 2000 o Windows XP, inicie una sesión como
Administrador antes de desinstalar el controlador.
• Antes de desinstalar el controlador, cierre la aplicación de software que utiliza con la
cámara.
1 Conecte la cámara al equipo.
Si desea obtener más información acerca de la conexión, consulte
“Conexión de la cámara” (página 13).
2 En Windows XP, haga clic en “Inicio” y, con el botón
derecho del ratón, haga clic en “Mi PC” y seleccione
“Propiedades”.
Aparecerá el cuadro de diálogo “Propiedades del sistema”. Vaya al
Paso 4.
Para otros sistemas operativos que no sean Windows XP,
haga clic en “Inicio”, seleccione “Configuración” y, a
continuación, haga clic en “Panel de control”.
Aparecerá la ventana “Panel de control”.
3 Haga doble clic en “Sistema”.
Aparecerá el cuadro de diálogo “Propiedades del sistema”.
4 Haga clic en la ficha “Hardware” y a continuación en el
botón “Administrador de dispositivos”. Es posible que el
sistema operativo solicite que haga clic en la ficha
“Administrador de dispositivos”.
Aparecerá la ventana “Administrador de dispositivos”.
5 Haga clic en el símbolo más (+) que aparece a la izquierda
de “Controladora USB”, (o “Controladoras de bus serie
universal” en algunos sistemas) en la pantalla
“Administrador de dispositivos”.
Continúa
ES
9
Page 42

6 Haga clic en “Sony Visual Communication Camera
(PCGA-UVC11)” o “Dispositivo USB Composite” y, a
continuación, haga clic en “Desinstalar” o “Quitar”.
Aparecerá el cuadro de diálogo “Confirmar la eliminación del
dispositivo”.
7 Haga clic en “Aceptar”.
8 Cierre la ventana “Administrador de dispositivos”. Haga clic
en “Aceptar” en el cuadro de diálogo “Propiedades del
sistema”. Es posible que el sistema operativo solicite que
haga clic en “Aceptar” en el cuadro de diálogo “Propiedades
del sistema”.
Desinstalación del software
Si no desea utilizar el software Network Smart Capture o necesita más
espacio en el disco duro del equipo, quite el software siguiendo el
procedimiento que se describe a continuación.
Nota
En un equipo con Windows 2000, inicie una sesión como Administrador antes de
desinstalar el software. En un equipo con Windows XP, inicie una sesión como
Administrador antes de desinstalar el software.
10
1 Cierre el software Network Smart Capture.
2 En Windows XP, haga clic en “Inicio” y “Panel de control”.
En otros sistemas operativos, haga clic en “Inicio”,
seleccione “Configuración” y, a continuación, haga clic en
“Panel de control”.
Aparecerá la ventana “Panel de control”.
3 En Windows XP, haga clic en “Agregar o quitar programas”.
En otros sistemas operativos, haga doble clic en “Agregar o
quitar programas”.
Aparecerá la ventana “Agregar o quitar programas” o el cuadro de
diálogo “Propiedades de Agregar o quitar programas”.
ES
Page 43

4 En Windows XP, en la lista de software instalado,
seleccione “Network Smart Capture” y haga clic en “Cambiar
o quitar”.
En Windows Me, en la lista de software instalado,
seleccione “Network Smart Capture” y haga clic en “Agregar
o quitar”.
En Windows 2000, en la lista de software instalado,
seleccione “Network Smart Capture” y haga clic en
“Cambiar/quitar”.
Aparecerá un mensaje de confirmación.
5 Haga clic en “Aceptar”.
Siga las instrucciones de la pantalla para completar el procedimiento.
Instalación del controlador de la red inalámbrica
Necesario sólo para los modelos PCG-SRX55TC/SRX55TH/SRX55TL/
VX89/VX89P.
Nota
No realice el siguiente procedimiento con modelos distintos a los indicados arriba.
1 Haga clic en “Inicio”, haga clic con el botón derecho del
ratón en “Mi PC” y, a continuación, haga clic en
“Propiedades”.
Aparecerá el cuadro de diálogo “Propiedades del sistema”.
2 Haga clic en la ficha “Hardware” y, a continuación, en el
botón “Administrador de dispositivos”.
Aparecerá la ventana “Administrador de dispositivos”.
3 Haga clic en el símbolo más (+) a la izquierda de
“Adaptadores de red”, haga clic con el botón derecho del
ratón en “ORiNOCO Mini PCI Card” y, finalmente, haga clic
en “Actualizar controlador” en el menú de acceso directo.
Se iniciará el Asistente para actualización de hardware.
4 En el cuadro de diálogo, seleccione “Instalar desde una lista
o ubicación especifica (avanzado)” y, a continuación, haga
clic en “Siguente”.
Continúa
11
ES
Page 44

5 Seleccione “No buscar. Seleccionaré el controlador que se
va a instalar.” y, a continuación, haga clic en “Siguente”.
6 En “Adaptador de red”, haga clic en “Utilizar disco”.
7 Haga clic en “Examinar”, seleccione la carpeta
UPDATE\WirelessLAN en el CD-ROM y, finalmente, haga
clic en “Aceptar”.
8 Haga clic en “Siguente”.
9 Haga clic en “Finalizar”.
Confirmación de la instalación del controlador de red inalámbrica
1 Haga clic en “Inicio”, haga clic con el botón derecho del
ratón en “Mi PC” y, a continuación, haga clic en
“Propiedades”.
Aparecerá el cuadro de diálogo “Propiedades del sistema”.
2 Haga clic en la ficha “Hardware” y, a continuación, en el
botón “Administrador de dispositivos”.
Aparecerá la ventana “Administrador de dispositivos”.
12
3 Haga clic en el símbolo más (+) a la izquierda de
“Adaptadores de red”, haga clic con el botón derecho del
ratón en “ORiNOCO Mini PCI Card” y, finalmente, haga clic
en “Propiedades” en el menú de acceso directo.
4 Haga clic en la ficha “Controlador”.
Si la versión del controlador es la “7.16.0.189”, significa que se ha
instalado correctamente.
ES
Page 45

Conexión de la cámara
En esta sección se describe cómo conectar la cámara a un ordenador.
Notas
• Cuando utilice la cámara por primera vez, instale el controlador y el software antes de
conectarla al equipo. Para obtener más información, consulte “Puesta en
funcionamiento de la cámara” (página 6).
• No conecte ni desconecte el cable USB de la cámara mientras se inicia o se apaga el
sistema operativo Windows; de lo contrario, pueden producirse fallos de
funcionamiento de la cámara o del equipo.
• No desconecte el cable USB de la cámara para volverlo a conectar rápidamente, de lo
contrario podría afectar al funcionamiento del equipo.
• Esta cámara está diseñada para garantizar en todo momento un ancho de banda USB
fijo para la transferencia de datos con el lente de mostrar imágenes de alta calidad. Por
consiguiente, si utiliza un concentrador USB para conectar varios dispositivos USB a la
vez, el ancho de banda disponible para la transferencia de datos será insuficiente para el
funcionamiento normal de la cámara.
Si instala la cámara directamente
Para instalarla en un ordenador que utiliza un panel de visualización
elevado, como los que se encuentran en los modelos de un ordenador
portátil o en los modelos de sobremesa con pantalla de cristal líquido, se
puede montar la cámara directamente ajustando el brazo de la misma sobre
el panel de visualización como se muestra a continuación.
1 Instale la cámara en el panel de visualización.
Mientras sujeta la abrazadera, tire del brazo posterior como se muestra
en la ilustración, y enganche la cámara en la parte superior de la
pantalla.
Brazo
Panel de
visualización
Abrazadera
Continúa
ES
13
Page 46

2 Conecte el cable USB de la cámara al conector USB del
ordenador.
Consulte el manual de instrucciones que se suministra con el ordenador
o el manual electrónico para localizar la posición del conector USB en
el ordenador.
zSugerencia
Dependiendo del ordenador que utilice, es posible que en ocasiones no pueda
conectar la cámara directamente.
En este caso, consulte la sección “Si no puede instalar la cámara directamente” que
aparece a continuación, para obtener más información.
Si no puede instalar la cámara directamente
Si no puede instalar la cámara directamente con el brazo de la misma,
instálela realizando uno de los pasos que se describen a continuación.
• Utilización del adaptador de montaje (consulte la página 14)
• Sujeción de la cámara con cinta adhesiva (consulte la página 16)
• Ajuste de la cámara en posición horizontal (consulte la página 17)
• Conexión de la cámara a un trípode (consulte la página 18)
Utilización del adaptador de montaje
14
Si el ordenador no permite que la cámara se instale directamente porque el
panel de visualización es demasiado grueso, ésta no podrá instalarse con el
brazo. En este caso, utilice el adaptador de montaje y la cinta adhesiva
(grande y mediana) como se muestra a continuación.
1 Aplique la cinta adhesiva (grande y mediana) en el
adaptador de montaje.
Retire la protección de la cinta de doble cara y aplique la cinta
adhesiva (grande y mediana) en el adaptador de montaje. A
continuación, retire la protección de la parte superior de la cinta
adhesiva.
Nota
Al aplicar la cinta adhesiva en el
adaptador de montaje, asegúrese de que
la cámara y el adaptador no tengan
polvo ni suciedad.
ES
Adaptador de montaje
Cinta adhesiva (mediana)
Cinta adhesiva
(grande)
Page 47

2 Ajuste el adaptador de montaje en la ubicación donde se va
a instalar la cámara.
Adaptador de montaje
3 Instale la cámara en el adaptador de montaje.
Mientras sujeta la abrazadera, tire del brazo posterior como se muestra
en la ilustración, y enganche la cámara en la parte superior del
adaptador de montaje.
Adaptador de
montaje
Abrazadera
Brazo
Abrazadera
Brazo
Adaptador
de montaje
Panel de
visualización
4 Conecte el cable USB de la cámara al conector USB del
ordenador.
Consulte los manuales suministrados con el ordenador para localizar la
posición del conector USB en el ordenador.
Continúa
ES
15
Page 48

Sujeción de la cámara con cinta adhesiva
La cámara puede sujetarse en cualquier superficie plana, como la parte
superior de un monitor de pantalla de cristal líquido, utilizando la cinta
adhesiva suministrada (pequeña).
1 Retire la protección de la cinta de doble cara y aplique la
cinta adhesiva (pequeña) en el lado inferior de la cámara.
Nota
Al aplicar la cinta adhesiva, asegúrese de que la cámara no tenga polvo ni suciedad.
2 Retire la protección de la parte superior de la cinta adhesiva
y coloque la cámara en la ubicación para montarla.
16
3 Conecte el cable USB de la cámara al conector USB del
ordenador.
Consulte los manuales suministrados con el ordenador para localizar la
posición del conector USB en el ordenador.
ES
Page 49

Ajuste de la cámara en posición horizontal
Utilice el adaptador de montaje, como se muestra a continuación, para
ajustar la cámara en posición horizontal sobre una superficie plana y
estable, como la pantalla CRT o la parte superior del ordenador.
1 Conecte la cámara al adaptador de montaje.
Mientras sujeta la abrazadera, tire del brazo posterior como se muestra
en la ilustración, y enganche la cámara al adaptador de montaje.
Asegúrese de que coloca el adaptador de montaje en una superficie
uniforme y estable.
Abrazadera
Adaptador de
montaje
Brazo
2 Conecte el cable USB de la cámara al conector USB del
ordenador.
Consulte los manuales suministrados con el ordenador para localizar la
posición del conector USB en el ordenador.
Continúa
ES
17
Page 50

Conexión de la cámara a un trípode
Puede conectar la cámara a un trípode para capturar imágenes.
Tornillo del trípode
Notas
• No mueva la cámara cuando esté instalada en el trípode, ya que si se cae
podría dañarse.
• No utilice un trípode con un tornillo de más de 7 mm (0.28 pulgadas) de
longitud, de lo contrario, la cámara no tendrá estabilidad y puede dañarse.
• Al colocar la cámara, compruebe que el trípode sea estable e instale la
cámara en posición horizontal, ya que si la cámara está inclinada, podría
caerse.
• Al ajustar la posición de la cámara, sujete el mango del trípode y la
cámara con las manos para que ésta no se caiga.
• Al ajustar el ángulo de la cámara, el enfoque o el cable USB, sujete la
cámara con la mano.
• Cuando utilice el botón de captura, sujete la cámara con la mano.
• Asegúrese de que utiliza un trípode que pueda soportar el peso de la
cámara sin tambalearse.
18
1 Coloque el tornillo del trípode en el orificio del adaptador de
montaje.
2 Conecte la cámara al adaptador de montaje.
3 Conecte el cable USB de la cámara al conector USB del
ordenador.
Consulte los manuales suministrados con el ordenador para localizar la
posición del conector USB en el ordenador.
ES
Page 51

Desconexión de la cámara
Notas
• Si desconecta la cámara con el equipo encendido, siga los pasos que se describen a
continuación. De lo contrario, es posible que el equipo no funcione correctamente.
• Si el equipo está apagado, no es necesario que realice el paso 1 anterior. Sin
embargo, si desconecta el cable USB mientras el sistema está en modo de ahorro
de energía y vuelve a conectarlo, es posible que no detecte la cámara.
1 Cierre el software que utiliza la cámara.
2 Desconecte el cable USB y quite la cámara.
Notas
• No tire del cable USB al desconectarlo, ya que podría dañarlo. Para desconectarlo
tire del conector.
• Para retirar la cámara del adaptador de montaje, separe la abrazadera con la mano
y, a continuación, retire la cámara.
Continúa
ES
19
Page 52

Uso de la cámara
En esta sección se describe cómo utilizar la cámara.
Notas
• Cuando utilice la cámara por primera vez, instale el controlador y el software antes de
conectarla al equipo. Para obtener más información, consulte “Puesta en
funcionamiento de la cámara” (página 6).
• No conecte ni desconecte el cable USB de la cámara mientras se inicia o apaga el
software de la cámara, de lo contrario podría afectar al funcionamiento del equipo.
Para los usuarios de DVgate Motion
Antes de utilizar DVgate Motion, asegúrese de que ha retirado el cable
USB de la cámara del conector USB del equipo.
Captura de imágenes con la cámara
Utilice el software Network Smart Capture para capturar imágenes con la
cámara. Si desea obtener más información sobre cómo instalar el software
Network Smart Capture, consulte “Instalación del software y el
controlador” (página 6).
Si desea obtener más información sobre el funcionamiento, consulte la
ayuda del software Network Smart Capture.
20
1 Conecte la cámara al equipo.
El cable USB de la cámara puede conectarse o desconectarse mientras
el equipo está encendido.
Si desea obtener más información, consulte “Conexión de la cámara”
(página 13) .
2 Inicie el software Network Smart Capture.
ES
Page 53

3 Gire el anillo de enfoque para ajustar el enfoque.
4 Pulse el botón CAPTURE para capturar la imagen.
Además de colocar la cámara en el equipo, también puede sostenerla
en la mano, como muestra la ilustración, para capturar imágenes desde
diversos ángulos.
z Sugerencia
Si desea utilizar la cámara manualmente, se recomienda cancelar la función de
espejo del software Network Smart Capture.
Nota
Recuerde que debe cancelar la función de espejo del software Network Smart
Capture antes de utilizar la cámara de este modo.
z Sugerencia
Si, por ejemplo, el fondo es demasiado brillante o el motivo es demasiado oscuro, se
recomienda activar la función de compensación de luz fondo del software Network Smart
Capture.
Continúa
ES
21
Page 54

Captura de imágenes posteriores
Puede girar la cámara tal como se muestra en la siguiente ilustración, lo que
le permite capturar imágenes hacia atrás sin tener que cambiar la cámara de
posición.
Cámara
Ajuste del volumen del micrófono de la cámara
22
Nota
Los nombres y las pantallas pueden variar según el sistema operativo que utilice.
1 Haga doble clic en ( según el sistema operativo) en
la barra de tareas que aparece en la parte inferior de la
pantalla.
Aparecerá la ventana “Control de volumen”.
2 En el menú “Opciones”, haga clic en “Propiedades” (u
“Opciones”, dependiendo del sistema operativo que utilice).
Aparecerá el cuadro de diálogo “Propiedades”.
3 Seleccione “Sony PCGA-UVC11” en la lista Dispositivo
Mezclador y a continuación, haga clic en “Aceptar”.
Aparecerá el cuadro de diálogo “Capturar”.
ES
Page 55

z Sugerencia
Si no aparece el cuadro de diálogo “Capturar”, es posible que el controlador no esté
correctamente instalado. Consulte “Confirmación de la instalación del controlador”
(página 7), y compruebe que el controlador esté bien instalado.
4 Asegúrese de que la entrada de audio del micrófono de la
cámara esté activada.
Compruebe que la casilla de verificación “Silenciar Todo” no está
seleccionada. Si lo estuviera, haga clic para deseleccionarla.
5 Ajuste el volumen de la entrada del micrófono de la cámara.
Mueva la barra de desplazamiento del controlador del Paso 4 para
ajustar el volumen.
Grabe audio o vídeo con el software. Si el audio se reproduce
correctamente, significa que se han establecido todos los ajustes necesarios.
Si no puede grabar con el micrófono de la cámara
En función del software que utilice, es posible que tenga que ajustar el
dispositivo de entrada de audio manualmente. Siga los procedimientos
siguientes para ajustar el dispositivo de entrada de audio en el micrófono de
la cámara, según el sistema operativo que utilice.
z Sugerencia
Si utiliza el software Network Smart Capture, no hace falta que realice los siguientes
procedimientos.
Con el sistema operativo Windows XP
1 Haga clic en “Inicio” y, a continuación, haga clic en “Panel
de control”.
Aparecerá la ventana “Panel de control”.
2 Haga clic en “Dispositivos de sonido, video y juegos”.
Se expande la selección “Dispositivos de sonido, video y juegos”.
3 Haga clic en “Dispositivos de sonido, video y juegos”.
Expande la selección “Dispositivos de sonido, video y juegos”.
Continúa
ES
23
Page 56

4 En la ficha “Audio”, en “Grabación de sonido”, seleccione
“Sony PCGA-UVC11” de la lista “Dispositivo
predeterminado”.
5 Haga clic en “Aceptar” para cerrar el cuadro de diálogo
“Propiedades de dispositivos de sonido y audio”.
Con el sistema operativo Windows Me
1 Haga clic en “Inicio”, seleccione “Configuración” y, a
continuación, haga clic en “Panel de control”.
Aparecerá la ventana “Panel de control”.
2 Haga doble clic en “Sonidos y multimedia”.
Aparecerá el cuadro de diálogo “Propiedades de Sonidos y multimedia”.
z Sugerencia
Si no aparece “Sonidos y multimedia” en el “Panel de control”, haga clic en “ver
todas las opciones del Panel de control” a la izquierda de la ventana.
3 En la ficha “Audio”, en “Grabación de sonido”, seleccione
“Sony PCGA-UVC11” de la lista “Dispositivo preferido”.
4 Haga clic en “Aceptar” para cerrar el cuadro de diálogo
“Propiedades de Sonidos y multimedia”.
Con el sistema operativo Windows 2000
1 Haga clic en “Inicio”, seleccione “Configuración” y, a
continuación, haga clic en “Panel de control”.
Aparecerá la ventana “Panel de control”.
2 Haga doble clic en “Sonidos y multimedia”.
Aparecerá el cuadro de diálogo “Propiedades de Sonidos y
multimedia”.
3 En la ficha “Audio”, en “Grabación de sonido”, seleccione
“Sony PCGA-UVC11” de la lista “Dispositivo preferido”.
ES
24
Page 57

4 En la parte inferior del cuadro de diálogo “Sonidos y
propiedades multimedia”, seleccione la casilla de
verificación “Usar sólo dispositivos preferidos”.
5 Haga clic en “Aceptar” para cerrar el cuadro de diálogo
“Propiedades de Sonidos y multimedia”.
25
ES
Page 58
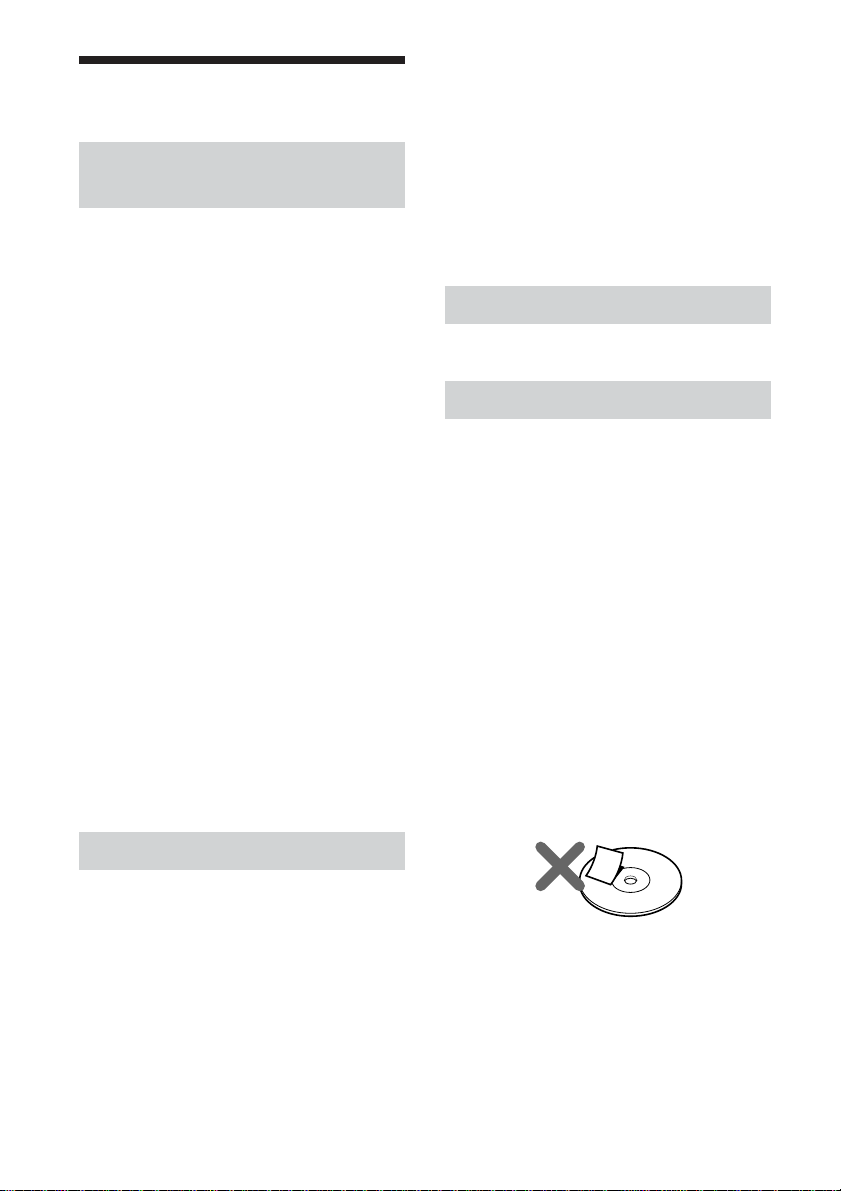
Precauciones
Lugares de empleo y
almacenamiento
No utilice ni guarde este producto en los
lugares que se enumeran a continuación,
de lo contrario la cámara podría dañarse.
• Ubicaciones sujetas a
temperaturas inusualmente
elevadas
No deje la cámara en el interior de un
vehículo en verano o en épocas de
mucho calor, ya que podría deformarse
o dañarse.
• Ubicaciones expuestas a la luz
solar directa o próximas a
aparatos de calefacción.
La cámara podría deformarse o dañarse.
• Lugares arenosos, como la playa.
No deje la cámara en un lugar donde
pueda haber arena, como la playa. Si lo
hace podría dañar la cámara y, en
ocasiones, los daños podrían ser
irreparables.
• No enfoque el lente hacia el sol.
Podrían producirse imágenes residuales
u otro tipo de daños del lente. Tenga
cuidado cuando coloque la cámara cerca
de una ventana o en exteriores.
sujetas a cambios bruscos de
temperatura. No utilice la cámara
inmediatamente después de trasladarla
de un sitio frío a otro caluroso, o tras un
aumento drástico de la temperatura
ambiente. De lo contrario, podría
producirse condensación. Deje reposar
la cámara unos instantes antes de
utilizarla.
Lente
No toque el lente.
Notas sobre los discos
Tenga en cuenta lo siguiente para proteger
los datos almacenados en discos.
• Si el borde de la etiqueta del disco se
sale de la superficie o la etiqueta no se
adhiere correctamente, es posible que se
pegue al interior de la unidad y
provoque fallos de funcionamiento en el
equipo. Asegúrese de que la etiqueta
está firmemente pegada a la superficie
del disco antes de utilizarlo. Sony no se
hace responsable del mal
funcionamiento del equipo ni de los
daños en los soportes que puedan causar
las etiquetas mal colocadas.
Lea detenidamente las hojas y notas de
las instrucciones del software de
etiquetas antes de proseguir.
Funcionamiento
• No retire el cable USB de la cámara
cuando ésta esté en funcionamiento, ya
que podría causar un mal
funcionamiento de la misma.
• No coloque objetos de ningún tipo
encima de la cámara.
• No deje la cámara en ubicaciones
ES
26
Page 59

• No toque la superficie en la que se
guardan los discos (la opuesta al de la
etiqueta) y sujete el disco como se
muestra en la ilustración.
• No raye el disco.
• No guarde el disco en ubicaciones
polvorientas o sujetas a gran humedad,
altas temperaturas o luz solar directa
• Procure no derramar ningún líquido en
el disco.
• Cuando no utilice el disco, colóquelo en
su caja para que no se dañe.
• Utilice un rotulador de punta de fieltro
para escribir en el disco.
Limpieza del lente
Elimine el polvo de la superficie del lente
mediante un cepillo de aire o un cepillo
suave.
Limpieza del disco
• Las huellas dactilares y otro tipo de
suciedad en la superficie del disco
pueden causar errores de lectura.
Mantenga el disco limpio.
• Límpielo desde el centro hasta los
bordes.
Mantenimiento
Limpieza de la unidad
Limpie la parte exterior de la cámara con
un paño suave y seco. Para quitar las
manchas rebeldes, humedézcalo con un
detergente neutro y poco concentrado. No
utilice disolventes, alcohol, bencina ni
ninguna otra sustancia que pueda dañar el
acabado.
• Para eliminar las manchas difíciles,
utilice un paño ligeramente humedecido
para limpiar el disco y después pase un
paño seco.
• No utilice bencina, limpiadores de
discos de vinilo, líquidos antiestáticos ni
otras sustancias que puedan dañar la
superficie del disco.
• No utilice limpiadores en discos
vírgenes. Para quitar el polvo, utilice los
limpiadores especiales para CD.
• Es posible que no pueda grabar en los
discos si la parte sin grabar tiene rayas o
polvo. No dañe los discos.
27
ES
Page 60

Obtención de
ayuda
Servicio de soporte informático de Sony
en la dirección:
http://www.sony.com/pcsupport .
En esta sección se describe cómo obtener
ayuda y soporte de Sony, así como
sugerencias para la resolución de
problemas de la Visual Communication
Camera.
Acerca de las opciones de
soporte de Sony
Sony proporciona distintas opciones de
soporte para Cámara de Communicación
Visual. Si desea realizar consultas acerca
de la cámara y el software, consulte lo
siguiente:
❑En esta guía se describe cómo utilizar
la cámara.
Para los clientes en los Estados
Unidos y Canadá
❑El Centro de servicio de
información al cliente de Sony
ofrece información acerca del equipo
portátil y otros productos Sony
compatibles con el mismo. Para ponerse
en contacto con el Centro de servicio de
información al cliente de Sony, llame al
1-888-4SONYPC (1-888-476-6972).
❑Servicio de soporte informático
de Sony Este servicio proporciona
acceso inmediato a información
relacionada con problemas frecuentes.
Introduzca una descripción del
problema y la base de datos de
conocimientos buscará la solución
correspondiente en línea. Visite el
Para los clientes en otros países
y regiones
❑El sitio Web en línea de VAIO
cuenta con un apartado de preguntas
más frecuentes y soluciones.
http://www.ita.sel.sony.com/
support/lapc
28
ES
Page 61

Especificaciones
Cámara de comunicación
visual
Captación de imágenes
Sensor de imágenes con escaneado progresivo
CMOS en color de 370.000 píxeles y 1/5,5"
(310.000 píxeles efectivos).
Lente
2 grupos de 2 lentes, F3,4
Distancia focal f=2,8 mm (0,1 pulgadas)
(equivale a una cámara de 35 mm (1,4 pulgadas) a
f=40 mm (1,6 pulgadas)
Distancia focal de 30 a ∞ mm (1,2 pulgadas)
Campo angular de visualización
Horizontal aprox. 47°
Vertical aprox. 36°
Balance de blancos
Automático/Interiores/Exteriores/Pausa
Velocidad de obturación
Automático/Pausa
Función para cancelar el parpadeo
Automático/50 Hz/60 Hz
Formato de vídeo
YUY2/RGB24 bits
Tamaños
80 × 60, 160 × 120, 320 × 240, 640 × 480,
176 × 144, 352 × 288
Número de fotogramas
Máximo: 30 fotogramas/segundo*
* Esta relación varía según las especificaciones
del equipo y de la aplicación que utilice.
Rango de giro de la cámara
Aprox. 220°
Consumo de energía
Aprox. 0,5 W
Interfaz
USB (energía suministrada directamente desde el
ordenador VAIO)
Conector
USB de tipo A
Dimensiones
Aprox. 60 × 34 × 33 mm
(2,4 × 1,4 × 1,3 pulgadas) (an × al × pr)
Longitud del cable
Aprox. 100 cm (39,4 pulgadas)
Peso
Aprox. 43 g (1,6 oz) (sólo la unidad principal)
Entorno operativo
Temperatura de funcionamiento
5°C a 35°C (41°F a 95°F)
(cambios de temperatura inferiores a 10°C (18°F)/
hora)
Humedad de funcionamiento
20% al 80% (sin condensación), siempre que la
humedad sea inferior al 65% a 35°C (95°F)
(lectura de higrómetro inferior a 29°C (84°F))
Temperatura de almacenamiento
–20°C a 60°C (–4°F a 140°F) (cambios de
temperatura inferiores a 10°C (18°F)/hora)
Humedad de almacenamiento
10% al 90% (sin condensación), siempre que la
humedad sea inferior al 20% a 60°C (140°F)
(lectura de higrómetro inferior a 35°C (95°F))
Accesorios suministrados
• Disco de instalación de PCGA-UVC11A
(CD-ROM × 1)
• Adaptador de montaje (1)
• Cinta adhesiva (3)
• Manual de instrucciones (1)
• Garantía (1)*
• CONTRATO DE LICENCIA DE
SOFTWARE PARA USUARIO FINAL (1)
* Los accesorios incluidos varían según el país y
región.
El diseño y las especificaciones están sujetos a
cambios sin previo aviso.
ES
29
Page 62

Solución de problemas
Si surge algún problema al utilizar la unidad, consulte la información que
se proporciona en esta sección. Si el problema persiste, consulte el
proveedor de Sony más cercano. Para obtener información de contacto,
consulte ”Obtención de ayuda“ de la página 28. Dispone también de los
manuales que se suministran con el equipo.
Problema Causa/solución
El equipo no reconoce
la cámara.
Las imágenes aparecen
con granos en el
buscador de Network
Smart Capture.
Aunque Smart Capture
se está ejecutando, no es
posible ver las imágenes
de la cámara.
• El cable USB no está conectado correctamente.
c Cierre el software que utiliza y vuelva a conectar el
cable.
• El controlador no está instalado.
c Compruebe que el controlador esté instalado, y si el
dispositivo no aparece correctamente, vuelva a instalar
el controlador. Para obtener más información, consulte
“Puesta en funcionamiento de la cámara” (página 6).
• El controlador no está instalado correctamente.
c Desinstale el controlador, reinicie el equipo y vuelva a
instalarlo. Para obtener más información, consulte
“Desinstalación del software” (página 10) e “Instalación
del software y el controlador” (página 6).
• El equipo no reconoce el concentrador raíz USB.
c Vuelva a instalar el sistema operativo Windows
correctamente.
• No se puede utilizar USB.
c Compruebe las propiedades del sistema para el equipo.
• La cámara se conecta al equipo a través de un
concentrador USB y la alimentación del concentrador
USB es insuficiente.
c Utilice un concentrador USB capaz de suministrar 500
mA al puerto.
• Si el equipo cuenta con varios conectores USB, conecte la
cámara a otro conector USB y compruebe que el equipo lo
reconoce correctamente.
• Si la cámara está conectada al conector USB de la
pantalla, significa que la pantalla del equipo no está
conectada correctamente.
c Compruebe el método de conexión.
Cuando se muestran motivos que se mueven rápidamente en
el buscador, pueden producirse franjas horizontales, o
aparecer líneas horizontales en la parte de la imagen en
movimiento. Sin embargo, ello no indica un funcionamiento
anómalo.
La cámara es compatible con Network Smart Capture, pero
no con Smart Capture. Asegúrese de utilizar el programa
adecuado.
30
ES
Page 63

Problema Causa/solución
Las fotos y en película
descargadas de la
cámara muestran
granos en la pantalla.
No puede ajustar el
volumen del altavoz
con la tecla Fn.
Al descargar películas
de la cámara, se
producen
interrupciones de la
secuencia de
fotogramas y del
sonido.
Las imágenes
descargadas de la
cámara se detienen
unos segundos.
Las imágenes
descargadas de la
cámara no se
visualizan.
• Es posible que se trate de luz reflejada en imágenes
capturadas bajo luz fluorescente.
• Si la imagen descargada contiene manchas oscuras, pueden
aparecer interferencias de color rojo o verde.
• El lente está sucio.
c Limpie el lente.
• La imagen está desenfocada.
c Enfoque la imagen con el anillo de enfoque.
Según el equipo que utilice, no podrá utilizar la tecla Fn para
ajustar el volumen cuando la cámara esté conectada al
equipo. Abra el control del volumen desde la barra de tareas
o área de notificación y ajuste el volumen (página 22).
• Pueden producirse interrupciones de la secuencia de
fotogramas según la configuración de los efectos de
Network Smart Capture. Si necesita más información,
consulte la ayuda de Network Smart Capture.
• Si hay varias aplicaciones de software abiertas a la vez, es
posible que disminuya la velocidad de proceso del equipo.
Cierre las aplicaciones de software que no necesite.
• La función de gestión de la alimentación del equipo está
activada.
c Compruebe la configuración de la velocidad de la CPU
del equipo. Para obtener más información, consulte los
manuales del equipo.
Es posible que las imágenes se detengan durante unos
segundos en las situaciones que se enumeran a continuación.
Sin embargo, no se trata de un defecto de funcionamiento.
• Cuando se utiliza la tecla Fn para realizar un acceso
directo.
• Cuando la carga del CPU es excesiva.
• Varias aplicaciones de software se ejecutan a la vez.
c Cierre una de las aplicaciones de software.
• Según el modo de pantalla y el número de colores que
utilice el equipo, y según determinadas condiciones de uso,
es posible que la memoria de vídeo sea insuficiente.
c Reduzca la resolución o el número de colores.
• Si tras realizar este procedimiento, las imágenes siguen sin
visualizarse, reinicie el equipo.
Continúa
ES
31
Page 64

Problema Causa/solución
El micrófono está
conectado, pero no el
sonido no se graba.
Al conectar el cable
USB, el cuadro de
diálogo “Asistente
para agregar nuevo
hardware” aparece en
la pantalla del equipo.
La cámara no funciona
en modo de ahorro de
energía y Windows es
inestable.
La pantalla de cristal
líquido del equipo se
oscurece o entra en
modo de ahorro de
energía mientras la
cámara está en uso.
El equipo no sale del
modo en espera de
vídeo.
El balance de blancos
es incorrecto.
• Compruebe que el control de grabación (o el control de
grabación de audio) esté configurado correctamente
(página 22).
• Si el controlador de dispositivos no está instalado, es
posible que el sonido no se grabe aunque el micrófono esté
conectado. Siga el procedimiento descrito en “Instalación
del software y el controlador” (página 6) para instalar el
controlador.
• En función del software que utilice, es posible que tenga
que ajustar el micrófono como método de entrada de audio
de manera manual. Para obtener más información sobre
este ajuste, consulte la documentación del software o la
sección “Si no puede grabar con el micrófono de la
cámara” (página 23).
El controlador de dispositivos no está instalado.
c Haga clic en “Cancelar” en el cuadro de diálogo “Asistente
para agregar nuevo hardware” y, tras desconectar el cable
USB del conector USB, siga el procedimiento descrito en
“Instalación del software y el controlador” (página 6) para
instalar el controlador.
Cierre todas las aplicaciones de software en uso y reinicie el
equipo. Si no puede reiniciarlo, consulte los manuales del
equipo y apáguelo.
c Al utilizar la almohadilla, el ratón o el teclado, el equipo
sale del modo de ahorro de energía.
c Puede ajustar los valores de la ficha “Combinaciones de
energía” del cuadro de diálogo “Opciones de energía” para
que el equipo no pase al modo de espera. También puede
modificar las opciones de alimentación con aplicaciones
independientes de gestión de la alimentación.
Para obtener más información, consulte los manuales
suministrados con el equipo.
Al utilizar la almohadilla, el ratón o el teclado, el equipo sale
del modo de ahorro de energía. Para obtener más
información, consulte los manuales suministrados con el
equipo.
Si cierra Network Smart Capture y “Hold” es el ajuste del
“White Balance” de la configuración de Network Smart
Capture, la próxima vez que inicie el equipo, el balance de
blancos será incorrecto.
c Si selecciona “Auto” para “White Balance” en la
configuración de Network Smart Capture y espera unos
instantes, el balance de blancos se ajustará
automáticamente.
32
ES
Page 65

Problema Causa/solución
Al descargar imágenes
fijas, la imagen no se
descargará
inmediatamente
después de pulsar el
botón CAPTURE. (Se
descarga una imagen
posterior al momento
de pulsar el botón
CAPTURE.)
Las imágenes
descargadas de la
cámara aparecen en
blanco.
Comparado con el
fondo, el motivo está
oscuro.
Al utilizar el software
NetMeeting, el audio
se corta y se oye con
dificultad.
Puede ver el ruido en
bloque de las
imágenes desde la
cámara.
Según la velocidad de la CPU del equipo, la carga de proceso
y el tamaño de la imagen, el cambio de modo de
funcionamiento de la cámara que se produce durante la
descarga de imágenes fijas puede causar un retraso entre el
momento en que se pulsa el botón CAPTURE y el momento
en que se descarga la imagen.
Si se ha seleccionado “Hold” para “Shutter Speed” de la
configuración de Network Smart Capture, la velocidad del
obturador no está establecida, por lo que las imágenes
aparecen en blanco.
c Si selecciona “Auto” para “Shutter Speed” en la
configuración de Network Smart Capture y espera unos
instantes, la velocidad del obturador se ajustará
automáticamente.
Si, por ejemplo, el fondo es demasiado brillante o el motivo
es demasiado oscuro, se recomienda activar la función de
compensación de luz trasera (BLC). Para obtener
información acerca de esta función, consulte la Ayuda
incluida con el software Network Smart Capture.
En función del entorno de red, es posible que el ancho de
banda de comunicación no sea suficiente. Conéctese a una
red con un ancho de banda superior.
Si conecta la cámara con dispositivos equipados con botones
de zoom/giro u otros botones y los utiliza cuando está usando
la cámara, puede ver el ruido en bloque de las imágenes
desde la cámara.
c Espere hasta que el problema se corrija por sí mismo o
reinicie el software que utiliza con la cámara para
corregirlo.
c Antes de utilizar estos botones, cierre el software que
utiliza con la cámara.
33
ES
Page 66

中文
警告
為防發生火災或觸電危險,請
勿讓本裝置淋雨或受潮。
• Sony , VAIO , 和和環境生態資訊
標誌是 Sony Corporation 的商標。
• Microsoft 和 Windows 是 Microsoft
Corporation 在美國和 / 或其他國家的註冊商
標。
• 系統、產品和維修的所有其他名稱均為其各自
所有者的商標。
• 在本手冊中,對 ™ 或 ® 標記未標明。
• 在本手冊中, Microsoft® Windows® 2000
Professional 被簡稱為 Windows 2000 。
• 在本手冊中,Microsoft® Windows® Millennium
Edition 被簡稱為 Windows Me 。
• 在本手冊中, Microsoft® Windows® XP Home
Edition 和 Microsoft® Windows® XP
Professional 被簡稱為 Windows XP 。
目錄
使用本產品之前 ................. 3
介紹........................... 3
隨機附件 ....................... 4
部件名稱 ....................... 5
設置攝影機 ..................... 6
安裝驅動程式和軟體 ......... 6
安裝無線網路驅動程式 ...... 11
連接攝影機 .................... 13
直接安裝時 ................ 13
當您不能直接安裝時 ........ 14
使用安裝配接器 .......... 14
使用粘貼帶加以固定 ...... 16
水平安裝 ................ 17
將攝影機安裝到三腳架上 .. 18
拔掉攝影機 ................ 19
使用攝影機 .................... 20
用攝影機擷取影像 .......... 20
向後擷取影像 .............. 22
設定攝影機麥克風音量 ...... 22
如果您不能用攝影機麥克風進行
錄音...................... 23
注意事項 ...................... 25
維護.......................... 26
獲取幫助 ...................... 27
規格.......................... 28
疑難排除 ...................... 29
CT
2
Page 67

使用本產品之前
這款攝影機是為配合Sony VAIO電腦使用所設計的,這些電腦必須預裝
有 Windows 2000 , Windows Me 或 Windows XP 作業系統,或者可以支
援預裝有 Windows XP 的 VAIO 電腦並且用由 Sony Corporation 提供的
Windows XP升級軟體進行了升級(在後面簡稱為“已經升級到Windows
XP作業系統的電腦”)。該攝影機不是為配合其他任何電腦使用所設計
的。
介紹
您可以使用這款攝影機來擷取靜止影像和動態影像,然後儲存在電腦
上。可以使用 Network Smart Capture 軟體把擷取的靜止影像和動態
影像透過e-mail發送給朋友和家人。也可以用攝影機的Web Camera模
式按您指定的間隔擷取靜止影像。這些影像可以即時上載到網站。也可
以用攝影機透過 Windows Messenger 或 NetMeeting 進行視訊聊天。
z 提示
詳情請參考 Network Smart Capture 軟體的說明。
CT
CT
3
Page 68

隨機附件
將攝影機從包裝盒中取出,並確定盒中含有下面列出的附件。
如果缺少任何附件,請聯絡您購買該產品時的 Sony 銷售商或者您所在
地區的 Sony 服務代表。
• 可視通訊攝影機(PCGA-UVC11A)
• PCGA-UVC11A 安裝光碟(CD-ROM)
• 安裝配接器
• 粘貼帶(大號 / 中號 / 小號)
• 操作說明(本文件)
• 軟體使用者授權合約書
CT
4
Page 69

部件名稱
前面
後面
攝影機
對焦環
麥克風
鏡頭
支架板
CAPTURE 按鈕
支架
CT
5
Page 70

設置攝影機
在使用這款攝影機之前,您必須用隨機提供的安裝光碟在您的電腦上安
裝所需的驅動程式和軟體。
附註
• 請確認您的電腦的光碟機(CD-ROM 或 DVD 光碟機)可用。在本文件中,CD-ROM 光
碟機或其他磁碟機被簡稱為“CD-ROM 光碟機”。有關如何連接外部CD-ROM 光碟機
的詳細資訊,請參閱與您的電腦或 CD-ROM 光碟機一起提供的手冊。
• 在將攝影機與您的電腦連接之前,請確認您已經安裝了本文件所提到的驅動程式
和軟體。
• 如果出現“新增硬體精靈”對話方塊,按一下“取消”,切斷攝影機與您的電腦
的連接並重新安裝驅動程式和軟體。
• Sony VAIO 型號PCG-SRX55TC/SRX55TH/SRX55TL/VX89/VX89P系列電腦預裝的無線
網路驅動程式與 PCGA-UVC11A USB 攝影機不相容。
為了正確使用,Sony 建議安裝與 PCGA-UVC11A USB攝影機一起提供的無線網路驅
動程式。請遵循下面的指導進行。如果您在美國,請造訪
http://www.sony.com/pcsupport 獲取更多資訊。
安裝驅動程式和軟體
安裝 PCGA-UVC11A 裝置驅動程式和 Network Smart Capture 軟體。
附註
在運行 Windows 2000 作業系統的電腦上,在安裝驅動程式和軟體前以
Administrator 身份登錄。在運行 Windows XP 作業系統的電腦上,在安裝驅動程
式和軟體前以管理員的身份登錄。
1 打開電腦。 Windows 作業系統啟動。關閉所有其他程式,把提
供的安裝光碟插入 CD-ROM 光碟機。
安裝程式自動啟動,螢幕上出現“Sony Visual Communication
Camera PCGA-UVC11A Application Installer Setup”的字樣。
2 從清單中選擇您所在地區。
3 確認選擇了您想安裝的軟體,然後按一下“Next”。
z 提示
如果已經安裝了該軟體,核取方塊將不會出現。
CT
6
Page 71

4 依照螢幕上出現的指示,按一下“Next”或“Previous”直到
設置結束且顯示關閉。
z 提示
當安裝過程結束後,可能會出現一條訊息提示您重新啟動您的電腦。如果是這
樣,按一下“Yes”。
5 將攝影機連接到您的電腦。
所需的驅動程式和軟體被自動安裝。如果出現訊息提示您重新啟動
您的電腦,按一下“Yes”。在您的Windows作業系統重新啟動後,
您就可以開始使用攝影機了。
檢查驅動程式是否被正確安裝
1 將攝影機連接到您的電腦。
有關連接的更詳細資訊,請參閱“連接攝影機”(第 13 頁)。
2 如果您使用 Windows XP 作業系統,按一下“開始”,在“我的
電腦”上按右按鈕一下,然後按一下“內容”。
“系統內容”對話方塊將會出現。跳到第 4 步。
如果您使用Windows XP 以外的作業系統,按一下“開始”,滑
鼠指向“設定”,然後按一下“控制台”。
“控制台”出現。
3 按兩下“系統”。
“系統內容”對話方塊出現。
4 按一下“硬體”標籤,然後按一下“裝置管理員”按鈕。您的
作業系統可能需要您按一下“裝置管理員”標籤。
“裝置管理員”視窗出現。
5 按一下“裝置管理員”視窗中“影像裝置”左邊的加號(+)。
如果出現“Sony Visual Communication Camera PCGA-UVC11”字
樣,驅動程式就已經被正確安裝了。
CT
7
Page 72

移除驅動程式
6 按一下“裝置管理員”視窗中“音效、視訊及遊戲控制卡”左
邊的加號(+)。
如果出現“Sony USB Microphone(PCGA-UVC11)”字樣,驅動程式
就已經被正確安裝了。
7 按一下“裝置管理員”視窗中“USB 控制器”(在某些系統中可
能是“通用序列匯流排控制卡”)左邊的加號(+)。
如果出現“Sony Visual Communication Camera PCGA-UVC11”字
樣,驅動程式就已經被正確安裝了。
8 關閉“裝置管理員”視窗。按一下“系統內容”對話方塊中的
“確定”按鈕。您的作業系統可能需要您按一下“系統內容”對
話方塊中的“確定”按鈕。
附註
如果驅動程式沒有出現或者在它旁邊有一個驚嘆號(!),這個驅動程式就沒有被正確
地安裝。按照“移除驅動程式”中的步驟執行,在刪除了這個驅動程式之後,重新
安裝它。
如果驅動程式沒有被正確地安裝,請按照下面的步驟來移除它,然後重
新安裝該驅動程式。
附註
• 在運行 Windows 2000作業系統的電腦上,在移除驅動程式前以Administrator 身
份登錄。在運行Windows XP作業系統的電腦上,在移除驅動程式前以一個管理員
的身份登錄。
• 在移除驅動程式之前,關閉由攝影機所使用的軟體應用程式。
1 將攝影機連接到您的電腦。
有關連接的更詳細資訊,請參閱“連接攝影機”(第 13 頁)。
CT
8
Page 73

2 如果您使用 Windows XP 作業系統,按一下“開始”,在“我的
電腦”上按右按鈕一下,然後按一下“內容”。
“系統內容”對話方塊將會出現。跳到第 4 步。
如果您使用Windows XP 以外的作業系統,按一下“開始”,滑
鼠指向“設定”,然後按一下“控制台”。
“控制台”將出現。
3 按兩下“系統”。
“系統內容”對話方塊出現。
4 按一下“硬體”標籤,然後按一下“裝置管理員”按鈕。您的
作業系統可能需要您按一下“裝置管理員”標籤。
“裝置管理員”視窗出現。
5 按一下“裝置管理員”視窗中“USB 控制器”(在某些系統中可
能是“通用序列匯流排控制卡”)左邊的加號(+)。
6 按一下“Sony Visual Communication Camera(PCGA-UVC11)”
或者“USB Composite Device”,然後按一下“解除安裝”。
“確認裝置移除”對話方塊出現。
7 按一下“確定”。
移除軟體
8 關閉“裝置管理員”視窗。按一下“系統內容”對話方塊中的
“確定”按鈕。您的作業系統可能需要您按一下“系統內容”對
話方塊中的“確定”按鈕。
如果不再使用 Network Smart Capture 軟體或您的電腦需要更多的硬
碟空間,可以按照下面的步驟來移除軟體。
附註
在運行 Windows 2000 作業系統的電腦上,在移除軟體前以 Administrator 身份登
錄。在運行 Windows XP 作業系統的電腦上,在移除軟體前以管理員身份登錄。
CT
9
Page 74

1 關閉 Network Smart Capture 軟體。
2 如果您使用Windows XP 作業系統,按一下“開始”,然後按一
下“控制台”。
如果使用其他作業系統,按一下“開始”,滑鼠指向“設定”,
然後按一下“控制台”。
“控制台”出現。
3 如果您使用 Windows XP 作業系統,按一下“新增或移除程
式”。
如果使用其他作業系統,按兩下“新增 / 移除程式”。
“新增或移除程式”視窗、“新增/ 移除程式內容”視窗或“新增 /
移除程式”對話方塊出現。
4 如果您使用Windows XP作業系統,在已安裝軟體的清單上,選
擇“ Network Smart Capture”,然後按一下“變更 / 移除”。
如果使用Windows Me作業系統,在已安裝軟體的清單上,選擇
“Network Smart Capture”,然後按一下“新增 / 移除”。
如果您使用Windows 2000作業系統,在已安裝軟體的清單上,
選擇“Network Smart Capture”,然後按一下“變更/移除”。
確認訊息出現。
5 按一下“確定”。
按螢幕上的指示完成此過程。
10
CT
Page 75

安裝無線網路驅動程式
只有PCG-SRX55TC/SRX55TH/SRX55TL/VX89/VX89P型號的電腦需要進行
這個步驟。
附註
如果不是上面提到的型號,請不要執行下面的步驟。
1 按一下“開始”,右按一下“我的電腦”,然後按一下“內容”。
“系統內容”對話方塊出現。
2 按一下“硬體”標籤,然後按一下“裝置管理員”按鈕。
“裝置管理員”視窗出現。
3 按一下“網路配接卡”左邊的加號(+),右按一下“ORiNOCO
Mini PCI Card”,然後按一下快捷功能表上的“更新驅動程
式”。
硬體更新精靈啟動。
4 在對話方塊中,選擇“從清單或特定位置安裝(進階)”,然
後按一下“下一步”。
5 選擇“不要搜尋,我將選擇要安裝的驅動程式”,然後按一
下“下一步”。
6 在“網路介面卡”中,按一下“從磁碟安裝”。
7 按一下“瀏覽”,選擇 CD-ROM 中的 UPDATE\WirelessLAN 資
料夾,然後按一下“確定”。
8 按一下“下一步”。
9 按一下“完成”。
11
CT
Page 76

確認無線網路驅動程式被正確安裝
1 按一下“開始”,右按一下“我的電腦”,然後按一下“內容”。
“系統內容”對話方塊出現。
2 按一下“硬體”標籤,然後按一下“裝置管理員”按鈕。
“裝置管理員”視窗出現。
3 按一下“網路配接卡”左邊的加號(+),右按一下“ORiNOCO
Mini PCI Card”,然後按一下快捷功能表上的“內容”。
4 按一下“驅動程式”標籤。
如果驅動程式的版本是“7.16.0.189”,它就已經被正確安裝了。
12
CT
Page 77

連接攝影機
這一節描述如何將攝影機連接到您的電腦上。
附註
• 當第一次使用攝影機時,在將它連接到您的電腦之前請確認您已經安裝了驅動程
式和軟體。有關安裝驅動程式和軟體的詳細資訊,請參閱“設置攝影機”(第 6
頁)。
• 在您的 Windows 作業系統正在啟動或者關閉時,請不要插入或拔出攝影機的 USB
電纜。否則可能會損壞攝影機或您的電腦。
• 不要在拔出攝影機的USB電纜後又立即將它插入。否則可能會導致您的電腦操作不
穩定。
• 這款攝影機可以確保USB資料傳輸的頻寬固定,以顯示高品質的影像。所以,如果
您使用一個USB集線器同時連接多個USB裝置,可用的資料傳輸頻寬可能不足以支
援進行正確的操作。
直接安裝時
若要安裝到使用凸型顯示面板的電腦上,如筆記型電腦或LCD組合式桌
上型電腦上所使用的那種顯示面板,可以按下面所示的方法將攝影機支
架安裝在顯示面板上,再直接安裝攝影機。
1 將攝影機安裝到顯示面板上。
支架板
支架
顯示面板
13
CT
Page 78

2 將攝影機的 USB 電纜連接到電腦的 USB 連接埠上。
請參閱隨您電腦一同提供的操作說明或電子版本的手冊以確定您電
腦上 USB 連接埠的位置。
z 提示
根據您使用的電腦的類型,也許有時不能直接連接攝影機。
如果出現這種情況,請參見下面的“當您不能直接安裝時”這一節,以獲取詳
細的說明。
當您不能直接安裝時
如果不能使用攝影機支架直接進行安裝,可按下述步驟之一安裝攝影
機。
• 使用安裝配接器(參見第 14 頁)
• 使用粘貼帶加以固定(參見第 16 頁)
• 水平安裝(參見第 17 頁)
• 將攝影機安裝到三腳架上(參見第 18 頁)
使用安裝配接器
如果您的電腦因顯示面板太厚而不能直接安裝攝影機,則不能使用攝影
機支架安裝攝影機。在此情況下,可按以下所示方法,使用安裝配接器
和粘貼帶(大號和中號)進行安裝。
14
1 將粘貼帶(大號和中號)粘到安裝配接器上。
撕掉兩面膠帶保護膜,將粘貼帶(大號和中號)粘到安裝配接器
上。然後,撕掉粘貼帶頂端的保護膜。
附註
用粘貼帶粘貼安裝配接器時,應確認攝影機和安裝配接器上沒有灰塵和汙漬。
粘貼帶(大號)
安裝配接器
粘貼帶(中號)
CT
Page 79

2 將安裝配接器固定到攝影機將要安裝的位置。
安裝配接器
3 將攝影機安裝到安裝配接器上。
握住支架板,按下圖所示拉出後支架,將攝影機裝於安裝配接器的
頂部。
安裝配接器
支架板
支架
支架板
支架
安裝配接器
4 將攝影機 USB 電纜連接到電腦的 USB 連接埠。
參閱隨您電腦一同提供的說明書以確定您電腦上 USB 連接埠的位
置。
顯示面板
CT
15
Page 80

使用粘貼帶加以固定
使用隨機附送的粘貼帶(小號)可以將攝影機固定到任何平坦的表面,
如 LCD 顯示器的頂部。
1 撕掉兩面膠帶保護膜,將粘貼帶(小號)粘到攝影機的底部。
附註
使用粘貼帶時,應確認攝影機上沒有灰塵和汙漬。
2 撕掉粘貼帶頂部的保護膜,將攝影機粘到將要安裝攝影機的位
置。
3 將攝影機的 USB 電纜連接到電腦的 USB 連接埠上。
參閱隨您電腦一同提供的說明書以確定您電腦上 USB 連接埠的位
置。
16
CT
Page 81

水平安裝
按下圖所示用安裝配接器將攝影機水平地安裝在平坦、穩定的表面,如
CRT 顯示器或您電腦的頂部。
1 將攝影機安裝到安裝配接器上。
握住支架板,然後將下圖中所示的後支架拉出,並將攝影機安裝到
安裝配接器上。請確認您將安裝配接器放置在一個水平、穩定的平
面上。
支架板
安裝配接器
支架
2 將攝影機的 USB 電纜連接到電腦的 USB 連接埠上。
參閱隨您電腦一同提供的說明書以確定您電腦上 USB 連接埠的位
置。
17
CT
Page 82

將攝影機安裝到三腳架上
您可以把攝影機安裝到三腳架上來擷取影像。
附註
• 在攝影機安裝到三腳架上時不要帶著它到處走動。如果攝影機摔落,它可能會受
到損壞。
• 使用的三腳架的螺絲釘的長度不要超過 7 mm 。如果您使用的三腳架的螺絲釘長
度超過 7 mm ,攝影機的連接可能會不牢固,並可能會受到損壞。
• 在安裝攝影機時,首先確認三腳架是牢固的,然後再安裝攝影機以保證它的水平
性。如果攝影機傾斜了,它可能會掉落。
• 當調節攝影機位置時,請用手同時支撐三腳架的把手和攝影機以防止攝影機掉
落。
• 當調節攝影機角度、焦距或者USB電纜位置的時候,請確認您用手支撐著攝影機。
• 在操作攝影機的 CAPTURE 按鈕的時候,請確認您用手支撐著攝影機。
• 請確認您使用的三腳架足夠大,以支撐攝影機的重量而不會掉落。
1 將三腳架螺絲釘旋入安裝配接器上的三腳架螺絲孔中。
三腳架螺絲釘
18
2 將攝影機安裝到安裝配接器上。
3 將攝影機的 USB 電纜連接到電腦的 USB 連接埠上。
參閱隨您電腦一同提供的說明書以確定您電腦上 USB 連接埠的位
置。
CT
Page 83

拔掉攝影機
• 如果您在電腦還在運行的時候拔掉攝影機,請按照下面的步驟進行。如果您不按
• 如果您的電腦已經關閉,您無須執行下面的步驟1。不過,如果您在電腦處於省電
1 關閉攝影機所使用的軟體。
2 拔出 USB 電纜,然後取下攝影機。
附註
照這些步驟進行,可能會損壞您的電腦。
模式的時候拔出 USB 電纜,然後又把它插上,攝影機可能不會被檢測到。
附註
• 如果您在拔出 USB 電纜的時候只拔電纜本身,可能會損壞電纜。在拔出電纜
的時候請確認您捏住了連接埠。
• 在將攝影機從安裝配接器上取下時,用手將支架板展開,然後取出攝影機。
19
CT
Page 84

使用攝影機
這一節描述如何使用攝影機。
附註
• 當第一次使用攝影機時,在將它連接到您的電腦之前請確認您已經安裝了驅動程
式和軟體。有關安裝驅動程式和軟體的詳細資訊,請參閱“設置攝影機”(第 6
頁)。
• 在攝影機所使用的軟體正在啟動或關閉時,請不要插入或拔出攝影機的USB電纜。
否則可能會導致您的電腦操作不穩定。
使用 DVgate Motion 的用戶請注意
在使用DVgate Motion 之前,請確認您已經將攝影機的 USB 電纜從
電腦的 USB 連接埠中拔出。
用攝影機擷取影像
可以使用 Network Smart Capture 軟體透過本攝影機來擷取影像。有
關如何安裝 Network Smart Capture 軟體的詳細資訊,請參閱“安裝
驅動程式和軟體”(第 6 頁)。
有關操作的詳細資訊,請參考 Network Smart Capture 軟體說明。
20
1 將攝影機連接到您的電腦。
在電腦運行的時候可以插入或拔出攝影機的 USB 電纜。
有關連接的更詳細資訊,請參閱“連接攝影機”(第 13 頁)。
2 啟動 Network Smart Capture 軟體。
CT
Page 85

3 旋轉對焦環來調節焦距。
4 按下 CAPTURE 按鈕來擷取影像。
除了將攝影機固定到您的電腦,您也可以像圖中一樣手持攝影機從
不同角度來擷取影像。
z 提示
如果您想在手持攝影機的時候使用它,我們建議您取消 Network Smart
Capture 軟體的鏡像顯示功能。
附註
在用這種方式使用攝影機之前,請確認Network Smart Capture軟體的鏡像顯
示功能被取消了。
z 提示
例如,如果背景太亮或被攝對象太暗了,我們建議您開啟 Network Smart Capture
軟體的背光補償功能。
CT
21
Page 86

向後擷取影像
您可以如下圖所示那樣旋轉攝影機,這使得您可以不用變換攝影機的位
置就可以擷取後面的影像。
攝影機
設定攝影機麥克風音量
22
附註
根據您所用作業系統的不同,名稱和螢幕顯示可能會有所不同。
1 按兩下螢幕底部工作列上的
能是 )。
“音量控制”視窗出現。
(根據您作業系統的不同,也可
2 在“ 選項”功能表中,按一下“內容”(根據您所用作業系統的
不同,也可能是“選項”)。
“內容”對話方塊出現。
3 在混音器裝置清單中選擇“Sony PCGA-UVC11”,然後按一下
“確定”。
“擷取”對話方塊出現。
z 提示
如果“擷取”對話方塊沒有出現,可能沒有正確地安裝驅動程式。參閱“檢查
驅動程式是否正確安裝”(第 7 頁),檢查驅動程式是否正確安裝了。
CT
Page 87

4 確認攝影機麥克風的音訊輸入被開啟。
確認“靜音”核取方塊沒有被選上。如果是,請清除它。
5 調節攝影機麥克風輸入的音量。
移動步驟 4 中控制器的滾動條來調節音量。
使用您的軟體進行一段視訊或音訊錄製。如果聲音可以被正確播放,設
定過程就結束了。
如果您不能用攝影機麥克風進行錄音
根據您所用軟體的不同,您可能不得不手動設定音訊輸入裝置。請您根
據您所用的作業系統,按照下面的步驟來把音訊輸入裝置設定為攝影機
麥克風。
z 提示
如果您使用 Network Smart Capture 軟體 , 您無需執行下面的步驟。
使用 Windows XP 作業系統
1 按一下“開始”,然後按一下“控制台”。
“控制台”出現。
2 按一下“聲音、語音、和音訊裝置”。
“聲音、語音、和音訊裝置”視窗出現。
3 按一下“聲音和音訊裝置”。
“聲音和音訊裝置內容”對話方塊出現。
4 在“音訊”標籤上,在“音效錄音”下面,從“預設裝置”中
選擇“Sony PCGA-UVC11”。
5 按一下“確定”,關閉“聲音和音訊裝置內容”對話方塊。
CT
23
Page 88

使用 Windows Me 作業系統
1 按一下“開始”,滑鼠指向“設定”,然後按一下“控制台”。
“控制台”出現。
2 按兩下“聲音與多媒體”。
“聲音與多媒體內容”對話方塊出現。
z 提示
如果在“控制台”中沒有出現“Sound and Multimedia”,按一下視窗左邊的
“檢視所有控制台選項”。
3 在“音訊”標籤上,在“音效錄音”下面,從“喜歡使用的裝
置”中選擇“Sony PCGA-UVC11”。
4 按一下“確定”,關閉“Sound and Multimedia Properties”
對話方塊。
使用 Windows 2000 作業系統
1 按一下“開始”,滑鼠指向“設定”,然後按一下“控制台”。
“控制台”出現。
2 按兩下“Sound and Multimedia”。
“Sound and Multimedia Properties”對話方塊出現。
24
3 在“音訊”標籤上,在“音效錄音”下面,從“喜歡使用的裝
置”中選擇“Sony PCGA-UVC11”。
4 在“只使用喜好的裝置”對話方塊的底部,將“Use only
preferred devices”核取方塊選上。
5 按一下“確定”,關閉“Sound and Multimedia Properties”
對話方塊。
CT
Page 89

注意事項
鏡頭
請不要觸摸鏡頭。
使用和存放位置
請不要在下列場所使用和存放這款產
品。否則可能會導致對攝影機的損壞。
• 異常高溫的場所
在高溫或夏季的時候,封閉車輛內部
的溫度會變得特別高,如果將攝影機
放置在這樣一個環境下,可能會導致
它變形或損壞。
• 受陽光直射或靠近發熱器具的場所
攝影機可能會變形或損壞。
• 沙地場所,例如海灘
不要將攝影機放置在可能有沙石存在
的地方,例如海灘或其他沙地區域。
否則可能會損壞攝影機,在某些情
況,甚至可能造成無法修復的損壞。
• 不要將鏡頭對著太陽。
否則可能導致內燃或其他鏡頭損傷。
在窗戶邊或戶外使用攝影機的時候要
當心。
操作
• 在操作中不要拔出攝影機的 USB 電
纜。否則可能會損壞攝影機。
• 不要在攝影機上放置任何物品。
• 避免將攝影機放在溫度變化劇烈的地
方。在將攝影機從寒冷場所移動到溫
暖場所後,或是周圍溫度劇烈上升
後,不要立即使用它。否則,可能會
導致攝影機內部結露。在使用前請將
攝影機放置一會。
光碟注意事項
請注意下列事項以保護光碟上儲存的資
料。
• 如果光碟上的標籤的邊緣翹起或標籤
粘得不牢,標籤可能粘到驅動器的內
部,使電腦發生故障。在使用光碟前
確認標籤已粘好。對於因不正確的標
籤粘貼引起的電腦故障或媒體損壞,
Sony 不承擔責任。在粘貼標籤前,請
詳閱標籤軟體和標籤紙的說明。
• 請不要觸摸資料面(標籤背面)。如下
圖中所示那樣拿取光碟。
• 不要劃傷光碟。
• 不要將光碟存放在高濕、高溫、陽光
直射或者灰塵過多的地方。
• 請不要讓任何液體濺到光碟上。
• 在不使用的時候將光碟放回盒中以防
止資料損壞。
• 在往光碟上寫字時,請使用油性氈
筆。
25
CT
Page 90
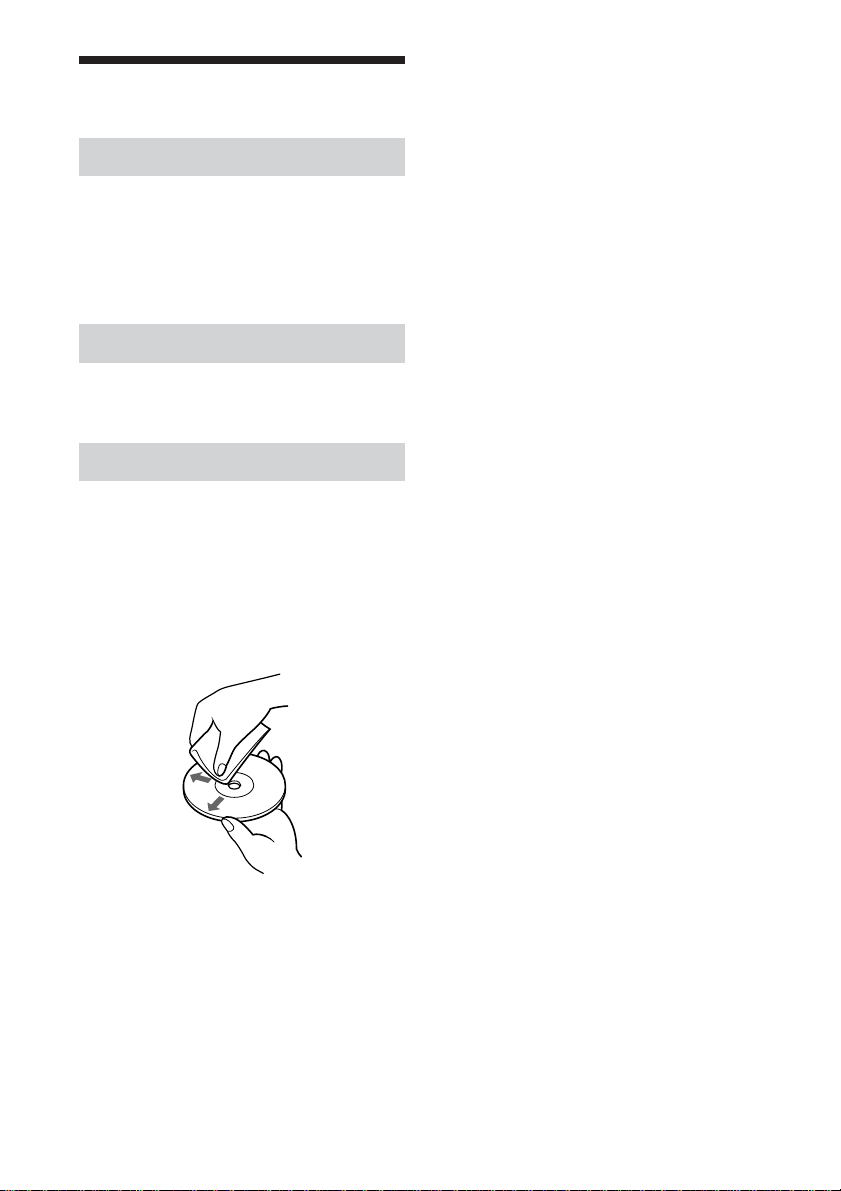
維護
清潔外殼
用一塊柔軟的乾布來清潔攝影機的外
部。為除去難以去除的污漬,用柔和
的、中性清潔劑將布弄濕。不要使用溶
劑、清洗酒精、汽油或其他可能損壞塗
層的物質。
清潔鏡頭
使用吹風刷或者軟刷從鏡頭前面除去所
有灰塵。
清潔光碟
• 光碟表面的指紋和其他污漬可能導致
讀取資料錯誤。請務必保持光碟清
潔。
• 清潔光碟時,請從中間往外輕輕地擦
拭。
• 不要使用汽油、錄音清洗液、抗靜電
液體或其他可能損壞光碟表面的物
質。
• 千萬不要用普通清潔器來清潔一張沒
用過的光碟。使用專門的CD清潔器來
除去灰塵。
• 如果在光碟的未記錄區有劃痕或灰
塵,可能會導致資料無法寫入。請小
心不要損壞光碟。
• 為去除難以去除的污漬,在擦拭光碟
前將布微微打濕。最後再用一塊乾布
擦拭。
CT
26
Page 91

獲取幫助
這一節告訴您如何從Sony獲取支援和幫
助,以及關於您的可視通訊攝影機的疑
難排除方面的一些提示。
關於 Sony 的技術支援
Sony為您的可視通訊攝影機提供了多種
技術支援方式。當您對您的攝影機或軟
體有疑問時,您可以選擇下列方式獲取
支援︰
❑本指南告訴您如何使用攝影機。
對於美國和加拿大用戶
❑Sony 客戶資訊服務中心為您的筆記型
電腦和其他和電腦配套的Sony產品提
供資訊。Sony客戶資訊服務中心的聯
絡電話是
1-888-4SONYPC(1-888-476-6972)。
❑Sony Online Support
此項服務可以使您快速獲取常見問題
的有關訊息。輸入存在的問題,
Knowledge Database將在線搜索出相
應的解決方案。您可以訪問 Sony
Online Support ,網址是︰
http://www.sony.com/pcsupport .
對於其他國家和地區的用戶
❑VAIO 網站提供了常見問題及其解決方
法。
vaio-online.sony.com/
27
CT
Page 92

規格
可視通訊攝影機
影像擷取規格
1/5.5" 370,000- 像素(310,000有效像素)彩
色 CMOS 順序掃描影像感應器。
鏡頭
2組2件,F3.4
焦距 f=2.8 mm
(相當於 35 mm 相機的 f=40 mm)
焦距範圍 30 mm 到無窮遠
觀察角度範圍 水平大約 47 °
垂直大約 36 °
白平衡
自動 / 室內 / 室外 / 固定
快門速度
自動 / 固定
搖晃取消
自動 /50 Hz/60 Hz
視訊擷取格式
YUY2/RGB 24 位元
尺寸
80× 60,160 ×120, 320×240 ,640× 480 ,
176 × 144 , 352 × 288
顯示畫格數
最大︰ 30 個畫格 / 秒 *
* 這個速率根據您所用電腦規格和所用軟體的
不同而變化。
攝影機旋轉角度
約 220 °
電量消耗
約 0.5 W
介面
USB(從 VAIO 電腦直接供電)
連接器
USB A 型
外形尺寸
約60×34×33 mm(寬×高×深)
電纜長度
約 100 cm
重量
約 43 g(只包括主機)
作業環境
作業溫度
5℃至 35℃
(溫度變化率應小於 10℃/ 小時)
作業濕度
20%至 80%(無結露),假設濕度在 35℃時小
於65%
(濕度計的讀數小於 29℃)
儲藏溫度
-20℃至 60℃
(溫度變化率應小於 10℃/ 小時)
儲藏濕度
10%至 90%(無結露),假設濕度在 60℃時小
於20%
(濕度計的讀數小於 35℃)
隨機附件
• PCGA-UVC11A 安裝光碟(CD-ROM × 1)
• 安裝配接器 (1)
• 粘貼帶 (3)
• 操作說明 (1)
• 軟體使用者授權合約書 (1)
設計和規格有變更時將不再另行通知。
28
CT
Page 93

疑難排除
如果在操作本產品時出現問題,請參閱本節提供的資訊。如果問題仍然
存在,請聯絡離您最近的Sony 銷售商。有關聯絡方面的資訊,請參閱
第27頁的“獲取幫助”。也可以參閱和您的電腦一起提供的手冊。
現象 原因 / 解決方法
您的電腦無法識別攝
影機。
影像在 Network
Smart Capture 觀景
窗中呈粒狀
從攝影機下載的靜止
影像和動態影像在顯
示器上呈粒狀
• 沒有正確連接 USB 電纜。
c 關閉目前使用的軟體,重新連接電纜。
• 沒有安裝驅動程式。
c 檢查是否安裝了驅動程式,如果裝置顯示不正確,請
安裝驅動程式。更詳細的資訊, 請參閱“設置攝影
機”(第 6 頁)。
• 驅動程式安裝不正確。
c 移除驅動程式,然後重新啟動電腦並重新安裝驅動程
式。(更詳細的資訊,請參閱“移除驅動程式”(第
8頁)和“安裝驅動程式和軟體”(第 6 頁))。
• 您的電腦不識別 USB 根集線器。
c 重新正確安裝您的 Windows 作業系統。
• USB 無法使用。
c 檢查您電腦的系統內容。
• 攝影機透過 USB集線器和電腦相連,而USB集線器提供
的電力不足。
c 使用可以為端口提供 500 mA 電流的 USB 集線器。
• 如果您的電腦配備有多個USB連接埠,將攝影機連接到
另一個 USB 連接埠,並檢查它是否能被正確識別。
• 如果攝影機是與顯示器上的USB連接埠連接的,顯示器
和您的電腦可能沒有正確地連接。
c 檢查連接方式。
當一個快速移動的物體在觀景窗中顯示的時候,影像中
可能會出現水平的帶狀,或者物體的移動部分會出現水
平線條。不過,這並不意味著攝影機出了故障。
• 在螢光下擷取的影像,光線可能會被反射進影像。
• 如果下載的影像包含黑色的斑點,可能出現了紅色或綠
色的雜訊。
• 鏡頭髒了。
c 清潔鏡頭。
• 影像超出了對焦範圍。
c 用對焦環調節焦距。
29
CT
Page 94

現象 原因 / 解決方法
您無法用 Fn 鍵調節
揚聲器音量。
在從攝影機下載動態
影像的時候,發生了
畫格遺失、聲音也不
連續。
從攝影機下載的影像
會暫停幾秒鐘
從攝影機下載的影像
無法顯示。
即使連接了麥克風,
仍然無法錄製聲音。
當您插入 USB 電纜的
時候,您的電腦螢幕
出現“新增硬體精靈”
對話方塊。
根據您所用電腦的不同,在攝影機連接到您的電腦的時
候,您可能無法使用Fn鍵來調節音量。從工作列或通知
區域打開音量控制來調節音量(第 22 頁)。
• 根據 Network Smart Capture 的效果設定的不同,可
能會發生畫格遺失。更詳細的資訊,請參閱 Network
Smart Capture 的說明。
• 如果同時打開了多個軟體應用程式,這可能超過了您電
腦的處理速度。關閉所有您不使用的軟體應用程式。
• 您的電腦的電源管理功能被開啟了。
c 檢查您電腦的CPU速度設定。有關設定的詳細資訊,
參閱與您電腦一起提供的手冊。
在下列情況影像可能會暫停幾秒鐘。不過,這並不是故
障。
• 當執行了一個使用了 Fn 鍵的鍵盤快捷方式時。
• 當 CPU 的負載過重時。
• 同時運行了多個軟體應用程式。
c 關閉其中一個軟體應用程式。
• 根據您所用電腦的螢幕顯示模式和色彩數的不同,還有
其他使用條件的不同,可用的顯示記憶體可能會不足。
c 減小顯示解析度,或者將所用色彩數調少。
• 如果您執行了上述過程而問題仍然存在,請重新啟動您
的電腦。
• 檢查錄音控制(或者音訊錄製控制)是否設定正確(第
22 頁)。
• 如果沒有安裝裝置驅動程式,即使連接了麥克風,仍然
可能無法錄製聲音。請按照“安裝驅動程式和軟體”
(第 6 頁)中所描述的步驟來安裝驅動程式。
• 根據您所用軟體的不同,您可能必須手動把麥克風設成
音訊輸入方式。有關該設定的詳細資訊,請參閱您的軟
體文件或者參閱“如果您不能用攝影機麥克風進行錄
音”(第 23 頁)。
沒有安裝裝置驅動程式。
c 按一下“新增硬體精靈”中的“取消”按鈕,然後,在
將 USB 電纜從 USB 連接埠拔出後,按照“安裝驅動程式
和軟體”(第 6 頁)中所描述的步驟來安裝驅動程式。
30
CT
Page 95

現象 原因 / 解決方法
操作沒有轉換到省電
模式, Windows 操作
變得不穩定。
在您使用攝影機的時
候,您的電腦的 LC D
變黑或進入了省電模
式。
電腦無法從顯示待機
模式中返回。
白平衡不正確
下載靜止影像時,當
您按了 CAPTURE 按鈕
以後,影像並不會被
立即下載。(在您按
了 CAPTURE 鈕以後出
現的一幅影像被下
載。)
從攝影機下載的影像
顯得發白。
與背景相比,被攝對
象顯得太暗
當使用NetMeeting軟
體時,聲音很模糊,
聽不清
您可以從攝影機看見
影像的塊狀雜訊。
關閉所有正在使用的軟體應用程式並重新啟動您的電
腦。如果您不能重新啟動您的電腦,請參閱與您電腦一
起提供的手冊,並關閉電源。
c 操作電腦的觸控板,滑鼠或者鍵盤來使電腦結束省電模
式。
c 您可以在“電源配置”對話方塊中,調節“電源選項”
標籤裡的設定,這樣您的電腦就不會進入待機狀態。您
也可以用獨立的電源管理應用程式來修改電源選項。更
詳細的情況資訊,請參閱與您電腦一起提供的手冊。
操作電腦的觸控板,滑鼠或者鍵盤來使電腦從省電模式
返回。更詳細的資訊,請參閱與您電腦一起提供的手
冊。
如果您在 Network Smart Capture 設定中選擇“White
Balance”為“Hold”,並關閉了 Network Smart
Capture ,下一次您重新啟動您的電腦,白平衡設定可
能會被不正確地調節。
c 如果您在 Network Smart Capture 設定中選擇“White
Balance”為“Auto”並等待一會,白平衡將會被自動
調節。
根據您的電腦的 CPU 運算速度、處理負載、影像大小的
不同以及在下載靜止影像時發生的攝影機操作模式的變
化,可能會導致在您按下 CAPTURE 按鈕的時間和影像實
際下載的時間之間有一段間隔。
如果在Network Smart Capture設定中“Shutter Speed”
選擇了“Hold”,又沒有設定合適的快門速度,影像可能
會顯得發白。
c 如果您在 Network Smart Capture 設定中選擇
“Shutter Speed”為“Auto”並等待一會,將會自動
設定合適的快門速度。
例如,如果背景太亮或者被攝對象太暗了,我們建議您
開啟背光補償功能。有關該功能的詳細情況資訊,請參
閱 Network Smart Capture 軟體附帶的說明。
根據您網路環境的不同,通訊頻寬可能不夠。用更高的
頻寬連接上網。
如果您使用了配備有縮放/旋轉按鈕或其他這樣按鈕的裝
置來連接攝影機,並且在使用攝影機時用到了這些按
鈕,您就可能從攝影機看見影像的塊狀雜訊。
c 等待問題自己被解決,或者重新啟動攝影機所用的軟體
來解決問題。
c 在使用這些按鈕之前,關閉攝影機所用的軟體。
31
CT
Page 96

한국어
경고
제품에 빗물이 들어가거나 습기가 차면
화재나 감전의 위험이 있습니다. 빗물이
나 습기를 방지해 주십시오.
이 기기는 가정용으로 전자파 적합등록
을 한 기기로서 주거지역에서는 물론 모
든 지역에서 사용할 수 있습니다.
• Sony, VAIO, , Eco Info의 로고는
Sony Corporation의 상표입니다.
• Microsoft 및 Windows는 미국 및 그 밖의 나라
에 있는 Microsoft Corporation의 등록 상표입
니다.
• 그 밖의 시스템 및 제품명, 서비스 명칭은 각 회사
의 상표입니다.
• 본 사용설명서에서는
않았습니다.
• 본 사용설명서에서는 Microsoft
2000 Professional은 Windows 2000로 표기했
습니다.
• 본 사용설명서에서는 Microsoft
Millennium Edition은 Windows Me로 표기
했습니다.
• 본 사용설명서에서는 Microsoft
Home Edition 및 Microsoft
Professional은 Windows XP로 표기했습니다.
™이나 ®을 낱낱이 표시하지
®
Windows
®
Windows
®
Windows® XP
®
Windows® XP
목차
본 제품을 사용하시기 전에 ............. 3
처음에 ........................................ 3
부속 액세서리 .............................. 4
각 부분 명칭 ................................ 5
카메라 셋업 ................................. 6
드라이버와 소프트웨어
설치하기 .............................. 6
무선 LAN 드라이버
설치하기 ............................. 11
카메라 연결하기 .......................... 13
직접 연결하는 경우 ................ 13
®
®
직접 장착할 수 없는 경우 ........ 14
마운팅 어댑터 사용하기 ....... 14
점착 시트를 사용해서
고정하기 ......................... 16
수평으로 고정하기 .............. 17
삼각대에 카메라 장착하기 .... 18
카메라 분리하기 .................... 19
카메라 사용하기 .......................... 20
카메라로 영상 캡쳐하기 .......... 20
뒤의 영상 캡쳐하기 ................ 22
카메라 마이크로폰의
음량 설정하기 ...................... 22
카메라 마이크로폰으로
녹음할 수 없을 때에는 ........... 23
사용상의 주의 ............................. 25
손질법 ....................................... 26
도움말 정보 ................................ 27
사양 .......................................... 28
문제 해결 ................................... 29
KR
2
Page 97

본 제품을 사용하시기 전에
본 카메라는 Windows 2000, Windows Me, Windows XP 운영체제
가 설치된 Sony VAIO 컴퓨터 또는 Windows XP에 대응하며 Sony
Corporation이 제공한 Windows XP 업그레이드 소프트웨어를 사용
해서 업그레이드한 VAIO 컴퓨터용(이하 “Windows XP 운영체제로 업
그레이드한 컴퓨터”라 함) 제품입니다. 그 밖의 컴퓨터에서는 본 카메라
를 사용할 수 없습니다.
처음에
본 카메라를 사용해서 정지영상 및 동영상을 캡쳐한 후 컴퓨터에 저장해
놓을 수 있습니다. Network Smart Capture 소프트웨어를 사용하면
본 카메라에서 캡쳐한 이미지 및 동영상을 이메일로 친구나 가족에게 송
신할 수도 있습니다. 또 카메라의 Web Camera 모드에서는 지정한 간격
으로 정지영상을 캡쳐할 수도 있습니다. 그리고 그 영상을 리얼타임으로
웹사이트로 업로드할 수도 있습니다. 또 카메라를 사용해서 Windows
Messenger 또는 NetMeeting 등으로 비디오 채팅을 즐기실 수 있습니
다.
z 힌트
자세한 것은 Network Smart Capture 소프트웨어 도움말을 참조하여 주십시오.
KR
KR
3
Page 98

부속 액세서리
상자에서 카메라를 꺼내고 상자에 다음과 같은 액세서리가 들어있는지 확
인하여 주십시오.
부족한 액세서리가 있을 때에는 본 제품을 구입하신 Sony 판매점 또는 거
주 지역의 Sony 서비스 담당자에게 연락하여 주십시오.
• 비주얼 커뮤니케이션 카메라(PCGA-UVC11A)
• PCGA-UVC11A 설치 디스크(CD-ROM)
• 마운팅 어댑터
• 점착 시트(대/중/소)
• 사용설명서(본 책자)
• 사용자 소프트웨어 라이센스 계약서
KR
4
Page 99

각 부분 명칭
앞면
뒷면
카메라
초점 링
마이크로폰
렌즈
암 플레이트
CAPTURE 버튼
리어 암
KR
5
Page 100

카메라 셋업
카메라를 사용하기 전에 제공된 설치 디스크를 사용해서 필요한 드라이버
와 소프트웨어를 컴퓨터에 설치해야 합니다.
주의점
• 컴퓨터에서 광드라이브(CD-ROM 또는 DVD 드라이브)를 이용할 수 있는지 확인하
여 주십시오. 본 책자에서는 CD-ROM 드라이브 및 그 밖의 디스크 드라이브를 “CDROM 드라이브”라 합니다. 외장 CD-ROM 드라이브의 자세한 연결 방법은 컴퓨터나
CD-ROM 드라이브에 부속된 사용설명서를 참조하여 주십시오.
• 카메라를 컴퓨터에 연결하기 전에 본 책자의 설명에 따라 드라이버와 소프트웨어를 설
치하여 주십시오.
•“새 하드웨어 추가 마법사” 대화 상자가 나타났을 때에는 “취소”를 클릭하고 컴퓨터에
서 카메라를 분리한 후 다시 설치하여 주십시오.
• PCGA-UVC11A USB 카메라를 사용하는 경우 Sony VAIO 컴퓨터 모델 PCGSRX55TC/SRX55TH/SRX55TL/VX89/VX89P용으로 설치된 무선 LAN 드라
이버에는 대응하지 않습니다.
바르게 사용하기 위해 Sony는 PCGA-UVC11A USB 카메라에 제공된 무선 LAN
드라이버를 설치하고 사용하실 것을 권장합니다. 다음 설명에 따라 주십시오. 자세한
것은 http://www.vaio-online.sony.co.kr을 참조하여 주십시오.
드라이버와 소프트웨어 설치하기
PCGA-UVC11A 장치 드라이버와 Network Smart Capture 소프트
웨어를 설치합니다.
주의점
Windows 2000 운영체제를 사용하는 컴퓨터에서는 Administrator로서 로그 온하고
드라이버와 소프트웨어를 설치하여 주십시오. Windows XP 운영체제를 사용하는 컴
퓨터에서는 관리자로서 로그 온하고 드라이버와 소프트웨어를 설치하여 주십시오.
1 컴퓨터 전원을 켭니다. Windows 운영체제가 시작됩니다. 다른
모든 프로그램을 종료하고 제공된 설치 프로그램 디스크를 CDROM 드라이브에 넣습니다.
설치 프로그램이 자동으로 시작되고 “Sony Visual Communication
Camera PCGA-UVC11A Application Installer Setup” 화면이
나타납니다.
2 거주지역을 목록에서 선택합니다.
KR
6
 Loading...