


Search
undefined
VAIO User Guide VCC111 Series Back | Back to Top
Search
Troubleshooting
Read This First
How to Use
Parts Description
Congratulations on your purchase of this computer and welcome to the on-screen User
Guide.
Setup
Network / Internet
Connections
Settings
Other Operations
Notifications
About your computer’s configuration
To find out about the configuration of your computer, visit the Sony online support website.
<
About configuration differences in your computer
Some features, options, and supplied items may not be available on your computer.
Features
Available features vary depending on the model or options you selected.
Not all features described in this manual are available depending on your model.
Illustrations
Illustrations, photos, or screenshots in this manual may look slightly different depending on
the model or options you selected.
Software
The preinstalled software may vary depending on the model or options you selected. The
software described in this manual may not be preinstalled on your computer.
Supplied manuals
The following manuals are supplied with your computer.
On-screen documentation
User Guide - Introduction version
A preinstalled manual with limited information of your computer focused on support and
internet connection. The User Guide - Introduction version is replaced with a complete
version of the User Guide (this manual) after update. [Details]
User Guide (this manual)
General information and operation instruction about your computer including support
and troubleshooting information
Printed documentation
Quick Start Guide
An overview of components connection, set-up information, etc.
Recovery, Backup and Troubleshooting Guide
Information on how to recover and back up your computer, as well as troubleshooting
information
Safety Regulations
Read carefully before activating the wireless functions such as the wireless LAN and
BLUETOOTH technology.
Other references
Help and Support
General information and technical assistance for your computer.
To access Help and Support, click
Choose from the following categories to find the answers you need.
Get started
with my
VAIO
Use my VAIO
Get help with Internet and wireless setup, security setup, personalizing
your VAIO computer, creating Recovery Media, and more.
Get assistance with your VAIO computer by accessing useful information
such as interactive VAIO tutorials, how -to articles, the VAIO technology
page, specifications, and system and software information. The available
information varies depending on the model you purchased.
(Start) and Help and Support.

You can find useful documentation such as general and model specific
user guide on the computer.
Troubleshoot
my VAIO
Software help files
Software help files may be included with the preinstalled software on your computer.
You may be able to access the help files from the help menu.
Maintain and troubleshoot your VAIO computer with VAIO Care, system
restore, backup and recovery, and contact Sony support.
Notice
Copyright 2011 Sony Corporation. All rights reserved.
This manual and the software described herein, in whole or in part, may not be
reproduced, translated, or reduced to any machine-readable form without prior written
approval.
Sony Corporation provides no warranty with regard to this manual, the software, or other
information contained herein and hereby expressly disclaims any implied warranties or
merchantability or fitness for any particular purpose with regard to this manual, the
software, or such other information. In no event shall Sony Corporation be liable for any
incidental, consequential, or special damages, whether based on tort, contract, or
otherwise, arising out of or in connection with this manual, the software, or other
information contained herein or the use thereof.
In the manual, the (TM) or (R) marks are not specified.
Sony Corporation reserves the right to make any modification to this manual or the
information contained herein at any time without notice. The software described herein
is governed by the terms of a separate user license agreement.
Sony Corporation is not liable and will not compensate for any lost recordings made to
your computer, external recording media, or recording devices or any relevant losses,
including when recordings are not made due to reasons including the computer failure,
or when the contents of a recording are lost or damaged as a result of the computer
failure or repair undertaken to the computer. Sony Corporation will not restore, recover,
or replicate the recorded contents made to the computer, external recording media, or
recording devices under any circumstances.
Features and specifications are subject to change without notice.
© 2011 Sony Corporation
Related Topic

Search
undefined
VAIO User Guide VCC111 Series Back | Back to Top
Search
Troubleshooting
Welcome
How to Use
Parts Description
Setup
Network / Internet
Connections
Settings
Other Operations
Notifications
Congratulations on the purchase of this VAIO(R) computer.
This User Guide - Introduction Version provides you with limited information about your
VAIO computer. To update this file to the complete version of the User Guide, see Updating
the User Guide to the Latest Version [Details] for more information.
Updating the User Guide to the Latest Version
Connecting to the Internet
Updating Your VAIO Computer
Solving Problems on Your VAIO Computer Using VAIO Care
Finding Support Information
Trademarks
^ Go to top
Updating the User Guide to the Latest Version
The complete version of the User Guide is available online. Update this User Guide Introduction Version to the complete version so that you can access it anytime even if you
are offline.
With the complete version of the User Guide you can view information about:
Parts description
Feature and operating instructions
Precautions
Troubleshooting information
Note
You will need to connect your VAIO computer to the Internet before updating to the
complete version of the User Guide. See Connecting to the Internet [Details] for more
information on connecting the computer to the Internet.
To get the complete version of the User Guide
By updating this User Guide - Introduction Version, you can get the complete version of
the User Guide with detailed information on your VAIO computer.
1. Connect your VAIO computer to the Internet.
2. Close this window, and then click
3. A window prompting you to update the manual appears. Follow the on-screen
instructions.
This file will automatically update to the complete version of the User Guide.
Hint
It may take some time to complete the update.
If the window prompting you to update the User Guide does not appear, make sure your
VAIO computer is connected to the Internet and repeat the above steps. If the update
window still does not appear, launch VAIO Update so you can find and download the
User Guide manually. See Updating Your VAIO Computer [Details] for more
information on VAIO Update.
(Start), All Programs, and VAIO Manual again.
To view help files for Windows OS and software operations
When you have trouble operating your VAIO computer, try referring to Windows Help and
Support or help files included with your applications.
To access Windows Help and Support, click
(Start) and Help and Support.
^ Go to top
Connecting to the Internet
You will need to connect your VAIO computer to the Internet before updating to the complete
version of the User Guide.
Before connecting to the Internet
Before using the Internet, you will need to sign up with an Internet Service Provider (ISP)
and set up devices required for connecting your VAIO computer to the Internet.
The following types of Internet connection services may be available from your ISP:
Fiber to the Home (FTTH)
Digital Subscriber Line (DSL)
Cable modem
Satellite
Dial-up
For more information on devices required for Internet access and how to connect your VAIO
computer to the Internet, ask your ISP.
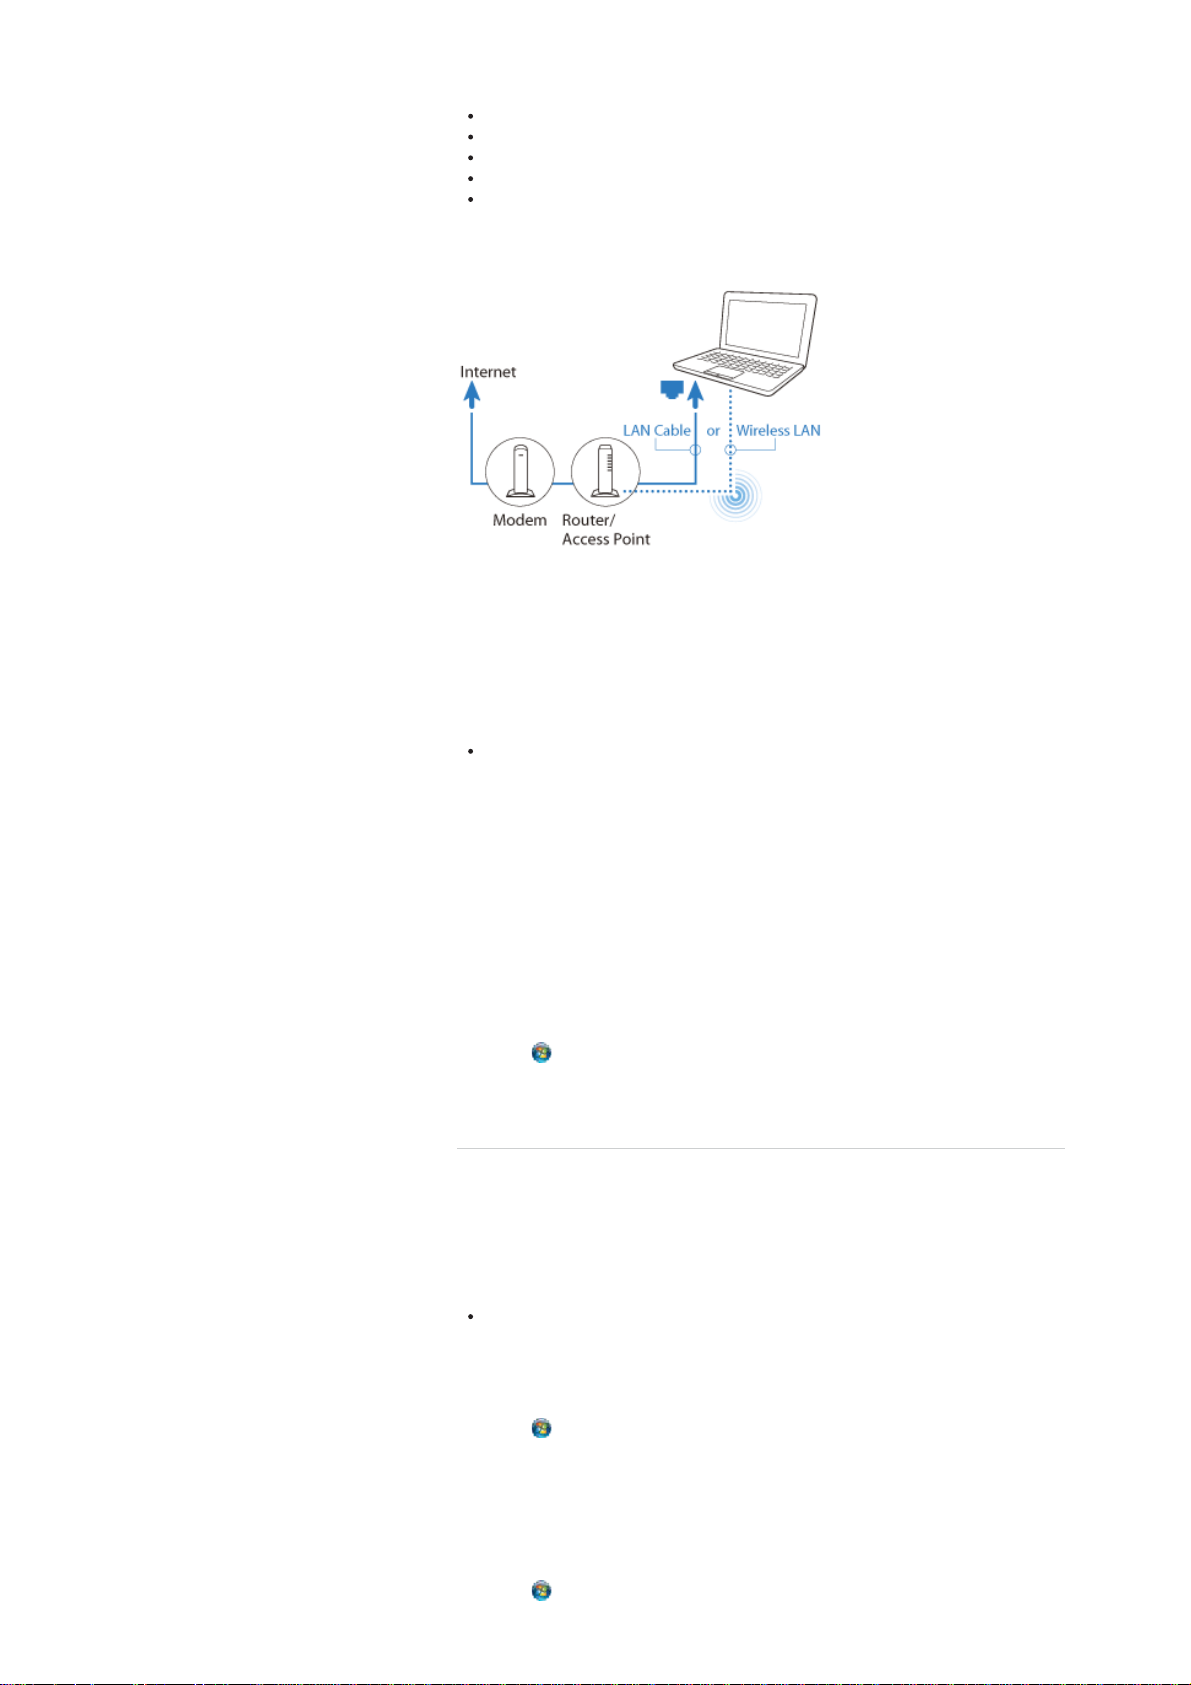
The following is one of the Internet connection methods as an example.
To use the network (LAN)
You can connect your VAIO computer to networks with a LAN cable (not supplied). Connect
one end of a LAN cable (not supplied) to the LAN port on the computer and the other end to
your network. For detailed settings and devices required for LAN access, ask your network
administrator.
Note
The connection, setting method, or required devices may vary depending on your
network environment.
To use the wireless LAN network (Wi-Fi)
You first need to establish wireless LAN communications between your VAIO computer and
an access point (not supplied). See Windows Help and Support for more information.
To start wireless LAN communications with VAIO Easy Connect
You can easily set up wireless LAN communications by following the instructions in VAIO
Easy Connect. VAIO Easy Connect supports you especially when you first set up a
wireless Internet connection at home or when you connect to a public wireless network (WiFi hotspot).
1. Click
2. Follow the on-screen instructions to setup wireless LAN communications.
(Start), All Programs, VAIO Easy Connect, and Easy Internet Connection
Setup.
^ Go to top
Updating Your VAIO Computer
Be sure to update your VAIO computer with the following software applications to enhance
the computer’s efficiency, security, and functionality.
Note
Your VAIO computer must be connected to the Internet to download the updates.
To use Windows Update
Windows Update enables you to make your VAIO computer more stable.
1. Click
2. Follow the on-screen instructions.
(Start), All Programs, and Windows Update.
To use VAIO Update
VAIO Update automatically notifies you of new updates available on the Internet then
downloads and installs them on your VAIO computer.
1. Click
(Start), All Programs, and VAIO Update.
2. Follow the on-screen instructions.
To update antivirus software
Help protect your VAIO computer against security threats by keeping Internet security
programs current with the latest updates. You can download and install the updates from the
website of the manufacturer.
1. Click
2. Follow the on-screen instructions to complete the updates.
(Start), All Programs, and select the antivirus software.
^ Go to top
Solving Problems on Your VAIO Computer Using VAIO
Care
With VAIO Care, you can regularly conduct performance checks and system tune-ups on
your VAIO computer to keep it running at optimum level. Launch VAIO Care whenever a
problem arises.
VAIO Care will provide appropriate measures and support information to solve the problem.
To launch VAIO Care
Press the ASSIST button while your VAIO computer is on.
Hint
Alternatively, click (Start), All Programs, and VAIO Care to launch VAIO Care.
See the help file included with VAIO Care for more information.
Pressing the ASSIST button while your VAIO computer is off launches VAIO Care
Rescue. VAIO Care Rescue can be used to recover the computer in case of
emergency, for example, when Windows does not start.
^ Go to top
© 2011 Sony Corporation
Finding Support Information
The Sony online support website provides instant access to information on commonly
encountered problems. You can find support information such as the support website URL in
VAIO Care or the supplied Quick Start Guide.
^ Go to top
Trademarks
SONY and the SONY logo are registered trademarks of Sony Corporation.
VAIO, the VAIO logo, and other Sony product or service names are trademarks or
registered trademarks of Sony Corporation.
Windows and the Windows logo are either registered trademarks or trademarks of
Microsoft Corporation in the United States and/or other countries.
All other names of system, products, and services are trademarks of their respective
owners.
In the manual, the TM or (R) marks are not specified.
^ Go to top
Copyright 2011 Sony Corporation
Search
undefined
VAIO User Guide VCC111 Series Back | Back to Top
Search
Troubleshooting
Checking Supplied Items
How to Use
Parts Description
Check all items packed with the product before use.
AC adapter
Setup
Network / Internet
Connections
Settings
Other Operations
Notifications
© 2011 Sony Corporation
Power cord
Battery pack
Hint
No recovery media is included because your computer can be recovered using data
stored in the hard disk drive or SSD. See Recovering from the Recovery Area for
more information.

Search
undefined
VAIO User Guide VCC111 Series Back | Back to Top
Search
Troubleshooting
Parts and Controls on the Front
How to Use
Parts Description
Setup
Network / Internet
Connections
Settings
Other Operations
Notifications
Describes the features on the front of the computer, such as buttons and indicator lights.
© 2011 Sony Corporation
1. Ambient light sensor
2. Built
-in microphone (monaural)
3. Built -in camera
4. Built
-in camera indicator
5. LCD
screen
6. Keyboard
7.
8. Touch pad [Details] (Left/right buttons [Details] )
9.
10.
Related Topic
Parts and Controls on the Sides
Parts and Controls on the Bottom
(power) key [Details]
Power indicator [Details]
Charge indicator [Details]

Search
undefined
VAIO User Guide VCC111 Series Back | Back to Top
Search
Troubleshooting
Parts and Controls on the Sides
How to Use
Parts Description
Setup
Network / Internet
Connections
Settings
Other Operations
Notifications
Describes the features on the sides of the computer, such as connection ports.
1. DC IN port [Details]
2. HDMI output port [Details]
3. Microphone jack [Details]
4. Headphones jack [Details]
1. SD memory card slot [Details]
2. SD memory card indicator [Details]
3.
USB ports [Details]
4. Security slot
© 2011 Sony Corporation
Related Topic
Parts and Controls on the Sides
Parts and Controls on the Bottom

Search
undefined
VAIO User Guide VCC111 Series Back | Back to Top
Search
Troubleshooting
Parts and Controls on the Bottom
How to Use
Parts Description
Setup
Network / Internet
Connections
Settings
Other Operations
Describes the features on the bottom of the computer.
1. Recovery button
2. SIM card slot
3. Battery connector [Details]
Notifications
© 2011 Sony Corporation
Related Topic
Parts and Controls on the Front
Parts and Controls on the Sides

Search
undefined
VAIO User Guide VCC111 Series Back | Back to Top
Search
Troubleshooting
Installing/Removing the Battery Pack
How to Use
Parts Description
Setup
Network / Internet
Connections
Settings
Other Operations
Notifications
Install the battery pack into the battery compartment on the bottom of your computer.
Do not use the computer without installing the battery pack as it may cause the
computer to malfunction.
To install the battery pack
1. Turn off your computer and close the LCD screen lid.
2. Slide the battery LOCK switches (1) inward.
3. Place the battery pack into the battery compartment until the projections (2) on either
side of the battery pack fit into the grooves (1).
4. Push down the circled area on the battery pack until the battery pack clicks into place.
5. Slide the battery LOCK switches outward to secure the battery pack on your computer.
To remove the battery pack
1. Turn off your computer and close the LCD screen lid.
2. Slide the battery LOCK switches inward.
3. Slide and hold the battery RELEASE latch (1), put your fingertip underneath the tab (2)
on the battery pack, and lift the battery pack in the direction of the arrow.

© 2011 Sony Corporation
4. Slide the battery pack diagonally to take out from the computer.
Note
You will lose all unsaved data if you remove the battery pack while your computer is on
or in Sleep mode and not connected to the AC adapter.
Be sure to turn off the computer before removing the battery pack.
Related Topic
Charging the Battery Pack
Notes on Using the Battery Pack
Shutting Down Your Computer

Search
undefined
VAIO User Guide VCC111 Series Back | Back to Top
Search
Troubleshooting
Charging the Battery Pack
How to Use
Parts Description
Setup
Network / Internet
Connections
Settings
The battery pack can be charged even while you are using your computer when the
computer is connected to a power source. The charging time may vary depending on
operating conditions.
1. Install the battery pack into your computer. [Details]
2. Plug the computer into an AC outlet. [Details]
Hint
The charging time varies depending on ambient temperature.
Note that at a low ambient temperature, it takes longer time to charge the battery pack.
To check the battery status of your computer, click the battery icon, such as (on
battery) or
(plugged in), in the desktop notification area.
Other Operations
Notifications
© 2011 Sony Corporation
Related Topic
Charge Indicator Status List
<

Search
undefined
VAIO User Guide VCC111 Series Back | Back to Top
Search
Troubleshooting
Notes on Using the Battery Pack
How to Use
Parts Description
Setup
Network / Internet
Connections
Settings
Other Operations
Notifications
Before using the battery pack, read the following precautions for correct use.
About the battery pack
The supplied battery pack is designed specifically for your computer.
For your safety, only use the supplied battery pack or an optional battery pack that is
specified by Sony.
For safety reasons, battery charging may be suspended at higher or lower temperatures.
While your computer is connected to an AC outlet with the AC adapter, it runs on AC
power, even if the battery pack is installed.
The battery pack is not fully charged at the time of delivery.
While the battery pack is in use or being charged, heat builds up in the battery pack.
This is normal and is not cause for concern.
Do not use your computer without installing the battery pack as it may cause the
computer to malfunction.
About battery discharge
After battery charge, the battery pack will gradually discharge over time even while not in
use. If it is left unused for an extended period of time, the battery power may be depleted. It
is recommended that you recharge the battery pack before use.
About battery life
Battery life varies depending on usage and settings.
About battery deterioration and replacement
The battery pack is consumable. The capacity gradually declines through repeated
cycles of recharging and discharging. As a result, the battery life becomes short even if it
is fully charged and eventually the battery pack reaches the end of its life.
If the battery pack quickly runs out of power after being fully charged or it has reached
the end of its life, replace it with a new one.
When using the power saving mode
If the battery pack runs out during Sleep mode, all unsaved data before your computer
enters Sleep mode will be lost and cannot be restored. Be sure to save all data before
placing the computer into Sleep mode.
In Hibernate mode, all data and status (such as window position, size, etc.) are saved to the
built-in storage device, so no data will be lost even if the battery pack runs out. If you cannot
connect the computer to an AC power source for an extended period of time, place the
computer into Hibernate mode.
When the battery pack is running out of power
If the battery pack runs out during your absence, power will be cut off and any data you are
working on will be lost.
While your computer is running on battery power, save data frequently and manually place
the computer into Hibernate mode if necessary.
© 2011 Sony Corporation
Related Topic
Notes on Using the Power Source

Search
undefined
VAIO User Guide VCC111 Series Back | Back to Top
Search
Troubleshooting
Connecting a Power Source
How to Use
Parts Description
Setup
Network / Internet
Connections
Settings
Connect your computer to an AC power source. Carefully read the precautions in Notes on
Using the Power Source before connection. [Details]
1. Plug one end of the power cord (1) into the AC adapter (3).
2. Plug the other end of the power cord into an AC outlet (2).
3. Plug the cable from the AC adapter (3) into the DC IN port (4) on your computer.
Other Operations
Notifications
© 2011 Sony Corporation
Note
Do not plug more than one device into the same AC outlet.
The shape of the AC adapter varies depending on the model you purchased.
Make sure that the power plug is firmly plugged into your computer.
Hint
You can purchase a power strip with a surge protector to help prevent damage to your
computer caused by sudden power surges (in an electrical storm, for example).
Related Topic
Installing/Removing the Battery Pack
Charging the Battery Pack
Notes on Using the Battery Pack
Turning on Your Computer
Shutting Down Your Computer
Notes on Using the Power Source

Search
undefined
VAIO User Guide VCC111 Series Back | Back to Top
Search
Troubleshooting
Turning on Your Computer
How to Use
Parts Description
Setup
Network / Internet
Connections
Settings
Other Operations
Notifications
Turn on your computer to start Chrome OS.
Carefully read the precautions in Notes on Using the Power Source before turning on.
[Details]
1. Install the battery pack on your computer [Details], and then connect to an AC outlet.
[Details]
2. Lift the LCD screen lid.
The computer automatically turns on and Chrome OS starts.
Note
Pressing the (power) key activates a screen saver.
If, however, you press and hold down the power key for more than four seconds, your
computer will be turned off.
Do not use your computer without installing the battery pack as it may cause the
computer to malfunction.
When opening the LCD screen lid, do not hold the built -in camera as it may cause your
computer to malfunction. (Built-in camera equipped models)
Hint
By default, your computer automatically enters Sleep mode after a certain period of
inactivity while the computer is connected to an AC outlet.
© 2011 Sony Corporation
Related Topic
Installing/Removing
Charging the Battery Pack
Notes on Using the Battery Pack
Connecting a Power Source
Shutting Down Your Computer
Notes on Using the Power Source
the Battery Pack

Search
undefined
VAIO User Guide VCC111 Series Back | Back to Top
Search
Troubleshooting
Shutting Down Your Computer
How to Use
Parts Description
Setup
Network / Internet
Connections
Settings
Other Operations
Notifications
Shut down your computer properly to avoid losing unsaved data.
1. Turn off any peripherals connected to your computer.
2. Save your data and close all running software applications.
3. Close the LCD screen lid.
The computer and the green power indicator light are automatically turned off.
Note
An improper shutdown may cause loss of unsaved data or your computer to
malfunction.
To disconnect your computer completely from an AC power source, turn off the
computer and unplug the power cord from the AC outlet.
Related Topic
Turning on Your Computer
<
Notes on Using the Power Source
© 2011 Sony Corporation

Search
undefined
VAIO User Guide VCC111 Series Back | Back to Top
Search
Troubleshooting
Charge Indicator Status List
How to Use
Parts Description
The charge indicator light turns on or blinks differently according to conditions.
Setup
Network / Internet
Connections
Settings
Other Operations
Notifications
© 2011 Sony Corporation
Lit in orange
Blinks along with the green
power indicator
Blinks along with the orange
power indicator
Blinks fast in orange
Related Topic
Charging the Battery Pack
The battery pack is charging. (Turns off when charging is
completed.)
The battery pack is running out of power. (Normal mode)
The battery pack is running out of power. (Sleep mode)
A battery error has occurred due to a failed battery pack
or an unlocked battery pack.

Search
undefined
VAIO User Guide VCC111 Series Back | Back to Top
Search
Troubleshooting
Notes on Using the Power Source
How to Use
Parts Description
Setup
Network / Internet
Read the following precautions before plugging your computer into an AC power source.
If you remove the battery pack while your computer is turned on or in Sleep mode but it
is disconnected from an AC power source, you will lose all unsaved data.
If you do not intend to use your computer for an extended period of time while it is
disconnected from an AC power source, place the computer into Hibernate mode or turn
it off.
Connections
Settings
Other Operations
Notifications
© 2011 Sony Corporation
Notes on the AC adapter
Use the AC adapter supplied with your computer or genuine Sony products. Do not use
any other AC adapter as it may cause a malfunction.
Do not connect the AC adapter to a power conversion device such as a travel power
converter. It may cause overheating or a malfunction.
If the AC adapter cable becomes damaged or broken, do not use it.
Notes on turning on your computer
Because your computer contains magnetic components, keep magnetic storage media,
such as floppy disks, away from the computer, as it may cause data corruption.
Your computer will automatically enter Sleep mode (with the default settings) when you
move magnetic devices closer to the computer. Keep magnetic devices away from the
computer.
Related Topic
Connecting a Power Source
Turning on Your Computer
Shutting Down Your Computer

Search
undefined
VAIO User Guide VCC111 Series Back | Back to Top
Search
Troubleshooting
Using the Touch Pad
How to Use
Parts Description
Setup
Network / Internet
Connections
By sliding your finger on the touch pad, you can move the pointer on the computer screen.
With the pointer on your desired item or object, press the left button or the right button to
execute various commands or display menus.
Settings
Other Operations
Notifications
To click
With the pointer (1) on your desired item or object, press the left button (3) once.
Alternatively, tap on the touch pad (2) once.
To double-click
With the pointer on your desired item or object, press the left button twice in a row.
Alternatively, tap on the touch pad twice quickly.
To right-click
With the pointer on your desired item or object, press the right button (4) once.
Depending on the location of the pointer, you can display various shortcut menus.
To drag
With the pointer on your desired object, press the left button once, and while holding down
the button, slide your finger on the touch pad.
Alternatively, tap on the touch pad twice quickly, and on the second tap, slide your finger.
To drag and drop
Drag an icon, such as a file, to a folder, a window, or a software icon to your desired location
and release the left button.
Alternatively, tap the icon twice quickly, and on the second tap, slide your finger to your
desired location and lift the finger off the touch pad.
To scroll
Slide your finger along the right edge up and down to scroll vertically in the active window.
Slide your finger along the bottom edge from side to side to scroll horizontally in the active
window.
Once vertical or horizontal scrolling is engaged, you can move your finger in circles on the
touch pad to keep scrolling without taking the finger off the touch pad. Move the finger in
circles from the right edge of the touch pad to scroll vertically, or from the bottom edge of the
touch pad to scroll horizontally. (The scroll function works only with applications that support
the function.)
To back or forward without moving the pointer
On the software that supports the back/forward function, such as a web browser, put two
fingers on the touch pad and slide them from side to side to perform the back/forward
operation without moving the pointer.
To zoom in or out
With some software applications, such as a photo viewer, pinch on the touch pad with two
fingers for zooming. Pinch open to zoom in or pinch close to zoom out.
Note
The scroll function and the zoom function may not work depending on the software you
are using.
The scroll function and the zoom function may be disabled by default.
Hint
Refer to the help file of the touch pad for detailed information on how to use the touch
pad.
Related Topic

© 2011 Sony Corporation

Search
undefined
VAIO User Guide VCC111 Series Back | Back to Top
Search
Troubleshooting
Connecting a TV with an HDMI Input Port
How to Use
Parts Description
Setup
Network / Internet
Connections
Settings
Other Operations
Notifications
You can connect a TV with an HDMI input port to your computer with an HDMI cable (not
supplied).
Refer to the manual that came with your TV for more information on installation and use.
1. Plug the power cord of your TV into an AC outlet.
2. Connect one end of an HDMI cable to the HDMI output port [Details] on your computer
and the other end to the TV.
3. Set the TV input to the external input.
The screen image of your computer is displayed on the TV.
© 2011 Sony Corporation
Note
If a device driver other than the one provided by Sony is used, the image will not be
displayed and audio will not be heard. Always use the device driver provided by Sony
for updates.
Related Topic

Search
undefined
VAIO User Guide VCC111 Series Back | Back to Top
Search
Troubleshooting
Adjusting the Speakers Volume
How to Use
Parts Description
Setup
Network / Internet
You can change the volume level of the speakers and headphones.
To decrease the volume using the volume control key
1. Press and hold down the (volume down) key.
The volume is turned down.
Connections
Settings
Other Operations
Notifications
© 2011 Sony Corporation
To increase the volume using the volume control key
1. Press and hold down the (volume up) key.
The volume is turned up.
To turn on/off the volume using the muting key
1. Press the (muting) key.
The volume is turned off.
Press the key again to turn on the volume.
Related Topic
Connecting External Speakers or Headphones

Search
undefined
VAIO User Guide VCC111 Series Back | Back to Top
Search
Troubleshooting
Connecting External Speakers or Headphones
How to Use
Parts Description
Setup
Network / Internet
Connections
Settings
Other Operations
Notifications
You can connect external sound output devices (such as speakers or headphones) to your
computer.
1. Connect external speakers to the headphones jack
(not supplied).
[Details] with a speaker cable
© 2011 Sony Corporation
Note
Turn down the volume of the speakers before turning them on.
Hint
Refer to the manual that came with your speakers or headphones.
Related Topic
Adjusting the Speakers Volume
Connecting an External Microphone

Search
undefined
VAIO User Guide VCC111 Series Back | Back to Top
Search
Troubleshooting
Connecting an External Microphone
How to Use
Parts Description
Setup
Network / Internet
Connections
Settings
Other Operations
Notifications
You can connect an external microphone to your computer and enjoy voice chat, etc.
1. Plug the microphone cable into the microphone jack
Note
If you connect or disconnect the microphone to/from your computer while running voice
recording software, voice recording may fail or the software may exit.
Connect the microphone and select it as the sound recording device for Windows before
starting the software.
Hint
Use a plug-in-power microphone.
Refer to the manual that came with your microphone.
If microphone feedback occurs, move the microphone away from your speakers.
[Details].
© 2011 Sony Corporation
Related Topic
Connecting External Speakers or Headphones

Search
undefined
VAIO User Guide VCC111 Series Back | Back to Top
Search
Troubleshooting
About the Internet Connection Services
How to Use
Parts Description
Setup
Network / Internet
Connections
The following types of Internet connection services are available. You can select from among
the services according to your preference, for example, communication speed or a usage
fee. For detailed information on a variety of connection services, contact Internet Service
Providers (ISPs).
Fiber to the Home (FTTH)
Cable modem
Digital Subscriber Line (DSL)
Satellite
Settings
Other Operations
Notifications
© 2011 Sony Corporation
Related Topic
<
Starting Wireless LAN Communications

Search
undefined
VAIO User Guide VCC111 Series Back | Back to Top
Search
Troubleshooting
About the Wireless LAN Standards
How to Use
Parts Description
Setup
Network / Internet
Connections
Settings
Other Operations
Notifications
The Wireless Local Area Network (WLAN) allows your computer to connect to a network
through a wireless connection.
The WLAN uses the following IEEE 802.11a/b/g/n standard, which specifies the type of
technology used.
Refer to the specifications to find out about the configuration of the computer.
WLAN standard Frequency band Remarks
IEEE 802.11a 5 GHz
IEEE 802.11b/g 2.4 GHz
IEEE 802.11n 5 GHz/2.4 GHz
Related Topic
Exclusive to models compliant with the IEEE
802.11a/b/g/n standard.
The IEEE 802.11g standard provides higher -speed
communications than the IEEE 802.11b.
For models compliant with the IEEE 802.11b/g/n
standard, only 2.4 GHz band can be used.
© 2011 Sony Corporation
Starting Wireless LAN Communications
Stopping Wireless LAN Communications
Notes on Using the Wireless LAN Function

Search
undefined
VAIO User Guide VCC111 Series Back | Back to Top
Search
Troubleshooting
Starting Wireless LAN Communications
How to Use
Parts Description
Setup
You can connect your computer to a Wi-Fi network and access the Internet wirelessly.
Click
range. The secure network is displayed with
information for the network.
(the network icon) in the upper right corner to detect available Wi-Fi networks in
and you will be prompted to enter user
Network / Internet
Connections
Settings
Other Operations
Notifications
About supported types of Wi-Fi networks
Sony Chromebook (TBD) supports the following wireless standards and security protocols.
Wireless standards: 802.11a/b/g/n
Security protocols: WEP, WPA-PSK, WPA-Enterprise, (TBD)
Sony Chromebook does not support networks which require security credentials as of now.
To enable Wi- Fi on your computer
1. Click (the network icon) in the upper right corner.
2. Select @@@Enable Wi-Fi@@@ to enable Wi-Fi.
Your computer automatically detects available networks in range and displays them on
the network menu.
Hint
When @@@Disable Wi-Fi@@@ is displayed on the menu, it indicates Wi-Fi is
currently enabled.
3. Select your desired network.
You will be prompted to enter a password when connecting the computer to the
network protected by the password.
To use the security protocol (WPA or WPA2 -Personal), select WPA.
The network icon flashes while the Wi-Fi connection is established. When the connection is
is displayed.
lost,
Some networks allow access only to certain MAC addresses. To check the MAC address of
your computer, click here.
About the network status
When your computer is connected to the Internet using a Wi-Fi network, the network status
icon in the upper right corner shows the current status of the network connection.
© 2011 Sony Corporation
Indicates your computer is connected to a Wi-Fi network. The number of lit bars
indicates the strength of the network connection.
Indicates your computer is not connected to a Wi-Fi network.
Hint
You can automatically connect your computer to the Wi-Fi network that is saved as a
network profile on the computer.

Search
undefined
VAIO User Guide VCC111 Series Back | Back to Top
Search
Troubleshooting
Stopping Wireless LAN Communications
How to Use
Parts Description
Setup
Network / Internet
Connections
Settings
Other Operations
Notifications
To stop wireless LAN (Wi-Fi) communications, follow these steps.
1. Click
2. Select @@@Disable Wi-Fi@@@.
(the network icon) in the upper right corner.
When @@@Enable Wi-Fi@@@ is displayed on the menu, it indicates Wi-Fi is
currently disabled.
© 2011 Sony Corporation

Search
undefined
VAIO User Guide VCC111 Series Back | Back to Top
Search
Troubleshooting
Notes on Using the Wireless LAN Function
How to Use
Parts Description
Setup
Network / Internet
Connections
Settings
Other Operations
Notifications
Before using the wireless LAN function, read the following precautions for correct use.
In some countries or regions, using the Wireless LAN products may be restricted by the
local regulations.
Wireless LAN devices work on the 2.4 GHz band, which is used by a variety of devices.
Wireless LAN devices use the technology to minimize radio interference from other
devices that use the same band; however, radio interference may still slow
communication speeds, reduce communication range, or cause communication failure.
If both the BLUETOOTH function and the 2.4 GHz wireless LAN function of your
computer are enabled, interference may occur and cause slower communication speeds
or other problems.
To communicate via a wireless LAN while you are on the road, you may need to
contract with a wireless LAN connection service provider.
If your computer is equipped with the IEEE 802.11a/b/g/n standard, outdoor use of the 5
GHz wireless LAN function is prohibited by law.
The communication speed and range may vary depending on the following conditions:
Distance between devices
Existence of obstacles between devices
Device configuration
Radio conditions
Ambient environment (including wall material, etc.)
Software in use
Communications may be cut off depending on radio conditions.
The data transfer rate specified in the specification is the theoretical maximum, and may
not reflect actual data transfer rate.
Actual communication speed may not be as fast as the one displayed on your computer.
The 2.4 GHz Wireless LAN and 5 GHz Wireless LAN frequency bands are not
communicable with one another.
The data transfer rate of IEEE 802.11g and IEEE 802.11n (2.4 GHz) may be affected by
interference when used with an IEEE 802.11b product. Also, IEEE 802.11g and IEEE
802.11n automatically lower the transfer rate to maintain compatibility with an IEEE
802.11b product. The transfer rate may be regained by changing the channel settings of
your access point.
The IEEE 802.11a standard and the IEEE 802.11n standard are not available on ad-hoc
networks.
To stop the wireless LAN function abruptly, turn off your computer.
The WLAN standard includes the encryption methods: Wired Equivalent Privacy (WEP),
which is a security protocol, Wi-Fi Protected Access 2 (WPA2), and Wi-Fi Protected
Access (WPA). Proposed jointly by the IEEE and Wi-Fi Alliance, both WPA2 and WPA
are specifications of standards based on interoperable security enhancements that
increase the level of data protection and access control for existing Wi-Fi networks.
WPA is designed to be forward compatible with the IEEE 802.11i specification. It utilizes
the enhanced data encryption Temporal Key Integrity Protocol (TKIP) in addition to user
authentication using 802.1X and Extensible Authentication Protocol (EAP). Data
encryption protects the vulnerable wireless link between clients and access points.
Besides that, there are other typical LAN security mechanisms to ensure privacy, such
as: password protection, end -to-end encryption, virtual private networks, and
authentication. WPA2, the second generation of WPA, provides stronger data protection
and network access control and is also designed to secure all versions of 802.11
devices, including 802.11b, 802.11a, 802.11g, and 802.11n standards, multi-band and
multi-mode. In addition, based on the ratified IEEE 802.11i standard, WPA2 provides
government grade security by implementing the National Institute of Standards and
Technology (NIST) FIPS 140-2 compliant AES encryption algorithm and 802.1X -based
authentication. WPA2 is backward compatible with WPA.
Related Topic
About the Wireless LAN Standards
Starting Wireless LAN Communications
Stopping Wireless LAN Communications
© 2011 Sony Corporation

Search
undefined
VAIO User Guide VCC111 Series Back | Back to Top
Search
Troubleshooting
Using the Wireless WAN
How to Use
Parts Description
Setup
Network / Internet
Connections
Settings
Other Operations
Notifications
This topic describes how to connect your computer to the Internet using the wireless WAN
(WWAN).
1. Sign up with a telecommunications carrier that provides the wireless WAN service.
Once you have signed up with the carrier, you will receive documents, such as a
manual, from the carrier.
2. Follow the instructions in the manual provided by the carrier.
3. Configure the connection settings on your computer.
Refer to the Google website for more information on how to configure the wireless
WAN connection settings.
Note
Be sure to follow the instructions in the manual provided by the carrier.
Be sure to establish security measures against unauthorized access to your computer
before using the wireless WAN for the first time.
You may be asked to provide your credit card information by the carrier you sign up
with.
Charges vary depending on the carrier you sign up with.
© 2011 Sony Corporation

Search
undefined
VAIO User Guide VCC111 Series Back | Back to Top
Search
Troubleshooting
Connecting a USB Device
How to Use
Parts Description
Setup
Network / Internet
Connections
Settings
Other Operations
Notifications
You can connect a Universal Serial Bus (USB) device such as a mouse, floppy disk drive,
speaker or printer to your computer. Installation of the device driver software supplied with
the USB device may be required when connecting. Refer to the manual that came with the
device for more information.
1. Choose the USB port (1) you prefer to use.
2. Plug the USB device cable (2) (not supplied) into the USB port.
Note
You may need to install the driver software supplied with your USB device before use.
Refer to the manual that came with the USB device for more information.
In order to print documents, be sure the USB printer is compatible with your version of
Windows.
Before disconnecting USB speakers from your computer, stop DVD or music playback or
turn off the computer. If you disconnect the USB speakers during playback, it may cause
a malfunction.
For information on how to remove a USB device, refer to the manual that came with the
device.
To protect your computer and/or USB devices from damage, observe the following:
When moving your computer with USB devices connected, avoid exposing the USB
ports to shock or impact.
Do not put your computer in a bag or carrying case with USB devices connected.
© 2011 Sony Corporation
Hint
The USB ports on your computer are compliant with the USB 2.0 standard.
Related Topic

Search
undefined
VAIO User Guide VCC111 Series Back | Back to Top
Search
Troubleshooting
Inserting/Removing SD Memory Cards
How to Use
Parts Description
Setup
Network / Internet
Your computer is equipped with an SD memory card slot. You can use this slot to transfer
data among digital cameras, camcorders, music players, and other audio/video devices.
The SD memory card slot on the computer can accommodate the following memory cards:
SD memory card
SDHC memory card
SDXC memory card
Connections
Settings
Other Operations
Notifications
To insert an SD memory card
1. Locate the SD memory card slot.
2. Hold the SD memory card with the arrow pointing toward the slot, and carefully slide it
into the slot until it clicks into place.
The SD memory card icon will appear in the Computer window after you insert the card into
the slot.
Note
Be careful not to insert an SD memory card with wrong orientation. If you force it into the
slot upside down, the slot may be damaged. Refer to the manual that came with the SD
memory card for more information.
The SD memory card icon will not appear in the Computer window until you insert the
card into the slot.
Hint
When you insert the SD memory card into the slot for the first time, you may be
prompted to install driver software. If prompted, follow the on-screen instructions to
install the software.
While data is being read from or written to the SD memory card, the media access
indicator light is on.
© 2011 Sony Corporation
To remove an SD memory card
1. Locate the SD memory card slot.
2. Check that the media access indicator light is off.
3. Push in the SD memory card toward your computer and release.
4. Pull the SD memory card out of the slot.
Related Topic
Notes on Using SD Memory Cards

Search
undefined
VAIO User Guide VCC111 Series Back | Back to Top
Search
Troubleshooting
Notes on Using SD Memory Cards
How to Use
Parts Description
Setup
Network / Internet
Connections
Settings
Other Operations
Notifications
Before using SD memory cards, read the following precautions for correct use.
Keep an SD memory card out of reach of children. There is a risk of swallowing it.
Do not touch the SD memory card connector with your finger or metal objects.
An SD memory card contains delicate electronic components. Do not impact, bend or
drop it.
Do not disassemble or modify an SD memory card.
Do not wet an SD memory card.
Do not use or store in a location subject to:
Extremely high temperature, such as in a car parked in the sun
Direct sunlight
High humidity or corrosive substances
Excessive dust
Be sure to use SD memory cards and adaptors that are compliant with the standards
supported by your computer. Incompatible cards and adaptors may get stuck in the slot,
causing damage to the computer.
You cannot write data to an SD memory card that is write -protected.
It is recommended that you make a backup copy of important data.
Stored data may be lost or corrupted if:
You remove an SD memory card or turn off your computer while the media access
indicator light is on.
You use an SD memory card at a place where static electricity or electrical noise may
disturb the card.
When carrying an SD memory card, be sure to put it in its case to avoid static electricity.
Before using an SD memory card with a device other than a computer, such as a digital
camera or a portable audio, format (initialize) the SD memory card using the device.
Some devices may not support the file format for computers and show you a message
that recommends you to format the SD memory card. In this case, copy data from the
card to your computer and format the card using the device. All data in the SD memory
card will be deleted when you format it.
Refer to the manual that came with the device for more information.
Do not insert foreign objects into the SD memory card slot.
The SD memory card slot can be used for reading/writing supported memory cards only,
and cannot be used for other purposes.
SD memory cards (up to 2 GB), SDHC memory cards (up to 32 GB) and SDXC memory
cards (up to 64 GB) available as of June 2011 have been tested and found compatible
with your computer. However, it is not guaranteed that all SD memory cards, SDHC
memory cards or SDXC memory cards will be compatible with the computer.
Do not attempt to insert a memory card or memory card adaptor of a different type into
the memory card slot. An incompatible memory card or memory card adaptor may get
stuck in the slot, causing damage to your computer.
Some types of SD memory cards, for example ones with the UHS (Ultra High Speed
data transfer feature), may become extremely hot due to continuous access to the
memory cards. In such a case, wait for a while before removing the memory card until it
cools down.
© 2011 Sony Corporation
Related Topic
Inserting/Removing SD Memory Cards
 Loading...