

Sony NWZ-B103F User Manual

© 2007 Sony Corporation
3-268-876-11 (1)
Operation Guide
NWZ-B103F / B105F

2
3
The following FCC statement applies only to the
version of this model manufactured for sale in the
USA. Other versions may not comply with FCC
technical regulations.
NOTE:
This equipment has been tested and found to
comply with the limits for a Class B digital device,
pursuant to Part 15 of the FCC Rules. These limits
are designed to provide reasonable protection
against harmful interference in a residential
installation. This equipment generates, uses
and can radiate radio frequency energy and, if
not installed and used in accordance with the
instructions, may cause harmful interference to
radio communications.
However, there is no guarantee that interference
will not occur in a particular installation. If this
equipment does cause harmful interference
to radio or television reception, which can be
determined by turning the equipment off and
on, the user is encouraged to try to correct the
interference by one or more of the following
measures:
• Reorient or relocate the receiving antenna.
• Increase the separation between the equipment
and receiver.
• Connect the equipment into an outlet on a
circuit different from that to which the receiver
is connected.
• Consult the dealer or an experienced radio/TV
technician for help.
You are cautioned that any changes or
modifications not expressly approved in this
manual could void your authority to operate this
equipment.
If you have any questions about this product:
Visit: www.sony.com/walkmansupport
Contact: Sony Customer Information Service
Center at 1-(866)-456-7669
Write: Sony Customer Information Services Center
12451 Gateway Blvd., Fort Myers, FL 33913
Declaration of Conformity
Trade Name: SONY
Model No.: NWZ-B103F/B105F
Responsible Party: Sony Electronics Inc.
Address: 16530 Via Esprillo, San
Diego CA 92127 U.S.A.
Telephone Number: 858-942-2230
This device complies with Part 15 of the FCC
Rules. Operation is subject to the following
two conditions: (1) This device may not cause
harmful interference, and (2) this device must
accept any interference received, including
interference that may cause undesired
operation.
Notice for users
• The recorded song is limited to private use
only. Use of the song beyond this limit requires
permission of the copyright holders.
• Sony is not responsible for incomplete
recording/downloading or damaged file due to
problems of the player or computer.
• The ability to display the languages on supplied
software will depend on the installed OS on
your computer. For better results, please ensure
that the installed OS is compatible with the
desired language you want to display.
– We do not guarantee all the languages will
be able to be displayed properly on supplied
software.
– User-created characters and some special
characters may not be displayed.
• Depending on the types of the text and
characters, the text shown on the player may not
be displayed properly on device. This is due to:
– The capacity of the connected player.
– The player is not functioning normally.
– Content information is written in the language
or the character that is not supported by the
player.
On sample audio data
The player is pre-installed with sample audio data.
To delete this audio data, delete it using Windows
Explorer.
If you delete sample audio data, you cannot restore
it. We cannot supply any replacement data.

4
5
Table of Contents
Getting Started ..........................................................................................................................................6
Supplied Accessories .............................................................................................................................6
Parts and Controls ...................................................................................................................................8
HOME menu ............................................................................................................................................10
Basic Operations ............................................................ 12
Before Connecting the Player ....................................................................................................... 12
Charging the Battery ..........................................................................................................................12
Turning the Player On and Off ......................................................................................................14
Transferring Music ................................................................................................................................15
Playing Music ................................................................. 17
Playing Music...........................................................................................................................................17
Searching for songs by artist, album, or song name, etc. ................................18
Searching for songs by folder and file name ........................................................... 19
Setting the Play Mode .......................................................................................................................23
Setting the Sound Quality ...............................................................................................................25
Listening/Recording FM Radio ..................................... 27
Listening to FM Radio in the Manual Tuning Mode ........................................................27
Listening to FM Radio in the Preset Tuning Mode ...........................................................29
Presetting Desired Broadcast Stations ......................................................................... 29
Selecting Broadcast Stations in the Preset Tuning Mode ................................32
Recording FM Radio ............................................................................................................................33
Playing Back Recorded FM Radio Programs .........................................................................34
Listening/Recording Voice ............................................ 36
Recording Sound ..................................................................................................................................36
Playing Back the Recorded Sound Files ..................................................................................37
Settings .......................................................................... 39
Changing the Settings.......................................................................................................................39
Troubleshooting ............................................................ 43
Troubleshooting ....................................................................................................................................43
Messages....................................................................................................................................................57
Additional Information ................................................. 60
Precautions ............................................................................................................................................... 60
Specifications ..........................................................................................................................................65
Index .............................................................................................................................................................69

6
7
Getting Started
Thank you for purchasing the NWZ-B103F/B105F*1.
By transferring songs from your computer to the player by drag and drop, you can enjoy
them wherever you go. You can also listen to FM radio and record voice using the player.
Supplied Accessories
Please check the accessories in the package.
Headphones (1)
CD-ROM *2 *3 (1)
– MP3 Conversion Tool
– Operation Guide (this manual)
Quick Start Guide (1)
*1 Depending on the country/region in which you have purchased the player, some models may not be
available.
*2 Do not attempt to play this CD-ROM in an audio CD player.
*3 Depending on the country/region in which you have purchased the player, the supplied software may
be different.
About the serial number
The serial number provided for the player is required for the customer registration. The
number is shown on the rear of the USB connector base of the player.
Serial number
8
9
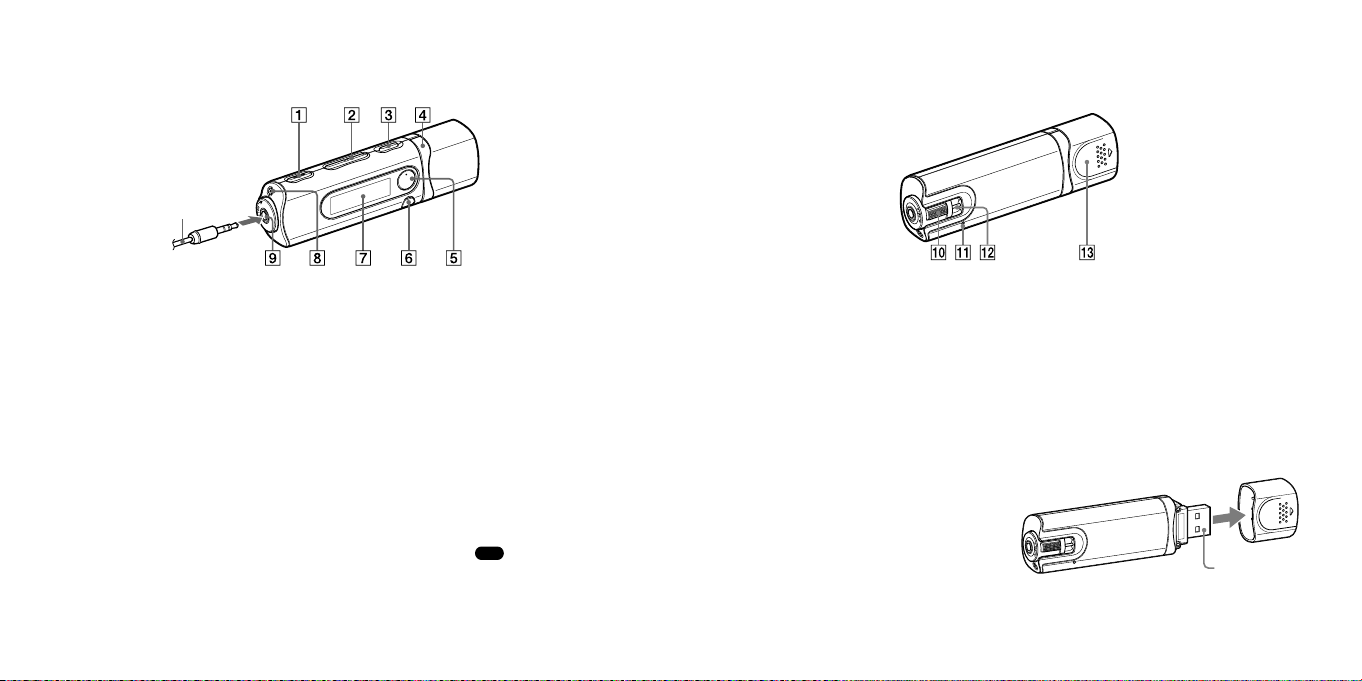
Parts and Controls
Headphones
RearFront
REC/STOP button ( pages 33, 36)
Starts/stops recording. You can record the
sound from the microphone or the currently
received FM program.
VOL +*1/– button
Adjusts the volume.
/
(Power ON/OFF) button ( page 14)
Turns on/off the player.
/ button ( pages 11, 22)
Selects a song, album, artist, folder or menu
item. You can also skip to the beginning of
the song/album/artist/folder, fast-forward or
fast-rewind.
*1 button ( pages 11, 18)
Starts/pauses song playback or pauses/
restarts recording. When a menu appears
on the display, use this button to confirm
menu item.
BACK/HOME*2 button ( page 11)
Returns to the previous menu. Press and hold
this button to display the HOME menu.
Display ( page 21)
Microphone ( page 36)
(Headphone) jack
When connecting the headphones, insert the
plug until it clicks into place. If connected
improperly, it may not sound right.
*1 There are tactile dots. Use them to help with
button operations.
*2 Functions which are marked near the buttons
are activated if you press them. Likewise
functions marked near the buttons, are
activated if you press and hold them.
HOLD switch
You can protect the player against accidental
operation by using the HOLD switch when
carrying it.
By rotating the HOLD switch in the direction
of the arrow (), all the buttons are
inoperable. If you press buttons while the
HOLD function is activated, “HOLD” and
the current time appears in the display. (The
current time appears only when the clock is
set ( page 41).)
If you rotate the HOLD switch to the
opposite position, the HOLD function is
released.
Strap hole
This is used to attach a strap (sold
separately).
USB cap
Remove the USB cap and insert the USB
connector of the player to a USB port on your
computer.
To remove the USB cap
Remove the USB cap as shown below.
RESET button ( page 43)
Resets the player when you press the RESET
button with a small pin, etc.
When you turn on the player after resetting
it, the player activates resuming the previous
setting items.
USB connector
10
11
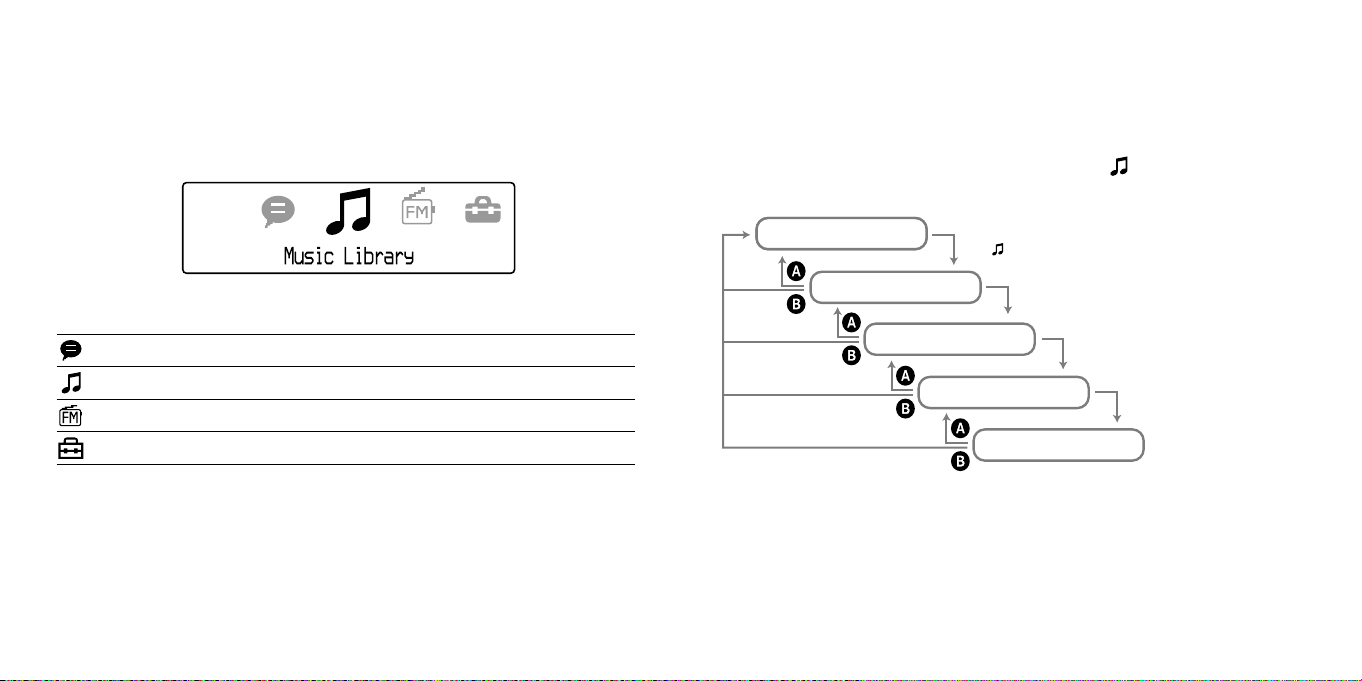
HOME menu
The HOME menu appears when you turn on the player or press and hold the BACK/
HOME button of the player. The HOME menu is the starting point to play songs, listen to
FM radio, play recorded sound files, and change settings.
HOME menu
To operate the HOME menu
When menu items appear on the HOME menu, press the / button to select an
item, and then press the button to confirm.
When menu items appear on the HOME menu and you press the BACK/HOME button,
the screen returns to the previous menu. If you press and hold it, the screen returns to the
HOME menu.
For example, when you want to play back a song by selecting (Music Library) - Album
from on the HOME menu, the menu changes as follows.
4 icons appear in the display with the current selection in the center. The current icon
changes depending on the function you use.
Voice
Music Library
FM
Settings
Plays/deletes recorded sound file ( page 37).
Plays transferred songs on the player ( page 17).
Plays FM radio, or plays back or deletes a recorded FM program ( page 27).
Sets function settings of music, FM, voice recording, or the player ( page 39).
HOME menu
Select (Music Library) and press the button.
Music Library
Album list
Song list
Now Playing screen
Press the BACK/HOME button.
Press and hold the BACK/HOME button.
Select “Album”, and press the button.
Select your desired folder, and press the button.
Select your desired Song (File), and press
the button. Playback begins.
12
13
Basic Operations
Before Connecting the Player
Before connecting the player to your computer, make sure that the OS is Windows XP
(Service Pack 2 or later) or Windows Vista, and the installed Windows Media Player
version on your computer is 10 or 11.
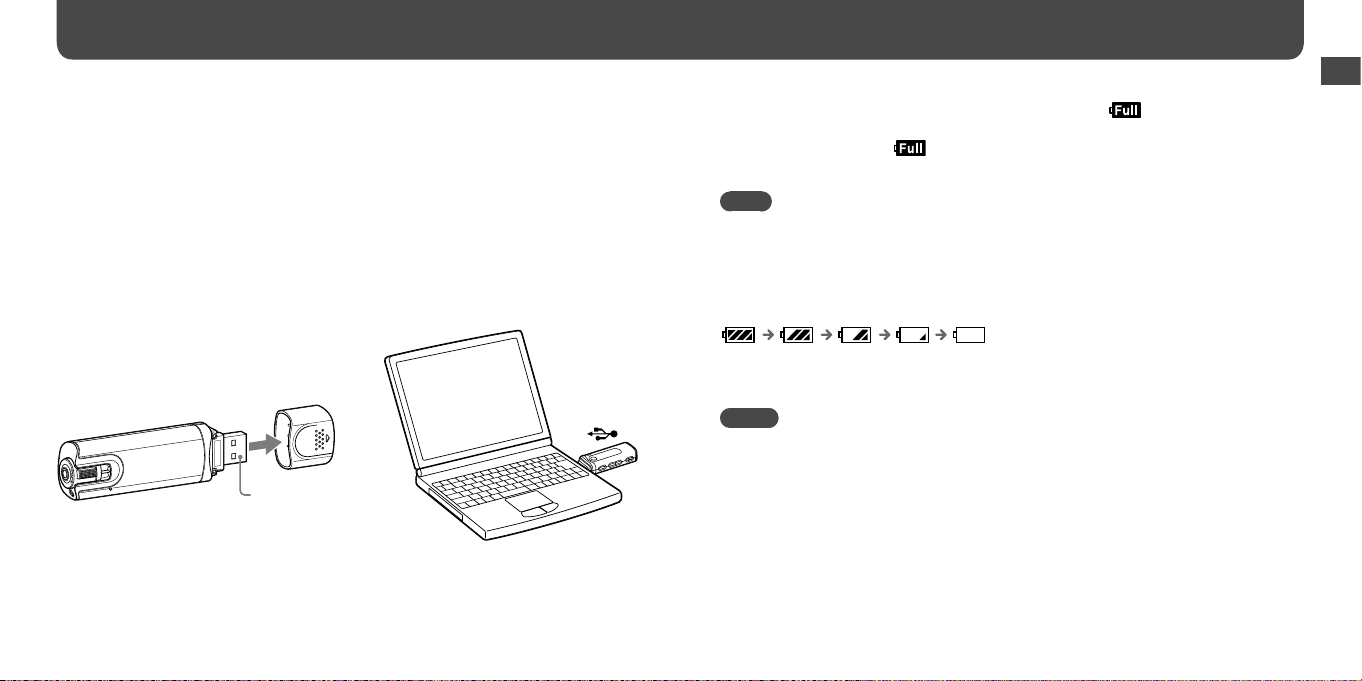
Charging the Battery
The player’s battery is recharged while the player is connected to a running computer.
Remove the USB cap and insert the USB connector to a USB port on your computer.
USB connector
When the remaining battery indication of the display shows: , charging is complete.
When you use the player for the first time, or if you have not used the player for a long
time, recharge it fully until appears on the screen. For details on charging time or
battery life, see page 67.
Note
• Be careful not to accidentally bump or put stress on the player when it is connected to your computer.
It may be damaged.
Basic Operations
On the remaining battery indication
The battery icon in the display ( page 21) changes as shown below. See page 67 for
details on battery duration.
The battery power gets low as shown in the battery icon. If “LOW BATTERY” appears, you
cannot operate the player. In this case, charge the battery by connecting to your computer.
To
Notes
• Charge the battery in an ambient temperature of between 5 to 35 ºC.
• The number of times the battery can be recharged before it is used up is approximately 500 times.
This number differs, depending on the conditions under which you use the player.
• The battery indicator on the display is only an estimate. For example, one section of black in the
indicator will not always indicate exactly one-fourth of the battery’s charge.
• “DATA ACCESS” appears in the display while the player accesses the computer. Do not disconnect
the player while “DATA ACCESS” appears or the file being transferred may be destroyed.
Continued

14
15
Basic Operations (continued)
•
When disconnecting the player from your computer, follow the procedure below.
Double-click (Remove Hardware) in the task tray in the lower right portion of the screen. In
the windows that appears, click [USB Mass Storage Device] or [USB Disk], and then click [Stop].
Click [OK].
When “Safe To Remove Hardware” appears on the screen, disconnect the player from the computer.
The icon and the messages displayed may be different depending on the installed OS.
• The control buttons on the player are all disabled while it is connected to a computer.
• Some USB devices connected to the computer may interfere with the proper operation of the player.
•
We do not guarantee the recharge of the battery using personally assembled computers or modified computers.
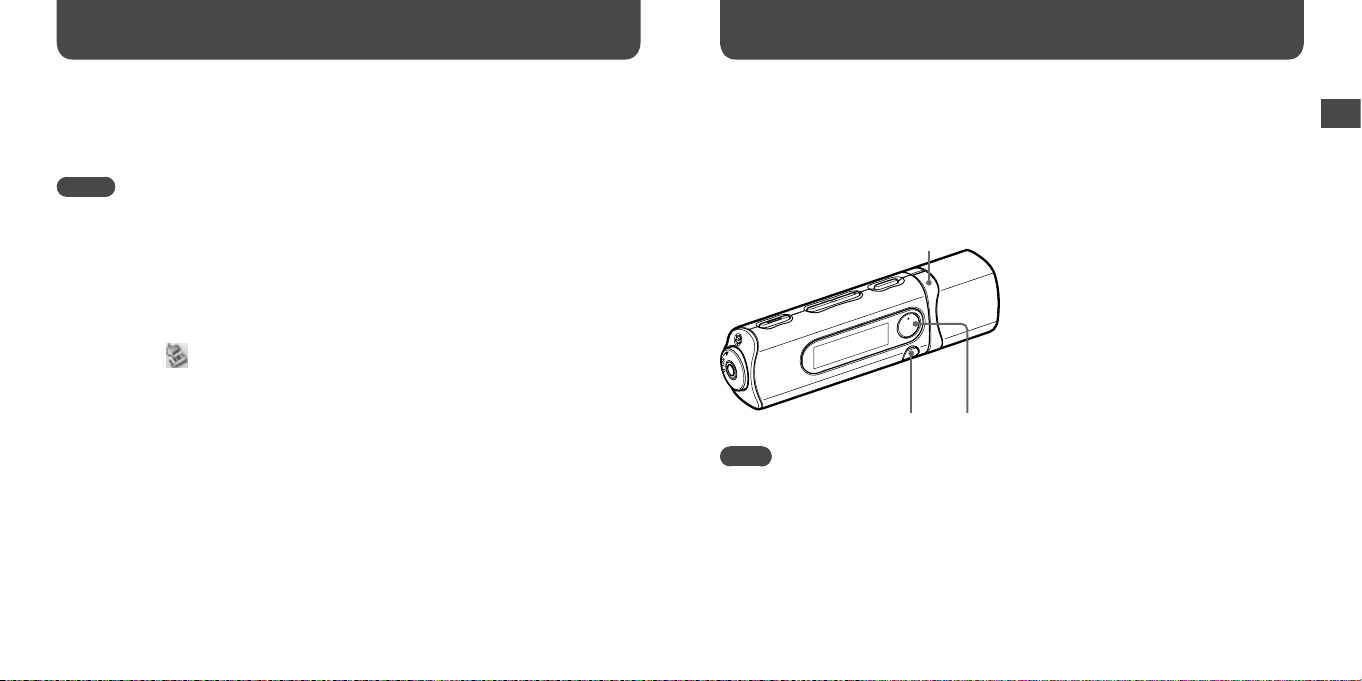
Turning the Player On and Off
To turn on the player
Press the / (Power ON/OFF) button so that the screen appears. The player activates
resuming the previous setting items.
To turn off the player
When the player is turned on, press and hold the / (Power ON/OFF) button until
“POWER OFF...” appears.
Hint
• To save the battery consumption, the player activates the functions as follows:
– After turning on the power if there is no operation and playback performed for about 1
minute, the power of the player turns off.
– If there is no operation for a certain period of time while in stop mode, the display turns off
automatically and the player enters stand-by status. When there is no operation for the next
30 minutes, the power of the player turns off.
Transferring Music
Connect the player to your computer and transfer an audio file to the player.
Hints
• You can also transfer audio files using Windows Media Player 10 or 11. For details about usage,
or support on Windows Media Player, refer to the Windows Media Player information from the
following web site:
http://support.microsoft.com/
• ATRAC files need to be converted using the supplied MP3 Conversion Tool. (Audio data purchased
from a music distribution service on the Internet cannot be converted.)
To use the supplied MP3 Conversion Tool, install the supplied CD-ROM on your computer and select
the icon from the left side of the install menu, then click [Start] on the bottom-right.
Note that when converting ATRAC files to MP3 files, the ATRAC files are not deleted. You can also
delete the ATRAC files by setting the Option.
Note
• Only MP3/WMA files can be played on the player (
Connect the player directly to a USB port on your computer.
1
If the screen for selecting what you want Windows to do appears, select [Open folder
to view files] and click [OK], and then go to step 3.
Open the folder in the hierarchy under [WALKMAN] from [My Computer].
2
Data hierarchy may differ, depending on your computer environment.
Open the folder ([My Music], etc.) from where you want to transfer the
3
audio files, and then drag and drop them onto the player.
The audio files are transferred to the player.
You can also transfer files to the player by dragging and dropping a folder.
page 65).
Continued
Basic Operations
16
17
Basic Operations (continued)
Playing Music
To delete songs transferred to the player
Connect the player to your computer, and then delete any unnecessary audio files using
Windows Explorer.
Notes
• Be careful not to accidentally bump or put stress on the player when it is connected to your computer.
It may be damaged.
• The player does not use SonicStage software (SonicStage software, developed by Sony, manages music
on a computer or transfers music to other types of players). For this player, you can transfer music
simply by dragging and dropping, not using SonicStage.
• Do not disconnect the player while a file is being transferred. If you do, the file being transferred may
be damaged.
•
When disconnecting the player from your computer, follow the procedure below.
Double-click (Remove Hardware) in the task tray in the lower right portion of the screen. In
the windows that appears, click [USB Mass Storage Device] or [USB Disk], and then click [Stop].
Click [OK].
When “Safe To Remove Hardware” appears on the screen, disconnect the player from the
computer.
The icon and the messages displayed may be different depending on the installed OS.
• If the player is disconnected while files are being transferred, unnecessary files may be left in the
player. In this case, transfer usable files back to the computer and format the player ( page 42).
• Some files may not be played back with the player due to copyright protection.
• The player can display up to a combined total of 999 files and folders, and folders of up to 8 levels.
Although you can transfer more files or folders to the player, the player cannot display or play any
files, folders, or levels that exceed this limit.
• Data hierarchy may differ, depending on your computer environment.
• It may take time to start up the player or display the file/folder list when many files or folders are
stored on the player.
Playing Music
You can search for desired songs in the following ways.
• Searching for songs by artist, album, and song name, etc. (“Artist/Album/Song Sort”
mode)
• Searching for songs by folder and file name (“Folder/File Name Sort” mode)
/ button
BACK/HOME button
Note
• Before playing songs:
– Confirm that the battery power is not low or exhausted (
recharge the battery ( page 12).
– Disconnect the player from the computer.
– Release the HOLD function (
– Turn on the player (
page 14).
button
page 9).
page 13). If it is low or exhausted,
Continued
Playing Music

18
19
Playing Music (continued)
Searching for songs by artist, album, or song name, etc.
You can search the desired song by artist/album/song name, etc.
Press and hold the BACK/HOME button until the HOME menu appears.
1
Press the / button to select (Music Library), and then press
2
the button to confirm.
The following lists appear.
• “Now Playing”: Plays back the last file* you listened to.
• “All Songs”: Searches for a song by song name.
• “Artist”: Searches for a song by artist.
• “Album”: Searches for a song by album.
• “Genre”: Searches for a song by genre.
• “Release Year”: Searches for a song by release year.
• “Playlists”: Searches for a song by playlist.
• “Folder/File Name Sort”: Switches to the “Folder/File Name Sort” mode. In this mode,
you can search for desired songs by folder and file name.
* File includes the song, recorded FM radio program, or recorded sound using the “Voice”
menu, that you last listened to.
Press the / button to select an item, and then press the
3
button to confirm.
To find the song you want, repeat this step.
Press the / button to select a song, and then press the
4
button to confirm.
Playback starts.
Hint
• You can edit or change ID3 tag information and the playlist using Windows Media Player 10 or 11.
For details about usage, or support on Windows Media Player, refer to the Windows Media Player
information from the following web site:
http://support.microsoft.com/
Notes
• Only songs that have ID3 tag information can be automatically classified by the player.
• If an artist or album has no name, “Unknown” appears. If any songs have no name, assigned file
names for each song appear.
• The player can display up to a combined total of 999 files and folders, and folders of up to 8 levels.
Although you can transfer more files or folders to the player, the player cannot display or play any
files, folders, or levels that exceed this limit.
• Data hierarchy may differ, depending on your computer environment.
• It may take time to start up the player or display the file/folder list when many files or folders are
stored on the player.
To return to the previous menu
Press the BACK/HOME button.
Searching for songs by folder and file name
You can search the desired song by the folder/file name.
Press and hold the BACK/HOME button until the HOME menu appears.
1
Continued
Playing Music
20
21
Playing Music (continued)
Press the / button to select (Music Library), and then press
2
the button to confirm.
The following lists of transferred songs and folders appear.
• “Now Playing”: Plays back the last file* you listened to.
• “Play All”: Plays back all songs on the player.
• Folder name: Displays the level 1 folders.
• Song name: Displays the level 1 songs.
• “Artist/Album/Song Sort”: Switches to the “Artist/Album/Song Sort” mode. In this mode,
you can search for desired songs by artist, album, and song name, etc.
* File includes the song, recorded FM radio program, or recorded sound using the “Voice”
menu, that you last listened to.
Press the / button to select an item, and then press the
3
button to confirm.
To find the song you want, repeat this step.
Press the / button to select a song, and then press the
4
button to confirm.
Playback starts.
Notes
• The player can display up to a combined total of 999 files and folders, and folders of up to 8 levels.
Although you can transfer more files or folders to the player, the player cannot display or play any
files, folders, or levels that exceed this limit.
• Data hierarchy may differ, depending on your computer environment.
• It may take time to start up the player or display the file/folder list when many files or folders are
stored on the player.
To return to the previous menu
Press the BACK/HOME button.
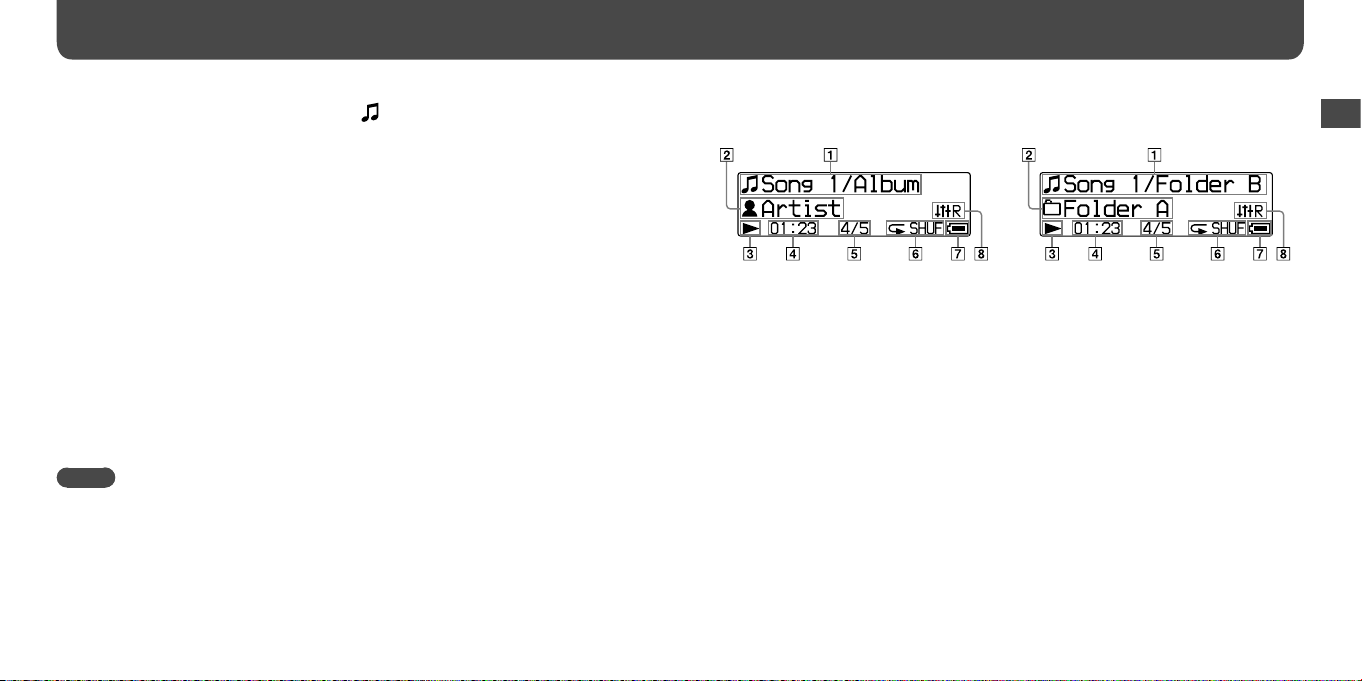
Display
When selecting “Artist/Album/Song Sort” mode When selecting the “Folder/File Name Sort” mode
Song title/Album title indication
For the “Artist/Album/Song Sort” mode,
displays song title and album title currently
played back. When you select “All Songs,”
the current song title/current artist name is
displayed.
For the “Folder/File Name Sort” mode,
displays file name and folder name currently
play back.
Playback range indication
Displays the playback range.
Playing status indication
Displays the current play mode (:
playback, : pause, (): fast-rewind
(or fast-forward), (): skip to the
beginning of the current (or next) song).
Elapsed time indication
Displays the elapsed time.
Current song number/total song
number indication
Displays the song number currently selected
or being played back and the total number
of songs.
Play mode indication
Displays the current play mode icon ( page
24). If the play mode is set to “Normal,” no
icon appears.
Remaining battery indication
Displays the remaining battery power.
Equalizer mode indication
Displays the current equalizer mode (
page 26).
Continued
Playing Music
 Loading...