

Sony NWMS-7 Service manual
NW-MS7
SERVICE MANUAL
Ver 1.4 2001. 03
SPECIFICATIONS
Recording time
About 60 min. (132 kbps)
About 80 min. (105 kbps)
About 120 min. (66 kbps)
Sampling frequency response
44.1 kHz
Recording format
ATRAC3
Frequency response
20 to 20,000 Hz (single signal measurement)
Output
Headphone: stereo mini-jack
Signal-to-noise ratio (S/N)
More than 80 dB (excluding 66 kbps)
Dynamic range
More than 85 dB (excluding 66 kbps)
Operating temperature
5°C to 35°C (–41°F to 95°F)
Power source
DC IN 3.7 V (internal Lithium-ion battery)
DC IN 5.5 V (supplied AC power adaptor)
Battery life
About 4 hours
US Model
Canadian Model
AEP Model
UK Model
E Model
Australian Model
Dimensions (approx.)
37 × 96.3 × 19.2 mm
(1 1/2 × 3 7/8 × 25/32 inches)
(w/h/d, projecting parts not included)
Mass (approx.)
70 g (2.5 oz) (internal battery and a
“Memory Stick” included)
Supplied accessories
64 MB “MG Memory Stick” (MSG-64A)
AC power adaptor (AC-NW55NA)
DC/USB adaptor
Headphone
Headphone extension cord
USB cable
CD-ROM
Strap (US model)
Carrying pouch (except US model)
Instruction manual
Design and specifications are subject to change without
notice.
9-927-626-13
2001C0400-1
© 2001. 3
PORTABLE MEMORY STICK PLAYER
Sony Corporation
Audio Entertainment Group
General Engineering Dept.
– 1 –

TABLE OF CONTENTS
1. GENERAL
Looking at the controls............................................................ 3
Installing the OpenMG Jukebox software ............................... 4
Transferring music data from the computer to the
Memory Stick Walkman .......................................................... 4
Listening to music with the Memory Stick Walkman ............. 5
Playing in Various Modes........................................................ 5
Changing the Display Mode.................................................... 6
Locking the Controls (HOLD) ................................................ 6
Changing the Settings of Memory Stick Walkman ................. 6
Names and Functions of the OpenMG Jukebox Window ....... 7
2. DISASSEMBLY
2-1. Lid, Battery Case.................................................................8
2-2. Lid Assy (Service), Upper...................................................9
2-3. Main Board ....................................................................... 10
2-4. LCD Block ........................................................................ 11
2-5. HP Board, CN Board ........................................................ 11
3. TEST MODE
3-1. General Information .......................................................... 12
3-2. Tools .................................................................................. 12
3-3. Setting the TEST MODE .................................................. 12
3-4. Releasing the TEST MODE.............................................. 12
3-5. Operations in the TEST MODE ........................................ 12
3-6. Creating the Memory Stick for Operational Check .......... 14
4. DIAGRAMS
4-1. IC Pin Description............................................................. 16
4-2. Block Diagram –Audio Section (1/2)– ............................. 19
4-3. Block Diagram –Audio Section (2/2)– ............................. 21
4-4. Block Diagram –Power Supply Section–..........................23
4-5. Printed Wiring Board –Main Board– ................................ 25
4-6. Schematic Diagram –Main Board (1/4)– .......................... 29
4-7. Schematic Diagram –Main Board (2/4)– .......................... 31
4-8. Schematic Diagram –Main Board (3/4)– .......................... 33
4-9. Schematic Diagram –Main Board (4/4)– .......................... 35
4-10. Printed Wiring Boards –CN Board, HP Board– ................ 37
4-11. Schematic Diagrams –CN Board, HP Board– .................. 39
4-12. IC Block Diagrams............................................................41
5. EXPLODED VIEWS ....................................................... 45
6. ELECTRICAL PARTS LIST ........................................ 46
IC Repairing
• Replacement of HD64F7198RVBP16 (IC701), MG IC ASSY
(IC702) and CXD1858GA (IC703) on main board used in this
set requires a special tool. Therefore, they cannot be replaced.
SAFETY-RELATED COMPONENT WARNING!!
COMPONENTS IDENTIFIED BY MARK 0 OR DOTTED LINE
WITH MARK 0 ON THE SCHEMATIC DIAGRAMS AND IN
THE PARTS LIST ARE CRITICAL TO SAFE OPERATION.
REPLACE THESE COMPONENTS WITH SONY P ARTS WHOSE
P AR T NUMBERS APPEAR AS SHO WN IN THIS MANUAL OR
IN SUPPLEMENTS PUBLISHED BY SONY.
Flexible Circuit Board Repairing
• Keep the temperature of the soldering iron around 270°C during
repairing.
• Do not touch the soldering iron on the same conductor of the
circuit board (within 3 times).
• Be careful not to apply force on the conductor when soldering
or unsoldering.
Notes on Chip Component Replacement
• Never reuse a disconnected chip component.
• Notice that the minus side of a tantalum capacitor may be
damaged by heat.
– 2 –
SECTION 1
GENERAL
This section is extracted
from instruction manual.
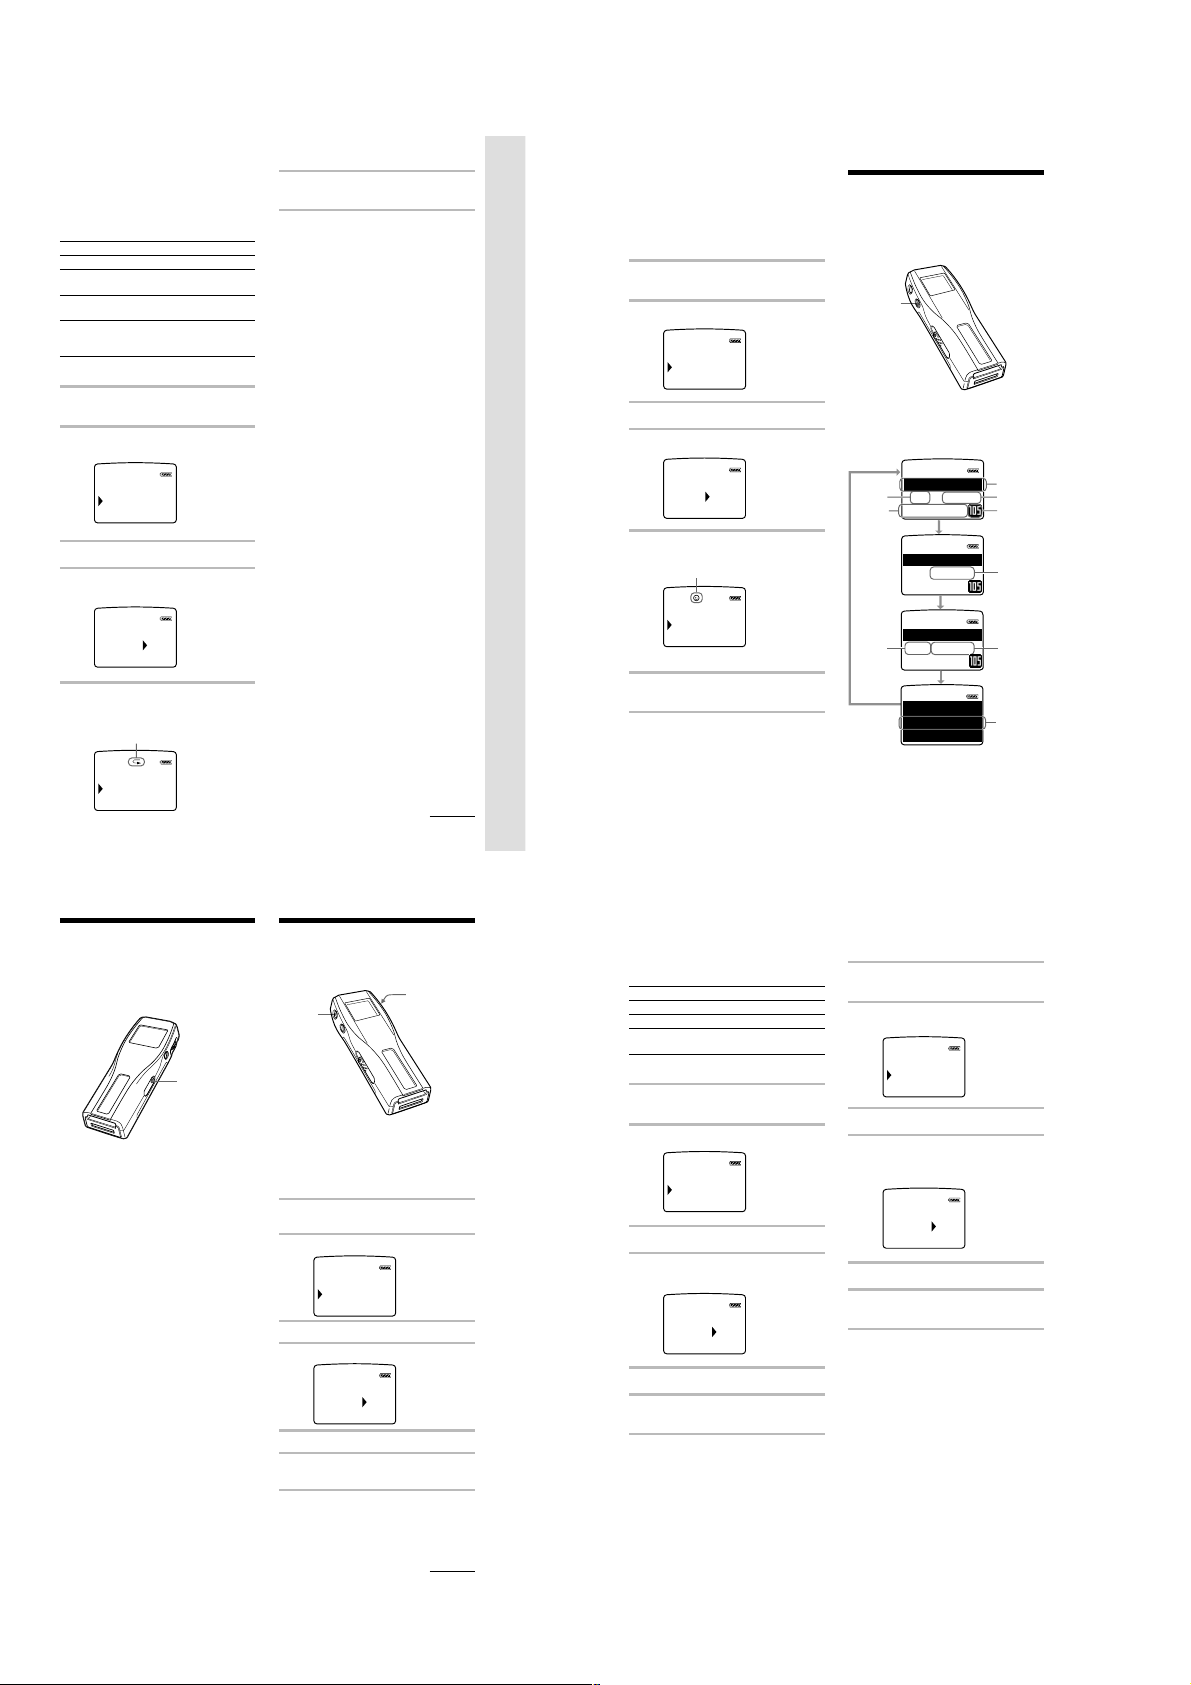
Looking at the
controls
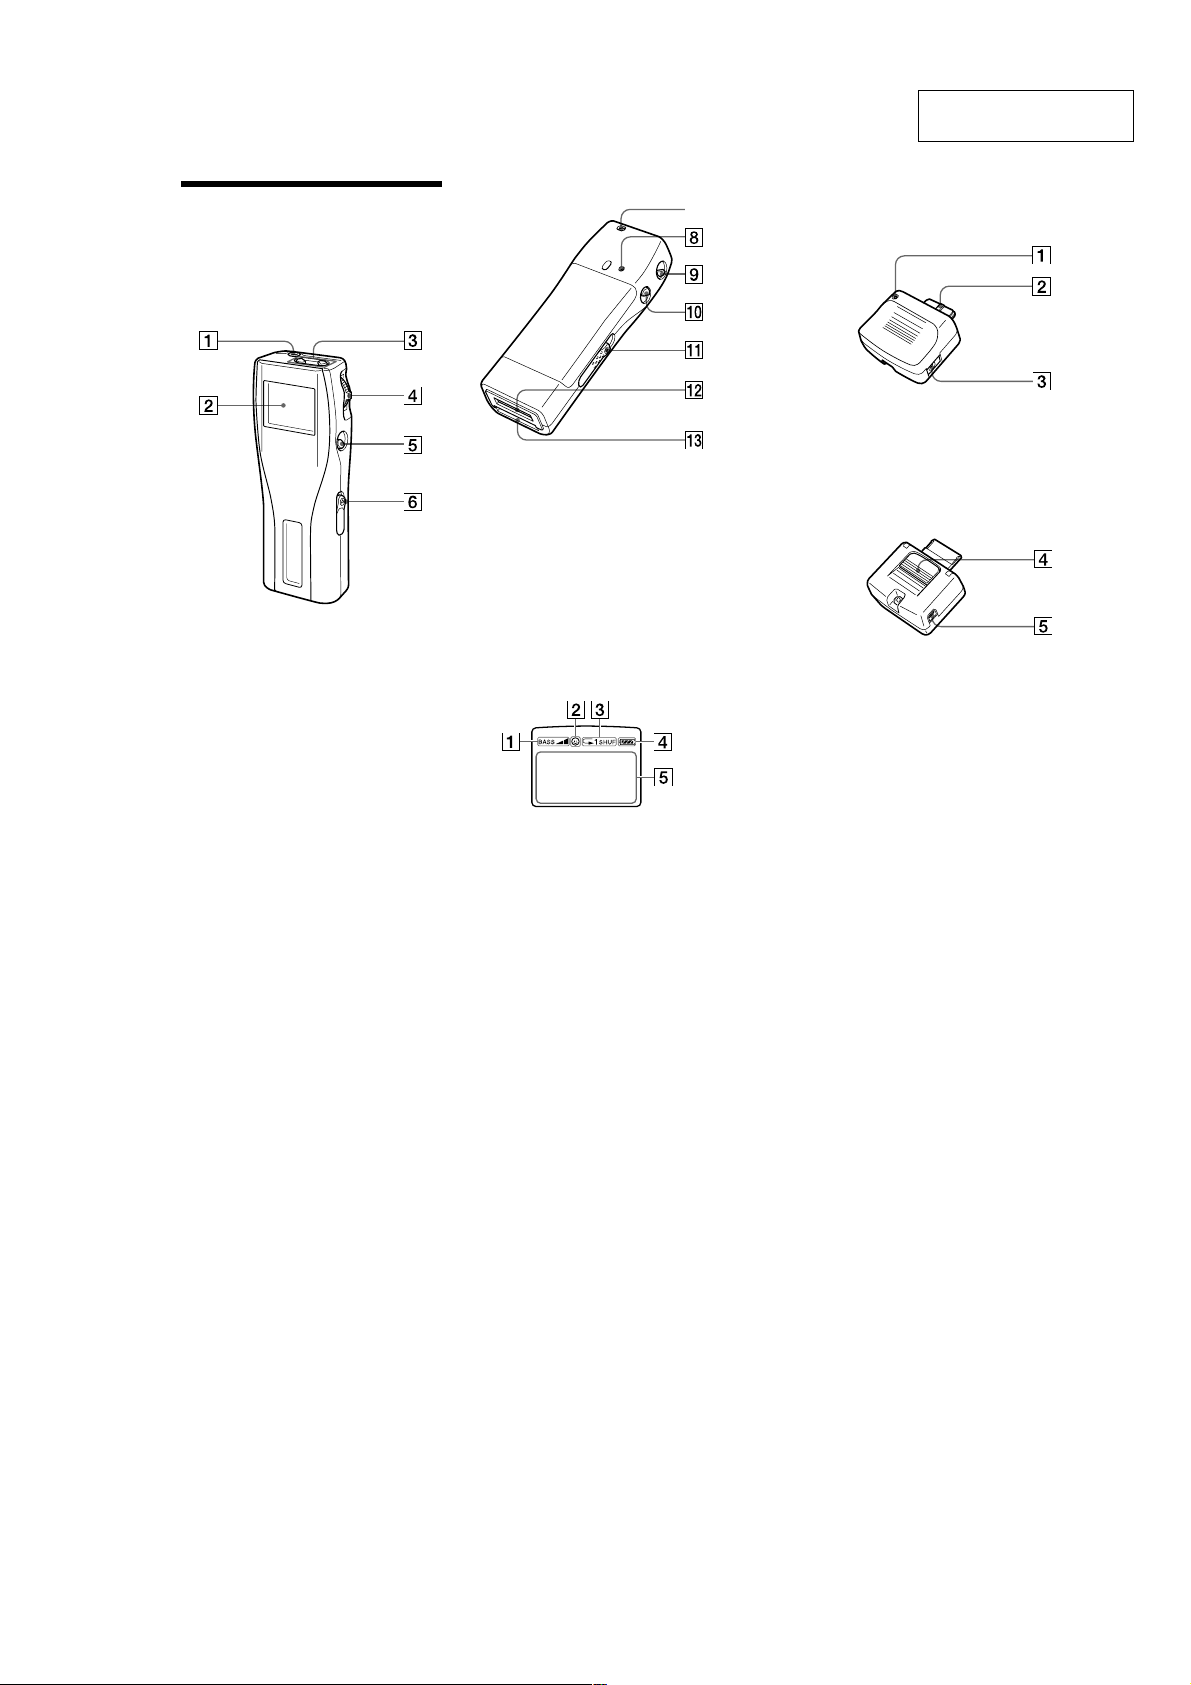
Memory Stick Walkman
(front)
1 i (Headphones) jack (page 16)
2 Display (page 17, 20)
3 VOLUME +/- button (page 16)
4 Jog lever (page 16 - 25)
5 x (stop) button (page 16)
6 HOLD switch (page 21)
(rear)
7 Strap hole for attaching the strap
(supplied with U.S.A. model only)
8 RESET button (page 32)
9 MENU button (page 18 - 25)
0 DISPLAY button (page 20)
qa EJECT lever (page 17)
qs DC/USB adaptor plug (page 10)
qd Memory Stick slot (page 13, 16)
Display
7
DC/USB adaptor
(front)
1 BATTERY CHARGE lamp (page 10)
2 Connector (page 10)
3 DC IN 5.5 V jack (page 10, 13)
(rear)
4 Release button (page 10)
5 USB jack (for the supplied USB cable)
(page 13)
40
1 Mega-bass (page 18)
2 AVLS (page 20)
3 Playback mode (page 19)
4 Battery remain indication (page 10)
5 Information
Track name, track number, counter, menu
items, error messages, etc., are displayed.
(page 17, 20)
41
– 3 –
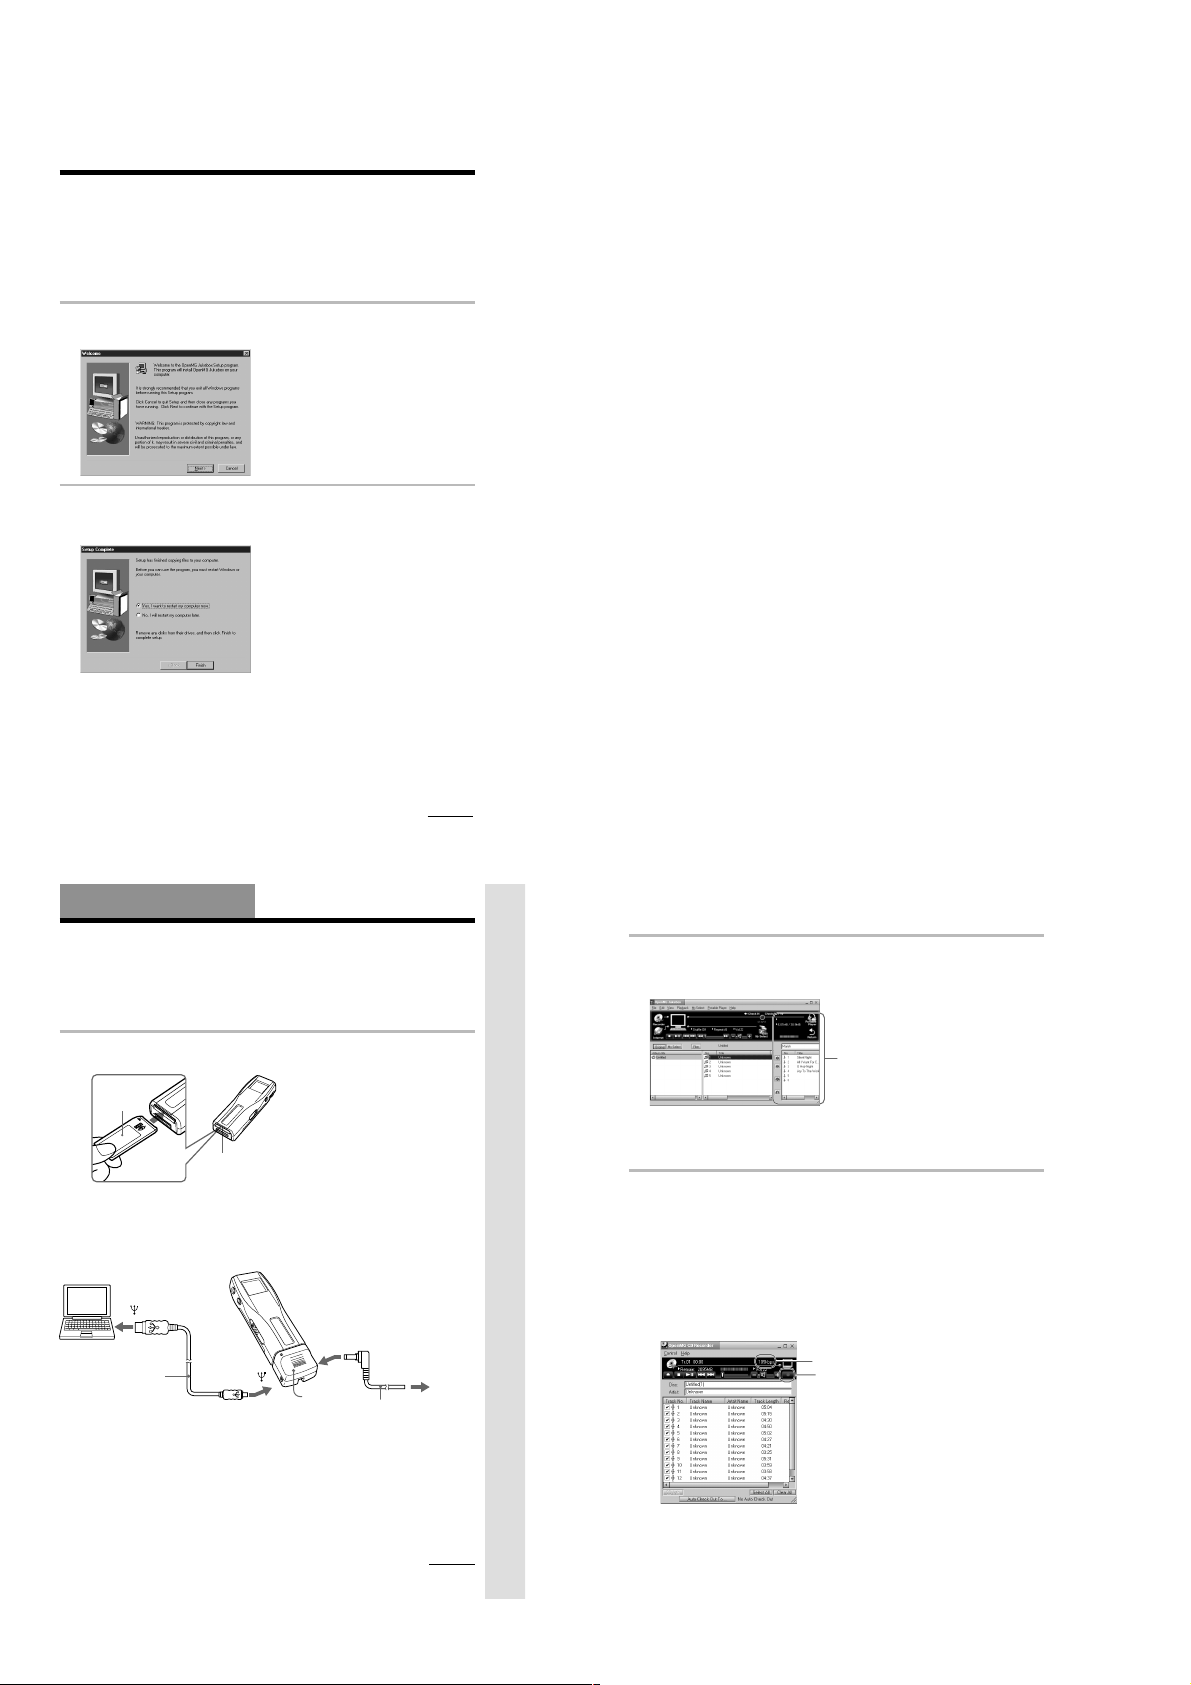
Step 3: Installing the OpenMG Jukebox
software
This section describes how to install the OpenMG Jukebox software to your computer. Before
installation, turn on your computer, and start Windows 98.
Note
Be sure to install the software before connecting with the supplied USB cable. Do not install the software while
connecting the USB cable. Connect the USB cable only after you have restarted the computer after installation.
1 Insert the supplied CD-ROM into the CD-ROM drive of your computer.
The Setup program automatically starts and the following window appears. If the program
does not start, double-click [setup.exe].
2 Follow the instructions in the Installer window to complete the installation.
When the Input window for the CD key appears, input the CD key written on the CD-ROM
case label .
When the installation is finished, the following dialog box appears in the display.
Click Finish to restart the computer.
Note
Do not delete, move or modify the installed folder.
About the “OpenMG Registration” icon on the desktop
When you restart the computer after installing the software, the “OpenMG(NW-MS7)
Registration” icon will appear on the desktop. Make sure that you can connect to Internet, then
double-click this icon to start customer registration for this product (Memory Stick Walkman)
and for the EMD services.
For details on registration, refer to the supplied leaflet.
continued
11
Notes on EMD (Electronic Music Distribution) services
To use OpenMG-enabled EMD services on the Internet, the following conditions are required.
• You need Internet access from your computer. (Sign up an Internet service provider.)
• You need to download several programs (e.g., EMD key installer).
To download these programs, double-click the “OpenMG Registration” icon, then follow the
displayed instructions.
• You need to register yourself with the EMD service provider you are going to use. Consult the
provider for details.
For current OpenMG Jukebox users
1 In order to update your OpenMG Jukebox software, your current software must be registered.
If your software is not registered, please register your current software now. If you are a
registered user, proceed to step 2.
2 Insert the CD-ROM supplied with your new product. This will automatically run. If the
program does not start, double-click [Setup.exe].
Please follow the on-screen instructions to retain all existing music files and update your
software.
3 After your update is completed, restart the computer.
Then double-click the “OpenMG(NW-MS7) Registration” icon on your desktop and follow the
instructions to register.
Notes
• If the OpenMG Jukebox icon is displayed on the task tray, right-click the icon to choose [Remove from the
task tray], then proceed with the installation.
• Be sure to input the CD keys of the CD-ROM you are going to install. If an error message appears in the
display, check if the CD keys are of the correct CD-ROM case label.
12
Basic Operations
Transferring music data from the
computer to Memory Stick Walkman
This section describes how to record the contents of a compact disc onto the hard drive of your
computer, and then how to transfer it to Memory Stick Walkman (Check-Out).
You can also download by using EMD Services, or convert MP3 files and WAV format audio
files. Please refer to the online help for more information.
1 Connect Memory Stick Walkman to your computer.
1 Insert “MagicGate Memory Stick.”
“MagicGate
Memory
Stick“
Memory Stick slot
2 Connect the AC power adaptor.
Connect the supplied AC power adaptor to
an AC wall outlet, then into the DC IN 5.5V
jack on the right side of the DC/USB
adaptor.
to
USB cable
(supplied)
Notes
• Do not connect more than two USB devices to your computer. Normal operation will not be guaranteed.
• Use of this player with a USB hub or a USB extension cable is not guaranteed.
• A malfunction may occur depending on the USB devices connected at any one time.
• Be sure to connect the player to an AC wall outlet when connecting it to your computer.
• When connecting Memory Stick Walkman to your computer for the first time, the USB driver Installer
window appears. Please follow the instructions in the Installer window.
Notes
• When connecting Memory Stick Walkman
to your computer, make sure the erasure
prevention switch of the “Memory Stick”
(page 30) is OFF .
• Do not start your computer while Memory
Stick Walkman is connected.
3 Connect Memory Stick Walkman to your
computer.
Connect the small connector of the supplied
USB cable into the USB jack on the left side
of the DC/USB adaptor, then the large
connector to the USB jack of your computer.
“PC CONNECT” appears in the display.
to DC IN 5.5V
to
DC/USB
adaptor
to AC
wall outlet
AC power adaptor
(supplied)
continued
Basic Operations
13
Transferring music data from the computer to
Memory Stick Walkman (continued)
2 Start the OpenMG Jukebox software.
Double click the OpenMG Jukebox icon on the desktop or click [Start]–[Programs]–
[OpenMG Jukebox]–[OpenMG Jukebox]
The OpenMG Jukebox window appears.
Portable Player window
(the music files inside the
“Memory Stick” appear)
zIf the Start-Up function is ON
The OpenMG Jukebox software automatically starts when Memory Stick Walkman is connected to your
computer. (Please refer to the online help for more information.)
3 Start recording.
You can record music from a compact disc onto the hard drive of your computer, using the
OpenMG CD Recorder software.
1 Insert the compact disc you want to record into the CD-ROM drive of your computer. If
the OpenMG CD Recorder automatically starts, go to 3.
2 Click the [Recorder] button in the OpenMG Jukebox window.
The OpenMG CD Recorder window appears showing the contents of the compact disc.
If the message “Do you want to check your CD Drive to optimize for
recording ?” appears in the display
This message appears when you use the OpenMG CD Recorder for the first time. We recommend you
to choose “Yes.” You can optimize the CD drive later, too. Please refer to the online help for more
information. (It may take maximum 20 minutes to optimize the CD drive.)
3 Click z.
bit rate
z button
The recording begins. When recording is finished, the recorded music will appear in the
OpenMG Jukebox window as a new album.
14
– 4 –
To stop the recording
23BBB
CCC
1TRACKAAA
Click x. The recording will be interrupted.
Click z again to continue the recording.
zTo select only certain items
Click the check box of the contents you do not want to record to remove the check, then click z.
zOn the bit rate
You can choose the bit rate among 132kbps, 105kbps, 66kbps. If you choose a higher bit rate, recording
will have better sound quality, however the recordable time will be shorter. If you choose a lower bit
rate, you can record longer, however the sound will not be as good. See below for the recording time
according to the bit rate when using the supplied 64MB “Memory Stick.”
• 132kbps: maximum 60 min.
• 105kbps: maximum 80 min.
• 66kbps: maximum 120 min.
(The recording time differs according to the number of songs you are recording.)
To choose the bit rate, click [Control]-[Settings]. The Settings window appears. Click the Recording
Setup tab and choose from the ATARC3 Bit rate list. Please refer to the online help for more
information.
zTo name a new album or song
You can enter the name using the keyboard or bring the name from the Internet database.
Please refer to the online help for more information.
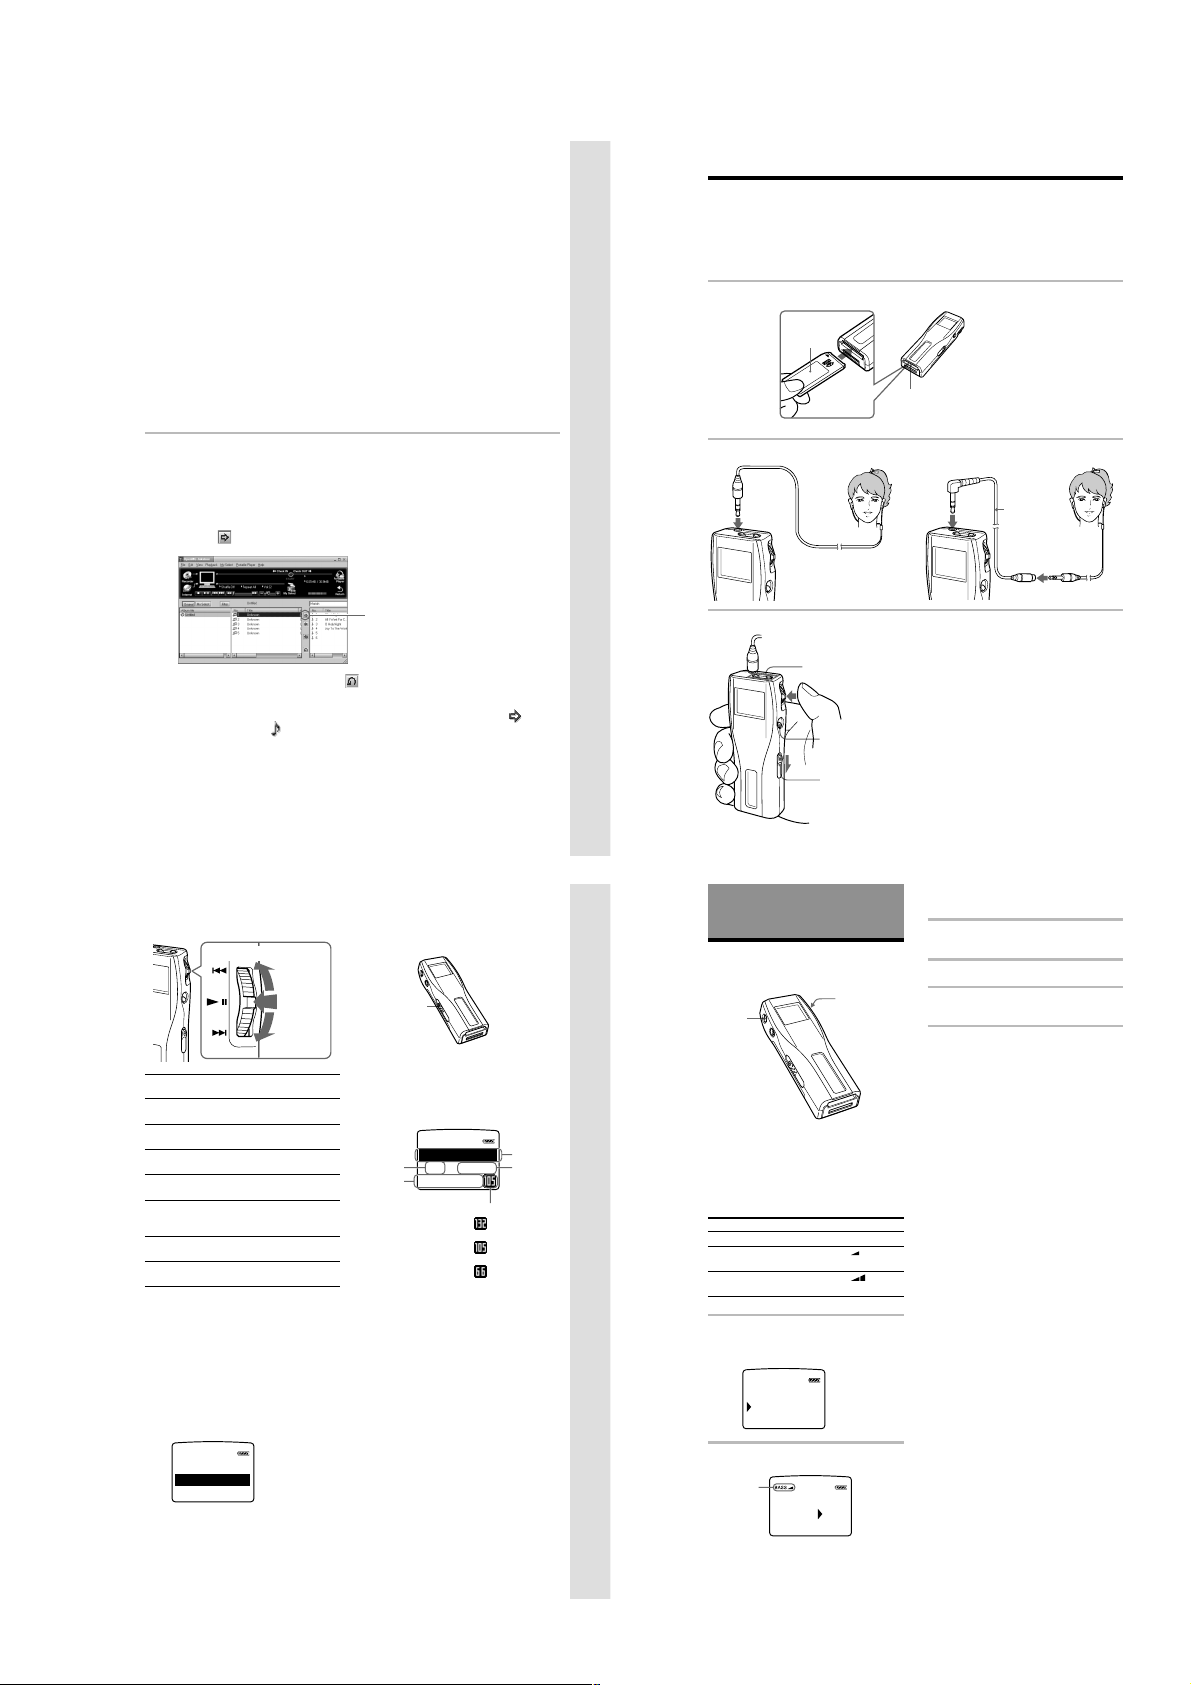
4 Transfer the music file to the “Memory Stick” (Check-Out).
1 Check that the Portable Player window (page 14) is displayed on the right side of the
OpenMG Jukebox window.
2 Click the album which contains the songs you want to Check-Out.
The contents of the album appear.
3 Click the music item you want to Check-Out.
Click the music item while pressing the Ctrl key to choose more than one music item.
4 Click the
button.
The desired music item appears in the Portable Player window as Check-Out candidate.
Basic Operations
Listening to music with Memory Stick
Walkman
Please charge the battery before use (see page 10).
Note
When using Memory Stick Walkman, be sure to disonnect it from the computer.
1 Insert a recorded “MagicGate Memory Stick” into Memory Stick Walkman.
“MagicGate
Memory
Stick“
Memory Stick
slot
2 Connect the headphones.
to i jack
To use the headphones extension cord
to i jack
Headphones
extension
cord
Click here
To cancel the song added as Check-Out candidate, click the respective song in the
Portable Player window, then click the
5 Click the START button.
The desired music item is Checked-Out to Memory Stick Walkman.
During Check-Out the STOP button flashes. When Check-Out is finished, the
indication changes to .
To quit Check-Out
Click the STOP button.
To Check-In
See page 28.
On other operations
Jog lever
Press
upwards
Press
Press
downwards
To
1)
Pause
Go to the beginning
of the actual track
Go to previous
tracks
Go to the beginning
of the next track
Go to the beginning
of the succeding
tracks
Go backward
Go forward
1)
If you do not operate the player for 10 seconds
while in pause mode, the player automatically
switches to stop mode.
2)
To go backward or forward without listening to
the sound, press upwards or downwards and hold
while in pause mode.
To select by track name
While in stop mode, press the Jog lever up or down
and hold it still. Three track names are displayed.
Press the Jog lever upwards or downwards to select
the track, then press the Jog lever to playback.
Operation of
the Jog lever
Press while in playback
mode.
Press upwards once.
Press upwards
continuously.
Press downwards once.
Press downwards
continuously.
2)
While playback, press up
and hold still.
2)
While playback, press
down and hold still.
button.
To take out the “Memory Stick”
Slide the EJECT lever in the direction of the arrow as
shown below.
EJECT lever
On the display
Press the DISPLAY button to change the
display mode. See “Changing the display
mode” (page 20) for more information.
Track
number
001 02:01
Song
HAP Y B RT
title*
* Song title and album title are displayed when
information is recorded on the “Memory Stick.”
PI
l
0
Bit rate
Album
title*
ERITMY FAVOU
Elapsed
time
: songs recorded
at 132kbps
: songs recorded
at 105kbps
: songs recorded
at 66kbps
15
Basic Operations
3 Start playback.
2 Press the VOLUME
+/- button up or
down to adjust the
volume.
16
Advanced Operations
(Memory Stick Walkman)
Playing in various
modes
MENU
button
Emphasizing the bass
sound (BASS)
Mega Bass function intensifies low frequency
sound for richer quality audio reproduction.
Menu
Sound quality
OFF
normal play
ON-1
Mega Bass
(moderate effect)
ON-2
Mega Bass
(strong effect)
1 Press the MENU button.
The menu is displayed.
Check that “BASS” is selected.
[RETURN]
BASS O FF
REPEAT OFF
2 Press the Jog lever.
Display
indication
BASS
1 Press the Jog lever.
x button
HOLD switch
Jog lever
Display indication
none
BASS
BASS
OFF
1
-
O
N
2
-
O
N
Playback stops automatically when the music
reaches the end (only when REPEAT OFF is
selected).
If playback does not start
The HOLD switch may be switched down. Please
release it up (page 21).
To stop playback
Press the x button.
Tip
If you do not operate the player for 10 seconds while
in stop mode, the display automatically turns off.
3 Select ON-1 or ON-2 using the Jog
lever.
4 Press the Jog lever.
5 Press the MENU button.
The display returns to normal.
Note
If the sound becomes distorted when emphasizing
the bass, turn down the volume.
To exit from the Menu mode
Select [RETURN] in the menu or press the MENU
button.
To cancel the MEGA BASS effect
Select OFF in step 3.
17
18
– 5 –
Playing tracks repeatedly
(REPEAT)
You can play tracks repeatedly in three waysall repeat, single repeat and shuffle repeat.
Menu
Playback mode
OFF
normal
ALL
all tracks
repeatedly
1
current track
repeatedly
SHUF
all tracks
repeatedly in
random order
* The display indication appears after step 5.
1 Press the MENU button.
The menu is displayed.
2 Select “REPEAT” using the Jog
lever.
BASS O FF
REPEAT OFF
AVLS NORM
Display indication*
none
F
F 1
F SHUF
3 Press the Jog lever.
4 Select “ALL,” “1” or “SHUF” using
the Jog lever.
OFF
REPEAT
A1LL
5 Press the Jog lever.
The selected playback mode is
displayed.
Display indication
BASS O FF
L
L
A
REPEAT
ALS NRMV
O
6 Press the MENU button.
The display returns to normal.
To exit from the Menu mode
Select [RETURN] in the menu or press the MENU
button.
To cancel the REPEAT mode
Select OFF in step 4.
Note
If there is no “Memory Stick” inserted, “REPEAT
----” appears in the display, and repeat mode cannot
be selected.
continued
Playing in various modes
(continued)
Protecting your hearing
(AVLS)
The AVLS (Automatic Volume Limiter
System) function keeps down the maximum
volume to protect your ears.
1 Press the MENU button.
The menu is displayed.
2 Select “AVLS” using the Jog lever.
Advanced Operations (Memory Stick Walkman)
REPEAT OFF
AVLS NORM
BEEP OFF
3 Press the Jog lever.
4 Select “LIMIT” using the Jog lever.
NORM
AVLS
LIMIT
5 Press the Jog lever.
The AVLS indication is displayed.
AVLS indication
REPEAT OFF
AVLS
LIMIT
BEEP OFF
The volume is kept to a moderate level.
6 Press the MENU button.
The display returns to normal.
To exit from the Menu mode
Select [RETURN] in the menu or press the MENU
button.
To cancel AVLS
Select NORM in step 4.
19
20
Changing the
display mode
You can change the display mode and display
the track number, the remaining time, etc.
while in playback or stop mode.
DISPLAY
button
Press the DISPLAY button.
Each time you press the DISPLAY button, the
display changes as shown below.
Album
Track
number
001 02:01
Song
HAP Y B RT
title
Number
of
remaining
tracks*
When playing in repeat mode, “-----” appears
instead of the number of remaining tracks and the
total time remaining.
PI
-
001 04:18
0
REMEIN
A
-
0-
008 54:11
REM IN
ALL
HAP
YBRT
PI
title
ERITMY FAVOU
Elapsed
0
time
Bit rate
Remaining
RITMY FAVOU
time of the
current
track
ERITMY FAVOU
Total time
remaining *
A
Song title*
(only while
in play /
HD
pause mode)
Locking the
controls (Hold)
To prevent the controls from being
accidentally operated when you carry the
player, use this function.
HOLD switch
L
Slide the HOLD switch in the direction
of the arrow.
No controls will be able to operate. (except
the EJECT lever)
If you press buttons other than the Jog lever
or the EJECT lever while the HOLD switch is
ON, HOLD appears in the display.
The current time appears in the display when
you press the Jog lever while the HOLD
switch is ON. (See page 24)
To release the Hold function
Slide the HOLD switch in the opposite direction of
the arrow.
Changing the settings
of Memory Stick
Walkman
MENU
button
To turn off the beep
sound (BEEP)
BEEP ON: a beep will sound to indicate that
operation has been accepted.
BEEP OFF: no beep sound will be heard.
1 Press the MENU button.
The menu is displayed.
2 Select “BEEP” using the Jog lever.
AVLS NORM
BEEP ON
LIGHT OFF
3 Press the Jog lever.
4 Select “OFF” using the Jog lever.
BEEP
5 Press the Jog lever.
6 Press the MENU button.
The display returns to normal.
To exit from the Menu mode
Select [RETURN] in the menu or press the MENU
button.
To cancel the Beep function
Select ON in step 4.
OFF
ON
Jog lever
continued
21
Changing the settings of Memory Stick
Walkman
(continued)
To change the display
backlight setting (LIGHT)
You can select from the following 3 settings.
Menu
Backlight mode
OFF
always off
ON
turns on during operation*
OPR
turns on for three seconds after each
operation
* The battery life is shorter if ON is selected.
1 Press the MENU button.
The menu is displayed.
2 Select “LIGHT” using the Jog lever.
BEEP OFF
LIGHT OFF
CONTRAST
3 Press the Jog lever.
4 Select a backlight mode using the
Jog lever.
OFF
LIGHT ON
OPR
5 Press the Jog lever.
6 Press the MENU button.
The display returns to normal.
To exit from the Menu mode
Select [RETURN] in the menu or press the MENU
button.
22
To adjust the LCD
contrast (CONTRAST)
1 Press the MENU button.
The menu is displayed.
2 Select “CONTRAST” using the Jog
lever.
LIGHT OFF
CONTRAST
TITLE J PN
3 Press the Jog lever.
4 Select the contrast using the Jog
lever.
You can adjust between -5 and +5
CONTRAST
+1
5 Press the Jog lever.
6 Press the MENU button.
The display returns to normal.
To exit from the Menu mode
Select [RETURN] in the menu or press the MENU
button.
– 6 –
To format the “Memory
qd
qf
qs
qh
qk
qg
ql
qj
Stick” (FORMAT)
If you need to format the “Memory Stick,”
use this player.
If formatted, all data previously recorded on
the “Memory Stick” will be erased. Be sure to
check the data of the “Memory Stick” before
formatting (data recorded using other devices
will also be erased).
A commercially available “Memory Stick” is
already formatted at the factory.
The supplied “Memory Stick” is also
formatted.
Notes
• Be sure to connect the player to a power source
with the AC power adaptor.
• You cannot use a “Memory Stick” that has been
formatted using the computer.
1 Press the MENU button.
The menu is displayed.
2 Select “FORMAT” using the Jog
lever.
TITLE J PN
FORMAT
DATE&TIME
3 Press the Jog lever.
4 Select “YES” using the Jog lever.
YEFORMATONS
5 Press the Jog lever.
“FORMAT OK?” appears in the display.
OKFORMAT ?
6 Press the Jog lever.
“FORMATTING” appears in the display,
and the formatting of the “Memory
Stick” begins.
TIFORMAT NG
When formatting is finished,
“COMPLETE” appears in the display,
and returns to the menu in step 2.
7 Press the MENU button.
The display returns to normal.
To exit from the Menu mode
Select [RETURN] in the menu or press the MENU
button.
To cancel the formatting
Select “NO” in step 4 or press any button other than
the Jog lever in step 5.
Notes
• You cannot format while playback or in pause
(“FORMAT” will not be displayed).
• If the erasure prevention switch of the “Memory
Stick” is ON, “LOCKED” appears in the display,
and you cannot format the “Memory Stick.”
• Do not take out the “Memory Stick” or unplug the
AC power adaptor when “FORMATTING” is
displayed.
Changing the settings of Memory Stick
Walkman
(continued)
To set the date and time
(DATE & TIME)
You can set the current date and time and
display it. To play a music item with a
playback period restriction (page 5), you need
to set the date and time.
1 Press the MENU button.
The menu is displayed.
2 Select “DATE&TIME” using the Jog
lever.
FORMAT
DATE&TIME
3 Press the Jog lever.
A cursor appears under the year.
DATE&TIME
00
Y 1 M 1 D
20
0:00
4 Set the year using the Jog lever.
5 Press the Jog lever.
The cursor moves to the month.
DATE&TIME
00
Y 1 M 1 D
20
0:00
6 Do the same to set the month, day,
hour and minutes, and then press
the Jog lever.
7 Press the MENU button.
The display returns to normal.
To switch between 24 hour display and
12 hour display
Press the DISPLAY button during the setting.
To exit from the Menu mode
Select [RETURN] in the menu or press the MENU
button.
To display the current time
You can display the current time by any of the
following ways.
• Press the Jog lever while the display is OFF and
the HOLD switch is ON.
t The current time is displayed for 3 seconds
while the Jog lever is being pressed.
• Press the Jog lever while the display is ON and the
HOLD switch is ON.
t The current time is displayed while the Jog
lever is being pressed.
• Press the DISPLAY button for a while when the
HOLD switch is OFF.
t The current time is displayed while the
DISPLAY button is being pressed.
continued
Advanced Operations
(OpenMG Jukebox)
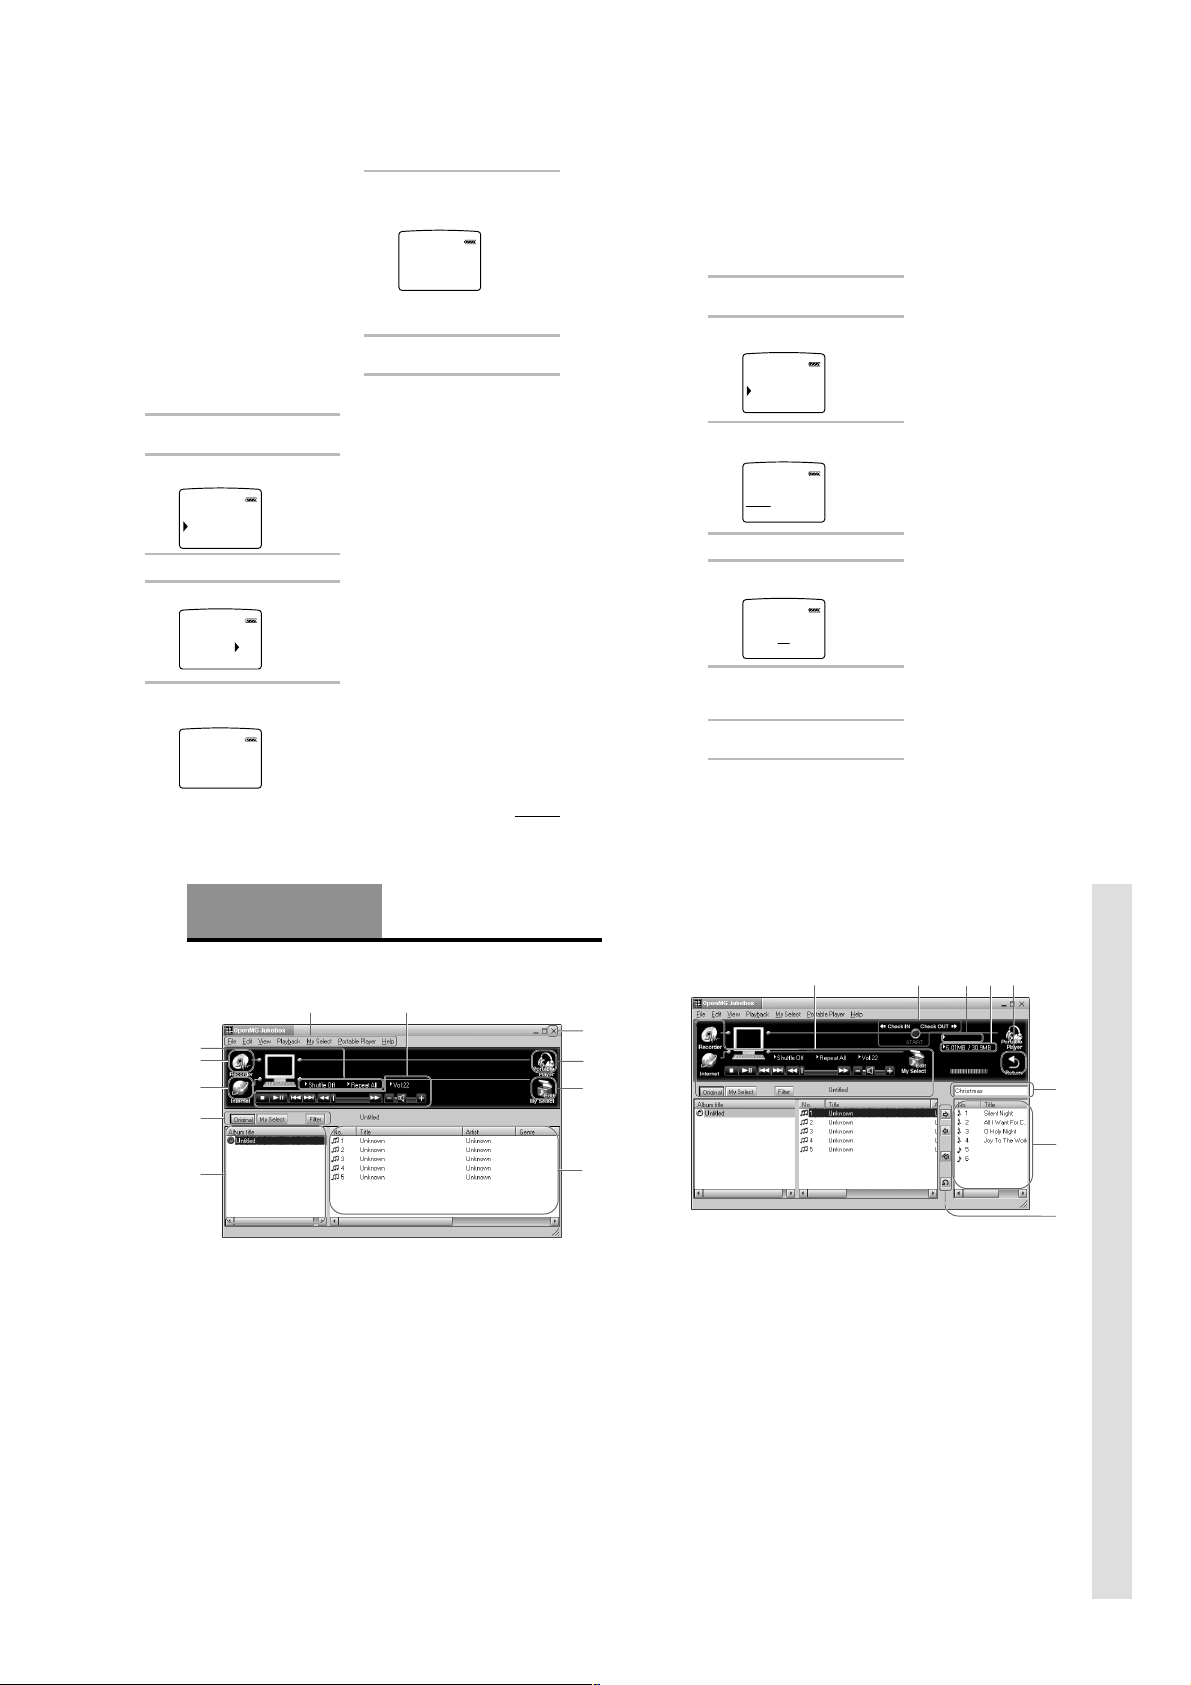
Names and functions of the OpenMG
Jukebox window
1
qa
0
9
8
7
1 Menu bar: for details on each menu items,
see page 28.
2 Operation buttons: you can play or adjust
the volume, etc.
3 Close button: quits the OpenMG Jukebox
software. (You can also quit by clicking
[File]–[Quit])
4 Portable Player: opens the Portable Player
window (page 27)
5 Edit My Select: opens the My Select
window.
2
6 Song title list: displays the song titles
listed in the selected album/Filter
7 Album title list: displays the album/Filter
titles in the OpenMG Jukebox
8 You can choose to display the album list,
the Filter, etc.
9 Internet: for using EMD services
0 Recorder: opens the OpenMG CD
Recorder window
qa Playback mode buttons: you can set the
shuffle mode, repeat mode, etc.
23
24
Portable Player window
When you connect Memory Stick Walkman to the computer, the Portable Player window appears
in the display on the right side of the OpenMG Jukebox.
3
4
5
Advanced Operations (OpenMG Jukebox)
6
qs You can use these buttons to operate the
OpenMG Jukebox software (see page 26
for more information).
qd CHECK IN/OUT START (STOP) button:
starts or stops the Check-In/Out
qf Name of the connected portable player
(such as Memory Stick Walkman)
qg Memory space on the “Memory Stick” or
memory used for audio files, and total
memory capacity*
qh RETURN button: closes the Portable
Player window
qj Album title of the “Memory Stick”
qk Displays the song titles recorded on the
“Memory Stick”
ql Check-In/Out buttons (to start Check-In/
Out, click the START button next)
* When using a 64MB “Memory Stick,” “61.8MB”
appears in the display as the total memory
capacity. This number is a result of subtracting
memory for the system operation of Memory Stick
Walkman.
26
27
– 7 –
SECTION 2
DISASSEMBLY
Note : This set can be disassemble according to the following sequence.
Set
Note : Follow the disassembly procedure in the numerical order given.
Lid, Battery Case Case Assy Main Board
LCD Block
HP Board, CN Board
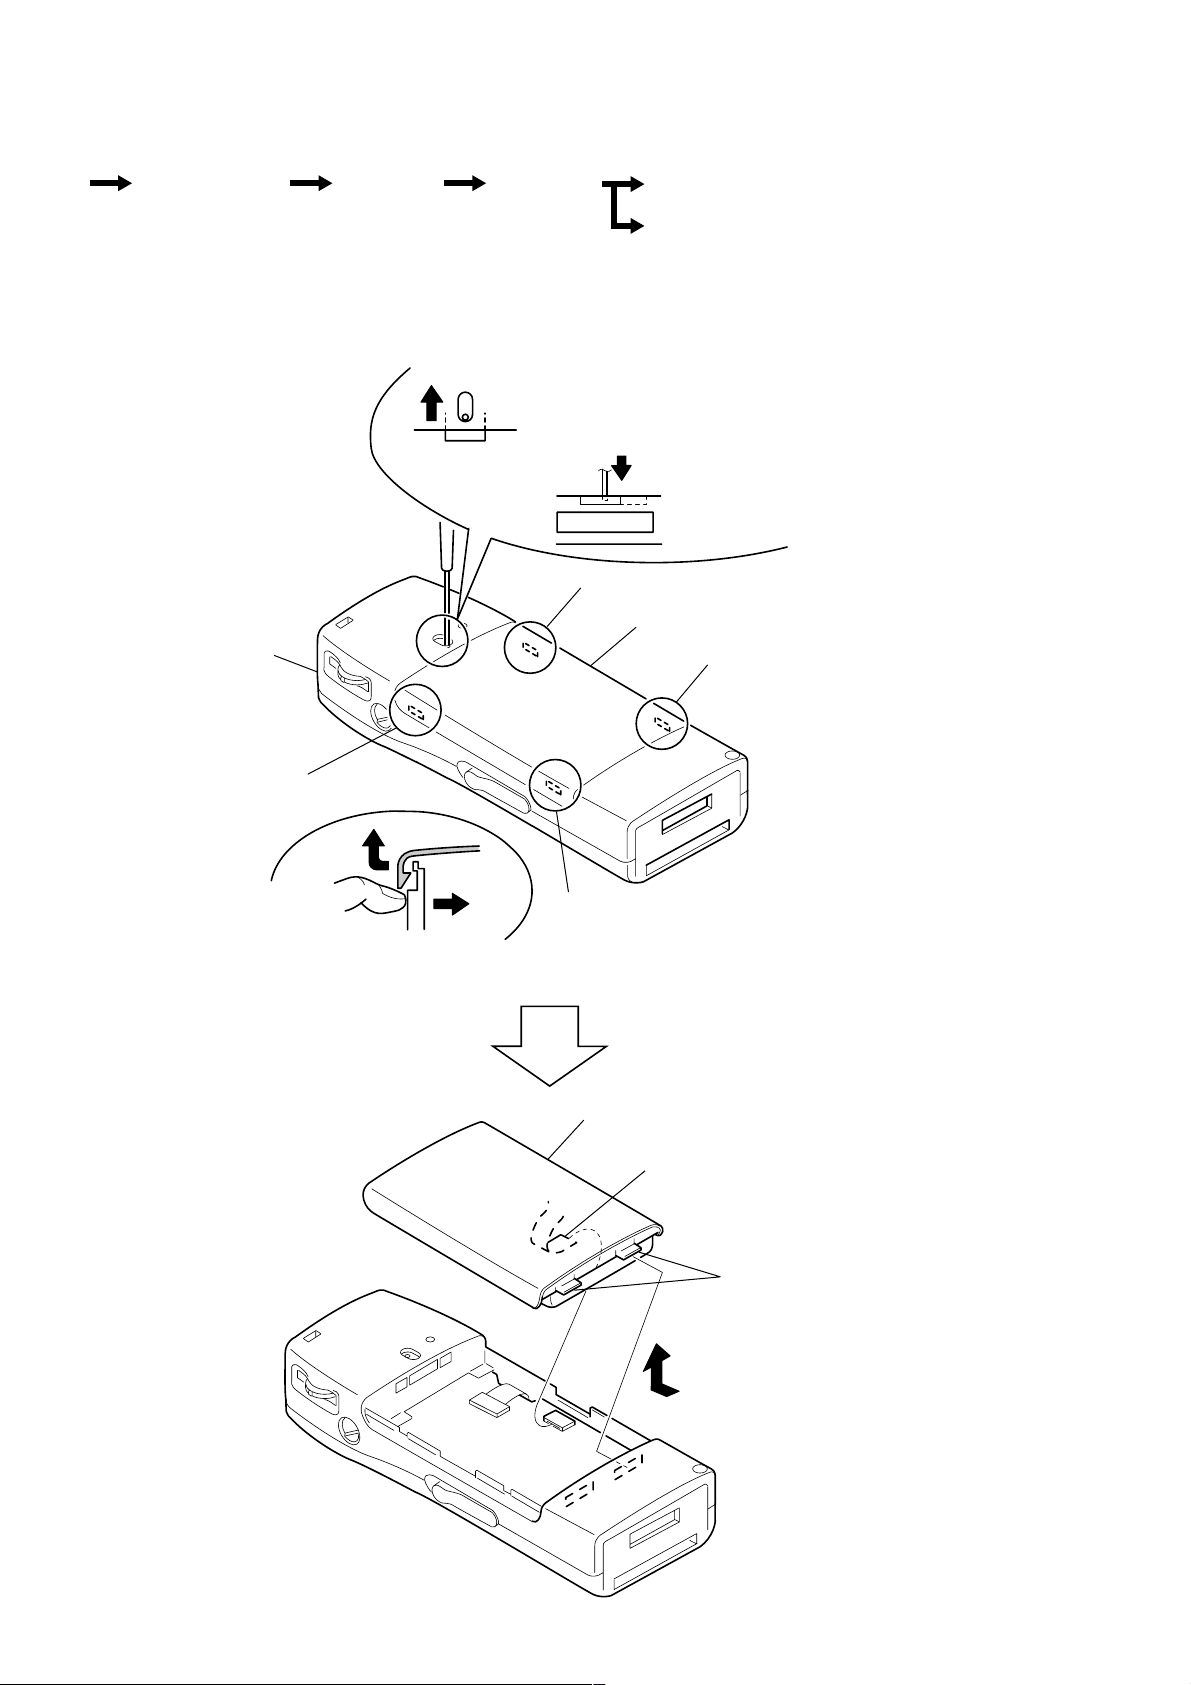
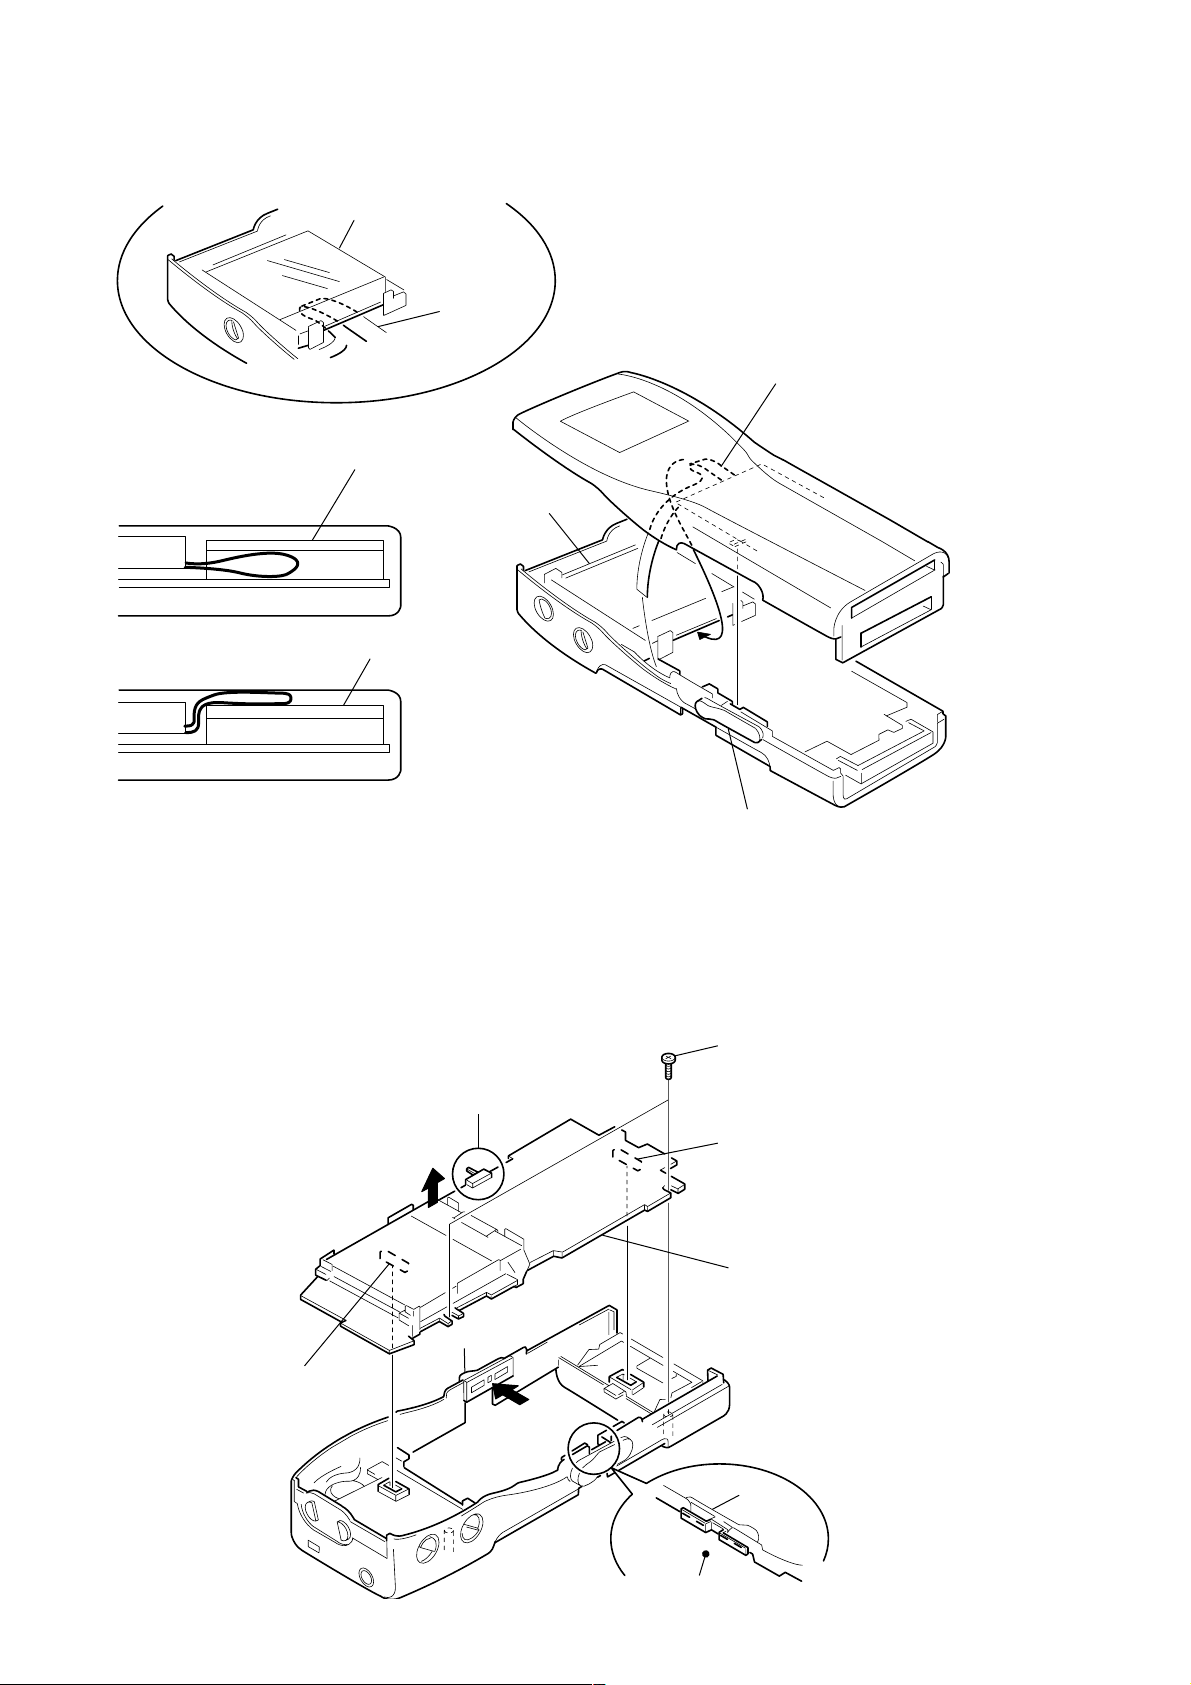
2-1. LID, BATTERY CASE
case
2 – 5
Use your fingernail to push the “lid, battery case” up.
1 Move the stopper in the direction of
the arrow with a screwdriver or other means,
then push in the claw.
Note:Do not push the stopper downward.
The LCD unit may be damaged.
LCD unit
3 claw
lid, battery case
5 claw
2 claw
4 claw
8 lid, battery case
– 8 –
7 CN501
6 claws
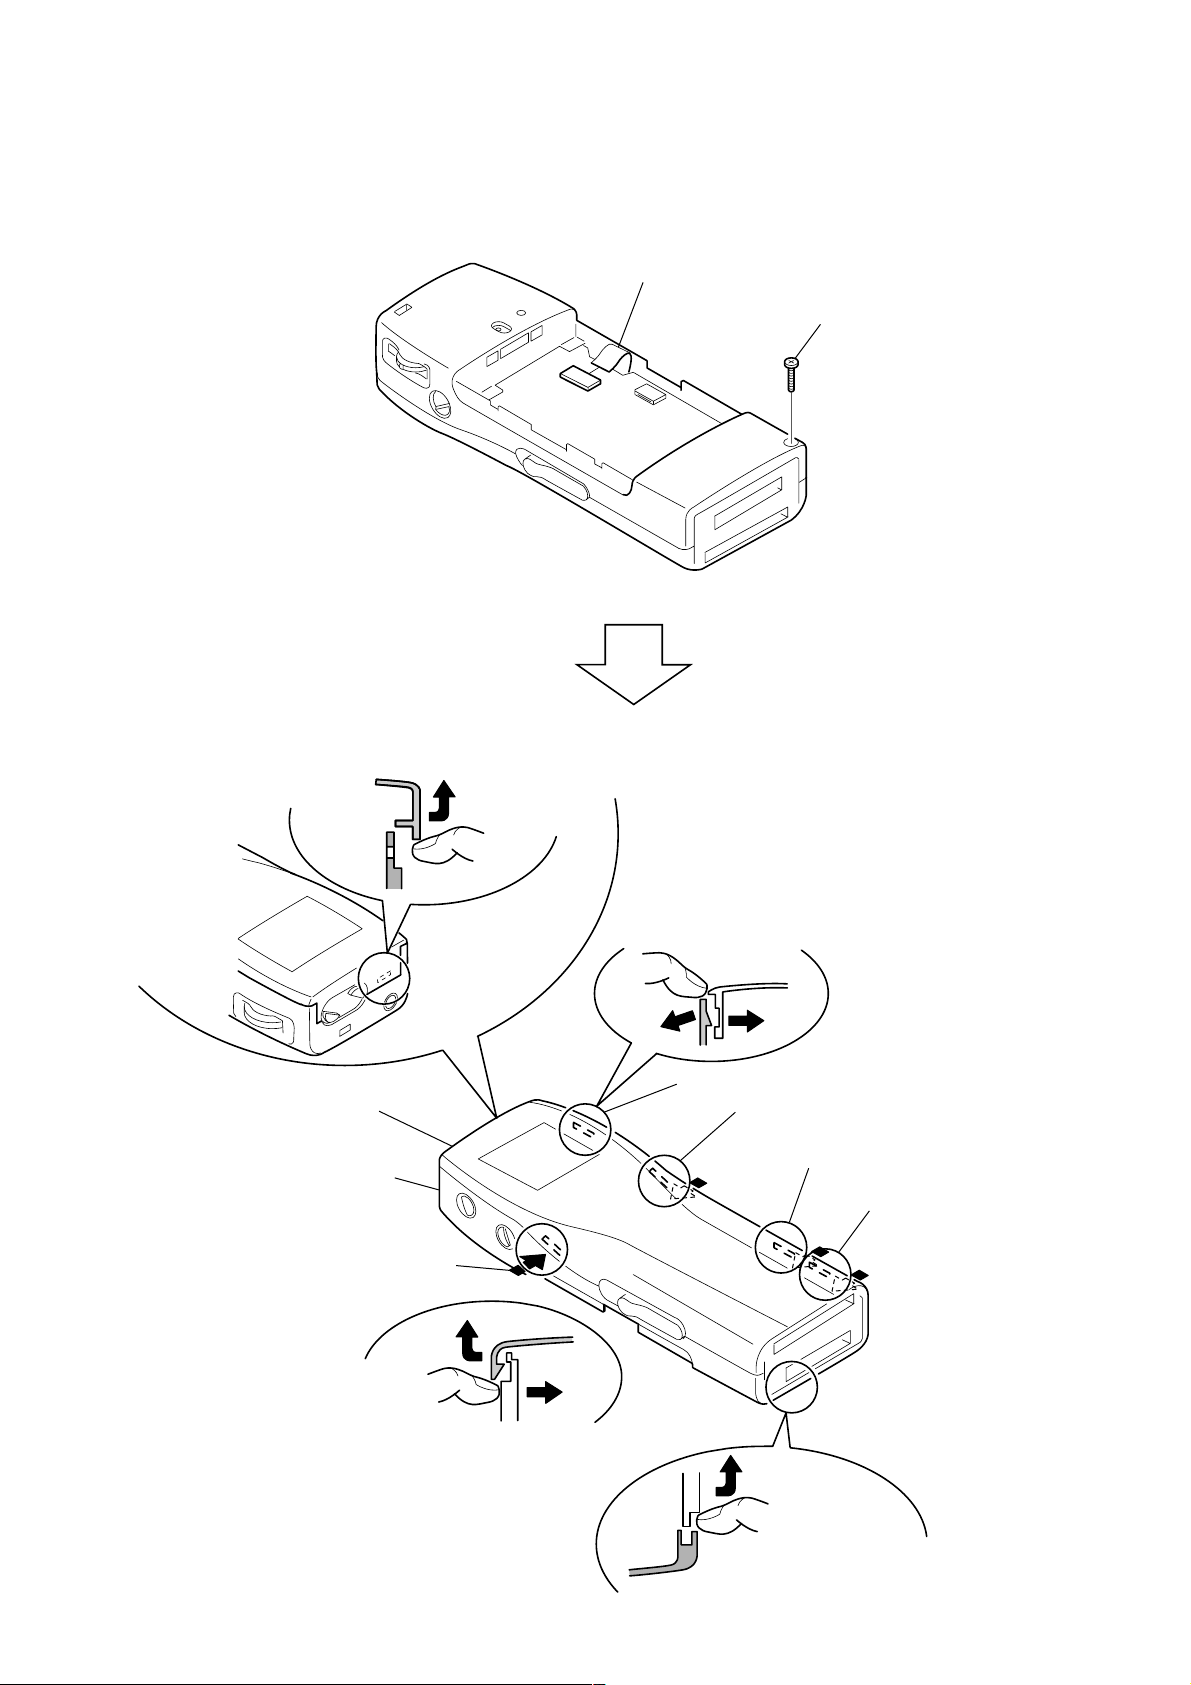
2 B1.7x9
1 CN701
2-2. LID ASSY (SERVICE), UPPER
Note : When removing the “lid assy (service), upper”, remove the parts
in the following order as the claws are easy to be broken.
9 Use your fingernail to push the “lid assy (service), upper” up.
Push the “lid assy (service), upper” or spread the case to detach the claw.
8 claw
lid assy (service), upper
case
4 Push the case.
7 claw
6 claw
5 claw
4 – 7
Use your fingernail to
push the “lid assy (service), upper” up.
3 Use your fingernail to
push the “lid assy (service), upper” up.
– 9 –
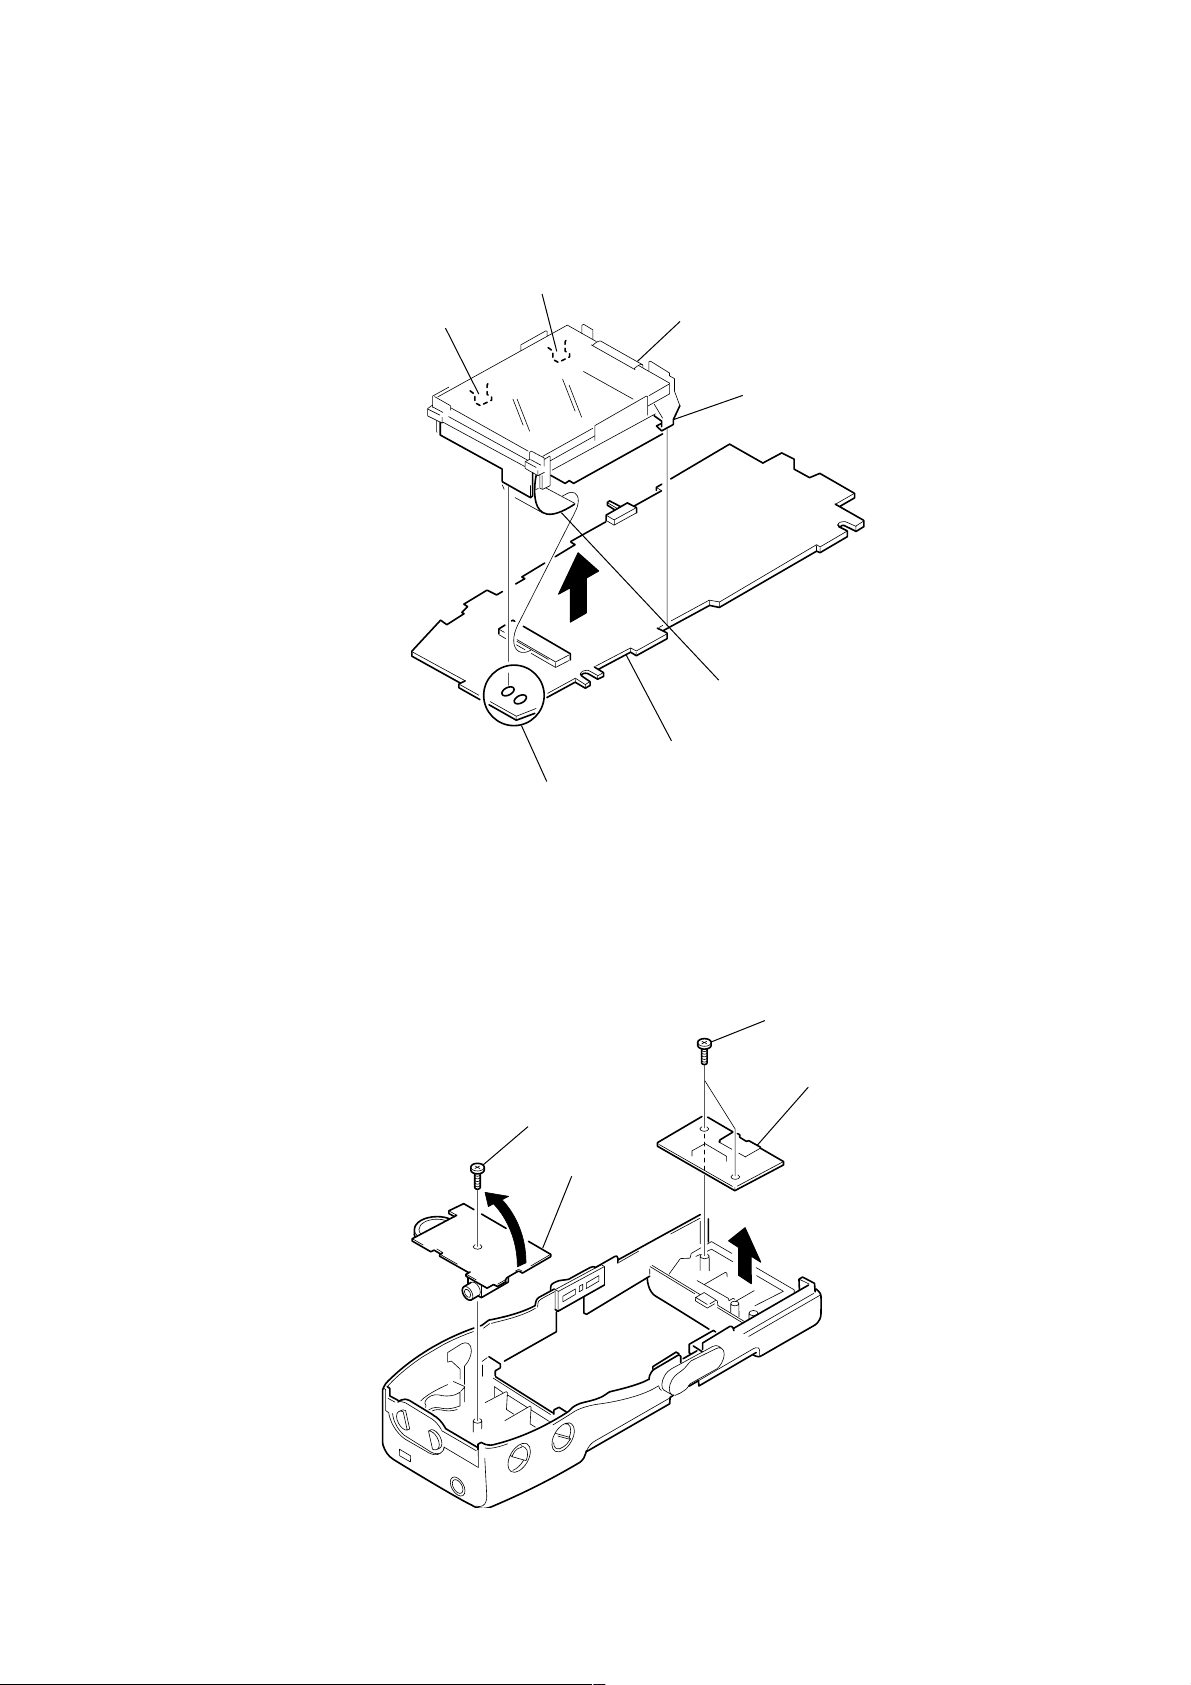
• Note for installation
LCD unit
flexiblecable
Place the slag in the flexible
cable under the LCD unit.
LCD unit
OK
LCD unit
NG
Insert the memory stick and check for opening and closing of the shutter.
If NG, the memory stick shutter cannot be fully closed,
which disallows the connector shutter to be opened.
LCD unit
2-3. MAIN BOARD
Note : When installing, fit the knob (HOLD) and switch (S806).
Note: Be careful no to damage
the claw of switch S806.
Push out a little.
When installing, adjust the knob (EJECT)
to the claw on the eject mechanism.
1 M 1.4
4 CN707
3
knob (HOLD)
Spread a little.
5 CN706
6 MAIN board
2
knob
(EJECT)
MAIN BOARD
– 10 –
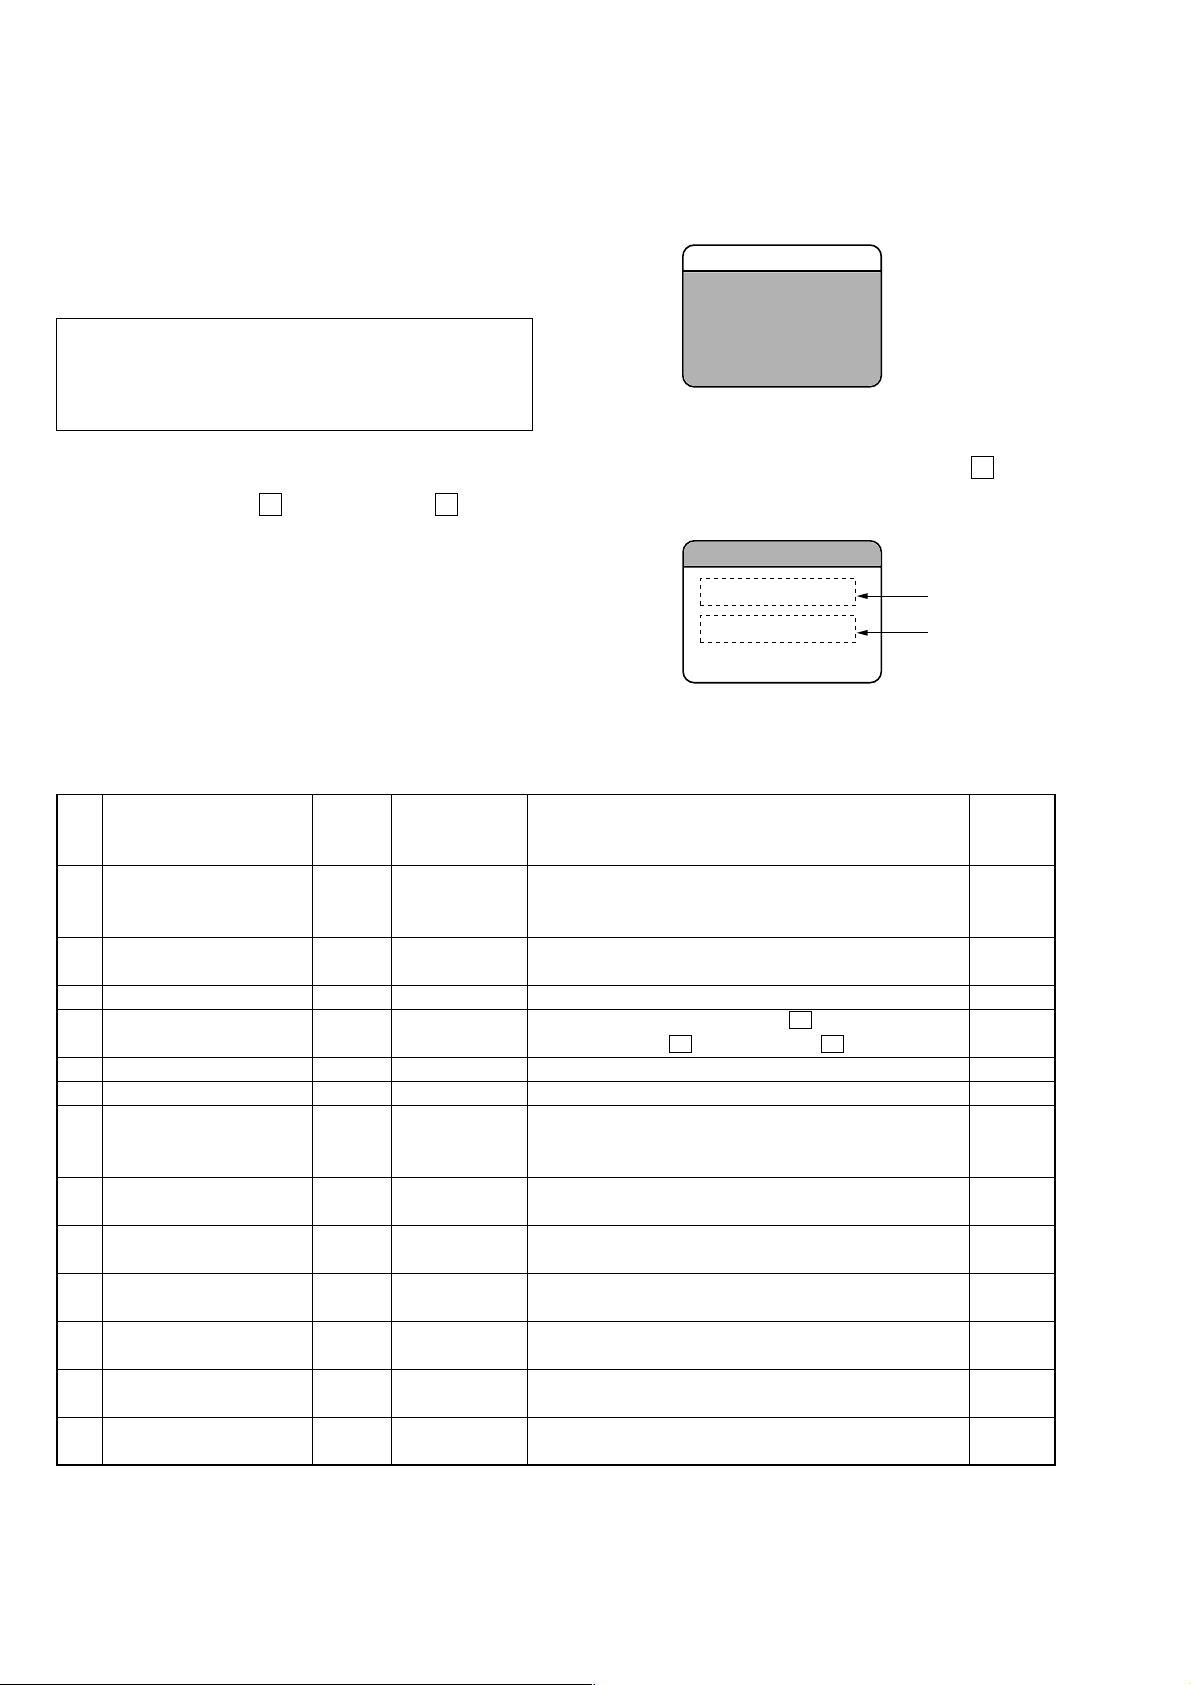
1 screw
3 screw
2 HP board
4 CN board
2-4. LCD BLOCK
4 claw
3 claw
7 LCD block assy
2 claw
6
5 CN702
2-5. HP BOARD, CN BOARD
8 MAIN board
1 Removal the solders.
– 11 –
SECTION 3
BASSwa31SHUFu
TEST MODE
3-1. GENERAL INFORMATION
In this set, the functions and audio capabilities can be checked by
entering the TEST MODE.
3-2. TOOLS
1. Memory stick player NW-MS7
2. Test memory stick
Note:This test requires the memory stick for operational check.
Once created, the memory stick for test may be used for
each test.
For information on how to create this stick, see
“3-6. Creating the Memory Stick for Operational Check.”
3-3. SETTING THE TEST MODE
1. Insert the MG memory stick into the main unit.
2. While holding down the x (STOP) key and the B (PLAY)
key, push the RESET button. (Release the RESET button first.)
3-4. RELEASING THE TEST MODE
1. When the test mode is completed, push the RESET button.
3-5. OPERATIONS IN THE TEST MODE
Once the Test Mode is entered from the normal mode, the system
will present the displays below.
The system will proceed to the next step each time the x (STOP)
key is pressed.
test No. display
test item display
STEP Test item
-1 RAM test 32-bit data. (The ROM checksum is also checked in this step.)
0 LCDs all ON/all OFF Test ¢1
1 BEEP generation Test ¢1 Continuously sounds BEEPs.
2 Destination setting Test ¢2 SEL SIMUKE
3 Test ¢3 E2P WRITE (Do not operate)
4 EEPROM check Test ¢4 E2P CHECK (Do not operate)
5 Reference signal level Test ¢5 SoundTest memory stick is played back, and the headphone output is 001
Frequency characteristic
6
20 Hz (XP)
Frequency characteristic
7
20 kHz (XP)
Frequency characteristic
8
20 Hz (SP)
Frequency characteristic
9
20 kHz (SP)
A De-Emphasis 5 kHz (XP) Test ¢A SoundTest
B De-Emphasis 16 kHz (XP) Test ¢B SoundTest
Test No. Test item
Display display
The address and data buses are tested by reading/writing
The backlight turns on to indicate that this test is OK.
1.¢1b Check for unusual condition in any LCD segments and
(Ver. No.) common signal. Visually check.
The destination is set by pressing the B (PLAY) KEY. (For
example, For A t B KEY t For B t B KEY t For C)
The backlight turns off, 1 kHz (0 dB) reference in the test
set to the reference output value (Vol. 23).
Test ¢6 SoundTest SP/20 Hz (0 dB) in the test memory stick is played back. 002
Test ¢7 SoundTest SP/20 kHz (0 dB) in the test memory stick is played back. 003
Test ¢8 SoundTest XP/20 Hz (0 dB) in the test memory stick is played back. 004
Test ¢9 SoundTest XP/20 kHz (0 dB) in the test memory stick is played back. 005
5 kHz (–4.53 dB) emphasis off in the test memory stick is
played back.
16 kHz (–9.04 dB) emphasis off in the test memory stick is
played back.
Description of the test playback
Test MS
track
006
007
– 12 –
STEP Test item
C Channel balance (XP) Test ¢C SoundTest 1 kHz (0 dB) in the test memory stick is played back. 008
Channel separation
D
(L) IN > (R) OUT is played back (XP mode).
Channel separation
E
(R) IN > (L) OUT is played back (XP mode).
F Noise level (XP) Test ¢F SoundTest Mute signal in the test memory stick is played back. 011
10 Distortion factor (XP) Test 1¢ SoundTest
11 Maximum output (XP) Test 11 VOL MAX Vol. is set to MAX. (0 dB) 001
12 AVLS LEVEL (XP) Test 12 AVLS ON AVLS is set ON. 001
13 AVLS releasing (XP) Test 13 AVLS OFF AVLS is set OFF. 001
14 Vol. setting (XP) Test 14 VOL –4¢dB
15 MEGA BASS 1 (XP) Test 15 MEGA BASS 1 The mode is set to MEGA BASS 1 mode. 012
16 MEGA BASS 2 (XP) Test 16 MEGA BASS 2 The mode is set to MEGA BASS 2 mode. 012
17 MEGA BASS releasing (XP) Test 17 MEGA BASS OF MEGA BASS is set OFF. 012
18 BATT low voltage detection Test 18 Wait LowBatt
BATT Reference voltage
19
detection reference voltage, the backlight turns on.
1A Lo DC IN detection Test 1A Wait LowDC
1B Hi DC IN detection Test 1B Wait HighDC
1C STOP current Test 1C STOP 1 Backlight off t 2 STOPPED state
1D PLAY current (XP) Test 1D PLAY
1E USB response check Test 1E USB
1F Standby current Test 1F Forces the set to be in the sleeping state.
20 Setting initialization Test 2¢ E2P INIT
Returns to step 0.
Notes: 1. The RAM test in STEP-1 is performed just when the TEST MODE is entered.
2. SP mode: 105 kbps, XP mode: 132 kbps
3. Each track is played back once to playback the test MS in each step. The data is not played back continuously.
Test No. Test item
Display display
Test ¢D SoundTest
Test ¢E SoundTest
Test 18 Wait Batt2
Description of the test playback
L: 1 kHz (0 dB) reference/R: mute in the test memory stick
L: mute/R: 1 kHz (0 dB) reference in the test memory stick
1 kHz (0 dB) reference in the test memory stick is played
back.
100 Hz reference in the test memory stick is played back
and the headphone output is set to –40 dB (Vol. 03).
When a low voltage (3.35 V or Less) condition is detected
(BATT), the backlight turns on.
1 Backlight off t 2 When the BATT voltage is at the
1 Backlight off t 2 When the AC adaptor voltage is found
to be lower (4.65 V or Less), the backlight turns on.
1 Backlight off t 2 When the AC adaptor voltage is found
to be lower, the backlight tur ns on. When the AC adaptor
voltage is found to be higher (6.0 V or more), the backlight
turns on.
The set is in PLAY mode 0.1 mW (Approx. 0.08 mW for vol.
11 and approx. 0.12 mW for vol. 12)
5 V is applied to Vbus and potential variations at D+/D– or
crystal oscillations are verified for this check.
The destination information is set again and the volume,
BASS and other equipment setting information are initialized.
Test MS
track
009
010
001
012
001
– 13 –
3-6. CREATING THE MEMORY STICK FOR
OPERATIONAL CHECK
Note:Once created, the memory stick for test may be used for each
test.
3-6-1. TOOLS
1. MG memory stick MSG-32A or MSG-64A
2. Connecting adapter (1-418-764-21)
3. USB cable (1-791-785-11)
4. Open MG Jukebox CD ROM
5. Test CD YEDS-18 (3-702-101-01)
3-6-2. Activating the software
1. Mount the Open MG Jukebox CD ROM in the drive of a
computer and install the software. (For more information, refer
to This manual "Setup 3: Installing the OpenMG Jukebox
software" on page 4.)
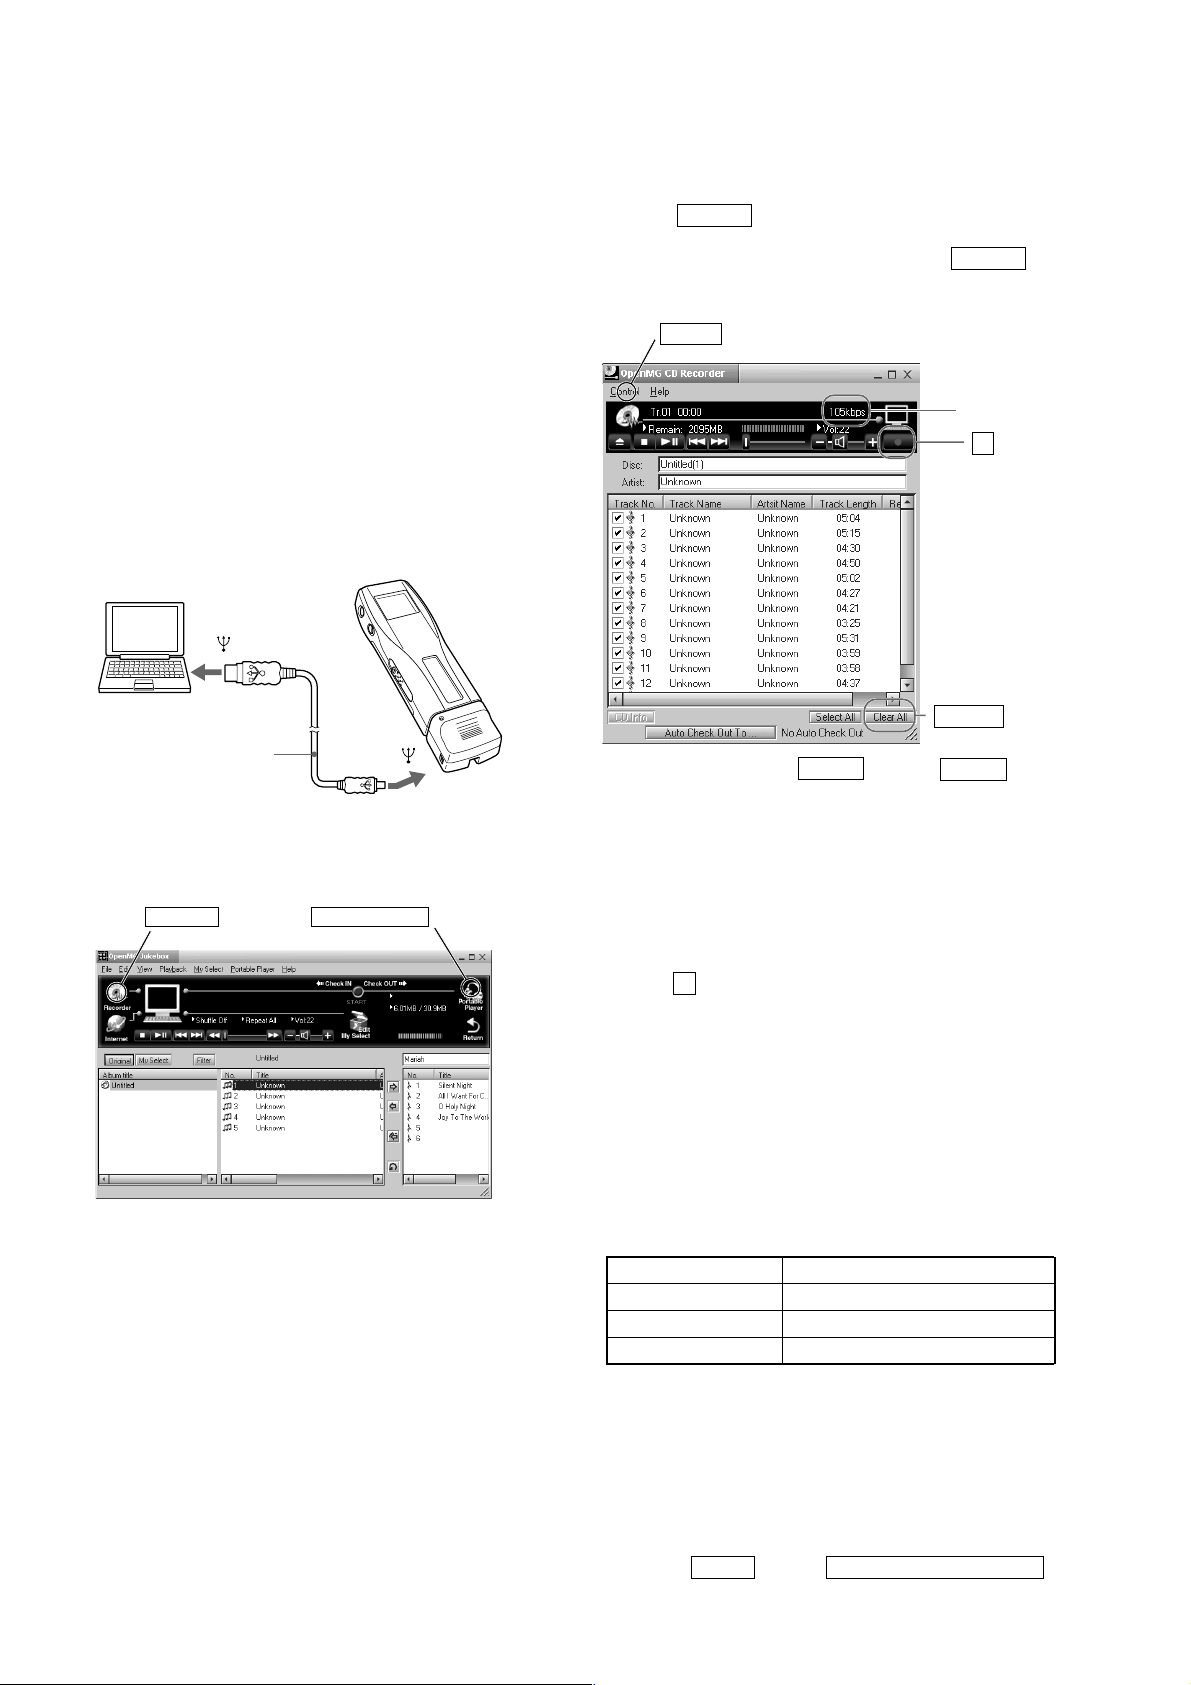
2. Connect the memory stick player NW-MS7 to the computer.
to
USB cable
(supplied)
3. Activate the Open MG Jukebox software.
(Double click the icon in the desktop.)
Recorder button Portable Player button
to
3-6-3. Recording the CD (to enter music data into the
computer)
4. Mount the TEST CD (YEDS-18) in the CD-ROM drive.
5. Click the Recorder button at the upper left of the Open MG
Jukebox window. The MG CD Recorder screen appears to
display the contents of the TEST CD. Press the Clear All
button at the lower right of the window to uncheck all the track
numbers.
Control
bit rate
z button
Clear All button
6. Setting the bit rate: Click Control and then Settings at the
upper left section of the window . Click the Recording Setup tab
in the setup dialog and select 132kbps from the dropdown list
of ATRAC3 bit rates.
7. Enter the disc name and the artist name.
Disc: YEDS-18 132kbps-1
Artist: SONY
8. To select the recording track, check the following track
numbers:
2, 3, 4, 6, 7, 8, 10, 12, 13
9. Press the z (record) button at the upper right of the window to
record data.
10. Repeat the steps 5 through 9 with the following settings:
Bit rate: 132kbps
Disc: YEDS-18 132kbps-2
Artist: SONY
Recording track number: 2
11. Repeat the steps 5 through 9 with the following settings:
Bit rate: 105kbps
Disc: YEDS-18 105kbps
Artist: SONY
Recording track number: 3, 6
12. The following recording was made:
Album title Recorded TEST CD track numbers
YEDS-18 132kbps-1 2, 3, 4, 6, 7, 8, 10, 12, 13
YEDS-18 132kbps-2 2
YEDS-18 105kbps 3, 6
Note:Any music content on the same track can be checked out
only once onto one memory stick in accordance with the
SDMI (Secure Digital Music Initiative) standard.
Therefore, record the data twice for the following
settings: bit rate of 132kbps and recording track number
of 2.
13. Once the recording is complete, terminate the Open MG CD
Recorder. ( Control and then Open MG CD Recorder Quit )
– 14 –
3-6-4. Checkout (to load music data to the memory stick)
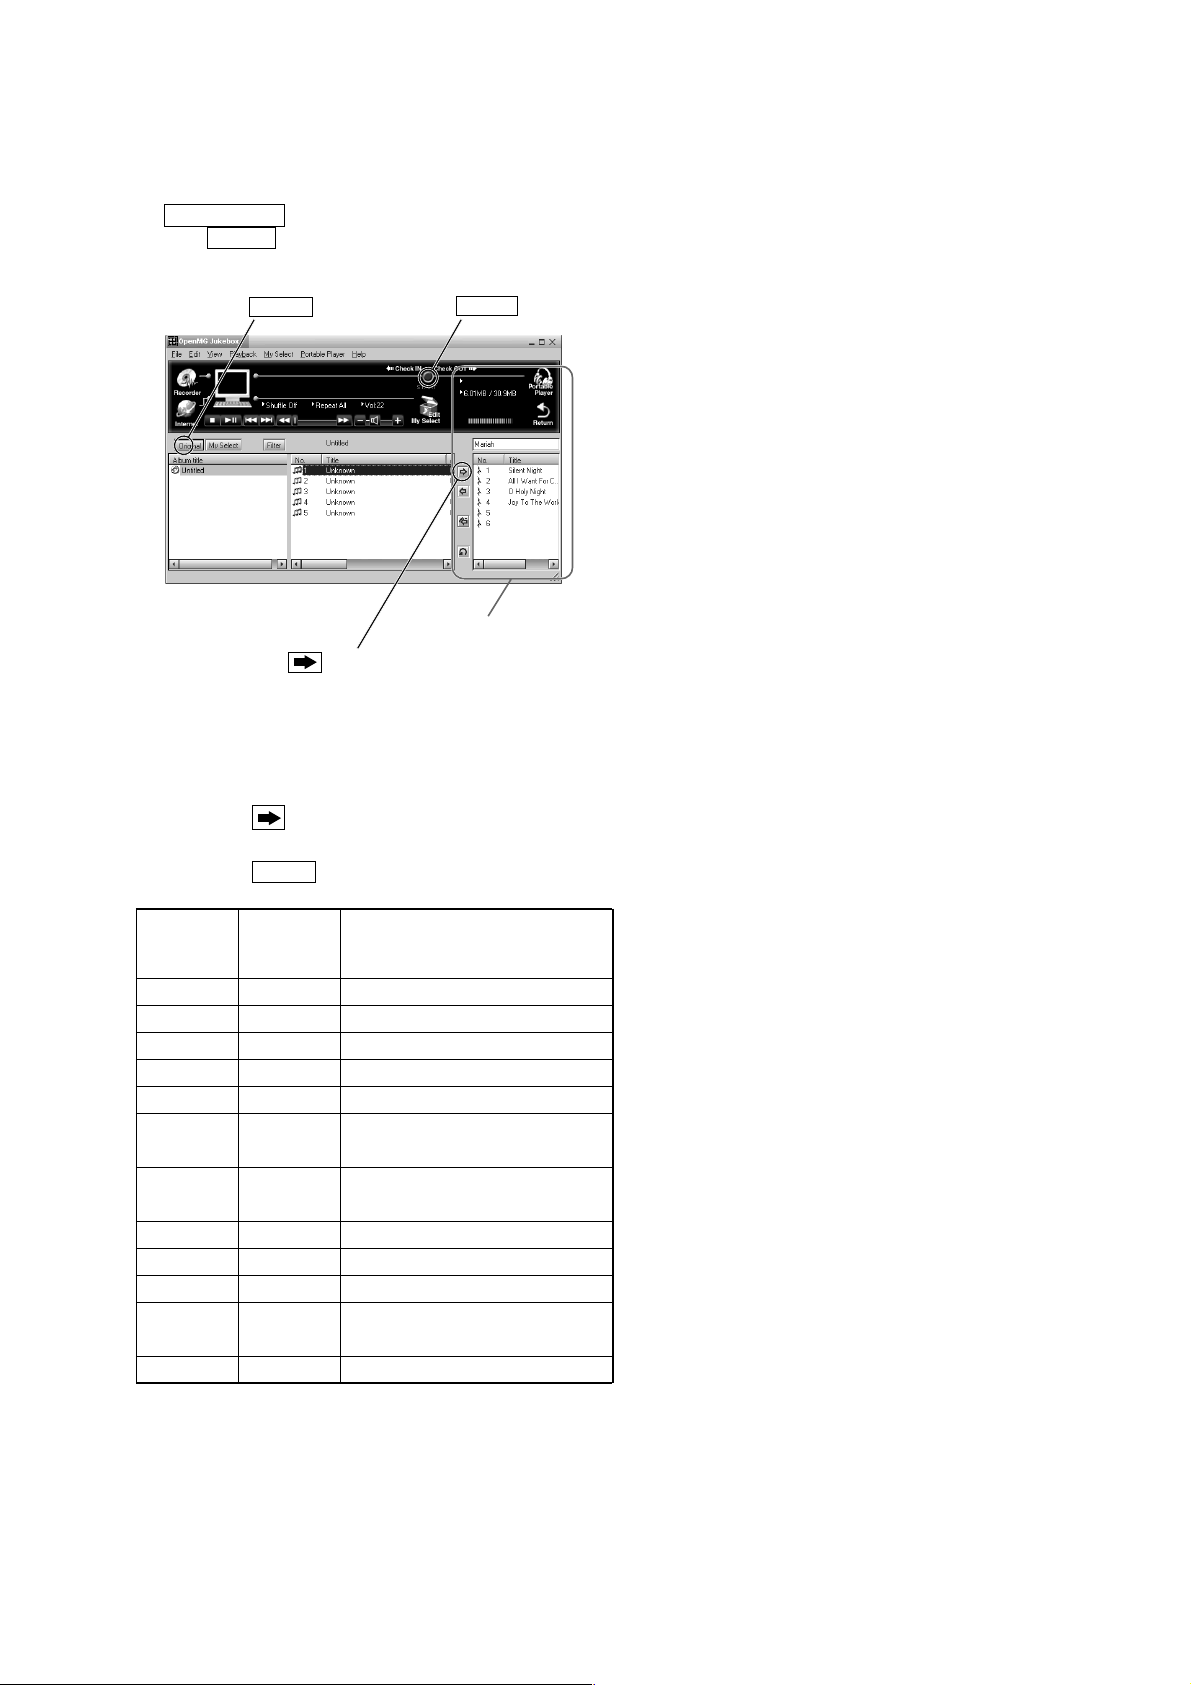
14. Verify that the Portable Player screen is displayed at the right
side of the Open MG Jukebox screen. (If not displayed, click
Portable Player .)
15. Click Original on the Open MG Jukebox screen to display the
recorded contents of the CD.
Original button
button
START button
Portable Player window
(the music files inside
the“Memory Stick” appear)
16. Repeat the following operations in the order of checkout:
Click the title.
r
Click button.
r
Click START button.
Checkout order
TEST CD
Track Contents of test signals
number
1 2 1kHz, 0dB, L&R, 132kbps
2 3 20Hz, 0dB, L&R, 132kbps
3 6 20kHz, 0dB, L&R, 132kbps
4 3 1kHz, 0dB, L&R, 132kbps
5 6 20Hz, 0dB, L&R, 105kbps
612
713
5kHz, –4.53dB, L&R
w/emphasis 132kbps
16kHz, –9.04dB, L&R
w/emphasis 132kbps
8 2 1kHz, 0dB, L, 132kbps
9 8 1kHz, 0dB, L&R, 132kbps
10 10 1kHz, 0dB, R, 132kbps
11 7
Infinity Zero w/o
emphasis, L&R, 132kbps
12 4 100Hz, 0dB, L&R, 132kbps
17. Complete.
– 15 –

SECTION 4
DIAGRAMS
4-1. IC PIN DESCRIPTION
• IC701 HD64F7198RVDP16 (SYSTEM CONTROL)
Pin No. Pin Name I/O Pin Description
1 XCS5 F_XCS O EEPROM chip select signal output terminal
2 XCS4 LCD_XCS O LCD chip select signal output terminal
3 VCC — Power supply terminal
4 XCS3 U_XCS O USB chip select signal output terminal
5 XCS2 SRAM_XCS O S-RAM chip select signal output terminal
6 XCS1 S_XCS O MG IC chip select signal output terminal
7 CHARGE_LED O Battery charge LED signal output terminal
8 VSS — Ground
9 PA19 MS_INS I Memory stick insertion signal input terminal
10 XRD O Read signal output terminal
11 MS_BS O Memory stick interface byte cycle signal output terminal
12 MS_DIO I/O Memory stick interface data signal input/output terminal
13 MS_CLK O Memory stick interface clock signal output terminal
14 XWRLH S_XWRH O H side write signal output terminal
15 XWRLL S_XWRL O L side write signal output terminal
16 PA12 XWAIT I Wait signal input terminal
17 PA8 RTC_CE O Real time clock chip enable signal output terminal
18 PA4 RTC_CLK O Real time clock signal output terminal
19 PA0 RTC_SIO I/O Real time clock serial data signal input/output terminal
20 TXD1 O Transceiver data signal output terminal Not used. (Open)
21 RXD1 I Receive data signal input terminal Not used. (Open)
22 VCC — Power supply terminal
23 VSS — Ground
24 TXD0 LCD_SDA O LCD transceiver IIC data signal output terminal
25 RXD0 LCD_SDA I LCD receive IIC data signal input terminal
26 VSS — Ground
27 VCC — Power supply terminal
28 PB17 G_XLAT O ATRAC3 IC serial latch signal output terminal
29 PB16 O Output port terminal Not used. (Open)
30 PB13 O Output port terminal Not used. (Open)
31 PB7 G_SCLK O ATRAC3 IC system clock signal output terminal
32 PB6 G_SWDT O ATRAC3 IC watch dog timer signal output terminal
33 VSS — Ground
34 PC25 AU_PWR O Audio power signal output terminal
35 PC24 PCON O System power control signal output terminal
36 PC23 O Output port terminal Not used. (Open)
37 PC22 S_CLKOFF O MG IC clock off signal output terminal
38 PC21 S_PWR O MG IC power signal output terminal
39 VCC — Power supply terminal
40 PC20 O Output port terminal Not used. (Open)
41 PC19 O Output port terminal Not used. (Open)
42 PC18 MS_PWR O Memory stick interface power signal output terminal
43 VSS — Ground
44 – 50 A17 – A11 O Address bus signal output terminal
51 VSS — Ground
52 A10 O Address bus signal output terminal
53 VCC — Power supply terminal
54 – 59 A9 – A4 O Address bus signal output terminal
60 VCC — Power supply terminal
61 VSS — Ground
62 – 65 A3 – A0 O Address bus signal output terminal
– 16 –
 Loading...