

Page 1
2-629-003-12(1)
SonicStage
r
Portable Hard Disk Audio Player
Network Walkman NW-HD5/NW-HD5H
Operating Instructions Preparations/Basic Operations
Quick Start Guide
Quick Start Guide
Owner’s Record
The model and serial numbers are located on the bottom of the player. Record the serial number
in the space provided below. Refer to these numbers whenever you call upon your Sony dealer
regarding this product.
Model No. NW-HD5
Serial No. ___________________________
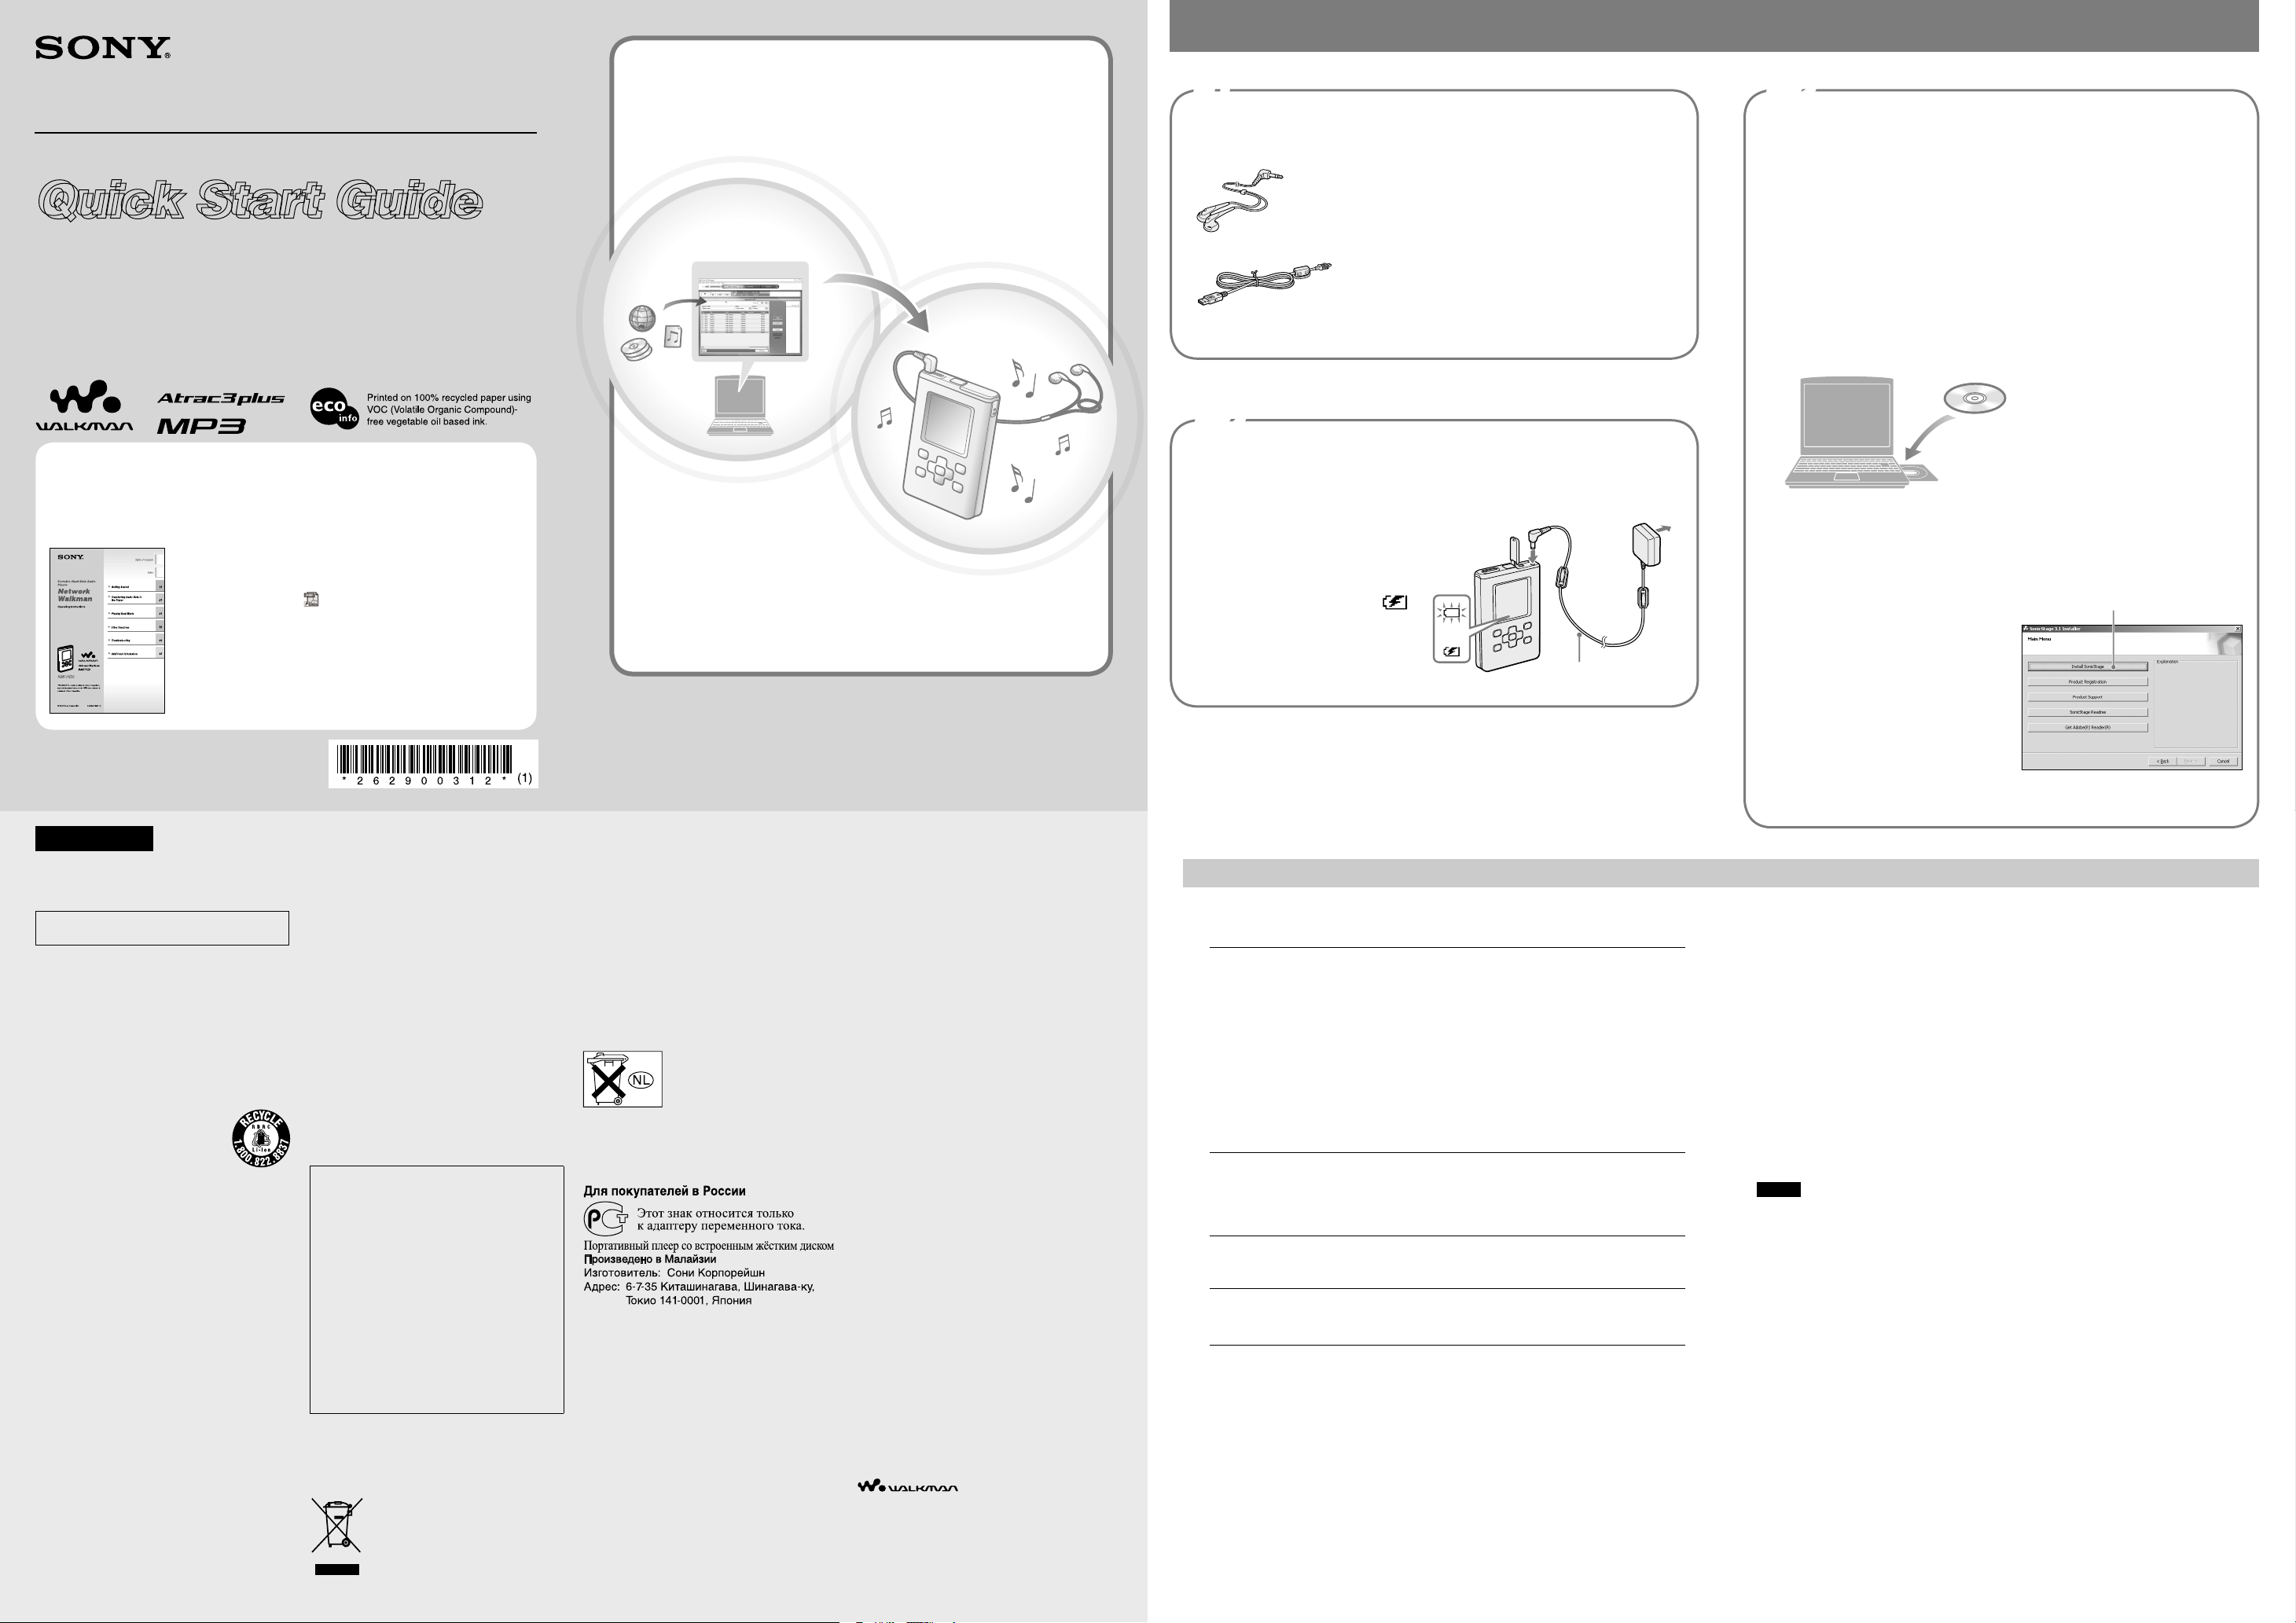
To enjoy music on the player
You can carry a number of music tracks with you by importing them to the player using
SonicStage.
Importing audio data
to SonicStage
Transferring audio data to
the player
Playing back
Getting Started
1
• Headphones (1)
• Dedicated USB cable (1)
• AC power adaptor (1)
Checking the supplied accessories
• Carrying case (1)
• CD-ROM (1) *
Includes:
− SonicStage software
− Operating Instructions for the player
(PDF)
• Quick Start Guide (this book) (1)
(The rechargeable battery has been installed
in the player beforehand).
* Do not play this CD-ROM on an audio CD
player.
3
Installing SonicStage on your
computer
Make sure to use the supplied CD-ROM for installing SonicStage. If SonicStage or OpenMG
Jukebox has been installed, the existing software will be overwritten by the new version
without erasing the existing functions or audio data registered by the existing software.
Close all other running software.
Check the following to see whether or not there are any applicable items before
installing the SonicStage software as they may cause the software installation to fail.
• You are not logged on as an “Administrator” (when using Windows 2000/Windows XP).
• Virus-check software is running. (Such software usually demands a large amount of
system resources.)
Insert the supplied CD-ROM into the CD drive of your computer.
The setup program starts up automatically and the installation window appears.
Refer also to the PDF of the Operating Instructions
This Quick Start Guide briefly explains the preparation, how to transfer audio data, and
basic playback procedures of the player.
You can enjoy various play modes and setup items on the player. See the PDF of the
Operating Instructions for details on functions and troubleshooting.
To see the PDF file
The PDF of the Operating Instructions is installed on your PC
together with SonicStage from the supplied CD-ROM. To use
the PDF, double-click “NW-HD5 series manuals” on the
desktop or click “Start” – “All Programs”– “SonicStage” –
“Operating Instructions.”
Adobe Acrobat Reader 5.0 or more or Adobe Reader is
necessary. If you cannot view the PDF, click “Get Adobe
Reader” on the SonicStage install window and follow the
instructions on the screen.
© 2005 Sony Corporation Printed in Malaysia
WARNING
To prevent fire or shock hazard,
do not expose the unit to rain or
moisture.
Do not install the appliance in a confined space,
such as a bookcase or built-in cabinet.
To prevent fire, do not cover the ventilation of
the apparatus with newspapers, table cloths,
curtains, etc. And don’t place lighted candles on
the apparatus.
To prevent fire or shock hazard, do not place
objects filled with liquids, such as vases, on the
apparatus.
For the customers in the USA and Canada
RECYCLING LITHIUM-ION BATTERIES
Lithium-ion batteries are recyclable.
You can help preserve our
environment by returning your
used rechargeable batteries to the
collection and recycling location
nearest you.
For more information regarding recycling of
rechargeable batteries, call toll free 1-800-8228837, or visit http://www.rbrc.org/.
Caution: Do not handle damaged or leaking
Lithium-ion batteries.
For the customers in the USA
INFORMATION:
This equipment has been tested and found to
comply with the limits for a Class B digital
device, pursuant to Part 15 of the FCC Rules.
These limits are designed to provide reasonable
protection against harmful interference in a
residential installation. This equipment generates,
uses, and can radiate radio frequency energy
and, if not installed and used in accordance with
the instructions, may cause harmful interference
to radio communications. However, there is no
guarantee that interference will not occur in a
particular installation. If this equipment does
cause harmful interference to radio or television
reception, which can be determined by turning the
equipment off and on, the user is encouraged to
try to correct the interference by one or more of
the following measures:
– Reorient or relocate the receiving antenna.
– Increase the separation between the equipment and
receiver.
– Connect the equipment into an outlet on a circuit
different from that to which the receiver is
connected.
– Consult the dealer or an experienced radio/TV
technician for help.
You are cautioned that any changes or
modifications not expressly approved in this
manual could void your authority to operate this
equipment.
If you have any questions about this
product:
Visit: www.sony.com/walkmansupport
Contact: Sony Customer Information
Service Center at 1-(866)-456-7669
Write: Sony Customer Information
Services Center12451 Gateway Blvd.,
Fort Myers, FL 33913
Model NW-HD5 only
Declaration of Conformity
Trade Name: SONY
Model No.: NW-HD5
Responsible Party: Sony Electronics Inc.
Address: 16450 W. Bernardo Dr,
San Diego, CA 92127
USA
Telephone Number: 858-942-2230
This device complies with Part 15 of the FCC
Rules. Operation is subject to the following
two conditions: (1) This device may not cause
harmful interference, and (2) this device must
accept any interference received, including
interference that may cause undesired
operation.
Disposal of Old Electrical & Electronic
Equipment (Applicable in the European Union
and other European countries with separate
collection systems)
This symbol on the product or on
its packaging indicates that this
product shall not be treated as
household waste. Instead it shall
be handed over to the applicable
collection point for the recycling of
Firstly, import audio data from audio
CDs or the Internet.
You can manage or edit the imported
audio data using SonicStage.
Now enjoy the player
electrical and electronic equipment. By ensuring
this product is disposed of correctly, you will
help prevent potential negative consequences
for the environment and human health, which
could otherwise be caused by inappropriate
waste handling of this product. The recycling of
materials will help to conserve natural resources.
For more detailed information about recycling of
this product, please contact your local city office,
your household waste disposal service or the shop
where you purchased the product.
Applicable accessories: Headphones
For the Customers In Netherlands
Voor de Klanten in Nederland
Gooi de batterij niet weg maar
lever deze in als klein chemisch
afval (KCA).
In sommige landen gelden
wettelijke voorschriften met betrekking tot de
afvoer van de batterij waarmee dit toestel wordt
gevoed. Raadpleeg hiervoor de lokale instanties.
For the Customers in Russia
Notice for users
On the supplied software
• The ability to display the languages on the software
will depend on the installed OS on your PC. For
better results, please ensure that the installed OS is
compatible with the desired language you want to
display.
– We do not guarantee all the languages will be
able to be displayed properly on the software.
– User-created characters and some special
characters may not be displayed.
• Depending on the type of the text and characters,
the text shown on the software may not be
displayed properly on the device.
This is due to:
– The capability of the connected device.
– The device is not functioning normally.
You can play back music tracks of
selected artists or albums. You can also
select the playback mode, from Shuffle
play or Repeat play, etc.
➔
• SonicStage and SonicStage logo are trademarks or
registered trademarks of Sony Corporation.
• OpenMG, ATRAC, ATRAC3, ATRAC3plus and
their logos are trademarks of Sony Corporation.
• Microsoft, Windows, Windows NT and Windows
Media are trademarks or registered trademarks of
Microsoft Corporation in the United States and/or
other countries.
• IBM and PC/AT are registered trademarks of
International Business Machines Corporation.
• Macintosh is a trademark of Apple Computer, Inc.
in the United States and/or other countries.
• Pentium is a trademark or a registered trademark of
Intel Corporation.
• US and foreign patents licensed from Dolby
Laboratories.
• All other trademarks and registered trademarks
are trademarks or registered trademarks of their
respective holders. In this manual, TM and ® marks
are not specified.
• Adobe Reader is a trademark of Adobe Systems
Incorporated.
• MPEG Layer-3 audio coding technology and
patents licensed from Fraunhofer IIS and Thomson.
• CD and music-related data from Gracenote, Inc.,
copyright © 2000-2004 Gracenote.
Gracenote CDDB® Client Software, copyright
2000-2004 Gracenote. This product and service
may practice one or more of the following U.S.
Patents: #5,987,525; #6,061,680; #6,154,773,
#6,161,132, #6,230,192, #6,230,207, #6,240,459,
#6,330,593, and other patents issued or pending.
Services supplied and/or device manufactured
under license for following Open Globe, Inc.
Untied States Patent 6,304,523. Gracenote
is a registered trademarks of Gracenote. The
Gracenote logo and logotype, and the “Powered by
Gracenote” logo are trademarks of Gracenote.
Program ©2001, 2002, 2003, 2004, 2005 Sony
Corporation
Documentation ©2005 Sony Corporation
“WALKMAN” is a registered trademark of Sony
Corporation to represent Headphone Stereo
products.
is a trademark of Sony
Corporation.
2
Connect the AC power adaptor to the DC IN jack.
Preparing a power source
Connect the AC power adaptor first,
then connect it to an AC outlet.
The battery indicator changes in the
display and charging of the battery
starts.
Charging is completed in approximately
3 hours, and then “Charged” and
light up.
to DC IN jack
to AC outlet
AC power adaptor
When installing is not successful
Check the required hardware and software below for using SonicStage.
Computer
• IBM PC/AT or Compatible
• CPU: Pentium III 450 MHz or higher
• Hard disk drive space: 200 MB or more (1.5 GB or more is recommended) (The amount of
space will vary according to the Windows version and the number of music files stored on
the hard disk.)
• RAM: 128 MB or more
• Others
– CD drive (capable of digital playback by WDM) (CD-R/RW drive is necessary for CD
writing.)
– Sound Board
– USB port
Operating System
Factory installed: Windows XP Media Center Edition 2005/Windows XP Media Center
Edition 2004/Windows XP Media Center Edition/Windows XP Professional/Windows XP
Home Edition/Windows 2000 Professional (Service Pack 3 or later)/Windows Millennium
Edition/Windows 98 Second Edition
Display
High Color (16 bit) or higher, 800 × 600 dots or better (1024 × 768 dots or better is
recommended.)
Others
• Internet access: for Web registration, EMD services, and CDDB
• Windows Media Player (version 7.0 or higher) installed for playing WMA files
SonicStage is not supported by the following environments:
– OSs other than the indicated above.
– Personally constructed PCs or operating systems
– An environment that is an upgrade of the original manufacturer-installed operating system
– Multi-boot environment
– Multi-monitor environment
– Macintosh
When the window on the right appears, click the region in which you will
use SonicStage software.
If no windows appear, proceed to step .
Click “Install SonicStage,” and then follow the displayed instructions.
Read the instructions carefully.
Depending on your region, the buttons other
than “Install SonicStage” may differ from
those in the illustration above.
The installation may take 20 to 30 minutes,
depending on your system environment.
Make sure to restart your computer after
installing SonicStage software.
If any problem occurs during the installation,
see steps to in “When installing is not
successful” below.
“Install SonicStage”
SonicStage Install window
Check the following items.
Close all Windows applications before installation.
Check that there is at least 200 MB free space on the hard disk of your computer. If not,
delete the unnecessary files on your computer.
When the installation appears to have stopped before it has finished, check for the
appearance of an error message beneath the installation window. Press the “Tab” key while
holding down the “Alt” key. If an error message has appeared, follow the instructions on the
screen. If there is no message, the installation is still in progress. Wait for a little while
longer.
When the progress bar on the display of your computer is not moving or the access lamp of
your computer has not lit for a few minutes, the installation is progressing normally. Please
wait. The installation may take 30 minutes or more, depending on your CD drive or system
environment.
Should any problem persist after you have checked these symptoms, consult
your nearest Sony dealer.
Notes
• We do not guarantee trouble-free operation on all computers that satisfy the system requirement.
• The NTFS format of Windows XP/Windows 2000 Professional can be used only with the standard
(factory) settings.
• We do not guarantee trouble-free operation of the system suspend, sleep, or hibernation function on the
computers.
Continued
Page 2
Transferring Audio Data to the Player
Playing Back Music
4
Importing audio data to your
computer
Record and store tracks (audio data) from an audio CD to the SonicStage “My Library” on the
hard disk drive of your computer. If you want to obtain CD information (artist name, track
titles, etc.) automatically, connect your computer to the Internet beforehand. To import audio
data from the Internet or the hard disk of your computer, refer to the “SonicStage Help.”
Double-click (SonicStage) on the desktop of your computer.
SonicStage starts up.
Insert the audio CD that you
want to record into the CD
drive of your computer.
Point to of “Music
SonicStage window
Source,” and select “Import
a CD” from the menu.
Click .
The recording of the selected
tracks starts.
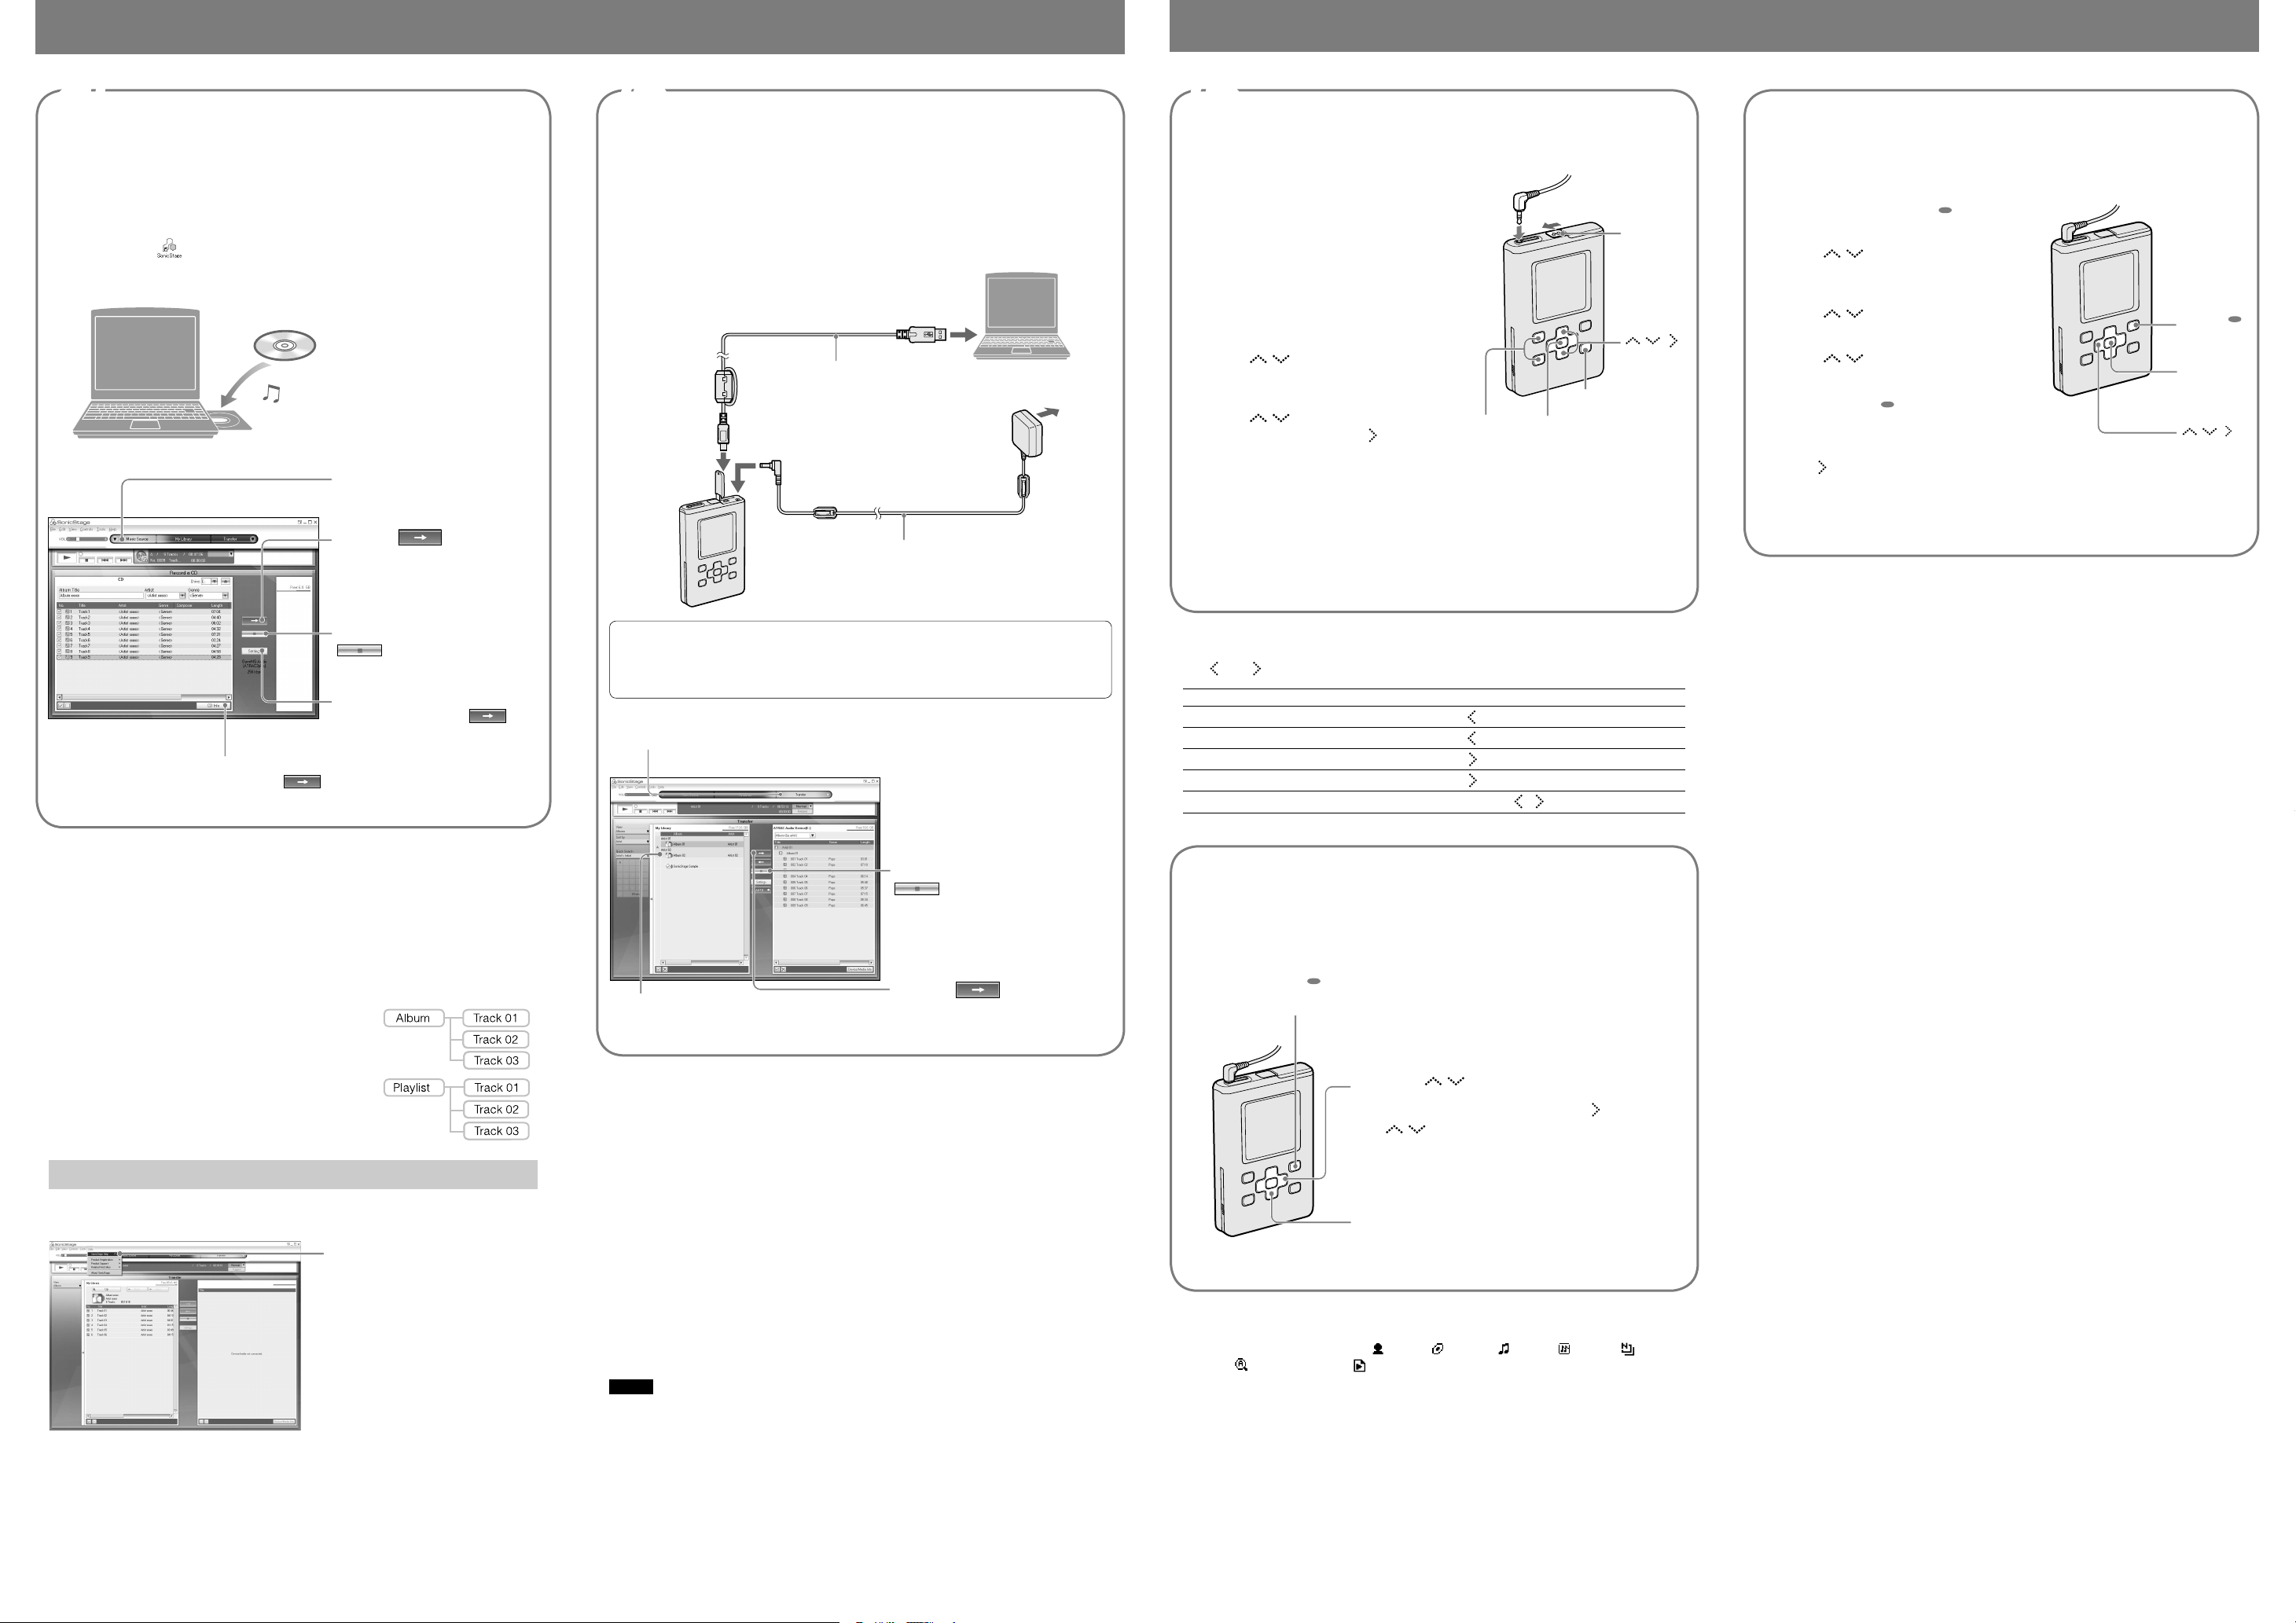
5
Transfer the tracks (audio data) stored in SonicStage “My Library” to the player in ATRAC3plus
or MP3 format.
The audio data to be transferred includes the information, such as an artist name and an album
name in the track information.
Transferring audio data to the player
Connect the player to your computer and the AC power adaptor in the order
of to .
“Connecting to PC” appears in the display.
to USB port
Dedicated USB cable
to USB jack
(supplied)
to DC IN jack
AC power adaptor (supplied)
to AC outlet
6
You can change the language to your own for the menu and the messages in the display.
Playing back
Connect headphones to
(headphones)/LINE OUT jack.
Slide the HOLD switch in the direction of
the arrow in the illustration to unlock the
controls.
All the buttons are unlocked.
HOLD switch
Press any button other than on the
player.
The MENU display appears.
/ /
Press / to select “Find,” and then
press .
The Find display appears.
Press / to select a search mode.
To search a track more, press .
VOL+
VOL–
/
(play/pause)
Press .
appears on the left bottom of the display and the player starts playback.
Press again to pause.
Press VOL
The player is installed with the function which senses the direction of the player. With using this
function, the orientation of the display can be changed according to the direction of the player.
For details, see the PDF of the Operating Instructions.
+
/VOL– to adjust the volume.
Changing playback options – Shuffle play
You can play back all the tracks in the player or selected tracks randomly.
Playback mode other than Shuffle play, such as Repeat play, Unit play, or Single play, refer to
the PDF of the Operating Instructions for details.
Press and hold SEARCH/ MENU.
The MENU display appears.
Press / to select “Options” and
then press .
The Options display appears.
Press / to select “Play Mode” and
then press .
Press / to select a “Shuffle
Tracks,” and then press .
Press SEARCH/ MENU to display the
Find display, and then select the search
category for playback.
To narrow down the search category for playback,
press .
Press .
Playback starts. All the tracks are played back once in random order.
SEARCH/
MENU
(play/
pause)
/ /
To stop recording, click
.
To change the format and bit rate, click
“Settings” before clicking in
step .
If CD information does not appear automatically, click “CD Info”
before clicking in step while connecting to the
Internet.
What is the CD information?
CD information refers to information about audio CDs, such as an album name, an artist’s
name, track titles, etc. Using SonicStage, you can obtain CD information for free from the
Gracenote CDDB (Gracenote Compact Disc DataBase) service automatically via the Internet
when you insert the audio CD into the CD drive of your computer.
Note that you cannot obtain CD information of CDs that are not registered with CDDB. You
can change the CD information only on SonicStage.
How will the audio data be managed?
SonicStage manages albums and playlists as explained in the
diagram shown on the right.
A playlists enables you to group and play back your favorite
tracks or tracks that are sorted by a certain theme, such as
movie, etc. You can play back transferred playlists on the
player by selecting “Playlist” in the Find display of the player.
Refer to “Managing Tracks and Albums” in SonicStage Help
for details.
Using SonicStage Help
SonicStage Help provides further details on how to use SonicStage.
SonicStage window
Select “Help” – “SonicStage Help” to
display the Help. The player is explained
as “ATRAC Audio Device” in SonicStage
Help.
You can also automatically transfer albums include tracks which have not been previously
transferred to the player (Automatic Transfer function). To use the Automatic Transfer
function, follow the instructions on the screen. For details, see the SonicStage Help. When
you transfer the tracks manually, close the window and proceed to step .
Point to of “Transfer,” and select “ATRAC Audio Device” from the transfer
destination list.
SonicStage window
To stop transferring, click
.
Click .
Click the album or tracks
you want to transfer.
The transferring of the selected
albums or tracks starts.
What is ATRAC3/ATRAC3plus?
ATRAC3plus (Adaptive Transform Acoustic Coding3plus) is an audio compression technology
that satisfies the demand for high sound quality and high compression rates. ATRAC3plus is a
more advanced version of ATRAC3, and it can compress audio files to about 1/20 of their
original size at 64 kbps.
What is a format and bit rate?
Format refers to the recording format, such as WAV or ATRAC3plus, which can be selected
when importing tracks from audio CDs.
Bit rate refers to the amount of data processed per second. The larger bit rates provide, better
sound quality. However, the larger bit rates require more capacity to store the data.
The default setting is OpenMG Audio (ATRAC3plus) for format and 64 kbps for bit rate.
To change the format and bit rate, click “Settings” on the right side of the SonicStage window.
If the transfer is not completed properly
Disconnect the player from a computer, and then install SonicStage software again using the
supplied CD-ROM. As the existing audio will not be erased, it will be transferred to the reinstalled SonicStage.
Notes
• Do not remove the battery or disconnect the USB cable while the data is being transferred.
• The number of transfers for a track may be limited for reasons of copyright.
To search tracks
Use and on the player.
To Operation on the player
Find the beginning of the current track
Find the beginning of previous tracks
Find the beginning of the next track
Find the beginning of succeeding tracks
Go forward/backwards quickly
Press once.
Press repeatedly.
Press once.
Press repeatedly.
Press and hold / .
Selecting tracks to play back
You can select tracks to play back by searching them in “Artist” or “Album,” etc.
For details on how to select tracks (search mode) and about the displays, refer to the “Selecting
Tracks to Playback (Album, Artist, Genre, etc.)” of the PDF of the Operating Instructions.
Press SEARCH/ MENU.
The Find display appears.
Press / to select a search mode.
To search for more tracks, press . Then press
/ to select an album or an artist.
Press .
Playback starts from the track you selected or the first
track of the item (artist, album, etc.) you selected.
About Find displays and search category for playback
You can select a search mode from “ Artist,” “ Album,” “ Track,” “ Genre,” “ New
Tracks,” “ Initials Search” or “ Playlist.”
The search category for playback differs depending on the Find display where you start
playback. For details, refer to the PDF of the Operating Instructions.
 Loading...