

Page 1
© 2004 Sony Corporation
Network Walkman
Portable Hard Disk
Audio Player
2-584-484-13 (1)
KR
Istruzioni per l’uso
IT
Operating Instructions
GB
Mode d’emploi
FR
Bedienungsanleitung
DE
Manual de Instrucciones
ES
CS
JP
NW-HD3
To go to the section you want to read, click the title
in the PDF Bookmarks, the title in the “Table of
Contents” of the Operating Instructions, or the page
in the sentences.
CT
Page 2

Page 3
© 2004 Sony Corporation
Network Walkman
Portable Hard Disk
Audio Player
取扱説明書
NW-HD3
電気製品は安全のための注意事項を守らないと、
火災や人身事故になることがあります。
この 取扱説 明書に は、事故を 防ぐた めの重要 な注意 事項と
製品の取り扱いかたを示しています。
この 取扱説 明書を よくお 読みのう え、製品を 安全に お使い
ください。お読みになったあとは、いつでも見られるところ
に必ず保管してください。
読みたいページにジャンプするには、P DF の「しおり」、取
扱説明書の「 目次」、または文中のページをクリックしてく
ださい。
Page 4
安全のために
ソニー製品は安全に充分配慮して設計されています。しか
し、電気製品はすべて、まちがった使いかたをすると、火災
や感電などにより人身事故になることがあり危険です。事
故を防ぐために注意事項を必ずお守りください。
v
安全のための注意事項を守る
ページの注意事項をお読みください。製品全般の注意
5~8
事項が記載されています。
定期的に点検する
年に一度は、ACパワーアダプターのプラグ部とコンセ
1
ントとの間にほこりがたまっていないか、故障したまま使
用していないか、などを点検してください。
故障したら使わない
動作がおかしくなったり、変換アダプターやACパワーア
ダプターなどが破損しているのに気づいたら、すぐにお客
様ご相談センターまたはお買い上げ店、ソニーサービス窓
口に修理をご依頼ください。
万一、異常が起きたら
パワーアダプ
変な音・においがし
たら、煙が出たら、
液漏れしたら
AC
ターを使用中の場合
は、コンセントから
抜く。
お客様ご相談セン
ターまたはお買い上
げ店、ソニーサービ
ス窓口に修理を依頼
する。
警告表示の意味
取扱説明書および製品で
は、次のような表示をして
います。表示の内容をよく
理解してから本文をお読み
ください。
この表示の注意事項を守ら
ないと、火災・感 電・破 裂 な
どにより死亡や大けがなど
の人身事故が生じます。
この表示の注意事項を守ら
ないと、火災・感電などに
より死亡や大けがなど人身
事故の原因となります。
この表示の注意事項を守ら
ないと、感電やその他の事
故によりけがをしたり周辺
の家財に損害を与えたりす
ることがあります。
注意を促す記号
行為を禁止する記号
行為を指示する記号
2
Page 5

目次
安全のために
使用上のご注意
................................2
.............................8
準備
付属品を確かめる
推奨アクセサリーのご案内
各部の名前
シリアルナンバーについて
充電する
....................................11
電池残量を確認する
SonicStage
インストールする
必要な環境を準備する
インストールする
パソコンに音楽データを取り込む
本機に音楽データを転送する
SonicStage
.........................9
......... 9
.................................10
....... 10
................. 13
をパソコンに
......................14
.............. 14
.................... 15
........18
のヘルプを使う
再生
再生する
選んで再生する
( アーティスト、アルバム、
ジャンル、グループなど)
....................................22
誤操作を防ぐ(
再生の基本操作一覧
( 再生、停止、頭出しなど)
表示窓の情報を確認する
HOLD
機能)
........ 24
.......... 24
.............25
画面一覧
MODE
ブックマークを付ける
( ブックマークトラック再生)
.....................
..16
.... 20
...... 23
27
... 28
再生方法(
変えて再生する
Play Mode
Play Mode
繰り返し聞く(
音質や表示の設定を変える
設定項目一覧
好みの音質に細かく設定する
(
Sound EQ - Custom)......... 36
高音や低音を強調する
( デジタルサウンド
プリセット)
)を
..........................29
項目一覧
............... 30
Repeat)........... 32
.......................... 34
........................... 37
その他の機能
転送した曲をパソコンに戻す
他の機器に接続する
音楽以外のデータを保存する
お買い上げ時の設定に戻す
初期化する
.................................41
....................39
その他
本機を廃棄するときのご注意
故障かな?と思ったら
メッセージ一覧
お手入れ
保証書とアフターサービス
主な仕様
索引
....................................51
....................................52
..........................................53
.................45
...........................49
...........33
........38
........40
...........40
........43
...........51
3
Page 6

電波障害自主規制について
この装置は、情報処理装置等電波障害自主規制協議会(
置です。この装置は、家庭環境で使用することを目的としていますが、この装置がラジオやテレビ
ジョン受信機に近接して使用されると、受信障害を引き起こすことがあります。
取扱説明書に従って正しい取り扱いをしてください。
)の基準に基づくクラスB情報技術装
VCCI
付属のソフトウェアについて
□ 権利者の許諾を得ることなく、本機に付属のソフトウェアおよび取扱説明書の内容の全部または一
部を複製すること、およびソフトウェアを賃貸することは、著作権法上禁止されております。
□
本機に付属のソフトウェアを使用したことによって生じた金銭上の損害、逸失利益、および第三者
からのいかなる請求等につきましても、当社は一切その責任を負いかねます。
□
万一、製造上の原因による不良がありましたらお取り替えいたします。それ以外の責は
ださい。
□ 本機に付属のソフトウェアは、指定された装置以外には使用できません。
本機に付属のソフトウェアの仕様は、改良のため予告なく変更することがありますが、
□
さい。
□ 本機に付属していないソフトウェアを使用した際の動作は保証しておりません。
付属のソフトウェアは、この取扱説明書の画面と一部違うところがある場合があります。
□
この取扱説明書は、お客様が
□
パソコンの操作については、お使いのパソコンの取扱説明書をご覧ください。
Windows
の基本操作に習熟していることを前提にしています。
ご容赦く
ご了承くだ
• SonicStage
• OpenMG、ATRAC3plus
• Microsoft
米国およびその他の国における登録商標、または商標です。
• IBM
• Macintosh
• PentiumはIntel Corporation
• Adobe、Adobe ReaderはAdobe Systems Incorporated
他の国における商標または登録商標です。
本機はドルビー・ラボラトリーズの米国および外国特許に基づく許諾製品です。
•
その他、本書で登場するシステム名、製品名は、一般に各開発メーカーの登録商標あるいは商標です。
•
なお、本文中では
• CD and music-related data from Gracenote, Inc., copyright © 2000-2003 Gracenote.
Gracenote CDDB
およびそのロゴはソニー株式会社の登録商標です。
およびそれぞれのロゴはソニー株式会社の商標です。
および
Windows、Windows NT、Windows Media
および
は米国
PC/AT
は、米国その他の国で登録された米国アップルコンピュータ社の商標です。
International Business Machines Corporation
の商標または登録商標です。
マークは明記していません。
™、®
®
Client software, copyright 2000-2003 Gracenote. This product and
は、米国
( アドビ システムズ社)の米国ならびに
Microsoft Corporation
の登録商標です。
service may practice one or more of the following U.S. Patents: #5,987,525; #6,061,680;
#6,154,773, #6,161,132, #6,230,192, #6,230,207, #6,240,459, #6,330,593, and other
patents issued or pending.
Gracenote and CDDB are registered trademarks of Gracenote. The Gracenote logo and
logotype, the Gracenote CDDB logo, and the
“
Powered by Gracenote" logo are
trademarks of Gracenote.
Program © 2001, 2002, 2003, 2004 Sony Corporation
Documentation © 2004 Sony Corporation
4
の
Page 7

この製品はリチウムイオン充電式電池を内蔵しています。
漏液、発熱、発火、破裂
必ず下記の注意事項をお守りください。
指定以外のACパワーアダプターを使わない。
充電するときおよび家庭用電源で使用するときは、必ず指定の
パワーアダプターと変換アダプターを使用してください。
破裂や電池の液漏れ、過熱などにより、火災やけが、周囲の汚損の
原因となります。
火の中に入れない。
分解しない。
感電の原因となります。充電池の交換、内部の点検および修理はお
買い上げ店またはソニーのサービス窓口にご依頼ください。
ただし、廃棄時には
はずし、リサイクルにご協力ください。
ページの手順に従って内蔵の充電池を取り
42
火のそばや炎天下などで充電したり、放置しない。
AC
などを避けるため、
変換アダプターにコイン、キー、ネックレスなどの
金属類を置かない。
変換アダプターの端子が金属とつながるとショートし、発熱するこ
とがあります。
充電式電池が液漏れしたとき
充電式電池の液が漏れたときは素手で液をさわらない。
液が本体内部に残ることがあるため、お客様ご相談センターまたはソニーサービス窓口にご相談下
さい。
液が目に入ったときは、失明の原因になることがあるので目をこすらず、すぐに水道水などのきれい
な水で充分洗い、ただちに医師の治療を受けて下さい。
液が身体や衣服についたときも、やけどやけがの原因になるので、すぐにきれいな水で洗い流し、皮
膚に炎症やけがの症状があるときには医師に相談して下さい。
5
Page 8
下記の注意事項を守らないと
大けが
の原因となります。
運転中は使用しない。
自動車、オートバイ、自転車などの運転をしながらヘッドホンや
•
イヤホンなどを使用したり、細かい操作をしたり、表示画面を見
ることは絶対におやめください。交通事故の原因になります。
また、歩きながら使用するときも、事故を防ぐため、周囲の交通や
•
路面状況に十分にご注意ください。
内部に水や異物を入れない。
水や異物が入ると火災や感電の原因になります。
万一、水や異物が入ったときは、
ブルを変換アダプターから抜き、お客様ご相談センターまたはお買
い上げ店、ソニーサービス窓口にご相談ください。
パワーアダプター、
AC
USB
ケー
海外で使用しない。
交流
で使用すると、火災や感電の原因となります。
の電源でお使いください。海外などで、異なる電源電圧
100V
雷が鳴りだしたら、電源プラグに触れない。
感電の原因となります。
火 災・感 電
により
6
Page 9
下記の注意事項を守らないと
周辺の
家財に損害
を与えたりすることがあります。
けが
をしたり
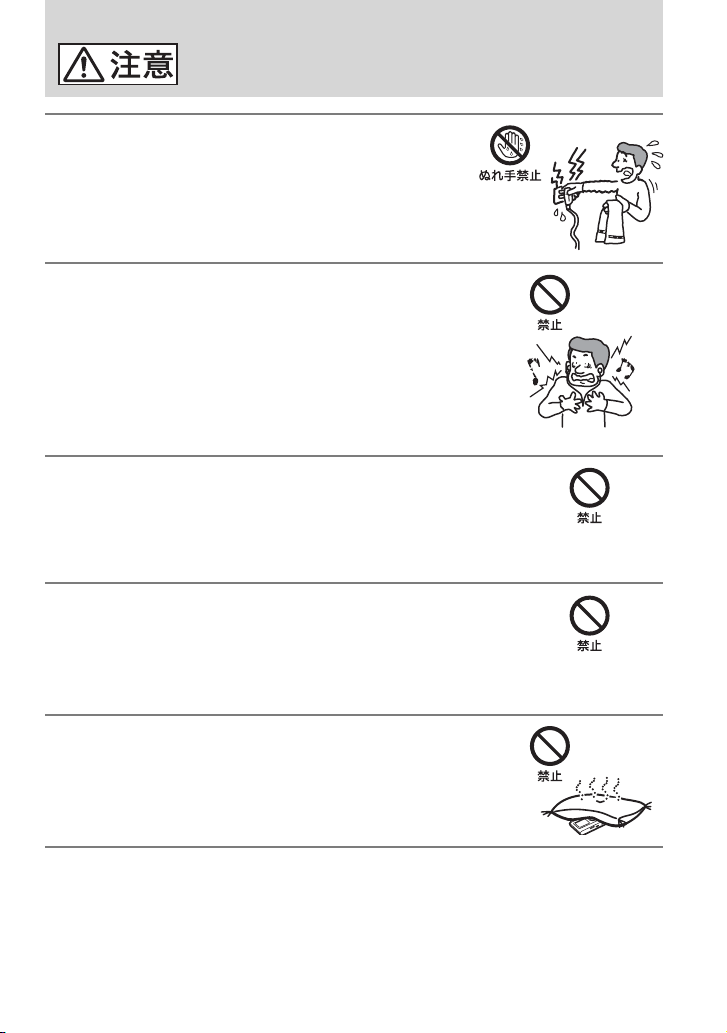
ぬれた手でACパワーアダプターをさわらない。
感電の原因となることがあります。
大音量で長時間続けて聞きすぎない。
耳を刺激するような大きな音で長時間つづけて聞くと、聴力に悪い
影響を与えることがあります。とくにヘッドホンで聞くときにご注
意ください。呼びかけられて返事ができるぐらいの音量で聞きま
しょう。
はじめからボリュームを上げすぎない。
突然大きな音が出て、耳をいためることがあります。ボリュームは
徐々に上げましょう。とくに、ヘッドホンで聞くときにはご注意く
ださい。
通電中のACパワーアダプターや製品に長時間ふ
れない。
長時間皮膚がふれたままになっていると、低温やけどの原因になる
ことがあります。
本体や変換アダプター、あるいはACパワーアダプ
ターを布団などでおおった状態で使わない。
熱がこもってケースが変形したり、火災の原因となることがあります。
7
Page 10
使用上のご注意
本機の取り扱いについて
落としたり、重いものを乗せたり、強いショッ
•
クを与えたり、圧力をかけたりしない。本機の
故障の原因となります。
以下のような場所に置かない。
•
直射日光があたる場所や暖房器具の近くなど
温度が非常に高いところ。
ダッシュボードや、炎天下で窓を閉め切った
自動車内(とくに夏季)。
磁石やスピーカー、テレビのすぐそばなど磁
気を帯びたところ。
ホコリの多いところ。
ぐらついた台の上や傾いたところ。
振動の多いところ。
風呂場など、湿気の多いところ。
ラジオやテレビの音に雑音が入るときは、本機の
•
電源を切って、本機をラジオやテレビから離す。
ヘッドホン使用中、肌に合わないと感じたとき
•
は早めに使用をやめて、医師またはお客様ご相
談センターに相談する。
本機をお使いになるときは、キャビネットの変
•
形や故障を防ぐために、次のことを必ずお守り
ください。
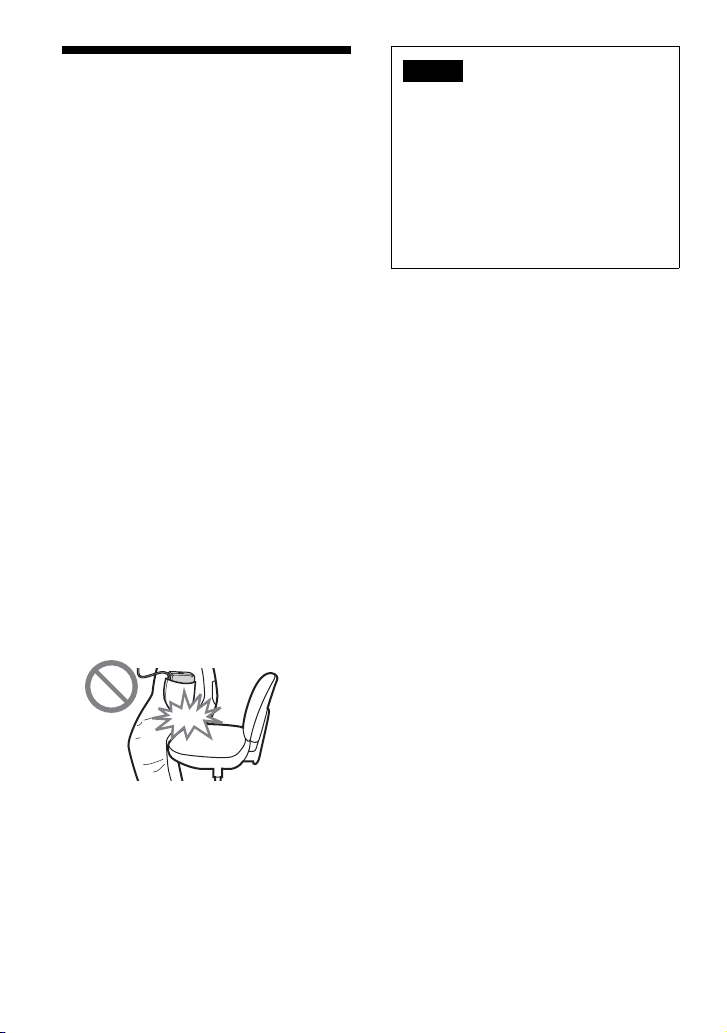
−本機をズボンなどの後ろのポケットに入れて
座らない。
ご注意
あなたが録音したものは、個人として楽し
•
むなどのほかは、著作権法上、権利者に無断
では使用できません。
本製品およびパソコンの不具合により、録
•
音やダウンロードができなかった場合、お
よび音楽データが破損または消去された場
合、データの内容の補償については、ご容赦
ください。
−本体にリモコン/ヘッドホンを巻き付けたま
ま、かばんの中に入れ、外から大きな力を加
えない。
8
Page 11

準備
付属品を確かめる
ヘッドホン(1)
•
変換アダプター(1)
•
( 付属の
アダプター接続用)
• 専用USB
パワーアダプター(1)
• AC
キャリングケース(1)
•
• CD-ROM(1)*
ソニックステージ
(
S
onicStage
クイックスタートガイド(1)
•
保証書(1)
•
ソニーご相談窓口のご案内(1)
•
カスタマー登録のお願い(1)
•
安全のために(1)
•
* CD-ROM
ないでください。
接続ケーブル、ACパワー
USB
接続ケーブル(1)
、取扱説明書の
は、音楽CDプレーヤーでは再生し
PDF
推奨アクセサリーのご案内
本機用の推奨アクセサリーとして、下記の
アクセサリーをご案内いたします。
漢字表示対応3行ジョグダイヤル
•
リモコン
漢字表示対応スティック・
•
コントローラー
別売りリモコン使用時のご注意
推奨のリモコンに表示されていても、本機で
•
は、一部使えない機能があります。
詳細な使い方は、下記
•
さい。
‒
‒
各アクセサリーについて詳しくは下記
•
ご覧ください。
‒
)
‒
RM-MC40ELK
RM-MC35ELK
URLのPDF
http://www.sony.jp/support/p-audio/con
tents/pdf/RM_MC40ELK.pdf
http://www.sony.jp/support/p-audio/con
tents/pdf/RM_MC35ELK.pdf
http://www.ecat.sony.co.jp/audio/walk
manacc/acc/index.cfm?PD=17150&K
M=RM-MC40ELK
http://www.ecat.sony.co.jp/audio/walk
manacc/acc/index.cfm?PD=10824&K
M=RM-MC35ELK
をご覧くだ
URL
準
備
を
9
Page 12
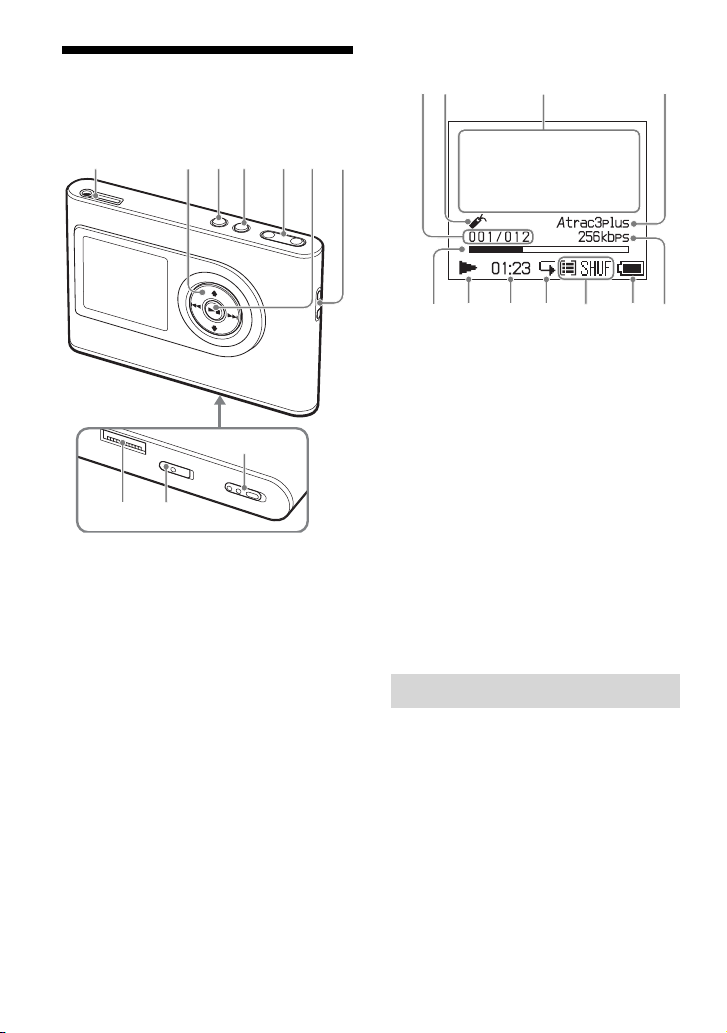
各部の名前
本体
( ヘッドホン)
(
ページ)
22
、、、
(
24、25
メニュー
*
**
ボタン(
M
ENU
モード
ボタン(25ページ)
M
ODE
ボリューム
V
OLUME+*/
(再生/停止)ボタン
(
22、24
ハンドストラップ穴
変換アダプター接続部
(
11、19
ビルトイン
B
UILT‒IN B
(
ページ)
11
ホールド
スイッチ(
H
OLD
凸点(突起)が付いています。操作の目印とし
て使ってください。
お手持ちのハンドストラップを付けられます。
10
/L
ボタン
ページ)
−ボタン(
ページ)
ページ)
バッテリー
ATTERY
ライン
INE O
29、33
**
23
アウト
ジャック
UT
ページ)
22
スイッチ
ページ)
ページ)
本体表示窓
ページ)
23
34
ページ)
曲番表示(
ブックマーク表示(
文字情報表示部(
Atrac3plus/MP3
再生位置表示(
再生状態(
再生時間(
リピート表示(
プレイモード表示(
サウンド表示
電池残量表示(
ビットレート表示(
ページ)
24
24
表示(
ページ)
24
ページ)
24
ページ)
24
ページ)
32
( 音量調節時、
ページ)
13
ページ)
28
ページ)
ページ)、
30
ページ)
17
シリアルナンバーについて
カスタマー登録の際に、本機のシリアルナ
ンバーの入力が必要となります。シリアル
ナンバーは、本体裏面のラベルに印刷され
ています。
Page 13
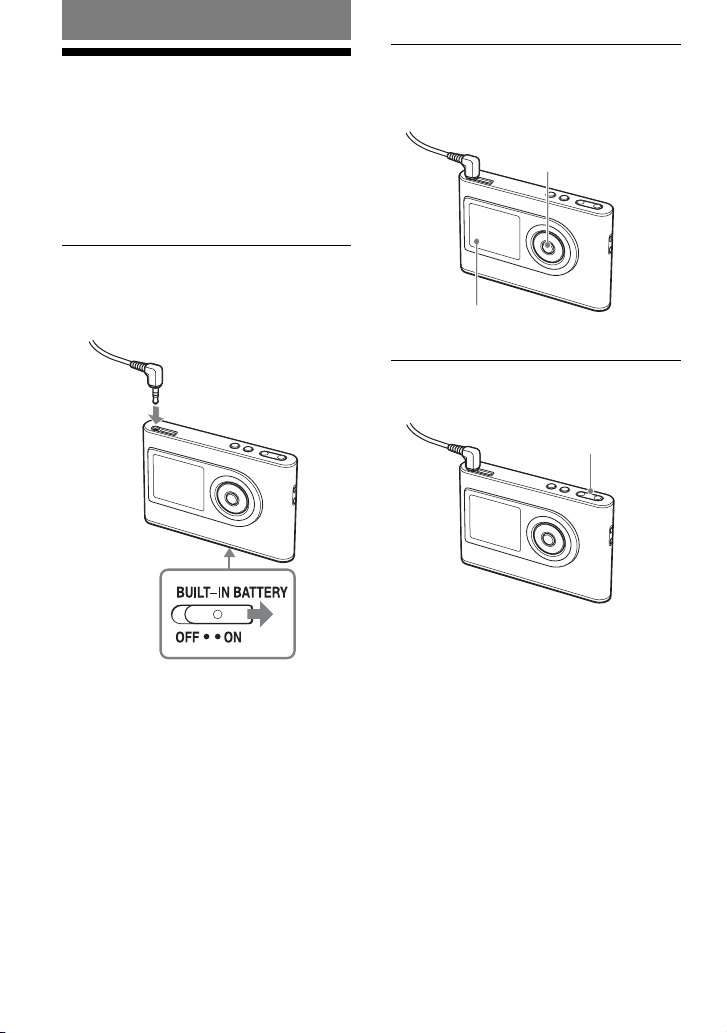
充電する
初めて使うときや電池が消耗したときは、
本体内蔵の
てください。
B
1
2
変換アダプター
充電式電池( 充電池)を充電し
ビルトイン
UILT-IN B
イドして
内蔵リチウムイオン充電式電池の保護
機能が解除されて、通電が始まります。
通常は
変換アダプターにACパワーアダプ
ターを接続する。
先に
AC
プターに接続し、次にコンセントに差
し込みます。
DC IN
ジャックへ
バッテリー
ATTERY
にする。
OオンN
のままお使いください。
ON
パワーアダプターを変換アダ
スイッチをスラ
コンセントへ
パワー
AC
アダプター
本体に 変換アダプターを接続する。
3
イラストの矢印の向きに、「 カチッ」と
音がするまで変換アダプターを差し込
みます。変換アダプターの
プが点灯して、本体の電源が入ってい
る場合はバッテリー表示が変わり、充
電が始まります。
変換アダプター接続部
充電は約3時間*で終わり、
プが消えて、本体の電源が入っている場
合は表示窓に稲妻マークが点灯します。
急いで充電したい場合は、表示窓が消え
た状態でかつ、
いた状態で充電すると、約
充電されます。
80%
USB
チャージ
C
HG
変換アダプター
CHG
ランプ
CHG
接続ケーブルを抜
1時間*
ラン
ラン
で約
準
備
室温で電池残量がない状態から充電したとき
*
の目安です。本体表示窓がついている場合
は、約
時間で充電が完了します。電池残量
5
や電池の使用状況により、
ます。また、充電時の温度が低い場合は、充電
時間は長くなります。
充電時間は異なり
次のページにつづく
11
Page 14
本体から変換アダプターを取り外す
には
変換アダプターの両側にあるグレーのボ
タンを押しながら、変換アダプターを奥へ
押し付けてから引き抜いてください。
接続で充電するには
USB
パソコンの電源を入れて、
をパソコンに接続してください
ページ)
。
ランプが点灯して、充電が
CHG
始まります。約
なお、
AC
いるときは、
時間で充電が完了します。
5
パワーアダプターが接続されて
パワーアダプターから充
AC
電されます。
ご注意
接続で充電する場合、パソコンの電源が
• USB
充分でないと、充電時間が長くなることがあり
ます。
接続で充電中に、パソコンの状態によっ
• USB
ては、充電が停止します。
充電中に長時間パソコンと
•
と、本体の温度上昇を抑えるために一時的に充
電を停止することがあります。充電が停止した
場合は、
換アダプターを外し、しばらくたってから再び
充電をしてください。
か月以上お使いにならないときは、内蔵充電
•3
池の劣化を防ぐため、
イッチを
充電は周囲の温度が5〜35℃の環境で行って
•
ください。
ランプが消えます。本体から変
CHG
BUILT-IN BATTERY
にしてください。
OFF
USB
USB
ケーブル
(
18
接続している
ス
パワーアダプターについてのご
AC
注意
本機には、付属のACパワーアダプター
•
( 極性統一形プラグ・
使用ください。上記以外の
ダプターを使うと、故障の原因となるこ
とがあります。
極性統一形プラグ
パワーアダプターは容易に手が届く
•AC
ような電源コンセントに接続し、異常が
生じた場合はすみやかにコンセントか
ら抜いてください。
充電には付属のACパワーアダプター
•
と変換アダプターをお使いください。
JEITA
規格)をご
パワーア
AC
12
Page 15
リチウムイオン電池について
リチウムイオン電池はリサイクルできま
す。不要になったリチウムイオン電池は、
金属部にセロハンテープなどの絶縁テー
プを貼ってリサイクル協力店へお持ちく
ださい(「本機を廃棄するときのご注意」
ページ)。
43
充電式電池の回収・リサイクルおよびリサ
イクル協力店については有限責任中間法
人
さい。
のホームページを参照してくだ
JBRC
URL: http://www.jbrc.net/hp/contents
/index.html
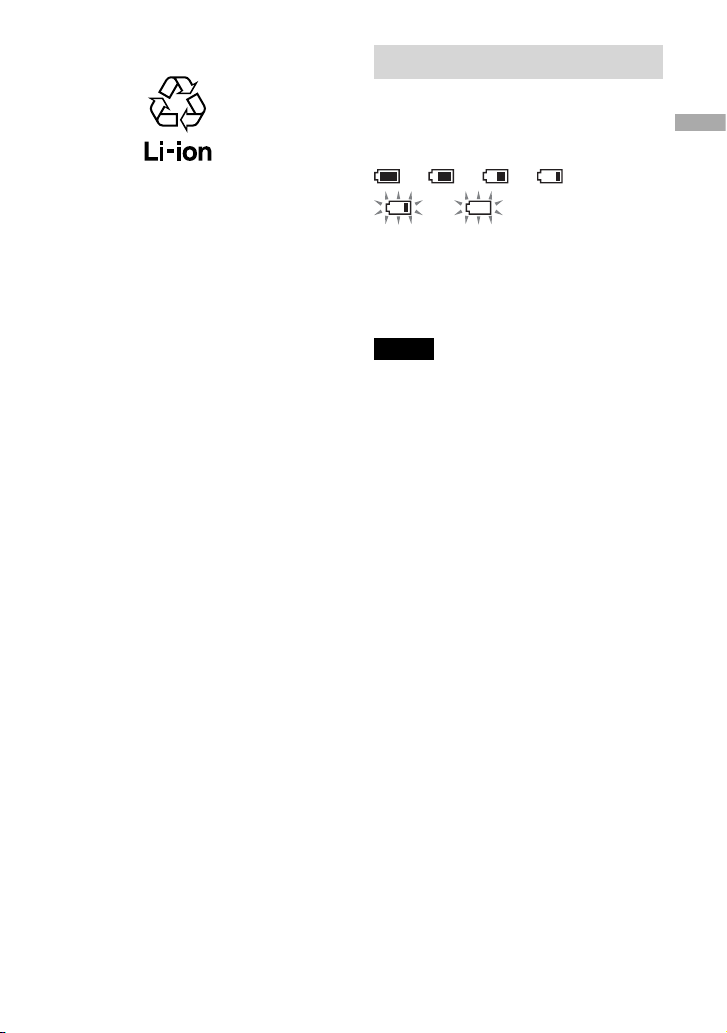
電池残量を確認する
表示窓に電池残量が表示されます。黒い目
盛りが少なくなるほど、電池残量が減って
います。
表示窓に「 電池残量がありません」と表示され、
*
「 ピー」という音がします。
電池が消耗しきったら、充電池を充電して
ください。
ご注意
残量表示は目安です。1つの目盛りが4分の
•
を示しているわけではありません。
動作状況により、残量表示は増減します。
•
電池の使用可能時間( 連続再生時)
アトラックスリープラス
A
TRAC3plus 48kbps
エムピースリー
間、
M
P3 128kbps
す。再生時間は、使用状況によって変わり
ます。
電子情報技術産業協会(
*
基づいています。
*
再生時で約30時
再生時で約22時間で
)の測定方法に
JEITA
準
備
1
*
13
Page 16
SonicStage
をパソコンにインストールする
付属の
CD-ROM
を使って、パソコンに
SonicStage
をインストールします。
必要な環境を準備する
以下のハードウェアおよびソフトウェアが必要です。
パソコン
OS
IBM PC/AT
• CPU:Pentium
ハードディスクの空き容量:
•
( お使いの
必要です。)
• RAM:64MB
その他
下記、日本語版標準インストールのみ
互換機
Ⅱプロセッサー
Windows
以上(
ドライブ(
• CD
サウンドボード
•
ポート(本機は
• USB
以上(
400MHz
以上(
200MB
のバージョンや扱う音楽ファイルの量に比例して空き容量が
以上推奨)
128MB
によるデジタル再生機能に対応しているドライブ)
WDM
Hi-Speed USB
Pentium III 450MHz
以上推奨)
1.5GB
に対応しています。)
Windows XP Media Center Edition 2005/Windows XP Media Center Edition
2004/Windows XP Professional/Windows XP Home Edition/Windows 2000
Professional/Windows Millennium Edition/Windows 98 Second Edition
ディスプレイ ハイカラー(16ビットカラー)以上、
800×600
その他
• CDDB、MUSIC NAVI
• WMA
ドット以上(
合は、インターネットへの接続環境
ファイルを再生する場合は、
トールされた環境
1024×768
、インターネット音楽配信サービス(
ドット以上推奨)
Windows Media Player 7.0
ご注意
以下のシステム環境での動作保証はいたしません。
•
上記の
自作
標準インストールされているOSから他のOSへのアップグレード環境
マルチブート環境
マルチモニタ環境
Macintosh
推奨環境のすべてのパソコンについて動作を保証するものではありません。
•
• Windows XP/2000のNTFS
• Windows 2000
すべてのパソコンに対して、システムサスペンド、スリープ( スタンバイ状態)、ハイバネーション
•
( 休止状態)などの動作を保証するものではありません。
PC
OS
以外の
OS
の場合は、
フォーマットは、標準インストール( お買い上げ時)でのみ使えます。
Service Pack3
以降を導入してください。
14
)を利用する場
EMD
以上がインス
以上推奨)
Page 17

インストールする
インストールの前に以下を確認します。
他のすべての
•
を終了してください。
チェックソフトは負荷が大きいため、
必ず終了してください。
本機を使うときは、必ず付属の
•
を使ってインストールしてください。
すでに
–
SonicStage
る場合は、上書きインストールされま
す。それまでにお使いいただいていた
機器の機能は引き継がれ、新たに必要
な機能が追加されます。
Windows
OpenMG Jukebox
がインストールされてい
– SonicStage Premium、SonicStage
Simple Burner
がインストールされている場
Burner
合は、共存します。
登録した音楽データは、そのまま引き
–
継がれます。念のため、音楽データの
バックアップをとることをおすすめし
ます。バックアップについては、
SonicStage
リをバックアップする」をご覧ください。
パソコンの電源を入れ、
1
起動する。
のヘルプ「マイ ライブラ
のプログラム
特にウィルス
、
MD Simple
Windows
CD-ROM
、
を
「SonicStage
4
クリックし、画面の指示に従って操作
する。
「
SonicStage
注意事項をよくお読みください。お使
いのパソコンの環境によっては、イン
ストールに
あります。
インストールが終わったら、必ずパソ
コンを再起動してください。
インストールできないときは、
ページをご覧ください。
インストール」を
インストール」
20〜30
分かかることが
準
備
47
パソコンのCDドライブに付属の
2
CD-ROM
インストーラが起動し、インストール
ガイドが表示されます。
次の画面が表示された場合は、使用す
3
る地域または国を選択しクリックす
る。表示されなかった場合は、手順
に進む。
を入れる。
アンインストールするときのご注意
SonicStage
「
OpenMG Secure Module
トールされます。「
Module
していることがありますので削除しない
4
でください。
をインストールすると、
」もインス
OpenMG Secure
」は 、他のソフトウェアでも使用
15
Page 18
パソコンに音楽デー タを取り込む
音楽CDの曲を
ブラリに取り込んで、録音します。
音楽
CD
ン上の音楽ファイルも取り込めます。
詳しくは
ださい(
SonicStageの マイ
以外に、インターネットやパソコ
SonicStage
20
のヘルプをご覧く
ページ)。
ライ
「 スタート」−「 すべてのプログラム」*−
1
「
SonicStage
クリックする。
SonicStage
以前のバージョンの
お使いになっていた場合、インストー
ル後、初めて
ときは、「
変換ツール」
画面の指示に従って操作してください。
」−「
SonicStage
が起動します。
SonicStage
SonicStage
SonicStage
**
ファイル一括
の画面が表示されます。
」の順に
を起動した
を
「 音楽を取り込む」
取り込み元選択リスト
「 詳細設定」
「
情報取得」
CD
* Windows ME/2000/98SE
本機に高速で音楽データを転送できるように、
**
SonicStage2.0
の形式(
(
OpenMG Audio
録音したい音楽CDを、パソコンの
2
ドライブに入れる。
CD
SonicStage
択リストに、「
されます。
以前で録音した音楽ファイル
OpenMG
画面左上の取り込み元選
CD
では「プログラム」
)を、本機に最適な形式
)に変換するツールです。
を録音する」と表示
16
Page 19
SonicStage
3
む」をクリックする。
音楽
情報を自動で取得できなかったと
CD
きは、インターネットに接続してから
右下の「CD情報取得」をクリック
画面
して、アルバム名やアーティスト名、タ
イトルなどを曲の一覧に取り込みます。
必要に応じて、録音時のフォーマット
4
ビットレートを変更する。
と
SonicStage
をクリックして、「
トの設定」画面を表示します。
お買い上げ時の設定では、フォーマット
は
OpenMG Audio(ATRAC3plus
ビットレートは
画面の「 音楽を取り込
の曲が一覧で表示されます。
CD
画面右側の「 詳細設定」
録音フォーマッ
CD
です。
64kbps
)、
録音を途中でやめるには
SonicStage
クリックする。
画面の
録音したくない曲があるときは
手順5の前に、
ラック番号をクリックして
ご注意
SonicStage
が入っている
での動作保証はいたしません。
CD
SonicStage
で使える音楽CDは、
のみです。コピーコントロール
CD
画面で、ト
を外す。
を
準
備
マーク
SonicStage
5
をクリックする。
録音が始まります。
画面の
17
Page 20
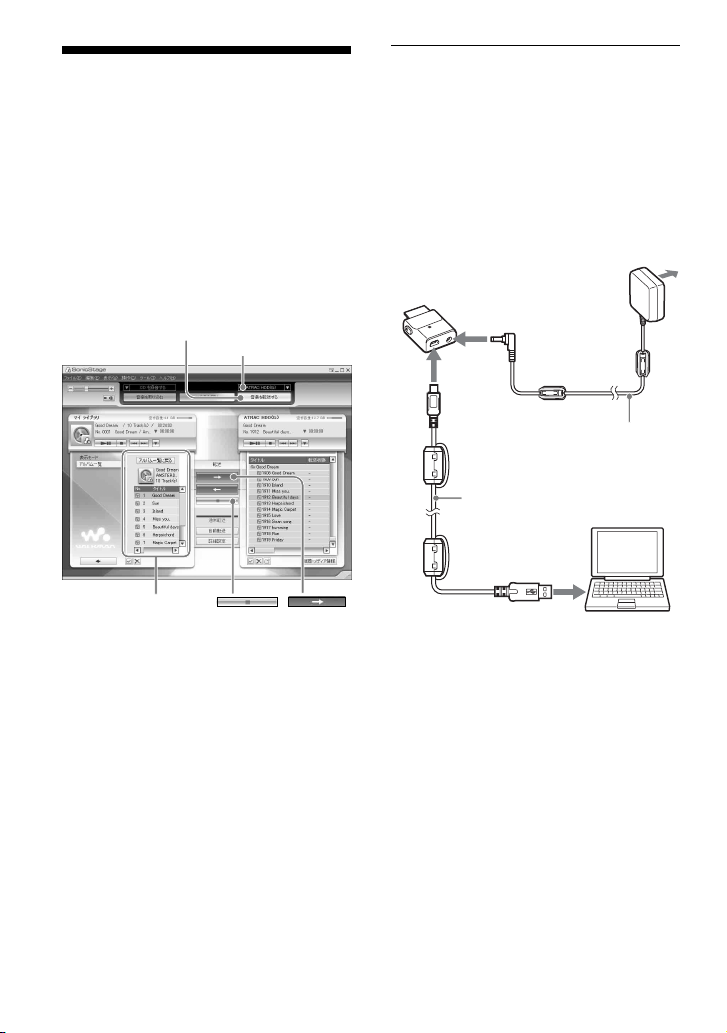
本機に音楽データを転 送する
SonicStageの マイ
た曲( 音楽データ)を、
のフォーマットで本機に転送します。
MP3
転送する音楽データには、曲情報に入って
いるアーティスト名やアルバム名( オリジ
ナルアルバム名)などの情報が含まれてい
ます。
「 音楽を転送する」
マイライブラリの一覧
ライブラリに録音し
ATRAC3plus/
「
ATRAC Audio
」
Device
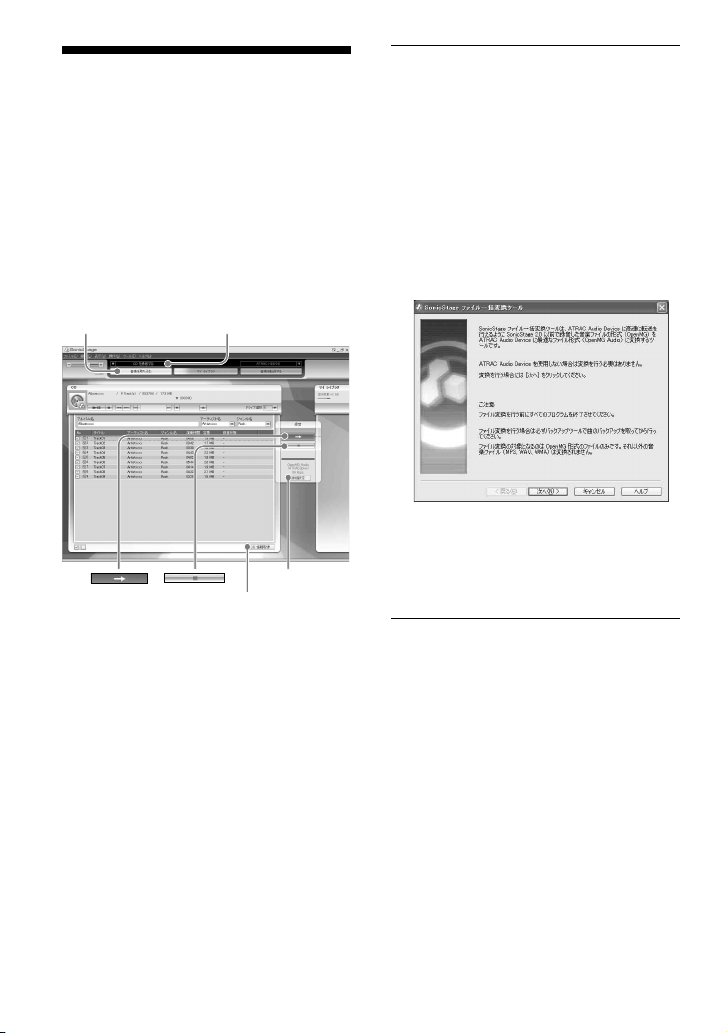
変換アダプターをパソコンと電源に接
1
続する。
下記イラストのからを接続しま
す。
きいほうの端子をパソコンの
子に、小さいほうの端子を変換アダプ
ターに差し込みます。
変換アダプター
音楽データ転送時には、必ず変換アダプター
*
に
い。接続しないと転送できません。
接続ケーブル( 付属)は、大
USB
コンセントへ
DC IN
ジャックへ
USB
ジャックへ
(付属)
接続ケーブル
USB
(付属)
端子へ
USB
パワーアダプターを接続してくださ
AC
AC
アダプター
USB
パワー
端
*
18
Page 21
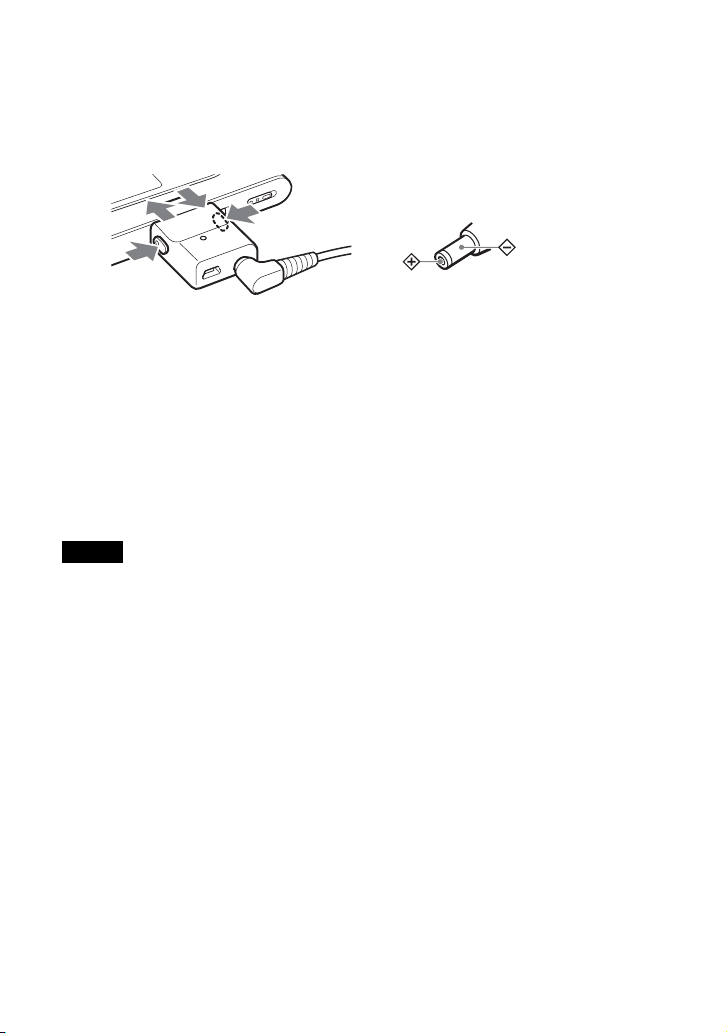
変換アダプターを本体に接続する。
2
イラストの矢印の向きに「 カチッ」と
音がするまで、奥までしっかり本体に
差し込みます。
本体表示窓に「
されます。
SonicStage
定」画面が表示され、自動転送ができ
ます。画面の指示に従って操作してく
ださい。詳しくは
プをご覧ください
PC Connect
画面に「 自動転送の設
SonicStage
(
ページ)
20
」と表示
のヘル
。
SonicStage
5
ラリ側)の一覧で、転送したい曲をク
リックして選ぶ。
複数の曲を一度に転送する場合は、
「
Ctrl
アルバム内の曲をまとめて転送する場
合は、アルバムを選びます。
SonicStage
6
をクリックする。
選んだ曲の転送が始まります。転送の
状態は、
ます。
画面左側( マイ ライブ
」キーを押しながら曲を選びます。
画面の
SonicStage
画面で確認でき
準
備
変換アダプター接続部
変換アダプター
SonicStage
3
する」をクリックする。
本機に音楽データを転送する画面が表
示されます。
SonicStage
4
ストで「
選ぶ。
画面右上の「 音楽を転送
画面右上の転送先選択リ
ATRAC Audio Device
」を
転送を途中でやめるには
SonicStage
クリックする。
ご注意
転送中は、本機に振動や衝撃を加えないでくださ
い。また磁気を帯びたものを、近づけないでくだ
さい。
画面の
を
本体から変換アダプターを取り外す
には
変換アダプターの両側にあるグレーのボ
タンを押しながら、変換アダプターを奥へ
押し付けてから引き抜いてください。
次のページにつづく
19
Page 22

ご注意
• SonicStage
ている間は、
ターを抜かないでください。転送中のデータ
が壊れることがあります。
• USB
の場合の動作保証はいたしません。
同時にお使いになる
•
常に動作しないことがあります。
パソコンに接続しているときは、本機での操作
•
はできません。本機で再生中に、パソコンと接
続した変換アダプターを本体に取り付けると、
再生が停止し、本体表示窓に「
と表示されます。
本機の空き容量が転送しようとした曲の容量よ
•
りも少ない場合、転送できません。
転送中は、パソコンのサスペンド、スリープ(ス
•
タンバイ状態)、ハイバネーション( 休止状態)
機能は働きません。
• SonicStage
文字数によって、本機で表示できないことがあ
ります。これは本機の制限によるものです。
パソコンが起動した状態で本機をパソコンに接
•
続したままにしたり、本機に大量のデータを転
送した後は、本体が温かくなる場合があります
が故障ではありません。変換アダプターを抜い
てしばらく放置しておくと常温に戻ります。
画面でデータ転送中の表示が出
接続ケーブルや変換アダプ
USB
ハブ、または
延長ケーブルをご使用
USB
機器によっては、正
USB
で入力した文字は、文字の種類や
PC Connect
SonicStage
のヘルプを
使う
SonicStage
の使いかたについて詳しく説明していま
す。調べたいことがらを「音楽を取り込
む」、「音楽を転送する」といった操作の目
的から探したり、あらかじめ設定されてい
る「 キーワード」から探したりできます。
また、ヘルプ内の説明を思いついた単語で
検索」することもできます。
「
」
SonicStage
1
「 ヘルプ」から「
をクリックする。
ヘルプが表示されます。
ヘルプでは、本機を「
Device
ご注意
ヘルプでは、本機を「 機器・メディア」と呼んで
•
います。
音楽配信サイトを利用するときは、プロバイ
•
ダーが推奨する使用環境などの指示に従ってく
ださい。
のヘルプでは、
を起動した状態で、
SonicStage
」として説明しています。
「
SonicStage
SonicStage
のヘルプ」
ATRAC Audio
のヘルプ」
20
Page 23
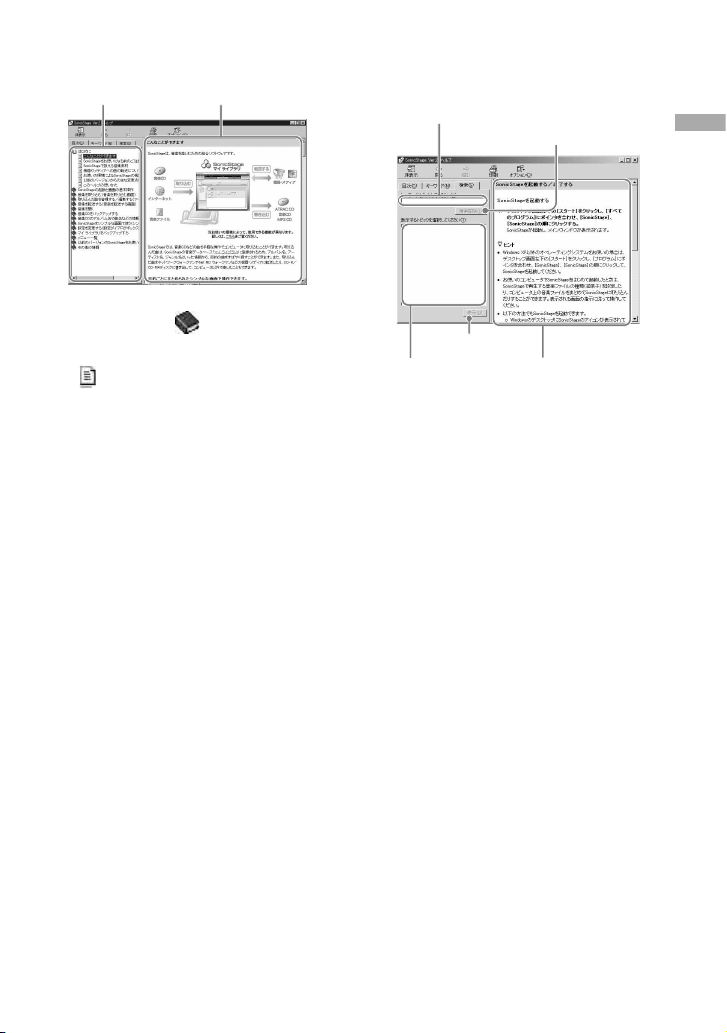
ヘルプの使いかたを見るには
左フレーム
左フレームの「 はじめに」をダブ
1
ルクリックする。
「 このヘルプの使いかた」をクリック
2
する。
右フレームに説明が表示されます。
必要に応じてスクロールしてください。
下線付きの用語をクリックすると、
その用語の説明にジャンプします。
右フレーム
思いついた用語を入力して調べる
には
キーワード入力欄
「検索」
「表示」
入力した用語が
含まれる項目の
一覧
検索」をクリックする。
1 「
キーワード入力欄に調べたい用語を
2
入力する。
「 検索開始」をクリックする。
3
入力した用語が含まれる項目の一覧が
表示されます。
表示された項目から、内容を見たい項
4
目をクリックする。
「 表示」をクリックする。
5
選んだ項目の説明が表示されます。
「 検索開始」
項目の説明
準
備
21
Page 24
再生
再生する
あらかじめ本機に音楽データを転送して
おきます(
表示窓に表示されるメニューやメッセー
ジなどの言語を変えることができます
ページ)。
(
33
ページ)。
18
を押す。
2
表示窓の左下にが表示され、再生が
始まります。
BUILT-IN BATTERY
1
(11ページ)にしてから、ヘッドホ
ンを本体に接続する。
ヘッドホン
(ヘッドホン)
ジャックへ
スイッチを
ライン
/L
INE O
ON
アウト
UT
V
OLUME+/
3
する。
が表示される。
ボリューム
−を押して 音量を調節
VOLUME+/
−
22
Page 25

再生できる音楽データについて
本機では、
トの音楽データを再生できます。
ATRAC3plusは、A
アコースティック
coustic C
A
アトラックスリープラス
A
TRAC3plus/ M
アダプティブ
daptive T
コーディングスリープラス
oding3plus
エムピースリー
フォーマッ
P3
トランスフォーム
ransform
の略で、高音質
と高圧縮を両立させた音声圧縮技術です。
ATRAC3plus
20分の1
は、音声データをCDの約
(ビットレートが
64kbps
のと
き)に圧縮する音声圧縮技術です。また本
機で再生できる
フォーマットは、次
MP3
の通りです。
‒
MPEG-1 Audio Layer-3
‒ ビットレート
(
CBR/VBR
‒ サンプリング周波数
ご注意
本機で再生できない
•
も、本機に転送されます。
本機で再生できない
•
再生しようとすると、再生が止まります。その
場合は、を押して別の曲を選び、再生して
ください。
電池で使用しているときに、停止状態のまま約
•
秒間操作がないと、自動的に表示が消えま
30
す。また、曲名などがスクロール中のときは、ス
クロールが終了してから約
えます。
パワーアダプターを接続しているときは、
•AC
停止状態のまま約
に表示が消えます。また、曲名などがスクロー
ル中のときは、スクロールが終了してから約
分後に表示が消えます。
再生が始まらないときは、
•
止)スイッチが解除されているのを確認してく
ださい(右記)。
32〜320kbps
)
32/44.1/48kHz
フォーマットの曲
MP3
フォーマットの曲を
MP3
秒後に表示が消
30
分間操作がないと、自動的
3
ホールド
H
OLD
3
(誤操作防
誤操作を防ぐ
(
HOLD
機能)
持ち運び中などに誤って操作ボタンが押
され、誤操作するのを防ぎます。
HOLD
能が働いているときは、操作しても表示窓
に「
がかかっています」と表示され、
HOLD
操作が無効になります。
HOLD
1
スイッチを矢印の方向にスラ
イドする。
HOLD
HOLD
を解除するには
スイッチを矢印と反対の方向にス
ライドする。
次のページにつづく
機
再
生
23
Page 26
再生の基本操作一覧
こんなときは 本体操作
続きから再生する
再生を止める
今聞いている曲を頭出しする
前の曲、更に前の曲を頭出しする
次の曲を頭出しする
更に先の曲を頭出しする
早戻しする
早送りする
* Play Mode(30
ます。
*
ページ)がシャッフル再生、プレイユニットシャッフル再生の場合は、動きが異なり
( 再生、 停止、 頭出しなど)
を押す。前回再生を止めたところから始まる。
を押す。
を1度押す。
*
*
を繰り返し押す。
を1度押す。
を繰り返し押す。
を押したままにする。
を押したままにする。
電源を切るには
表示が消えるまで
電源を入れるには、いずれかのボタンを押す。
を押したままにする。
MENU
表示窓の情報を確認する
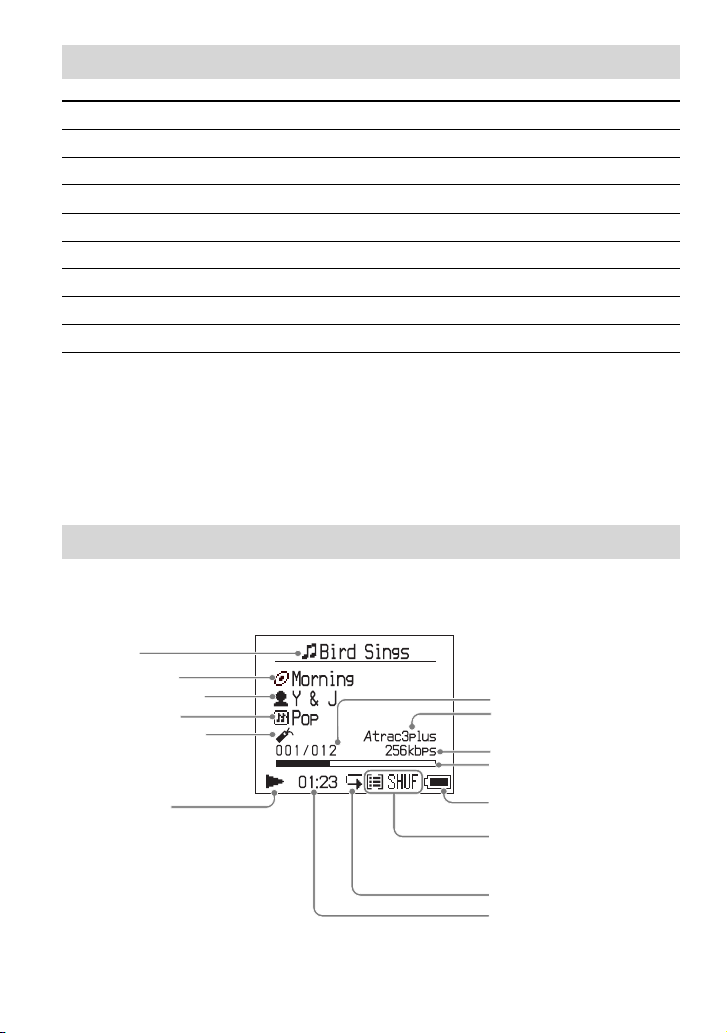
再生中の表示窓で、音楽データや再生状態の詳しい情報を確認できます。
再生中の 本体表示窓
曲名
アルバム名
アーティスト名
ジャンル名
ブックマーク
(
ページ)
28
再生状態
:再 生
:停 止
: 早送り
: 早戻し
/
:頭 出 し
曲番
Atrac3plus/MP3
(
ページ)
23
ビットレート(
再生位置
電池残量
(
ページ)
13
プレイモード(
サウンド表示( 音量調節時
のみ、
34
リピート(
再生時間
ページ)
32
表示
ページ)
17
ページ)、
30
ページ)
24
Page 27
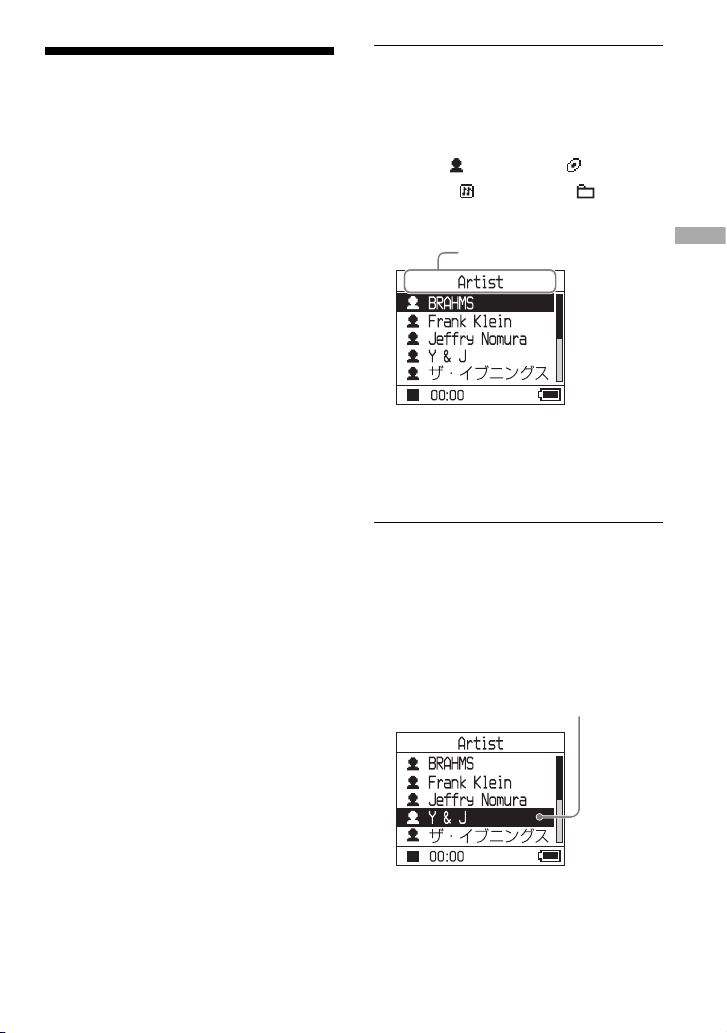
選んで再生する
( アーティスト、アルバム、
ジャンル、グループなど)
アーティスト
「
A
rtist
ぶ)で
MODEには5
「
Artist」 MODE
画面を使って説明します。
各
MODE
くは、
選んだ曲やアルバムなどで、リピート再生
(
32
ページ)もできます。
アルバム
」や「
検索して、聞きたい曲を選べます。
と表示される画面について詳し
27
ページ)やシャッフル再生(
」な ど(
A
lbum
種類あります。ここでは、
を選んで再生するときの
ページをご覧ください。
M
モード
ODE
と呼
30
MODE
1
* SonicStage
( オリジナルアルバム名)で表示されます。
**SonicStage
認識されます。
/
2
を繰り返し押して、
選ぶ。
押すたびに
り換わります。
アーティスト
A
rtist
ジャンル
enre
G
アザーズ
O
thers Artist
ここで再生を始めたいときは、
押します。
選んだアーティストの最初のアルバム
の
1
く全アーティストのアルバムの全曲を
再生します。
MODE
( )
( )
で再生したい項目を選ぶ。
曲目から順に再生し、その後に続
アルバム
A
lbum
グループ
G
に戻る
が表示される。
MODE
の曲情報に入っているアルバム名
の「アルバム」がグループとして
再生したいアーティスト
MODE
が以下のように切
( )*
( )**
roup
を
再
生
を
次のページにつづく
25
Page 28
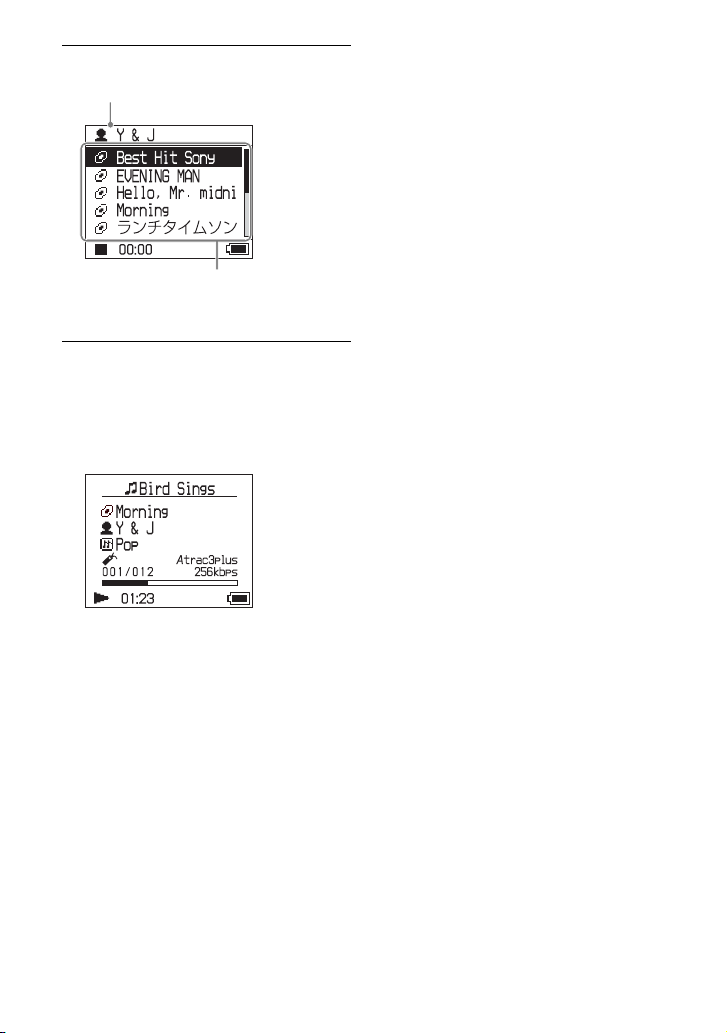
更に細かく検索するには、を押す。
3
手順2で選んだアーティスト
再生を始めた画面に戻るには
を押したままにする。
MODE
選んだアーティストのアルバム
が表示される。
で再生したい項目を選び、を
/
4
押す。
選んだ曲や項目( アルバム、アーティ
ストなど)の
その後に続く全曲を再生します。
曲目から順に再生し、
1
MODE
MODE
を選ぶ画面に戻るには
を押す。
曲一覧の画面に戻るには
またはを押す。
MODE
を選ぶ画面や一覧画面で再
生を止めるには
本体の を押したままにする。
26
Page 29
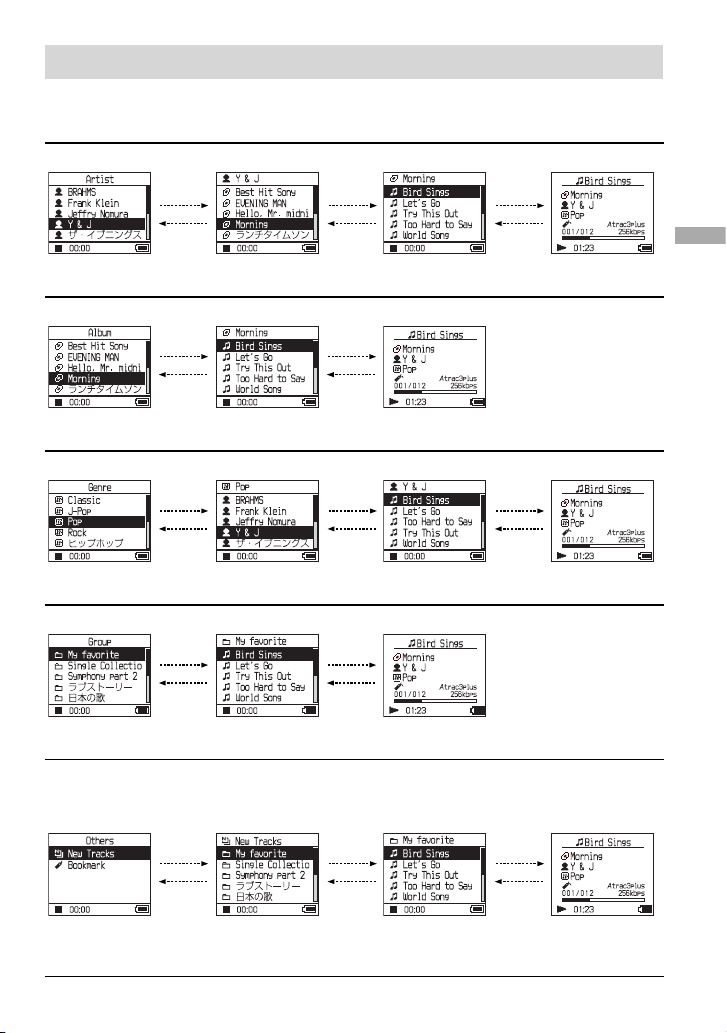
MODE
画面一覧
各
で表示される画面が異なります。
MODE
どの画面からでも、 を押すと、再生が始まります。
Artist
アーティスト一覧
:曲情報に入っているアルバム名(オリジナルアルバム名)で表示される。
Album
アルバム一覧 選んだアルバムの
選んだアーティスト
のアルバム一覧
曲一覧
/
選んだアルバムの
曲一覧
再生中
Genre
ジャンル一覧 選んだジャンルの
Group:SonicStage
アーティスト一覧
の「アルバム」のグループごとに再生する。
選んだアーティスト
の曲一覧
/
再生中
再
生
/
再生中
グループ一覧 選んだグループの
曲一覧
Others
•「 New Tracks」:
•「Bookmark
新しく転送された(最近5回)グループに含まれる曲
」:ブックマークを付けた曲( 設定方法は
グループ一覧
(New Tracks)/
曲一覧(
Bookmark
)
/
再生中
ページ)
28
選んだグループの曲
一覧(
New Tracks
/
再生中
)
次のページにつづく
27
Page 30

ブックマークを付ける
( ブックマークトラック再生)
聞きたい曲にブックマークを付けること
ができます。ブックマークを付けた曲は、
MODEで「Others
ページ)。
(
25
ブックマークを付けたい曲の再生中
1
またはを押したままにする。
に、
ブックマーク数( 登録数
が表示され、
灯します。
複数の曲にブックマークを付けたいと
2
きは、手順
ブックマークは、
ます。
」を選んで再生します
登録可能数)
/
( ブックマーク)が点
を繰り返す。
1
曲まで付けられ
100
ブックマークを付けた曲を再生する
には
1 MODE
2 /
3 /
を繰り返し押して、「
を選ぶ。
MODE
で「
Bookmark
す。
ブックマークを付けたすべての曲を再
生するときは、ここで
で聞きたい曲を選び、を押す。
Others」
」を選び、を押
を押します。
ブックマークを消すには
ブックマークを消したい曲の再生中に、
またはを押したままにする。
「
」と表示され、 が消えます。
Off
ご注意
ブックマークを付けたり、消したりできるのは、
再生中のみです。
28
Page 31

再生方法
(
Play Mode
)
を変えて再生する
好きな曲だけを聞いたり、曲を順不同に聞
くことができます。
再生方法(
て詳しくは、
さい。
また、選んだ再生方法を繰り返して聞くこと
もできます( リピート再生、
M
1
/
2
プレイ
モード
P
lay M
ode
30、31
メニュー
を押す。
ENU
画面が表示されます。
MENU
で「
Play Mode
押して決定する。
Play Mode
画面が表示されます。
)や再生範囲につい
ページをご覧くだ
ページ)。
32
」を選び、を
で再生方法を選び、を押して
/
3
決定する。
初期設定は「
再生方法が表示される。
MENUを2
4
し、
選んだ再生方法で再生が始まります。
ノーマル
」(通常再生)です。
N
ormal
回押して再生画面を表示
を押す。
操作を途中でやめるには
を押すと、
MENU
を押したままにする、または
MODE
画面で
MENU
前の画面に戻る。
MENU
画面に戻る。
MENU
を押すと、手順1の
通常再生に戻るには
手順3で、「
Normal
」を選ぶ。
再
生
MODE
MODE
Play Mode
ページ)は全曲に変更されます。
プレイユニットの再生をしたい場合は、一覧画面
から項目(アーティスト、アルバム、曲など)を選
んでください。
を選ぶ画面に戻るには
を押す。
ご注意
を変えると、プレイユニット(
次のページにつづく
31
29
Page 32

Play Mode
項目一覧
再生する
MODE
(
ページ)によって、曲の再生範囲( プレイユニット、
25
が変わります。
本体/本体のアイコン
表示なし
Normal/
(
通常再生)
1Track/ 1
(1曲再生)
Play Unit /
( プレイユニット再生)
Track SHUF/ SHUF
( シャッフル再生)
Unit SHUF / SHUF
( プレイユニットシャッフル再生)
ページ)
31
説明
選んだ曲の後に続くすべての曲を、順に
曲以外(アルバムやアーティストなど)を選んだときは、最初
の曲やアルバムの
選んだ曲だけを、
曲以外(アルバムやアーティストなど)を選んだときは、最初
の曲だけを、
プレイユニット内の全曲を、順に
プレイユニット内の全曲を、順不同に
を選ぶ画面を表示しているときに選ぶと、本機内の全曲
MODE
を順不同に
プレイユニット内の全曲を、曲やアルバム、アーティストなど
の項目ごとに順不同に1回再生します。
曲目から順に1回再生します。
1
回再生します。
1
回再生します。
1
回再生します。
1
回再生します。
1
回再生します。
1
回再生します。
1
30
Page 33

プレイユニットとは
再生を始めたときに一覧に属しているすべての項目( アーティスト、アルバム、曲など)を、
「 プレイユニット」と呼びます。
Play Mode
を変えると、プレイユニットは全曲に変更されます。
プレイユニットの再生について
例:「
Artist」MODE
アーティスト一覧 アルバム一覧 曲一覧
を選んだときのプレイユニット
再
生
全アーティストの全曲がプレ
イユニットになる。
プレイユニット再生をすると
」の曲から順に再生
•「Y & J
し、「
Jeffery Nomura
曲を再生して止まる。
プレイユニットシャッフル再生をすると
アーティストごとに順不同
•
回再生する。アーティス
に
1
ト内のアルバムや曲は順に
再生する。
シャッフル再生をすると
本機内の全曲を順不同に再
•
生する。
」の 全
アーティスト「
ルバムの全曲がプレイユニッ
トになる。
アルバム「
•
順に再生し、「
midnight
て止まる。
アルバムごとに順不同に1回
•
再生する。アルバム内の曲は
順に再生する。
アーティスト「
•
ルバムの全曲を順不同に再
生する。
Y & J
Morning
Hello, Mr.
」の全曲を再生し
Y&J
シャッフル再生について
例えば、本機内の全曲をシャッフル再生するには、「
を表示して、
MODE
す(
ページ)。本機内の全曲を順不同に1回再生して止まります。
29
Play Modeで「Track SHUF
アーティスト一覧の場合は、
全アーティストの全曲を順
不同に再生して止まる。
」の全ア
」の曲を
」の 全 ア
Artist」MODE
アーティスト「
バム「
Morning
イユニットになる。
アルバム「
•
順に全曲再生して止まる。
アルバム「
•
順不同に
1
アルバム「
•
順不同に
1
など「
Others
」のアル
Y & J
」の全曲がプレ
Morning
Morning
回再生する。
Morning
回再生する。
」以 外 の
」の曲を
」の曲を
」の曲を
」( シャッフル再生)を選んで再生しま
次のページにつづく
31
Page 34

(
繰り返し聞く
ページで選んだ再生方法を繰り返し
29
て再生します。
繰り返したい再生方法を選ぶ(
1
ページ)。
MENU
2
を押す。
画面が表示されます。
MENU
Repeat
)
29
全曲を繰り返し聞くには
例えば「
Artist」MODE
外のいずれかの
1〜5
を行う。
順
MODE
など、「
を選んでから、手
操作を途中でやめるには
を押すと、
MENU
を押したままにする、または
MODE
画面で
MENU
前の画面に戻る。
MENU
画面に戻る。
MENU
を押すと、手順2の
通常再生に戻るには
手順4の
Repeat
画面で「
Oオフff
Others
」を選ぶ。
」以
/
3
「
て決定する。
Repeat
で「
4
5
Oオンn
する。
MENUを2
し、
選んだ再生方法が繰り返されます。
」を選び、を押し
R
epeat
画面が表示されます。
」を選び、を押して決定
が表示される。
回押して再生画面を表示
を押す。
リピート
で
32
MODE
MODE
を選ぶ画面に戻るには
を押す。
Page 35

音質や表示の設定を
前の画面に戻るには
を押す。
変える
設定項目と内容について詳しくは、
ページをご覧ください。
MENU
1
/
2
/
3
音質を変えるときは(
手順3の後、
ジ)を選び、
「
C
または「
ごとに更に細かく設定できます(
ページ)。
を押す。
画面が表示されます。
MENU
で項目を選び、を押して決定
する。
選んだ項目の画面が表示されます。
で設定内容を選び、を押して
決定する。
サウンド
S
ound
/
カスタム
ustom1
C
で設定内容(
を押して決定する。
カスタム
」、「
C
ustom2
カスタム
」を 選 ん だ
ustom4
カスタム
」、「
C
ustom3
ときは、音域
34
)
ペー
36
34
操作を途中でやめるには
を押すと、
MENU
を押したままにする、または
MODE
画面で
MENU
前の画面に戻る。
MODE
MODE
ご注意
「
V-SUR
フォーマットの曲を再生しても、音質は変わりま
せん。
MP3
時は、「
てください。
」
MENU
を選ぶ画面に戻るには
を押す。
」または「
Sound EQ
フォーマットの曲の音質を変えたい
Digital Sound Preset
画面に戻る。
MENU
を押すと、手順1の
」設定時は、
」を選んで設定し
次のページにつづく
再
生
MP3
33
Page 36

設定項目一覧
項目 設定内容(●:お買い上げ時の設定)
Sound
( 音質設定)
●
Off
V-SUR
1) 2)
Studio
(VS)
Live
(VL)
Club
(VC)
Arena
(VA)
1) 2)
Heavy
(SH)
Sound
EQ
Pops
(SP)
Jazz
(SJ)
Unique
(SU)
Custom1
(S1)
Custom2
(S2)
2)
システム
ystem
Custom3
(S3)
Custom4
(S4)
Digital
Sound
Preset
3)
AVLS
( 快適音量)
Beep
( 確認音)
1) ATRAC3plus
している時には、音質は変わりません。
設定内容が表示窓に( )内の文字で表示されます(
2)
オートマチック
3) A
utomatic V
On
●
Off
●
On
Off
フォーマットの曲を再生している時に、設定できます。
ボリューム
リミッター
olume L
imiter S
通常の音質になります。
録音スタジオで聞いているような音質になります。
ライブハウスで聞いているような音質になります。
クラブで聞いているような音質になります。
アリーナ会場で聞いているような音質になります。
低域と高域を最も強調した迫力のある音質になりま
す。
中域を強調したヴォーカルなどに適した音質になり
ます。
低域と高域を強調したメリハリのある音質になりま
す。
低域と高域を強調し中域もある程度強調した音質に
なります。
自分で設定した音質になります。音域ごとに更に細
かく設定できます(設定方法は
自分で設定した音質になります。音域ごとに更に細
かく設定できます(設定方法は
高音や低音を強調して、あらかじめお好みの音質に
設定できます(設定方法は
高音や低音を強調して、あらかじめお好みの音質に
設定できます(設定方法は
音もれや耳への圧迫感軽減のため、一定以上に音量が
上がりません。
音量の制限無しで、操作に合わせて音量が変わります。
操作時の確認音(ピッなど)が鳴ります。
確認音は鳴りません。
24
の略です。
ページ)。
ページ)。
36
ページ)。
36
ページ)。
37
ページ)。
37
フォーマットの曲を再生
MP3
34
Page 37

項目 設定内容(●:お買い上げ時の設定)
Audio Out
( 外部出力音声)
Contrast
( 本体表示窓明
暗調整)
Backlight
( 表示窓のラン
プ点灯)
Reverse
Display
( 反転表示)
Language
( 表示言語)
●
Headphone
Line Out
● 右から
●
10
30
つ目 適度な明るさで表示します。本体の色が黒の場合は、
2
−〜+ −に設定すると薄く、+に設定すると濃く表示します。
Auto
秒 操作直後に約10秒間点灯します。また、表示がスク
秒 操作直後に約30秒間点灯します。また、表示がスク
Off
●
Positive
Negative
●
日本語 日本語で表示します。
English
Français
Deutsch
Italiano
Español
付属のヘッドホンを接続しているときに選びます。
スピーカーなどの他機を音声コードで接続していると
きに選びます(
お買い上げ時の設定は左から
操作直後に約10秒間点灯します。また、表示をスク
ロールしている間点灯します。
ロール中でも、
ロール中でも、
表示が消灯し、電池の消耗を極力抑えます。
文字やアイコンは黒、背景色は白で表示します。
文字やアイコンは白、背景色は黒で表示します。
英語で表示します。
フランス語で表示します。
ドイツ語で表示します。
イタリア語で表示します。
スペイン語で表示します。
ページ)。
39
つ目です。
2
秒を過ぎると消灯します。
10
秒を過ぎると消灯します。
30
再
生
次のページにつづく
35
Page 38

好みの音質に細かく設定する
(
Sound EQ - Custom
)
手順2と3
4
設定を行う。
を繰り返して残りの音域の
表示窓を見ながら、音域ごとに更に細かく
音質を調節できます。
「 音質や表示の設定を変える」の手順
1
(33ページ)で「
後、「
Sound EQ
たは「
Custom2
2
3
/
6
/
7
で音域を選ぶ。
つの音域があります。
音域
で音声レベルを選ぶ。
段階の中から選びます。
」の「
」を選ぶ。
Sound
Custom1
」を選んだ
」ま
を押して決定する。
5
画面に戻ります。
MENU
2
操作を途中でやめるには
を押すと、
MENU
を押したままにする、または
MODE
画面で
MENU
前の画面に戻る。
MODE
MODE
•
•「Custom1
を選ぶ画面に戻るには
を押す。
ご注意
設定によって、音量を大きくしたときに音が歪
む場合は、音量を下げてください。
とそれ以外の音質で音量が変わったように感じ
る場合は、音量を調節してください。
MENU
」ま た は「
画面に戻る。
MENU
を押すと、手順1の
Custom2
」を選んだとき
36
音声レベル
Page 39

高音や低音を強調する
( デジタルサウンドプリセット)
高音や低音を強調して、あらかじめお好み
の音質を設定できます。表示窓を見ながら
音質を調節し、記憶させることができます。
「 音質や表示の設定を変える」の手順
1
(33ページ)で「
デジタル
後、「
D
igital S
「
Custom3
ぶ。
お買い上げ時の設定
音質
Bass
( 低音)
Treble
( 高音)
/
2
を選ぶ。
Treble
を調整できます。
」または「
Custom3
(S3)
+
1
±
0
で「
( 高音)と
サウンド
ound P
Treble
Bass
」を選んだ
Sound
プリセット
reset
Custom4
Custom4
(S4)
+
3
±
0
」または「
( 低音)の音質
」の
(
」を 選
Off
通常の
音質)
±
0
±
0
Bass
2
」
で音声レベルを選ぶ。
/
3
段階の中から選びます。
8
音質 数値の設定
( 低音) 4〜+
Bass
( 高音) 4〜+
Treble
を押して決定する。
4
MENU
画面に戻ります。
3
3
操作を途中でやめるには
を押すと、
MENU
を押したままにする、または
MODE
画面で
MENU
前の画面に戻る。
MODE
MODE
ご注意
設定する
•
は、画面の左右両端に表示されます。中央の4
つの値は、両端の値に連動して自動的に設定さ
れます。選んで設定することはできません。
設定によって、音量を大きくしたときに音が歪
•
む場合は、音量を下げてください。
•「Custom3
とそれ以外の音質で音量が変わったように感じ
る場合は、音量を調節してください。
MENU
を選ぶ画面に戻るには
を押す。
(高音)と
Treble
」ま た は「
画面に戻る。
MENU
を押すと、手順1の
(低音)の値
Bass
Custom4
」を選んだとき
再
生
37
Page 40

その他の機能
転送した曲をパソコ ンに戻す
音楽データを
ラリに戻します。
「 音楽を転送する」
マイライブラリの一覧
本機をパソコンに接続する(「 本機に
1
音楽データを転送する」の手順
SonicStageの マイ
ページ)。
18
「
ATRAC Audio
Device
ライブ
」
本機に入っている
曲の一覧
1と2
SonicStage
4
で、マイ
クリックして選ぶ。
複数の曲を一度に転送する場合は、
「
Ctrl
アルバム内の曲をまとめて転送する
場合は、アルバムを選びます。
SonicStage
5
をクリックする。
手順
転送の状態は、
認できます。
画面右側( 本機)の一覧
ライブラリに戻したい曲を
」キーを押しながら曲を選びます。
画面の
で選んだ曲の転送が始まります。
4
SonicStage
転送を途中でやめるには
SonicStage
クリックする。
画面の
本体から変換アダプターを取り外す
には
変換アダプターの両側にあるグレーのボ
タンを押しながら、変換アダプターを奥へ
押し付けてから引き抜いてください。
、
画面で確
を
SonicStage
2
する」をクリックする。
SonicStage
画面が表示されます。
SonicStage
3
ストで「
選ぶ。
38
画面右上の「 音楽を転送
に音楽データを転送する
画面右上の転送元選択リ
ATRAC Audio Device
」を
ご注意
パソコンから本機に転送した曲は、同じパソコ
•
ンにしか戻すことができません。
• SonicStage
いる間は、
ターを抜かないでください。転送中のデータが
壊れることがあります。
画面でデータ転送中の表示が出て
接続ケーブルや変換アダプ
USB
Page 41

他の機器に接続する
他のステレオ機器に接続して曲を聞いたり、
本機で再生した曲を
きます。接続する機器の取扱説明書も合わ
せてご覧ください。
接続する機器の電源を必ず切ってから、
以下のように接続、設定してください。
( ミニジャック、別売り)
(白)
L
デッキ、AVアンプ、
MD
アクティブスピーカー、
カセットデッキ、など
やテープに録音で
MD
(ヘッドホン)
/LINE OUT
ジャックへ
接続コード
(赤)
R
接続した機器に音声が出力されるように、
画面で「
MENU
ず変更してください。「
定は以下のとおりです。設定方法は、
オーディオ
A
udio O
アウト
」の 設 定 を 必
ut
Audio Out
」の 設
33
ページをご覧ください。
接続機器 設定
ヘッドホン
接続コードで接続した機器
他機に接続したときは、「
定します。「
量調節と「
Line Out
」の設定はできないだけ
Sound
Headphone
Line Out
ライン
アウト
ine O
ut
」に 設
L
」に設定すると、音
でなく、働きません。
ご注意
付属のヘッドホンを接続しているときは、
•
(ヘッドホン)
「
Audio Out
でください。音量調節ができなくなり、ひずん
だ大きな音が出ます。
曲を聞く前に、接続した機器の音量を下げてく
•
ださい。音がひずんだり、思わぬ大音量が出て
スピーカーが破損するおそれがあります。
/LINE OUT
」を「
Line Out
出力の設定
」に切り換えない
そ
の
他
の
機
能
39
Page 42

音楽以外のデータを
お買い上げ時の設定
保存する
Windowsの
ソコンのハードディスク内のデータを、本
機の内蔵ハードディスクに転送できます。
Windows
ルディスクとして、本機の内蔵ハードディ
スクが表示されます。
ご注意
• Windows
ハードディスクを操作している間、
SonicStage
エクスプローラを使って
•
ファイルを転送しても本機では再生できません。
SonicStage
データへのアクセス中は、
•
を抜かないでください。データを転送中に
USB
が壊れることがあります。
パソコンで本機のハードディスクを初期化しな
•
いでください。
エクスプローラを使って、パ
のエクスプローラのリムーバブ
のエクスプローラを使って本機内蔵
は使わないでください。
WAVやMP3
を使って、転送してください。
USB
接続ケーブルを抜くと、転送中のデータ
などの
接続ケーブル
に戻す
設定項目の内容をお買い上げ時の設定に
戻します。
停止中に、
1
画面が表示されます。
MENU
で
/
「
2
「
3
F
て決定する。
画面が表示されます。
Format
工場出荷設定」が選ばれているので、
を押して決定する。
工場出荷設定画面が表示されます。
を押す。
MENU
フォーマット
」を選び、を押し
ormat
40
Page 43

で「 はい」を選び、を押して
4
決定する。
「 設定を工場出荷設定にしました」と
表示され、
Format
画面に戻ります。
操作を途中でやめるには
手順4で「 いいえ」を選び、を押すと、
画面に戻る。
Format
を押すと、
MENU
を押したままにする、または
MODE
画面で
MENU
前の画面に戻る。
MODE
MODE
ご注意
再生中は、お買い上げ時の設定に戻すことはでき
ません。
MENU
を選ぶ画面に戻るには
を押す。
画面に戻る。
MENU
を押すと、手順1の
初期化する
内蔵ハードディスクを 初期化できます。初
期化すると、記録された音楽やデータはす
べて消去されます。初期化する前に内容を
確認してください。
本機を転送元のパソコンに接続すると、初
期化により消した曲は、
を戻したとみなされ、残りの転送回数が増
えます。
停止中に、
1
MENU
/
2
て決定する。
Format
MENU
画面が表示されます。
で「
Format
画面が表示されます。
SonicStage
を押す。
」を 選 び 、を押し
で曲
そ
の
他
の
機
能
次のページにつづく
41
Page 44

で「 ハードディスク初期化」を選び、
3
を押して決定する。
ハードディスク初期化画面が表示され
ます。
で「 はい」を選び、を押して
4
決定する。
で「 はい」を選び、を押して
5
決定する。
「 ハードディスクを初期化しました」
と表示され、
Format
画面に戻ります。
ご注意
パソコンで本機のハードディスクを初期化しな
•
いでください。
再生中は初期化できません。
•
初期化すると、音楽データや音楽以外のファイ
•
ルがすべて削除されます。
操作を途中でやめるには
手順5で「 いいえ」を選び、を押すと、
画面に戻る。
Format
を押すと、
MENU
を押したままにする、または
MODE
画面で
MENU
前の画面に戻る。
MODE
MODE
MENU
を選ぶ画面に戻るには
を押す。
画面に戻る。
MENU
を押すと、手順1の
42
Page 45

その他
内蔵充電式電池の取り出しかた
本機を廃棄するとき のご注意
環境保護のため、内蔵の 充電式電池を取り
出してください。
本機を廃棄するとき以外は、絶対にネジ
を外さないでください。
内蔵充電式電池は、完全に消耗した状態を
確認してから取り出してください。
内部の金属部分( 取り付け板など)の取り
扱いには充分ご注意ください。
本体底面の
1
イッチを
本体底面にある2本のネジを外す。
2
本体底面のプレート()を 矢 印 の 方
3
向に外し、
ンセットなどを使って外す。
本体側面のプレート()を 矢 印 の 方
4
向にスライドさせて外し、本体側面に
ある
BUILT-IN BATTERY
にする。
OFF
ブラケット()を ピ
USB
本のネジ()を外す。
2
ス
そ
の
他
次のページにつづく
43
Page 46

本体の中身を矢印の方向に引き出す。
5
電池の横にある1本のネジを外す。
6
電池を本体から外す。
7
本体と電池を接続しているコードを引
8
き抜き、接続部を外して電池を取り出す。
44
Page 47

故障かな?と思ったら
サービス窓口にご相談になる前に、もう1度以下の流れにしたがって、問題をチェックして
ください。
本体底面の
1
OFF
「 故障かな?と思ったら」の各項目で調べる。
2
「 パーソナルオーディオ・カスタマーサポート」のホームページ
3
BUILT-IN BATTERY
にしても音楽データは失われません。
http://www.sony.co.jp/support-pa/
4 手順1〜3
またはお買い上げ店に相談する。
を確認しても問題が解決しないときは、お客様ご相談センター(裏表紙)
電源
症状 原因/処置
ランプが点灯しない。
CHG
ランプが点滅する。
CHG
電池の持続時間が短い。
5
スイッチを
にして、再びONにする。
OFF
で調べる。
変換アダプターの充電用端子が汚れている。乾いた柔らかい布などで
充電用端子を拭く。
変換アダプターが正しく接続されていない。変換アダプターを「 カ
チッ」と音がするまで、本機の接続部の奥までしっかり差し込み、
ランプが点灯するのを確認する(
充電可能温度範囲(5〜35℃)外で充電しようとした。5〜35℃の温
度範囲で充電する。
℃以下の環境で使用している。電池の特性によるもので故障ではあ
りません。
長期間使用していなかった。何回か充放電を行うと、電池性能が回復する。
充電式電池の交換が必要。ソニーサービス窓口に問い合わせる。
充電時間が短い。電池を保護するため、最初の15分間は電池状態の
チェックを行い、その後急速充電をする。
完了するまで、充電をする。
ページ)。
11
ランプが消えて充電が
CHG
CHG
そ
の
他
次のページにつづく
45
Page 48

音声
症状 原因/処置
再生音が出ない。
雑音が入る。
音量がゼロになっている。音量を上げる(
ヘッドホンがしっかり差し込まれていない。(ヘッドホン)
OUT
ヘッドホンのプラグが汚れている。乾いた柔らかい布などでプラグの
汚れを拭く。
曲が入っていない。
再生音が大きくならない。
右チャンネルから音が出
ない。
音量を調節できない。
接続したステレオ機器で、
音がひずんだり雑音が聞
こえる。
フォーマットの曲を
MP3
再生時に、「
は「
Sound EQ
をしても音質が変わらな
い。
V-SUR
」の設定
」ま た
「AVLS
(
34
ヘッドホンがしっかり差し込まれていない。(ヘッドホン)
OUT
「Audio Out
量を調節する。または「
ページ)。
34
「Audio Out
「
Line Out
MP3
Preset
操作/再生
症状 原因/処置
ボタン操作に反応しない。
再生していたら急に音が
止まった。
表示窓のバックライトが
つかない。
タイトル欄に「□」と表
示される。
HOLD
対の方向にスライドして、
結露している。そのまま約2、3時間おく。
電池の残量が少ない。充電をする(
パソコンに接続し、更にパソコンが起動している場合、変換アダプター
を接続しているときは操作できない。変換アダプターを外して操作す
る(
電池が消耗している。充電をする(
本機で再生できない音楽データを、再生しようとしている(
ジ)。を押して別の曲を選び、再生する。
「Backlight
秒」「30秒」のいずれかに設定する(
「
10
本機で表示できない文字が使用されている。付属の
ソフトウェアを使って本機で表示可能な別の文字に置き換える。
ページ)。
22
ジャックにしっかり差し込む(
」が「On」に設定されている。「
ページ)。
ジャックにしっかり差し込む(
」が「
」に設定されている。接続した機器側で音
Line Out
Audio Out
」が「
Headphone
」に設定する(
フォーマットの曲の音質を変えたいときは、「
」を選んで設定してください(
になっている(誤操作防止状態)。
」に設定されている。「
ページ)。
34
HOLD
ページ)。
12
」が「
」に設定されている。「
Off
ページ)。
22
AVLS
ページ)。
22
」を「
Headphone
ページ)。
34
HOLD
を解除する(
ページ)。
11
ページ)。
11
Backlight」を 「Auto
35
」を「
ページ)。
/LINE
」に設定する
Off
/LINE
」に設定する(
Audio Out
Digital Sound
スイッチを矢印と反
ページ)。
23
ペー
23
」
SonicStage
」を
46
Page 49

表示が消える。
停止状態のまま電池使用時は約30秒間、ACパワーアダプター使用時
分間操作がないと、自動的に表示が消える。また、曲名などがス
は約
3
クロール中のときは、スクロールが終了してから電池使用時は約
パワーアダプター使用時は約3分後に表示が消える。更に、
後、
AC
を押したままにすると表示が消える。いずれの場合も、操作ボ
MENU
タンを押すと再び表示される。
30
秒
パソコンとの接続
症状 原因/処置
インストールできない。
/SonicStage
対応のOS以外のOSを使っている(
すべての
が起動した状態でインストールを行うと、不具合が生じることがある。
特にウィルスチェックソフトは負担が大きいため、必ず終了する。
ハードディスクの空き容量が足りない。ハードディスクの空き容量は
200MB
インストール作業が止
まっているように見える。
画面上のバーが動いてい
ない。または、
ブやハードディスクのア
クセスランプが数分間点
灯していない。
接続ケーブルでパソ
USB
コンに接続しても、本機
の表示窓に「
Connect
ない。
パソコンに接続したとき、
本体がパソコンに認識さ
れない。
ドライ
CD
PC
」と表示され
警告などのメッセージダイアログが、インストール画面の後ろに隠れ
ている。「
されたら画面に従って操作する。メッセージが表示されないときは、イ
ンストール作業中のため、そのまま待つ。
インストール作業は正常に行われているため、そのまま待つ。お使いの
パソコン、
かる場合がある。
SonicStage
待つ。
パソコン上で他のアプリケーションが起動している。しばらくしてか
ら、専用
ケーブルを抜いてからパソコンを再起動する。
USB
ルをいったん抜いて、差し直す。
USB
接続する。
変換アダプターが正しく接続されていない。「カチッ」と音がするまで、
本機の接続部の奥までしっかり差し込む(
USB
ルをいったん抜いて、差し直す。
USB
接続する。
本機用のドライバをインストールしていない。付属の
使って、もう
ドライバもインストールされる(
ソフトウェアのインストールに失敗している。本機とパソコンの接続
を外し、付属の
ルする(
本体の
ページ)。
14
Windows
以上必要のため、不要なファイルなどを削除する。
Alt
USB
接続ケーブルがきちんと差し込まれていない。
ハブを使用している。動作保証外のため、パソコンの
接続ケーブルがきちんと差し込まれていない。
ハブを使用している。動作保証外のため、パソコンの
のプログラムを終了していない。他のプログラム
」キーを押しながら「
ドライブによっては、インストール終了まで30分以上か
CD
の認証を行うために、時間がかかる場合がある。しばらく
接続ケーブルを接続し直す。それでも解決しない場合は、
」キーを押し、メッセージが表示
Ta b
USB
ページ)。
19
USB
CD-ROM
1度SonicStage
CD-ROM
ページ)。
15
BUILT-IN BATTERY
をパソコンにインストールすると、
ページ)。
15
を使ってもう1度ソフトウェアをインストー
スイッチをスライドしてONにする。
次のページにつづく
接続ケーブ
端子に
USB
接続ケーブ
端子に
USB
を
そ
の
他
47
Page 50

症状 原因/処置
転送できない。
転送できる曲数が少ない。
( 録音できる時間が短い。)
パソコンに戻せない。
本機をパソコンに接続す
ると勝手に曲の転送回数
が戻ることがある。
パソコン接続中の動作が
安定しない。
パソコンと接続中にパソ
コンの画面に「 機 器・メ
ディアの認証処理に失敗
しました。」と表示される。
USB
ルをいったん抜いて、差し直す。
つの曲をすでに3回転送している。1度転送した曲をパソコンに戻す
1
と(
本体内の空き容量が不足している。聞かなくなった曲をパソコンに戻
して(
本機に
プ数を転送しようとしている。または
る曲数を転送しようとしている。
再生期間や再生回数などの再生制限のついた曲は、著作権者の意向に
より本機に転送できないことがある。それぞれの曲に関する設定内容
については、配信者に問い合わせる。
本体内の空き容量が不足している。聞かなくなった曲をパソコンに戻
して(
本機に音楽以外のデータが入っていると、転送できる曲数が減る。音楽
以外のデータをパソコンに移動するなどして、本体内の空き容量を増
やす。
転送したパソコンと異なるパソコンに曲を戻そうとしている。転送元
のパソコン以外には、曲を戻せない。
転送元のパソコンで曲を削除した。パソコン側の転送元の曲を削除し
た場合は、曲を戻せない。
SonicStage
曲を削除した場合、自分のパソコンに本機を接続すると、
は削除された曲を戻したものと自動的にみなし、残りの転送回数を元
に戻す。
USB
め、付属の
パソコンと本機が正しく接続されていない。
USB
する。
接続ケーブルがきちんと差し込まれていない。
ページ)、再び転送できるようになる。
38
ページ)、空き容量を増やす。
38
曲を超える曲数、または
65,535
ページ)、空き容量を増やす。
38
ソフトウェアをインストールした他のパソコンで本機の
ハブ、または
USB
延長ケーブルを使用している。動作保証外のた
USB
接続ケーブルのみで直接パソコンと接続する。
グループを超えるグルー
4,096
グループにつき
1
SonicStage
接続ケーブルでの接続を確認した後、再び
SonicStage
接続ケーブ
USB
999
SonicStage
を終了し、
曲を超え
を起動し
その他
症状 原因/処置
操作時の確認音が鳴ら
ない。
本体や変換アダプターが
温かくなる。
本体から「キーン」とい
う音がする。または、本体
が震えることがある。
48
」が「
「Beep
(
34
充電中または充電直後である。急速充電のため、充電中および充電直後
は本体や変換アダプターが一時的に温かくなることがある。また、大量
の曲を転送した場合も、本体や変換アダプターが一時的に温かくなる
ことがある。しばらく放置する。
本体内蔵ハードディスクの動作時の音または振動で、故障ではありま
せん。
」に設定されている。「
Off
ページ)。
」を「On」に設定する
Beep
Page 51

メッセージ一覧
本体表示窓にエラー表示が出たら、下の表に従ってチェックしてください。
表示 意味 処置
グループ数制限を超
えました
再生できません
再生可能期間外です
再生できません
トラックエラーです
再生できません
に接続してくだ
PC
さい
再生を停止しないと
操作できません
システムエラーです
<No.***>
(
には番号が表示
***
されます。)
システムファイルに
不整合があります
停止中は操作できません停止中にブックマークを設定しよう
データベースがあり
ません
電池残量がありません電池残量がない。
グループ(アルバムやアーティス
ト)の数が制限数(
再生期限開始前に再生しようと
•
した。
再生期限が切れた後に再生しよう
•
とした。
音楽データが壊れている。
本機の時刻設定が無効になっている。
再生中に「
選んだ。
システムエラーが発生した。
システムファイルに不整合がある。
とした。
パソコン接続終了時に本機に曲がな
い、またはすべての
揃っていない。
MENU
8,192
」の「
MODE
)を超えた。
」を
Format
の情報が
一覧画面(曲一覧を除く)での合計
項目数が
MODE
を
SonicStage
に戻す(
再生期限外の曲は再生できない。
本機に音楽データを転送し直す(
ページ)。
18
パソコンに接続する(
再生を停止してから、「
選び直す。
エラー番号をメモして、お客様ご相
談センター(裏表紙)またはお買
い上げ店に相談する。
ハードディスクを初期化し(
ページ)、本機に音楽データを転送し
なおす(
再生中に設定する(
本機に音楽データを転送する(
ページ)。
電池を充電する(
を超えている。
8,192
を確認し、不要な音楽データ
のマイ ライブラリ
ページ)。
38
ページ)。
18
Format
28
ページ)。
11
ページ)。
18
ページ)。
」を
そ
の
他
41
18
登録制限数を超えて
います
トラックがありません曲一覧で曲が表示されていない状態
ブックマークの登録制限数を超えた。
で、再生しようとした。
不要なブックマークを消し(
ページ)制限数以内でブックマーク
をつける。
曲が表示されている曲一覧で再生
する。
本機に音楽データを転送する(
ページ)。
次のページにつづく
28
18
49
Page 52

表示 意味 処置
本機では再生できな
いトラックです
ラインアウト設定の
ため変更できません
パワーアダプター
AC
をつないで下さい
AVLS ON
音量を上げられません
が正しく初期
HDD
化されていません
HDDは5℃〜35
で書き込み可能です
がかかって
HOLD
います
℃内で充
5℃〜35
電して下さい
本機で再生が許可されていない曲
•
を再生しようとした。
回数制限付きの曲を再生しようと
•
した。
「
Audio Out
のときに、音量または「
設定を変更しようとした。
変換アダプターの
•
に
れていない状態で、パソコンと接
続した。
パソコン接続中にACパワーアダ
•
プターが変換アダプターから抜か
れた。
音量が
ハードディスクが正しく初期化さ
•
れていない。
パソコンで初期化されている。
•
ハードディスク交換などで初期化
•
していない。
℃
書き込み可能温度(5〜35℃)の範
囲外で操作しようとした。
HOLD
るため、本機の操作ができない。
充電可能温度(5〜35℃)の範囲外
で充電しようとした。
」の設定が「
DC IN
パワーアダプターが接続さ
AC
の制限値まで上がった。
AVLS
スイッチがONになってい
Line Out
Sound
ジャック
」の
」
(
(
本機で再生が許可されていない曲は
再生できない。
「Audio Out
にする(
AC
ターに接続する(
「AVLS
ハードディスクを初期化しなおす
5〜35
HOLD
向にスライドして、
る(
5〜35
」の設定を「
ページ)。
34
パワーアダプターを変換アダプ
」の設定を「
ページ)。
34
ページ)。
41
℃の範囲内で操作する。
スイッチを矢印と反対の方
ページ)。
23
℃の範囲内で充電する。
18
Off
HOLD
Headphone
ページ)。
」にする
を解除す
」
50
Page 53

お手入れ
保証書とアフター
キャビネットの汚れは
水やぬるま湯を少し含ませた柔らかい布
で拭いた後、乾ぶきします。汚れがひどい
ときは、うすい中性洗剤溶液をしめらせた
布でふいてください。シンナー、ベンジン、
アルコールなどは表面の仕上げをいため
ますので使わないでください。変換アダプ
ター接続部分のすき間から内部に水が入
らないようにご注意ください。
ヘッドホンプラグのお手入れに
ついて
ヘッドホンプラグが汚れていると雑音や
音飛びの原因になることがあります。常に
よい音でお聞きいただくために、ヘッドホ
ンの先端のプラグ部をときどき柔らかい
布で乾ぶきしてください。
サービス
保証書
この製品には保証書が添付されていま
•
すので、お買い上げの際お買い上げ店で
お受け取りください。
所定事項の記入および記載内容をお確
•
かめのうえ、大切に保存してください。
保証期間は、お買い上げ日より1年間です。
•
アフターサービス
調子が悪いときはまずチェックを
この説明書をもう一度ご覧になってお調べくだ
さい。
それでも具合が悪いときはサービスヘ
お客様ご相談センターまたはお買い上げ店、添付
の「ソニーご相談窓口のご案内」にあるお近くの
ソニーサービス窓口にご相談ください。
保証期間中の修理は
保証書の記載内容に基づいて修理させていただ
きます。詳しくは保証書をご覧ください。
保証期間経過後の修理は
修理によって機能が維持できる場合は、ご要望に
より有料修理させていただきます。
部品の保有期間について
当社では、ポータブルハードディスクオーディオ
プレーヤーの補修用性能部品(製品の機能を維持
するために必要な部品)を、製造打ち切り後
間保有しています。この部品保有期間を修理可能
の期間とさせていただきます。保有期間が経過し
た後も、故障箇所によっては修理可能の場合があ
りますので、お客様ご相談センターまたはお買い
上げ店、ソニーサービス窓口にご相談ください。
年
6
そ
の
他
51
Page 54

主な仕様
記録できる最大曲数*の目安
ATRAC3 ATRAC3plus MP3
曲
5,000
(
6,000
(
10,000
(
*1曲4
サンプリング周波数
)
132kbps
曲
)
105kbps
曲
)
66kbps
分の曲を転送した場合
44.1kHz(Atrac3plus
32/44.1/48kHz(MP3
再生信号圧縮方式
アダプティブトランスフォームアコースティック
コーディング
MPEG-1 Audio Layer-3(MP3)
周波数特性
*
20 Hz 〜 20,000 Hz
電子情報技術産業協会(
*
定値です。
出力端子
(ヘッドホン)
ステレオミニジャック
ヘッドホンと
*
動作温度
℃
5〜35
電源
DC IN 6V
電池持続時間( 連続再生時)
内蔵充電式電池使用
ATRAC3plus
形式(
MP3
本体寸法( 幅×高さ×奥行き)
約
( 最大突起部を含まず)
最大外形寸法( 幅×高さ×奥行き)(
約
質量
本 体:約
128kbps
90.0×62.1×14.8
90.8×63.4×15.7 mm
130 g(JEITA*
曲
2,500
(
10,000
(
13,000
(
256kbps
曲
64kbps
曲
48kbps
)
)
)
)
)
3plus(ATRAC3plus
( 再生時、単信号測定)
)の規格による測
JEITA
/LINE OUT*
:
/194mV(10k
LINE OUT
形式(
は兼用ジャックです。
):約30時間
48kbps
):約22時間
( 最薄部
13.8)mm
)
5,000
(
128kbps
10,000
(
64kbps
)
Ω)
曲
曲
JEITA*
電子情報技術産業協会(
*
づいています。
本機の仕様および外観は、改良のため予告なく変
更することがありますが、ご了承ください。
本機はドルビーラボラトリーズの米国及び外国特
許に基づく許諾製品です。
)
)
)
)の測定方法に基
JEITA
52
Page 55

索引
あ行
アーティスト一覧
頭出し
24
アルバム一覧
アンインストール(
エクスプローラ
音量
か行
回数制限付きの曲
キャリングケース
グループ一覧
検索
検索(
工場出荷設定
さ行
再生期限付きの曲
シャッフル再生
ジャンル一覧
充電時間
充電式電池
初期化
27
40
22
27
25
SonicStage) 20, 21
40
30
27
11
11
41
27
SonicStage) 15
50
9
49
は行
早送り
24
早戻し
24
ビットレート
ブックマーク
プレイモード
プレイユニット
プレイユニット再生
プレイユニットシャッフル再生
ヘッドホン
変換アダプター
ホールド(誤操作防止)
本体表示窓
17, 24
28
29
31
30
9
9, 11, 19
23
10, 24
ま行
マイ ライブラリ(
SonicStage) 16, 18, 38
ら行
リピート
32
次のページにつづく
30
そ
の
他
た行
通常再生
30
停止
24
デジタルサウンドプリセット
電池(取り出す)
電池の使用可能時間
43
13
な行
日本語
35
37
53
Page 56

A、B、C、D
パワーアダプター
AC
9, 11
Album 27
Arena 34
Artist 27
ATRAC3plus 23
Audio Out 35, 39
AVLS 34
Backlight 35
Beep 34
Bookmark 28
(
CD-ROM
SonicStage) 9
Club 34
Contrast 35
Custom 34, 36
Deutsch 35
Digital Sound Preset 34
E、F、G、H
English 35
Español 35
Français 35
Genre 27
Group 27
Headphone 35, 39
Heavy 34
機能
HOLD
23
I、J、K、L
Italiano 35
Jazz 34
Korean 35
Language 35
Line Out 35, 39
Live 34
M、N、O、P
MODE 25
MP3 23
Negative 35
New Tracks 27
Normal 30
Others 27
Play Mode 29
Play Unit 30
Pops 34
Positive 35
Q、R、S、T
Repeat 32
Reverse Display 35
Simple Chinese 35
SonicStage 14
Sound 34
Sound EQ 34
Studio 34
Track SHUF 30
Traditional Chinese 35
U、V、W、X、Y、Z
Unique 34
Unit SHUF 30
接続ケーブル
USB
V-SUR 34
Windows
記号
(New Tracks) 27
( アーティスト)
( アルバム)
( グループ)
( シャッフル再生)
SHUF
( ジャンル)
( 電池残量)
( ブックマーク)
( プレイユニット再生)
SHUF
( リピート)
(1曲再生)
1
1Track 30
9
のエクスプローラ
25
25
25
25
13
28
( プレイユニットシャッフル再生)
32
30
40
30
30
30
54
Page 57

Page 58

お問合せ窓口のご案内
本機についてご不明な点や技術的なご質問、故障と思われるときのご相談については、下記のお
問い合わせ先をご利用ください。
ホームページで調べるには
•
(
http://www.sony.co.jp/support-pa/
ネットワークウォークマンに関する最新サポート情報や、よくあるお問合せとその回答をご
案内しています。
電話・
•
( 下記電話・
本機の商品カテゴリーは[オーディオ]−[ウォークマン]です。
•
お問い合わせの際は、次のことをお知らせください。
•
◆
◆
でのお問い合わせは
FAX
番号)
FAX
セット本体に関するご質問時:
型名:
•
NW-HD3
製造( シリアル)番号:本体裏面のラベルに記載
•
ご相談内容:できるだけ詳しく
•
お買い上げ年月日
•
付属のソフトウェアに関連するご質問時:
質問の内容によっては、お客様のシステム環境についてご質問させていただく場合があ
ります。上記内容に加えて、システム環境(「必要な環境を準備する」
前にわかる範囲でご確認いただき、お知らせください。
パーソナルオーディオ・カスタマーサポートへ
)
お客様ご相談センターへ
14
ページ)を事
Sony Corporation
Page 59

© 2004 Sony Corporation
Network Walkman
Portable Hard Disk
Audio Player
Operating Instructions
GB
NW-HD3
To go to the section you want to read, click the title
in the PDF Bookmarks, the title in the “Table of
Contents” of the Operating Instructions, or the page
in the sentences.
Page 60

Owner’s Record
The model and serial numbers are located
at the rear of the player. Record the serial
number in the space provided below. Refer
to these numbers whenever you call upon
your Sony dealer regarding this product.
Model No. NW-HD3
Serial No. ___________________________
WARNING
To prevent fi re or shock hazard,
do not expose the unit to rain
or moisture.
Do not install the appliance in a confi ned
space, such as a bookcase or built-in cabinet.
To prevent fi re, do not cover the ventilation
of the apparatus with newspapers, table
cloths, curtains, etc. And don’t place lighted
candles on the apparatus.
To prevent fi re or shock hazard, do not place
objects fi lled with liquids, such as vases, on
the apparatus.
Note on installation
If you use the unit at a place subject to static
or electrical noise, the track’s transferring
information may be corrupted. This would
prevent successful transferring authorization
on your computer.
For the customers in the USA and Canada
RECYCLING LITHIUM-ION BATTERIES
Lithium-ion batteries are recyclable.
You can help preserve our environment
by returning your used rechargeable
batteries to the collection and recycling
location nearest you.
For more information regarding recycling of
rechargeable batteries, call toll free 1-800-822-8837,
or visit http://www.rbrc.org/.
Caution: Do not handle damaged or leaking
Lithium-ion batteries.
For the Customers in Russia
Для покyпaтeлeй в Pоccии
Этот знaк отноcитcя только
к aдaптepy пepeмeнного токa.
Портативный плеер со встроенным жёстким диском
For the customers in the USA
INFORMATION:
This equipment has been tested and found to comply
with the limits for a Class B digital device, pursuant
to Part 15 of the FCC Rules. These limits are
designed to provide reasonable protection against
harmful interference in a residential installation. This
equipment generates, uses, and can radiate radio
frequency energy and, if not installed and used in
accordance with the instructions, may cause harmful
interference to radio communications. However, there
is no guarantee that interference will not occur in a
particular installation. If this equipment does cause
harmful interference to radio or television reception,
which can be determined by turning the equipment
off and on, the user is encouraged to try to correct the
interference by one or more of the following measures:
– Reorient or relocate the receiving antenna.
– Increase the separation between the equipment and
receiver.
– Connect the equipment into an outlet on a circuit
different from that to which the receiver is
connected.
– Consult the dealer or an experienced radio/TV
technician for help.
You are cautioned that any changes or modifi cations
not expressly approved in this manual could void your
authority to operate this equipment.
If you have any questions about this product:
Visit: www.sony.com/walkmansupport
Contact:
Sony Customer Information Service Center at
1-(866)-456-7669
Write:
Sony Customer Information Services Center
12451 Gateway Blvd.,
Fort Myers, FL 33913
Declaration of Conformity
Trade Name: SONY
Model No.: NW-HD3
Responsible Party: Sony Electronics Inc.
Address: 16450 W. Bernardo Dr,
San Diego, CA 92127 USA
Telephone Number: 858-942-2230
This device complies with Part 15 of the FCC Rules.
Operation is subject to the following two conditions:
(1) This device may not cause harmful interference,
and (2) this device must accept any interference
received, including interference that may cause
undesired operation.
“WALKMAN” is a registered trademark of
Sony Corporation to represent Headphone
Stereo products.
is a
trademark of Sony Corporation.
2
GB
Page 61

Table of Contents
Notice for Users
Precautions
..............................................
.......................................................
On safety................................................................. 5
On installation
On heat build-up
On the headphones
On cleaning
....................................................... 5
.................................................. 5
.............................................. 5
............................................................ 5
Getting Started
Checking the Supplied Accessories
Guide to Parts and Controls
About the serial number.................................... 7
Preparing a Power Source
..........................
Charging the battery using a USB
connection
............................................................. 9
Checking the remaining power of the
..................................................................... 9
battery
Installing SonicStage
on Your Computer
.......................................
Preparing the required system....................... 10
Installing SonicStage
........................................11
Importing Audio Data
to Your Computer
........................................
Transferring Audio Data
to the Player
..................................................
Using SonicStage Help.................................... 16
......
......................
10
12
14
Playback
Playing Back
Locking the controls (HOLD) .................. 19
Basic playback operations
(Play, stop, search)...................................20
Checking information in the display
Playing Back Tracks Selected by MODE
(Artist, Album, Genre, Group, etc.)..... 21
MODE displays..................................................23
Adding a bookmark
(Bookmark track play)............................. 24
..................................................
..........20
18
4
Changing Playback Options
(Play Mode) .......................................... 25
5
Playback options (Play Mode) .................26
Playing tracks repeatedly (Repeat play)...28
Changing Sound Quality
and Settings
..................................................
Setup items........................................................... 30
Customizing sound quality
(Sound EQ - Custom) .............................. 32
Adjusting treble and bass emphasis
6
7
8
(Digital Sound Preset) .............................33
Other Functions
Transferring Audio Data Back
to Your Computer
........................................
Connecting Other Devices
Storing Data Other Than Audio Files
Resetting to the Factory Settings
Initializing Hard Disk
..................................
Additional Information
Notes on Disposing of the Unit
Troubleshooting
Error Messages
Specifi cations
Index
.................................................................
...........................................
............................................
...............................................
......................
........
.............
29
34
35
...
36
36
37
39
41
46
48
48
3 GB
Page 62

Notice for Users
On the supplied software
• Copyright laws prohibit reproducing the
software or the manual accompanying it
in whole or in part, or renting the software
without the permission of the copyright
holder.
• In no event will SONY be liable for
any fi nancial damage, or loss of profi ts,
including claims made by third parties,
arising out of the use of the software
supplied with this player.
• In the event a problem occurs with
this software as a result of defective
manufacturing, SONY will replace
it. However, SONY bears no other
responsibility.
• The software provided with this player
cannot be used with equipment other than
that which is so designated.
• Please note that, due to continued efforts to
improve quality, the software specifi cations
may be changed without notice.
• Operation of this player with software other
than that provided is not covered by the
warranty.
• The ability to display the languages on the
software will depend on the installed OS on
your PC. For better results, please ensure
that the installed OS is compatible with the
desired language you want to display.
- We do not guarantee all the languages will
be able to be displayed properly on the
software.
- User-created characters and some special
characters may not be displayed.
• Depending on the type of the text and
characters, the text shown on the software
may not be displayed properly on the
device. This is due to:
- The capability of the connected device.
- The device is not functioning normally.
Program ©2001, 2002, 2003, 2004 Sony
Corporation
Documentation ©2004 Sony Corporation
4
GB
• SonicStage and SonicStage logo are
trademarks or registered trademarks of Sony
Corporation.
• OpenMG, ATRAC3plus and their logos are
trademarks of Sony Corporation.
• Microsoft, Windows, Windows NT
and Windows Media are trademarks
or registered trademarks of Microsoft
Corporation in the United States and/or
other countries.
• IBM and PC/AT are registered trademarks
of International Business Machines
Corporation.
• Macintosh is a trademark of Apple
Computer, Inc. in the United States and/or
other countries.
• Pentium is a trademark or a registered
trademark of Intel Corporation.
• Adobe and Adobe Reader are trademarks
or registered trademarks of Adobe Systems
Incorporated in the United States and/or
other countries.
• US and foreign patents licensed from Dolby
Laboratories.
• All other trademarks and registered
trademarks are trademarks or registered
trademarks of their respective holders.
• In this manual,
TM
and ® marks are not
specifi ed.
• CD and music-related data from Gracenote,
Inc., copyright © 2000-2003 Gracenote.
Gracenote CDDB
®
Client Software,
copyright 2000-2003 Gracenote.
This product and service may practice
one or more of the following U.S. Patents:
#5,987,525; #6,061,680; #6,154,773,
#6,161,132, #6,230,192, #6,230,207,
#6,240,459, #6,330,593 and other patents
issued or pending.
Gracenote and CDDB are registered
trademarks of Gracenote. The Gracenote
logo and logotype, the Gracenote CDDB
logo, and the “Powered by Gracenote” logo
are trademarks of Gracenote.
Page 63

Precautions
On safety
• Do not put any foreign objects in the DC IN
jack of the USB adaptor.
• Be sure not to short-circuit the terminals of
the USB adaptor with other metallic objects.
On installation
• Never use the player where it will be
subjected to extremes of light, temperature,
moisture or vibration.
• Never wrap the player in anything when it
is being used with the AC power adaptor.
Heat build-up in the player may cause
malfunction or damage.
On heat build-up
Heat may build up in the player or USB
adaptor while charging if it is used for an
extended period of time.
On the headphones
Road safety
Do not use headphones while driving, cycling,
or operating any motorized vehicle. It may
create a traffi c hazard and is illegal in many
areas. It can also be potentially dangerous
to play at a high volume while walking,
especially at pedestrian crossings. You should
exercise extreme caution or discontinue use in
potentially hazardous situations.
Preventing hearing damage
Avoid using the headphones at a high volume.
Hearing experts advise against continuous,
loud and extended play. If you experience a
ringing in your ears, reduce the volume or
discontinue use.
Caring for others
Keep the volume at a moderate level. This
will allow you to hear outside sounds and to
be considerate to the people around you.
Warning
If there is lightning when you are using the
player, take off the headphones immediately.
On cleaning
• Clean the player casing with a soft cloth
slightly moistened with water or a mild
detergent solution.
• Clean the headphone plug periodically.
Notes
• Do not use any type of abrasive pad,
scouring powder or solvent such as alcohol
or benzene as it may mar the fi nish of the
casing.
• Be careful not to let water into the USB
adaptor or the recording USB adaptor from
the clearance at the connection part.
If you have any questions or problems
concerning the player, consult your nearest
Sony dealer.
NOTES
• The recorded music is limited to private
use only. Use of the music beyond this
limit requires permission of the copyright
holders.
• Sony is not responsible for incomplete
recording/downloading or damaged
data due to problems of the player or
computer.
5 GB
Page 64

Getting Started
Checking the Supplied Accessories
• Headphones (1)
• USB adaptor (1)
(For connecting to the supplied USB cable
and the supplied AC power adaptor)
• Dedicated USB cable (1)
• AC power adaptor (1)
• Carrying case (1)
• CD-ROM (1) *
(SonicStage, PDF of Operating Instructions)
• Quick Start Guide (1)
* Do not play this CD-ROM on an audio CD player.
Notes
When using this unit, remember to follow the
precautions below in order to avoid warping the
cabinet or causing the unit to malfunction.
– Make sure not to sit down with the unit in your
back pocket.
– Make sure not to put the unit into a bag with
the remote control or the headphones/earphones
cord wrapped around it and then subject the bag
to strong impact.
For customers in the US
The AC power adaptor supplied with this
unit is not intended to be serviced. Should
the AC power adaptor cease to function in its
intended manner during the warranty period,
the adaptor should be returned to your nearest
Sony Service Center or Sony Authorized
Repair Center for replacement, or if a
problem occurs after the warranty period has
expired, the adaptor should be discarded.
6 GB
Page 65

Guide to Parts and Controls
Player display
Player
(headphones)/LINE OUT jack
( page 18)
, , , buttons (
MENU button ( page 25, 29)
MODE button ( page 21)
VOLUME +*/– buttons ( page 18)
(play/stop) button (
Hole for hand strap**
USB adaptor connector
( page 8, 15)
BUILT-IN BATTERY switch ( page 8)
HOLD switch ( page 19)
* This button has a tactile dot.
** You can attach your own hand strap.
page 20, 21)
page 18, 20)
Track number indicator ( page 20)
Bookmark indicator ( page 24)
Character information display
( page 20)
Atrac3plus/MP3 indicator ( page 19)
Playback progress bar ( page 20)
Playback indicator ( page 20)
Playing time ( page 20)
Repeat indicator ( page 28)
Play mode indicator ( page 25),
Sound indicator (when adjusting the
volume, page 30)
Battery indicator ( page 9)
Bit rate ( page 13)
About the serial number
The serial number provided for this player is
required for the customer registration. The
number is on a label on the rear of the player.
Getting Started
7 GB
Page 66

Preparing a Power Source
Charge the built-in lithium-ion rechargeable
battery before using it for the fi rst time or
when it is depleted.
Slide the BUILT-IN BATTERY switch
1
to ON.
The protection for the built-in
rechargeable battery is released and power
is supplied to the player. Keep the switch
to ON position.
Connect the the AC power adaptor
2
to the USB adaptor.
Connect the DC plug of the AC power
adaptor to the DC IN jack of the USB
adaptor, and then connect the AC plug to
a wall outlet.
to an AC outlet
AC power
adaptor
USB adaptor
to DC IN
jack
Connect the USB adaptor to the
3
player.
Insert the USB adaptor as shown below
until it clicks into place.
Charging of the battery starts. The CHG
lamp lights up on the USB adaptor, and
if the player is on, the battery indicator in
the display changes.
USB adaptor connector
USB adaptor
Charging is completed and the CHG lamp
goes off in approximately 3 hours*. The
lightning mark lights up in the display if
the player is on.
To charge quickly, turn the display off and
disconnect the USB cable from the USB
adaptor, and then it takes approximately 1
hour* to charge up to 80%.
* This is the approximate charging time for an
empty battery charged under room temperature.
When the display is on, it takes approximately
5 hours to charge. The charging time will
differ depending on the remaining power and
battery condition. If the battery is charged in a
low-temperature environment, the charging time
will be longer.
CHG
lamp
8 GB
Page 67

To remove the USB adaptor from the player
While pressing the gray buttons on both sides,
push the USB adaptor inward, and then pull
it outward.
Charging the battery using a USB connection
Turn on your computer and connect the USB
cable to your computer ( page 14). The
CHG lamp lights up on the USB adaptor
and charging of the battery starts. It takes
approximately 5 hours to charge. When the
player is connected to the AC power adaptor,
the power is supplied from the AC power
adaptor.
Notes
• When charging the battery using a USB
connection, if your computer’s power supply is
insuffi cient, the charging time will be longer.
• When charging the battery using a USB
connection, the charging will stop depending on
your system environment.
• If the player is connected to the computer for
a long time while charging, charging may stop
to prevent the temperature of the player from
increasing too much. In this case, the CHG lamp
goes out. Remove the USB adaptor from the
player and start charging again after a while.
• If the player will not be used for three months or
more, set the BUILT-IN BATTERY switch to OFF
to prevent degradation of the battery.
• Charge the battery in an ambient temperature of
between 5 to 35ºC (41 to 95ºF).
Notes on the AC power adaptor
• Use only the AC power adaptor and the
USB adaptor supplied with the player. Do
not use any other AC power adaptor since
this may cause the player to malfunction.
• The player is not disconnected from the
AC power source (mains) as long as it is
connected to the wall outlet, even if the
player itself has been turned off.
• If you are not going to use the player for a
long time, be sure to disconnect the power
supply. To remove the AC power adaptor
from the wall outlet, grasp the adaptor plug
itself; never pull the cord.
Checking the remaining power of the battery
The remaining power of the battery is
indicated in the display. As the black indicator
section decreases, the remaining power is
depleted further.
* “LOW BATTERY” appears in the display and
beep sounds.
When the battery is depleted, recharge the
battery.
Notes
• The display shows the approximate battery power
remaining. For example, one section does not
always indicate one-fourth of the battery power.
• Depending on the operating conditions, the display
may increase or decrease relative to the actual
power remaining.
Battery life (continuous use)
Playing time for ATRAC3plus 48 kbps is
approximately 30 hours. Playing time for
MP3 128 kbps is approximately 22 hours.
The amount varies depending on how the
player is used.
*
Getting Started
9 GB
Page 68

Installing SonicStage on Your Computer
Using the supplied CD-ROM, install the SonicStage on your computer.
Preparing the required system
The following system environment is required.
Computer
Operating System
Display
Others
Notes
• SonicStage is not supported by the following environments:
– Operating systems other than those the indicated above
– Personally constructed PCs or operating systems
– An environment that is an upgrade of the original manufacturer-installed operating system
– Multi-boot environment
– Multi-monitor environment
– Macintosh
• We do not guarantee trouble-free operation on all computers that satisfy the system requirement.
• The NTFS format of Windows XP/Windows 2000 Professional can be used only with the standard (factory)
settings.
• For Windows 2000 Professional users, install Service Pack 3 or later version before using the software.
• We do not guarantee trouble-free operation of the system suspend, sleep, or hibernation function on the
computers.
IBM PC/AT or Compatible
• CPU: Pentium II 400 MHz or higher (Pentium III 450 MHz or higher is
recommended.)
• Hard disk drive space: 200 MB or more (1.5 GB or more is recommended.) (The
amount of space will vary according to the Windows version and the number of
music fi les stored on the hard disk.)
• RAM: 64 MB or more (128 MB or more is recommended.)
Others • CD drive (capable of digital playback by WDM)
• Sound Board
• USB port (Hi-Speed USB is supported.)
Factory installed:
Windows XP Media Center Edition 2005/Windows XP Media Center Edition 2004/
Windows XP Media Center Edition/Windows XP Professional/
Windows XP Home Edition/Windows 2000 Professional/
Windows Millennium Edition/Windows 98 Second Edition
High Color (16 bit) or higher, 800 × 600 dots or better (1024 × 768 dots or better is
recommended.)
• Internet access: for Web registration, EMD services and CDDB
• Windows Media Player (version 7.0 or higher) installed for playing WMA fi les
10 GB
Page 69

Installing SonicStage
Check the following before installing the
SonicStage software.
• Make sure to close all other software,
including any virus-check software, as such
software usually demands a large amount of
system resources.
• Make sure to use the supplied CD-ROM for
installing SonicStage.
– If OpenMG Jukebox or SonicStage has
been installed, the existing software will
be overwritten by the new version with the
new functions.
– If SonicStage Premium, SonicStage
Simple Burner, or MD Simple Burner has
been installed, the existing software will
co-exist with SonicStage.
– You will still be able to use audio data
registered by the existing software. As
a precaution, we recommend that you
back up your audio data. To back up the
data, refer to “Backing Up My Library”
– “Backing Up Data to a Disk” on
SonicStage Help.
Turn on your computer and start up
1
Windows.
Insert the supplied CD-ROM into the
2
CD drive of your computer.
The setup program starts up automatically
and the installation window appears.
Depending on the region, a window
may appear asking you to select your
country. In this case, follow the displayed
instructions.
Click the region in which you will
3
use SonicStage software.
Click “Install SonicStage,” and then
4
follow the displayed instructions.
“Install SonicStage”
Read the instructions carefully.
Depending on your region, the buttons
other than “Install SonicStage” may differ
from those in the illustration above.
The installation may take 20 to 30
minutes, depending on your system
environment.
Make sure to restart your computer only
after the installation is completed.
If any trouble occurs during the
installation, see “Troubleshooting” (
page 43).
Getting Started
Note on uninstalling
“OpenMG Secure Module” is installed when
you install SonicStage. If you uninstall
SonicStage, do not delete OpenMG Secure
Module since it may be used by other
software.
11 GB
Page 70

Importing Audio Data to Your Computer
Record and store tracks (audio data) from an
audio CD to the SonicStage “ My Library” on
the hard disk drive of your computer.
You can record or import tracks from
other sources such as the Internet and your
computer’s hard disk. Refer to SonicStage
Help for details ( page 16).
Select “Start” – “All Programs”* –
1
“SonicStage” – “SonicStage.”
SonicStage starts up.
If you use the earlier version of
SonicStage, the “SonicStage fi le
conversion tool”
you start up SonicStage for the fi rst time
after installing it. Follow the instructions
in the window.
**
window appears when
“Music Source”
Source indication
“Format/Bit Rate”
“CD Info”
* “Programs” in the case of Windows Millennium
Edition/Windows 2000 Professional/Windows
98 Second Edition
**This tool converts the audio fi les that were
imported to your computer with SonicStage2.0
or a prior version into the optimum data format
(OpenMG) for this player, in order to transfer
audio data to the player at high speed.
Insert the audio CD that you want
2
to record into the CD drive of your
computer.
The source indication in the top-left of the
SonicStage window changes to “Record
a CD.”
12 GB
Page 71

Click “Music Source” on the
3
SonicStage window.
The contents of the audio CD appear in
the music source list. If CD information
such as album title, artist name, and
track names could not be obtained
automatically, connect your computer to
the Internet and click “CD Info” on the
right side of the window.
If necessary, change the format and
4
bit rate for audio CD recording.
Click “Format/Bit Rate” on the right side
of the SonicStage window to display “CD
Recording Format [My library]” dialog
box.
The default setting is OpenMG Audio
(ATRAC3plus) for format and 64 kbps for
bit rate.
Click on the
5
SonicStage window.
The recording of the selected tracks starts.
To stop recording
Click on the SonicStage
window.
To select the tracks you do not want to
record
Before step 5, click the track number to
uncheck
Note
Only audio CDs with a mark can be used with
SonicStage. We do not guarantee normal operation
in the case of the copy-controlled CDs.
on the SonicStage window.
Getting Started
13 GB
Page 72

Transferring Audio Data to the Player
Transfer the tracks (audio data) stored in
SonicStage “ My Library” on your computer
to the player in ATRAC3plus/MP3
The audio data to be transferred includes the
information, such as an artist name and an
album name (original album name) in the CD
information.
“Transfer”
format.
“ATRAC Audio Device”
Connect the USB adaptor to
1
your computer and the AC power
adaptor.
Connect from to as shown below.
Connect the large connector of the USB
cable to a USB port on your computer and
the small connector to the USB jack on
the USB adaptor.
to an AC outlet
USB adaptor
to DC IN jack
to USB
jack
AC power adaptor
(supplied)*
USB cable (supplied)
14 GB
My Library list
to USB port
* When transferring audio data, make sure to
connect the AC power adaptor to the USB
adaptor. You cannot transfer audio data if they
are not connected.
Page 73

Connect the USB adaptor to the
2
player.
Insert the USB adaptor as shown below
until it clicks into place.
“PC Connect” appears in the display.
The setup display for automatic transfer
appears in the SonicStage window. Follow
the instructions in the window. For details,
see the SonicStage Help ( page 16).
USB adaptor connector
USB adaptor
Click “Transfer” on the right side of
3
the SonicStage window.
The screen is switched to the Transfer
window.
Select “ATRAC Audio Device” from
4
the Transfer Destination list on
the right side of the SonicStage
window.
Click the tracks you want to transfer
5
from the My Library list on the left
side of the SonicStage window.
To transfer more than one track, hold
down the “Ctrl” key while selecting the
tracks. To transfer all tracks of the album,
click the album.
Click on the
6
SonicStage window.
Transfer of the selected tracks starts.
You can check the transferring status on
the SonicStage window.
To stop transferring
Click on the SonicStage
window.
Note
Do not use the player where it will be subjected to
vibration when transferring audio data. Also, do not
place the player near magnetic objects.
To remove the USB adaptor from the player
While pressing the gray buttons on both sides,
push the USB adaptor inward, and then pull
it outward.
Getting Started
Continued
15
GB
Page 74

Notes
• Do not disconnect the USB cable or the USB
connector while the data is being transferred.
If you do, the data being transferred may be
destroyed.
• Use of the player with a USB hub or a USB
extension cable is not guaranteed. Always connect
the player to the computer directly using the
supplied USB cable.
• Some USB devices connected to the computer
may interfere with the proper operation of the
player.
• The control buttons on the player are all disabled
while it is connected to a computer. If you attach
the player to the USB adaptor connected to the
computer during playback, playback stops and
“PC Connect” appears in the player display.
• When there is not enough free space on the player
for audio data to be transferred, the transfer will
fail.
• During the transfer, the system suspend, sleep, or
hibernation function will not operate.
• Depending on the type of the text and number of
characters, the text entered by SonicStage may
not be displayed on the player. This is due to the
limitations of the player.
• If the player is connected for a while to a computer
that is powered, or after lots of data is transferred
to the player, the player may get warm. However,
this is not a malfunction. Disconnect the player
from the USB adaptor and leave it aside for a
while.
Using SonicStage Help
SonicStage Help provides further details on
how to use SonicStage. SonicStage Help
allows you to search easily for information
from a list of operations, such as “Importing
audio data” or “Transferring audio data,” or
from large list of keywords, or by typing in
words that might lead you to the appropriate
explanations.
Click “Help” – “SonicStage Help”
1
while SonicStage is running.
Help appears.
The player is explained as “ATRAC Audio
Device” in SonicStage Help.
“SonicStage Help”
Notes
• In SonicStage Help, “Device/Media” is the general
term for this player.
• Follow the instructions of your internet provider
regarding such things as recommended system.
16 GB
Page 75

To understand SonicStage Help
The left side
frame
The right side
frame
To search for a word inside an explanation
“Type in the keyword to fi nd”
text box
“Search”
“List Topics”
Getting Started
1 Double click “ Overview” in the left-
side frame of SonicStage Help.
2 Click “
About This Help File.”
The explanation will appear in the rightside frame.
Scroll the display if necessary. Click
underlined words to jump to their
explanations.
“Display”
A list of the typed
words
An explanations of
the selected item
1 Click “Search.”
2 Type in the words.
3 Click “List Topics.”
A list of the typed words is displayed.
4 Click to select the desired item among
those displayed.
5 Click “Display.”
An explanation of the selected item is
displayed.
17 GB
Page 76

Playback
Playing Back
Transfer audio data from your computer to the
player beforehand ( page 14).
You can change the language to your own for
the menu and the messages in the display (
page 31).
After setting the BUILT-IN BATTERY
1
switch to ON ( page 8), connect
headphones to the player.
Headphones
to (headphones)/
LINE OUT jack
Press .
2
(play) appears on the left bottom of
the display and the player starts playback.
appears.
Adjust the volume by pressing
3
VOLUME +/–.
VOLUME +/–
18 GB
Page 77

Playable audio data
This player can play audio data compressed in
the ATRAC3plus/ MP3 formats.
ATRAC3plus (Adaptive Transform Acoustic
Coding3plus) is an audio compression
technology that satisfi es the demand for high
sound quality and high compression rates.
ATRAC3plus can compress audio fi les to
about 1/20 of their original size at 64 kbps.
Playable MP3 fi le formats are as follows:
– MPEG-1 Audio Layer-3
– Bit rate 32 to 320 kbps (CBR/VBR)
– Sampling frequencies 32/44.1/48 kHz
Notes
• MP3 format fi les that are not playable on the
player can still be transferred to the player.
• When trying to play an MP3 audio track that
cannot be played on this player, playback will
stop. Press to select other tracks.
• When using the built-in battery, if the player is not
operated for about 30 seconds while in stop mode,
the display automatically turns off. When scrolling
track titles, etc., the display turns off about 30
seconds after scrolling is fi nished.
• When using the AC power adaptor, if the player
is not operated for about 3 minutes while in stop
mode, the display automatically turns off. When
scrolling track titles, etc., the display turns off
about 3 minutes after scrolling is fi nished.
• If playback does not start, make sure that the
HOLD switch is set to off ( right).
Locking the controls
( HOLD)
You can prevent accidental button presses
while carrying the player by locking the
controls. “HOLD” fl ashes on the display
if you press any button when the HOLD
function is activated.
Slide the HOLD switch in the
1
direction of the arrow.
To unlock the controls
Slide the HOLD switch in the direction
opposite to that of the arrow.
Continued
Playback
19 GB
Page 78

Basic playback operations
(Play, stop, search)
To Operation
Play from a point where you stopped the
player previously
Stop playback
Find the beginning of the current track
Find the beginning of previous tracks*
Find the beginning of the next track*
Find the beginning of succeeding tracks*
Go backwards quickly
Go forward quickly
* When shuffl e play or play unit shuffl e play ( page 26) is selected, playback order is different.
. Playback starts from the point where you
Press
stopped.
.
Press
once.
Press
Press
repeatedly.
Press
once.
Press
repeatedly.
Press and hold
Press and hold
.
.
To turn off the player
Press and hold MENU until the display disappears.
To turn on the player again, press any button.
Checking information in the display
You can check audio data and the playback status in the player display.
Player display during playback
Track name
Album name
Artist name
Genre
Bookmark ( page 24)
Track number
Playing status
: Playback
: Stop
: Fast forward
: Fast reverse
/: Locating the
beginning of the track
Atrac3plus/MP3
indicator ( page 19)
Bit rate ( page 13)
Playback progress bar
Remaining power of the
battery ( page 9)
Play mode ( page 25),
sound (when adjusting the
volume, page 30)
Repeat ( page 28)
Elapsed playing time
Note
The characters A to Z, a to z, 0 to 9, and symbols (except / ) can be displayed.
20 GB
Page 79

Playing Back Tracks
Selected by MODE
(Artist, Album, Genre,
Group, etc.)
By grouping the tracks in the player into a
“ MODE,” such as by “Artist” or “Album,”
you can select tracks you want to listen to.
There are fi ve MODEs, and the steps here
use the displays of the “Artist” MODE as an
example.
For details about the displays of each MODE,
see page 23.
You can also play the selected tracks
repeatedly ( page 28) or randomly (shuffl e
play, page 26).
Press MODE repeatedly to select a
1
MODE.
Each press of the button changes the
MODE as follows:
Artist (
Genre (
Others Return to Artist
* An album name (original album name) in the
CD information of SonicStage is displayed.
**An album in SonicStage is recognized as a
group.
Press or to select an item in the
2
MODE.
To start playback here, press .
Playback starts from the fi rst track in
the fi rst album of the artist you selected.
All the albums of the artists listed after
the selected artist are played in the track
number order.
) Album ( )*
) Group ( )**
MODE appears.
Artist you want to listen to.
Playback
Continued
21 GB
Page 80

To search tracks more, press .
3
Artist selected in step 2.
To return to the display where you start
playback
Press and hold MODE.
To return to the display where you select
a MODE
Press MODE.
To return to the track list
Press or .
Albums of the selected artist appear.
Press or to select an item, and
4
then press
Playback starts from the track you
selected or the fi rst track of the item
(artist, album, etc.) you selected. All the
tracks listed after the selected items are
played in the track number order.
.
To stop playback when selecting a MODE
or in the list display
Press and hold .
22 GB
Page 81

M ODE displays
The display differs depending on the MODE.
You can start playback by pressing
Artist
in all the displays.
List of artists Albums of the artist
selected
Tracks of the album
selected
/
Playing back
Album: displaying an album name (original album name) in the CD information of SonicStage
List of albums Tracks of the album
/
Playing back
selected
Genre
List of genres Artists of the genre
selected
Tracks of the artist
selected
/
Playing back
Group: playing tracks in the groups of albums created in SonicStage
List of groups Tracks of the group
/
Playing back
selected
Others
• “ New Tracks”: Tracks in groups newly transferred to the player (the 5 latest times)
• “ Bookmark”: Bookmarked tracks (for how to add the bookmark, page 24)
Playback
Groups (New Tracks)
or tracks (Bookmark)
Tracks of the group
selected (New Tracks)
/
Playing back
Continued
23 GB
Page 82

Adding a bookmark
( Bookmark track play)
You can play your favorite tracks by adding
a Bookmark to them. To play bookmarked
tracks, select “Others” MODE ( page 21).
During playback of the track where
1
you want to add a Bookmark, press
and hold
The number of bookmarks (the number
of bookmarked tracks/the number of
possible bookmark) appears, and then
(Bookmark) lights up.
If you want to add a Bookmark to
2
two or more tracks, repeat step 1.
You can add Bookmarks to up to 100
tracks.
To play the bookmarked tracks
1 Press MODE repeatedly to select “Others”
MODE.
2 Press
then press
To playback all the bookmarked tracks,
press
3 Press
press
To remove bookmarks
During playback of the track where you want
to remove a Bookmark, press and hold
.
“Off” appears and
display.
Note
You can add or remove a bookmark only during
playback.
or .
or to select “Bookmark,” and
.
.
or to select a track, and then
.
or
disappears from the
24 GB
Page 83

Changing Playback
Options
You can use various playback options, such
as selecting songs you want to listen to and
playing songs in random order.
For details about playback options (Play
Mode), see page 26, 27.
You can also play songs repeatedly using the
playback options you choose (repeat play,
page 28).
Press MENU.
1
The MENU display appears.
Press or to select “Play Mode,”
2
and then press
The Play Mode display appears.
(Play Mode)
.
Press or to select the playback
3
options, and then press
The default setting is “Normal” (normal
play).
Playback options appear.
Press MENU twice to go to the
4
playback display, and then press
.
Playback starts in the selected playback
option.
.
To cancel set up
Press MENU to return to the MENU display.
Press and hold MODE or press MENU in the
MENU display to return to the display before
step 1.
To return to normal play
In step 3, select “Normal.”
To return to the display where you select
a MODE
Press MODE.
Note
When you change the Play Mode, the play unit (
page 27) also changes to all the tracks recorded in
the player.
To play only the selected play mode, select the item
(artist, album, track, etc.) in the list display.
Continued
Playback
25 GB
Page 84

Playback options
( Play Mode)
A range of tracks to be played (“Play unit” page 27) differs depending on the MODE
( page 21) where you start playback.
In the MENU display/icon Explanation
Normal/No icon
( Normal play)
1 Track/ 1
( Single play)
Play Unit/
( Play unit play)
Track SHUF/
( Shuffl e play)
Unit SHUF/
( Play unit shuffl e play)
SHUF
SHUF
All the tracks after the selected track are played once in the track
number order.
When you select an item (album, artist, etc.) other than a track, all
the tracks are played once from the fi rst track of the item in the track
number order.
The selected track is played once.
When you select an item (album, artist, etc.) other than a track, only
the fi rst track is played once.
All the tracks of the selected play unit are played once in a track
number order.
All the tracks of the selected play unit are played once in random
order.
In the display where you select a MODE, all the recorded tracks are
played once in random order.
All the tracks in the selected play unit are played once in random
order for every play unit.
26 GB
Page 85

What is a “ play unit” ?
All the items (an artist, an album, a track, etc.) on the list when you start playback is called a “play
unit.”
When you change the Play Mode, the play unit changes to all the tracks recorded in the player.
On playback of a play unit
Example: When you select Artist MODE
Artists Albums Tracks
Playback
All the tracks of all the artists
make a play unit.
When selecting “Play Unit” (Play unit play)
• Playback starts from the
tracks of “Y & J” and stops
after playing all the tracks of
“The Evenings.”
When selecting “Unit SHUF” (Play unit shuffl e play)
• Playback is in random order
for every artist. Albums or
tracks of the artist are played
in order.
When selecting “Track SHUF” (Shuffl e play)
• All the recorded tracks are
played in random order.
All the tracks in all the albums
of the artist “Y & J” make a
play unit.
• Playback starts from the
album “Morning” and stops
after playing all the tracks
of the album “Lunch Time
Song.”
• Playback is in random order
for every album. Tracks of the
album are played in order.
• The tracks in all the albums
of “Y & J” are played in
random order.
All the tracks in the album
“Morning” of the artist “Y & J”
make a play unit.
• Playback starts from the fi rst
track of the album “Morning”
and stops after playing all the
tracks.
• The tracks in the album
“Morning” are played in
random order.
• The tracks in the album
“Morning” are played in
random order.
On Shuffl e play
For example, to play all the tracks recorded in the player randamly, display a MODE other than
“Others” (“Artist” MODE, etc.), and then start playback selecting “Track SHUF” as the Play Mode
( page 25). All the tracks recorded in the player are played once in random order.
In the artist list, all the
tracks recorded are played
in random order.
Continued
27 GB
Page 86

Playing tracks repeatedly
( Repeat play)
Playback of tracks repeats in the playback
options selected in page 25.
Select the playback option you want
1
to repeat ( page 25).
Press MENU.
2
The MENU display appears.
Press or to select “Repeat,” and
3
then press
The Repeat display appears.
.
To repeat all the tracks
Select a MODE other than “Others” (“Artist”
MODE, etc.) and then follow steps 1 to 5.
To cancel set up
Press MENU to return to the MENU display.
Press and hold MODE or press MENU in the
MENU display to return to the display before
step 2.
To return to normal play
In step 4, select “Off” on the Repeat display.
To return to the display where you select
a MODE
Press MODE.
Press to select “On,” and then
4
5
.
press
appears.
Press MENU twice to go to the
playback display, and then press
.
The current playback option repeats.
28 GB
Page 87

Changing Sound Quality and Settings
For details about various setting items, see
page 30.
Press MENU.
1
The MENU display appears.
Press or to select the item, and
2
then press
The display to set the selected item
appears.
Press or to select an option,
3
and then press
To change sound quality
After step 3, press or to select an option
( page 30), and then press
When you select “Custom1” , “Custom2”,
“Custom3” or “Custom4” you can customize
sound quality ( page 32).
.
.
.
To return to the previous display
Press .
To cancel set up
Press MENU to return to the MENU display.
Press and hold MODE or press MENU in the
MENU display to return to the display before
step 1.
To return to the display where you select
a MODE
Press MODE.
Note
When “V-SUR” or “Sound EQ” is selected, the
sound settings do not work for MP3 tracks. To
change sound quality of MP3 tracks, adjust the
“Digital Sound Preset” sound setting.
Continued
Playback
29 GB
Page 88

Setup items
Item
Sound
(Sound setting)
Options (
Off
V-SUR
: Default setting)
1) 2)
Studio
Plays tracks in normal sound quality.
Recreates the sound of a recording studio.
(VS)
Live
Recreates the sound of a concert hall.
(VL)
Club
Recreates the sound of a dance hall.
(VC)
Arena
Recreates the sound of a stadium.
(VA)
3)
AVLS
(Limiting volume)
Beep
(Sound of
operation)
Audio Out
(External audio
output)
Contrast
(Adjustment of the
display)
Sound
1) 2)
EQ
Heavy
(SH)
Pops
(SP)
Jazz
(SJ)
Unique
(SU)
Custom1
(S1)
Custom2
(S2)
Digital
Sound
Preset
Custom3
(S3)
2)
Custom4
(S4)
On The maximum volume is limited to protect your hearing.
Off
On
Off The beep is turned off.
Headphone
Line Out Select this when you connect other devices such as
Second
from the
right
Plays tracks in powerful sounds, further emphasizing
high and low ranges compared with Pops sound.
Plays tracks in sound for vocal, stressing middle range
audio.
Plays tracks in lively sounds, emphasizing high and low
range audio.
Plays tracks in special sounds, emphasizing high and
low range audio more than middle range.
Plays tracks in customized sound ( page 32 for
details).
Plays tracks in customized sound ( page 32 for
details).
Plays tracks with preset treble and bass sound ( page
33 for details).
Plays tracks with preset treble and bass sound ( page
33 for details).
The volume changes without limiting the volume level.
The beep sounds when you operate the player.
Select this when you connect the supplied headphones.
speakers with an audio cord ( page 35).
The display is moderately bright. If the body color of
the player is black, the default setting is second from
the left.
– to + Set toward – to make the display brighter and toward +
to make it darker.
1) The settings work only when playing ATRAC3plus audio tracks. When playing an MP3 audio track, the
settings do not work.
2) The sound settings appear in the display as the letters in parentheses ( page 7).
3) AVLS is an abbreviation of the Automatic Volume Limiter System.
30 GB
Page 89

Items
Backlight
(LCD backlight of
the display)
Reverse Display
(Turning over the
display)
Language
(Display language)
* These languages are not displayed depending on the country where you use the player.
: Default settings)
Options (
Auto
10 seconds The display lights up for about 10 seconds when you
30 seconds The display lights up for about 30 seconds when you
Off The display is turned off to save power.
Positive
Negative Characters and icons appear in white and the
English
Français The messages and the menus are in French.
Deutsch The messages and the menus are in German.
Italiano The messages and the menus are in Italian.
Español The messages and the menus are in Spanish.
* The messages and the menus are in Simple Chinese.
*
*
The display lights up for about 10 seconds when you
press a button and keeps lighting up while you scroll the
track titles, etc.
press a button. The light turns off in about 10 seconds
even if you are scrolling the track titles, etc.
press a button. The light turns off in about 30 seconds
even if you are scrolling the track titles, etc.
Characters and icons appear in black and the
background in white.
background in black.
The messages and the menus are in Japanese.
The messages and the menus are in English.
The messages and the menus are in Traditional Chinese.
The messages and the menus are in Korean.
Continued
Playback
31 GB
Page 90

Customizing sound quality
(Sound EQ - Custom)
You can adjust the sound quality for each
frequency range individually, checking the
settings on the display.
After selecting “Sound” in step
1
2 in “Changing Sound Quality
and Settings” ( page 29), select
“Custom1” or “Custom2” of “Sound
EQ.”
Press or to select the
2
frequency range.
There are six frequency ranges.
Repeat steps 2 and 3 to make
4
adjustments for the remaining
frequency ranges.
Press .
5
The MENU display appears.
To cancel set up
Press MENU to return to the MENU display.
Press and hold MODE or press MENU in the
MENU display to return to the display before
step 1.
To return to the display where you select
a MODE
Press MODE.
Notes
• If the sound is distorted by your sound settings
when you turn up the volume, turn the volume
down.
• If you feel difference in sound volume between
the “Custom1” or “Custom2” sound setting and
other sound settings, adjust the volume to your
preference.
Frequency range
Press or to select the sound
3
level.
The sound level can be adjusted in seven
levels.
32 GB
Sound level
Page 91

Adjusting treble and bass
emphasis
( Digital Sound Preset)
You can preset the treble and bass levels to
your preference. While checking the display,
adjust the emphasis settings.
After selecting “Sound” in step 2
1
in “Changing Sound Quality and
Settings” ( page 29), select
“Custom3” or “Custom4” of “Digital
Sound Preset”.
Default settings
Sound
Custom3
quality
(S3)
Bass
Treble
Press or to select “Treble”
2
or “Bass”.
You can adjust the sound quality of the
treble and bass.
Custom4
(S4)
+1 +3 ±0
±0 ±0 ±0
OFF
(NORMAL
SOUND)
Press or to select the sound
3
level.
The sound level can be adjusted in eight
levels.
Sound quality Emphasis level
Bass
Treble
Press .
4
The MENU display appears.
-4 to +3
-4 to +3
To cancel set up
Press MENU to return to the MENU display.
Press and hold MODE or press MENU in the
MENU display to return to the display before
step 1.
To return to the display where you select
a MODE
Press MODE.
Notes
• The treble and bass sound levels appear on the
right and left ends of the “Custom3” or “Custom4”
chart. You cannot adjust the in-between levels
individually because they are linked to the treble
and bass levels and change automatically.
• If the sound is distorted by your sound settings
when you turn up the volume, turn the volume
down.
• If you feel difference in sound volume between
the “Custom3” or “Custom4” sound setting and
other sound settings, adjust the volume to your
preference.
Playback
33 GB
Page 92

Other Functions
Transferring Audio Data Back to Your Computer
Audio data can be transferred back to
SonicStage “ My Library” on your computer.
“Transfer”
“ATRAC Audio Device”
Click the tracks you want to transfer
4
to My Library in the Network
Walkman list on the right side of the
SonicStage window.
To transfer more than one track, hold
down the “Ctrl” key while selecting the
tracks. To transfer all tracks of the album,
click the album.
Click on the
5
SonicStage window.
Transfer of the tracks selected in step 4
starts.
You can check the transferring status on
the SonicStage window.
To stop transferring
Click on the SonicStage
window.
My Library list
Connect the player to your
1
computer (see steps 1 and 2 in
“Transferring audio data to the
player,”
Click “Transfer” on the right side of
2
the SonicStage window.
The screen is switched to the Transfer
window.
Select “ATRAC Audio Device” from
3
the Transfer Destination list on
the right side of the SonicStage
window.
page 14).
34 GB
List of tracks on the
player
To remove the USB adaptor from the player
While pressing the gray buttons on both sides,
push the USB adaptor inward, and then pull
it outward.
Notes
• Tracks transferred to the player from another
computer cannot be transferred to My Library on
your computer.
• Do not disconnect the USB cable or the USB
adaptor while the data is being transferred. If you
do, the data being transferred may be destroyed.
Page 93

Connecting Other Devices
You can listen to tracks through a stereo
system and record tracks in the player
onto a MiniDisc or a cassette tape. See the
instruction manual that comes with the device
you want to connect.
Be sure to turn off all devices before making
the connections and changing the settings and
explained below.
to (headphones)/
LINE OUT jack
Connecting cord
(minijack, not supplied)
Left (white) Right (red)
MiniDisc recorder, AV amplifi er,
active speaker, cassette
recorder, etc.
You need to change the setting for “Audio
Out” in the MENU display to output sound
to the connected device. The settings of
“ Audio Out” are shown below. To make those
settings, see page 29.
Connected device Setting
Headphones
Device connected using the
connecting cord
Headphone
Line Out
When you connect another device, set this to
“Line Out.” When the setting is “Line Out,”
volume cannot be adjusted, and the settings in
“Sound” is not available and do not work.
Notes
• When the supplied headphone is connected to the
player, do not set “Audio Out” to “Line Out.” If it
is set to “Line Out,” the volume cannot be adjusted
and the sound will be distorted and noisy.
• Before playback, turn down the volume of the
connected device to avoid damaging the connected
speaker.
Other Functions
35 GB
Page 94

Storing Data Other Than Audio Files
You can transfer data from the hard disk of
a computer to the built-in hard disk of this
player using Windows Explorer.
The built-in hard disk of the player is
displayed in Windows Explorer as an external
drive (as a removable storage).
Notes
• Do not use SonicStage while operating the hard
disk of the player using Windows Explorer.
• If WAV and MP3 fi les are transferred to the player
using Explorer, they cannot be played. Transfer
them using SonicStage.
• Do not disconnect the USB cable while the data
is transferred. The data being transferred may be
destroyed.
• Do not initialize the hard disk of the player on the
computer.
Resetting to the Factory Settings
Reset all the settings in the MENU display to
the factory settings.
While the player is stopped, press
1
MENU.
The MENU display appears.
Press or to select “Format,” and
2
then press
The Format display appears.
Press while selecting “Factory
3
Settings.”
The Factory Settings display appears.
.
36 GB
Page 95

Press to select “Yes,” and then
4
.
press
The message appears, and then the Format
display appears.
To cancel set up
In step 4, select “No,” and then press .
The Format display appears.
Press MENU to return to the MENU display.
Press and hold MODE or press MENU in the
MENU display to return to the display before
step 1.
To return to the display where you select
a MODE
Press MODE.
Note
You cannot reset to the factory settings during
playback.
Initializing Hard Disk
You can initialize the built-in hard disk of the
player. If the hard disk is initialized, all the
audio data and the other data stored will be
erased. Be sure to verify the data stored in the
hard disk prior to initializing.
If tracks are erased by initializing, SonicStage
recognizes them as tracks to be transferred
back to the computer when the player is
connected to your computer. Therefore,
the remaining transferable count increases
automatically.
While the player is stopped, press
1
MENU.
The MENU display appears.
Press or to select “Format,” and
2
then press
The Format display appears.
.
Other Functions
Continued
37 GB
Page 96

Press to select “Initialize Hard
3
Disk,” and then press
The Initialize Hard Disk display appears.
Press to select “Yes,” and then
4
5
.
press
Press to select “Yes,” and then
.
press
The message appears, and then the Format
display appears.
.
To cancel set up
In step 5, select “No,” and then press .
The Format display appears.
Press MENU to return to the MENU display.
Press and hold MODE or press MENU in the
MENU display to return to the display before
step 1.
To return to the display where you select
a MODE
Press MODE.
Notes
• Do not initialize the hard disk of the player on the
computer.
• You cannot format the hard disk during playback.
• All the audio data and the fi les other than audio
data are deleted if the player is initialized.
38 GB
Page 97

Additional Information
Notes on Disposing of the Unit
This player has a built-in lithium-ion
rechargeable battery. When you dispose of the
player, be sure to dispose of it properly.
Certain countries may regulate disposal of
the battery used to power this product.
Please consult with your local authority.
Notes
• Never disassemble the player except when
disposing it.
• Be careful of handling the inside metallic part,
especially its edge.
To remove the built-in rechargeable
battery
1 Slide the BUILT-IN BATTERY switch on
the bottom of the player to OFF.
2 Remove the two screws on the bottom.
4 Slide the side part () and remove the
two screws () on the side of this player.
5 Push the bottom into the player with your
fi nger and pull out the inside of the player
in the direction of the arrow below.
Additional Information
6 Remove the screw on the side of the
battery.
3 Remove the plate on the bottom () and
the USB bracket (). If necessary, use
the tools such as tweezers.
Continued
39 GB
Page 98

7 Remove the built-in battery.
8 Pull the connecting cord between the
battery and the player to separate the
connector.
40 GB
Page 99

Troubleshooting
If you experience trouble with your player, try the following solutions.
1 Set the BUILT-IN BATTERY switch to OFF, and then set to ON again. The data is not lost
when you set it to OFF.
2 Check the symptoms in “Troubleshooting.”
3 If the problem persists, consult your nearest Sony dealer.
Power
Symptom Case and/or corrective action
The CHG lamp does not light.
The CHG lamp fl ashes.
Battery life is short.
The terminals of the USB adaptor are dirty. Wipe them with a
soft, dry cloth.
The player is not connected to the USB adaptor.
Insert the
USB adaptor securely until it reaches to the end and clicks
into place
The temperature is not appropriate.
ambient temperature of between 5 to 35ºC (41 to 95ºF).
The operating temperature is below 5°C (41°F). This is due to
the battery characteristics and not a malfunction.
You have not used the player for a prolonged period. Effi ciency
of the battery will be improved by repeatedly charging and
discharging.
The battery needs to be replaced. Consult your nearest Sony
dealer.
Battery charging time is not enough. The player requires 15
minutes to check the battery condition to protect it before
a quick recharge starts. Keep charging the battery until it is
complete (until the CHG lamp goes out).
( page 8).
Charge the battery in an
Additional Information
Continued
41 GB
Page 100

Sound
Symptom Case and/or corrective action
There is no sound. Noise is heard.
The volume does not increase.
There is no sound from the right
channel of the headphones.
The volume cannot be adjusted.
When using the player with a
stereo system connected, the
sound is distorted or noisy.
When playing an MP3 audio track,
the sound does not change even if
the “V-SUR” and “SOUND EQ” in
“Sound” have been set.
The volume level is set to zero. Turn the volume up
( page 18).
The headphone plug is not connected properly. Connect it to
(headphones)/LINE OUT jack securely ( page 18).
The headphone plug is dirty. Clean the headphone plug with a
soft dry cloth.
No audio data is stored in the hard disk.
“AVLS” is set to “On.” Set it to “Off” ( page 30).
The headphone plug is not connected properly. Connect it to
(headphones)/LINE OUT jack securely ( page 18).
“Audio Out” is set to “Line Out.” Adjust the volume using the
volume control on the connected device, or set “Audio Out” to
“Headphone” ( page 30).
“Audio Out” is set to “Headphone.” Set it to “Line Out” (
page 30).
Only the settings in “Digital Sound Preset” work when playing
an MP3 audio track ( page 30).
Operation/Playback
Symptom Case and/or corrective action
Buttons do not work.
Playback has stopped suddenly.
The backlight is not turned on.
“” is displayed for a title.
The buttons are locked. Slide the HOLD switch back
( page 19).
Moisture condensation has occurred. Leave the player aside for
a few hours until the moisture evaporates.
The remaining battery power is insuffi cient. Charge the battery
( page 8).
When the player is connected to your computer that is powered,
if the USB adaptor is connected to the player, button operations
are disabled. Remove the USB adaptor from the player (
page 9).
The remaining battery power is insuffi cient. Charge the battery
( page 8).
When trying to play an MP3 audio track that cannot be played
on this player, playback will stop. Press to select other
tracks ( page 19).
“Backlight” is set to “Off.” Set it to “Auto,” “10 seconds,” or
“30 seconds” ( page 31).
Characters that cannot be displayed on the player are
involved. Use the SonicStage software to rename the title with
appropriate characters.
42 GB
 Loading...