

Page 1

3-231-825-11(1)
Portable IC Audio Player
Network Walkman
Operating Instructions
NW-E8P
© 2001 Sony Corporation
Page 2

Notice for users
On the supplied software
• Copyright laws prohibit reproducing the software
or the manual accompanying it in whole or in
part, or renting the software without the
permission of the copyright holder.
• In no event will SONY be liable for any financial
damage, or loss of profits, including claims made
by third parties, arising out of the use of the
software supplied with this player.
• In the event a problem occurs with this software
as a result of defective manufacturing, SONY will
replace it.
However, SONY bears no other responsibility.
• The software provided with this player cannot be
used with equipment other than that which is so
designated.
• Please note that, due to continued efforts to
improve quality, the software specifications may
be changed without notice.
• Operation of this player with software other than
that provided is not covered by the warranty.
Program ©2000 Sony Corporation
Documentation ©2001 Sony Corporation
Network Walkman is trademark of Sony
Corporation.
OpenMG and its logo are trademarks of Sony
Corporation.
WALKMAN is a registered trademark of Sony
Corporation.
US and foreign patents licensed from Dolby
Laboratories.
All other trademarks and registered trademarks are
trademarks or registered trademarks of their
respective holders.
2
Page 3

Table of Contents
Overview .......................................... 4
What you can do with your
Network Walkman ................ 4
Other features ............................... 5
Getting Started
Step 1: Unpacking........................... 6
Step 2: Inserting the battery .......... 7
Basic Operations
Transferring songs from the computer
to Network Walkman (Check-out)
...................................................... 8
Listening to music with
Network Walkman .................... 9
On other operations....................11
On the display ............................ 12
Changing the display mode ..... 12
Advanced Operations
Adjusting the sound...................... 13
Emphasizing the bass sound
(MEGA BASS) ...................... 13
Protecting your hearing
(AVLS) ................................... 13
Adjusting the playback mode
(REPEAT).................................. 14
Locking the controls (HOLD) ...... 14
Attaching the attachments ........... 15
Other Information
Precautions ..................................... 16
Troubleshooting ............................. 17
To reset the player...................... 17
What happened ? ....................... 17
Messages ..................................... 20
Glossary .......................................... 21
Looking at the controls ................. 22
Network walkman ..................... 22
Display ........................................ 22
Specifications.................................. 23
Index ................................................ 24
This manual explains how to operate Network Walkman. For details on how to use the
supplied software (OpenMG Jukebox), refer to the OpenMG Jukebox Operating Instructions.
3
Page 4
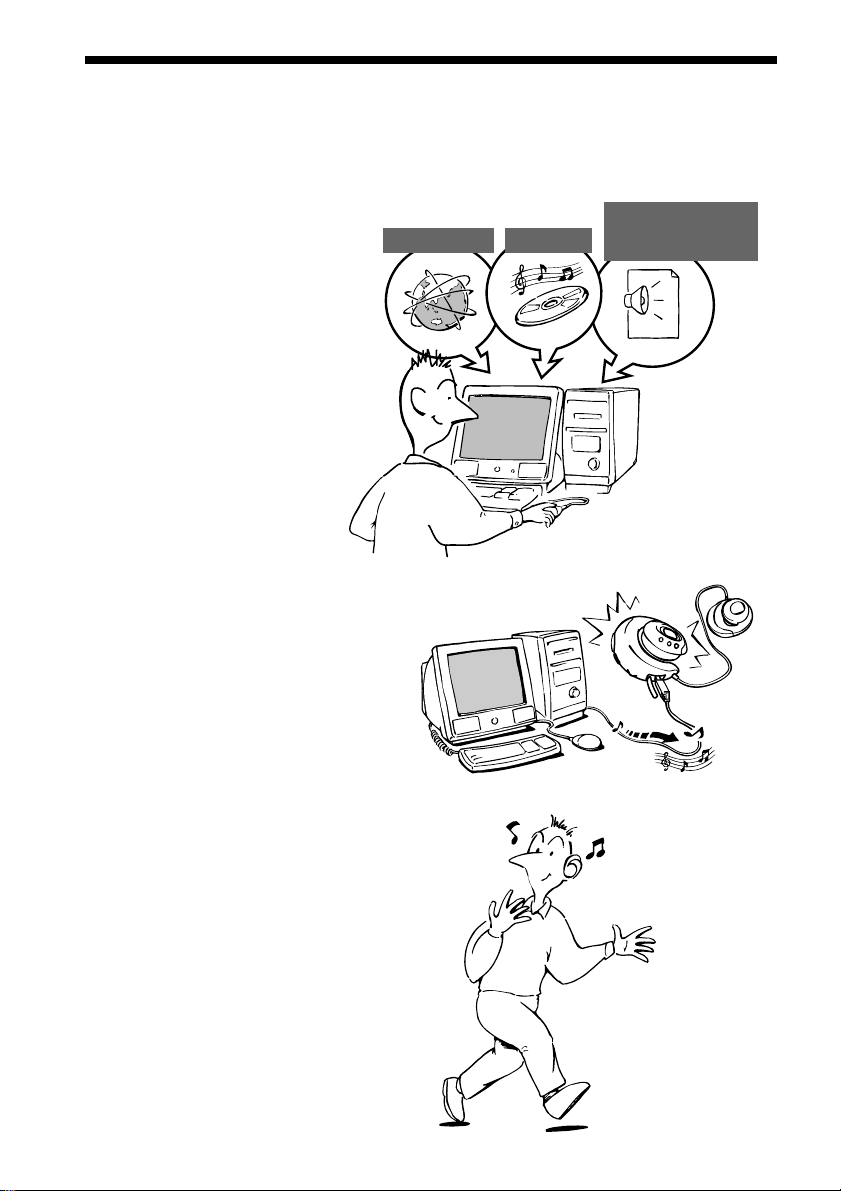
Overview
What you can do with your Network Walkman
Network Walkman is a portable IC audio player.
You can easily transfer digital audio files from your computer to the product’s built-in flash
memory and carry it anywhere to enjoy.
Audio CDsEMD Services
MP3 and WAV
Format files
1 Store digital
audio files on
your computer.
2 Transfer the files
to the Network
Walkman.
3 Listen to your
Network W alkman.
4
USB connection
Page 5

Other features
• Headphone shape IC audio player
– Skip-proof using IC memory
• LR03 (size AAA) alkaline battery enables about 7 hours continuous playback.
• Select record time: up to 60 min., 80 min., 120 min.*
• Back light LCD screen: When you use Jog lever or buttons, the backlight lights up for some
seconds to control the player in the dark.
• Jog lever: easy to operate.
• High speed data transfer using the supplied dedicated USB cable.
• OpenMG Jukebox software enables you to record compact discs using the ATRAC3 format
(high sound quality, high compression) to the hard drive.**
* Differs according to the bit rate when recording. In this case, the figures for the recordable time are when
recording at 132kbps, 105kbps, and 66kbps.
** OpenMG technology conforms to the SDMI (Secure Digital Music Initiative) specifications and allows you to
enjoy digital music while maintaining the copyrights of its holders.
NOTES:
• The recorded music is limited to private use only. Use of the music beyond this limit requires permission
of the copyright holders.
• Sony is not responsible for music files that are not saved on your computer due to unsuccessful recording
from CD or music downloading.
5
Page 6
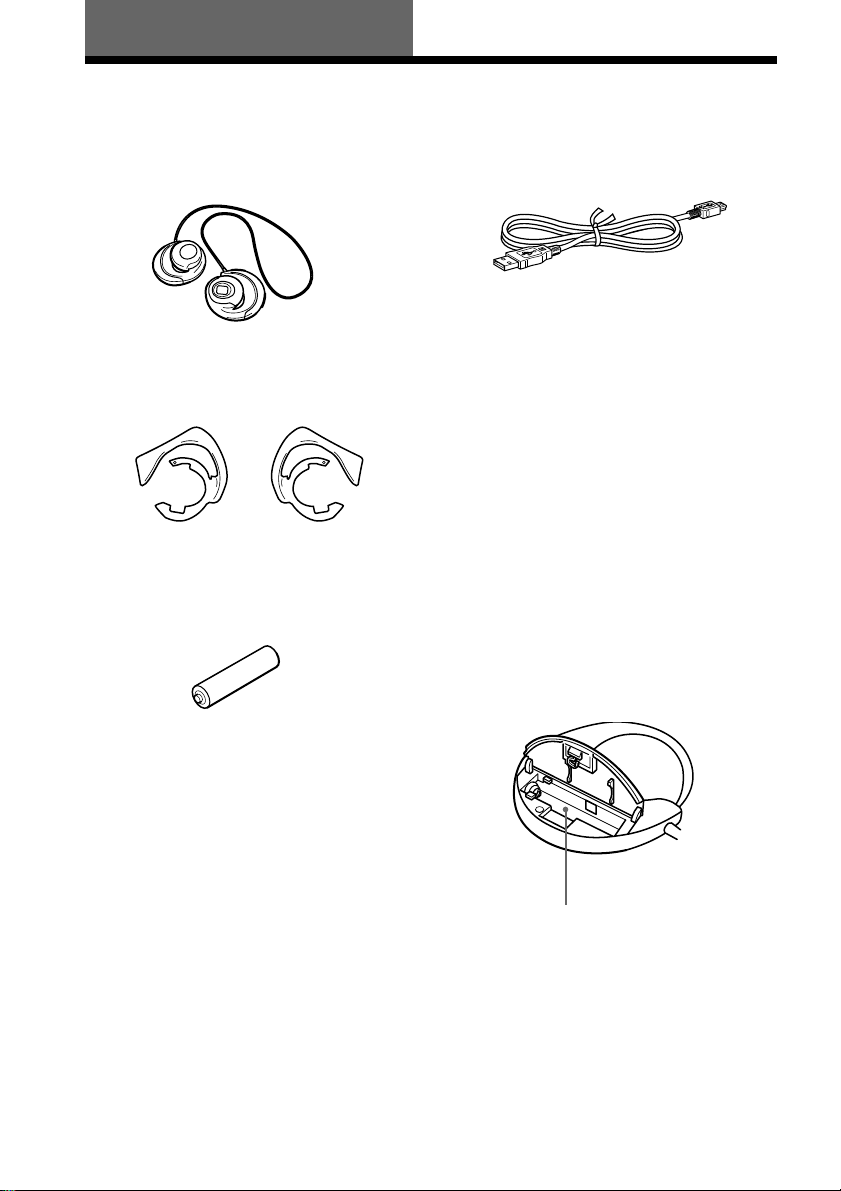
Getting Started
Step 1: Unpacking
Your Network Walkman comes with the following items.
• Network Walkman (1)
• Attachments (1 for left ear, 1 for right ear)
• LR03 (Size AAA) alkaline battery (1)
• Dedicated USB cable (1)
• Carrying pouch (1)
• CD-ROM
(OpenMG Jukebox installation disc) (1)
• NW-E8P Operating Instructions (1)
• OpenMG Jukebox
Operating Instructions (1)
About the Serial Number
The serial number provided for your player is
required for the customer registration. The
number is printed inside the battery
compartment.
Serial Number
6
Page 7
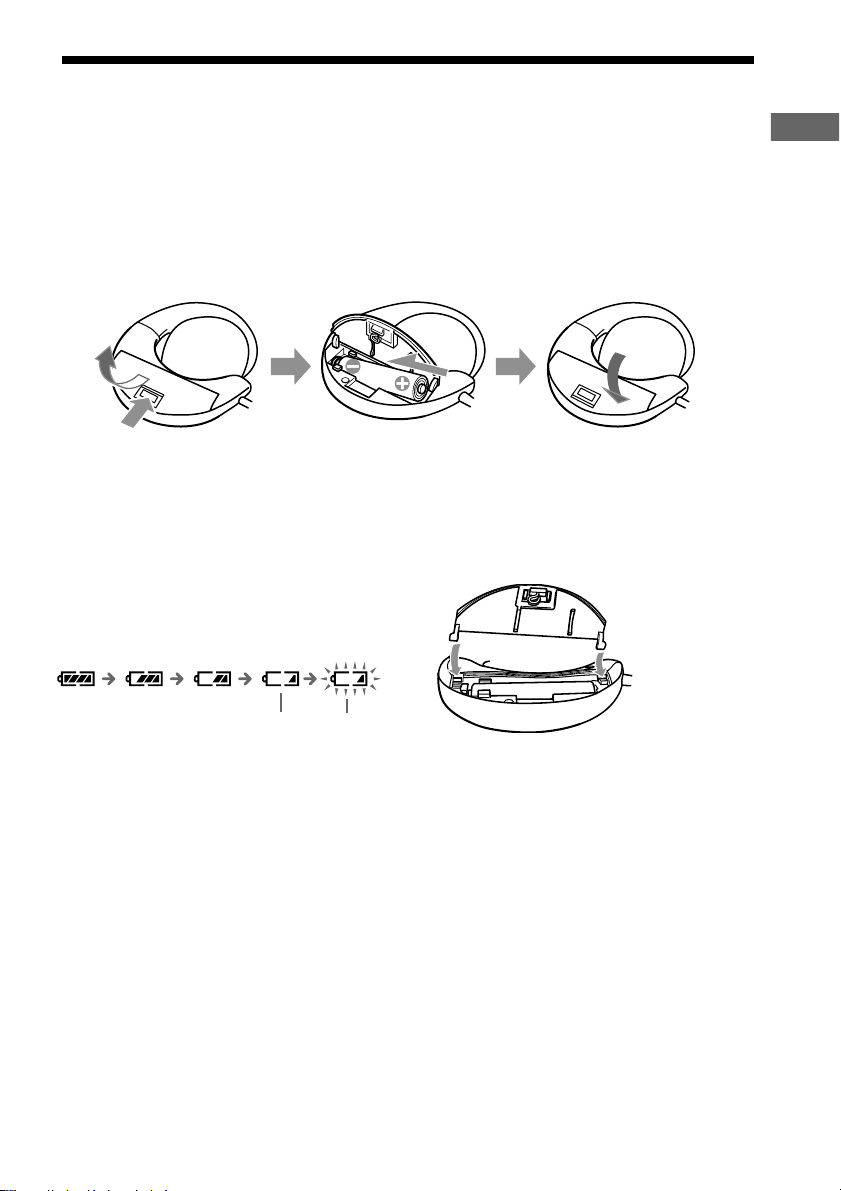
Step 2: Inserting the battery
Insert the LR03 (size AAA) alkaline battery (supplied) with correct polarity. Be sure to insert it
from the # side as illustrated.
Insert the battery
The battery compartment is in the back of the player (left ear side).
Slide the knob of the battery compartment in the direction of the arrow to open the battery cover.
Insert the negative end # of the battery first.
Getting Started
Battery duration
About 7 hours*.
* The battery life may be shorter due to operating
conditions and the temperature of the location.
On the remaining battery charge
indication
The battery icon in the display changes as shown
below during playback.
Low battery Please insert a
new battery
If “LOW BATT” is displayed in the display, you
need to change the battery.
Notes
If you do not use the battery correctly, it may
become damaged from leakage and corrosion. For
best results:
– Use the alkaline battery.
– Make sure the polarity is correct.
– Do not charge a dry cell battery.
– Remove the battery, if you do not intend to use the
player for an extended period of time.
– If you have battery leakage, replace with a new
battery after cleaning the battery compartment.
If the battery compartment lid is
accidentally detached
Insert one edge of the lid first, and then attach
the other edge, slightly bending the lid as
illustration below.
Insert this side
first.
7
Page 8
Basic Operations
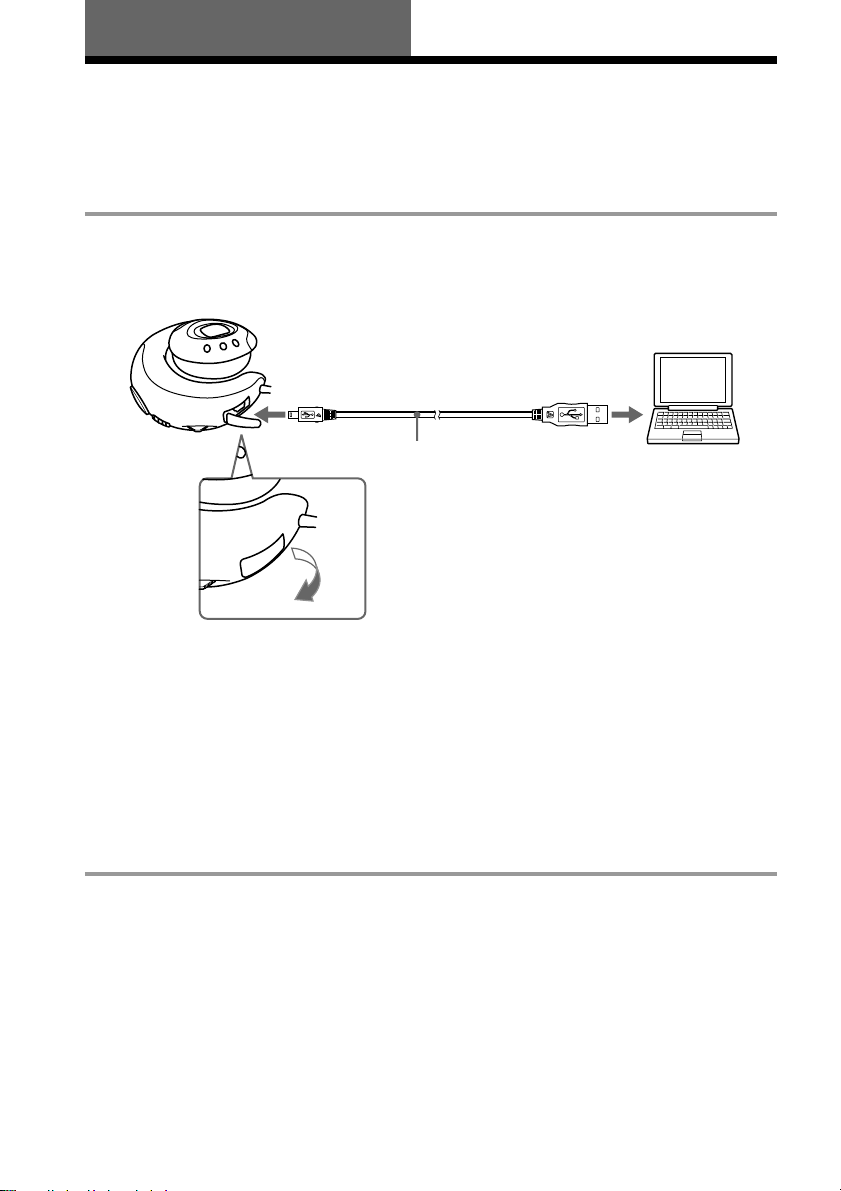
Transferring songs from the computer to Network Walkman (Check-out)
In order to check out digital audio files from your computer, first you must install the supplied
OpenMG Jukebox software and then import digital audio files to OpenMG Jukebox.
For details, refer to the OpenMG Jukebox operating Instructions.
1 Connect Network Walkman to your computer
Connect the narrow connector of the supplied dedicated USB cable into the dedicated USB jack on
Network Walkman, then the wide connector to the USB jack of your computer.
“CONNECT” appears in the display.
to the dedicated
USB jack
Dedicated USB cable (supplied)
Notes
• Do not connect more than two USB devices (player) to your computer. Normal operation will not be
guaranteed.
• If you use this player with a USB hub or a USB extension cable normal operation is not guaranteed.
• A malfunction may occur depending on the USB devices connected at any one time.
• Be sure to insert a fresh Alkaline battery into the unit. If the battery is not inserted, or battery power is
exhausted, the unit will not be identified by the computer.
• When connecting Network Walkman to your computer for the first time, the USB driver Installer window
appears. Please follow the instructions in the Installer window.
• Connect Network Walkman only as necessary. Disconnect the dedicated USB cable when not needed.
to the USB jack
2 Transfer the music file to Network Walkman (Check-out)
For details on how to operate, refer to the OpenMG Jukebox Operating Instructions.
Tip
To transfer the song back to the computer (check-in), refer to the OpenMG Jukebox software instruction manual
or the online help.
8
Page 9

Listening to music with Network Walkman
Please insert the battery before use (see page 7).
Note
When using Network Walkman, be sure to disconnect it from the computer.
1 Putting the player on your ears
The attaching
part of this player
would be open
(be apart)
flexibly.
1 Pinch the center of
the player with your
thumb and middle
finger, and then open
the attaching part
with your forefinger.
2 Hook the cured part
around the back of your
ear and twist it to the
earlobe direction to sit it
on your ear. If your hair
hangs over your ear,
please push back your
hair before attaching it.
k
2cm
k
Basic Operations
Notes
• Please remove earrings.
• If you wear the glasses, remove your glasses before
putting on this player and put them on again.
• Be sure not to open the attaching part more than
2 cm. Otherwise, this player may deform and
might not sit on your ears comfortably. Note that
if you press the player to opposite side, it also
may deform.
Hook the
edge of the
attaching part
to the back of
your ear and
twist it.
3 Adjust the position of
the player to fix it
comfortably.
If you cannot attach the player to your ear comfortably
Confirm the position of the player with a mirror. In the correct position, your ears should appear as
illustrated. if your ears are small and not visible as shown, use the supplied attachments (see page 15).
To remove the player from your ears
Twist the player to the opposite direction when attaching it, and remove it.
continued
9
Page 10

Listening to music with Network Walkman (continued)
2 Release the HOLD function
If the HOLD switch is in the arrow direction ( the yellow mark is
visible), slide it to the opposite direction to release the HOLD function.
3 Start playback
2 VOLUME
+/– button to adjust
the volume.
HOLD switch
1 Press the Jog lever
Bx. Playback starts.
When playback ends,
the playback
automatically stops
(in the case the player
is set to REPEAT OFF).
H
O
L
D
F
F
If playback does not start
Make sure the HOLD function is released.
To stop playback
Press the Jog lever Bx.
Tip
If you do not operate the player for 3 seconds while in stop mode, the display automatically turns off.
10
Page 11

On other operations
Jog lever
FF direction
REW direction
To
Go to the beginning
of the next track
Go to the beginning
of succeeding
1)
tracks
Go to the beginning
of the current track
Go to previous
1)
tracks
Go forward
2)
Go backward
Operation of
the Jog lever
Press in the FF direction
once.
Press in the FF direction
repeatedly.
Press in the REW direction
once.
Press in the REW direction
repeatedly.
During playback, press in
the FF direction and hold .
2)
During playback, press in
the REW direction and
hold.
1)
While in stop mode, press the Jog lever in the FF
direction and hold, you can go to the beginning of
the next track and succeeding tracks continuously.
While in stop mode press the Jog lever in the REW
direction and hold, you can go to the beginning of
the current track and previous tracks continuously.
2)
If you press and hold in the FF or REW direction
for more than 5 seconds, the search speed
increases.
Basic Operations
continued
11
Page 12

m
Listening to music with Network Walkman (continued)
On the display
2
3
Changing the display mode
1
5
1 AVLS indication (page 13)
The indication lights up while the AVLS
function is activated.
2 MEGA BASS indication (page 13)
The indication lights up while the MEGA
BASS function is activated.
3 Battery remain indication (page 7)
The remaining battery power is
displayed.
4 Play mode indication (page 14)
The selected play mode is displayed.
5
Play status/Track number display
The following information is displayed
according to the display mode.
Play status Play status
Play status
During playback: or is
displayed alternately.
In stop mode: is displayed.
While locating tracks: > or
. is displayed.
While searching a point in a track:
M or m is displayed.
When you play back songs for
more than 15 seconds, a wave
pattern is displayed.
4
Track
number
Volume
indication
(Displayed
numerically.
Max. volume is
31)
Press the DISPLAY button while the wave is
displayed during playback and the track
number is displayed.
About the backlight
If you perform the following operation, the
backlight lights up for a few seconds.
• Press the buttons (VOLUME+/--, DISPLAY,
P.MODE, MEGABASS/AVLS)
• Operate the Jog lever
Note
In a bright place, the backlight may not be
apparent.
12
DISPLAY
button
Track
number
Page 13

Advanced Operations
Adjusting the sound
MEGA BASS/
AVLS button
Emphasizing the bass sound (MEGA BASS)
Mega Bass function intensifies low frequency
sound for richer quality audio reproduction.
Press the MEGA BASS/AVLS button.
Each time you press the MEGA BASS/AVLS
button, the MEGA BASS indication changes
as follows:
Protecting your hearing (AVLS)
The AVLS (Automatic Volume Limiter
System) function limits the maximum volume
to protect your ears.
Press and hold the MEGA BASS/AVLS
button.
The (AVLS) indication lights up in the
display.
The volume is kept to a moderate level.
To cancel AVLS
Press and hold the MEGA BASS/AVLS button until
the indication goes off.
Advanced Operations
BASS B BASS B (none)
b
Display indication
BASS
BASS
none
Note
If the sound becomes distorted when emphasizing
the bass, turn down the volume.
To cancel the MEGA BASS effect
Press the MEGA BASS/AVLS button repeatedly
until the MEGA BASS indication goes off.
Sound quality
Mega Bass (moderate
effect)
Mega Bass
(strong effect)
normal play
13
Page 14

Adjusting the
Locking the
playback mode
(REPEAT)
You can play tracks repeatedly in three ways:
all repeat, single repeat and shuffle repeat.
P. MODE button
Press the P.MODE button.
Each time you press the P.MODE button, the
play mode indication changes as follows:
F B F 1 B F SHUF
b
(none) b
Display indication
F
F 1
F SHUF
none
Playback mode
all tracks repeatedly
current track repeatedly
all tracks repeatedly in
random order
normal
controls (HOLD)
To prevent the controls from being
accidentally operated when you carry the
player, use this function.
L
D
O
H
F
F
HOLD switch
Slide the HOLD switch in the direction of the
arrow.
The yellow mark appears and no controls will
function.
If you press the Jog lever or buttons while the
HOLD switch is ON, “HOLD” appears in the
display.
To release the Hold function
Slide the HOLD switch in the opposite direction of
the arrow.
To cancel the playback mode
Press the P.MODE button repeatedly until the play
mode indication goes off.
14
Page 15

Attaching the attachments
If your ears are small and you cannot attach the player correctly, use the supplied attachments.
For left ear For right ear
LR
Example for left ear
1
2 Turn the attachment to click into place.
To remove the attachment
1 Pull the edge of the attachment in
the direction of the arrow.
Engage the pin in the slot as shown, and
insert the attachment.
Advanced Operations
pin
3 Press the point shown by the arrow to
secure it.
2 Lift its edge and turn it in the
direction of the arrow to remove it.
15
Page 16

Other Information
Precautions
On installation
•Never use the player where it will be
subjected to extremes of light, temperature,
moisture or vibration.
•The player is not waterproof; do not expose
this player to rain or snow. Do not use this
unit during jogging or aerobics so that
sweat does not come in contact with the
player.
•Remove earrings when using this player to
avoid injury.
On the headphones
Road Safety
Do not use this player while driving, cycling,
or operating any motorized vehicle. It may
create a traffic hazard and is illegal in many
areas. It can also be potentially dangerous to
play your player at high volume while
walking, especially at pedestrian crossings.
You should exercise extreme caution or
discontinue use in potentially hazardous
situations.
On cleaning
Clean the player casing with a soft cloth
slightly moistened with water or a mild
detergent solution. Do not use any type of
abrasive pad, scouring powder or solvent
such as alcohol or benzene as it may mar the
finish of the casing.
About earpads
With extended use, the earpads may wear
out. In this case replace them with new ones.
Replaceable earpads: EP-Q1
If you have any questions or problems
concerning your Network Walkman, please
consult your nearest Sony dealer.
Preventing hearing damage
Avoid using this player at high volume.
Hearing experts advise against continuous,
loud and extended play. If you experience a
ringing in your ears, reduce the volume or
discontinue use.
Caring for others
Keep the volume at a moderate level. This
will allow you to hear outside sounds and to
be considerate of the people around you.
16
Page 17

Troubleshooting
If you experience any of the following difficulties while using Network Walkman, use this
troubleshooting guide to help you remedy the problem. Should any problem persist, consult your
nearest Sony dealer. For trouble concerning operations while connecting with your computer,
please refer to the supplied software‘s online help “Troubleshooting” contents, too.
To reset the player
If Network Walkman does not operate normally, or if there is no sound, even after checking the
troubleshooting guide below, remove the battery, then re-insert it.
What happened ?
On attachment of this player
Symptom
The player slips off your ears.
The player does not sit comfortably
or your ears do not stick out
between the housing and holder.
Cause/Remedy
c Your ears are too small for the player to sit properly.
Please use the supplied attachments.
c The flexible part of the player is deformed.
Adjust its form.
Move it in the direction
of the arrow to adjust its
form to fit on your ears
comfortably.
Other Information
On playback
Symptom
There is no sound.
The controls on the player do not
work.
The volume does not increase.
Sound is distorted.
Playback has stopped suddenly.
The normal position
About 2.5-3.5cm
Cause/Remedy
c Adjust the volume (page 10).
c If the player is connected to the computer, disconnect it.
c Make sure that the Hold function is deactivated (page 14).
c Condensation may have developed inside the player. Allow it
to sit for about 2 or 3 hours.
c If the battery is weak, replace it with a new one (page 7).
c Check that the battery is inserted correctly.
c Cancel the AVLS function (page 13).
c Record with a higher bps value.
c The battery is exhausted. You need to change it (page 7).
continued
17
Page 18

Troubleshooting (continued)
On the connection with the computer and the supplied software
Symptom
The software cannot be installed.
“CONNECT” does not appear in
the display window when
connecting to the computer with
the supplied dedicated USB cable.
The computer does not identify the
player when it is connected to the
computer using the dedicated USB
cable.
Cannot check-out.
There are only a few songs you can
check-out. (The recordable time is
short.)
Cannot check-in.
Check-in starts automatically when
the player is connected to the
computer.
The CD cannot be recorded.
The computer/player does not
operate normally when connected.
“Failed to authenticate the portable
player” appears on the display when
the player is connected to the computer.
Cause/Remedy
c Software is not compatible with your operating system. For
more information about Windows, refer to the OpenMG
Jukebox Operating Instructions.
c Please wait for the authentication of the OpenMG Jukebox to
complete.
c If another software is active on your computer, wait for a
while, then reconnect the dedicated USB cable. If the problem
persists, disconnect the dedicated USB cable, restart your
computer, then connect the dedicated USB cable to your
computer again.
c Make sure the dedicated USB cable is correctly connected.
c If you use the USB hub, normal operation is not guaranteed.
Connect the USB cable to the USB jack of your computer.
c If there is no battery in the player, insert a new battery.
c Install the driver. For details about installing the driver, refer to
the Operating Instructions manual of the OpenMG Jukebox.
c The dedicated USB cable is not fully plugged in. Disconnect the
dedicated USB cable and re-connect it.
c A song cannot be checked-out more than three times. Check
the song back in from one of your other portable players so that
checking-out is enabled again.
c The available memory space in the Network Walkman may be
insufficient.
c You may be trying to check-out 121 or more songs to the
Network Walkman. The maximum number of songs that can
be checked-out to the Network Walkman is 120.
c If the song has a limited playing period or playing count, you
may not be able to check it out to the Network Walkman,
depending on the restrictions set by the copyright holders. For
details on the settings of each song, contact the service, or see
the OpenMG Web site.
c The free memory space of Network Walkman may be less than
the data of the song you want to check-out. Check-in
unnecessary songs to make more memory space.
c The songs can only be checked-in to the computer from which
they were checked-out.
c If a song is deleted from the computer, it cannot be checked-in.
c If you delete songs using another computer’s OpenMG Jukebox
software, when you reconnect to your computer, the OpenMG
Jukebox software will register those songs as checked-in, and
the remaining available check-out count is restored.
c Clean the CD.
c If you are connecting both devices with a USB hub or a USB
extension cable, normal operation is not guaranteed. Please use
only the supplied dedicated USB cable.
c You cannot use this player anymore. Please contact your
nearest Sony dealer.
18
Page 19

Symptom
A communication error has
occurred.
Other
Symptom
The player gets warm.
The backlight of the display
does not light up.
Cause/Remedy
c If a communication error occurs, a warning message may be
displayed on the computer indicating that authentication of the
external device has failed, or access to the current file has been
cancelled. Then, the communication process may terminate. If
this occurs, disconnect and then connect the cable with the
player. If the above message appears while connecting player,
try the following:
1 When using an external hub, connect the player directly to
the computer.
2 Disconnect and then connect the cable with the player.
3 When your computer is equipped with multiple USB ports,
connect the player to another USB port.
4 Restart the OpenMG Jukebox software.
Cause/Remedy
c Sometimes, during normal conditions, the player becomes
slightly warm.
c In a bright place, the backlight may not be apparent.
Other Information
continued
19
Page 20

Troubleshooting (continued)
Messages
Follow the instructions below if a message appears in the display.
Message
ACCESS
AVLS
CONNECT
FLASH ERR
HI DC IN
HOLD
LOW BATTERY
LOW DC IN
NO MUSIC
Meaning
The player is accessing the flash
memory.
The volume exceeds the maximum
level.
The player is connected to the
computer.
The player cannot read the data in the
memory.
The DC IN voltage is too high.
The HOLD switch is ON, and no
operating buttons are available.
The battery is low, and needs to be
changed.
The DC IN voltage is too low.
There are no tracks inside
the player.
Remedy
This is not an error. This message
appears during Check-out and during
initialization of the flash memory.
Turn down the volume or cancel the
AVLS function (page 10, 13).
This is not an error. You can operate
using the OpenMG Jukebox software,
but you cannot operate the controls on
the player.
There is an error in the data. Initialize
the memory (see below).
The connected computer may have
trouble. Disconnect the dedicated USB
cable and examine the computer.
This is not an error. Switch the HOLD
switch to OFF before operating the
buttons (page 14).
You must change the battery (page 7).
The connected computer may have
trouble. Disconnect the dedicated USB
cable and examine the computer.
Use the OpenMG Jukebox to check-out
music items. Refer to the OpenMG
Jukebox Operating Instructions.
To initialize the flash memory
If “FLASH ERR” appears in the display, there is an error in the data in the built-in flash memory.
In this case, connect the Network Walkman to your computer and initialize the flash memory
using the OpenMG Jukebox software. Once you begin initializing the memory of Network
Walkman, do not disconnect the USB cable until initialization is completed.
Disconnecting the USB cable during initialization may destroy the data in the flash memory.
For details about initializing, refer to the online help for the OpenMG Jukebox software.
Note
If “FLASH ERR” appears even after initializing the flash memory, please contact an authorized Sony service
center.
20
Page 21

Glossary
ATRAC3
ATRAC3, which stands for Adaptive Transform Acoustic Coding3, is audio compression
technology that satisfies the demand for high sound quality and high compression rates.
The ATRAC3 compression rate is approximately 10 times higher than that of the Audio CD,
resulting an increased data capacity for the media.
Bit rate
Indicates the data amount per second. The rate is reflected in bps (bit per second).
In OpenMG Jukebox, the bit rate for recording an audio CD or converting MP3 and WAV format
audio files into ATRAC3 format can be chosen from 132 kbps/105kbps/66kbps. 105 kbps means
105000 bits of information per second. If the bit rate is large, that means a large amount of
information is used to play music. Comparing music of the same format, a 105 kbps data offers
better sound quality than 66 kbps data, and 132 kbps data offers better sound quality than 105
kbps data. However, audio files in formats such as MP3 have different encoding methods, and
thus sound quality cannot be determined by simply comparing the bit rate.
“Check-in /Check-out”
Check-out is to transfer music files from a personal computer to an external device/media(such
as Network Walkman). Returning checked-out music files to the same computer is to check in.
(You cannot move checked-out music files to another computer.)
You can check-out a music file, check it back in, and then check it out again an infinite number of
times. The SDMI rules provide that up to four copies of a music file can be checked-out at one
time. OpenMG employs a method whereby three copies of a song can be checked-out
simultaneously, while the fourth copy is maintained as a “master” on your PC. If three copies of
the same song are checked-out at a given time, one copy of the song needs to be checked-in to the
computer in order to create an additional check-out.
Other Information
21
Page 22

Looking at the controls
Network Walkman
Display
2
3
(front of the right player)
1
2
34 5
(rear of the left player)
9
6
7
8
1
5
1 AVLS indication (page 13)
2 MEGA BASS indication (page 13)
3 Battery remain indication (page 7)
4 Play mode indication (page 14)
5 Text/graphic information display (page 12)
4
0
1 DISPLAY button (page 12)
2 VOLUME+/– button (page 10)
3 HOLD switch (page 14)
4 Jog lever (page 11)
5 Dedicated USB jack (page 8)
6 Display (page 12)
7 MEGA BASS/AVLS button (page 13)
8 P.MODE button (page 14)
9 Ear pad
0 Battery compartment (page 7)
22
Page 23

Specifications
Recording time
Approx. 60 min. (132kbps)
Approx. 80 min. (105kbps)
Approx. 120 min. (66kbps)
Sampling frequency response
44.1kHz
Recording format
ATRAC3
Frequency response
20 to 20,000 Hz (single signal measurement)
Signal-to-noise ratio (S/N)
More than 80dB (excluding 66 kbps)
Supplied accessories
LR03 (Size AAA) alkaline battery (1)
Attachments (1 for left, 1 for right)
Dedicated USB cable (1)
Carrying pouch (1)
CD-ROM (OpenMG Jukebox installation disc) (1)
NW-E8P Operating Instructions (1)
OpenMG Jukebox Operating Instructions (1)
Optional accessories
Replaceable earpads : EP-Q1
Design and specifications are subject to change
without notice.
Dynamic range
More than 85dB (excluding 66 kbps)
Operating temperature
5˚C to 35˚C (-41˚F to 95˚F)
Power source
LR03 (Size AAA) alkaline battery
Battery life
Approx. 7 hours
Mass (approx.)
90g (3.2 oz) (battery included)
Memory capacity
64MB (including the system software: 60.6MB
available)
Other Information
23
Page 24

Index
A
ACCESS 20
ATRAC3 5, 21, 23
attachment 6, 15, 17
AVLS 13, 17, 20, 22
B
back light 5, 12, 19
Battery 7
beginning of the track
11
Bit rate 5, 17, 21
C
CD (compact disc)
4, 18, 21
CD-ROM 6, 23
Check-in 18, 21
Check-out 8, 18, 21
computer 4, 8, 19
CONNECT 8, 20
copyright 2
G
go backward 11
go forward 11
H
hard drive 5
headphones 5
HI DC IN 20
HOLD 14, 20
HOLD switch 10, 14, 20, 22
I
initialize (flash memory)
20
install 8
J
Jog lever 10, 11, 22
L
listen to music 9
LOW BATTERY
7, 20
LOW DC IN 20
P
playback 10, 12, 14
playback mode 14
previous tracks 11
R
record 5
remain (battery)
7, 12, 22
repeat 14
S
SDMI 5, 21
Serial number 6
succeeding tracks
11
supplied accessories
6, 23
T
transferring 4, 8
to Network Walkman
8
troubleshooting
17
D
display 12, 22
DISPLAY button
display mode 12
driver (USB) 8
E
earpads 16, 22, 23
F
FLASH ERR 20
Sony Corporation
24
M
MEGA BASS 13, 22
MP3 4, 21
12
U
USB cable 6, 8, 18, 19,
23
USB driver 8, 18
N
NO MUSIC 20
V
volume 10, 13, 22
O
online help 17
OpenMG 2, 5, 18, 21
OpenMG Jukebox software
5, 8, 20
W
WAV format 4
Printed in Japan
 Loading...