

Page 1
MY INFORMATION
Use this section to store your account information for future
reference. Fill out this section using the information determined
during the registration of your e Villa account. (See page 10 for
instructions on registering your account.)
Primary Account Username
Example: myname
This is also the first part of your email address—before the @ symbol.
Primary Account Email Address
Example: myname@eVilla.com
See page 12 for tips on selecting your email address.
Primary Account Password
How to Contact Us
If you write your password here, others may have access to it.
For security reasons, you may want to write a “hint” that will
help you remember it later.
Primary Local Internet Access Telephone Number
See page 10 for information on choosing this number.
eVilla Network Entertainment Center Serial Number
Located on the identification panel on the rear of the unit.
eVilla Network Entertainment Center Model Number
NTE-D101
CUSTOMER SUPPORT
For questions about billing,
service plans and product
returns, information or
assistance with your
Internet access account or
email, or for problems with
your device, contact us at:
Web Site:
sony.com/eVilla
Email:
sos@info.sel.sony.com
Toll Free:
1 888-344-9400
Or, write to:
Sony Customer Service Center
12451 Gateway Blvd.
Ft Myers, FL 33913
Page 2

TABLE OF CONTENTS
Welcome Home . . . . . . . . . . . . . . . . . . . . . . . . . . . . . . . . . . . . . . . . . . . . . . . . . . . . . . . 1
Keeping Your Device Clean and Safe . . . . . . . . . . . . . . . . . . . . . . . . . . . . . . . . . . . . . . 2
Helpful Resources . . . . . . . . . . . . . . . . . . . . . . . . . . . . . . . . . . . . . . . . . . . . . . . . . . . . . 3
Taking the Tour. . . . . . . . . . . . . . . . . . . . . . . . . . . . . . . . . . . . . . . . . . . . . . . . . . . . . . . 4
Getting Connected . . . . . . . . . . . . . . . . . . . . . . . . . . . . . . . . . . . . . . . . . . . . . . . . . . . . 6
Moving In (Registration) . . . . . . . . . . . . . . . . . . . . . . . . . . . . . . . . . . . . . . . . . . . . . . . 9
Coming Home . . . . . . . . . . . . . . . . . . . . . . . . . . . . . . . . . . . . . . . . . . . . . . . . . . . . . . . 14
Exploring the e Villa Neighborhoods . . . . . . . . . . . . . . . . . . . . . . . . . . . . . . . . . . . . . . 16
Getting Familiar with the Layout . . . . . . . . . . . . . . . . . . . . . . . . . . . . . . . . . . . . . . . . 21
Leaving Home . . . . . . . . . . . . . . . . . . . . . . . . . . . . . . . . . . . . . . . . . . . . . . . . . . . . . . . 26
Where to Get More Information . . . . . . . . . . . . . . . . . . . . . . . . . . . . . . . . . . . . . . . . . 28
Connecting Additional Accessories . . . . . . . . . . . . . . . . . . . . . . . . . . . . . . . . . . . . . . . 29
Solving Problems . . . . . . . . . . . . . . . . . . . . . . . . . . . . . . . . . . . . . . . . . . . . . . . . . . . . 31
Speaking the Internet Language . . . . . . . . . . . . . . . . . . . . . . . . . . . . . . . . . . . . . . . . 32
Specifications . . . . . . . . . . . . . . . . . . . . . . . . . . . . . . . . . . . . . . . . . . . . . . . . . . . . . . . 35
The Legal Stuff . . . . . . . . . . . . . . . . . . . . . . . . . . . . . . . . . . . . . . . . . . . . . . . . . . . . . . 36
Index. . . . . . . . . . . . . . . . . . . . . . . . . . . . . . . . . . . . . . . . . . . . . . . . . . . . . . . . . . . . . . 37
Using the Getting Started Guide
Accessing the eGuide
Using the Quick Reference Card
On the Front
On the Back
The Keyboard
The Scroll Mouse
Registering Your eVilla Internet Access Account
Choosing an Internet Access Number
Entering Your Personal Information
Providing Payment Information
Entering a Username
Entering a Password
Logging In
Dialing Up
eVilla Home
The Web
Email
The Toolbars
The Tray
The Status Bar
The Media Player
The File Manager
The Hardware Icons
Saving Favorite Web Sites or Email Drafts
Logging Out
Hanging up
Powering Off
Review the eGuide
Visit the eVilla Web Site
Learn the Language
USB Printer
External Storage Device
Speakers
3
Page 3

4
Page 4
WELCOME HOME
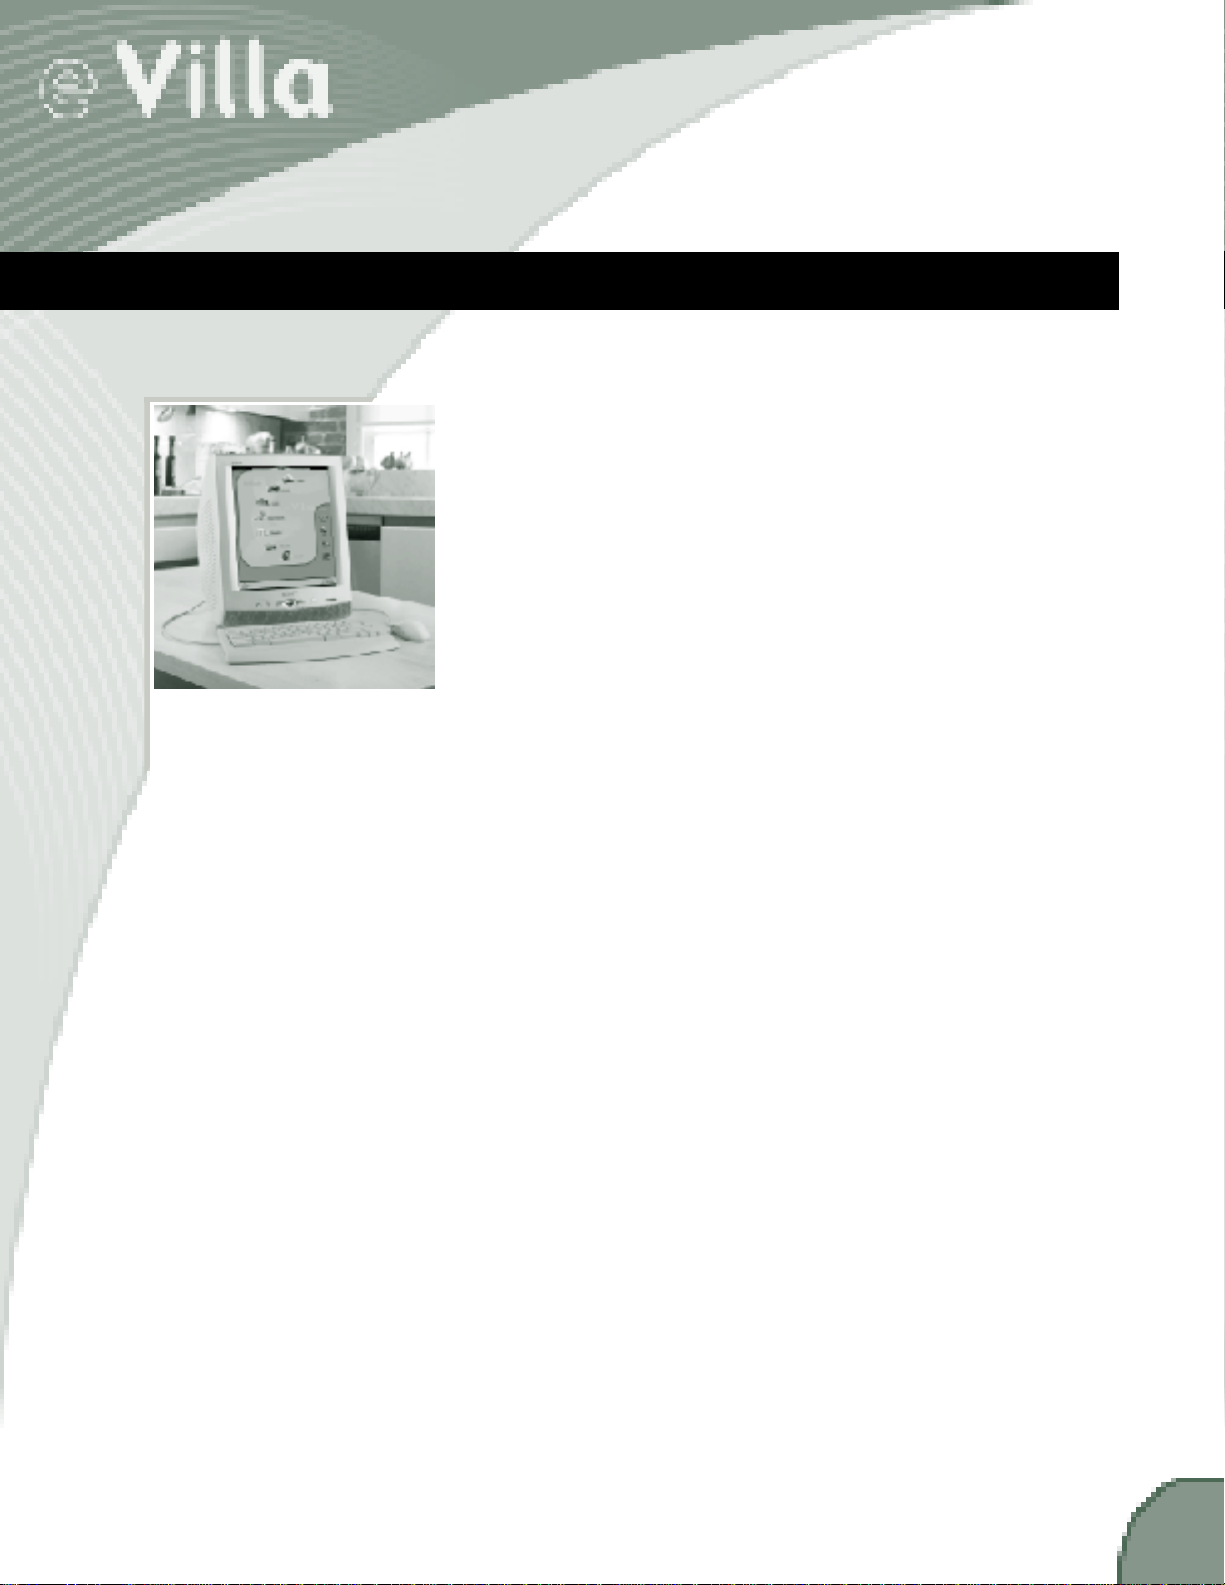
Congratulations on your purchase of the e Villa™ Network
Entertainment Center—the most convenient way to
communicate and enjoy multimedia entertainment through the
Internet. After a simple registration process, you’ll be able to
connect to the world with the touch of a button. We’re glad you
chose the Sony e Villa Network Entertainment Center as your
home on the Internet. We think you will be, too.
The e Villa Network Entertainment Center offers easy access to
the most popular features of the Internet, including the World
Wide Web, email, convenient content channels, and much more.
With a high-resolution FD Trinitron display, built-in speakers and
Memory Stick media slot, you’ll enjoy a rich multimedia
experience. Here’s just a brief sample of how powerful the eVilla
Network Entertainment Center is:
n Easy and powerful on-screen displays to get you around
n Truly private and customized online experience for up to
four (4) people in your household
n Enjoy daily automatic downloads of email and Web
content without tying up your telephone line
n Convenient automatic software management allows you
to enjoy maintenance-free operation
And when it comes to using the Internet, you can:
n Keep up with the latest news and information from
around the world
n Share photographs and movies with family and friends
through electronic mail
n Tune in to your favorite Internet channels for music and
radio
n Shop, get latest sports scores or plan your next family
vacation
n Provide your kids with a powerful resource for
researching their homework assignments
n Watch exciting Internet video
n And so much more
Because the eVilla Network Entertainment Center is so easy and
fun to use, it’s a great way to feel right at home on the Internet.
We’re certain it will soon become one of the most welcome
additions to your home.
1
Page 5

KEEPING YOUR DEVICE CLEAN AND SAFE
This section provides you with some key instructions on how to
clean your e Villa Network Entertainment Center and keep it
from being damaged.
n Dangerously high voltages are present inside the unit.
Do not open the cabinet. Refer servicing to qualified
personnel only.
n The e Villa case holes are for ventilation. Never place
anything in the holes.
n Avoid spilling food or liquids on or near your e Villa
device.
n Use a soft, dry cloth to clean the screen, cabinet,
controls and keyboard. You can use an anti-static dusting
spray (compressed air) designed for VCRs, computer
monitors and television sets to clean between the keys of
the keyboard.
n Avoid using an anti-static solution or similar additives as
they may scratch the screen.
n Avoid cleaning the device with ammonia-based or
chlorine cleaners or sprays.
n Avoid using household detergents to clean any part of
the device as they may scratch or damage the unit.
n Avoid using abrasive pads, scouring powders or
solvents, such as alcohol or benzene.
n Keep the device out of direct sunlight and away from
heat vents, radiators and other heat sources.
n Do not rub, scratch or tap the surface of the screen with
sharp or abrasive items such as ballpoint pens or
screwdrivers. This type of contact may result in a
scratched picture tube.
2
Page 6
HELPFUL RESOURCES
Using the Getting Started Guide
The Getting Started Guide is intended to assist you with setting
up and getting familiar with your e Villa Network Entertainment
Center. In this guide you’ll find information on:
n e Villa hardware and software features, pages 4-8
n Connecting the keyboard, scroll mouse, phone and power
cords, page 6
n Setting up your e Villa Internet access account, pages
10-13
n Using the e Villa keyboard, scroll mouse and other
features, pages 7-8
n The look and feel of the user interface, pages 16-27
n Where to find answers to your questions, pages 28 and
31
Online Tips
icon
n Connecting additional accessories, pages 29-30
n Problem solving, page 31
Accessing the eGuide
The complete operating instructions, called the eGuide, are
available online. All your usage questions can be answered
quickly and easily without having to search for the printed
manual. Simply click the ONLINE TIPS icon in the upper right
corner of most of the screens for information on that section.
Using the Quick Reference Card
A handy quick reference card also comes with your device. This
card fits conveniently under your keyboard. Use it to remind you
how to perform some of the most common Web and email tasks.
3
Page 7
TAKING THE TOUR
This section provides you with a quick look at the structure of
the e Villa components: the front and back of the e Villa device,
the keyboard and the scroll mouse.
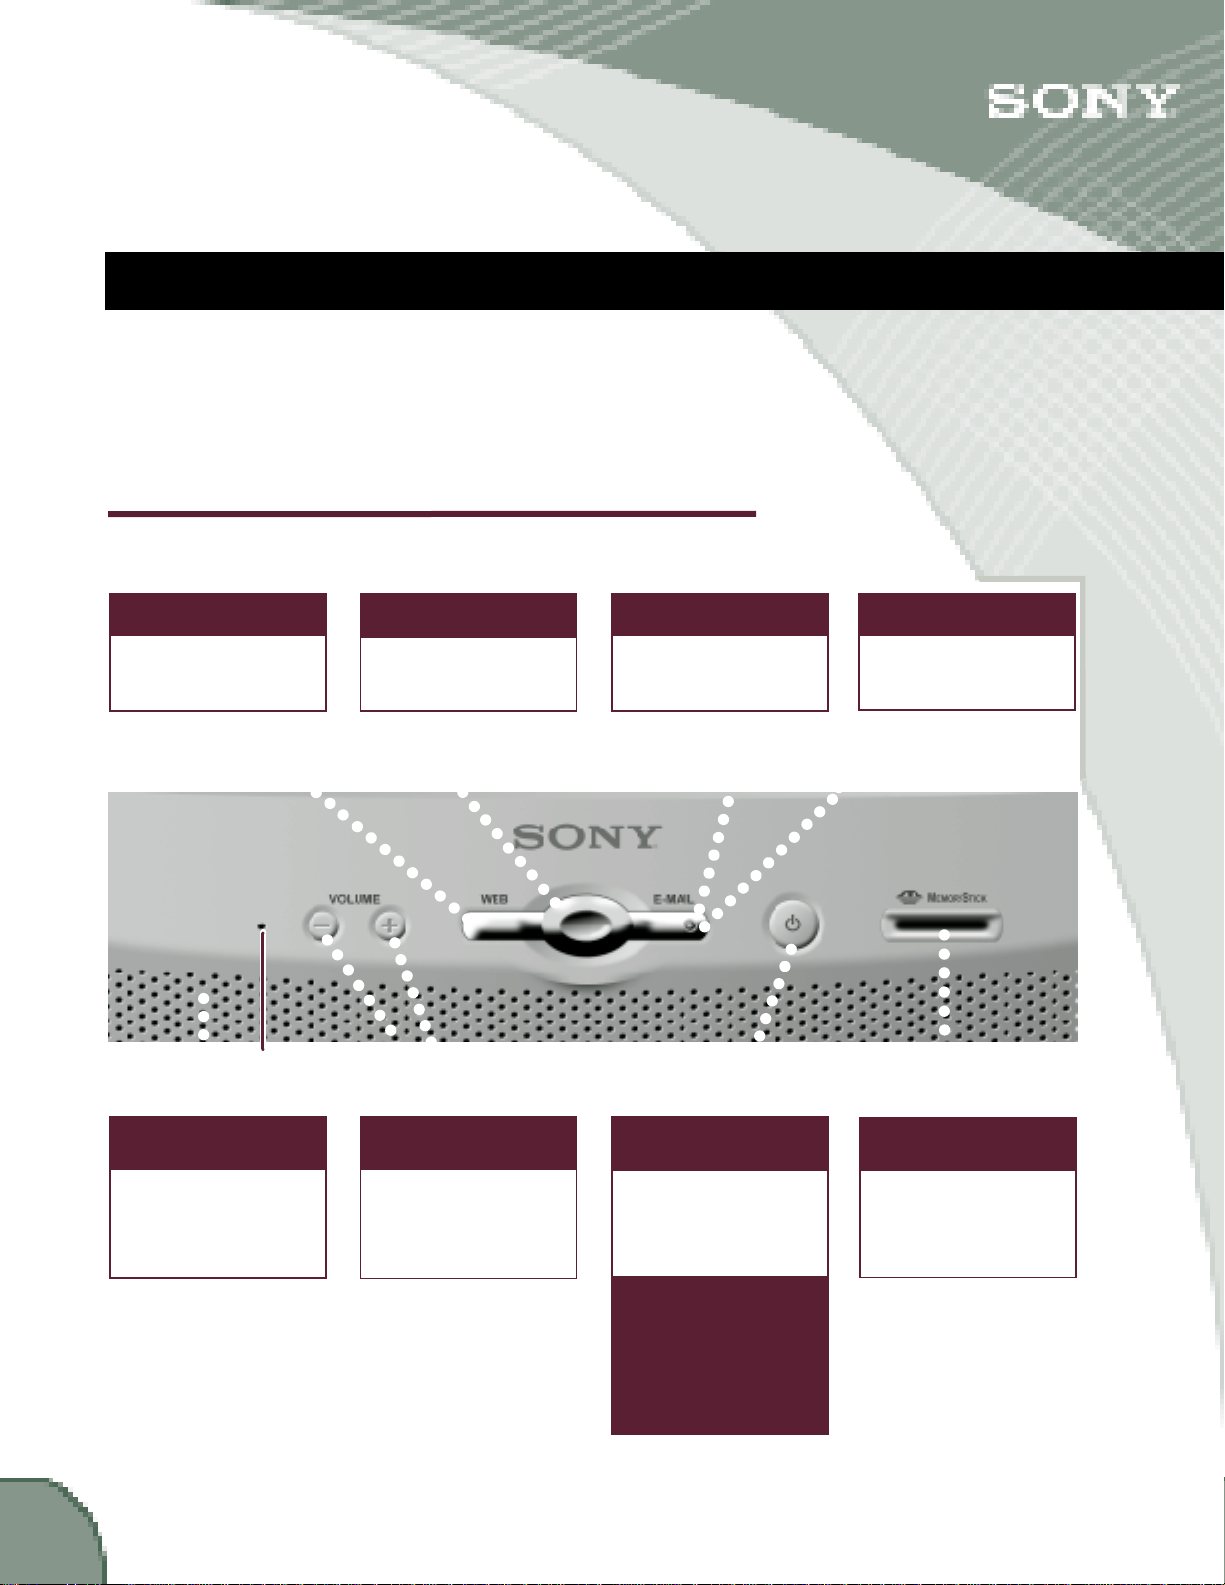
On the Front
WEB Button
One-touch access
to the
Web neighborhood.
.
.
.
.
.
.
.
.
.
.
System
.
Reset hole
.
.
Speaker Area
Listen to
the system sounds,
audio and music.
e Villa Home Button
One-touch access
to the e Villa Home
neighborhood.
.
.
.
.
.
.
.
.
.
.
.
.
.
.
.
.
.
VOLUME up/down
Increase or decrease
.
.
.
.
.
.
.
.
.
.
.
.
.
.
.
.
.
.
.
.
.
.
Buttons
the volume.
EMAIL Button
One-touch access
to the
email neighborhood.
.
.
.
.
.
.
.
.
.
.
.
.
.
.
.
.
.
.
.
.
.
.
.
.
.
.
.
.
.
.
.
.
.
.
.
.
.
.
.
.
.
POWER Button
Starts or shuts down
your device.
The light indicates
when the system is
on (glows green),
sleeping (glows
amber) or
off (no light).
EMAIL Indicator
Lights up when
new email
has arrived.
.
.
.
.
.
.
.
.
.
.
.
.
.
.
.
.
.
Memory Stick®
Media Slot
Use Sony Memory
Stick storage media
to access and save
pictures, music or
other files.
4
Page 8

On the Back
. . . . . . . .
Mic in
Reserved for future use.
. . . . . . . . . . . . . . . . . . . . .
. . . . . . . .
external storage devices.
2 USB ports
Connect printers and
. . . . . . . . . . . . . . . . . . . . . .
. . . . . . . .
Mouse connection
Connect to the
scroll mouse.
. . . . . . . . . . . . . . . . . . . . . .
. . . . . . . .
Phone line in
Connect to the
phone jack.
Audio out
Connect headphones or
external speakers.
Ethernet connection
Reserved for future use.
Keyboard connection
Connect to the keyboard.
. . . . . .
note
Power connection
Connect to AC power.
Additional speakers, printers and external storage
devices are not included. You may purchase eVillasupported products separately. Please go to the
eVilla Web site at sony.com/eVilla for a current list
of compatible products.
5
Page 9
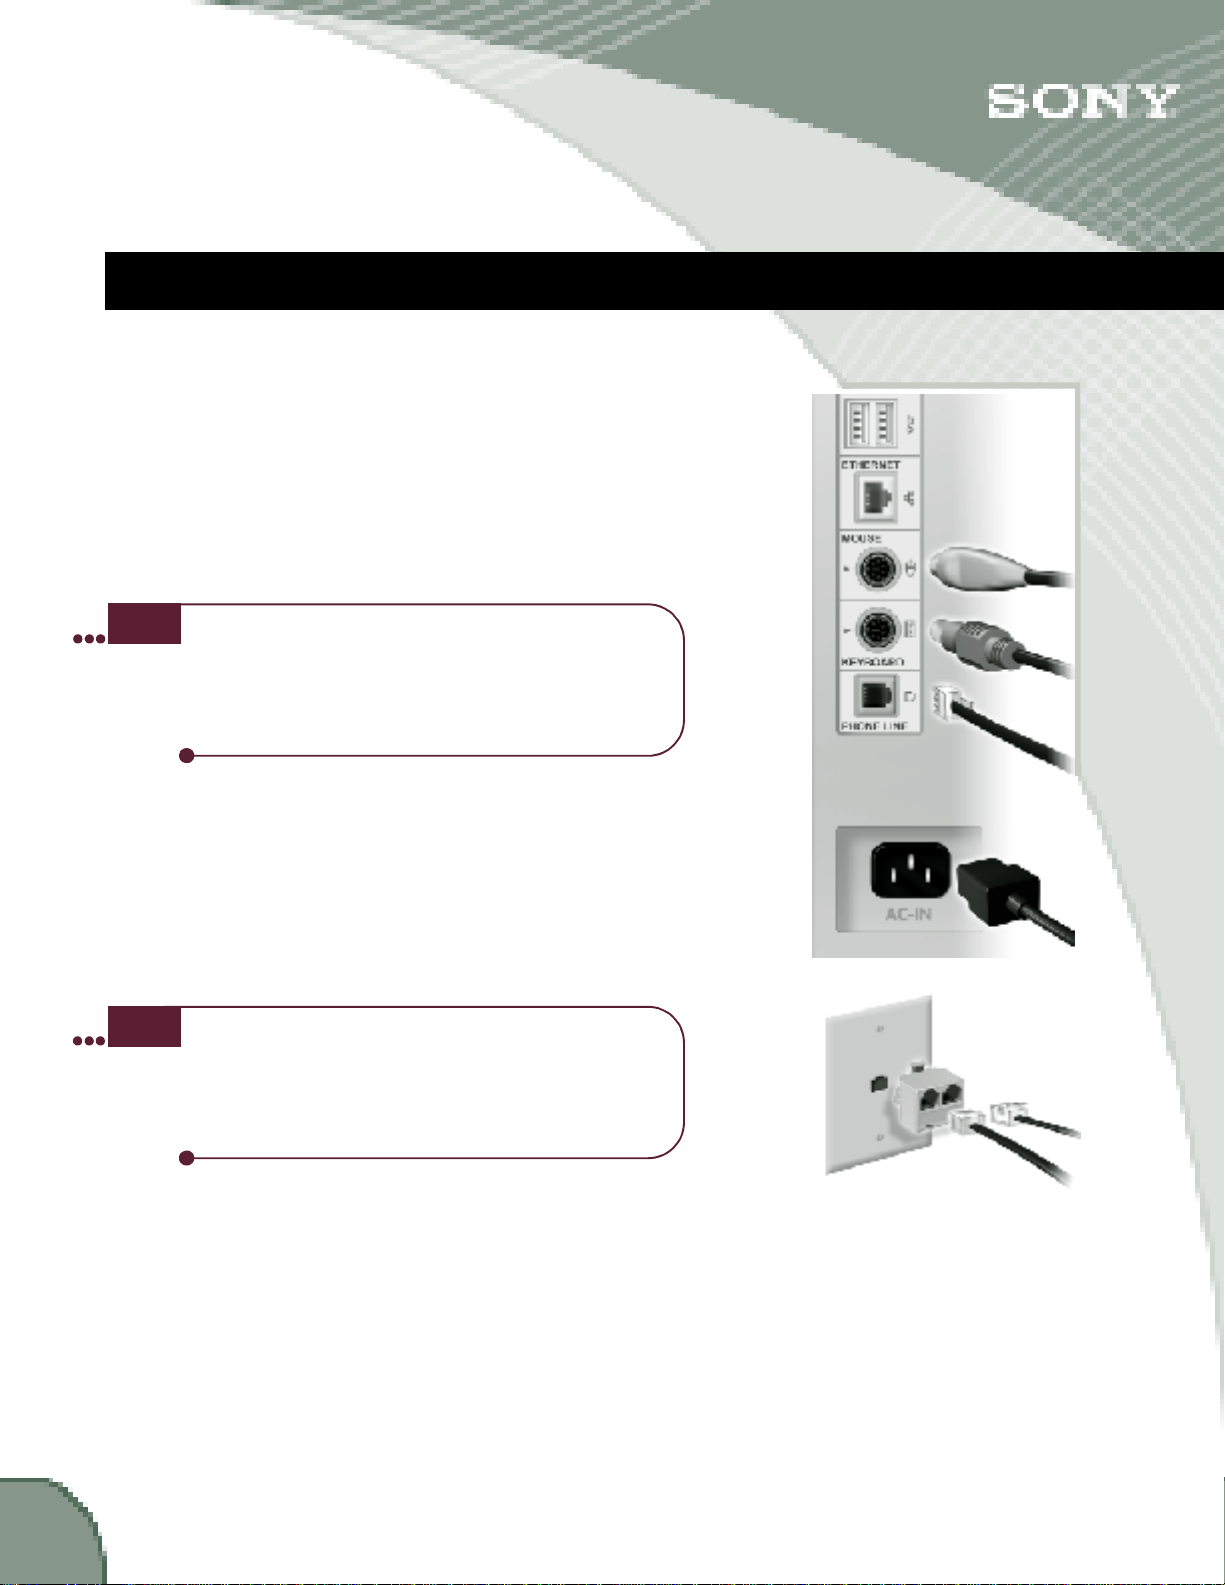
GETTING CONNECTED
The connections on the back of the unit are marked according to
what you plug into them. Plug the keyboard, scroll mouse,
phone cord and power cord into their corresponding
connections. The cords and jacks are color coded. Match the
colors to assure you have plugged the keyboard and scroll
mouse into the proper jacks. The cords can only be inserted one
way, with the flat side of the connector aligned with the left side
of the jack. Be sure the connections are solid.
note
When you have plugged all the connections into the device, plug
the phone cord and the power cord into the wall jacks.
note
Be sure to place the device close to a power outlet
and phone jack. If you do not have a phone jack
near the site you have selected, you may need to
purchase a longer phone cord. Do not run cords
where they could be tripped on or damaged.
Use the splitter if you have a single phone jack and
want to have a phone next to your e Villa device.
Plug the splitter into the telephone wall jack, then
plug the eVilla device and the phone into the
splitter’s jacks.
6
For more information. . .
on connecting other accessories, such as printers and speakers,
see page29.
Page 10
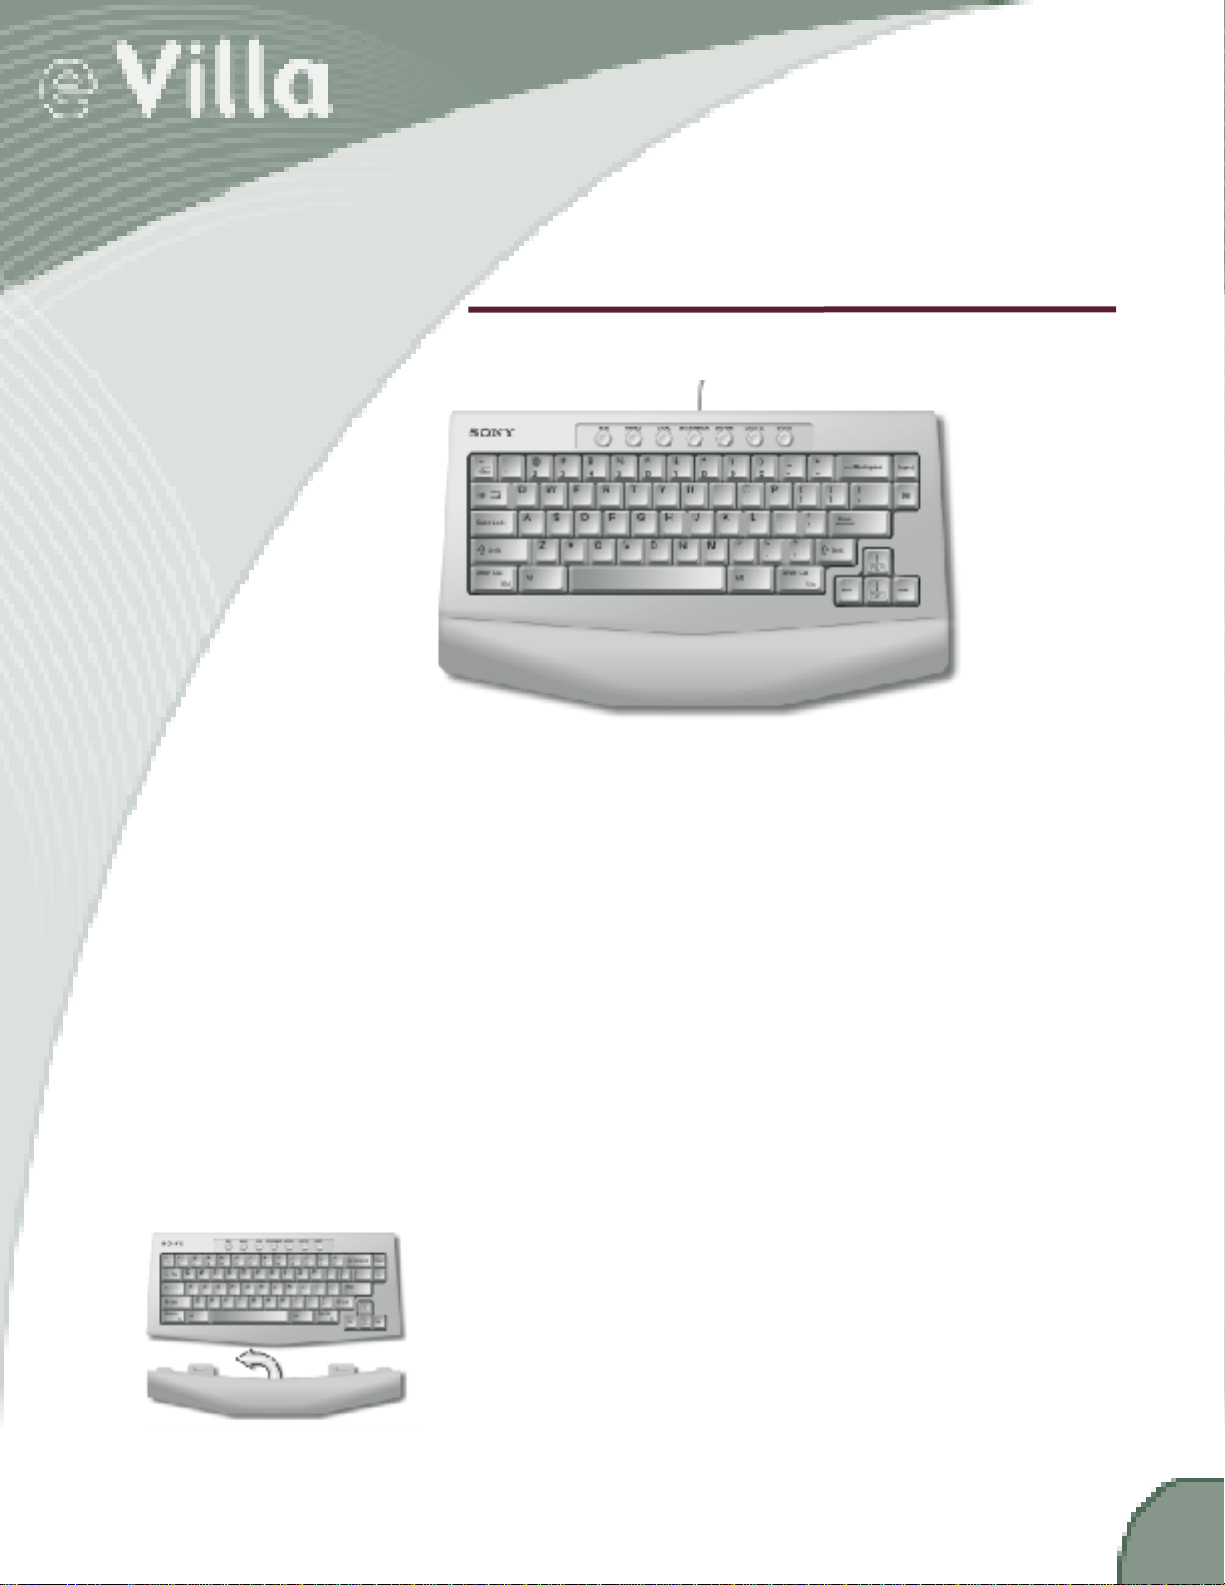
The Keyboard
The e Villa keyboard is compact, functional and provides onetouch access to the information you’ll want most. Across the top
of the keyboard is a row of buttons. These are the NET GUIDE
channel buttons. Simply press a button to go instantly to the
Net Guide channel of your choice.
For more information. . .
on the Net Guide, see page17.
The e Villa keyboard includes a shortcut key which can be used
to perform common tasks such as copying and pasting text.
For more information. . .
on the supported shortcuts, look up “keyboard shortcuts” in the
eGuide.
Attach the palm rest by inserting the tabs into the slots on the
underside of the keyboard and sliding it into the locked position.
7
Page 11
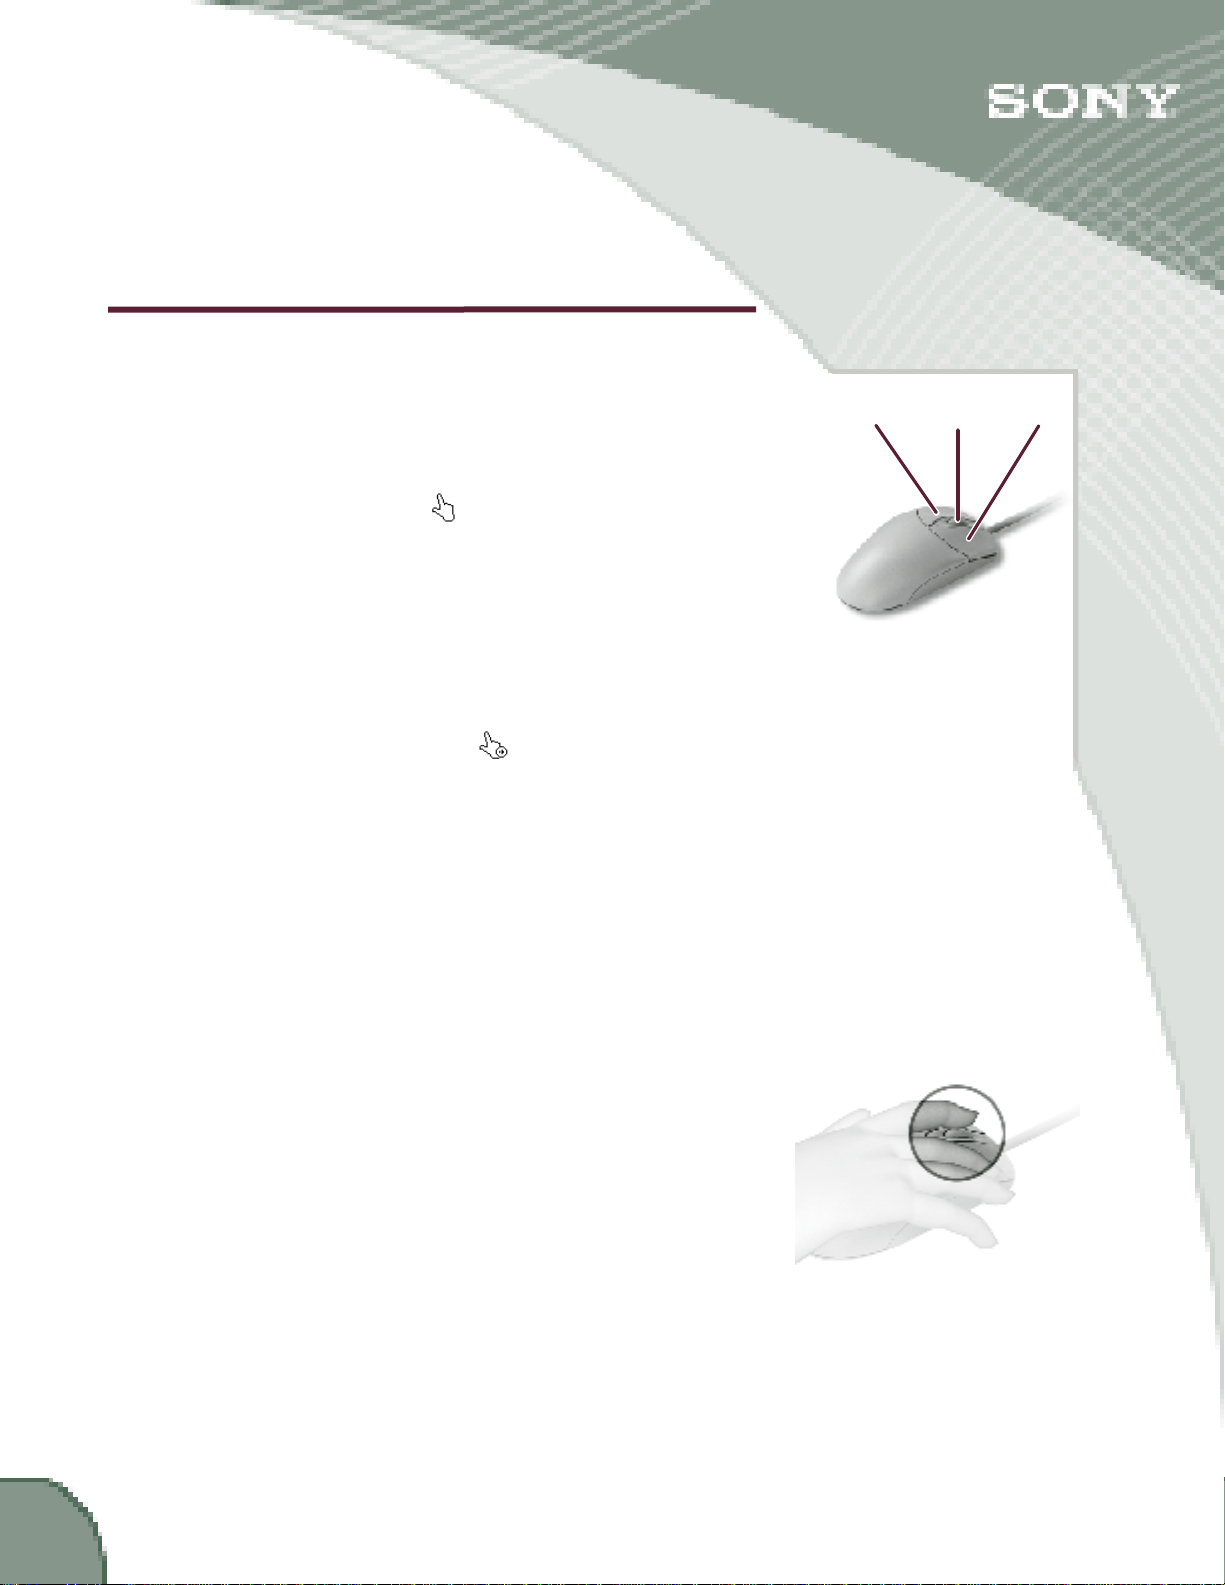
The Scroll Mouse
There are three parts to the scroll mouse — the two buttons and
the scroll wheel. When sitting on a flat surface, the mouse fits
comfortably in the palm of your hand. Your fingers should
naturally rest on the two buttons. When you move the mouse,
you will see a hand move around on the screen; this is
commonly known as the cursor .
Point and Click
Move the cursor over an active element (for example, a
hardware icon or Net Guide channel) or an Internet link. This is
the “pointing” part. Press the left button one time (called
“clicking”) to open or activate that feature. After you click to
perform a task, the cursor changes to let you know the
information is processing. Or, move the cursor within a line of
text, for instance while you are editing an email message, and
click the left button to place the cursor there. Within text, the
cursor appears as a flashing vertical line.
You may be familiar with the computer concept of “double
clicking” an icon to open it. You can use this method with the
e Villa Network Entertainment Center or click once to select an
item, then click the proper action icon to perform the desired
function, such as: OPEN, CLOSE or DELETE.
Left
button
Scroll
wheel
Right
button
8
Scrolling
Use the scroll wheel between the two mouse buttons to easily
maneuver up and down through an email or a Web site that
extends beyond the vertical size of the screen. Merely roll the
wheel away from you to move up on the page, or roll it toward
you to move down.
For more information. . .
and detailed instructions on using the click, scroll and drag
features of the scroll mouse, look up “Using the Scroll Mouse” in
the eGuide.
Page 12
MOVING IN (REGISTRATION)
Now that you’ve connected the keyboard, scroll mouse, phone
cord and power cord, you’re ready to go. The POWER button is
located on the front of the unit to the left of the Memory Stick
media slot.
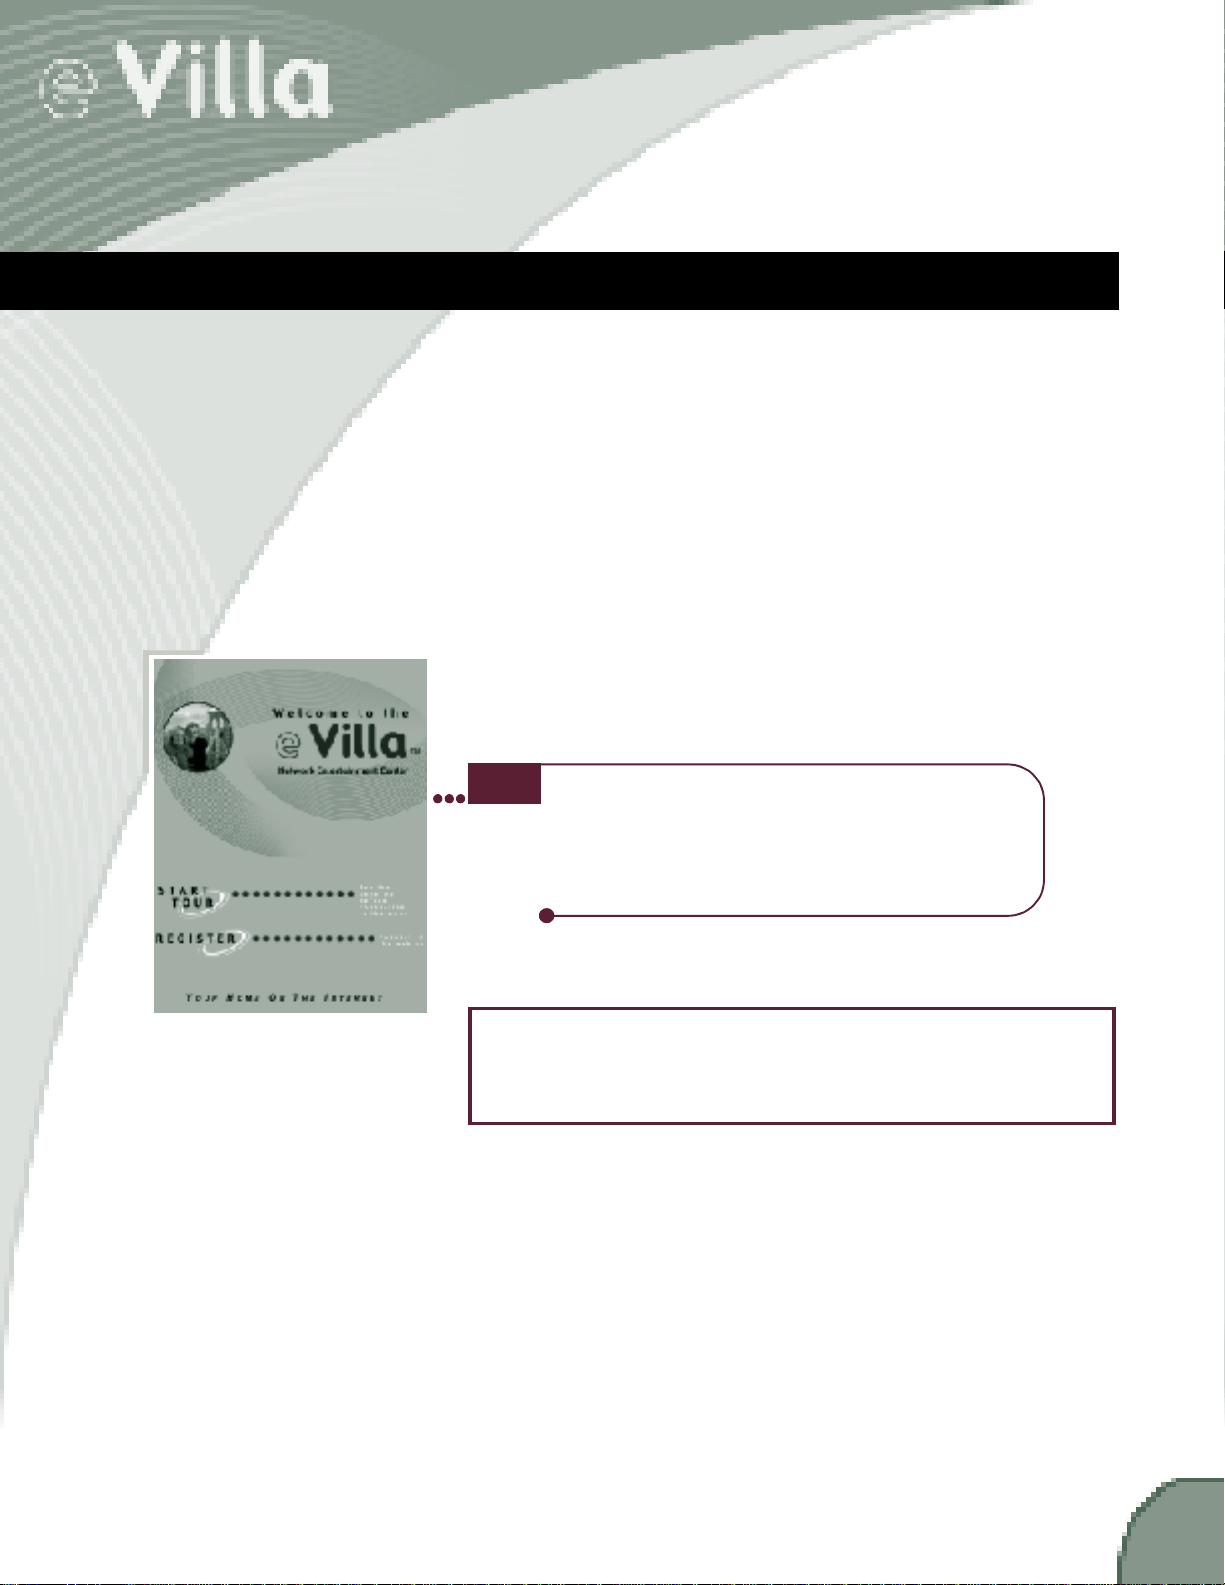
When you press the POWER button, the indicator light turns
green and the eVilla Network Entertainment Center comes alive.
The first time you start the device you will see the Sony logo;
then, the Welcome screen appears. You can choose to register
your eVilla Internet access account or preview e Villa’s features.
n To preview the features, click START TOUR.
n To register, click REGISTER.
note
You must register your Internet access account
before you can use the eVilla Network Entertainment
Center on the Internet. Please read the End User
License Agreement included with your device before
you register. It provides the terms and conditions for
use of the eVilla device and its software.
The screens you see on your eVilla unit may not look
exactly as depicted in this guide. Sony continues to
update the eVilla software to bring the best and foremost
to you.
9
Page 13
Registering Your eVilla Internet Access Account
Registering your eVilla account to access the Internet is a snap.
Use the scroll mouse to click REGISTER when the Welcome
screen appears. A series of screens leads you step-by-step
through the process.
note
tip
If for any reason you need to stop the process before
it is complete, don’t worry. The display appears as
soon as you power on again, and the account
registration process automatically starts over.
For easy access when you need it, record your
account information in the space provided on the
inside front cover of this guide.
Choosing an Internet Access Number
Initially, the system dials a toll-free number to register your
account. After that, it uses a local telephone number to connect
to the Internet. Access numbers will be suggested to you during
the registration process. Be sure you choose one or more that
are in your local toll-free zone so you do not have to pay
additional telephone charges while you are on the Internet.
10
tip
Please contact your local telephone company to
assure the telephone number you select to access
the Internet is free of any toll charges. Sony cannot
be held responsible for any additional telephone
charges incurred while using this device.
Page 14

Entering Your Personal Information
terms and conditions as set forth by EarthLink.
In this step you’ll provide information like your name, address,
phone number and credit card information to register your
account. The information is typed into a series of very easy,
self-explanatory screens. It is completely safe and private. The
information is sent to Customer Service over a secure, direct
phone connection.
Example:
Providing Payment Information
You must supply a debit or credit card number for monthly
billing of your Internet access account. You’ll also need the
name on the card and the expiration date, just like you would if
you were ordering something over the phone.
note
The subscription fee for Internet access is a
monthly fee. Charges will vary depending on the
type of service. Your Internet access is being
provided by EarthLink, Inc. an Internet Service
Provider (ISP) that is not affiliated with Sony. Your
use of this service may be subject to additional
11
Page 15

Entering a Username
During the account registration process you will be asked to enter
a primary account username. This name becomes part of your
email address. Enter something that is easy for you and your
friends to remember. Your name is always a good choice, as is a
hobby or special interest. Additional usernames and email
addresses, up to a total of four per eVilla device, can be set up
once your eVilla account is registered. Not only does each user
have a unique username and email address, they can save their
own favorite Web sites and have their own email address book.
Each user logs in using their own username and password.
You only need to enter your username here. Your eVilla device
automatically enters the rest of the address that identifies your
Internet access account as an eVilla account.
Example:
12
The username is the part of your email address that is
individualized and makes your address completely unique.
An email address has three parts:
n the username
(should be between 6 and 20 characters long)
n the @ symbol
n the hostname/domain of the user,
eVilla.com for e Villa Network Entertainment Center
users.
Example:
myname@evilla.com—Pronounced “my name at e Villa dot com.”
note
It’s possible that the username you want is
already being used by someone else, so be
prepared with a couple of possibilities.
Page 16

Entering a Password
Enter a password that is easy for you to remember, but hard for
others to guess. It is best not to use your birth date or your
name. Combining letters and numbers is a good strategy. Write
a hint for yourself on the inside front cover of this guide as a
reminder in case you forget your password.
note
If you do forget your password, don’t worry. Call
the toll-free number listed on the inside front cover.
Case Sensitivity
Your username and password are case sensitive. When you
enter them in the registration screen, be sure to note how you
typed them. For example, if your password is Fido, you must
type it that way (not fido or FIDO) to access your account later.
For more information. . .
on adding other users to your account, look up “Setup” in the
eGuide.
13
Page 17

COMING HOME
In this section, you’ll learn how to log in and dial up so you can
begin using your e Villa Network Entertainment Center.
Logging In
Logging in is like unlocking the door to your own, personal
room. In your room you might keep your private email address
book, your favorite Web sites and your own, private electronic
communication (called email). Each user (up to four) has a
private room.
If there are several people using your system, you must log in
before you can access your account. When you power on, the
e Villa Login box appears. If you are the only user registered
on the system, the box does not appear and you are not
required to log in.
note
In order to use passwords, you must enable this
feature in Setup. See the eGuide for instructions on
changing the security setting.
For more information. . .
on adding up to three additional users, look up “Setup” or
“Users” in the eGuide.
To log in:
1. Click your username in the eVilla Login box to highlight it.
2.
Click in the
type the password you selected when you registered your
e
Villa Internet access account.
3.
Click
LOGIN
note
If the device was not powered off after someone else
used it and they did not log out, simply click the LOG
OUT icon located at the bottom of the screen, then log
in using your own username. If you are working in
someone else’s account, you will not be able to access
your email, address book or Favorites.
Password
.
text box to place the cursor there, and
14
Page 18

Dialing Up
The system is set up to allow you to work offline until you are
ready to access the Web or send email. As soon as you select an
option that requires you to be online, such as looking for a Web
site or sending an email, a message appears asking if you want
to go online. If you select OK, the device dials up automatically
and you hear the distinctive sounds that indicate dial up.
When you’re online, if there is no Internet activity for several
minutes the device automatically terminates the connection. If
that happens and you again want to work online, simply
continue what you were doing. As soon as you select an option
that requires you to be online, the “going online” message
appears and the device dials up.
note
In Setup, you can select the amount of time the
system is idle before automatically disconnecting
from the Internet.
For more information. . .
on changing settings, including the automatic disconnect time,
look up “Setup” in the eGuide.
This device provides access to numerous Internet services,
such as the World Wide Web and electronic mail (email).
Information on the Internet is created by millions of
individuals and organizations. This is what gives the
Internet its diversity and value. However, some of the
information may include material that you find
objectionable. Sony cannot be held responsible for the
content of material accessed through this device. Please
use it and the Internet responsibly.
The eVilla Network Entertainment Center does not support
all data formats, including some plug-ins, and may not
provide access to all areas of the Internet.
For more information. . .
and instructions on adding users or changing an Internet access
number, look up “Setup” in the eGuide.
15
Page 19

EXPLORING THE e Villa NEIGHBORHOODS
The eVilla Network Entertainment Center is organized into three
neighborhoods: web, eVilla Home and email. Click the tabs at
the top of the screen to easily get from place to place. You can
also access these neighborhoods with a simple touch of one of
the chrome buttons on the front of the device.
Your screen may appear slightly different.
e Villa Home
The first neighborhood that appears is eVilla Home. This
section allows you to quickly access some of the most
interesting and widely used features of the Web, such as
entertainment, shopping, news, sports, finances and more. In
addition, Net Tools on this page allow you to listen to Internet
radio, watch the latest Internet streaming video clips, store and
view your photographs online, and explore the Attractions.
Net Guide Channels
News
Finance
Local
Entertainment
Shopping
Lifestyle
Sports
Net Tools
Audio
Video
Photos
Attractions
16
Page 20

Using the Net Guide Channels
You can access the NET GUIDE in two places: icons on eVilla
Home and buttons across the top of your keyboard. Each takes
you directly to an area on the Web that is full of useful
information on that topic. One of the great features of the eVilla
device is that it automatically updates the Net Guide content.
Schedule the update time in Setup — after that, you don’t have
to do a thing. The content contained in these guides is
downloaded from the Internet every day. So, you can review the
Net Guide channels without having to go online!
NEWS Keep up-to-date on what’s happening locally,
nationally and worldwide.
FINANCE Monitor financial market news, use personal
finance tools and track your own personal
stock portfolio.
LOCAL Check on the local weather or traffic before
you venture out, look up restaurants in your
neighborhood, discover special events
happening in your town and much more.
ENTERTAINMENT Access TV and movie listings, play online
games, and link to entertainment news and
Web sites.
SHOPPING Bring the mall right into your home. Shop for
electronics, flowers, toys and gifts. . .
LIFESTYLE Research your next family vacation, get
information on health, home and familyrelated Web content.
SPORTS Keep track of your favorite teams’ stats and
comprehensive sports news.
For more information. . .
on what’s available in these guides, look up “Net Guide” in the eGuide.
17
Page 21

Using the Net Guide Channels - cont.
When you select one of the NET GUIDE channels by clicking an
icon or pressing a button, you are taken instantly to the web
neighborhood, and the channel you chose appears. You do not
have to be online to view a Net Guide channel. Each channel has
links to other related pages on the Web. As soon as you click one
of the links, the device dials up (if you’re not already connected)
and the Web page you chose appears.
To check out another channel simply click its icon on the toolbar
or press the corresponding button on the keyboard.
Using the Net Tools Icons
On eVilla Home you will also find the NET TOOLS icons. These
icons allow you to listen to the radio, watch video clips, store
your electronic photographs online for friends and family to
view, and much more.
18
AUDIO Some of the best Internet and standard radio
stations are preset into the eVilla Network
Entertainment Center.
VIDEO Easily review the latest video clips available on the
Web or sent to you as email attachments.
PHOTOS Store your photos online for your family and
friends to enjoy.
ATTRACTIONS Learn about special offers from Sony and Sony
partners.
For more information. . .
on using these icons, look up “Net Tools” in the eGuide.
Page 22

The Web
Click the web tab to quickly access the World Wide Web. The
world is instantly brought into the comfort of your home. When
you click the web tab on your eVilla device, your personal start
page appears.
BACK If you’ve already been surfing the Web, click this
icon to scroll back through the sites you’ve
already visited.
FORWARD Click to reverse the effects of the BACK icon.
Scrolls you “forward” again, as far as the page
you were on before you clicked BACK.
START PAGE Click to return to your personal start page.
GO TO: If you know the address of the Web site you
want to visit, type it in this text box. Then press
ENTER on the keyboard or click the LOAD icon .
There’s no need to type http:// or www. before
the site address, the eVilla device adds it for you.
LOAD/REFRESH
Click to load the Web site you typed in the
GO TO:
box, or refresh the information on the current site.
FAVORITES Click to open your list of Favorites. From here
you can add, open, edit or delete Favorites.
ONLINE TIPS
Your link to the eGuide. Click here to automatically
bring up the Web section of the eGuide.
FONT Click the up arrow next to the letter A to increase
the size of the text you see on a Web site. Or, to
decrease the size, click the down arrow.
PRINT Click to print the current Web page.
ADD Click to add the current Web page to your list of
TO FAVORITES
Favorites sites.
19
Page 23

Email
Click the email tab to go to your email inbox where your
incoming mail is stored. From the inbox you can check your new
email, write messages to send to others and update your
address book.
Opens the folder where your incoming mail resides.
Opens the folder where you save drafts of your email messages
if you’re not ready to send them.
Opens the folder where copies of the mail you have sent are
stored.
20
Opens the page where you write messages.
Opens the address book where you can store, update and
manage email addresses.
Your link to the eGuide.
Click here for helpful tips about email.
Page 24

GETTING FAMILIAR WITH THE LAYOUT
Read this section to familiarize yourself with the look and feel of
the on-screen display.
The Toolbars
The toolbars are located directly below the tab in the email and
web neighborhoods. They contain icons that allow you to
navigate the Web and work in your email.
Web Toolbar
For more information. . .
on the WEB and email toolbars, see page19 and page20.
21
Page 25

The Tray
The Tray is the colored bar nearest the bottom of the screen
(above the Status Bar).
On the Tray you will find:
n The Hardware Icons
(See page24 for more information on Hardware icons.)
n SETUP Icon
In Setup you can change user information, modem
connection, video and audio settings, mouse speed,
printer settings, reset the date and time and schedule
browser updates.
n LOG OUT Icon
(See page26 for information on logging out.)
The Status Bar
The Status Bar is the black bar at the very bottom of the screen.
On the Status Bar you will find:
n Status of processing information.
n Username of user currently logged on to the system.
n ONLINE/OFFLINE Indicator
This indicator tells you if you are connected to the
Internet or not. Click this icon if you want to disconnect
from the Internet.
For more information. . .
on changing settings, see “Setup” in the eGuide.
22
Page 26

The Media Player
When you choose to play a music or video file from a storage
device (see page 24 for information on storage devices) or from
the Internet, the Media Player opens at the bottom of the screen
above the Tray.
The Media Player allows you to listen to music and watch
streaming video content in popular Internet formats.
The File Manager
When you select any of the storage device icons (see Hardware
Icons on page24), the File Manager expands below the Tray at
the bottom of the screen.
All the files you have stored on that storage device are listed in
one of four categories: audio, images, text and other. The
device knows what a file’s category is based on the extension
(the three letters that follow the dot). For example, a music file
might have the extension .mp3; an image file (picture) might
have a .jpg extension. The File Manager is only accessible
through external storage media (Memory Stick card or Zip disk)
or your online storage.
23
Page 27

The Hardware Icons
The hardware icons are located on the Tray (see page 22). They
let you know what other accessories are connected to your
e Villa Network Entertainment Center, whether they’re on and if
they’re available for you to use. Only the accessories actually
connected to the device will appear in this area. For example, if
you have a printer connected, you will see the printer icon.
Sony Memory Stick® storage media — Purchased Separately —
Memory Stick IC recording media, similar to floppy disks used
with a computer, provide storage of files offline — meaning you
don’t have to be connected to the Internet. There is a slot on the
front of the device especially for these versatile storage media.
They are portable, which means they can be used to share your
files with other electronic products, such as digital cameras,
camcorders, personal organizers and other electronic devices. If
there is no Memory Stick card in the Memory Stick media slot,
this icon will be “faded,” indicating it is not ready to be used.
note
Iomega® USB Zip® drive — Purchased Separately — A USB
Zip drive is another type of external file storage. An Iomega USB
Zip drive plugs directly into one of the USB ports, quickly and
easily allowing files to be stored on portable Zip disks.
If you have an external USB Zip drive connected to your device,
the ZIP DRIVE icon appears in the lower left corner with the other
hardware icons. If there is no Zip disk in the drive, the icon will
be “faded,” indicating it is not ready to be used. If you do not
have a USB Zip drive connected, this icon does not appear.
note
Memory Stick media are sold separately and can be
purchased from a local Sony retailer or online. To
purchase them online, click the web tab and type
sony.com/eVilla in the URL. The site has instructions
on purchasing eVilla-supported products.
Zip disks must be used when saving to a USB Zip
drive. Zip disks come in two sizes: 100MB and 250MB.
The 100MB disks can be used in either a 100MB or a
250MB USB Zip drive. The 250MB disks can only be
used in a 250MB USB Zip drive. Be sure you purchase
the proper size disk for your USB Zip drive.
24
Page 28

The Hardware Icons - cont.
USB Printer — Purchased Separately — Having a printer allows
you to print out Web pages, email, photographs and more.
The e Villa Network Entertainment Center supports a wide
variety of printers. Go to the e Villa Web site, sony.com/eVilla,
for a current list of supported printers. If you have connected a
USB printer via one of the USB ports, the PRINTER icon appears
in the lower left corner with the other hardware icons. If the
printer is not on, the icon will be “faded,” indicating it is not
ready to be used. If you do not have a printer connected, this
icon does not appear.
note
See “Connecting Additional Accessories” on
page29 for instructions on connecting a printer or
an external Zip drive. Go to the eVilla Web site,
sony.com/eVilla, for information on which printers
and external storage devices are supported with
the eVilla Network Entertainment Center.
For more information. . .
and instructions on how to use your hardware icons, look up
“Hardware icons” in the eGuide.
25
Page 29

LEAVING HOME
Ready to end your session and leave the eVilla device?—Simple!
There are some items you’ll want to keep in mind. This section
takes you through a few of the things to consider.
Saving Favorite Web Sites or Email Drafts
If you’re in a Web site that you think you will want to go back to,
consider saving it to your Favorites before you end your session.
For more information. . .
on saving favorite Web sites, look up “Favorites” in the eGuide.
Or, if you are writing an email that is not yet complete, you
might want to save it as a draft so you can come back to it later.
For more information. . .
on saving email drafts, look up “Saving Drafts” in the eGuide.
26
Logging Out
If there are other people registered to use your device and you
don’t want them to have access to your email, favorite Web
sites or address book, it’s a good idea to log out and disconnect
from the Internet when you finish. Logging out ensures that the
next person to use the device uses their own username and
password to log in to their personal information.
To log out, click the LOG OUT icon on the Tray in the lower right
hand corner of the screen.
tip
Don’t share your username and password with
anyone, unless you want them to have access to
your private email and information.
Page 30

Hanging up
If you log out when you finish, a window appears giving you the
option to hang up at that time. If you don’t log out, be sure to
disconnect from the Internet when you are finished by clicking
the ONLINE button on the Status Bar in the lower right corner of
the screen. Pressing the POWER button will also automatically
disconnect you from the Internet.
note
There are several things you can do offline. That means you do
not have to be connected to the Internet to view recent email,
look at your address book, look through files on external storage
devices, and much more.
If your Internet connection is inactive for several
minutes, it is automatically disconnected. When
you want to reconnect, simply select a function
that requires being online (such as sending an
email) and the device prompts you to reconnect.
For more information. . .
on what you can do offline, look up “Working Offline” in the
eGuide.
Powering Off
After you have disconnected your Internet connection, press the
POWER button to shut down. There is also a power save mode to
protect the screen and reduce electricity requirements. If the
e Villa device is on but has not been used for a while, the screen
goes dark and the power indicator light turns amber to let you
know it is sleeping. Move the scroll mouse or press any key on
the keyboard to bring the screen back on.
27
Page 31

WHERE TO GET MORE INFORMATION
Want to learn more about using the e Villa Network
Entertainment Center, the Internet or email? There are several
sources of additional information available.
Review the eGuide
The e Villa Network Entertainment Center comes with complete
operating instructions—online! For further information on eVilla
features, check out the eGuide—a quick and easy reference to
everything the device can do, without the hassle of a paper
manual that can get lost or tattered.
If you have a question about what to do or where to go, just
click the ONLINE TIPS icon in the upper right corner of the e Villa
display for instant helpful tips. Each neighborhood has an
ONLINE TIPS icon that makes it easy for you to get help on a
task.
Online Tips
Icon
Visit the e Villa Web Site
The e Villa Web site (sony.com/eVilla) provides quick access to
the latest information about the e Villa device, accessories and
product support.
Learn the Language
Look in the glossary on page32 for definitions of some of the
words you’ll come across in the Getting Started Guide. Then, as
you venture into the fascinating world of the Web, look in the
eGuide glossary for an even larger list of words. There are also
“links” from key words in the eGuide to the glossary. Just click
the underlined word and the definition comes up on the screen.
28
Page 32

CONNECTING ADDITIONAL ACCESSORIES
You can connect a USB printer, an external USB storage device
or another set of speakers to your eVilla Network Entertainment
Center in a flash whenever you wish to expand the capability of
your e Villa device.
USB Printer
There are many things you can find on the Web or get through
email that you might want to print out and keep. The e Villa
device supports a number of USB printers for just that reason.
Go to the eVilla Web site at sony.com/eVilla for a current list of
compatible printers.
note
After setting up the printer according to the
manufacturer's instructions, turn on the power. A
printer icon should appear in the hardware icon area
(lower left) of the screen. If not, check to be sure
the connection is solid and the printer is on.
External Storage Device
The e Villa device comes equipped with a Memory Stick media
slot. You can also add an external Zip drive.
29
Page 33

Speakers
The e Villa Network Entertainment Center comes complete with
a good quality sound system, but if you want to enhance it, you
can add an additional pair of speakers or connect to your stereo
receiver for broadcast throughout your home.
If you choose to attach additional speakers, refer to the
manufacturer’s documentation for information on adjusting the
volume, tone or balance.
30
note
Be sure the accessories you purchase have USB
cable connections so they are compatible with this
device. The USB cable may accompany your
accessories or may have to be purchased
separately.
Go to the eVilla Web site, sony.com/eVilla, for
information on which accessories are supported
with the eVilla Network Entertainment Center.
Supported accessories can be purchased online or
from a local Sony retailer.
Page 34

SOLVING PROBLEMS
The power light doesn’t come on
n Check that the AC power cord is securely connected to the device and
plugged into the wall outlet.
n Check that the wall outlet is working correctly by plugging in something
that you know works.
n Firmly press the POWER button on the front panel of the device. It
should glow green.
There is no picture on the screen
n Check that the AC power cord is securely connected to the device and
plugged into the wall outlet.
n If the POWER button is glowing amber, the unit is in “sleep” mode. If the
unit has not been used for a little while, the screen goes dark to
conserve energy. Move the scroll mouse or press any key on the
keyboard to bring the display back on.
n The display may be turned off. Turn it on by pressing the POWER button
on the front of the e Villa device.
Cursor doesn’t move properly or doesn’t move at all
n Check that the mouse cable is plugged securely into the connection on
the back of the unit.
Sound is too low or too high or there is no sound at all
n Adjust the volume accordingly using the up/down VOLUME buttons
located on the front of the device.
n Check the rear connector panel to ensure that nothing, other than
speakers, is plugged into the speaker connector.
I am unable to connect to the Internet
n Check that the phone cord is securely plugged into the back of the
device and into the phone jack on the wall.
n Make sure that no one else in the house is using a telephone connected
to the phone line your e Villa device is trying to dial from.
n Check that the phone jack is working properly by plugging a working
telephone into it.
The device is behaving abnormally or is unresponsive
n You may have to reset the device by slowly inserting a pushpin, or other
similar item, into the sytem reset hole. The system will shut down and
restart.
The picture is not centered or sized properly
n Click the SETUP icon, then click DISPLAY. You can change the size,
proportions, brightness, contrast and more.
The keyboard isn’t functioning
n Be sure the keyboard is securely plugged into the back of the device.
There’s a black/gray line running down the screen’s right side
n This is normal for the Trinitron monitor and is not a malfunction. It is a
shadow from the damper wire used to stabilize the aperture grille and is
most noticeable when the screen’s background is light (usually white).
The aperture grille is the essential element that makes a Trinitron
picture tube unique by allowing more light to reach the screen, resulting
in a brighter, more detailed picture.
There is no picture and the power light continually flashes
amber or alternates between amber and green
n Unplug the AC Power Cord, waiting one minute before reconnecting.
n If condition continues, unplug the AC Power Cord and please contact
Customer Support.
For further problem solving see the eGuide or contact Customer Support. (See the inside front
cover for how to contact us.)
31
Page 35

SPEAKING THE INTERNET LANGUAGE
In this section you will find a list of Internet-related words that
you will come across in this guide. For definitions of more
Internet and email terms, see the eGuide.
Browser: Application for viewing Web pages or stored files.
The e Villa Network Entertainment Center has its own Web
browser.
Dial-up number: Or Internet Access Number. The phone
number(s) your modem dials to connect you to your Internet
Service Provider (ISP) which connects you to the Internet.
Domain name: The main part of a URL, or Internet Address
after the @ symbol. It consists of at least two parts, separated
by periods (called dots), usually the organization’s name (such
as eVilla), followed by three letters designating the organization
type: .com (commercial business), .net (network organization),
.org (nonprofit organization), .mil (military) and .gov
(government). Your domain name is evilla.com.
eGuide: The e Villa Network Entertainment Center’s online
operating instructions.
Email: Short for electronic mail. If you have an email address,
you can send a nearly instantaneous electronic message to
anyone on the Internet who has an email address.
Icon: A graphical representation of a button on a monitor or
display screen. Most icons are symbols that represent a
function, concept or other feature. Generally the icon’s graphic
design suggests the function, concept or feature it represents,
such as the question mark used to indicate ONLINE TIPS. When
we refer to a button in this guide, we’re referring to a physical
button you would push with your finger. When we refer to an
icon, it is an on-screen “button” that you would click with your
scroll mouse.
Internet: The huge computer network that connects millions
of smaller computer networks all around the world using the
TCP/IP protocol. The Web is part of the Internet.
ISP: Internet Service Provider. A company that provides
access to the Internet and other types of services.
32
Page 36

Link: Short for hyperlink. On the Web, you click on links (text
or graphics) to move from page to page. Links are often
underlined and in a different color from other text. When you
roll your cursor over a link on the e Villa display a change in the
appearance of the cursor indicates that the text or icon is a link.
Log in: To gain access to or sign in to your individual e Villa
Internet access account and personal settings.
Log out: To sign out of your individual account so others don’t
have access to your information.
Memory Stick: An IC recording media, similar to a floppy
disk used with a computer. Used to store electronic files that can
then be used with many other electronic devices.
Modem: A part of your device that makes the connection to
the Internet over a phone line. The modem dials the e Villa
Internet account telephone access number to connect to the
Internet.
Net Guide: Specially provided popular information on the
World Wide Web. The large icons on the e Villa Home
neighborhood and the function buttons across the top of the
keyboard access the Net Guide channels.
Online: The state of being connected to the Internet. “Offline”
is when you are not connected to the Internet.
Page: Short for Web page. A document on the Web that is
displayed by a Web browser.
Password: A private code (letters, numbers or both) used to
prevent others from accessing your e Villa account.
Status Bar: The area at the bottom of the e Villa screen that
displays the system status and other information related to the
system.
Storage Device: Any external, portable method for storing
files, such as Memory Stick cards and Zip disks.
Surf: To navigate around the Web.
Toolbar: An area in the on-screen display which contains
icons that allow you to perform specific tasks. On the web
toolbar you will find the BACK, FORWARD, LOAD/REFRESH, START
PAGE and font size icons, as well as the GO TO: text box.
33
Page 37

Tray: The area on the e Villa screen that contains the
hardware icons and other icons to control your e Villa device.
USB: Universal Serial Bus. A standard for connecting devices
such as keyboards, mice, printers and Zip drives to computers
and Internet devices, like your e Villa Network Entertainment
Center.
User: Anyone who uses the Internet.
Username: The name of a particular user on the e Villa
Network Entertainment Center. Your username is the part
before the “@” symbol in your e Villa email address.
Web: Short for World Wide Web.
Web Browser: Sometimes called a browser. Application
used for viewing Web pages.
Web Page: A document on the World Wide Web that is
displayed by a Web browser.
World Wide Web: Web for short. The part of the Internet
that allows you to “surf” or “browse” through all kinds of text,
graphics and multimedia with a Web browser. Information on
the Web is formatted into “pages” and “sites.” Pages and sites
are actually files stored on remote network computers.
34
Zip® drive: An external storage device made by the Iomega
Corporation. Zip drives use Zip disks to store large individual
files or large quantities of files. The e Villa Network
Entertainment Center is compatible with the USB version of
Iomega Zip drives.
Page 38

SPECIFICATIONS
Hardware
Display
15” (14” Visual Image Size) Portrait View
FD Trinitron® CRT display
(0.24 - 0.25mm AG pitch)
800 lines (H) x 1024 pixels (V)
CPU/Graphics
Geode GX1RTM (266MHz) processor,
Geode CS 5530A
Memory
64MB SDRAM
24MB Flash ROM
Modem
V.90 (56 kbps max.)
Audio
AC97 Codec, Built-in Stereo Speakers
Input/Output
Memory Stick® media slot
(Memory Stick media not included)
Keyboard/Mouse ports: PS-2 (x2)
USB ports (x2)
Ethernet jack (RJ-45) (For future use)
Modem jack (RJ-11)
Audio Out (Headphone/Speaker port): Mini jack
Mic Input: Mini jack (For future use)
Power Supply
120VAC, 50-60Hz, 2.0Amps, 110W max.
Dimensions
11.875”(w) X 17.875”(d) X 16.5”(h)
(300mm x 453mm x 417mm)
at 15 degree tilt position
Weight
31.9lbs (14.5 kg) net weight
43.0lbs (19.8 kg) gross weight
(gross weight includes e Villa unit, supplied
accessories and packing materials)
Software
Operating System
®
BelA
Email
IMAP protocol, up to 4 users/individual inbox
Composer (online and offline)
Font
Arial
(English language, size/color selection available)
Web Browser
OPERA® HTTP 1.0/1.1, HTML 4.0, CSS 1 & 2,
JavaScript 1.3, FTP, Transfer Layer Security (TLS)
Browser Plug-ins
Macromedia® FlashTM 4.0,
Personal Java® 3.0.1 for BelA
Image Formats
JPEG, Progressive JPEG, GIF, PNG
File Viewers
PDF, Plain ASCII Text, HTML
Audio
RealAudio®, MP3, MP2 (MPEG Layer 1, 2 and 3),
WAV, MIDI, AU, AIFF
Video
RealPlayer® 8
Security
SSL2 and SSL3 (40 and 128 bit encryption)
Supplied Accessories
Compact keyboard (71 keys) and palm rest
Scroll Mouse
25’ Phone Cord
Phone Line Splitter
AC Power Cord
Getting Started Guide
Quick Reference Card
Warranty Card
Unpacking Insert
End User License Agreement
35
Page 39

THE LEGAL STUFF
FCC Regulations and Information
This device has been tested and found to comply with the limits for a Class B
digital device, pursuant to Part 68 of the Federal Communications
Commission (FCC) Rules. These limits are designed to provide reasonable
protection against harmful interference to the telephone network when
connected directly to the telephone lines in a residential installation. In order
to fully comply with the Rules of the FCC, the following instructions should be
read carefully and followed completely where applicable:
The FCC has established Rules which permit this device to be directly
connected to the telephone network. Standardized jacks are used for these
connections. This equipment should not be used on party lines or coin
phones.
If this device is malfunctioning, it may also be causing harm to the telephone
network; this device should be disconnected until the source of the problem
can be determined and until the repair has been made. If this is not done, the
telephone company may temporarily disconnect service.
The telephone company may make changes in its technical operations and
procedures; if such changes affect the compatibility or use of this device, the
telephone company is required to give adequate notice of the changes. You
will be advised of your right to file a complaint with the FCC.
If the telephone company requests information on what equipment is
connected to their lines, inform them of:
a. The telephone number to which this unit is connected.
b. The ringer equivalence number.
c. The USOC jack required.
d. The FCC registration number.
Items (b) and (d) are indicated on the label. The Ringer Equivalence Number
(REN) is used to determine how many devices can be connected to your
telephone line. In most areas, the sum of the RENs of all devices on any one
line should not exceed five (5). If too many devices are attached, they may
not ring properly.
Declaration of Conformity
Trade Name: Sony
Model No.: NTE-D101
Responsible Party: Sony Electronics Inc.
Address: 680 Kinderkamack Road
Telephone Number: 201-930-6972
This device complies with Part 68 of the FCC rules. Each product marketed is
identical to the representative unit tested and found to be compliant with the
standards. Records maintained continue to reflect the equipment being
produced can be expected to be within the variation accepted, due to quantity
production and testing on a statistical basis. Operation is subject to the
following two conditions: 1) This device may not cause harmful interference,
and 2) this device must accept any interference received, including
interference that may cause undesired operation.
Oradell, NJ 07649
Telephone line interruption
This system connects to the Internet through your telephone line. If you do not
have a dedicated telephone line for use solely with this system, you cannot use
your telephone to receive incoming calls or to place outgoing calls during the
time that the system is online.
Power Supply Cord
This notice is applicable for USA only.
If shipped to USA, install only a UL LISTED LABELLED power supply cord
meeting the following specifications:
Plug Type Nema-Plug 5-15p
Cord Type SVT or SJT, minimum 3 x 18 AWG
Length Maximum 15 feet
Rating Minimum 7 A, 125V
Notice to Users
© 2001 Sony Electronics Inc. All rights reserved. This guide and the software
described herein, may not be reproduced, translated, or reduced, in whole or
in part, to any machine-readable form without prior written approval.
SONY ELECTRONICS INC. PROVIDES NO WARRANTY WITH REGARD TO THIS GUIDE, THE
SOFTWARE, OR OTHER INFORMATION CONTAINED HEREIN AND HEREBY EXPRESSLY
DISCLAIMS ANY IMPLIED WARRANTIES OF MERCHANTABILITY OR FITNESS FOR ANY
PARTICULAR PURPOSE WITH REGARD TO THIS GUIDE, THE SOFTWARE, OR SUCH OTHER
INFORMATION. IN NO EVENT SHALL SONY ELECTRONICS INC. BE LIABLE FOR ANY
INCIDENTAL, CONSEQUENTIAL, OR SPECIAL DAMAGES, WHETHER BASED ON TORT,
CONTRACT, OR OTHERWISE, ARISING OUT OF OR IN CONNECTION WITH THIS GUIDE, THE
SOFTWARE, OR OTHER INFORMATION CONTAINED HEREIN OR THE USE THEREOF.
Sony Electronics Inc. reserves the right to make any modification to this
guide or the information contained herein at any time without notice. The
software described herein is governed by the terms of a separate user license
agreement.
This product contains software owned by Sony and licensed by third parties.
Use of such software is subject to the terms and conditions of license
agreements enclosed with this product. Some of the software may not be
transported or used outside the United States. Software specifications are
subject to change without notice and may not necessarily be identical to
current retail versions.
Updates and additions to software may require an additional charge.
Subscriptions to online service providers may require a fee and credit card
information. Financial services may require prior arrangements with
participating financial institutions.
36
Radio Interference Information
This equipment has been tested and found to comply with the limits for a
Class B digital device, pursuant to Part 15 of the FCC rules. These limits are
designed to provide reasonable protection against harmful interference in a
residential installation. This equipment generates, uses and can radiate radio
frequency energy and, if not installed and used in accordance with the
instructions, may cause harmful interference with radio communications.
However, there is no guarantee that interference will not occur in a particular
installation. If this equipment does cause interference to radio or television
reception (which you can determine by turning the equipment off and on), you
are encouraged to try to correct the interference by one or more of the
following measures:
n Change the position of the unit with respect to the radio or
television equipment that is receiving the interference.
n Move the unit away from the equipment that is receiving the
interference.
n Plug the unit into a different outlet so that the unit and the
equipment receiving the interference are on different branch
circuits.
n Shielded cables and I/O cords must be used for this equipment to
comply with the relevant FCC regulations.
Changes or modifications not expressly approved in writing by Sony
Electronics, Inc., void the user’s authority to operate this equipment. If these
measures do not eliminate the interference, you should consult your Sony
dealer or an experienced radio/television technician for additional
suggestions. In addition, you may find the following booklet prepared by the
FCC helpful: “How to Identify and Resolve Radio-TV Interference Problems.”
This booklet is available from the U.S. Government Printing Office,
Washington, DC, 20402 Stock No. 004-000-00345-4.
The International ENERGY STAR Office Equipment Program is an international
program that promotes energy saving through the use of computers and
other office equipment. The program backs the development and
dissemination of products with functions that effectively reduce energy
consumption. It is an open system in which business proprietors can
participate voluntarily. The targeted products are office equipment such as
computers, displays, printers, facsimiles and copiers. Their standards and
logos are uniform among participating nations.
Sony, e Villa, Trinitron, “Memory Stick” and the Memory Stick logo are
trademarks of Sony.
Iomega and Zip are registered trademarks of Iomega Corporation. Geode is a
trademark of National Semiconductor Corporation. BelA is a registered
trademark of Be Inc. in the U.S. and other countries. RealPlayer, RealVideo
and RealAudio are registered trademarks of RealNetworks, Inc. Macromedia
and Flash are trademarks or registered trademarks of Macromedia, Inc. Java
and Personal Java are trademarks of Sun Microsystems in the U.S. and other
countries. OPERA is a registered trademark of OPERA Software, AS. PS-2 is a
trademark of International Business Machines Corporation.
All other trademarks are trademarks of their respective owners.
Service Requirements
In the event of equipment malfunction, all repairs should be performed by
Sony or an authorized agent. It is the responsibility of users requiring service
to report the need for service to Sony or to one of our authorized agents. For
service, call 1-888-344-9400.
Your Warranty
Your eVilla Network Entertainment Center comes with a one-year limited
warranty on parts and labor. See the Warranty card included in the box for
complete warranty information.
Page 40

INDEX
A
Accessing
eGuide . . . . . . . . . . . . . . . . . . . . . . . . . . 3, 28
email . . . . . . . . . . . . . . . . . . . . . . . . . . . 4, 20
Net Guide . . . . . . . . . . . . . . . . . . . . . . . 16, 17
Net Tools . . . . . . . . . . . . . . . . . . . . . . . 16, 18
World Wide Web . . . . . . . . . . . . . . . . . . . 4, 19
e Villa Home . . . . . . . . . . . . . . . . . . . . . . . . 16
File Manager . . . . . . . . . . . . . . . . . . . . . . . . 23
Add to favorites . . . . . . . . . . . . . . . . . . . . . . . 19
Adding other users to your account . . . . . . . . . 14
Addresses icon (email) . . . . . . . . . . . . . . . . . . 20
Attractions icon (Net Tools) . . . . . . . . . . . . 16, 18
Audio out . . . . . . . . . . . . . . . . . . . . . . . . . . . .5
Audio icon (Net Tools). . . . . . . . . . . . . . . . . . . 18
Automatic disconnect time. . . . . . . . . . . . . 15, 27
B
Back icon (web) . . . . . . . . . . . . . . . . . . . . . . . 19
C
Case sensitivity . . . . . . . . . . . . . . . . . . . . . . .12
Changing settings . . . . . . . . . . . . . . . . . . . . . 21
Choosing
password . . . . . . . . . . . . . . . . . . . . . . . . . . 12
telephone access number . . . . . . . . . . . . . . . 12
username . . . . . . . . . . . . . . . . . . . . . . . . . 11
Cleaning your device. . . . . . . . . . . . . . . . . . . . .2
Compose icon (email) . . . . . . . . . . . . . . . . . . . 20
Connecting
additional accessories. . . . . . . . . . . . . . . . 5, 29
external speakers . . . . . . . . . . . . . . . . . . . . .5
external storage devices . . . . . . . . . . . . . . . .5
headphones . . . . . . . . . . . . . . . . . . . . . . . . .5
keyboard . . . . . . . . . . . . . . . . . . . . . . . . .5, 6
phone line . . . . . . . . . . . . . . . . . . . . . . . . 5, 6
power cord . . . . . . . . . . . . . . . . . . . . . . . . . .5
printers . . . . . . . . . . . . . . . . . . . . . . . . . . . .5
scroll mouse . . . . . . . . . . . . . . . . . . . . . . . 5, 6
to the Internet . . . . . . . . . . . . . . . . . . . . . . .5
Cursor. . . . . . . . . . . . . . . . . . . . . . . . . . . . . . . 8
D
Dialing up . . . . . . . . . . . . . . . . . . . . . . . . . . . 15
Drafts icon (email) . . . . . . . . . . . . . . . . . . . . . 20
E
Email
address . . . . . . . . . . . . . . . . . . . . . . . . . . . 11
button . . . . . . . . . . . . . . . . . . . . . . . . . . . . . 4
icons . . . . . . . . . . . . . . . . . . . . . . . . . . . . . 20
indicator. . . . . . . . . . . . . . . . . . . . . . . . . . . . 4
tab (neighborhood) . . . . . . . . . . . . . . . . . . . 20
Entertainment (Net Guide) . . . . . . . . . . . . 16, 17
e Villa login box . . . . . . . . . . . . . . . . . . . . . . . 14
e Villa Home
button . . . . . . . . . . . . . . . . . . . . . . . . . . . . . 4
personal start page . . . . . . . . . . . . . . . . . . . 19
tab . . . . . . . . . . . . . . . . . . . . . . . . . . . . . . 22
e Villa Web site . . . . . . . . . . . . . . . . . . . . . . . 28
External speakers. . . . . . . . . . . . . . . . . . . . 5, 30
External storage device . . . . . . . . . . 4, 5, 23, 29
F
Favorites icon (web) . . . . . . . . . . . . . . . . 19, 26
File Manager . . . . . . . . . . . . . . . . . . . . . . . . . 23
Finance icon (Net Guide) . . . . . . . . . . . . . 16, 17
Font icon (web) . . . . . . . . . . . . . . . . . . . . . . . 19
Forward icon (web) . . . . . . . . . . . . . . . . . . . . 19
File types . . . . . . . . . . . . . . . . . . . . . . . . . . . 23
G
Go To text box (web) . . . . . . . . . . . . . . . . . . . 19
Going online . . . . . . . . . . . . . . . . . . . . . . . . . 15
H
Hanging up . . . . . . . . . . . . . . . . . . . . . . . 22, 27
Hardware icons . . . . . . . . . . . . . . . . . 22, 24, 25
Home icon (web) . . . . . . . . . . . . . . . . . . . . . 219
I
Inbox icon (email) . . . . . . . . . . . . . . . . . . . . . 20
Iomega USB Zip drive . . . . . . . . . . . . . . . . . . 24
K
Keyboard . . . . . . . . . . . . . . . . . . . . . . . . 5, 6, 7
37
Page 41

L
Learn the language . . . . . . . . . . . . . . . . . 28, 32
Lifestyle icon (Net Guide) . . . . . . . . . . . . . 16, 17
Load/Refresh icon (web) . . . . . . . . . . . . . . . . 19
Local icon (Net Guide) . . . . . . . . . . . . . . . 16, 17
Log out icon . . . . . . . . . . . . . . . . . . . . . . . . . 26
Logging in . . . . . . . . . . . . . . . . . . . . . . . . . . 14
Logging out . . . . . . . . . . . . . . . . . . . 14, 22, 26
M
Mail, electronic . . . . . . . . . . . . . . . . . . 4, 11, 20
Media Player . . . . . . . . . . . . . . . . . . . . . . . . . 23
Memory Stick slot . . . . . . . . . . . . . . . . . 4, 9, 24
N
Net Guide icons and buttons . . . . . . . . . 7, 16, 17
Net Tools. . . . . . . . . . . . . . . . . . . . . . . . . 16, 18
News icon (Net Guide) . . . . . . . . . . . . . . . 16, 17
S
Saving favorite Web sites or email drafts . . . . . 26
Setup icon. . . . . . . . . . . . . . . . . . . . . . . . . . . 22
Scroll mouse . . . . . . . . . . . . . . . . . . . . . . . 5, 8
Shopping icon (Net Guide) . . . . . . . . . . . . 16, 17
Sony Memory Stick . . . . . . . . . . . . . . . . . . . . 24
Speaker, built-in . . . . . . . . . . . . . . . . . . . . . . . 4
Speakers, additional . . . . . . . . . . . . . . . . . . . 30
Specifications . . . . . . . . . . . . . . . . . . . . . . . . 35
Sports icon (Net Guide) . . . . . . . . . . . . . . 16, 17
Status Bar . . . . . . . . . . . . . . . . . . . . . . . . . . 22
System reset hole . . . . . . . . . . . . . . . . . . . 4, 31
T
Telephone access number . . . . . . . . . . . . . . . . 12
Tips icon . . . . . . . . . . . . . . . . . . . . 3, 19, 20, 28
Toolbars . . . . . . . . . . . . . . . . . . . . . . . . . . . 21
Tray . . . . . . . . . . . . . . . . . . . . . . . . .22, 23, 24
Turning off your e Villa device . . . . . . . . . . . . . 27
O
Online tips icon . . . . . . . . . . . . . . . .3, 19, 20, 28
Online/Offline indicator . . . . . . . . . . . 15, 22, 27
Outbox icon (email) . . . . . . . . . . . . . . . . . . . . 20
P
Palm rest . . . . . . . . . . . . . . . . . . . . . . . . . . . . 7
Phone line splitter . . . . . . . . . . . . . . . . . . . . . . 6
Photos icon (Net Tools) . . . . . . . . . . . . . . 16, 18
Point and click . . . . . . . . . . . . . . . . . . . . . . . . 8
Power button . . . . . . . . . . . . . . . . . . . . 4, 9, 27
Power save . . . . . . . . . . . . . . . . . . . . . . . . . . 27
Previewing the features . . . . . . . . . . . . . . . . . . 9
Print icon . . . . . . . . . . . . . . . . . . . . . 19, 25, 29
Printer . . . . . . . . . . . . . . . . . . . . . . . . . . . . . 25
Providing payment information . . . . . . . . . . . . 13
R
Registering
register icon . . . . . . . . . . . . . . . . . . . . . 9, 10
your e Villa Internet access account . . . . . . . . 10
Reset hole . . . . . . . . . . . . . . . . . . . . . . . . . 4, 31
Review the eGuide . . . . . . . . . . . . . . . . . . . . 34
U
USB ports . . . . . . . . . . . . . . . . . . . . . . . . 5, 29
USB printer . . . . . . . . . . . . . . . . . . . . 5, 25, 29
Username . . . . . . . . . . . . . . . . . . . . . . . . 11, 22
Using
the Getting Started guide . . . . . . . . . . . . . . . 3
the scroll mouse . . . . . . . . . . . . . . . . . . . . . 8
the Net Guide . . . . . . . . . . . . . . . . . .16. 17. 18
the Net Tools . . . . . . . . . . . . . . . . . . . . 16, 18
V
Video icon (Net Tools) . . . . . . . . . . . . . . . . . . 18
Volume buttons . . . . . . . . . . . . . . . . . . . . . . . 4
W
Web
button . . . . . . . . . . . . . . . . . . . . . . . . . . . . 4
icons . . . . . . . . . . . . . . . . . . . . . . . . . . . . . 19
tab (neighborhood) . . . . . . . . . . . . . . . . . . 19
Welcome screen . . . . . . . . . . . . . . . . . . . . 9, 10
Working offline . . . . . . . . . . . . . . . . . . . . 15, 27
Z
Zip drive . . . . . . . . . . . . . . . . . . . . . . . . . . . . 24
38
 Loading...