

Page 1
Quick Start Guide
Before getting started
Check if your BRAVIA’s setup is complete.
Check your BRAVIA’s series name.
Internet Player
NSZ-GU1
••••
See the next page for
details on series names:
Page 2
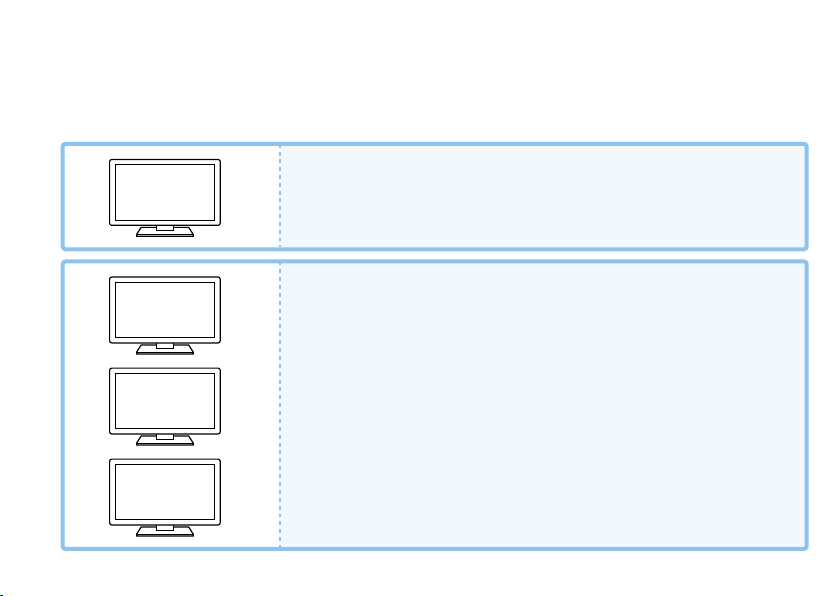
Setup procedure differs
depending on which BRAVIA you use:
R
series
S
series
Update is not required.
Follow the instructions on this Quick Start Guide.
Update your BRAVIA before
starting the setup.
W
series
X
series
2
Turn on your BRAVIA and find the settings menu as follows:
HOME Settings Product Support Software Update
To update, follow the instruction on the screen and select “Update
Now.”
Page 3
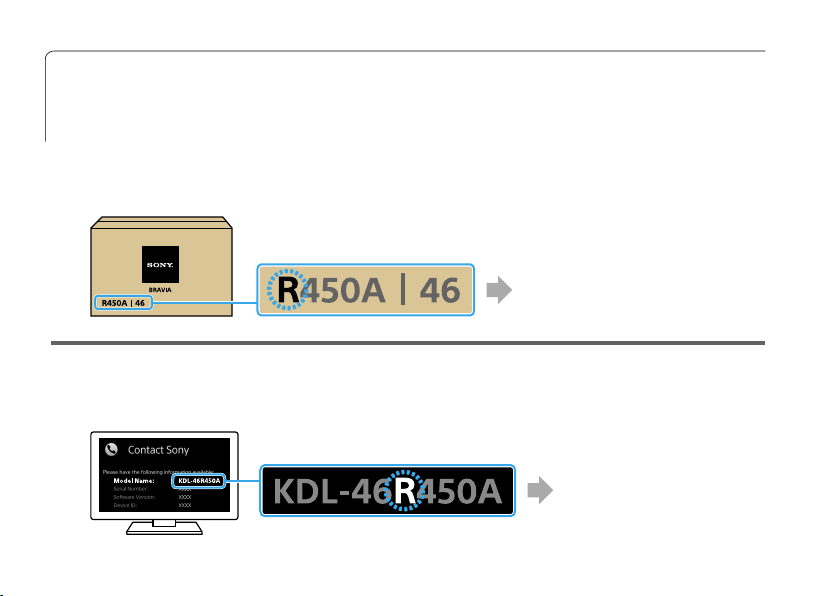
How do I check my BRAVIA’s series name?
You can find the series name in your product’s model name. Follow either of the
methods below to find your model name.
On your BRAVIA packaging:
Example
BRAVIA R series
In your BRAVIA settings:
HOME Settings Product Support Contact Sony
Example
BRAVIA
R series
3
Page 4

What you
need
In the Box:
Smart Stick (1)
Remote control (1)
Micro HDMI cable (1)
(if you use Cable/Satellite
Box)
Micro USB cable (1)
Size AA batteries (2)
IR (Infrared) Blaster
cable (1)
4
Page 5

You will also need:
BRAVIA R, S, W or X series
Wireless Network
Wireless network name (“SSID”) and
Password
Cable/Satellite Box (if you use one)
5
Page 6
Connection
6
How do you watch TV?
I use my Cable/Satellite
Box and BRAVIA
R, S, W, X
series
start from page 8 ( )
Page 7

I use my BRAVIA R series
by itself
I use my BRAVIA S, W or X
series by itself
R series
start from page 9 ( ) start from page 10 ( )
S, W, X
series
7
Page 8
8
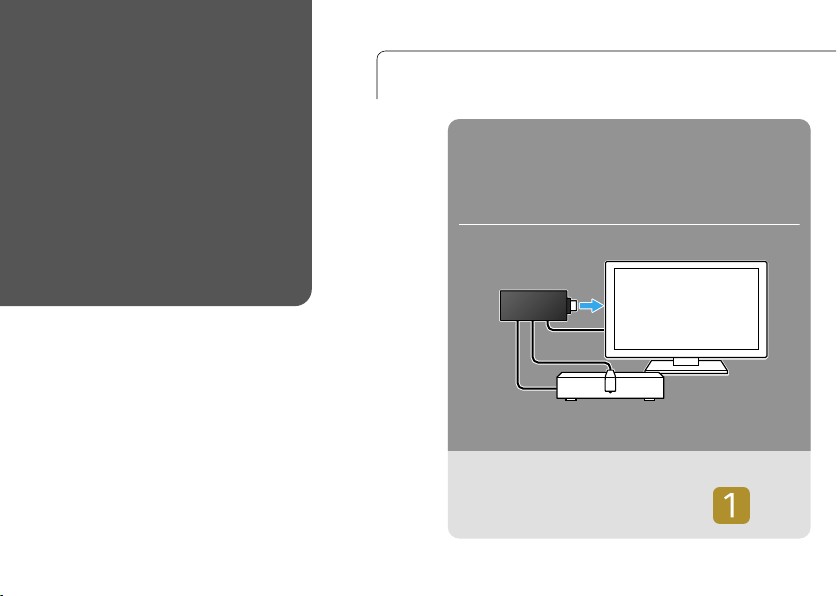
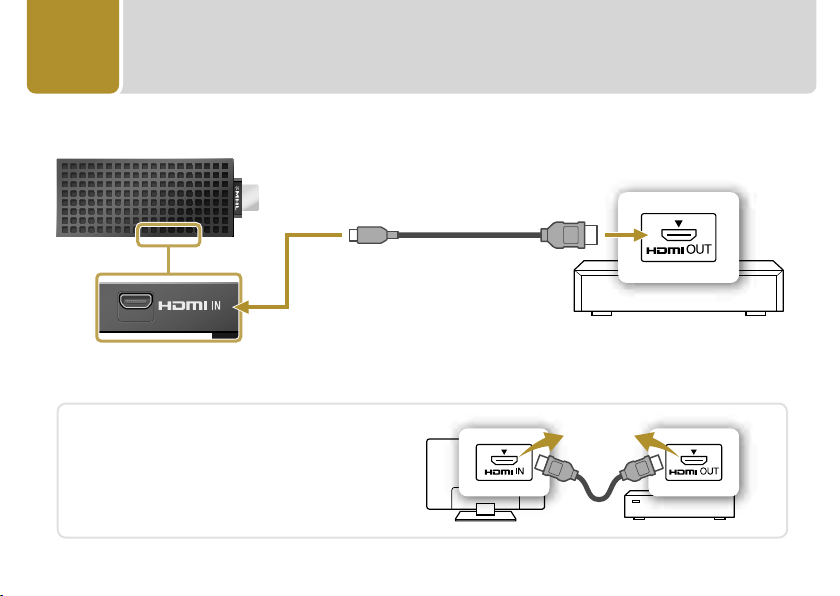
1
Connect the Smart Stick and the Cable/Satellite Box using the
Micro HDMI cable.
Micro HDMI cable
(supplied)
Cable/Satellite Box
TIPS
If your BRAVIA and Cable/Satellite Box
are already connected by an HDMI
cable, remove it in advance.
Page 9

2
Connect the IR Blaster cable to the Smart Stick.
Place the other end near to the Cable/Satellite Box or your
BRAVIA as illustrated below.
If you use Cable/Satellite Box:
IR Blaster cable
(supplied)
OR
If you use BRAVIA by itself:
9
Page 10
10
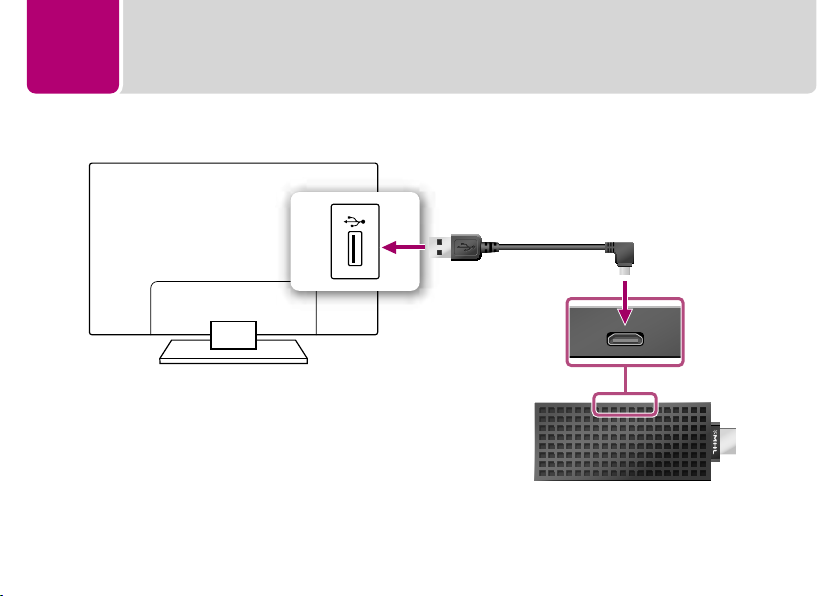
3
Connect the Smart Stick and your BRAVIA using the Micro USB
cable to supply power to the Smart Stick.
Micro USB cable
(supplied)
*
*
BRAVIA
* Do not connect this plug to devices other than the BRAVIA.
* This jack is for power supply from BRAVIA.
Page 11

4
Finally, connect the Smart Stick directly to your BRAVIA.
BRAVIA
Do not connect the Smart Stick to any jacks other than the jack labeled .
11
Page 12
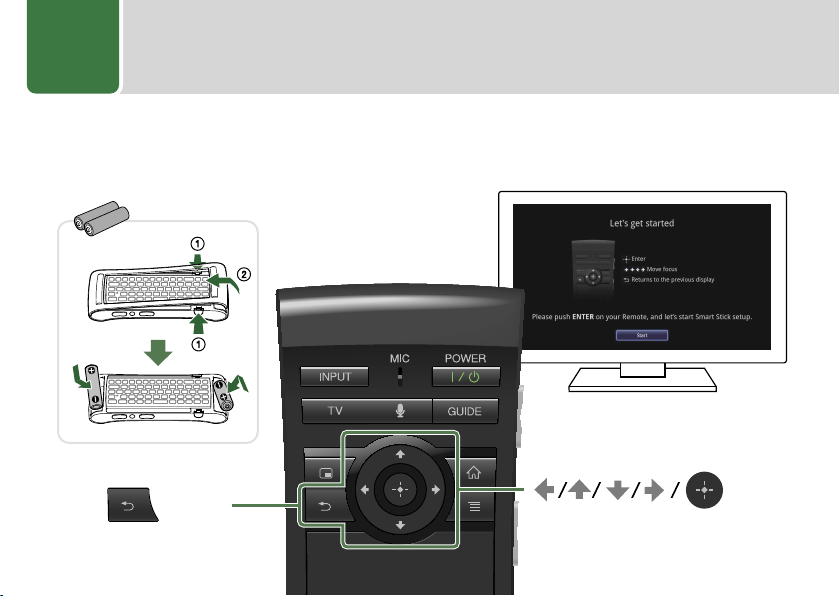
5
Turn on your BRAVIA and follow the on-screen Initial Setup Wizard
to get the system ready for use.
If the setup screen is not displayed, change the TV input to “MHL.”
12
(BACK)
(ENTER)
Page 13

Congratulations! You have now finished the setup.
Following pages…
About your remote control ........p14
Learn more about the Smart
Stick/Troubleshooting ...............p16
13
Page 14
About your
remote
control
14
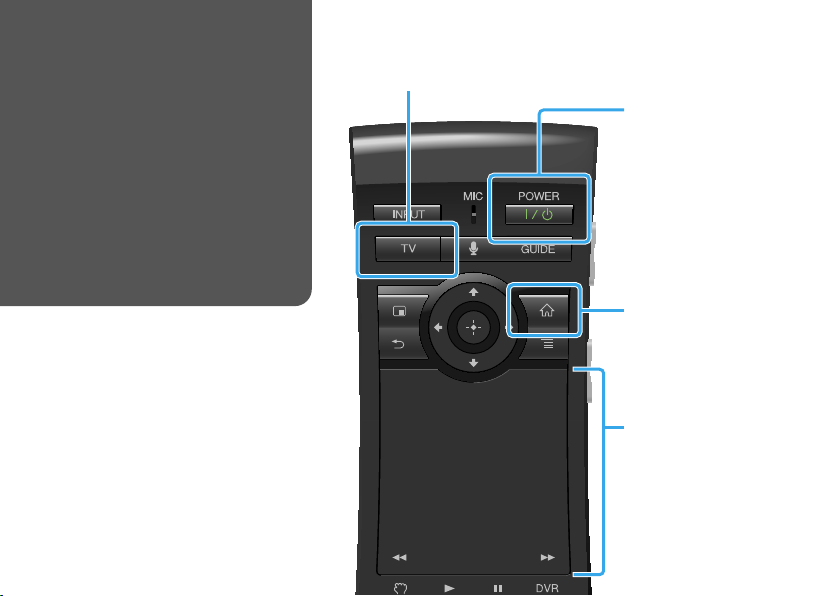
TV
POWER
ON/STANDBY*
Turns on or off the Smart
Stick and your BRAVIA.
* You may also need your
BRAVIA’s remote control to
turn your BRAVIA on/off if
you use BRAVIA R series.
HOME
Touch pad*
* Touch pad will not work
on the HOME screen, Live
TV screen and a few other
screens.
Page 15

HOME
Access each feature of the HOME
screen.
Touch pad
Click
Click Scroll vertically &
TV
Watch TV broadcasts.
Explore the online Help
Guide for more finger
gestures/details on how to
use your remote control
(see page 16).
Zoom in/out
horizontally
15
Page 16
Learn more about
the Smart Stick/
Troubleshooting
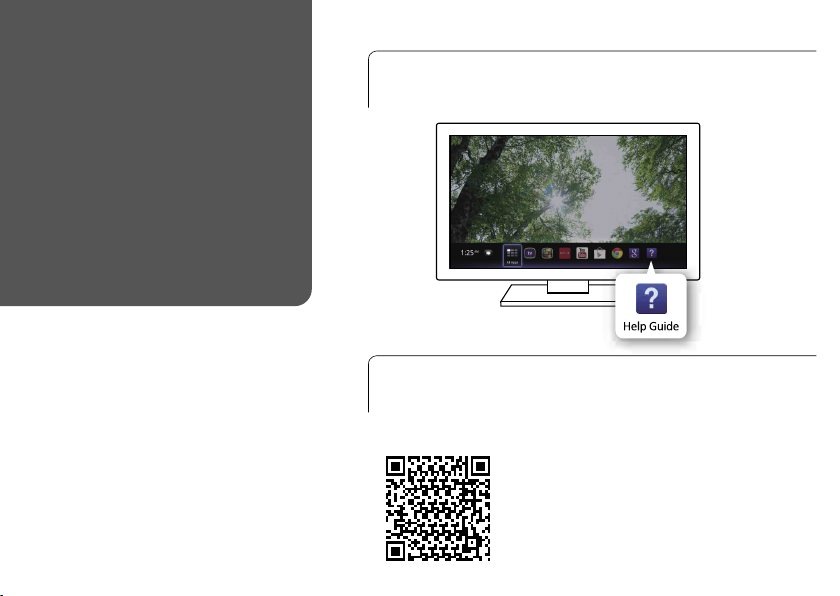
The online Help Guide gives you
complete guide on how to use the
Smart Stick.
16
Accessing the Help Guide from the
Smart Stick
Accessing the Help Guide from your
PC/mobile
http://rd1.sony.net/help/nsz/gu1/h_u/
Page 17

Troubleshooting
There is no picture (screen is dark).
– Make sure that the Smart Stick is securely
connected to the MHL jack.
– Make sure that the supplied USB cable is securely
connected to the Smart Stick and your BRAVIA.
– Make sure that all the connecting cables are
securely connected. (Especially, make sure HDMI
IN is correctly connected.)
– Change the input of the TV to display the signal
from the MHL jack of the Smart Stick.
– Make sure that the power indicator is lit up white
as illustrated below.
Power indicator
– Connect a Cable/Satellite Box to the HDMI IN jack.
(When you press TV, GUIDE, or DVR on the remote
control, the image from the device connected to
the HDMI IN jack will appear on the TV screen.)
Press
(HOME) on the remote control, and
then select any application other than Live TV to
return to the Smart Stick screen.
– Try the following:
– Disconnect the Smart Stick from the TV and
reconnect it securely to the MHL jack.
– Turn the connected device off and on again.
– Disconnect and reconnect the Micro HDMI cable.
The remote control does not function.
– Make sure that the batteries are inserted correctly
into the remote control. If the remote control still
does not function, re-pair the remote control with
the Smart Stick by following the procedure below.
Press shortly the CONNECT button, located on
the side of the Smart Stick.
Follow the instructions on the screen.
CONNECT button
17
Page 18

Troubleshooting
The Smart Stick cannot connect to the
Internet.
– Make sure that the Wireless LAN router is on.
– Check the settings of the Wireless LAN router. For
details, refer to the operating instructions supplied
with the Wireless LAN router.
– Move the Smart Stick and the Wireless LAN router
closer to each other. The Wireless LAN connection
is affected by the surrounding environment (the
wall material, radio wave receiving condition,
obstacles between the Smart Stick and the
Wireless LAN router, etc.).
– Move the Smart Stick away from devices that use
a 2.4 GHz frequency band (microwaves, Bluetooth
devices, cordless digital devices, etc.), or turn off
such devices. These devices may interrupt the
communication between the Smart Stick and the
Wireless LAN router.
– If you need MAC address in the Initial Setup
Wizard, please select “Explain step” on “Connect
to the Internet” screen.
18
The remote control cannot be used to
control connected devices.
– Make sure that the IR Blaster cable is securely
connected to the Smart Stick.
– Adjust the location of the IR Blaster near the
connected device while checking the remote
control to see if it works.
The picture from the Cable/Satellite
Box is not output correctly.
– Make sure that the Micro HDMI cable is securely
connected to the Smart Stick and the Cable/
Satellite Box.
– Turn the Cable/Satellite Box off, then turn it on
again.
The LED on the remote control is
flashing.
– The remote control is being paired. Perform
pairing according to the instructions on the
screen.
Page 19

– The LED on the remote control continues to flash
after pairing is complete because the remote
control is connecting with the Smart Stick. This is
not a malfunction. The LED on the remote control
flashes faster when it starts connecting with the
Smart Stick.
The Smart Stick does not work, or you
want to reboot the Smart Stick.
– Press (Control), (Shift) and
(Backspace) at the same time on the keyboard
of the remote control to reboot the Smart Stick. If
the Smart Stick still does not work, disconnect the
Smart Stick from the TV and reconnect it securely
to the MHL jack. This does not initialize the Smart
Stick settings or other such settings.
19
Page 20

© 2013 Sony Corporation
Printed in China
4-471-308-11(1)
See the Help Guide for
complete instructions
http://rd1.sony.net/help/nsz/gu1/h_u/
Sony Customer Support
http://esupport.sony.com/ | 1-800-222-SONY
Please Call Before Returning the Product to the Store
Screen images, operations, and specifications
are subject to change without notice.
 Loading...