

Page 1

NEX-3/NEX-5/NEX-5C
The 3D functions provided by this firmware update are described in this
booklet. Please refer to the “Instruction Manual” and the “α Handbook”
contained on the supplied CD-ROM.
© 2010 Sony Corporation
A-DRG-100-12(1)
Page 2
3D Functions
3D images shot in [3D Sweep Panorama] mode of this camera can be played back only
on a 3D TV. The recorded images are played back as normal still images on the LCD
monitor of this camera and a non-3D TV.
Shooting
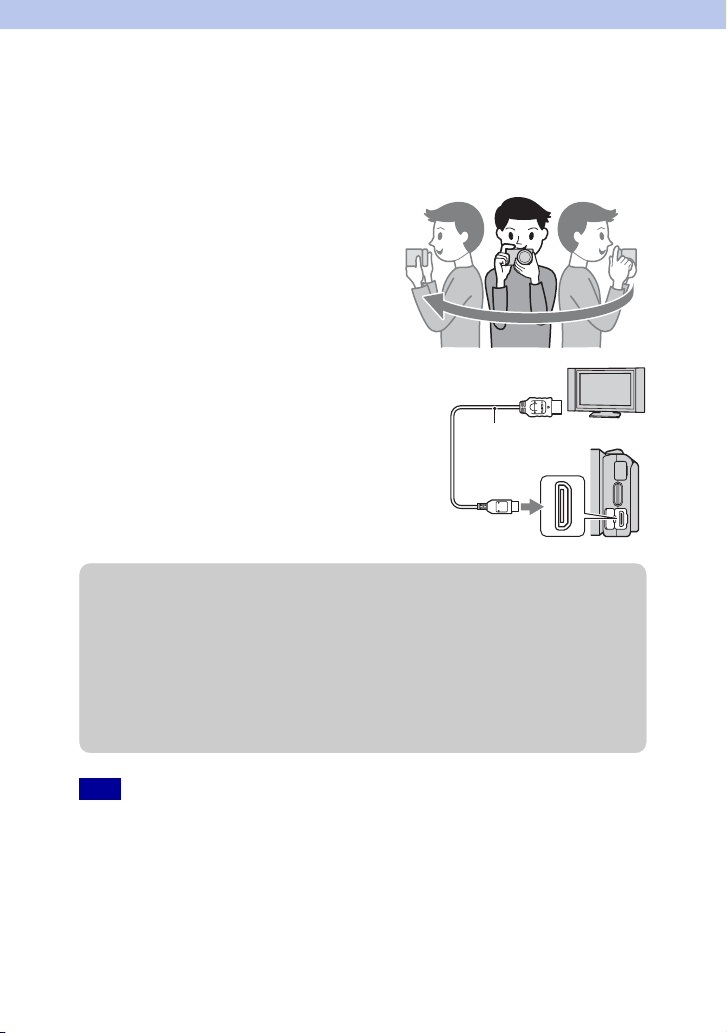
To shoot 3D images, sweep the camera as
illustrated.
Viewing
Connect the camera to a 3D TV using an HDMI
1 To the HDMI
connector
cable (sold separately) (page 9).
HDMI cable
2 To the HDMI
terminal
z File name of the 3D image
A 3D image consists of both JPEG and MPO files.
If you import images shot in [3D Sweep Panorama] mode into a computer, the following
two image data are stored in the same folder on the computer.
•DSC0sss.jpg
•DSC0sss.mpo
If you delete either the JPEG file or the MPO file comprising a 3D image, that 3D image
may not be played back.
Note
• You may feel uncomfor table symptoms such as eyestrain, nausea, or a tired feeling while watching 3D
images recorded with the camera on 3D compatible monitors. When you watch 3D images, we
recommend that yo u take a break at regular time intervals. Since the need for or frequency of break times
varies between individuals, please set your own standards. If you feel sick, stop watching 3D images, and
consult a doctor as needed. Also, refer to the operating instruct ions of the connected device or the
software used with the camera. A child’s vision is always vulnerable (especially for childr en under six
years of age). Befor e allowing them to watch 3D images, please consult with an expert, such as a
pediatric or opht halmic doctor. Make sure your children follow the precautions ab ove.
GB
2
Page 3
3D functions provided
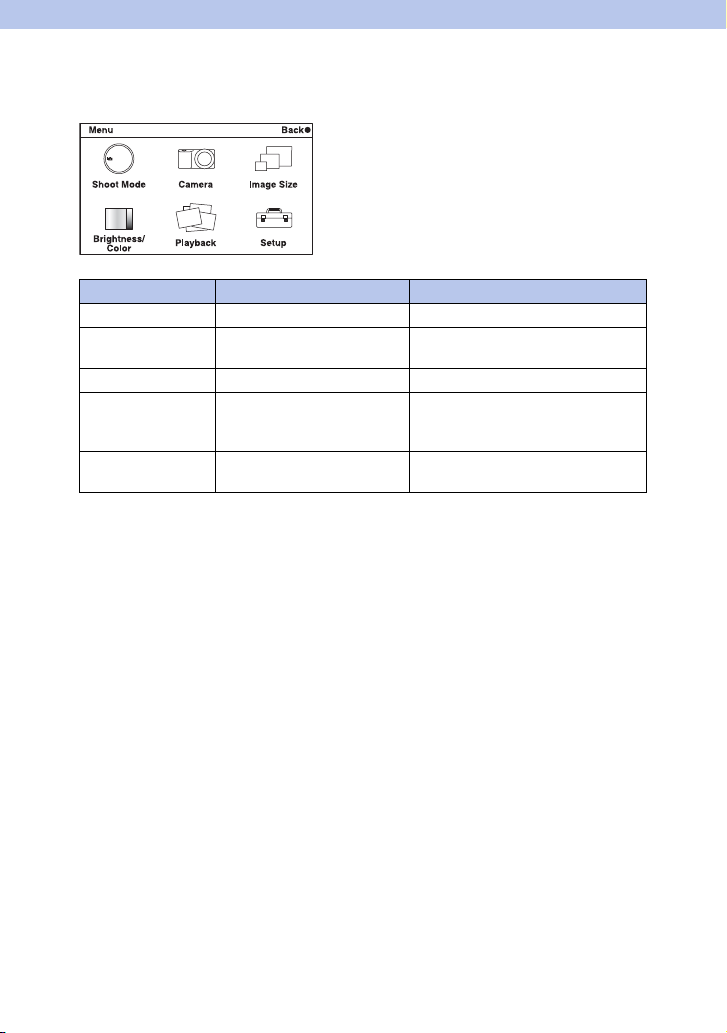
New functions are provided to the menu by this firmware update.
Menu New items provided Functions
Shoot Mode 3D Sweep Panorama Sets 3D image shooting.
Camera 3D Panorama Direct. Sets the shooting direction for 3D
Image Size 3D Panorama: Image Size Selects the size of 3D images.
Playback Slide Show t Image Type Automatically plays back 3D images
Playback 3D Viewing Plays back 3D images on a 3D TV
images.
only on a 3D TV connected to the
camera.
connected to the camera.
GB
3
Page 4

3D Sweep Panorama
Allows you to create a 3D image from composed images.
1 [Menu] t [Shoot Mode] t [3D Sweep Panorama].
2 Point the camera at the edge of the subject,
then press the shutter button fully down.
This part will not be taken.
3 Pan the camera to the end, following the
guidance on the LCD monitor.
Guidance bar
Notes
• If you cannot pan the camera across the entire subject within the giv en time, a gray area occu rs in the
composed image. We recommend you pan the camera 180 degrees within about six seconds when using
an E18 – 55 mm lens at the wide end (18 mm) for better results. You should pan the camera slower with
the telephoto side of th e lens.
• If you shoot a 3D image with T side of a zoom lens, a gray area may occur more often, or shooting may
be stopped. It is re commended to use a zoo m lens with W side.
• The camera continues shooting during [3D Sweep Panorama] recording, and the shutter keeps clicking
until the end of the shooting.
• Since several images are stitched together, the stitched part will not be recorded smoothly.
• Under low light conditions, 3D panoramic images may be blurred.
• Under lights t hat flicker such as fluorescent light, the brig htness or color of the combined image is not
always the same.
• When the whole angle of 3D panoramic shooting and the angle in whi ch you fixed the focus and exposure
(AE/AF lock) by pressing the shutter button halfway down are extremely different in bri ghtness, color
and focus, the shooting will not be successful. If this happens, change the lock angle and shoot again.
• [3D Sweep Panorama] is not suitable when s hooting:
– Subjects are moving.
– Subjects are too close to the camera.
– Subjects with a repeating pattern such as tiles , and subjects with little contrast such as sky, sandy
beach, or lawn.
– Subjects with const ant change such as waves or water falls.
– Subjects with the sun or electric lights, etc. that are much brighter than surroundings.
• [3D Sweep Panorama] recording may be dis continued in the following situations:
– You pan the camera too fast or too slow.
– There is too much camera shake.
• A 3D image consists of both JPEG and MPO files. If you delete either the JPEG file or the MPO file
comprising a 3D image, that 3D image may not be played back.
• You can pan the camera in the horizontal di rection only when shooting 3D Sweep Panorama images.
Continued r
GB
4
Page 5

z Tips for shooting a 3D image
Pan the camera in an arc at a constant speed in
the direction indicated on the LCD screen,
taking the following points into account. You
should pan at about half speed of that in
normal sweep panorama shooting.
• Shoot a still subject.
• Maintain a sufficient distance between the subject and the
background.
• Shoot 3D images in a bright place, such as outdoors.
• Determine the scene and press the shutter button halfway,
so that you can lock the focus, exposure, and white balance.
Then, press the shutter button fully down and pan the
camera.
• When using a zoom lens, it is recommended to use it with
W side.
GB
5
Page 6

3D Panorama Direct.
Sets the direction to pan the camera when you shoot 3D Sweep Panorama images.
1 [Menu] t [Camera] t [3D Panorama Direct.] t desired mode.
(Right) Pan the camera from the left to the right.
(Left) Pan the camera from the right to the left.
GB
6
Page 7

Image Size
Sets the image size to shoot 3D Sweep Panorama images.
1 [Menu] t [Image Size] t [3D Panorama: Image Size] t desired mode.
(16:9) Horizontal: 1920 × 1080
(Standard)
(Wide)
z Tips for selecting the image size
The 3D images appear differently, depending on the mode selected.
Horizontal: 4912 × 1080
Horizontal: 7152 × 1080
16:9
When [Standard] or [Wide] is selected, the images are scrolled when you press the center of
the control wheel.
Standard Wide
GB
7
Page 8

Image Type
Plays back only 3D images in Slide Show on the 3D TV connected to the camera.
1 [Menu] t [Playback] t [Slide Show] t [Image Type] t desired mode.
All Plays back all still images on the memory card as normal
Display 3D Only Plays back 3D images only.
images.
GB
8
Page 9

3D Viewing
To view 3D panorama images recorded on the camera on a 3D TV, set as follows.
Connect the camera to a 3D TV using an HDMI cable (sold separately).
1 Connect the camera to the 3D TV using an
HDMI cable (sold separately).
2 [Menu] t [Playback] t [3D Viewing] t
[OK].
3D panorama images shot with the camera appear on the
TV screen.
When [Standard] or [Wide] is selected, you can scroll
3D panorama images by pressing the center of the
control wheel.
Notes
• When you select [3D Viewing] mode, only 3D images are displayed.
• Do not connect the came ra and equipment to be co nnected using output te rminals. When the camera and
TV are connected using output terminal s, no video and sound are produced. Such connection can also
cause trouble of the camera and/or connected equipment.
• This function may not work properly with some TVs. For example, you may not be able to view a video
on your TV, output in 3D mode or hear sound from the TV.
• Use an HDMI cable with the HDMI logo.
• Use an HDMI mini connector on one end (for the camera), and a plug suitable for connecting your TV on
the other end.
• Influenced by the signal output from the TV to 3D glasses, the RMT-DSLR1 Wireless Remote
Commander (sold separately) may not operate correctly. When using the Wireless Remote Commander,
place the camera as far away from the TV as possible with the camera's remote sensor facing away from
the TV. (NEX-5/5C only)
1 To the HDMI
connector
HDMI cable
2 To the HDMI
terminal
z To view normal still images on a TV
If you select [3D Viewing], only 3D images are displayed on the TV.
To view normal still images, press the bottom of the control wheel to finish [3D Viewing].
To return to 3D, press the bottom of the control wheel again.
To display the image index, select [Menu] t [Playback] t [Image Index].
GB
9
 Loading...