

Page 1
SONY@
3-226-930-11(i)
Portable Memory Stick Audio Player
Network Walkman
Operating Instructions
NW-MS9
0 2001 Sony Corporation
Page 2
For the customers in the
United States
Owner’s Record
The model and serial numbers are located inside the
“Memory Stick” slot cover of the player (see page 7)
Record the serial number in the space provided
below Refer to them whenever you call your Sony
dealer regarding this product
Model No NW-MS9
Serial No
INFORMATION:
This equipment has been tested and found to
comply with the limits for a Class B digital device,
pursuant to Part 15 of the FCC Rules These limits
are designed to provide reasonable protection
against harmful interference in a residential
installation This equipment generates, uses, and can
radiate radio frequency energy and, if not installed
and used in accordance with the instructions, may
cause harmful interference to radio
communications
However, there is no guarantee that interference
will not occur in a oarticular installation
equipment does ca;se harmful interference to radio
or television reception, which can be determined by
turning the equipment off and on, the user is
encouraged to try to correct the interference using
one or more of the following measures:
- Reorient or relocate the receiving antenna
- Increase the separation between the equipment
and receiver
- Connect the equipment into an outlet on a circuit
different from that to which the receiver is
connected
- Consult the dealer or an experienced radio/TV
technician for help
You are cautioned that any changes or modifications
not expressly approved in this manual could void
your authority to operate this equipment
If you have any questions about this product, you
may call:
Sony Direct Response Center l-(800)-222-7669
or write to:
Sony Direct Response Center 12451 Gateway
Blvd Fort Myers, FL 33913
Declaration of Conformity
Trade Name: SONY
Model No : NW-MS9
Responsible Party: Sony Electronics Inc.
Address: 1 Sony Drive,
Telephone No :
This device complies with Part 15 of the FCC
Rules Operation is subject to the following two
conditions: (1) This device may not cause harmful
interference, and (2) this device must accept any
interference received, including interference that
may cause undesired operation
Park Ridge, NJ 07656 USA
201-930-6972
2
If this
1
SONY,
NW-MS9 1
For the customers in the
Netherlands
Voor de Klanten in Nederland
Gooi de batterij niet weg, maar
lever hem in als KCA
Note on the supplied
“MagicGate Memory Stick”
For the customers in the United
States
This device complies with Part 15 of the FCC Rules
Cueration is subiect to the followinz two conditions:
(lj This device day not cause harm”“iul interference,
and (2) this device must accept any interference
received, including interference that may cause
undesired operation
For the customers in Canada
This class B digital apparatus complies with
Canadian ICES-003
Notice for users
On the supplied software
l
Copyright laws prohibit reproducing the software
or the manual accompanying it in whole or in
part, or renting the software without the
uermission of the cowright holder
l
In no event will SONY be liable for any financial
damaee. or loss of orofits. in&dine claims made
by thiyd’parties, arising out of the u”se of the
software supplied with this player
l
In the event a problem occurs with this software
as a result of defective manufacturing, SONY will
replace it
However, SONY bears no other responsibility
l
The software provided with this player cannot be
used with equipment other than that which is so
designated
l
Please note that, due to continued efforts to
improve quality, the software specifications may
be changed without notice
l
Operation of this player with software other than
that provided is not covered by the warranty
Program 02000 Sony Corporation
Documentation 02001 Sofiy Corporation
Page 3
Table of Contents
Overview
What you can do with your
Network Walkman
Other features 5
On “MagicGate Memory Stick”
Getting Started
Step 1: Unpacking
Step 2: Charging the rechargeable
battery
Basic Operations
Transferring songs from the computer
to the “Memory Stick” (CheckOut) 9
Listening to music with Network
Walkman
On other operations
On the display
Advanced Operations
Playing tracks repeatedly
(REPEAT) 13
Adjusting the sound
Emphasizing the bass sound
(MEGA BASS) 14
Protecting your hearing
(AVLS) 14
Changing the display mode
Locking the controls (HOLD)
Changing the settings
To set a reasonable volume
(Volume preset functions)
To turn off the beep sound
(BEEP)
To change the display backlight
setting (LIGHT) 18
To set the date and time
(DATE - TIME)
To erase the “Memory Stick”
(ERASE) 20
To format the “Memory Stick”
(FORMAT) 21
Menu
4
4
5
7
8
11
12
12
14
15
16
16
16
17
18
22
Other Information
Precautions
Notes on the rechargeable battery
Troubleshooting
To reset the player 25
What happened ? 25
Error
messages 28
Specifications
Glossary 31
Looking at the controls 33
Index
This manual explains how to operate
Network Walkman For details on how
to use the supplied software (OpenMG
Jukebox), refer to the OpenMG Jukebox
Operating Instructions
Network Walkman is a trademark of Sony
corporation
OpenMG and its logo are trademarks of Sony
Corporation
“MagicGate Memory Stick,” s, “Memory Stick,”
e , Network Walkman are trademarks of Sony
Corporation
“MagicGate” and
Sony Corporation
WALKMAN is a registered trademarks of Sony
Corporation
US and foreign patents licensed from Dolby
Laboratories
All other trademarks and registered trademarks are
trademarks or registered trademarks of their
respective holders
MAGICGATE
are trademarks of
23
24
25
30
34
Page 4
Overview
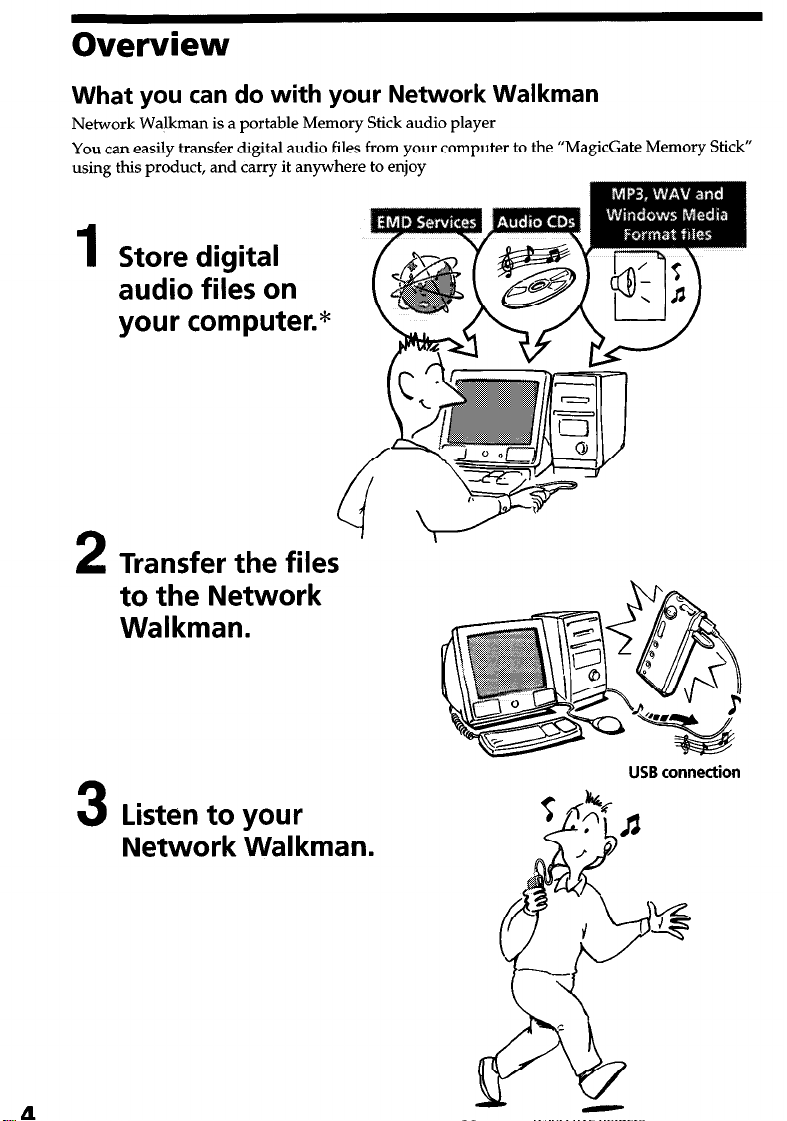
What you can do with your Network Walkman
Network Walkman is a portable Memory Stick audio player
You can easily transfer digital audio files from your computer to the “MagicGate Memory Stick”
using this product, and carry it anywhere to enjoy
Store digital
1
audio files on
your computer.*
Transfer the files
2
to the Network
Walkman.
4
Listen to your
3
Network Walkman.
USB connection
Page 5

For the customers in the
United States
Owner’s Record
The model and serial numbers are located inside the
“Memory Stick” slot cover of the player (see page 7)
Record the serial number in the space provided
below Refer to them whenever you call your Sony
dealer regarding this product
Model No NW-MS9
Serial No
INFORMATION:
This equipment has been tested and found to
comply with the limits for a Class B digital device,
pursuant to Part 15 of the FCC Rules These limits
are designed to provide reasonable protection
against harmful interference in a residential
installation This equipment generates, uses, and can
radiate radio frequency energy and, if not installed
and used in accordance with the instructions, may
cause harmful interference to radio
communications
However, there is no guarantee that interference
will not occur in a particular installation If this
equipment does cause harmful interference to radio
or television reception, which can be determined by
turning the equipment off and on, the user is
encouraged to try to correct the interference using
one or more of the following measures:
- Reorient or relocate the receiving antenna
- Increase the separation between the equipment
and receiver
- Connect the equipment into an outlet on a circuit
different from that to which the receiver is
connected
- Consult the dealer or an experienced radio/TV
technician for help
You are cautioned that any changes or modifications
not expressly approved in this manual could void
your authority to operate this equipment
If you have any questions about this product, you
may call:
Sony Direct Response Center l-(800)-222-7669
or write to:
Sony Direct Response Center 12451 Gateway
Blvd Fort Myers, FL 33913
Declaration of Conformity
Trade Name: SONY
Model No : NW-MS9
Responsible Party: Sony Electronics Inc.
Address: 1 Sony Drive,
Telephone No :
This device complies with Part 15 of the FCC
Rules Operation is subject to the following two
conditions: (1) This device may not cause harmful
interference, and (2) this device must accept any
interference received, including interference that
may cause undesired operation
Park Ridge, NJ 07656 USA
201-930-6972
2
For the customers in the
Netherlands
Voor de Klanten in Nederland
Gooi de batterij niet weg, maar
lever hem in als KCA
Note on the supplied
“MagicGate Memory Stick”
For the customers in the United
States
This device complies with Part 15 of the FCC Rules
Operation is subject to the following two conditions:
(1) This device may not cause harmful interference,
and (2) this device must accept any interference
received, including interference that may cause
undesired operation
For the customers in Canada
This class B digital apparatus complies with
Canadian ICES-003
Notice for users
On the supplied software
l
Copyright laws prohibit reproducing the software
or the manual accompanying it in whole or in
part, or renting the sofhvare without the
permission of the copyright holder
l
In no event will SONY be liable for any financial
damage, or loss of profits, including claims made
by third parties, arising out of the use of the
software supplied with this player
l
In the event a problem occurs with this software
as a result of defective manufacturing, SONY will
replace it
However, SONY bears no other responsibility
l
The software provided with this player cannot be
used with equipment other than that which is so
designated
l
Please note that, due to continued efforts to
improve quality, the software specifications may
be changed without notice
l
Operation of this player with software other than
that provided is not covered by the warranty
Program 02000 Sony Corporation
Documentation 02001 Smiy Corporation
Page 6
l
Compact size, light weight
l
Skip-proof: you can enjoy uninterrupted enjoyment of music during physical activities such as
jogging or commuting
l
Approximately 10 hours of continuous playback with a rechargeable nickel hydride battery
l
Recordable time: up to 60 min ,80 mm ,120 min **, on the supplied 64MB “MagicGate Memory
Stick “
l
Backlight LCD screen: song titles and artist names can be displayed
l
High speed data transfer using the supplied USB cable
l
OpenMG Jukebox software enables you to record compact discs using the ATRAC3 format
(high sound quality, high compression) to the hard drive
* The copyright protection technology of Network Walkman conforms to the SDMI (Secure Digital Music
Initiative) specifications
‘*Differs according to the bit rate when recording In this case, the figures for the recordable time are when
recording
on a
64MB “MagicGate Memory Stick” at 132kbps, 105kbps, and 66kbps
NOTES:
l
The recorded music is limited to private use only Use of the music beyond this limit requires permission
of the copyright holders
l
Sony is not responsible for music files that are not saved on your computer due to unsuccessful recording
from CD or music downloading
What is a “Memory Stick”?
“Memory Stick” is a compact, portable and versatile Integrated Circuit recording medium with a
data capacity that exceeds a floppy disk “Memory Stick” is specially designed for exchanging
and sharing digital data among “Memory Stick” compatible products
the “Memory Stick” can also be used for external data storage
Because it is removable,
Types of ‘*Memory Stick”
There are two types of “Memory Stick”:
-
“MagicGate Memory Stick” that is equipped with “MagicGate” copyright protection
technology
- “Memory Stick” that is not equipped with “MagicGate” copyright protection technology
(See “Glossary” on page 31 for details )
Use a “MagicGate Memory Stick” with this player
A 64-MB “MagicGate Memory Stick” is supplied with this product
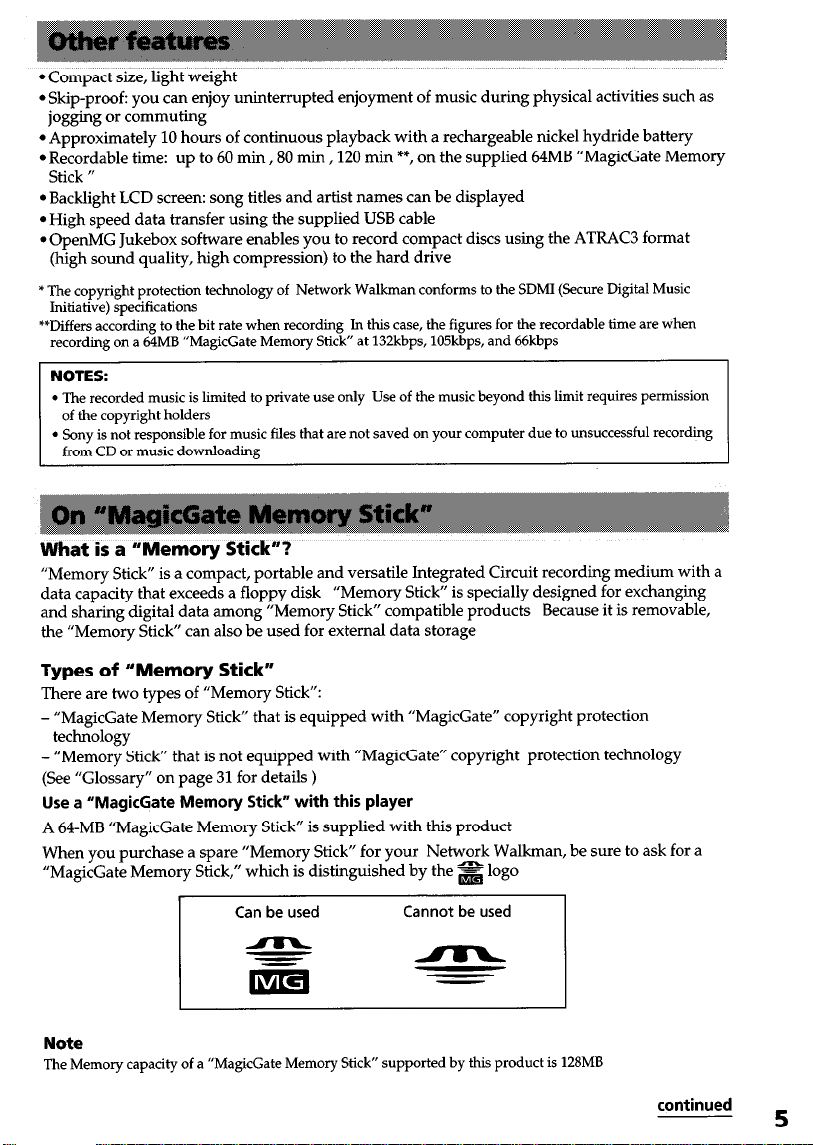
When you purchase a spare “Memory Stick” for your Network Walkman, be sure to ask for a
“MagicGate Memory Stick,” which is distinguished by the s logo
Can be used Cannot be used
Note
The Memory capacity of a “MagicGate Memory Stick” supported by this product is 128MB
continued
5
Page 7
overview (continued)
What is “MagicGate”?
“MagicGate” is a copyright protection technology for “MagicGate Memory Stick” and compliant
products, such as Network Walkman Authentication ensures that protected content is
transferred only between compliant devices and “MagicGate Memory Stick,” and that protected
content is recorded and transferred in an encrypted format to prevent unauthorized copying or
playback
Notes on use
To avoid damaging data, do not
- release the “Memory Stick” or unplug the USB cable during reading or writing of data
- use the “Memory Stick” in a location subject to static electricity or electric noise
On formatting the “Memory Stick”
The “Memory Stick” is shipped with a FAT format as the standard format
To format the “Memory Stick,” please use devices conformable with the “Memory Stick ”
When formatting the “Memory Stick,” do not use the format function on the Windows Explorer
“FORMAT ERR” (page 28) is displayed and you cannot playback using Network Walkman To
format the “Memory Stick,” do one of the following:
*Follow the instructions, “To format the ‘Memory Stick”’ on page 21
l
Use the supplied OpenMG Jukebox software
For details on how to use the OpenMG Jukebox, refer to the online Help for Network Walkman
On the Windows Explorer
When you connect Network Walkman to your computer with the supplied USB cable, you can
display the data recorded on a “Memory Stick” as an external drive (for example, as the D drive)
using the Windows Explorer
l
Data is stored in a falder called “Hifi” Folder Do not edit data that is stored in the “Hifi” Folder
You cannot playback data that has been copied or edited using the Windows Explorer
l
You can display data that has been recorded on other “Memory Stick” compatible devices
CJPEG data, MPEG data, etc )
For information on how to handle data except in the “Hifi” Folder, refer to the instruction manual
that comes with the equipment with which the recording has been done
6
Page 8
Step 1: Unpacking
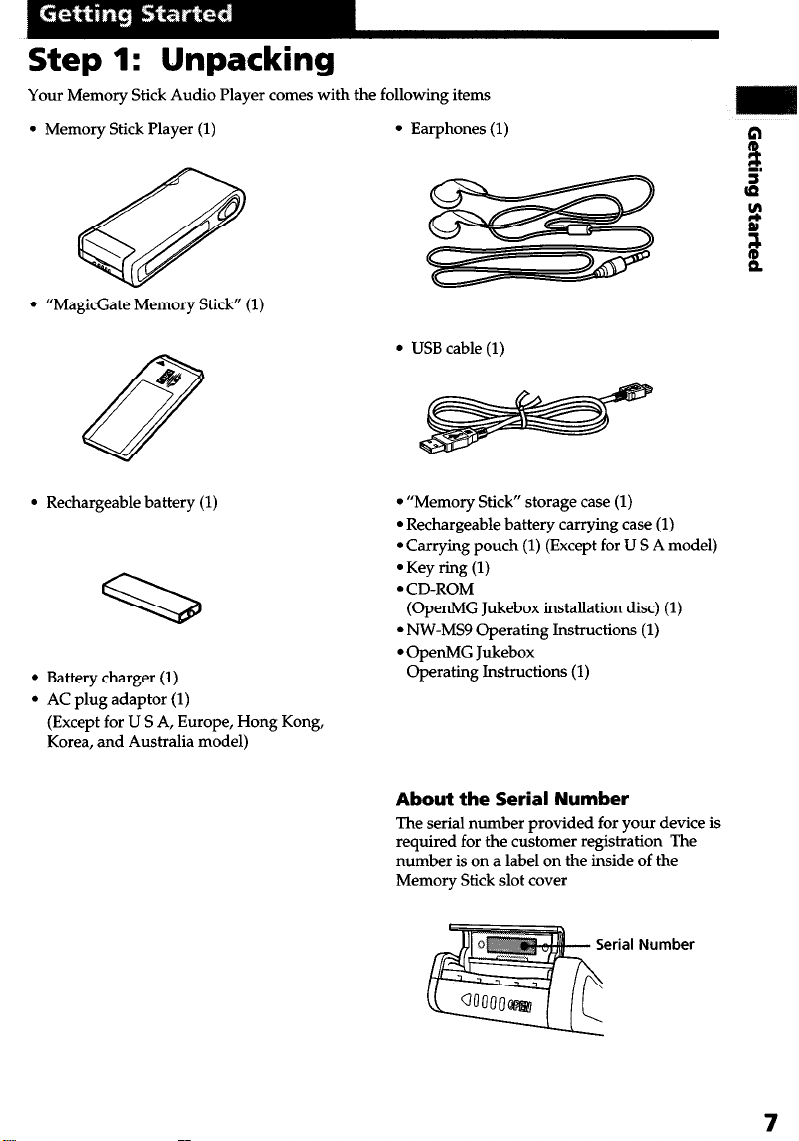
Your Memory Stick Audio Player comes with the following items
l
l
Memory Stick Player (1)
l
“MagicGate Memory Stick” (1)
l
Rechargeable battery (1)
l
Battery charger (1)
l
AC plug adaptor (1)
(Except for U S A, Europe, Hong Kong,
Korea, and Australia model)
Earphones (1)
l
“Memory Stick” storage case (1)
l
Rechargeable battery carrying case (1)
l
Carrying pouch (1) (Except for US A model)
l
Key ring (1)
l
CD-ROM
(OpenMG Jukebox installation disc) (1)
l
NW-MS9 Operating Instructions (1)
l
OpenMG Jukebox
Operating Instructions (1)
About the Serial Number
The serial number provided for your device is
required for the customer registration The
number is on a label on the inside of the
Memory Stick slot cover
erial Number
7
Page 9
Step 2: Charging the rechargeable battery
Please charge the battery before using the player
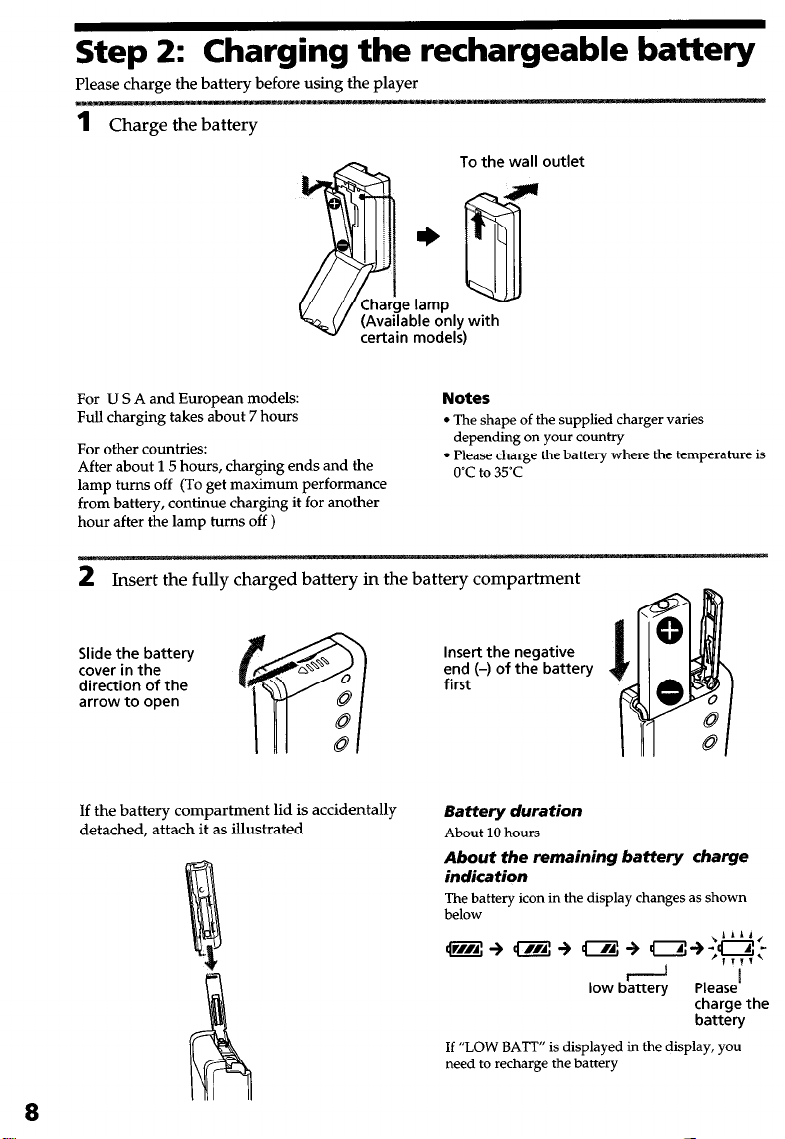
1
Charge
the
battery
e lamp
able only with
certain models)
To the wall
For U S A and European models:
Full charging takes about 7 hours
For other countries:
After about 15 hours, charging ends and the
lamp turns off (To get maximum performance
from battery, continue charging it for another
hour after the lamp turns off )
2 Insert the fully charged battery in the battery compartment
Slide the battery
cover in the
direction of the
arrow to open
If the battery compartment lid is accidentally
detached, attach it as illustrated
Notes
l
The shape of the supplied charger varies
depending on your country
l
Please charge the battery where the temperature is
0°C to 35°C
, -
Insert the negative
end (-) of the battery
first
Battery duration
About 10 hours
About the remaining battery charge
indication
The battery icon in the display changes as shown
below
8
low battery Please’
If “LOW BATT” is displayed in the display, you
need to recharge the battery
charge the
battery
Page 10
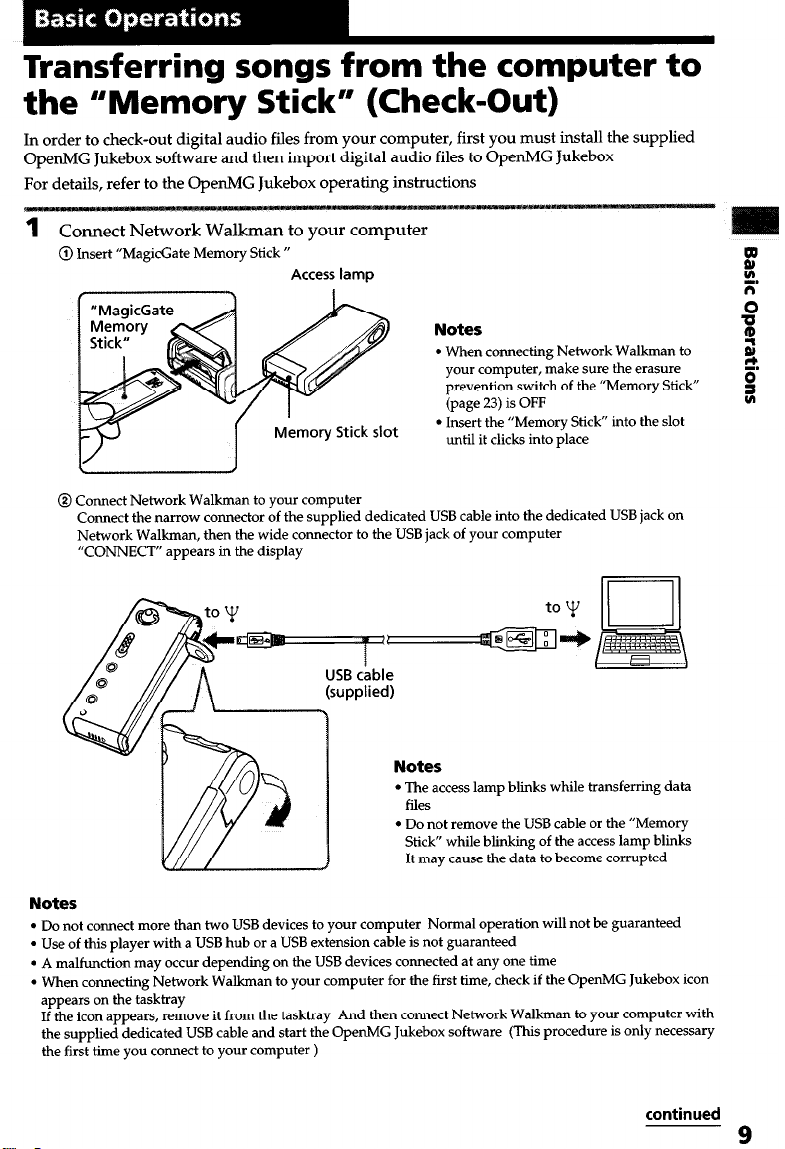
Transferring songs from the computer to
the “Memory Stick” (Check-Out)
In order to check-out digital audio files from your computer, first you must install the supplied
OpenMG Jukebox software and then import digital audio files to OpenMG Jukebox
For details, refer to the OpenMG Jukebox operating instructions
@ Insert “MagicGate Memory Stick ”
Access lamp
I
Notes
l
When connecting Network Walkman to
your computer, make sure the erasure
prevention switch of the “Memory Stick”
(page 23) is OFF
l
Memory Stick
@ Connect Network Walkman to your computer
Connect the narrow connector of the supplied dedicated USB cable into the dedicated USB jack on
Network Walkman, then the wide connector to the USB jack of your computer
“CONNECT” appears in the display
slot
Insert the “Memory Stick” into the slot
until it clicks into place
l
The access lamp blinks while transferring data
l
Do not remove the USB cable or the “Memory
Stick” while blinking of the access lamp blinks
It may cause the data to become corrupted
Notes
l
Do not connect more than two USB devices to your computer Normal operation will not be guaranteed
l
Use of this player with a USB hub or a USB extension cable is not guaranteed
l
A malfunction may occur depending on the USB devices connected at any one time
l
When connecting Network Walkman to your computer for the first time, check if the OpenMG Jukebox icon
appears on the tasktray
If the icon appears, remove it from the tasktray And then connect Network Walkman to your computer with
the supplied dedicated USB cable and start the OpenMG Jukebox software (This procedure is only necessary
the first time you connect to your computer )
continued
9
Page 11
Transferring songs from tie computer to
“Memory Stick” (Check-Out)
(continued)
2 Transfer the music file to the “Memory Stick” (Check-out)
For details on how to operate, refer to the OpenMG Jukebox operating instructions
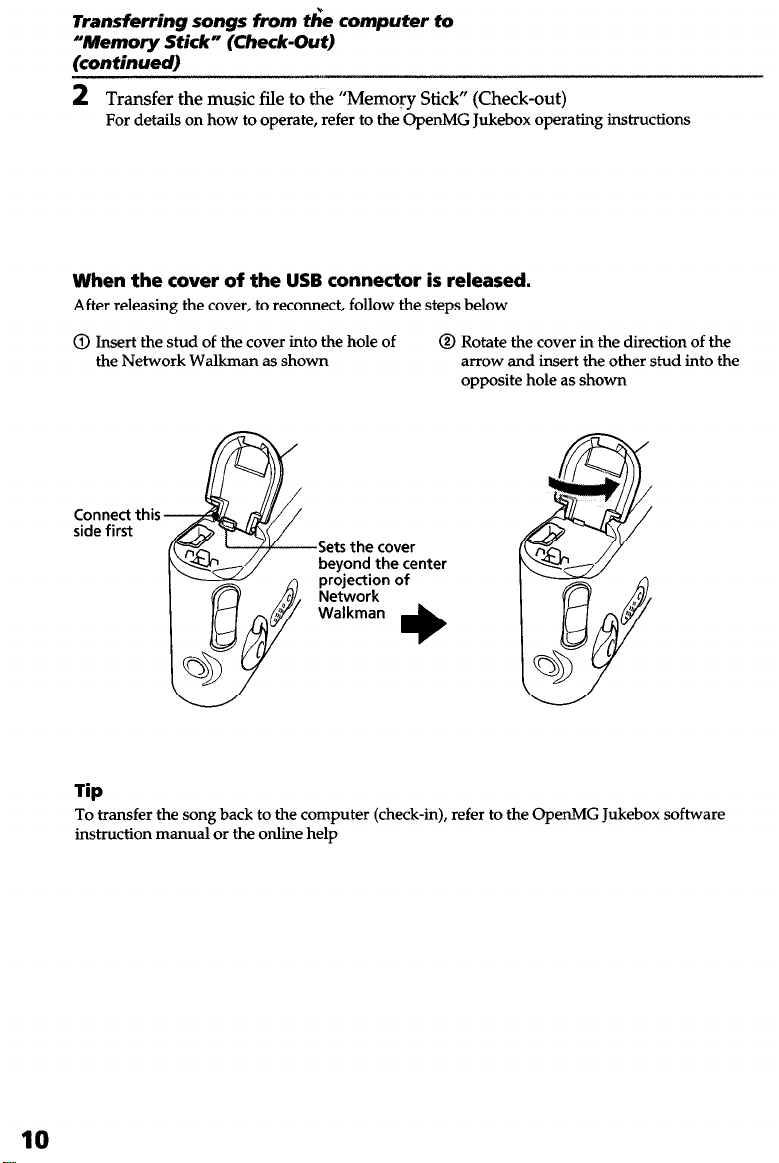
When the cover of the USB connector is released.
After releasing the cover, to reconnect, follow the steps below
@ Insert the stud of the cover into the hole of
the Network Walkman as shown
Connect this
side first
.Sets the cover
beyond the center
projection of
Network
Walkman
@I Rotate the cover in the direction of the
arrow and insert the other stud into the
opposite hole as shown
Tip
To transfer the song back to the computer (check-in), refer to the OpenMG Jukebox software
instruction manual or the online help
10
Page 12
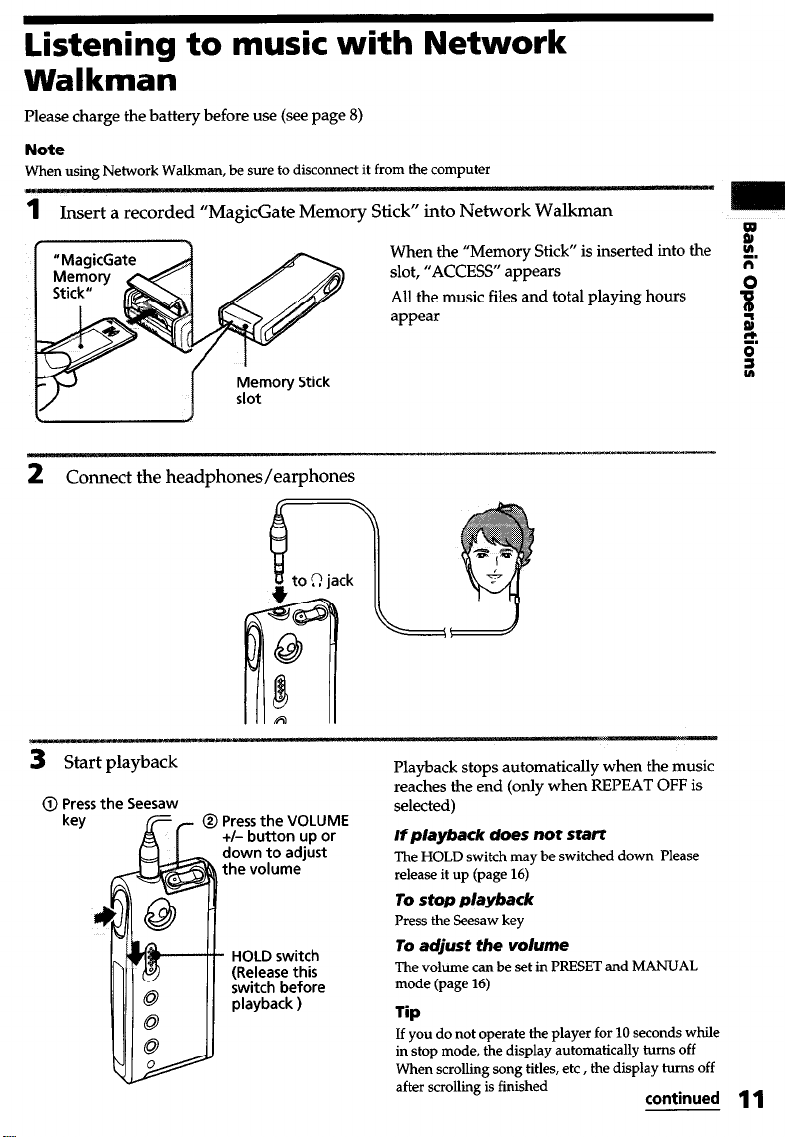
Listening to music with Network Walkman
Please charge the battery before use (see page 8)
Note
When using
2
Network Walkman, be
sure to disconnect it from the computer
Insert a recorded “MagicGate Memory Stick” into Network Walkman
When the “Memory Stick” is inserted into the
c
onnect
the
headphones/earphones
slot, “ACCESS”
All the music fiies and total playing hours
appear
appears
P
8.
Q
2
‘,
0
?I
@ Press the VOLUME
+I- button up or
down to adjust
the volume
HOLD switch
(Release this
switch before
playback )
Playback stops automatically when the music
reaches the end (only when REPEAT OFF is
selected)
If playback does not start
The HOLD switch may be switched down Please
release it up (page 16)
To stop playback
Press the Seesaw key
To adjust the volume
The volume can be set in PRESET and MANUAL
mode (page 16)
lip
If you do not operate the player for 10 seconds while
in stop mode, the display automatically turns off
When scrolling song titles, etc , the display hums off
after scrolling is finiihed
continued 11
Page 13
Listening to music with Network Walkman (continued)
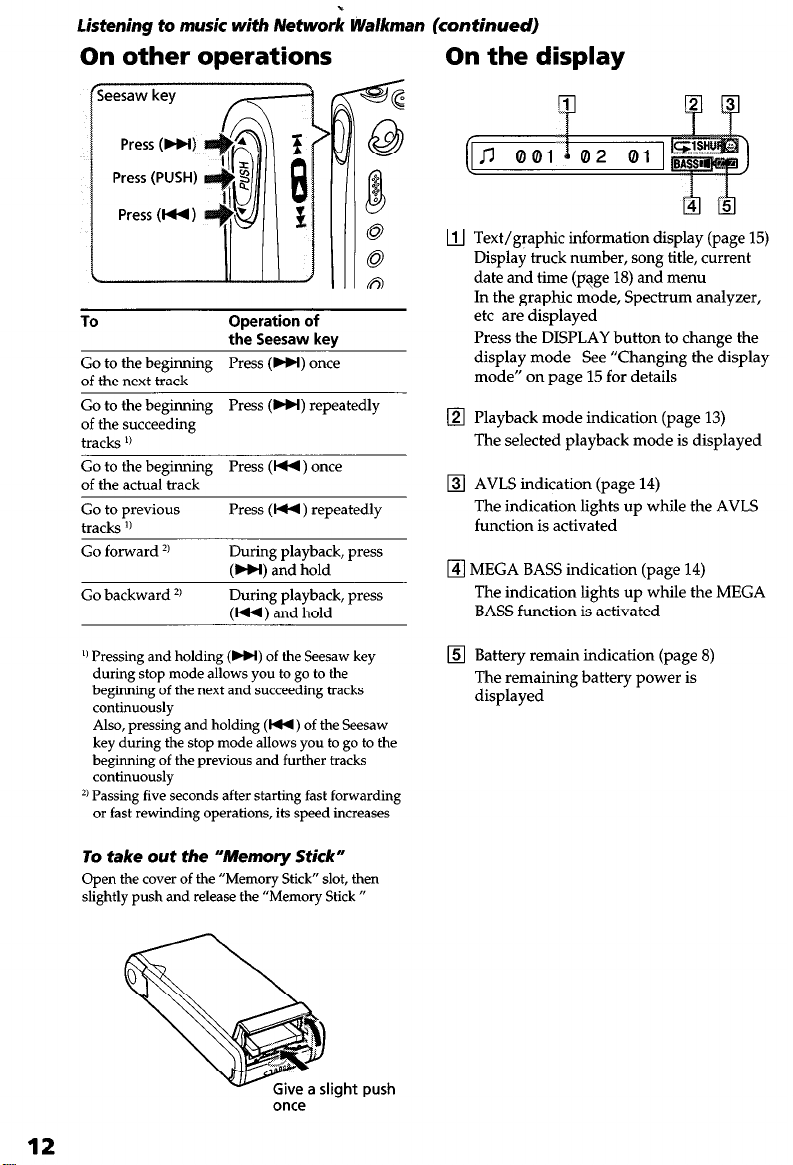
On other operations On the display
q
Text/graphic information display (page 15)
Display truck number, song title, current
date and time (page 18) and menu
In the graphic mode, Spectrum analyzer,
To
Go to the beginning Press (W) once
of the next track
Go to the beginning Press (W) repeatedly
of the succeeding
tracks ‘1
Go to the beginning Press (H) once
of the actual track
Go to previous
tracks I)
Go forward 2, During playback, press
Go backward 2, During playback, press
Operation of
the Seesaw key
Press (W4) repeatedly
(HI) and hold
(W ) and hold
etc are displayed
Press the DISPLAY button to change the
display mode See “Changing the display
mode” on page 15 for details
q
Playback mode indication (page 13)
The selected playback mode is displayed
q
AVLS indication (page 14)
The indication lights up while the AVLS
function is activated
q
MEGA BASS indication (page 14)
The indication lights up while the MEGA
BASS function is activated
‘1 Pressing and holding (W) of the Seesaw key
during stop mode allows you to go to the
beginning of the next and succeeding tracks
continuously
Also, pressing and holding (H1) of the Seesaw
key during the stop mode allows you to go to the
beginning of the previous and further tracks
continuously
2, Passing five seconds after starting fast forwarding
or fast rewinding operations, its speed increases
To take out the “Memory Stick”
Open the cover of the “Memory Stick” slot, then
slightly push and release the “Memory Stick ”
once
12
q
Battery remain indication (page 8)
The remaining battery power is
displayed
Page 14
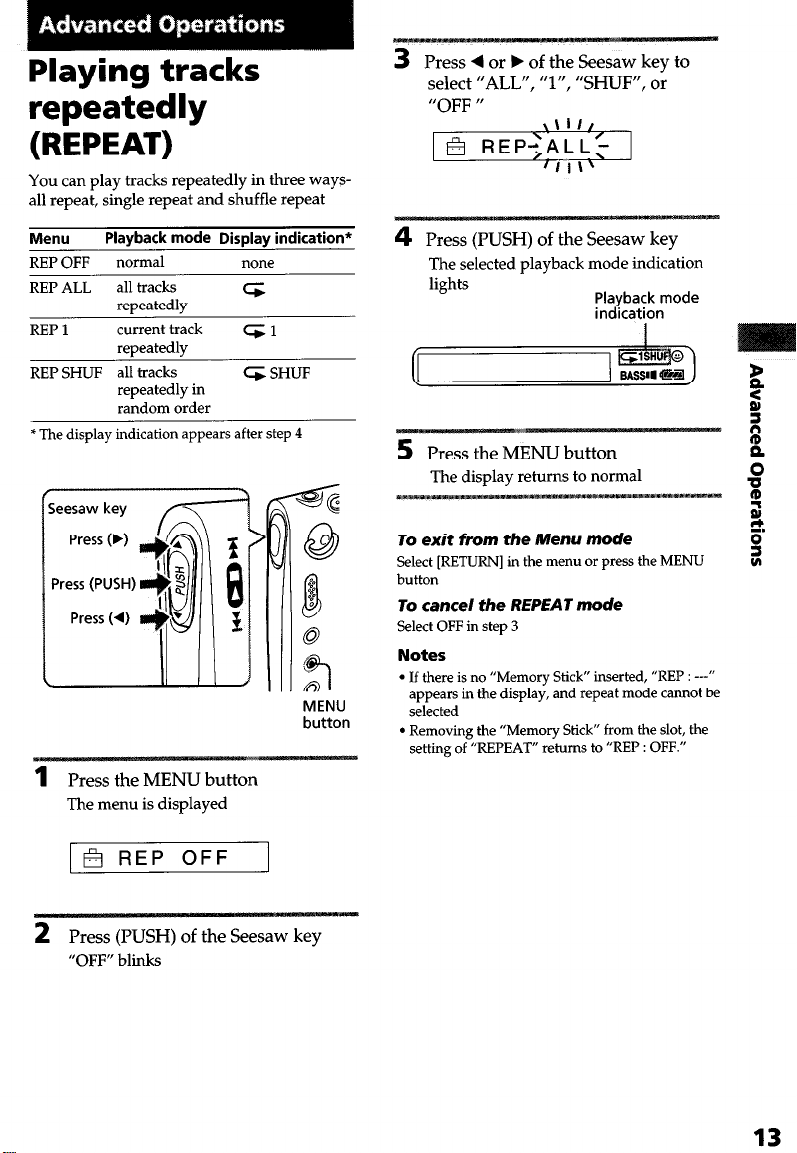
Playing tracks
repeatedly
(REPEAT)
You can play tracks repeatedly in three ways-
all repeat, single repeat and shuffle repeat
3
Press 4 or b of the Seesaw key to
select “ALL”, “l”, “SHUF”, or
“OFF “
Menu Playback mode Display indication*
REP OFF normal none
REP ALL all tracks
REP 1 current track
REP SHUF all tracks
* The display indication appears after step 4
1
repeatedly
repeatedly
repeatedly in
random order
Press the MENU button
The menu is displayed
4
41
4 SHUF
MENU
button
4
Press (PUSH) of the Seesaw key
The selected playback mode indication
lights
Playback mode
indication
Press the MENU button
returns to normal
To exit from the Menu mode
Select [RETURN] in the menu or press the MENU
button
To cancel the REPEAT mode
Select OFF in step 3
Notes
l
If there is no “Memory Stick” inserted, “REP : --”
appears in the display, and repeat mode cannot be
selected
l
Removing the “Memory Stick” from the slot, the
setting of “REPEAT” returns to “REP : OFF.”
2
Press
“OFF” blinks
(PUSH) of the Seesaw key
13
Page 15
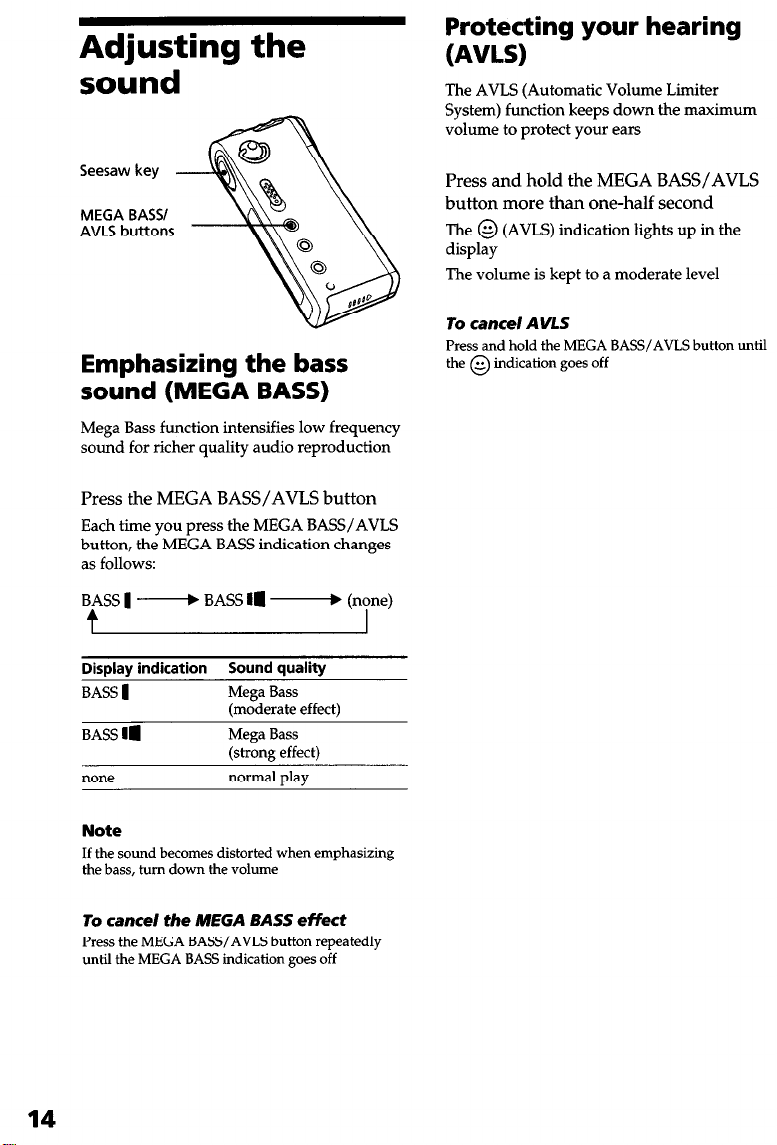
Adjusting the
sound
Protecting your hearing
(AVLS)
The AVLS (Automatic Volume Limiter
System) function keeps down the maximum
volume to protect your ears
Seesaw key
MEGA BASS/
AVLS buttons
Emphasizing the bass
sound (MEGA BASS)
Mega Bass function intensifies low frequency
sound for richer quality audio reproduction
Press the MEGA BASS/AVLS button
Each time you press the MEGA BASS/AVLS
button, the MEGA BASS indication changes
as follows:
BASS 1 W BASS Ia F (none)
Display indication Sound quality
BASS 1 Mega Bass
BASS Ia Mega Bass
none normal play
(moderate effect)
(strong effect)
Press and hold the MEGA BASS/AVIS
button more than one-half second
The @ (AVLS) indication lights up in the
display
The volume is kept to a moderate level
To cancel AVLS
Press and hold the MEGA BASS/AVLS button until
the @ indication goes off
Note
If the sound becomes distorted when emphasizing
the bass, turn down the volume
To cancel the MEGA BASS effect
Press the MEGA BASS/AVLS button repeatedly
until the MEGA BASS indication goes off
14
Page 16
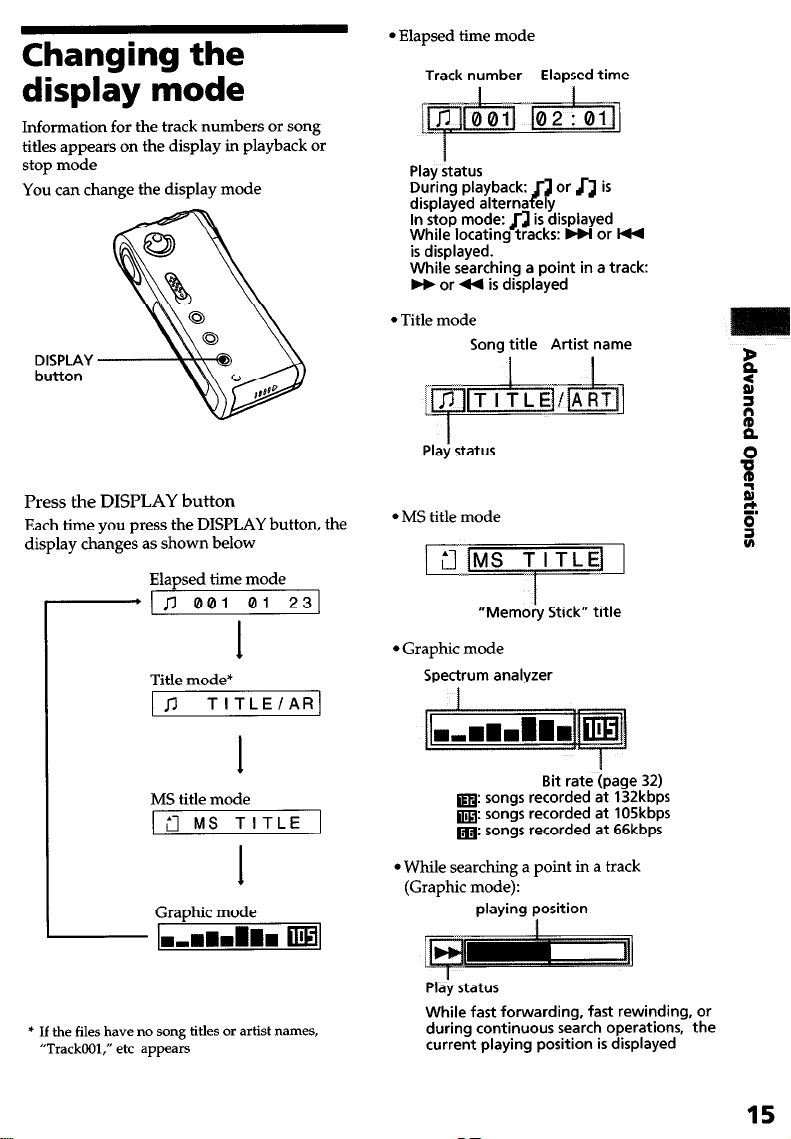
Changing the
display mode
Information for the track numbers or song
titles appears on the display in playback or
stop mode
You can change the display mode
DISPLAY
button
l
Elapsed time mode
Track number Elapsed time
Play status
p$YP;“,g~;~;-$~ Jl is
In stop mode: n is displayed
While locating tracks: w or I44
is displayed.
While searching a point in a track:
H or 44 is displayed
l
Title mode
Song title Artist name
I I
I
Play status
Press the DISPLAY button
Each time you press the DISPLAY button, the
display changes as shown below
Elapsed time mode
[-+I ~7 001 01 231
I
Title mode*
1~7 TITLE/AR]
MS title mode
1 fi MS TITLE 1
I
Graphic mode
L-,
*
If
the
files have
“TrackOOl,” etc appears
.,mdmm m
no song
titles
or artist names,
l
MS title mode
1 ;3iMS TITLEif 1
1
“Memory Stick” title
l
Graphic mode
Spectrum analyzer
m: songs recorded at 132kbps
m: songs recorded at 10Skbps
m: songs recorded at 66kbps
l
While searching a point in a track
(Graphic mode):
playing position
Pla; status
While fast forwarding, fast rewinding, or
during continuous search operations, the
current playing position is displayed
Bit rate {page 32)
1
15
Page 17
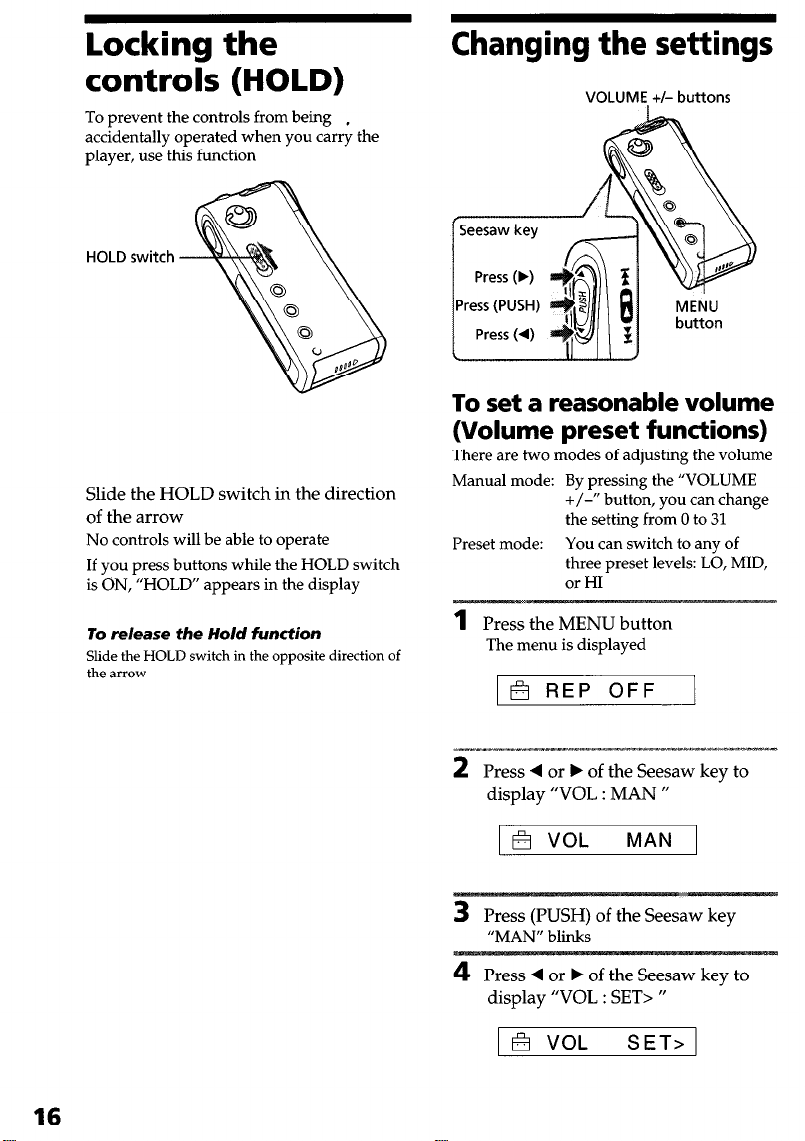
Locking the
Changing the settings
controls (HOLD)
To prevent the controls from being
accidentally operated when you carry the
player, use this function
HOLD switch
Slide the
of the arrow
No controls will be able to operate
If you press buttons while the HOLD switch
is ON, “HOLD” appears in the display
To release the Hold function
Slide the HOLD switch in the opposite direction of
the arrow
HOLD
switch in the direction
,
VOLUME. +I- buttons
Press (4)
I
II
To set a reasonable volume
(Volume preset functions)
There are two modes of adjusting the volume
Manual mode: By pressing the “VOLUME
Preset mode:
1
Press the MENU button
The menu is displayed
+/-I’ button, you can change
the setting from 0 to 31
You can switch to any of
three preset levels: LO, MID,
or HI
2
Press 4 or F of the Seesaw key to
display “VOL : MAN ”
3
Press (PUSH) of the Seesaw key
“MAN” blinks
4
Press 4 or b of the Seesaw key to
display “VOL : SET> “
1 a VOL SET> 1
Page 18
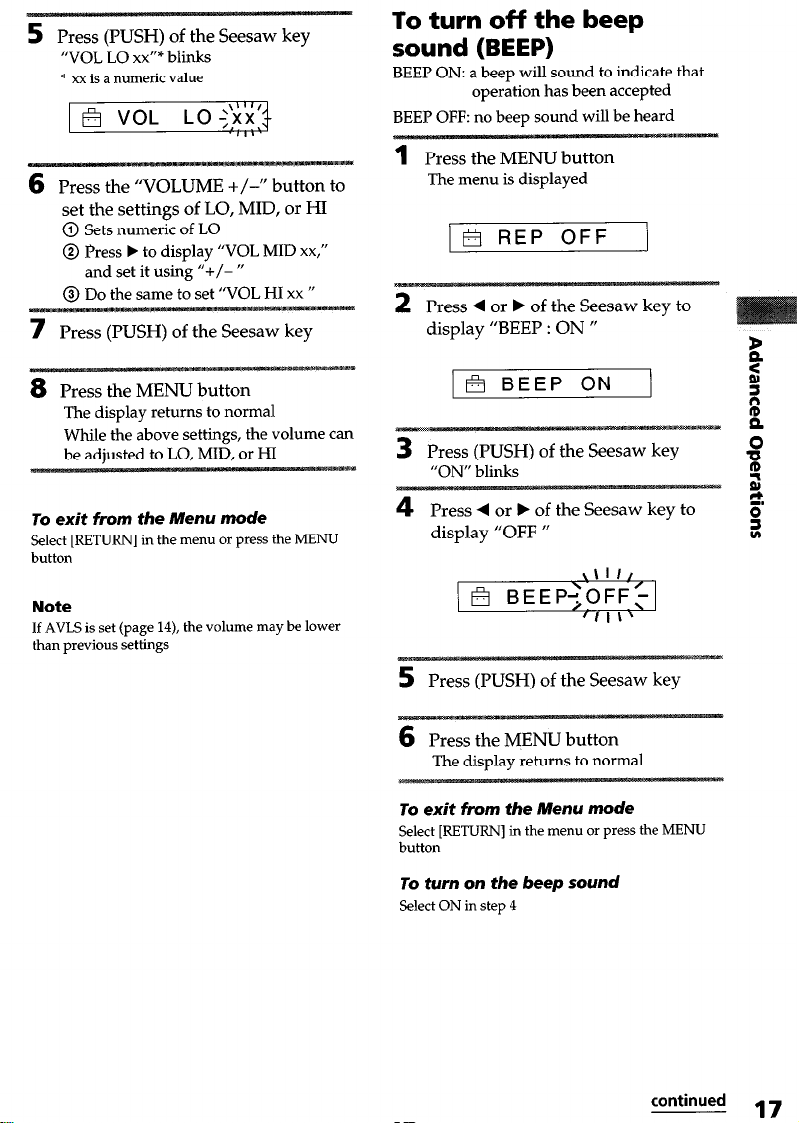
5
Press
(PUSH) of the Seesaw key
“VOL LO xx”* blinks
* xx is a numeric value
set the settings of
@ Sets numeric of LO
@ Press b to display “VOL MID xx,”
and set it using ‘I+/- “
7
Press (PUSH) of the Seesaw key
The display returns to normal
While the above settings, the volume can
To exit from the Menu mode
Select [RETURN] in the menu or press the MENU
button
Note
If AVLS is set (page 14), the volume may be lower
than previous settings
LO, MID, or HI
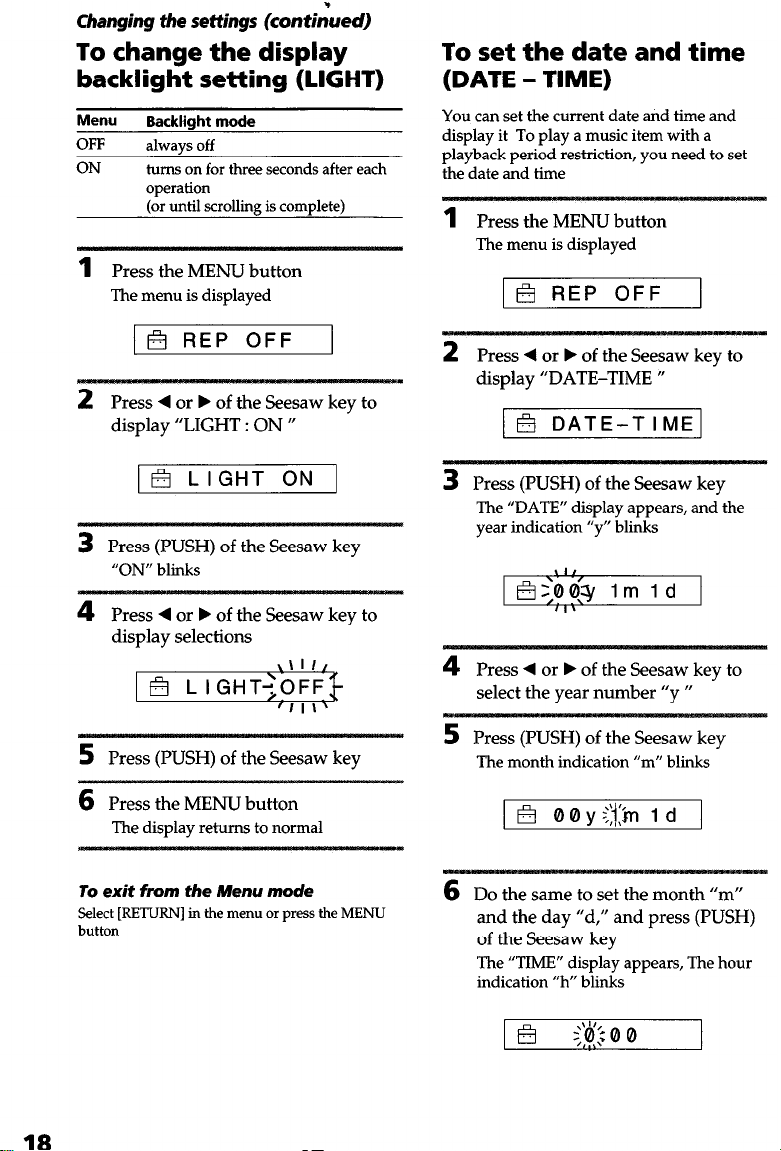
To turn off the beep
sound (BEEP)
BEEP ON: a beep will sound to indicate that
BEEP OFF: no beep sound will be heard
1
2
3
4
operation has been accepted
Press the MENU button
The menu is displayed
1 R REP OFF
Press 4 or b of the Seesaw key to
display
“BEEP : ON “
1 B BEEP ON
Press (PUSH) of the Seesaw key
“ON” blinks
Press 4 or W of the Seesaw key
display “OFF ”
to
5
Press (PUSH) of the Seesaw key
6
Press the MENU button
The display returns to normal
To exit from the Menu mode
Select
[RETURN] in
button
To turn on the beep sound
Select ON in step 4
the menu
or press the MENU
continued
17
Page 19
Changing the settings (con&d)
To change the display
backlight setting (LIGHT)
Menu
OFF
ON
1
Backlight mode
always off
turns on for three seconds after each
operation
(or until scrolling is complete)
Press the MENU button
The menu is displayed
To set the date and time
(DATE - TIME)
You can set the current date and time and
display it To play a music item with a
playback period restriction, you need to set
the date and time
1
Press the MENU button
The menu is displayed
1 B REP OFF
1 E?I REP OFF
2
Press 4 or F of the Seesaw key to
display “LIGHT : ON v
I@ LIGHT ON 1
3
Press (PUSH) of the Seesaw key
“ON” blinks
4
Press 4 or F of the Seesaw key to
display selections
5
Press (PUSH) of the Seesaw key
6
Press the MENU button
The display returns to normal
To exit from the Menu mode
Select [RETURN] in the menu or press the MENU
button
2
Press 4 or F of the Seesaw key to
display “DATE-TIME II
) Q DATE-TIME1
3
Press (PUSH) of the Seesaw key
The “DATE” display appears, and the
year indication “y” blinks
4
Press 4 or F of the Seesaw key to
select the year number “y fl
5
Press (PUSH) of the Seesaw key
The month indication “m” blinks
6
Do the same to set the month “m”
and the day “d,” and press (PUSH)
of the Seesaw key
The “TIME” display appears, The hour
indication “h” blinks
18
Page 20
7 Do the same to set the month “h”
and the day “m,” and press (PUSH)
of the Seesaw key
8
Press the MENU button
The display returns to normal
To switch between 24 hour display and
12 hour display
Press the DISPLAY button during the setting in step
7
To exit from the Menu mode
Select [RETURN] in the menu or press the MENU
button
To display the current time
Press the DISPLAY button more than one-half
second
You can display the current time during pressing
Note
If the unit is not used for a long time, it may reset
your settings of the date and time
19
Page 21
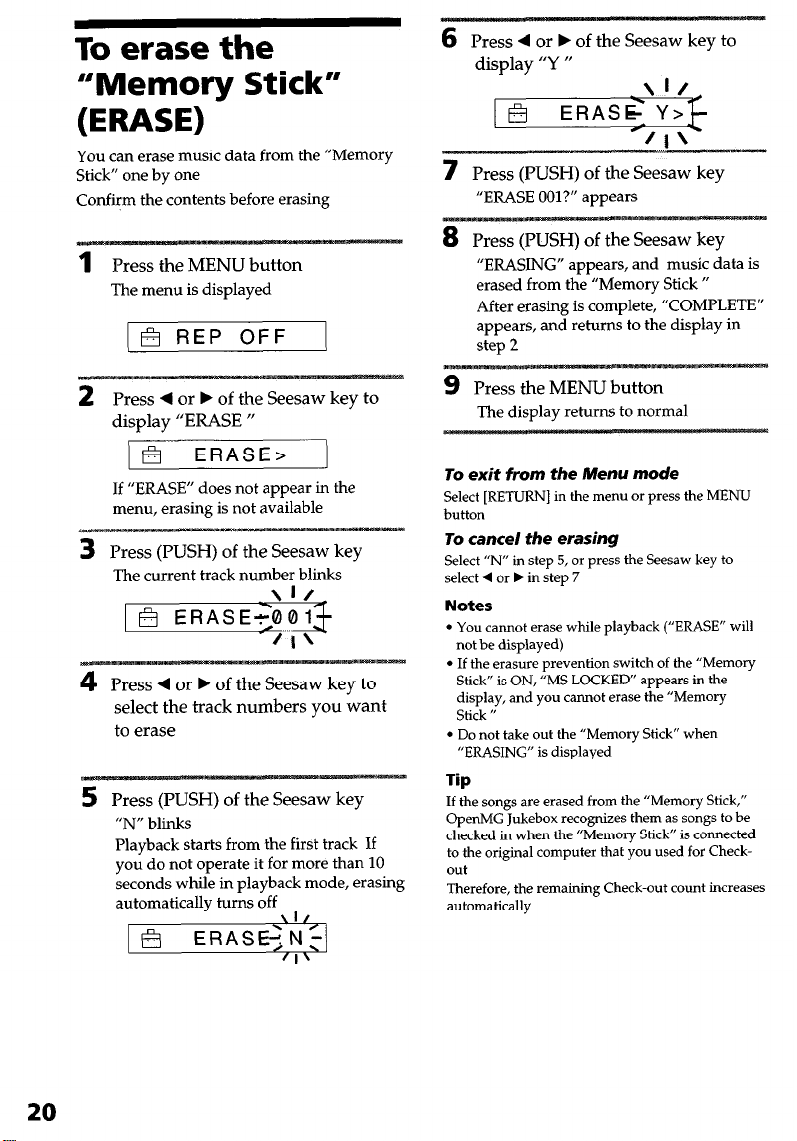
To erase the
“Memory Stick”
(ERASE)
You can erase music data from the “Memory
Stick” one by one
Confirm the contents before erasing
6
Press 4 or b of the Seesaw key to
display “Y ”
7
Press
(PUSH) of the Seesaw key
“ERASE OOl?” appears
1
Press
the MENU button
The menu is displayed
1 F? REP OFF 1
2
Press 4 or b of the Seesaw key to
display
“ERASE “
) @ ERASE>
If “ERASE” does not appear in the
menu, erasing is not available
3
Press (PUSH) of the Seesaw key
The current track number blinks
\If
1 B ERASE<0013
fl’
4
Press 4 or F of the Seesaw key to
select the track
to erase
5
Press (PUSH) of the Seesaw key
“N” blinks
Playback starts from the first track If
you do not operate it for more than 10
seconds while in playback mode, erasing
automaticallv turns off
numbers
you want
“ERASING” appears, and music data is
erased from the “Memory Stick ”
After erasing is complete, “COMPLETE”
appears, and returns to the display in
9 Press the MENU button
The display returns to normal
To exit from the Menu mode
Select [RETURN] in the menu or press the MENU
button
To cancel the erasing
Select “IV’ in step 5, or press the Seesaw key to
select 4 or b in step 7
Notes
l
You cannot erase while playback (“ERASE” will
not be displayed)
l
If the erasure prevention switch of the “Memory
Stick” is ON, “MS LOCKED” appears in the
display, and you cannot erase the “Memory
Stick ”
l
Do not take out the “Memory Stick” when
“ERASING” is displayed
Tip
If the songs are erased from the “Memory Stick,”
OpenMG Jukebox recognizes them as songs to be
checked in when the “Memory Stick” is connected
to the original computer that you used for Checkout
Therefore, the remaining Check-out count increases
automatically
20
Page 22
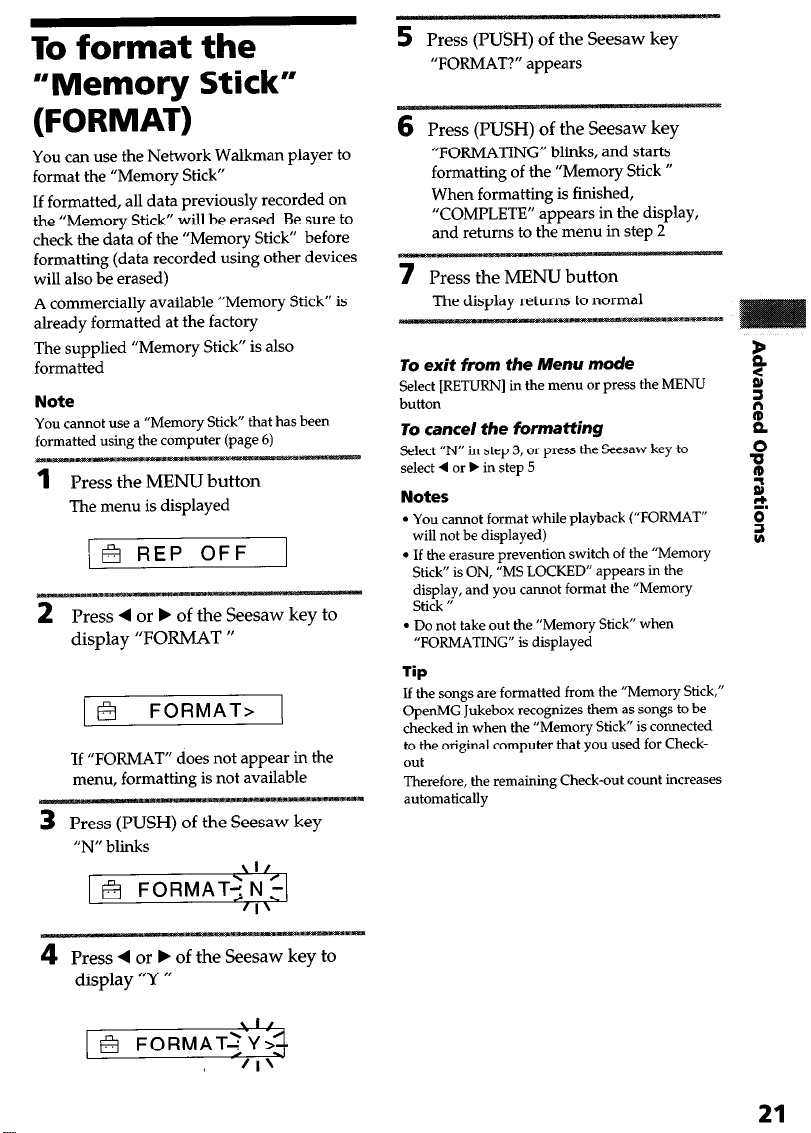
To format the
“Memory Stick”
5
Press (PUSH) of the Seesaw key
“FORMAT?” appears
(FORMAT)
You can use the Network Walkman player to
format the “Memory Stick”
If formatted, all data previously recorded on
the “Memory Stick” will be erased Be sure to
check the data of the “Memory Stick” before
formatting (data recorded using other devices
will also be erased)
A commercially available “Memory Stick” is
already formatted at the factory
The supplied “Memory Stick” is also
formatted
Note
You cannot use a “Memory Stick” that has been
formatted using the computer (page 6)
The menu is displayed
(a REP OFF
display “FORMAT ”
1 @ FORMAT> 1
If
“FORMAT” does not
menu, formatting is not available
Press (PUSH) of the Seesaw key
“N”
blinks
appear in the
6
Press (PUSH) of the Seesaw key
“FORMATING” blinks, and starts
formatting of the “Memory Stick “
When formatting is finished,
“COMPLETE” appears in the display,
and returns to the menu in step 2
7 Press the MENU button
The display returns to normal
To exit from the Menu mode
Select [RETURN] in the
button
To cancel the formatting
Select “IV’ in step 3, or press the Seesaw key to
select 4 or b in step 5
Notes
l
You cannot format while playback (“FORMAT”
will not be displayed)
l
If the erasure prevention switch of the “Memory
Stick” is ON, “MS LOCKED” appears in the
display, and you cannot format the “Memory
Stick ”
l
Do not take out the “Memory Stick” when
“FORMATING” is displayed
lip
If the songs are formatted from the “Memory Stick,”
OpenMG Jukebox recognizes them as songs to be
checked in when the “Memory Stick” is connected
to the original computer that you used for Checkout
Therefore, the remaining Check-out count increases
automatically
menu or press
the
MENU
4
Press 4 or b of the Seesaw key to
display “Y ”
21
Page 23
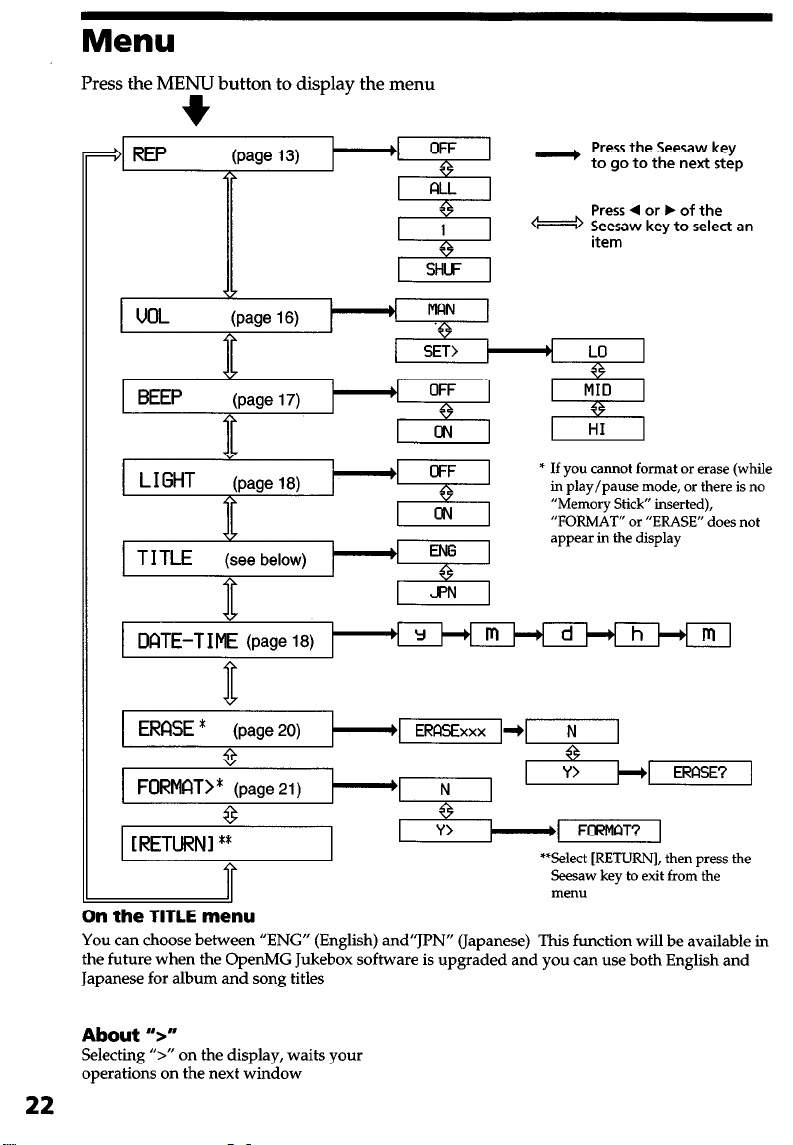
Menu
Press the MENU button to display the menu
+
- Press the Seesaw key
to go to the next step
Press 4 or b of the
Seesaw key to select an
* If you cannot format or erase (while
in play/pause mode, or there is no
“Memory Stick” inserted),
“FORMAT” or “ERASE” does not
appear in the display
DATE-T I ME (page
18)
)
h
Y
D
ERfXE *
FORMAT>*
(page 20)
8
(page 21)
8
; baby
[RETURN] **
On the TITLE menu
You can choose between “ENG” (English) and”JPN” (Japanese) This function will be available in
the future when the OperMG Jukebox software is upgraded and you can use both English and
Japanese for album and song titles
About ‘5”
Selecting ‘5“ on the display, waits your
operations on the next window
q-.iEsqERFlSExxxm
**Select [RETURN], then press the
Seesaw key to exit from the
menu
22
m
Page 24
Precaritions
On safety
l
When you carry the supplied rechargeable
battery, be sure to put it in the supplied
rechargeable battery carrying case Carrying
the rechargeable battery without the case
may cause a short-circuit with metallic
objects such as coins, key rings, or necklace
As a result, a heat may generate
l
Incorrect battery usage may lead to leakage
of battery fluid or bursting batteries To
prevent such accidents, observe the
following precautions:
-Install batteries with the + and - poles
aligned correctly
-Do not charge dry batteries
l
If a battery leak should develop, carefully
and thoroughly wipe away battery fluid
from the battery compartment before
inserting new one
On installation
Never use the player where it will be
subjected to extremes of light, temperature,
moisture or vibration
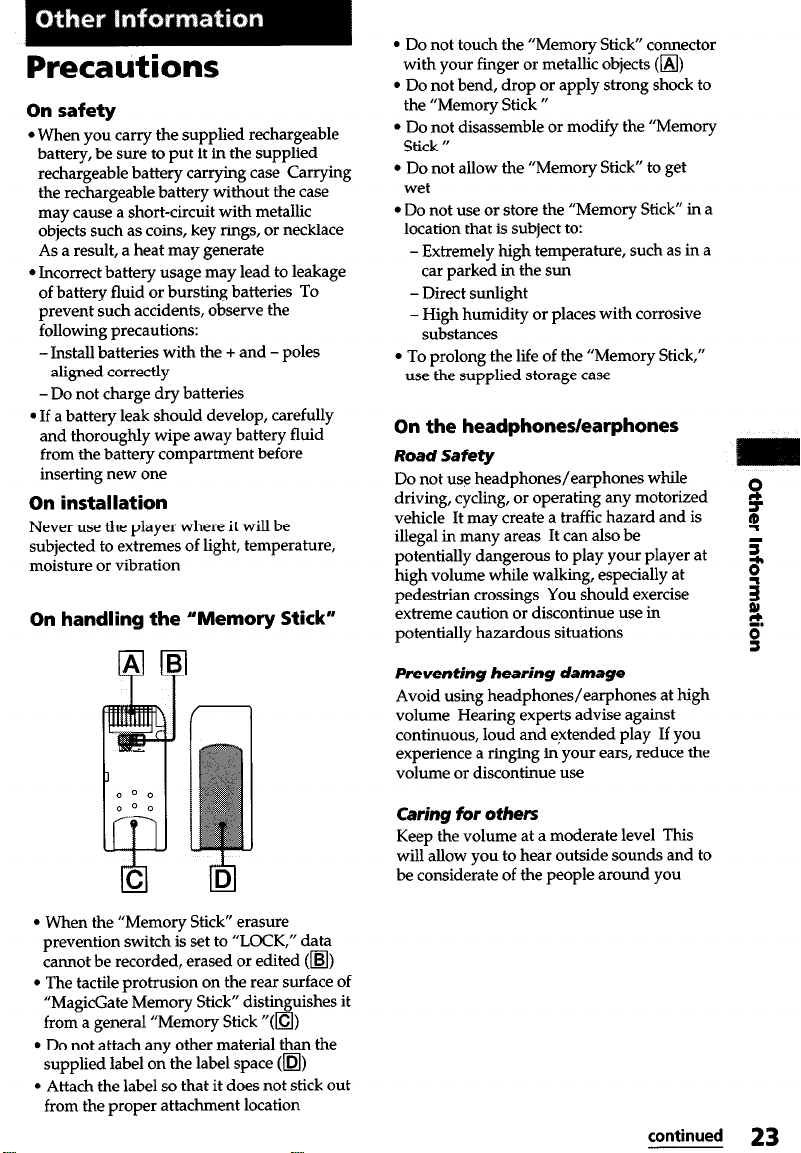
On handling the “Memory Stick”
l
Do not touch the “Memory Stick” connector
with your finger or metallic objects (m)
l
Do not bend, drop or apply strong shock to
the “Memory Stick ”
l
Do not disassemble or modify the “Memory
Stick U
l
Do not allow the “Memory Stick” to get
wet
l
Do not use or store the “Memory Stick” in a
location that is subject to:
- Extremely high temperature, such as in a
car parked in the sun
- Direct sunlight
- High humidity or places with corrosive
substances
l
To prolong the life of the “Memory Stick,”
use the supplied storage case
On the headDhones/earphones
Road Safety
Do not use headphones/earphones while
driving, cycling, or operating any motorized
vehicle It may create a traffic hazard and is
illegal in many areas It can also be
potentially dangerous to play your player at
hieh volume while walking, esneciallv at
pedestrian crossings You &ouid exercise
extreme caution or discontinue use in
potentially hazardous situations
Preventing hearing damage
Avoid using headphones/earphones at high
volume Hearing experts advise against
continuous, loud and extended play If you
experience a ringing in your ears, reduce the
volume or discontinue use
h
5
g
5
B
g
$
0
s
l
When the “Memory Stick” erasure
prevention switch is set to “LOCK,” data
cannot be recorded, erased or edited (m)
l
The tactile protrusion on the rear surface of
“MagicGate Memory Stick” distinguishes it
from a general “Memory Stick “(m)
l
Do not attach any other material than the
supplied label on the label space (m)
l
Attach the label so that it does not stick out
from the proper attachment location
Caring for others
Keep the volume at a moderate level This
will allow you to hear outside sounds and to
be considerate of the people around you
continued 23
Page 25
Precautions (continued)
On cleaning
l
Clean the player casing with a soft cloth
slightly moistened with water or a mild
detergent solution Do not use any type of
abrasive pad, scouring powder or solvent
such as alcohol or benzene as it may mar the
finish of the casing
l
Clean the headphones/earphones plug and
extension cord plug periodically
If you have any questions or problems
concerning your Network Walkman, please
consult your nearest Sony dealer (If trouble
occurred when the “Memory Stick” was in
the player, we recommend that the “Memory
Stick” be left in the player when you consult
your Sony dealer so that the cause of trouble
may be better understood )
Notes on the
rechargeable battery
l
Be sure to use the supplied battery charger
only for specified batteries
l
When a rechargeable battery is charged for
the first time or charged after a long period
of disuse, battery life may be shorter than
usual Repeat discharging and recharging a
few times The battery life should return to
normal
l
Disconnect the charger from the wall outlet
as soon as the battery has been charged
Leaving it connected may result in reduced
battery performance (
l
The charger and a rechargeable battery may
become warm while recharging, however
this is normal and is not a malfunction
l
The charging time may vary depending on
the battery condition
l
A rechargeable battery can be charged
about 300 times
l
When the battery life of a fully charged
rechargeable battery becomes about half the
normal life, you may need to replace the
battery with a new one
For the customers in the U.S.A.
and Canada
DISPOSAL OF NICKEL METAL
HYDRIDE BATTERY.
NICKEL METAL HYDRIDE BATTERY
DISPOSE OF PROPERLY
You can return your unwanted nickel metal
hydride batteries to your nearest Sony Service
Center or Factory Service Center
Note: In some areas the disposal of nickel
metal hydride batteries in household or
business trash may be prohibited
For the Sony Service Center nearest you call
l-SOO-222-SONY (United States only)
For the Sony Factory Service Center nearest
you call
416-499-SONY (Canada only)
Caution: Do not handle damaged or leaking
nickel metal hydride battery
24
Page 26
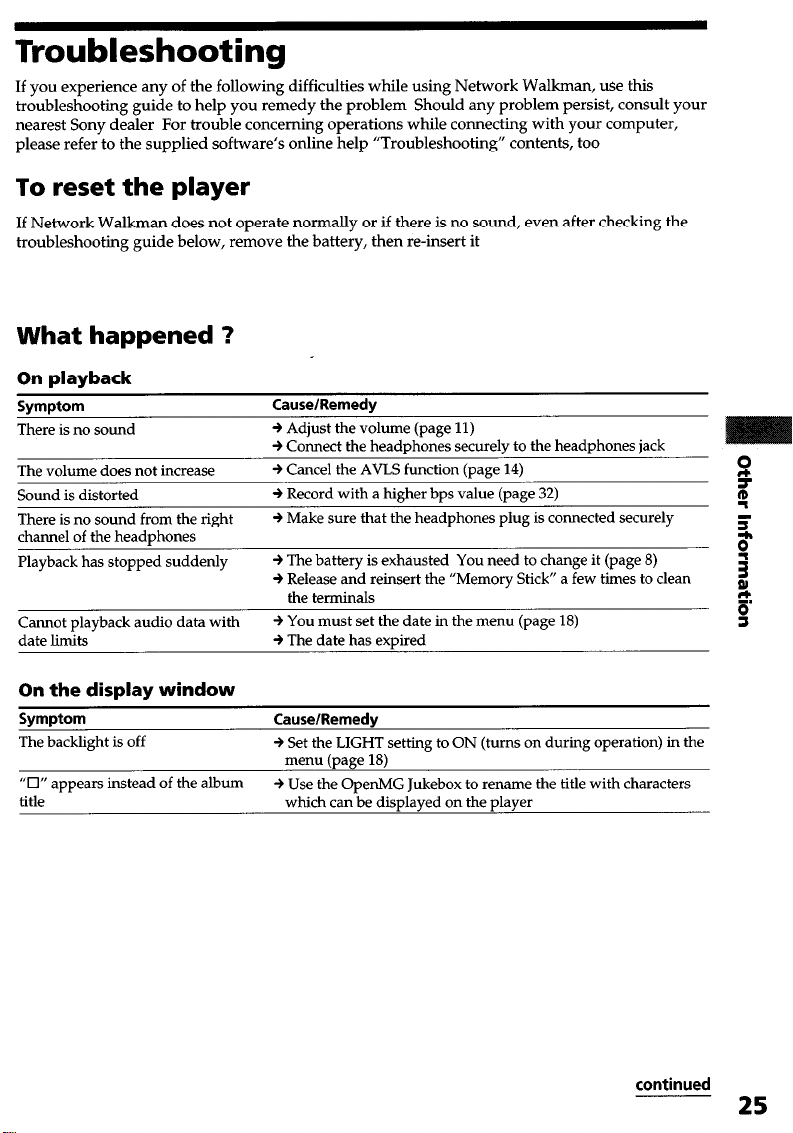
Troubleshooting
If you experience any of the following difficulties while using Network Walkman, use this
troubleshooting guide to help you remedy the problem Should any problem persist, consult your
nearest Sony dealer For trouble concerning operations while connecting with your computer,
please refer to the supplied software’s online help “Troubleshooting” contents, too
To reset the player
If Network Walkman does not operate normally or if there is no sound, even after checking the
troubleshooting guide below, remove the battery, then re-insert it
What happened 1
On playback
Symptom
There is no sound
The volume does not increase
Sound is distorted
There is no sound from the right
channel of the headphones
Playback has stopped suddenly
Cannot playback audio data with
date limits + The date has expired
Cause/Remedy
9 Adjust the volume (page 11)
+ Connect the headphones securely to the headphones jack
+ Cancel the AVLS function (page 14)
+ Record with a higher bps value (page 32) 0
9 Make sure that the headphones plug is connected securely
+ The battery is exhausted You need to change it (page 8)
+ Release and reinsert the “Memory Stick” a few times to clean
the terminals z
+ You must set the date in the menu (page 18) g
0
‘I
z
$
1
On the display window
Symptom
The backlight is off
“0” appears instead of the album + Use the OpenMG Jukebox to rename the title with characters
title
Cause/Remedy
+ Set the LIGHT setting to ON (turns on during operation) in the
menu (uaee 18)
which can be disolaved on the slaver
continued
25
Page 27

Troubleshooting (contim&
On charging
Svmatom
The battery does not last even
when recharged
Charging stops just after
connecting the supplied battery
charger
CauselRemedv
+ If you use the player where the temperature is below 0°C
(32”F), the battery does not function
+ You need to replace the battery Please contact your nearest
Sony dealer
+ The battery is full (If the charging stops even when the battery
is low, this may be due to a problem with the battery life Please
contact your nearest Sony dealer )
On the connection with the computer
Symptom
“CONNECT” does not appear in + Please wait for the authentication of the OpenMG Jukebox
the display window when
connecting to the computer with 4 If another software is active on your computer, wait for a
the supplied USB cable while, then reconnect the USB cable If the problem persists,
The computer does not identify the + Make sure the USB cable is correctly connected (page 9)
player when it is connected to the
computer
There are only a few songs I can
Check-out (The recordable time is
short ) Stick.”
After connecting to the computer,
the drive appears but there is
nothing inside
The computer/player does not
operate normally when connected
Cause/Remedy
(page 31) to be finished
disconnect the USB cable, restart your computer, then connect
the USB cable to your computer again
+ Make sure the USB cable is correctly connected
+ Install driver only
For details, refer to the OpenMG Jukebox operating
instructions.
+ If there is data other than audio files in the “Memory Stick,”
copy them to your computer to free memory on the “Memory
+ Make sure the “Memory Stick” is inserted and reconnect the
player to your computer
Disconnect the USB cable and put in the battery, then check the
display If the error message is displayed, there may be a
problem with the “Memory Stick ” Follow the on-screen
instructions to solve the problem
+ If you are connecting both devices with a USB hub or a USB
extension cable, normal operation is not guaranteed Please use
only the supplied USB cable.
26
Page 28

Other
Symptom
The buttons do not operate
There is no beep sound to indicate
that operation has been accepted
Cannot insert the “Memory Stick n
The current time is reset
Cause/Remedy
4 Make sure the HOLD switch is OFF (page 16)
4 You must recharge the battery (page 8)
+ Set the BEEP setting to ON in the menu (page 17)
+ Make sure the “Memory Stick” is correctly inserted as shown
on Network Walkman (page 9)
+ The battery is low and needs to be charged
Cannot use a “Memory Stick” used
on other devices 9 If the “Memory Stick” has been formatted using a computer,
+ Only “MagicGate Memory Stick” can be used with this player
backup the files of the”Memory Stick” on your computer if
necessary, and reformat the “Memory Stick” using this player
(paw
21)
continued
27
Page 29

Troubleshooting (continued)
Error messages
Follow the instructions below if an error message appears in the display
Message
ACCESS
CANNOT PLAY
FILE ERROR
FORMAT ERR
HOLD
EXPIRED
MS LOCKED
LOW BATT
ERROR
NO AUDIO
Meaning
Accessing the “Memory Stick ” This is not an error Please wait for
l
The player cannot playback certain l Remove and reinsert the battery, and
contents of this “Memory Stick” due then check the display on the screen
to a difference in format
l
Check-out has been interrupted
forcefully
l
Cannot read the data
l
The data is not normal
The inserted “Memory Stick” contains
a data format which is not supported
by Network Walkman (For example,
if you format the “Memory Stick” using this player If you format the
using the computer ) “Memory Stick” using the computer,
The HOLD switch is ON, and no
operating buttons are available
l
The data’s playback date has
expired playback data with date limits (page 18)
l
The current date has not been set to l If there is data in a different format,
playback data with date limits
l
Plays back songs beyond the
playback restriction supported by
Network Walkman
The erasure prevention switch of the
“Memory Stick” is on LOCK OFF when connecting to your computer
The battery is low, and needs to be
charged
A malfunction is detected First, remove and reinsert the battery
l
There is no music data in
“MagicGate Memory Stick n
l
The “Memory Stick” is not
“MagicGate Memory Stick ”
Remedy
access to be finished Do not take out the
“Memory Stick”
l
If music data cannot be played back,
you can erase it from the “Memory
Stick ”
For details on how to erase, refer to
“To erase the abnormal data from the
Memory Stick” (page 29)
l
Remove and reinsert the battery, and
then make sure displays on the screen
l
You need to Check-in data you are able
to Check-in into your computer, then
format the “Memory Stick” using this
player (See “To delete abnormal data
from the Memory Stick” on page 29 )
You must format the “Memory Stick”
following the instructions on page 21
(You must format the “Memory Stick”
you may Check-in/out, but you cannot
playback using this player )
This is not an error Switch the HOLD
switch to OFF before operating the
buttons
l
You need to set the current date to
you must delete that data from the
“Memory Stick” (See “To delete
abnormal data from the Memory
Stick,” on page 29 )
Switch the erasure prevention switch to
or formatting a “Memory Stick “
You must charge the battery
If you have any questions or problems
concerning your Network Walkman,
please consult your nearest Sony dealer
Check that “MagicGate Memory Stick”
is inserted If there is no music data in
“MagicGate Memory Stick,” use the
OpenMG Jukebox to Check-out music
items
28
Page 30

Message
NO DATA
Meaning
There are no tracks inside
“MagicGate Memory Stick ”
NO STICK
CONNECT
There is no “Memory Stick” inserted
The player is connected to the
computer
STICK ERROR You cannot access the “Memory
Stick,” or the data inside the
“Memory Stick” or the player itself
is not normal
MG ERROR
An unauthorized distribution file is
detected for copyright protection
Remedy
Use the OpenMG Jukebox to Check-out
music items
Insert a “Memory Stick ”
This is not an error You can operate
using the OpenMG Jukebox software, but
you cannot operate the controls on the
player
l
Remove and reinsert the battery, and
then make sure displays on the screen
l
Eject and reinsert the “Memory Stick” a
few times If this does not solve the
problem, Check-m data items into the
computer, and then format the
“Memory Stick” using this player
(Refer to the instructions in “To delete
the abnormal data from the Memory
Stick” below for details )
If the problem persists, bring both the
player and the “Memory Stick” to your
nearest Sony dealer
l
Remove and reinsert the battery, then
check the display on the screen
l
First, check-in the Check-m data
available to your computer, then format
the “Memory Stick” with Network
Walkman
Refer to the instructions in “To delete
the abnormal data from the Memory
Stick” below for details
To delete abnormal data from the “Memory Stick”
If “CANNOT PLAY,” “EXPIRED” “FILE ERROR,” “STICK ERROR” “MG ERROR” appears in
the display window, there is abnormal data in the “Memory Stick ”
Please follow the instructions below to delete abnormal data (data you cannot playback)
1
Connect Network Walkman to your computer, and start the “OpenMG Jukebox ”
2 If the cause of the abnormal data is clear (data of which the playback date limits have expired,
etc ), erase the data from the Portable Player window of the “OpenMG Jukebox ”
3 If the problem persists, click the button on the OpenMG Jukebox to Check-in all data you
are able to Check-m
4 Disconnect the player from the computer and then format the “Memory Stick” using the menu
(page
21)
Note
If you format the “Memory Stick,” data that has been recorded using other devices will be deleted, too If there
are other data in the “Memory Stick,” check the data contents using a compatible equipment before formatting
the “Memory Stick ” Refer to the OpenMG Jukebox Help files
29
Page 31

Specifications
Recording time (when using the
supplied 64MB “MagicGate Memory
Stick”)
Approx 6Omin (132kbps)
Approx 80 min (105kbps)
Approx 12Omin (66kbps)
Sampling frequency response
44 1kHz
Recording format
ATRAC3
Frequency response
20 to 20,000 Hz (single signal measurement)
output
Headphone/earphone: stereo mini-jack
Signal-to-noise ratio (S/N)
More than 8OdB (excluding 66 kbps)
Dynamic range
More than 85dB (excluding 66 kbps)
Operating temperature
5°C to 35°C (-41°F to 95°F)
Supplied accessories
64MB “MagicGate Memory Stick” (1)
Rechargeable battery (1)
Battery charger (1)
AC plug adaptor (1) (Except US A, Europe,
Hong Kong, Korea, and Australia model)
Earphones (1)
USB cable (1)
“Memory Stick” storage caSe (1)
Rechargeable battery carrying case (1)
Carrying pouch (1) (Except for U S A model)
Key &tg (1)
CD-ROM (OpenMG Jukebox installation disc) (1)
NW-MS9 oderating instructions (1)
OpenMG Jukebox Operating Instructions (1)
Optional accessories
“MagicGate Memory Stick” MSG-32A (32MB)
Design and specifications are subject to change
without notice
MSG-64A (64MB)
Power source
l
DC IN 12V (gum type, secondary battery
Ni-MH (NH-14WM))
l
Power for USB (supplies from the computer
through supplied USB cable)
Battery life
Approx 10 hours (back-to-back playback)
Dimensions (approx.)
36 x 814 x 14 1 mm (17/16 x 3 l/4 x 9/16 inches)
(w/h/d, projecting parts not included)
Mass (approx.)
67g (2 4 oz) (includes “Memory Stick,” battery
NH-14WM)
30
Page 32

Glossary
MagicGate
Copyright protection technology that consists of authentication and encryption technology
Authentication ensures that protected content is transferred only between compliant devices and
media, and that protected content is recorded and transferred in an encrypted format to prevent
unauthorized copying or playback
Note
MAGICGATE is terminology denoting the copyright protection system developed by Sony It does not
guarantee conversion among other media
“MagicGate Memory Stick”
A compact IC recording media “Memory Stick” equipped with “MagicGate” copyright protection
technology You can record or play data, such as music, that requires copyright protection only
by using a “MagicGate Memory Stick” with “MagicGate” compatible equipment (e g , Network
Walkman)
“MagicGate Memory Stick” can be used to record any other kind of digital data with any other
“Memory Stick” compatible equipment
“MagicGate Memory Stick” is distinguished by the “MG” and “MAGIC GATE” logos
“Memory Stick”
“Memory Stick” is a portable and compact Integrated Circuit recording medium There are two
types of “Memory Stick”: “MagicGate Memory Stick” equipped with “MagicGate” copyright
protection technology and a normal “Memory Stick” not equipped with the copyright protection
technology You can record image files, audio files, and sound files using “Memory Stick”
compatible audio visual devices, or record data from the computer Data with different formats
can be stored in the same “Memory Stick “ (Please refer to the instruction manuals that come with
the devices to check which format the equipment is able to read )
For example, you can store image files in the space available on “MagicGate Memory Stick” using
the respective equipment even if there are already audio files in “MagicGate Memory Stick ”
OpenMG
Copyright protection technology that securely manages music content from the EMD/Audio CD
on a personal computer Application software that is installed on the computer encrypts the
digital music content when recording on the hard drive This allows you to enjoy music content
on the computer, but prevents unauthorized transmission of this content across a network (or
elsewhere) This PC copyright protection complies with “MagicGate,” and allows you to transfer
digital music content from a PC’s hard drive to a compliant device
ATRAQ, which stands for Adaptive Transform Acoustic Coding3, is audio compression
technology that satisfies the demand for high sound quality and high compression rates
The ATRACS compression rate is approximately 10 times higher than that of the Audio CD,
resulting an increased data capacity for the media
continued
31
Page 33

Glossary (continued)
SDMI
SDMI which stands for Secure Digital Music Initiative, is a forum that consists of over 130
companies in the fields of recorded audio content, computers, and consumer electronics,
dedicated to developing an integrated method of copyright protection technology that can be
used worldwide
SDMI is working to create a framework for preventing improper usage of audio files and to
promote legal music distribution services The copyright protection technologies “OpenMG” and
“MagicGate” are based upon the SDMI standard
“Check-in/Check-out”
Check-out is to transfer music files from a personal computer to an external device/media (such
as Network Walkman) Returning checked-out music files to the same computer is to check-in
(You cannot move checked-out music files to another computer )
You can check-out a music file, check it back in, and then check it out again an infinite number of
times The SDMI rules provide that up to four copies of a music file can be checked-out at one
time OpenMG employs a method whereby three copies of a song can be checked-out
simultaneously, while the fourth copy is maintained as a “master” on your PC If three copies of
the same song are checked-out at a given time, one copy of the song needs to be checked-m to the
computer in order to create an additional check-out
Bit rate
Indicates the data amount per second The rate is reflected in bps (bit per second)
In OpenMG Jukebox, the bit rate for recording an audio CD or converting MI’3 and WAV format
audio files into ATRAC3 format can be chosen from 132 kbps/105kbps/66kbps 105 kbps means
105000 bits of information per second If the bit rate is large, that means a large amount of
information is used to play music Comparing music of the same format, a 105 kbps data offers
better sound quality than 66 kbps data, and 132 kbps data offers better sound quality than 105
kbps data However, audio files in formats such as MI’3 have different encoding methods, and
thus sound quality cannot be determined by simply comparing the bit rate
32
Page 34

F
Looking at the
controls
Network Walkman
(front)
q
Access lamp (page 9)
q
Seesaw key (page ll-14,16-22)
q
Display (page 12,15)
q
Memory Stick slot (page 9,ll)
q
Battery compartment (page 8)
(rear)
q
c! (Headphones/earphones) jack (page 11)
q
Hole for attaching the key ring or strap
(The strap is not supplied)
q
HOLD switch (page 16)
q
MEGA BASS/AVLS button (page 14)
q
VOLUME +/-buttons (page 11,16)
q
Dedicated USB jack (page 9)
q
MENU button (page 13,16-22)
q
DISPLAY button (page 12,15)
Display
q
Text/graphic information display
(page 15)
q
Playback mode indication (page 13)
q
AVLS indication (page 14)
q
MEGA BASS indication (page 14)
q
Battery remain indication (page 8)
33
Page 35

Index
m
Access lamp 9
actual track 12
artist name 15
ATRAC3 31
AVLS 14
m
Backlight 18
Battery 8
Battery charge lamp
8
Battery remain
indicator 8
BEEP 17
beginning of the track 12
Bit rate 15,32
m
CD (compact disc) 4
CD-ROM 7
charging 8
Check-in 32
Check-out 9,32
computer 4,9
DATE-TIME 18
display 12,15
DISPLAY button 15
display mode 15
download 4
m
EMD services
ERASE 20
erasure prevention switch
earphones 7
4
23
m
FORMAT
formatting
13
go backward
go forward 12
headphones/earphones
Hifi Folder
HOLD 16
HOLD switch
0
Internet (EMD services)
LIGHT
listen to music 11
LOW BATT
21
6,21
12
11
6
16
4
18
8,28
34
Page 36

MEGA BASS 14
MagicGate 31
“MagicGate Memory Stick”
4,5,7,31
“Memory Stick” 5,23,31
insert 9
remove 12
Menu 22
MENU button 13,16-22
m
OpenMG
OpenMG Jukebox software
4,31
9
m
playback 11
Preset volume 16
previous tracks 12
REPEAT 13
RETURN
22
TITLE 15
transferring
to the “Memory Stick” 9
troubleshooting
25
u
USB cable
1111
volume
7,9
11,16
m
WAV format 4
Windows Explorer 6
SDMI
Serial Number 7
set the current data and time 18
song title 15
spectrum analyzer 15
succeeding tracks 12
supplied accessories 7
31
35
Page 37

http llwww world sony corn/
Sony Corporation
Printed on recycled paper
Printed in Japan
Page 38

SONYe
3-227-797-l 1 (1)
OpenMG Jukebox
Veft2.0
for Sony digital music players
Operating Instructions
This manual describes how to install the OpenMG Jukebox software
and explains its basic operations for use with the Sony digital music
players such as the Network Walkman or Music Clip Player
Before you start, please also review the instruction manual of your
digital music player as well
0 2001 Sony Corporation
Page 39

Program 01999,zOOo Sony corporation
Documentation 02001 Sony Corporation
l
Network Walkman, OpenMG, “MagicGate”, “MagicGate Memory Stick
“, “Memory Stick” and their logos are
trademarks of Sony Corporation
l
WALKMAN is a registered trademark of Sony Corporation
l
Microsoft, Windows, Windows NT and Windows Media are trademarks or registered trademarks of
Microsoft Corporation in the United States and/or other countries
l
IBM and PC/AT are registered trademarks of International Business Machines Corporation
l
Macintosh is a trademark of Apple Computer, Inc in the United States and/or other countries
l
MMX and Pentium are trademarks or registered trademarks of Intel Corporation
l
CD-related data through the Internet from the CDDB(TM) Music CD Database, Copyright 1999,200O CDDB,
Inc CDDB Client Software, Copyright 1999,2lXlO CDDB, Inc
l
CDDB-Enabled(TM), CDDB(TM), CDDB 2(TM) and the CDDB Logo are trademarks of CDDB, Inc
Disc Recognition Service and DRS are service marks of CDDB, Inc
. All other trademarks are trademarks of their respective owners
l
Copyright laws prohibit reproducing the software or the manual accompanying it in whole or in part, or
renting the software without the permission of the copyright holder
l
In no event will SONY be liable for any financial damage, or loss of profits, including claims made by third
parties, arising out of the use of the software supplied with this player
l
Jn the event a problem occurs with this software as a result of defective manufacturing, SONY will replace
it
However, SONY bears no other responsibility
l
The software provided with this player cannot be used with equipment other than that which is so
designated
l
Please note that, due to continued efforts to improve quality, the software specifications may be changed
without notice
2
Page 40

Table of Contents
Overview
What you can do with the
OpenMGTM Jukebox software
How to store digital audio files on
the computer
What is “Check-in/Check-out”? 5
On copyright protection 6
About this manual
Using online Help 7
Before you begin
System requirements 9
Notes on using OpenMG Jukebox
with Windows 2000
Notes on using OpenMG Jukebox
with Windows Me
Installing the OpenMG Jukebox
software 11
Basic Operations
Importing digital audio files into
the OpenMG Jukebox 13
Starting OpenMG Jukebox
Recording audio CDs on the hard
drive 13
Importing songs via EMD 15
Importing MP3 and WAV format
audio files, etc
Transferring songs from the computer
to your digital music player
(Check-Out) 20
Transferring songs from the digital
music player to the computer
(Check-in)
4
4
4
9
10
10
13
17
22
Advanced Operations
Window reference
Overview of the OpenMG
Jukebox window
CD window
Import window
Check-In/Out window
Internet window
Menu Reference
7
Other Information
Uninstalling the OpenMG Jukebox
Features of copyright protection by
OpenMG 35
Glossary
Index 38
23
23
24
26
28
30
31
34
. 36
Notes
l
The illustrations in this manual may differ
from the actual software
l
Explanations in this manual assume that you
are familiar with basic operations of
Widows For how to use your computer and
operating system, please refer to the
respective manuals
3
Page 41

Overview
OpenMG Jukebox is a software application that utilizes Sony Corporation’s copyright protection
technology, “OpenMG ‘I It allows users to store and play digital music content on the hard disk
drive of a computer You can transfer digital audio files from the hard drive to a Sony digital
music player such as the Network WalkmarP or Music ClipTM Player, etc , for portable listening
The OpenMG copyright protection technology enables storage and playback of music contents
while maintaining the holder’s copyrights by preventing unauthorized distribution
To listen to digital music with a digital music player, import and save audio files into the hard
disk of your computer using the OpenMG Jukebox You can import digital audio files with
OpenMG Jukebox in the following ways:
l
Downloading digital audio files provided by EMD (Electronic Music Distribution) service sites
over digital networks such as the Internet (see Pagel5)
l
Recording from audio CDs inserted into the CD-ROM drive of your computer (the recorded
songs are compressed in the ATRAC3 format) (see Page 13)
l
Converting existing MI’3 and WAV format audio files to the ATRAC3 format which is
encrypted in OpenMG format* (see Page 17)
* If you are using NW-S4 or Music Clip Player, you can check-out Ml’3 format audio files from
OpenMG Jukebox to the digital music Player
Page 42

After storing the audio files on the hard disk of your computer, you can transfer them to the
digital music player using OpenMG Jukebox
Transferring audio files to the digital music player from your computer is called “check-out ”
Returning checked-out audio files back to that computer is called “check-in “
For details, see “Check-in/Check-out” in the Glossary on page 36
You can check-out the same song
up to three times simultaneously,
If you check-in the song, you
can check-out the song again
5
Page 43

The OpenMG technology* allows you to enjoy digital music, while maintaining the copyrights of
its holders OpenMG Jukebox encrypts audio files in OpenMG format and stores them on the
hard disk of your computer to prevent unauthorized distribution
* The copyright protection technology of your digital music player conforms to SDMI (Secure
Digital Music Initiative) specifications
The digital music player has some restrictions on recording and playback to protect copyrights
You can check-in audio files only to the same computer from which they were checked-out They
cannot be copied or checked-in to other computers
For details, see “Restrictions on copyright protection by OpenMG” on page 35
You can check-in audio
files only to the
computer from which
they were checked-out
You cannot check-in audio files
to any computer other than the
computer used for check-out
You cannot copy or
move audio files to
another computer
Restrictions on audio content
High quality digital audio content is widely available through music distribution services on the
Internet To protect the copyrights of its holders from unauthorized distribution, some audio
content is distributed with certain restrictions on recording and playback For example, the
playback period or playback count for the data may be limited
6
Page 44

About this manual
This manual explains how to operate the OpenMG Jukebox software basics for use with the
digital music player
For details about the use of the digital music player, refer to the instruction manual supplied with
your digital music player
For details about the OpenMG Jukebox software, refer to the online Help for OpenMG Jukebox
To display online Help
Online Help consists of two sections
OpenMG Jukebox Help
Explains how to use OpenMG Jukebox software
Digital music player Help
Explains how to use digital music player while it is connected to your computer
You can display Help in the following ways:
l
Click the [Start] button, point to [Programs], then select the help you want to view from
[OpenMG Jukebox]
l
Select the help you want to view from the [Help] menu while running OpenMG Jukebox
To view the display
Tabs
The left side frame The right.side frame
l
The left side frame
Displays contents and keywords
Click [Contents] tab, [Index] tab, or [Search] tab to change the display
l
The right side frame
Displays topics
Click the underlined item to display related topics
continued
7
Page 45

Using online Help (continued)
To search topics
To perform a search, click the tabs on the left side frame as follows:
l
[Contents] tab
Click the tab to display the Contents
Click or double-click the item in the Contents to display a topic on the right side frame
l
[Index] tab
Click the tab to display a list of Index
Enter the first few letters of the topic you want to search for or select a keyword from the Index
list and click [Display] to display a topic on the right side frame
l
[Search] tab
Click the tab to change the display of the left side frame
Enter the first few letters of the topic you want to search for in the “Type in the keyboard to
find” text box and click [List topics] Then select an item in the list to search for and click
[Display] to display a topic on the right side frame (The information you enter in the window
is highlighted )
8
Page 46

Before you begin
l
IBM PC/AT or Compatible
CPU: MMXTM Pentiume 233 MHz or higher
Hard disk drive space: 60 MB or more
RAM 64 MB or higher
CD-ROM drive
Sound Board
USB port
l
Operating System: Windows@ 98/Windows@ 98 Second Edition/Windows@ 2000 Professional/
Window@ Me (manufacturer installed)
The following environments are not supported
-Window@’ 95, Windows” NT
-Upgraded from Window@ 3 l/95 to Window6 98 (or Windows@ 98 Second Edition/
Window@’ Me)
-Dual boot with WindowsO 2000 and Windows0 98 (or Window@ 98 Second Edition/
Windows@ Me)
l
Display: High (16bit) Color or more (800 x 480 dot or more)
l
Internet access: for Web registration and EMD services
Note
We
do not assure trouble-free operation for all computers satisfying the system requirements
Note
For
the protection of copyrights when you use the computer with an optical digital output connector, it
may be disabled during playback with this software
9
Page 47

OpenMG Jukebox software users with Windows 2000 models should be aware of the following:
l
Only Administrators are allowed to install and uninstall the OpenMG Jukebox software
l
To use the application, log on with the user name of “Administrator” or “Power User”
l
Do not remove or insert the CD-ROM drive connected via a PC card while OpenMG Jukebox is
running
l
Only Windows 2000 Professional Edition is supported
l
Windows 2000 NTFS format is not supported Use FAT32 format
If Windows Millennium Edition is installed in your computer, and you perform the “System
Restore” function of the Windows “System Tools,” the songs managed by OpenMG Jukebox may
become corrupted and rendered unplayable
Therefore, before executing “System Restore,”
back up the songs using OpenMG Jukebox Backup
Tool first
Then, after the “System Restore” function is finished, restore the songs using OpenMG Jukebox
Backup Tool to ensure the integrity and reliability of song playback
For more information about backup, refer to the online Help for OpenMG Jukebox
Note
When songs become unplayable by executing “System Restore,”
case, follow the displayed messages
an error dialog box may be displayed In this
10
Page 48

Installing the OpenMG Jukebox software
Note
Be sure to install the software before connecting the digital music player to your computer
Do not install the sofhvare while the dedicated USB cable is connected to your computer
Connect the dedicated USB cable only after you have installed the software and restarted the computer
Install the OpenMG Jukebox software to the hard disk drive of your computer
Turn on your computer and start Windows in advance Close all applications and follow the
steps below
When you use Windows 2000
You must log on as an Administrator
When an older version of OpenMG Jukebox is installed
If OpenMG Jukebox icon is displayed on the Task tray, remove it from the Task tray
1 I
nsert the installation CD-ROM into the CD-ROM drive of your computer
The setup program starts up automatically The OpenMG Jukebox Ver 2 0 installation
window appears
lip
Select the desired language if the setup language options appear
2 Click to select [Install OpenMG Jukebox Ver 2 0 and Driver] or [Install Driver
only1
l
If installing OpenMG Jukebox for the first time, select [Install OpenMG Jukebox Ver 2 0 and
Driver]
l
If an older version of OpenMG Jukebox is installed, select [Install OpenMG Jukebox Ver 2 0
and Driver] (see page 12)
l
If OpenMG Jukebox Ver 2 0 is already installed, select [Install Driver only] to add only the
driver for a new external device/media
3 Click to select your digital music player model
If you have more than one digital music player, you can select multiple models by clicking
them
4 Click [Install], then follow the displayed instructions
If OpenMG Jukebox icon is already displayed on the Task tray
The setup program will not be run and the software will not be installed First, right-click on
the OpenMG Jukebox icon on the task tray and select [Exit] to remove the icon, then start the
setup program again
After the installation is completed, the computer will be restarted if required
continued
11
Page 49

Installing the OpenMG Jukebox software (continued)
5c
onnect your digital music player to your computer
If the OpenMG Jukebox icon is set to display on the Task tray
The first time you connect the digital music player to the computer after installing OpenMG
Jukebox Ver 2 0, remove OpenMG Jukebox icon from the Task tray before connecting From
the next time, this is not necessary
6
Start
OpenMG Jukebox
Note
Do not delete, move, or edit the installed folders using Windows Explorer or any other application Doing so could cause
the OpenMG Jukebox database to become unstable or corrupted
If an older version of OpenMG Jukebox is installed
If OpenMG Jukebox Ver 1 x is installed in your computer, go to step 2 and select [Install OpenMG
Jukebox Ver 2 0 and Driver]
The older version of Openh4G Jukebox is uninstalled automatically and older version songs are
automatically upgraded, so you can still enjoy them with OpenMG Jukebox Ver 2 0
The message “Remove shared File?” will appear during uninstallation If you click [Yes to All], “Sure?” will appear Click
[Yes ] If you do not see the message, click the minimize buttons to try minimizing all windows to check for the message
on the Desk top
When you start using a new digital music player whose supplied CD-ROM
is an older version of OpenMG Jukebox
If you have already installed OpenMG Jukebox 2 0 and then want to add a digital music player as
a new external device, be sure to install its driver using the OpenMG Jukebox Ver 2 0 installation
CD-ROM before connecting the new device to your computer
Select [Install Driver only] in step 2 on page 11, and select your model
Note that you cannot use the older version (OpenMG Jukebox Ver 1 X) installation CD-ROM If
you accidentally start installing OpenMG Jukebox Ver 1 X after installing Ver 2 0, be sure to
terminate the installation before it overwrites the Ver 2 0 software Otherwise, the registered
OpenMG Jukebox database will be corrupted
Note
If you need to install an older version software using its CD-ROM after uninstalling the existing Ver 2 0, make sure to
back up the songs by using OpenMG Jukebox Backup Tool so that you will not loose all the songs registered in OpenMG
Jukebox For the details about backup, see the online Help of OpenMG Jukebox
12
Page 50

Do one of the following:
l
Double-click [OpenMG Jukebox] icon on the desktop
*Click [Start], point to [Programs] - [OpenMG Jukebox] and click [OpenMG Jukebox]
The OpenMG Jukebox window appears
Songs recorded from audio CDs can be registered on the hard disk to Playlists and managed with
OpenMG Jukebox
Insert the compact disc you want
to record into the CD-ROM
drive of your
computer
The CD window and the tracks of the audio CD appear
‘gHints
l
If the CD window is not displayed automatically, click the [CD] tab to display the CD window
l
By importing song names, you can retrieve information from the CDDB2 database via the Internet
Click (CD Info) Refer to “OpenMG Jukebox Help” for details
8 (Recta
[CD] tab button dropdown list
m (Ret Stop)
button
2 Select
the
recording bit rate
From the drop-down list, select the bit rate for recording
Jukebox)
[Bit Rate]
3 Confirm the check mark m appears by the songs you want to record
To uncheck the songs you do not want to record, Click the song numbers(track numbers)
m disappears
If you accidentally clear the a of a song you want to record, just click the song number
again
The
continued
13
Page 51

Recording audio CDs on the hard drive (continued)
The “Select Playlist” dialog box appears
Start Re; button
Note
When you record from an audio CD on your
Optimization” dialog box appears when you click @ (Ret to Jukebox), in order to verify that the CDROM drive can perform recording properly Click [Start] to verify your CD-ROM drive After the
verification is performed, recording starts
Register the songs to the Playlist
If
you want to create a
Playlist you want to create
If you want to add the songs to an existing Playlist, click [Add to Playlist] and select the
Playlist from the drop-down list
new Playlist, click [Create a New Playlist] and enter the name of the
CD-ROM
drive for the first time, the “CD Drive
6
Click [Start Ret]
Recording starts
To abort recording
Click
l
(Ret Stop)
The recording is aborted To resume the recording, click @ (Ret to Jukebox) again
When the recording is resumed, it starts from the beginning of the song that was previously aborted
‘;CS’About Bit Rates
In OpenMG Jukebox, the bit rate for recording an audio CD can be chosen from 132 kbps/lO5 kbps/66
kbps The sound quality and available recording time after the conversion will be different depending on
the selected bit rate A Higher value makes the sound quality better, but the size of the recorded data will
be bigger thus shortening the total check-out time available on your digital music player
Likewise, a lower value means less sound quality, but lengthens the total check-out time available on
your digital music player
14
Page 52

What is EMD (Electronic Music Distribution) service?
EMD stands for Electronic Music Distribution, which is a generic name for services that
distribute digital audio contents via the Internet or other kinds of networks
To use an EMD service supporting OpenMG
You must be able to access the Internet from your computer Sign up with an Internet service
provider, properly configure your computer, and configure the settings of your Web
browser before using this service After the connection to the Internet is set up, view the
OpenMG Home Page (http://www openmg corn/) using the “Internet” screen of OpenMG
Jukebox or another web browser You can access the web sites of the EMD services linked
from the OpenMG Home Page
To use an EMD services
1
Click the [Internet] tab to display the Internet window
The introduction to the OpenMG Home Page appears on the window
-[Internet] tab
8
P
g.
%
z
0
a
2 Click the button or logo on the window
The connection to the Internet starts and the OpenMG Home Page appears
The OpenMG Home Page provides a guide to EMD service Web sites that support OpenMG
and information on how to use EMD services
Refer to this OpenMG Home Page for more information about importing audio contents
using EMD services
continued
15
Page 53

Importing songs via EMD (continued)
To download audio files from web sites of EMD services
1
Display th e web page of an EMD service on the Internet window
Click an audio file for downloading (e g , MP3 files or WMA files compatible with
WT)
Downloading starts automatically
If you click an audio file that requires purchasing, the default web browser starts up to
display the online transaction page After the process is completed, the audio file is allowed
to be imported into OpenMG Jukebox
3 Import downloaded songs to the OpenMG Jukebox
If they are imported automatically, they are registered as playlists which the EMD service
determines
If they are not imported automatically, select the songs in the Import window to import to
the OpenMG Jukebox (see page 17)
Note
Audio files cannot be imported automatically by clicking if you use a web browser (e g , Internet Explorer,
Netscape, etc ) other than the Internet window of OpenMG Jukebox In this case specify the audio files in
the Import window to import them
‘@Hint
l
It is possible to import audio files from some software such as Liquid Player into OpenMG Jukebox Refer to
the OpenMG Home Page (http://www openmg corn/) for details
l
The Internet settings (e g , proxy server, etc ) are related to the settings of your Internet Explorer If your
computer is set to be used within a firewall, etc , confirm the settings of Internet Explorer before the
connection
Note
When specifying the location to store songs, do not choose a folder on removable media,such as CD-R,
CD-R/W, MO, ZIP, etc choose a folder on the hard disk of your computer
16
Page 54

The following audio files are converted to the ATRAC3 format and can be imported to OpenMG
Jukebox
l
MP3 file
Ml’3 files of 16 bits, monaural/stereo, 32 kHz/44 1 kHz/48 kHz
l
WAV file
WAV files of linear KM, 16 bits, monaural/stereo, 32 kHz/44 1 kHz/48 kHz
l
WMT (Windows Media Technologies) compliant audio file downloaded via EMD
WMT files of 16 bits, monaural/stereo, 44 1 kHz
Depending on the copyright protection, some WMT compliant audio files may not be available
for importing
For Network Walkman players (except for NW-S4)
To transfer (check-out) songs to the Network Walkman, it is necessary to convert the audio files
to be checked-out into ATRACS format Audio files converted into ATRAC3 format can be
imported to the OpenMG Jukebox by using the Import feature (It is also possible to import files
in their original format and to convert into ATRAC3 format when checking-out )
For Music Clip player or Network Walkman NW-S4
l
When the audio files to be checked-out are in the MP3 format, it is possible to import them as
they are and to transfer (check-out) them to the Music Clip/NW-S4 player
You can only import MP3 files encoded with a bit rate up to 256 kbps (except for files encoded
with a variable bit rate) The copyright information of the files is also checked before importing
l
For other format audio files, to conversion to ATRAC3 format is necessary before transferring
(checking-out) them (It is also possible to import files in their original format and to convert
into ATRACS format when checking-out )
1 Ch ange the settings for importing according to your external device/media
@ Select [Options] from the [Tool] menu Then click the [Import] tab
@ Select [With the following External Device/Media] from [Set the default External Device/
Media], and select your devices from the displayed list
For Network Walkman IC Audio Player (except for NW-S4):
Select [Network Walkman (E)]
For Network Walkman Memory Stick Audio Player:
Select [MagicGate Memory Stick Device]
For Music Clip Player or Network Walkman NW-S4:
Select [Music Clip/NW-S41
This setting is applied automatically for the check-out format when importing data
continued
17
Page 55

Importing MP3 and WAV format audio files, etc. (continued)
2 Click the [Import] tab to display the Import window
[Import] tab [Bit Rate] drop-down list
[Format]
drop-dow
list
File tree
view
File List view
3 Select the audio format you want to import from the [Format] drop-down list
(see page 13) from the [Bit Rate] drop-down list
Note
When you select [Without External Device/Media] from [Set the default External Device/Media] in step
1, the recording bit rate cannot be changed
5 In the File Tree view, click the folder containing the audio file you want to play
The audio files in the selected folder are listed in the File List view
from the File List view
7 Click to select the desired Playlist on the right side of the window, and click
(Import)
The audio file you selected in step 6 can be imported into the Playlist According to the
setting in step 1, the file is imported in its original format or converted into ATRAC3
format
*@Hint
l
You can import all of the audio files in the drive dedicated on your computer to your OpenMG Jukebox at
one time For details, refer to “Importing audiofiles from your computer” - “Importing songs” in the
OpenMG Jukebox Help
l
If the music title is included in the data, such as ID3 data of Ml’3 format files, the title is displayed in the
“Title” column of the Playlist view of the OpenMG Jukebox If the title data is not included, the file name is
displayed in the “Title” column
18
Page 56

Notes
l
The original MP3/ WAV files imported are referred by the OpenMG Jukebox when playing back or checkingout the data Therefore, to prevent moving or deleting the files, copy them to a specific folder in the hard disk
before importing them to the OpenMG Jukebox
If the referred file is stored in a removable media and the media is removed, the following messages are
displayed when try to playback or check-out the data
For playing back: “Cannot play selected song The song file not found ” P
For checking-out: “Detected song(s) which cannot be checked-out ”
When the referred file is on a network, the same messages are displayed when the network is disconnected
l
When deleting a song, note that the original MP3/WAV is also deleted when you select [Delete the song file
from the PC] a
2
n
Q
d
3
19
Page 57

The songs on the Playlist of OpenMG Jukebox can be transferred (checked-out) to your digital
music player
For more information about connecting, see your digital music player operating
instructions
If you use Memory Stick Audio Player with your computer, insert a “MagicGate Memory
Stick” in the Player before connectiong to your computer
1
Run OperMG Jukebox, then click [Check-In/Out] tab to display the Check-in/
Check-out window
Your computer recognizes the connected digital music player and the list of songs are
displayed on the right side of the window
[Check-In/Out] tab (Out) button
PlayI& view
2 sklkct the Playlist containing the songs you want to check-out
The songs in the Playlist are listed in the Playlist view in the center of the window
l_^l^_l_^_ - -----..--.
3 In the Playlist view, select the song to be checked-out
To check-out more than one song at a time, hold down the Ctrl key and click the songs to be
selected
20
Page 58

t starts and the song is added to the end of the song list in the digital music player
Note
You can set to “1 step mode” or “2 step mode” for checking-out
In “2 step mode,” click the (Start) button after selecting the songs
Refer to the online He1
To stop check-out
Click
(Stop)
Note
Once check-in has started, do not disconnect the USB cable or “Memory Stick”
complete Doing so may damage the data or cause malfunction
until the check-in is
21
Page 59

You can return the tracks recorded on the digital music player back to the hard drive of your
computer (Check-in) You can return them only to the same computer from which the tracks were
checked-out
1
Run OpenMG Jukebox, and click [Check-In/Out] tab to display the Check-in/
Check-out window
Your computer recognizes the connected digital music player and the list of songs are
displayed on the right side of the window
2 Select the song to be checked-in from the song list of the digital music player
To check-in more than one song at a time, hold down the Ctrl key and click the songs to be
selected
Check-in starts
Note
You can set to “1 step mode” or “2 step mode” for checking-in
In “2 step mode,” click (Start) button after selecting the songs Refer to the online Help for details
To stop check-in
Click
(Stop)
Note
Once check-in has started, do not disconnect the USB cable or “Memory Stick” until the check-in is
complete Doing so may damage the data or cause malfunction
‘;ii’Hint
If you want to check-in all the songs, click (In All) All the songs in the digital music player are checked-in
22
Page 60

Window reference
q
Menu Bar: Shows OpenMG Jukebox
menus
q
Playback Control Area: Displays the
playback control buttons (e g , Play/Stop,
Previous, Repeat, etc ) for songs in
OpenMG Jukebox Playlists, external
device/media, or Audio CDs
Refer to the OpenMG Jukebox online Help
for details
q
[CD] tab: Displays the CD window
(page 24)
q
[Import] tab: Displays the Import window
(Page 26)
q
EFdF;] tab: Displays the Playlist
Refer to the OpenMG Jukebox online Help
for details
q
[Check-In/Out] tab: Displays the CheckIn/Out window (page 28)
q
[Device/Media] tab: Displays the Device/
Media window Refer to the OpenMG
Jukebox online Help for details
q
[Internet] tab: Displays the Internet
window (page 30)
q
[Tutorial] tab: Displays the Tutorial
window
Refer to the OpenMG Jukebox online Help
for details
23
Page 61

24
q
[Eject] button: Ejects the audio CD
q
Stop Recording button: Stops recording
q
Album Name: Displays the name of the
album
q
Start Recording button: Starts recording
q
Artist Name: Displays the name of the
artist
q
[Bit Rate]: From the drop-down list, select
the bit rate for recording
q
Genre Name: Displays the name of the
q
?tTiOlvl drive: Displays the name of the
CD-ROM drive of your computer
q
[Ret to]: From the drop-down list, changes
the setting of the destination for checking
out If it is set for automatic check-out to a
connected external device/media upon
recording, it shows the destination for
checking-out
q
[Count/Time/Size]: Displays the number
and length of songs, and the file size
q
Song display area: Displays a list and
information about each song on the audio
CD, such as the track numbers, the titles,
the artist name(s), the genre, the length of
the songs, file size, and the recording
status
The W mark indicates which songs are
selected for recording
Page 62

q
[Properties] button: Opens the “CD
Properties” dialog box
q
Get CD Information button: Connects to
the CDDBZ database via the Internet and
automatically retrieves the audio CD
information, such as the name of the
album and track titles
q
Check All button: Selects all the songs to
be recorded from the audio CD
q
Clear All Checks button: Deselects all the
songs to be recorded from the audio CD
q
[Recordable time]: Displays the estimated
available time for recording (depending
on the bit rate) on the drive in which
OpenMG Jukebox is managing the data
q
[Remain]: Displays the amount of free
space remaining on the drive in which
OpenMG Jukebox is managing the data
q
Address: Displays the URL address
information You can select one from the
drop-down list
fl [Go] button: Connects to the Internet web
page of the URL
25
Page 63

i
q
[Format]: From the drop-down list, choose
the type of audio files you want to import
to OpenMG Jukebox
q
[Bit Rate]: From the drop-down list, you
can select the bit rate for conversion of
audio files from the other formats to the
ATRAC3 format
q
Start Import button: Imports the audio
files (or the folders containing the audio
files) selected in the File Tree view/File
List view to OpenMG Jukebox
q
Stop Import button: Stops importing
q
Create New Playlist button: Creates a new
Playlist
q
Playlist drop-down list: You can choose
Playlists, etc , in the Playlist Tree view
drop-down list
q
[Delete] button: Deletes the items of the
Playlist that are selected in the Playlist
Tree view/Playlist view
q
Switch View button: Switches between
“Tree + List,” “List,” and “Tree” view
q
File Tree view: Displays the folders, etc ,
on your computer in the File Tree view
(similar to Windows Explorer)
Page 64

q
[Properties] button (File Tree view/File
List view): The “Properties” dialog box of
the folder or song, which is selected in the
File Tree view or the File List view,
appears
q
[Import all] button: You can
simultaneously import multiple audio
files on your computer to OpenMG
Jukebox
q
File List view: Lists the items under the
selected folder in the File Tree view
q
[Remain]: Displays the amount of free
space remaining on the drive in which
OpenMG Jukebox is managing the data
q
[Properties] button (Playlist): When a
Playlist is selected, the “Playlist
properties” dialog box appears
When a song is selected, the “Song
properties” dialog box appears
q
Playlist Tree view: Displays the Playlist in
the Playlist Tree view (similar to Windows
Explorer)
27
Page 65

28
q
[Delete] button: Deletes the selected Tree/
List view item
q
Keyword Search button: You can search
for songs and Playlists using keywords,
such as album, title, artist, or genre names
q
Playlist drop-down list: You can choose
Playlists, etc , in the Playlist Tree view
drop-down list
q
Go Back button: Go one directory level up
q
[Track/Time/Size]: Displays the number
and length of songs, and the file size of the
selected Playlist
q
[Data]: Displays the amount of space used
on the connected external device/media
q
Switch View button: Switches between
“Tree + List” and “List” view
q
[Free]: Displays the amount of free space
remaining on the connected external
device/media
q
External Device/media name: Displays
the names of the connected external
device/media
q
Audio Album Name of “Memory Stick”
(only when connecting a Memory Stick
Player)
q
Playlist Tree view: Displays the Playlist,
etc , in a Playlist Tree view (similar to
Windows Explorer)
q
[Properties] button (Playlist): When a
Playlist is selected, the “Playlist
properties” dialog box appears
When a song is selected, the “Song
properties” dialog box appears
Page 66

q
Get CD Information button : Connects to
the CDDB2 database via the Internet and
automatically retrieves the audio CD
information, such as the name of the
album and track titles
q
Playlist view: Lists the items under the
selected item in the Playlist
q
[Remain]: Displays the amount of free
space remaining on the drive in which
OpenMG Jukebox is managing the data
q
Check-In/Check-Out control buttons
@ [Properties] button (External Device/
Media): When a song in the external
device/media is selected, the “Song
properties” dialog box appears
Otherwise, the “Device/Media
Properties” dialog box for the external
device/media connected to your
computer appears
q
ge&,All button: Selects all of the songs in
q
Song List: Lists information about each
song in the external device/media, such as
the titles, the artist name, and the length of
the songs
29
Page 67

q
[Back]: Goes back to the previous page
q
[Forward]: Moves forward to the next
page
q
FStf]: Quits the connection to the current
@ [Home]: Displays the introduction of
OpenMG Home Page
@ feJi~;x;efwshes the page shown on
30
q
[Favorites]: Registers/Displays your
favorite addresses
q
Address: Allows you to enter the URL
(Internet address), or to select one from
the drop-down list
q
Display area: Displays the web page of the
URL
Page 68

Menu Reference
[File] menu
New
Playlist: Creates a new Playlist
Playlist Folder: Creates a new Playlist Folder
Open
Opens the “Open File” dialog box
In this dialog box, you can import the selected
audio files to OpenMG Jukebox
import All
Opens the “Import All” wizard
In this wizard, you can simultaneously import
all of the audio files in the selected drive to the
Plavlist of OoenMG Jukebox
Exit
Ouits OoenMG Jukebox
[Edit] menu
COPY
Copies the currently selected item to the
cliuboard
Paste
Inserts the contents of the clipboard
Delete
Deletes the currently selected items
Check All
Checks all of the check boxes shown on the CD
window
Clear All Checks
Clears all of the check boxes shown on the CD
window
Select All
Chooses all of the items in the list shown on the
current window
Move Up
Moves the currently selected item one line up
Move Down
Moves the currently selected item one line
down
Divide
Divides the selected song into two
Combine
Combines the selected multiple songs into one.
Rename
Makes the name of the selected item editable
Displays the “Keyword Search” dialog box You
can search for tracks and Playlists using
keywords, such as title, album, artist, or genre
names
Create Shortcut
Creates a shortcut icon for the currently selected
Playlist or song on the Windows Desktop If you
double-click the created shortcut icon, OpenMG
Jukebox launches automatically and starts
olavback
Properties
Displays/edits the information about the
currentlv selected item
[View] menu
CD Screen
Displays the CD window
Import Screen
Displays the Import window
Playlist Screen
Displays the Playlist window
Check-in/Out Screen
Displays the Check-m/Out window
Device/Media Screen
Displays the Device/Media window
Internet Screen
Displays the Internet window
Cover Art/Analyzer display area
Switches Cover Art and Analvzer view
Time Display Mode
Switches the mode between “Progress” and
“Remain” disnlaved on the Time Disolav
indicator in &e <layback Control are:
Tutorial
Opens/Closes the Tutorial window
Cover Art/Lyrics Information
Displays the information of the Playlist or the
song, such as cover images and lyrics
Simple Mode
Switches to Simole mode
Refresh
Updates the displayed contents with the latest
information
2
’
continued
31
Page 69

Menu Reference (continued)
[Control] menu
Play
Plays the currently selected Playlist/song
Pause
Pauses playback
stop
Stovs vlavback
To Next Track
Skivs
to the
beginnina of the next sow
To Previous Track
Skips back to the beginning of the previous song
To Previous
Skips back to the beginning of the current song
Start Import
Imports the audio files to OpenMG Jukebox
Stop Import
Stops importing the audio files
Repeat All/Repeat l/Repeat Off
Selects the repeat playback mode
Repeat All:
Repeats all of the songs in the current Playlist
Repeat 1:
Repeats the current song
Repeat Off:
Turns repeat mode off and returns to normal
playback mode
Shuffle
Switches on/off the shuffle playback mode
Shuffle on plays songs in random order
[External Device/Media] menu
Check-Out
Check-out selected song(s) to the external
device/media (In 2 step mode, adds the
currently selected song(s) to the list as the
song(s) to be checked-out )
Check-In
Check-m selected song(s) from the external
device/media (In 2 step mode, adds the
currently selected song to the list as the song(s)
to be checked-m )
Check-In All
Selects all songs in the external device/media to
check-m (In 2 step mode, adds all the selected
songs to the list as the songs to be checked-in )
Start Check-In/Check-Out
Performs check-in/check-out of the selected
song(s)
Stop Check-In/Check-Out
Aborts check-in/check-out
Select External Device/Media
Switches control of the external device/media
when more than one external device/media is
connected to your computer
Note
This function may not be available, depending on the
external device/media you are using
External Device/Media Properties
Displays the information about the external
device/media
Switches on/off the sound of playback
Start Recording
Starts audio CD recording
Stop Recording
Stops audio CD recording
Eject
Eiects the audio CD
32
Page 70

[Tool]
menu
Get CD Information
Help
menu
Connects to the CDDB2 database via the Internet
and automatically retrieves the audio CD
information, such as the name of the album and
track titles
Submit CD Info
Submits your CD information to CDDB2 via the
Internet, such as an album title, artist name, or
track title
Show Extended CD Info
If this item is checked, the “CDDB2 Disk
Information” dialog box appears the result of the
search for the CD information
Music Visualizer
Launches the Music Visualizer application
Note
Music Visualizer is only available on Sony
computers with Media Bar Version 3 0 or later
Optimize Format
Converts audio files in OpenMG Jukebox to the
appropriate formats, depending on the external
device/media
Options
Opens the “Options” dialog box of OpenMG
Jukebox
[Web Site] menu
Register product page
Connects to the Internet and displays the
OuenMG Jukebox user registration
Product support page
Connects to the Internet and displays the
OpenMG Jukebox support page
CDDB The #I CD Info Source
Connects to the CDDB2 Web site
OpenMG Home Page
Connects to the Internet and displays the
OpenMG Home Page
page
OpenMG Jukebox Help
Opens the online help for OpenMG Jukebox
External device/media Help
Opens the online help for your external device/
media fe e Network Walkman or Music ClipPlayer)
Tutorial
Opens/closes the tutorial for OpenMG Jukebox
About OpenMG Jukebox
Shows the OpenMG Jukebox version
information
33
Page 71

Uninstalling the OpenMG Jukebox
Follow the instructions below on how to uninstall the OpenMG Jukebox
For Windows 98Mlindows 98 Second Edition/Windows Me users
1
Click [Start]-[Settings]-[Control Panel] to display the Control Panel
2 Double-click [Add/Remove programs]
The Add/Remove programs Property window appears
3 Click “OpenMG Jukebox” from the list
Click [Add/Remove]
For users with Windows 2000 models
Log on as an Administrator, then follow the instructions below
1
Click [Start]-[Settings]-[Control Panel] to display the Control Panel
Double-click [Add/Remove Programs]
34
ox, and click [Change/Remove]
Page 72

Features of copyright protection by
OpenMG
The OpenMG Jukebox software features OpenMG, a copyright protection technology developed
by Sony to protect music copyrights
OpenMG uses a high-level cryptographic technology to protect music contents with computers
Users should be notified of the restrictions mentioned below
l
Music recorded on the hard disk using the OpenMG Jukebox software cannot be played if
copied onto other computers
l
Music contents checked out from a computer cannot be played if copied onto other computers
l
Music contents checked out from a computer must be checked in to the same computer You
cannot check in to other computers
l
Installation of the same OpenMG Jukebox software onto other computers is not permitted
l
Usage Rules for using music
If Usage Rules are included in the music by way of the copyright holder or the distributor,
operation will be restricted to use permitted by the Usage Rule For music, such as compact
discs, that does not contain a Usage Rule, the Default Usage Rule of SDMI will be followed
This Default Usage Rule states that one file can be checked out up to three times only
l
On music contents that are not compatible with the OpenMG Jukebox software
- Under the supervision of SDMI, this software prohibits recording of music with a copy
prohibition signal
l
Upgrading OpenMG Jukebox software
This software was developed in accordance with the current arrangement between Sony and
SDMI If this arrangement is modified in the future, some of the software functions may become
unavailable Sony may offer an upgrade kit in this case at additional user expense
0
s
7
z
0”
i
$
0
s
35
Page 73

Glossary
ATRAC3
ATRAC3, which stands for Adaptive Transform Acoustic Coding3, is audio compression
technology that satisfies the demand for high sound quality and high compression rates
The ATRAC3 compression rate is approximately 10 times higher than that of the Audio CD,
resulting an increased data capacity for the media
“Check-In /Check-Out”
Check-out is to transfer music files from a personal computer to an external device/media (such
as Network Walkman) Returning checked-out music files to the same computer is to check in
(You cannot move checked-out music files to another computer )
You can check-out a music file, check it back in, and then check it out again an infinite number of
times The SDMI rules provide that up to four copies of a music file can be checked-out at one
time OpenMG employs a method whereby three copies of a song can be checked-out
simultaneously, while the fourth copy is maintained as a “master” on your PC If three copies of
the same song are checked-out at a given time, one copy of the song needs to be checked-in to the
computer in order to create an additional check-out
Bit rate
Indicates the data amount per second The rate is reflected in bps (bit per second) In OpenMG
Jukebox, the bit rate for recording an audio CD or converting MP3 and WAV format audio files
into ATRACJ format can be chosen from 132 kbps/105kbps/66kbps 105 kbps means 105000 bits
of information per second If the bit rate is large, that means a large amount of information is
used to play music Comparing music of the same format, a 105 kbps data offers better sound
quality than 66 kbps data, and 132 kbps data offers better sound quality than 105 kbps data
However, audio files in formats such as MI’3 have different encoding methods, and thus sound
quality cannot be determined by simply comparing the bit rate
“MagicGate Memory Stick”
A compact IC recording media “Memory Stick” equipped with “MagicGate” copyright protection
technology You can record or play data, such as music, that requires copyright protection only
by using a “MagicGate Memory Stick” with “MagicGate” compatible equipment “MagicGate
Memory Stick” can be used to record any other kind of digital data with any other “Memory
Stick” compatible equipment “MagicGate Memory Stick” is distinguished by the “MG” and
“MAGIC GATE” logos
MP3
MP3, which stands for MPEG-1 Audio Layer3, a standard for audio files compression determined
by the Motion Picture Experts Group, an IS0 (International Organization for Standardization)
working group It enables compression of audio files to about l/10 of the data size of a standard
compact disc Since the MI’3 encoding algorithm is disclosed, there are various encoders/
decoders that are compliant with this standard, including freeware that is available for no charge
Thus, the MI’3 standard is widely used in the computer field
36
Page 74

OpenMG
Copyright protection technology to import and manage contents of music distribution services or
CDs By using software compliant with OpenMG, audio contents can be encrypted before storage
on a hard disk drive so that you can enjoy playback of the audio files on that computer OpenMG
also prevents unauthorized distribution of the contents via the Internet or other networks
SDMI
SDMI which stands for Secure Digital Music Initiative, is a forum that consists of over 130
companies in the fields of recorded audio content, computers, and consumer electronics,
dedicated to developing an integrated method of copyright protection technology that can be
used worldwide
SDMI is working to create a framework for preventing improper usage of audio files and to
promote legal music distribution services The copyright protection technology OpenMG is based
upon the SDMI standard
Windows Media Technology
A technology including a contents management system called Windows Media Rights Manager,
which can encrypt contents and distribute them with their conditions for usage, distribution, etc
Audio files supporting Windows Media Technologies (WMT) downloaded via EMD can be
imported into and managed by OpenMG Jukebox
37
Page 75

Index
ATRAC3 4,17,36
m
Bit rate 13,14,36
m
CD (compact disc) 13,14
CD-ROM drive 4,10,11, 13,
CD-ROM 11,12
Check-In 22,36
Check-Out 20,36
computer 4,11,32
copyright protection technology
download
14
4,37
4,16
m
EMD services
4,15
u
Features
file tree view
hard disk (hard drive) 4,11,13
Help 7
35
18
online Help
OpenMG
OpenMG Jukebox software
optimizing the CD drive
record 13
7
4,15,16,23,
35,37
4,35
14
u
SDMI
start (software) 13
6,37
u
transferring
to the computer
to the digital music player
uninstalling
upgrading
Usage Rule
USB
WAV format
Windows 2000
Windows Me
5,22
5,20
34
35
35
21,22
4,17
10
10
install 11
Internet (EMD services) 4,15
import 17
MagicGate Memory Stick 36 *
MI’3 17,36
38
Page 76

Sony Corporation
http Ilwww world sony corn/
Printed on recycled paper Printed in Japan
Page 77

SONY
USBCr--7JwBI#%Zi
How to connect the USB cable
N W-MS9
Raccordement du cable USB
So schliel3en Sie das USB-Kabel an
Page 78

Traffic Safety Tips
l
Do not use your unit while operating a motorized
vehicle or bicycle It may create a traffic hazard and
is illegal in many areas
l
You should use extreme caution or temporarily
discontinue use in potentially hazardous situations
l
Even if your headset is an open-air type design to let
you hear outside sounds, don’t turn up the volume
so high that you can’t hear what‘s around you
mead this important
information before
using your headset.
REMEMBER
. . . .
USE YOUR HEAD
WHEN YOU USE
YOUR HEADSET.
Printed in Japan 3-755-536-21 (1)
Page 79

Dear Customer:
q
We Want You Listening For A Lifetime
Selecting fine audio equipment such as the unit
you’ve just purchased is only the start of your
musical enjoyment Now its time to consider how you
can maximize the fun and excitement your equipment
offers Sony and the Electronic Industries
Association’s Consumer Electronics Group want you
to get the most out of your equipment by playing it at
a safe level One that lets the sound come through
loud and clear without annoying blaring or distortion
and, most importantly in a way that protects your
sensitive hearing
Sound can be deceiving Over time your hearing
“comfort level” adapts to higher volumes of sound
which could be harmful to your hearing Guard
against this by setting your equipment at a safe level
BEFORE your hearing adapts
To establish a safe level:
l
Adjust your volume control to a low setting
l
Slowly increase the sound until you can hear it
comfortably and clearly, and without distortion
Once you have established a comfortable sound
level:
l
Set the dial and leave it there
Taking a minute to do this now will protect your
hearing in the future After all, we want you listening
for a lifetime
Used wisely, your new sound equipment will
provide a lifetime of fun and enjoyment Sony and the
Electronic Industries Association’s Consumer
Electronics Group recommend you avoid prolonged
exposure to excessive noise This list of sound levels
is included for your protection
7
1 ; 1 rulibrary soft whispers 1
Living room, refrigerator, bedroom away from
Light traffic, normal conversation, quiet office
Air conditioner at 20 feet, sewing machine
70
Vacuum cleaner, hair dryer, noisy restaurant
Average city traffic, garbage disposals, alarm
80
clock at two feet
THE FOLLOWlNG NOISES CAN BE DANGEROUS UNDER
CONSTANT EXPOSURE
90
Subway, motorcycle, truck traffic, lawn mower
100 1 Garbage truck, chain saw, pneumatic drill
I
Rock band concert in front of speakers,
120
thunderclap
140 Gunshot blast, jet plane
180 1 Rocket launching oad
Information courtesy of the Deafness Research Foundation
SONY
Page 80

SONY@
Customer Registration Instructions
@
Thank you for purchasing the Network Walkman
your product online The information you provide will help us to assist you, should you
have to contact us for customer support All information is confidential
Registered customers receive the following benefits:
(1) Warranty extension from 90 days to 1 year
(2) Automatic e-mail notification when OpenMG Jukebox upgrades are available
Please take a moment to register
Step1
Step2
Step3
Step4
* To make this system secure, we utilize SSL between your PC and our browser Please contact your network support manager if you have difficulty using the registration system
For technical support questions, please
visit
http://www.sony.com/openmg
future reference
Install OpenMG Jukebox
Insert the CD-ROM from your Network Walkman package
The installation program will run automatically When the installation is
complete, your PC will automatically restart
Click
Double click the “Registration” icon on your desk top
You will be automatically connected to the Internet
Register your Network Walkman
Complete the “Customer Profile” Form See the instruction manual for
the location of the serial number
Confirmation
We will be sending you a “Welcome” e-mail shortly to confirm your
registration
go
to
http://www.sony.com/service
We suggest bookmarking these pages for
or
0 2001 Sony Corporation Printed in Japan
3-231-918-01
Page 81

SONY@
NW-MS9
Notice for using this product
When using this product, be sure to read the following and other
supplied operating instructions
For the latest information, go to the support Web site at:
http://www Sony com/walkmanproductsupport
Before operating the unit
Be sure to install the OpenMG Jukebox software on the
supplied CD-ROM before connecting the unit to your computer.
If you connect the unit to your computer before installing, your
computer selects an inappropriate driver and the unit may not work
correctly
If you connect the unit to your computer before installing OpenMG
Jukebox, and [Add New Hardware Wizard] appears, click [Cancel]
Before installing the software
Before installing, be sure to quit all other Windowsa programs,
otherwise problems may occur
Note on installing OpenMG Jukebox
If the “Installing:” message continues to appear without advancing
to the next step for several moments, click the [InstallShield Wizard]
icon on the taskbar The taskbar is displayed when you press the
[ a ] Windows key on the keyboard
Importing MP3 files
To import ME3 files to the supplied OpenMG Jukebox software
using the Windows@ 98 operating system, Microsoft@ Windows
MediaTU Player Version 6 4 or later is necessary If Windows
MediaTM Player is not installed on your computer, it can be
downloaded from the OpenMG Web site
(http://www openmg corn/us/)
If your operating system is Windows@ 98 Second Edition, Windows@
Millennium Edition, or Windows@ 2000 Professional, Windows
MediaTM Player Version 6 4 or later is already installed
Backing up songs
When operations that modify the operating system (e g , operating
system recovery or system restoration, etc ) are performed, be sure
to use “OpenMG Jukebox Backup Tool” beforehand to make a
backup and then execute the operation
Sony Corporation 0 2001 Printed in Japan
3-229-191-11 (1)
1 See reverse side. 1
Page 82

When OpenMG Jukebox Version 1.x is installed
l
If you have OpenMG Jukebox Version 1 X (older than 2 0) on
your computer, select [Install OpenMG Jukebox Ver 2 0 and
Driver] to install OpenMG Jukebox 2 0
Follow the instructions in the supplied “OpenMG Jukebox
Operating Instructions ”
When you install it, OpenMG Jukebox Version 1 X will
automatically be uninstalled
l
Songs registered using OpenMG Jukebox Version 1 X can
automatically be converted to Version 2 0, so you can continue to
use them However, to be safe, it is recommended that they be
backed up using OpenMG Jukebox Backup Tool
l
Be sure to check in any songs checked out using OpenMG
Jukebox Version 1 X before upgrading You may not be able to
check in a song checked out using OpenMG Jukebox Version 1 X
after upgrading
l
If you are using an external device/media other than this
product, select the appropriate external devices/media (multiple
selection is available) after selecting [Install OpenMG Jukebox
Ver 2 0 and Driver] Alternatively, restart the installer and select
[Install Driver only] to install the appropriate driver
Note
After you have installed the OpenMG Jukebox Version 2 0 software, do not
install OpenMG Jukebox Version 1 X to overwrite the existing Version 2 0 If
OpenMG Jukebox Version 2 0 is overwritten, registered songs may be lost If
installation is accidentally started, be sure to halt the installation
Notes on system suspend/system hibernation mode
l
While playing or recording, or while connecting the Network
Walkman player, do not change to system suspend/system
hibernation mode Prevent settings that automatically make such
changes
If the mode changes to system suspend/system hibernation
during CD recording, file import, check-in, or check-out, songs
may be lost and the system may not be recovered normally Also,
if the “Memory Stick” is replaced during system suspend/system
hibernation mode, songs may be lost after system recovery
l If you are using Windows” 2000 Professional:
When you put the computer in suspend/system hibernation
mode while an external device/media is connected, if OpenMG
Jukebox is started immediately upon system recovery, the
message “Cannot initialize OpenMG PD Manager U may appear
In this case, click [OK] and then disconnect and reconnect the
external device/media and restart OpenMG Jukebox
Note on the “LOCK” tab on the “Memory Stick”
While using OpenMG Jukebox, the contents of the “MagicGate
Memory Stick“ may not be displayed if you insert it with the writeprotect tab locked, even if you then unlock it In this case, reconnect
the Network Walkman
Page 83

SONY
CORRECTION
Pages 18 and 19 “To set the date and time (DATE-TIME)”
NW-MS9
clncorrecb
1
Press the MENU button.
The menu 1s displayed.
1 a REP OFF 1
2
Press 4 or F of the Seesaw key to
display “DATE-TIME.”
1~3 DATE-TIME1
3
Press (PUSH) of the Seesaw
The “DATE” display appears, and
year indication “y” blinks.
4
Press 4 or F of the Seesaw key to select
the year number “y.”
5
Press (PUSH) of the Seesaw key.
The month Indication “m” blinks
key.
the
<Correct>
1
Press the MENU button.
The menu IS displayed.
1 Q REP OFF 1
2
Press 4 or b of the Seesaw key to
display “DATE-TIME.”
1 @ DATE-TIME1
3
Press (PUSH) of the Seesaw key.
The “DATE” display appears, and the
year digits blink.
4
Press 4 or b of the Seesaw key to select
the year
5
Press (PUSH) of the Seesaw key.
The month digit blinks.
~3_oBy,$rn
_ .
dinits
ld ]
6
Do the same to set the month “m” and
the day “d,” and press (PUSH) of the
Seesaw key.
The “TIME” display appears, The hour
Indication “l-t” blinks.
7
Do the same to set
and the day “m,” and press
(PUSH) of the Seesaw key
8
Press the MENU button.
The display returns to normal.
Sony Corporation 0 2001 Printed m Japan O-578-454-00 (1)
the
month “h”
6
Do the same to set the month “m” and
the day “d,” and press (PUSH) of the
Seesaw key.
The “TIME” display appears, The hour
digit blinks.
7
Do the same to set the hour and
minute and press (PUSH) of the
Seesaw key.
8
Press the MENU button.
The display returns to normal.
Page 84

4-557-147-01 (Tl) A
SONY@
Tape Cassette Player/Recorder/CD Player/Minr Disc
DAT/Radio/Head Phone/Speaker/MIC/Personals
LI M ITED WARRANTY ’ Portab’e Audio’
Sony Electronrcs Inc. (“Sony”) warrants thus Product (including any accessones) agarnst defects rn material or
workmanshrp as follows:
1. LABOR: For a penod of 90 days from the date of purchase, if thus Product IS determrned to be defective,
Sony will repair or replace the Product, at its option, at no charge, or pay the labor charges to any Sony authonzed servrce facility. After the Warranty Period, you must pay for all labor charges.
2. PARTS: In addition, Sony will supply, at no charge, new or rebuilt replacements rn exchange for defective
parts for a period of one (I) year. After 90 days from the date of purchase, labor for removal and rnstallation IS
available from Sony authorrzed servrce facilitres or a Sony Servrce Center at your expense.
To obtarn warranty service, you musttake the Product, or deliverthe Product frerght prepaid, In either its ongrnal
packagrng or packagrng affording an equal degree of protection, to any authorized Sony servrce facility.
Thus warranty does not cover customer Instruction, Installation, set up adjustments or srgnal reception prob-
lems.
Thus warranty does not cover cosmetic damage or damage due to acts of God, accident, mrsuse, abuse, negligence, commercral use, or modification of, or to any part of the Product, Including the antenna. Thus warranty
does not cover damage due to Improper operation or marntenance, connection to rmproper voltage supply, or
attempted reparr by anyone other than a facility authorized by Sony to servrce the Product. This warranty does
not cover Products sold AS IS or WITH ALL FAULTS, or consumables (such as fuses or batteries). Thus warranty
IS valid only rn the United States.
Proof of purchase rn the form of a bill of sale or recerpted rnvorce whrch IS evrdence that the unit IS withrn the
Warranty perrod must be presented to obtarn warranty servrce.
This warranty IS Invalid if the factory applied serial number has been altered or removed from the Product.
REPAIR OR REPLACEMENT AS PROVIDED UNDER THIS WARRANTY IS THE EXCLUSIVE REMEDY OF THE
CONSUMER. SONY SHALL NOT BE LIABLE FOR ANY INCIDENTAL OR CONSEQUENTIAL DAMAGES FOR
BREACH OF ANY EXPRESS OR IMPLIED WARRANTY ON THIS PRODUCT EXCEPT TO THE EXTENT PROHIBITED BY APPLICABLE LAW, ANY IMPLIED WARRANTY OF MERCHANTABILITY OR FITNESS FOR A PARTICULAR PURPOSE ON THIS PRODUCT IS LIMITED IN DURATION TO THE DURATION OF THIS WARRANTY.
Some states do not allowthe exclusron or limitation of incrdental or consequential damages, or allow limitations
on how long an Implied warranty lasts, so the above limitations or exclusrons may not apply to you. In addition,
if you enter Into a servrce contract with the Sony Partnershrp withrn 90 days of the date of sale, the limitation on
how long an Implied warranty lasts does not apply to you. This warranty grves you specific legal rights, and you
may have other rights whrch vary from state to state.
For your convenrence, Sony Electronrcs Inc. has established telephone numbers for frequently asked questions:
To locate the servrcer or dealer nearest you, or for servrce assrstance or resolution of a servrce problem, or for
product rnformatron or operation, call:
Sony Direct Response Center
l-(800)-222-7669
or write to:
Sony Direct Response Center
12451 Gateway Blvd.
Fort Myers, FL 33913
For an accessory or part not available from your authorized dealer, call:
I-(800k488~SONY (7669)
Pnnted rn Japan
 Loading...