

Sony MSZ-2100G Operation Manual

Smart Agriculture Solution
Operation Guide
D-829-100-12 (1)
GB
MSZ-2100G MULTISPECTRAL SENSING UNIT
FFA-PCW Fast Field Analyzer
© 2019 Sony Corporation

2
00
Table of Contents
Read This First
Read This First .................................................................... 3
Chapter 1 Overview
What is Smart Agriculture Solution? .................................4
Basic Configuration ............................................................ 6
Items Necessary for Smart Agriculture Solution ............... 7
Operating Process (Workflow) .......................................... 8
Recommended Flight Conditions ...................................... 9
Chapter 2 Installing the Software (for the first time)
Installing Software on a Computer .................................10
Downloading an App ....................................................... 11
Chapter 3 Preparation
Configuring the Drone ..................................................... 12
Creating a Flight Plan .......................................................14
Preparing MSZ-2100G ..................................................... 17
Sample Flight Plan Setting ............................................. 18
Glossary ............................................................................ 39
Trademarks
Microsoft, Windows, and Excel are registered
trademarks of the Microsoft Corporation in the
United States and/or other countries.
iPad is the registered trademark of Apple Inc. in
the United States and other countries.
©
TM and
Intel and Intel Core are the trademarks of
the Intel Corporation in the U.S.A. and other
countries.
“Google”, the “Google logo”, “Google Maps”,
“Android”, and “Google Earth” are the
trademarks or registered trademarks of Google
LLC.
OpenStreetMap and the magnifying glass
logo are the registered trademarks of the
OpenStreetMap Foundation.
DJI and DJI GO are trademarks of DJI.
SD and microSD are trademarks of SD-3C, LLC.
AIRDATA UAV is the trademark of Airdata UAV,
Inc.
All other system names and product names are
registered trademarks or trademarks of their
respective owners. Further, the ® or ™ symbols are
not used in this document.
2018 Apple Inc. All rights reserved.
Chapter 4 Shooting
Before Shooting ...............................................................19
Shooting ........................................................................... 21
Checking Flight Success ................................................... 25
Checking Crop Health ...................................................... 28
Generating Reports .......................................................... 32
Displaying Mobile Device Data ........................................ 33
Chapter 5 Appendix
Updating the firmware .................................................... 34
Troubleshooting ............................................................... 35
Maintenance and Usage Precautions .............................. 37

Read This First
3
00
Read This First
Information on this manual
This operation guidebook assumes that the
product is mounted on a DJI drone.
Copyrights
In some cases, the approval of the copyright
holder may be required for images recorded using
this product. To protect copyright, observe the
following points carefully when using the product.
Carefully observe laws relating to copyright.
The distribution of images for which the
copyright is held by a third party, or otherwise
permitting private or public access without the
permission of the copyright holder is prohibited
by law.
Images recorded on this product
This product is intended to check the vegetation
conditions of agricultural fields. Do not use images
recorded on this product for any other purposes.
NDVI information
The NDVI is calculated with Sony original
processing methods. Values may change
depending on shooting conditions.
accepts no responsibility whatsoever if the drone
that the product is attached to crashes.
Points to check before use
Perform a test recording, and verify that it was
recorded successfully.
Images used in this manual
The images used in this manual are created to aid
in explaining operations. The actual images that
are displayed during operations may differ.
Data backup
Back up data frequently to prevent data loss. Sony
will not be liable for loss of data resulting from
circumstances of any kind.
Product information
This product is not dust or splash resistant.
Drone use
Make sure to check the relevant laws that apply to
your area.
Follow the drone manual for information on drone
operation and precautions. When attaching the
product (MULTISPECTRAL CAMERA (hereafter
referred to as “camera”) and GNSS SENSOR UNIT
(hereafter referred to as the “sensor unit”) to a
drone, system integrator and user intentions are
outside the realm of Sony responsibility, and Sony
Chapter 1 Overview
4
00
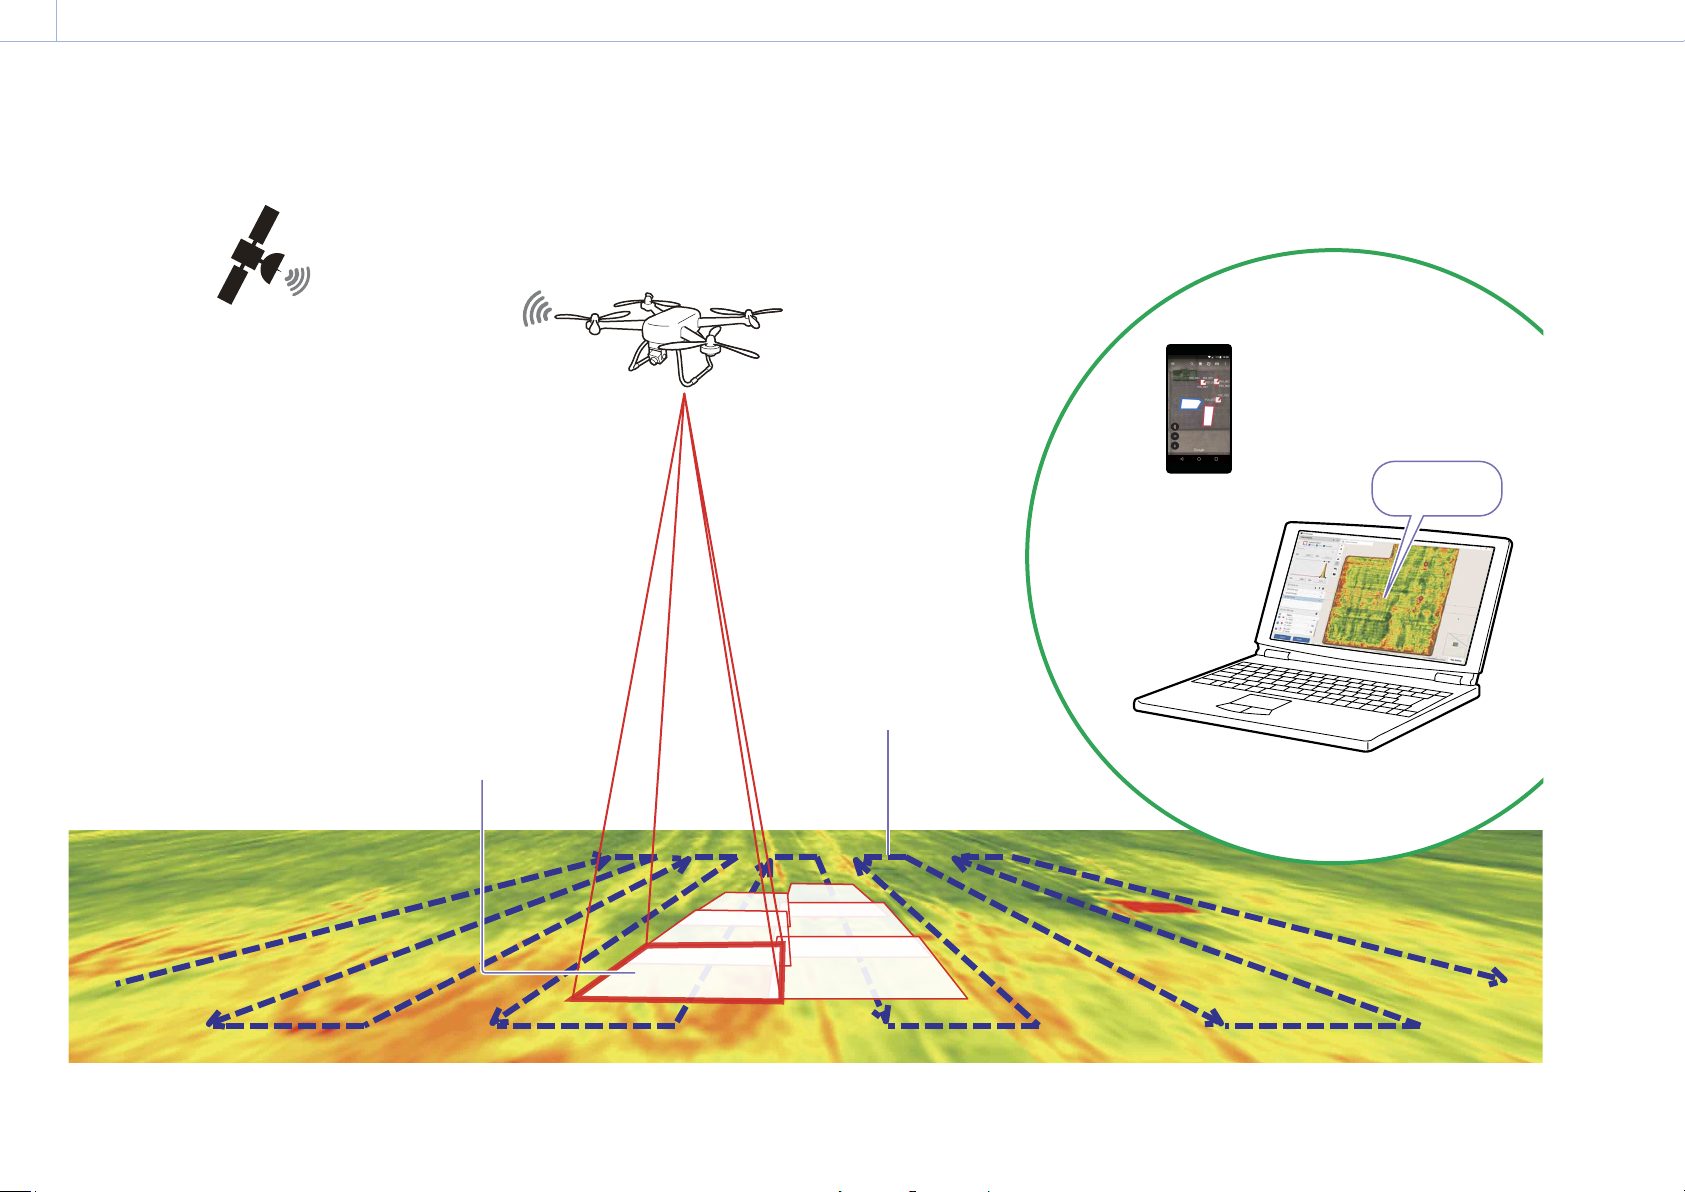
What is Smart Agriculture Solution?
Smart Agriculture Solution is a solution that helps identify abnormal areas and lets you check vegetation using the Fast Field Analyzer dedicated software to quickly analyze flight data
recorded on the MSZ-2100G MULTISPECTRAL SENSING UNIT (camera, sensor unit) mounted on a drone.
Drone with MSZ-2100G
GPS satellite/GLONASS satellite
(see Glossary)
A GNSS (see Glossary) signal is
acquired and position, altitude,
and attitude information is
added to recorded images.
Overlapped images are
efficiently captured.
The camera simultaneously photographs
in the RED range (red wavelength
range)/NIR range (near infrared range),
and RGB range (visible light range).
Flight path
Mobile device
Field flight images are quickly
stitched to be used to check
problem areas and analyze
vegetation status.
Computer with Fast Field Analyzer
Point Of Interest (hereafter referred to
as “POI”) and Region of Interest
(hereafter referred to as “ROI”) can be
viewed in the viewer app.
Growth problem
here

Chapter 1 Overview : What is Smart Agriculture Solution?
5
00
Fast stitching
You can record images that efficiently overlap
the drone’s flight route on each side. Because the
process can be completed by capturing a minimal
number of images, the processing time for image
stitching is significantly reduced. After the flight is
complete, you can check whether or not the flight
and shooting was successful on the spot, and check
the status of vegetation.
Efficiently overlapped and photographed
Centralized management of multiple
farms
Using the Fast Field Analyzer specialized software,
you can define “Farms” (see Glossary) and define
multiple areas in the farm that you wish to stitch
together as “Fields” (see Glossary) for managing
vegetation analytics. Images recorded according
to the drone flight plan are stitched within the
scope of the field definition and displayed. You can
register multiple farms in Fast Field Analyzer.
Farm
Generating stitched images
You can quickly generate stitched images from flight data recorded with the camera to check vegetation
status. You can set POI or ROI at spots or areas in your concern. It is also possible to show NDVI and RGB
images in side-by-side view.
NDVI color map
You can adjust the NDVI (see Glossary) stitched image
color to make it easier to understand vegetation status.
NDVI image RGB image
POI, ROI
You can specify spots and areas of concern in stitched images.
Stitched image
Flight data recorded by the dronemounted camera is stitched and displayed.
Viewing original images recorded by
the camera
You can zoom in and display the original images
used for stitched images to view details of
vegetation status in areas of concern.
Compare past stitched data
In Fast Field Analyzer, you can compare past
stitched images and analytics results to view
trends in vegetation status. You can also compare
the surface area of abnormal zones.
Convert to data for creating
orthoimages
If you want to use flight data with third party
image processing software, you can convert it to
data for creating orthoimages (see Glossary).
Field
Flight plan
Chapter 1 Overview
6
00
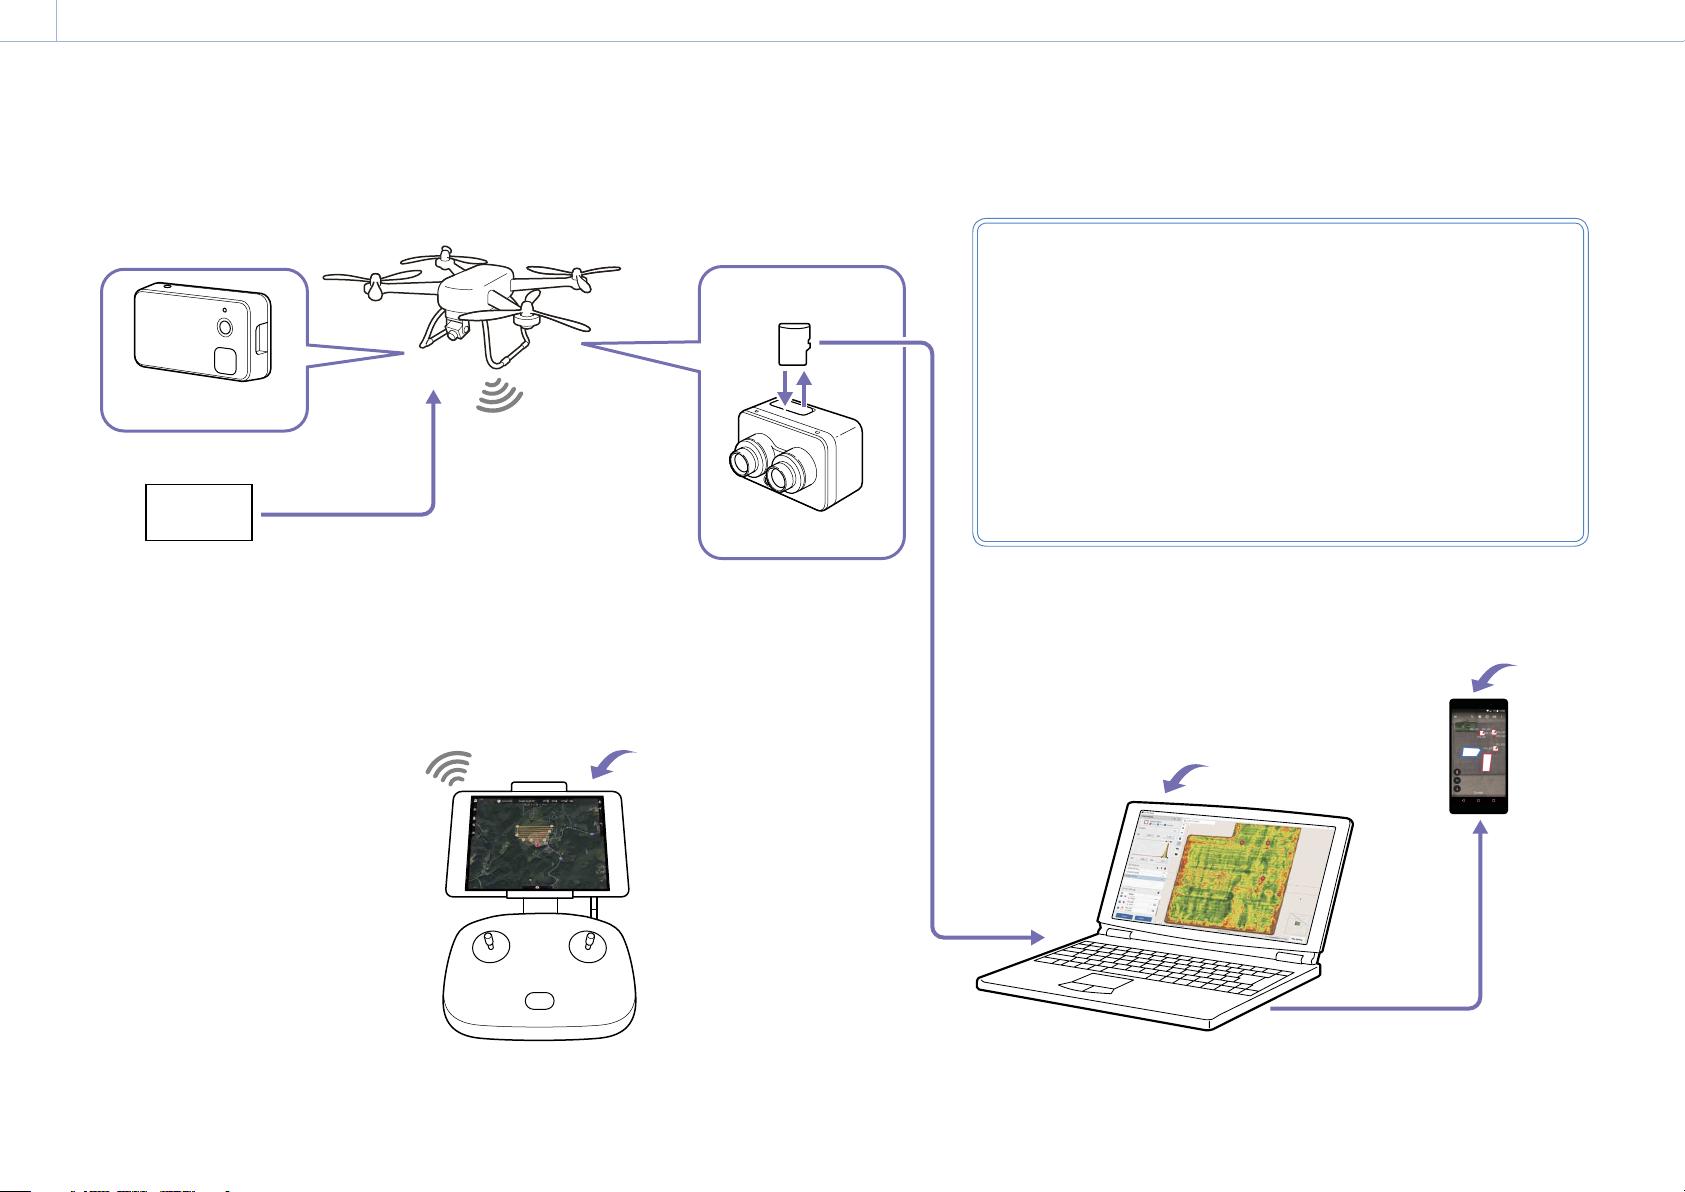
Basic Configuration
Smart Agriculture Solution is used on the following hardware and software.
For details on devices and software, see “Items Necessary for Smart Agriculture Solution” (page 7).
Drone
Sensor unit
Mobile
battery
microSD card
1)
1)
Camera
Flight plan creation app
iPad
The manuals for this product consist of the following three documents.
Operating Instructions (separate manual)
Includes information on handling the product, precautions, and
specifications. Make sure to read this first.
Operation Guide (this document)
Includes information on how to operate the product, software installation,
troubleshooting, and general operations.
Fast Field Analyzer User’s Guide (PDF)
This guide contains information on how to use the Fast Field Analyzer.
GeoJSON (see Glossary)/
GPX/KML Viewer
Fast Field Analyzer
2)
Mobile
device
Manuals
1) MULTISPECTRAL SENSING UNIT MSZ-2100G (camera, sensor unit)
2) MULTISPECTRAL SENSING UNIT MSZ-2100G software
Drone controller
Computer
Transfer via email attachment, etc.

Chapter 1 Overview
7
00
Items Necessary for Smart Agriculture Solution
The following hardware and software are required
to run Smart Agriculture Solution.
Hardware
Shooting
MSZ-2100G MULTISPECTRAL SENSING UNIT
– Camera
– Sensor unit
– Connecting cable
The MSZ-2100G is mounted to the drone using
a dedicated bracket.
Drone set
– Drone body
– Propellers
– Controller
– Battery
– Battery charger
Landing pad
Mobile battery (for powering the camera)
Mobile battery cable (for connecting the camera
and mobile battery)
Controller cable (for connecting the iPad and
drone controller)
microSD card
– Use an SDHC, Class 10 card (Maximum 32GB)
– Use the card with sufficient free space (32GB
recommended) after formatting it to FAT 32
SD card adapter (for reading and writing to the
microSD card on a computer)
Analyzing and viewing flight data
Computer (for Fast Field Analyzer)
Mobile device (smartphone, tablet PC, etc.)
Software
Dedicated software
Fast Field Analyzer
Apps required for creating flight plans
DJI GO4 (Only when used with a DJI brand
drone)
Map Pilot for DJI - Business (recommended)
Apps required for viewing POI/ROI information
(recommended)
POI and ROI can be output in the following
formats.
GeoJSON
GPX
KML
Make sure to use the apps provided by each
manufacturer according to the format.
App required for checking flight logs
Airdata HD Sync (Airdata UAV)
Creating a flight plan and running missions
(seeGlossary)
iPad
Follow the app for supported OS and models.

Chapter 1 Overview
8
00
Operating Process (Workflow)
Preparing to use the system
for the first time
Installing the software
Computer
Fast Field Analyzer (dedicated software)
iPad
DJI GO4
Map Pilot for DJI - Business (recommended app
for creating flight plans)
Mobile device
GeoJSON/ GPX/KML viewer app
See “Chapter 2 Installing the Software (for the first time)”
(page 10).
Configuring Fast Field Analyzer
Define farms and configure fields (areas
photographed by the camera).
Farms (multiple farms can be registered)
Creating a flight plan
1 Set a flight path for efficiently photographing
the agricultural field using a flight plan
creation app, then create a flight plan
(mission).
2 Confirm that the mission you created has been
added to the list.
Shooting
1 Check the weather and connect the required
equipment.
See “Before Shooting” (page 19).
2 Execute the mission and shoot.
Checking crop health
conditions
1 Adjust the display for viewing clearly, then
check for uneven growth, stress or any other
abnormal areas.
See “Checking Crop Health” (page 28).
2 Set POI and ROI in spots and areas of concern.
POI
ROI
Fields (displays flight data)
If there is an instruction from the integrator, go to
the application menu [Edit] - [Preferences] and set
[Camera Pitch Offset].
Refer to the Fast Field Analyzer User’s Guide (PDF).
See “Creating a Flight Plan” (page 14).
See “Shooting” (page 21).
3 Confirm that the flight and shooting have
been successful, then generate a stitched
image.
See “Checking Flight Success” (page 25), and “Generating
stitched images” (page 26).
See “Setting POI/ROI” (page 30).
3 Export POI and ROI information to generate a
report or view it on a mobile device.
See “Generating Reports” (page 32), and “Displaying
Mobile Device Data” (page 33).
Chapter 1 Overview
9
00
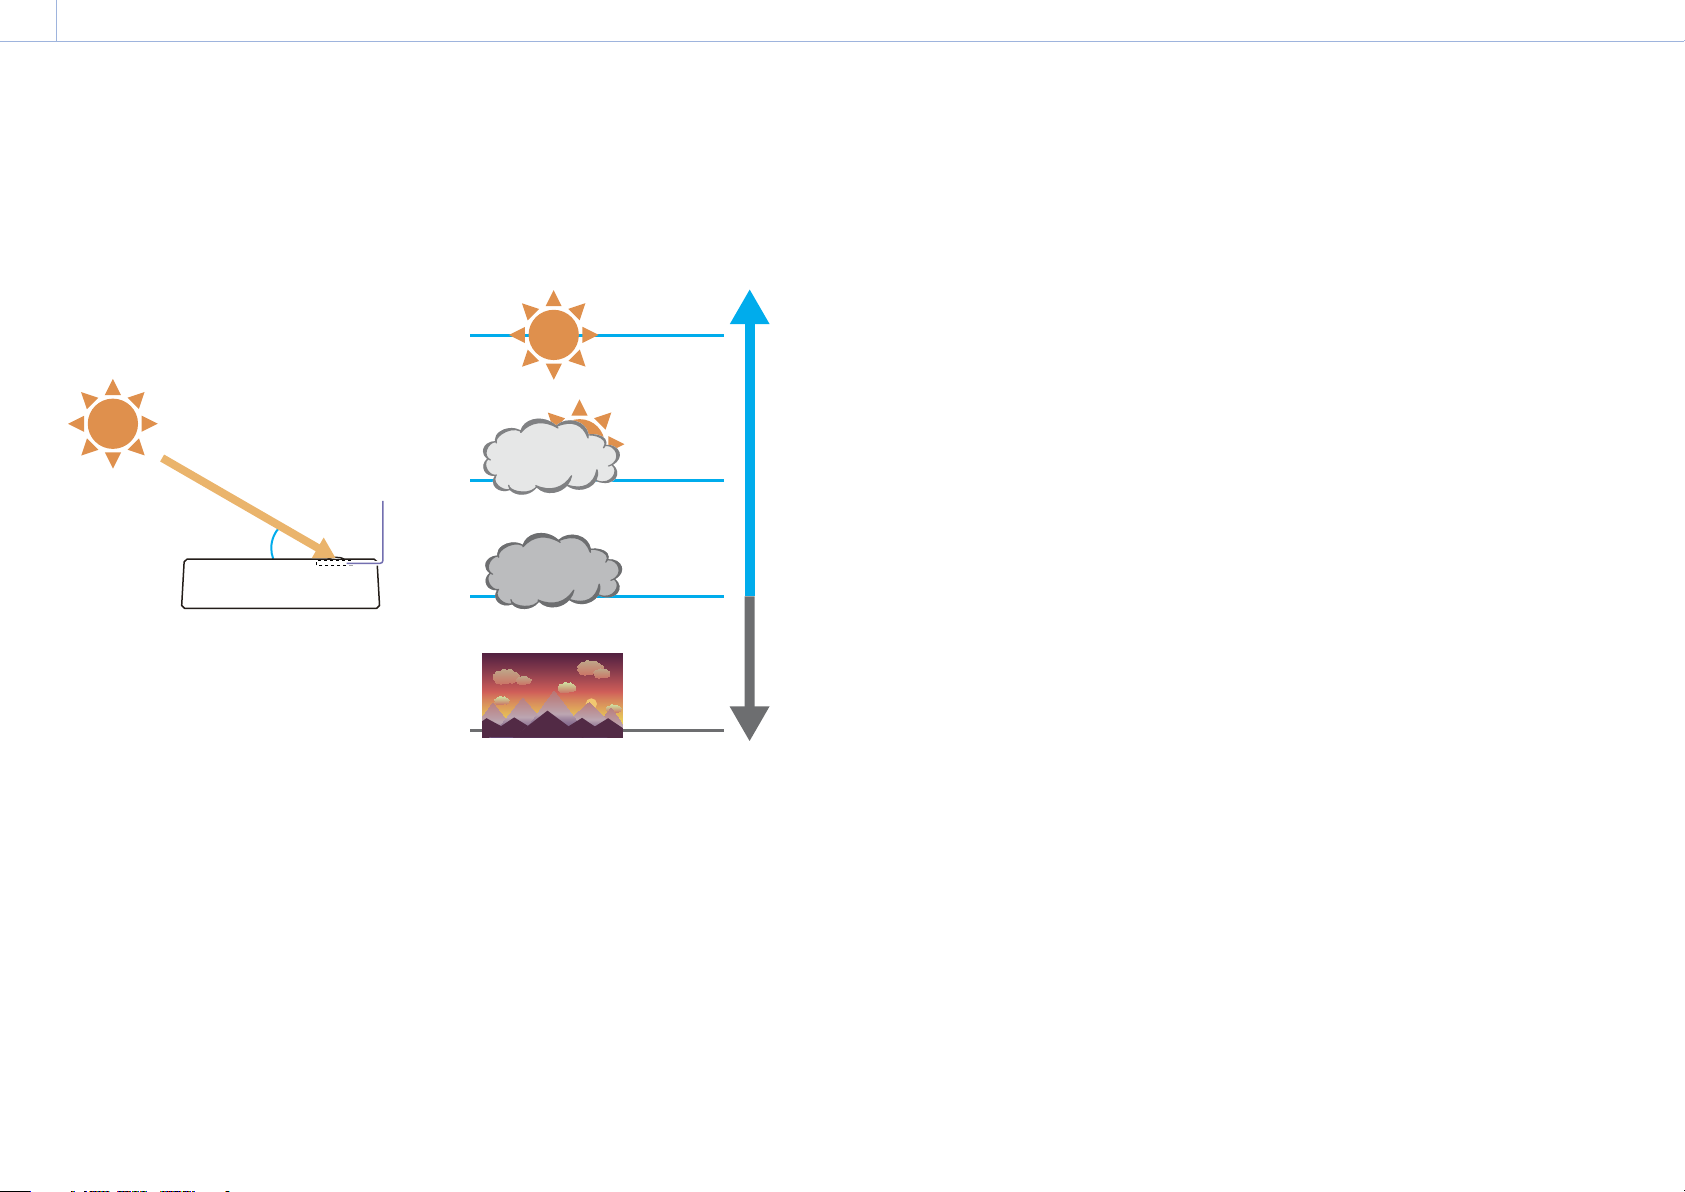
Recommended Flight Conditions
The appropriate time to execute a flight differs
depending on the area and season. Execute flights
during times and weather conditions that fulfill the
following requirements.
Time of day
Execute a flight during a time of day when the
sunlight angle of incidence is 30° or higher in
relation to the sensor unit.
Light sensor
(White upper section)
Sunlight incident angle
of 30° or more
Cross-section view of sensor unit
Weather
Execute a flight during clear, slightly cloudy,
and cloudy weather conditions when the
illumination is at 15,000 lux or higher.
Clear weather
100,000 lux
Slightly cloudy
30,000 lux
Cloudy
15,000 lux
Sundown
100 lux
Available
range of
use
No
Shooting objects
Avoid photographing the following. Later
image processing may not be applied correctly
otherwise.
Multiple mixed vegetation types
White objects (flowers, soil, etc.)
Make sure to execute flights in environments
that do not have a mix of clear and cloudy
weather conditions in the same flight area.
If these conditions are mixed, later image
processing may not be applied correctly.
Flights are not possible in rainy weather.
Wind speed
Wind speed in the air: within 7m/s
Chapter 2 Installing the Software (for the first time)
10
0
Installing Software on a Computer
Download Fast Field Analyzer from the Sony
Professional web site, purchase a license, then
install it on a computer to check and analyze flight
data.
Fast Field Analyzer is software that generates
stitched images from flight data of agricultural
fields recorded on the drone-mounted camera
for analyzing vegetation status and identifying
problem areas.
For instructions on how to use Fast Field Analyzer, refer to the
Fast Field Analyzer User’s Guide (PDF).
[Notes]
You can also purchase a license after setting fields in Fast
Field Analyzer and checking the total farm size.
Recommended computer
Operating system: Windows 10 Pro 64bit (English
version)
Antivirus software: Windows Defender (Included as
standard on Windows 10)
CPU: Intel Core i7 quad core or higher
Memory: 16GB or more
Storage: 512GB SSD or higher
Display: Full HD (1920 x 1080) or higher
Downloading Fast Field Analyzer
1 Access the Sony Professional web site from the
following URL.
https://pro.sony/products/aerial-camerassoftware/ffa-pcw
2 Access [Resources and downloads] on the
above page and download Fast Field Analyzer.
Purchasing a license
1 Access the Sony Professional web site from the
following URL.
https://pro.sony/products/aerial-camerassoftware/ffa-pcw
2 Select [Buy now] on the page to be navigated
to the Fast Field Analyzer page in the Sony
Creative Software web site.
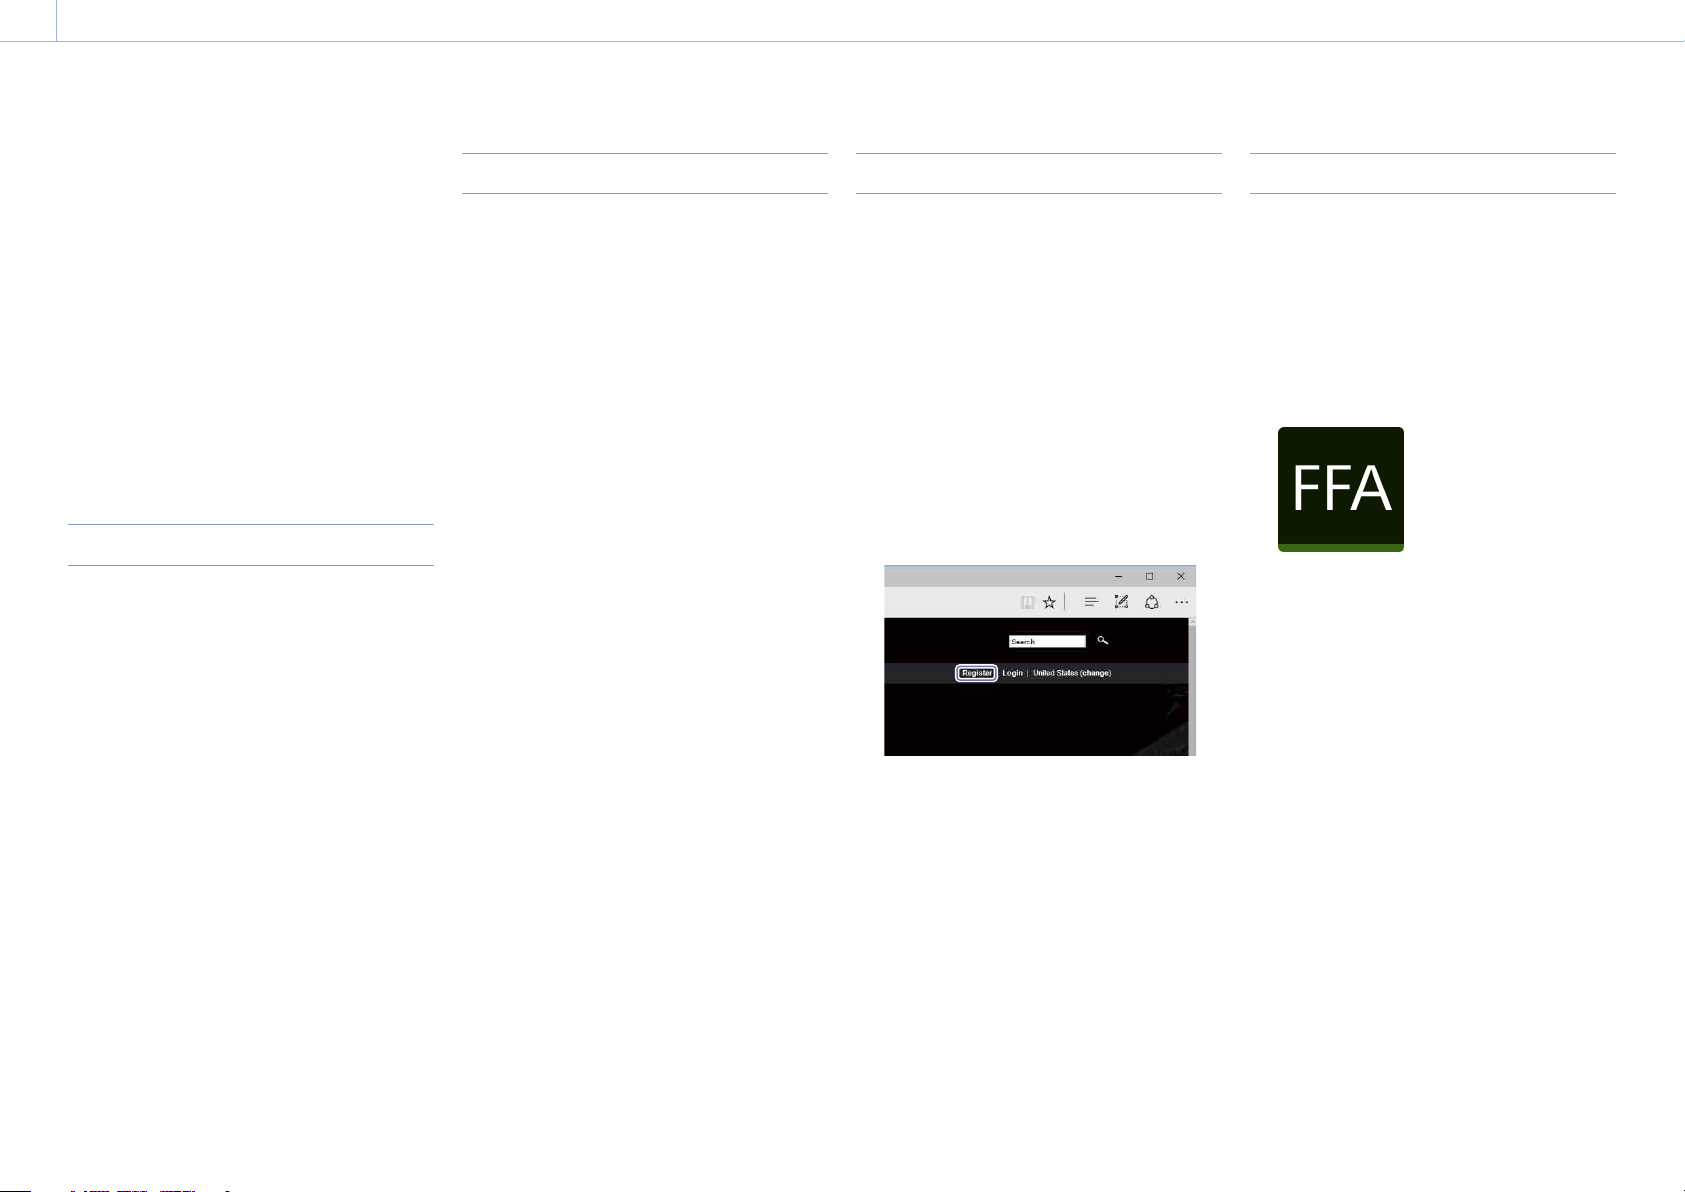
3 If you do not have an account of Sony Creative
Software web site, click [Register] on the top
right of the screen and follow the on-screen
instructions to create an account.
If you have an account, log in.
4 Select a license, and follow the on-screen
instructions to purchase the license.
[Notes]
The license must be activated after launching Fast Field
Analyzer.
For information on how to activate the license, see the Fast
Field Analyzer User’s Guide (PDF).
Installing Fast Field Analyzer
1 Double click “fastfieldanalyzer_setup_XXX.exe”
(“XXX” is the version number).
The installer is launched.
2 Follow the on-screen instructions to complete
the installation.
Once Fast Field Analyzer is installed, a shortcut
is created on the desktop.
The following folder is created for storing flight
data and logs.
C:/Computer/Documents/Fast Field Analyzer
How to uninstall Fast Field Analyzer
1 Click “Start”, [All apps] > [Control Panel] >
[Programs] > [Uninstall a program].
2 Right click “Fast Field Analyzer” and select
[Uninstall].
3 Follow the on-screen instructions to uninstall.
4 If you want to delete the flight data and logs,
delete the storage folder specified in Fast Field
Analyzer.
Chapter 2 Installing the Software (for the first time)
11
0
Downloading an App
Download an app required for creating flight plans
and viewing POI/ROI information.
This section explains how to download the
recommended app.
Downloading the app for creating
flight plans
Download the following app from the App Store
on an iPad.
DJI GO4
This is an app required for DJI brand drone
configuration, flight, and drone firmware
updates.
Map Pilot for DJI - Business (recommended)
This is an app for creating flight plans and
executing missions.
Downloading a viewer app
Download the required app for viewing POI/ROI
information on a mobile device.
Setup flight log recording
Create an AIRDATA UAV account for viewing flight
logs.
AIRDATA UAV is a service that automatically
uploads drone flight logs for detailed analysis.
To use the service, you must register at AIRDATA
UAV and create an account. See the following URL
for further details.
https://airdata.com/
1 Access the following URL, register at AIRDATA
UAV, and create an account.
[Notes]
The user token you are issued is required for setting
basic information in Map Pilot for DJI - Business, so make
sure to keep it handy.

Chapter 3 Preparation
12
0
Configuring the Drone
Use DJI GO4 to update the drone firmware to the
latest version and set the maximum flight altitude
and RTH (see Glossary) altitude.
Launching DJI G04
1 Attach the remote control to the iPad, then
use the controller cable to connect the remote
control to the iPad.
2 Attach the battery to the drone and turn the
drone on.
3 Turn the remote control power on.
4 Launch DJI G04 on the iPad.
If the drone, remote control, and iPad are
connected correctly, the setting status list
currently specified on the drone appears as a
pop-up.
6 Tap [...] on the top right of the screen.
A window for configuring settings appears.
Select the item you want to configure in the
menu bar on the left side of the menu
window.
Menu bar
Updating the drone firmware
Update the drone firmware to the latest version.
For further details, refer to the drone manual.
Configuring the drone
Correctly set the maximum flight altitude and
return to home altitude (RTH altitude). Refer to
the bracket manual and change the obstacle
avoidance sensor settings when necessary.
[Notes]
Before each day’s flight, check to make sure the DJI GO4
settings are exactly as you want them to ensure a safe flight.
How to set the flight altitude
Select (Main Controller Settings) on the menu
bar and configure the following items.
5 Check the current status and close the pop-up
window.
For details on items and how to congure settings, refer to
the manual provided by DJI.
https://store.dji.com/guides/dji-go-4-manual/
[Return-to-Home Altitude]: Set to 120m or less.
[Set Max Flight Altitude]: 120 m
[Notes]
If an automatic flight is designed and executed at a setting
that is less than the RTH altitude, the drone will climb to the
RTH altitude and return home during RTH.
 Loading...