

Page 1
3-078-320-11 (1)
Memory Stick USB
Reader/Writer
Operating Instructions
Mode d’emploi
MSAC-US20
2002 Sony Corporation
GB
FR
Page 2
English
Before operating the unit, please read this instructions thoroughly, and
retain it for future reference.
For the customers in U.S.A.
If you have any questions about this product, you may call:
Sony Customer Information Center 1-800-222-SONY(7669).
The number below is for the FCC related matters only.
Regulatory Information
Trade Name : SONY
Model : MSAC-US20
Responsible Party : Sony Electronics lnc.
Address : 680 Kinderkamack Road, Oradell, NJ
Telephone number : 201-930-6972
This device complies with Part 15 of the FCC Rules. Operation is
subject to the following two conditions: (1) This device may not cause
harmful interference, and (2) this device must accept any interference
received, including interference that may cause undesired operation.
Declaration of Conformity
07649 U.S.A.
CAUTION
You are cautioned that any changes or modifications not expressly approved
in this manual could void your authority to operate this equipment.
2-GB
Page 3

Note:
This equipment has been tested and found to comply with the limits for a
Class B digital device, pursuant to Part 15 of the FCC Rules. These limits
are designed to provide reasonable protection against harmful interference
in a residential installation. This equipment generates, uses, and can
radiate radio frequency energy and, if not installed and used in accordance
with the instructions, may cause harmful interference to radio
communications. However, there is no guarantee that interference will not
occur in a particular installation. If this equipment does cause harmful
interference to radio or television reception, which can be determined by
turning the equipment off and on, the user is encouraged to try to correct
the interference by one or more of the following measures:
– Reorient or relocate the receiving antenna.
– Increase the separation between the equipment and receiver.
– Connect the equipment into an outlet on a circuit different from that to
which the receiver is connected.
– Consult the dealer or an experienced radio/TV technician for help.
The specified USB cable (supplied) must be used with the equipment in
order to comply with the limits for a digital device pursuant to Subpart B
of Part 15 of FCC Rules.
For the customers in Canada
This class B digital apparatus complies with Canadian ICES-003.
3-GB
Page 4

Program©2000-2002 Sony Corporation
Documentation©2002 Sony Corporation
• “Memory Stick,” “OpenMG,” “SonicStage,” “MagicGate Memory Stick,”
“Memory Stick Duo,” “MagicGate” and
Corporation.
• Microsoft and Windows are registered trademarks of Microsoft Corporation in
the United States and/or other countries.
• MMX Pentium is registered trademark or trademark of Intel Corporation.
• Adobe, Acrobat, Acrobat Reader are registered trademarks or trademarks of
Adobe Systems, Inc. in the United States and/or other countries.
• Macintosh and Mac OS are registered trademarks of Apple Computer, Inc. in
the United States and/or other countries.
• All other trademarks and registered trademarks or trademarks of their
respective holders.
Furthermore “™” and “®” are not mentioned in each case in this manual.
are trademarks of Sony
Pay attention to the following points when using this unit.
•If the body becomes dirty, wipe with a soft cloth. Never use benzene,
alcohol, paint thinner or other solvents. This unit may deform or
malfunction.
•The contents of data cannot be compensated if recording or playing back
is not made due to malfunctions such as “Memory Stick” error.
•To prevent recording or deletion of data on “Memory Stick” set the
“Memory Stick” write-protect switch to “LOCK.”
zHint
Refer to the contents of the supplied CD-ROM for detailed operating
instructions (PDF file).
Make sure to read it before using the unit.
4-GB
Page 5

Table of contents
Before You Begin
On “Memory Stick” .............................................................................................. 6
System requirements............................................................................................ 8
Checking the supplied accessories................................................................... 10
Parts identification ............................................................................................. 11
Supplied applications ........................................................................................ 12
Using the operating instructions and online help ......................................... 13
How to Use
Installing the software on your computer ...................................................... 15
Installing the “SonicStage” software on your computer .............................. 19
Precautions for installing the “SonicStage” software.................................... 24
Connecting this unit to your computer ........................................................... 25
Confirming that connections are completed .................................................. 28
When the removable disk (Memory Stick icon) is not indicated ................ 29
Disconnecting the unit from your computer .................................................. 32
How to Use (When using Macintosh) ............................................................. 34
Other Information
Formatting (initialization) of “Memory Stick” ............................................... 35
Precautions for use of “Memory Stick” ........................................................... 37
Troubleshooting.................................................................................................. 39
Specifications....................................................................................................... 40
LIMITED WARRANTY ..................................................................................... 41
5-GB
Page 6

BBefore You Begin
On “Memory Stick”
What is “Memory Stick”?
“Memory Stick” is a new-generation IC storage media that is ultra-small
and lightweight and has far greater storage capacity than floppy disks. The
media can be used not only for transferring data between “Memory Stick”
compatible products, but also as a removable, external storage media for
storing data.
“Memory Stick” is available in standard size and a smaller size called
“Memory Stick Duo.” When “Memory Stick Duo” is inserted into a
Memory Stick Duo Adaptor, the size becomes the same as the standardsized “Memory Stick” to allow use with products that are compatible with
the standard-sized “Memory Stick.”
“Memory Stick” types that can be used with
this unit
* Two types of “Memory Stick” are available to suit your needs.
“Memory Stick”
A “Memory Stick” that allows recording of all kinds of data with the
exception of data requiring copyright-protection technology
(“MagicGate”).
“MagicGate Memory Stick”
This is a “Memory Stick” featuring built-in copyright protection
technology (“MagicGate”).
The “Memory Stick” concept also comprises “I/O expansion module.”
Compatible “I/O expansion module” can be used with this unit. (For
details of compatible modules, visit the web site, http://www.sony.net/
memorystick/supporte)
PNote
Never insert an ”I/O expansion module” that does not comply with this
unit into the Memory Stick slot on this unit.
For the functions and operation methods of ”I/O expansion module”,
please refer to the instructions for each ”I/O expansion module”.
6-GB
Page 7

What is “MagicGate”?
“MagicGate” is a copyright protection technology that operates when it is
provided in both the “Memory Stick” and the product in which the media
is used. A “Do you comply with “MagicGate”?” authentication takes place
between devices equipped with “MagicGate” (this unit, etc.) and the
“Memory Stick.” Data encryption takes places after the authentication.
Copyright-protected data cannot be played back on devices other than
those certified for this.
Music and other data that require copyright protection can be recorded
and played back by using a combination of a “MagicGate Memory Stick”
and equipment compatible with “MagicGate”, such as this unit.
Different types of data can be recorded on a single “Memory Stick.”
For example, it is possible to record image data on the remaining empty
section of a “MagicGate Memory Stick” containing music data.
Using “MagicGate Memory Stick”
PNotes
• Data transferred (checked out) from “SonicStage” to a “MagicGate Memory
Stick” are collected in a folder named “Hifi folder.”
Do not edit the “Hifi folder” using anything but “SonicStage”, such as
Explorer, etc. Data edited by other means cannot be played back or checked in.
Sony can not be held responsible for the data lost in the case of editing.
• Formatting a “MagicGate Memory Stick” containing data will delete all the
data, including music data. Be careful not to delete important data
accidentally. Sony can not be held responsible for the data lost through
formatting.
• What you record are for personal enjoyment only. Copyright laws prohibit
other forms of use without the permission of the copyright holder.
• In no event will Sony be liable for the data contents in case download of
recorded material is impeded or music data is corrupted or deleted due to
malfunctions of this unit or the “Memory Stick”.
Before You Begin
7-GB
Page 8

System requirements
Recommended Windows environment
•OS: Microsoft Windows 98 Second Edition (Windows 98SE)/Windows
Millennium Edition (Windows Me)/Windows 2000 Professional
(Windows 2000)/Windows XP Home Edition/XP Professional
(Windows XP)
* The operating systems mentioned above must be installed on the
computer when shipped from the factory.
* Operation is not guaranteed for upgraded operating systems even if
they are among those mentioned above.
•CPU: MMX Pentium II 400 MHz or faster processor (Pentium III 450
MHz or faster processor recommended)
•RAM: 64 MB or more
•Available hard disk space: 100 MB or more
(More disk space may be required depending on the version of Windows
you are using. Further space is also required for handling music data.)
•CD-ROM drive
•Sound board
•USB jack as standard equipment
(This unit supports USB 2.0 Full Speed (standard USB 1.1).)
•Display: High Color (16-bit) or higher, 800 · 480 pixels or more
(800 · 600 pixels or more recommended.)
Recommended Macintosh environment
•OS: Mac OS 9.0/9.1/9.2/X (v10.1)
* The operating systems mentioned above must be installed on the
computer when shipped from the factory.
* Operation is not guaranteed for upgraded operating systems even if
they are among those mentioned above.
•RAM: 64 MB or more
•Hard disk: 50 MB or more available hard-disk space
•USB jack as standard equipment
(This unit supports USB 2.0 Full Speed (standard USB1.1).)
PNotes
• Operation is not guaranteed for all computers even if they comply with the
recommended environments.
• “SonicStage” does not support Macintosh.
If you are using a Macintosh computer, it is not possible to transfer music data
that requires copyright protection.
8-GB
Page 9
PNote
To safeguard copyrights, optical digital output from equipment equipped
with optical digital output may be restricted during playback using the
supplied software.
When using Windows 2000/Windows XP
The following restrictions apply when “SonicStage” is running under
Windows 2000/Windows XP.
•Installation should take place after you log on as Administrator.
For how to log on using the Administrator account, see the manual
provided with your computer.
•When using the software, log on as an Administrator or as a Power User.
•Do not insert or remove a CD-ROM drive while “SonicStage” is running.
Your important data may get lost.
•Only the Professional edition of Windows 2000 can be used.
•NTFS format can only be used when standard-installed (installed when
shipped from the factory).
On System Restore and Windows XP/Windows Me
When using the Windows XP or Windows Me, executing the “System
Restore” item in System Tools may make it impossible to play back the
songs managed by “SonicStage.”
Therefore, be sure to back up the song data managed by “SonicStage”
before you execute “System Restore.”
After “System Restore” has been executed, the backed-up data can be
restored and the songs managed by “SonicStage” can then be played
back again.
For how to back up data, see the Help information for “SonicStage.”
PNote
An error dialog appears if playback of song data is impeded following
execution of “System Restore.” In this case, follow the instructions displayed
on the screen.
Before You Begin
9-GB
Page 10

Checking the supplied accessories
• Memory Stick USB Reader/Writer (1)
• Special USB cable 1.0 m (1)
• Special USB cable 10 cm (1)
• CD-ROM for Windows (MSAC-US20 DISK1 [ENGLISH/
FRENCH]) (1)
* The CD-ROM contains the following software programs.
•Device Driver Software
•“SonicStage” Ver. 1.5
•Memory Stick Formatter Ver. 1.3
•Operating Instructions (PDF file)
• Operating Instructions for this unit (1)
10-GB
Page 11
Parts identification
USB jack
USB jack
A connector
On the special USB cable
A connector: This is plugged into the USB jack on the computer. Any of
the jacks can be used if the computer is provided with
multiple USB jacks.
Mini-B connector: This is plugged into the USB jack on this unit.
PNotes
• The access lamp lights while the “Memory Stick” is being accessed. Never
remove the “Memory Stick,” turn off the computer, or unplug the USB cable,
etc., while the access lamp is on. The data on the “Memory Stick” could be
destroyed.
• When disconnecting the USB cable, do not hold it by its cable; hold it by its
connector.
Mini-B
connector
Access lamp
* Serial number
(7-digit number on the
backside of this unit)
Before You Begin
11-GB
Page 12

Supplied applications
The supplied Windows CD-ROM contains the following software
programs.
Device driver (Windows)
The driver must be installed when this unit is used on a Windows
computer.
For how to install the driver software, see page 15.
“SonicStage” Ver. 1.5 (Windows)
“SonicStage” is comprehensive software for enjoying music. With
“SonicStage”, you can enjoy listening to music sources such as music CDs,
etc., or you can import music into the hard disk of your PC for a complete
management of your collection. Furthermore, music data that has been
imported into the hard disk of your PC can also be transferred to a
“MagicGate Memory Stick” so that they can be enjoyed outside the PC
environment.
PNotes
• “SonicStage” does not support Macintosh.
• This software is not compatible with writing of music data to CD-RW/CD-R
media. Sony will not be liable for any loss of data resulting from such
operation.
Memory Stick Formatter Ver. 1.3 (Windows)
This is a software program for formatting (initialization) of “Memory
Stick.” Formatting deletes all the data recorded on a “Memory Stick.”
In order to maintain the compatibility of a “Memory Stick” when using it
with compatible products, always use this software when formatting
“Memory Stick” on this unit.
Download “Memory Stick Formatter” for Macintosh from web site at
http://www.sony.net/memorystick/supporte
PNote
Formatting a “Memory Stick” to which data has already been written will delete
the existing data. Be careful not to delete important data by mistake.
12-GB
Page 13
Using the operating instructions and
online help
Using the Operating Instructions on the CDROM (When Using Windows)
The supplied CD-ROM contains more detailed Operating Instructions
(PDF file).
For details on how to use this unit, see these Operating Instructions.
Acrobat Reader from Adobe Systems Incorporated is required to view PDF
files.
How to use Acrobat Reader is described in the following.
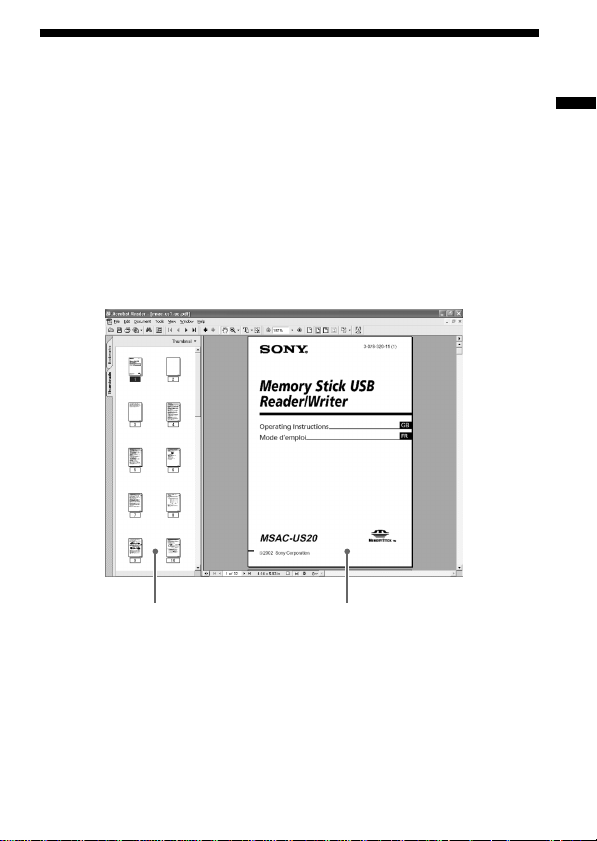
Screen view
Before You Begin
Left frame
•Left frame
Each page of the Operating Instructions appears as a thumbnail.
When you click on the thumbnail corresponding to the page that you
want to view, the page is shown in the “Right frame.”
•Right frame
Shows each page.
For details on how to use Acrobat Reader, see the online Help manual for
Adobe Acrobat Reader.
Right frame
13-GB
Page 14
Using the operating instructions and online help
(continued)
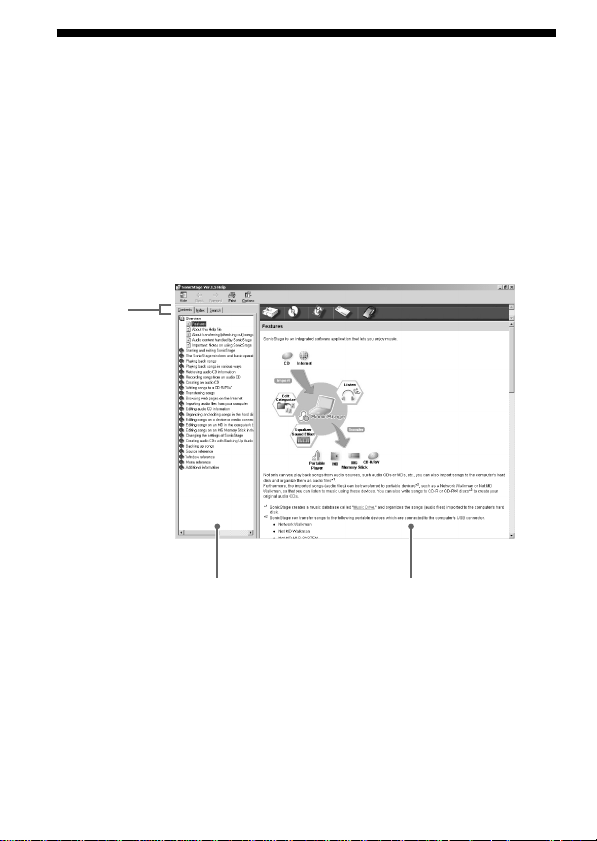
How to use the online Help
The following applications feature separate online Help manuals.
•“SonicStage”
•Memory Stick Formatter
For details on how to use each of the application software programs, see
the respective online Help manuals.
How to use the online Help manuals is described in the following.
Screen view
Tab
Left frame
•Left frame
Contents or Keywords are displayed here.
•Right frame
Displays explanations. Clicking underlined parts in the text displays
related explanations.
Right frame
14-GB
Page 15

BHow to Use
Installing the software on your
computer
PNote
Be sure to install the supplied software before you connect this unit to your
computer.
Do not perform the installation while this unit is connected to your computer.
Restart your computer when installation is completed, and then connect this
unit to your computer.
The following explanation is based on the screens shown in Windows XP.
Depending on the OS, the screens may look different.
A part of the installation may take place automatically.
Use the following procedure to install the software.
Installing the device driver on your computer
PNote
Simultaneously with the installation of the device driver, the “Memory Stick
Formatter” and the operating instructions (PDF file) are also installed on your
computer.
1 Turn on your computer.
At this point, do not connect this unit to your computer.
Close all running applications.
To install the device driver when you are using Windows 2000 or XP,
you must log on with Administrator rights.
How to Use
15-GB
Page 16
Installing the software on your computer
(continued)
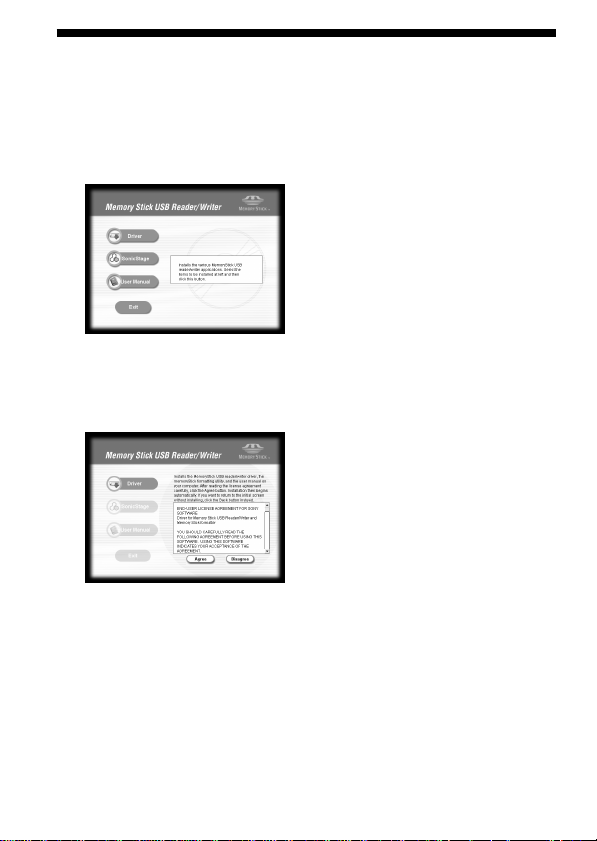
2 Insert the supplied CD-ROM (MSAC-US20 DISK 1) into the CD-
ROM drive on your computer.
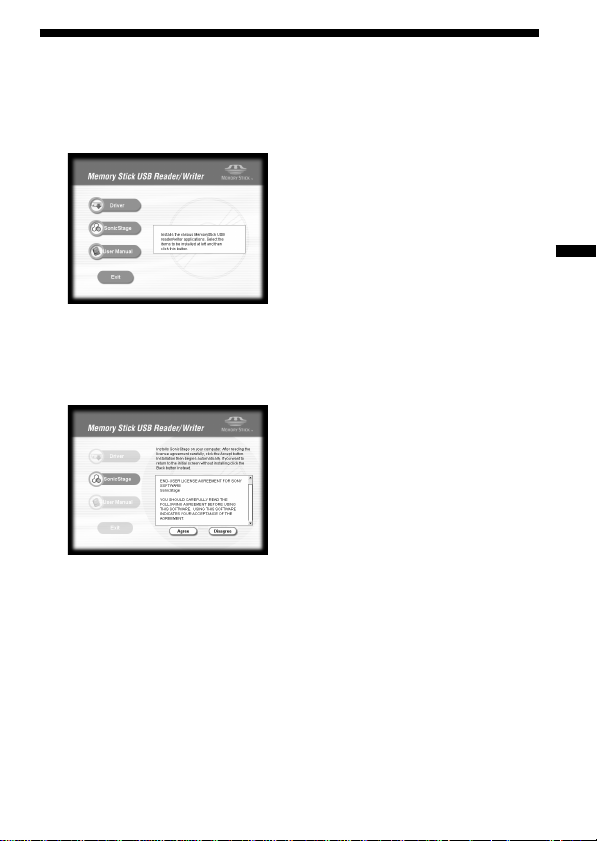
The Installer launcher starts up automatically.
To install a driver, click the [Driver] button in the menu.
3 Carefully read the License Agreement, and then click the
[Agree] button.
When you click the [Agree] button, installation of the driver starts.
16-GB
Page 17
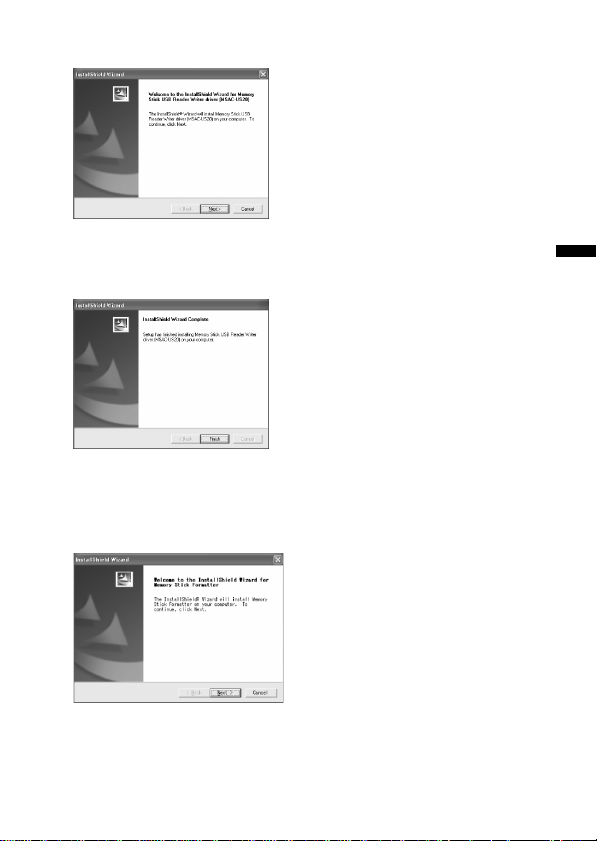
4 Click the [Next] button as prompted on the screen.
5 When you click [Finish], the driver installation is completed.
6 Following this, installation of the “Memory Stick Formatter”
starts.
Click the [Next] button as prompted on the screen.
17-GB
How to Use
Page 18
Installing the software on your computer
(continued)
7 When you click [Finish], installation of “Memory Stick
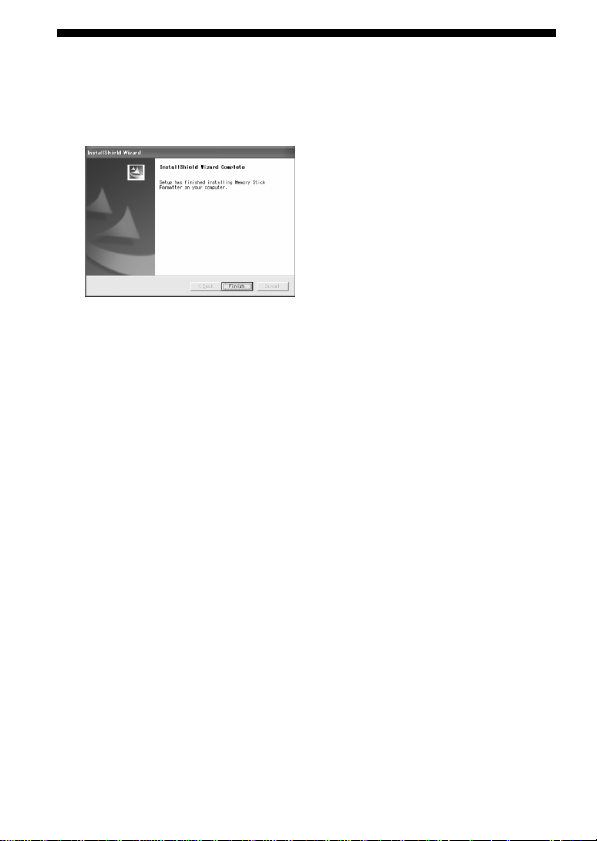
Formatter” is completed.
To use “Memory Stick Formatter”, select [Start] – [Programs] –
[Memory Stick Utility] – [Memory Stick Formatter].
8 Following this, installation of the operating instructions (PDF
file) is performed automatically.
When installation of the operating instructions is completed, the
application selection screen returns.
To end installation of the software at this point, click [Exit].
If you do so, “SonicStage” is not installed.
To view the operating instructions, select [Start] – [Programs] – [Sony
Memory Stick Reader Writer] – [MSAC-US20 Instructions].
PNote
Adobe Reader from Adobe Systems Incorporated is required for viewing
the operating instructions (PDF file).
18-GB
Page 19
Installing the “SonicStage” software on
your computer
1 Do as follows to install “SonicStage”.
Click the [SonicStage] button in the menu.
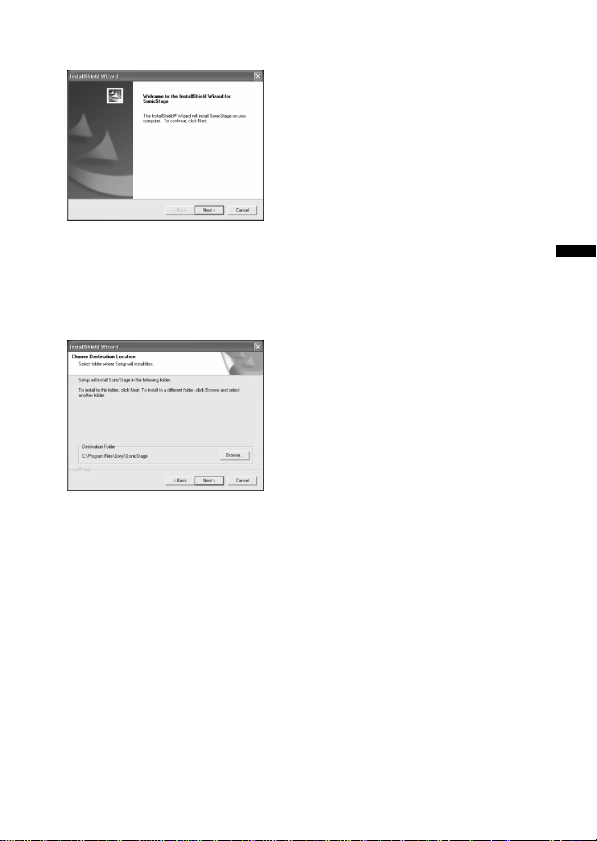
2 Carefully read the License Agreement, and then click the
[Agree] button.
When you click the [Agree] button, installation of “SonicStage” starts.
How to Use
19-GB
Page 20
Installing the “SonicStage” software on your
computer (continued)
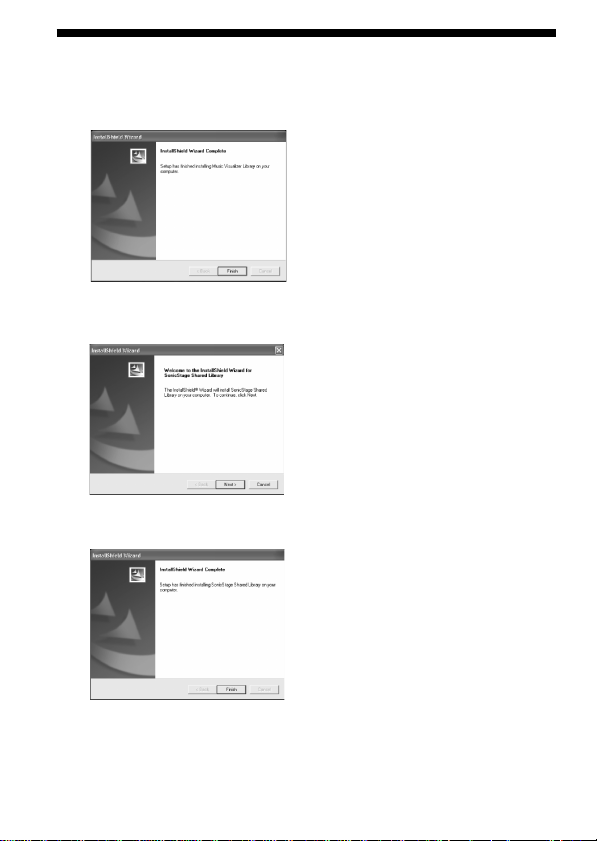
3 Click the [Finish] button.
4 Click the [Next] button as prompted on the screen.
5 Click the [Finish] button.
20-GB
Page 21
6 Click the [Next] button as prompted on the screen.
7 Select the folder in which you want to install “SonicStage”.
To change the folder suggested for the installation, click the [Browse]
button and then select the folder. When the installation destination
folder is decided, click the [Next] button.
21-GB
How to Use
Page 22
Installing the “SonicStage” software on your
computer (continued)
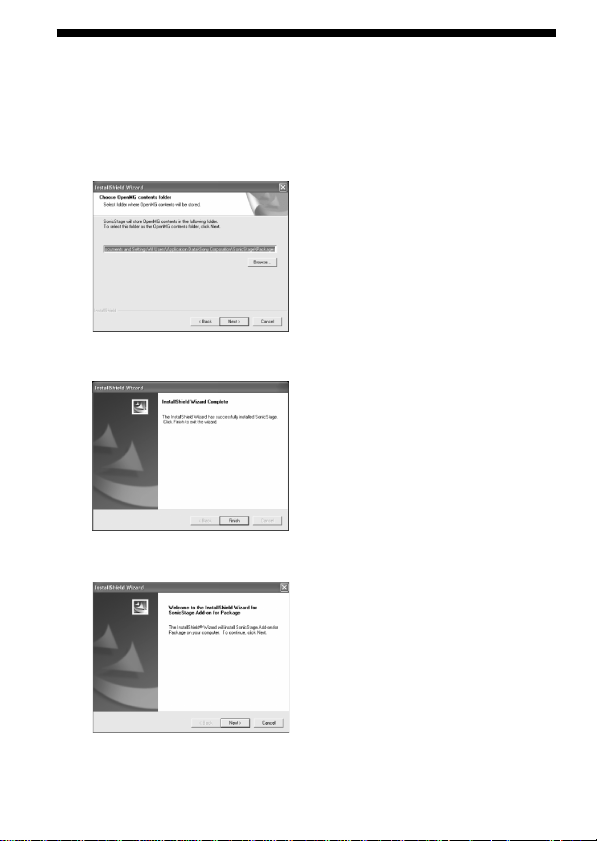
8 Select the folder for storing the “OpenMG” contents.
To change the folder suggested for the installation, click the [Browse]
button and select the folder. When the storage destination folder is
decided, click the [Next] button.
9 Click the [Finish] button.
10Click the [Next] button as prompted on the screen.
22-GB
Page 23
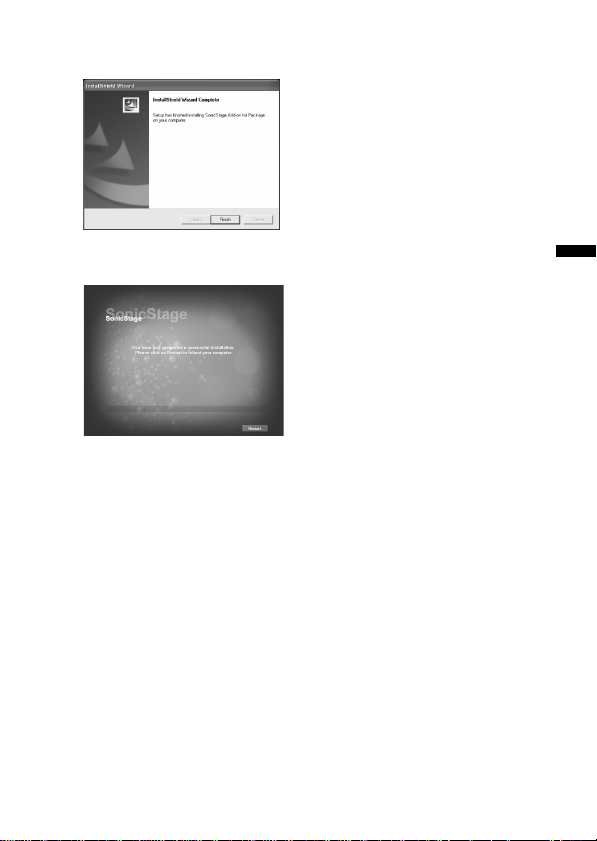
11When you click [Finish], installation of “SonicStage “ is
completed.
12Click the [Restart] button to restart your computer.
PNote
Be sure to connect this unit only after you have restarted your computer.
How to Use
23-GB
Page 24
Precautions for installing the
“SonicStage” software
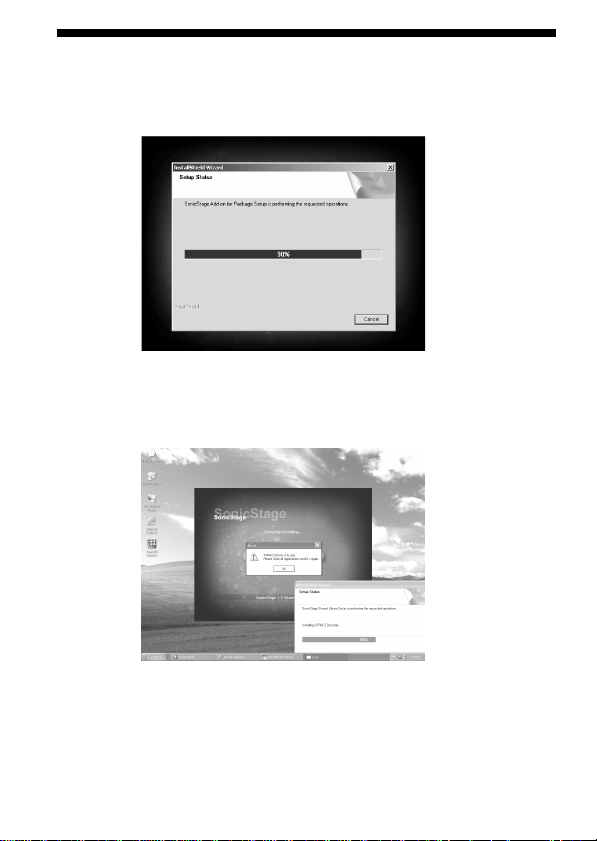
Sometimes, the installation may stop.
If this occurs, move installation screen aside and see if a message box has
appeared.
Click [Yes] to continue installation.
24-GB
Page 25

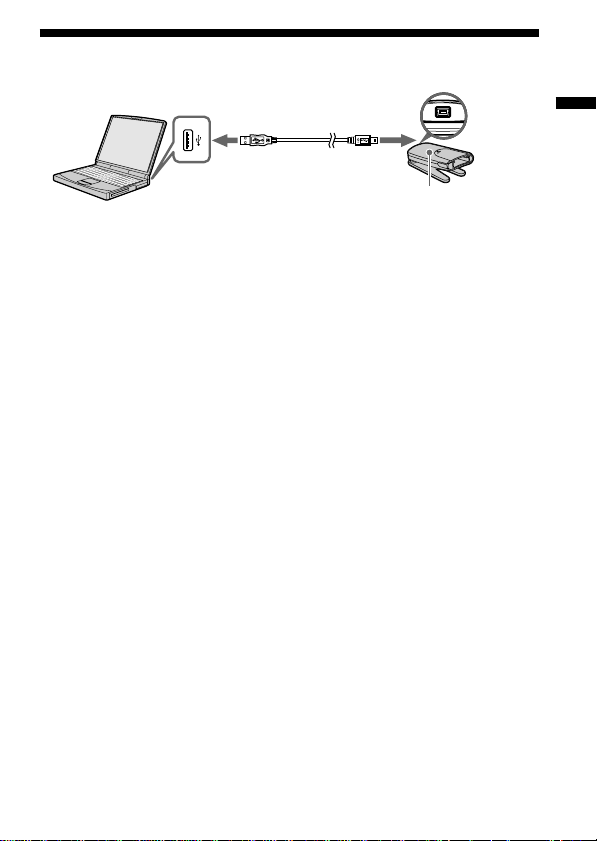
Connecting this unit to your computer
PNote
Be sure to install the supplied software before you connect this unit to your
computer. Restart your computer following installation.
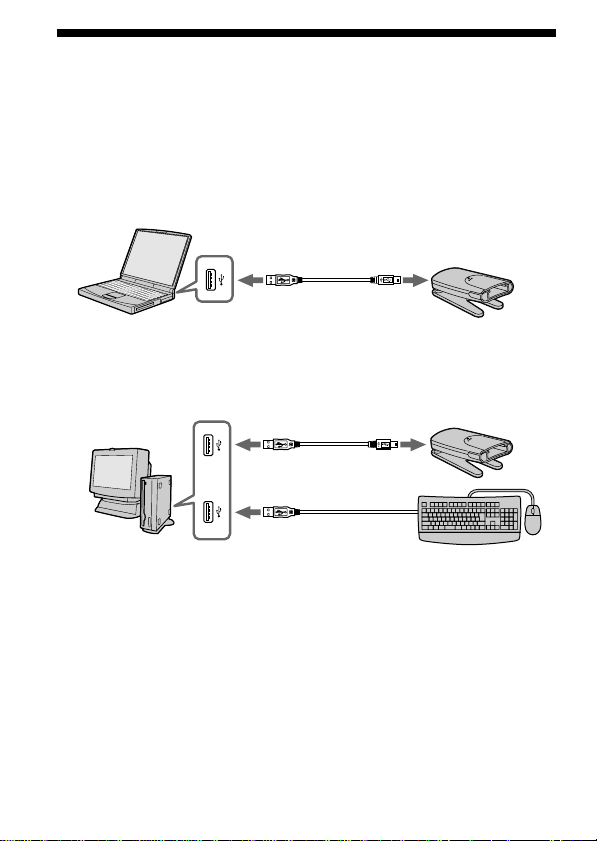
Connect the USB jack on this unit to a USB jack on your computer using
the special USB cable supplied.
1 Firmly insert the Mini-B connector of the USB cable into the
USB jack on this unit as far as it will go.
2 Plug the A connector of the USB cable into a USB jack on your
computer.
•The “Found New Hardware Wizard” starts up and installation of
the driver begins. Depending on the OS, the driver installation may
take place automatically.
•The location of the USB jack on the computer differs with the
computer used.
•When using a computer with multiple USB jacks, do not connect
other devices, with the exception of a standard mouse and keyboard,
to USB jacks at the same time as this unit. When using a desktop
computer, use a USB jack on the main unit of the computer. For
details, see “Recommended ways for connecting this unit” on page
26.
How to Use
25-GB
Page 26
Connecting this unit to your computer
(continued)
Recommended ways for connecting this unit
The operation of this unit has been confirmed when connected to the
computer in either of the following ways.
When this unit is connected to a USB jack on the computer main unit, and
nothing is connected to other USB jacks on the computer main unit.
When, on a computer with a USB keyboard and mouse as standard
equipment, the USB keyboard is connected to one of the USB jacks on the
computer main unit, and this unit is connected to another USB jack on the
computer main unit with the supplied USB cable.
PNotes
• When two or more USB devices are connected to one computer, and both are
used simultaneously, operation is not guaranteed depending on the USB
devices.
• Make sure to connect the supplied USB cable to a USB jack on the computer
main unit. Operation is not guaranteed if the cable is connected via the
keyboard or a USB hub, etc.
• Not all operations are guaranteed on all computers running under the
recommended environment.
• Make sure to use the specified USB cable (supplied) to connect to your
computer.
26-GB
Page 27

3 Select “Install software automatically [Recommended]”, and
click [Next].
4 When you click [Finish], installation is completed.
You can now start using this unit.
How to Use
27-GB
Page 28

Confirming that connections are
completed
In the following, the settings screen of the classic [Start] menu in Microsoft
Windows XP is used for illustration. Depending on the OS type and the
settings, the screens may look different.
1 Open the “My Computer” folder.
The “My Computer” folders appear.
2 Confirm that the newly recognized Memory Stick (F:) icon is
shown.
PNote
Depending on the computer used, the drive letter (F:) may be different.
The connection is completed when the Memory Stick icon is shown.
It may take a little while before the Memory Stick icon appears.
PNotes
• Depending on the OS type used and the “Memory Stick”, the displayed icon
may appear as “Removable Disk (F:)” instead of “Memory Stick (F:)”.
Depending on the “Memory Stick” used, it may be recognized as “Local Disk
(F:)” but this does not affect the use or operation.
• If the Memory Stick icon is not shown, the device driver may not be installed
correctly. Perform the procedures described on the following page. When
using another “Removable Disk,” plural “Removable Disk” icons appear.
28-GB
Page 29

When the removable disk (Memory
Stick icon) is not indicated
A separate device driver may already have been installed. Connect this
unit to your computer, and then perform the following procedure.
– When using Windows 2000/Windows XP –
Log on as Administrator or using a user ID that has administrative
privilege.
1 Double-click the “System” icon on the “Control Panel”.
The “System Properties” screen appears.
2 Check if the device driver has already been installed.
1 Click the [Hardware] tab on the
“System Properties” screen.
2 Click [Device Manager].
The “Device Manager” screen
appears.
How to Use
29-GB
Page 30

When the removable disk (Memory Stick icon) is
not indicated (continued)
3 Click [View].
4 Click [View devices by type].
5 Double-click [Other devices].
6 Check whether [? MSAC-US20]
preceded by the “?” symbol is
shown.
3 Delete the driver if installed.
If you use the procedure described in Step 2 and confirm that [?
MSAC-US20] is shown under “Other devices” in the “View devices by
type” display, a separate device driver has already been installed.
Use the following procedure to delete this driver.
Do not delete other devices than [? MSAC-US20].
1 Right-click on [? MSAC-US20].
2 Click on [Remove]. The “Confirm Device Removal” screen
appears.
3 Click the [OK] button. The device is removed.
4 Restart your computer after disconnecting this unit from the
computer.
Install the device driver again by performing the procedure from
Step 1 described on page 15.
PNotes
• If you delete other devices than [? MSAC-US20], your computer may no
longer operate normally.
• You do not need to install “SonicStage” again if installation of
“SonicStage” has already been completed. Following completion of the
driver installation, restart your computer before you connect this unit to
the computer.
30-GB
Page 31

– When using Windows 98SE/Windows Me –
1 Double-click the “System” icon on the “Control Panel”.
The “System Properties” screen appears.
2 Check if the device driver has already been installed.
1 Click the [Device Manager] tab on the “System Properties” screen.
2 Double-click [Other devices].
3 Check whether [? MSAC-US20] preceded by the “?” symbol is
shown.
3 Delete the driver if installed.
If you use the procedure described in Step 2 and find that [? MSACUS20] is shown under “Other devices,” a separate device driver has
already been installed.
Use the following procedure to delete this driver.
Do not delete other devices than [? MSAC-US20].
1 Click on [? MSAC-US20].
2 Click on [Remove]. The “Confirm Device Removal” screen appears.
3 Click the [OK] button. The device is removed.
4 Restart your computer after disconnecting this unit from the
computer.
Install the device driver again by performing the procedure from
Step 1 described on page 15.
PNotes
• If you delete other devices than [? MSAC-US20], your computer may no
longer operate normally.
• You do not need to install “SonicStage” again if installation of
“SonicStage” has already been completed. Following completion of the
driver installation, restart your computer before you connect this unit to
the computer.
How to Use
31-GB
Page 32

Disconnecting the unit from your
computer
– For customers using Windows Me/Windows 2000/Windows XP –
Perform the procedure described below before disconnecting the USB
cable from the computer.
•The screens shown in Windows XP are used in the following
explanations.
The screens may differ slightly with the type of OS used.
•Customers using Windows 98SE do not need to perform this procedure.
1 Click the “Unplug or Eject Hardware” icon in the task tray in
the lower right corner of the screen.
Click this icon.
A message
This section is the task tray.
appears.
2 Click “Safely remove Sony Memory Stick USB Reader/Writer
(MSAC-US20)-Drive (F:)”.
Click this section.
A message appears after a
little while.
* The drive letter “(F:)”, etc. differs with the computer used.
32-GB
Page 33

3 [“Sony Memory Stick USB Reader/Writer (MSAC-US20) can be
safely removed.”] is displayed.
In this condition, you can safely remove this unit from your computer.
PNote
The indications may be different depending on the OS that you are using.
PNotes
• When you just want to remove the “Memory Stick” from this unit, the
procedure described above is not required.
• Do not remove the “Memory Stick” from this unit while the access lamp is
blinking. Data on the “Memory Stick” could be corrupted.
• When you carry out this operation, this unit is not recognized by your
computer. To make this unit recognize again, disconnect the USB cable from
your computer and connect the USB cable to your computer again.
How to Use
33-GB
Page 34

How to Use (When using Macintosh)
You can use the driver provided as a standard feature of the OS.
Operate as described in the following.
This unit can be used on your computer.
1 Turn on your computer.
2 Insert “Memory Stick” to this unit and connect the USB jack on
this unit with a USB jack on the computer main unit using the
special USB cable supplied.
See page 25 for how to connect this unit and your computer.
3 Driver installation starts automatically and the driver is
installed on the computer.
4 When driver installation is completed, a Memory Stick icon
appears on the desktop and this unit can now be used.
PNote
Memory Stick icon is not displayed on the desktop when “Memory Stick” is not
inserted to this unit.
Removing this unit from your computer or removing
“Memory Stick” from this unit.
1 Close the software used by this unit.
2 Confirm that the access lamp is off.
3 Drag the Memory Stick icon to the Trash icon.
Alternatively, place the Memory Stick icon in the selected state and
select “Eject” from the “Special” menu in the upper left of the screen.
4 Remove this unit from your computer or remove “Memory
Stick” from this unit.
PNotes
• Do not remove the “Memory Stick” from this unit while the access lamp is
blinking. Data on the ”Memory Stick” could be corrupted.
• Removing this unit or the “Memory Stick” in this unit without performing the
operations above may cause damage to the “Memory Stick.” Sony will not be
liable for any damage caused as a result of not following the instructions
above.
34-GB
Page 35

BOther Information
Formatting (initialization) of “Memory
Stick”
This deletes all the data recorded on a “Memory Stick.” When formatting
on this unit, be sure to use the supplied “Memory Stick Formatter”
software program, following the procedures outlined below. Operation on
a Handycam or other “Memory Stick” compatible products is not
guaranteed for a “Memory Stick” formatted on a computer without the use
of the “Memory Stick Formatter” software program.
For the details on how to use the “Memory Stick Formatter,” refer to the
manual supplied with the “Memory Stick Formatter.” You can download
the “Memory Stick Formatter” at the following Web Site.
http://www.sony.net/memorystick/supporte
PNote
If you format a “Memory Stick” that contains recorded data, the already
recorded data will be deleted. Be careful not to inadvertently delete important
data.
1 Insert a “Memory Stick” into this unit.
2 Start “Memory Stick Formatter.”
3 After confirming that the drive is selected on which the
“Memory Stick” is recognized to have been mounted, click
[Start formatting]. Formatting begins.
PNote
Never remove this unit from the computer while formatting the “Memory
Stick.” The data on the “Memory Stick” may be damaged.
Other Information
35-GB
Page 36

Formatting (initialization) of “Memory Stick”
LOCK
LOCK LOCK
(continued)
Write-protecting data
A “Memory Stick” is equipped with an erasure prevention switch to
ensure that important data is not deleted by mistake. Sliding this switch to
the left or right enables or prevents writing of data to the “Memory Stick.”
•Write enable
Data can be written.
•Write protect
When the switch is moved to the right, the condition becomes the one in
which data cannot be written to the “Memory Stick.” Data can be read
out but writing is prevented.
Underside of “Memory Stick”
Write enable Write protect
Precautions for use of “Memory Stick Duo”
When using “Memory Stick Duo” with this unit, make sure the “Memory
Stick Duo” has been inserted into the Memory Stick Duo Adaptor before
starting to use.
Confirm that the “Memory Stick” is positioned correctly before inserting
for use.
Do not insert the Memory Stick Duo Adaptor into “Memory Stick”
compatible products when no “Memory Stick Duo” is inserted into the
Memory Stick Duo Adaptor.
If used in these ways, malfunctions may occur.
Data read/write speed
The data read/write speed differs with the “Memory Stick” and product
combination that you are using.
36-GB
Page 37

Precautions for use of “Memory Stick”
B
A
How to affix
labels
C
•Recording, editing and deletion are prevented when the erasure
prevention switch is set to the “LOCK” position. B
•Use a pointed object to move the erasure prevention switch on the
“Memory Stick Duo.”
•Never remove the “Memory Stick” while the access lamp is on (while
data is being read/written).
•Data may be corrupted in the following cases.
– If the “Memory Stick” is removed or the power to this unit is turned
off while the access lamp is on (while data is being read/written)
– When used in a location subject to static electricity or electrical noise
•Always backup important data. Sony does not accept liability for damage
of the data.
We cannot acccept resposibility in the event that data is lost or damaged
and the unit is damaged, while using this unit.
•Data copyright protected by “MagicGate” can only be used with a
“MagicGate Memory Stick.”
•Do not affix any label other than those specially provided to the
“Memory Stick.” C
•When affixing labels, affix these at the designated positions. Labels
should not protrude from the edges of the “Memory Stick.”
•Do not apply excessive force when writing in the memo area of a
“Memory Stick Duo.”
•When transporting or storing a “Memory Stick,” place it in the supplied
storage case.
•Do not touch the connector section with fingers or metallic objects. A
•Do not bend, drop or subject the “Memory Stick” to strong impacts.
•Do not attempt to disassemble or modify the “Memory Stick.”
•Do not wet with water.
Other Information
37-GB
Page 38

Precautions for use of “Memory Stick”
(continued)
•Avoid use and storage in the following locations.
– In a car where the temperature may become very high or in other hot
locations
– Location subject to direct sunlight
– Location with humidity or where corrosive substance are present.
38-GB
Page 39

Troubleshooting
Symptom
The Memory Stick icon
(Removable disk) is not
displayed.
The “Memory Stick”
cannot be accessed from
Explorer or My
Computer.
The access lamp blinks
when a “Memory Stick” is
inserted.
Music data can no longer
be used on the computer
Cause/Solution
•Not connected correctly.
t Connect correctly. (Page 25)
•In addition to this unit, another device is
connected to the USB jack on the
computer.
t Disconnect other USB devices than
this unit. Also turn off the power and
reboot.
•The driver is not installed.
t Install the driver from the supplied
CD-ROM. (Page 15)
•No “Memory Stick” inserted.
t Insert a “Memory Stick.”
•Foreign matter adhering to the
connector section of the “Memory
Stick.”
t Check whether dust or dirt is
adhering to the connector section of
the “Memory Stick.”
Remove any foreign matter and
insert the “Memory Stick” again.
•The System Restore function found in
Windows Me and Windows XP have
been executed. (Page 9.)
t When you have backup data, restore
the backup data to the computer.
For how to use the backup tool, see
the online Help manual for
“SonicStage.”
Other Information
39-GB
Page 40

Specifications
Memory Stick USB Reader/Writer
Interface: USB interface
Baud rate: Max. 12 Mbps
General
Operating voltage DC 5V (supplied via USB cable)
Power consumption Max. 500 mA (during operation)
External dimensions Approx. 42 mm · 22.5 mm · 85.5 mm (1 11/16 ·
Mass Approx. 40g (not including “Memory Stick”)
Operating conditions Temperature 0°C to 40°C (32°F to 104°F)
Design and specifications are subject to change without notice.
If you have any questions/comments related to this product, please visit
our Customer Support website at
http://www.sony.net/memorystick/supporte
If you have any questions/comments related to “OpenMG”, please visit
the website at
http://www.openmg.com/
Max. 2.5 mA (PC suspend time)
29/32 · 3 3/8 in.) (Width · Height · Depth)
(condensation not allowed)
Humidity 20% to 80% (condensation not allowed)
40-GB
Page 41

LIMITED WARRANTY
If this product should prove defective in workmanship or material
during the period of 1 year from the date of original purchase at retail,
the same will be replaced by either the Seller, or Sony Electronics,
Inc. or Sony of Canada, Ltd.
SUCH REPLACEMENT SHALL BE THE SOLE REMEDY OF THE
CONSUMER, AND THERE SHALL BE NO LIABILITY ON THE PART
OF THE MANUFACTURER, DISTRIBUTOR OR SELLER FOR ANY
LOSS OR DAMAGE, DIRECT OR CONSEQUENTIAL, ARISING OUT
OR THE USE OF, OR INABILITY TO USE, THIS PRODUCT.
Some states of the United States do not allow the exclusion of
incidental or consequential damages, so the above exclusion may not
apply to you.
This warranty gives you specific legal rights and you may also have
other rights which vary from state to state in the United States, Puerto
Rico or from province to province in Canada.
In the United States, contact: Sony Electronics Inc.,
Sony Building, 680 Kinderkamack Road, Oradell, New Jersey 07649.
In Canada, contact: Sony of Canada Ltd.,
115 Gordon Baker Road, Toronto, Ontario, M2H 3R6 CANADA.
41-GB
Page 42

Français
Avant d’utiliser cet appareil, veuillez lire attentivement ces explications,
puis conservez-les de manière à pouvoir les consulter.
Pour les clients au Canada
Cet appareil numérique de la classe B est conforme à la norme NMB-003
du Canada.
2-FR
Page 43

Programme©2000-2002 Sony Corporation
Documentation©2002 Sony Corporation
• “Memory Stick”, “OpenMG”, “SonicStage”, MagicGate Memory Stick”,
“Memory Stick Duo”, “MagicGate” et
Sony Corporation.
• Microsoft et Windows sont des marques déposées de Microsoft Corporation
aux États-Unis et/ou dans d’autres pays.
• MMX Pentium est une marque déposée ou une marque de fabrique de Intel
Corporation.
• Adobe, Acrobat, Acrobat Reader sont des marques déposées ou des marques
de fabrique de Adobe Systems, Inc. aux États-Unis et/ou dans d'autres pays.
• Macintosh et Mac OS sont des marques déposées de Apple Computer Inc., aux
États-Unis et/ou dans d’autres pays.
• Tous les autres noms de compagnies et noms de produits sont les marques de
fabrique ou les marques déposées de leurs détenteurs respectifs.
Les symboles “™” et “®” ne sont pas mentionnés chaque fois dans la présente
brochure.
sont des marques de fabrique de
Veuillez noter les points suivants lorsque vous utilisez l'appareil.
•Si le coffret est sale, nettoyez-le avec un tissu doux. N’utilisez jamais de
benzène, alcool, diluant ni aucun autre solvant. Ces produits peuvent
déformer l’appareil ou l’endommager.
•Aucune compensation ne pourra vous être accordée en cas de panne,
d’erreur de “Memory Stick” ou d’autres problèmes apparaissant lors de
l’enregistrement ou de la lecture.
•Pour éviter de perdre des données en réenregistrant un “Memory Stick”
par erreur, mettez le taquet de protection du “Memory Stick” en position
de verrouillage “LOCK”.
zConseil
Reportez-vous au contenu du CD-ROM fourni où vous trouverez des
informations de fonctionnement détaillées (fichier PDF).
Prenez soin de lire ce fichier avec d’utiliser l’appareil.
3-FR
Page 44

Table des matières
Informations préliminaires
A propos des “Memory Stick”............................................................................ 5
Configuration système requise........................................................................... 7
Vérification des accessoires fournis ................................................................... 9
Nomenclature...................................................................................................... 10
Applications fournies......................................................................................... 11
Utilisation du mode d’emploi et de l’aide en ligne ....................................... 12
Utilisation de l’appareil
Installation du logiciel dans votre ordinateur ................................................ 14
Installation de “SonicStage” dans votre ordinateur ...................................... 18
Précautions à l’installation du logiciel “SonicStage” .................................... 23
Raccordement de l’appareil à l’ordinateur ..................................................... 24
Vérification des connexions .............................................................................. 27
Si le disque amovible (icôn du Memory Stick) n’est pas affiché ................. 28
Débranchement de l’appareil de l’ordinateur ................................................ 31
Utilisation de l’appareil (avec Macintosh) ...................................................... 33
Informations diverses
Formatage (initialisation) d’un “Memory Stick” ........................................... 34
Remarques sur l’emploi des “Memory Stick” ................................................ 36
En cas de problème ............................................................................................ 38
Spécifications....................................................................................................... 39
GARANTIE RESTREINE................................................................................... 40
4-FR
Page 45

BInformations préliminaires
A propos des “Memory Stick”
Qu’est-ce qu’un “Memory Stick” ?
Le “Memory Stick” est un nouveau support d’enregistrement à circuit
intégré, minuscule et léger, doté d’une capacité de stockage bien
supérieure à celle des disquettes. Ce support peut être utilisé non
seulement pour l’échange de données entre divers produits compatibles
avec les “Memory Stick”, mais aussi comme support de stockage amovible.
Les “Memory Stick” existent en deux tailles, les “Memory Stick” de taille
standard et les “Memory Stick Duo” de plus petite taille. Les “Memory
Stick Duo” peuvent être insérés dans un adaptateur de Memory Stick Duo
et utilisés sur les appareils compatibles avec les “Memory Stick” standards.
Types de “Memory Stick” pouvant être utilisés
avec cet appareil
* Deux types de “Memory Stick” répondant à différents besoins peuvent
être utilisés avec cet appareil.
“Memory Stick”
Ce type de “Memory Stick” permet d’enregistrer toutes sortes de données
à l’exception de données exigeant la technologie de protection des droits
d’auteur “MagicGate”.
“MagicGate Memory Stick”
Ce type de “Memory Stick” intègre la technologie de protection des droits
d’auteur “MagicGate”.
Sous le terme “Memory Stick” sont compris les “I/O expansion module
(modules d’expansion E/S)”. Les “I/O expansion module (modules
d’expansion E/S)” peuvent être utilisés avec cet appareil. (Pour le détail
sur les modules compatibles, consultez le site web, http://www.sony.net/
memorystick/supporte)
Informations préliminaires
PRemarque
N’insérez jamais un “I/O expansion module (modules d’expansion E/S)” non
conforme à cet appareil dans le slot du Memory Stick.
En ce qui concerne les fonctions et les méthodes d’utilisation des “I/O
expansion module (modules d’expansion E/S)”, reportez-vous aux explications
de chaque “I/O expansion module (modules d’expansion E/S)”.
5-FR
Page 46

A propos des “Memory Stick” (suite)
Qu’est-ce que “MagicGate” ?
“MagicGate” est une technologie de protection des droits d’auteur qui
fonctionne avec les “Memory Stick” et les produits compatibles avec les
“Memory Stick” et dotés de ce système. Le message “Do you comply with
“MagicGate”?” sert à authentifier les appareils dotés du système
“MagicGate” (par ex : cet appareil) et le “Memory Stick”. Les données
protégées ne peuvent pas être décryptées sans authentification, car elles ne
peuvent être lues que sur les appareils autorisés.
Les données, musicales ou autres, protégées par des droits d’auteur
peuvent être enregistrées sur les “MagicGate Memory Stick” et lues par cet
appareil et tous les appareils compatibles avec le système “MagicGate”.
Différents types de données peuvent être enregistrés sur un même
“Memory Stick”.
Par exemple, vous pouvez enregistrer des photos sur un “MagicGate
Memory Stick” contenant des données musicales.
Utilisation des “MagicGate Memory Stick”
PRemarques
• Les données transférées (contrôlées à la sortie) de “SonicStage” sur un
“MagicGate Memory Stick” sont réunies dans le dossier “Hifi folder”.
Ne modifiez pas le dossier “Hifi folder” en utilisant d’autres données que
“SonicStage”, par exemple des données de l’Explorateur. Ces données ne
pourront pas être lues ni contrôlées en entrée.
Sony décline toute responsabilité en cas de pertes de données, résultant d’une
modification de ce dossier.
• Toutes les données d’un “MagicGate Memory Stick”, y compris les données
musicales, sont effacées par le formatage. Veillez à ne pas effacer par
inadvertance des données importantes. Sony décline toute responsabilité en
cas de perte de données, résultant du formatage.
• La musique enregistrée est destinée à un usage privé seulement. Toute autre
utilisation non autorisée par les détenteurs des droits d’auteur viole les lois
sur le copyright.
• En aucun cas Sony ne peut être tenu pour responsable de l’échec du
téléchargement d’un enregistrement ou de la destruction ou de la suppression
de données musicales, résultant d’un mauvais fonctionnement de l’appareil
ou du “Memory Stick”.
6-FR
Page 47

Configuration système requise
Environnement Windows recommandé
•Système d’exploitation : Microsoft Windows 98 Seconde Edition
(Windows 98SE)/Windows Millennium Edition (Windows Me)/
Windows 2000 Professional (Windows 2000)/Windows XP Home
Edition/XP Professional (Windows XP)
* Les systèmes d’exploitation mentionnés ci-dessus doivent être installés
en usine sur l’ordinateur.
* Le fonctionnement n’est pas garanti pour les mises à jour avec les
systèmes mentionnés ci-dessus.
•Processeur : MMX Pentium II 400 MHz ou plus rapide (Pentium III 450
MHz ou plus rapide recommandé)
•RAM : au moins 64 Mo
•Espace disponible sur le disque dur : au moins 100 Mo (Selon la version
de Windows utilisée, un plus grand espace peut être nécessaire sur le
disque. Un espace supplémentaire est requis également pour le
traitement des données musicales.)
•Lecteur de CD-ROM
•Carte son
•Prise USB en standard
(Cet appareil supporte le standard USB2.0 Full Speed (USB1.1).)
•Affichage : High color (16 bits) ou plus 800 · 480 pixels (800 · 600 pixels
ou plus recommandé)
Environnement Macintosh recommandé
•Système d’exploitation : Mac OS 9.0/9.1/9.2/X (V10.1)
* Les systèmes d’exploitation mentionnés ci-dessus doivent être installés
en usine sur l’ordinateur.
* Le fonctionnement n’est pas garanti pour les mises à jour avec les
systèmes mentionnés ci-dessus.
•RAM : au moins 64 Mo
•Disque dur : au moins 50 Mo d’espace libre
•Prise USB en standard
(Cet appareil supporte le standard USB2.0 Full Speed (USB1.1).)
PRemarques
• Le fonctionnement ne peut pas être garanti pour tous les ordinateurs
conformes à l’environnement recommandé.
• “SonicStage” ne fonctionne pas sur Macintosh.
Si vous utilisez un Macintosh, vous ne pourrez pas transférer de données
musicales, exigeant la technologie de protection des droits d’auteur.
7-FR
Informations préliminaires
Page 48

Configuration système requise (suite)
PRemarque
La sortie numérique optique des appareils dotés de cette sortie peut être
restreinte en cours de lecture par la technologie de protection des droits
d’auteur du logiciel fourni.
Lorsque Windows 2000/Windows XP est utilisé
Les restrictions suivantes sont valides lorsque “SonicStage” est exécuté
sous Windows 2000/Windows XP.
•L’installation doit être effectuée après la connexion en tant
qu’Administrateur.
Voir le mode d’emploi de l’ordinateur pour la connexion par le compte
de l’Administrateur.
•Pour utiliser ce logiciel, il faut se connecter comme Administrateur ou
Utilisateur attitré.
•Ne pas insérer ni retirer de lecteur de CD-ROM pendant l’exécution de
“SonicStage”. Des données importantes pourraient être perdues.
•Seule l’édition Professionnelle de Windows 2000 peut être utilisée.
•Le format NTFS ne peut être utilisé qu’avec une installation standard
(effectuée en usine).
A propos de la restauration du système et de Windows XP/
Windows Me
Lorsque vous utilisez Windows XP ou Windows Me, la lecture de
morceaux gérés par “SonicStage” peut être impossible après la “System
Restore (Restauration du système)” avec les Outils Système.
C’est pourquoi il faut sauvegarder les morceaux gérés par “SonicStage”
avant de restaurer le système.
Lorsque le système a été restauré, les données sauvegardées peuvent
être récupérées et les morceaux gérés par “SonicStage” peuvent être
lus.
Pour la sauvegarde des données, voir le manuel en ligne de
“SonicStage”.
PRemarque
Un message d’erreur apparaît si la lecture d’un morceau est impossible
après la “System Restore (Restauration du système)”. Dans ce cas, suivez les
instructions qui apparaissent à l’écran.
8-FR
Page 49

Vérification des accessoires fournis
• Lecteur/Enregistreur USB de Memory Stick (1)
• Câble USB spécial 1,0 m (1)
• Câble USB spécial 10 cm (1)
• CD-ROM pour Windows
MSAC-US20 DISK1 [ENGLISH / FRENCH] (1)
PRemarque
Sélectionnez le CD-ROM, contenant la langue de votre choix, lors de
l’installation de “SonicStage”.
* Ce CD-ROM contient les programmes suivants.
•Pilote du dispositif
•“SonicStage” Ver. 1.5
•Memory Stick Formatter Ver. 1.3
•Mode d’emploi (Fichier PDF)
La donnée des instructions de fonctionnement pour cet appareil
(Fichier PDF) est MSAC-US20Manual_FRE_UC.pdf
• Mode d’emploi de l’appareil (1)
Informations préliminaires
9-FR
Page 50

Nomenclature
Prise USB
Connecteur
A
Miniconnecteur
* Numéro de série (numéro à 7
chiffres à l'arrière de l'appareil)
Prise USB
B
Voyant d’accès
A propos du câble spécial USB
Connecteur A : Ce connecteur se branche sur la prise USB de l’ordinateur.
Miniconnecteur B :Ce connecteur se branche sur la prise USB de
PRemarques
• Le voyant d’accès s’allume pendant l’accès au “Memory Stick”. Ne jamais
retirer le “Memory Stick”, éteindre l’ordinateur ni débrancher le câble USB,
etc. lorsque le voyant d’accès est allumé. Les données du “Memory Stick”
peuvent être détruites.
• Pour débrancher le câble USB, ne tirez pas sur le câble mais sur son conneteur.
N’importe quelle prise peut être utilisée si l’ordinateur est
doté de plusieurs prises USB.
l’appareil.
10-FR
Page 51

Applications fournies
Le CD-ROM Windows fourni contient les programmes suivants.
Pilote du périphérique (Windows)
Le pilote doit être installé si vous utilisez cet appareil avec un ordinateur
Windows.
Pour l’installation du pilote, voir page 14.
“SonicStage” Ver. 1.5 (Windows)
“SonicStage” est un programme complet pour l’appréciation de la
musique. Avec “SonicStage”, vous pouvez écouter la musique d’un CD,
par exemple, ou importer de la musique sur le disque dur de votre PC
pour gérer comme vous le souhaitez votre collection. De plus, les données
musicales importées sur le disque dur de votre PC peuvent aussi être
transférées sur un “MagicGate Memory Stick” pour une écoute en dehors
de l’environnement PC.
PRemarques
• “SonicStage” n’est pas pris en compte sur Macintosh.
• Ce logiciel n’est pas compatible avec l’écriture de données musicales sur un
support CD-RW/CD-R. Sony décline toute responsabilité pour la perte de
données, résultant d’une telle opération.
Memory Stick Formatter Ver. 1.3 (Windows)
Ce programme sert à formater (initialiser) les “Memory Stick”. Le
formatage supprime toutes les données enregistrées sur le “Memory
Stick”.
Pour des raisons de compatibilité, utilisez toujours ce logiciel pour
formater les “Memory Stick” utilisés avec cet appareil.
Têlécharger “Memory Stick Formatter” pour Macintosh sur le site web à
http://www.sony.net/memorystick/supporte
PRemarque
Les données enregistrées sur le “Memory Stick” sont effacées lors du formatage.
Veillez à ne pas effacer par erreur des données importantes.
Informations préliminaires
11-FR
Page 52

Utilisation du mode d’emploi et de
l’aide en ligne
Utilisation du mode d’emploi du CD-ROM (à
l’emploi de Windows)
Le CD-ROM fourni contient un mode d’emploi détaillé de l’appareil sous
forme de fichier PDF.
Pour le détail sur l’utilisation de cet appareil, voyez ces modes d’emploi.
Pour pouvoir lire les fichiers PDF, Acrobat Reader de Adobe Systems
Incorporated doit être installé sur l’ordinateur.
L’utilisation de Acrobat Reader est décrite plus loin.
Vue de l’écran
Cadre gauche
•Cadre gauche
Chaque page du mode d’emploi apparaît sous forme de vignette.
Lorsque vous cliquez sur une vignette, la page correspondante s’affiche
dans le cadre droit.
•Cadre droit
Affiche chaque page.
Pour le détail sur l’utilisation de Acrobat Reader, voyez l’aide en ligne de
Adobe Acrobat Reader.
Cadre droit
12-FR
Page 53

Comment utiliser l’aide en ligne
Les applications suivantes ont des manuels en ligne séparés.
•“SonicStage”
•Memory Stick Formatter
Pour le détail sur l’emploi de chaque programme, voyez les manuels en
ligne respectifs.
Pour utiliser les manuels en ligne, procédez de la façon suivante.
Vue de l’écran
Onglet
Informations préliminaires
Cadre gauche
•Cadre gauche
Affichage du contenu ou des mots-clés
•Cadre droit
Affichage des explications. Cliquez sur le texte souligné pour afficher les
explications afférentes.
Cadre droit
13-FR
Page 54

BUtilisation de l’appareil
Installation du logiciel dans votre
ordinateur
PRemarque
Veillez à installer le logiciel fourni avant de raccorder cet appareil à votre
ordinateur.
N’effectuez pas l’installation alors que cet appareil est raccordé à l’ordinateur.
Redémarrez l’ordinateur après l’installation, puis raccordez cet appareil à
l’ordinateur.
Les explications suivantes sont basées sur les écrans visibles sous Windows XP.
Les écrans peuvent être différents suivant le système d’exploitation utilisé.
Une partie de l'installation s’effectuera peut-être automatiquement.
Utilisez la procédure suivante pour installer le logiciel.
Installation du pilote USB dans votre
ordinateur
PRemarque
Le “Memory Stick Formatter” et les instructions de fonctionnement (fichier
PDF) sont installés simultanément dans votre ordinateur avec le pilote USD.
1 Allumez votre ordinateur.
A ce point, ne raccordez pas cet appareil à l’ordinateur.
Fermez toutes les applications ouvertes.
Pour installer le pilote de périphérique sous Windows 2000 ou XP,
vous devez ouvrir la session comme Administrateur.
14-FR
Page 55

2 Insérez le CD-ROM (MSAC-US20 DISK1) dans le lecteur de CD-
ROM de votre ordinateur.
L’installateur est lancé automatiquement.
Pour installer un pilote, cliquez sur le bouton [Driver] du menu.
3 Veuillez lire attentivement l’accord de licence utilisateur, puis
cliquez sur le bouton [Agree].
Lorsque vous cliquez sur le bouton [Agree], l’installation du pilote
commence.
Utilisation de l’appareil
15-FR
Page 56

Installation du logiciel ordinateur (suite)
4 Cliquez sur le bouton [Next] quand le message affiché à
l’écran vous le demande.
5 Lorsque vous cliquez sur [Finish], l’installation du pilote est
terminée.
6 L’installation de “Memory Stick Formatter” commence ensuite.
Cliquez sur le bouton [Next] quand le message affiché à l’écran vous le
demande.
16-FR
Page 57

7 Lorsque vous cliquez sur [Finish], l’installation de “Memory
Stick Formatter” est terminée.
Pour utiliser “Memory Stick Formatter”, sélectionnez [Start] –
[Programs] – [Memory Stick Utility] – [Memory Stick Formatter].
8 L’installation des instructions de fonctionnement (fichier PDF)
est effectuée ensuite automatiquement.
Lorsque l’installation des instructions de fonctionnement est terminée,
l’écran de sélection de l’application s'affiche de nouveau.
Pour arrêter l’installation du logiciel à ce point, cliquez sur [Exit].
“SonicStage” ne sera pas installé.
Pour lire les instructions de fonctionnement, sélectionnez [Start] –
[Programs] – [Sony Memory Stick Reader Writer] – [MSAC-US20
Instructions].
PRemarque
Adobe Reader de Adobe Systems Incorporated est nécessaire pour lire les
instructions (fichier PDF)
17-FR
Utilisation de l’appareil
Page 58

Installation de “SonicStage” dans votre
ordinateur
1 Procédez de la façon suivante pour installer “SonicStage”.
Cliquez sur le bouton [SonicStage] du menu.
2 Veuillez lire attentivement l’accord de licence utilisateur, puis
cliquez sur le bouton [Agree].
Lorsque vous cliquez sur le bouton [Agree], l’installation du pilote
commence.
18-FR
Page 59

3 Cliquez sur le bouton [Finish].
4 Cliquez sur le bouton [Next] quand le message affiché à
l’écran vous le demande.
5 Cliquez sur le bouton [Finish].
Utilisation de l’appareil
19-FR
Page 60

Installation de “SonicStage” dans votre
ordinateur (suite)
6 Cliquez sur le bouton [Next] quand le message affiché à
l’écran vous le demande.
7 Sélectionnez le dossier dans lequel vous souhaitez installer
“SonicStage”.
Pour changer le dossier suggéré pour l’installation, cliquez sur le
bouton [Browse] et sélectionnez le dossier. Lorsque le dossier
d'installation est sélectionné, cliquez sur le bouton [Next].
20-FR
Page 61

8 Sélectionnez le dossier dans lequel vous souhaitez stocker le
contenu d’“OpenMG”.
Pour changer le dossier suggéré pour l’installation, cliquez sur le
bouton [Browse] et sélectionnez le dossier. Lorsque le dossier de
destination pour le stockage des données est sélectionné, cliquez sur le
bouton [Next].
9 Cliquez sur le bouton [Finish].
10Cliquez sur le bouton [Next] quand le message affiché à
l’écran vous le demande.
Utilisation de l’appareil
21-FR
Page 62

Installation de “SonicStage” dans votre
ordinateur (suite)
11Lorsque vous cliquez sur le bouton [Finish], l’installation de
“SonicStage” est terminée.
12Cliquez sur le bouton [Restart] pour redémarrer votre
ordinateur.
PRemarque
Veillez à raccorder cet appareil seulement après avoir redémarré votre
ordinateur.
22-FR
Page 63

Précautions à l’installation du logiciel
“SonicStage”
Il peut arriver que l’installation s’arrête.
Dans ce cas, déplacez l’écran d’installation sur le côté et vérifiez si une
boîte de message apparaît.
Cliquez sur [Yes] pour continuer l’installation.
Utilisation de l’appareil
23-FR
Page 64

Raccordement de l’appareil à
l’ordinateur
PRemarque
Veillez à installer le logiciel fourni avant de raccorder cet appareil à votre
ordinateur. Redémarrez l’ordinateur après l’installation.
Reliez la prise USB de cet appareil à la prise USB de l’ordinateur à l’aide
du câble USB spécial fourni.
1 Insérez à fond le miniconnecteur B du câble USB dans la prise
USB de l’appareil.
2 Branchez le connecteur A du câble USB dans le port USB de
l’ordinateur.
•“Found New Hardware Wizard” est lancé et l’installation du pilote
commence. Suivant le système d’exploitation utilisé, l’installation du
pilote peut se faire automatiquement.
•L’emplacement de la prise USB sur l’ordinateur dépend du modèle.
•Si vous utilisez un ordinateur équipé de plusieurs prises USB, ne
raccordez pas d’autres appareils, à l’exception d’une souris ordinaire
et du clavier, aux prises USB en même temps que cet appareil. Si
vous utilisez un ordinateur de bureau, utilisez la prise USB de
l’ordinateur proprement dit. Pour le détail, voyez “Raccordements
préconisés” à la page 25.
24-FR
Page 65

Raccordements préconisés
Le fonctionnement de l’appareil est garanti si les connexions suivantes sont
effectuées.
Lorsque cet appareil est raccordé directement à la prise USB de
l’ordinateur et que rien d’autre n’est raccordé à l’autre prise USB de
l’ordinateur.
Ordinateur équipé en standard d’une souris et d’un clavier USB, le clavier
USB étant raccordé à une prise USB et cet appareil à l’autre prise USB de
l’ordinateur au moyen du câble USB fourni.
PRemarques
• Si plusieurs appareils USB sont raccordés à un ordinateur et que tous deux
sont utilisés en même temps, dans certains cas, ils risquent de ne pas
fonctionner.
• Veillez à bien raccorder le câble USB fourni directement à la prise USB de
l’ordinateur. L’appareil ne fonctionnera pas si le câble est raccordé à
l’ordinateur par le clavier ou un concentrateur USB, etc.
• Le bon fonctionnement de l’appareil n’est pas garanti dans tous les
environnements d’ordinateurs recommandés.
• Seul le câble USB spécifié (fourni) doit être utilisé pour le raccordement de
l’appareil à l’ordinateur.
Utilisation de l’appareil
25-FR
Page 66

Raccordement de l’appareil à l’ordinateur (suite)
3 Sélectionnez “Install software automatically [Recommended]”,
et cliquez sur [Next].
4 Lorsque vous cliquez sur le bouton [Finish], l’installation est
terminée.
Vous pouvez maintenant utiliser l’appareil.
26-FR
Page 67

Vérification des connexions
L’écran des réglages du menu classique [Start] de Microsoft Windows XP
est utilisé dans les illustrations suivantes. L’écran peut être différent
suivant le système d’exploitation et les réglages utilisés.
1 Ouvrez le dossier “My Computer”.
Les dossiers figurant dans le poste de travail apparaissent.
2 Assurez-vous que l’icône du Memory Stick (F:) apparaît.
PRemarque
La désignation du lecteur (F:) peut être différente sur certains ordinateurs.
La connexion est terminée lorsque l’icône du Memory Stick apparaît.
Il faut attendre un instant pour que l’icône apparaisse.
PRemarques
• Suivant le système d’exploitation et le “Memory Stick” utilisés, l’icône affichée
apparaîtra sous la forme “Disque amovible (F:)” au lieu de “Memory Stick
(F:)”. Suivant le “Memory Stick” utilisé, il est possible que ce dernier soit
identifié comme “Local Disk (Disque local) (F:)” mais ce détail n’aura pas
d’effet sur l’utilisation ou le fonctionnement.
• Si l’icône Memory Stick n’apparaît pas, c’est que le pilote USB n’est pas
installé correctement. Procédez de la façon suivante pour le réinstaller. Si vous
utilisez un autre “Removable Disk (Disque amovible)”, plusieurs icônes
“Removable Disk (Disque amovible)” apparaîssent.
27-FR
Utilisation de l’appareil
Page 68

Si le disque amovible (icôn du Memory
Stick) n’est pas affiché
Un autre pilote de périphérique est déjà installé. Dans ce cas, raccordez
l’appareil à l’ordinateur et effectuez les opérations suivantes.
– Lorsque vous utilisez Windows 2000/Windows XP –
Connectez-vous en tant qu’Administrateur ou en utilisant un pseudonyme
ayant un privilège administratif.
1 Double-cliquez sur l’icône “System” du “Control Panel”.
L’écran “System Properties” (Propriétés système) apparaît.
2 Assurez-vous que le pilote du dispositif déjà été installé.
1 Cliquez sur l’onglet [Hardware]
(Matériel) sur l’écran “System
Properties” (Propriétés système).
28-FR
2 Cliquez sur [Device Manager]
(Gestionnaire de périphériques).
L’écran “Device Manager”
(Gestionnaire de périphériques)
apparaît.
Page 69

3 Cliquez sur [View]
(Affichage).
4 Cliquez sur [View devices
by type] (Afficher les
périphériques par type).
5 Double-cliquez sur [Other
devices] (Autres
périphériques).
6 Vérifiez si [? MSAC-US20]
précédé du point
d’interrogation apparaît.
3 Supprimez le pilote s’il est installé.
Si vous procédez comme indiqué à l’étape 2 et si [? MSAC-US20] est
indiqué dans “Other devices” (Autres périphériques) dans “View
devices by type” (Afficher les périphériques par type), c’est qu’un
autre pilote de périphérique a déjà été installé.
Procédez de la façon suivante pour supprimer le pilote.
Ne pas supprimer d’autres pilotes que [? MSAC-US20].
1 Cliquez à droite sur [? MSAC-US20].
2 Cliquez sur [Remove] (Supprimer). L’écran “Confirm Device
Removal” (Confirmer le retrait du périphérique) apparaît.
3 Cliquez sur le bouton [OK]. Le périphérique est supprimé.
4 Redémarrez l’ordinateur après avoir débranché l’appareil de
l’ordinateur.
Installez de nouveau le pilote de périphérique sur l’ordinateur comme
indiqué à la page 14 en commençant par l’étape 1.
PRemarques
• Si vous supprimez d’autres périphériques que [? MSAC-US20],
l’ordinateur risque de ne plus fonctionner correctement.
• Il n’est pas nécessarie de réinstaller pas “SonicStage” si l’installation a
déjà été effectuée. Après l’installation du pilote, redémarrez votre
ordinateur avant de le relier à l’ordinateur.
Utilisation de l’appareil
29-FR
Page 70

Si le disque amovible (icôn du Memory Stick)
n’est pas affiché (suite)
– Si vous utilisez Windows 98SE/Windows Me –
1 Double-cliquez sur l’icône “System” du “Control Panel”.
L’écran “System Properties” (Propriétés système) apparaît.
2 Vérifiez si le pilote du périphérique a bien été installé.
1 Cliquez sur l’onglet [Device Manager] (Gestionnaire de
périphériques) sur l’écran “System Properties” (Propriétés
système).
2 Double-cliquez sur [Other devices] (Autres périphériques).
3 Vérifiez si vous voyez [? MSAC-US20] précédé du point
d’interrogation.
3 Supprimez le pilote s’il est installé.
Si vous effectuez les opérations de l’étape 2 et si [? MSAC-US20]
apparaît dans “Other devices” (Autres périphériques), c’est qu’un
autre pilote le périphérique est déjà installé.
Procédez de la façon suivante pour supprimer ce pilote.
Ne pas supprimer d’autres pilotes que le [? MSAC-US20].
1 Cliquez sur [? MSAC-US20].
2 Cliquez sur [Remove] (Supprimer). L’écran “Confirm Device
Removal” (Retirer le périphérique) apparaît.
3 Cliquez sur le bouton [OK]. Le pilote est supprimé.
4 Redémarrez votre ordinateur après avoir débranché l’appareil de
l’ordinateur.
Installez de nouveau pilote du périphérique en procédant comme
indiqué à partir de l’étape 1 de la page 14.
PRemarques
•Si vous supprimez d’autres périphériques que [? MSAC-US20], votre
ordinateur risque de ne plus fonctionner correctement.
•Il n’est pas nécessarie de réinstaller pas “SonicStage” si l’installation a
déjà été effectuée. Après l’installation du pilote, redémarrez votre
ordinateur avant de le relier à l’ordinateur.
30-FR
Page 71

Débranchement de l’appareil de
l’ordinateur
– Utilisateurs de Windows Me/Windows 2000/Windows XP –
Procédez de la façon suivante pour débrancher le câble USB de
l’ordinateur.
•Les écrans représentés ici sont ceux de Windows XP.
Selon le système d’exploitation utilisé, ils peuvent être légèrement
différents.
•Les opérations suivantes sont inutiles si vous utilisez Windows 98SE.
1 Cliquez sur l’icône “Unplug or Eject Hardware” (Débrancher
ou éjecter le matériel) dans le plateau de tâches dans le coin
inférieur droit de l’écran.
Cliquez sur cette icône.
Un message
apparaît.
Le plateau de tâches est ici.
2 Cliquez sur “Safely remove Sony Memory Stick USB Reader/
Writer (MSAC-US20)-Drive (F:)” (Retirer avec précaution le
lecteur/enregistreur USB de Memory Stick Sony (MSAC-US20)Lecteur (F:)).
Cliquez ici.
Utilisation de l’appareil
Un message apparaît un
instant plus tard.
* La désignation du lecteur “(F:)”, etc. peut être différente sur certains
ordinateurs.
31-FR
Page 72

Débranchement de l’appareil de l’ordinateur
(suite)
3 [“Sony Memory Stick USB Reader/Writer (MSAC-US20) can be
safely removed.”] est affiché.
Dans ces conditions, vous pouvez débrancher l’appareil de
l’ordinateur en toute sécurité.
PRemarque
Les indications peuvent être différentes suivant le système d’exploitation
utilisé.
PRemarques
• Si vous désirez retirer le “Memory Stick” hors de cet appareil, les opérations
ci-dessus ne sont pas nécessaires.
• Ne retirez pas le “Memory Stick” de cet appareil pendant que son voyant
d’accès clignote, car les données du “Memory Stick” pourraient en être
endommagées.
• Si vous effectuez cette opération, l’appareil n’est pas reconnu par votre
ordinateur. Pour qu’il soit à nouveau reconnu, débranchez le câble USB au
niveau de votre ordinateur, puis branchez à nouveau ce câble USB.
32-FR
Page 73

Utilisation de l’appareil (avec
Macintosh)
Vous pouvez utiliser le gestionnaire fourni d’origine avec le système
d’exploitation OS.
Effectuez les démarches décrites ci-dessous.
Cet appareil peut être utilisé sur votre ordinateur.
1 Mettez votre ordinateur sous tension.
2 Insérez un “Memory Stick” dans láppareil et raccordez la prise
USB de cet appareil sur la prise USB de l’ordinateur au moyen
du câble USB spécial fourni.
Voir page 24 pour raccorder cet appareil à votre ordinateur.
3 L’installation du gestionnaire commence automatiquement et
le gestionnaire est installé sur l’ordinateur.
4 Une fois que l’installation du gestionnaire est achevée, l’icône
Memory Stick apparaît sur le Bureau et l’appareil peut alors
être utilisé.
PRemarque
L’icône de “Memory Stick” n’apparaît pas sur l’ordinateur si le “Memory Stick”
n’est pas inséré dans l’appareil.
Deconnexion de l’appareil et de l’ordinateur ou retrait du
“Memory Stick” de l’appareil.
1 Refermez le logiciel utilisé par cet appareil.
2 Assurez-vous que le voyant d’accès est éteint.
3 Déplacez l’icône Memory Stick dans la Poubelle.
Vous pouvez aussi placer l’icône Memory Stick à l’état sélectionné et
choisir “Éjecter” sur le menu “Spécial” dans le coin supérieur gauche
de l’écran.
4 Déconnectez cet appareil de votre ordinateur ou retrait du
“Memory Stick” de l’appareil.
PRemarques
• Si vous désirez retirer le “Memory Stick” hors de cet appareil, les démarches
ci-dessus ne sont pas nécessaires. Ne retirez pas le “Memory Stick” hors de cet
appareil pendant que son voyant d’accès clignote, car les données du
“Memory Stick” pourraient en être endommagées.
• Retirer cet appareil ou le “Memory Stick” de l’appareil sans effectuer les
démarches ci-avant peut endommager le “Memory Stick”. Sony décline toute
responsabilité en cas de dégâts, provenant du fait que les instructions ci-avant
n’ont pas été respectées.
33-FR
Utilisation de l’appareil
Page 74

BInformations diverses
Formatage (initialisation) d’un
“Memory Stick”
Le formatage supprime toutes les données enregistrées sur le “Memory
Stick”. Pour formater un “Memory Stick” sur cet appareil, il faut utiliser le
programme fourni “Memory Stick Formatter” et effectuer les opérations
suivantes. Les “Memory Stick” formatés sur un ordinateur sans le
programme “Memory Stick Formatter” ne fonctionneront probablement
pas sur un Handycam ou un appareil compatible avec les “Memory Stick”.
Pour le détail sur l’utilisation du “Memory Stick Formatter”, reportez-vous
au mode d’emploi fourni avec le logiciel “Memory Stick Formatter”. Vous
pouvez télécharger le logiciel “Memory Stick Formatter” en accédant au
site web suivant.
http://www.sony.net/memorystick/supporte
PRemarque
Lorsque vous formatez un “Memory Stick”, toutes les données déjà enregistrées
sont effacées. Veillez à ne pas effacer des données importantes par inadvertance.
1 Insérez un “Memory Stick” dans cet appareil.
2 Lancez “Memory Stick Formatter”.
3 Après avoir vérifié que le lecteur contenant le “Memory Stick”
était bien sélectionné, cliquez sur [Start formatting]. Le
formatage commence.
PNote
Ne retirez jamais cet appareil hors de l’ordinateur au cours du formatage du
“Memory Stick”, car les données présentes sur celui-ci pourraient en être
endommagées.
34-FR
Page 75

Données de protection d’écriture
LOCK
LOCK LOCK
Les “Memory Stick” ont un taquet de protection qui empêchent
l’effacement accidentel des données. La position du taquet, gauche ou
droite, peut être changée pour autoriser ou interdire l’enregistrement de
données du “Memory Stick”.
•Position d’autorisation
Des données peuvent être enregistrées.
•Position de protection
Lorsque le taquet est à droite, aucune donnée ne peut être enregistrée sur
le “Memory Stick”, mais les données existantes peuvent être lues.
Face arrière du “Memory Stick”
Position
d’autorisation
Position de
protection
Précautions concernant l’emploi des “Memory
Stick Duo”
Avant d’utiliser un “Memory Stick Duo” avec cet appareil, n’oubliez pas
d’insérer le “Memory Stick Duo” dans l’adaptateur de Memory Stick Duo.
Assurez-vous que le “Memory Stick” est bien orienté avant de l’insérer.
N’insérez pas l’adaptateur de Memory Stick Duo dans les produits
compatibles avec les “Memory Stick” si un Memory Stick Duo n’est pas
inséré dans l’adaptateur.
Ceci peut entraîner une panne.
Vitesse d’écriture et de lecture des données
La vitesse d’écriture et de lecture des données dépend du “Memory Stick”
et des produits utilisés.
Informations diverses
35-FR
Page 76

Remarques sur l’emploi des “Memory
Stick”
B
A
Où coller les
étiquettes
C
•Il est impossible d’enregistrer, d’éditer ou de supprimer des données
lorsque le taquet de protection est en position “LOCK”. B
•Utiliser un objet pointu pour changer la position du taquet sur le
“Memory Stick Duo”.
•Ne jamais retirer un “Memory Stick” lorsque le témoin d’accès est éclairé
(des données sont lues ou enregistrées).
•Les données peuvent être détruites dans les cas suivants :
– Le “Memory Stick” est retiré de l’appareil ou l’appareil est éteint
quand le témoin d’accès est éclairé (des données sont lues ou
enregistrées).
– Le “Memory Stick” est utilisé près d’objets émettant de l’électricité
statique ou des interférences.
•Toujours faire des copies de données importantes. Sony n’assume aucune
responsabilité en cas de dégâts des données.
Nous déclinons toute responsabilité en cas de perte ou de dégâts des
données, découlant d'une utilisation de cet appareil.
•Les données protégées par “MagicGate” ne peuvent être utilisées qu’avec
un “MagicGate Memory Stick”.
•Ne coller que les étiquettes spécialement fournies avec les “Memory
Stick”. C
•Coller les étiquettes aux endroits prévus à cet effet. Les étiquettes ne
doivent pas dépasser des bords du “Memory Stick”.
•Ne pas écrire en appuyant sur l’étiquette d’un “Memory Stick Duo”.
•Les “Memory Stick” doivent toujours être rangés dans le boîtier fourni
lorsqu’ils ne sont pas utilisés.
•Ne pas toucher le connecteur avec les doigts ou un objet métallique. A
•Ne pas courber, laisser tomber ni soumettre les “Memory Stick” à des
chocs violents.
36-FR
Page 77

•Ne pas essayer d’ouvrir ou de modifier les “Memory Stick”.
•Ne pas mouiller les “Memory Stick”.
•Evitez de ranger les “Memory Stick” aux endroits suivants.
– A un endroit exposé à de hautes températures ou dans une voiture
garée à un endroit exposé à une chaleur très intense.
– A un endroit exposé au soleil.
– Endroit très humide ou endroit cù des substan ces porrosires sont
présentes.
Informations diverses
37-FR
Page 78

En cas de problème
Symptôme
L’icône de Memory Stick
(Disque amovible)
n’apparaît pas.
Impossible d’accéder au
“Memory Stick” depuis
l’explorateur ou le poste
de travail.
Le témoin d’accès clignote
lorsqu’un “Memory
Stick” est inséré.
Les données musicales ne
peuvent plus être utilisées
sur l’ordinateur.
Cause/Solution
•L’appareil est mal raccordé.
t Raccordez-le correctement. (Page 24)
•Un autre périphérique USB est
également raccordé à la prise USB de
l’ordinateur.
t Débranchez l’autre périphérique,
éteignez l’ordinateur et remettez-le
en marche.
•Le pilote n’est pas installé.
t Installez le pilote en utilisant le
CD-ROM fourni. (Page 14)
•Aucun “Memory Stick” inséré.
t Insérez un “Memory Stick”.
•Des matières adhèrent au connecteur du
“Memory Stick”.
t Vérifiez si le connecteur n’est pas sale
ou poussiéreux.
Enlevez ces matières et insérez de
nouveau le “Memory Stick”.
•La fonction de restauration du système
de Windows Me et Windows XP a été
exécutée. (Page 8)
t Si vous avez sauvegardé les données,
récupérez-les sur l’ordinateur.
Pour l’emploi de l’outil de
sauvegarde, consultez le manuel en
ligne de “SonicStage”.
38-FR
Page 79

Spécifications
Lecteur/Enregistreur USB de Memory Stick
Interface : Interface USB
Vitesse en bauds : Max. 12 Mbps
Données générales
Tension de fonctionnement : CC 5V (fournis par le câble USB)
Consommation : Max. 500 mA (en fonctionnement)
Max. 2,5 mA (en veille)
Dimensions externes : Approx. 42 mm · 22,5 mm · 85,5 mm
(1 11/16 · 29/32 · 3 3/8 pouces)
(largeur · hauteur · profondeur)
Poids Approx. 40 g (sans “Memory Stick”)
Conditions de fonctionnement : Température 0°C à 40°C (32°F à 104°F)
(condensation non permise)
Humidité 20% à 80%
(condensation non permise)
La conception et les spécifications peuvent être modifiées sans avis
préalable.
Pour toute question ou commentaire à propos de cet appareil, consultez
notre site web Service Clientèle
http://www.sony.net/memorystick/supporte
Pour toute question ou commentaire à propos de “OpenMG”, consultez
notre site web
http://www.openmg.com/
Informations diverses
39-FR
Page 80

GARANTIE RESTREINE
Si ce produit est reconnu défectueux par sa main d’œuvre ou ses
matériaux dans pendant un an suivant sa date d’achat au détail, il
sera remplacé soit par le Marchand,
soit par Sony Electronics Inc. ou par Sony du Canada Ltée.
UN TEL REMPLACEMENT SERA L’UNIQUE RECOURS DU
CONSOMMATEUR, ET NI LE FABRICANT, NI LE DISTRIBUTEUR,
NI LE VENDEUR NE SAURAIENT ETRE TENUS RESPONSABLES
DE TOUTE PERTE OU DE TOUT DOMMAGE, DIRECT OU
CONSEQUENT, RESULTANT DE L’USAGE OU DE
L’IMPOSSIBILITE D’USAGE, DE CE PRODUIT.
Certains états aux États-Unis ne permettent pas l’exclusion des
dommages conséquents ou fortuits. Dans ces cas, cette exclusion ne
s’applique pas. Cette garantie donne des droits légaux spécifiques au
consommateur qui peut avoir aussi d’autres droits, variant d’un état à
autre aux États-Unis, à Porto Rico ou d’une province à l’autre au
Canada.
Aux États-Unis, s’adresser á: Sony Electronics Inc.,
Sony Building, 680 Kinderkamack Road, Oradell, New Jersey 07649.
Au Canada, s’adresser à: Sony du Canada Ltée.,
115 Gordon Baker Road, Toronto, Ontario, M2H 3R6 CANADA.
40-FR
Page 81

Page 82

Page 83

Page 84

Sony Corporation Printed in Japan
 Loading...