

4-679-609-22(1)
2x Speed USB
Floppy Disk Drive
Operating Instructions
Mode d’emploi
Bedienungsanleitung
Istruzioni per l’uso
Guía de instrucciones
Manual de instruções
Инcтpyкция по экcплyaтaции
MPF88E-UA
2004 Sony Corporation
GB
FR
DE
IT
ES
PT
RU
Owner’s Record
The model and serial number are
located on the bottom of the drive unit.
Record the serial number in the space
provided below. Refer to these
numbers whenever you call upon your
Sony dealer regarding this product.
Model No. MPF88E-UA
Serial No.
WARNING
To prevent fire or shock hazard, do not
expose the unit to rain or moisture.
To avoid electrical shock, do not open
the cabinet. Refer servicing to
qualified personnel only.
Caution
This equipment has been tested and found
to comply with the limits for a Class B
digital device, pursuant to Part 15 of the
FCC Rules. These limits are designed to
provide reasonable protection against
harmful interference in a residential
installation. This equipment generates,
uses, and can radiate radio frequency
energy and, if not installed and used in
accordance with the instructions, may
cause harmful interference to radio
communications. However, there is no
guarantee that interference will not occur
in a particular installation. If this equipment
does cause harmful interference to radio or
television reception, which can be
determined by turning the equipment off
and on, the user is encouraged to try to
correct the interference by one or more of
the following measures:
•
Reorient or relocate the receiving antenna.
• Increase the separation between the
equipment and receiver.
• Connect the equipment into an outlet
on a circuit different from that to
which the receiver is connected.
• Consult the dealer or an experienced
radio/TV technician for help.
You are cautioned that any changes or
modifications not expressly approved in
this manual could void your authority to
operate this equipment.
Note:
If you have any questions about this
product, you may call the telephone number
listed in “Technical Support”. The telephone
number below is not for customer service
but only for official purpose.
Declaration of Conformity
Trade Name: SONY
Model No.: MPF88E-UA
Responsible Party:Sony Electronics Inc.
Address: 16450 W.Bernardo
Dr., San Diego, CA
92127 U.S.A.
Telephone No.: 858-942-2230
This device complies with Part 15 of the
FCC Rules. Operation is subject to the
following two conditions: (1) This device
may not cause harmful interference, and
(2) this device must accept any interference
received, including interference that may
cause undesired operation.
NOTICE TO USERS
Device drivers ©2004 Sony Corporation.
Documentation ©2004 Sony Corporation.
All rights reserved. This manual or device
drivers described herein, in whole or in
part, may not be reproduced, translated to
any machine-readable form without prior
written approval from Sony Corporation.
I
N NO EVENT SHALL SONY CORPORATION
BE LIABLE FOR ANY INCIDENTAL,
CONSEQUENTIAL OR SPECIAL DAMAGES,
WHETHER BASED ON TORT, CONTRACT, OR
OTHERWISE, ARISING OUT OF OR IN
CONNECTION WITH THIS MANUAL, THE
DEVICE DRIVERS OR OTHER INFORMATION
CONTAINED HEREIN OR THE USE THEREOF
.
Sony Corporation reserves the right to
make any modification to this manual or the
information contained herein at any time
without notice.
2
GB
SONY CORPORATION IS NOT RESPONSIBLE
FOR ANY DAMAGE TO OR LOSS OF ANY
PROGRAMS, DATA, OR OTHER
INFORMATION STORED ON ANY MEDIA.
Trademarks
•
Microsoft and Windows are registered
trademarks of Microsoft Corporation in the
United States and/or other countries.
•
Macintosh, Mac, PowerBook, Power Mac,
iMac, iBook, and Mac OS are registered
trademarks or trademarks of Apple
Computer, Inc.
•
Other system names, product names, and
company names appearing in this manual
are trademarks or registered trademarks
of their respective holders, even though
not indicated by the ® or TM marks.
Table of Contents
Overview .............................. 4
Overview ............................................. 4
Package Contents ................................ 4
System Requirements .......................... 5
Supported Floppy Disks ...................... 5
Parts and Functions ............................. 6
Installing and Removing the
Color Panel .......................................... 6
Positioning the USB Floppy
Disk Drive ........................................... 8
Before you use the drive for the
first time, you must install the
device driver on your computer.
Before connecting the drive, see page
12 for details about the device driver
installation procedure. Also see the end
user license agreement on page 19.
Installing and Removing the
Drive Stand .......................................... 8
Using the USB Floppy Disk Drive ...... 9
Usage Notes ....................................... 11
Installation ......................... 12
Disposal of Old
Electrical & Electronic
Equipment (Applicable
in the European Union
and other European
countries with separate
collection systems)
This symbol on the product or on its
packaging indicates that this product shall
not be treated as household waste. Instead it
shall be handed over to the applicable
collection point for the recycling of electrical
and electronic equipment. By ensuring this
product is disposed of correctly, you will help
prevent potential negative consequences for
the environment and human health, which
could otherwise be caused by inappropriate
waste handling of this product. The recycling
of materials will help to conserve natural
resources. For more detailed information
about recycling of this product, please
contact your local Civic office, your
household waste disposal service or the
shop where you purchased the product.
Installing the Windows XP Device
Driver ................................................. 12
Installing the Windows Me Device
Driver ................................................. 12
Installing the Windows 2000 Device
Driver ................................................. 13
Installing the Windows 98 Device
Driver ................................................. 15
Installing the Mac OS 9.x/Mac OS X
Device Driver .................................... 17
Installing the Mac OS 8.6
Device Driver .................................... 17
Appendix ............................ 17
Specifications .................................... 17
Technical Support ............. 18
End User License Agreement .. 19
GB
3
GB
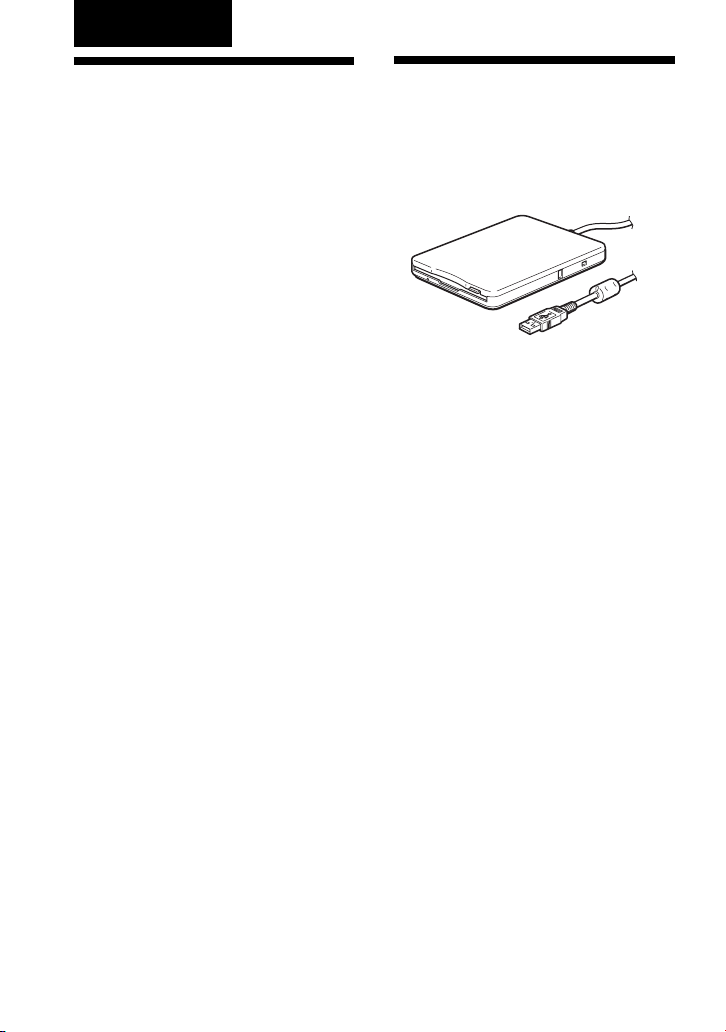
Overview
Overview
The MPF88E-UA (hereafter referred to
as the “drive”) has the following
features:
• Capable of a 2× read/write speed.
• Comes with two changeable color
panels, Pearl White and Sapphire
Blue.
• Can be used vertically by installing
the supplied stand.
• Compatible with Windows and
Macintosh systems.
• Equipped with a USB cable for easy
connectivity.
• The drive is powered by your
computer’s USB port (i.e. USB buspowered device), so an external power
source is not required.
• Compact and lightweight design for
portability.
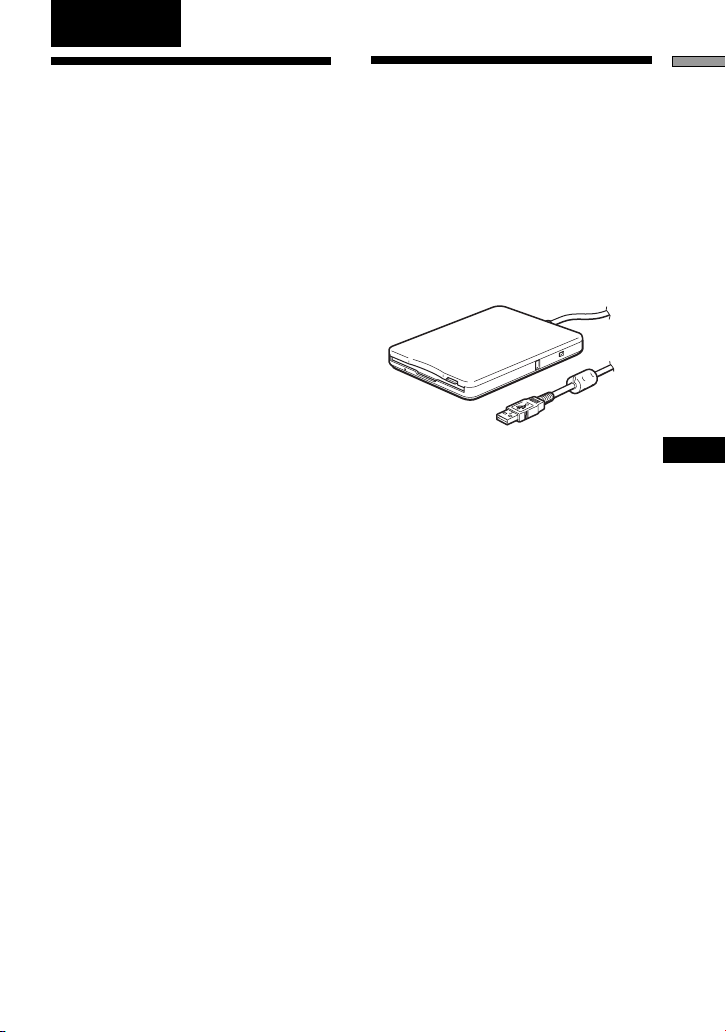
Package Contents
The drive package contains the
following:
• MPF88E-UA USB Floppy Disk Drive
• Changeable color panels
– Pearl White
– Sapphire Blue
• Stand
• USB Floppy Disk Drive Device
Driver CD-ROM
• Operating Instructions
• Warranty card
4
GB

System
Overview
Supported Floppy
Requirements
The drive requires the following
minimum system configuration:
• PC/AT compatible personal computer
– Preinstalled Windows 98 SE,
Windows 2000 Professional,
Windows Me, or Windows XP
– USB port
– CD-ROM drive (or device that can
read CD-ROM)
• Macintosh system
– Power Mac G4, G4 Cube, iMac,
iBook, PowerBook G4
– Preinstalled Mac OS 8.6, Mac OS 9
or later, or Mac OS X 10.1 or later
Notes
• Mac OS X 10.0 does not support this
drive.
• With Mac OS X, format floppy disks
with the “Erase” command of the Disk
Utility and select the “Mac OS
Standard” format.
• Mac OS X cannot format unformatted
floppy disks.
– USB port
Disks
The drive supports the following floppy
disks:
• Windows
– 2DD (720 KB)
– 2HD (1.44 MB)
• Macintosh
– 2DD (720 KB)
– 2HD (1.44 MB)
– 2HD (Mac standard format)
5
GB
Parts and
Installing and
Functions
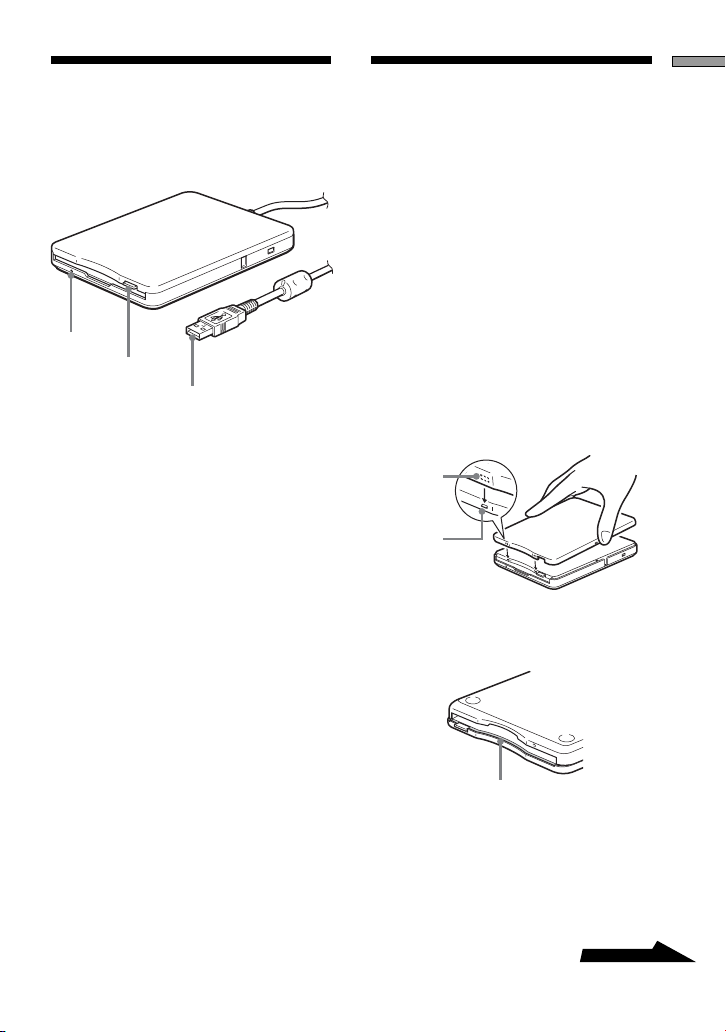
This section describes the drive parts and
functions.
1
2
3
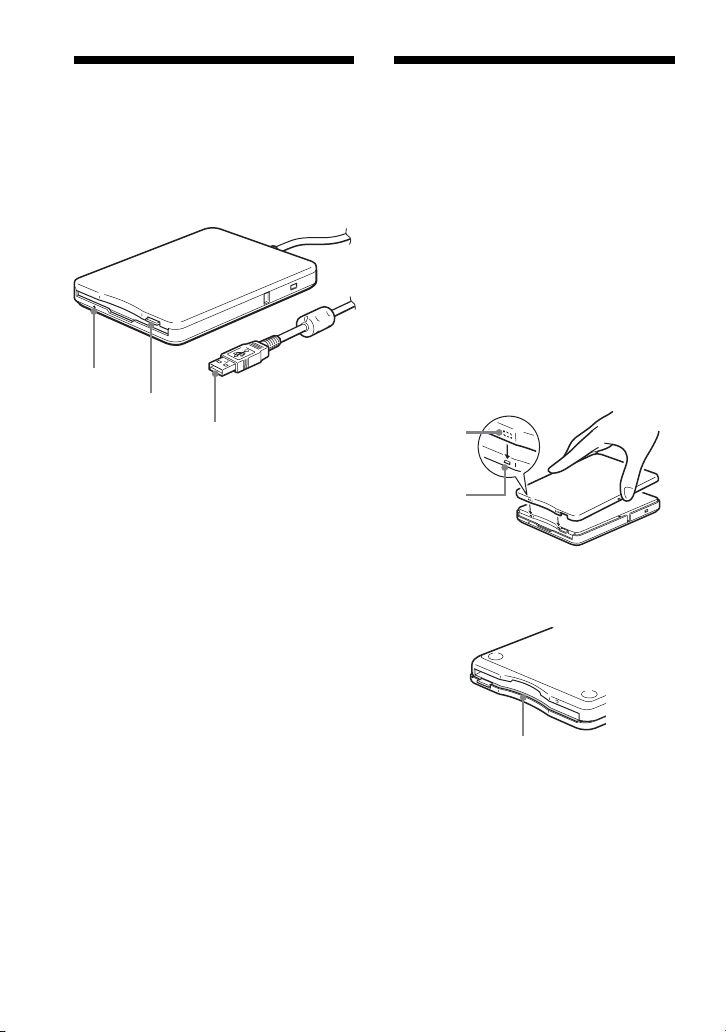
1Status indicator
Indicates the status of the drive. It lights
when the floppy disk in the drive is
being accessed.
2Eject button
Push this button to eject a floppy disk
from the drive.
3USB type A plug
Used to connect the drive to your
computer.
Removing the
Color Panel
To install the color panel
1 Align the panel with the front of
the drive so that the panel
hooks mate securely with the
drive notches.
Note
Make sure the panel fits snugly on the
drive.
Notch
Hook
Front of drive
m
Drive base
Make sure the panel fits snugly
on the drive.
6
GB
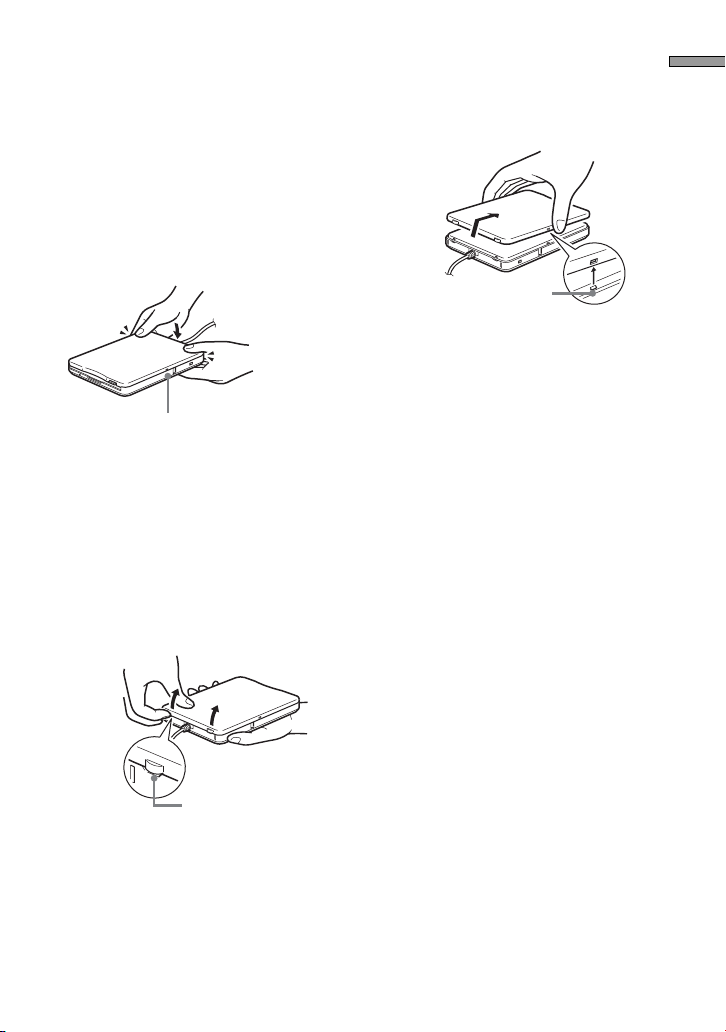
2 Make sure the panel center
notches are aligned with the
drive center hooks, then lower
the panel towards the rear of
the drive. When the panel
snaps into place, it is secured.
Note
Make sure the panel snaps into place. If it
doesn't, you may no longer be able to
remove the panel.
Snap!
Align the panel center
notches with the drive hooks.
To remove the color panel
1 Hold the drive as illustrated, put
a fingernail in one of the
grooves at the rear of the drive,
and then release one of the
drive hooks. Repeat the same
steps for the other hook.
2 Release the center drive hooks,
then gently slide the panel
away from the drive.
Gently slide
the panel and
remove it.
Release the
center hooks.
Overview
Rear of drive
Put your fingernail in
the notch.
7
GB
Positioning the
Installing and
USB Floppy Disk
Drive
The drive is designed to be used
horizontally and vertically. When you
want to use it vertically, you must install
the stand supplied with the drive. For
details, see “Installing and Removing the
Drive Stand”, page 8.
Warning
• When using the drive vertically, make sure
that you place the drive on a stable
horizontal surface. Failing to do so may
cause the drive to fall resulting in
damage, injury, and/or loss of data
on the floppy disk.
• Do not use the drive in any other position
than horizontal and vertical.
Removing the
Drive Stand
This section describes how to install and
remove the stand of the drive when
using the drive vertically.
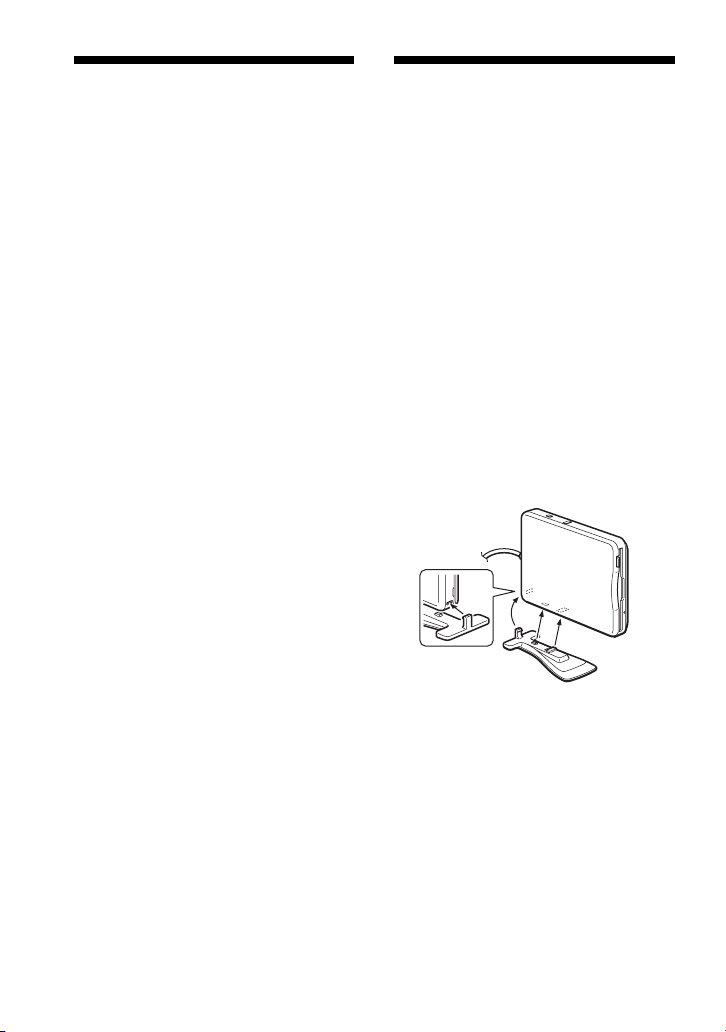
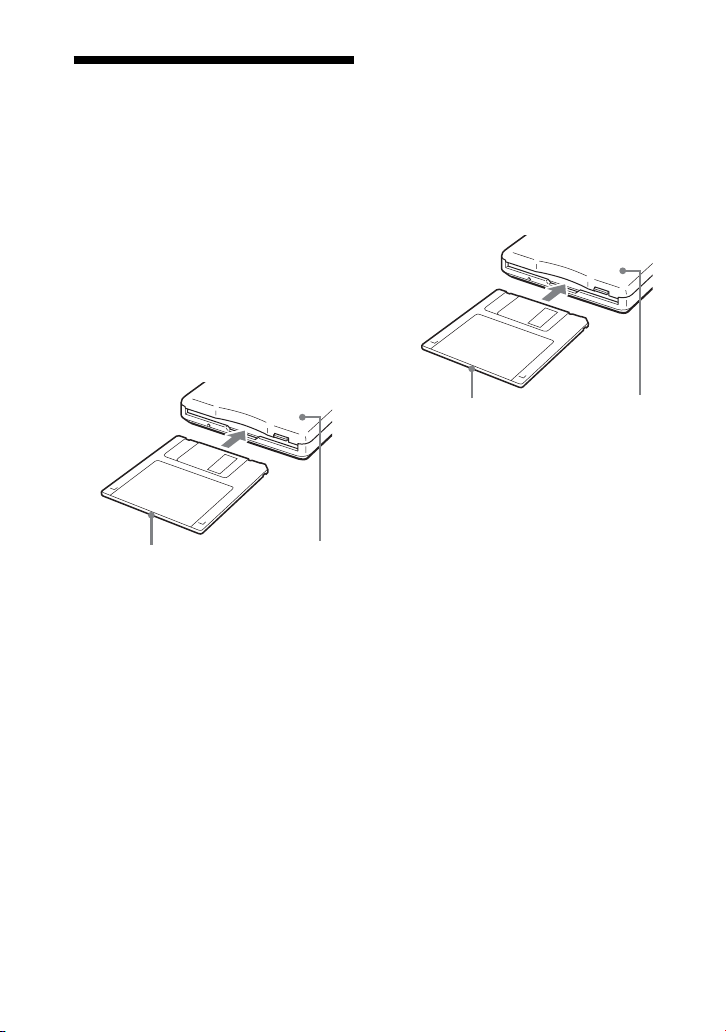
To install the stand
1 Holding the drive vertically,
insert the stand hook into the
notch at the rear of the drive.
2 Raise the stand toward the
drive until the stand pins snap
into the notches under the
drive.
8
GB
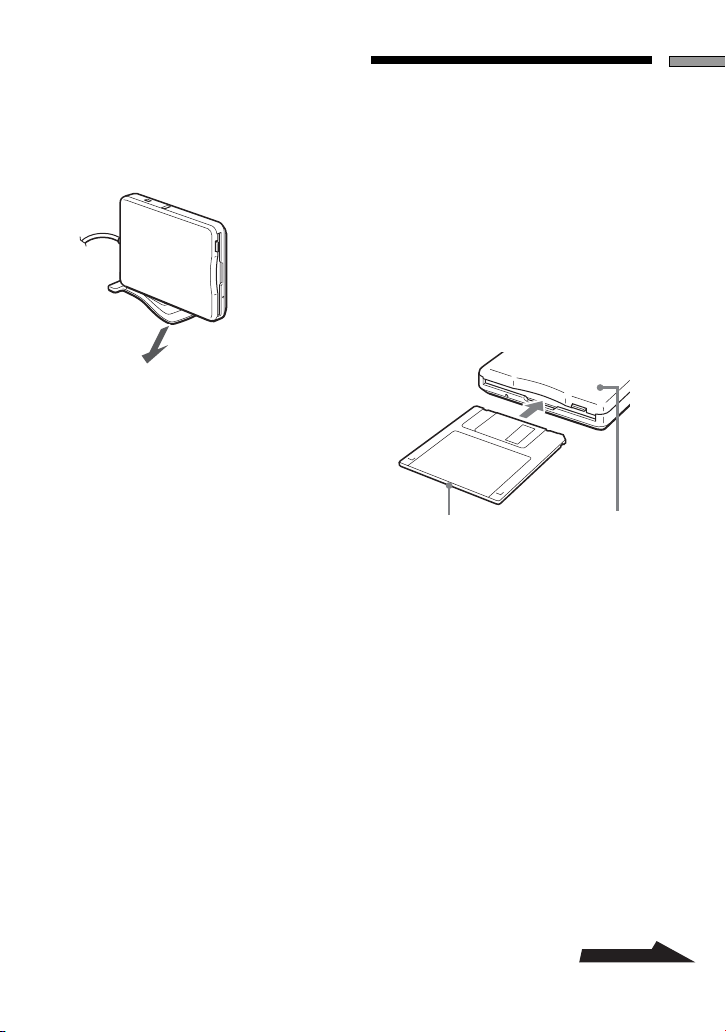
To remove the stand
1 Holding the drive vertically,
push down the front of the
stand, taking care not to let it
fall.
2 Remove the stand hook from
the notch at the rear of the
drive.
Overview
Using the USB
Floppy Disk Drive
This section describes how to use the
drive.
With a Windows system
1 Holding a floppy disk label side
up, push it into the drive until
you hear a click.
Label side Color panel
Note
When you are using the drive vertically,
insert the floppy disk so that the label side
faces the same direction as the color
panel.
2 Perform the desired operations
with the floppy disk from your
computer.
3 To eject the floppy disk, wait
until the status indicator goes
off, and then push the eject
button.
Note
Do not eject the floppy disk from the
drive while the status indicator is on as
this may result in data loss or damage.
Continued
9
GB

With a Macintosh system
1 Holding a floppy disk label side
up, push it into the drive until
you hear a click.
A floppy disk icon appears on your
desktop.
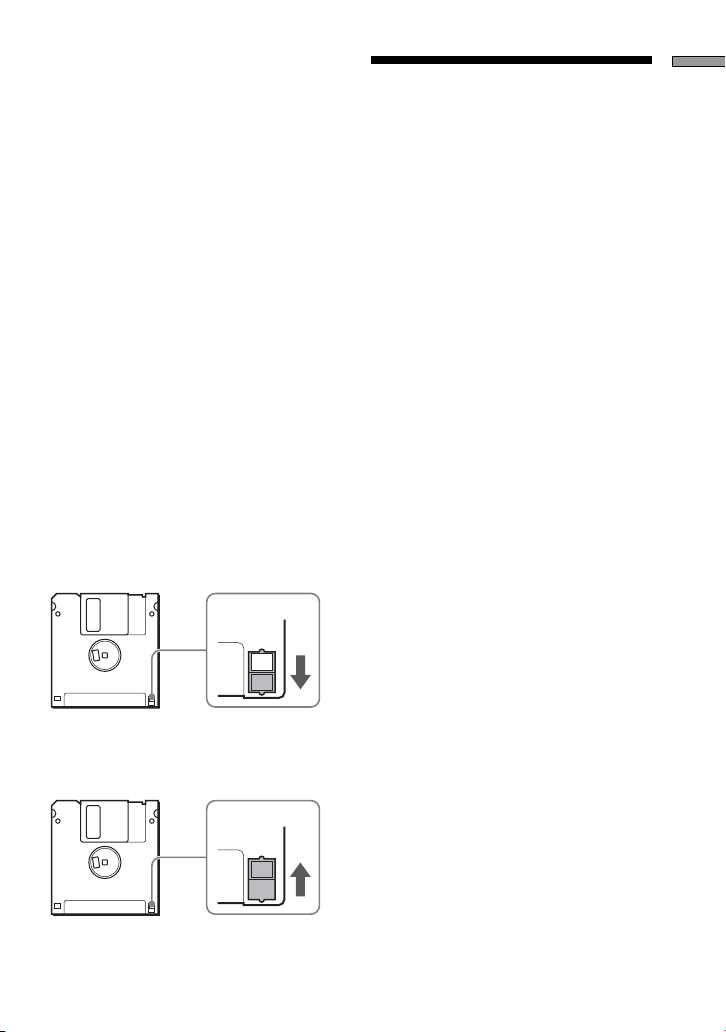
To write-protect a floppy disk
To prevent data on a floppy disk from
being overwritten, you can write-protect
the floppy disk. When the floppy disk is
write-protected, data cannot be saved on
it.
To write-protect a floppy disk, push the
write-protect tab as illustrated below.
Label side
Note
When you are using the drive vertically,
insert the floppy disk so that the label side
face the same direction as the color panel.
Color panel
2 Perform the desired operations
with the floppy disk from your
computer.
3 To eject the floppy disk, drag
the floppy disk icon to the trash
can on your desktop.
A message confirming that you can
eject the floppy disk from the drive
appears.
4 Push the eject button of the
drive.
Notes
• Do not eject the floppy disk by pushing
the eject button before dragging the
floppy disk icon to the trash can as this
may result in data loss or damage.
• It is recommended to eject the floppy
disk from the drive before your
computer goes into sleep mode.
To remove the write-protection on a
floppy disk, push the write-protect tab as
illustrated below.
10
GB

Usage Notes
Usage with other USB devices
Because the drive is a high-powered
device (bus-powered; draws 500 mA of
current or less), it may malfunction if the
power from the computer is not stable.
Therefore, the drive operation is not
guaranteed in the following situations.
• When using the drive at the same time
as other high-powered USB devices
such as hard disks, CD-ROM drives,
scanners, and printers.
• When multiple drives are connected at
the same time.
• When using the drive at the same time
as a bus-powered hub.
Connection to the USB hub
• Connect the drive directly to your
computer’s USB port (root hub).
Operation is not guaranteed when you
connect the drive to other bus-powered
hubs such as keyboard hubs.
Overview
11
GB
Installation
Installing the
Windows XP
Device Driver
Windows XP does not require a device
driver to use the drive because the
device driver is already installed. It is
automatically found when you connect
the drive to your computer.
Installing the
Windows Me
Device Driver
This section explains how to install the
drive device driver on a system running
Windows Me.
To install the device driver
1 Insert USB Floppy Disk Drive
Device Driver CD-ROM into the
CD-ROM drive of your
computer.
2 Connect the USB connector of
the drive to the USB port of
your computer.
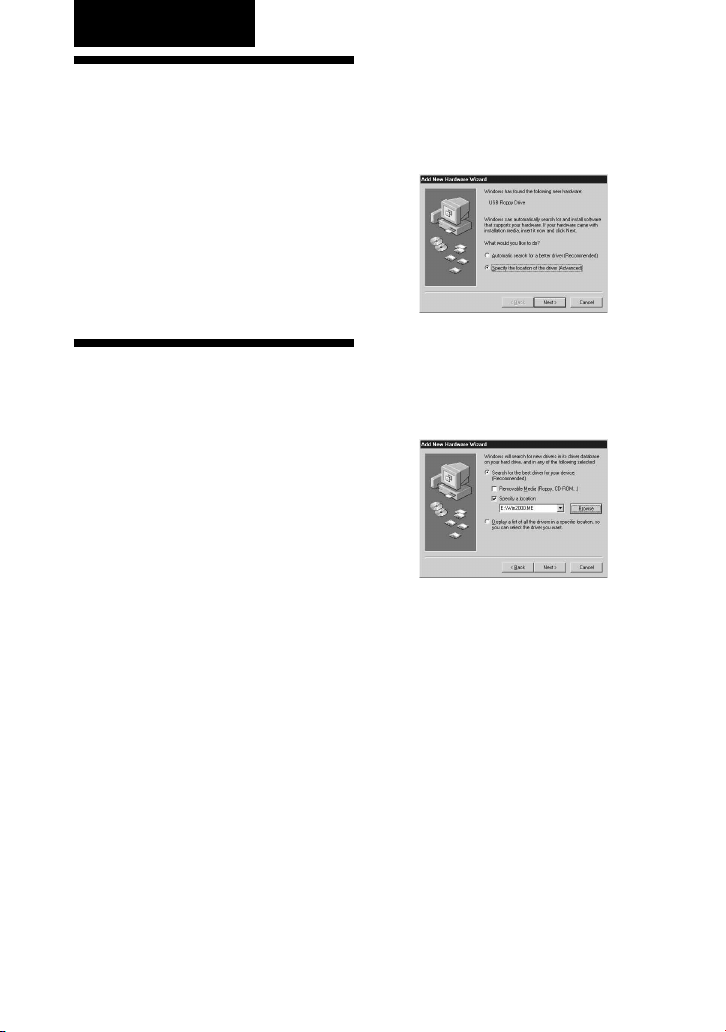
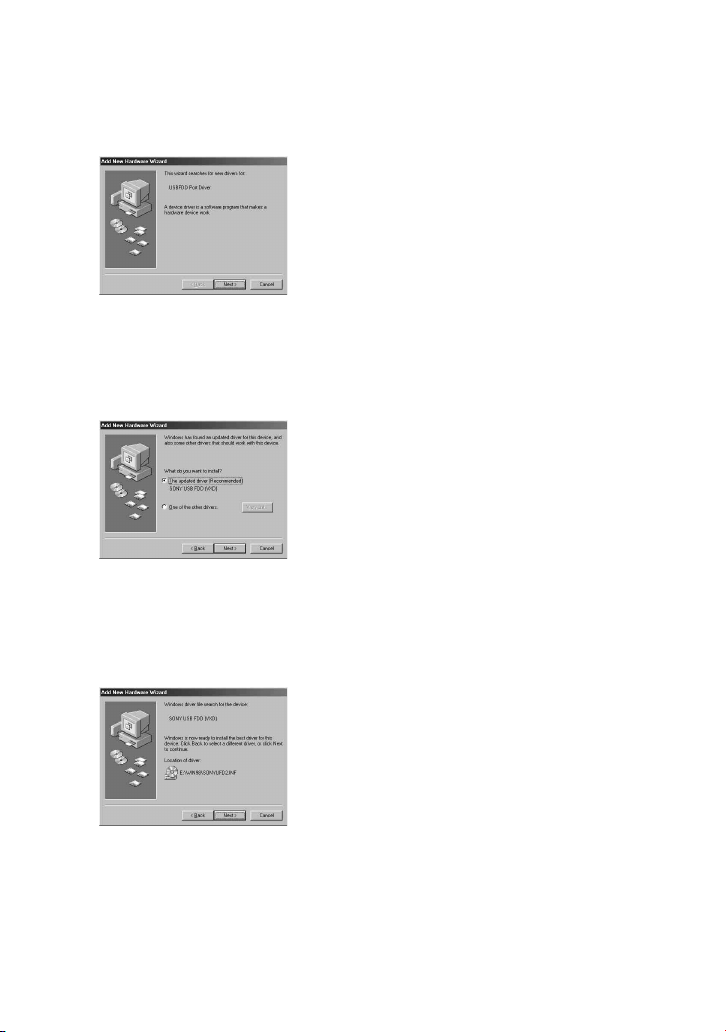
The Add New Hardware wizard starts and
the following dialog box appears.
3 Select “Specify the location of
the driver (Advanced)”, and
then click [Next].
The following dialog box appears.
4 Select the “Specify a location”
check box and type
“X:\Win2000.ME” (where X is
your CD-ROM drive letter) in
the box.
Note
Make sure that all the other check boxes
are clear.
12
GB
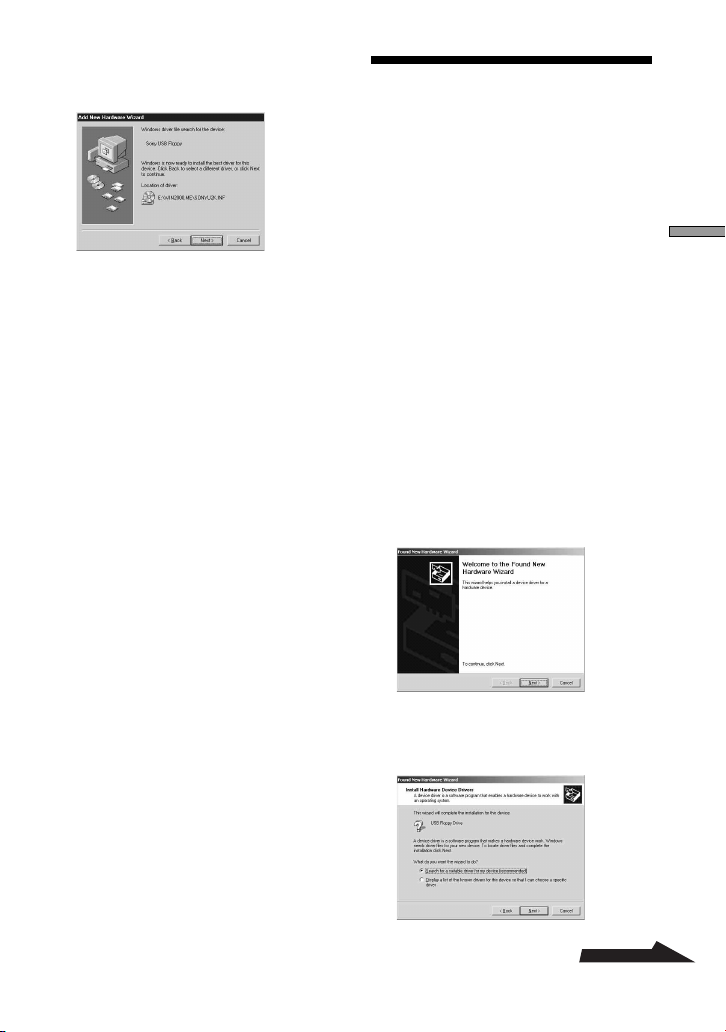
5 Click [Next].
The following dialog box appears.
6 Confirm the location of the
device driver.
Note
If the location is not
“X:\WIN2000.ME\SONYU2K.INF”
(where X is your CD-ROM drive letter),
click [Back] and return to step 3.
7 Click [Next] to install the device
driver.
8 When installation is complete,
click [Finish].
Installing the
Windows 2000
Device Driver
This section explains how to install the
drive device driver on a system running
Windows 2000.
To install the device driver
1 Insert drive Device Driver CD-
ROM into the CD-ROM drive of
your computer.
2 Connect the USB connector of
the drive to the USB port of
your computer.
The Found New Hardware wizard
starts and the following dialog box
appears.
Installation
3 Click [Next].
The following dialog box appears.
Continued
13
GB
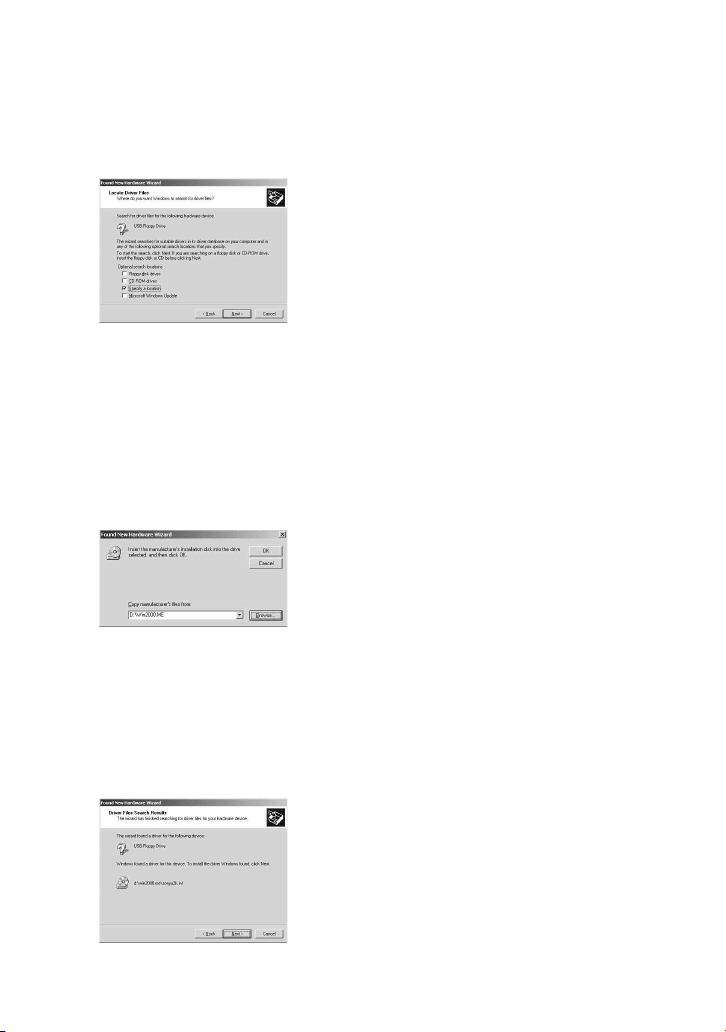
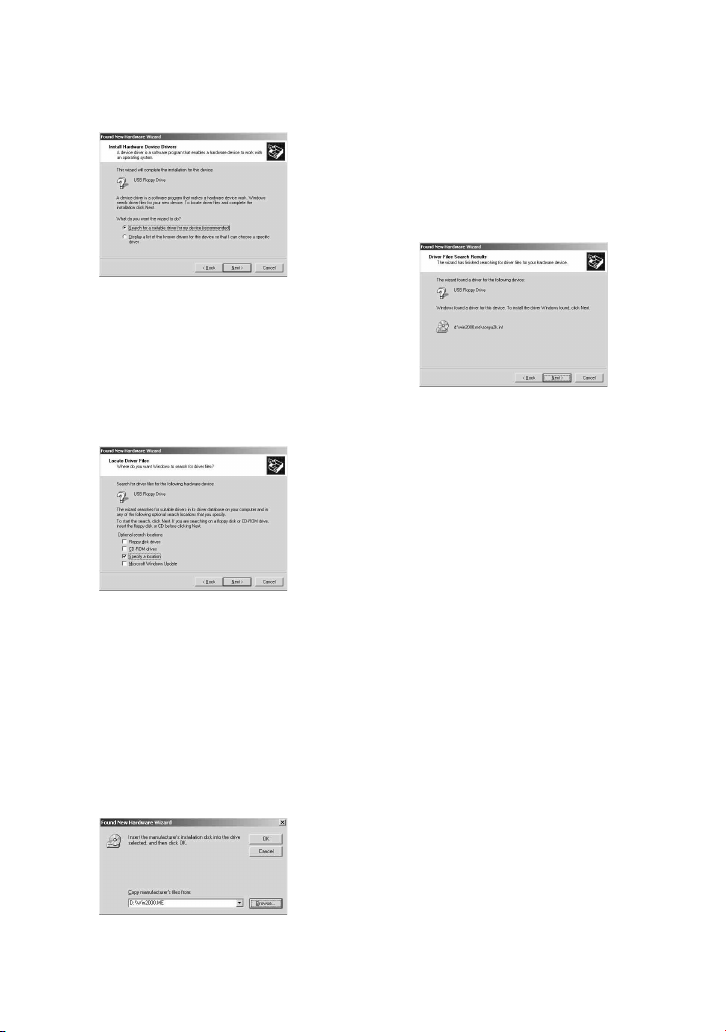
4 Select “Search for a suitable
driver for my device
(recommended)”, and then click
[Next].
The following dialog box appears.
5 Select the “Specify a location”
check box.
Note
Make sure that all the other check
boxes are clear.
6 Click [Next].
The following dialog box appears.
8 Confirm the location of the
device driver.
Note
If the driver location is not
“X:\win2000.me\sonyu2k.inf” (where X
is your CD-ROM drive letter), click
[Back] and return to step 4.
9 Click [Next] to install the device
driver.
10
When installation is complete,
click [Finish].
7 In the “Copy manufacturer's
files from” box, type
“X:\Win2000.ME” (where X is
your CD-ROM drive letter), and
then click [OK].
The following dialog box appears.
GB
14
Installing the
Windows 98
Device Driver
This section explains how to install the
drive device driver on a system running
Windows 98.
To install the device driver
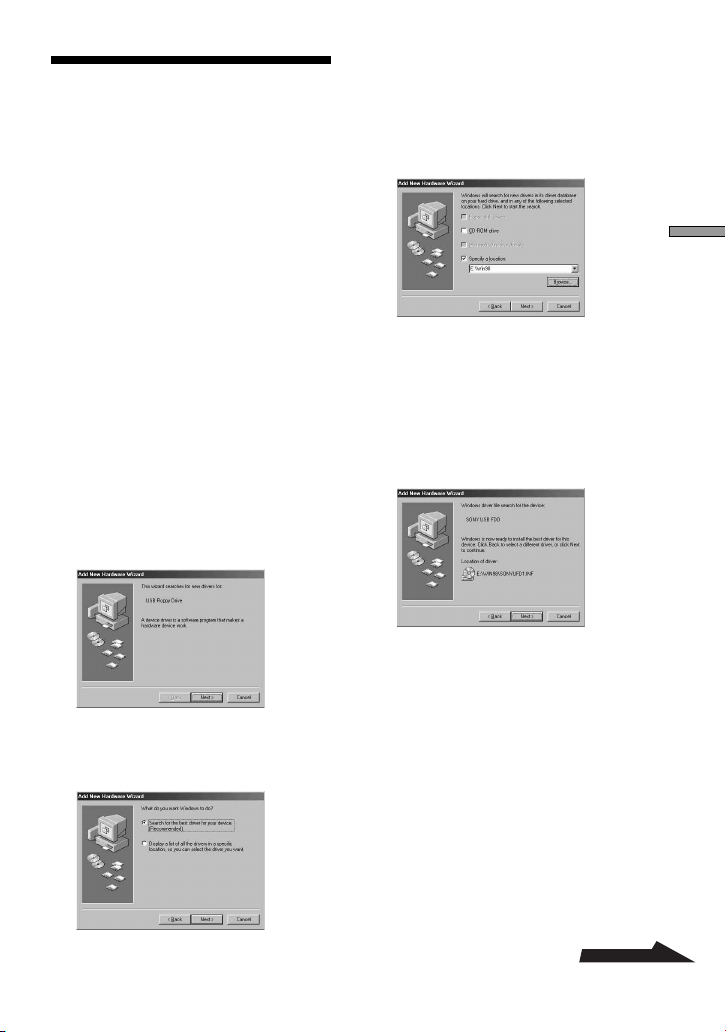
4 Select “Search for the best
drivers for your device
(Recommended)”, and then
click [Next].
The following dialog box appears.
Installation
1 Insert USB Floppy Disk Drive
Device Driver CD-ROM into the
CD-ROM drive of your
computer.
2 Connect the USB connector of
the drive to the USB port of
your computer.
The Add New Hardware wizard
starts and the following dialog box
appears.
3 Click [Next].
The following dialog box appears.
5 Select the “Specify a location”
check box and type “X:\Win98”
(where X is your CD-ROM drive
letter) in the box, and then click
[Next].
The following dialog box appears.
6 Confirm the location of the
device driver.
Note
If the location is not
“X:\WIN98\SONYUFD1.INF” (where X
is your CD-ROM drive letter), click
[Back] and return to step 4.
Continued
15
GB
7 Click [Next] to install the device
driver. When installation is
complete, click [Finish].
The following dialog box appears.
8 Click [Next], and then repeat
steps 4 and 5.
When you are done, the following
dialog box appears.
9 Select “The updated driver
(Recommended)”, and then
click [Next].
The following dialog box appears.
10
Confirm the location of the
device driver.
Note
If the location is not
“X:\WIN98\SONYUFD2.INF” (where X
is your CD-ROM drive letter), click
[Back] and return to step 9.
11
Click [Next] to install the device
driver.
12
When installation is complete,
click [Finish].
16
GB

Appendix
Installing the Mac
OS 9.x/Mac OS X
Device Driver
Mac OS 9 or later, and Mac OS X 10.1
or later versions do not require a device
driver to use the drive.
Notes
• With Mac OS X, format floppy disks with
the “Erase” command of the Disk Utility
and select the “Mac OS Standard” format.
• Mac OS X cannot format unformatted
floppy disks.
Installing the Mac
OS 8.6 Device
Driver
Mac OS 8.6 needs USB Mass Storage
Support 1.3.5 to use the drive.
Visit the Apple Web site at the address
below to download USB Mass Storage
Support 1.3.5 and installation
instructions.
• http://docs.info.apple.com/
article.html?artnum=60394
Note
If you do not have an Apple ID, you must
create an account to access the USB Mass
Storage Support 1.3.5 article page. Follow the
instructions on the screen to create a new
account. After your account is created, the
USB Mass Storage Support 1.3.5 article page
opens automatically.
Specifications
Power requirements
+5 V DC (powered by the USB port)
Power consumption
0.5 A (2.5 W)
Operating temperature
5 to 35ºC (41 to 95ºF)
Operating humidity
20 to 80% RH (no condensation)
Storage environments
–20 to 55ºC (–4 to 131ºF) at 15 to 90%
RH (no condensation)
Supported floppy disks
3.5" micro floppy disk (2HD and 2DD)
Support formats
• Windows
– 2DD (720 KB)
– 2HD (1.44 MB)
• Macintosh
– 2DD (720 KB)
– 2HD (1.44 MB)
– 2HD (Mac standard format)
Interface
USB
Data transfer rate
2HD: maximum 1 Mbps
2DD: maximum 500 kbps
Dimensions (W×D×H)
Approx. 105 × 142 × 19.5 mm (horizontal)
(Approx. 4.1 × 5.6 × 0.8 in.)
(excluding cable, stand, and protrusions)
Weight
Approx. 315 g (without stand)
(Approx. 11.1 oz.)
Approx. 325 g (with stand)
(Approx. 11.5 oz.)
Appendix
17
GB

Technical Support
Local technical support service
is only available in the following
sales regions.
●For customers in the USA
(Sony Electronics Inc.)
Monday to Saturday 8:00 a.m. - 8:00 p.m.
CT
• Toll free: 1-800-588-3847
• Free telephone support is offered for
90 days after your first call. USA
technical support only: Web-based
technical support is free and available
24 hours a day, 7 days a week.
• Web site:
http://sony.storagesupport.com/
●For customers in Europe
Refer to “Customer Support and
Service” of the European guarantee
certificate.
●For customers in Australia
and New Zealand
(Sony Australia Limited)
Monday to Friday 8:30 a.m. - 6:00
p.m. EST
• Toll free: (Australia) 1300-13-7669
(NZ) 0800-7669-7895
• Web site:
www.sony.com.au/support.asp
• E-mail:
cic-customerissues@ap.sony.com
●For customers in Hong Kong
(Sony Corporation of Hong
Kong Service Center)
Monday to Friday 9:00 a.m. - 6:00 p.m.
• Hotline: 28335129
• Product information Web site:
http://www.sony.com.hk/
Electronics/cp
GB
18
●For customers in China
(Sony Corporation of Hong
Kong, China Customer Call
Center)
Monday to Friday 8:30 a.m. - 7:00 p.m.,
Saturday 9:00 a.m. - 4:30 p.m.
• Toll free: 86-800-810-2228
• Product information Web site:
http://www.sony.com.cn/
electronics/edmh/home.htm
• E-mail:
EDMH-shanghai@sony.com.cn
●For customers in Korea
(Sony Korea Corp.)
Monday to Friday 10:00 a.m. - 7:00 p.m.
CS center of Sony Korea
Tel.: 080-777-2000
●For customers in Taiwan
(Sony Taiwan Limited)
Monday to Friday 10:00 a.m. - 5:00 p.m.
Computer Peripheral Department
Tel.: 02-2522-7920
●For customers in Singapore,
Malaysia, Thailand, the
Philippines, Indonesia,
Vietnam, South Africa, and
India
(Sony Electronics Singapore
Pte. Ltd.)
Monday to Friday 9:00 a.m. - 5:00 p.m.
Tel.: (65) 6544 7393
●For customers in Brasil
(Sony Brasil Ltda.)
• Toll free: 0800-888-4444
• Web site:
http://www.sony.com.br/corporate
• E-mail:
sonysac@ssp.br.sony.com
• Phone:
(0XX11) 3677-1080

End User License Agreement
IMPORTANT NOTICE
The following “END USER LICENSE
AGREEMENT” applies to the USB Floppy
Disk Drive Device Driver software provided by
Sony. Please read the following “END USER
LICENSE AGREEMENT” before installing.
By installing the device driver software, you
agree to the “END USER LICENSE
AGREEMENT”.
END USER LICENSE AGREEMENT
This is a legal agreement between you
(hereafter referred to as the User) and Sony
Corporation (hereafter referred to as Sony)
pertaining to the right to use the USB Floppy
Disk Drive Device Driver software (hereafter
referred to as the PROGRAM). Using the
PROGRAM indicates your acceptance of these
terms and conclusion of the Agreement
between the User and Sony.
1 Copyright and all other rights relating to the
PROGRAM and documents accompanying
the PROGRAM are owned by Sony or the
original rightful person or organization
(hereafter referred to as the original rightful
person) granting Sony the right to use the
PROGRAM. The User is granted no rights
other than those specified in this agreement.
2 Sony grants the User the non-exclusive,
indivisible and non-transferable right to use
the PROGRAM for the purpose of using the
Sony product “USB floppy disk drive” for
which the PROGRAM designates.
3 The User may not transfer the Right of Use
described above to any third party nor allow
for any third party to use the PROGRAM
unless the User obtains the advance written
permission of Sony.
4 The User may not export or transport the
PROGRAM or documents accompanying the
PROGRAM from the country where the User
installed the PROGRAM to any other
country.
5 The User may not (i) update, add to, or
modify nor (ii) de-assemble or de-compile
the PROGRAM either in whole or in part.
6 THE PROGRAM IS PROVIDED “AS IS”
WITHOUT EXPRESS OR IMPLIED
WARRANTIES, INCLUDING
WARRANTIES OF MERCHANTABILITY
AND FITNESS FOR A PARTICULAR
PURPOSE OR NON-DEFECTIVENESS.
7 If any dispute relating to infringement of
copyright, patent, or other intangible property
rights arises between the User and a third
party as a consequence of use of the
PROGRAM, the User shall settle the dispute
at the User’s own expense, and shall make no
claim against Sony or the original rightful
person.
8 Sony may terminate your license upon notice
for failure to comply with any of these
Terms. Any such termination shall not affect
any payments, any compensation for damage.
Upon termination, you must immediately
destroy the Software together with all copies
in any form.
9 This Agreement has several non-English
language versions for the reference purpose
only. In the event of any discrepancy
between the English language version and
any other language version, the English
language version shall prevail.
Technical Support
19
GB
Avant d’utiliser le lecteur pour la
première fois, vous devez installer
le pilote sur l’ordinateur.
Avant de raccorder le lecteur, reportezvous à la page 10 pour plus de détails
sur la procédure d’installation du pilote.
Consultez également l’accord de
licence de l’utilisateur final page 19.
Traitement des
appareils électriques
et électroniques en fin
de vie (Applicable
dans les pays de
l’Union Européenne et
aux autres pays
européens disposant de systèmes
de collecte sélective)
Ce symbole, apposé sur le produit ou sur
son emballage, indique que ce produit ne
doit pas être traité avec les déchets
ménagers. Il doit être remis à un point de
collecte approprié pour le recyclage des
équipements électriques et électroniques.
En s’assurant que ce produit est bien mis
au rebut de manière appropriée, vous
aiderez à prévenir les conséquences
négatives potentielles pour
l’environnement et la santé humaine. Le
recyclage des matériaux aidera à
préserver les ressources naturelles. Pour
toute information supplémentaire au sujet
du recyclage de ce produit, vous pouvez
contacter votre municipalité, votre
déchetterie ou le magasin où vous avez
acheté le produit.
Table des
matières
Aperçu .................................. 3
Aperçu ................................................. 3
Contenu de la boîte .............................. 3
Conditions système.............................. 4
Disquettes acceptées ............................ 4
Nomenclature ...................................... 5
Installation et retrait du panneau de
couleur ................................................. 5
Position du lecteur de disquette USB ...
Installation et retrait du support du
lecteur .................................................. 7
Utilisation du lecteur de
disquette USB ...................................... 8
Remarques sur l’utilisation .................. 9
Installation ......................... 10
Installation du pilote de périphérique
Windows XP ...................................... 10
Installation du pilote de périphérique
Windows Me ..................................... 10
Installation du pilote de périphérique
Windows 2000 ................................... 11
Installation du pilote de périphérique
Windows 98 ....................................... 13
Installation du pilote de périphérique
Mac OS 9.x/Mac OS X ...................... 15
Installation du pilote de périphérique
Mac OS 8.6 ........................................ 15
6
2
Appendice .......................... 16
Spécifications .................................... 16
Support technique ............ 17
Accord de licence utilisateur ..
FR
19
Aperçu
Aperçu
Aperçu
Contenu de la
Le MPF88E-UA (appelé par la suite
« lecteur ») présente les caractéristiques
suivantes:
• Vitesse de lecture et d’écriture 2×.
• Fourni avec deux panneaux
interchangeables de couleur Blanc
Perles et Bleu Saphir.
• Possibilité de l’utiliser en position
verticale à l’aide du support fourni.
• Compatible avec les systèmes
Windows et Macintosh.
• Doté d’un câble USB pour faciliter la
connexion.
• Aucune source externe d’alimentation
n’est nécessaire puisque le lecteur est
alimenté par le port USB de votre
ordinateur (c.-à-d. un périphérique
alimenté par bus USB).
• Compact et léger pour faciliter le
transport.
boîte
La boîte du lecteur contient les articles
suivants:
• Lecteur de disquette USB
MPF88E-UA
• Panneaux de couleur interchangeables
– Blanc Perles
– Bleu Saphir
• Support
• CD-ROM du pilote de périphérique
pour le lecteur de disquette USB
• Mode d’emploi
• Carte de garantie
FR
3
FR

Conditions
Disquettes
système
Le lecteur requiert la configuration de
système minimum suivante:
• Ordinateur personnel compatible PC/
AT
– Windows 98 SE, Windows 2000
Professional, Windows Me ou
Windows XP préinstallés
– Port USB
– Lecteur CD-ROM (ou périphérique
pouvant lire les CD-ROM)
• Système Macintosh
– Power Mac G4, G4 Cube, iMac,
iBook, PowerBook G4
– Mac OS 8.6, Mac OS 9 ou version
plus récente ou Mac OS X 10.1 ou
version plus récente installée par
défaut
Remarques
• Mac OS X 10.0 ne prend pas en
charge ce lecteur.
• Sous Mac OS X, formatez les
disquettes à l’aide de la commande
« Effacer » de l’utilitaire de disque et
sélectionnez le format « Mac OS
Standard ».
• Mac OS X ne peut formater les
disquettes non formatées.
acceptées
Le lecteur prend en charge les disquettes
suivantes:
• Windows
– 2DD (720 KB)
– 2HD (1,44 MB)
• Macintosh
– 2DD (720 KB)
– 2HD (1,44 MB)
– 2HD (Format standard Mac)
4
FR
Nomenclature
Aperçu
Installation et
Cette section présente les pièces et les
fonctions du lecteur.
1
2
3
1Indicateur Status
Indique l’état du lecteur. Il s’allume lors
de l’accès à la disquette dans le lecteur.
2Bouton Eject
Appuyer sur ce bouton pour éjecter une
disquette du lecteur.
3Fiche USB de type A
Permet de raccorder le lecteur à votre
ordinateur.
retrait du panneau
de couleur
Pour installer le panneau de
couleur
1 Alignez le panneau avec l’avant
du lecteur de sorte que les
crochets du panneau
s’emboîtent parfaitement dans
les encoches du lecteur.
Remarque
Vérifiez que le panneau s’emboîte
parfaitement sur le lecteur.
Encoche
Crochet
Avant du lecteur
m
Socle du lecteur
Vérifiez que le panneau s’emboîte
parfaitement sur le lecteur.
à suivre
5
FR

2 Vérifiez que les encoches
centrales du panneau sont
alignées avec les crochets
centraux du lecteur puis
abaissez le panneau vers
l’arrière du lecteur. Lorsque le
panneau s’enclenche en place,
il est fixé.
Remarque
Vérifiez que le panneau s’enclenche en
place. Si ce n’est pas le cas, vous risquez
de ne plus pouvoir l’enlever.
Alignez les encoches centrales du
panneau avec les crochets du lecteur.
Pour retirer le panneau de
couleur
1 Tenez le lecteur comme illustré,
glissez un ongle dans l’une des
rainures à l’arrière du lecteur
puis relâchez l’un des crochets
du lecteur. Recommencez cette
procédure pour l’autre crochet.
Arrière du lecteur
Glissez un ongle
dans l’encoche.
2 Libérez les crochets centraux
du lecteur puis faites
doucement glisser le panneau
en l’éloignant du lecteur.
Faites doucement
glisser le panneau
et retirez-le.
Libérez les
crochets centraux.
Position du
lecteur de
disquette USB
Le lecteur est conçu pour être utilisé en
position horizontale et verticale. Si vous
souhaitez l’utiliser en position verticale,
vous devez installer le support fourni
avec le lecteur. Pour de plus amples
informations, reportez-vous à la section
« Installation et retrait du support du
lecteur », à la page 7.
Avertissement
• Lorsque vous utilisez le lecteur en position
verticale, veillez à placer le lecteur sur une
surface horizontale stable. Sinon le
lecteur risque de tomber, ce qui peut
l’endommager, provoquer des
blessures et/ou perdre des données
sur la disquette.
• N’utilisez pas le lecteur dans une position
autres que verticale et horizontale.
6
FR

Installation et
retrait du support
du lecteur
Cette section décrit comment installer et
retirer le support du lecteur lorsque vous
utilisez le lecteur en position verticale.
Pour installer le support
1 Tout en tenant le lecteur en
position verticale, insérez le
crochet du support dans
l’encoche située à l’arrière du
lecteur.
2 Levez le support vers le lecteur
jusqu’à ce que le support
s’enclenche dans les encoches
situées sous le lecteur.
Pour retirer le support
1 Tout en tenant le lecteur en
position verticale, poussez vers
le bas l’avant du support, en
prenant soin de ne pas le faire
tomber.
2 Retirez le crochet du support de
l’encoche située à l’arrière du
lecteur.
Aperçu
à suivre
7
FR
Utilisation du
lecteur de
disquette USB
Cette section explique comment utiliser
le lecteur.
Avec un système Windows
1 Tenir une disquette avec
l’étiquette face vers le haut et la
pousser dans le lecteur jusqu’à
entendre un clic.
Avec un système Macintosh
1 Tenir une disquette avec
l’étiquette face vers le haut et la
pousser dans le lecteur jusqu’à
entendre un clic.
Une icône de disquette apparaît dans
le bureau.
Face de l’étiquette
Remarque
Lorsque vous utilisez le lecteur
verticalement, insérez la disquette de sorte
que la face de l’étiquette soit orientée
dans la même direction que le panneau de
couleur.
Panneau
de couleur
2 Effectuer les opérations
souhaitées avec la disquette à
partir de l’ordinateur.
3 Pour éjecter la disquette,
attendre que l’indicateur Status
s’éteigne, puis appuyer sur le
bouton Eject.
Remarque
Ne pas éjecter la disquette du lecteur alors
que l’indicateur Status est allumé au
risque d’endommager ou de perdre des
données.
FR
8
Face de l’étiquette
Remarque
Lorsque vous utilisez le lecteur
verticalement, insérez la disquette de sorte
que la face de l’étiquette soit orientée
dans la même direction que le panneau de
couleur.
Panneau de
couleur
2 Effectuer les opérations
souhaitées avec la disquette à
partir de l’ordinateur.
3 Pour éjecter la disquette,
glisser l’icône de disquette dans
la corbeille.
Un message apparaît confirmant la
possibilité d’éjecter la disquette du
lecteur.
4 Appuyer sur le bouton Eject du
lecteur.
Remarques
• Ne pas essayer d’éjecter la disquette en
appuyant sur le bouton Eject sans avoir
au préalable glissé l’icône de disquette
dans la corbeille car il y a un risque de
perte de données ou de dommages.
• Il est recommandé d’éjecter la disquette
du lecteur avant que l’ordinateur se
mette en mode veille.
Pour protéger une disquette
contre l’écriture
Pour éviter d’écrire sur des données déjà
présentes dans une disquette, il est
possible de protéger cette dernière contre
l’écriture. Lorsque la disquette est
protégée contre l’écriture, il n’est pas
possible non plus d’enregistrer les
données.
Pour protéger la disquette contre
l’écriture, pousser la languette de
protection tel qu’illustré ci-dessous.
Aperçu
Remarques sur
l’utilisation
Utilisation avec d’autres
périphériques USB
Etant donné que le lecteur est un
périphérique à grande puissance
(alimenté par bus, consommation
maximale de 500 mA), il peut mal
fonctionner si l’alimentation provenant
de l’ordinateur n’est pas stable.
Par conséquent, le fonctionnement du
lecteur n’est pas garanti dans les
situations suivantes :
• Lorsque vous utilisez le lecteur en
même temps que d’autres
périphériques USB à grande puissance
tels que disques durs, lecteurs de
CD-ROM, scanners et imprimantes.
• Lorsque plusieurs lecteurs sont
connectés en même temps.
• Lorsque le lecteur est utilisé en même
temps qu’un concentrateur alimenté
par bus.
Pour retirer la protection contre
l’écriture de la disquette, pousser la
languette tel qu’illustré ci-dessous.
Connexion à un concentrateur
USB
• Connectez le lecteur directement au
port USB de votre ordinateur
(concentrateur racine). Le bon
fonctionnement du lecteur n’est pas
garanti si vous le branchez via des
concentrateurs alimentés par bus, tels
que des concentrateurs sur clavier.
9
FR

Installation
Installation du
pilote de
périphérique
Windows XP
Un pilote de périphérique n’est pas
nécessaire avec Windows XP pour
pouvoir utiliser le lecteur car le pilote de
périphérique est déjà installé. Il est
automatiquement détecté lorsque le
lecteur est raccordé à l’ordinateur.
Installation du
pilote de
périphérique
Windows Me
Cette section explique comment installer
le pilote de périphérique du lecteur sur
un système fonctionnant avec un
système d’exploitation Windows Me.
Pour installer le pilote de
périphérique
1 Insérer le CD-ROM du pilote
pour le lecteur de disquette
USB dans le lecteur CD-ROM
de l’ordinateur.
2 Branchez le connecteur USB
du lecteur au port USB de votre
ordinateur.
Le message d’invite « Add New
Hardware » démarre et la boîte de
dialogue suivante apparaît.
3 Sélectionner « Specify the
location of the driver
(Advanced) », puis cliquer sur
[Next].
La boîte de dialogue suivante apparaît.
4 Cocher la case « Specify a
location » et taper
« X:\Win2000.ME » (X étant la
lettre correspondante au lecteur
CD-ROM) dans la case.
Remarque
Vérifier que toutes les autres cases à
cocher sont vierges.
10
FR

5 Cliquer sur [Next].
La boîte de dialogue suivante
apparaît.
Installation du
pilote de
périphérique
Windows 2000
6 Confirmer l’emplacement du
pilote de périphérique.
Remarque
Si l’emplacement n’est pas
« X:\WIN2000.ME\SONYU2K.INF » ( X
étant la lettre correspondante au lecteur
CD-ROM), cliquer sur [Back] et revenir à
l’étape 3.
7 Cliquer sur [Next] pour installer
le pilote de périphérique.
8 Lorsque l’installation est
terminée, cliquer sur [Finish].
Cette section explique comment installer
le pilote de périphérique du lecteur sur
un système fonctionnant avec un
système d’exploitation Windows 2000.
Pour installer le pilote de
périphérique
1 Insérer le CD-ROM du pilote
pour le lecteur de disquette
USB dans le lecteur CD-ROM
de l’ordinateur.
2 Branchez le connecteur USB
du lecteur au port USB de votre
ordinateur.
Le message d’invite « Add New
Hardware » démarre et la boîte de
dialogue suivante apparaît.
Installation
à suivre
11
FR
3 Cliquer sur [Next].
La boîte de dialogue suivante
apparaît.
4 Sélectionner « Search for a
suitable driver for my device
(recommended) » et cliquer sur
[Next].
La boîte de dialogue suivante
apparaît.
5 Cocher la case « Specify a
location ».
Remarque
Vérifier que toutes les autres cases à
cocher sont vides.
7 Dans la case « Copy
manufacturer’s files from »,
taper « X:\Win2000.ME » (X
étant la lettre correspondante
au lecteur CD-ROM), puis
cliquer sur [OK].
La boîte de dialogue suivante
apparaît.
8 Confirmer l’emplacement du
pilote de périphérique.
Remarque
Si l’emplacement du pilote n’est pas
« X:\win2000.me\sonyu2k.inf » (X étant
la lettre correspondante au lecteur CDROM), cliquer sur [Back] et revenir à
l’étape 4.
9 Cliquer sur [Next] pour installer
le pilote de périphérique.
10
Lorsque l’installation est
terminée, cliquer sur [Finish].
6 Cliquer sur [Next].
La boîte de dialogue suivante
apparaît.
FR
12
 Loading...