

Page 1

4-668-815-11(1)
CD-RW/DVD-ROM
Drive
User’s Guide
MPD-AP20U
2002 Sony Corporation
Page 2

Page 3
Safety Regulations
WARNING
You are cautioned that any changes or modifications not expressly approved in this manual could void
your authority to operate this equipment.
To prevent fire or shock hazard, do not expose the unit to rain or moisture.
To avoid electrical shock, do not open the cabinet. Refer servicing to qualified personnel only.
Caution
As the laser beam in this MPD-AP20U is harmful to the eyes, do not attempt to disassemble the cabinet.
Refer servicing to qualified personnel only.
The use of optical instruments with this product will increase eye hazard.
The use of controls or adjustments or performance of procedures other than those specified herein may
result in hazardous radiation exposure.
This label is located inside the cover and on the bottom of the drive.
Dieses Etikett befindet sich auf der CD-Schublade und auf der Innenseite der unteren Abdeckung.
DANGER
VISIBLE AND INVISIBLE LASER RADIATION WHEN OPEN.
AVOID DIRECT EXPOSURE TO BEAM
VORSICHT
SICHTBARE UND UNSICHTBARE LASERSTRAHLUNG. WENN ABDECKUNG
GEOFFNET NICHT DEM STRAHL AUSSETZEN.
The MPD-AP20U is classified as a CLASS 1 LASER PRODUCT.
The CLASS 1 LASER PRODUCT label is located on the bottom cover.
Bei diesem MPD-AP20U handelt es sich um ein Laser-Produkt der Klasse 1.
Das Etikett mit der Aufschrift LASER KLASSE 1 PRODUKT befindet sich auf der Unterseite des
Gehäuses.
CLASS 1
LASER PRODUCT
LASER KLASSE 1
PRODUKT
LUOKAN 1 LASERLAITE
KLASS 1 LASER APPARAT
DANGER VISIBLE AND INVISIBLE LASER RADIATION WHEN OPEN.
AVOID DIRECT EXPOSURE TO BEAM.
DANGER RADIATIONS VISIBLES ET INVISIBLES DU LASER EN CAS D’OUVERTURE.
EVITER TOUTE EXPOSITION DIRECTE AU FAISCEAU.
VORSICHT SICHTBARE UND UNSICHTBARE LASERSTRAHLUNG, WENN ABDECKUNG
GEÖFFNET. NICHT DEM STRAHL AUSSETZEN.
ADVARSEL SYNLIG OG USYNLIG LASERSTRÅLING VED ÅBNING, UNDGÅ UDSÆTTELSE
FOR STRÅLING.
ADVARSEL SYNLIG OG USYNLIG LASERSTRÅLING NÅR DEKSEL ÅPNES. UNNGÅ
EKSPONERING FOR STRÅLEN.
VARNING SYNLIG OCH OSYNLIG LASERSTRÅLNING NÄR DENNA DEL ÄR ÖPPNAD.
STRÅLEN ÄR FARLIG.
VARO! NÄKYVÄÄ JA NÄKYMÄTÖN AVATTAESSA OLET ALTTIINA
LASERSÄTEILYLLE, ÄLÄ KATSO SÄTEESEN.
3
Page 4
FCC Compliance
This equipment has been tested and found to comply with the limits for a Class B digital device, pursuant
to Part 15 of the FCC Rules. These limits are designed to provide reasonable protection against harmful
interference in a residential installation. This equipment generates, uses, and can radiate radio frequency
energy and, if not installed and used in accordance with the instructions, may cause harmful interference to
radio communications. However, there is no guarantee that interference will not occur in a particular
installation. If this equipment does cause harmful interference to radio or television reception, which can
be determined by turning the equipment off and on, the user is encouraged to try to correct the interference
by one or more of the following measures:
• Reorient or relocate the receiving antenna.
• Increase the separation between the equipment and receiver.
• Connect the equipment into an outlet on a circuit different from that to which the receiver is connected.
• Consult the dealer or an experienced radio/TV technician for help.
Note
If you have any questions about this product, you may call the telephone number listed in the “Product and
Support Information” section. The telephone number below is not for customer service but only for official
purposes.
Declaration of Conformity
Trade Name: SONY
Model No.: MPD-AP20U
Responsible Party: Sony Electronics Inc.
Address: 680 Kinderkamack Road, Oradell, NJ 07649 USA
Telephone No.: 201-930-6972
This device complies with Part 15 of the FCC Rules. Operation is subject to the following two
conditions:
(1) This device may not cause harmful interference, and
(2) This device must accept any interference received, including interference that may cause undesired
operation.
4
Page 5
CE Sicherheitsbestimmungen
Diese Ausrüstung erfüllt die Europäischen EMC-Bestimmungen für die Verwendung in folgender /
folgenden Umgebung(en):
• Wohngegenden
• Gewerbegebiete
• Leichtindustriegebiete
(Diese Ausführung erfüllt die Bestimmungen der Norm EN55022, Klasse B.)
Caution
The mains plug on this equipment must be used to disconnect mains power.
Please ensure that the socket outlet is installed near the equipment and shall be easily accessible.
Achtung
Zur Trennung vom Netz ist der Netzsecker aus der Steckdose zu ziehen, welche sich in der Nähe des
Gerätes befinden muß und leicht zugänlich sein soll.
For the Customers in the USA and Canada
RECYCLING LITHIUM-ION BATTERIES
Lithium-Ion batteries are recyclable. You can help preserve our environment by
returning your used rechargeable batteries to the collection and recycling location
nearest you.
For more information regarding recycling of rechargeable batteries, call toll free
1-800-822-8837, or visit http://www.rbrc.org/.
Caution
Do not handle damaged or leaking Lithium-Ion batteries.
Pour les utilisateurs aux Etats-Unis et au Canada
RECYCLAGE DES ACCUMULATEURS AUX IONS DE LITHIUM
Les accumulateurs aux ions de lithium sont recyclables.
Vous pouvez contribuer à préserver l’environnement en rapportant les piles usées dans
un point de collection et recyclage le plus proche.
Pour plus d’informations sur le recyclage des accumulateurs, téléphonez le numéro
gratuit 1-800-822-8837 (Etats-Units et Canada uniquement), ou visitez
http://www.rbrc.org/.
Avertissement
Ne pas utiliser des accumulateurs aux ions de lithium qui sont endommagés ou qui fuient.
Voor de Klanten in Nederland
• Dit apparaat bevat een vast ingebouwde batterij die niet vervangen hoeft te worden
tijdens de levensduur van het apparaat.
• Raadpleeg uw leverancier indien de batterij toch vervangen moet worden. De batterij
mag alleen vervangen worden door vakbekwaam servicepersoneel.
• Gooi de batterij niet weg maar lever deze in als klein chemisch afval (KCA).
• Lever het apparaat aan het einde van de levensduur in voor recycling, de batterij zal
dan op correcte wijze verwerkt worden.
5
Page 6
• Power-Burn and are trademarks of Sony Corporation.
•“Memory Stick” and are trademarks of Sony Corporation.
• Microsoft, MS, MS-DOS and Windows are registered trademarks of Microsoft
Corporation.
• Macintosh and Mac OS are registered trademarks of Apple Computer Inc.
• Other system and product names used herein are registered trademarks or
trademarks of their respective manufacturers, although the™ and ®marks are not
used in the text.
Before using this device, be sure to read the end-user license agreements for the
software provided with your computer.
❑ Our product guarantee is valid only when the supplied accessories (including
software) are used in the specified or recommended system environment, in
accordance with this User’s Guide, and applies only to this portable
CD-RW/DVD-ROM drive. Our customer service and user support apply
only under these product guarantee conditions.
❑ Please note that we cannot accept responsibility for failure of the computer
or other devices, incompatibility with special hardware, operating problems
caused by improper installation of software, loss of data, discs or other
accidental or incidental damage that might occur when using this product.
❑ The guarantee and user support for this product are valid only within the
countries or sales regions specified on the warranty card.
❑ Copyright laws prohibit the copying of all or part of the supplied software
and User’s Guide, or loaning the software, without obtaining permission of
the copyright holder.
❑ We cannot accept responsibility for any direct or indirect financial damage
or loss of profit that might occur when using the supplied software.
❑ The supplied software can only be used with this product.
❑ Specifications of the supplied software may be changed without notice in the
interest of product improvement.
Please Record Responsibly
Before copying anything onto a CD-R or CD-RW disc, or “Memory Stick”,
please be sure you are not violating copyright laws. Most software companies
allow you to make a backup or archive copy of software. Check your
software’s license agreement for details.
6
Page 7

Table of Contents
Safety Regulations ............................................................... 3
Introduction
Features ...............................................................................10
System Requirements ........................................................12
Name and Function of Parts ..............................................13
Drive ....................................................................................13
Cradle .................................................................................. 15
Preparation
Using the Drive When Connected to the Power Outlet ...16
Connecting the drive............................................................ 16
Using the Drive on the Cradle ........................................... 17
Removing the drive from the cradle ....................................19
Using the Drive on Internal Power ....................................20
Charging the internal battery ...............................................20
Basic Operation
Using Discs .........................................................................22
Inserting a disc into the drive .............................................. 22
Ejecting a disc from the drive .............................................. 23
Accessing disc data from your computer ............................ 24
Creating CDs (Using the Provided Software)................... 25
Watching DVDs (Using the Provided Software) ...............25
Using “Memory Stick” ........................................................26
Inserting a “Memory Stick” into the drive .......................... 26
Ejecting a “Memory Stick” from the drive.......................... 26
Accessing “Memory Stick” data from your computer ........ 27
Listening to Music (Using the Drive as a CD Player) ...... 28
Remote control part names and functions ........................... 28
Starting playback and adjusting the volume ........................ 30
Using the remote control ..................................................... 32
Remote control display ........................................................ 33
Compatible discs and files ................................................... 33
Continued
7
Page 8

Advanced Features
Power ...................................................................................34
Remaining charge indicator................................................. 34
Inserting batteries into the cradle ........................................ 35
Battery life ...........................................................................37
Listening to Music Files .....................................................38
Selecting folders and files.................................................... 38
Folder organization and playback order ..............................39
Advanced Playback ............................................................ 40
Loop playback (Repeat) ...................................................... 41
Listening to all the files in a folder (Folder playback) ........ 41
Listening to one track only (Single playback)..................... 42
Listening to all the track in random order
(Shuffle playback).......................................................... 42
Listening to all the track in a folder in random order
(Folder shuffle) .............................................................. 42
Listening to selected tracks in the desired order (Program) .. 43
Listening to a playlist .......................................................... 45
Advanced Playback Functions ..........................................46
Displaying track information ............................................... 46
Adjusting the tone (SOUND function) ................................ 47
Limiting the volume (AVLS function) ................................ 48
Preventing accidental operation (HOLD function) ............. 48
Miscellaneous
CDs and DVDs.....................................................................49
Compatible discs ................................................................. 49
CD-R and CD-RW discs...................................................... 50
DVD-Video playback and region codes (region numbers) .. 51
“Memory Stick” ...................................................................51
Music Files .......................................................................... 52
Compatible music files ........................................................52
Playlist files ......................................................................... 53
MP3 file ID3 tags ................................................................ 53
Hi-Speed USB......................................................................54
Removing the Device Driver ..............................................54
Usage Notes ........................................................................ 55
Troubleshooting .................................................................. 58
8
Page 9

Warranty Card & After Sales Service ................................63
Warranty card ...................................................................... 63
After sales service................................................................ 63
Specifications ..................................................................... 64
Product and Support Information .....................................66
Sony global sites information ..............................................66
Technical support................................................................. 67
9
Page 10
Introduction
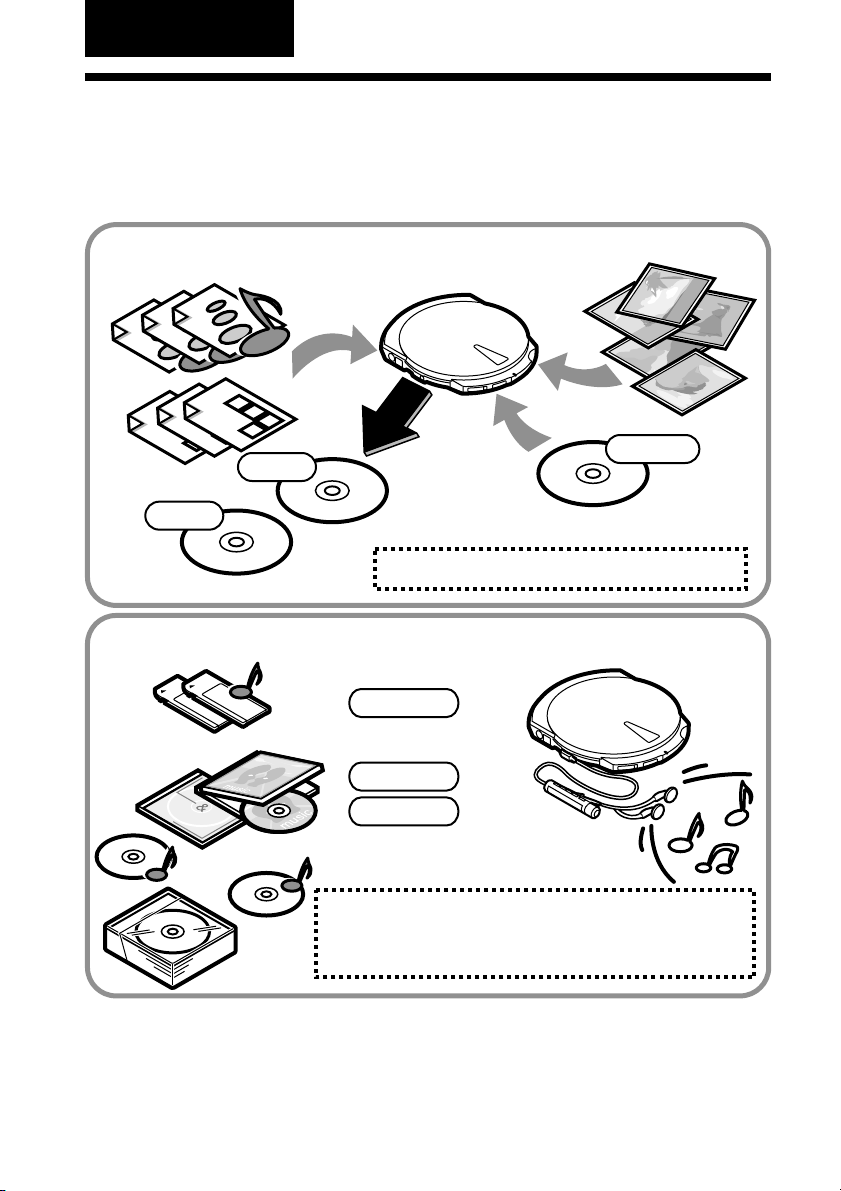
Features
The MPD-AP20U (hereafter, the “drive”) is an extremely versatile drive. Not only is
it a CD-RW/DVD-ROM drive, it can also be used as a CD player, a “Memory Stick”
reader/writer, and more!
Write data to CD-R/RW discs
CD-RW
CD-R
• Creating CDs (see page 25)
Listen to music
MP3/WAV
MP3/WAV
LOVELOVE
LOVELOVE
1)
For details about MP3 and WAV files, see “Compatible discs and files” (page 33).
Music CDs
• Creating CDs (see page 25)
• Listening to music (see page 28)
• Using “Memory Stick” (see page 26)
1)
1)
CD-ROM
Backup
10
Page 11
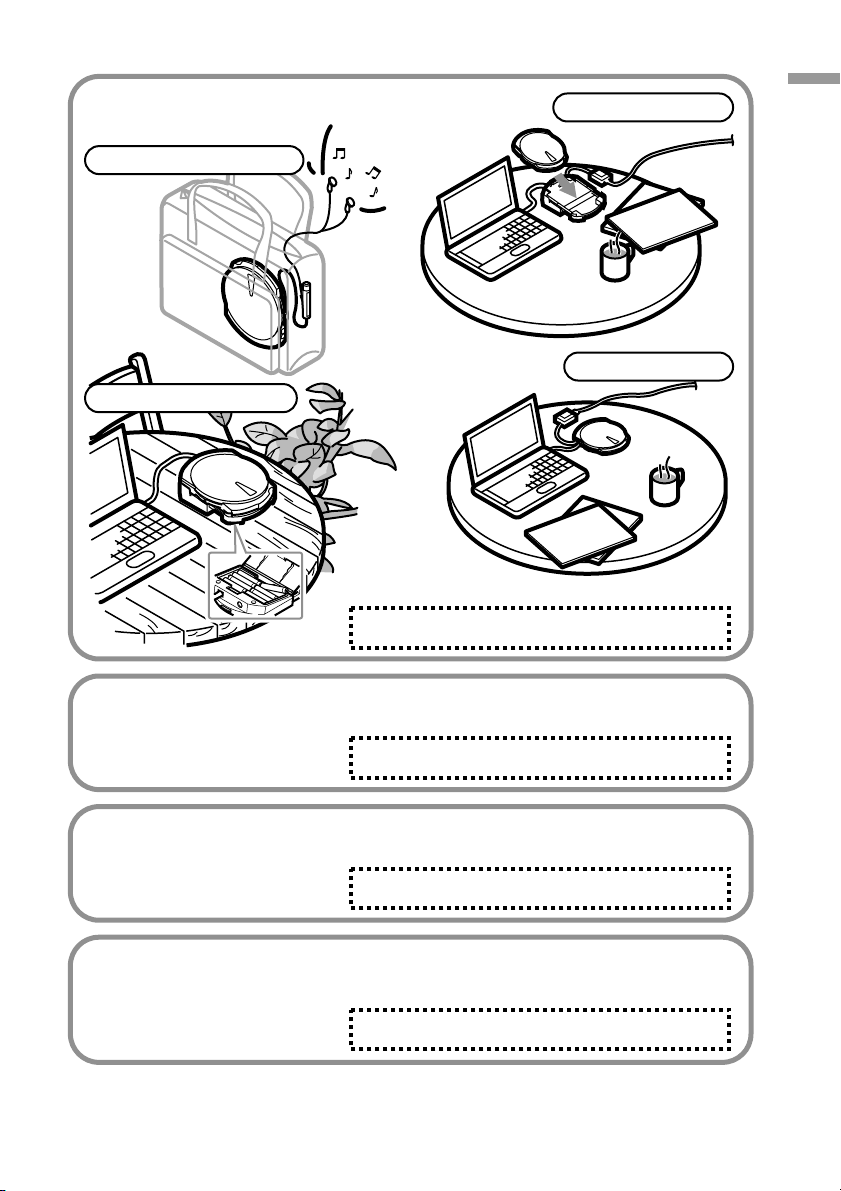
Using the drive under different
power
On internal battery power
Cradle on battery power
• Preparation (see page 16)
Cradle on AC power
Introduction
Drive on AC power
Watching DVDs
Connect the drive to your
computer and enjoy your
favorite DVD-Video.
• Watching DVDs (see page 25)
Using “Memory Stick”
The drive comes standard with a
“Memory Stick” slot.
• Using “Memory Stick” (see page 26)
Power management features
Depending on the status of the drive, the drive power is automatically
turned on, off, or the
internal battery recharged.
• Power (see page 34)
11
Page 12

System Requirements
The following are the minimum system requirements to use the MPD-AP20U.
Windows computers
❏ CPU: Pentium II, 400 MHz or higher
❏ RAM: 64 MB or more
❏ Available hard disk space: 1 GB or more
❏ OS:Windows 98 Second Edition (Windows 98 SE)
Windows 2000 Professional, Service Pack 3 or later (Windows 2000)
Windows Millennium Edition (Windows Me)
Windows XP Home Edition or Professional (Windows XP)
❏ USB connector
❏ If you are using Windows 98 SE, you need a CD-ROM drive or a connection to
the Internet to install the device drivers
Macintosh computers
❏ Power Mac G3, G4, or G4 Cube; iMac, eMac, or iBook; PowerBook G3 or G4
❏ OS: Mac OS 9 or X ver. 10.1 (9.2.2 and 10.1.5 recommended)
❏ RAM: 64 MB or more
❏ USB connector
Note
The requirement outlined above are the ones necessary for smooth writing to CD-R and CD-RW discs.
When using the MPD-AP20U CD-RW/DVD-ROM drive features, make sure that your system meets the
necessary requirements of the software that you are using. For details, refer to the appropriate software
user’s manual (on the software disc).
1)
1)
1)
This drive supports Hi-Speed USB (USB 2.0-compliant), which yields a much higher data transfer rate
than USB 1.1. Connecting the drive to a computer equipped with a USB 1.1-compliant USB connector
can be the cause of problems when playing back DVD-Video, for example. For details, see “Watching
DVDs” (page 25).
12
Page 13
Name and Function of Parts
1
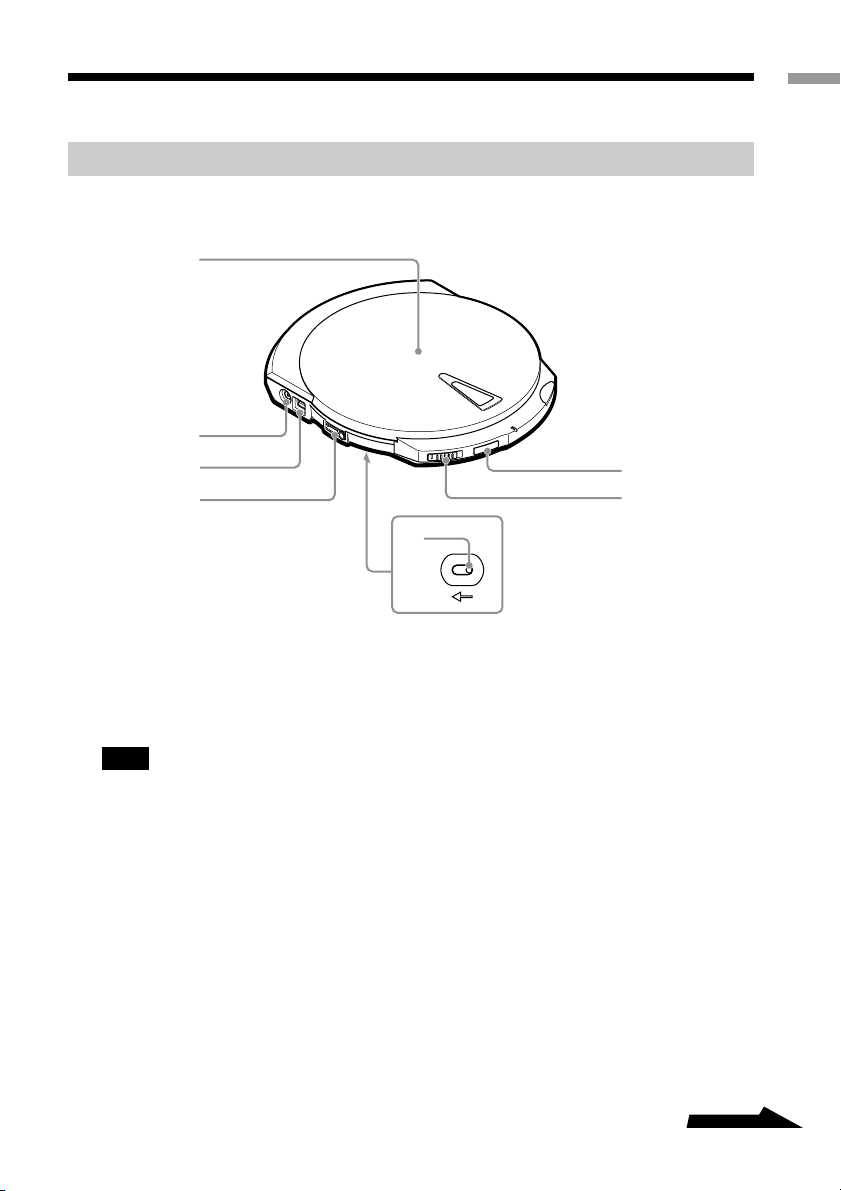
Drive
Left
2
3
4
5
Introduction
7
6
1 Cover
2 Power connector
Used to connect the AC power
adapter (provided).
Note
To avoid the risk of fire, electric shock, or
malfunction, only use the supplied AC
power adapter to connect the drive.
3 USB connector
Used to connect the USB cable
(provided).
4 i/REMOTE jack
Used to connect the remote control
(provided).
5 Manual ejection lever (located
on the bottom of the drive)
Used when the drive is off and you
want to open the cover. Push the
lever in the direction of the arrow
to open.
6 LOCK switch
Used to lock the EJECT and SOUND
buttons. For example, even if you
press the EJECT button when
listening to music, the cover does not
open. Slide the switch in the direction
of the arrow to lock the buttons.
7 SOUND button
Used to adjust the playback tone
according to the type of music that
you are listening to. For details, see
“Adjusting the tone (SOUND
function)” (page 47).
Continued
13
Page 14
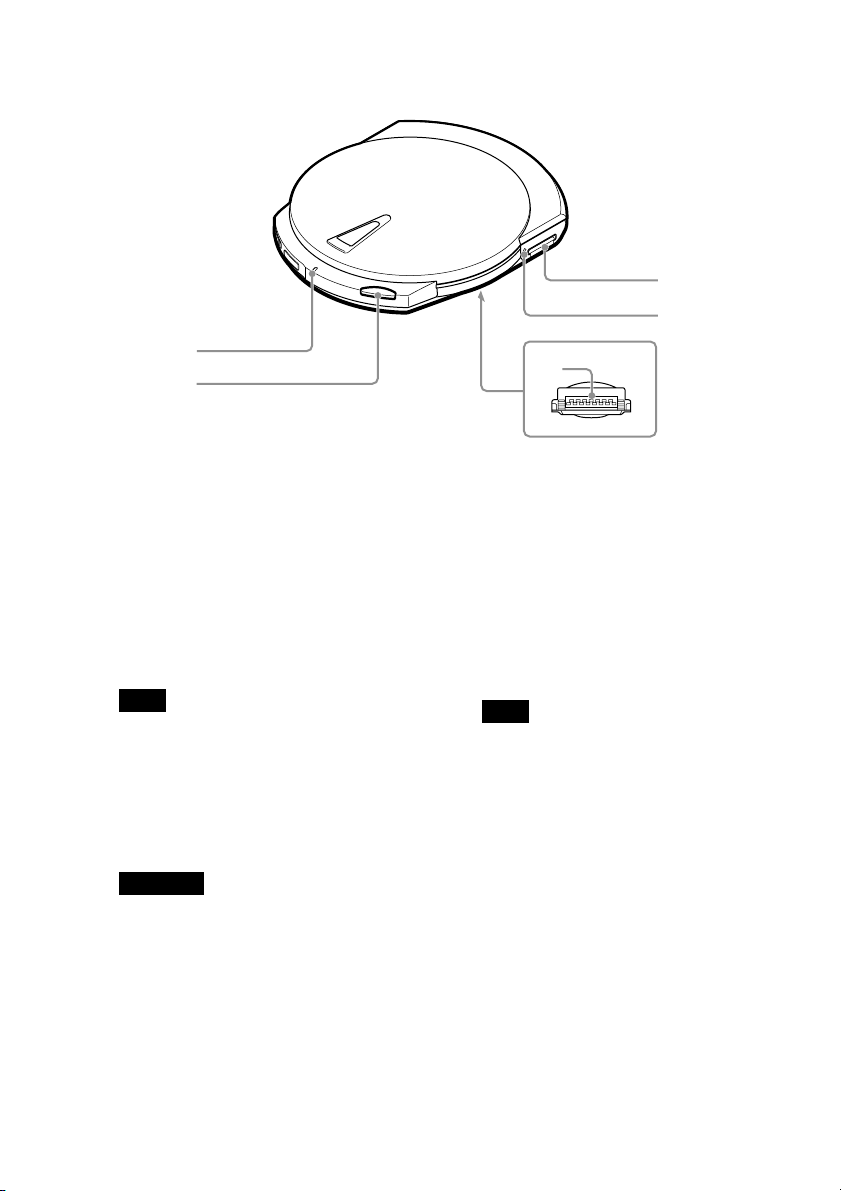
Right
5
4
1
2
1 CHARGE/BUSY indicator
The CHARGE/BUSY indicator
changes color as follows according
to the drive status.
• Drive connected to computer
Power on, idle:.................. Green
During disc access: ......... Orange
• Drive not connected to computer
Battery charging: .................. Red
Note
The drive is not equipped with a power
button. The drive automatically manages its
power status depending on its state (i.e. on,
off, recharge). For details, see “Power”
(page 34).
2 EJECT button
Used to open the cover.
Important
To prevent the cover from being accidentally
opened during operation, the drive is
equipped with a powered ejection
mechanism. Therefore, when the drive is off,
the cover does not open. Also, depending on
the software that you are using, when you
press the EJECT button, there may be a lag
of a few seconds before the cover opens. For
details, see “Ejecting a disc from the drive”
(page 23).
3
3 Cradle connector (located on
the bottom of the drive)
Used to connect to the cradle.
A cover protects the connector.
4 “Memory Stick” busy
indicator
The indicator lights orange when
the drive is accessing data on a
“Memory Stick”.
Note
Do not eject the “Memory Stick” from the
drive when the indicator above is lit.
5 “Memory Stick” slot
Used to insert “Memory Stick”.
14
Page 15
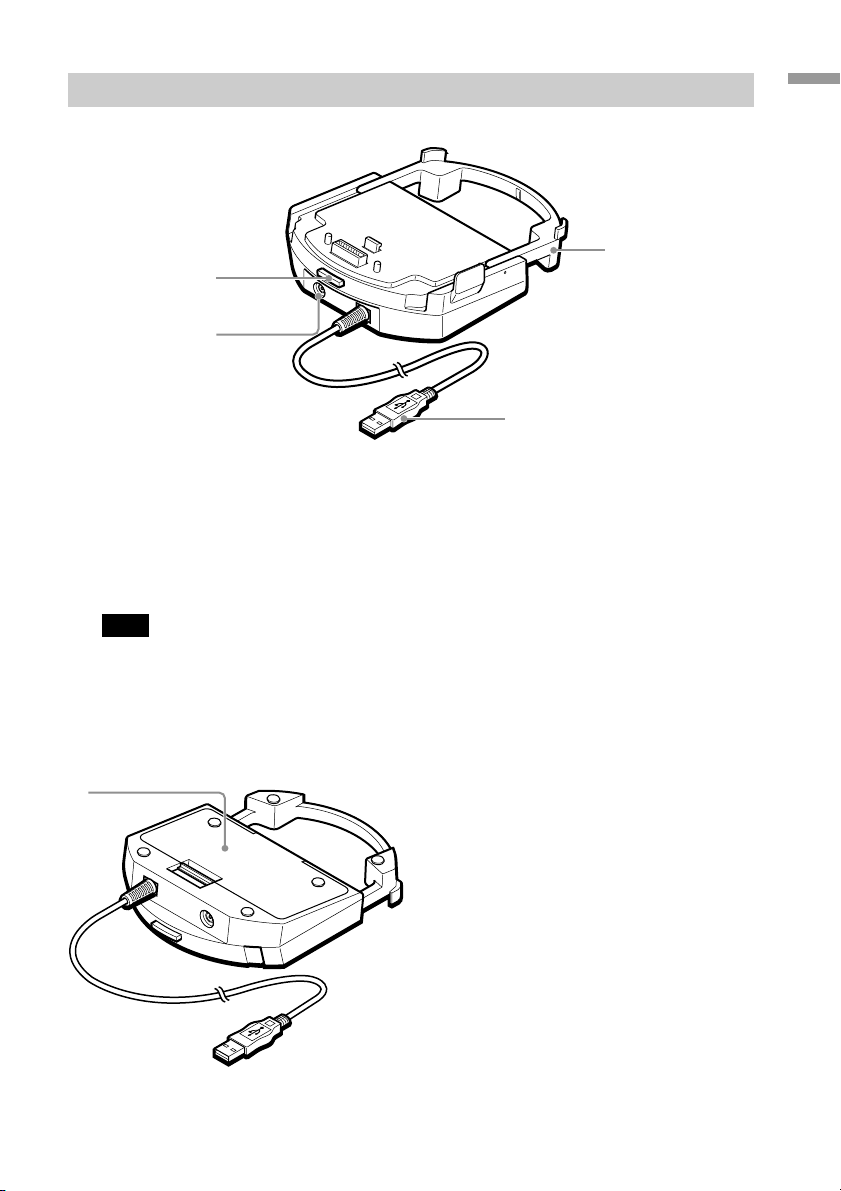
Cradle
1
Introduction
4
1
2
3
1 Release button
Used to remove the drive from the
cradle.
2 Power connector
Used to connect the AC power
adapter (provided).
Note
To avoid the risk of fire, electric shock, or
malfunction, only use the supplied AC
power adapter to connect the drive.
Bottom
3 USB connector
Used to connect to the USB port of
your computer.
4 Extension
You can fold the extension when
you are not using the cradle.
1 Battery case
Open the lid to insert batteries. For
details, see “Inserting batteries into
the cradle” (page 35).
15
Page 16
Preparation
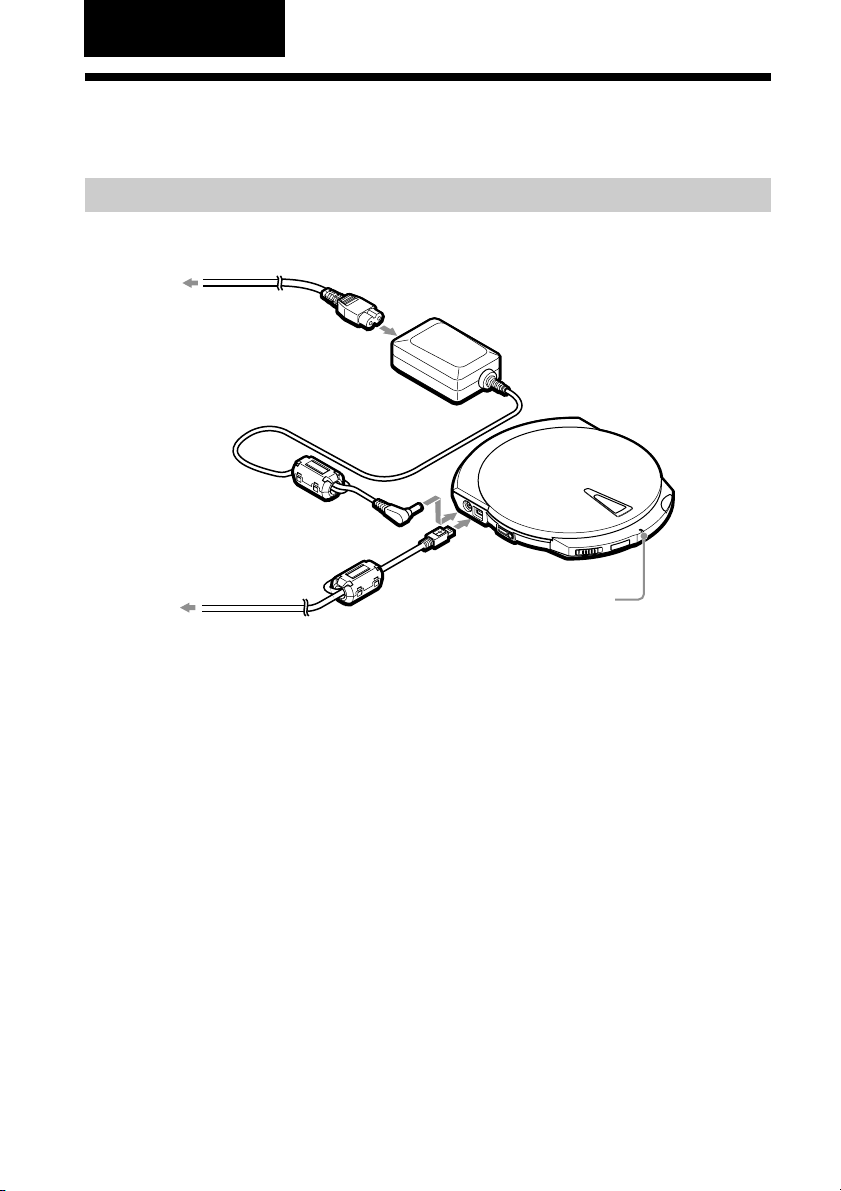
Using the Drive When Connected to the Power Outlet
Connecting the drive
Connect the drive to the power outlet and to your computer as follows.
To the power outlet
Power cord
AC power adapter
To the computer’s
USB connector
When you connect the drive as illustrated here, the drive comes on and the
CHARGE/BUSY indicator lights green.
You can now use the drive with your computer.
USB cable
CHARGE/BUSY
indicator
Using the drive on internal power
The drive is equipped with an internal battery, enabling you to use the drive on
internal power without being connected to a power outlet. However, before you can
do this, you need to charge the battery. For details, see “Charging the internal
battery” (page 20).
16
Page 17
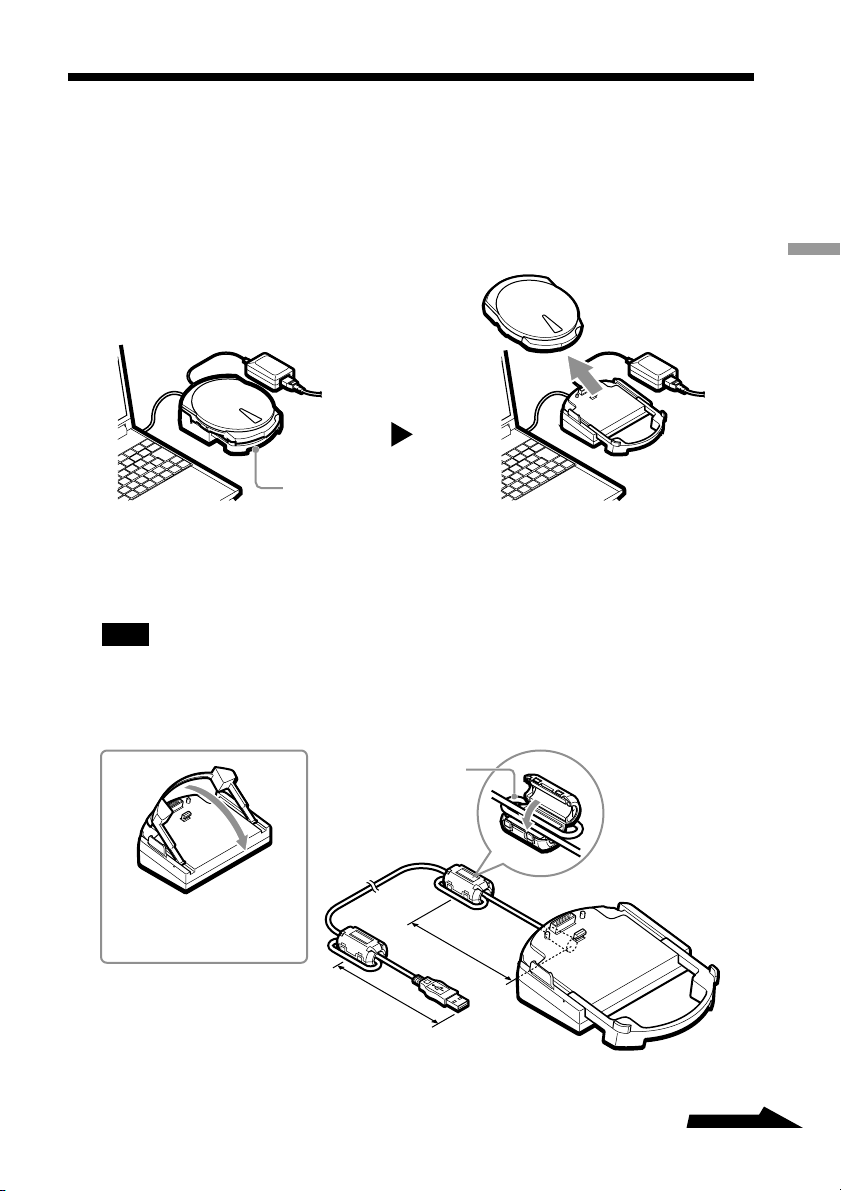
Using the Drive on the Cradle
If you carry the drive with you as well as use it with your computer often, using the
cradle is extremely convenient. If you connect your computer and the drive through
the cradle, you can take the drive with you whenever you want. Then, all you need to
do is set the drive on the cradle when you want to use it with your computer – no
reconnections necessary.
Cradle
1 Attaching the ferrite clamp
You need to attach the provided ferrite clamps at both ends of the cradle’s USB
cable.
Note
Ferrite clamps serve to reduce the noise generated by cables in compliance with local standards.
Make sure that the clamps are properly attached.
Preparation
Open the extension when
setting the drive on the
cradle.
Wind once
Close firmly until
you hear a click
8 cm
8 cm
Continued
17
Page 18
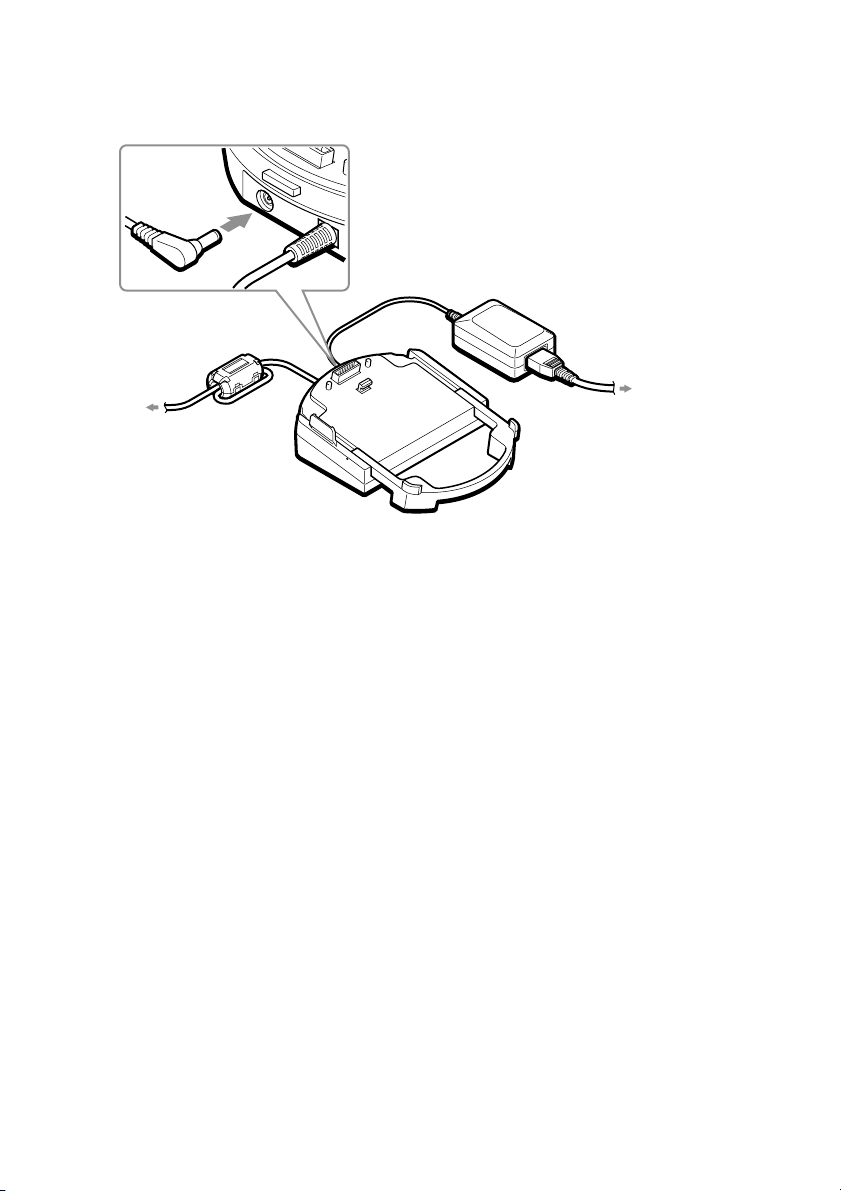
2 Connecting the cradle
Connect the cradle to the power outlet and to your computer as follows.
AC power adapter
USB cable
Power cord
To the computer’s
USB connector
To the power outlet
Using the cradle with batteries
If you insert batteries (rechargeable) into the cradle battery case, you can use the
cradle without connecting it to the power outlet. For details, see “Power” (page 34).
18
Page 19
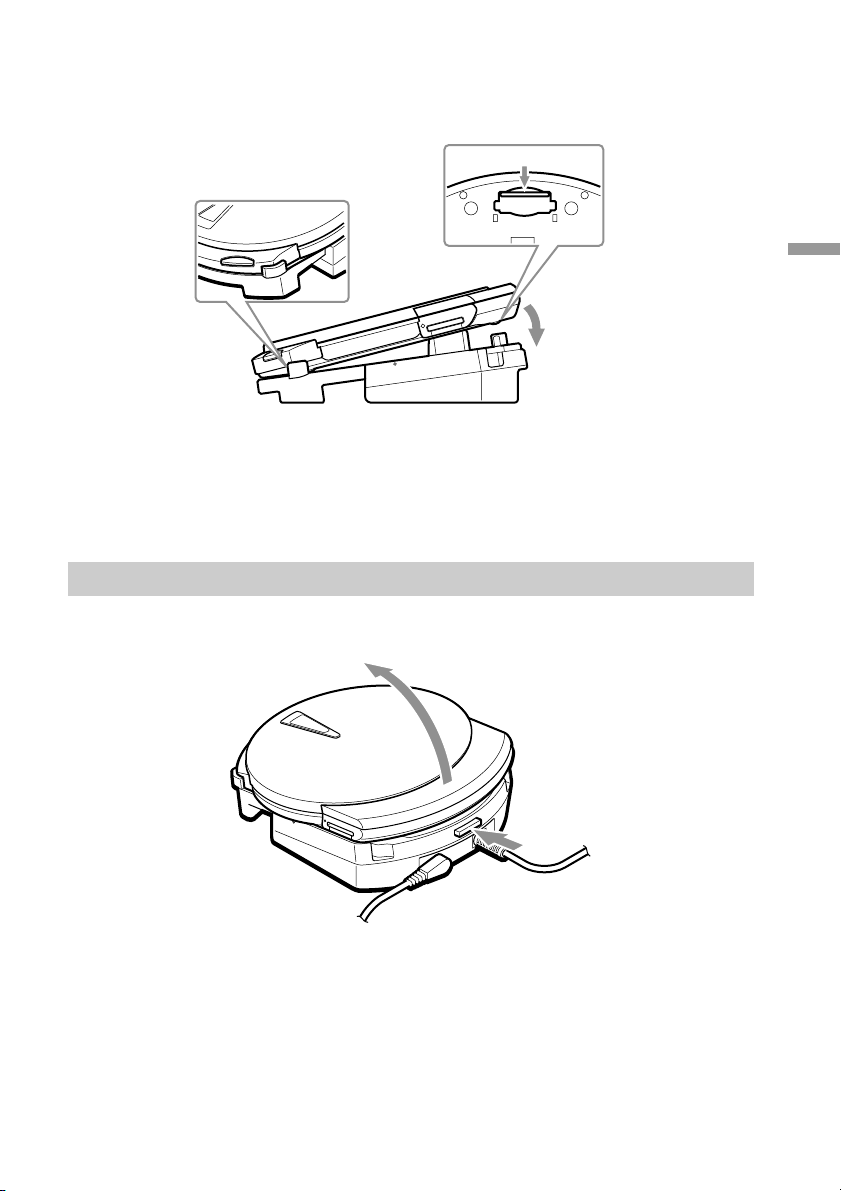
3 Setting the drive on the cradle
2
Set the drive on the cradle as follows.
2 Align the front of the drive
with the extension.
Bottom
3 Push the drive down.
1 Slide the
connector cover.
When you set the drive on the cradle as illustrated here, the drive comes on and
the CHARGE/BUSY indicator lights green.
You can now use the drive with your computer.
Removing the drive from the cradle
Press the cradle’s release button, then remove the drive from the cradle.
Preparation
1
19
Page 20
Using the Drive on Internal Power
Charging the internal battery
When the drive is connected to a power outlet, it automatically charges the internal
battery. Be sure to charge the internal battery after buying the drive or after an
extended period of disuse. When the internal battery is completely depleted, it takes
approximately 4 hours to fully charge it.
z
• If you recharge the internal battery after using it, charge time may be shorter than 4 hours.
• The internal battery is also charged when you set the drive on the cradle and the cradle is connected to
the power outlet.
• For details about the internal battery, see “Power” (page 34).
1 Connect the drive to the power outlet.
Charging starts.
(The internal battery is charged in the background during operation.)
To the power
outlet
CHARGE/BUSY
Remote control
(Displays the
charge status.)
indicator
When the internal battery is fully charged, charging stops.
20
Page 21
Confirming the charge status
Preparation
Not connected to
your computer
The indicator lights red.
The indicator goes off.
Charging
Upon reaching
full charge
Connected to
your computer
The charge indicator is
animated to simulate charging.
The indicator disappears.
Verifying the internal battery charge
When you disconnect the AC power adapter from the drive and turn
the control knob (right), the current internal battery charge appears
on the remote control display. When the internal battery is fully
charged, appears on the display.
21
Page 22

Basic Operation
Using Discs
Inserting a disc into the drive
1 Press the EJECT button to open the cover.
2
1
2 Insert the disc.
Press down on the center portion of the disc until you hear a click.
Vibration
damper
Disc label facing up
Note
Be sure that the edge of the disc fits under the ridge at the top of the spring-loaded vibration damper
located at the left rear of the disc compartment. (See the illustration above.)
Disc
3 Close the cover.
Press at the point
marked PUSH.
22
Page 23

Ejecting a disc from the drive
Note
Do not attempt to eject a disc from the drive when the CHARGE/BUSY indicator is orange (data on the
disc is being accessed).
1 Press the EJECT button to open the cover.
2
1
CHARGE/BUSY indicator
With a Windows computer, you can also open the cover by right-clicking the
drive icon and clicking Eject on the shortcut menu.
With a Macintosh computer, you can also open the cover by moving the disc
icon to the [Trash] icon.
z
• Depending on the status of your computer and the drive, there may be a lag of a few seconds before
the cover open. Sometimes, you may have to eject the disc from the software, rather than open the
drive by pressing the EJECT button.
• Except when writing to a disc, if the EJECT button is ineffective, you can open the drive by
pushing the manual ejection lever on the bottom of the drive in the direction of the arrow.
Basic Operation
2 Remove the disc.
Press on the hub while lifting the disc to remove it.
Disc
Continued
23
Page 24

Accessing disc data from your computer
Perform the following procedure to view files and folders on discs.
With Windows
1 Open [My Computer].
The [My Computer] window appears.
Example: Windows XP [My Computer] window
2 Double-click the icon below.
z The drive letter assigned to the drive depends on your computer. (In the
example, “G”.)
The folders and/or files on the disc are displayed.
With Macintosh
When you insert a disc into the drive, a disc icon appears on the desktop of your
Macintosh computer. Double-click this icon to display the files and/or folders on the
disc.
24
Page 25

Creating CDs (Using the Provided Software)
You can use the programs on the software disc accompanying the drive to write data
to CD-R/RW discs or create music CDs. For details about the installation procedures,
various functions and operation procedures, refer to the software manuals1).
z
Windows XP and Mac OS X computers have built-in CD writing functions that you can use instead of the
provided writing software. For details, refer to your operating system Help.
Watching DVDs (Using the Provided Software)
You can use the programs on the software disc accompanying the drive to watch
DVD-Video discs. For details about the installation procedures, various functions
and operation procedures, refer to the software manuals1).
USB 1.1 connectors
When you connect the drive to a USB 1.1-compliant connector, video and audio may
be choppy during playback. This occurs because playback is limited by the lower
data transfer rate of USB 1.1, it is not a malfunction of the drive. If you connect the
drive to a USB 2.0-compliant (Hi-Speed USB) connector, you are certain to
experience smoother playback of DVDs.
Basic Operation
1)
Software manuals: refers to the “Software Quick Start Guide”, as well as the user’s guide and Help for
each program on the software disc.
25
Page 26

Using “Memory Stick”
Inserting a “Memory Stick” into the drive
1 Push the “Memory Stick” into the
“Memory Stick” slot until it is fully
inserted.
Insert the “Memory Stick” in
the direction of the v until
you hear a click.
Ejecting a “Memory Stick” from the drive
Note
Do not attempt to eject a “Memory Stick” from the drive when the “Memory Stick” busy indicator is
orange (data on the “Memory Stick” is being accessed).
1 Push the “Memory Stick”.
“Memory Stick”
busy indicator
2 Move your hand away and remove
the “Memory Stick”.
When you move your hand away,
“Memory Stick” partially comes
out so that you can remove it.
z
With Macintosh computers, even if you eject the “Memory Stick” from the drive, the icon corresponding
to the “Memory Stick” drive remains on your desktop. Move it to the [Trash].
26
Page 27

Accessing “Memory Stick” data from your computer
Perform the following procedure to view files and folders on “Memory Stick”.
With Windows
1 Open [My Computer].
The [My Computer] window appears.
Example: Windows XP [My Computer] window
2 Double-click the icon below.
Basic Operation
z The drive letter assigned to the drive depends on your computer. (In the
example, “H”.)
The folders and/or files on the “Memory Stick” are displayed.
With Macintosh
When you insert a “Memory Stick” into the drive, an icon appears on the desktop of
your Macintosh computer. Double-click this icon to display the files and/or folders
on the “Memory Stick”.
27
Page 28

Listening to Music
1
(Using the Drive as a CD Player)
You must use the remote control when using the drive as a CD player.
Remote control part names and functions
Front
3
2
1 Display
Displays information such as the
remaining charge of the internal
battery, number and elapsed time of
the current track, etc. (Page 33)
2 Control knob
Allows you to start playback,
control the volume, etc. (Page 32)
3 x (stop) button
Press to stop playback. (Page 32)
28
Page 29

Back
1
8
2
3
4
1 Clip
2 DISPLAY button
Press to change the information
displayed. (Page 46)
3 PLAY MODE button
Press to change the playback mode.
(Page 40)
4 RPT/ENT (Repeat/Enter)
button
Press to enter repeat mode or when
programming tracks. (Page 40)
5 SOUND button
Press to adjust the playback tone
according to the type of music that
you are listening to. (Page 47)
7
6
5
Basic Operation
6 X (pause) button
Press to pause playback. (Page 32)
7 Headphone jack
Connect your headphones to this
jack.
8 HOLD switch
Locks the controls on the remote
control to prevent accidental use.
(Page 48)
Note
You may not be able to use the remote control
provided with this drive with other CD players.
Further, we do not guarantee proper operation of
the drive if you use it with another remote control.
Continued
29
Page 30

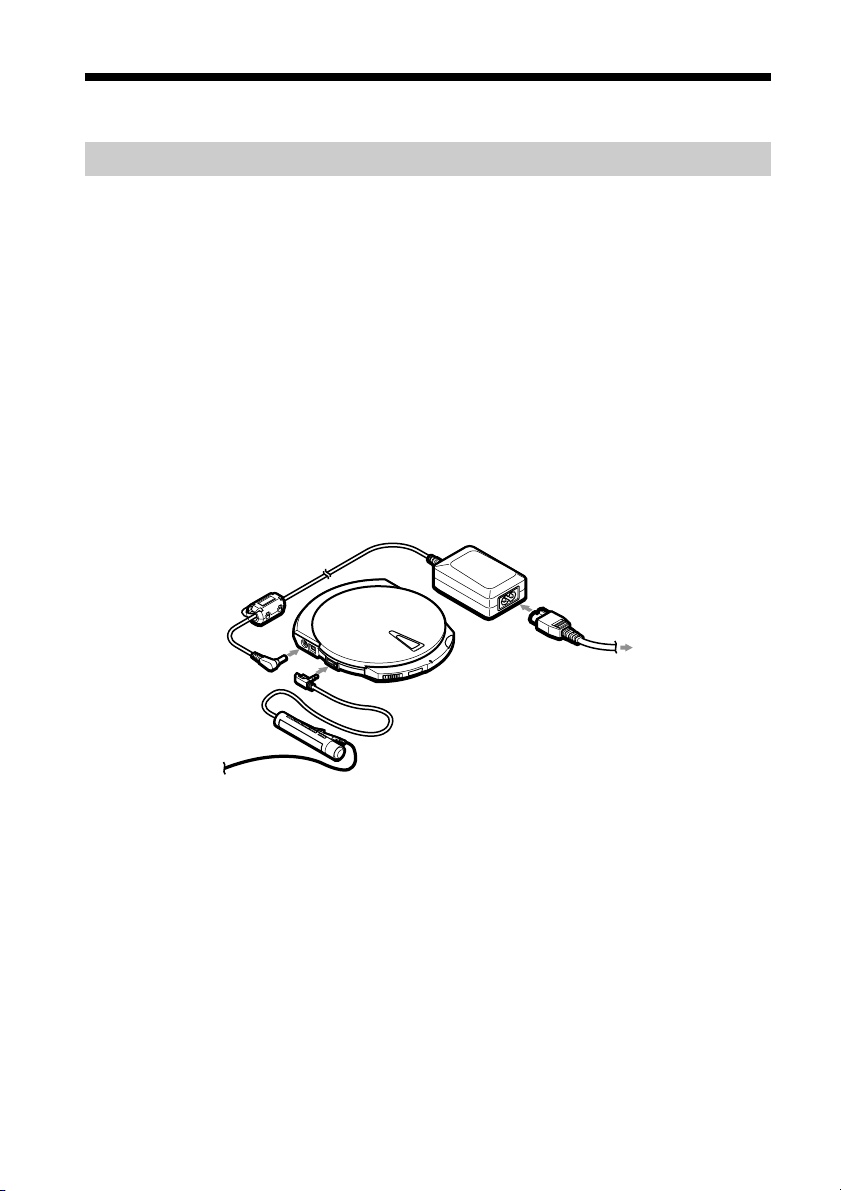
Starting playback and adjusting the volume
You can listen to music on a disc or “Memory Stick” with headphones. You can also
use the drive on internal power (for details, see “Power” (page 34)).
1 Connect the remote control and headphones.
To power outlet
Power cord
Remote control
AC power adapter
Headphones
2 Insert the disc or “Memory Stick” into the drive.
You can insert any CD, or “Memory Stick”/disc containing MP3 files into the
drive.
3 Turn the control knob on the remote control.
Playback starts.
z
• For details about compatible discs and files, see “Compatible discs and files” (page 33). For details about
how to select files, see “Listening to Music Files” (page 38).
• If you disconnect the remote control during playback, playback stops.
30
Page 31

Adjusting the volume
You can adjust the volume by pulling the control knob of the remote control and
turning it.
Raise the volume
Lower the volume
z
If you are unable to raise the volume and AVLS appears on the display of the remote control, repeatedly
press the remote control SOUND button until the display shows AVLS OFF. For details, see “Limiting
Volume (AVLS function)” (page 48).
Basic Operation
Continued
31
Page 32

Using the remote control
This section outlines the basic operations possible with the remote control.
What do you want to do?
Start playback
(from the previous track)
Start playback
(from the first track)
Pause playback/
Resume playback
Stop playback
(during playback or pause)
Return to the beginning
of the current track
(during playback or pause)
Return to previous tracks
(during playback or pause)
Go to the next track
(during playback or pause)
Procedure
Maintain turned until playback of
the first track starts.
Press
Press
Turn once
Turn successively
Turn once
1)
2)
Go to succeeding tracks
(during playback or pause)
Rewind
(during playback or pause)
Fast Forward
(during playback or pause)
1)
If you are on the first track during repeat playback, returns to the last track.
2)
If you are on the last track during repeat playback, goes to the first track.
Turn successively
Maintain turned
Maintain turned
32
2)
Page 33

Remote control display
During playback, the remote control display shows the number and elapsed time of
the current track.
Track number
Elapsed time
When listening to music files (MP3, WAV)
When you start playback the title of the song appears briefly (if there is no title
information, the file name appears), followed by the elapsed time. If the title of the
song is long, it scrolls across the display.
Remote control display backlight
The backlight of the remote control display comes on when you use the remote
control and automatically goes off a few seconds after you finish using it.
Compatible discs and files
You can play back the following discs and files with the drive.
• Commercially sold music CDs
• Original music CDs (discs in CD-DA format written to CD-R/RW discs)
• Music files written to CD-R/RW (MP3, WAV files)
• Music files written to DVD-R/RW (MP3, WAV files)
• Music files stored on “Memory Stick” (MP3, WAV files)
Basic Operation
z
• Depending on the device used for recording, the settings of the writing software, and the media type, you
may not be able to play back some recordings with the drive.
• For details about the types of music files that you can play back with the drive, see “Music Files” (page
52).
MP3
MP3 stands for MPEG Audio Layer 3 and is audio compression technology. An audio file compressed in
the MP3 format is called an MP3 file. Because the compression ratio of MP3 files is very high, you can
write more than 100 five-minute tracks to a CD-R disc.
WAV
Default Windows file format in which sounds are saved as waveforms. Unlike MP3 files, WAV files are
uncompressed, so their sound quality is better. However, they are also 10 times larger than MP3 files.
33
Page 34

Advanced Features
Power
You can use the drive with the following power sources. Power management varies
according to the type of power supply, as illustrated below.
Drive Cradle Power management
AC power ✓✓The internal battery is charged in the
Internal battery ✓ × Depending on its state, the drive is
Batteries (rechargeable) × ✓ Depending on its state, the drive is
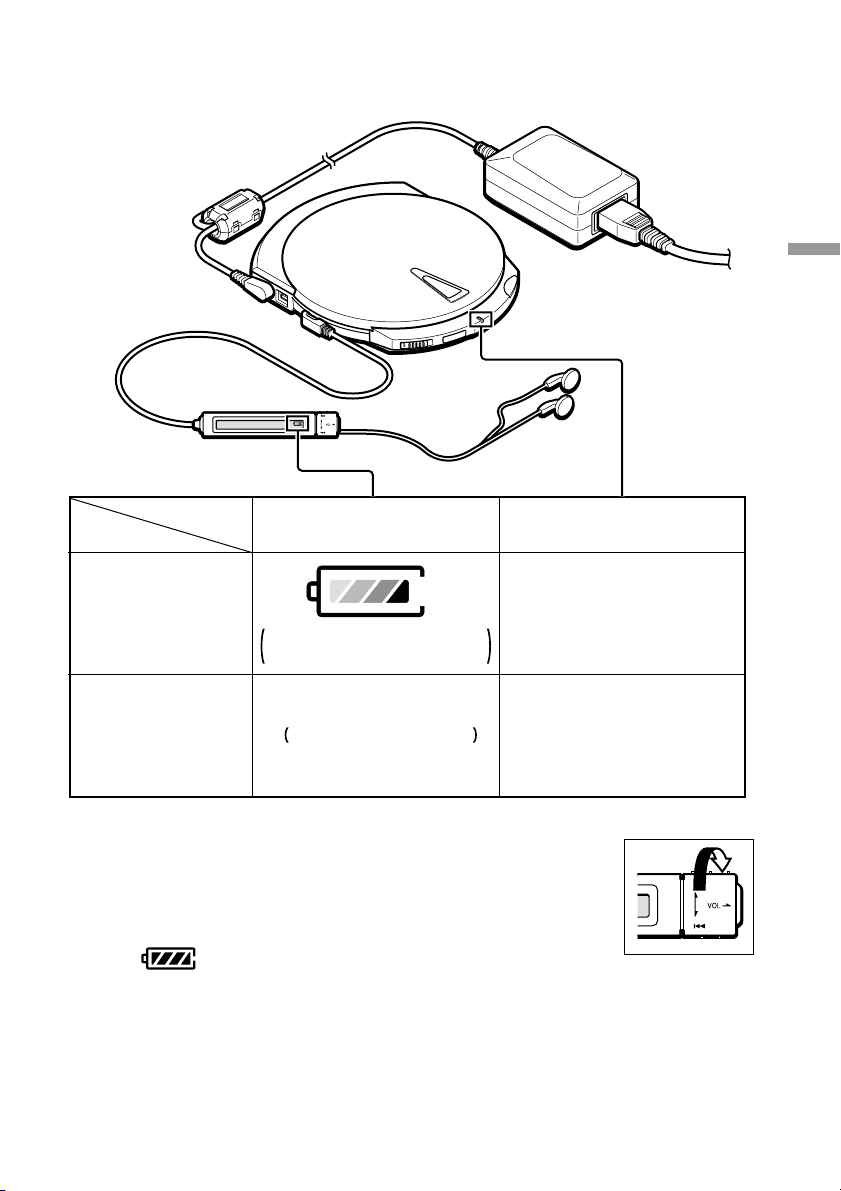
Remaining charge indicator
To be able to verify the remaining charge of the internal battery, you must first
connect the remote control. As the charge of the internal battery decreases, the
indicator on the remote control display changes as follows:
background.
turned on or off.
turned on or off.
Sufficient charge Low charge
No charge
Notes
• When you want to verify the remaining charge of the internal battery, be sure that the drive is not
connected to the AC power adapter. When the drive is connected to the AC power adapter, the remaining
charge indicator does not appear on the remote control display.
• The remaining charge indicator is only a gauge. It is not meant to accurately reflect the remaining charge
of the internal battery. (In other words, one bar does not represent a quarter of the internal battery
charge).
• The remaining charge indicator may change depending on the operating status of the drive.
Extremely low charge
Disposing of the internal battery
The internal battery used in this drive is a lithium ion polymer battery. Therefore
when the time comes to throw away the drive, we ask that you dispose of the internal
battery according to your region’s regulations on battery disposal.
34
Page 35

Inserting batteries into the cradle
You can use the cradle under rechargeable battery power (8 batteries necessary).
Doing so allows to use the drive for extended periods of time without connecting it to
a power outlet.
Compatible batteries (sold separately)
● Rechargeable batteries
AA nickel metal hydride (Ni-MH) batteries
AA nickel cadmium (Ni-Cd) batteries
Notes
• The cradle is not a battery charger. To recharge batteries, use a proper battery charger (sold separately).
• The cradle does not support any type of dry cell batteries.
Inserting batteries
1 Open the lid of the battery case on the bottom of the cradle.
2
1
Advanced Features
Continued
35
Page 36

2 Insert eight batteries into the battery case.
Notes
• Be sure to look at the indications inside the battery case for the proper positioning of the batteries.
• Be sure to use similar batteries (i.e. do not use rechargeable and dry cells batteries together).
• Because the batteries may leak, remove the batteries from the cradle and store them if you do not intend
to use the cradle on battery power for an extended period of time.
• When you replace the batteries, be sure to replace the eight batteries. Mixing new and old batteries may
cause them to leak.
36
Page 37

Battery life
The following is the approximate playback life and number of discs that can be
written using the drive under battery power.
Playback battery life
CD-DA
1)
MP3 files
1)
DVD-Video
2)
Internal battery approx. 4 hours approx. 10 hours approx. 1.5 hours
When internal battery and cradle batteries are used together
Ni-MH batteries approx. 12 hours approx. 30 hours approx. 5 hours
Ni-Cd batteries approx. 9 hours approx. 22 hours approx. 3.5 hours
1)
When all playback is performed in the same playback mode
2)
1-sided, double layered disc
Number of discs that can be written
3)
CD-R
Internal battery approx. 9 discs approx. 8 discs
When internal battery and cradle batteries are used together
Ni-MH batteries approx. 26 discs approx. 21 discs
Ni-Cd batteries approx. 14 discs approx. 10 discs
3)
The number of discs that can be consecutively written is based on writing to 650 MB discs, at the
maximum write speed, with a 480 Mbps transfer rate
Notes
• The data above represents the battery life of fully charged batteries (internal or rechargeable).
• Actual battery life varies on operating conditions.
CD-RW
3)
Advanced Features
37
Page 38

Listening to Music Files
The basic operations necessary to listen to music files (MP3, WAV files) are the
same as when listening to a music CD. For details about these operations, see
“Listening to Music (Using the Drive as a CD Player)” (page 28).
This section explains the functions and operations specific to music files.
z
To learn more about the types of music files compatible with the drive, see “Music
Files” (page 52).
Selecting folders and files
Selecting a folder
1 During music file playback, press the remote control DISPLAY button until
“/<folder name>/” appears on the remote control display.
2 Turn the control knob . or N/> to select the desired folder.
Playback of the files in the selected folder starts.
Selecting a file
1 During MP3 playback, if the remote control display does not already display the
current track elapsed time or name, press the DISPLAY button.
2 Turn the control knob . or N/> to select the desired file.
Playback of the selected file starts.
38
Page 39

Folder organization and playback order
Under normal playback conditions, the contents of folders are played back in the
folder organization order, high-level folders first. Similarly, the files in folders are
played back in alphabetical order.
For example, with the following folder organization, playback is performed from 1 to
10.
CD-R
CD-RW
Music
song01.mp3 1
song02.mp3 2
Popular
New
Oldies
folder
MP3 file
May
The80s
01new.mp3 4
may01.mp3 5
may02.mp3 6
song03.mp3 9
old8301.mp3 8
track01.mp3 q;
Advanced Features
01tune.mp3 7
1990
track01.mp3 3
Rock
Notes
• If you insert a disc and a “Memory Stick” into the drive at the same time, the contents of the disc are
played back first.
• In the case of music CDs, the disc is recognized as one folder and the tracks as files.
• Folders that do not contain music files are skipped.
• The drive can display file and folder names of up to 64 alphanumeric characters (Joliet extension).
• To be able to listen to the files in a folder in the desired order, we suggest that you perform the
following:
- There should be no more than 256 files per folder.
- Only use the alphanumeric characters (uppercase or lowercase) in folder and file names.
- Name the files so that the desired playback order is reflected by the first 8 characters (or less).
Example: Track01VaporTrails.mp3
39
Page 40

Advanced Playback
You can play back your music with a variety of features accessible with the remote
control PLAY MODE and RPT/ENT buttons.
RPT/ENT (Repeat/Enter) button
PLAY MODE button
PLAY MODE button
Press it during playback to change the
playback mode.
Normal playback (all)
x
Listen to all the tracks in a folder
1)
(folder)
x
Listen to one track only (single)
x
Listen to all the tracks in random
order (all) SHUF
x
Listen to all the tracks in a folder in
random order (folder) SHUF
x
Listen to selected tracks in the
desired order
PGM
1)
A music CD is considered to be a single folder.
1)
RPT/ENT button
• Press it after selecting a playback
mode with the PLAY MODE button
to loop playback.
• Press it to select tracks when creating
a program.
40
Page 41

Loop playback (Repeat)
You can loop the playback of every playback mode of the drive. For example, if you
are listening to music in normal playback mode, pressing the RPT/ENT button results
in all the tracks on your disc to be repeated. Similarly, in folder playback, all the
tracks in the folder are repeated.
Pressing the RPT/ENT button during playback.
Repeat indicator
Playback mode
Listening to all the files in a folder (Folder playback)
Press the PLAY MODE button repeatedly until “(folder)” appears on the remote
control display.
Advanced Features
Continued
41
Page 42

Listening to one track only (Single playback)
Press the PLAY MODE button repeatedly until “(single)” appears on the remote
control display.
Single playback indicator
Listening to all the track in random order (Shuffle playback)
Press the PLAY MODE button repeatedly until “(all)” and “SHUF” appear on the
remote control display.
Shuffle playback indicator
Listening to all the track in a folder in random order (Folder shuffle)
Press the PLAY MODE button repeatedly until “(folder)” and “SHUF” appear on the
remote control display.
Shuffle playback indicator
42
Page 43

Listening to selected tracks in the desired order (Program)
You can program up to 64 tracks in the order of your choice.
1 During playback, press the PLAY MODE button repeatedly until
“*PROGRAM*” appears on the remote control display.
z
If there is a playlist on the disc or “Memory Stick” in the drive, press the remote control PLAY
MODE button repeatedly until the name of the playlist appears on the remote control display. Then,
turn the control knob N/> until “*PROGRAM*” appears on the remote control display.
“PGM” flashes
2 Press the RPT/ENT button.
Program the desired tracks.
3 Turn the control knob . or N/> until you reach the desired track.
Playback
number
Track number
Song title
Advanced Features
z
The “Song title” part of the display changes depending on the information accompanying songs and
files.
4 Press the RPT/ENT button to select the track.
The playback number becomes “002” and you can select another track.
Playback number
Continued
43
Page 44

5 Repeat steps 3 to 4 to select other tracks.
6 Press and hold the RPT/ENT button until playback starts.
Listen to the tracks that you programmed.
Confirming the contents of the program
When creating a program
1 Before performing step 6 above, press the RPT/ENT button repeatedly.
Each time that you press the RPT/ENT button, the track and playback numbers
are displayed.
When playing back the programmed tracks
1 Press the PLAY MODE button repeatedly until “PGM” blinks on the remote
control display.
2 Press the RPT/ENT button repeatedly.
Each time that you press the RPT/ENT button, the track and playback numbers
are displayed.
Notes
• After you program the 64th track in step 4 above, the track number of the first track that you
programmed appears instead of “000”.
• If you program more than 64 tracks, the program is overwritten from playback number one.
44
Page 45

Listening to a playlist
If a playlist exists on the disc or “Memory Stick” that you are using, you can use it
with the drive to listen to the music files according to their order in the playlist.
z
To be able to use this function, you need to save a playlist (extension: m3u) to disc or “Memory Stick”
before you insert them into the drive. For details, see “Playlist files” (page 53).
1 During playback, press the remote control PLAY MODE button until the playlist
file name appears on the remote control display.
2 If there are several playlists on your media, turn the control knob N/> until
the desired playlist appears on the remote control display.
Advanced Features
3 Press the remote control RPT/ENT button to set the playlist.
Playback starts from the first track in the playlist.
45
Page 46

Advanced Playback Functions
Displaying track information
You can use the DISPLAY button to display such information as:
• CD-TEXT. CD-TEXT is essentially text information on the music CD such as
album titles, artist names, and song titles.
• The file and folder names of an music files, and MP3 file ID3 tags (album titles,
artist names, and song titles).
z
For details about ID3 tags, see page 53.
Press the DISPLAY button during playback
Each time that you press the button, the remote control display changes as follows:
Remote control display
Normal playback Track number Song title1) and elapsed time
1)
x
Press the DISPLAY button Track number Song title1)/Artist name
x
If there is no song title information, the file name appears.
1)
If there is no song title information, the file name appears.
Press the DISPLAY button again Remaining tracks Album title/Artist name
x
Press the DISPLAY button again Folder number /Folder name/
Notes
• During folder playback, the track number and remaining tracks in the folder are displayed.
• Only alphanumeric characters can be displayed.
• When a disc contains text information incompatible with this drive or no text information, the
information may be incorrectly displayed or not displayed at all.
• In the case of music CDs, the folder name is “*CDDA*” is displayed instead of the folder name.
• During playlist playback, the folder name is the playlist file name.
• During program playback, the folder name is “*PROGRAM*”.
46
Page 47

Adjusting the tone (SOUND function)
You can adjust the playback tone according to the type of music you are listening to.
Press the SOUND button of the remote control or on the drive
itself.
Each time that you press the button, the remote control display changes as follows:
NORMAL (Normal)
x
BASS 11) (Bass1)
x
BASS 21) (Bass2)
x
ROCK (Rock)
x
JAZZ (Jazz)
x
DANCE (Dance)
x
LATIN (Latin)
Advanced Features
Note
If your music sounds distorted, lower the volume.
1)
These two settings boost the bass of your music upon output. BASS 2 is stronger than BASS 1.
“BASS 1” and “BASS 2” are displayed here.
Continued
47
Page 48

Limiting the volume (AVLS function)
The AVLS function automatically limits the volume to a certain level to avoid
sounds that are painfully loud and the potential danger from not being able to hear
sounds of your surroundings.
Press the SOUND button repeatedly until “AVLS ON” appears on the
remote control display.
Trying to raise the volume above the set level
When the AVLS1) function is active, it is not possible to raise the volume above a
certain level.
Appears when you attempt to raise the volume
above the set level.
To deactivate the function, press the SOUND button repeatedly until “AVLS OFF”
appears on the remote control display.
Note
Using the SOUND and AVLS functions at the same time may distort your music. If so, lower the volume.
1)
AVLS: Automatic volume limiter system
Preventing accidental operation (HOLD function)
You can prevent accidental operation of the remote control buttons by using the
HOLD function.
Slide the HOLD switch in the direction
of the arrow.
Returning the remote control to its normal operation mode
Slide the HOLD switch back to its original position.
Note
“HOLD” does not appear on the remote control display, even when the function is in effect.
48
Page 49

Miscellaneous
CDs and DVDs
Compatible discs
You can use the following disc types
with the drive.
Disc Type Symbol
DVD-ROM
DVD-Video
1)
DVD+R
(Read Only)
DVD+RW
(Read Only)
DVD-R
(Read Only)
1)
1)
Disc Type Symbol
Music CD
CD Extra
Video CD
CD TEXT
1)
The drive can only read these discs. Depending
on the discs, devices, and settings used in
writing the discs, the drive may not be able to
read some discs.
Notes
• Only use round discs with the drive. Using oddshaped discs (stars, hearts, etc.) can damage the
drive.
• We do not guarantee proper operation when
writing to or playing back 99-minute discs.
• We do not guarantee proper operation when
writing to 8 cm discs.
DVD-RW
(Read Only)
CD-R
CD-RW
CD-ROM
1)
Miscellaneous
Continued
49
Page 50

CD-R and CD-RW discs
Use the provided writing software to
write to CD-R and CD-RW discs. To be
able to play back CD-R and CD-RW
discs with other CD players and CDROM drives, you must make the
appropriate settings in the writing
software before writing.
For details about writing to discs, refer
to the software manuals1).
CD-R discs
Data can be written to this type of disc
only once. Once it has been written,
data cannot be deleted. However, if you
use the track-at-once writing method,
you can add data to the CD-R up to 99
times (this is dependant on the
remaining space on the disc). Also, if
you use the disc-at-once writing
method, music CDs created on CD-R
discs can be played back with most CD
players.
CD-RW discs
Data can be repeatedly written to and
deleted from this type of disc.
Typically, a new CD-RW disc can be
rewritten about 1,000 times. Further, if
you use the Fixed packet writing
method, you can write and delete files
individually, making using a CD-RW as
easy as using a floppy disc. However,
music CDs created on CD-RW discs
cannot be played back with most CD
players unless they CD-RW compatible.
High speed CD-RW discs
The drive can write to High Speed CDRW discs. Data written to High Speed
CD-RW discs can be read by common
CD-ROM drives.
Note
CD-R/RW drives that do not display the High
Speed CD-RW logo cannot be used to write to
High Speed CD-RW discs. When writing or
appending data to such discs with a CD-R/RW
drive other than this one, be sure that the drive
displays the High Speed CD-RW logo. Also,
always set the writing speed to that specified for
the particular High Speed CD-RW disc that you
are using.
Writing speed
When writing to CD-R and CD-RW
discs, use the writing speed specified on
the disc. You can change the writing
speed through the writing software.
Reading discs
CD-R and CD-RW discs created with
the drive can be read by most CD-ROM
drives. However, some older CD-ROM
drives may not be able to read CD-RW
discs. Also, CD-R music discs created
with the drive can be played back with
most CD players, but playback is not
guaranteed for all CD players or
automobile CD players. Further, due to
variations in disc quality and various
characteristics specific to
manufacturers, certain CD-ROM drives
and CD players may on occasion be
incapable of playing back certain CD-R
and CD-RW discs.
1)
Software manuals: refers to the “Software Quick
Start Guide”, as well as the user’s guide and
Help for each program on the software disc.
50
Page 51

Recommended discs
We recommend using Sony recording
media products with the CD-R/RW
drive.
CD-R: Sony 650 MB and 700 MB
CD-R discs
CD-RW: Sony 650 MB CD-RW discs
DVD-Video playback and region codes (region numbers)
The playback of DVD-Video (DVD
discs) is protected and controlled by
region codes1).
To be able to play back DVD-Video
with the drive, the region code on the
DVD, the region code of the drive, and
the region code of the DVD-Video
software must all match.
DVD-Video playback and
region codes
With the drive, the region code can be
set up to five times, including the initial
assignment (RPC Phase 2 standard).
The drive’s region code is set through
the DVD-Video software.
Important
After setting the region code five times (including
the initial setting), the setting becomes permanent
and can no longer be changed. Thereafter, you are
only be able to play DVD-Video whose region
code matches the one set the fifth time.
Note
Do not attempt to make unauthorized changes to
the region code. Any problems that result from
doing so is not under warranty.
“Memory Stick”
On “Memory Sticks”
“Memory Stick” is a new compact,
portable and versatile IC recording
medium with a data capacity that
exceeds a floppy disk. “Memory Stick”
is specially designed to share digital
data with other “Memory Stick”
compatible products. Because it is
removable, “Memory Stick” can also be
used for external data storage.
Compatible “Memory Stick”
You can use the following types of
“Memory Stick” with the drive.
•“Memory Stick”: standard blue
“Memory Stick”.
•“MagicGate Memory Stick”: White
“Memory Stick” incorporating
copyright protection technology
(MagicGate2)).
z
Because the drive does not support the MagicGate
standard, data recorded with the drive is not
subject to MagicGate copyright protection.
Miscellaneous
1)
Region Playback Control standard (RPC
standard)
2)
MagicGate is an encryption method used to
protect copyrighted material.
Continued
51
Page 52

Protecting data on “Memory
LOCK LOCK
Stick”
Music Files
To prevent the accidental loss of
important data, use the write-protect
switch on the “Memory Stick”. When
you slide the switch to the write-protect
position, you can read data on a
“Memory Stick”, but it is impossible to
write or delete data.
Contacts
Write-enable
position
Place the label here
Write-protect
position
If an error message appears
If an error occurs when reading or
writing to a “Memory Stick” and a
message appears indicating that data
may be lost, it means that the “Memory
Stick” may be write-protected. In this
case, slide the write-protect switch as
illustrated above to remove the
protection. No data is erased from the
“Memory Stick” if this occurs.
Compatible music files
To play back music files with the drive
you must fulfill the following
conditions.
Files Formats
• MP3 (MPEG 1 Audio Layer 3, 44.1
kHz, 32 Kbps to 320 Kbps)
File name extension: mp3
• RIFF WAV MPEG (PCM, 44.1 kHz,
16 bits, 2 channels)
File name extension: wav
• Playlist (M3u format)
File name extension: m3u
Notes
• Files name extensions must be either mp3 or
wav.
• If you affix an extension to a file that does not
match its actual format, the drive cannot play it
back. For example, if you affix the extension
mp3 to a file that is not an MP3 file, it will not
be played back by the drive.
Media
• CD-R
• CD-RW
• DVD-R
• DVD-RW
•“Memory Stick”
1)
1)
52
Formats
• ISO 9660 Level 1
• ISO 9660 Level 2
• ISO 9660 Joliet
• UDF (Ver. 1.02, 1.5)
• FAT (“Memory Stick” only)
1)
The drive can only read these discs. Depending
on the discs, devices, and settings used in
writing the discs, the drive may not be able to
read some discs.
Page 53

Number of usable folders and
files
• Number of playable folders: max. 512
• Number of playable files in shuffle
playback: max. 2048
Encoders and writing software
settings
When encoding MP3 files, we
recommend that you use constant bit
rate encoding, at a compression rate of
128 Kbps, and a sampling rate of 44.1
kHz.
Note on saving files to media
Examples of playlists
• Complete paths
The path is specified from the root of
the media to the file location.
\Music\Popular\New\01new.mp3
\Music\Popular\New\May\may01.mp3
• Relative paths
The path is specified from the folder
where the playlist is saved.
\New\01new.mp3
New/May/may01.mp3
When you insert a disc or “Memory
Stick” into the drive, it searches for all
the files on the media. The more folders
or non-music files on the media, the
slower playback starts (or continues).
Therefore, we recommend not to create
unnecessary folders or save non-music
files on media that you want to use with
the drive.
Playlist files
A playlist is a file on a disc or “Memory
Stick” that determines the playback
order of specific music files on the
media. You can create playlists with
basic tools such as text editors. Simply
create a file with an m3u extension,
where you specify the music file paths
(their locations on the media and
names), then write it to a disc or save it
on a “Memory Stick” containing the
music files.
Note
The drive only recognizes the following path
delimiters: “\”, “/”, and “¥”.
MP3 file ID3 tags
The ID3 tag is basically text
information appended to MP3 files.
This text information consists of album
titles, artist names, song titles, etc.
Note
The drive supports ID3 tag format version 1.0,
1.1, 2.21), or 2.31). If you use any other version,
the text information does not appear properly on
the remote control display.
1)
Version 2.2 unsynchronized, compressed, or
encrypted frames are not supported.
Miscellaneous
53
Page 54

Hi-Speed USB
Removing the
This drive supports Hi-Speed USB
(USB 2.0-compliant), which yields a
much higher data transfer rate than that
of USB 1.1. Connecting the drive to a
computer equipped with a Hi-Speed
USB connector or PCI adapter card
provides the highest possible drive
reading/writing performance1).
• You must connect the drive to a USB
connector that supports Hi-Speed
USB. (Your computer must be
equipped with a Hi-Speed USB
compliant PCI adapter or PC card.)
• The USB EHCI (Enhanced Host
Controller Interface) device driver
must be installed on your computer.
• You must use a Hi-Speed USB
compatible USB cable. (One is
provided with the drive.)
2)
When writing to discs
When you write to a disc, we
recommend that you set the writing
speed to match the transfer speed of
your USB 1.1-compliant product
(usually 8× or less).
Device Driver
With a Windows XP/Me/2000
(SP3 or later) computer
Because these operating system come
standard with the device driver, there is
no need to remove it.
With a Windows 98 Second
Edition computer
There is an uninstaller on the provided
software disc. Use it to remove the
device driver.
1 Insert the software disc into the
CD-ROM drive of your computer.
2 Open the USB folder on the
software disc, then double-click
“UNINST.EXE”.
The following dialog box opens.
1)
When using a DVD-ROM drive, the maximum
transfer rate of 10800 KB/s
2)
The USB EHCI device driver is supplied with
currently available PCI adapter cards that
supports Hi-Speed USB. Microsoft also released
the USB EHCI device driver for Windows XP.
For details, contact your adapter dealer or
consult the Microsoft Corporation Web site.
54
z
If you inserted the software disc into the
drive, copy “UNINST.EXE” to your hard
disk before performing this procedure.
Page 55

3 Click [Yes].
The following dialog box opens.
4 Stop the device with the icon ( )
on the taskbar, then disconnect the
USB cable from your computer.
5 Click [OK].
The following dialog box opens.
6 Click [Yes].
Your computer restarts.
Usage Notes
Important precautions
• Never move or lift the drive when it is
connected to your computer.
Specifically, do not subject the unit to
vibrations or physical shocks while
writing to a disc.
• Do not use any AC adapter other than
the one provided. Using a different
adapter could damage the drive.
• Do not bend the USB cable sharply,
especially near the connectors. Doing
so may damage the cable or cause
poor contact.
Operation and storage
conditions
Avoid using or storing the drive in a hot
or humid environment, or where it may
be subjected to severe vibrations or in
direct sunlight.
Operation
With a Macintosh computer
Mac OS 9
To remove the drive from your
computer, delete the “MPD-AP20U
Bus”, “MPD-AP20U Shim”, “MPDAP20U USB” system extension
installed at the same time as the writing
software.
Mac OS X (ver. 10.1)
Because this operating system comes
standard with writing software, there is
no need to remove the device driver.
Place the drive (or cradle) on a level
surface when it is connected to your
computer.
Shipping
• Keep the packing materials. They may
be necessary if you ever need to ship
the drive.
• Before shipping the drive, be sure that
there is no disc in the drive.
Continued
55
Miscellaneous
Page 56

Condensation
Connection to a USB hub
Avoid sudden temperature changes as
much as possible. Do not attempt to use
the drive immediately after moving it
from a cold to a warm location, or room
temperature rises suddenly, as
condensation may form within the
drive. If you experience a sudden
temperature change during operation,
halt operation immediately and wait
approximately one hour before
resuming operation of the drive.
Lens
Do not touch or look directly into the
lens inside the cover. To prevent dust
from accumulating on the lens, always
keep the cover closed except when
inserting or removing a disc.
Internal battery
• The internal battery is partially
charged upon shipment, but we
recommend that you charge it
completely before using the drive on
internal power.
• The internal battery gradually loses its
charge even when it is not in use. If
you do not use the drive for a day or
two, we recommend that you charge
the internal battery before using the
drive on internal power.
• Charge the internal battery at an
ambient temperature of 5 to 35°C. If
the internal temperature of the drive
exceeds 45°C, charging of the internal
battery stops automatically.
• If you do not use the internal battery
for an extended period of time, it
should be charged, then discharged
completely before being stored, and so
once a year to maintain its usability.
Connect the drive directly to the USB
connector of your computer. Operation
through a USB hub (including keyboard
USB hubs) cannot be guaranteed.
Disconnection from your
computer
The drive can be connected and
disconnected to your computer while it
is on. However, before disconnecting
the drive with Windows, you must click
the taskbar icon and perform the
procedure to stop and remove the
hardware.
The appearance of the taskbar icon
varies depending on your version of
Windows (see below). Click the icon
and follow the instructions on the
screen to stop and remove the drive.
With Windows XP, Windows Me, and
Windows 2000, it is necessary to stop
both the disc and “Memory Stick”
devices.
• Windows XP:
• Windows Me and Windows 2000:
• Windows 98 SE:
56
Page 57

Handling discs
“Memory Stick” handling notes
• Only handle discs by the edges. Never
touch the recording surface.
• Do not write on discs (except with a
felt-tip marker), or paste labels on
them.
• Do not store discs in dusty, dirty, or
humid locations, in direct sunlight, or
near heat-generating devices.
• Avoid spilling liquid on discs.
• To protect important data, always
keep discs in their protective cases.
DVD-Video discs playback
The playback conditions for DVDVideo discs are sometimes determined
by software manufacturers. Because the
drive plays back discs as determined by
the software manufacturer, some drive
functions may not always work as
expected. When playing back DVDVideo discs, refer to the instructions
accompanying each disc.
Make sure that you take the following
precautions when handling “Memory
Stick” to ensure
the safety of your data.
•“Memory Stick” are formatted at the
time of manufacture. There is no need
to reformat them. Formatting a
“Memory Stick” with your computer
may cause access problems when
inserting it into other “Memory Stick”
compatible devices.
• To use a “Memory Stick” formatted
with a computer, reformat it with a
“Memory Stick” compatible device.
•“Memory Stick” compatible devices
require the “MemoryStick.ind” file on
the “Memory Stick”. Do not delete
this file.
• Do not attempt to defragment or
compress the “Memory Stick” drive.
• Data may be lost if:
-A “Memory Stick” is removed from
the drive or the computer is turned
off while reading or writing data.
-A “Memory Stick” is subjected to an
electrostatic discharge or
electrostatic noise.
• When affixing labels to “Memory
Stick”, only use “Memory Stick”
labels. Do not use other types of
labels.
• When storing or carrying a “Memory
Stick”, keep it in its original case.
• Avoid touching the connector or
making it come in contact with
metallic objects.
• Do not drop, bend, or submit
“Memory Stick” to external shock.
• Do not disassemble or modify
“Memory Stick”.
• Avoid dropping liquids on “Memory
Stick”.
Miscellaneous
57
Page 58

Troubleshooting
If you are experiencing problems with the drive, verify the following items before
contacting us for assistance. If you cannot resolve the problem after verifying these
items, contact your dealer or our customer service department.
Problem
The drive is not detected by
the computer, or it behaves
incorrectly or intermittently.
Windows 2000 does not
detect the “Memory Stick”
reader/writer of the drive.
The drive does not come on
(the CHARGE/BUSY
indicator does not light
green even if the drive is
connected to the
computer).
Cause/Solution
t If you are using the drive on internal power, the remaining
charge of the internal battery may be low. Connect the drive
to the AC power adapter and recharge the internal battery.
t The AC power adapter or USB cable may not be properly
connected. Verify that the connectors are firmly mated at
the drive and computer ends. See the “Quick Start Guide”
to confirm that the connections are correct.
t The USB interface card may not be set up correctly. Refer
to the instructions provided with the USB interface card and
perform the setup procedure again.
t With computers running Windows 98 SE or Mac OS 9.x, the
device drivers may not be properly installed. Uninstall the
device drivers (page 54), then follow the instructions
outlined in the “Quick Start Guide” to reinstall the device
drivers.
t If Windows 2000 is not updated to Service Pack 3 (or later),
you cannot use the “Memory Stick” reader/writer. For
details, refer to the “Quick Start Guide”.
t The drive may be malfunctioning for an unspecified reason.
Insert a pin-like object (such as a paper clip) into the
emergency reset hole next to the manual ejection lever at
the base of the drive.
58
Page 59

Problem
The drive does not respond
to remote control
commands or NO MEDIA
appears on the remote
control display even if you
insert a disc.
After inserting a disc, the
audio skips or data cannot
be read.
Cause/Solution
t When the HOLD function is in use, slide the HOLD switch
on the remote control in the opposite direction indicated by
the arrow. (For details, see page 48.)
t When the control knob is pulled out, it serves as the volume
control. Push it back.
t You cannot use the remote control when the drive is
connected to your computer. If you want to use the drive as
a CD player, disconnect it from the computer. If you want to
use the drive as a CD player while it is connected to your
computer, use a player installed on your computer to listen
to music.
t If you are using the drive on internal power, the remaining
charge of the internal battery may be low. Connect the drive
to the AC power adapter and recharge the internal battery.
t Confirm that the disc that you are trying to play back
contains files compatible with the drive. (For details, see
page 52.)
t The disc that you are trying to play back may not be
“finalized”. Therefore, you may not be able to play it back or
playback may take some time to start.
t Because of the disc, device used in creating the disc, and
settings at the time of creation, you may not be able to play
back some discs with the drive.
t The drive may be malfunctioning for an unspecified reason.
Insert a pin-like object (such as a paper clip) into the
emergency reset hole next to the manual ejection lever at
the base of the drive. (See illustration on the previous
page.)
t If, after performing the above, you are still unable to play
back discs, see the item titled “After inserting a disc, the
audio skips or data cannot be read”.
t The disc may be inserted with the label side facing down.
Discs must be inserted label side up.
t The disc may be incompatible with this drive. See
“Compatible discs” on page 49.
t The disc or the drive lens may be dirty. If the lens is dirty,
contact your retailer or repair service center nearest you.
t The disc may be scratched. Try a different disc to determine
whether the drive is operating normally.
t There may be dust or other foreign objects on the drive
turntable. If so, wipe it clean.
t Condensation may have formed in the drive or on the disc.
If the disc surface or the drive lens appears to be fogged,
remove the disc and wait approximately one hour for the
condensation to evaporate.
Miscellaneous
Continued
59
Page 60

Problem
Cannot eject the disc.
An error occurs when
writing to a disc.
Cause/Solution
t If the LOCK switch on the front of the drive is in the locked
position, move it to the other position.
t While writing is in progress, you cannot remove the disc by
pressing the EJECT button. Remove the disc by following
the instructions of the writing software that you are using.
Refer to the manual provided with the writing software.
t The computer may be hung. Restart your computer.
t If the disc cannot be ejected despite the above, push the
manual ejection lever in the direction of the arrow to open
the cover.
t If the drive is connected to a USB hub (including keyboard
hubs), reconnect the drive directly to a USB port on the
computer.
t If a low write speed is selected, change to a higher speed.
Depending on the media being used, higher writing speeds
may work better. Changing the writing speed is done
through the writing software.
t If the computer has a slow CPU, you may need to use a
slower writing speed.
t Disable any screensaver that may be running on the
computer.
t Close any software that may be running, other than the
writing software. Other software running while writing data
can cause the data transfer rate to drop considerably, which
can cause the writing process to fail (buffer underrun).
t Close any resident disc or other utilities that are supposed
to accelerate disc access.
t In some cases, file fragmentation on the hard disk can
cause problems. Defragment the hard disk. Use “Disk
Defragmenter” found in the [Accessories], [System Tools] or
another suitable program.
t If on-the-fly writing (copying data disc to disc from a
CD-ROM drive to the drive) is enabled, disable it. Instead,
copy the data to the hard disk first, and then write from the
hard disk to the drive. Write errors are more ilkely to occur
with on-the-fly writing.
60
Page 61

Problem
Created music CDs are
noisy (noise is mixed into
the played sound).
Playback starts from where
you stopped. (Resume
function)
During playback of a disc
containing music files, the
disc does not rotate, but
you can hear your music
normally.
When you close the cover
of the drive, the disc starts
to rotate.
A problem occurs when the
computer starts, or the
writing software does not
operate properly.
Writing software other than
the supplied program has
been installed, but does not
work.
Although the drive operated
normally in the past,
operation became unstable
at some point.
No sound is output from the
drive headphones when
playing music CDs or files.
Cause/Solution
t Refer to the FAQ or troubleshooting sections of the writing
software manual to change the writing software settings.
t Some computers generate more noise than others, so using
a different computer may allow creating noise-free music
CDs.
t The resume function is active. To start playback from the
first track, turn the control knob in the N/> direction until
playback starts, or open the cover of the drive.
t The drive is designed to stop the rotation of discs during
playback to reduce power consumption. This is not a
malfunction.
t The drive is reading the information on the disc. This is not
a malfunction.
t If the writing software provided with the drive is installed on
a computer with packet writing-based writing software
already installed, the writing software may not operate
correctly. The other packet writing software should be
uninstalled beforehand. Note that packet writing software
comes preinstalled on some computers, so check your
system to see if it is present.
t Some writing software or versions of writing software may
be incompatible with the drive. For details, contact the
manufacturer or reseller of the writing software. Sometimes
you can solve the problem by upgrading or downloading a
later version of the software.
t If operation becomes unstable after a particular program is
installed, uninstall that program. If this resolves the
problem, refrain from using or reinstalling that program.
t When you connect the drive to your computer, you cannot
listen to music with through the headphone jack of the drive.
Miscellaneous
Continued
61
Page 62

Problem
No sound is output from the
computer speakers when
playing music CDs or files.
The “Batt NG” message
appeared on the remote
control display.
The “Hi Temp” message
appeared on the remote
control display.
The internal battery does
not charge or can only be
used for a short period of
time.
Cause/Solution
t The sound output destination is determined by Windows
settings.
• If using Windows XP, on the [Start] menu, click [Control
Panel]. In [Control Panel], click [Performance and
Maintenance], then click [System]. In the [System
Properties] dialog box, click the [Hardware] tab, then click
the [Device Manager] button. In the [Device Manager]
window, double-click [DVD/CD-ROM drives], then
double-click [SONY CD-RW MPD-AP20U USB Device].
In the properties dialog box to enable CD audio from the
computer speakers, click the [Properties] tab, then select
the “Enable digital CD audio for this CD-ROM device”
check box.
• If using Windows Me or Windows 2000, on the [Start]
menu, point to [Settings], then click [Control Panel]. In
[Control Panel], double-click [System]. In the [System
Properties] dialog box, click the [Device Manager] tab. (If
using Windows 2000, click the [Hardware] tab, and then
the [Device Manager] button to display the [Device
Manager] window.) To enable CD audio from the computer
speakers, double-click [CD-ROM], double-click the drive,
click the [Properties] tab, and select the “Enable digital CD
audio for this CD-ROM device” check box.
• If using Windows 98 SE, on the [Start] menu, point to
[Settings], then click [Control Panel]. In [Control Panel],
double-click [Multimedia]. In the [Multimedia Properties]
dialog box, click the [CD Music] tab. To enable CD audio
from the computer speakers, select the “Enable digital
CD audio for this CD-ROM device” check box.
• If using a Macintosh computer, music CDs cannot be
played through the computer speakers. We recommend
that you use the CD-ROM or DVD-ROM drive of your
Macintosh computer to play music CDs.
• Some computers cannot play music from an external
drive through their speakers.
t The internal battery may need to be replaced. To replace
the internal battery, we ask that you contact your dealer or
our customer service department. (See page 67.)
t Make sure that the ambient temperature where you are
using the drive is within the operating temperature range
specified on page 64.
t If this message appears when you are charging the internal
battery, disconnect the AC power adapter from the drive and
wait until the drive cools down before resuming the operation.
t Battery operation time is reduced at low temperatures.
t The internal battery may need to be replaced. To replace
the internal battery, we ask that you contact your dealer or
our customer service department. (See page 67.)
62
Page 63

Warranty Card &
After sales service
After Sales
Service
Warranty card
• A warranty card should be provided
with this product at the place of
purchase.
• Please read the warranty card, fill in
the specified information, and retain it
for future reference.
• The warranty period is one year from
the date of purchase.
Note
The warranty and technical support service are
valid only in the countries or sales regions
specified on the warranty card.
Repairs under warranty
We provide repair services as described
in this manual and on the warranty card.
Please contact your supplier or repair
service provider for details.
Repairs outside warranty
If operation can be restored by repair,
we will repair the drive for a charge.
Repair requirements
If the drive needs repair, return it
together with all supplied accessories
(USB cable and AC power adapter) to
your place of purchase or repair service
provider.
• If you return the drive to your place of
purchase or repair service provider
because of damage resulting from
misuse or other causes, you will be
responsible for all repair-related
expenses, including shipping and
handling and product adjustments.
63
Miscellaneous
Page 64

Specifications
Speed
Write speed
24 × maximum (CD-R)
10 × maximum (CD-RW)
Read speed
24 × maximum (CD-ROM)
8 × maximum (DVD-ROM)
Discs
Compatible discs
CD-ROM DVD-ROM
CD-ROM XA DVD-Video
Photo CD CD-DA
CD-R CD-RW
DVD+R
DVD-R
Video CD CD Extra (CD+)
CD TEXT
Disc diameter: 12 cm
1)
Writing methods
Track-at-once
Disc-at-once
Session-at-once
Fixed packet writing
1)
1)
DVD+RW
DVD-RW
1)
1)
8 cm (CD-DA reading
only)
The drive can only read these discs. Depending
on the discs, devices, and settings used in
writing the discs, the drive may not be able to
read some discs.
Drive
Data transfer rate
Maximum: 10800 KB/s
(DVD-ROM 8 ×2))
Access time
Average (random stroke): 160 ms
2)
The maximum data transfer rate varies
according to the performance of your computer.
Buffer underrun error protection
technology
Laser
CD
Type
GH0780MA6CS
Wavelength
780 nm
Output power
200 mW (pulse)
100 mW (CW)
DVD
Type
GH6D407B5A
GH6D407B5A1
Wavelength
650 nm
Output power
6.3 mW
Operating environment/Storage
environment
64
Operating temperature
5 °C to 35 °C
Page 65

Interfaces
Drive interface
Hi-Speed USB (USB 2.0-compliant)
3)
Used in connecting to your computer using the
USB cable provided with the drive.
Buffer capacity
8 MB
“Memory Stick” slot
Write speed
Up to 1.5 MB/s
4)
Read speed
Up to 2.45 MB/s
4)
Maximum read and write speeds depend on the
performance of your computer and the type of
“Memory Stick” used.
4)
Power supply/Miscellaneous
Power supply
External power jack: rated DC 10 V
AC adapter: AC-CRX20
(rated input AC 100 V - 240 V)
Power consumption
10 W (charging)
7.5 W (not charging)
Size
Approximately 136.4 × 22 × 159 mm
(5.4 × 0.9 × 6.3 in.)
(W × H × D)
Mass
Approximately 330 g (0.7 lb, drive
only)
Internal battery (Li-ion)
Recharge time approx. 4 hours
3)
Operation
5), 6)
CD-DA
Playback approx. 4 hours
6)
MP3 disc
Playback approx. 10 hours
6)
DVD-Video
Playback approx. 1.5 hours
6)
CD-R
Writing approx. 9 discs
7)
CD-RW
Writing approx. 8 discs
5)
General indication of the amount of time
required to fully charge the battery from the
completely discharged condition at 23 °C.
6)
Actual charging and playback times depend on
the ambient temperature, operating conditions,
and the type of disc.
7)
The number of discs that can be consecutively
written is based on writing to 650 MB discs, at
the optimum write speed, with a 480 Mbps
transfer rate. Writing time may vary depending
on your computer, the disc quality, and the
remaining charge of the internal battery.
7)
Miscellaneous
65
Page 66

Cradle
Power supply
External power jack: rated DC 10 V
AC adapter: AC-CRX20
(rated input AC 100 V-240 V)
Compatible batteries (all sold
separately)
8)
Nickel Cadmium (Ni-Cd) rechargeable
batteries
9)
Nickel Metal Hydride (Ni-MH)
rechargeable batteries
9)
Size
Approximately 132.3 × 43.5 × 158.5
mm (5.2 × 1.7 × 6.2 in.)
(W × H × D)
Mass
Approximately 160 g (0.4 lb, cradle
only)
8)
You cannot use dry cell batteries.
9)
You cannot use the cradle to recharge batteries.
The specifications and appearance of
the product are subject to change
without notice.
Product and Support Information
Sony global sites information
Products purchased in the USA:*
http://www.sony.storagesupport.com/
Products purchased in Canada:
http://www.sony.ca/
Products purchased in Australia or
New Zealand:
http://www.sony.com.au/support.asp
Products purchased in Europe:*
http://www.sonyisstorage.com/support
Products purchased in Hong Kong:*
http://www.sony.com.hk/Electronics/cp
Products purchased in China:*
http://www.sony.com.cn/electronics/
edmh/default1.html
Products Purchase in Singapore:
http://www.sony.com.sg/asianit/
Products purchased in Taiwan:*
http://www.sony.com.tw/stwn/cpd/
index.htm
Products purchased in Korea:*
http://www.sony.co.kr/cp
Products purchased in Brazil:
http://www.sonybrasil.com.br
Products purchased in the Middle
East:
http://www.sony-middleeast.com
* Local Web sites for computer peripheral
products
About the Bundled Writing Software
Detailed information about the supplied
66
Page 67

writing software is available on the
Web sites of the software manufacturers
and software distributors.
Customer Services for Media
Products
Sony Electronics Inc., New Jersey,
U.S.A. Sony of Canada Ltd., Ontario,
Canada
http://www.mediabysony.com/
Sony France S.A. Customer Service
40465 Pontonx sur l’Adour France
http://www.sony-europe.com/
For products purchased in Canada
(Sony of Canada Limited):
Monday to Friday
8:00 a.m. - 8:00 p.m. EST
• Toll Free: 1-800-961-7669
• E-mail Address: it_help@sony.ca
For products purchased in Australia
or New Zealand (Sony Australia
Limited):
Monday to Friday
8:30 a.m. - 7:00 p.m. EST
• Toll Free: 1300-13-7669
• International: +61-2-9887-6666
Technical support
Please consult the above sources before
calling with questions about using
MPD-AP20U, or with technical
questions about the drive or the
supplied software. If using telephone or
e-mail support, please have the
following information available:
• Model number: MPD-AP20U
• Serial number
• Date and place of purchase
• Computer maker and model number
• Computer specifications (CPU speed,
memory size, OS version, etc.)
• Writing software used (version, etc.)
Local technical support service is
available in the following sales
regions:
For products purchased in the USA
(Sony Electronics Inc):
Monday to Saturday
8:00 a.m. - 8:00 p.m. CT
• Toll Free: 1-800-588-3847
• Free telephone support is offered for
90 days from your first call.
For products purchased in Europe
(Sony UK Limited):
Monday to Friday
8:00 a.m. - 9:00 p.m.
• Toll Free:
00800-CNCESONY
(00800-26237669)
• E-mail Address:
Helpdesk@SonyNordic.no
(For Nordic regions)
CNCE.SONY@suplie.com
(For other European regions)
Miscellaneous
67
Page 68

Printed in Malaysia
 Loading...