

Page 1
4-668-816-11(1)
CD-RW/DVD-ROM
Drive
Setup Guide
Windows XP
Windows Me
MPD-AP20U
2002 Sony Corporation
Windows 2000
Windows 98 SE
Mac OS
Page 2

Table of Contents
When Using Windows XP .....................................................3
When Using Windows Me ....................................................5
When Using Windows 2000 .................................................7
When Using Windows 98 Second Edition ..........................9
When Using Mac OS ...........................................................15
2
Page 3

When Using Windows XP
Perform the following procedure to set up the drive with Windows XP.
1 Turn on your computer.
Caution
Be sure to log on as a user with “Administrator” access privileges.
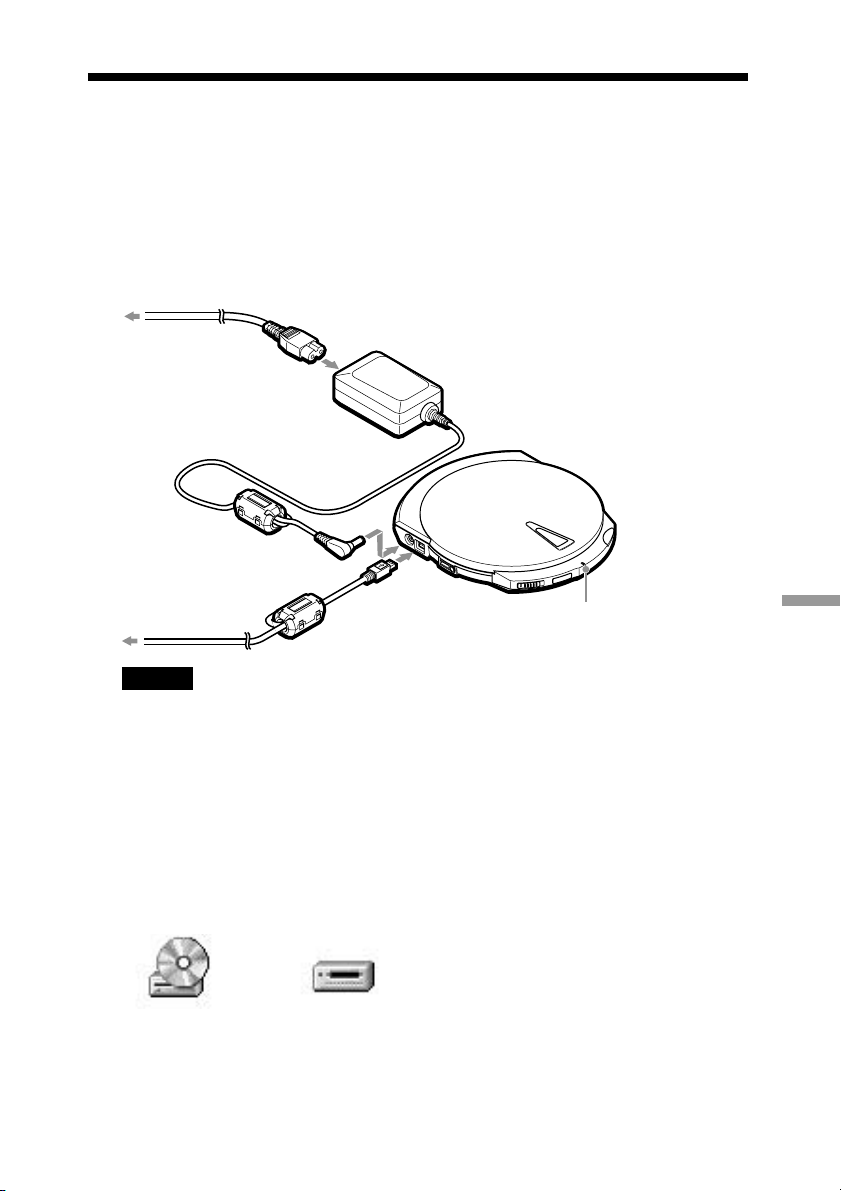
2 Connect the drive to the power outlet with the AC power adapter
and to your computer with the USB cable.
Power cord
To power outlet
AC power adapter
Windows XP
To USB connector
of your computer
Caution
• Connect only the supplied AC power adapter and cord.
• Connect the drive directly to the USB connector of your computer. Operation through a USB
hub (including keyboard USB hubs) cannot be guaranteed.
USB cable
CHARGE/BUSY indicator
The CHARGE/BUSY indicator of the drive lights green. Messages about the
new hardware appear above the Windows XP taskbar.
3
Page 4

3 Confirm that the drive is detected.
On the [Start] menu, click [My Computer] and confirm that the following
icons are present.
• • • • The “Memory Stick” reader/writer appears as
“Removable Disk”.
4 Insert the supplied software disc and install the software.
To install the software, refer to the supplied “Software Quick Start Guide”.
If your computer does not detect the drive
If your computer does not detect the drive, read and perform the following.
• Disconnect the USB cable from your computer’s USB connector. Restart your
computer. Reconnect the USB cable.
• The CHARGE/BUSY indicator does not light green, even when the drive is
connected to your computer. The drive is not on. Verify the connections between
the drive, AC power adapter, power cord, and power outlet.
4
Page 5
When Using Windows Me
Perform the following procedure to set up the drive with Windows Me.
1 Turn on your computer.
2 Connect the drive to the power outlet with the AC power adapter
and to your computer with the USB cable.
Power cord
To power outlet
AC power adapter
To USB connector
of your computer
Caution
• Connect only the supplied AC power adapter and cord.
• Connect the drive directly to the USB connector of your computer. Operation through a USB
hub (including keyboard USB hubs) cannot be guaranteed.
USB cable
CHARGE/BUSY indicator
The CHARGE/BUSY indicator of the drive lights green. Messages about the
new hardware appear on the screen, then disappear.
3 Confirm that the drive is detected.
On your desktop, double-click [My Computer] and confirm that the following
icons are present.
• • • • The “Memory Stick” reader/writer appears as
“Removable Disk”.
4 Insert the supplied software disc and install the software.
To install the software, refer to the supplied “Software Quick Start Guide”.
Windows Me
5
Page 6

If your computer does not detect the drive
If your computer does not detect the drive, read and perform the following.
• Disconnect the USB cable from your computer’s USB connector. Restart your
computer. Reconnect the USB cable.
• The CHARGE/BUSY indicator does not light green, even when the drive is
connected to your computer. The drive is not on. Verify the connections between
the drive, AC power adapter, power cord, and power outlet.
6
Page 7

When Using Windows 2000
Perform the following procedure to set up the drive with Windows 2000.
Caution
To be able to use the drive, Windows 2000 must be updated with Windows 2000 Service Pack 3 or
later (hereafter, “SP3”).
Notes
• Consult the Microsoft Corporation Web site on information about obtaining service packs.
• If you are unsure whether Windows 2000 was updated with SP3, perform the following to confirm it.
On your desktop, right-click [My Computer] and click [Properties] on the shortcut menu. If “Service
Pack 3” appears under “System” on the [General] tab in the [System Properties] dialog box, SP3 is
installed.
1 Turn on your computer.
Caution
Be sure to log on as a user with “Administrator” access privileges.
2 Connect the drive to the power outlet with the AC power adapter
and to your computer with the USB cable.
Power cord
To power outlet
AC power adapter
Windows 2000
To USB connector
of your computer
Caution
• Connect only the supplied AC power adapter and cord.
• Connect the drive directly to the USB connector of your computer. Operation through a USB
hub (including keyboard USB hubs) cannot be guaranteed.
USB cable
CHARGE/BUSY indicator
The CHARGE/BUSY indicator of the drive lights green. Messages about the
new hardware appear on the screen, then disappear.
7
Page 8

3 Confirm that the drive is detected.
On your desktop, double-click [My Computer] and confirm that the following
icons are present.
• • • • The “Memory Stick” reader/writer appears as
“Removable Disk”.
4 Insert the supplied software disc and install the software.
To install the software, refer to the supplied “Software Quick Start Guide”.
If your computer does not detect the drive
If your computer does not detect the drive, read and perform the following.
• Disconnect the USB cable from your computer’s USB connector. Restart your
computer. Reconnect the USB cable.
• The CHARGE/BUSY indicator does not light green, even when the drive is
connected to your computer. The drive is not on. Verify the connections between
the drive, AC power adapter, power cord, and power outlet.
8
Page 9

When Using Windows 98 Second
Edition
Perform the following procedure to set up the drive with Windows 98 SE.
Connecting the drive
1 Turn on your computer.
2 Connect the drive to the power outlet with the AC power adapter
and to your computer with the USB cable.
Power cord
To power outlet
AC power adapter
To USB connector
of your computer
Caution
• Connect only the supplied AC power adapter and cord.
• Connect the drive directly to the USB connector of your computer. Operation through a USB
hub (including keyboard USB hubs) cannot be guaranteed.
USB cable
CHARGE/BUSY indicator
Windows 98 Second Edition
9
Page 10

The CHARGE/BUSY indicator of the drive lights green. The [Add New
Hardware Wizard] dialog box appears when you connect the drive to your
computer.
3 Insert the supplied software disc into a CD-ROM drive other than
this drive.
4 Click [Next], then select “Search for the best driver for your
device (Recommended)” in the screen that appears.
10
Page 11

5 Click [Next], select “Specify a location” in the screen that
appears, then type “D:\USB” (When the drive where you inserted
the disc is “D:”).
Notes
• If you copied the device driver to the hard disk of your computer, type the path of the folder
where you copied it.
• You can also click [Browse] and select a location in the dialog box that appears. (With this
method, you do not need to type the path of the folder.)
6 Click [Next] until the following screen appears.
11
Windows 98 Second Edition
Page 12

7 Click [Finish].
The [Found New Hardware Wizard] dialog box appears and the “USB2.0ATA/ATAPI Mass Storage” device driver installation starts.
8 Repeat steps 4 to 7.
9 Confirm that the drive is detected.
On your desktop, double-click [My Computer] and confirm that the following
icons are present.
• • • • The “Memory Stick” reader/writer appears as
“Removable Disk”.
10Insert the supplied software disc and install the software.
To install the software, refer to the supplied “Software Quick Start Guide”.
If your computer does not detect the drive
If your computer does not detect the drive, read and perform the following.
• Disconnect the USB cable from your computer’s USB connector. Restart your
computer. Reconnect the USB cable.
• The CHARGE/BUSY indicator does not light green, even when the drive is
connected to your computer. The drive is not on. Verify the connections between
the drive, AC power adapter, power cord, and power outlet.
• The device driver may not be properly installed. Uninstall, then reinstall the
device driver. (For details, See next page.)
12
Page 13

Removing the device driver
There is an uninstaller on the provided software disc. Use it to remove the device
driver.
1 Insert the software disc into the CD-ROM drive of your computer.
2 Open the USB folder on the software disc, then double-click
“UNINST.EXE”.
The following dialog box opens.
Note
If you inserted the software disc into the drive, copy “UNINST.EXE” to your hard disk before
performing this procedure.
3 Click [Yes].
The following dialog box opens.
4 Stop the device with on the taskbar, then disconnect the USB
cable from your computer.
Windows 98 Second Edition
13
Page 14

5 Click [OK].
The following dialog box opens.
6 Click [Yes].
Your computer restarts.
14
Page 15

When Using Mac OS
Perform the following procedure to set up the drive with a Macintosh computer.
Installing the writing software
1 Turn on your computer.
2 Insert the supplied software disc into the CD-ROM drive of your
computer and install the writing software.
Note
With Mac OS 9, the system extensions are installed along with the writing software. To install the
software, refer to the supplied “Software Quick Start Guide”.
Connecting the drive
1 Turn on your computer.
2 Connect the drive to the power outlet with the AC power adapter
and to your computer with the USB cable.
Power cord
To power outlet
AC power adapter
To USB connector
of your computer
Caution
• Connect only the supplied AC power adapter and cord.
• Connect the drive directly to the USB connector of your computer. Operation through a USB
hub (including keyboard USB hubs) cannot be guaranteed.
The CHARGE/BUSY indicator of the drive lights green.
USB cable
CHARGE/BUSY indicator
Mac OS
15
Page 16

3 Confirm that the drive is detected.
Insert a CD-ROM into the drive and confirm that a CD-ROM icon appears on
the desktop. Alternatively, insert a “Memory Stick” into the drive and confirm
that a disc icon appears on the desktop.
If your computer does not detect the drive
If your computer does not detect the drive, read and perform the following.
• Disconnect the USB cable from your computer’s USB connector. Restart your
computer. Reconnect the USB cable.
• The CHARGE/BUSY indicator does not light green, even when the drive is
connected to your computer. The drive is not on. Verify the connections between
the drive, AC power adapter, power cord, and power outlet.
• With Mac OS 9, the system extensions of the drive may be conflicting with other
system extensions. Open the [Extensions Manager] and deactivate any system
extensions that may be conflicting with the drive system extensions. If you are
unsure of which system extensions to deactivate, click [Mac OS 9.x.x Base] on
the [Selected Set] list at the top of the [Extensions Manager] window, reactivate
the drive’s system extensions, then restart your computer.
• With Mac OS 9, the drive system extensions may not be properly installed.
Reinstall the writing software with the system extensions.
16
Page 17

 Loading...