

Sony MHS-TS22 User Manual [ru]

contents
Search
Search
Table of
Operation
Settings
Handbook
Mobile HD Snap Camera
Index
MHS-TS22
© 2012 Sony Corporation 4-416-996-12(1)
GB

How to use this handbook
Click on a button on the right to jump to the corresponding page.
This is convenient when searching for a function you want to view.
contents
Table of
Search for information by function.
Operation
Search
Settings
Search
Index
Marks and notations used in this handbook
Search for information by operation.
Search for information in a listing of
setting items.
Search for information by keyword.
In this handbook, the sequence of
operations is shown by arrows (t).
Operate the camera in the order indicated.
Marks are shown as they appear in the
camera’s default setting.
contents
Search
Search
Table of
Operation
Settings
Index
The default setting is indicated by .
Indicates cautions and limitations relevant
to the correct operation of the camera.
z Indicates information that is useful to
know.
GB
2
Notes on using the camera
contents
Table of
Internal memory back up
Be sure to make a backup copy to protect your
data.
Notes on recording/playback and
connection
• Before you start recording, make a trial
recording to make sure that the camera is
working correctly.
• Do not aim the camera at the sun or other bright
light.
• Do not use the camera near a location that
generates strong radio waves or emits radiation.
Otherwise, the camera may not properly record
or play back images.
• If moisture condensation occurs, remove it
before using the camera (page 67).
• Do not shake or strike the camera. It may cause
a malfunction and you may not be able to record
images. Furthermore, the recording media may
become unusable or image data may be
damaged.
• When connecting your camera to another device
with a cable, be sure to insert the connector plug
in the correct way. Pushing the plug forcibly
into the terminal will damage the terminal and
may result in a malfunction of your camera.
• Playback of movies other than those shot, edited
or composed on this camera is not guaranteed.
On camera’s temperature
The camera may get warm due to continuous use,
but it is not a malfunction.
On the overheat protection
Depending on the camera and battery temperature,
you may be unable to record movies or the power
may turn off automatically to protect the camera.
A message will be displayed on the LCD screen
before the power turns off or you can no longer
record movies.
Notes on the battery pack
• The battery pack is built into the camera. Charge
the camera before using for the first time.
• You can charge the battery pack even if it is not
completely discharged. In addition, even if the
battery pack is not fully charged, you can use the
partially charged capacity of the battery pack as
is.
• For details on the usable battery pack, see page
66.
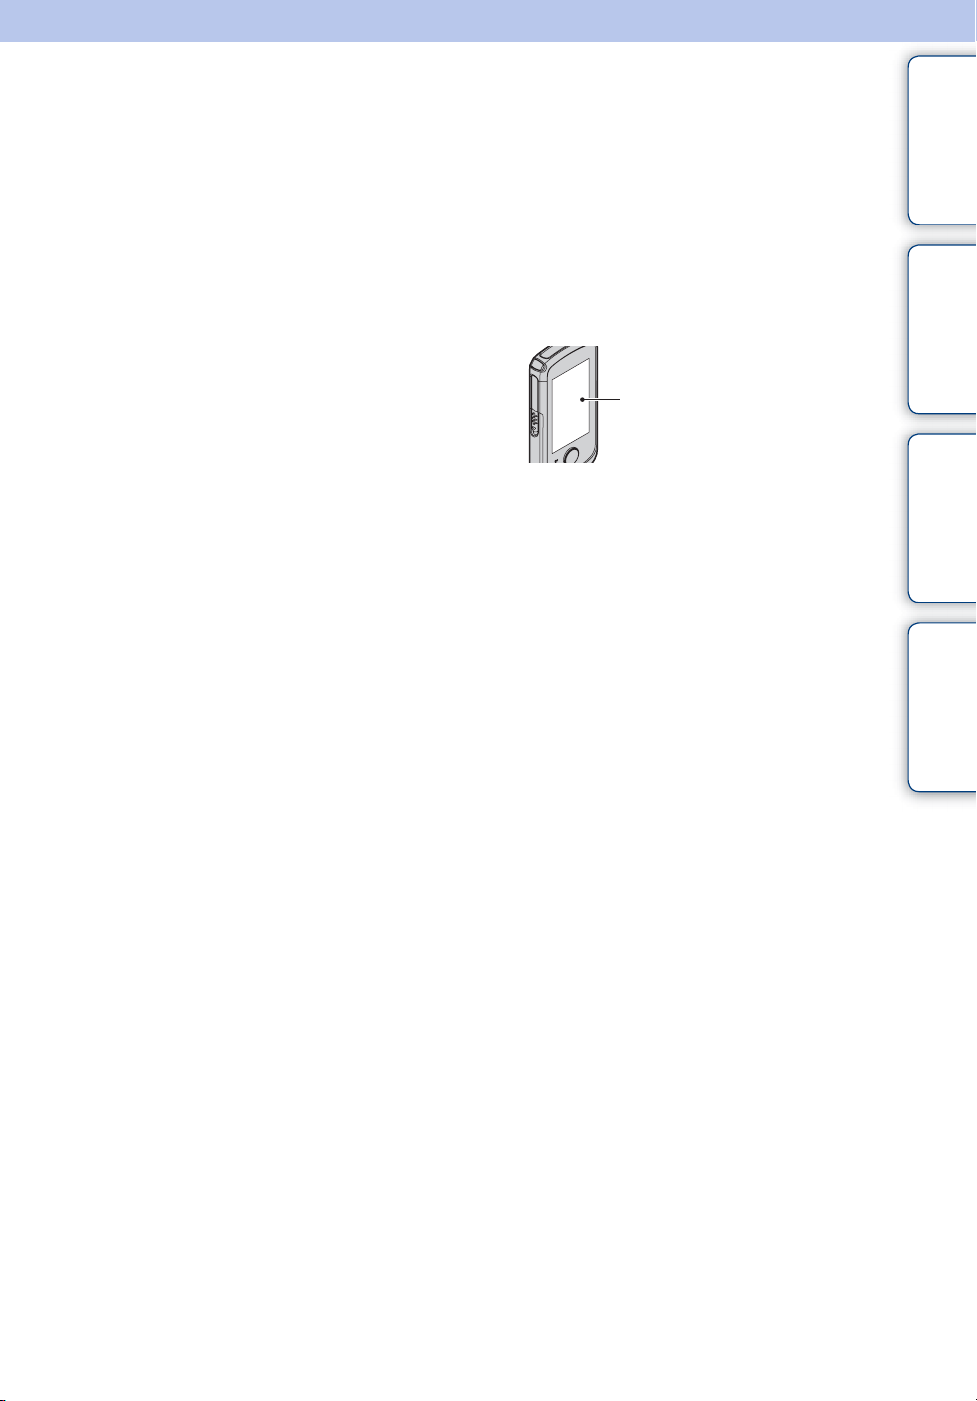
Notes on the LCD screen and lens
• The LCD screen is manufactured using
extremely high-precision technology so over
99.99% of the pixels are operational for
effective use. However, some tiny black and/or
bright dots (white, red, blue or green) may
appear on the LCD screen. These dots are a
normal result of the manufacturing process and
do not affect the recording.
Black, white, red, blue or
green dots
• Exposing the LCD screen or the lens to direct
sunlight for long periods may cause
malfunctions. Be careful when placing the
camera near a window or outdoors.
• Do not press against the LCD screen. The screen
may be discolored and that may cause a
malfunction.
• Images may trail across on the LCD screen in a
cold location. This is not a malfunction.
On image data compatibility
• This camera supports “MP4 format” as movie
file format. Therefore, movies recorded by this
camera cannot be played on devices that do not
support “MP4 format”.
• This camera does not support “AVCHD format”
and therefore is not compatible with the
playback and recording of movies in “AVCHD
format” like a Digital HD Video camera
recorder.
• Still images recorded by this camera are
compressed/recorded in JPEG format. The file
extension is “.JPG”.
• The camera conforms with DCF (Design rule
for Camera File system) universal standard
established by JEITA (Japan Electronics and
Information Technology Industries
Association).
• Sony does not guarantee that the camera will
play back images recorded or edited with other
equipment, or that other equipment will play
back images recorded with the camera.
Warning on copyright
Television programs, films, videotapes, and other
materials may be copyrighted. Unauthorized
recording of such materials may be contrary to the
provisions of the copyright laws.
Continued r
Operation
Search
Settings
Search
Index
GB
3
No compensation for damaged
content or recording failure
Sony cannot compensate for failure to record or
loss or damage of recorded content due to a
malfunction of the camera or recording media, etc.
The images used in this handbook
• The images used as examples in this handbook
are reproduced images, and are not actual
images shot using the camera.
• Design and specifications are subject to change
without notice.
Notes on playing back movies on
other devices
The camera is compatible with MPEG-4 AVC/
H.264 Main Profile. Therefore, you cannot play
back images on the camera with the devices which
are not compatible with the MPEG-4 AVC/H.264.
About water-proof, dust-proof, and
shock-proof performance of the
camera
This camera is equipped to be water-proof, dustproof and shock-proof. Damage caused from
misuse, abuse or failure to properly maintain the
camera is not covered by the limited warranty.
This camera is water-proof/dust-proof equivalent
to IEC60529 IP58. The camera is operable up to a
water depth of 5 m for 60 minutes.
• Do not subject the camera to pressurized water,
such as from a tap.
• Do not use in hot springs.
• Use the camera in the recommended operating
water temperature range of 0°C to 40°C (32°F to
104°F).
• Conforming to MIL-STD 810F Method 516.5Shock standards, this product has passed testing
when dropped from a height of 1.5 m above a 5cm thick plywood board*.
* Depending on use conditions and circumstances,
no guarantee is made regarding damage to,
malfunction of, or the water-proof performance
of this camera.
• As for dust-proof/shock-proof performance,
there is no guarantee that the camera will not
become scratched or dented.
• Sometimes water-proof performance is lost if
the camera is subjected to a strong shock such as
from being dropped. We recommend the camera
be inspected at an authorized repair shop for a
fee.
• Accessories supplied do not meet water-proof,
dust-proof, and shock-proof specifications.
• Read “Precautions” (page 67) before operating
the camera.
• If you attach the camera to a tripod with a screw
over 5.5 mm in length, a hole may result in the
camera body, and cause water to enter the
camera.
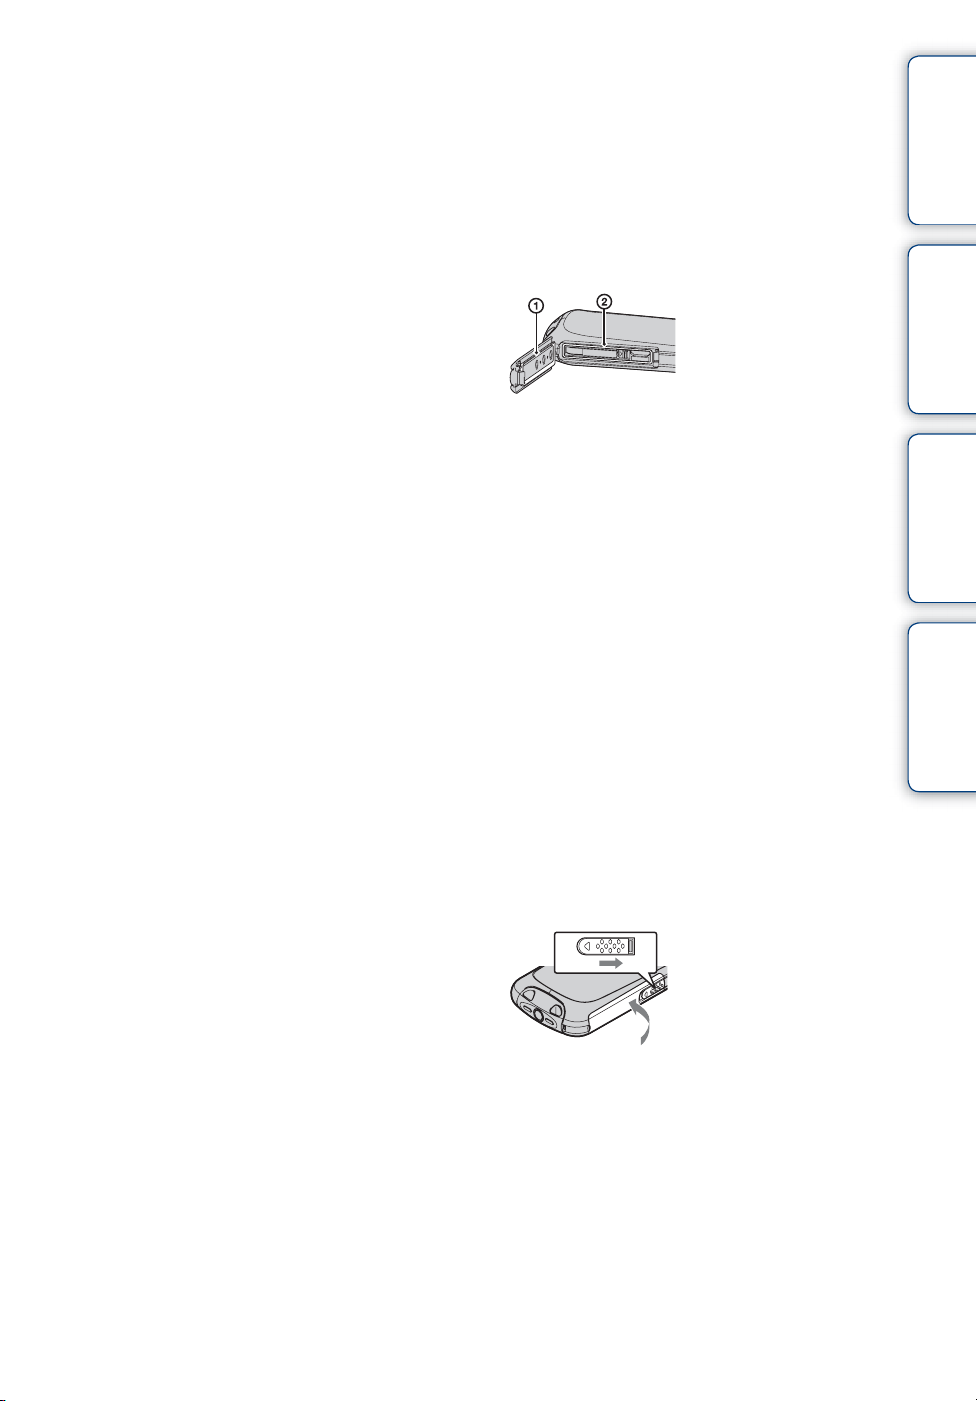
Notes before using the camera under/
near water
• Make sure that no foreign matter such as sand,
hair, or dirt gets inside the multi-connector
cover. Even a small amount of foreign matter
may lead to water entering the camera.
1Sealing gasket
2Surface contacting
the sealing gasket
• Confirm that the sealing gasket and its mating
surfaces have not become scratched. Even a
small scratch may lead to water entering the
camera. If the sealing gasket or its mating
surfaces become scratched, take the camera to
an authorized repair shop to have the sealing
gasket replaced for a fee.
• If dirt or sand gets on the sealing gasket or its
mating surfaces, wipe the area clean with a soft
cloth that will not leave behind any fibers. Be
careful not to damage the sealing gasket or
mating surfaces when cables are connected.
• Do not open/close the multi-connector cover
with wet or sandy hands or near water. There is
a risk this will lead to sand or water getting
inside. Before opening the cover, perform the
procedure described in “Cleaning after using the
camera under/near water”.
• Open the multi-connector cover with the camera
completely dry.
Closing the covers
Multi-connecter cover
knob
• Fully close the cover until the yellow mark
under the slide lock can no longer be seen.
Notes on using the camera under/near
water
• Do not subject the camera to shock such as from
jumping into water.
• Do not open and close the multi-connector cover
while under/near water.
• This camera sinks in water. Place your hand
through the wrist strap to prevent the camera
from sinking.
Continued r
contents
Table of
Operation
Search
Settings
Search
Index
GB
4
• Faint, white, circular spots may appear in underwater flash photos due to reflections off of
floating objects. This is not a malfunction.
• Set [Underwater Mode] if you are concerned
about the color.
• If water drops or other foreign matter is present
on the lens, you will be unable to record clear
images.
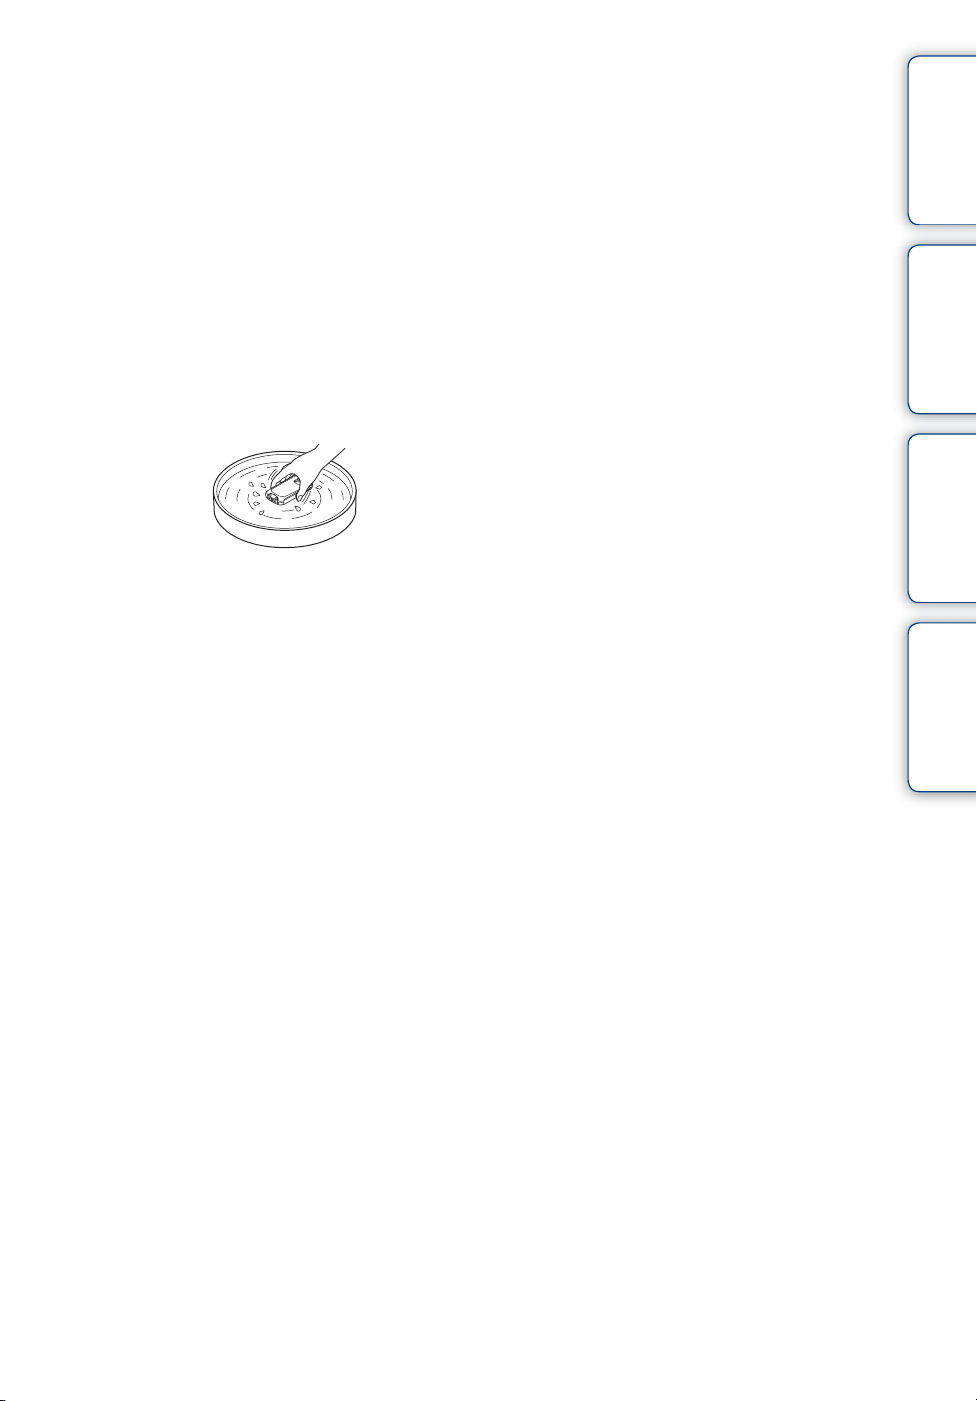
Cleaning after using the camera
under/near water
• Always clean the camera with water after use
within 60 minutes, and do not open the multiconnector cover before cleaning is finished.
Sand or water may get inside places where it
cannot be seen. If not rinsed, water-proof
performance will be degraded.
• Place the camera in fresh water for about 5
minutes. Then, gently shake the camera
underwater while pressing each button
repeatedly to clean away any lodged salt, sand
or other matter.
• After rinsing, wipe away water drops with a soft
cloth. Allow the camera to dry completely in a
shady location with good ventilation. Do not
blow dry with a hair dryer as there is a risk of
deformation and/or degraded waterproof
performance.
• This camera is constructed to drain water. Water
will drain from openings around the ON/OFF
(Power) button, zoom lever, and other controls.
After removing from water, place the camera on
a dry cloth for a while to allow water to drain.
• Bubbles may appear when the camera is placed
under water. This is not a malfunction.
• The camera body may become discolored if it
comes in contact with sunscreen or suntan oil. If
the camera does come in contact with sunscreen
or suntan oil, quickly wipe it clean.
• Do not allow the camera to sit with salt water
inside or on the surface. This may lead to
corrosion or discoloration, and degradation of
water-proof performance.
• Remove any remaining water or other foreign
matter inside the multi-connector cover with a
soft, dry cloth.
• Do not directly subject the camera to flowing
water such as tap water.
• To maintain the water-proof performance, we
recommend that once a year you take the camera
to your dealer, or to an authorized repair shop, to
have the sealing gasket of the multi-connector
cover replaced for a fee.
Message on the LCD screen when
using [Underwater Mode]
The following message is displayed every time*
you set [Underwater Mode] to [On].
“When using the camera underwater/near water,
firmly close the cover, specified by the arrow,
after having inspected it for foreign matter/
damage, then press [OK]”
• This message does not indicate the malfunction.
• Rather, it is to remind you of the things to be
checked before using the camera to keep the
waterproof performance.
• Operate the camera after erasing the message by
touching the area around the displayed message.
* It is displayed only when you set [Underwater
Mode] to [On].
contents
Table of
Operation
Search
Settings
Search
Index
GB
5

Life with “Bloggie”
Capture your life
For more active scenes
Use “Bloggie Sport” to capture not only
everyday scenes, but also scenes of outdoor
activities, on snowy mountains, etc.
At a party
Record still images at maximum 5M (2592 ×
1944) and movies at maximum 1920 × 1080
30p full high-definition (page 42, 44). Also,
you can record still images during movie
recording (page 31).
contents
Search
Search
Table of
Operation
Settings
Index
During a walk
Take compact “Bloggie” with you anywhere,
anytime. Take it out, and record casually.
Continued r
GB
6

Share your life
Import and upload captured
moments
You can upload images easily and intuitively
using the available software (page 26, 40).
You can also choose the images and the
sharing site to upload in advance (Share it
Later) (page 46).
contents
Search
Search
Table of
Operation
Settings
Connect to TV
Connect your “Bloggie” to a TV with an
HDMI cable (sold separately), and enjoy
images on the big screen (page 57).
Index
GB
7

Table of contents
Notes on using the camera
How to use this handbook····································· 2
Notes on using the camera ··································· 3
Life with “Bloggie”·················································· 6
Operation Search················································ 11
Settings Search··················································· 12
Identifying parts··················································· 14
List of icons displayed on the screen ·················· 15
How to hold the camera ······································ 17
How to use the touch panel································· 19
Getting started
contents
Search
Search
Table of
Operation
Settings
Shooting
Checking the accessories supplied····················· 21
Charging the camera··········································· 22
For easy set-up of Bloggie Sport,
visit the web ························································ 26
Setting the language and clock ··························· 27
Shooting (Still images) ········································ 28
Shooting (Movies) ··············································· 30
Zoom ··································································· 32
Light ···································································· 33
Self-Timer···························································· 34
Underwater Mode················································ 35
Index
GB
8

Viewing
Computer
Settings
Viewing································································ 36
Playback zoom···················································· 38
Volume control ···················································· 39
For easy set-up of Bloggie Sport,
visit the web ························································ 26
Using the software to upload images ·················· 40
Recommended computer environment··············· 41
Setting items ······················································· 12
How to set items·················································· 12
contents
Search
Search
Table of
Operation
Settings
Index
TV
Viewing images on a TV ····································· 57
Troubleshooting
Troubleshooting ·················································· 59
Warning indicators and messages ······················ 63
Others
Number of still images and recordable time of
movies································································· 65
Built-in battery pack············································· 66
Precautions ························································· 67
Specifications ······················································ 68
GB
9

Index
Index ··································································· 70
contents
Search
Search
Table of
Operation
Settings
Index
10
GB

Operation Search
contents
Table of
Shooting still images
Shooting movies
Changing image size
Deleting images
Displaying enlarged
images
Changing clock
settings
Initializing settings
Shooting (Still images)······································· 28
Shooting (Movies) ··············································· 30
Photo Size ····························································· 42
Movie Size ····························································· 44
Delete······································································ 45
Format ···································································· 55
Playback zoom····················································· 38
Date & Time Setting············································ 56
Initialize··································································· 52
Search
Search
Operation
Settings
Index
Viewing on TVs
Marking the images to
upload
Adjusting the touch
panel
Connecting with an HDMI cable
(sold separately) ·················································· 57
Share it Later ························································ 46
Calibration ····························································· 51
11
GB
Settings Search
Setting items
In the table below, indicates settings that can be changed, while – indicates settings that
cannot be changed.
Click an item to jump to the corresponding page.
Items Shooting mode/Playback mode
Image Size
Self-Timer
Underwater Mode
Flicker Reduction
Beep
Language Setting
Demo Mode
Initialize
HDMI Output
LUN Settings(USB)
Format
Date & Time Setting
Calibration
contents
Search
Search
Table of
Operation
Settings
Index
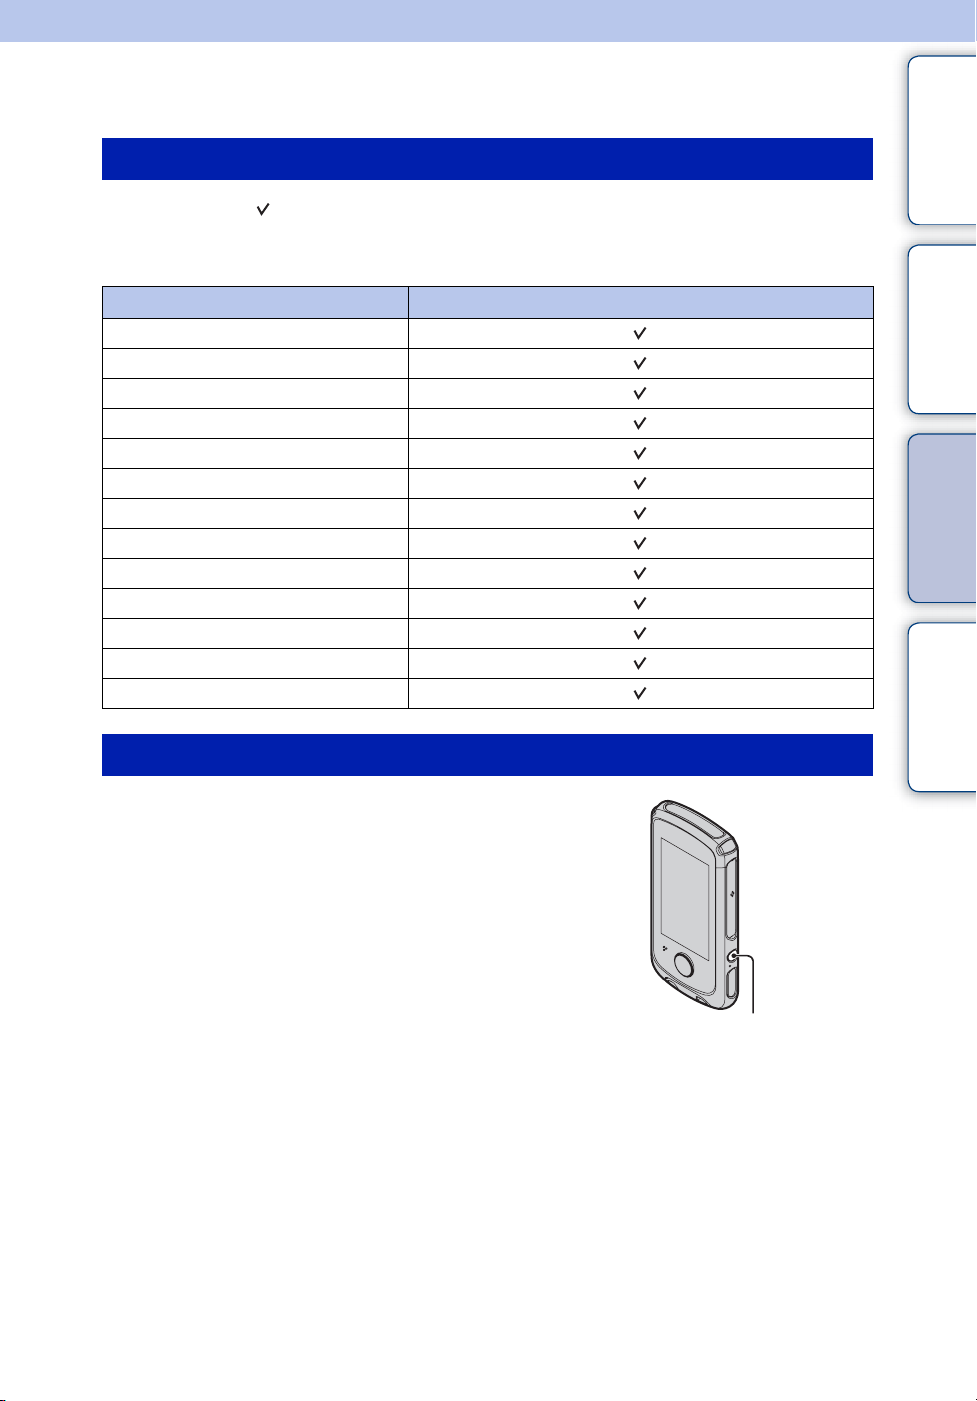
How to set items
1 Press the ON/OFF (Power) button.
ON/OFF (Power) button
Continued r
12
GB

2 Tap [MENU] to display the menu screen.
3 Tap the desired item.
Tap v/V to scroll the display.
contents
Search
Search
Table of
Operation
Settings
4 Tap the desired settings.
5 Tap [Back].
Index
13
GB
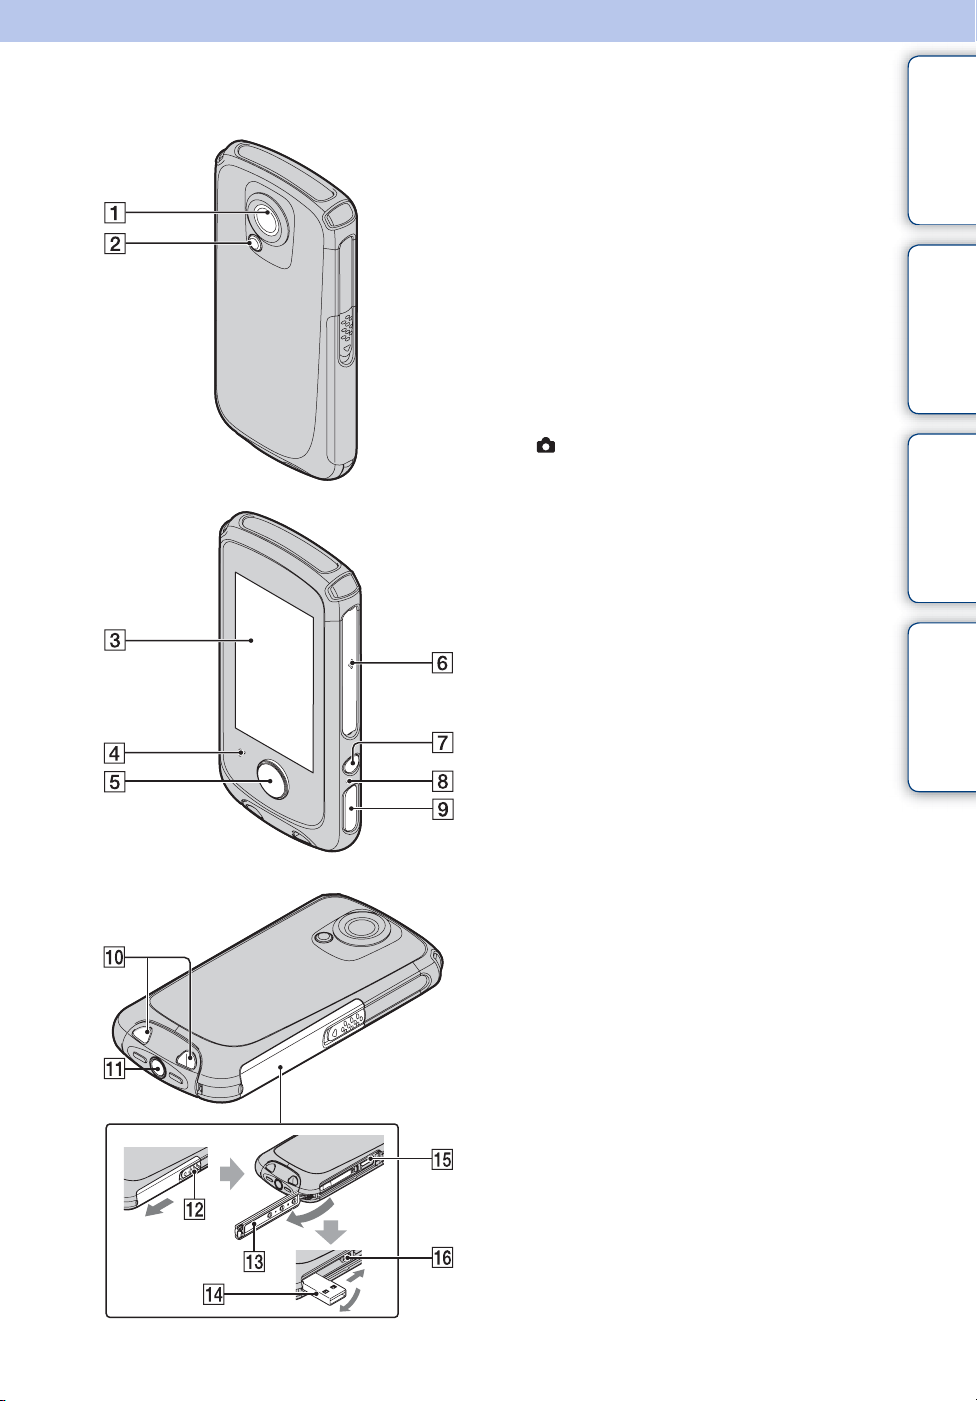
Identifying parts
A Lens
B Video Light
C LCD screen
D Speaker
E Movie button
F Microphone
G ON/OFF (Power) button
• Press and hold the ON/OFF (Power) button
for at least 7 seconds to force-quit the
camera.
H Charge lamp
I (Shutter) button
J Strap hole
K Tripod receptacle
• Do not hold the camera when attaching the
tripod.
L Multi-connector cover knob
M Multi-connector cover
N Built-in USB arm
O HDMI OUT jack (57)
P USB jack knob
contents
Search
Search
Table of
Operation
Settings
Index
14
GB
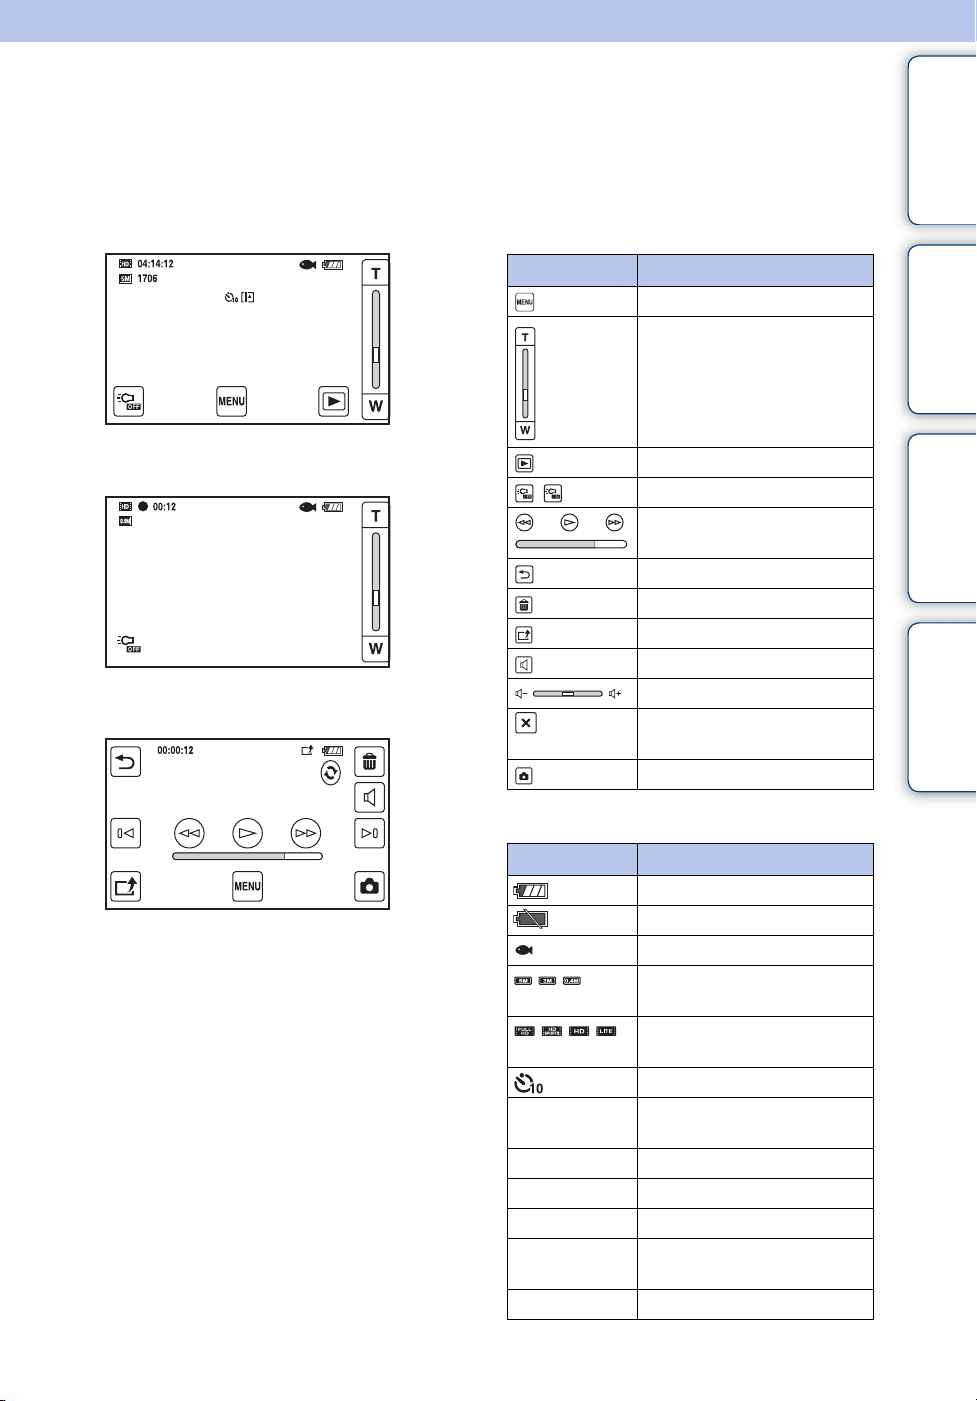
List of icons displayed on the screen
Icons are displayed on the screen to indicate the camera status.
contents
Table of
When in standby for shooting
When shooting movies
When playing back
Buttons
Display Indication
Menu
Zoom scaling
Viewing mode
Light
Playback bar
Back
Delete
Share it Later
Adjusting volume
Volume
Returning to the previous
screen
Shooting mode
Search
Search
Operation
Settings
Index
Icons
Display Indication
Battery remaining
Low battery warning
Underwater Mode
Photo Size (aspect ratio/
resolution)
Movie Size (resolution vertical
shooting/frame rate)
Self-Timer
1706
z (green)
04:14:12
00:12
JAN-1-2012
9:30 AM
z (red)
Number of recordable still
images
AE/AF lock
Recordable time
Recording time (m:s)
Recorded date/time of the
playback image
During movie recording
Continued r
15
GB
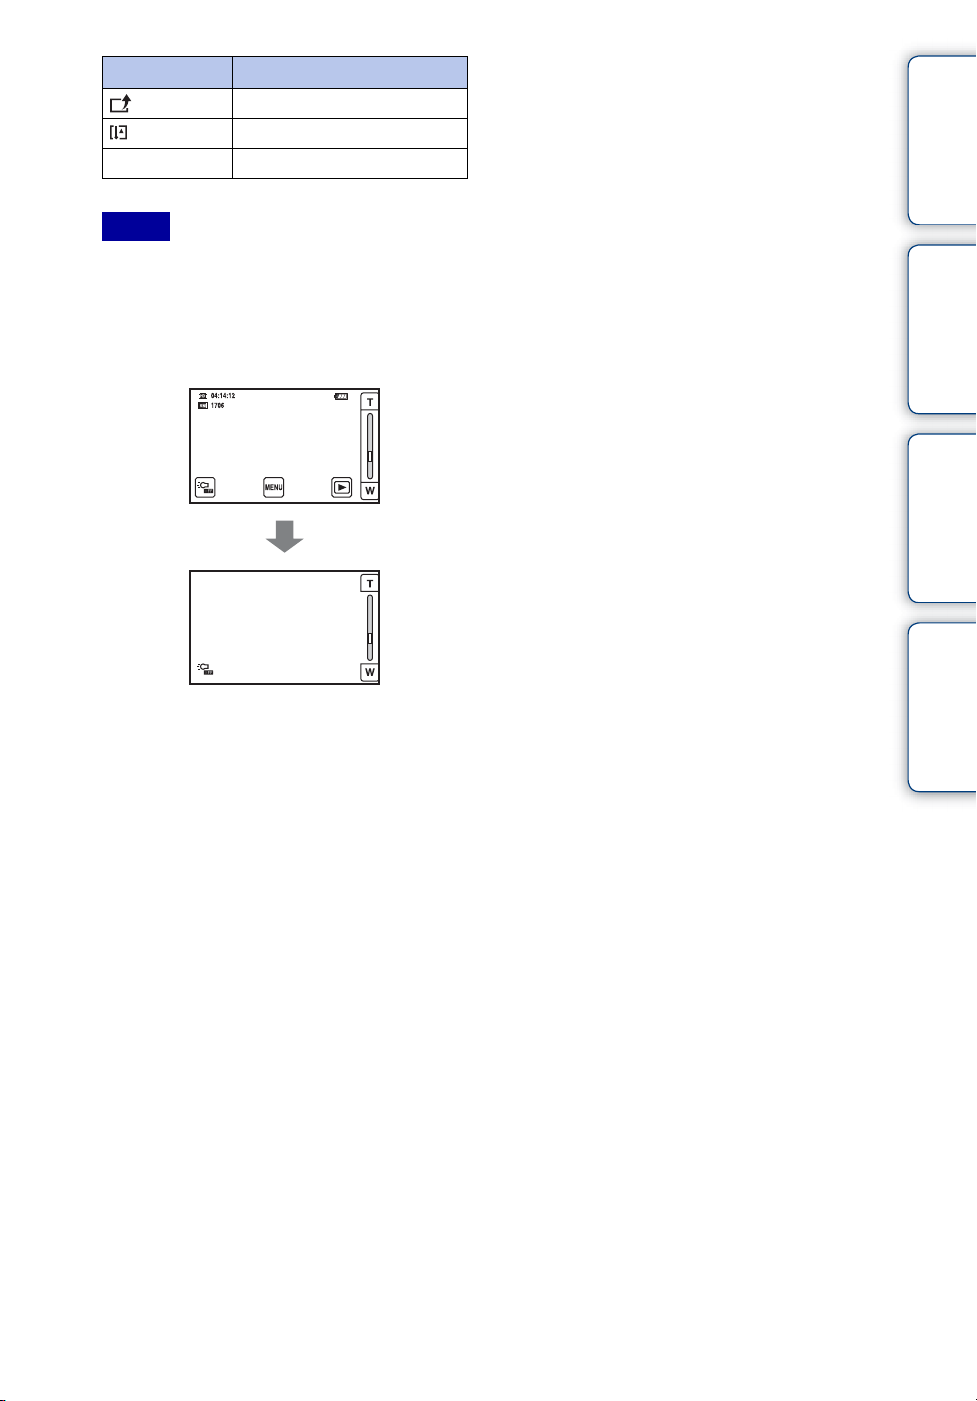
Display Indication
Share it Later
Overheating warning
00:00:12
Notes
• Indicators and their positions are approximate
and differ from what you actually see.
• The screen display shifts both horizontally and
vertically depending on the camera aspect.
• The screen display disappears automatically
after about 5 seconds.
Counter
contents
Search
Search
Table of
Operation
Settings
Index
16
GB
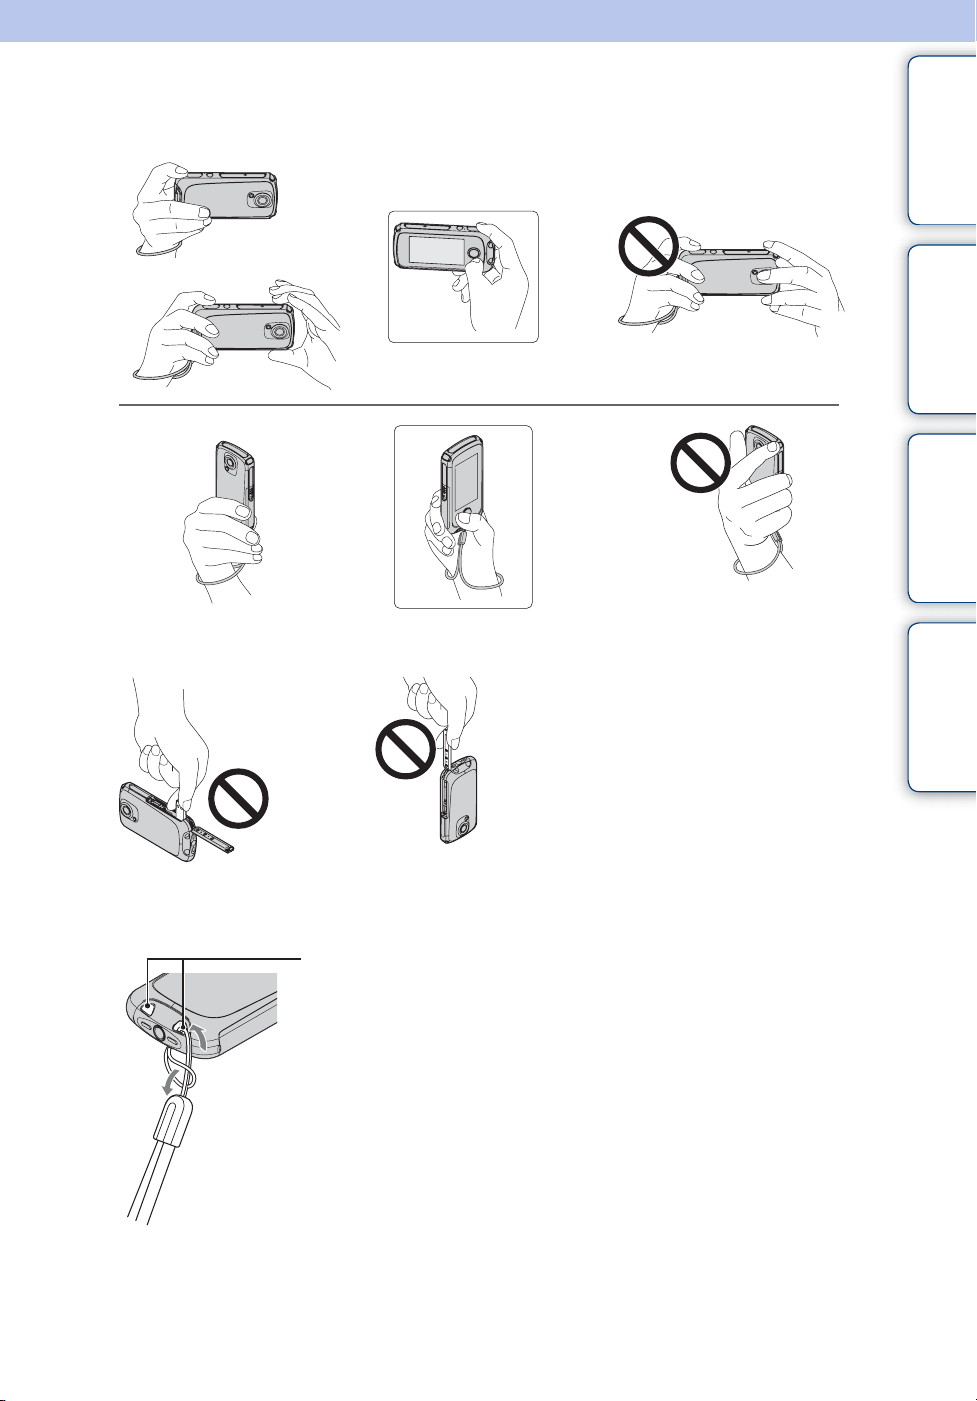
How to hold the camera
Be careful not to block the lens or microphone with your finger when shooting.
Do not hold the Built-in USB arm or multi-connector cover.
contents
Search
Search
Table of
Operation
Settings
Index
Attach the strap and place your hand through its loop to prevent the camera from sinking or
damage by being dropped.
Strap hole
Continued r
17
GB

zHolding the camera vertically when you shoot
movies
Portrait images are recorded. Black bands appear on the left and right of the screen during
playback on TV or computer. This is useful when shooting portrait objects.
contents
Search
Search
Table of
Operation
Settings
Index
18
GB
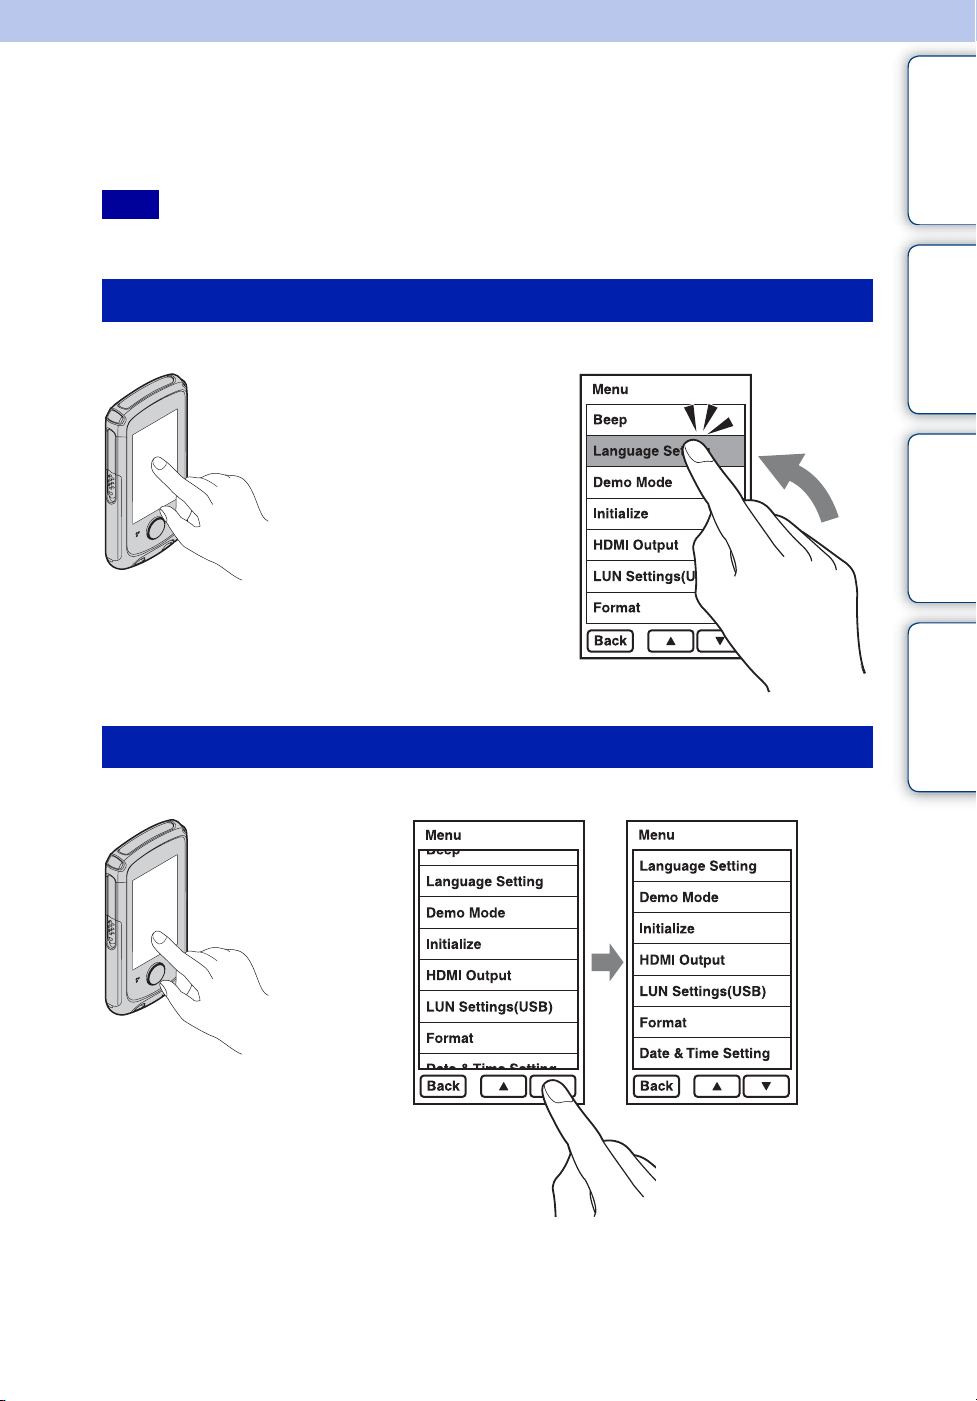
How to use the touch panel
You can operate the camera or set the settings by tapping buttons on the LCD screen of the
camera.
Note
• Do not operate with a sharp-pointed object, such as pen or finger nail.
Select the items
Tap the buttons or items on the screen with your finger.
contents
Search
Search
Table of
Operation
Settings
Scroll the screen
Tap v/V on the LCD screen.
Index
19
GB

Display the next screen
Tap / on the LCD screen.
contents
Search
Search
Table of
Operation
Settings
Index
20
GB

Checking the accessories supplied
• USB connection support cable (1)
(Sony Corporation 4-277-105-)
Use this if Built-in USB arm of the camera cannot be connected to the computer (page 22).
• Wrist strap (1)
• Instruction Manual (1)
• Important Notice (1)
• Notes on the water-proofing (1)
• Bloggie Handbook (this manual)
This is included in the internal memory of this camera.
contents
Search
Search
Table of
Operation
Settings
Index
21
GB
 Loading...