

Sony MD Walkman MZ-E900 User Manual
3-220-299-13(1)
Portable MiniDisc
Player
Operating instructions
Manual de instrucciones
“WALKMAN” is a trademark of Sony
Corporation.
MZ-E900
Sony Corporation © 2000 Printed in Japan
A
A
U.S.A., Canadian, Hong Kong, and European model
Modelo para los EE.UU., Canadá, Hong Kong y Europa
to a wall outlet
al tomacorriente
de la pared
World model and other models
Modelo mundial y modelo para otros países
B
C
D
to DC IN 1.5V jack
a DC IN 1.5V
B
Insert the plugs firmly.
Enchufe firmemente los cables.
HOLD
“WALKMAN” es una marca comercial de
Sony Corporation
lamp
luz
lamp
luz
to a wall outlet
al tomacorriente de la
pared
,
e
E
b
b
1
m
3
4
HOLD
2
to a wall outlet
al tomacorriente
de la pared
C
A
B
C
VOL+
VOL–
1N >
.
VOLUME
+/–
OPR lamp
Indicador OPR
.
x
>/N
2
X
D
A
PLAYMODE RPT/ENT
DISPLAY SOUND
HOLD
./N >
VOL +/–
x
B
Track number
Número de
canción
Program number
Número de programa
E
A
When you select bass-setting mode, “B” appears. When you
select treble-setting mode, “T” appears.
Cuando se selecciona el modo de ajuste de graves aparece “B”.
Cuando selecciona el modo de ajuste de agudos aparece “T”.
B
Example: While adjusting the bass,
Ejemplo: Mientras se ajustan los graves
The sound can be adjusted in eight steps, from –4 to +3.
Se puede ajustar el sonido en ocho pasos de –4 a +3.
the cursor moves. (Position: –2)
Se mueve el cursor (Posición: –2)
–4 ±0 +3
F
A
Example: When the playback speed is 95% of the original
Ejemplo: Cuando la velocidad de la reproducción es del
The playing speed can be set at 80% to 110% normal speed,
in seven steps of 5% each.
La velocidad de reproducción puede cambiar a 80% a 110%
la velocidad normal en siete pasos de 5% cada uno.
speed, “–” and the cursor will flash alternately.
95% de la velocidad original, destella
alternadamente “–” y el cursor.
80% 100% 110%
B
G
BA
English
WARNING
To prevent fire or shock hazard, do not
To connect the headphones/
earphones (See Fig.B)
To adjust the sound quality (Digital
Sound Preset)(See Fig.E)
expose the unit to rain or moisture.
To avoid electrical shock, do not open the
cabinet. Refer servicing to qualified
personnel only.
Caution
The use of optical instruments with this product will increase
eye hazard.
CAUTION — INVISIBLE LASER RADIATION WHEN OPEN
DO NOT STARE INTO BEAM OR VIEW DIRECTLY WITH
OPTICAL INSTRUMENTS
Information
IN NO EVENT SHALL SELLER BE LIABLE FOR ANY DIRECT,
INCIDENTAL OR CONSEQUENTIAL DAMAGES OF ANY
NATURE, OR LOSSES OR EXPENSES RESULTING FROM ANY
DEFECTIVE PRODUCT OR THE USE OF ANY PRODUCT.
Certain countries may regulate disposal of the battery used to power this
product.
Please consult with your local authority.
For customers in the United States
Owner’s Record
The model number is located at the top and the serial number is located at the
rear of the disc compartment lid. Record the serial number in the space
provided below. Refer to them whenever you call upon your Sony dealer
regarding this product.
Model No. MZ-E900
Serial No.
x
Information
This equipment has been tested and found to comply with the limits for a Class
B digital device, pursuant to Part 15 of the FCC Rules. These limits are
designed to provide reasonable protection against harmful interference in a
residential installation. This equipment generates, uses, and can radiate radio
frequency energy and, if not installed and used in accordance with the
instructions, may cause harmful interference to radio communications.
However, there is no guarantee that interference will not occur in a particular
installation. If this equipment does cause harmful interference to radio or
television reception, which can be determined by turning the equipment off
and on, the user is encouraged to try to correct the interference by one or more
of the following measures:
— Reorient or relocate the receiving antenna.
— Increase the separation between the equipment and receiver.
— Connect the equipment into an outlet on a circuit different from that to
which the receiver is connected.
— Consult the dealer or an experienced radio/TV technician for help.
This device complies with Part 15 of the FCC Rules. Operation is subject to the
following two conditions: (1) This device may not cause harmful interference,
and (2) this device must accept any interference received, including interference
that may cause undesired operation.
You are cautioned that any changes or modifications not expressly approved in
this manual could void your authority to operate this equipment.
For customers in the United States
DISPOSAL OF NICKEL METAL HYDRIDE BATTERY.
NICKEL METAL HYDRIDE BATTERY.
DISPOSE OF PROPERLY.
You can return your unwanted nickel metal hydride batteries to your nearest
Sony Service Center or Factory Service Center.
Note: In some areas the disposal of nickel metal hydride batteries in household
or business trash may be prohibited.
For the Sony Service Center nearest you call 1-800-222-SONY (United States
only)
For the Sony Factory Service Center nearest you call 416-499-SONY (Canada
only)
Caution: Do not handle damaged or leaking nickel metal hydride battery.
B Getting started
Preparing a power source
Using on the rechargeable battery
Charge the supplied rechargeable battery before using it for the
first time.
1 Charge the supplied rechargeable battery NH-14WM(A)
with the supplied battery charger.(See Fig. A-A)
• Model for USA, Canada, Hong Kong, and Europe
Full charging takes about 80 minutes.
• World model and other models
Full charging takes about 120 minutes.
Because of the fast charging rate of the battery charger, the
charger and the battery may become temporarily hot while
the battery is being charged or right after charging is
completed. In this case, remove the battery from the charger
for five minutes after the lamp turns off.
2 Open the rechargeable battery compartment lid and insert
the charged battery with correct polarity. (See Fig. A-B)
You can charge the battery about 300 times.
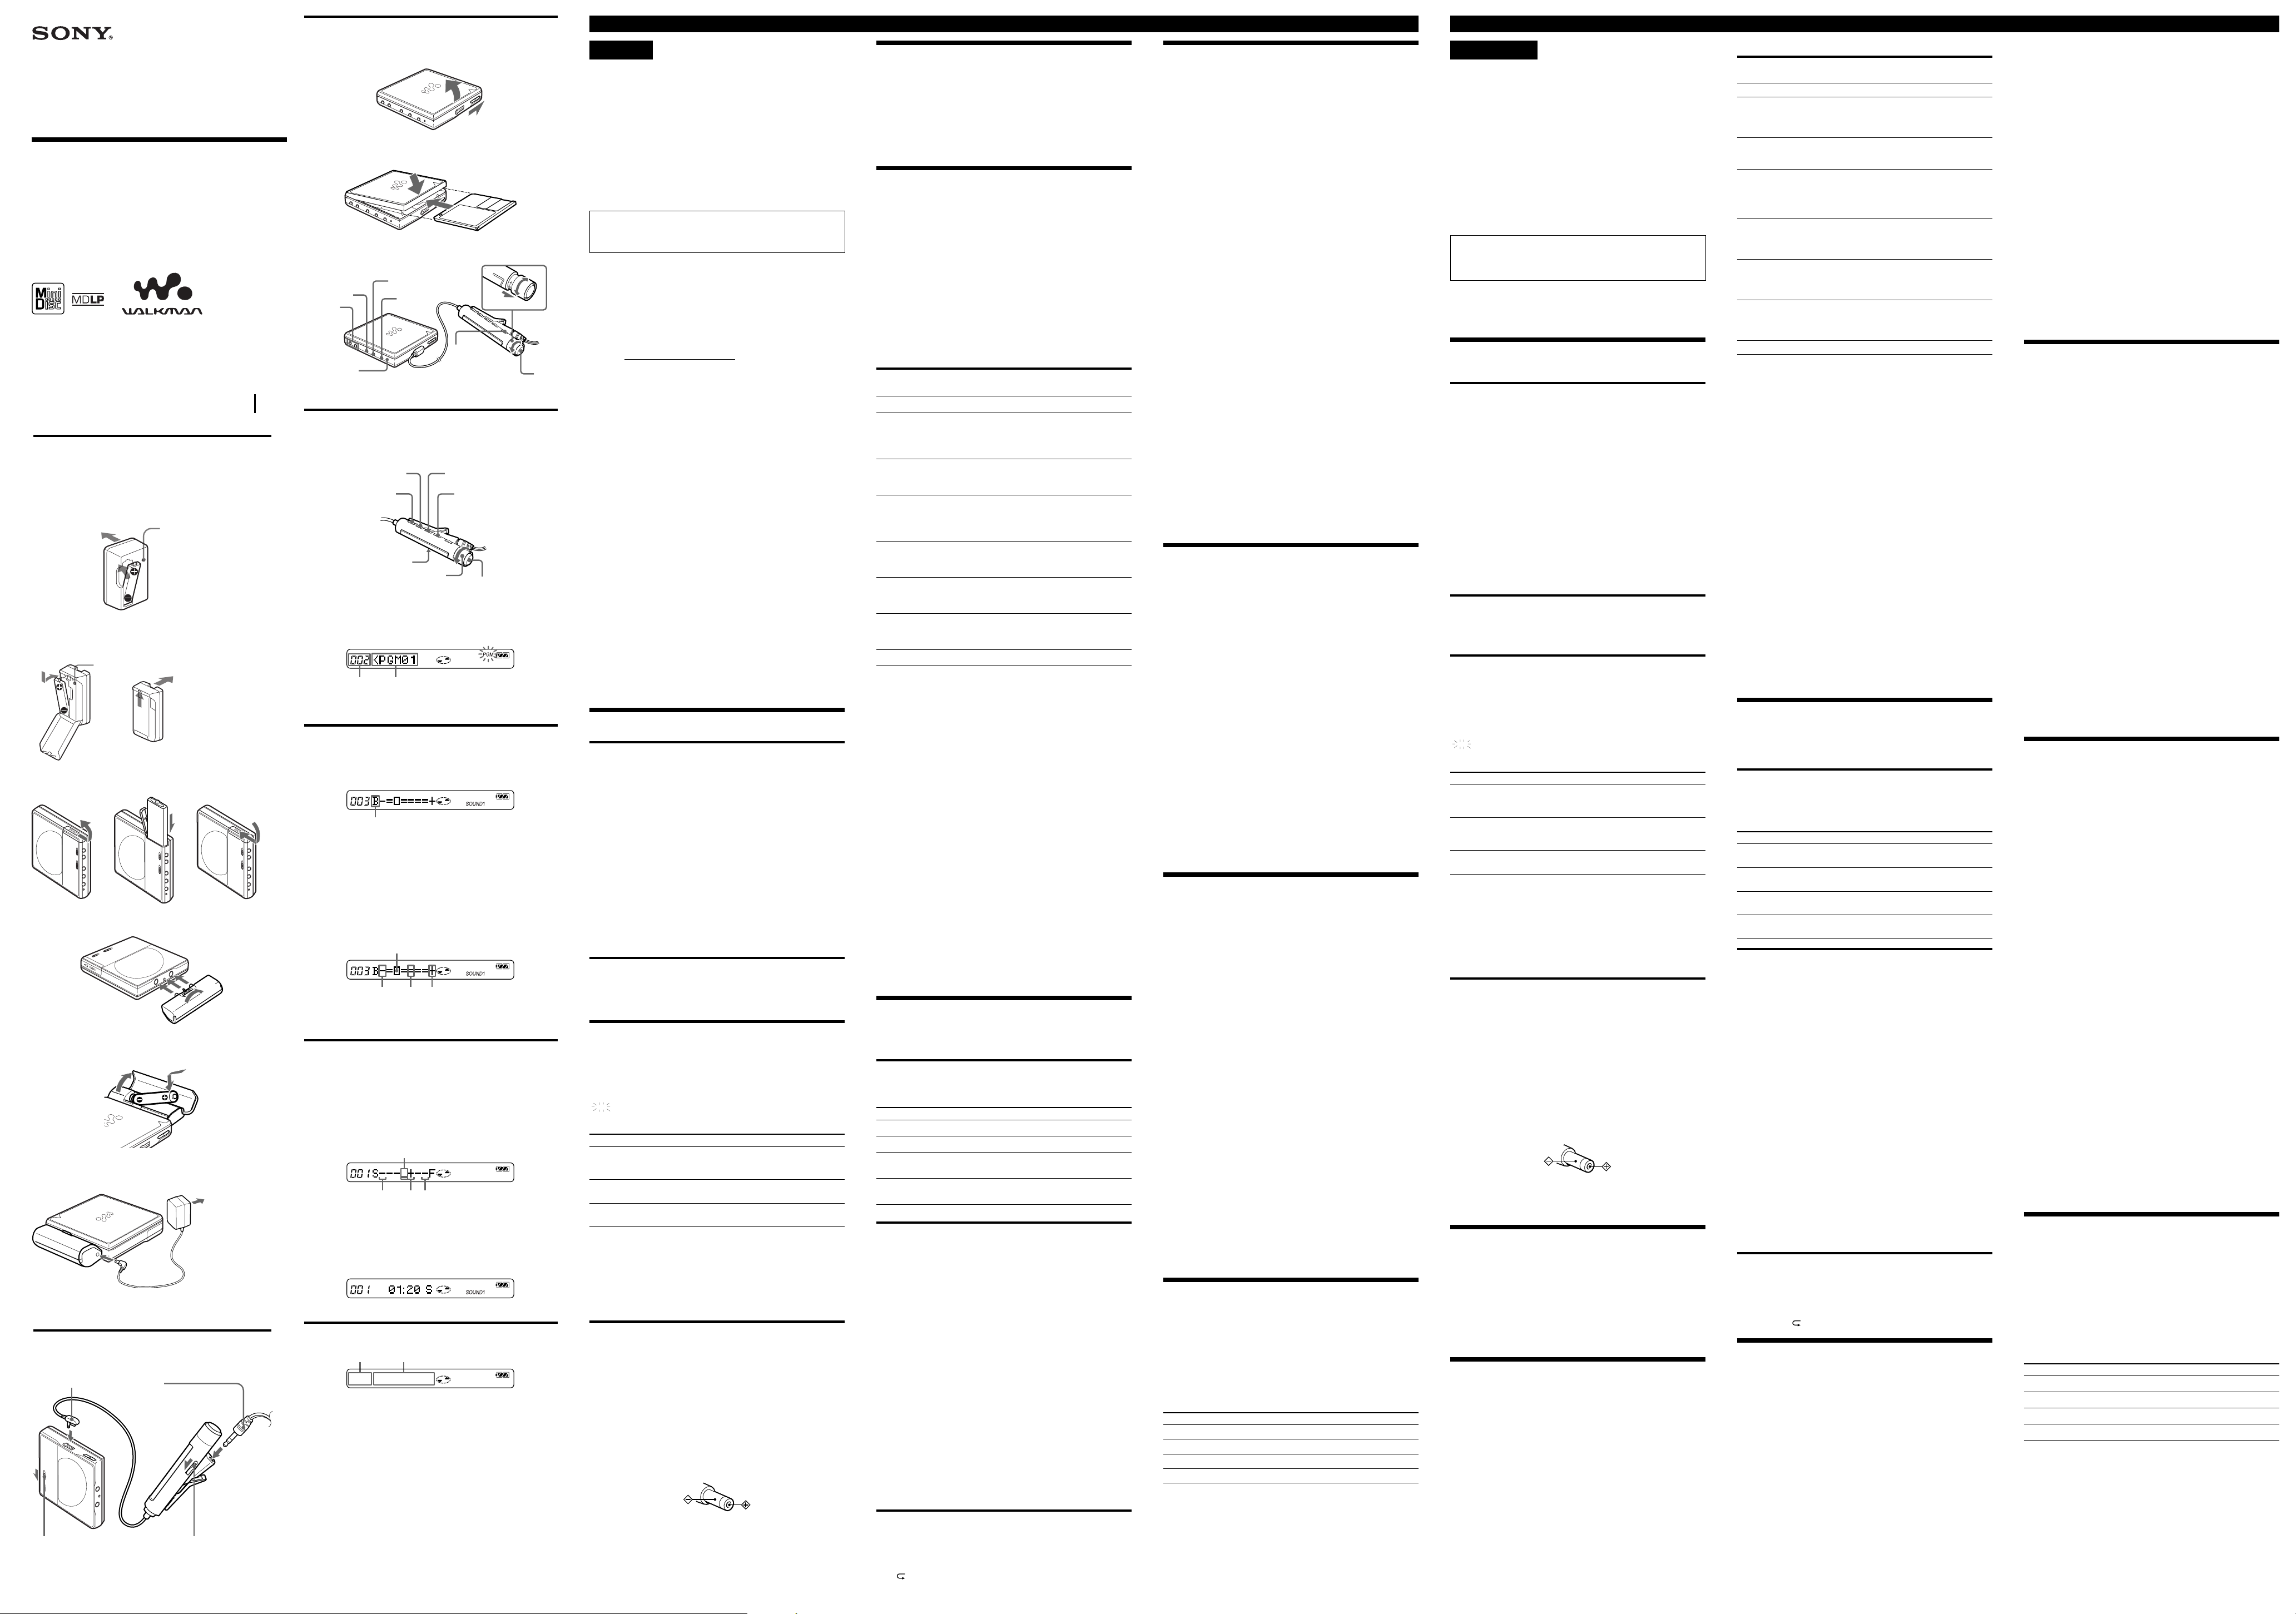
1 Connect the supplied headphones/earphones to the remote
control.
Connect the remote control to i jack of the player.
Slide HOLD on the remote control and the player to the
direction of the arrows shown in the illustration.
BMD playing
Playing an MD (See Fig.C)
1 Insert an MD.
1 Slide OPEN. (See Fig. C-A)
2 Insert the MD with the label side facing up, and press
the lid down to close. (See Fig. C-B)
2 Play the MD. (See Fig. C-C)
1 Turn the control towards .or N> on the remote
control (or press >/N on the player).
When using the remote control, a short beep sounds in
the headphones/earphones.
2 Pull and turn VOL +/– on the remote control (or press
VOLUME +/– on the player) to adjust the volume.
The volume indicator appears on the remote control to
allow you to check the volume.
BOther disc operation
To
Stop
Pause
Find the beginning
of the current track
Listen to the beginning
of the previous track
Listen to the
beginning of the
next track
Go backwards
while playing
Go forward
while playing
Remove the MD
1)
When you press . or >/N on the player during pause, the
player resumes playback.
If you turn and hold the control towards . or N> on the remote
control (or hold down . or >/N on the player) during pause,
you can fast forward/rewind without listening to the playback sound.
2)
Once you open the lid, the point to start playback changes to the
beginning of the first track.
Note
When removing the disc, make sure to press x first, and then slide
OPEN.
About the G-PROTECTION function
The G-PROTECTION function has been developed to provide excellent
protection against sound skipping during many active uses. This
function provides a higher level of shock protection during playback than
the traditional one.
Tips
• The player can play the track recorded by double or 4 times long mode
(LP2 or LP4). Normal stereo playback, LP2 stereo playback, LP4 stereo
playback or monaural playback is automatically selected to match the
audio source.
• During the operation of the unit, the OPR lamp on the player turns on.
After you press x to stop the playback, the OPR lamp turns off.
• The display on the remote control will turn off shortly after you press x.
Note
Sound may skip if:
— the player receives stronger continuous shock than expected.
— a dirty or scratched MiniDisc is played.
1)
1)
Do this (Beeps in the headphones/
earphones)
Press x. (A Long beep)
Press X on the remote control.
(Continuous short beeps)
Press X on the remote control again to
resume playback.
Turn the control towards . on the
remote control. (Three short beeps)
Press . on the player once.
Turn the control towards .on the
remote control repeatedly. (Continuous
three short beeps)
Press . on the player repeatedly.
Turn the control towards N> on the
remote control. (Two short beeps)
Press >/ N on the player once.
Turn and hold the control towards .
on the remote control.
Hold down . on the player.
Turn and hold the control towards
N> on the remote control.
Hold down >/N on the player.
Press x, and then slide OPEN.
1)
2)
Using on a dry battery (See Fig. A-C)
Attach the supplied battery case to the player, and then insert
one LR6 (size AA) battery with correct polarity. Be sure to insert
the battery (minus) end first.
When to replace or recharge the battery
You can check the battery condition with the battery indication
on the remote control while using the player.
t Battery power decreasing
v
r Weak batteries
v
e The batteries have gone out. “LOW BATT” flashes in the display
on the remote control, and the power goes off.
Battery life (EIAJ1))
Batteries
Ni-MH rechargeable
battery
NH-14WM(A)
LR6 (SG) Sony
Alkaline dry battery
LR6 (SG)3) and
NH-14WM(A)
1)
Measured in accordance with the EIAJ (Electronic Industries Association of
Japan) standard (using a Sony MDW-series Mini-disc).
2)
With a fully charged battery
3)
When using a Sony LR6 (SG) “STAMINA” alkaline dry battery (produced in
Japan).
Note
The battery life may be shorter depending on operating conditions, the
surrounding temperature, and the battery type.
2)
2)
Stereo (normal)
29 33 37
42 49 58
3)
76 87 100
LP2 Stereo LP4 Stereo
(Unit: Approx. hours)
BVarious ways of playback
Changing the play mode
You can select from various play modes using the PLAYMODE
and RPT/ENT on the remote control.
Selecting the play mode (See Fig. D-A)
(See Fig.D)
1 Press PLAYMODE repeatedly to select one of the four play
modes, as follows.
Display Play mode
(none) (normal play)
“1” (single play)
“SHUF” (shuffle play)
“PGM” (program play)
All the tracks are played once.
A single track is played once.
All the tracks are played in random
order.
Tracks are played in the order that
you specified.
Listening to tracks in a desired sequence
(Program play)
1 Press PLAYMODE repeatedly until “PGM” flashes in the
display.
2 Turn the control towards . or N> repeatedly to select
a track. (See Fig. D-B)
3 Press RPT/ENT.
Using on house current (See Fig.A-D)
1
Attach the supplied battery case to the player.
If the rechargeable battery is inserted in the player, remove it.
2 Connect the optional AC-E15L AC power adaptor (for use in
Japan) or the optional AC-E15HG AC power adaptor (for
use outside of Japan) to the DC IN 1.5V jack of the battery
case.
3 Connect the AC power adaptor to a wall outlet.
Notes
• Do not use any other AC power adaptor. Specifications for AC-E15HG
AC power adaptor vary in each region. Check the voltage and the
shape of the plug before purchasing.
Polarity of the plug
• The battery indication mark is displayed while using the AC power
adaptor.
The track is entered.
4 Repeat steps 2 and 3 to select other tracks in the desired
sequence.
5 Press RPT/ENT for 2 seconds or more.
The settings are entered and playback starts from the first
programmed track.
Tips
• The program play settings will remain in memory even after playback
finishes or is stopped.
• You can set the program play up to 20 tracks.
• The settings can be stored to the Personal Disc Memory.
Notes
• All program settings are lost when the disc is removed from the player.
• If no settings are made for five minutes while the player is stopped, the
settings made up to that point are entered.
Repeat play
You can use this function to repeat playback in normal play,
single play, shuffle play, or program play mode.
1 Press RPT/ENT during playback.
“ ” appears in the display.
You can make adjustments to the sound quality to suit your
taste, and then store two sets of these adjustments.
1 Press SOUND on the remote control repeatedly to select
“SOUND1” or “SOUND2.” (See Fig. D-A)
2 During playback, press SOUND on the remote control for 2
seconds or more. (See Fig. E-A)
The player changes to the bass-setting mode. Pressing
SOUND for 2 seconds again changes the player back to the
treble-setting mode.
3 Turn the control on the remote control towards . or
N> repeatedly to adjust the bass or the treble.
(See Fig.
When you press SOUND for more than 2 seconds while
adjusting the bass, the display switches to the treble (or viceversa).
When you press SOUND for a short time while adjusting the
bass or the treble, the setting for that sound is entered and
the display switches to the other sound setting.
E-B
)
4 Press RPT/ENT on the remote control.
The sound settings are stored and the playback display
appears again.
To select a preset sound
Press SOUND repeatedly to select “SOUND1,” “SOUND2,” or
no display.
Selecting no display turns off the Digital Sound Preset function.
Digital Sound Preset factory settings
The Digital Sound Preset Factory settings are as follows:
• “SOUND1”: bass +1, treble ±0
• “SOUND2”: bass +3, treble ±0
Tips
• The settings can be stored to the Personal Disc Memory.
• Settings can be changed while playback is momentarily paused.
Notes
• Settings cannot be changed through the operation buttons on the
player.
• When you use the Digital Sound Preset, the sound may break or
become distorted when the volume is turned up too high, depending
on the settings.
To change playback speed (Speed
Control)(See Fig.F)
The variable playback function is convenient for such uses as
language study.
You can adjust the speed in seven steps.
1 Press DISPLAY on the remote control for 2 seconds or more
during playback. (See Fig. D-A)
2 Turn the control on the remote control towards . or
N> until “SPEED” flashes in the display, and then press
x on the remote control.
The player changes to speed-setting mode.
3 Turn the control towards . or N> to select the
playback speed.
“+” shows the normal speed and the cursor shows the
playback speed you are selecting. (See Fig. F-A)
4 Press x to set the playback speed.
During playback speeds other than normal, “S” appears to
the right of the elapsed time. (See Fig. F-B)
Tip
The settings can be stored to the Personal Disc Memory.
Notes
• Settings cannot be changed through the operation buttons on the
player.
• The playback sound will be affected by the playback speed.
• All settings will be lost when you remove the disc from the player.
Storing the settings for individual discs
(Personal Disc Memory)
Settings can be memorized for a disc. Once memorized, the
settings are recalled and applied whenever the disc is inserted.
The following settings can be stored:
• Volume
• Play mode
• Program setting
• Sound quality (Digital Sound Preset)
• Playback speed (Speed control)
1 Press DISPLAY on the remote control for 2 seconds or more.
(See Fig. D-A)
2 Turn the control on the remote control towards . or
N> until “PERSONAL” flashes in the display, and then
press x on the remote control.
“Entry?” flashes in the display.
3 Press x on the remote control.
“Entry OK” appears in the display and the disc settings are
stored in the player.
To Erase the disc information
Insert the disc whose information is to be erased and verify its
contents. Do steps 1 and 2 until “Erase?” flashes in the display,
and then press x. “Erase OK” appears in the display and the
disc information is erased.
If you try to erase the disc information of a disc that has never
been stored, “No Entry!” appears in the display for 2 seconds.
Notes
• Settings can be stored for up to 20 discs. Any settings stored thereafter
will replace the settings for the MD with the oldest playback date.
• If you use another minidisc recorder to edit or add tracks to a disc
whose settings have been stored on the player, the disc will no longer
be recognizable by the player and the stored information will become
useless.
To know the track name and playing
time (See Fig.G)
During playback, you can check the track name and track
number, the elapsed time of the current track, and the total
number of tracks on the MD.
1 Press DISPLAY on the remote control while the player is
playing an MD.
Each time you press DISPLAY, the display changes the
indications as the followings (See Fig. G):
AB
Track number The elapsed time
Track number Track name
The number of total tracks Disc name
Track number Track mode
1)
Appears only with MDs that have been electronically labeled.
2)
The mode for each track is indicated as follows:
“Mode : SP” Standard mode (stereo)
“Mode : LP2” 2 × mode (2 × normal playing time)
“Mode : LP4” 4 × mode (4 × normal playing time)
“Mode : MONO” Monaural
Note
The mode indication appears only during playback. The mode appears
for 2 seconds. It is then replaced by the elapsed time of the current track.
1)
1)
2)
Español
ADVERTENCIA
Para evitar un incendio o peligro de
descarga, no exponga el aparato a la lluvia
o humedad.
Para evitar una descarga eléctrica, no abra
el mueble. Solicite siempre el servicio de un
técnico cualificado.
Precaución
El uso de lentes de aumento con este producto puede perjudicar
su vista.
PRECAUCIÓN — TENGA CUIDADO CON LOS RAYOS
NO MIRE HACIA AL RAYO U OBSERVE CON
INSTRUMENTOS OPTICOS.
LASER INVISIBLES CUANDO ABRA.
Información
EN NINGUN CASO SERA EL VENDEDOR RESPONSABLE POR
DAÑOS DIRECTOS, INCIDENTES O CONSECUENTES DE
CUALQUIER NATURALEZA O PERDIDAS O GASTOS
DERIVADOS DE PRODUCTOS DEFECTUOSOS O DE SU USO.
Algunos países pueden controlar el desecho de la batería utilizada para
hacer funcionar este producto.
Consulte con las autoridades locales.
B Para empezar
Preparación de la alimentación
eléctrica
Utilización de batería recargable
Cargue la batería recargable incluida, antes de utilizarla por
primera vez.
1 Cargue la batería incluida NH-14WM(A). (Vea la Fig. A-A)
• Modelo para los EE.UU., Canadá, Hong Kong y Europa
El tiempo para la carga completa es de unos 80 minutos.
• Modelo de mundial y modelo para otros países
El tiempo para la carga completa es de unos 120 minutos.
Como el cargador de batería tiene una velocidad de carga
rápida, el cargador y la batería pueden calentarse
temporalmente cuando se está cargando la batería o justo
después de terminar la carga. En este caso, desmonte la
batería del cargador durante cinco minutos después de
apagarse la lámpara.
2 Abra el compartimiento de la batería recargable y coloque la
batería cargada con sus polos correctos. (Vea la Fig. A-B)
Puede cargar la batería unas 300 veces.
Utilización de una pila (Vea la Fig. A-C)
Instale la caja de pila incluida en el reproductor y coloque una
pila LR6 (tamaño AA) con sus polos correctos. Coloque la pila
primero por su polo negativo primero.
Cuando cambie o recargue la batería
Puede confirmar el estado de la batería con las indicaciones de
carga de batería en el mando a distancia mientras utiliza el
reproductor.
t Disminuye la carga de la batería o pila
v
r Batería o pilas débiles
v
e Se han descargado las baterías o pilas. Destella “LOW BATT” en
la pantalla del mando a distancia y se desconecta el aparato.
Longevidad de la batería o pila (EIAJ
Baterías o pilas
Batería recargable
Ni-MH
NH-14WM(A)
Una pila alcalina LR6
(SG) de Sony
(tamaño AA)
LR6 (SG)
y NH-14WM(A)
1)
Medida según normas EIAJ (Electronic Industries Association of Japan) (con
un minidisco de serie MDW de Sony).
2)
Con una batería o pila totalmente cargada
3)
Cuando se utiliza una pila alcalina “STAMINA” LR6 (SG) de Sony
(fabricada en Japón).
Nota
La longevidad de la batería o pila puede ser más corta según las
condiciones de funcionamiento, la temperatura ambiente y el tipo de
batería o pila.
2)
3)
3)
Estéreo (normal)
29 33 37
42 49 58
76 87 100
2)
LP2
Estéreo
(Unidad: Horas aprox.)
LP4
1)
Estéreo
Utilización con la corriente del hogar (Vea la
Fig. A-D)
1 Instale la caja de pila incluida en el reproductor.
Si hay una batería recargable en el reproductor, sáquela.
2 Conecte el adaptador de CA opciona AC-E15L (para
utilización en el Japón) o el adaptador de CA opcional ACE15HG (para utilización fuera del Japón) en la toma DC IN
1.5V de la caja de pilas.
3 Conecte el adaptador de CA en el tomacorriente de la pared.
Notas
• No utiliza ningún otro adaptador de CA. Las especificaciones para el
adaptador de CA AC-E15HG son diferentes según la región. Confirme
el voltaje y la forma del enchufe antes de hacer la compra.
Polos del enchufe
• Aparece la marca de indicación de pila mientras utilice el adaptador de
CA.
Para conectar los auriculares/
audífonos (Vea la Fig. B)
1 Conecte auriculares/audífonos con el mando a distancia
incluido.
Conecte el mando a distancia en la toma i del reproductor.
Deslice HOLD del reproductor y del mando a distancia en el
sentido de la flecha en la figura.
BMando a distancia
Reproducción de un minidisco (Vea la
Fig. C)
1 Coloque un minidisco.
1 Deslice a OPEN. (Vea la Fig. C-A)
2 Coloque el minidisco con la etiqueta hacia arriba y
presione la tapa para cerrar. (Vea la Fig. C-B)
2 Reproduzca el minidisco. (Vea la Fig. C-C)
1 Gire el control hacia .o N> en el mando a
distancia (o presione >/N en el reproductor).
Cuando utilice el mando a distancia, suena un timbre
corto en los auriculares/audífonos.
2 Levante y gire VOL +/– en el mando a distancia (o
presione VOLUME +/– en el reproductor) para ajustar
el volumen.
El indicador de volumen aparece en el mando a
distancia para que pueda verificar el volumen.
BOtras funciones del disco
Para
Parar
Pausa
Encuentre el principio
de la pista actual
Escuchar el principio
de la pista anterior
Escuchar el principio
de la siguiente canción
Ir hacia atrás mientras
reproduce
Ir hacia adelante
mientras reproduce
Retire el minidisco
1
)
2)
Nota
Cuando retire el disco, asegúrese de presionar primero x y deslice a
OPEN.
Acerca de la función G-PROTECTION
La función G-PROTECTION fue desarrollada para darle excelente
protección contra el salto de sonido durante muchos usos activos. Esta
función le da un mayor nivel de protección contra golpes durante la
reproducción que el tradicional.
Sugerencias
• El reproductor puede reproducir la canción al doble o 4 veces el modo
• Durante el funcionamiento del aparato se enciende la luz OPR del
• Se apaga la pantalla en el mando a distancia un poco después de
Nota
Puede haber un salto del sonido si:
1)
Cuando presione . o >/N en el reproductor durante una pausa, el
reproductor continúa reproduciendo.
Si se gira y se mantiene el control hacia . o N> en el mando a
distancia (o mantiene presionado . o >/N en el reproductor) durante
una pausa, puede avanzar/rebobinar rápidamente sin escuchar el sonido
reproducido.
Cuando abra la tapa, el punto de inicio de la reproducción cambia al
principio de la primera canción.
de larga duración (LP2 o LP4). La reproducción etéreo normal, la
reproducción estéreo LP2, la reproducción estéreo LP4 o la
reproducción monoaural se seleccionan automáticamente de acuerdo
con la fuente de audio.
reproductor. Después de presionar x para parar la reproducción, se
apaga la luz OPR.
presionar x.
— tel reproductor recibe un golpe continuo más fuerte que el esperado.
— se reproduce un minidisco sucio o rayado.
Haga esto (suenan timbres por los
auriculares/audífonos)
Presione x. (Un timbre largo)
Presione X en el mando a distancia.
(Timbres cortos continuos)
Presione nuevamente X en el mando a
distancia para continuar la reproducción.
Gire el control hacia . en el mando a
distancia. (Tres timbres cortos)
Presione . una vez en el reproductor.
Gire el control .del mando a distancia
repetidamente. (Tres timbres cortos
continuos)
Presione . repetidamente en el
reproductor.
Gire el control hacia N> en el mando
a distancia. (Dos timbres cortos)
Presione >/N en el reproductor una
vez.
Gire y mantenga el control hacia . en
el mando a distancia.
Mantenga presionado . en el
reproductor.
Gire y mantenga el control hacia N>
1)
en el mando a distancia.
Mantenga presionado >/N en el
reproductor.
Presione x, y deslice a OPEN.
1)
2)
BDistintas formas de reproducción
Cambio del modo de reproducción
(Vea la Fig.
Se pueden seleccionar distintos modos de reproducción
utilizando PLAYMODE y RPT/ENT en el mando a distancia.
)
Selección del modo de reproducción (Vea la
Fig. D-A)
D)
1 Presione repetidamente PLAYMODE para seleccionar uno
de los siguientes cuatro modos de reproducción.
Indicación Modo de reproducción
(nada) (reproducción
normal)
“1” (una reproducción)
“SHUF” (reproducción
aleatoria)
“PGM” (reproducción
programada
Se reproducen una vez todas las
canciones
Se reproduce una canción una sola
vez.
Todas las canciones se reproducen en
orden aleatorio.
Se reproducen las canciones en el
orden especificado.
Para escuchar las canciones en la secuencia
deseada (reproducción programada)
1 Presione repetidamente PLAYMODE hasta que destelle
“PGM” en la pantalla.
4 Presione RPT/ENT en el mando a distancia.
Los ajustes de sonido se memorizan y aparecen nuevamente
las indicaciones de reproducción.
Para seleccionar un sonido prefijado
Presione repetidamente SOUND en el mando a distancia para
seleccionar “SOUND1”, “SOUND2” o sin indicación.
La selección sin indicación desactiva la función de Prefijados de
Sonido Digital.
Ajustes por omisión de Prefijados de Sonido
Digital
Los ajuste por omisión de Prefijados de Sonido Digital son los
siguientes:
• “SOUND1”: graves +1, agudos ±0
• “SOUND2”: graves +3, agudos ±0
Sugerencias
• Los ajustes pueden memorizarse en la memoria de disco personal.
• Los ajustes pueden cambiarse durante una pausa momentánea de la
reproducción.
Notas
• No puede cambiar los ajustes con los botones de funcionamiento del
reproductor.
• El sonido reproducido puede quedar cortado o distorsionado según el
ajuste de Prefijados de Sonido digital, cuando se levanta el volumen
demasiado alto, según los ajustes.
Para cambiar la velocidad de
reproducción (Control de velocidad)
(Vea la Fig. F)
La función de reproducción variable es conveniente para utilizar
cuando estudia un idioma.
La velocidad puede ajustarse en 7 niveles.
1 Presione DISPLAY en el mando a distancia durante 2
segundos o más durante la reproducción. (Vea la Fig. D-A)
2 Gire el control en el mando a distancia hacia . o N>
hasta que destelle “SPEED” en la pantalla y presione e x en
el mando a distancia.
El reproductor cambia al modo de ajuste de velocidad.
3 Gire el control hacia . o N> para seleccionar la
velocidad de reproducción.
“+” muestra la velocidad normal y el curso muestra la
velocidad de reproducción seleccionada. (Vea la Fig. F-A)
4 Presione x para ajustar la velocidad de reproducción.
Durante otras velocidades de reproducción que no sean la
normal, aparece “S” a la derecha del tiempo transcurrido
(Vea la Fig. F-B)
Sugerencia
Los ajustes pueden memorizarse en la memoria de disco personal.
Notas
• No puede cambiar los ajustes con los botones de funcionamiento del
reproductor.
• El sonido reproducido se verá afectado por la velocidad de la
reproducción.
• Todos los ajustes se perderán al retirar el disco del reproductor.
Memorización de ajustes para discos
individuales (Memoria de disco
personal)
Se pueden memorizar los ajustes de un disco. Una vez
memorizados, los ajustes pueden llamarse y utilizarse cada vez
que coloque ese disco. Pueden memorizarse los siguientes
ajustes:
• Volumen
• Modo de reproducción
• Ajuste de programa
• Calidad de sonido (Prefijados de sonido Digital)
• Velocidad de reproducción (Control de velocidad)
1 Presione DISPLAY en el mando a distancia durante 2
segundos o más. (Vea la Fig. D-A)
2 Gire el control del mando a distancia hacia . o N>
hasta que destella “PERSONAL” en la pantalla y presione x
en el mando a distancia.
Destella “Entry?” en la pantalla.
3 Presione x en el mando a distancia.
Aparece “Entry OK” en la pantalla y se memorizan los
ajustes del disco en el reproductor.
2 Gire repetidamente el control hacia . o N> para
seleccionar una canción.
(Vea la Fig. D-B)
3 Presione RPT/ENT.
Entra en la canción.
4 Repita los pasos 2 y 3 para seleccionar otras canciones en la
secuencia deseada.
5 Presione RPT/ENT durante 2 segundos o más.
Los ajustes se entran y empieza la reproducción desde la
primera canción programada.
Sugerencias
• Los ajustes de reproducción programada permanecen en la memoria
incluso después de terminar la reproducción o de pararla.
• Se pueden seleccionar hasta 20 canciones en la reproducción/
programada.
• El programa puede memorizarse en la memoria de disco personal.
Notas
• Se perderán todos los ajustes programados cuando se retire el disco del
reproductor.
• Si no se hacen más ajustes durante cinco minutos con el reproductor
parado, se entrarán los ajustes hechos hasta ese punto.
Reproducción repetida
Se puede utilizar esta función para repetir la reproducción en el
modo de reproducción normal, reproducción de una canción,
reproducción aleatoria o reproducción programada.
1 Presione RPT/ENT durante la reproducción.
Aparece “ ” en la pantalla.
Para ajustar la calidad de sonido
(Prefijado de sonidos digitales)
Se pueden hacer ajustas en la calidad de sonido de acuerdo a sus
preferencias y memorizar dos juegos de estos ajustes.
(Vea la Fig. E)
1 Presione repetidamente SOUND en el mando a distancia
para seleccionar “SOUND1”, “SOUND2”. (Vea la Fig. D-
A)
2 Durante la reproducción, presione SOUND en el mando a
distancia durante 2 segundos o más. (Vea la Fig. E-A)
El reproductor cambia al modo de ajuste de graves. Presione
SOUND durante 2 segundos para cambiar otra vez el
reproductor al modo de ajuste de agudos.
3 Gire repetidamente el control en el mando a distancia hacia
. o N> para ajustar los graves o agudos.
(Vea la Fig. E-B)
Si presiona SOUND durante más de 2 segundos mientras
ajusta los graves, las indicaciones cambian a agudos (o
viceversa).
Cuando presione SOUND durante un corto período de
tiempo mientras se ajustan los graves o agudos, se entra el
ajuste para ese sonido y la indicación cambia al otro ajuste
de sonido.
Para borrar la información del disco
Coloque el disco cuya información desea borrar y verifique su
contenido. Haga los pasos 1 y 2 hasta que destelle “Erase?” en la
pantalla y presione x. Aparece “Erase OK” en la pantalla y se
borra la información del disco.
Si trata de borrar la información de un disco que no estaba en la
memoria, aparece “No Entry!” en la pantalla durante 2
segundos.
Notas
• Se pueden memorizar ajustes para hasta 20 discos. Los ajustes
memorizados a continuación sustituirán los ajustes de minidisco con
fecha más antigua.
• Si se utiliza otro grabador de minidiscos para editar o agregar
canciones en un disco, cuyos ajustes han sido memorizados en el
reproductor, el disco dejará de reconocerse en el reproductor y la
información memorizada se volverá inútil.
Para saber el nombre de la canción y
el tiempo de reproducción (Vea la Fig.
G)
Durante la reproducción, puede confirmar el nombre y número
de la canción, tiempo transcurrido de la canción actual y el
número total de canciones en el minidisco.
1 Presione DISPLAY en el mando a distancia cuando el
reproductor está reproduciendo un minidisco.
Cada vez que presione DISPLAY, la pantalla cambia las
indicaciones de la siguiente forma (Vea la Fig. G):
AB
Número de canción Tiempo transcurrido
Número de canción Número de canción
Número total de canciones Nombre del disco
Número de canción Modo de canción
1)
Aparece sólo con minidiscos con etiqueta electrónica.
2)
El modo para cada canción aparece como sigue:
“Mode : SP” Modo normal (estéreo)
“Mode : LP2” Modo 2 × (2 veces la reproducción normal)
“Mode : LP4” Modo 4 × (4 veces la reproducción normal)
“Mode : MONO” Monoaural
Nota
La indicación de modo sólo aparece durante la reproducción. El modo
aparece durante 2 segundos. Después cambia por el tiempo transcurrido
de la canción actual.
1)
1)
2)
H
DISPLAY
./N >
x
I
HOLDAVLS
J
HOLDHOLD
This warranty is valid only in the United States.
Esta garantía sólo es válida en los Estados
Unidos.
English Español
B Other operations
Setting the alarm (Melody Timer)
(See Fig. H)
The alarm is convenient for reminding yourself of important
events, like getting off the train at your station. The alarm can
be set to sound in 1 to 99 minutes.
1 Press DISPLAY on the remote control for 2 seconds or more.
2 Turn the control on the remote control towards .or
N> repeatedly until “M-TIMER” flashes in the display,
and then press x on the remote control.
3 Turn the control towards . or N> repeatedly until
“ON” flashes in the display, and press x on the remote
control.
appears.
,
4 Turn the control towards . or N> repeatedly to
specify the desired time.
Each time you turn the control, the indication moves from
“TIME 01” to “TIME 99” (1 minute to 99 minutes) in oneminute intervals.
5 Press x on the remote control.
The specified time is set.
6 Turn the control towards .or N> repeatedly to select
the sound.
You can select from three kinds of sounds.
Display Alarm sound
“MELODY : 1”
“MELODY : 2”
“MELODY : 3”
Melody (Classical music 1)
Melody (Classical music 2)
Beep sound
7 Press x on the remote control.
The alarm is set.
To check the remaining time until the alarm
Stop playback. The remaining time will appear in the display
after a short while.
Do steps 1 to 3 again to display the remaining time during play
or play-pause.
To exit from the alarm setting procedure
Press DISPLAY for 2 seconds or more.
To cancel the alarm settings
Select “OFF” in step 3, and then press x on the remote control.
To stop the alarm
Press any button to stop the alarm.
Note that this will not activate the button’s original function.
Tips
• If you end the procedure with step 3, the previous setting is
automatically used.
• After sounding for one minute, the alarm will automatically stop and
the alarm setting will be canceled. If the alarm sounds during stop
mode, then the power will automatically turn off 10 seconds after the
alarm stops. If the alarm stops while an MD is playing, the playback
will continue uninterrupted.
Note
The timer will begin counting from the moment you select “ON” in step
3. When you change the alarm setting in step 4, timer will begin counting
again with the new alarm setting.
To protect your hearing (AVLS)
(See Fig. I)
1 Set AVLS (Automatic Volume Limiter System) on the player
to LIMIT.
The volume is kept at a moderate level, even if you try to
turn the volume above the limited level.
To cancel the AVLS function
Set AVLS to NORM to cancel the AVLS function.
To lock the controls (HOLD) (See Fig.
J)
1 Slide HOLD on the remote control in the direction of the
. to lock the controls of the remote control and slide
HOLD on the player in the direction of the . to lock the
controls of the player.
To unlock the controls
Slide HOLD to the opposite direction of the arrow.
BAdditional information
Precautions
On safety
• Make sure to keep the player in the supplied carrying pouch. If
the terminals on the player, charger, or battery case are accidently
brought into contact with a metallic object, they may short-circuit
and begin to heat up.
• Keep the terminals on the player or on the battery case away from
metallic objects or surfaces. Such contact may short-circuit the
terminals and cause dangerous heat generation. When carrying
the player with you, always keep the battery case attached to the
player and the player in the supplied carrying pouch.
• When you carry the supplied rechargeable battery, be sure to put
it in the supplied rechargeable battery carrying case. Carrying the
rechargeable battery without the case may cause a short-circuit
with metallic objects such as coins, key rings, or necklace. As a
result, a heat may generate.
• Do not put any foreign objects in the DC IN 1.5V jack.
• Do not carry or store the dry battery or battery case in the same
place with metallic objects such as coins, key rings, or necklaces.
This may cause a short-circuit to occur and the generation of heat.
• Incorrect battery usage may lead to leakage of battery fluid or
bursting batteries. To prevent such accidents, observe the
following precautions:
—Install batteries with the + and – poles aligned correctly.
—Do not charge dry batteries.
• If a battery leak should develop, carefully and thoroughly wipe
away battery fluid from the battery compartment before inserting
new one.
• If you are not going to use this player for a long time, be sure to
disconnect the power supply (AC power adaptor, dry battery, or
rechargeable battery). To remove the AC power adaptor from the wall
outlet, grasp the adaptor plug itself; never pull the cord.
About charging
• Do not use it to charge any other battery besides the one
designated for it.
• Because of the battery’s character, the capacity of the battery may
be shorter than normal when it is used for the first time or after a
long period of disuse. In this case, charge and discharge the
battery several times. The battery life will be restored.
• If the rechargeable battery capacity becomes half the normal life,
replace it with a new one.
• Remove the rechargeable battery when the unit is not to be used
for a long time.
• Disconnect the charger from the wall outlet as soon as the battery
has been charged. Leaving it connected may result in reduced
battery performance.
• Though the charger and the battery may become hot during the
charging procedure, this poses no danger.
On the battery case
The supplied battery case is designed for use with the MZ-E900 only.
Never use another type of battery case with this player.
Handling
• Do not drop or give a bump the player. This may cause the player
to malfunction.
• Do not pull on the remote control or headphones/earphones
cords.
• Do not place the player in the following places:
—An extremely hot place (over 60°C (140°F))
—A place exposed to direct sunlight or near a heater
—In a car with the windows rolled up (especially in the summer)
—In a damp place such as a bathroom
—Near a source of electromagnetic fields such as a magnet,
speaker, or TV
—In a dusty place
• If you experience an allergic reaction to the supplied headphones/
earphones, stop using them at once and consult a doctor or a Sony
service center.
On heat build-up
Heat may build up in the player if it is used for an extended period
of time. This, however, is not a malfunction.
On mechanical noise
The player gives out mechanical noise while operating, which is
caused by the power-saving system of the player. This is not a
malfunction.
On installation
• Never use the player where it will be subjected to extremes of
light, temperature, moisture or vibration.
• Never wrap the player in anything when it is being used with the
AC power adaptor. Heat build-up in the player may cause
malfunction or injury.
On the headphones/earphones
Road safety
Do not use headphones/earphones while driving, cycling, or
operating any motorized vehicle. It may create a traffic hazard and
is illegal in many areas. It can also be potentially dangerous to play
your player at high volume while walking, especially at pedestrian
crossings. You should exercise extreme caution or discontinue use in
potentially hazardous situations.
Preventing hearing damage
Avoid using headphones/earphones at high volume. Hearing
experts advise against continuous, loud and extended play. If you
experience a ringing in your ears, reduce the volume or discontinue
use.
Caring for others
Keep the volume at a moderate level. This will allow you to hear
outside sounds and to be considerate of the people around you.
About remote control
The supplied remote control is designed for use with the MZ-E900
only. Note also that the player cannot be controlled by remote
controls for other models.
On the MiniDisc cartridge
• Do not touch the internal disc directly. Forcing the shutter open
may damage the internal disc.
• Do not place the cartridge where it will be subjected to light,
temperature, moisture or dust.
• Do not affix the lable outside of the specified area on the MD.
Make sure the lable is placed within the recessed space on the
disc.
On cleaning
• After wiping the player casing with a soft cloth slightly moistened
with water, wipe it again with a dry cloth. Do not use any type of
abrasive pad, scouring powder or solvent such as alcohol or
benzene as it may mar the finish of the casing.
• Wipe the disc cartridge with a dry cloth to remove dirt.
• Dust on the lens may prevent the unit from operating properly.
Be sure to close the disc compartment lid after inserting or ejecting
an MD.
• To maintain good sound quality, use a soft cloth to clean the plugs
of the headphones/earphones and remote control. A dirty plug
may cause noise or intermittent breaks in the sound during
playback.
If you have any questions or problems concerning your player,
please consult your nearest Sony dealer.
Troubleshooting
The player does not work or works poorly.
•You tried to play with no disc in the player.
b
Insert an MD.
•The hold function is activated and the controls are locked. (If you
press any of the operation buttons on the player, “HOLD” flashes
on the remote control.)
b
Slide HOLD against the direction of the arrow to release the
hold function.
•When the remote control is enabled for the making settings
(“MENU” appears on the remote control when the buttons on the
player are pressed).
b
End the procedure for making settings using the remote
control or disconnect the remote control plug.
•Moisture has condensed inside the player.
b
Take the MD out and wait for several hours until the moisture
evaporates.
•The rechargeable battery or dry battery is weak (“LOW BATT”
flashes on the remote control).
b
Replace a new dry battery or recharge the battery.
•The rechargeable battery or dry battery has been installed
incorrectly.
b
Install the battery with correct polarity.
•An MD with no recording on it is inserted (“BLANKDISC”
flashes on the remote control).
b
Insert a recorded MD.
•The player cannot read the disc (it’s scratched or dirty) (“DISC
Err” flashes on the remote control).
b
Reinsert or replace the disc.
•While operating, the player received a mechanical shock, too
much static, abnormal power voltage caused by lightning etc.
b
Restart as follows.
1 Disconnect all the power sources.
2 Leave the player for about 30 seconds.
3 Connect the power source.
The MD is not played normally.
• The player is set to the repeat mode (“ ” is displayed on the
remote control).
b
Press PLAYMODE repeatedly until “ ” disappears, then
start playing.
The MD cannot be played from the first track.
• Disc playing stopped before it came to the last track.
b
Press . repeatedly or eject and reinsert the MD once to go
back to the beginning of the disc, and restart playing after
checking the track number in the display.
• The program play settings of that MD has been stored in Personal
Disc Memory.
b
Cancel the stored settings.
The Digital Sound Preset function does not function.
• The Digital Sound Preset function is off.
b
Press SOUND on the remote control repeatedly to select
“SOUND1” or “SOUND2.”
Playback sound skips.
• The player is placed where it receives continuous vibration.
b
Put the player on a stable place.
• A very short track may cause sound to skip.
Sound has a lot of static.
• Strong magnetism from a television or such device is interfering
with operation.
b
Move the player away from the source of strong magnetism.
Momentary noise is heard.
• The sound was recorded in LP4 stereo mode.
b
Because of the nature of the compression method used in LP4
mode, noise may be heard on very rare occasions when
playing back sound recorded in this mode.
The rechargeable battery does not start charging (in case of
a charger with a lid).
• The lid of the battery charger is not closed properly.
b
Close the lid and slide the lock.
• A disc is playng.
b
Stop playback.
No sound comes through the headphones/earphones.
• The headphones/earphones plug is not firmly connected.
b
Connect the headphones/earphones plug firmly to the remote
control.
b
Connect the headphones/earphones plug firmly to the i jack.
• Volume is too low.
b
Adjust the volume by pressing VOLUME +/– (VOL +/– on
the remote control).
• AVLS is on.
b
Slide AVLS to NORM.
Specifications
Audio playing system
MiniDisc digital audio system
Laser diode properties
Material: GaAlAs
Wavelength: λ = 790 nm
Emission duration: continuous
Laser output: less than 44.6 µW*
* This output is the value measured at a distance of 200 mm from the
objective lens surface on the optical pick-up block with 7 mm aperture.
Revolutions
Approx. 300 rpm to 2,700 rpm
Error correction
ACIRC (Advanced Cross Interleave Reed Solomon Code)
Sampling frequency
44.1 kHz
Coding
ATRAC (Adaptive TRansform Acoustic Coding)
ATRAC3: LP2
ATRAC3: LP4
Modulation system
EFM (Eight to Fourteen Modulation)
Number of channels
2 stereo channels
1 monaural channel
Frequency response
20 to 20,000 Hz ± 3 dB
Wow and Flutter
Below measurable limits
Outputs
Headphones/earphones: stereo mini-jack, maximum output level 5 mW +
5 mW, load impedance 16 ohms
Power requirements
Nickel metal hydride rechargeable battery
One NH-14WM(A) (supplied): 1.2V, 1,350 mAh (min)
One LR6 (size AA) battery (not supplied)
External power jack: Power rating 1.5V DC
Battery operation time
See “When to replace or recharge the battery”
Dimensions
Approx. 77.7 × 12.7 × 71.0 mm (w/h/d) (3 1/
(not including projecting parts and controls)
Mass
Approx. 58 g (2.1 oz) (the player only)
Supplied accessories
Headphones/earphones with a remote control (1)
Battery charger (1)
Rechargeable battery (1)
Rechargeable battery carrying case (1)
Dry battery case (1)
Carrying pouch (1) (except for the U.S.A. model)
AC plug adaptor (1) (world model only)
US and foreign patents licensed from Dolby Laboratories.
Design and specifications are subject to change without notice.
Optional accessories
AC-E15HG AC power adaptor*
CPA-9C Car connecting pack
DCC-E215 Car battery cord
MDR series stereo headphones/earphones**
SRS series Active Speakers
Carrying pouch
* The operative voltage for the AC power adaptor varies depending
upon the country in which it is sold. Therefore, purchase the AC
power adaptor in the country you intend to use it.
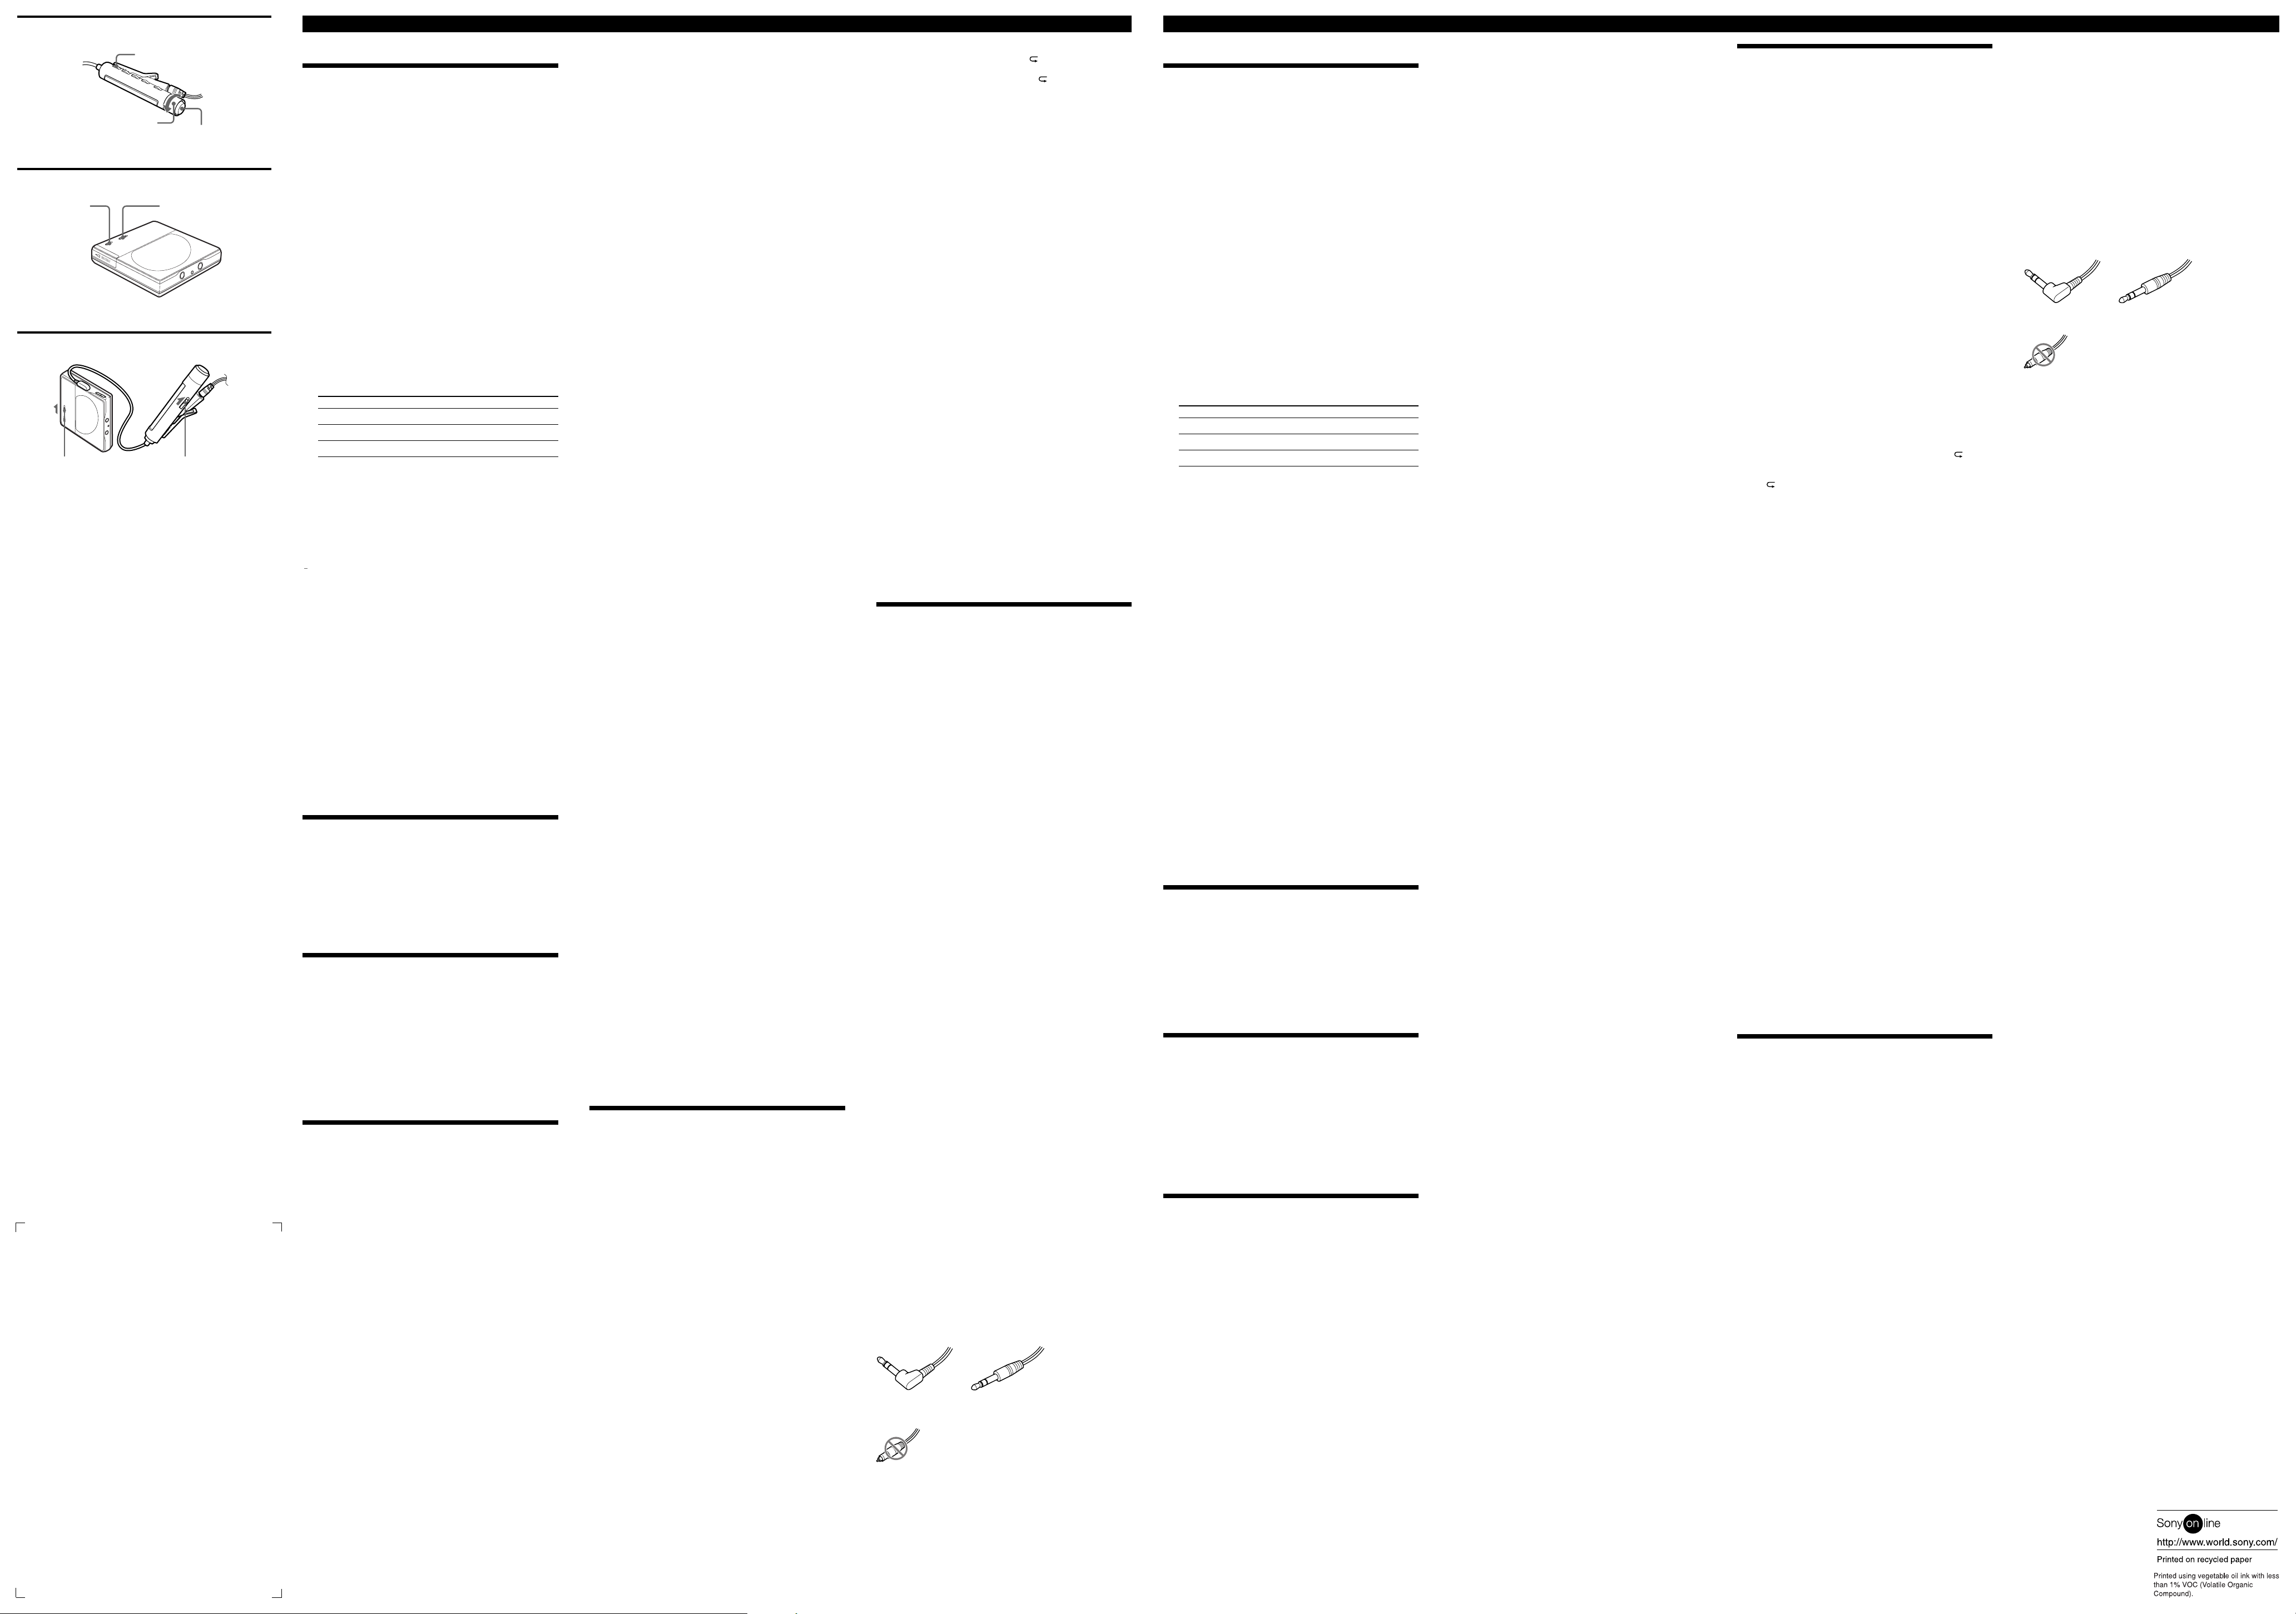
** Whether you should plug the headphones/earphones directly to the i
jack on the main unit or to a remote control, use only headphones/
earphones with stereo mini plugs. Headphones/earphones with a
microplug cannot be used.
Stereo mini plugs
Micro plug
Your dealer may not handle some of the above listed accessories. Please
ask the dealer for detailed information about the accessories in your
country.
× 1/2 × 2 7/8 in.)
8
BOtras operaciones
Ajuste de la alarma (temporizador
con melodía) (Vea la Fig. H)
La alarma es conveniente para recordarle acontecimientos
importantes como cuando tiene que bajarse del tren al llegar a su
estación. Se puede ajustar la alarma para que suene en 1 a 99
minutos.
1 Presione DISPLAY en el mando a distancia durante 2
segundos o más.
2 Gire repetidamente el control del mando a distancia hacia
.o N> hasta que destella “M-TIMER” en la pantalla
y presione x en el mando a distancia.
3 Gire repetidamente el control hacia . o N> hasta que
destella “ON” y presione x en el mando a distancia.
Aparece ,.
4 Gire repetidamente el control hacia . o N> para
especificar el tiempo deseado.
Cada vez que gire el control, la indicación se mueve de
“TIME 01” a “TIME 99” (1 minuto a 99 minutos) en
intervalos de un minuto.
5 Presione x en el mando a distancia.
Se ajusta el tiempo especificado.
6 Gire repetidamente el control hacia .o N> para
seleccionar el sonido.
Se puede seleccionar entre tres tipos de sonido.
Indicación Sonido a alarma
“MELODY : 1”
“MELODY : 2”
“MELODY : 3”
7 Presione x en el mando a distancia.
Queda ajustada la alarma.
Para confirmar el tiempo remanente hasta la
alarma
Pare la reproducción. El tiempo remanente aparecerá en la
pantalla después de un corto período de tiempo.
Haga nuevamente los pasos 1 a 3 para que aparezca el tiempo
remanente durante la reproducción o pausa de reproducción.
Para salir del procedimiento de ajuste de la
alarma
Presione DISPLAY durante 2 segundos o más.
Para cancelar los ajustes de la alarma
Seleccione “OFF” en el paso 3 y presione x en el mando a
distancia.
Para parar la alarma
Presione cualquier botón para parar la alarma.
Tenga en cuenta que esto no activará la función original del
botón.
Sugerencias
• Si termina el procedimiento después del paso 3, se utilizarán
automáticamente los ajustes anteriores de la alarma.
• Después de sonar durante un minuto, la alarma se parará
automáticamente y se cancelará el ajuste de alarma. Si suena la alarma
durante el modo de parada, se desconectará automáticamente el
aparato 10 segundos después de que se para la alarma. Si se para la
alarma mientras se reproduce un minidisco, la reproducción no se
interrumpirá.
Nota
El temporizador empezará a contar desde el momento que selecciona
“ON” en el paso 3. Cuando cambie los ajustes de alarma en el paso 4, el
temporizador empezará a contar nuevamente con el nuevo ajuste de
alarma.
Para proteger sus oídos (AVLS)
(Vea la Fig. I)
1 Ajuste AVLS (Automatic Volume Limiter System) en el
reproductor a LIMIT.
El volumen se mantiene a un nivel moderado, incluso
aunque trata de girar el volumen por encima del límite.
Para cancelar la función AVLS
Ajuste AVLS a NORM para cancelar la función AVLS.
Para fijar los controles (HOLD)
(Vea la Fig. J)
1 Deslice HOLD en el mando a distancia en el sentido de .
para fijar los controles en el mando a distancia y deslice
HOLD en el reproductor en el sentido . para fijar los
controles en el reproductor.
Para activar los controles
Deslice HOLD en el sentido opuesto de la flecha.
BInformación adicional
Precautions
Acerca de la seguridad
• Guarde el reproductor en la bolsa de transporte incluida. Si los
terminales del reproductor, cargado o caja de pilas entran
accidentalmente en contacto con un objeto metálicos pueden
cortocircuitar y calentarse.
• Mantenga los terminales en el reproductor de la caja de pilas lejos
de objetos o superficies metálicas. El contacto puede cortocircuitar
los terminales y provocar una generación de calor peligrosa.
Cuando transporte el reproductor, mantenga siempre la caja de
pilas instalada en el reproductor y el reproductor en la bolsa de
transporte incluida.
• Cuando transporte la batería de carga guárdela en la caja de
transporte incluida. El transporte de la batería de carga sin la caja
puede provocar un cortocircuito con objetos metálicos tales como
monedas, llaveros o collares. Esto puede generar calor.
• No ponga objetos extraños en la toma DC IN 1.5V.
• No transporte o guarde la pila o caja de pilas en el mismo lugar
que objetos metálicos tales como monedas llaveros o collares.
Puede provocar un cortocircuito que genere calor.
• Un uso incorrecto de la pila puede hacer que se derrame el líquido
de la pila o que exploten. Para evitar estos accidentes, respete las
siguientes precauciones:
—Instale las pilas con los polos + y – correctamente alineados.
—No cargar pilas.
• Si se derrama el líquido de la pila, limpie cuidadosamente y a
fondo todo el líquido de la pila del compartimiento de pilas antes
de colocar otra nueva.
• Si no se va a utilizar el reproductor durante mucho tiempo, desconecte
la alimentación eléctrica (adaptador de CA, pila o batería recargable).
Para desenchufar el adaptador de CA del tomacorriente de la pared,
tome por el enchufe del adaptador; no tire por el cable.
Melodía (Música clásica 1)
Melodía (Música clásica 2)
Sonido de timbre
Acerca de la carga
• No utilice para cargar otras baterías que no sea la específica para
éste.
• Debido a las propiedades de la batería, la capacidad de la batería
puede ser más corta que la normal cuando la utilice por primera
vez después de un largo período sin usar. En este caso, cargue y
descargue la batería varias veces. Se recuperará la longevidad de
la batería.
• Si la capacidad de la batería recargable se vuelve la mitad de la
longevidad normal, cambie por una nueva.
• Saque la batería recargable cuando no se va a utilizar la unidad
durante mucho tiempo.
• Desconecte el cargador del tomacorriente de la pared cuando haya
terminado de cargar la batería. Si lo deja conectado, pueden
reducirse las prestaciones de la batería.
• El cargador y la batería pueden calentarse durante el
procedimiento de carga sin que esto represente un peligro.
Acerca de la caja de la batería
La caja de batería incluida fue diseñada para utilizar sólo con la
MZ-E900. No utilice otro tipo de caja de batería para este
reproductor.
Manipulación
• No deje caer o golpee el reproductor. Puede provocar una avería
del reproductor.
• No tire del mando a distancia o cables de auriculares/audífonos.
• No coloque el reproductor en los siguientes lugares:
—Un lugar muy caliente (más de 60°C (140°F))
—Un lugar expuesto a los rayos directos del sol o cerca de la
calefacción
—En un coche con la ventana levantada (especialmente en
verano)
—En un lugar húmedo como el baño
—Cerca de un campo electromagnético tal como un imán, altavoz
o TV
—En un lugar polvoriento
• Si sufre una reacción alérgica a los auriculares/audífonos, deje de
usarlos inmediatamente y consulte con un médico o con el centro
de servicio de Sony.
Acerca de la acumulación de calor
El calor puede concentrarse en el reproductor si lo utiliza durante
mucho tiempo. Esto no es una avería.
Acerca del ruido mecánico
El reproductor produce un ruido mecánico durante el
funcionamiento, provocado por el sistema de ahorro de energía del
reproductor. Esto no es una avería.
Acerca de la instalación
• No utilice el reproductor en un lugar donde quede expuesto a
extremos de luz, temperatura, humedad o vibración.
• No encierre el reproductor en nada mientras utilice con el
adaptador de CA. La acumulación de calor en el reproductor
puede provocar una avería o heridas.
Acerca de los auriculares/audífonos
Seguridad en la carretera
No utilice los auriculares/audífonos durante la conducción, en
bicicleta o cuando anda en un vehículo motorizado. Puede ser un
peligro para el tránsito y es ilegal en muchas regiones. También
puede ser un peligro en potencia si reproduce a gran volumen
mientras camina, especialmente en los cruces peatonales. Debe tener
cuidado y dejar de utilizar en situaciones peligrosas.
Para evitar daños a los oídos
No utilice los auriculares/audífonos a gran volumen. Los expertos
aconsejan contra escuchar a un volumen fuerte durante mucho
tiempo. Si escucha un tintineo en los oídos reduzca el volumen o deje
de utilizar.
Sea respetuoso de los demás
Mantenga el volumen a un nivel moderado. Permitirá escuchar los
sonidos del exterior y será amable con las personas que lo rodean.
Acerca del mando a distancia
El mando a distancia incluido fue diseñado para utilizar sólo con el
MZ-E900. El reproductor no se podrá controlar con el mando a
distancia de otros modelos.
Acerca del cartucho de minidiscos
• No toque directamente el disco interior. Si abra a la fuerza el cierre
metálico podrá dañar el disco interior.
• No coloque el cartucho en un lugar expuesto a la luz, temperatura,
humedad o polvo.
• No pegue la etiqueta fuera del lugar especificado en el minidisco.
Asegúrese de que la etiqueta está en el espacio escalonado del
disco.
Acerca de la limpieza
• Después de limpiar el exterior del reproductor con un paño suave
ligeramente empapado en agua, frote nuevamente con un paño
seco. No utilice ningún tipo de esponja abrasiva, polvo abrasivo o
un disolvente como alcohol o bencina ya que puede dañar la
terminación del exterior.
• Limpie el cartucho con un paño seco para eliminar la suciedad.
• El polvo en la lente puede evitar que el aparato funcione
correctamente. Asegúrese de cerrar la tapa del compartimiento del
disco después de colocar o expulsar el minidisco.
• Para mantener su buena calidad de sonido, utilice un paño suave
para limpiar los enchufes de los auriculares/audífonos y mando a
distancia. Un enchufe sucio puede provocar ruidos o cortes
intermitentes en el sonido durante la reproducción.
Si tiene dudas o problemas en su reproductor, acuda a su tienda de
Sony más cercana.
Localización de averías
El reproductor no funciona o lo hace mal.
• Se ha tratado de reproducir sin colocar un disco en el
reproductor.
b
Coloque un minidiscos.
• Se ha activado la función retención y los controles están
bloqueados. (Si se presiona uno de los botones de funcionamiento
del reproductor destella “HOLD” en el mando a distancia.)
b
Deslice HOLD contra el sentido de la flecha para desactivar la
función de retención.
• Cuando se activa el mando a distancia para hacer los ajustes
(aparece “MENU” en el mando a distancia cuando se presionan
los botones en el reproductor ).
b
Termine el procedimiento para hacer los ajustes con el mando
a distancia o desconecte el enchufe del mando a distancia.
• Se ha condensado humedad en el interior del reproductor.
b
Saque el minidisco y espere varias horas hasta que se evapore
la humedad.
• La batería recargable o pila está débil (Destella “LOW BATT” en
el mando a distancia).
b
Cambie por una nueva pila o recargue la batería.
• La batería recargable o pila se instaló incorrectamente.
b
Instale la batería con los polos correctamente instalados.
• Se instaló un minidisco sin grabar (Destella “BLANKDISC” en el
mando a distancia).
b
Coloque un minidisco grabado.
• El reproductor no puede leer el disco (Está rayado o sucio).
(Destella “DISC Err” en el mando a distancia).
b
Vuelva a colocar o cambie el disco.
• Durante el funcionamiento el reproductor recibió un golpe
mecánico, hay demasiada estática, voltaje anormal provocado por
un rayo, etc.
b
Vuelva a empezar se la siguiente forma.
1 Desconecte todas las fuentes eléctricas.
2 Deje descansar el reproductor durante 30 segundos.
3 Conecte la fuente eléctrica.
El minidisco no reproduce normalmente.
•El reproductor está en el modo de repetición (Aparece “ ” en el
mando a distancia).
b
Presione repetidamente PLAYMODE hasta que desaparezca
“ ” y empiece a reproducir.
El minidisco no puede reproducir desde la primera canción.
• Se paró la reproducción del disco antes de llegar a la última
canción.
b
Presione repetidamente . o expulse y vuelva a colocar el
minidisco una vez para volver al principio del disco y vuelva
a reproducir después de confirmar el número de canción en la
pantalla.
• Los ajustes de reproducción programada del minidisco se han
memorizado en la memoria de disco personal.
b
Cancele el ajuste memorizado.
No funciona la función de Prefijados de Sonido digital.
• La función de Prefijados de Sonido Digital está desconectada.
b
Presione repetidamente SOUND en el mando a distancia para
seleccionar “SOUND1” o “SOUND2”.
Salta el sonido reproducido.
• El reproductor está colocado en un lugar que recibe vibraciones
continuas.
b
Coloque el reproductor en un lugar estable.
• Una canción muy corta puede hacer que el sonido salte.
El sonido tiene mucha estática.
• Un fuerte magnetismo de la televisión o equipo similar interfiere
con el funcionamiento.
b
Aleje el reproductor de la fuente de magnetismo fuerte.
Se escucha un ruido momentáneo
• El sonido se grabó en el modo estéreo LP4.
b
Debido a la naturaleza del método de compresión utilizado en
el modo LP4, puede escucharse ruido en algunos casos muy
raros cuando se reproduce elsonido graado en este modo.
La batería recargable no empieza a cargar (en el caso de un
cargador con tapa).
• La tapa del cargador de batería no cierra correctamente.
b
Cierre la tapa y deslice el seguro.
• Se reproduce un disco.
b
Pare la reproducción.
No sale ningún sonido por los auriculares/audífonos.
• El enchufe de auriculares/audífonos no está bien conectado al
mando a distancia.
b
Conecte los auriculares/audífonos firmemente en el mando a
distancia.
b
Conecte firmemente los auriculares/audífonos en la toma i .
• El volumen está muy bajo.
b
Ajuste el volumen presionando VOLUME +/– (VOL +/– en el
mando a distancia).
• El AVLS está activado.
b
Deslice el AVLS a NORM.
Especificaciones
Sistema de reproducción de audio
Sistema de audio digital en minidiscos
Propiedades de diodo láser
Material: GaAlAs
Longitud de onda: λ = 790 nm
Duración de la medición: continua
Salida de láser: menos de 44,6 µW*
* Esta salida es el valor medido a una distancia de 200 mm de la
superficie del objetivo en el bloque de receptor óptico con abertura de
7 mm.
Revoluciones
Aprox. 300 rpm - 2.700 rpm
Corrección de error
ACIRC (Advanced Cross Interleave Reed Solomon Code)
Frecuencia de muestreo
44,1 kHz
Código
ATRAC (Adaptive TRansform Acoustic Coding)
ATRAC3: LP2
ATRAC3: LP4
Sistema de modulación
EFM (Eight to Fourteen Modulation)
Número de canales
2 canales estéreo
1 canal monoaural
Respuesta de frecuencia
20 a 20.000 Hz ± 3 dB
Cambios de velocidad
Por debajo del límite de medición
Salidas
Auriculares/audífonos: minitoma estéreo, máximo nivel de salida
5 mW + 5 mW, impedancia de carga de 16 ohmios
Requisitos eléctricos
Batería recargable de níquel-metal hídrido
Una NH-14WM(A) (incluida): 1,2 V, 1.350 mAh (min)
Una pila LR6 (tamaño AA) (no incluida)
Toma de electricidad externa: Régimen eléctrico de CC 1,5V
Tiempo de funcionamiento de la batería
Vea el “Cuando cambie o recargue la batería”
Dimensiones
Aprox. 77,7 × 12,7 × 71,0 mm ((an/al/prof) (sin incluir partes salientes y
controles))
Peso
Aprox. 58 g (sólo el reproductor)
Accesorios suministrados
Auriculares/audífonos con mando a distancia (1)
Cargador de batería (1)
Batería recargable (1)
Caja de transporte de batería recargable (1)
Caja de pilas (1)
Bolsa de transporte (1) (excepto para el modelo de los EE.UU.)
Adaptador de enchufe de CA (1) (sólo en el modelo mundial)
Patentes de los Estados Unidos y de otros países con licencia de Dolby
Laboratories.
El diseño y especificaciones están sujetos a cambios sin previo aviso.
Accesorios opcionales
Adaptador de CA AC-E15HG
Paquete de conexión para coche CPA-9C
Cable para batería de coche DCC-E215
Auriculares/audífonos estéreo de la serie MDR**
Altavoces activos de la serie SRS
Bolsa de transporte
* El voltaje de funcionamiento del adaptador de CA depende del país en
el que se compró. Por lo tanto, compre el adaptador de CA del país en
el que piensa utilizar.
** Si se enchufan los auriculares/audífonos directamente en la toma i
del aparato principal o a un mando a distancia, utilice sólo los
auriculares/audífonos con minitomas estéreo. No puede utilizar los
auriculares/audífonos con minitoma.
Minitomas estéreo
Enchufe micro
Su tienda puede no tener algunos de los accesorios mencionados. Solicite
información detallada de los accesorios en su países en su tienda.
 Loading...