

Page 1
3-264-043-11(1)
Wireless Stereo
Headphone System
Operating Instructions
Mode d’emploi
Manual de instrucciones
MDR-RF920RK
GB
FR
ES
MDR-RF960RK
© 2004 Sony Corporation
Page 2
WARNING
To prevent fire or shock hazard, do
not expose the unit to rain or
moisture.
To avoid electrical shock, do not
open the cabinet. Refer servicing to
qualified personnel only.
Information
You are cautioned that any changes or
modifications not expressly approved in this
manual could void your authority to operate this
equipment.
If you have any questions about this product,
you may call:
Sony Customer Information Services Center
1-800-222-7669 or http://www.sony.com/
Declaration of Conformity
Trade Name: SONY
Model No.: MDR-RF920R
MDR-RF960R
(Headphones Unit)
Responsible Party: Sony Electronics Inc.
Address: 680 Kinderkamack
Road, Oradell, NJ
07649 USA
Telephone No.: 201-930-6972
This device complies with Part 15 of the FCC
Rules. Operation is subject to the following
two conditions: (1) This device may not cause
harmful interference, and (2) this device must
accept any interference received, including
interference that may cause undesired
operation.
harmful interference to radio communications.
However, there is no guarantee that interference
will not occur in a particular installation. If this
equipment does cause harmful interference to
radio or television reception, which can be
determined by turning the equipment off and on,
the user is encouraged to try to correct the
interference by one or more of the following
measures:
– Reorient or relocate the receiving antenna.
– Increase the separation between the
equipment and receiver.
– Connect the equipment into an outlet on a
circuit different from that to which the
receiver is connected.
– Consult the dealer or an experienced radio/
TV technician for help.
For the customers in the Canada
Operation is subject to the following two
conditions: (1) this device may not cause
interference, and (2) this device must accept any
interference, including interference that may
cause undesired operation of the device.
For the customers in the USA and
Canada
RECYCLING NICKEL METAL
HYDRIDE BATTERIES
Nickel Metal Hydride
batteries are recyclable.
You can help preserve
our environment by
returning your used
rechargeable batteries
to the collection and
recycling location nearest you.
Note :
This equipment has been tested and found to
comply with the limits for a Class B digital
device, pursuant to Part 15 of the FCC Rules.
These limits are designed to provide reasonable
protection against harmful interference in a
residential installation. This equipment
generates, uses and can radiate radio frequency
energy and, if not installed and used in
accordance with the instructions, may cause
GB
2
For more information regarding recycling of
rechargeable batteries, call toll free
1-800-822-8837, or
visit http://www.rbrc.org/
Caution:
Do not handle damaged or leaking Nickel
Metal Hydride batteries.
Page 3

Welcome!
Table of contents
Thank you for purchasing the Sony
MDR-RF920RK/RF960RK Wireless Stereo
Headphone System. Before operating the unit,
please read this manual thoroughly and retain it
for future reference.
Some features are:
• Wireless system that allows you to listen to a
program free from the restriction of a cord
• High fidelity sound reproduction
•A compact transmitter with an AC power
adaptor (supplied) enables simple charging of
the headphone batteries. Just by placing the
headphones on the transmitter, headphone
batteries can be charged.
• Comfortable Circum-aural headphones with
self adjusting head band
• Automatic ON/OFF function on headphones
to preserve battery power
• As a power saving feature, the transmitter
automatically turns ON when the audio signal
is detected and OFF when the signal is not
received.
Notes on receiving
performance
The system for this equipment utilizes very high
frequency signals in the 900 MHz band so the
receiving performance may deteriorate due to the
surroundings. The following examples illustrate
conditions that may reduce the possible receiving
range or cause interference with reception.
• Inside a building with walls containing steel
beams.
• Area with many steel file cabinets, etc.
• Area with many electrical appliances capable
of generating electromagnetic noise.
• Transmitter is placed on a metal instrument.
• Area facing roadways.
• Noise or interfering signals exist in the
surroundings due to radio transceivers in
trucks, etc.
• Noise or interfering signals exist in the
surroundings due to wireless communication
systems installed along roadways.
Getting started
Unpacking ................................................. 4
Charging the supplied rechargeable
batteries ............................................... 4
Setting up the transmitter ........................ 7
Operating the system
Listening to a program............................. 9
The effective areas of the transmitter .. 11
Replacing the ear pads ........................... 11
Additional information
Precautions .............................................. 12
Troubleshooting ...................................... 12
Specifications ........................................... 13
GB
GB
3
Page 4

N Getting started
Charging the supplied
Unpacking
Check that you have the following items:
• The headphones (1)
• The transmitter (1)
• AC power adaptor (1)
• Unimatch plug adaptor (1)
(stereo mini jack y stereo phone plug)
rechargeable batteries
The supplied rechargeable nickel-metal hydride
batteries are not charged from the first time you
use them. Be sure to charge them before use.
To charge the headphones, place them on the
transmitter.
1 Press the button of the left housing
to open the battery compartment
lid.
The battery compartment lid comes off.
Button
2 Insert the supplied rechargeable
nickel-metal hydride batteries into
the battery compartment matching
the 3 terminals on the batteries to
the 3 marks in the compartment.
Do not use rechargeable batteries other
than the supplied ones.
• Connecting cord (1)
(phono plugs y stereo mini plug), 1 m (3.3 ft.)
• Rechargeable nickel-metal hydride batteries (2)
GB
4
Page 5
3 Close the battery compartment lid.
4 Connect the supplied AC power
adaptor to the transmitter.
Transmitter
to an AC outlet
AC power
adaptor
(supplied)
Right
housing
Left housing
When the indicator does not light in
green
Check if the right and left headphones are rested
on the transmitter correctly. The indicator will
not light up if the headphones’ contact point does
not meet the transmitter’s contact pin. Remove
the headphones and replace them on the
transmitter again so that the indicator lights in
green.
To recharge the headphone battery
after use
Place the headphones on the transmitter after
use. Since the built-in timer recognizes when
charging is complete, there is no need to remove
the headphones from the transmitter after
charging.
to DC IN 9V jack
5 Rest the headphones on the
transmitter so that the
headphones’ contact point meets
the transmitter’s contact pin while
making sure that the charging
indicator lights in green.
Charging is completed in about 16
hours and the charging indicator goes
off.
When placing the headphones on the
transmitter, be sure to hold them level
with both hands and that the right and
left housings are placed straight down
on the transmitter, and then tilt them
back as illustrated above.
Notes
• The transmitter automatically turns off while charging
the batteries.
• This system is designed to charge only the supplied
rechargeable batteries type BP-HP550 for safety. Note
that other types of rechargeable batteries cannot be
charged with this system.
• If dry batteries are installed, they cannot be charged.
• Do not attempt to use the supplied BP-HP550
rechargeable batteries for other components. They are
for use with this system only.
• Charge in an environmental temperature of between
0˚C and 40˚C (between 32˚F and 104˚F).
continue to next page
5
GB
Page 6

Charging and usage hours
Approx.
changing hours
1 hour
16 hours*
2
Approx. usage time*
MDR-RF920RK
80 minutes*
18 hours*
MDR-RF960RK
3
75 minutes*
3
15 hours*
*1at 1kHz, 1mW+1mW output
*2hours required to fully charge empty batteries
*3Time stated above may vary, depending on
the temperature or conditions of use.
1
3
Using the headphones with dry
batteries (sold separately)
Commercially available (size AAA) dry batteries
can also be used to power the headphones.
Install the batteries in the same manner as
described in steps 1 through 3 of “Charging the
supplied rechargeable batteries.”
When dry batteries are installed, the battery
charge function is not activated.
Battery life
(Using Sony alkaline battery LR03/AM-4(N))
Battery
MDR-RF920RK
MDR-RF960RK
Approx. hours*
28 hours*
24 hours*
1
2
2
Notes on Batteries
• Do not charge a dry battery.
• Do not carry a dry battery together with coins
or other metallic objects. It can generate heat if
3
the positive and negative terminals of the
battery accidentally come into contact with
metallic objects.
• If you are not going to use the unit for a long
time, remove the battery to avoid damage
from battery leakage or corrosion.
Checking the remaining battery
power
Pull up the self-adjusting band and check the
power indicator located on the upper part of the
right housing. The batteries are still serviceable
when the indicator lights in red.
Charge the rechargeable batteries or install new
dry batteries if the power indicator light dims,
flashes, or the sound becomes distorted or noisy.
Note
The rechargeable nickel-metal hydride batteries should
be replaced with new ones when they last only half the
expected time after a proper recharging. The
rechargeable batteries type BP-HP550 are not
commercially available. You can order the batteries from
the store where you purchased this system, or at your
nearest Sony dealer.
*1 at 1kHz, 1mW+1mW output
*2 Time stated above may vary, depending on
the temperature or conditions of use.
GB
6
Page 7
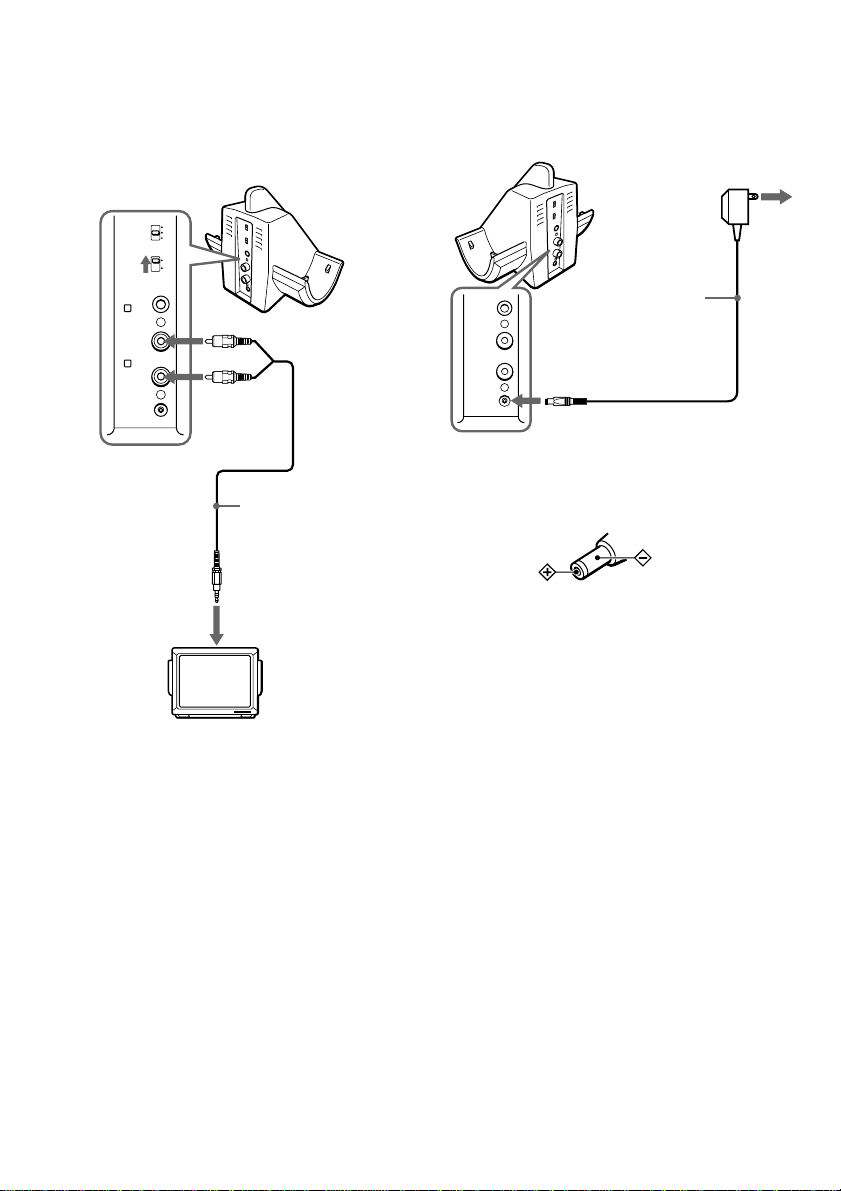
Setting up the
transmitter
1 Connect the transmitter to audio/
video equipment.
Select one of the hookups below
depending on the jack type:
A To connect to a headphones jack
Transmitter
1
CHANNEL
2
3
ON
NOISE FILTER
OFF
INPUT
A
to INPUT B
jacks
INPUT
B
DC IN 9V
!
L
R
Left channel
(white)
Right channel
(red)
B To connect to LINE OUT or REC OUT
jacks
Transmitter
1
CHANNEL
2
3
ON
NOISE FILTER
OFF
INPUT
A
L
INPUT
B
R
DC IN 9V
!
Left channel
(white)
Connecting cord
(supplied)
to INPUT A
jack
Right channel
(red)
Connecting cord
(supplied)
Unimatch plug
adaptor
(supplied)
to headphones
jack (stereo
mini jack)
to headphones
jack (stereo
phone jack)
WALKMAN*,
TV, VCR, etc.
* WALKMAN is a registered trademark of Sony
Corporation to represent Headphone Stereo
products.
to LINE OUT or REC
OUT jacks
Stereo system, VCR,
etc.
continue to next page
GB
7
Page 8
C To connect to TV, etc.
If noise occurs when the transmitter is
connected to your TV or VCR, set the
NOISE FILTER switch to ON.
to INPUT B
jacks
CHANNEL
NOISE FILTER
INPUT
A
INPUT
B
DC IN 9V
!
1
2
3
ON
OFF
L
R
Transmitter
Left channel
(white)
Right channel
(red)
Connecting cord
(supplied)
2 Connect the supplied AC power
adaptor to the transmitter.
Transmitter
AC power
adaptor
(supplied)
to DC IN 9 V jack
Notes
• Use only the supplied AC power adaptor. Do not use
any other AC power adaptor.
to an AC
outlet
to stereo mini jack
TV, etc.
Notes
• If you connect the transmitter to LINE OUT or
REC OUT jacks of an audio reproducer such as an
MD player or CD player, do not set the NOISE
FILTER switch to ON. Otherwise, volume will be
limited.
• The NOISE FILTER switch is active only in the
case of the connection shown in diagram A on
page 7 and C. In diagram B, the switch has no
effect.
• When the transmitter is placed on or near a TV, it
may pick up a noise.
In such case, place the transmitter away from the
TV.
GB
8
Polarity of the plug
• If the connected equipment has the AVLS (Automatic
Volume Limiter System) function, be sure to turn the
function off when using the transmitter. Otherwise,
you will have to turn up the volume of the
headphones, and that may cause noise.
• Do not place the transmitter near a fluorescent lamp,
etc. when using the system.
Page 9
N Operating the system
Listening to a program
3 Select the radio frequency with the
CHANNEL selector switch.
Before listening
To prevent your ears from being damaged, first
lower the volume.
1 Turn on the audio/video equipment
connected to the transmitter.
If the transmitter is connected to the
headphone jack, set the volume control
of the audio source equipment as high
as possible but not so high that the
audio signal becomes distorted.
2 Remove the headphones from the
transmitter.
The transmitter’s power indicator will
light in red.
CHANNEL
1
2
3
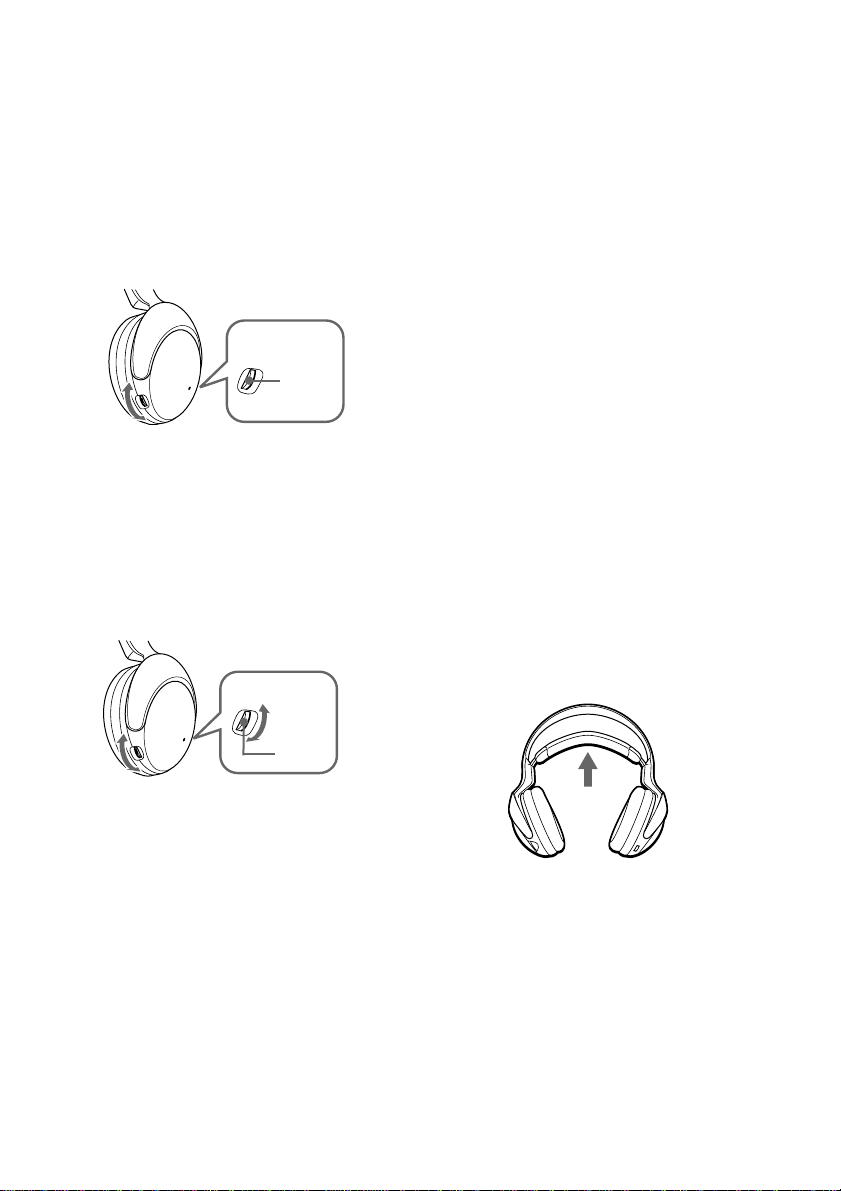
4 Put on the headphones.
The power indicator on the upper part
of the right housing glows red. Be sure
to put the right housing (R) on your
right ear and the left housing (L) on
your left ear. Wear the headphones
vertically on your head so that auto
power on function is properly activated.
continue to next page
GB
9
Page 10
5 Turn up the volume to a moderate
level with the VOL control.
A MDR-RF960RK
Press the TUNE button briefly for
automatic tuning of the headphones.
If you do not receive a clear audio
signal, press it again.
TUNE
TUNE
button
VOL control
B MDR-RF920RK
Tune the headphones into the frequency
of the transmitter with the TUNE
control until you can hear the audio
signal loud and clear.
TUNE
Sending RF signals from the Transmitter
The transmitter starts sending the RF signals
automatically, when it detects audio signals from
the equipment connected.
If it does not detect an audio signal for more than
approximately 10 minutes, the transmitter will
stop sending RF signals, and the power indicator
turns off.
When the transmitter receives an audio signal
again, it starts sending the RF signals, and the
power indicator will light in red again.
If the audio signal is very weak, the transmitter
does not send RF signals. If the transmitter is
connected to a headphone jack, make sure the
volume of the equipment connected is set to 5 – 6
or higher.
You may not hear the beginning of the sound
from the headphones until the transmitter starts
sending the RF signals after detecting an audio
signal.
Note
If the transmitter is connected to the headphones jack of
the source equipment, set the volume of that equipment
as high as possible without distorting the audio signal.
The headphones automatically turn
off when they are taken off
– Auto power on/off function
Do not pull up the self-adjusting band when not
in use, as this will consume the battery power.
TUNE
control
VOL control
Follow steps 3 and 5 above until the
receiving performance becomes better.
Bad reception conditions
If you use the unit near a cordless telephone, it may
cause radio interference. If poor reception occurs, try
another channel using the CHANNEL selector.
GB
10
Notes
• If hiss is hear, move closer to the transmitter.
• You may hear some noise when you disconnect the
AC power adaptor from the transmitter before taking
off the headphones.
After listening to a program
Take the headphones off and rest them away on the
transmitter, and recharge them.
Note
Do not hang the headphones by the self adjusting band,
otherwise, the self adjusting band will be pulled up and
the headphones will be switched on.
Page 11
The effective areas of
Replacing the ear pads
the transmitter
The optimum distance is up to approximately
46 m (150 feet ) without the system picking up
some interference. However, the distance may
vary according to the surroundings and
environment. If the system picks up some noise
while using it within the above mentioned
distance, reduce the distance between the
transmitter unit and the headphones, or select the
other channel.
Notes
• When you use the headphones inside the effective
areas of the transmitter, the transmitter can be placed
in any direction from the listener.
• Even within the signal reception area, there are some
spots (dead spot) where the RF signal can not be
received. This is a characteristic inherent to RF signals,
and does not indicate malfunction. By slightly moving
the transmitter, location of the dead spot can be
changed.
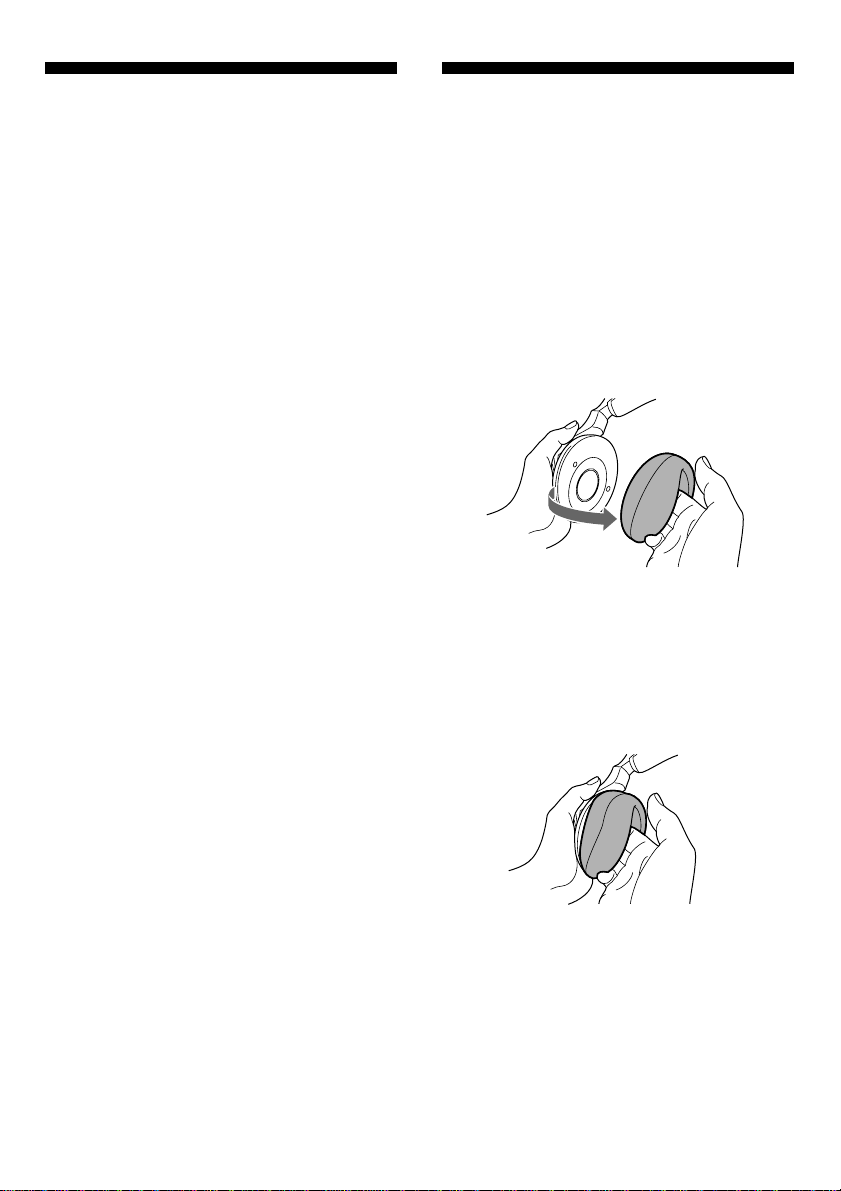
The ear pads are replaceable. If the ear pads
become dirty or worn out, replace them as
illustrated below.
The ear pad is not commercially available. You
can order replacements from the store where you
purchased this system, or at your nearest Sony
dealer.
1 Remove the old ear pad by pulling
it out of the groove on the housing.
2 Place the new ear pad on the driver
unit and insert the edge of the pad
into the groove as illustrated.
Make sure that the entire edge of the ear pad is
securely inserted into the groove.
11
GB
Page 12

N Additional information
Precautions
• When the transmitter is not to be used for a
long period of time, disconnect the AC power
adaptor from the AC outlet holding the plug.
Do not pull on the cord.
• Do not leave the wireless stereo headphone
system in a location subject to direct sunlight,
heat or moisture.
Notes on headphones
Preventing hearing damage
Avoid using headphones at high volume.
Hearing experts advise against continuous, loud
and extended play. If you experience a ringing in
your ears, reduce the volume or discontinue use.
Caring for others
Keep the volume at a moderate level. This will
allow you to hear outside sounds and to be
considerate to the people around you.
If you have any questions or problems
concerning the system that are not covered in this
manual, please consult the nearest Sony dealer.
Be sure to bring the headphones and the
transmitter to the Sony dealer when requiring
repair work.
Troubleshooting
Problem
No sound/
Muffled
sound
Solution
Turn on the transmitter first, then put
on the headphones.
Check the connection of the audio/
video equipment or the AC power
adaptor.
Check that the audio/video
equipment is turned on.
Turn up the volume on the connected
audio/video equipment, if the
transmitter is connected to the
headphones jack.
MDR-RF920RK:
Change the radio frequency with the
CHANNEL selector on the
transmitter, then tune the headphones
with the TUNE control.
MDR-RF960RK:
Change the radio frequency with the
CHANNEL selector on the
transmitter, then press the TUNE
button again.
The mute function is activated.
Use the headphones near the
transmitter.
The headphones’ POWER indicator
light is weak or turned off.
•Charge the supplied rechargeable
batteries or if the POWER indicator
is still off after charging the
supplied rechargeable batteries, take
the headphones to a Sony dealer for
replacement of the rechargeable
battery.
If you connect the transmitter to the
LINE OUT or REC OUT jacks of an
audio reproducer, make sure that the
NOISE FILTER switch is set to OFF.
Make sure that the NOISE FILTER
switch is set to either ON or OFF (If
the switch gets stuck between ON and
OFF, the sound will be cut off).
12
GB
Page 13

Problem
Distortion
Loud
background
noise
Solution
If the transmitter is connected to the
headphone jack, volume of the
connected audio/video equipment.
Change the radio frequency with the
CHANNEL selector on the
transmitter.
The headphones’ POWER indicator
light is weak or turned off.
•Charge the supplied rechargeable
batteries or if the POWER indicator
is still off after charging the
supplied rechargeable batteries, take
the headphones to a Sony dealer for
replacement of the rechargeable
battery.
If you connect the transmitter to the
LINE OUT or REC OUT jacks of an
audio reproducer, make sure that the
NOISE FILTER switch is set to OFF.
Move closer to the transmitter. As
you move away from the transmitter,
more noise is likely to be heard.
If the transmitter is connected to the
headphones jack, turn up the volume
of the connected audio/video
equipment.
MDR-RF920RK:
Change the radio frequency with the
CHANNEL selector on the
transmitter, then tune the headphones
with the TUNE control.
MDR-RF960RK:
Change the radio frequency with the
CHANNEL selector on the
transmitter, then press the TUNE
button again.
The headphones’ POWER indicator
light is weak or turned off.
•Charge the supplied rechargeable
batteries or if the POWER indicator
is still off after charging the
supplied rechargeable batteries, take
the headphones to a Sony dealer for
replacement of the rechargeable
battery.
If you connect the transmitter to the
LINE OUT or REC OUT jacks of an
audio reproducer, make sure that the
NOISE FILTER switch is set to OFF.
Specifications
General
Carrier frequency
913.5 – 914.5 MHz
Channel Ch1, Ch2, Ch3
Modulation FM stereo
Frequency response
MDR-RF920R : 20 – 20,000 Hz
MDR-RF960R : 10 – 22,000 Hz
Transmitter TMR-RF960R
Power source DC 9 V: supplied AC power
adaptor
Audio input phono jacks/stereo mini jack
Dimensions Approx. 133 × 124 × 136 mm
(5 1/4 × 5 × 5 3/8 in.)
(w/h/d)
Mass Approx. 195 g (7 oz.)
Headphones MDR-RF920R, MDR-RF960R
Power source Supplied rechargeable nickel-
metal hydride batteries BPHP550 or commercially available
(size AAA) dry batteries
Mass Approx. 270 g (9.6 oz.) incl.
batteries
Optional accessories
Audio cable RK-G136 (stereo mini plug y
Design and specifications are subject to change without
notice.
stereo mini plug)
RK-C310,C320 (pin plug × 2 y
pin plug × 2)
13
GB
Page 14

AVERTISSEMENT
Bienvenue !
Afin d’éviter tout risque d’incendie
ou d’électrocution, n’exposez pas cet
appareil à la pluie ou à l’humidité.
Afin d’écarter tout risque
d’électrocution, gardez le coffret
fermé. Ne confiez l’entretien de
l’appareil qu’à un professionnel.
Pour les utilisateurs aux Canada
Son utilisation est autorisée seulement aux
conditions suivantes : (1) il ne doit pas produire
de brouillage et (2) l’utilisateur du dispositif doit
être prêt à accepter tout brouillage
radioeléctrique reçu, même si ce brouillage est
susceptible de compromettre le fonctionnement
du dispositif.
Pour les utilisateurs aux États-Unis et
au Canada
RECYCLAGE DES ACCUMULATEURS
À HYDRURE MÉTALLIQUE DE
NICKEL
Les accumulateurs à
hydrure métallique de
nickel sont
recyclables.
Vous pouvez
contribuer à préserver
l’environnement en
rapportant les piles usées dans un point de
collection et recyclage le plus proche.
Nous vous remercions pour l’achat de ce système
de casque stéréo sans fil Sony MDR-RF920RK/
RF960RK. Avant d’utiliser cet appareil, lisez
attentivement le présent mode d’emploi et
conservez-le pour toute référence ultérieure.
Cet appareil offre, entre autres, les
caractéristiques suivantes :
• Système sans fil permettant d’écouter de la
musique ou une émission en toute liberté, sans
cordon.
• Reproduction du son d’une grande fidélité.
• Transmetteur compact avec adaptateur secteur
(fourni) simplifiant la recharge des piles du
casque. Il suffit de placer le casque sur le
transmetteur pour recharger les piles.
• Casque circumaural confortable avec serre-tête
auto-réglable.
• Fonction de mise sous tension et hors tension
(ON/OFF) automatique pour l’économie des
piles.
•À des fins d’économie d’énergie, le
transmetteur se met automatiquement sous
tension lorsque le signal audio est détecté et
hors tension en l’absence de signal.
Pour plus d’informations sur le recyclage des
accumulateurs, téléphonez le numéro gratuit
1-800-822-8837 (Etats-Units et Canada
uniquement), ou
visitez http://www.rbrc.org/
Avertissment:
Ne pas utilliser des accumulateurs à hidrure
métallique de nickel qui sont endommagées ou
qui fuient.
FR
2
Page 15

Remarques sur les
Table des matières
performances de
réception
Comme le système de cet appareil utilise des
signaux de très haute fréquence dans la gamme
de 900 MHz, l’environnement peut avoir une
influence sur la qualité de la réception. Les
exemples suivants illustrent les situations
pouvant réduire la plage de réception et
perturber la réception.
•À l’intérieur d’un bâtiment à structure
métallique.
• Pièce contenant de nombreux classeurs à
tiroirs métalliques.
•À proximité d’appareils électriques pouvant
engendrer des parasites électromagnétiques.
• Installation sur un instrument métallique.
•À proximité d’une route.
• Parasites ou interférences dans le voisinage,
provenant d’émetteurs-récepteurs de camions,
etc.
• Parasites ou interférences dans le voisinage,
provenant de systèmes de communication,
installés le long de routes.
Préparatifs
Déballage ................................................... 4
Charge des piles rechargeables
fournies ................................................ 4
Préparation du transmetteur .................. 7
Utilisation du système
Écoute d’un programme .......................... 9
Portée du transmetteur .......................... 11
Remplacement des oreillettes ............... 11
Informations complémentaires
Précautions .............................................. 12
Dépannage ............................................... 12
Spécifications ........................................... 13
FR
FR
FR
3
Page 16

N Préparatifs
Charge des piles
Déballage
Vérifiez que vous disposez des accessoires
suivants :
• Casque (1)
• Transmetteur (1)
• Adaptateur secteur (1)
• Adaptateur de prise universel (1)
(mini-prise stéréo y fiche stéréo)
• Cordon de raccordement (1)
(fiches phono y mini-fiche stéréo), 1 m (3,3 pieds)
rechargeables fournies
Les piles rechargeables au nickel-métal-hydrure
fournies ne sont pas encore chargées lorsque
vous les utilisez pour la première fois. Chargezles avant de les utiliser.
Pour charger les piles du casque, placez celui-ci
sur le transmetteur.
1 Appuyez sur le bouton du boîtier
gauche pour ouvrir le couvercle du
logement des piles.
Le couvercle du logement des piles se
détache.
Bouton
2 Insérez les piles au nickel-métal-
hydrure rechargeables fournies
dans le logement des piles en
faisant correspondre la borne 3 des
piles au symbole 3 dans le
logement.
N’utilisez pas de piles rechargeables
autres que celles fournies.
• Piles rechargeable au nickel-métal-hydrure (2)
FR
4
Page 17

3 Refermez le couvercle du logement
des piles.
4 Branchez l’adaptateur secteur
fourni sur le transmetteur.
Transmetteur
vers une prise secteur
Adaptateur
secteur
(fourni)
Boîtier
droit
Boîtier gauche
Si l’indicateur ne s’allume pas en
vert
Vérifiez que les boîtiers droit et gauche du
casque sont placés correctement sur le
transmetteur. L’indicateur peut ne pas s’allumer
si le point de contact du casque ne touche pas la
broche de contact du transmetteur. Retirez le
casque et placez-le de nouveau sur le
transmetteur afin que l’indicateur s’allume en
vert.
Pour recharger les piles du casque
après utilisation
Placez le casque sur le transmetteur après
utilisation du casque. Étant donné que l’horloge
intégrée détecte la fin de la charge, il n’est pas
nécessaire de retirer le casque du transmetteur à
la fin de la charge.
vers la prise DC IN 9V
5 Placez le casque sur le transmetteur
de manière que le point de contact
du casque touche la broche de
contact du transmetteur et assurezvous que l’indicateur de charge
s’allume en vert.
Le cycle de charge prend environ 16
heures. Une fois la charge terminée,
l’indicateur de charge s’éteint.
Lorsque vous placez le casque sur
l’émetteur, tenez-le bien droit avec les
deux mains et veillez à ce que les
écouteurs droit et gauche soient
enfoncés sur l’émetteur, puis inclinez-le
vers l’arrière comme illustré ci-dessus.
Remarques
• Le transmetteur s’éteint automatiquement pendant la
recharge des piles.
• Pour des raisons de sécurité, ce système est conçu
pour recharger uniquement les piles rechargeables
fournies de type BP-HP550. Les autres types de piles
rechargeables ne peuvent pas être rechargés avec ce
système.
• Les piles sèches ne peuvent pas être rechargées.
• N’essayez pas d’utiliser les piles rechargeables BPHP550 fournies avec d’autres appareils. Elles sont
conçues pour être utilisées exclusivement avec ce
système.
• Effectuez la charge à une température ambiante de
0 ˚C à 40 ˚C (de 32 ˚F à 104 ˚F).
suite à la page suivante
5
FR
Page 18

Durées de charge et d’utilisation
Durée de
charge approx.
1 heure
16 heures*
2
*1sortie de 1 mW+1mW, à 1 kHz
*2durée nécessaire à la recharge complète des
piles vides
*3La durée indiquée ci-dessus peut varier selon
la température ou les conditions d’utilisation.
Durée d’utilisation approx.
MDR-RF920RK
80 minutes*
18 heures*
MDR-RF960RK
3
75 minutes*
3
15 heures*
Remarques sur les piles
• Ne rechargez pas une pile sèche.
1
*
3
3
• Ne mettez pas une pile sèche en contact avec
des pièces de monnaie ou d’autres objets
métalliques. Si le pôle positif et le pôle négatif
de la pile sont mis en contact l’un avec l’autre
via un objet métallique, un échauffement
risque de se produire.
• Si vous prévoyez de ne pas utiliser l’appareil
pendant une longue période, retirez les piles
afin d’éviter tout dommage dû à une fuite
d’électrolyte et à la corrosion.
Utilisation du casque avec des piles
sèches (vendues séparément)
Vous pouvez aussi utiliser des piles sèches
(AAA) disponibles dans le commerce, avec ce
casque. Installez les piles comme décrit dans les
étapes 1 à 3 de la section « Charge des piles
rechargeables fournies ».
Lorsque vous utilisez des piles sèches, la fonction
de recharge de piles n’est pas activée.
Durée de vie des piles
(Utilisation de piles alcalines Sony LR03/AM-4(N))
Piles
MDR-RF920RK
MDR-RF960RK
Durée approx.*
28 heures*
24 heures*
*1 sortie de 1 mW+1mW, à 1 kHz
*2 La durée indiquée ci-dessus peut varier selon
la température ou les conditions d’utilisation.
1
2
2
Vérification du niveau de charge des
piles
Soulevez la bande auto-réglable et vérifiez
l’indicateur de puissance situé en haut du boîtier
droit. Si le témoin s’allume en rouge, les piles
sont encore bonnes.
Si l’indicateur s’allume faiblement, clignote ou si
le son est déformé ou il présente des parasites,
rechargez les piles rechargeables ou installez des
piles sèches neuves.
Remarque
Les piles rechargeables au nickel-métal-hydrure doivent
être remplacées lorsque leur durée d’utilisation est
inférieure à la moitié du temps prévu, même après une
recharge complète. Les piles rechargeables de type BPHP550 ne sont pas directement disponibles dans le
commerce. Commandez ces piles dans le magasin où
vous avez acheté cet appareil ou auprès de votre
revendeur agréé Sony.
FR
6
Page 19

Préparation du
transmetteur
1 Raccordez le transmetteur à un
appareil audio ou vidéo.
Sélectionnez l’un des raccordements cidessous en fonction du type de prise :
A Pour un raccordement sur une prise de
casque
Transmetteur
1
CHANNEL
2
3
ON
NOISE FILTER
OFF
INPUT
A
vers les prises
INPUT B
L
INPUT
B
R
DC IN 9V
!
Cordon de
raccordement
(fourni)
Canal gauche
(blanc)
Canal droit
(rouge)
B Pour un raccordement vers des prises
LINE OUT ou REC OUT
Transmetteur
1
CHANNEL
2
3
ON
NOISE FILTER
OFF
INPUT
A
L
INPUT
B
R
DC IN 9V
!
Canal gauche
(blanc)
vers les prises LINE
OUT ou REC OUT
vers la prise
INPUT A
Cordon de
raccordement
(fourni)
Canal droit
(rouge)
Adaptateur de
prise universel
(fourni)
vers la prise de
casque (miniprise stéréo)
vers la prise de
casque (prise
stéréo)
WALKMAN*,
téléviseur,
magnétoscope,
etc.
* WALKMAN est une marque déposée de Sony
Corporation, qui désigne les produits utilisés
avec un casque d’écoute stéréo.
Système stéréo,
magnétoscope, etc.
suite à la page suivante
FR
7
Page 20

C Pour un raccordement sur un téléviseur,
etc.
Si vous constatez l’apparition de
parasites lorsque le transmetteur est
raccordé à votre téléviseur ou
magnétoscope, réglez le commutateur
NOISE FILTER sur ON.
2 Branchez l’adaptateur secteur
fourni sur le transmetteur.
Transmetteur
vers une prise
secteur
vers les prises
INPUT B
CHANNEL
NOISE FILTER
INPUT
A
INPUT
B
DC IN 9V
!
1
2
3
ON
OFF
L
R
Transmetteur
Canal gauche
(blanc)
Canal droit
(rouge)
Cordon de
raccordement
(fourni)
vers la mini-prise
stéréo
Téléviseur, etc.
Remarques
• Si vous raccordez le transmetteur sur une prise
LINE OUT ou REC OUT d’un lecteur audio, tel
qu’un lecteur MD ou CD, ne réglez pas le
commutateur NOISE FILTER sur ON. Cela
limiterait le volume.
• Le commutateur NOISE FILTER n’est actif que
dans le cas des raccordements indiqués dans le
schéma A à la page 7 et dans le schéma C. Dans
le raccordement du schéma B, le commutateur
n’a aucun effet.
• Lorsque le transmetteur est placé sur ou à
proximité d’un téléviseur, il peut capter des
parasites.
Dans ce cas, éloignez le transmetteur du
téléviseur.
Adaptateur
secteur
(fourni)
vers la prise DC IN 9V
Remarques
• Utilisez uniquement l’adaptateur secteur fourni.
N’utilisez aucun autre adaptateur secteur.
Polarité de la fiche
• Si l’appareil raccordé dispose de la fonction AVLS
(Automatic Volume Limiter System = système de
limitation automatique du volume), désactivez cette
fonction lorsque vous utilisez le transmetteur. Sinon,
vous devez augmenter le volume du casque, ce qui
peut provoquer des parasites.
• N‘installez pas le transmetteur près d‘une lampe
fluorescente, etc. lorsque vous utilisez le système.
FR
8
Page 21

N Utilisation du système
Écoute d’un
programme
3 Sélectionnez la fréquence de
transmission à l’aide du
commutateur de sélection
CHANNEL.
Avant l’écoute
Réduisez d’abord le volume, pour éviter tout
trouble de l’ouïe.
1 Allumez l’appareil audio ou vidéo
raccordé au transmetteur.
Si le transmetteur est raccordé à la prise
de casque, augmentez le volume de
l’appareil audio source en prenant soin
de ne pas l’augmenter à un volume qui
provoquerait la distorsion du signal
audio.
2 Retirez le casque du transmetteur.
L’indicateur d’alimentation du
transmetteur s’allume en rouge.
CHANNEL
1
2
3
4 Placez le casque sur votre tête.
L’indicateur d’alimentation en haut du
boîtier droit est allumé en rouge. Placez
le boîtier droit (R) sur votre oreille
droite et le boîtier gauche (L) sur votre
oreille gauche. Placez le casque à la
verticale sur votre tête afin que la
fonction de mise sous tension
automatique soit activée correctement.
suite à la page suivante
FR
9
Page 22

5 Réglez le volume à un niveau
modéré à l’aide de la commande
VOL.
A MDR-RF960RK
Appuyez brièvement sur la touche
TUNE pour un réglage automatique de
la réception casque.
Si vous ne recevez pas un signal audio
clair, appuyez de nouveau sur cette
touche.
TUNE
Touche
TUNE
Commande VOL
B MDR-RF920RK
Réglez le casque sur la fréquence du
transmetteur à l’aide de la commande
TUNE jusqu’à ce que vous entendiez le
signal audio clairement.
TUNE
Emission des signaux RF par le
transmetteur
Le transmetteur se met automatiquement à
émettre des signaux RF quand il détecte des
signaux audio de l’appareil raccordé.
Lorsque le transmetteur ne reçoit aucun signal
audio pendant 10 minutes environ, le
transmetteur cessera d’envoyer des signaux RF et
son voyant d’alimentation s’éteindra.
Lorsque le transmetteur recevra des signaux
audio, il commencera à envoyer des signaux RF
et son voyant d’alimentation s’allumera de
nouveau en rouge.
Si le signal audio est très faible, le transmetteur
n’enverra pas de signaux RF. Si le transmetteur
est raccordé à une prise de casque, réglez le
volume de l’appareil raccordé sur 5 - 6 ou
supérieur.
Vous ne pourrez peut-être pas entendre le début
du son fourni par le casque quand le
transmetteur se remet à émettre des signaux RF
après la détection d’un signal.
Remarque
Si le transmetteur est raccordé à la prise de casque de
l’appareil source, réglez le volume le plus haut possible
sur l’appareil en évitant les distorsions du son.
Lorsque vous l’enlevez, le casque se
met automatiquement hors tension
— Fonction Mise sous tension/hors
tension automatique
Ne tirez pas sur la bande auto-réglable lorsque
vous n’utilisez pas le casque afin de ne pas
décharger les piles.
Commande
TUNE
Commande VOL
Reprenez les étapes 3 et 5 jusqu’à ce
que la qualité de réception s’améliore.
Mauvaises conditions de réception
Si vous utilisez le casque près d‘un téléphone sans fil, il
peut causer des interférences radio. Si la réception est
mauvaise, essayez d‘utiliser un autre canal avec le
sélecteur CHANNEL.
FR
10
Remarques
• Si vous entendez un sifflement, rapprochez-vous du
transmetteur.
• Vous risquez d’entendre des parasites si vous
débranchez l’adaptateur secteur du transmetteur
avant de retirer le casque.
Après l‘écoute d‘un programme
Retirez le casque, éloignez-le de l‘émetteur et
rechargez-le.
Remarque
Ne suspendez pas le casque par le serre-tête autoadaptable, sinon il sera tiré vers le haut et le casque se
mettra sous tension.
Page 23

Portée du
Remplacement des
transmetteur
Le système peut fonctionner sans capter
d’interférences à une distance optimale pouvant
atteindre environ 46 m (150 pieds). Cependant, la
distance peut varier en fonction de
l’environnement. Si le système capte des
parasites à moins de 46 m (150 pieds), réduisez la
distance entre le transmetteur et le casque ou
sélectionnez un autre canal.
Remarques
• Quand vous utilisez le casque dans la zone de
couverture du transmetteur, la direction du
transmetteur par rapport à l’auditeur n’a aucune
importance.
• Dans la zone de réception des signaux, il existe
toutefois certains endroits (zones de silence) où les
signaux de radiofréquence ne peuvent pas être reçus.
Il s’agit d’une caractéristique inhérente aux signaux RF
et non d’un dysfonctionnement. Un léger déplacement
du transmetteur suffit souvent à modifier la zone de
silence en question.
oreillettes
Les oreillettes peuvent être remplacées. Si les
oreillettes deviennent sales ou si elles sont usées,
remplacez-les tel qu’indiqué dans l’illustration cidessous.
Les oreillettes ne sont pas disponibles dans le
commerce. Commandez des oreillettes de
rechange dans le magasin où vous avez acheté
cet appareil ou auprès de votre revendeur agréé
Sony le plus proche.
1 Retirez l’oreillette usagée en la
tirant de la rainure du boîtier.
2 Placez la nouvelle oreillette sur le
transducteur et insérez le bord de
l’oreillette dans la rainure, comme
dans l’illustration.
Assurez-vous que toute la bordure de l’oreillette
est bien insérée dans la rainure.
11
FR
Page 24

N
Informations complémentaires
Précautions
• Si vous ne comptez pas utiliser le transmetteur
pendant longtemps, débranchez l’adaptateur
secteur de la prise murale en tirant sur la fiche
et non pas sur le cordon.
• Ne laissez pas le système de casque stéréo
infrarouge dans un endroit exposé au soleil, à
la chaleur ou à l’humidité.
Remarques sur le casque
Prévention des troubles auditifs
Évitez d’écouter à un volume élevé.
Les experts déconseillent l’écoute prolongée sans
interruption à un volume élevé. Si vous percevez
un bourdonnement dans les oreilles, réduisez le
volume ou interrompez l’écoute.
Civisme
Ecoutez à un volume modéré. Vous pourrez ainsi
entendre les sons extérieurs et vous ne
dérangerez pas les personnes qui sont près de
vous.
Pour toute question ou problème au sujet de ce
casque non mentionné dans ce mode d’emploi,
veuillez contacter votre revendeur Sony.
Veillez à apporter le casque et le transmetteur à
votre revendeur Sony pour toute réparation.
Dépannage
Problème
Aucun son/
Son étouffé
Remède
Mettez le transmetteur sous tension,
puis posez le casque sur la tête.
Vérifiez le branchement de l’appareil
audio ou vidéo et de l’adaptateur
secteur.
Vérifiez que l’appareil audio ou vidéo
est bien sous tension.
Si le transmetteur est branché à la
prise de casque, augmentez le volume
de l’appareil audio ou vidéo.
MDR-RF920RK :
Modifiez la fréquence de transmission
à l’aide du sélecteur CHANNEL sur le
transmetteur, puis réglez le casque à
l’aide de la commande TUNE.
MDR-RF960RK :
Modifiez la fréquence de transmission
à l’aide du sélecteur CHANNEL sur le
transmetteur, puis appuyez de
nouveau sur la touche TUNE.
La fonction de sourdine est activée.
Utilisez le casque près du
transmetteur.
L’indicateur POWER du casque
s’allume faiblement ou est éteint.
•Rechargez les piles rechargeables
fournies ou, si l’indicateur POWER
est toujours éteint après la recharge
des piles rechargeables fournies,
apportez votre casque chez un
revendeur Sony pour vous procurer
des piles rechargeables de rechange.
Si vous raccordez le transmetteur à la
prise LINE OUT ou REC OUT d’un
lecteur audio, assurez-vous que le
commutateur NOISE FILTER est réglé
sur OFF.
Assurez-vous que le commutateur
NOISE FILTER est réglé sur ON ou
OFF (si le commutateur reste coincé
entre ON et OFF, le son est coupé).
12
FR
Page 25

Problème
Distorsion
Bruits de
fond
importants
Remède
Si le transmetteur est raccordé à la
prise de casque, réduisez le volume
de l’appareil audio ou vidéo raccordé.
Changez de fréquence de
transmission à l’aide du commutateur
CHANNEL sur le transmetteur.
L’indicateur POWER du casque
s’allume faiblement ou est éteint.
•Rechargez les piles rechargeables
fournies ou, si l’indicateur POWER
est toujours éteint après la recharge
des piles rechargeables fournies,
apportez votre casque chez un
revendeur Sony pour vous procurer
des piles rechargeables de rechange.
Si vous raccordez le transmetteur à la
prise LINE OUT ou REC OUT d’un
lecteur audio, assurez-vous que le
commutateur NOISE FILTER est réglé
sur OFF.
Rapprochez-vous du transmetteur.
Plus vous vous éloignez du
transmetteur, plus vous risquez
d’entendre des parasites.
Si le transmetteur est raccordé à la
prise de casque, augmentez le volume
de l’appareil audio ou vidéo raccordé.
MDR-RF920RK :
Modifiez la fréquence de transmission
à l’aide du sélecteur CHANNEL sur le
transmetteur, puis réglez le casque à
l’aide de la commande TUNE.
MDR-RF960RK :
Modifiez la fréquence de transmission
à l’aide du sélecteur CHANNEL sur le
transmetteur, puis appuyez de
nouveau sur la touche TUNE.
L’indicateur POWER du casque
s’allume faiblement ou est éteint.
•Rechargez les piles rechargeables
fournies ou, si l’indicateur POWER
est toujours éteint après la recharge
des piles rechargeables fournies,
apportez votre casque chez un
revendeur Sony pour vous procurer
des piles rechargeables de rechange.
Si vous raccordez le transmetteur à la
prise LINE OUT ou REC OUT d’un
lecteur audio, assurez-vous que le
commutateur NOISE FILTER est réglé
sur OFF.
Spécifications
Généralités
Fréquence porteuse
913,5 – 914,5 MHz
Canaux CHANNEL (canal)
1, 2 et 3
Modulation FM stéréo
Réponse en fréquence
MDR-RF920R : 20 – 20 000 Hz
MDR-RF960R : 10 – 22 000 Hz
Transmetteur TMR-RF960R
Alimentation 9 V CC : adaptateur secteur
Entrée audio prises phono/mini-prise stéréo
Dimensions Env. 133 × 124 × 136 mm
Poids Environ 195 g (7 on.)
Casques MDR-RF920R, MDR-RF960R
Alimentation Piles rechargeables au nickel-
Poids Environ 270 g (9,6 on.) piles
Accessories en option
Câble audio RK-G136 (mini-fiche stéréo y
La conception et les spécifications sont sujettes à
modification sans préavis.
fourni
(5 1/4 × 5 × 5 3/8 po.) (l/h/p)
métal-hydrure BP-HP550
fournies ou piles sèches (AAA)
disponibles dans le commerce
comprises
mini-fiche stéréo)
RK-C310,C320 (connecteur à
fiche × 2 y connecteur à fiche
× 2)
13
FR
Page 26

ADVERTENCIA
¡Bienvenido!
Para evitar incendios o el riesgo de
electrocución, no exponga la unidad
a la lluvia ni a la humedad.
Para evitar descargas eléctricas, no
abra la unidad. En caso de avería,
solicite los servicios de personal
cualificado.
Información
Tenga en cuenta que cualquier cambio o
modificación no expresamente aprobado en este
manual puede anular su autoridad para utilizar
este equipo.
Para clientes de los EE UU y CANADÁ
RECICLADO DE BATERÍAS DE NÍQUELHIDRURO METALICO
Las baterías de níquelhidruro metalico son
reciclables.
Usted podrá ayudar a
conservar el medio
ambiente devolviendo
las baterías usadas al
punto de reciclaje mas cercano.
Gracias por haber adquirido este sistema
de auriculares estéreo inalámbricos MDRRF920RK/RF960RK de Sony. Antes de utilizarlo,
lea este manual atentamente y consérvelo para
consultarlo en el futuro.
Características principales:
• Sistema inalámbrico que permite escuchar un
programa sin las limitaciones que supone el
cable de los auriculares
• Reproducción de sonido de alta fidelidad
• Transmisor compacto con adaptador de
alimentación de ca (suministrado) en el que se
colocan los auriculares para cargar fácilmente
la pila.
• Cómodos auriculares supra-aurales con casco
autoajustable
• Función de conexión/desconexión automática
de los auriculares para conservar la energía de
las pilas
• Para ahorrar energía, el transmisor se conecta
automáticamente cuando se detecta la señal de
audio y se desconecta cuando ésta no se recibe.
Para más información sobre el reciclado de
baterías, llame al número gratuito
1-800-822-8837, o
visite http://www.rbrc.org/
Precaución:
No utilice baterías de níquel-hidruro metalico
dañadas o con fugas.
ES
2
Page 27

Notas sobre el
Índice
rendimiento de
recepción
El sistema para este equipo utiliza señales de
frecuencia muy alta de la banda de 900 MHz,
motivo por el que el rendimiento de la recepción
puede deteriorarse debido al entorno. En los
ejemplos siguientes se indican las condiciones
que pueden reducir el alcance de la recepción o
causar interferencias en ella.
• Dentro de un edificio con paredes que
contengan vigas de acero.
• Área con muchos armarios archivadores de
acero, etc.
• Área con muchos aparatos eléctricos capaces
de generar ruido electromagnético.
• Transmisor colocado sobre un instrumento
metálico.
• Área encarada hacia carreteras.
• Ruido o señales de interferencia en los
alrededores debido a transceptores de radio de
camiones, etc.
• Ruido o señales de interferencia en los
alrededores debido a sistemas de
comunicaciones instalados a lo largo de
carreteras.
Procedimientos iniciales
Desembalaje ............................................... 4
Carga de las pilas recargables
suministradas ..................................... 4
Configuración del transmisor ................. 7
Uso del sistema
Recepción de un programa ..................... 9
Áreas efectivas del transmisor .............. 11
Sustitución de las almohadillas de los
auriculares ......................................... 11
Información adicional
Precauciones ............................................ 12
Solución de problemas ........................... 12
Especificaciones ...................................... 13
ES
ES
3
Page 28

N Procedimientos iniciales
Carga de las pilas
Desembalaje
Compruebe que dispone de los siguientes
accesorios:
• Auriculares (1)
• Transmisor (1)
• Adaptador de alimentación de ca (1)
• Adaptador de conector Unimatch (1)
(minitoma estéreo y conector fonográfico
estéreo)
• Cable conector (1) (conectores fonográficos y
miniconector estéreo), 1 m (3,3 pies)
recargables
suministradas
Las pilas de hidruro de níquel metálico
recargables suministradas no estarán cargadas la
primera vez que vaya a utilizarlas. Asegúrese de
cargarlas antes de utilizarlas. Para cargar los
auriculares, colóquelos en el transmisor.
1 Pulse el botón del receptáculo
izquierdo para abrir la tapa del
compartimiento de las pilas.
La tapa del compartimiento de las pilas
se desprende.
Botón
2 Inserte las pilas de hidruro de
níquel metálico recargables
suministradas en el compartimiento
de las pilas haciendo coincidir el
terminal 3 de las pilas con la marca
3 del compartimiento.
No utilice otras pilas recargables que no
sean las suministradas.
• Pilas de hidruro de níquel metálico
recargables (2)
ES
4
Page 29

3 Cierre la tapa del compartimiento
de la pila.
4 Conecte el adaptador de
alimentación de ca suministrado al
transmisor.
Transmisor
a una toma de
corriente de ca
Receptáculo
derecho
Receptáculo
izquierdo
Si el indicador no se ilumina en
verde
Compruebe que los auriculares derecho e
izquierdo estén colocados correctamente en el
transmisor. Es posible que el indicador no se
encienda si los pines de contacto de los
auriculares no encajan en los orificios de contacto
del transmisor. Retire los auriculares y
colóquelos de nuevo en el transmisor para que se
encienda el indicador en verde.
Adaptador de
alimentación
de ca
(suministrado)
a la toma DC IN 9V
5 Coloque los auriculares en el
transmisor de modo que los
orificios de contacto encajen en los
pines de contacto del transmisor y
asegúrese de que el indicador de
carga se ilumina en verde.
La carga finaliza transcurridas
aproximadamente 16 horas y el
indicador de carga se apaga.
Al colocar los auriculares en el
transmisor, sosténgalos con las dos
manos de modo que los receptáculos
derecho e izquierdo permanezcan en
posición vertical e inclínelos hacia atrás,
como se muestra en la ilustración.
Para recargar la pila de los
auriculares después de su uso
Coloque los auriculares en el transmisor cuando
no los utilice. El temporizador incorporado
detecta el instante en que la carga finaliza, por lo
que no es necesario retirar los auriculares del
transmisor llegado ese momento.
Notas
• El transmisor se apaga automáticamente mientras se
cargan las pilas.
• Por razones de seguridad, este sistema se ha diseñado
para cargar únicamente las pilas recargables
suministradas de tipo BP-HP550. No se podrán cargar
otros tipos de pilas recargables.
• Si utiliza pilas secas, éstas no se pueden cargar.
• No intente utilizar las pilas recargables BP-HP550
suministradas en otros componentes. Estas pilas sólo
se pueden utilizar con este sistema.
• Realice la carga a una temperatura ambiental entre 0˚C
y 40 ˚C (entre 32 ˚F y 104 ˚F).
continúa en la página siguiente
5
ES
Page 30

Horas de carga y uso
Horas de carga
aprox.
1 hora
16 horas*
2
Tiempo de uso apox.*
MDR-RF920RK
80 minutos*
18 horas*
MDR-RF960RK
3
75 minutos*
3
15 horas*
*1con salida de 1 kHz, 1 mW + 1 mW
*2horas requeridas para cargar por completo
pilas descargadas
*3El tiempo indicado puede variar en función de
la temperatura y las condiciones de uso.
1
3
Uso de los auriculares con pilas secas
(se venden por separado)
Los auriculares también pueden alimentarse con
pilas secas (tamaño AA) de venta en
establecimientos especializados. Instálelas del
mismo modo que se describe en los pasos 1 a 3
de la sección “Carga de las pilas recargables
suministradas”.
Cuando se instalan pilas secas, la función de
carga de las pilas no se activa.
Duración de la pila
(Pila alcalina LR03/AM-4 (N) de Sony)
Pilas
MDR-RF920RK
MDR-RF960RK
Horas aprox.*
28 horas*
24 horas*
*1 con salida de 1 kHz, 1 mW + 1 mW
*2 El tiempo indicado puede variar en función de
la temperatura y las condiciones de uso.
1
2
2
Notas acerca de las pilas
• No cargue una pila seca.
• No transporte una pila seca junto con monedas
u otros objetos metálicos, ya que si los
3
terminales positivo y negativo de la pila entran
en contacto accidentalmente con los objetos
metálicos, puede generarse calor.
• Si no va a utilizar la unidad durante un
período de tiempo prolongado, retire la pila
para evitar que se produzcan daños por fugas
o corrosión de la misma.
Comprobación de la energía restante
de las pilas
Levante la cinta autoajustable y compruebe el
indicador de alimentación situado en la parte
superior del receptáculo derecho. La luz roja del
indicador señala que las pilas todavía se
encuentran en buen estado.
Cargue las pilas recargables o instale nuevas
pilas secas si la luz del indicador de alimentación
se atenúa o parpadea, o si el sonido se
distorsiona o presenta ruidos.
Nota
Las pilas de hidruro de níquel metálico recargables
deben reemplazarse por pilas nuevas si, después de
cargarlas, su duración se reduce a la mitad de la
duración esperada. Las pilas recargables de tipo BPHP550 no se comercializan. Sin embargo, puede
adquirirlas en el establecimiento donde compró el
sistema o bien solicitarlas al distribuidor Sony más
cercano.
ES
6
Page 31

Configuración del
transmisor
1 Conecte el transmisor al equipo de
audio/vídeo.
Seleccione una de las conexiones
siguientes en función del tipo de toma:
A Para conectarlo a una toma de
auriculares
Transmisor
1
CHANNEL
2
3
ON
NOISE FILTER
OFF
INPUT
A
a las tomas
INPUT B
L
INPUT
B
R
DC IN 9V
!
Cable conector
(suministrado)
Canal izquierdo
(blanco)
Canal derecho
(rojo)
B Para conectarlo a las tomas LINE OUT o
REC OUT
Transmisor
1
CHANNEL
2
3
ON
NOISE FILTER
OFF
INPUT
A
L
INPUT
B
R
DC IN 9V
!
Canal izquierdo
(blanco)
a las tomas LINE OUT
o REC OUT
Cable conector
(suministrado)
a la toma
INPUT A
Canal
derecho (rojo)
Adaptador de
conector
Unimatch
(suministrado)
a la toma de
auriculares
(minitoma
estéreo)
a la toma de
auriculares
(toma
fonográfica
estéreo)
WALKMAN*,
televisor,
videograbadora,
etc.
* WALKMAN es una marca comercial
registrada de Sony Corporation que representa
los productos de auriculares estéreo.
Sistema estéreo,
videograbadora, etc.
continúa en la página siguiente
ES
7
Page 32

C Para conectarlo a un televisor, etc.
Si se produce ruido cuando se conecta el
transmisor al televisor o la
videograbadora, ajuste el interruptor
NOISE FILTER en ON.
a las tomas
INPUT B
CHANNEL
NOISE FILTER
INPUT
A
INPUT
B
DC IN 9V
!
1
2
3
ON
OFF
L
R
Transmisor
Canal izquierdo
(blanco)
Canal derecho
(rojo)
Cable conector
(suministrado)
2 Conecte el adaptador de
alimentación de ca suministrado al
transmisor.
Transmisor
Adaptador de
alimentación
de ca
(suministrado)
a la toma DC IN 9V
Notas
• Utilice únicamente el adaptador de alimentación de ca
suministrado. No utilice ningún otro adaptador de
alimentación de ca.
a una toma de
corriente de ca
a la minitoma
estéreo
Televisor, etc.
Notas
• Si conecta el transmisor a la toma LINE OUT o
REC OUT de un reproductor de audio como, por
ejemplo, un reproductor de MD o de CD, no
ajuste el interruptor NOISE FILTER en ON, ya
que esto limitaría el volumen.
• El interruptor NOISE FILTER sólo se activa al
realizar la conexión que se muestra en el
diagrama A de la página 7 y en el diagrama C.
En el diagrama B, el interruptor no tiene ningún
efecto.
• Si el transmisor se coloca encima o cerca de un
televisor, es posible que produzca ruido.
Si esto ocurre, aléjelo del televisor.
ES
8
Polaridad de la clavija
• Si el equipo conectado dispone de la función AVSL
(Automatic Volume Limiter System = Sistema de
limitación automática del volumen), asegúrese de
desconectarla cuando utilice el transmisor. En caso
contrario, deberá subir el volumen de los auriculares,
lo que podría provocar ruido.
• No coloque el transmisor cerca de lámparas
fluorescentes, etc. cuando utilice el sistema.
Page 33

N Uso del sistema
Recepción de un
3 Seleccione la frecuencia de radio
con el selector CHANNEL.
programa
Antes de la recepción
Para prevenir daños en los oídos, primero baje el
volumen.
1 Encienda el equipo de audio/vídeo
conectado al transmisor.
Si el transmisor está conectado a la toma
de auriculares, ajuste el control de
volumen del equipo de audio en el valor
más alto posible sin que la señal de
audio se distorsione.
2 Retire los auriculares del
transmisor.
El indicador de alimentación del
transmisor se iluminará en rojo.
CHANNEL
1
2
3
4 Colóquese los auriculares.
El indicador de alimentación situado en
la parte superior del receptáculo
derecho se ilumina en rojo. Colóquese el
receptáculo derecho (R) en la oreja
derecha y el izquierdo (L) en la oreja
izquierda. Procure que los auriculares
permanezcan en su cabeza en posición
vertical para que la función de conexión
automática se active correctamente.
continúa en la página siguiente
ES
9
Page 34

5 Suba el volumen mediante el
control VOL hasta alcanzar un nivel
de sonido moderado.
A MDR-RF960RK
Pulse ligeramente el botón TUNE para
sintonizar automáticamente los
auriculares.
Si no recibe ninguna señal de audio
clara, pulse de nuevo dicho botón.
TUNE
Botón
TUNE
Control VOL
B MDR-RF920RK
Sintonice los auriculares en la frecuencia
del transmisor mediante el control
TUNE hasta que la señal de audio sea lo
suficientemente fuerte y clara.
TUNE
Control
TUNE
Transmisión de señales de RF desde el
transmisor
El transmisor comenzará a transmitir
automáticamente señales de RF cuando detecte
señales de audio procedentes del equipo de
audio.
Si no detecta una señal de audio durante más de
aproximadamente 10 minutos, el transmisor
dejará de transmitir señales de RF, y el indicador
de alimentación se apagará.
Cuando el transmisor vuelva a recibir una señal
de audio, comenzará a transmitir señales de RF, y
el indicador de alimentación se volverá a
encender en rojo.
Si la señal de audio es muy débil, el transmisor
no emitirá señales de RF. Si el transmisor está
conectado a una toma para auriculares, cerciórese
de que el volumen del equipo conectado esté
ajustado a 5-6 o un nivel superior.
Es posible que usted no oiga el comienzo del
sonido a través de los auriculares hasta que el
transmisor comience a transmitir señales de RF
después de haber detectado una señal de audio.
Nota
Si el transmisor está conectado a la toma para
auriculares del equipo fuente, ajuste el volumen de tal
equipo al nivel más alto posible sin que se distorsione la
señal de audio.
Los auriculares se desconectarán
automáticamente cuando se los quite
— Función de conexión y
desconexión automática
No levante la cinta autoajustable cuando no
utilice los auriculares puesto que consume
energía de las pilas.
Control VOL
Realice los pasos 3 y 5 anteriores hasta
que la recepción mejore.
Malas condiciones de recepción
Si utiliza la unidad cerca de un teléfono inalámbrico,
puede causar radiointerferencias.
Si la recepción es mala, pruebe otro canal utilizando el
selector CHANNEL.
ES
10
Notas
• Si oye un pitido, acérquese al transmisor.
• Es posible que oiga cierto ruido si desconecta el
adaptador de alimentación de ca del transmisor antes
de quitarse los auriculares.
Después de haber escuchado un
programa
Quítese los auriculares, colóquelos en el transmisor y
recárguelos.
Nota
No cuelgue los auriculares por la banda autoajustable,
ya que se vería empujada hacia arriba y se conectaría la
alimentación de los auriculares.
Page 35

Áreas efectivas del
Sustitución de las
transmisor
La distancia óptima es de aproximadamente 46
metros (150 pies) sin que el sistema capte
interferencias. Sin embargo, la distancia puede
variar de acuerdo con las condiciones
ambientales. Si el sistema capta ruido cuando lo
esté utilizando dentro de la distancia
mencionada, reduzca la distancia entre el
transmisor y los auriculares, o seleccione otro
canal.
Notas
• Cuando utilice los auriculares dentro del área efectiva
del transmisor, éste podrá colocarse en cualquier
dirección con respecto al oyente.
• Incluso dentro del área de recepción de señales,
pueden existir algunos puntos (puntos muertos) en los
que no se reciba la señal de RF. Se trata de una
característica inherente de las señales de RF y no
indica fallo de funcionamiento. Moviendo ligeramente
el transmisor podrá cambiar la ubicación del punto
muerto.
almohadillas de los
auriculares
Las almohadillas de los auriculares se pueden
sustituir. Si se ensucian o se dañan, reemplácelas
como se muestra en la ilustración siguiente.
Las almohadillas no están disponibles en el
mercado. Puede adquirir recambios en el
establecimiento donde adquirió el sistema o en el
proveedor Sony más próximo.
1 Extraiga la almohadilla vieja
sacándola de la ranura del
receptáculo.
2 Coloque la nueva almohadilla en el
auricular e inserte el borde de la
misma en la ranura, como se
muestra en la ilustración.
Cerciórese de que todo el borde de la almohadilla
haya quedado correctamente insertado dentro de
la ranura.
ES
11
Page 36

N Información adicional
Precauciones
• Cuando no vaya a utilizar el transmisor
durante mucho tiempo, desconecte el
adaptador de ca del tomacorriente de ca
sujetando el enchufe. No tire del cable.
• No deje el sistema de auriculares estéreo
inalámbrico en un lugar sometido a la luz solar
directa, al calor, ni a la humedad.
Notas sobre los auriculares
Cuidado de sus oídos
Evite utilizar los auriculares a gran volumen. Los
expertos en oídos aconsejan no utilizar los
auriculares para escuchar continuamente a gran
volumen. Si experimenta un silbido en sus oídos,
reduzca el volumen o deje de utilizar los
auriculares.
Respeto a los demás
Mantenga el volumen a un nivel moderado. Esto
le permitirá escuchar los sonidos del exterior y no
molestar a quienes se encuentren a su alrededor.
Si tiene alguna pregunta o problema en relación
con este sistema que el manual no pueda
resolver, póngase en contacto con su proveedor
Sony.
Cuando los auriculares o el transmisor necesiten
reparación, lleve ambos a su proveedor Sony.
Solución de problemas
Problema
Sin sonido/
Sonido
amortiguado
Solución
Conecte en primer lugar la
alimentación del transmisor, y
después colóquese los auriculares.
Compruebe la conexión del equipo de
audio/vídeo o del adaptador de
alimentación de ca.
Compruebe que el equipo de audio/
vídeo esté encendido.
Si el transmisor está conectado a la
toma de auriculares, suba el volumen
del equipo de audio/vídeo conectado.
MDR-RF920RK:
Cambie la frecuencia de radio
mediante el selector CHANNEL del
transmisor y, a continuación,
sintonice los auriculares con el control
TUNE.
MDR-RF960RK:
Cambie la frecuencia de radio
mediante el selector CHANNEL del
transmisor y, a continuación, pulse de
nuevo el botón TUNE.
La función de silenciamiento está
activada.
Utilice los auriculares cerca del
transmisor.
La luz del indicador POWER de los
auriculares es tenue o está apagada.
•Cargue las pilas recargables
suministradas. Si el indicador
POWER sigue apagado después de
cargar dichas pilas, lleve los
auriculares a un distribuidor Sony
para que sustituya las pilas
recargables.
Si conecta el transmisor a la toma
LINE OUT o REC OUT de un
reproductor de audio, compruebe que
el interruptor NOISE FILTER esté
ajustado en OFF.
Asegúrese de que el interruptor
NOISE FILTER esté ajustado en ON u
OFF (si queda bloqueado entre ambas
posiciones, el sonido se interrumpirá).
12
ES
Page 37

Problema
Distorsión
Ruido de
fondo alto
Solución
Si el transmisor está conectado a la
toma de auriculares, baje el volumen
del equipo de audio/vídeo conectado.
Cambie la frecuencia de radio
mediante el selector CHANNEL del
transmisor.
La luz del indicador POWER de los
auriculares es tenue o está apagada.
•Cargue las pilas recargables
suministradas. Si el indicador
POWER sigue apagado después de
cargar dichas pilas, lleve los
auriculares a un distribuidor Sony
para que sustituya las pilas
recargables.
Si conecta el transmisor a la toma
LINE OUT o REC OUT de un
reproductor de audio, compruebe que
el interruptor NOISE FILTER esté
ajustado en OFF.
Acérquese al transmisor. Cuanto más
se aleje de él, más posibilidades
existen de que se produzca ruido.
Si el transmisor está conectado a la
toma de auriculares, suba el volumen
del equipo de audio/vídeo conectado.
MDR-RF920RK:
Cambie la frecuencia de radio
mediante el selector CHANNEL del
transmisor y, a continuación,
sintonice los auriculares con el control
TUNE.
MDR-RF960RK:
Cambie la frecuencia de radio
mediante el selector CHANNEL del
transmisor y, a continuación, pulse de
nuevo el botón TUNE.
La luz del indicador POWER de los
auriculares es tenue o está apagada.
•Cargue las pilas recargables
suministradas. Si el indicador
POWER sigue apagado después de
cargar dichas pilas, lleve los
auriculares a un distribuidor Sony
para que sustituya las pilas
recargables.
Si conecta el transmisor a la toma
LINE OUT o REC OUT de un
reproductor de audio, compruebe que
el interruptor NOISE FILTER esté
ajustado en OFF.
Especificaciones
Generales
Frecuencia de portadora
913,5 – 914,5 MHz
Canales Ch1, Ch2, Ch3
Modulación FM estéreo
Frecuencia de respuesta
MDR-RF920R : 20 – 20.000 Hz
MDR-RF960R : 10 – 22.000 Hz
Transmisor TMR-RF960R
Fuente de alimentación
cc de 9 V: adaptador de
alimentación de ca suministrado
Entrada de audio
Tomas fonográficas/minitoma
estéreo
Dimensiones Aprox. 133 × 124 × 136 mm
(5 1/4 × 5 × 5 3/8 pulgadas)
(an/al/prf)
Peso Aprox. 195 g (7 onza)
Auriculares MDR-RF920R, MDR-RF960R
Fuente de alimentación
Pilas de hidruro de níquel
metálico recargables BP-HP550
suministradas o pilas secas
(tamaño AAA) de venta en
establecimientos especializados
Peso Aprox. 270 g (9,6 onza)
Accesorios opcionales
Cable de audio RK-G136 (miniconector estéreo
El diseño y las especificaciones están sujetos a cambios
sin previo aviso.
incluyendo las pilas
y miniconector estéreo)
RK-C310,C320 (enchufe macho ×
2 y enchufe macho × 2)
13
ES
Page 38

14
ES
Page 39

15
ES
Page 40

Printed in Korea
 Loading...