

1
2
L
Noise Canceling
Headphones
Operating Instructions
사용설명서
MDR-NC500D
©2008 Sony Corporation Printed in Malaysia
English
Before operating the unit, please read this manual
thoroughly and retain it for future reference.
WARNING
To reduce the risk of fire or
electric shock, do not expose this
apparatus to rain or moisture.
To reduce the risk of electrical
shock, do not open the cabinet.
Refer servicing to qualified
personnel only.
Connect the AC power adaptor to an easily
accessible AC outlet. Should you notice an
abnormality in the AC power adaptor, disconnect
it from the AC outlet immediately.
Do not install the AC power adaptor in a confined
space, such as a bookcase or built-in cabinet.
To reduce the risk of fire or electric shock, do not
place objects filled with liquids, such as vases, on
the AC power adaptor.
Features
•
Digital noise canceling headphones with
the proprietary DNC software engine.
The high-precision canceling signal delivers
predominant noise canceling performance.
• AI (Artificial Intelligence) Noise
Canceling function.
Automatic selection of the optimal noise
canceling mode based on intelligent analysis of
environmental ambient noise.
• Digital equalizer delivers ideal
frequency response and high-quality
music reproduction.
• High S/N ratio achieved through digital
signal processing.
3-278-744-51(1)
• Lightweight design for extremely
comfortable wearing.
Generous use of lightweight materials such as
Magnesium and A7075 aluminum alloy.
• Pressure relieving urethane cushion in
the earpad.
The earpad structure provides comfort without
stress even after extended use.
• Built-in monitor function lets you
silence the audio to hear externally.
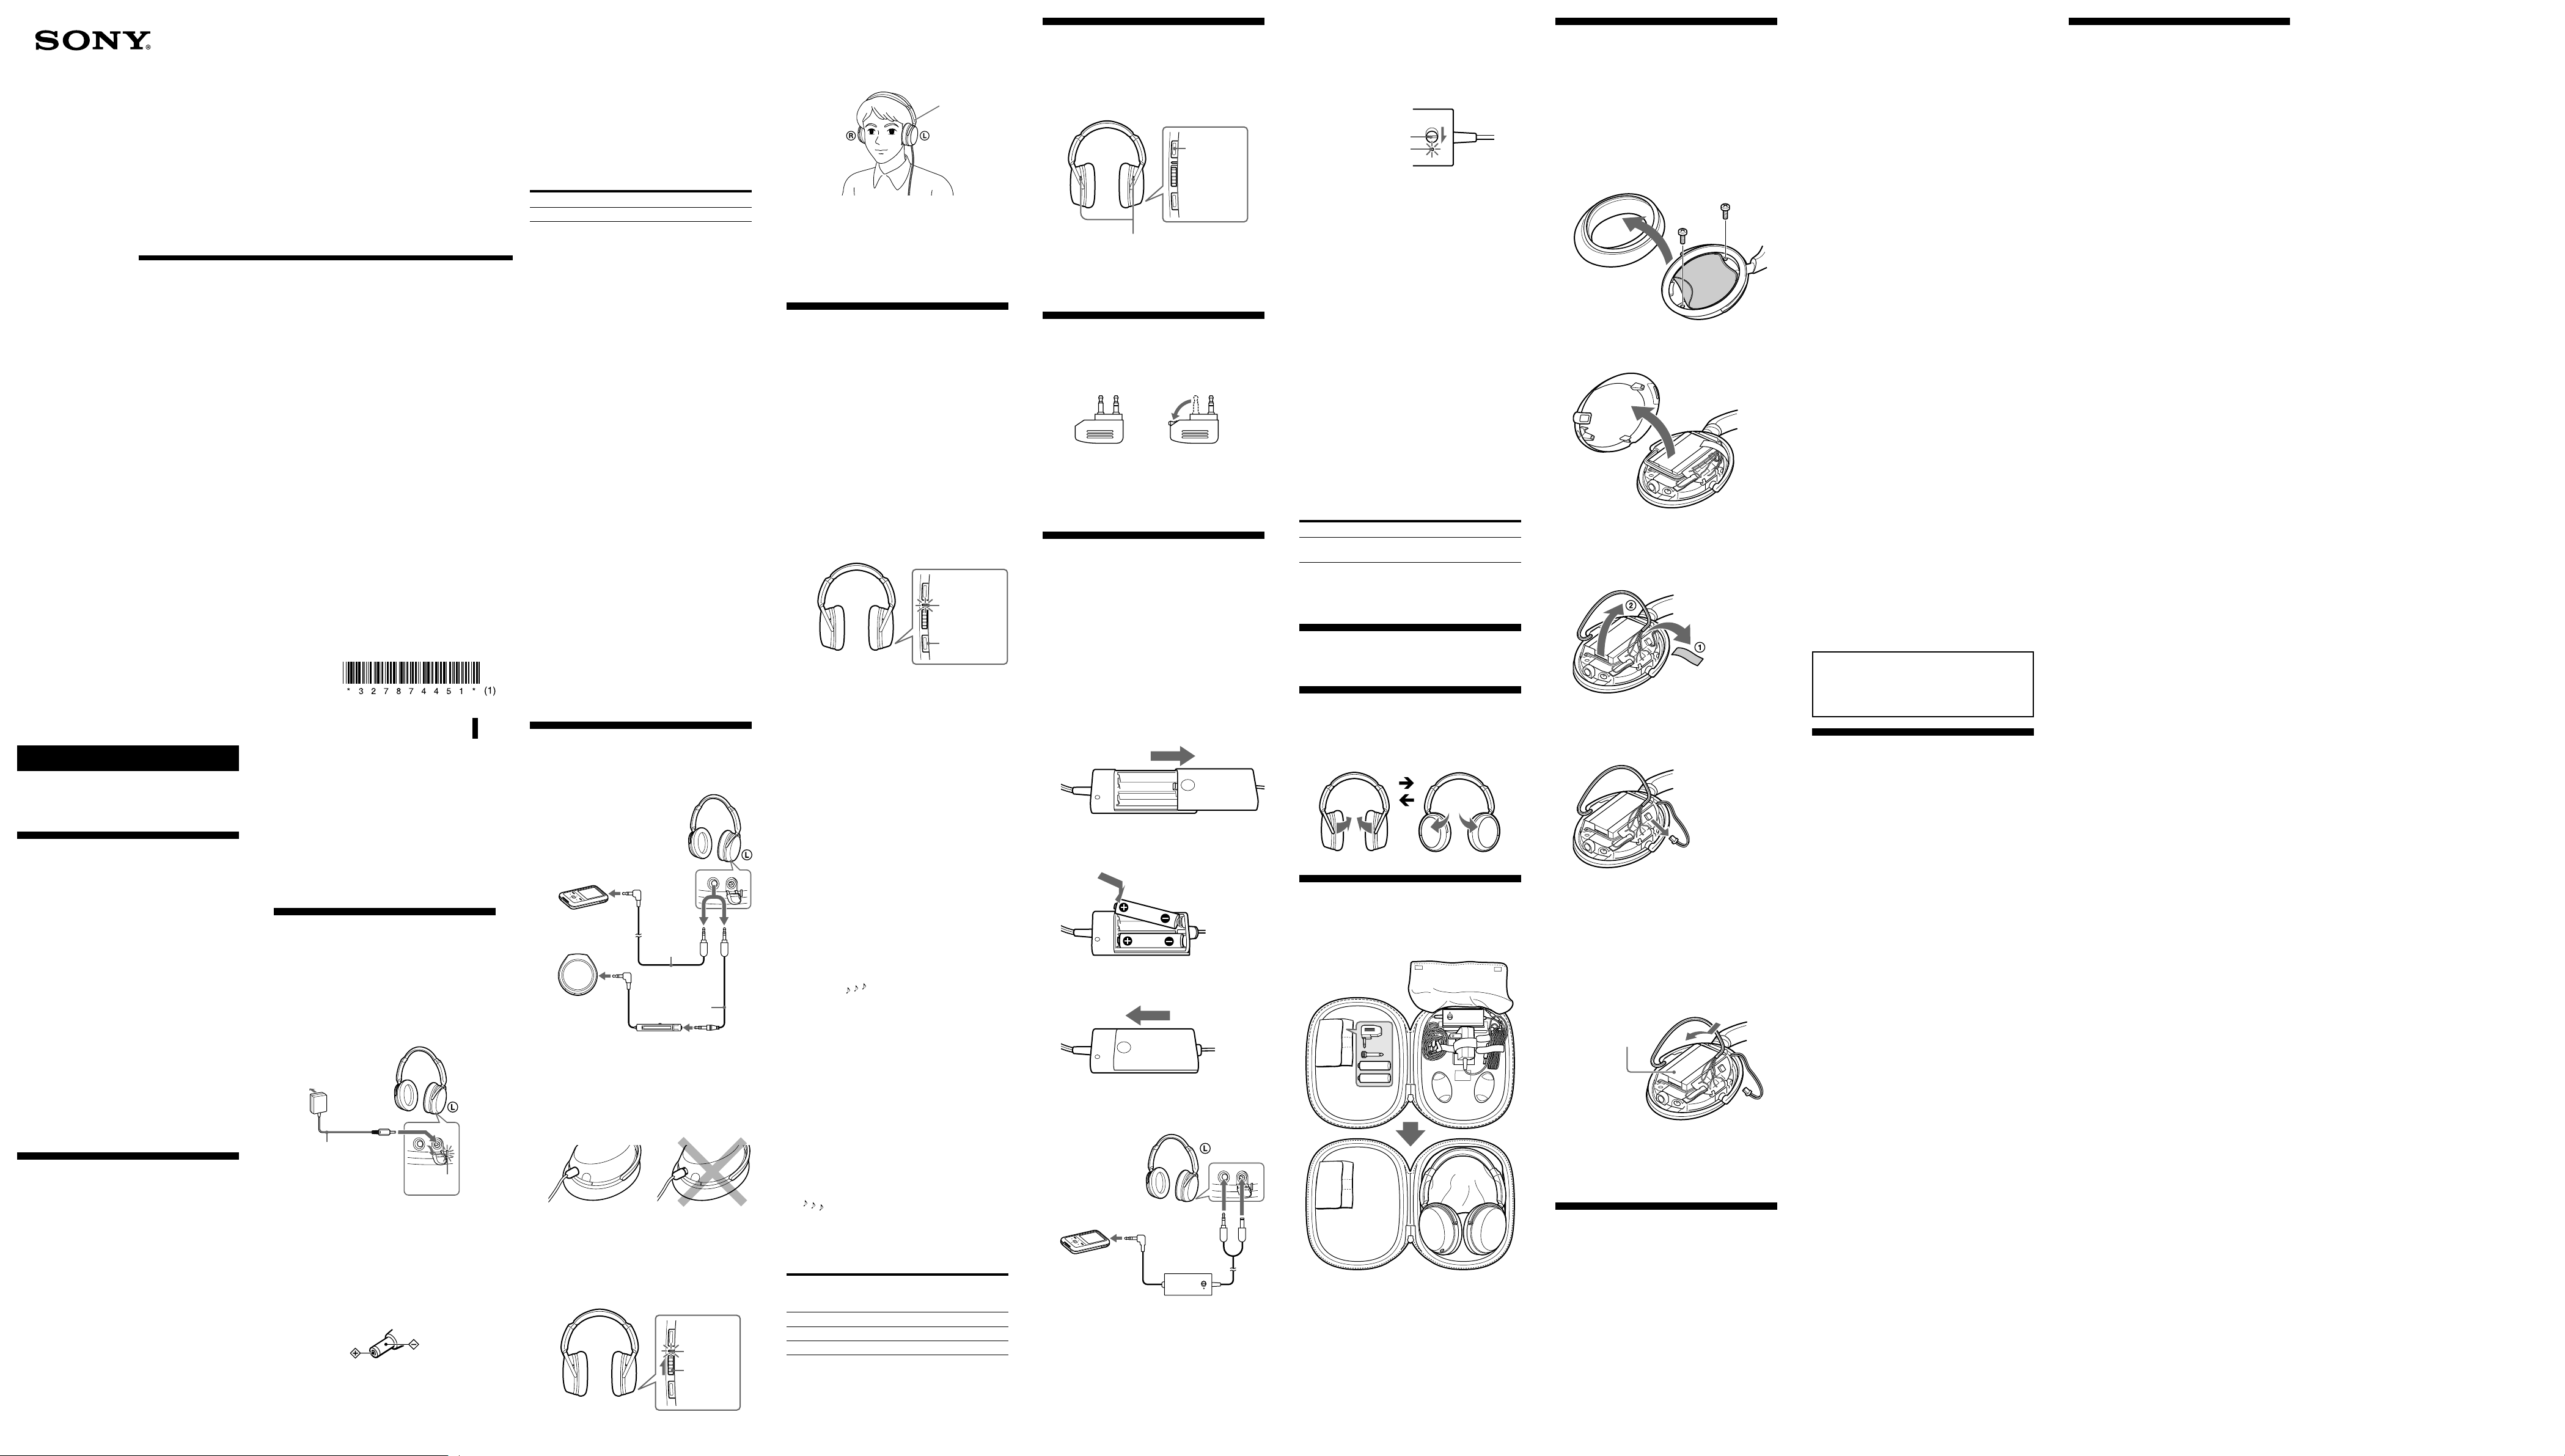
Charge the headphones
The headphones contains a rechargeable LithiumIon battery. Charge the battery before use.
Connect the supplied AC power adaptor to the
DC IN 6V jack on the headphones and an AC
outlet. The charge indicator lights up in orange
and charging starts.
Headphones
To an AC outlet
AC power
adaptor
(supplied)
Charging is completed after about three hours,
and the charge indicator goes out.
Disconnect the AC power adaptor after the
charging has finished.
Notes
• Use the AC power adaptor supplied with this unit. Do
not use any other AC power adaptor since it may
cause the unit to malfunction.
• Avoid exposure to temperature extremes, direct
sunlight, moisture, sand, dust or mechanical shock.
Never leave in a car parked in the sun.
• Charge in an environmental temperature of between
0°C and 40°C (between 32°F and 104°F). Otherwise,
the battery may not be fully charged.
To DC IN
6V jack
Polarity of the plug
Charge
indicator
• If you haven’t used the headphones for a long period
of time, the life of the rechargeable battery may
become short. This will improve when you repeat the
charging and discharging process several times.
• When the battery life reduces to half, this may be the
end of battery lifetime. For how to change batteries,
consult your place of purchase or a Sony dealer.
• Do not store the headphones in hot places for a long
period of time. When storing it for more than a year,
charge the battery once a year to prevent over
discharge.
• You cannot charge the rechargeable battery using the
supplied connecting cord with battery case.
General charging and usage time
Charging time Usage time*
Approx. 3 hours *
*1 At 1 kHz, 0.1 mW + 0.1 mW output
*2 Hours required to fully charge an empty battery
*3 Time stated above may vary, depending on ambient
temperature or conditions of use.
2
Approx. 15 hours*
1
3
When the rechargeable
battery is low
When the rechargeable battery is low, short beeps
sound from the unit for 8 seconds and the
POWER indicator blinks slowly.
When the battery level is getting lower, a long
beep sounds from the unit for 2 seconds and the
POWER indicator blinks quickly, and all
operations are stopped. Move the POWER
switch to “OFF” in this case.
z Tips
When the battery runs out, you can supply the power to
the headphones in one of the following ways:
• Connect the headphones to the AC power adaptor by
following the steps shown in “Charge the
headphones.”
You can use the headphones while charging.
• Use the supplied connecting cord with battery case.
See “How to use the connecting cord with battery
case” for details.
Using your AC power
adaptor abroad
You can use your AC power adaptor in any
country or area that uses 100 V to 240 V AC,
50/60 Hz, by connecting a plug adaptor. If the
country you visit employs a different shaped
socket, use the correct plug adaptor.
Consult your nearest travel bureau for the type of
plug adaptor needed for your trip.
Listening to music
1 Connect the headphones to the AV
equipment.
Headphones
When connecting
to the stereo mini
jack of a
WALKMAN*, etc.
Connecting
cord 1.5 m
(supplied)
When connecting
to the stereo mini
jack of the remote
control supplied
with a WALKMAN,
etc.
* “WALKMAN” and “WALKMAN” logo are
registered trademarks of Sony Corporation.
Notes
• When connecting the cord, insert the plug into the
jack until the green portion of the plug disappears.
• To disconnect the cord, pull it out by the plug, not
the cord, as the inner conductors may break.
2 Turn on the power on the right side of the
headphones.
The POWER indicator lights up in blue, and a
short beep sounds from the unit.
Connecting cord
0.5 m (supplied)
Remote
control
POWER
RL
indicator
POWER
switch
3 Put on the headphones.
After confirming the cord on the left and the
POWER switch on the right, put on the
headphones.
Adjust the ear pads so as to cover your ears.
Tactile dot
(on the left)
4 Start playing on the AV equipment
connected to the headphones.
Note
Playback is not available when there is no
power.
Utilizing the AI Noise
Canceling
1 Press the AI NC MODE button.
When you press the AI NC MODE
the POWER switch is set to “ON”, sounds
come from the headphones to inform you that
the unit has started analyzing ambient sound
components (approx. 3 seconds).
During analysis, sound reproduction from the
unit is stopped and the POWER indicator
lights in pink.
When analysis is completed, the most
effective noise canceling mode is set
automatically, and sound reproduction from
the headphones starts.
RL
AI Noise Canceling
AI Noise Canceling is a useful function that
automatically selects one of the noise canceling
modes. This function provides the most effective
noise canceling mode by immediately analyzing
ambient sound components when the AI NC
MODE button is pressed.
z Tips
• When the power of the headphones is turned on,
mode A is set. (See “Noise canceling mode types,”
for details about Mode A.)
• Press the AI NC MODE button again to reset the
noise canceling mode if ambient noise has changed,
such as when you move outdoors from a room.
To set the noise canceling mode
manually
You can set the noise canceling mode manually
(manual noise canceling).
1 Press and hold the AI NC MODE button
for more than one second.
Sounds ( ) come from the headphones to
inform you that manual noise canceling is set.
2 Press the AI NC MODE button
repeatedly to change the mode type.
The POWER indicator blinks pink and a beep
(s) sound(s) from the headphones. After that,
the noise canceling mode is set. The number
of POWER indicator blinks and the beep
sounds depends on the mode selected. See
“Noise canceling mode types.”
z Tips
• Mode A is selected when manual noise canceling is
activated.
• To change from manual noise canceling to AI Noise
Canceling, press and hold the AI NC MODE button
for more than one second. When you hear the sounds
( ) to inform you of the change to AI Noise
Canceling, press the AI NC MODE button again.
Ambient analysis starts and the most effective noise
canceling mode is set automatically.
Noise canceling mode types
Mode names Number of POWER indicator
blinks (pink) and beep
sounds
A1
B2
C3
A:Noise mainly in an airplane is effectively reduced.
B: Noise mainly in a bus or a train is effectively
reduced.
C: Noise mainly found in an office environment (PC,
copier, air ventilation, etc.) is effectively reduced.
button
POWER
indicator
AI NC MODE
button
and
Hearing environmental
sound for safety
If the MONITOR
the POWER switch is set to ON, playback silences
then you can hear the surrounding environment.
Monitor microphone
Note
Environmental sound might not be heard if the
microphone is covered with your fingers.
button
is pressed and held while
MONITOR
button
RL
When using in an
airplane
• The supplied plug adaptor can be connected to
the dual or stereo mini jacks in an airplane.
for dual jacks for stereo mini jacks
• Do not use the headphones when use of
electronic equipment is prohibited, or when use
of personal headphones for in-flight music
services are prohibited.
How to use the
connecting cord with
battery case
You can continue to use the unit, even when the
rechargeable battery in the headphones runs out,
by connecting the supplied connecting cord with
battery case.
Use the connecting cord with battery case by
inserting two size AA alkaline batteries.
1 Open the lid of the battery case.
2 Insert two size AA alkaline batteries.
Make sure of direction, matching the e
marks in the case with those on the batteries.
3 Close the lid.
4 Connect the supplied connecting cord
with battery case to both the headphones
and AV equipment.
Headphones
AV equipment
Connecting cord with
battery case (supplied)
Notes
• When connecting the cord, insert the plug fully into the
jack so that the green sign on the metal parts cannot be
seen.
• When disconnecting the cord, pull it out by holding the
plug. If the cord is pulled forcibly the wire may break.
5 Set the POWER switch of the
headphones to “OFF,” and then set the
POWER switch of the battery case to
“ON.”
The POWER indicator on the battery case
lights up green.
POWER switch
POWER indicator
See steps 2 to 4 of “Listening to music” for
the following setting steps.
After use, set the POWER switch of both the
headphones and the battery case to “OFF.”
z Tips
• The power supply of the rechargeable battery is
consumed first, unless the battery runs out.
• If you connect and turn on the connecting cord with
battery case in advance when the rechargeable battery
is low, you can use the headphones uninterrupted,
even after the battery in the headphones runs out.
Notes
• The use of manganese batteries is not recommended,
since this type of battery has an extremely short
usage time.
• The battery case supplies the power to the
headphones for operation purposes only. It does not
charge the internal rechargeable battery in the
headphones.
• The POWER indicator of the battery case becomes
dim when the battery life is reaching the limit.
Replace the battery with new ones at the time.
• The supplied connecting cord with battery case is
only for these headphones. Do not connect to other
equipment.
Battery life
Battery type Approx. hours*
Sony Alkaline 10 hours *
LR6 (size AA) battery
*1Output at 1 kHz, 0.1 mW + 0.1 mW
*2Time stated above may vary, depending on ambient
temperature or conditions of use.
1
2
After use
Turn off the power of the headphones.
Flat Storage
The housings rotate to make them flat for easy
storage in the carrying case (supplied), or in a seat
pocket. Restore to their usual position before using.
RLRL
Putting the headphones
in the carrying case
Rotate the housings to be flat before putting them
in the carrying case.
Disposing of the unit
The unit contains a rechargeable Lithium-Ion
battery. For environmental conservation, be sure
to remove the built-in rechargeable batteries from
the unit before disposing, and dispose of the
batteries appropriately.
1 Pull off the earpad on the left housing,
and unwind the two screws located as in
the illustration.
Earpad
2 Turn down the left housing and pull off
the outer cover.
Cover
3
Keep the cord away from the rechargeable
battery.
First, remove the adhesive tape on the surface
of the battery. Then, loosen the cord just
beside the rechargeable battery.
Adhesive tape
Note
Be careful not to break the internal wires.
4 Pull out the connector on the board.
Connector
Note
Be careful not to break the internal wires
when disconnecting the connector.
5 Remove the rechargeable battery.
The rechargeable battery is firmly installed by
adhesive tape. Take out the rechargeable
battery by lifting up in the direction of the
arrow shown in the illustration.
Rechargeable
battery
Note
Remove the rechargeable battery, taking care
not to damage it.
Precautions
The headphones contain a noise canceling circuit.
What is noise canceling?
The noise canceling circuit actually senses outside
noise with built-in microphones and sends an
equal-but-opposite canceling signal to the
headphones.
• The noise canceling effect may not be
pronounced in a very quiet environment, or
some noise may be heard.
• The noise canceling effect may vary depending
on how you wear the headphones.
• The noise canceling function works for noise in
the low frequency band primarily. Although
noise is reduced, it is not canceled completely.
• When you use the headphones in a train or a
car, noise may occur depending on street
conditions.
• Howling may occur if you do not wear the
headphones correctly.
• Howling may occur if you place an object such
as finger close to inside of the headphones.
Keep it away from the headphones.
• Mobile phones may cause interference and
noise. To avoid interference, use noise
canceling feature only with wireless
transmitters turned off (Airplane Mode).
Interference noise can also occur from nearby
mobile phones. Should this occur, locate the
headphones further away from the mobile
phone.
Notes on usage
• Clean the headphones with a soft dry cloth.
• Do not leave the plug dirty otherwise the sound
may be distorted.
• Be sure to consult a Sony dealer when the
earpads become dirty or damaged, or when the
headphones require repair work.
• Do not leave the stereo headphones in a
location subject to direct sunlight, heat or
moisture.
Note on headphones
Preventing hearing damage
Avoid using headphones at high volume. Hearing
experts advise against continuous, loud and
extended play. If you experience a ringing in your
ears, reduce the volume or discontinue use.
Do not listen with the headphones while
driving or cycling
As your headphones reduce surrounding sound, it
may cause a traffic accident. Also avoid using
them where hearing must not be impaired, for
example, at a railroad crossing, a construction
site, etc.
If you have any questions or problems
concerning the system that are not covered in
this manual, please consult your nearest Sony
dealer.
Trou bleshooting
No sound
• Turn on the headphones.
• When connecting the connecting cord with
battery case, turn on the power of the battery
case.
• Check that the rechargeable battery is not
depleted.
• When connecting the connecting cord with
battery case, check that the batteries have not
expired.
• Check the connection of the headphones and
the AV equipment.
• Check that the connected AV equipment is
turned on.
• Turn up the volume of the connected AV
equipment.
Muffled sound
• Turn down the volume of the connected AV
equipment.
• Charge the headphones.
• Replace the alkaline batteries in the battery
case with new ones.
Power does not turn on
• Check if the battery has expired (the POWER
indicator dims).
b If the power does not turn on, even after
charging the headphones, the rechargeable
battery may be damaged. Consult your place
of purchase or a Sony dealer in this case.
• When you are using the headphones with the
connecting cord with battery case, set the
POWER switch on the battery case to “OFF,”
then to “ON” again.
• Replace the alkaline batteries in the battery
case with new ones.
No operation works
• Set the POWER switch of the headphones to
“OFF,” confirm the connections, and then set
the POWER switch back to “ON.”
• Reset the headphones.
b Insert a pointed object, such as the tip of a
clip, into the hole located under the RESET
button on the right housing, and press until
the button slightly rebounds.
Specifications
General
Type Closed dynamic
Driver unit 40 mm, dome type (CCAW adopted)
Power handling capacity
100 mW
Impedance 40 Ω at 1 kHz
Sensitivity 102 dB/mW
Frequency response
Total Noise Suppression Ratio*
Power source DC 3.7 V: Built-in lithium-ion
Mass
Supplied accessories
Connecting cord (0.5 m, gold plated stereo mini
plug) (1)
Connecting cord (1.5 m, gold plated L type stereo
mini plug) (1)
Connecting cord with battery case (1)
Carrying case (1)
Plug adaptor for in-flight use*
Gold-plated unimatch plug adaptor (stereo phone
plug y stereo mini jack) (1)
AC power adaptor (1)
Operating Instructions (1)
Startup guide (1)
Product Information (1)
1
*
Under the Sony measurement standard.
For details about the Total Noise Suppression
Ratio amount for each mode, refer to the
Product Information booklet.
2
*
Equivalent to approx. 99 % reduction of energy
of sound compared with not wearing
headphones (NC MODE A).
3
*
May not be compatible with some in-flight
music services.
Design and specifications are subject to change
without notice.
5 - 24,000 Hz
Approx. 20 dB*
rechargeable battery,
2 × LR6 (size AA) batteries, or AC
power adaptor
Approx. 195 g (6.9 oz)
1
2
3
(single/dual) (1)

한국어
장치를 사용하기 전에 이 설명서를 자세히 읽은
다음 나중에 참고할 수 있도록 잘 보관하십시오.
경고
화재 또는 감전 사고의 위험을 줄이려면 본
제품에 비나 수분이 닿지 않도록 주의하십
시오.
감전될 염려가 있으므로 캐비닛을 열지 마
십시오. 점검은 기술자에게 의뢰하여 주십
시오.
AC 전원 어댑터를 주변의 가까운 AC 콘센트에
연결하십시오. AC 전원 어댑터에 이상이 있으면
AC 콘센트에서 즉시 빼 주십시오.
책장이나 붙박이장과 같이 좁은 공간에 AC 전원
어댑터를 설치하지 마십시오.
기기에 물방울이 떨어지거나 튀게 하지 말고, 꽃
병 등과 같이액체가 들어 있는 물건을 기기에 올
려 두지 마십시오.
특징
• 특허 낸 DNC 소프트웨어 엔진이 탑재된 디지털
노이즈 제거 헤드폰.
고정밀 제거 신호로 탁월한 노이즈 제거 효과를
볼 수 있습니다.
• AI(Artificial Intelligence) 노이즈 제거
기능.
주변 노이즈의 지능형 분석에 기반을 둔 최적
의 노이즈 제거 모드가 자동으로 선택됩니다.
• 디지털 이퀄라이저로 이상적인 주파수 응답
및 고음질 음악 재현 가능.
• 디지털 신호 처리에 의한 높은 S/N 비율.
• 가볍고 착용감이 뛰어난 디자인.
마그네슘 및 A7075 알루미늄 합금과 같은
가벼운 소재 사용.
• 압박감이 덜한 우레탄 쿠션의 이어 패드.
장시간 사용에도 불편함이 없는 이어 패드
구조.
• 주변 소리를 들을 수 있게 오디오가 들리지
않게 하는 내장 모니터 기능.
헤드폰 충전
헤드폰에는 충전식 리튬 이온 배터리가 포함되
어 있습니다. 사용하기 전에 배터리를 충전하십
시오.
부속된 AC 전원 어댑터를 헤드폰의 DC IN 6V
잭 및 AC 콘센트에 연결합니다. 충전 표시등이
주황색으로 켜지고 충전이 시작됩니다.
헤드폰
AC 콘센트에 연결
AC 전원 어댑터
(부속품)
3시간 정도 지나면 충전이 완료되며 충전 표시
등이 꺼집니다.
충전이 완료된 후 AC 전원 어댑터를 분리하십
시오.
주의점
• 본 기기에 부속된 AC 전원 어댑터를 사용하여 주십
시오. 기기가 고장날 수 있으므로 다른 AC 전원 어
댑터를 사용하지 마십시오.
• 지나친 고온, 직사광선, 습기, 모래, 먼지에 노출시
키거나 물리적인 충격을 가하지 마십시오. 햇볕 아
래 주차된 차 속에 놔두지 마십시오.
• 0°C 내지 40°C의 주변 온도에서 충전하여 주십시
오. 온도를 지키지 않으면 배터리가 만충전되지 않
을 수도 있습니다.
• 헤드폰을 오랫동안 사용하지 않은 경우 충전식 배터
리 지속시간이 짧아질 수 있습니다. 충전했다가 방
전하는 과정을 여러 번 반복하면 배터리 지속시간이
늘어납니다.
• 배터리 지속시간이 절반으로 줄어든 경우 수명이 다
된 것일 수 있습니다. 배터리 교환 방법은 구매처나
Sony 대리점에 문의하십시오.
• 온도가 높은 곳에 오랫동안 헤드폰을 보관하지 마십
시오. 1년 이상 사용하지 않는 경우 과방전을 방지
하기 위해 1년 한 번씩 배터리를 충전하여 주십시오.
• 부속된 배터리 케이스 일체형 연결 코드를 사용하여
충전식 배터리를 충전할 수 없습니다.
DC IN 6V
잭에 연결
플러그의 극
충전 표시등
일반 충전 및 사용 시간
충전 시간 사용 시간*
약 3시간*
*11 kHz에서 0.1 mW + 0.1 mW 출력
*2빈 배터리를 만충전하는 데 필요한 시간
*3위에 언급한 시간은 주변 온도나 사용 조건에 따라
2
약 15시간*
다를 수 있습니다.
1
3
충전식 배터리 잔량이 부족할 경우
충전식 배터리 잔량이 부족할 경우 짧은 비프음
이 기기에서 8초 동안 들리고 POWER 표시등
이 천천히 깜박입니다.
배터리 레벨이 점점 더 낮아지면 긴 비프음이 기
기에서 2초 동안 들리고 POWER 표시등이 빠
르게 깜박이면서 모든 작동이 중지됩니다. 이 경
우 POWER 스위치를 "OFF"로 이동하십시오.
z 팁
배터리가 다 닳으면 다음 방법 중 하나로 헤드폰에 전
원을 공급할 수 있습니다:
• "헤드폰 충전"에 나와 있는 순서에 따라 헤드폰을
AC 전원 어댑터에 연결합니다.
충전하는 동안 헤드폰을 사용할 수 있습니다.
• 부속된 배터리 케이스 일체형 연결 코드를 사용합니
다. 자세한 내용은 "배터리 케이스 일체형 연결 코
드 사용 방법"을 참조하여 주십시오.
해외에서 AC 전원 어댑터 사용
플러그 어댑터를 연결하면 100 V - 240 V
AC, 50/60 Hz를 사용하는 모든 국가나 지역에
서 본 AC 전원 어댑터를 사용할 수 있습니다.
다른 나라를 방문할 때 소켓 모양이 다를 경우
올바른 플러그 어댑터를 사용하십시오.
여행 중에 필요한 플러그 어댑터의 유형에 대해
서는 가까운 여행사에 문의하십시오.
음악 듣기
1 헤드폰을 AV 장치에 연결합니다.
헤드폰
WALKMAN®* 등의
스테레오 미니 잭에
연결할 경우
연결 코드
1.5 m(부속품)
WALKMAN® 등에
부속된 리모컨의 스테레
오 미니 잭에 연결할
경우
* "WALKMAN" 및 "WALKMAN" 로고는
Sony Corporation의 등록 상표입니다.
주의점
• 코드를 연결할 때는 플러그의 녹색 부분이 안보
일 때까지 플러그를 잭에 완전히 삽입하십시오.
• 코드를 분리할 때에는 코드가 아닌 플러그를 잡
고 뽑아 주십시오. 코드를 잡고 뽑으면 내부 도체
가 손상될 수 있습니다.
2 헤드폰 오른쪽에 있는 전원을 켭니다.
POWER 표시등이 파란색으로 켜지고 짧은
비프음이 기기에서 들립니다.
3 헤드폰을 머리에 씁니다.
왼쪽의 코드와 오른쪽의 POWER 스위치를
확인한 후 헤드폰을 머리에 씁니다.
귀에 맞게 이어 패드를 조절합니다.
4 헤드폰에 연결된 AV 장치에서 재생을
시작합니다.
주의점
전원이 들어오지 않으면 재생할 수 없습니다.
연결 코드 0.5 m
(부속품)
리모컨
RL
POWER
표시등
POWER
스위치
돌기(왼쪽)
AI 노이즈 제거 사용
1 AI NC MODE 버튼을 누릅니다.
POWER 스위치가 "ON"으로 설정된 상태
에서 AI NC MODE 버튼을 누를 경우 기
기에서 주변 사운드 컴포넌트 분석이 시작되
었다는 것을 알리는 사운드가 헤드폰에서 들
립니다(약 3초).
분석하는 도중에 기기에서의 사운드 재생이
중지되고 POWER 표시등이 분홍색으로 켜
집니다.
분석이 완료되면 가장 효과적인 노이즈 취소
모드가 자동으로 설정되고 헤드폰에서 사운
드 재생이 시작됩니다.
POWER
RL
표시등
AI NC MODE
버튼
AI 노이즈 제거
AI 노이즈 제거는 노이즈 제거 모드 중 하나가
자동으로 선택되는 유용한 기능입니다. 이 기능
은 AI NC MODE 버튼을 눌렀을 때 주변 사운
드 컴포넌트를 즉시 분석하여 가장 효과적인 노
이즈 제거 모드를 제공합니다.
z 팁
• 헤드폰 전원이 켜져 있는 경우 모드 A가 설정됩니
다. (모드 A에 대한 자세한 내용은 "노이즈 제거 모
드 유형"을 참조하여 주십시오.)
• 방에 있다가 밖으로 나가는 경우처럼 주변 노이즈가
바뀌는 경우 AI NC MODE 버튼을 다시 눌러 노이
즈 제거 모드를 재설정하십시오.
노이즈 제거 모드를 수동으로 설정하려면
노이즈 제거 모드를 수동으로 설정할 수 있습니
다(수동 노이즈 제거).
1 AI NC MODE 버튼을 1초 이상 동안
누르고 있습니다.
수동 노이즈 제거가 설정되었다는 것을 알리
는 사운드(
)가 헤드폰에서 들립니다.
2 AI NC MODE 버튼을 반복해서 눌러
모드 유형을 변경합니다.
POWER 표시등이 분홍색으로 깜박이고 헤
드폰에서 비프음이 들립니다. 그런 다음 노
이즈 제거 모드가 설정됩니다. POWER 표
시등 깜박임 및 비프음 횟수는 선택한 모드
에 따라 달라집니다. "노이즈 제거 모드 유
형"을 참조하여 주십시오.
z 팁
• 수동 노이즈 제거가 활성화된 경우 모드 A가 선택
됩니다.
• 수동 노이즈 제거를 AI 노이즈 제거로 변경하려면
AI NC MODE 버튼을 1초 이상 동안 누르고 계십
시오. AI 노이즈 제거로 변경되었음을 알리는 사운
드( )가 들리면 AI NC MODE 버튼을 다시
누르십시오. 주변 분석이 시작되고 가장 효과적인
노이즈 제거 모드가 자동으로 설정됩니다.
노이즈 제거 모드 유형
모드 이름 POWER 표시등 깜박임(분홍색) 및
A1
B2
C3
A: 주로 비행기에서 효과적으로 노이즈를 제거합니다.
B: 주로 버스나 기차에서 효과적으로 노이즈를 제거합
니다.
C: 주로 사무실 환경(PC, 복사기, 환기구 등)에서 효
과적으로 노이즈를 제거합니다.
비프음 횟수
안전을 위해 주변 소리 듣기
POWER 스위치가 ON으로 설정된 상태에서
MONITOR 버튼을 누르고 있으면 재생되는 사
운드가 들리지 않게 되어 주변의 소리를 들을 수
있습니다.
MONITOR
버튼
RL
모니터 마이크
주의점
손가락으로 마이크를 가리면 주변 소리가 들리
지 않을 수도 있습니다.
비행기에서 사용할 경우
• 부속된 플러그 어댑터를 비행기 내의 듀얼 또
는 스테레오 미니 잭에 연결할 수 있습니다.
듀얼 잭용 스테레오 미니 잭용
• 전자 제품의 사용이 금지된 경우 또는 기내 음
악 서비스 이용에 개인 헤드폰 사용이 금지된
경우에는 헤드폰을 사용하지 마십시오.
배터리 케이스 일체형 연결 코드
사용 방법
헤드폰의 충전식 배터리가 다 닳은 경우에도 부
속된 배터리 케이스 일체형 연결 코드를 연결하
여 기기를 계속 사용할 수 있습니다.
두 개의 AA 사이즈 알카라인 배터리를 넣어 배
터리 케이스 일체형 연결 코드를 사용하십시오.
1 배터리 케이스의 뚜껑을 엽니다.
2 AA 사이즈 알카라인 배터리 두 개를
넣습니다.
케이스의 e 표시가 배터리의 표시와 일치하
는지 방향을 확인합니다.
3 뚜껑을 닫습니다.
4 부속된 배터리 케이스 일체형 연결 코
드를 헤드폰 및 AV 장치 둘 다에 연결
합니다.
헤드폰
AV 장치
배터리 케이스 일체형
연결 코드(부속품)
주의점
• 코드를 연결할 때는 금속 부분의 녹색 표시가 안
보일 때까지 플러그를 잭에 완전히 삽입하십시오.
• 코드를 뺄 때에는 플러그를 잡고 빼 주십시오. 코
드를 강제로 잡아 당기면 전선이 끊어질 수 있습
니다.
5 헤드폰의 POWER 스위치를 "OFF"로
설정한 다음 배터리 케이스의 POWER
스위치를 "ON"으로 설정합니다.
배터리 케이스의 POWER 표시등이 녹색으
로 켜집니다.
POWER 스위치
POWER 표시등
다음 설정 순서는 "음악 듣기"의 순서 2에서
4를 참조하여 주십시오.
사용한 다음에 헤드폰과 배터리 케이스 둘
다에서 POWER 스위치를 "OFF"로 설정
하십시오.
z 팁
• 충전식 배터리가 다 닳을 때까지 충전식 배터리의
전원이 우선적으로 소비됩니다.
• 충전식 배터리 잔량이 부족한 경우 배터리 케이스
일체형 연결 코드를 미리 연결하고 전원을 켜두면
헤드폰의 배터리가 다 닳더라도 헤드폰을 중단 없이
사용할 수 있습니다.
주의점
• 망간 배터리는 사용 시간이 매우 짧기 때문에 사용
하지 않는 것이 좋습니다.
• 배터리 케이스는 헤드폰을 작동하는 데에만 전원을
공급합니다. 헤드폰의 내부 충전식 배터리를 충전하
지는 않습니다.
• 배터리 지속시간이 한계에 도달하면 배터리 케이스
의 POWER 표시등이 어두워집니다. 이 경우 배터
리를 새것으로 교체해 주십시오.
• 부속된 배터리 케이스 일체형 연결 코드는 이 헤드폰
에만 사용됩니다. 다른 장치에 연결하지 마십시오.
배터리 지속시간
배터리 유형 약 시간*
Sony 알카라인 LR6 10시간*
(AA 사이즈) 배터리
1
*
1 kHz에서 0.1 mW + 0.1 mW 출력
*2위에 언급된 시간은 사용 온도나 조건에 따라 다를
수 있습니다.
1
2
사용 후
헤드폰의 전원을 끄십시오.
납작하게 접어서 보관
하우징 부분을 돌려 휴대용 케이스(부속품)에
간편하게 보관하거나 좌석 주머니에 넣을 수 있
도록 납작하게 만들어 헤드폰의 부피를 줄일 수
있습니다. 사용하기 전에 원래 위치로 돌려 놓으
십시오.
RLRL
휴대용 케이스에 헤드폰 넣기
휴대용 케이스에 넣기 전에 하우징을 돌려 납작
하게 만드십시오.
기기 폐기하기
기기에는 충전식 리튬 이온 배터리가 들어 있습
니다. 환경 보존을 위해 기기를 폐기하기 전에
충전식 내장 배터리를 제거하고, 배터리는 적절
한 방법으로 폐기하여 주십시오.
1 그림과 같이 왼쪽 하우징의 이어 패드
를 당겨 빼내고 두 개의 나사를 풉니다.
1
2
이어 패드
2 왼쪽 하우징을 뒤집어서 외부 커버를
떼어냅니다.
커버
3 충전식 배터리에서 코드를 한쪽으로 젖
혀 놓습니다.
우선 배터리 겉에 있는 접착 테이프를 떼어
냅니다. 그런 다음 충전식 배터리 옆에 코드
를 느슨하게 합니다.
L
접착 테이프
주의점
내부 전선이 끊어지지 않게 조심하십시오.
4 기판에서 커넥터를 당겨 빼냅니다.
커넥터
주의점
커넥터를 분리할 때 내부 전선이 끊어지지
않도록 조심하십시오.
5 충전식 배터리를 제거합니다.
충전식 배터리는 접착 테이프로 단단하게 고
정되어 있습니다. 그림과 같이 화살표 방향
으로 들어 올려 충전식 배터리를 꺼내십시오.
충전식 배터리
주의점
파손되지 않게 조심스럽게 충전식 배터리를
제거하십시오.
주의사항
헤드폰에는 노이즈 제거 회로가 장착되어 있습
니다.
노이즈 제거란?
노이즈 제거 회로는 내장 마이크를 통해 외부 소
음을 감지하고 동급의 역신호인 노이즈 제거 신
호를 헤드폰으로 보냅니다.
• 노이즈 제거 효과는 매우 조용한 공간에서는
뚜렷한 효과를 발휘하지 못할 수도 있으며 약
간의 소음이 들릴 수도 있습니다.
• 헤드폰 착용 방법에 따라 노이즈 제거 효과가
다르게 나타날 수 있습니다.
• 노이즈 제거 기능은 주로 낮은 주파수 대역의
노이즈에 효과가 있습니다. 노이즈가 줄어들
더라도 완전히 제거되지는 않습니다.
• 기차 또는 자동차에서 헤드폰을 사용하는 경우
도로 조건에 따라 노이즈가 발생할 수 있습니다.
• 헤드폰을 올바로 착용하지 않을 경우 하울링
이 발생할 수 있습니다.
• 손가락과 같은 물체 등이 헤드폰 안쪽 가까이
있을 경우 하울링 현상이 발생할 수 있습니다.
헤드폰 주변에서 멀리하여 주십시오.
• 휴대폰으로 인해 간섭 및 노이즈가 발생할 수
있습니다. 간섭을 피하려면 노이즈 제거 기능
을 무선 송신기를 끈 상태에서만 사용하십시
오(비행기 모드). 휴대폰 가까이에서는 노이
즈가 발생할 수도 있습니다. 이런 경우에는 헤
드폰을 휴대폰으로부터 멀리 떨어뜨려 놓으십
시오.
사용 시 주의점
• 부드럽고 마른 헝겊으로 헤드폰을 닦아 주십
시오.
• 플러그를 더러운 상태로 방치하지 마십시오.
사운드가 왜곡될 수 있습니다.
• 이어 패드가 더러워지거나 손상된 경우 또는
헤드폰을 수리해야 할 경우에는 반드시 Sony
대리점에 문의하십시오.
• 직사광선, 열원 또는 습기가 있는 곳에 스테레
오 헤드폰을 놓아두지 마십시오.
헤드폰 사용에 대한 주의
청력 손상 예방하기
헤드폰을 높은 음량에서 사용하지 마십시오. 청
력 전문가는 장시간 지속적인 큰 소리로 음악을
듣는 것이 해롭다고 충고합니다. 귀에서 울리는
소리가 들리면 음량을 줄이거나 사용을 중지하
십시오.
운전 중이나 자전거를 타는 중에는 헤드폰을 사용
하지 마십시오
헤드폰을 사용하면 주변의 소리를 잘 들을 수 없
기 때문에 교통 사고의 원인이 될 수 있습니다.
또한 철로를 지나거나 공사 현장 주변 등과 같이
반드시 주위의 소리를 확인해야 하는 장소에서
의 헤드폰 사용도 피하십시오.
본 사용설명서에서 다루지 않은 시스템에 관한
문의 사항이나 문제점은 가까운 Sony 대리점
에 문의하십시오.
고장일까? 하고 생각되면
사운드가 들리지 않는다
• 헤드폰을 켜 주십시오.
• 배터리 케이스 일체형 연결 코드를 연결할 때
배터리 케이스를 켜 주십시오.
• 충전식 배터리가 방전되지 않았는지 확인하여
주십시오.
• 배터리 케이스 일체형 연결 코드를 연결할 때
배터리가 다 닳지 않았는지 확인하여 주십시오.
• 헤드폰과 AV 장치의 연결을 확인하여 주십
시오.
• 연결된 AV 장치가 켜져 있는지 확인하여 주
십시오.
• 연결된 AV 장치의 음량을 올려 주십시오.
사운드가 약하다
• 연결된 AV 장치의 음량을 낮춰 주십시오.
• 헤드폰을 충전하여 주십시오.
• 배터리 케이스의 알카라인 배터리를 새것으로
교체하여 주십시오.
전원이 켜지지 않는다
• 배터리가 다 닳았는지 확인하여 주십시오
(POWER 표시등이 희미함).
b 헤드폰을 충전한 후에도 전원이 켜지지 않
을 경우 충전식 배터리가 손상되었을 수 있
습니다. 이 경우 구매처나 Sony 대리점에
문의하여 주십시오.
• 헤드폰에서 배터리 케이스 일체형 연결 코드
를 사용하는 중이면 배터리 케이스의
POWER 스위치를 "OFF"로 설정한 다음 다
시 "ON"으로 설정하여 주십시오.
• 배터리 케이스의 알카라인 배터리를 새것으로
교체하여 주십시오.
아무것도 작동되지 않는다
• 헤드폰의 POWER 스위치를 "OFF"로 설정
하고 연결을 확인한 다음 POWER 스위치를
다시 "ON"으로 설정하여 주십시오.
• 헤드폰을 재설정하십시오.
b 클립 끝 부분과 같은 뾰쪽한 물건을 오른쪽
하우징의 RESET 버튼 아래에 있는 구멍
에 넣어 버튼이 살짝 들어갔다 나올 때까지
눌러 주십시오.
주요 제원
일반
종류 폐쇄형 다이내믹
드라이버 장치 40 mm, 돔 형식(CCAW 채택)
전원 처리량 100 mW
임피던스 1 kHz에서 40 Ω
감도 102 dB/mW
응답 주파수 5 - 24,000 Hz
총 노이즈 억제 비율*
전원 DC 3.7 V: 충전식 내장 리튬 이온 배
무게 약 195 g
부속품
연결 코드(0.5 m, 금도금 스테레오 미니 플러
그)(1)
연결 코드(1.5 m, 금도금 L 타입 스테레오 미니
플러그)(1)
배터리 케이스 일체형 연결 코드(1)
휴대용 케이스(1)
기내용 플러그 어댑터*
금도금 유니매치 플러그 어댑터(스테레오 폰
플러그 y 스테레오 미니 잭)(1)
AC 전원 어댑터(1)
사용설명서(1)
시작 안내서(1)
제품 정보(1)
1
*
Sony 측정 기준에 따릅니다. 각 모드의 총 노
이즈 억제 비율에 대한 자세한 내용은 제품 정
보 팜플렛을 참조하여 주십시오.
2
*
헤드폰을 착용하지 않은 경우와 비교하여 사
운드 에너지가 약 99% 감소하는 것과 동일합
니다(NC MODE A).
3
*
일부 기내 음악 서비스와 호환되지 않을 수도
있습니다.
디자인 및 주요 제원은 사전 통보 없이 변경될 수
1
약 20 dB*
터리, LR6(AA 사이즈) 배터리 2개
또는 AC 전원 어댑터
2
3
(싱글/듀얼)(1)
 Loading...