

Page 1
3-868-380-12(1)
MD Confer-Corder
Operating Instructions
MDCC-2000
2001 Sony Corporation
Page 2

Owner’s Record
The model and serial numbers are located on the
top. Record the serial number in the space provided
below. Refer to them whenever you call upon your
Sony dealer regarding this product.
Model No. MDCC-2000 Serial No.
WARNING
To prevent fire or shock hazard, do not
expose the unit to rain or moisture.
To avoid electrical shock, do not open the
cabinet. Refer servicing to qualified
personnel only.
Do not install the appliance in a confined space, such as
a bookcase or built-in cabinet.
Caution
The use of optical instruments with this product
will increase eye hazard.
The equipment should be connected to an easily
accessible mains outlet socket.
(So that it may be disconnected from the mains if
required)
This equipment has been tested and found to
comply with the limits for a Class A digital device,
pursuant to Part 15 of the FCC Rules. These limits
are designed to provide reasonable protection
against harmful interference when the equipment is
operated in a commercial environment. This
equipment generates, uses, and can radiate radio
frequency energy and, if not installed and used in
accordance with the instruction manual, may cause
harmful interference to radio communications.
Operation of this equipment in a residential area is
likely to cause harmful interference in which case
the use will be required to correct the interference at
his own expense.
You are cautioned that any changes or
modifications not expressly approved in this
manual could void your authority to operate this
equipment.
IN NO EVENT SHALL SELLER BE LIABLE FOR ANY
DIRECT, INCIDENTAL OR CONSEQUENTIAL
DAMAGES OF ANY NATURE, OR LOSSES OR
EXPENSES RESULTING FROM ANY DEFECTIVE
PRODUCT OR THE USE OF ANY PRODUCT.
Table of Contents
Introduction
Features ......................................................... 3
Notes on MiniDiscs...................................... 3
Location and Function of Controls............ 4
Setting Up
Connection ................................................... 7
Setting the Date and Time ......................... 8
Setting the Machine Information .............. 10
Basic Operations
Recording ...................................................... 12
Playback ........................................................ 16
Switching the Display ................................. 21
Naming a Disc or Index Marks .................. 22
Copying a disc from deck A to deck B...... 26
Erasing a disc ................................................ 28
Advanced Operations
Public Address ............................................. 30
Recording on an External Device .............. 31
Transcribing .................................................. 32
Additional Information
Precautions.................................................... 36
Maintenance.................................................. 36
Troubleshooting Guide ............................... 37
Error and Caution messages ...................... 38
Alarm System ............................................... 40
Specifications ................................................ 41
Index .............................................................. 42
Caution on lithium battery
Danger of explosion if battery is incorrectly replaced.
Replace only with the same or equivalent type
recommended by the manufacturer.
Dispose of used batteries according to the
manufacturer's instructions.
Certain countries may regulate disposal of the
battery used to power this product. Please consult
with your local authority.
Introduction
2
Note on power supply
Recording might stop if the power is interrupted
momentarily during recording. To prevent this,
we recommend you install a UPS
(Uninterruptible Power Supply). Contact your
dealer for further details.
Page 3
Features
Notes on MiniDiscs
The Sony MDCC-2000 is an extended-time
recording device for courtrooms, conferences and
other long meetings.
High Quality Digital Recording onto MiniDiscs
We have adopted MiniDiscs as the recording
medium, in order to obtain the very latest digital
recording quality. And MiniDiscs prevent
accidental deletion by adding any new recordings
onto the end.
Double Deck
The unit contains two decks to provide extended
recording time. Before the disc in one deck comes to
an end, the disc in the other deck automatically
starts recording. By replacing one disc at a time,
you can continue recording indefinitely.
Large LCD Display
You can check various data such as disc status, time
and date on one display.
Search Function
Being a digital device, the MDCC-2000 lets you
perform different kinds of searches, Index Search,
Time Search and Point Search. Use the jog dial or
number buttons to search quickly and precisely.
Eight Microphones Connect to the 4-Channel System
You can connect up to eight microphones, allowing
you to record the whole of a meeting in a large
conference hall, for example, on one machine. Each
disc records four channels, each channel containing
the mixed sound from two microphones.
Transcribe capability
By connecting the separately available foot control
unit, you can operate your MDCC-2000 with your
foot for transcribing. And auto backspace function
with the REVERSE TIME control makes
transcribing easy by enabling the reviewing of the
last recorded words each time listening is resumed.
Types of mini discs that can be used
We recommend that you use the supplied or
separately purchased special MiniDisc (MDW74CC)
to record using your MDCC-2000. We also
recommend that you use only 74-minute discs. 80minute discs cannot be used with the MDCC-2000.
• You cannot use the MDCC-2000 to playback a
disc recorded on a different device.
Recording time
The MDCC-2000 has two recording modes
depending on the number of channels. The
relationship between recording mode and recording
time is shown below (when using a 74-minute
MiniDisc).
Recording mode Recording time*
4ch
2ch
*For details about recording time, see page 12.
To prevent accidental erasure of the recorded material
To protect an MD recording, slide the recordprotect tab in the direction of the arrow (see
illustration below) to open the slot. To enable rerecording, close the slot.
Record protect tab
Slide in the
direction of arrow.
Max 148 minutes
(2 hours 28 minutes)
Max 296 minutes
(4 hours 56 minutes)
Public Address System
By connecting an amplifier and speakers to the
MDCC-2000, you can make a public address of the
sounds being recording through the microphone.
Security Lock
There is a key to lock the STANDBY switch of your
MDCC-2000, to protect any confidential
information on the discs inside.
On digital recording
This recorder uses the Serial Copy Management
System, which allows only first-generation digital
copies to be made from premastered software. You
can only make copies from a MD recorded on this
unit by using the analog (line out) connections.
On the MiniDisc cartridge
• When carrying or storing the MiniDisc, keep it in
its case.
• Do not break open the shutter.
• Do not place the cartridge where it will be subject
to light, extreme temperatures, moisture or dust.
• Attach the supplied MD label in the designated
space on the disc only. Stick it on firmly so that it
does not peel off. Do not stick it on any other disc
surface. If the label is not stuck on properly, you
might not be able to eject the disc.
• Wipe the disc cartridge with a dry cloth to remove
dirt.
Introduction
3
Page 4
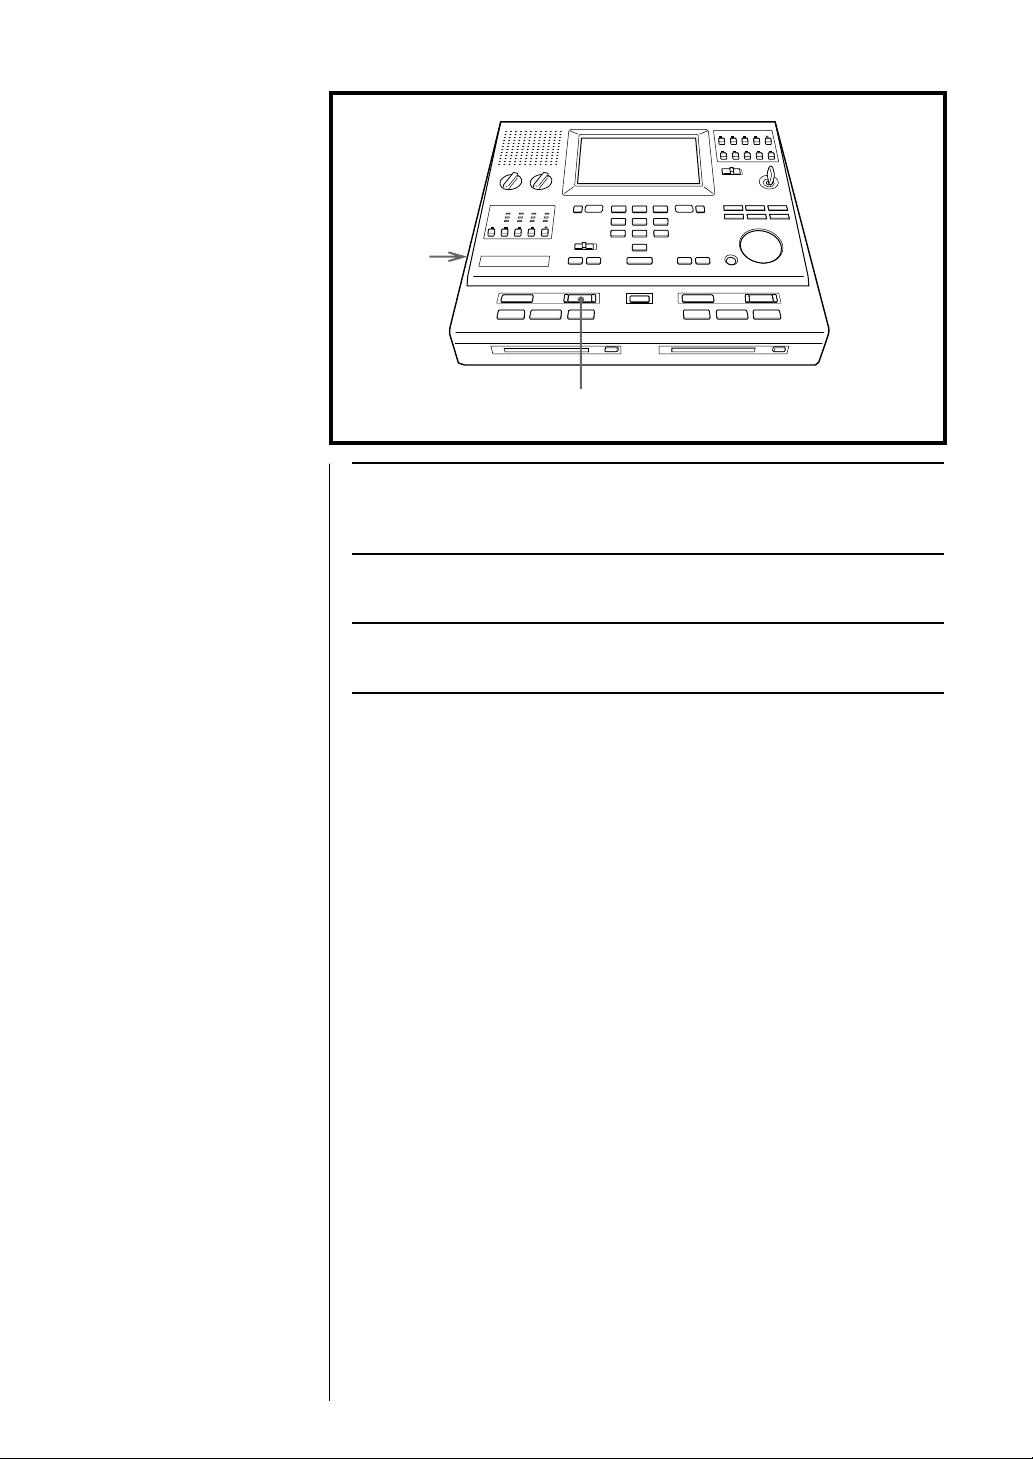
Location and Function of Controls
For details, refer to the pages indicated in ( ).
1 Built-in speaker
2 LCD CONTRAST control
Adjusts the contrast of the display.
3 MONITOR VOL control
4 DECK A button (17, 18)
5 DISPLAY MODE A button (21)
6 MONITOR select buttons (ALL/1/2/3/4)
7 SEARCH selector (17, 18)
(INDEX SEARCH/TIME SEARCH)
8 POINT SEARCH·POINT button (deck A) (20)
9 POINT SEARCH·RESET button (deck A) (20)
q; Number buttons
qa SEARCH button (17, 18)
qs INDEX button (14)
qd MD insertion slot (deck A)
qf Z EJECT button (deck A)
qg LCD display
qh LINE OUT 1 select buttons (ALL/1/2/3/4) (31)
qj LINE OUT 2 select buttons (ALL/1/2/3/4) (31)
qk PA/ADA selector (OFF/ON [ADA/PA]) (30)
Switches the output to the PA/ADA jacks on
or off.
ql STANDBY switch
w; DECK B button (17, 18)
wa DISPLAY MODE B button (21)
ws POINT SEARCH·RESET button (deck B) (20)
wd POINT SEARCH·POINT button (deck B) (20)
wf Z EJECT button (deck B)
wg MD insertion slot (deck B)
wh FUNCTION button
wj DELETE button
wk Arrow buttons
wl ENTER button
e; Jog dial
ea x STOP button (deck A)
es z REC button (deck A)
ed m REW/BS button (deck A)
ef u PLAY/PAUSE button (deck A)
eg M FF/FS button (deck A)
eh x STOP button (deck B)
ej z REC button (deck B)
ek m REW/BS button (deck B)
el u PLAY/PAUSE button (deck B)
r; M FF/FS button (deck B)
Introduction
4
Page 5
Left side
Rear
ra CONTROL UNIT connector (32)
rs TRANSCRIBE selector (33)
rd REMOTE jack (15)
rf EAR jack (16)
rg PC connector (RS-232C type)
rh DISPLAY connector
Used for connection of an external
counter unit.
rj ADA jack
Allows the unit to be connected to a
separately purchased amplifier
system.
rk PA (public address) jack (30)
rl LINE OUT jacks
t; LINE IN jacks
ta DC IN 12V jack (7)
ts Microphone connectors
(Canon XLR-3-31 type)
Introduction
5
Page 6
Location and Function of Controls (continued)
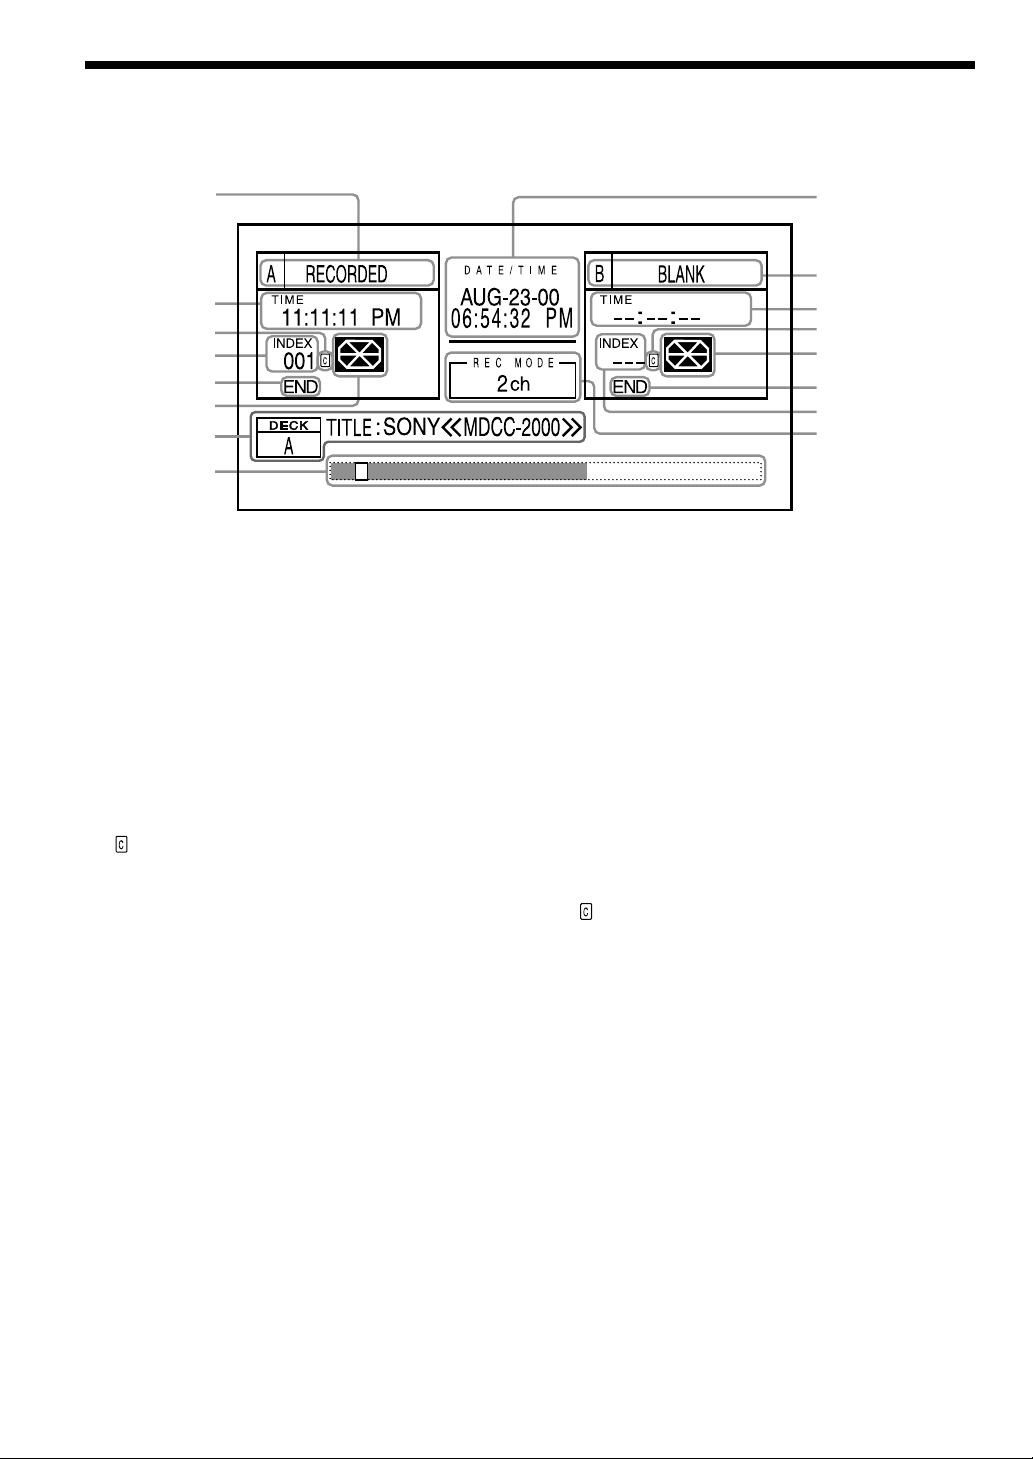
Display Window (Information screen)
1
2
3
4
5
6
7
8
1 A: display (deck A)
Indicates the disc inserted in deck A or the
status of deck A as follows:
BLANK: a blank disc
NO DISC: no disc
PB ONLY: a commercially available recorded
disc (for playback only)
PROTECTED: a protected disc (3)
RECORDED: a recorded disc
2 TIME display (deck A)
Indicates the recorded time at the current
location for each index item. It blinks during
time search. (18)
(copied) display (deck A)
3
Indicates that a disc digitally copied with the
Copy function is inserted. (26)
4 INDEX counter (deck A)
Lights up when a disc is inserted.
Blinks during an index search. (17)
5 END display (deck A)
This shows the end of the disc.
6 Disc status display (deck A)
Indicates the status of the disc with pictures.
9
0
qa
qs
qd
qf
qg
qh
7 DECK A/DECK B display
Indicates various data by characters and various
error messages. (38)
8 Disc position display
Indicates the current playback/recording location
on the disc by a white box. Already recorded
parts are indicated in black. The further it is to
the right, the closer the disc is to the end.
Depending on the condition of the disc, the black
part might not reach the far right even if the disc
is full.
9 DATE/TIME display
Indicates the current date and time.
0 B: display (deck B)
Indicates the same contents as deck A.
qa TIME display (deck B)
(copied) display (deck B)
qs
qd Disc status display (deck B)
qf END display (deck B)
qg INDEX counter (deck B)
qh REC MODE display
Indicates the recording mode (2ch/4ch) currently
selected.
Introduction
6
Page 7
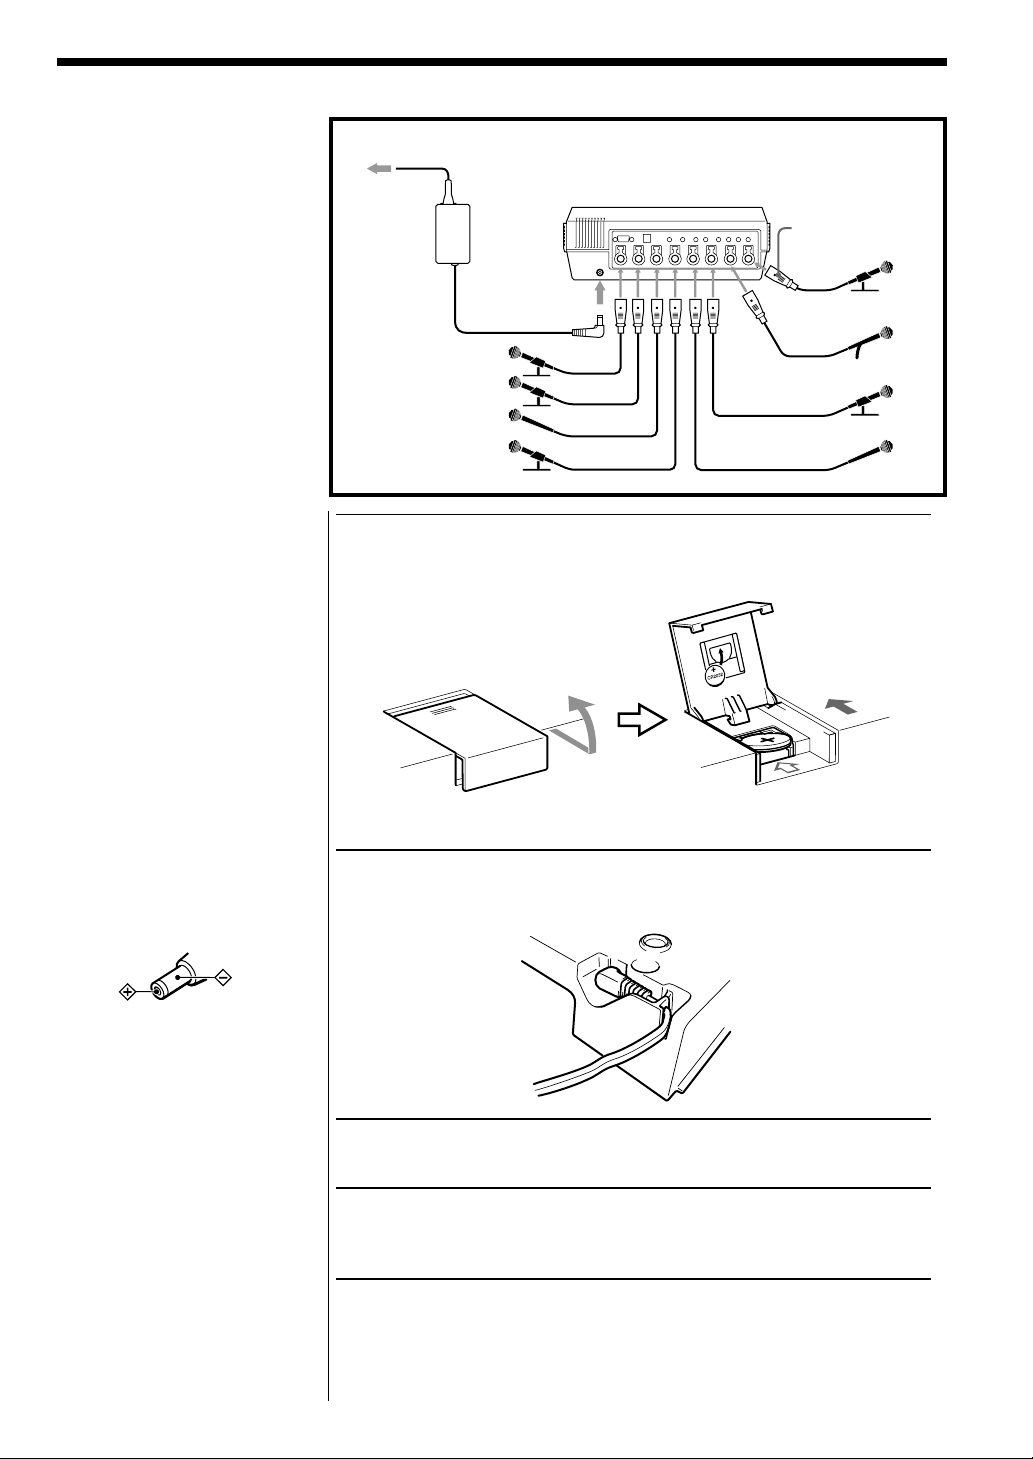
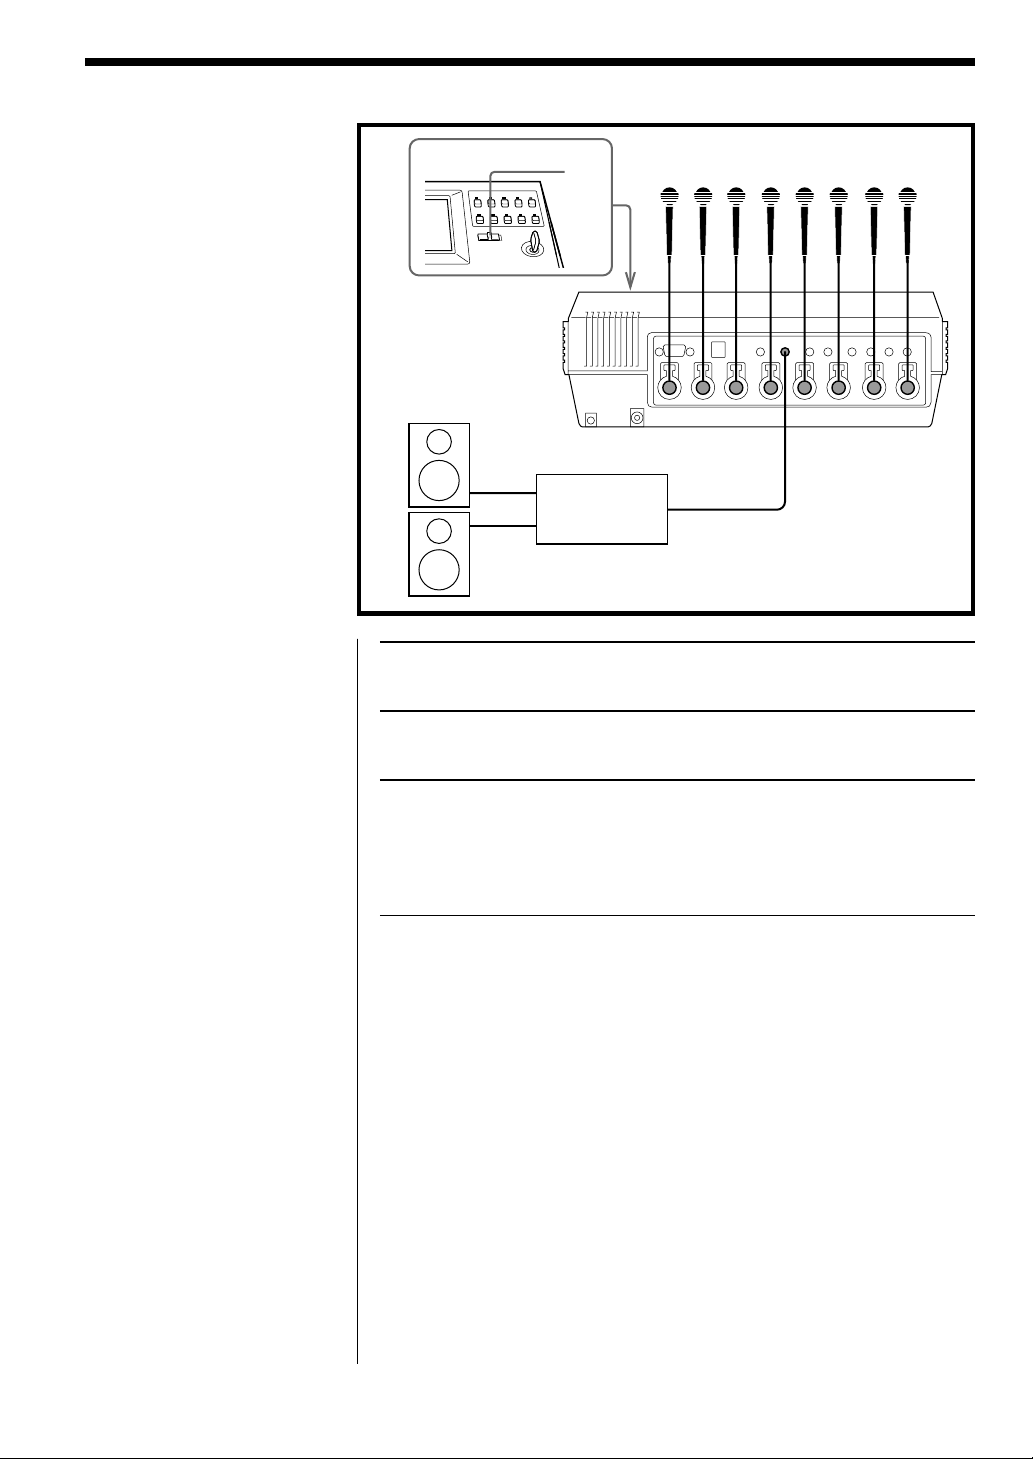
Connection
Insert a lithium battery as a
backup for the clock and
connect the microphones and
AC power adapter to the unit.
Up to eight microphones can
be connected. Insert the
microphones firmly.
Notes on lithium battery
• Keep the lithium battery out of
reach of children. Should the
battery be swallowed,
immediately consult a doctor.
• Wipe the battery with a dry cloth
to assure good contact.
• Be sure to install the battery in
the correct polarity position.
• Do not hold the battery with
metallic tweezers, as doing so
may cause a short-circuit.
• Do not break up the battery or
throw it into a fire, which might
cause it to explode. Carefully
dispose of the used battery. Insert the battery with
Note on the AC power
adaptor
Use only the AC power adaptor
supplied. Do not use any other AC
power adaptor.
to a wall outlet
AC power
AC power
adaptor
(supplied)
cord (supplied)
to DC IN 12 V
Rear
Canon XLR-3-12C
type
Microphones
1 Insert the supplied CR2032 lithium battery into the
lithium battery compartment in the bottom.
correct polarity.
2 Plug in the supplied AC power adapter to the DC IN 12V jack.
Put the cord of the AC power adaptor in the groove on the bottom of
the unit.
Porarity of the plug
Note
When recording the input from an
external device, connect it to the
LINE IN (1-4 ch) jack.
Note
The battery life may shorten
depending on the operation of the
unit.
3 Connect the microphones.
4 Connect the AC power cord to the AC power adaptor
firmly and plug in the AC power cord to a wall outlet.
When to replace the battery
The lithium battery will last for about 1 year. If the clock loses or gains,
replace the lithium battery with a new one.
Setting Up
7
Page 8
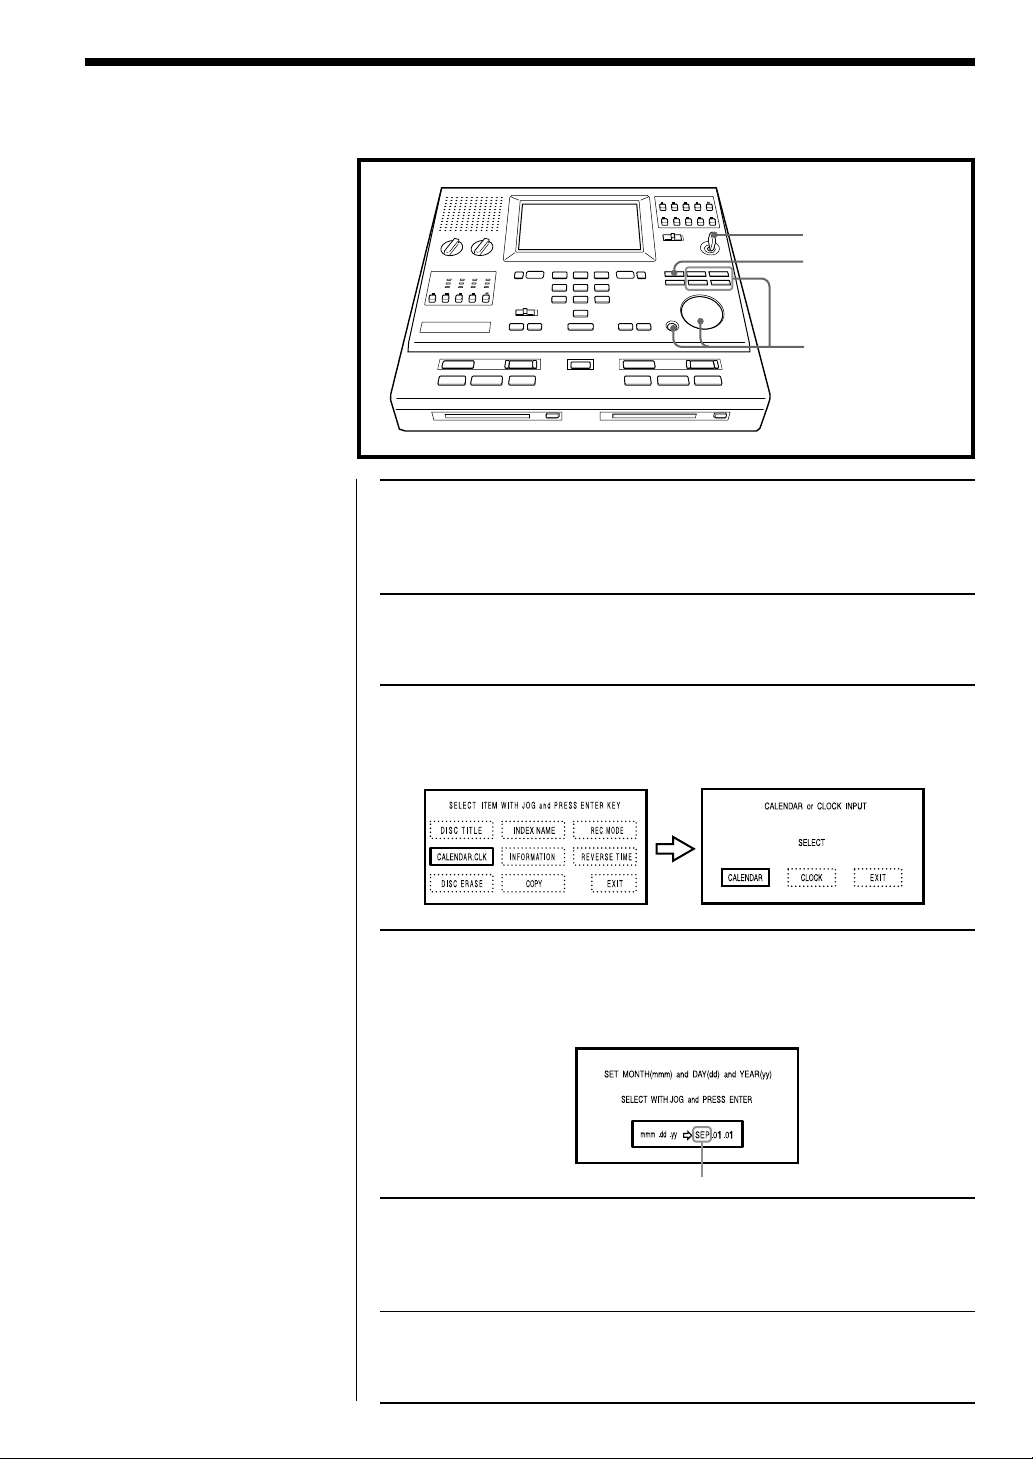
Setting the Date and Time
Setting the Date
To record the date and time
etc. on MiniDiscs when you
record, be sure to set the Date
and Time.
1 Insert the key and set it to ON.
You will see the initial screen in a few seconds.
2 Press FUNCTION.
1
2
3, 4, 5, 6
Note
You cannot use the K/k buttons
when setting the month, day and
year.
3 Select CALENDAR,CLK using the jog dial or the arrow
buttons, and press ENTER.
You will see the CALENDAR or CLOCK INPUT screen.
4 Select CALENDAR using the jog dial or the arrow buttons,
and press ENTER.
You will see the SET MONTH (mmm) and DAY (dd) and YEAR (yy)
screen with the name of a month blinking.
blink
5 Set the month using the jog dial or J/j buttons, and
press ENTER.
You will see “01” of the day blinking.
Setting Up
8
6 Set the day and the year in the same way as step 5.
When the year is set, the display will return to the information screen.
Page 9

Setting the Time
2, 3, 4
1 Carry out steps 2 and 3 of “Setting the Date”.
You will see the CALENDER or CLOCK INPUT screen.
2 Select CLOCK using the jog dial or the arrow buttons, and
press ENTER.
You will see the SET HOUR (hh) and MINUTE (mm) screen with the
hours and AM/PM blinking.
Note
You cannot use the K/k buttons
when setting the hour and minute.
blink
3 Set the hour using the jog dial or J/j buttons, and press
ENTER.
You will see the minutes blinking.
4 Set the minutes in the same way as step 3.
The display will return to the information screen and the clock will
start.
Setting Up
9
Page 10
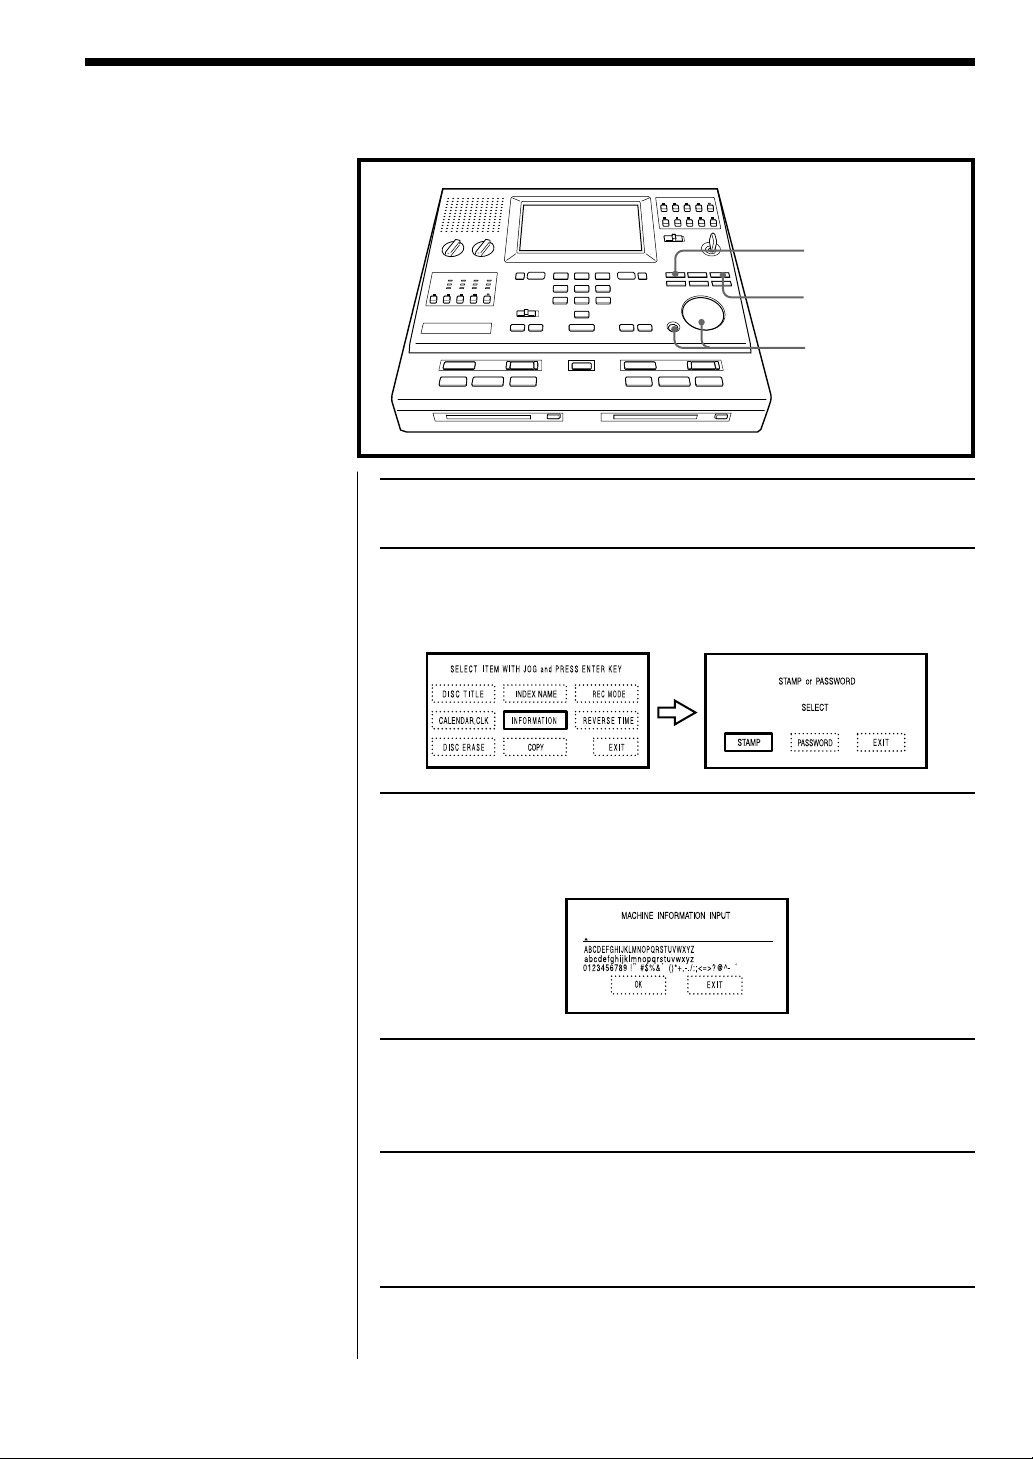
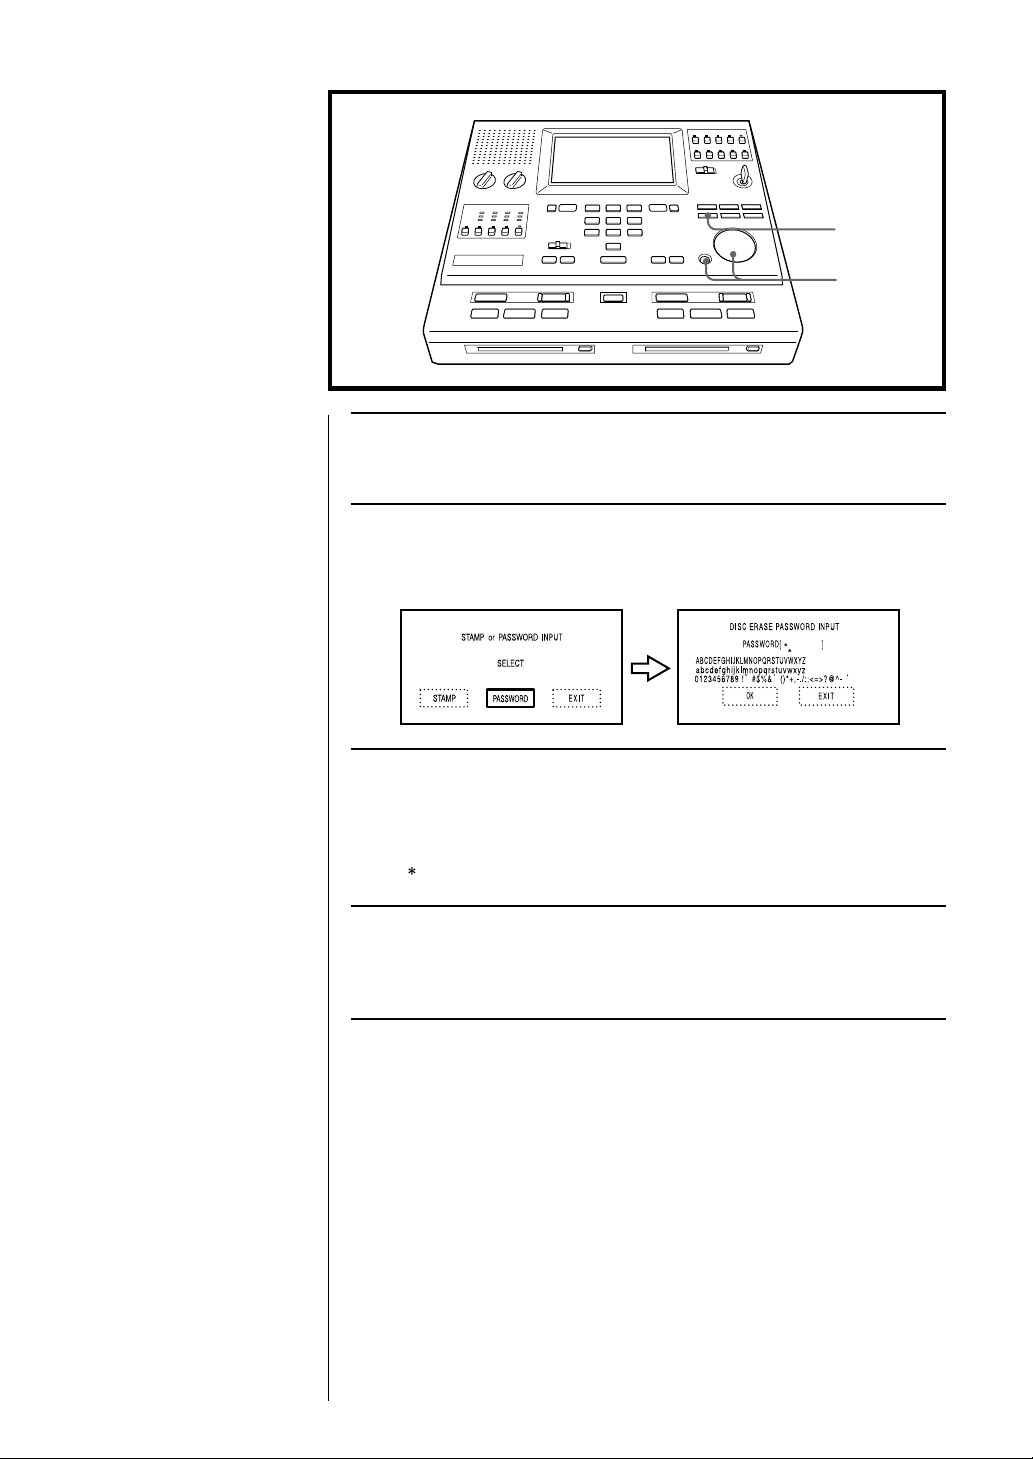
Setting the Machine Information
Setting the Stamp
The stamp is one of the items
that can be registered when
recording, and refers to the
title that appears after the disc
title. You can use it to indicate
the recording machine, for
example, by entering the
machine’s serial number.
1 Press FUNCTION.
2 Select INFORMATION using the jog dial or the arrow
buttons, and press ENTER.
You will see the STAMP or PASSWORD screen.
1
5
2, 3, 4, 5
Note
You can create a stamp of up
to 198 characters. However,
the maximum number of
characters might be less than
198 depending on the total
number of characters of DISC
TITLE and INDEX NAME (see
page 22, 24).
3 Select STAMP using the jog dial or the arrow buttons, and
press ENTER.
You will see the MACHINE INFORMATION INPUT screen.
4 Select a letter or number using the jog dial or the arrow
buttons, and press ENTER.
Repeat this step for each character you want to input.
5 Select OK using the jog dial or the arrow buttons, and
press ENTER.
The stamp is now set. When recording starts, you can see it on the
display inside the brackets << >> after the disc title.
10
Setting Up
Page 11
Set a password that will be
entered when you want to
delete recordings from a disc.
This password will prevent
you from accidentally deleting.
Setting the Password
DELETE
2, 3
1 Carry out steps 1 and 2 of “Setting the Stamp”.
You will see the STAMP or PASSWORD screen.
2 Select PASSWORD using the jog dial or the arrow buttons,
and press ENTER.
You will see the DISC ERASE PASSWORD INPUT screen.
Notes
• You can create a password
of up to 8 characters.
• Pressing DELETE while
setting the password will
delete all the characters.
3 Select a letter or number using the jog dial or the arrow
buttons, and press ENTER.
Repeat this step for each character you want to input.
Each letter and/or number of the password will be displayed as a
“ ”.
4 Select OK using the jog dial or the arrow buttons, and
press ENTER.
The password is now set.
Setting Up
11
Page 12
Recording
Read Connection (page 7)
carefully before recording.
Select the recording mode
before you record.
About recording time
This device normally records
onto the disc in minimum
units of about 8 seconds in 2ch
mode (or 4 seconds in 4ch
mode). When recording is
stopped, the entire 8 seconds
(or 4 seconds) of the last unit of
recording is always used even
if the actual recording is
shorter. Likewise, when
recording is restarted after the
stop, recording starts from the
next space. This is to avoid
accidental erasing of the
previous track whenever a
new recording is started.
Therefore the maximum
potential recording time
actually decreases by up to 8
seconds (or 4 seconds) every
time a recording is stopped.
The condition of the disc can
also prevent recording to the
end of the maximum potential
recording time.
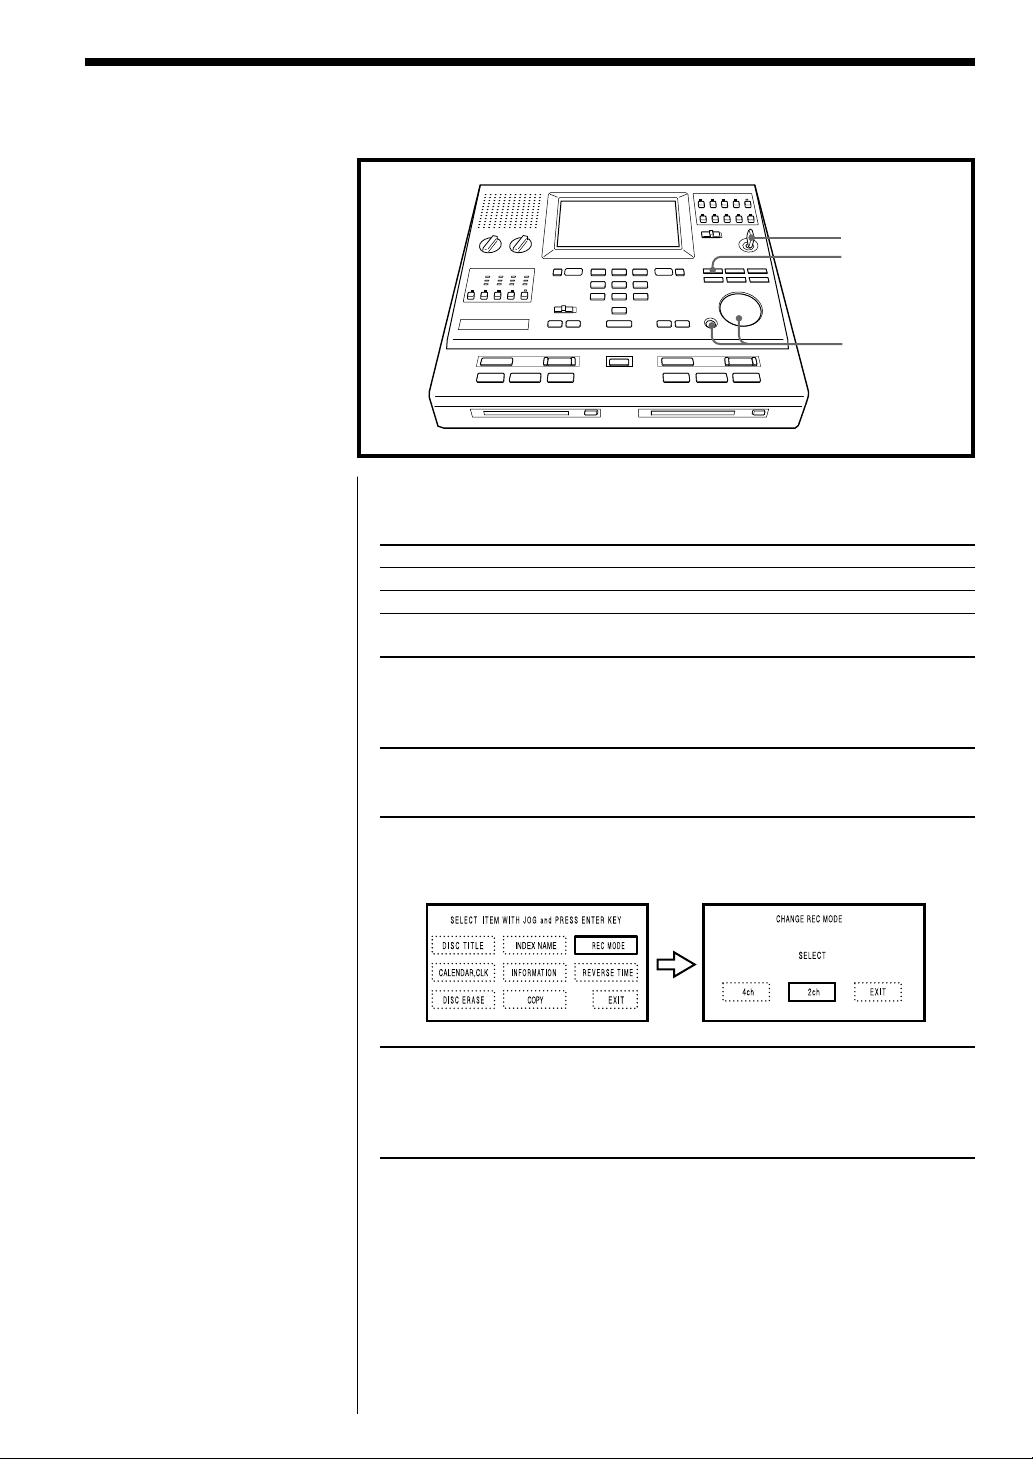
Setting the Recording Mode
1
2
3, 4
The relationship between the recording mode, recording time and channel
number is shown below.
(When using a 74-minute disc)
Recording mode Recording time Maximum channel number
2ch Max 296 minutes (4 hours 56 minutes) 2
4ch Max 148 minutes (2 hours 28 minutes) 4
1 Insert the key and set it to ON.
You will see the initial screen in a few seconds.
2 Press FUNCTION.
3 Select REC MODE, and press ENTER.
You will see the CHANGE REC MODE screen.
4 Select either 2ch or 4ch, and press ENTER.
The display will return to the information screen.
You will see the selected recording mode (2ch or 4ch).
Basic Operations
12
Page 13
This unit can record
continuously by using two
decks, deck A and deck B,
alternately.
Check and make sure that the
recording operation is not
malfunctioning prior to
recording important materials.
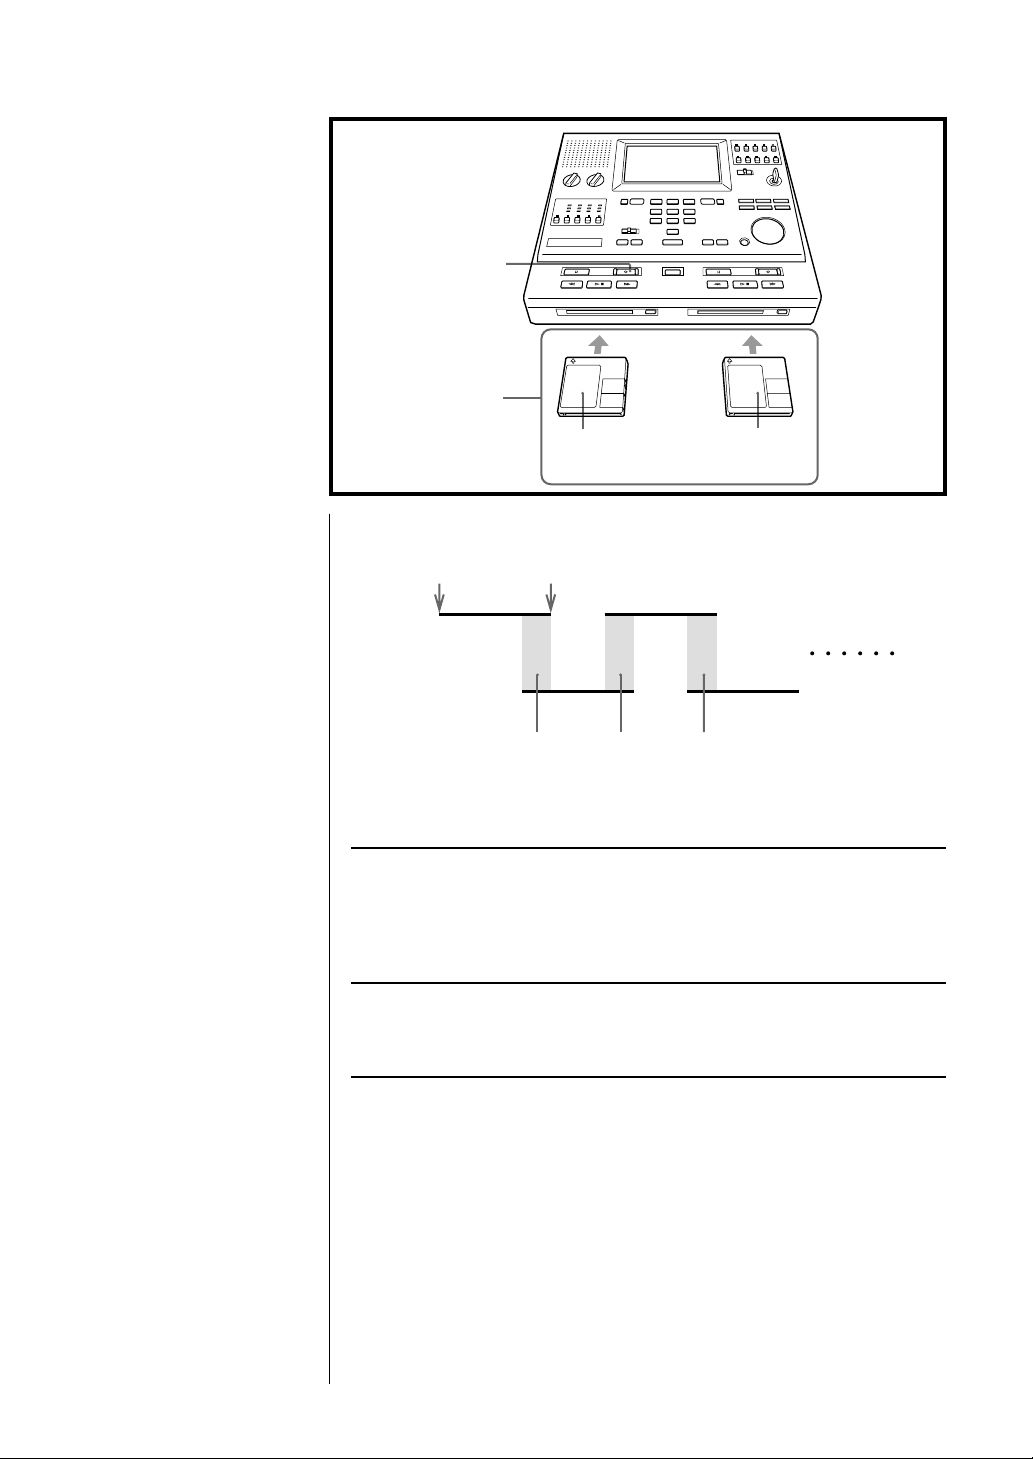
Recording Continuously Using Both Decks
– Continuous Recording
2
1
Notes
• On this unit the new
recording starts after the
previously recorded data.
You cannot overwrite onto
the previously recorded
data.
• For continuous recording,
always use blank discs
except for the first one. You
can only use a recorded disc
when you insert the first disc
to start continuous
recording.
• When not continuous
recording, insert a disc into
either deck and start
recording.
• When you start recording, a
new index mark is created at
the beginning. You can add
up to 200 index marks (or
less than 200 depending on
the recording status of the
disc). If a recorded disc has
200 index marks, the new
recording cannot be carried
out even if the disc has some
unrecorded space left.
A recorded disc
A blank disc
There is an overlap of a few seconds when the deck switch over, which
means you can record indefinitely without any pause.
START
Deck A
Deck B
Here are the steps when carrying out continuous recording from deck A to
deck B. You can also perform continuous recording successively from
deck B to deck A.
STOP
Overlapped recording period
A blank disc only
1 Insert MiniDiscs into decks A and B.
Be sure to insert a blank disc into deck B. Recording will not begin if
you put a previously recorded disc, commercially available prerecorded disc or protected disc into deck B.
2 Press zREC of deck A.
The lamp on the REC button lights up, and Deck A starts recording.
A few seconds before deck A finishes recording
Deck B starts recording automatically.
Once deck A has finished recording, the recorded disc inside is
automatically ejected.
To stop recording
Press xSTOP and zREC simultaneously.
For continuous recording of three or more discs successively
Replace the MiniDisc in one deck with a blank disc while recording with
the other deck. Endless recording can be done in this way.
Basic Operations
13
Page 14
Recording (continued)
Index mark (track number) is
automatically added when
- you start recording
- you restart recording after
pausing
You can also add index marks
manually at any location on
the disc while recording.
Adding index marks allows
you to jump to those locations
during playback or stop.
Adding Index Marks
INDEX
Notes
• You can add up to 200 index
marks.
• You can only add index
marks during recording.
• If the number of index
marks has reached 200 (or
less than 200 depending on
the recording status of the
disc) during recording, you
cannot add more index
marks. Recording will
continue, however, until you
press the stop button or the
disc ends.
• The maximum number of
index marks that can be
added might be less than
200, depending on the
condition of the disc.
To add an index mark
Press INDEX during recording at the location where you want to insert a
index mark. The index counter will count upwards.
Basic Operations
14
Page 15
Connecting the separately
purchased remote control unit
allows you to operate your
MDCC-2000 remotely. The
remote operations you can
perform are pausing during
recording and restarting
recording.
Notes
• The remote control unit can
only be used during
recording. It does not work
when not recording.
• One index mark is added
each time you restart
recording after pausing.
• Once the number of index
marks has reached 200 (or
less than 200 depending on
the recording status of the
disc), the remote control unit
does not work.The MDCC2000 just continues to record.
• The REC indicator on the
REC button flashes while
recording is being paused.
Using the Remote Control Unit (not supplied)
1
2
1 Connect the remote control unit to the REMOTE jack on
the left side of the MDCC-2000.
2 Press REC on the MDCC-2000 to start recording.
3 Pause and restart recording using the remote control unit.
Basic Operations
15
Page 16

Playback
You can play only the
MiniDisc recorded on
MDCC-2000. You can select
only the channel you want to
listen to and play it back.
Playing a Recorded Disc
MONITOR VOL
3
EAR
4
2
Here are the steps when playing a disc with deck A.
You can use deck B by following the same steps.
1 Insert the key and set it to ON.
1
Notes
• Press the MONITOR select
button firmly.
• You can select ALL to
playback the mixed sounds
of all the channels.
• When in 2ch mode, you
cannot select 3ch or 4ch on
the MONITOR select button
and there is no sound
output.
2 Insert the recorded disc into deck A.
3 Select one channel you want to listen to.
When a channel is selected, the indicator above the selected button
will light up.
4 Press u PLAY/PAUSE.
Playback will begin.
To pause playback
Press u PLAY/PAUSE during playback.
To restart playback, press u PLAY/PAUSE again.
To stop playback
Press x STOP.
To listen privately
Connect the earphone to the EAR jack. There will be no sound from the
speakers, only from the earphone.
To adjust the volume
Adjust the volume using the MONITOR VOL control.
To go forward/backwards
To: During playback: During stop:
go forward press and hold MFF/FS press MFF/FS
go backwards press and hold mREW/BS press mREW/BS
Basic Operations
16
Page 17

You can easily jump to the
recorded area you want to hear
by entering the index mark
number that is memorized
automatically or manually.
Searching by index mark (Index Search)
3
4
2
1
Here are the steps when playing a disc with deck A.
You can use deck B by following the same steps.
1 Insert the disc to be searched into deck A.
2 Set the SEARCH selector to INDEX SEARCH.
3 Press DECK A.
“000” will start to blink.
5
Tip
You can also enter the index
number using the jog dial or
the J/j buttons.
Notes
If you try to search for an
index number that does not
exist, the recorder searches for
the final index number.
blink
4 Enter the index number you are searching for.
Enter this number while “000” is blinking on the display.
5 Press SEARCH.
After searching for an index number entered during playback, the
unit will continue to playback.
After searching for an index number entered during stopping, the
unit will stop.
Basic Operations
17
Page 18

Playback (continued)
You can easily search for
recorded parts you want to
hear by entering the recording
time that is memorized on the
disc.
Searching by time (Time Search)
3
4
2
1
Here are the steps when playing a disc with deck A.
You can use deck B by following the same steps.
1 Insert the disc to be searched into deck A.
2 Set the SEARCH selector to TIME SEARCH.
3 Press DECK A.
“00:00:00” will start to blink.
5
Basic Operations
18
blink
4 Enter the time you are searching for.
Enter this time while “00:00:00” is blinking on the display.
eg. To enter the time “1:34:56”=, enter “0” “1” “3” “4” “5” “6” in that
order.
5 Press SEARCH.
After searching for the time entered during playback, the unit will
continue to playback.
After searching for the time entered during stopping, the unit will
stop.
Page 19

If more than one result is obtained from a search
When you perform a time search on a disc onto which an appended
recording has been made, more than one result might be obtained.
3/31/01
11:00:00 AM
INDEX 001
start time
3/31/01
~
2:00:00 PM
3/31/01
11:00:00 PM
INDEX 002
start time
4/1/01
~
2:00:00 AM
4/3/01
11:00:00 AM
~
INDEX 003
start time
In the above example, a search for a time 12:34:56 would find that time in
INDEX 1, INDEX 2 and INDEX 3.
INDEX 001: March 31st, 2001 12:34:56 PM
INDEX 002: April 1st, 2001 12:34:56 AM
INDEX 003: April 3rd, 2001 12:34:56 PM
In this case, you will see the index numbers and index start times in the
index order, as shown below.
Note
If there are more than 6 index
marks, use the jog dial or J/j
buttons to scroll the screen.
Move the B mark to the left of the index number to select the index
number you want using the jog dial or J/j buttons, and press ENTER.
Basic Operations
19
Page 20

Playback (continued)
Point search is the function
which allows you to mark a
point in any location during
playback or stop and then
search for that location
later.You can mark only one
point on each of decks A and B.
Searching by Marking a Specific Point
(Point Search)
POINT (deck A)
RESET (deck A)
To mark a point
Press POINT at the location you want to mark whether stopped or during
playback.
MARKING POINT will light up for a few seconds.
mark appears at the current position on the Disc position display.
A
POINT
(deck B)
RESET
(deck B)
Note
A "point search" is only
possible when the
on the Disc position display
(see page 6).
Note
Pressing RESET or ejecting the
disc by pressing EJECT clears
the point marked at a location.
The point mark cannot be
cleared by switching to
STANDBY.
mark is
To search for a point
Press POINT whether stopped or during playback.
You will see
When the search is complete;
- the unit will start to playback from the location searched if the search
was made during stopping.
- the unit will continue to playback from the location searched if the search
was made during playback.
To cancel a point
Press RESET.
POINT MARK RESET will light up for a few seconds and the point
will be canceled.
SEARCH MODE light up.
Basic Operations
20
Page 21

Switching the Display
You can see the various data
entered on a disc by pressing
the DISPLAY MODE button.
DISPLAY MODE A
(deck A)
Depending on the disc status, the displayed item changes every time you
press DISPLAY MODE as follows.
This display changes.
DISPLAY MODE B
(deck B)
Notes
• You cannot switch the
display in the following
cases.
- There is no disc inserted
- A blank disc is inserted
- An error message etc. is
displayed
In the case of the following
messages, however, you can
perform the operation below
to remove the message and
switch the display:
"CANNOT PAUSE REC!!"
Stop using the remote
control to pause.
"CANNOT TRANSFER!!"
Keep the DISPLAY MODE
button on the recording deck
pressed down.
• When you press the
DISPLAY MODE button on
the other deck, the deck
indicator blinks.
m
DISC TITLE (disc title)
m
INDEX NAME (index name)
m
SEP-17-01 (date at top of index)
m
REC TIME USED* (linear recorded time counter)
m
REC TIME REMAIN* (remaining recording time counter)
m
PLAY TIME USED** (linear playback time counter)
m
PLAY TIME REMAIN** (remaining playback time counter)
m
TOTAL INDEX (the number of the total index marks)
* Not displayed during playback.
** Not displayed during recording.
Basic Operations
21
Page 22

Naming a Disc or Index Marks
Disc Title
The disc title can be up to 203
characters. (This maximum
number of characters may vary
depending on the number of
characters of the other index
names and disc title
memorized on that disc.)
You can write a title onto a
blank disc. However, this title
will not appear on the display
(see page 21).
1
Here are the steps when using deck A.
You can use deck B by following the same steps.
1 Insert the disc to be named into deck A.
2
6
3, 4, 5
2 Press FUNCTION.
3 Select DISC TITLE and press ENTER.
You will see the DISC TITLE INPUT screen.
4 Select DECK A and press ENTER.
The DISC TITLE INPUT screen will appear.
Basic Operations
22
Page 23

Note
To change the title, use J/j
so that the v mark above the
bar on the DISC TITLE INPUT
screen is blinking. Next, use
K/k to move the v mark
below the character you want
to change, press the DELETE
button, and enter a new
character.
5 Select the first character you want to enter, and press
ENTER.
Repeat this step for the remaining characters of the disc title.
6 Select OK and press ENTER.
You will see SYSTEM PREPARING light up for a few seconds,
indicating that the title is being written onto the disc.
Basic Operations
23
Page 24

Naming a Disc or Index Marks (continuued)
Index Name
You can enter an index name
of up to 203 characters. (This
maximum number of
characters may vary
depending on the number of
characters of the other index
names and disc title
memorized on that disc.)
1
Here are the steps when using deck A.
You can use deck B by following the same steps.
1 Insert the disc on which you want to add an index name
into deck A.
2
7
3, 4, 5, 6
2 Press FUNCTION.
3 Select INDEX NAME and press ENTER.
You will see the INDEX NAME INPUT selection screen.
4 Select DECK A and press ENTER.
The index table will appear.
Basic Operations
24
Page 25

Note
To change the name, use J/j
so that the v mark above the
bar on the INDEX NAME
INPUT screen is blinking.
Next, use K/k to move the
v mark below the character
you want to change, press the
DELETE button, and enter a
new character.
5 Move the B mark to the left of the index number to be
named, and press ENTER.
You will see the INDEX NAME INPUT screen.
6 Select the first character of the index name and press
ENTER.
Repeat this step for the remaining characters of the index name.
7 Select OK and press ENTER.
You will see SYSTEM PREPARING will light up in the display for a
few seconds before the display returns to the index table screen.
Basic Operations
25
Page 26
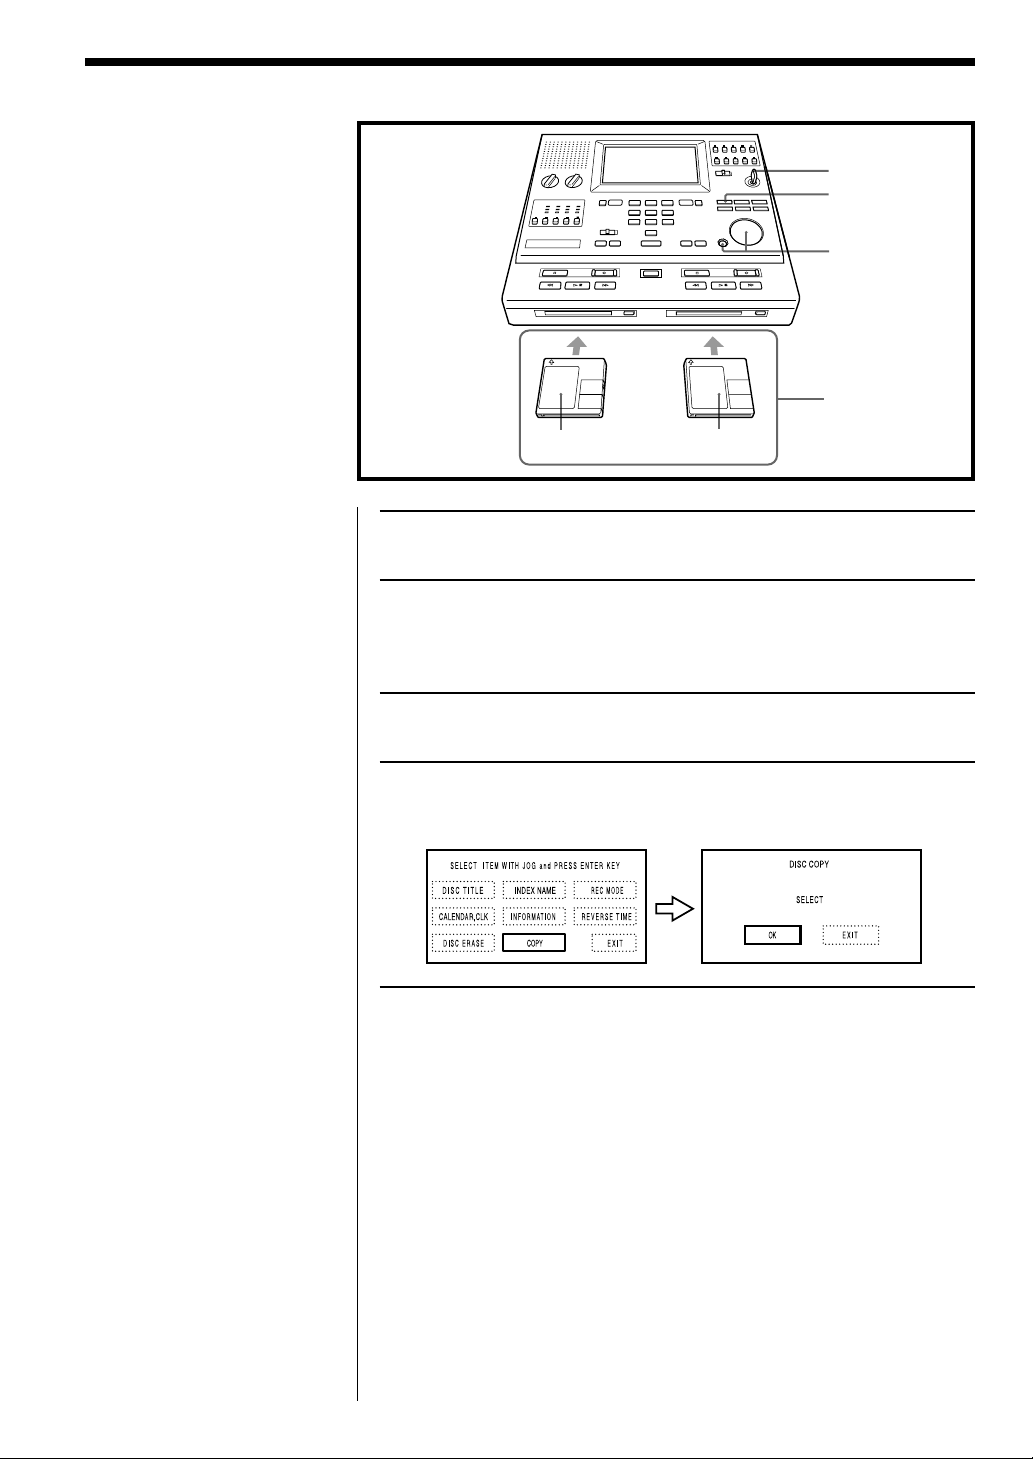
Copying a disc from Deck A to Deck B
You can use the two decks to
copy a recorded disc onto
another disc. One whole disc is
copied at a time.
Copying can only be carried
out from deck A to deck B.
You cannot copy from deck B
to deck A.
1
3
4, 5
2
Note
Always copy from a disc
recorded on an MDCC-2000,
and always copy onto a blank
disc. The unit cannot carry out
copying when any of the
messages below is shown on
the display.
Deck A:
NO DISC
BLANK DISC
NOT ORIGINAL
DISC FORMAT PRBLM
Deck B:
NO DISC
PROTECTED DISC
RECORDED DISC
DIFF. RECORD LENGTH
A recorded disc
A blank disc
1 Insert the key and set it to ON.
2 Insert the disc from which you will copy (a previously
recorded disc) into deck A and the disc onto which you
will copy (a blank disc) into deck B.
3 Press FUNCTION.
4 Select COPY and press ENTER.
You will see the DISC COPY screen.
See page 37 on the details of
the messages.
Basic Operations
26
Page 27

Notes
• You cannot hear the sound
during copying.
• You cannot use the new
copy (marked ) as an
original from which to make
a further new copy (See page
3, "On digital recording" for
SCMS.).
Notes
• Copying of a disc cannot be
restarted once it has been
interrupted.
• If copying is interrupted;
- Copying is carried out up
to the interrupted point.
- Disc B is ejected at the
interrupted point.
5 Select OK and press ENTER.
Copying will start.
When copying is complete, you will see COPY COMPLETED
blinking on the display for a few seconds. The disc is ejected from deck B
and the unit returns to stop status.
When you next insert the copied disc into the deck, a mark will appear
on the right of the index number of the copied disc.
lit
To interrupt copying
1 Press FUNCTION during disc copying.
You will see the DISC COPY STOP screen.
2 Select OK and press ENTER.
Copying will stop.
Basic Operations
27
Page 28
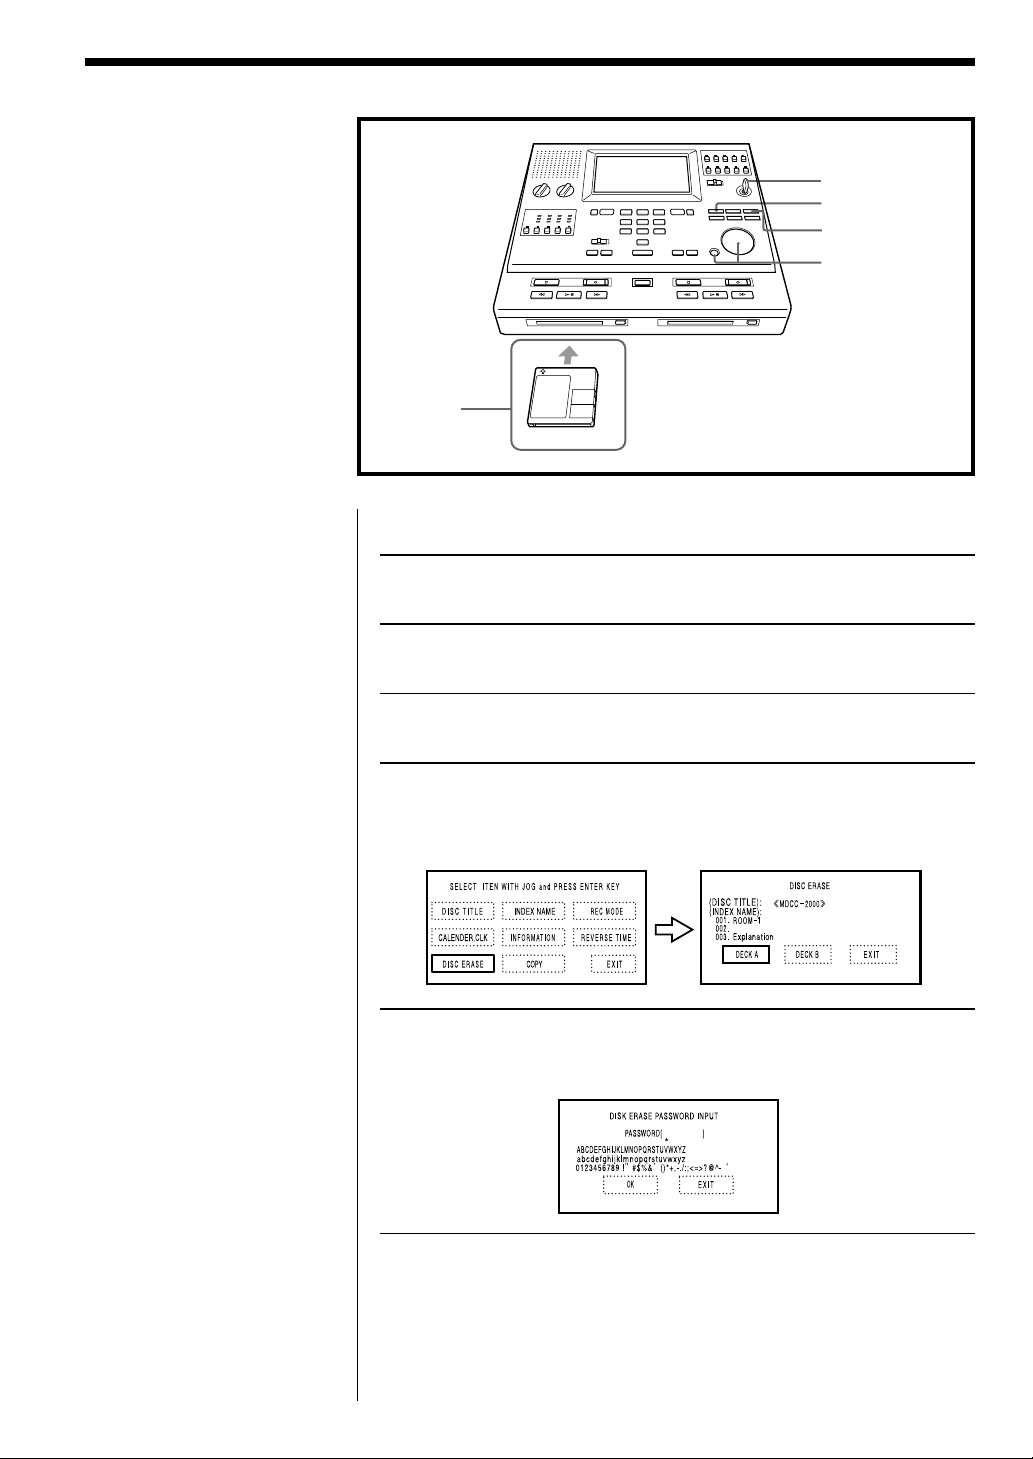
Erasing a Disc
You can erase the recorded
contents of a disc. One whole
disc is erased at a time.
1
3
7
4, 5, 6, 7
2
Here are the steps when using deck A.
You can use deck B by following the same steps.
1 Insert the key and set it to ON.
2 Insert the disc to be erased into deck A.
Note
Up to 3 index names can be
displayed on the DISC ERASE
screen, even if more index
names have been entered onto
the disc.
3 Press FUNCTION.
4 Select DISC ERASE and press ENTER.
You will see the DISC ERASE screen. If the disc title and index
names have been entered, they will be displayed.
5 Select DECK A and press ENTER.
You will see the DISC ERASE PASSWORD INPUT screen.
Basic Operations
28
Page 29

6 Select the first password character and press ENTER.
Repeat the operation for the other characters of the password. Each
letter and/or number of the password will be displayed as a “
7 Select OK and press ENTER.
TOC EDIT ” will blink to indicate that the disc is being erased.
“
When erasing is complete, you will see “ BLANK DISC <REMAIN
XX:XX:XX>
returns to stop status.
” on the display for about a few seconds before the unit
”.
Basic Operations
29
Page 30
Public Address
You can make a public address
of the sound through the
microphones or other external
devices. If microphones and
other devices are connected at
the same time, sound will be
mixed and output through the
external speakers.
Front Panel
1
Speaker system
(not supplied)
Amplifier
(PA system)
(not supplied)
1 Set the PA/ADA selector to ON [ADA/PA].
Microphones
(not supplied)
to PA jack
2 Switch on the power of the PA system.
3 Public address while recording: See Recording (page 12)
for operation.
Public address of playback: See Playback (page 16) for
operation.
To adjust the volume and tone during public address
Use the volume and tone controls of the PA system.
To listen in another location while recording
You can use the public address function to listen to the sound through a
microphone in a conference room, for example, in another location.
Public address of sound through a microphone
You can make a public address of the sound through a microphone using
the PA system even when the disc has stopped.
Advanced Operations
30
Page 31

Recording on an External Device
You can connect an external
device such as a tape recorder
and record the contents of a
disc, or the input of a
microphone or other
equipment on it.
1, 3
An External Device
4
Here is how to record the contents of a mini disc in deck A onto an
external device connected to the LINE OUT jack A.
You can use deck B by following the same steps.
to LINE OUT A or B
2
Note
When in 2ch mode, you cannot
select 3ch or 4ch on the LINE
OUT select buttons and there
is no sound output.
1 Connect the external device onto which you want to
record to the LINE OUT jack A.
2 Press one of the LINE OUT A select buttons firmly to select
the output channels to be output.
The indicator above the selected button will light up.
3 Start recording on the external device.
4 Insert the previously recorded disc into deck A and press
u PLAY/PAUSE.
Advanced Operations
31
Page 32

Transcribing
With the separately available
foot control unit, you can
easily transcribe using the auto
backspace function.
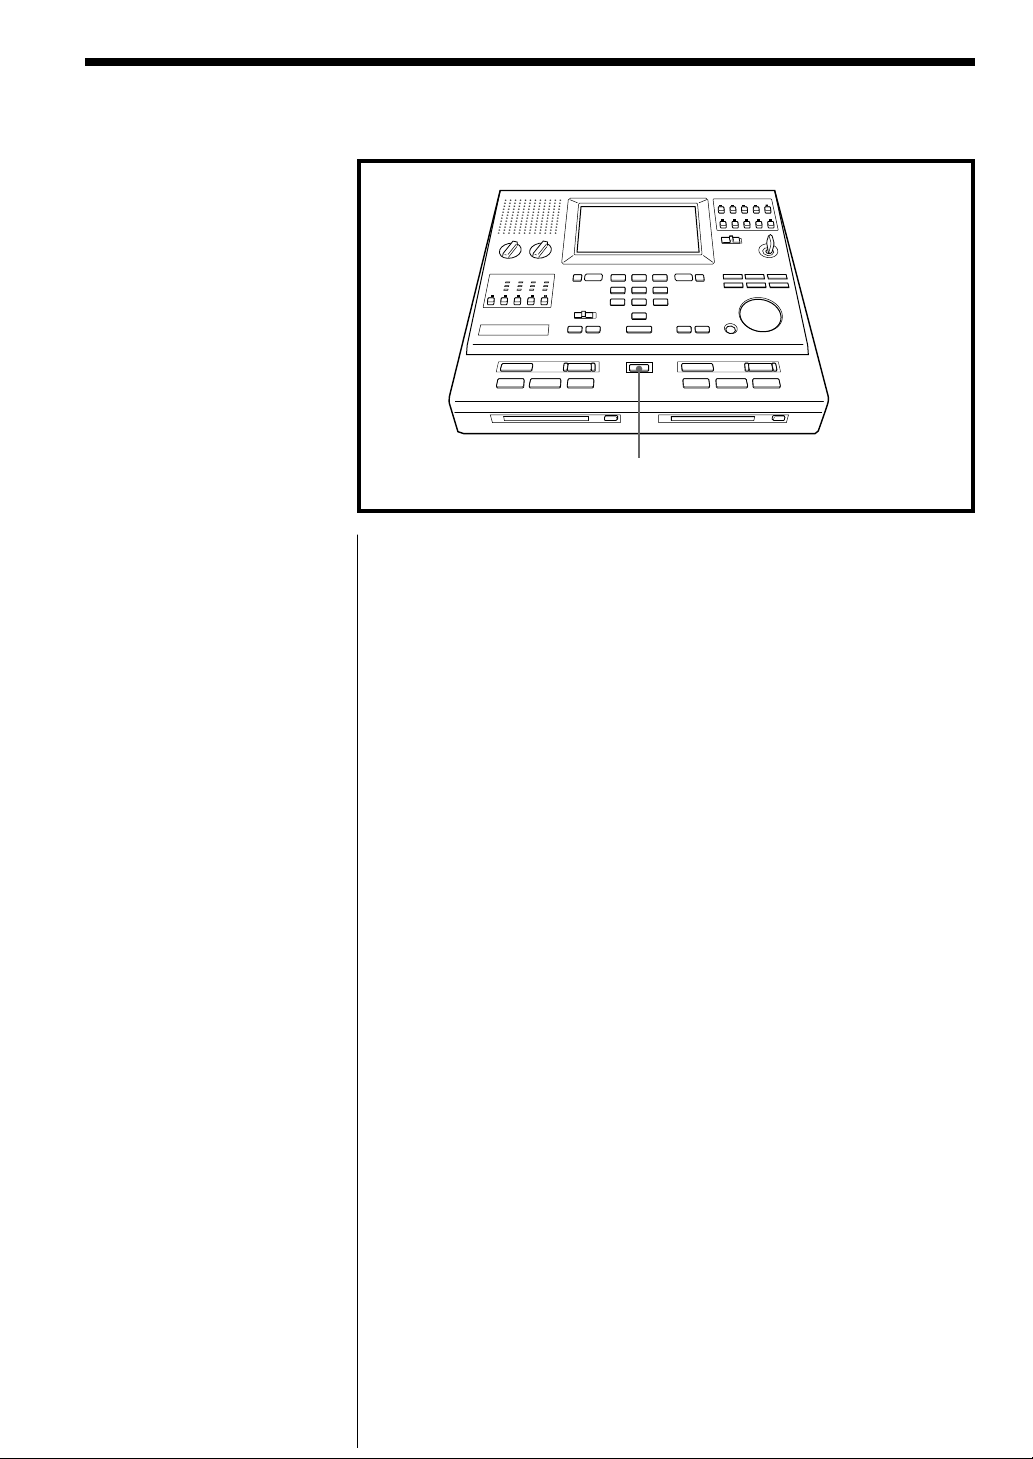
Connecting the foot control unit (not supplied)
to CONTROL UNIT
Foot control unit
(not supplied)
Advanced Operations
32
Page 33

You can use the foot control
unit to playback, backward or
fast-forward easily. Keep your
foot pressed down to perform
each operation and take your
foot off to stop operation.
Operation
Fast forward
4
2
5
3
Backward Listen
Foot control unit
Here are the steps when playing a disc with deck A.
You can use deck B by following the same steps.
1 Insert the key and set it to ON.
1
Notes
• The foot control unit cannot
be used during recording.
• When in 2ch mode, you
cannot select 3ch or 4ch on
the MONITOR select button
and there is no sound
output.
2 Slide TRANSCRIBE to A (deck A).
3 Insert the recorded disc into the deck A.
4 Select the playback channel using the MONITOR select
button.
5 Step on the right side of the pedal of the foot control unit
to listen continuously to the recorded sound.
You can keep listening as long as you keep the pedal pressed down.
To stop the disc
Release the pedal.
To backward the disc
Step on the left side of the pedal and keep it pressed down.
To fast forward the disc
Step on the center top of the pedal and keep it pressed down.
Advanced Operations
33
Page 34

Transcribing (continued)
Using the Auto Backspace function
If you use the foot control unit,
you can use the auto backspace
function. This function enables
you to confirm the last few
words each time you resume
playback by re-starting
playback from just before the
point where you stopped.
1
2, 3, 4
Note
Even if the reverse time is set,
the recorder might not
backward by the set amount in
the following cases because
there is no time to save onto
the memory.
- When you insert a disc and
first start playback.
- When you playback after
fast-forward or backward.
- When you playback after a
search operation.
- When you playback
immediately after REC.
- Immediately after
exchanging decks.
What is the Auto Backspace Function?
When you start playback, the unit stores recorded data in the memory
(maximum of about 10 seconds) and plays it back. If you set the reverse
time, you can stop playback by releasing the pedal once and then step on
the pedal again (Listen) to backward by the set time in the memory and
start playback again. The reverse time is factory-set to 0 seconds. You can
set it within the range about 0 to 10 seconds.
Example 1: The reverse time is set to 0.0
1Playback
approx.10 sec
in memory
recorded
contents
3Next playback
will start from
this point.
Example 2: The reverse time is set to 5.0
1Playback
approx.10 sec
in memory
2Release the pedel of the
foot control unit here.
4Playback
2Release the pedel of the
foot control unit here.
Advanced Operations
34
recorded
contents
4Playback
3Next playback
will start from
this point.
Page 35

Setting the Reverse Time
1 Press FUNCTION.
2 Select REVERSE TIME and press ENTER.
You will see the SELECT WITH JOG and SET screen.
3 Set the reverse time using the jog dial or J/j buttons.
You can set a reverse time from 0.0 to 10.0 (about 0 to 10 seconds).
4 Select OK using the K/k buttons and press ENTER.
The reverse time is now set.
Advanced Operations
35
Page 36

Precautions
Maintenance
On safety
• Heat may build up in the unit if it is used for an
extended period of time. In this case, leave the unit
turned off until it cools down.
• Should any solid object or liquid fall into the unit,
unplug the unit and have it checked by qualified
personnel before operating it any further.
On power sources
• Operate the unit only on 12 V DC.
• Use the AC power adaptor and the AC power cord
supplied with this unit. Do not use any other AC
power adaptor or AC power cord as it may cause
malfunction.
• Unplug the AC power cord from the wall outlet
when it will not be used of an extended period of
time. To disconnect the cord, pull it out by
grasping the plug. Never pull it by the cord.
• The AC power adaptor which has been supplied
becomes hot if it is connected to an AC outlet for a
long period of time. But, this will not cause any
trouble.
On placement
• Do not install the unit in a location near heat
sources, such as radiators or airducts, or in a place
subject to direct sunlight, excessive dust,
mechanical vibration, or shock.
• Allow adequate air circulation to prevent internal
heat build-up. Do not place the unit near materials
(curtains, draperies) that may block the ventilation
holes.
Cleaning the cabinet
Clean the cabinet with a soft cloth slightly moistened
with a mild detergent solution. Never use strong
solvents, such as thinner or benzine, since they may
damage the finish.
If you have any question or problem concerning
your unit that is not covered in this manual, please
consult the Sony dealer from whom you purchased
the unit.
Additional Information
36
Page 37

Troubleshooting Guide
Should any problem persist after you have made
these checks, consult your nearest Sony dealer.
The clock gains/loses.
The wrong recording date is stamped.
• The clock is not set.
mSet the clock (page 8).
• The lithium battery for the clock is weak.
mReplace with a new battery and reset the time
(page 9).
A deck does not start recording when the
other deck reaches the pre-end of disc. In
other words, the continuous recording
cannot be performed.
• No disc is inserted.
• A recorded disc is inserted.
• A protect disc is inserted.
The recorder does not work or works poorly.
• Connect the AC power cord to a wall outlet.
• Set the STANDBY switch to ON.
• Audio sources may not be securely connected.
mDisconnect the audio sources once and connect
them again (page 7).
• Moisture has condensed inside the recorder.
mTake the MD out and leave the recorder in a
warm place for several hours until the
moisture evaporates.
• You pressed a button during TOC READING.
mWait until the Disc status display stops flashing
and "TOC READING" disappears.
• The AC power adaptor/AC power cord was
unplugged during recording or a power outage
occurred.
• While operating, the recorder received a mechanical shock, too match static, abnormal power
voltage caused by lightning, etc.
mRestart the operation as follows.
1 Disconnect all the power sources.
2 Leave the recorder for about 30 seconds.
3 Connect the power source.
• The disc is damaged or does not contain proper
recording or editing data.
mReinsert the disc.
• Not pressing the button on the deck that you want
to operate.
mPress the correct button.
An MD is not played from the first index
mark.
• Disc playing stopped before it came to the last
index mark.
mEject the MiniDisc once, and restart playing after
checking the index mark in the display.
Playback sound skips.
• The recorder is placed where it receives
continuous vibration.
mPut the recorder on a stable place.
• Index marks are entered at very short intervals
when recording.
Sound has a lot of static.
• Strong magnetism from a television or such device
is interfering with operation.
mMove the recorder away from the source of
strong magnetism.
Auto Backspace Function does not work.
• The reverse time is set to 0.0 (page 35).
• You use the Auto Backspace Function immediately
after playback begins.
mIf you do not wait a little after playback begins,
the memory cannot save and you cannot
backward (page 34).
• When you use the Auto Backspace Function too
often in a short time, that is to say, you press the
Listen pedal a number of times in a short time,
you backward to the last 10 seconds stored in the
memory.
mYou cannot backward further than the last 10
seconds (page 34).
Alarm sounds or alarm indication appears
on the display.
• See pages 38 to 40.
You cannot see the LCD display.
• Adjust the LCD CONTRAST control.
No sound from the built-in speaker.
• Turn the MONITOR VOL control upwards.
• Press the MONITOR select button you want to
listen to firmly .
• Unplug the earphone from the EAR jack.
No sound comes through the earphone.
• The earphone plug is not firmly connected.
mPlug in the plug of the earphone firmly.
• Volume is too low.
mAdjust the volume using MONITOR VOL.
Additional Information
37
Page 38

Error and Caution messages
The unit will inform you of various error messages and caution messages in the display window.
1
2
2
3
1 Power supply caution
Displayed
POWER SUPPLY (flashing)
Situation
The power supply is unstable. Reinforce the power
supply with a UPS, etc. (See the UPS operating
manual for details.)
2 A/B status display
Displayed
COMAND EROR
CPU COM EROR
LASER ERROR
Situation
There is a problem with the deck. Turn off the power
for 30 seconds and then turn it on again. If the
problem persists, contact your dealer.
3 DECK A/DECK B display
Displayed
ATTENTION!! (DECK A(B): PUT IN BLANK DISC)
Situation
Quickly insert a blank disc into deck A (B).
If you do not, you might not be able to record.
CANNOT MARK!! (INDEX FULL)
The number of index marks has reached the
maximum so you cannot enter any more.
CANNOT PAUSE REC!! (INDEX FULL)
The number of index marks has reached the
maximum so you cannot pause recording.
CANNOT REC!!
CANNOT REC!! (DISC A(B): FULL DISC)
You cannot record.
Disc A (B) is full so you cannot record onto it
anymore. (See page 12 for details of recording time.)
CANNOT REC!! (DISC A(B): PB ONLY)
This disc is for playback only so you cannot record
onto it.
CANNOT REC!! (DISC A(B): PROTECTED)
CANNOT REC!! (DISC A(B): RECORDED)
CANNOT REC!! (INDEX FULL)
This disc is protected so you cannot record.
This disc is recorded so you cannot record.
The number of index marks has reached the
maximum so you cannot record.
1)
CANNOT TRANSFER!! (DECK A(B): NO DISC)
There is no disc inserted in deck A (B) so you cannot
continue recording.
1)
CANNOT TRANSFER!! (DISC A(B): PB ONLY)
The disc A (B) is for playback only so you cannot
continue recording.
1)
CANNOT TRANSFER!! (DISC A(B): PROTECTED)
The disc A (B) is protected so you cannot continue
recording.
1)
CANNOT TRANSFER!! (DISC A(B): RECORDED)
The disc A (B) is recorded so you cannot continue
recording.
1) The message “CANNOT TRANFER!!” blinks continuously when there are only a number of minutes of
potential recording time remaining on the disc currently being recorded. (See Notes on page 21.)
Additional Information
38
Page 39

3 DECK A/DECK B display (continued)
Displayed
COMMAND ERROR!!
CPU COMMUNICATION ERROR!!
DISC ERROR!!
LASER ERROR!!
READ ERROR!! (EJECT DISC A)
RECORDING ABORT!!
SEARCH ERROR!!
WRITE ERROR!! (EJECT DISC B)
4 Other messages displayed in the screen during operation
Displayed
ATTENTION!! (DECK A(B): PUT IN BLANK DISC)
BLANK DISC
CANNOT COPY!!
CANNOT INPUT MORE!!
DIFF.RECORD LENGTH
DISC FORMAT PRBLM
DISC IS FULL! STOP ENTERING DATA.
INPUT IS CANCELED AND EXIT
NO DISC
NOT ORIGINAL
INPUT IS VALID AND EXIT
OVERFLOW!!
PASSWORD INCORRECT!!
PB ONLY DISC
PROTECTED DISC
RECORDED DISC
RECORDING DECK WAS EXCHANGED BY SYSTEM!!
Situation
There is a problem with the deck. Turn off the power
for 30 seconds and then turn it on again. If the
problem persists, contact your dealer.
The disc contents cannot be read normally.
There is a problem with the deck. Turn off the power
for 30 seconds and then turn it on again. If the
problem persists, contact your dealer.
An error occurred when reading the disc data. Eject
disc A.
Recording will be interrupted.
The specified time cannot be found.
An error occurred when writing data onto the disc.
Eject disc B.
Situation
Quickly insert a blank disc into deck A (B). If you do
not, you might not be able to record.
A blank disc is inserted.
You cannot copy.
You cannot enter more characters.
The capacity of disc B is insufficient for the
prerecorded time of disc A.
This is not a disc recorded with the MDCC-2000.
The disc is recorded to the end. Stop entering data
immediately.
The input screen is closed without fixing the input
characters.
There is no disc inserted in the recorder.
This is a digitally copied disc and cannot be used to
make another copy. (See page 3.)
The input characters are fixed and the input screen is
closed. (Sometimes, depending on the conditions,
the input characters are not recorded on the disc.)
You cannot enter characters.
The password entered is incorrect.
This disc is for playback only.
This is a protected disc.
This is a recorded disc.
The recording deck was exchanged.
Additional Information
39
Page 40

Alarm System
An alarm sounds and an indication appears on the display window in the following situations.
Alarm system Situation To release alarm system
When pressing the zREC
button
m A continuous beep sounds
while the zREC button is
pressed.
During recording
m Long, intermittent beeps
continue to sound.
During recording or copying
m Short, intermittent beeps
continue to sound.
During recording, when
recording finishes or when
copying finishes
m Three short beeps sound.
During pause
m Two short beeps sound
every 10 seconds.
• The disc cannot be recorded onto.
Recording deck: There is no disc.
Alternatively, the disc inserted is
protected, commercially available
pre-recorded disc or has too small
a capacity.
Continuous deck: The disc inserted
is not blank.
• The disc has nearly reached the end,
but there is no recording enabled
disc in the continuous deck.
• There is something wrong with the
disc, but there is no recording
enabled disc in the continuous deck.
• Recording or copying was
interrupted due to some error.
• The disc was recorded to the end of
the disc and was automatically
ejected.
• Recording was interrupted by an
error and the disc was automatically
ejected.
• Copying ended and the disc was
automatically ejected.
• Currently pausing.
Note
If you press the zREC or xSTOP
button of either deck during pause,
the beeps will continue to sound once
just after the unit has been paused but
will stop repeating every 10 seconds.
This alarm stop function will be
cleared when you stop recording later.
• Insert a disc that can be recorded
into the recording deck.
• Insert a blank disc into the
continuous deck, or remove any
disc from the continuous deck.
• Insert a blank disc into the
continuous deck immediately.
Note
Press zREC or xSTOP button to
stop the alarm sound.
• Insert a blank disc into the
continuous deck immediately.
• Replace the disc and try to record
or copy again.
Note
Press zREC or xSTOP button to
stop the alarm sound.
• Replace the disc and try to record
again.
• Replace the continuous disc with
a blank disc for the next
continuous recording.
Additional Information
40
Page 41

Specifications
Laser diode properties
Material: GaAlAs
Wavelength: 780 nm
Emission duration: Continuous
Laser output: Less than 44.6 µW
(This output is the value measured at a distance of
about 200 mm from the lens surface on the optical
pick-up block with 7 mm aperture.)
Revolutions
400 rpm to 1800 rpm (CLV)
Error correction
Advanced Cross Interleave Reed Solomon Code (ACIRC)
Sampling frequency
44.1 kHz
Coding
ATRAC 3 (Adaptive TRansform Acoustic Coding 3)
Modulation system
EFM (Eight to Fourteen Modulation)
Number of channels
2 or 4 monaural channels
Frequency response
50–10,000 Hz
Speaker
Approx. 5.0 cm (2 inches) dia.
Power output
600 mW (at 10% distortion)
Input
MIC: Canon XLR-3-31 type 0.44 mV (-65 dB)
LINE IN 1-4: mini jack 0.49 V (-4 dB)
Output
EAR (minijack)
for 8–300 Ω earphones
LINE OUT 1,2 (minijack) 0.22 V (-11 dB) load inpedance 47 kΩ
ADA (minijack) 0.22 V (-11 dB) load inpedance 10 kΩ
PA (minijack) 0.22 V (-11 dB) load inpedance 47 kΩ
PC (9 pin D-sub)
DISPLAY (modular)
Other connector
CONTROL UNIT connector
REMOTE jack
Power requirements
12 V DC
DC IN 12V jack accepts the supplied AC power
adaptor for use on 120 V AC, 60 Hz
Dimensions
Approx. 320 x 280 x 118 mm (w/h/d)
(125⁄8 x 111⁄8 x 43⁄4 inches)
including projecting parts and controls
Mass
Approx. 4.5 kg (9 lb 15 oz)
Accessories supplied
AC power adaptor (1)
AC power cord (1)
Sony CR2032 lithium battery (1)
Key (2)
MiniDisc (2)
US and foreign patents licensed from Dolby Laboratories.
Design and specifications are subject to change without notice.
Optional accessories
Foot control unit FS-85
Dynamic microphone F-BM7
MiniDisc (10 included) 10MDW74CC
Your dealer may not handle some of the above listed
optional accessories. Please ask the dealer for detailed
information about the optional accessories.
Additional Information
41
Page 42

Index
A, B
ADA............................................................................. 4, 5
Alarm system ............................................................... 40
Auto Backspace function ............................................ 34
Battery ............................................................................. 7
C, D
Connection...................................................................... 7
Continuous Recording ................................................ 13
Copying a disc.............................................................. 26
Date.................................................................................. 8
Disc title ........................................................................ 22
Display window................................................. 6, 21, 38
E, F, I
Erasing a disc................................................................ 28
External device............................................................. 31
Foot control unit .......................................................... 32
Index mark.................................................................... 14
Naming ....................................................................... 24
Searching .................................................................... 17
L, M, N
Line out ......................................................................... 31
Messages ....................................................... 6, 21, 26, 38
MiniDisc .......................................................................... 3
Naming
Disc .............................................................................. 22
Index mark ................................................................. 24
T, U
Time ................................................................................. 9
Time search................................................................... 18
Transcribing.................................................................. 32
UPS .................................................................................. 2
P
PA .................................................................................. 30
Playback ........................................................................ 16
Point search .................................................................. 20
Power source ............................................................ 7, 36
Public Address ............................................................. 30
R
Recording mode........................................................... 12
Recording time ......................................................... 3, 12
Remote control unit ..................................................... 15
Reverse time ........................................................... 34, 35
S
Searching
Index mark ................................................................. 17
Point ............................................................................ 20
Time ............................................................................ 18
Serial Copy Management System ............................... 3
Setting
Date ............................................................................... 8
Machine Information ................................................ 10
Password .................................................................... 11
Recording Mode ........................................................ 12
Stamp .......................................................................... 10
Time .............................................................................. 9
Stamp............................................................................. 10
Additional Information
42
Page 43

Additional Information
43
Page 44

Page 45

Page 46

Page 47

Page 48

Sony Corporation Printed in Japan
 Loading...