

Page 1

M-crew
Version 1.05E
On-line Manual
4-231-460-12 (1)
PCLK-MN10A
2001 Sony Corporation
Page 2

• Duplication of any or all of the contents of
this software and instruction manual or
lending of this software to third parties
without the express permission of the
copyright holder is strictly prohibited by
copyright law.
• Sony cannot be held liable in any way for
monetary losses, lost profits or claims from
third parties arising from the use of this
software.
• Should any manufacturing defects occur,
Sony’s responsibility shall be limited solely
to replacing said defective merchandise.
• This software is approved for use only with
the specified equipment.
• Sony reserves the right to change software
specifications without prior notice.
Program 2001 Sony Corporation
Documentation 2001 Sony
Corporation
2001 Sony Corporation All rights
reserved.
• M-crew, PictureGear and VAIO are the
registered trademarks of Sony Corporation.
• Microsoft, MS-DOS and Windows are the
registered trademarks of Microsoft
Corporation.
• IBM and PC/AT are the registered
trademarks of International Business
Machines Corporation.
• Macintosh is the registrated trademark of
Apple Computer Inc.
• Adobe and Adobe Acrobat Reader are
the trademarks of Adobe Systems
Incorporated.
• Other companies and product names are
the trademarks or the registered
trademarks of each company.
Table of contents
Preparation
Functional restrictions that vary with the
connected system stereo component ... 4
Display items and functions ........................... 5
Main bar ................................................... 5
Tool bar .................................................... 7
CD bar ...................................................... 9
CD window ........................................... 10
MD bar ................................................... 13
MD window .......................................... 14
TUNER bar ............................................ 18
TUNER window ................................... 19
OTHERS bar .......................................... 21
OTHERS window ................................. 22
PC-CD bar .............................................. 23
PC-CD window ..................................... 24
2
AudioFile bar ........................................ 27
File window ........................................... 28
Disc Library window ........................... 32
Rec window ........................................... 34
“Option” dialog box ............................. 38
Timer window.......................................39
Operating the CD player
Listening to a CD ............................................ 40
Listening to a CD using the CD or
PC-CD bar .................................... 40
Listening to a CD using the CD or
PC-CD window ........................... 40
Assigning names to CDs ............................... 42
Assigning track names with text data
from another application ........... 43
Page 3

Using disc and track name data in
other applications ....................... 44
Adding an image to the CD or PC-CD
Jacket display .............................. 45
Performing MD operations
Listening to an MD ......................................... 46
Listening to an MD using
the MD bar ................................... 46
Listening to an MD using
the MD window .......................... 47
Assigning names to MDs...............................48
Assigning disc or track names ............ 48
Assigning track names with the text
data stored in the Disc
Library .......................................... 49
Assigning track names with text data
from another application ........... 50
Using disc and track name data in
other applications ....................... 52
Adding an image to the MD Jacket
display .......................................... 53
Recording to an MD ....................................... 54
Recording from a CD to an MD..........54
Recording from the tuner to
an MD ........................................... 59
Recording music files from the PC to
an MD ........................................... 60
Recording to an MD from other
audio sources...............................62
Editing recorded MDs....................................64
Moving tracks........................................64
Dividing tracks......................................66
Combining tracks..................................67
Erasing part of a track .......................... 69
Adding the fade-in effect after
recording ...................................... 71
Adding the fade-out effect after
recording ...................................... 73
Changing the recording level ............. 74
Erasing tracks ........................................ 76
Printing MD labels with Label Maker .........78
Launching Label Maker ....................... 78
Creating labels with Label Maker ...... 79
Operating the tuner
Listening to the radio ..................................... 86
Listening to the radio using the
TUNER bar .................................. 86
Listening to the radio using the
TUNER window ......................... 87
Assigning names to radio stations ............... 88
Adding an image to the TUNER Jacket
display .......................................... 89
Editing preset numbers ................................. 90
Operating the computer
Listening to file albums ................................. 92
Registering music files to a file
album ............................................ 92
Listening to file albums using
the AudioFile bar ........................ 93
Listening to file albums using
the File window .......................... 93
Editing a file album ........................................ 94
Creating a new file album or folder ... 94
Moving music files ............................... 95
Erasing file albums or folders ............. 96
Assigning names to file albums..........97
Adding an image to the File Jacket
display .......................................... 98
Using the disc library ..................................... 99
Viewing the disc library.......................99
Searching the disc library ..................100
Recording disc information in the
disc library .................................101
Erasing data in the disc library ......... 102
Setting optional items .................................. 103
Setting the audio input from the
computer .................................... 103
Choosing an Internet search
engine ......................................... 104
Creating an original genre.................105
Using the timers
How to use the timers .................................. 106
Setting the time ................................... 106
Setting the playback timer .................107
Setting the recording timer ............... 109
Enabling the timers ............................ 112
3
Page 4

Preparation
Functional restrictions that vary with
the connected system stereo
component
The functions that can be used and the icons displayed on the M-crew
Tool bar depend on the system stereo component connected to your
computer. For example, M-crew may not support timer and CD-TEXT
information display functions for certain system stereo components,
even if those components have timer and CD-TEXT information display
functions.
For more information about the system stereo components that are
compatible with M-crew and the functions that are supported, please
go to the following URL on the World Wide Web.
http://www.sony.co.jp/en/Products/homeaudio/
Notes
• In this manual, the term “system stereo component” refers specifically to
component stereo systems (incorporating CD and MD decks) and discrete MD
decks that support PC-LINK connections.
• The displays shown in this manual are those for a CMT-PX3 stereo system.
4
Page 5

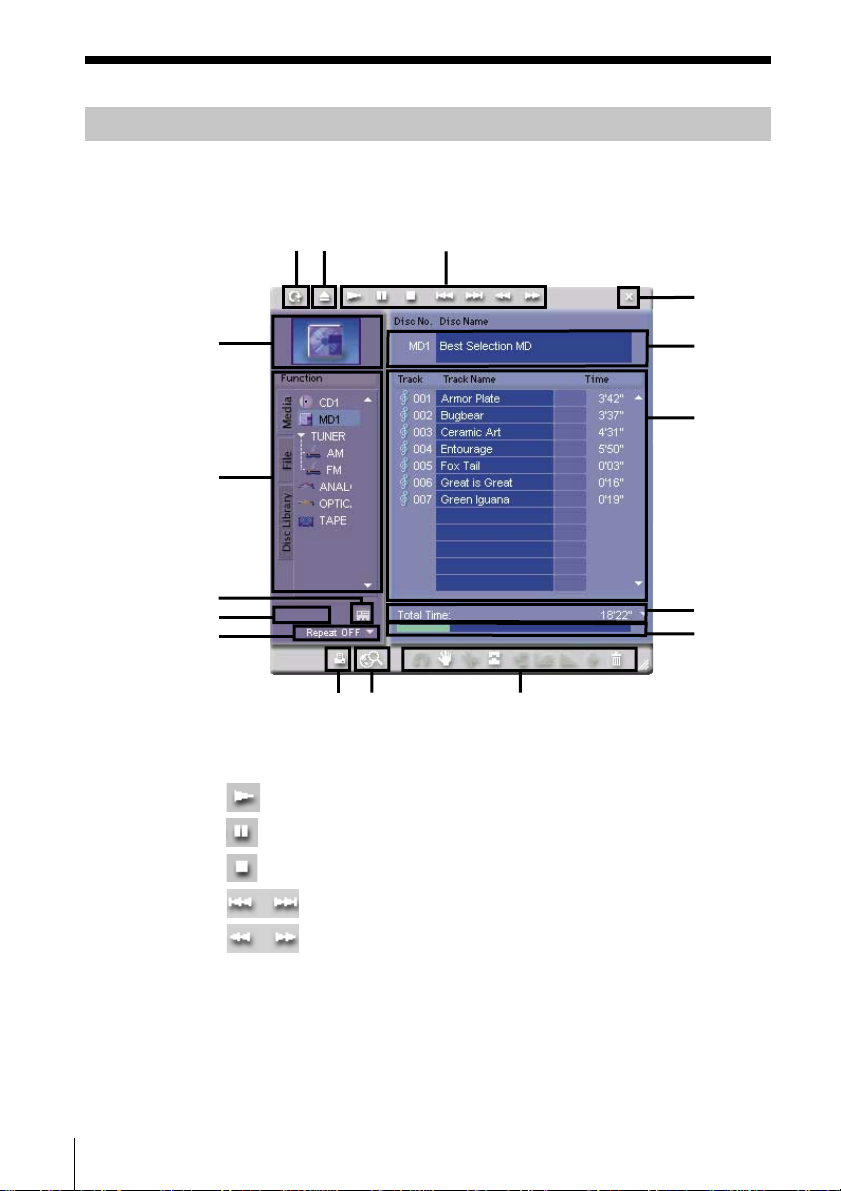
Display items and functions
Main bar
The Main bar is referred to as the CD bar (page 9) when “CD” is
selected in “2 Function Name display,” as the MD bar (page 13) when
“MD” is selected, as the TUNER bar (page 18) when “TUNER” is
selected, and as the OTHERS bar (page 21) when “OTHERS” is
selected.
1
2 3
1 SONY logo
Drag the logo with the left mouse button to move the Main bar up
or down.
Right-click the logo to display a pop-up menu.
2 Function Name display
Displays the name of the selected function.
Click to display and select a function. The selectable functions will
depend on the nature of the system stereo components connected to
your computer.
Preparation
568
4
7
3 URL button
Opens the website for the selected disc or radio station.
Notes
• To view websites, we recommend that you use Microsoft Internet
Explorer (Ver.4.0 or higher) or Netscape Navigator (Ver.4.0 or higher) as
your Internet browser.
• Internet access is necessary for viewing websites. For details on how to
gain access to the Internet, consult the manufacturer of your computer.
4 Volume control (only when connected to certain system stereo
components)
Adjusts the volume.
(continued)
5
Page 6

5 Tool bar switch
Click to show or hide the Tool bar (page 7).
6 Help button
Click to open Help (see “Using Help” on page 29 of “Operating
Instructions” for M-crew Version 1.05E).
7 Minimize button
Click to reduce the size of the window.
8 Close button
Click to exit M-crew.
6
Page 7

Tool bar
Preparation
To view the Tool bar, click the Tool bar switch (page 6) in the Main bar.
The icons displayed and their positions depend on the stereo system
component connected.
When you click a function icon in the Tool bar, the system switches to
the selected function and the corresponding window appears. Note that
only one window can be opened at a time.
Example 1
Example 2
1 CD icon
Click to display the CD window (page 10).
2 MD icon
Click to display the MD window (page 14).
3 TUNER icon
Click to display the TUNER window (page 19).
4 OTHERS icon
Click to display the OTHERS window (page 22).
5 TIMER icon
Click to display the Timer window (page 39). If the clock has not
been set yet, the “Clock Set” dialog box (page 106) will appear. The
time must be set before the Timer window can be displayed.
Note
M-crew does not support this function for certain system stereo components,
even if those components have a timer function.
(continued)
7
Page 8

6 File icon
Click to display the File window (page 28).
7 Disc Library icon
Click to display the Disc Library window (page 32).
8 Rec window icon
Click to display the Rec window (page 34).
9 Option icon
Click to display the “Option” dialog box (page 38).
0 PC-CD icon (only when connected to an MDS-series MD deck)
Click to display the PC-CD window (page 24).
8
Page 9

CD bar
Preparation
To view the CD bar, click “CD” in the Function Name display (page 5)
in the Main bar. Use this bar during CD player operations (page 40).
1 2 3 4 5
1 Function Name display
2 Disc Information display
Click to select the CD to play. The name of the selected CD appears
in the Disc Information display.
(CDs other than CD1 are available only when your system stereo
component is equipped with a CD changer.)
3 Track Number/Track Name display
Click to select the track to play.
4 Time display
Click to select the time display mode.
Display mode Display contents
Total Time Total playing time of all tracks on the CD
Elapsed Time Elapsed playing time of the current track
Track Remain Remaining playing time of the current track
Disc Remain Remaining playing time of the CD
5 CD operation buttons
: Play button
: Pause button
: Stop button
: AMS* (PREV and NEXT) buttons
* AMS: Automatic Music Sensor. This function searches for the beginning of
a track.
9
Page 10

CD window
To view the CD window, click the CD icon in the Tool bar (page 7).
Use this window to operate the CD player (page 40).
3 2
4
5
6
7
8
9
1 CD operation panel
: Play button
1
qd
qs
qa
0
10
: Pause button
: Stop button
: AMS* (PREV and NEXT) buttons
: Reverse and fast-forward buttons
* AMS: Automatic Music Sensor. This function searches for the beginning of
a track.
2 EJECT button
Page 11

3 Reload button
Click to refresh the “qa Track Name display” and “qs Disc
Information display.”
4 Jacket display
Displays an image of your choice (bitmapped or JPEG file) (page
45).
Click to select all tracks on the CD.
5 Function Tree display
Click on the icon of the CD to be played.
The icon flashes while the selected disc is being loaded. During this
time, no M-crew operations can be initiated.
You can drag the boundary to resize the display box.
6 Disc property button
Click to enter the properties of the currently selected CD.
Artist : Enter the name of the artist.
URL : Enter the URL of the website that is displayed when the
URL button in the Main bar is clicked.
Genre : Enter the music genre.
7 Play mode button
(Play mode button appears only when your system stereo
component is equipped with a CD changer.)
ALL DISCS : Plays all CDs loaded in the system stereo
component.
1 DISC : Plays a single CD.
Preparation
8 Repeat mode selector
Selects a repeat mode.
REPEAT : Plays a single CD repeatedly.
REPEAT 1 : Plays a single track repeatedly.
REPEAT OFF : Turns off the repeat function.
9 Internet search button
Initiates a search for websites based on keywords entered in the
dialog box.
Notes
• To view websites, we recommend that you use Microsoft Internet
Explorer (Ver.4.0 or higher) or Netscape Navigator (Ver.4.0 or higher) as
your Internet browser.
• Internet access is necessary for viewing websites. For details on how to
gain access to the Internet, consult the manufacturer of your computer.
(continued)
11
Page 12

0 Time display
Click
to select a time display mode.
Display mode Display contents
Total Time Total playing time of all tracks on the CD
Elapsed Time Elapsed playing time of the current track
Track Remain Remaining playing time of the current track
Disc Remain Remaining playing time of the CD
qa Track Name display
Displays the track names.
Click the track number to select it.
Click the track name to modify it (page 42).
Right-click the track name to display a pop-up menu, and then
select “Save to CSV file” to save the disc and track names to a CSV
(Comma Separated Value) formatted file (page 44).
You can also copy and paste text that has already been entered
(page 42).
qs Disc Information display
Displays the disc number and disc name.
Click the disc name to modify it (page 42).
Right-click the disc name to display a pop-up menu, and then select
“Save to CSV file” to save the disc name track names to a CSV
(Comma Separated Value) formatted file (page 44).
You can also copy and paste text that has already been entered
(page 42).
12
qd Close button
Click to close the CD window.
Note
To deselect the currently selected track, click on an empty area (i.e., a place
with no button or function key) in the Time display.
Page 13

MD bar
Preparation
To view the MD bar, click MD in the Function Name display (page 5) in
the Main bar. Use this bar when performing MD operations (page 46).
1
1 Function Name display
2 Disc Information display
Click to select the MD to play.
(MDs other than MD1 are available only when your system stereo
component is equipped with an MD changer.)
3 Track Number/Track Name display
Click to select the track to play.
4 Time display
Click to select the time display mode.
Display mode Display contents
Total Time Total playing time of all tracks on the MD
Elapsed Time Elapsed playing time of the current track
Track Remain Remaining playing time of the current track
Disc Remain Remaining playing time of the MD
5 MD operation buttons
2
: Play button
: Pause button
: Stop button
3 4
5
: AMS* (PREV and NEXT) buttons
* AMS: Automatic Music Sensor. This function searches for the beginning of
a track.
13
Page 14
MD window
To view the MD window, click the MD icon in the Tool bar (page 7).
Use this window to perform MD operations (page 46).
3
2
1
qh
4
5
6
7
8
9
0qa
1 MD operation panel
: Play button
: Pause button
: Stop button
: AMS* (PREV and NEXT) buttons
qg
qf
qd
qs
14
: Reverse and fast-forward buttons
* AMS: Automatic Music Sensor. This function searches for the beginning of
a track.
2 EJECT button
Page 15

3 Reload button
Click to refresh the “qf Track Name display” and “qg Disc
Information display.”
4 Jacket display
Displays an image of your choice (bitmapped or JPEG file) (page
53).
Click to select all tracks on the MD.
5 Function Tree display
Click on the icon of the MD to play.
The icon flashes while the selected disc is being loaded. During this
time, no M-crew operations can be initiated.
You can drag the boundary to resize the display box.
6 Disc property button
Click to enter the properties of the currently selected MD.
Artist : Enter the name of the artist.
URL : Enter the URL of the website that is displayed when the
URL button in the Main bar is clicked.
Genre : Enter the music genre.
7 Play mode button
(Play mode button appears only when your system stereo
component is equipped with an MD changer.)
ALL DISCS : Plays all MDs loaded in the system
stereo component.
1 DISC : Plays a single MD.
MD SEAMLESS ON/OFF: Selects seamless play mode or normal
play mode.
Preparation
8 Repeat mode selector
Selects a repeat mode.
REPEAT : Plays a single MD repeatedly.
REPEAT 1 : Plays a single track repeatedly.
REPEAT OFF : Turns the repeat function off.
9 Print button
Click to activate the Label Maker software.
(continued)
15
Page 16
0 Internet search button
Initiates a search for websites based on keywords entered in the
dialog box.
Notes
• To view websites, we recommend that you use Microsoft Internet
Explorer (Ver.4.0 or higher) or Netscape Navigator (Ver.4.0 or higher) as
your Internet browser.
• Internet access is necessary for viewing websites. For details on how to
gain access to the Internet, consult the manufacturer of your computer.
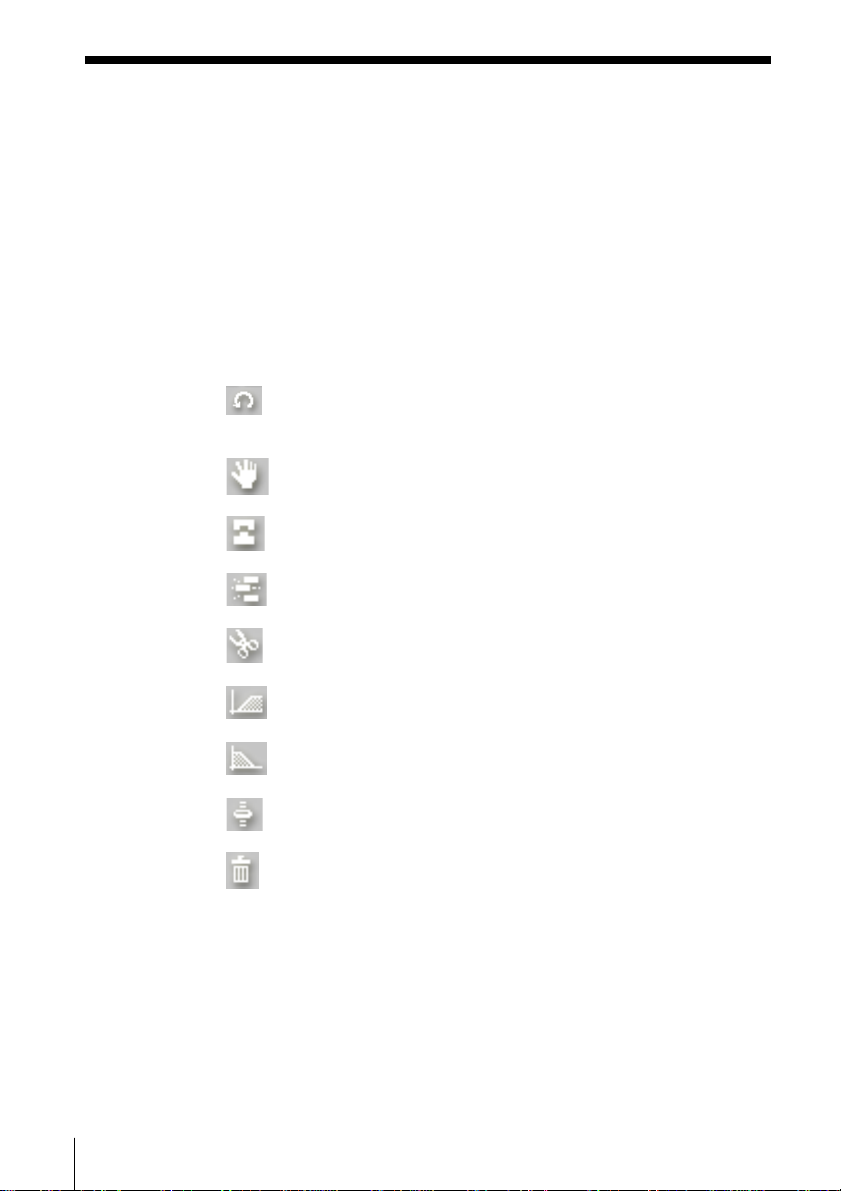
qa MD edit buttons
: Undo button
Click to cancel the most recent edit action performed (except
during a data entry or S.F edit operation).
: MOVE button
Click to open the “Move” dialog box (page 64).
: COMBINE button
Click to open the “Combine” dialog box (page 67).
: A-B ERASE button
Click to open the “A-B Erase” dialog box (page 69).
: DIVIDE button
Click to open the “Divide” dialog box (page 66).
: FADE IN button
Click to open the “Fade in” dialog box (page 71).
16
: FADE OUT button
Click to open the “Fade out” dialog box (page 73).
: LEVEL SHIFT button
Click to open the “Level Shift” dialog box (page 75).
: ERASE (recycle bin) button
Click to open the “Erase” dialog box (page 76).
Page 17

qs Disc Capacity display
Preparation
Disc space
already used
Disc space to be used
Free space
qd Time display
Click
to select the time display mode.
Display mode Display contents
Remain Time Total remaining recording time of the MD
Total Time Total playing time of all tracks on the MD
Elapsed Time Elapsed playing time of the current track
Track Remain Remaining playing time of the current track
Disc Remain Remaining playing time of the MD
qf Track Name display
Displays the track names.
Click the track number to select it.
Click the track name to modify it (page 48).
Right-click the track name to display a pop-up menu, and then
select “Save to CSV file” to save the disc name track names to a CSV
(Comma Separated Value) formatted file (page 52).
You can also copy and paste text that has already been entered
(page 48).
qg Disc Information display
Displays the disc number and disc name.
Click the disc name to modify it (page 48).
Right-click the disc name to display a pop-up menu, and then select
“Save to CSV file” to save the disc and track names to a CSV
(Comma Separated Value) formatted file (page 52).
You can also copy and paste text that has already been entered
(page 48).
qh Close button
Click to close the MD window.
Note
To deselect the currently selected track, click on an empty area (i.e., a place
with no button or function key) in the Time display.
17
Page 18

TUNER bar
To view the TUNER bar, select TUNER on the Function Name display
in the Main bar (page 5). Use this bar when operating the tuner (page
86).
1
2
3 4
1 Radio Band display
Click to select a band.
2 Preset Number/Broadcasting Station Name display
Click to select a preset station.
3 Frequency display
4 Tuner operation buttons
: BAND button
: Preset up button
: Preset down button
: URL button
Click to open the website set to the current preset number
(page 90).
Notes
• To view websites, we recommend that you use Microsoft Internet
Explorer (Ver.4.0 or higher) or Netscape Navigator (Ver.4.0 or higher) as
your Internet browser.
• Internet access is necessary for viewing websites. For details on how to
gain access to the Internet, consult the manufacturer of your computer.
18
Page 19

TUNER window
To view the TUNER window, click the TUNER icon in the Tool bar
(page 7). Use this window to operate the tuner (page 86).
Preparation
2
3
4
5
1 Tuner operation buttons
: BAND button
Click to select a band.
: Preset up button
1
8
7
6
: Preset down button
: EDIT button
Click to open the “Edit” dialog box (page 90).
Use the “Edit” dialog box to edit the preset station settings.
2 Reload button
Click to refresh the system stereo component preset information
displayed in “7 Preset display.”
(continued)
19
Page 20

3 Jacket display
Displays an image of your choice (bitmapped or JPEG file) for each
preset number (page 89).
4 Function Tree display
Displays the currently selected band.
You can drag the boundary to resize the display box.
5 Internet search button
Initiates a search for websites based on keywords entered in the
dialog box.
Notes
• To view websites, we recommend that you use Microsoft Internet
Explorer (Ver.4.0 or higher) or Netscape Navigator (Ver.4.0 or higher) as
your Internet browser.
• Internet access is necessary for viewing websites. For details on how to
gain access to the Internet, consult the manufacturer of your computer.
6 URL display
Displays the URL set to the selected preset station.
7 Preset display
Click a preset number to select the preset station.
Click the station name to modify it (page 88).
8 Close button
Click to close the TUNER window.
20
Page 21

OTHERS bar
1
To view the OTHERS bar, select OTHERS in the Function Name
display (page 5) in the Main bar. Use this bar when operating an
external component connected to a system stereo component.
1 Function Name display
Preparation
Displays the name of the external component connected to the
system stereo component.
21
Page 22

OTHERS window
To view the OTHERS window, click the OTHERS icon in the Tool bar
(page 7). Use this window to listen to the audio from external audio
components connected to a system stereo component.
1
3
2
22
1 Function Tree display
Click the external audio component that you want to listen to.
You can drag the boundary to resize the display box.
2 External Component display
The currently selected component is enclosed in a yellow box.
3 Close button
Click to close the OTHERS window.
Page 23

PC-CD bar
Preparation
To view the PC-CD bar, click “PC-CD” in the Function Name display
(page 5) in the Main bar. Use this bar to operate a CD in the CD-ROM
drive of your computer (page 40).
54321
1 Function Name display
2 Disc Information display
The name of the selected CD appears in the Disc Information
display.
(CDs other than CD1 are available only when you use multiple CDROM drives on your computer.)
3 Track Number/Track Name display
Click to select the track to play.
4 Time display
Click to select the time display mode.
Display mode Display contents
Total Time Total playing time of all tracks on the CD
Elapsed Time Elapsed playing time of the current track
Track Remain Remaining playing time of the current track
5 PC-CD operation buttons
: Play button
: Pause button
: Stop button
: AMS* (PREV and NEXT) buttons
* AMS: Automatic Music Sensor. This function searches for the beginning of
a track.
23
Page 24

PC-CD window
To view the PC-CD window, click the PC-CD icon in the Tool bar (page
7). Use this window to operate the CD loaded in the CD-ROM drive in
your computer (page 40).
3 2
4
5
6
7
8
1 CD operation panel
: Play button
1
qs
qa
0
9
24
: Pause button
: Stop button
: AMS* (PREV and NEXT) buttons
: Reverse and fast-forward buttons
* AMS: Automatic Music Sensor. This function searches for the beginning of
a track.
Page 25

2 EJECT button
3 Reload button
Click to refresh the “0 Track Name display” and “qa Disc
Information display.”
4 Jacket display
Displays an image of your choice (bitmapped or JPEG file) (page
45).
Click to select all tracks on the CD.
5 Function Tree display
Click on the icon of the CD to be played.
You can drag the boundary to resize the display box.
6 Disc property button
Click to enter the properties of the currently selected CD.
Artist : Enter the name of the artist.
URL : Enter the URL of the website that is displayed when the
URL button in the Main bar is clicked.
Genre : Enter the music genre.
7 Repeat mode selector
Selects a repeat mode.
REPEAT : Plays a single CD repeatedly.
REPEAT 1 : Plays a single track repeatedly.
REPEAT OFF : Turns off the repeat function.
Preparation
8 Internet search button
Initiates a search for websites based on keywords entered in the
dialog box.
Notes
• To view websites, we recommend that you use Microsoft Internet
Explorer (Ver.4.0 or higher) or Netscape Navigator (Ver.4.0 or higher) as
your Internet browser.
• Internet access is necessary for viewing websites. For details on how to
gain access to the Internet, consult the manufacturer of your computer.
(continued)
25
Page 26

9 Time display
Click
to select the time display mode.
Display mode Display contents
Total Time Total playing time of all tracks on the CD
Elapsed Time Elapsed playing time of the current track
Track Remain Remaining playing time of the current track
0 Track Name display
Displays the track name.
Click the track number to select it.
Click the track name to modify it (page 42).
Right-click the track name to display a pop-up menu, and then
select “Save to CSV file” to save the disc and track names to a CSV
(Comma Separated Value) formatted file (page 44).
You can also copy and paste text that has already been entered
(page 42).
qa Disc Information display
Displays the disc number and disc name.
Click the disc name to modify it (page 42).
Right-click the disc name to display a pop-up menu, and then select
“Save to CSV file” to save the disc and track names to a CSV
(Comma Separated Value) formatted file (page 44).
You can also copy and paste text that has already been entered
(page 42).
26
qs Close button
Click to close the PC-CD window.
Note
To deselect the currently selected track, click on an empty area in the Time
display.
Page 27

AudioFile bar
To view the AudioFile bar, click “AudioFile” in the Function Name
display (page 5) in the Main bar. Use this bar to operate music files
stored on your computer’s hard disk (page 92).
1 File Information display
Click to select the file album to play. The name of the selected file
album appears in the File Information display.
2 Track Number/Track Name display
Click to select the track to play.
3 Time display
Click to select the time display mode.
Display mode Display contents
Total Time Total playing time of all tracks in the file album
Elapsed Time Elapsed playing time of the current track
Track Remain Remaining playing time of the current track
Preparation
4321
4 Music files operation buttons
: Play button
: Pause button
: Stop button
: AMS* (PREV and NEXT) buttons
* AMS: Automatic Music Sensor. This function searches for the beginning of
a track.
27
Page 28

File window
To view the File window, click the File icon in the Tool bar (page 7),
and then click the file album in the Function Tree display. Use this
window to play the music files stored on your computer’s hard disk
(page 92).
2
3
4
5
6
1
qs
qa
0
9
8
28
7
1 File album operation panel
: Play button
: Pause button
: Stop button
: AMS* (PREV and NEXT) buttons
: Reverse and fast-forward buttons
* AMS: Automatic Music Sensor. This function searches for the beginning of
a track.
Page 29

2 Jacket display
Displays an image of your choice (bitmapped or JPEG file) (page
98).
Click to select all tracks in a file album.
3 Function Tree display
Click on the icon of the file album to play.
You can drag the boundary to resize the display box.
4 Disc property button
Set the properties of the track or file album currently displayed.
Click this button with no track name selected to set the properties of
the file album.
Click this button with a track name selected to set the properties of
the track. Track properties can only be set in the File window.
Artist : Enter the name of the artist.
URL : Enter the URL of the website that is displayed when the
URL button in the Main bar is clicked.
Genre : Enter the music genre.
5 File edit buttons
: Create new folder button
Click to create a new folder. Multiple File Album can be
placed inside a folder.
: Create new file album button
Click to create a new File Album.
Preparation
: File registration button
Click to register a music file.
6 Repeat mode selector
Selects a repeat mode.
REPEAT : Plays a single file album repeatedly.
REPEAT 1 : Plays a single track repeatedly.
REPEAT OFF : Turns the repeat function off.
(continued)
29
Page 30

7 Cancellation (eraser) button
Click to display the “Erase” dialog box (page 96).
8 Time display
Click
Display mode Display contents
Total Time Total playing time of all tracks being displayed in
Elapsed Time Elapsed playing time of the current track
Track Remain Remaining playing time of the current track
9 Track Name display
Displays the track name.
Click the track number to select it.
Click the track name to modify it (page 97).
Right-click the track name to display a pop-up menu, and then
select “Save to CSV file” to save the disc and track names to a CSV
(Comma Separated Value) formatted file.
You can also copy and paste text that has already been entered
(page 97).
You can also register a music file by dragging it from Explorer and
dropping it into the Track Name display.
0 File Information display
Displays a folder name and an album name.
Click the folder name or album name to modity it (page 97).
Right-click to display a pop-up menu, and then select “Save to CSV
file” to save the file and track names to a CSV (Comma Separated
Value) formatted file.
You can also copy and paste text that has already been entered
(page 97).
to select a time display mode.
the Track Name display.
30
Page 31

qa Display mode selector
Click
to select the display mode for file and track names.
Display mode Display contents
Title Name Track name
File Name File name
Title Name/File Name Track and file names
qs Close button
Click to close the File window.
Notes
• To deselect the currently selected track, click on an empty area (i.e., a place
with no button or function key) in the Time display.
• In M-crew, the original music file is registered, not a copy.
Therefore, when you delete a registered music file or rename it using
Explorer or another file management tool, M-crew will no longer be able to
play that music file.
• A dimmed track name indicates that some abnormality has happened to the
track and that it cannot be played back by M-crew.
• M-crew identifies and plays back music files according to the file name.
This key attribute must therefore never be changed.
Preparation
31
Page 32

Disc Library window
To view the Disc Library window, click the Disc Library icon in the
Tool bar (page 7). Use this window to view or reuse data on the media
that were played at least once before (page 99).
0
1
2
3
6754
1 Jacket display
Displays the image assigned to the disc.
2 Function Tree display
Selects the medium within the disc library.
You can drag the boundary to resize the display box.
3 Disc property button
Click to enter the properties of the currently selected disc library
window.
Artist : Enter the name of the artist.
URL : Enter the URL of the website that is displayed when the
URL button in the Main bar is clicked.
Genre : Enter the music genre.
9
8
32
Page 33

4 Print button
Click to activate the Label Maker software for the MD.
5 Internet search button
Initiates a search for websites based on keywords entered in the
dialog box.
Notes
• To view websites, we recommend that you use Microsoft Internet
Explorer (Ver.4.0 or higher) or Netscape Navigator (Ver.4.0 or higher) as
your Internet browser.
• Internet access is necessary for viewing websites. For details on how to
gain access to the Internet, consult the manufacturer of your computer.
6 Disc library search button
Click to open the “Disc Library Search” dialog box (page 100).
7 Erase (recycle bin) button
Click to erase discs in the disc library one at a time (page 102).
8 Track Name display
Displays the track name.
Click the track number to select it.
Right-click the track name to display a pop-up menu, and then
select “Save to CSV file” to save the disc and track names to a CSV
(Comma Separated Value) formatted file.
9 Disc Library Information display
Displays the disc name and disc properties registered in the disc
library.
Right-click to display a pop-up menu, and then select “Save to CSV
file” to save the disc and track names to a CSV (Comma Separated
Value) formatted file.
Preparation
0 Close button
Click to close the Disc Library window.
33
Page 34

Rec window
To view the Rec window, click the Rec window icon in the Tool bar
(page 7). Use this window to record to an MD from the CD player,
tuner, optional external component connected to a system stereo
component or other sources (pages 54, 59, 60, 62).
The recording destination window on the right is always the MD
window.
The recording source window on the left can be selected from the
Function Tree display.
The Rec window has a different appearance in synchro recording mode
and in manual recording mode.
In synchro recording mode, it is possible to record from a CD, PC-CD,
or file album.
Synchro recording mode
1
2 8
3
34
45
1 REC button
Starts recording the tracks and radio stations that have been entered
in the right-side (destination) window.
2 Add button
Adds the tracks that have been selected in the left-side (source)
window to the right-side (destination) window.
6
7
Page 35

3 Undo button
Deletes specified tracks from the destination window (before the
REC button is clicked).
4 Manual button
Selects manual recording mode.
5 Synchro speed change button
Changes the synchro speed to NORMAL (normal speed) or HIGH
(high speed).
6 Recording Mode display
STEREO : Stereo recording
MONO : Monaural* recording
LP2 : 2 × (2 × normal recording time) stereo recording
LP4 : 4 × (4 × normal recording time) stereo recording
* The monaural recording time is about twice that of stereo.
7 Erase (recycle bin) button
Erases a recorded track (This function does not work when the
system stereo component is in recording pause mode.).
Deselects a track selected for recording.
Drag the track number from the Track Name display in the MD
window and drop it into .
8 Close button
Click to close the Rec window.
Preparation
Note
To deselect currently selected track, click on an empty area (i.e., a place with
no button or function key) in the Time display.
(continued)
35
Page 36

Manual recording mode
1
2 9
354
1 REC button
Changes the unit to recording pause mode. Click
window to start recording to the MD.
* To start recording immediately, click the Rec button before playing the
source CD or sound file.
2 Fader button
Starts the fade-in/fade-out effect.
3 Synchro button
Activates synchro recording mode.
4 System recording mode button
(The system recording mode button appears only when your system
stereo component is equipped with an MD changer.)
ALL DISCS : Recording is performed in sequence to
1 DISC : Recording is performed to a single MD.
MD SEAMLESS ON/OFF :Selects MD seamless mode or normal
When ALL DISCS and normal recording mode are selected,
playback will continue even while the MD is being changed,
resulting in a break in the recorded sound. In MD seamless mode,
playback is paused while the MD is changed.
Tracks recorded and played back in MD seamless mode will have
no break in the recorded sound.
6
all MDs loaded in the system stereo
component.
recording mode.
7
in the MD
8
36
Page 37

5 Recording level adjustment button
Opens the “Rec Level Adjust” dialog box (pages 56, 60, 61, 63).
6 Set up button
Opens the “Set Up” dialog box for use of the following functions:
Smart Space : The gaps between recorded tracks are
trimmed to about 3 seconds.
Track Mark Level Sync : Sets the gap detection level for automatic
track marking.
Fader :Sets the fade-in/fade-out effect.
7 Recording Mode display
STEREO : Stereo recording
MONO : Monaural* recording
LP2 : 2 × (2 × normal recording time) stereo recording
LP4 : 4 × (4 × normal recording time) stereo recording
* The monaural recording time is about twice that of stereo.
8 Erase (recycle bin) button
Erases a recorded track.
Drag the track number from the Track Name display in the MD
window and drop it into .
9 Close button
Click to close the Rec window.
Preparation
Note
To deselect currently selected track, click on an empty area (i.e., a place with
no button or function key) in the Time display.
37
Page 38

“Option” dialog box
To view the “Option” dialog box, click the Option icon in the Tool bar
(page 7). Use this dialog box to enter settings for PC Input, search
engine, and original genre.
1 2
1 PC Input tab
Click to open the “PC Input” dialog box (page 103).
2 Search Engine tab
Click to open the “Search Engine Default Setting” dialog box (page
104).
3 Original Genre tab
Click to open the “Original Genre Setting” dialog box (page 105).
3
38
Page 39

Timer window
To view the Timer window, click the TIMER icon in the Tool bar (page
7). Use this window to set a timer (pages 107, 109). If the clock has not
been set yet, the “Clock Set” dialog box (page 106) will appear. The
clock must be set before the Timer window can be displayed.
1 Timer set button
Click to open the “Timer Set” dialog box (pages 107, 109).
2 REC Timer display
Displays the timer settings for recording.
Preparation
1
4
3
2
3 Play Timer display
Displays the timer setting for playing.
4 Close button
Click to close the Timer window.
39
Page 40

Operating the CD player
Listening to a CD
Listening to a CD using the CD or PC-CD bar
1 Display the CD or PC-CD bar (pages 9, 23).
2 Click the Disc Information display in the CD or PC-CD bar.
A list of CDs appears.
(A CD list is displayed only when your system stereo component is
equipped with a CD changer or you use multiple CD-ROM drives
on your computer. Otherwise, proceed to step 4.)
3 Click the CD (in the list) that you want to play.
The selected CD appears in the Disc Information display.
4 Click the Track Number/Track Name display in the CD or PC-CD
bar.
A list of tracks appears.
5 Click the track (in the list) that you want to play.
Sequential playback of the tracks starts with the selected track.
Listening to a CD using the CD or PC-CD window
The same basic steps below are used to listen to a CD loaded in the
system stereo component and a CD loaded in the CD-ROM drive of
your computer.
1 Open the CD window or the PC-CD window (pages 10, 24).
2 Click or double-click the CD (in the Function Tree display) that you
want to play.
A list of the tracks on the selected CD appears in the Track Name
display.
40
Page 41

3 Click the track number of the track (in the Track Name display)
that you want to play.
Playback of the track also starts when you double click the track
number.
4 Click in the CD window (only if you clicked a track number in
step 3).
Sequential playback of the tracks begins with the track selected in
step 3.
Note
If you play a CD using the PC-CD window, no audio signal will be output from
the PC link kit if the “Enable digital CD audio for this CD-ROM drive.” check
box is not selected under the “CD Music” tab in the “Multimedia Properties”
dialog box on your computer.
Operating the CD player
41
Page 42

Assigning names to CDs
You can assign names to discs and tracks, as well as assign names using
text data from another application (page 43) and use disc and track
name data in other application (page 44).
1 Open the CD window or the PC-CD window (pages 10, 24).
2 Click the CD (in the Function Tree display) that you want to name,
and then click the Disc Information display.
To assign a name to a track, click the track name of the track in the
Track Name display.
The edit mode for entering the name is activated.
3 Input the name.
Right-clicking in the edit mode opens up a pop-up menu that lets
you copy and paste previously entered text data.
4 Press the ENTER key.
The name that you typed in is entered and the system becomes
ready for input of the next name.
Notes
• Disc and track names are saved to the hard disk in your computer. Do not
delete, move or, modify the folder in which these names are stored.
• Disc and track names are displayed only within M-crew, and not on any of
the system stereo components. Names (disc memos) that are saved on a
system stereo component appear only on that component and not in M-crew.
• If you name a CD containing CD-text, the CD-text information
will no longer be displayed afterwards. If you want to view the CD-text
information, click the Reload button in the CD or PC-CD window (page 10,
24). Please note that clicking the Reload button will cause all discs and track
names assigned to the CD to be deleted.
42
Page 43

Assigning track names with text data from another application
You can use a text editor such as Notepad to enter track names in
advance, and then use the data to assign names to all tracks in a single
operation.
1 Type in the track names as shown in the example below, using
Notepad or other text editing software.
Example Track name of the third track<ENTER>
Track name of the fourth track<ENTER>
Track name of the fifth track<ENTER>
:
Track name of the eighth track<ENTER>
2 Copy the text and paste it to the clipboard using the editing menu
of the text editing software.
The copy and paste procedure may vary according to the text
editing software. For details, refer to the instructions provided with
the text editing software.
3 Click the track name of the track (in the Track Name display) that
you want to name.
Following the example text given in step 1, click the third track.
The edit mode for entering track names is activated.
4 Right-click to display a pop-up menu, and click “Paste.”
In this example, the track names created and copied through the
text editing software are entered as the track names of the third to
eighth tracks.
Operating the CD player
Notes
• Disc and track names are saved to the hard disk in your computer. Do not
delete, move or, modify the folder in which these names are stored.
• Disc and track names are displayed only within M-crew, and not on any of
the system stereo components. Names (disc memos) that are saved on a
system stereo component appear only on that component and not in M-crew.
• If you name a CD containing CD-text, the CD-text information
will no longer be displayed afterwards. If you want to view the CD-text
information, click the Reload button in the CD or PC-CD window (page 10,
24). Please note that clicking the Reload button will cause all discs and track
names assigned to the CD to be deleted.
43
Page 44

Using disc and track name data in other applications
Saving disc and track names entered in M-crew to a CSV (Comma
Separated Value) formatted file allows this data to be used in database
software, spreadsheets and other software.
1 Open the CD window or the PC-CD window (pages 10, 24).
2 Right-click the Track Name display.
A pop-up menu appears.
3 Click “Save As CSV File” in the pop-up menu.
A “Save As” dialog box appears.
4 Input a CSV file name and click “Save.”
The CSV file is saved and becomes available for use in database
software or spreadsheets.
z Tip
M-crew cannot read CSV files, but it can record disc and track names that have
been created by and input from another application (page 43).
44
Page 45

Adding an image to the CD or PC-CD Jacket display
You can add one jacket image (bitmapped or JPEG file) for each disc.
1 Open the CD or PC-CD window (page 10, 24).
2 Drag a bitmapped image file from the Explorer and drop it onto the
Jacket display.
The bitmapped image will appear in the Jacket display.
z Tips
• The bitmapped image file that is dragged and dropped is copied to the Jacket
folder (default location: C:\Program Files\M_crew\Jacket), which is located
in the same folder as the M-crew application.
• When the image in the Jacket folder is deleted, the image in the Jacket display
will not disappear. To delete the Jacket display image, right-click the Jacket
display, and then click “Initialize image.” The image file in the Jacket folder,
on the other hand, is not affected when the Jacket display image is deleted.
Operating the CD player
45
Page 46

Performing MD operations
Listening to an MD
Listening to an MD using the MD bar
1 Display the MD bar (page 13).
2 Click the Disc Information display on the MD bar.
A list of MDs appears.
(An MD list is displayed only when your system stereo component
is equipped with an MD changer. Otherwise, proceed to step 4.)
3 Click the MD (in the list) that you want to play.
MD text data are read in.
4 Click the Track Number/Track Name display in the MD bar.
A list of tracks appears.
5 Click the track (in the list) that you want to play.
Sequential playback of the tracks starts with the selected track.
46
Page 47

Listening to an MD using the MD window
1 Open the MD window (page 14).
2 Click the MD (in the Function Tree display) that you want to play.
A list of the tracks on the selected MD appears in the Track Name
display.
3 Click the track number of the track (in the Track Name display)
that you want to play.
Playback of the track also starts when you double click the track
number.
4 Click in the MD window (only if you clicked a track number in
step 3).
Sequential playback of the tracks begins with the track selected in
step 3.
Performing MD operations
47
Page 48

Assigning names to MDs
Assigning disc or track names
Before you begin
• Only alphanumeric characters and the symbols listed below can be
used in disc and track names:
! ” # $ % & ’ ( ) * + , – . / : ; < = > ? @ _ ‘
All other characters will not be correctly displayed.
• Disc or track names cannot be recorded or edited on a write-
protected MD. To do so, first slide the write-protect tab on the MD
to enable writing.
1 Open the MD window (page 14).
2 Click the MD (in the Function Tree display) that you want to name,
and then click the Disk Information display.
To assign a name to a track, click the track name of the track in the
Track Name display.
The edit mode for entering the name is activated.
3 Input the name.
Right-clicking in the edit mode opens up a pop-up menu that lets
you copy and paste previously entered text data.
48
4 Press the ENTER key.
The name that you typed in is entered and the system becomes
ready for input of the next name.
Note
Disc and track names are saved to both the MD and your computer’s hard disk.
If you modify the name of a track on the system stereo component, the track
name may no longer match the one displayed in M-crew. To correctly display
track names that have been modified on the MD, click the Reload button in the
MD window (page 15).
Page 49

Assigning track names with the text data stored in the Disc Library
Track names that have been assigned to a disc and stored in the Disc
Library can be reassigned in a single operation to another disc with the
same contents.
1 Open the Disc Library window (page 32).
2 Right-click the Track Name display.
A pop-up menu appears.
3 Click “Copy all text information” in the pop-up menu.
The text information is temporarily stored.
Performing MD operations
4 Open the MD window (page 14).
5 Right-click the Track Name display.
A pop-up menu appears.
6 Click “Paste all text information” in the pop-up menu.
Note
Disc and track names are saved to both the MD and your computer’s hard disk.
If you modify the name of a track on the system stereo component, the track
name may no longer match the one displayed in M-crew. To correctly display
track names that have been modified on the MD, click the Reload button in the
MD window (page 15).
49
Page 50

Assigning track names with text data from another application
You can use a text editor such as Notepad to enter track names in
advance, and then use the data to assign names to all tracks in a single
operation.
Before you begin
• Only alphanumeric characters and the symbols listed below can be
used in disc and track names:
! ” # $ % & ’ ( ) * + , – . / : ; < = > ? @ _ ‘
All other characters will not be correctly displayed.
• Disc or track names cannot be recorded or edited on a write-
protected MD. To do so, first slide the write-protect tab on the MD
to enable writing.
1 Type in the track names as shown in the example below, using
Notepad or other text editing software.
Example Track name of the third track<ENTER>
Track name of the fourth track<ENTER>
Track name of the fifth track<ENTER>
:
Track name of the eighth track<ENTER>
2 Copy the text and paste it to the clipboard using the editing menu
of the text editing software.
The copy and paste procedure may vary according to the text
editing software. For details, refer to the instructions provided with
the text editing software.
50
3 Click the track name of the track (in the Track Name display) that
you want to name.
Following the example text given in step 1, click the third track.
The edit mode for entering track names is activated.
Page 51

4 Right-click to display a pop-up menu, and click “Paste.”
In this example, the track names created and copied through the
text editing software are entered as the track names of the third to
eighth tracks.
Note
Disc and track names are saved to both the MD and your computer’s hard disk.
If you modify the name of a track on the system stereo component, the track
name may no longer match the one displayed in M-crew. To correctly display
track names that have been modified on the MD, click the Reload button in the
MD window (page 15).
Performing MD operations
51
Page 52

Using disc and track name data in other applications
Saving disc and track names entered in M-crew to a CSV (Comma
Separated Value) formatted file allows this data to be used in database
software, spreadsheets and other software.
1 Open the MD window (page 14).
2 Right-click the Track Name display.
A pop-up menu appears.
3 Click “Save As CSV File” in the pop-up menu.
A “Save As” dialog box appears.
4 Input a CSV file name and click “Save.”
The CSV file is saved and becomes available for use in database
software or spreadsheets.
z Tip
M-crew cannot read CSV files, but it can record disc and track names that have
been created by and input from another application (page 50).
52
Page 53

Adding an image to the MD Jacket display
You can add one jacket image (bitmapped or JPEG file) for each disc.
1 Open the MD window (page 14).
2 Drag a bitmapped image file from the Explorer and drop it onto the
Jacket display.
The bitmapped image will appear in the Jacket display.
z Tips
• The bitmapped image file that is dragged and dropped is copied to the Jacket
folder (default location: C:\Program Files\M_crew\Jacket), which is located
in the same folder as the M-crew application.
• When the image in the Jacket folder is deleted, the image in the Jacket display
will not disappear. To delete the Jacket display image, right-click the Jacket
display, and then click “Initialize image.” The image file in the Jacket folder,
on the other hand, is not affected when the Jacket display image is deleted.
Performing MD operations
53
Page 54

Recording to an MD
Recording from a CD to an MD
Before you begin
• You cannot record to a write-protected MD. Slide the write-protect
tab on the MD to enable writing.
• Before you begin the recording, double-click the disc icons of all the
MDs to be recorded to. This will cause the system to upload TOC
information necessary for the recording operation.
• Click
recording mode.
z Tip
You can also record from a PC-CD to an MD using the same procedure
described below.
Synchro recording from a CD to an MD
1 Open the Rec window (page 34).
2 Click the Synchro button (page 36).
3 (Only for certain system components) Click the Synchro speed
change button (page 35).
on the Recording Mode display (page 35) to select the
54
4 Click the destination MD in the Function Tree display in the MD
window.
The names of the tracks on the MD appear in the Track Name
display in the MD window.
If the track names do not appear, double-click the destination MD.
5 Click the source CD in the Function Tree display in the CD
window.
The names of the tracks on the CD appear in the Track Name
display in the CD window.
If the track names do not appear, double-click the source CD.
Page 55

6 Drag the number of the track you want to record from the Track
Name display in the CD window and drop it into the Track Name
or Disk Information display in the MD window.
The dropped track appears in orange in the Track Name display in
the MD window, which indicates that it is a track to be recorded.
You can register a track to be recorded by selecting the track and
pressing the Add button.
Repeat the procedure from step 4 to specify other tracks for
recording. Two or more tracks can be selected at the same time by
clicking the desired track numbers while holding down the CTRL
key.
To specify all tracks on a CD, drag and drop the CD disc icon (for
example, CD1) from the Disc Information display into the MD
window.
Repeat the procedure from step 4 to record from more than one
CD.
Note
If the tracks that you have dragged and dropped cannot be contained on a
single MD, the dragging operation is canceled and the message
“Insufficient free recording space” appears.
7 Click the REC button in the Rec window.
Recording from the CD to the MD starts.
To stop recording, click
in the MD window.
Performing MD operations
Deselecting tracks that have been selected for recording
To deselect a track that has been selected for recording, drag the track
number from the Track Name display in the MD window and drop it
into
Alternatively, you may click the track, and then click the Undo button
to cancel the track selection.
To cancel all selected tracks, click
.
in the MD window.
(continued)
55
Page 56

Recording from a CD to an MD manually
1 Open the Rec window (page 34).
2 Click the Manual button (page 35).
3 Click the System recording mode button in the Rec window to make
settings for the MD changer (page 36).
(System recording mode button appears only when your system
stereo component is equipped with an MD changer. Otherwise,
proceed to step 4.)
4 Click the REC button.
The MD recorder changes to record-pause mode.
5 Click
Recording to the MD starts.
To start recording with the fade-in effect, click the Fader button.
6 Play the CD in the CD window that you want to record to the MD
(page 40).
To stop recording, click
If you click the Fader button, the fade-out effect is recorded and the
MD recorder changes to record-pause mode.
z Tip
SmartSpace, TrackMarklevelSync, and Fade can be set with the Set up button
(page 37).
or the Fader button in the MD window.
in the MD window.
Adjusting the recording level
1 Open the Rec window (page 34).
2 Click the Manual button (page 35).
3 Click in the CD window.
4 Click the REC button.
The newly added track is highlighted in orange in the Track Name
display in the MD window and the MD recorder changes to recordpause mode.
5 Click the Recording level adjustment button (page 37).
The “Rec Level Adjust” dialog box appears and a red line points to
the peak level. Drag the slider to adjust the recording level.
6 Click
If you want to cancel the setting, click
.
.
56
Page 57

Making settings for manual recordings
1 Open the Rec window (page 34).
2 Click the Manual button.
3 Click the Set Up button to display the “Set Up” dialog box.
1
2
3
4 Make settings for each items.
1 Make space between each tracks equal
If this function is set to ON during manual recording, any space
between tracks that is longer than 30 seconds will be automatically
shortened to 3 seconds. Click ON to activate this function or OFF to
deactivate it.
2 Assign track numbers to each track automatically
If this function is set to ON, when an input signal level goes below
the preset level (track space detecting level) for more than 2 seconds
and goes above the preset level again, a track number is assigned to
the track.
Click ON to activate this function or OFF to deactivate it.
Click
to select track space detecting level to assign track number.
Performing MD operations
(continued)
57
Page 58

3 Adding the fade-in effect or fade-out effect
The beginning of a track becomes louder gradually, or the end of a
track fades away gradually. When
or is clicked once, end point
of fade-in or begining point of fade-out moves by 0.1 second.
When
is draged to left or right, the begining point or end point
moves as you drag.
5 Click .
Set Up dialog closes.
If you want to cancel the setting, click
Notes
• While recording to an MD, do not click any icon other than the TIMER icon in
the Tool bar. Recording will halt if you do.
• If the MD runs out of space while tracks are being recorded from a CD, the
recording operation is halted. Afterwards, M-crew may not function properly.
If this happens, restart M-crew.
• If the number or name of previously recorded tracks are displayed in orange
for too long, M-crew may fail to work properly after the recording operation is
completed. Be sure to restart M-crew.
• If CD or MD information is not displayed correctly after completing the
recording, click the Reload button to refresh the information.
• When all tracks on a CD were selected by dragging the Disc Information
display in the CD window to the MD window, the tracks cannot be deselected
individually. To deselect the tracks, you must deselect all of them by clicking
in the MD window.
.
58
Page 59

Recording from the tuner to an MD
When you record from the tuner to an MD, M-crew enters the manual
recording mode automatically. You cannot select synchro recording
mode.
Before you begin
• You cannot record to a write-protected MD. Slide the write-protect
tab on the MD to enable writing.
• Before you begin the recording, double-click the disc icons of all the
MDs to be recorded to. This will cause the system to upload TOC
information necessary for the recording operation.
1 Open the Rec window (page 34).
2 Click TUNER in the Function Tree display on the left.
3 Use the TUNER window to tune in the radio broadcast that you
want to record to the MD. (page 87).
4 Click the destination MD in the Function Tree display in the MD
window.
5 Click the REC button in the Rec window.
The MD enters recording-pause mode.
6 Click in the MD window.
Recording from the tuner to the MD starts.
To stop recording, click
Recording by drag-and-drop operation
1 Open the Rec window (page 34).
2 Click TUNER in the Function Tree display.
3 Drag the station name from the TUNER window and drop it onto
the destination MD in the MD window.
4 Click
in the MD window.
in the MD window.
Performing MD operations
(continued)
59
Page 60

Adjusting the recording level
1 Open the Rec window (page 34).
2 Listen to the source radio in the TUNER window.
3 Click the REC button.
4 Click the Recording level adjustment button (page 37).
The “Rec Level Adjust” dialog box appears and a red line points to
the peak level. Drag the slider to adjust the recording level.
Note
While recording to an MD, do not click any icon other than the TIMER icon in
the Tool bar. Recording will halt if you do.
Recording music files from the PC to an MD
Before you begin
• You cannot record to a write-protected MD. Slide the write-protect
tab on the MD to enable writing.
• Before you begin the recording, double-click the disc icons of all the
MDs to be recorded to. This will cause the system to upload TOC
information necessary for the recording operation.
1 Open the Rec window (page 34).
2 Click the Synchro button (page 36).
60
3 Click the source file album in the Function Tree display in the File
window.
The tracks registered in the file album are displayed in the Track
Name display in the File window.
If the files to be recorded are stored in a folder, double-click the
folder to open it.
Page 61

4 Drag the number of the track you want to record from the Track
Name display in the File window and drop it into the Track Name
or Disc Information display in the MD window.
The dropped track appears in orange in the Track Name display in
the MD window, which indicates that it is a track to be recorded.
You can register a track to be recorded by selecting the track and
clicking the Add button.
Repeat the procedure from step 3 to specify other tracks for
recording. Two or more tracks can be selected at the same time by
clicking the desired track numbers while holding down the CTRL
key.
To specify all tracks on the file album, drag and drop the file album
icon from the File Information display into the MD window.
Repeat the procedure from step 3 to record from more than one file
album.
Note
If the tracks that you have dragged and dropped cannot be contained on a
single MD, the dragging operation is canceled and the message
“Insufficient free recording space” appears.
5 Click the REC button in the Rec window.
Recording from the PC to the MD starts.
To stop recording, click
Adjusting the recording level
1 Open the Rec window (page 34).
2 Click the Manual button (page 35).
3 Click
4 Click the REC button.
5 Click the Recording level adjustment button (page 37).
The “Rec Level Adjust” dialog box appears and a red line points to
the peak level. Drag the slider to adjust the recording level.
Note
While recording to an MD, do not click any icon other than the TIMER icon in
the Tool bar. Recording will halt if you do.
in the File window.
in the MD window.
Performing MD operations
61
Page 62

Recording to an MD from other audio sources
Before you begin
• You cannot record to a write-protected MD. Slide the write-protect
tab on the MD to enable writing.
• Before you begin the recording, double-click the disc icons of all the
MDs to be recorded to. This will cause the system to upload TOC
information necessary for the recording operation.
1 Open the Rec window (page 34).
2 Click the Manual button (page 35).
3 Click the desired function (audio source) in the Function Tree
display you want to record from.
4 Click the REC button in the Rec window.
MD recorder changes to record-pause mode.
5 Start playing the source you want to record.
6 Click or the Fader button in the MD window.
Recording from the selected source to the MD starts.
To start recording with the fade-in effect, click the Fader button.
To stop recording, click
If you click the Fader button, the fade-out effect is recorded and the
MD recorder changes to record-pause mode.
in the MD window.
62
Page 63

Adjusting the recording level
1 Open the Rec window (page 34).
2 Click the desired function (audio source) in the Function Tree
display and start playing the source that you want to record.
3 Click the REC button.
4 Click the Recording level adjustment button (page 37).
The “Rec Level Adjust” dialog box appears and a red line points to
the peak level. Drag the slider to adjust the recording level.
Note
While recording to an MD, do not click any icon other than the TIMER icon in
the Tool bar. Recording will halt if you do.
Performing MD operations
63
Page 64

Editing recorded MDs
Moving tracks
You can rearrange the order of tracks on an MD, but you cannot move
tracks from one MD to another.
Note
While this dialog box is displayed, the MD cannot be operated by the system
stereo component.
1 Open the MD window (page 14).
2 Click the number of the track in the Track Name display in the MD
window that you want to move.
The name of the track is highlighted in yellow.
Note
You can move only one track per move operation. If you select more than
one track, the move function is disabled.
3 Click the MD edit button .
The “Move” dialog box appears.
64
To cancel the move, click .
4 Click to select the number to which you want the selected track
moved.
5 Click .
The track that you selected in step 2 moves to the track number
specified in step 4.
Page 65

Moving a track by drag-and-drop operation
1 Open the MD window (page 14).
2 Drag the number of the track in the Track Name display in the MD
window that you want to move and drop it at the desired
destination.
Moving a track that is being played
1 Open the MD window (page 14).
2 Play the track that you want to move (page 46).
3 Click the MD edit button
The “Move” dialog box appears.
To cancel the move, click
.
.
Note
Verify that the track you want to move is indicated in the “Move” dialog
box.
4 Select the new number to which you want to move the track.
5 Click
The track being played moves to the track number specified in step
4.
Note
To deselect a track, click in an empty area in the MD window (e.g., the empty
area in the Time display).
.
Performing MD operations
65
Page 66

Dividing tracks
You can divide a single track into two tracks.
Note
While this dialog box is displayed, the MD cannot be operated by the system
stereo component.
1 Open the MD window (page 14).
2 Play the track you want to divide (page 46).
Note
Only the track being played can be divided.
3 Click the MD edit button where you want to divide the track.
The division point is selected temporarily.
The “Divide” dialog box appears and Rehearsal playback starts
from the position you clicked.
66
To cancel the divide, click .
4 Adjust the division point.
Each click on
point by 1-frame intervals* (1 frame = 1/86 second) during stereo
recording. You can also slide
division point.
Rehearsal playback starts again from the new division point.
* In Monaural and LP2 stereo mode : 2-frame intervals
In LP4 stereo mode : 4-frame intervals
or in the “Divide” dialog box moves the division
to the left or right to adjust the
5 When the adjustment is completed, click .
The track is divided into two.
Page 67

Combining tracks
You can combine two tracks into one track.
Note
While this dialog box is displayed, the MD cannot be operated by the system
stereo component.
1 Open the MD window (page 14).
2 Select two tracks you want to combine from the MD window.
Click the track number of the first track, and then click the track
number of the second track while holding down the CTRL key.
Notes
• If you select the first track only, and then proceed to step 3, the system
assumes the second track to be that which immediately follows.
• You cannot select and combine three or more tracks.
• You cannot combine tracks recorded in different recording modes.
3 Click the MD edit button .
The “Combine” dialog box appears.
Rehearsal playback is performed for about 4 seconds of a segment
consisting of the last 2 seconds or so of the first track and the first 2
seconds or so of the second track.
Performing MD operations
To cancel the combination, click .
(continued)
67
Page 68

4 To enter the combination sequence of the two tracks shown in the
“Combine” dialog box, click
The selected tracks are joined.
To reverse the sequence of the tracks in the “Combine” dialog box,
click
.
Combining the track being played with the track that
immediately follows
1 Open the MD window (page 14).
2 Play the first track that you want to combine (page 46).
3 Click the MD edit button
The “Combine” dialog box appears.
Rehearsal playback is performed for about 4 seconds of a segment
consisting of the last 2 seconds or so of the first track and the first 2
seconds or so of the second track.
To cancel the combination, click
4 To enter the combination sequence of the two tracks shown in the
“Combine” dialog box, click
The selected tracks are joined.
To reverse the sequence of the tracks in the “Combine” dialog box,
click
Notes
• To deselect a track, click in an empty area within the MD window, e.g., the
empty area within the Time display.
• The track being played can only be combined with the track that immediately
follows it.
• If two tracks are selected in the Track Name display, they are combined no
matter what track is being played.
.
.
.
.
.
68
Page 69

Erasing part of a track
You can erase a portion of a track.
Note
While this dialog box is displayed, the MD cannot be operated by the
systemstereo component.
1 Open the MD window (page 14).
2 Play the part of the track that you want to erase (page 46).
Note
Erasing part of a track can be done only while the track is playing.
3 Click the MD edit button when the part that you want to erase
begins playing.
The starting point (point A) of the erasure is temporarily set.
The “A-B Erase” dialog box appears, and Rehearsal playback is
performed of a 2-second segment ending at point A.
To cancel the erasure, click .
(continued)
Performing MD operations
69
Page 70

4 Adjust the starting point (point A).
Each click of
by 1-frame interval* (1 frame = 1/86 second) during stereo
recording. You can also slide
A.
* In Monaural and LP2 stereo mode : 2-frame intervals
In LP4 stereo mode : 4-frame intervals
or in the “A-B Erase” dialog box moves point A
to the left or right to adjust point
5 When adjustment of point A is completed, click .
The track starts playing from point A. Clicking or moves
the track position backwards or forwards, allowing you locate the
ending point (point B) of the erasure easily.
6 Click when the part of the track that you want to erase
finishes playing.
The ending point (point B) is set temporarily.
Rehearsal playback is performed for about 4 seconds of a segment
that begins about 2 seconds before point A and ends about 2
seconds after point B.
7 Adjust the ending point (point B).
Adjust the location of point B using
point A.
and or as you did with
70
8 When adjustment of point B is completed, click .
The part from point A to point B is erased.
Page 71

Adding the fade-in effect after recording
You can add a fade-in effect at the beginning of a track. The fade-in can
range from 1 second to 15 seconds.
Notes
• The fade-in effect cannot be added to a track that has been recorded in an LP
mode (LP2 or LP4).
• While this dialog box is displayed, the MD cannot be operated by the system
stereo component.
Before you begin
Please note that it is impossible to undo the results of this MD edit
operation.
1 Open the MD window (page 14).
2 Select the track in the Track Name display in the MD window for
which you want to add the fade-in effect.
3 Click the MD edit button .
The “Fade in” dialog box appears, and Rehearsal playback of the
track starts.
Performing MD operations
To cancel the fade-in procedure, click .
(continued)
71
Page 72

4 Adjust the fade-in starting and ending points in three steps.
1 Drag
2 Drag
3 Click
within a range of 1 to 15 seconds.
in Start Point to roughly locate the starting point.
in Rate to fine-tune the starting point.
or to adjust the position in increments of 0.1-second
5 Set the fade-in curve type.
Select Curve1, Curve2, or Curve3.
6 When the adjustment is completed, click .
Updating of the track begins.
72
Page 73

Adding the fade-out effect after recording
You can add a fade-out effect at the end of a track. The fade-out can
range from 1 second to 15 seconds.
Notes
• The fade-out effect cannot be added to a track that was recorded in an LP
mode (LP2 or LP4).
• While this dialog box is displayed, the MD cannot be operated by the system
stereo component.
Before you begin
Please note that it is impossible to undo the results of this MD edit
operation.
1 Open the MD window (page 14).
2 Select the track in the Track Name display in the MD window for
which you want to add the fade-out effect.
3 Click the MD edit button .
The “Fade out” dialog box appears, and Rehearsal playback of the
track starts.
Performing MD operations
To cancel the fade-out procedure, click .
(continued)
73
Page 74

4 Adjust the fade-out starting and ending points in three steps.
1 Drag
2 Drag
3 Click
within a range of 1 to 15 seconds..
in Start Point to roughly locate the starting point.
in Rate to fine-tune the starting point.
or to adjust the position in increments of 0.1-second
5 Set the fade-out curve type.
Select Curve1, Curve2, or Curve3.
6 When the adjustment is completed, click .
Updating of the track begins.
Changing the recording level
You can change the recording level setting of a track.
Notes
• The recording level of a track that was recorded in an LP mode (LP2 or LP4)
cannot be changed.
• While this dialog box is displayed, the MD cannot be operated by the system
stereo component.
Before you begin
Please note that it is impossible to undo the results of this MD edit
operation.
74
1 Open the MD window (page 14).
2 Select the track in the Track Name display in the MD window
whose recording level you want to change.
Page 75

3 Click the MD edit button .
The “Level Shift” dialog box appears, and Rehearsal playback of
the track starts.
A red line points to the peak level.
To cancel the recording level change, click
.
4 Click to change the recording level.
The recording level can be adjusted within a range of -12 dB to +12
dB.
5 When the desired recording level is attained, click .
Updating of the track begins.
Performing MD operations
75
Page 76

Erasing tracks
You can erase recorded tracks.
Note
While this dialog box is displayed, the MD cannot be operated by the
systemstereo component.
1 Open the MD window (page 14).
2 Select the track in the Track Name display in the MD window that
you want to erase.
To erase only one track, click the track number.
To erase multiple tracks, click the track numbers in sequence while
holding down the CTRL key.
To select all the tracks on an MD, click the Jacket display (page 15).
To erase the track being played, proceed to step 3 without selecting
a track.
3 Click the MD edit button .
The “Erase” dialog box appears.
76
To cancel the erasure, click .
4 To erase the selected tracks, click .
All the selected tracks are erased. If you did not select a track, the
track being played is erased.
Page 77

Dragging tracks to to erase them
1 Open the MD window (page 14).
2 Select the track in the Track Name display in the MD window that
you want to erase.
To erase only one track, click the track number.
To erase multiple tracks, click the track numbers in sequence while
holding down the CTRL key.
3 Drag the selected tracks and drop them on the MD edit button
All the selected tracks are erased.
Erasing all tracks
You can erase all the tracks recorded on an MD and the all the track
and disc names registered for the MD.
1 Open the MD window (page 14).
2 While the MD is stopped and no track has been selected, drag the
Disc Information display of the disc to be erased (page 17) and drop
it on the MD edit button
To erase all the tracks on an MD while the MD is stopped and no track
has been selected, do the following:
1 Click .
2 A dialog box appears. Follow the instructions that appear.
Note
To deselect the currently selected track, click on an empty area (i.e., a place with
no button or function key) in the Time display.
.
.
Performing MD operations
77
Page 78

Printing MD labels with Label Maker
You can use Label Maker to print out disc and track names to MD
labels.
Note
Do not affix labels outside the designated area on the MD, e.g., in the area near
the shutter. Be sure to affix the label within the embossed label boundary, which
varies in shape from one disc type to another.
Launching Label Maker
1 Open the MD window (page 14).
2 Select the MD (in the Function Tree display) for which you want to
print a label.
The names of the tracks on the MD appear in the Track Name
display in the MD window.
If the track names do not appear, double-click the MD in the
Function Tree display.
3 Click in the MD window.
Label Maker is started up.
You can now make a label.
Note
is functional only if you have installed the Label Maker software.
78
z Tip
Alternatively you can double-click “PicLabel” located in the PictureGear folder
(default location: C:\Program files\Sony\PictureGear\Goodies) to launch the
Label Maker.
Page 79

Creating labels with Label Maker
You can create labels with graphics or text to print for MDs and other
media.
1 Open the MD window (page 14).
2 Click to launch the Label Maker.
A template of an MD label appears in the main display. The disc
and track names currently displayed in the MD window appear on
the MD label. If you want to print the label as it is shown on the
MD label go to step 9.
To adjust the display size
Select the zoom magnification from the drop-down list in the main
window.
To select another template
Click “Open Template” in the “File” menu. The “Open Template”
dialog box opens.
Select the file and click “Open” to display the template in the main
window.
The templates available are:
3.5-inch floppy disk, 3.5-inch MO disk, Hi8/8mm video cassette,
CD-R, DV, Memory stick, MD, Mini DV, VHS video cassette, and
Audio cassette
3 Click “Add Image” in the “File” menu.
The “Add Image” dialog box opens.
(continued)
Performing MD operations
79
Page 80

4 Select the file containing the image of your preference, and then
click “Open.”
The main window appears again with the image displayed on the
image palette located at the right side of the window.
The table below lists the file formats supported by the Label Maker
and their file extensions.
File format File extension
Bitmap .BMP
JPEG .JPG
TIFF .TIF
FlashPix .FPX
GIF .GIF
Mavica .JPG
Slipclip .BMP (16-bit colour)
5 Place the image.
Drag the desired image from the image palette onto the label
creation area.
80
Page 81

To place the images automatically
Select the images and click “Autocopy” in the “Edit” menu.
The images are pasted into the template area without changing the
aspect ratio.
To make the image round or square
Select the image in the label creation area and click “Round” or
“Square” in the “Edit” menu.
You can change the size of an image in the label creation area but
not in the template area.
To rotate the image 90 degrees
Select the image in the label creation area and click “Rotate” in the
“Edit” menu.
To change the size of the image
Select the image and drag the frame.
To change the size without changing the aspect ratio, drag the
image while holding down the SHIFT key.
To switch the positions of overlapping images or texts
Select the image or text in the label creation area, and then click
“Front” or “Back” in the “Overlap” menu to bring the selected
image or text to the front or move it to the back.
Performing MD operations
To realign multiple images
Select images while pressing down the SHIFT key, or drag the
images you want to realign, and then click “Align,” “Display
Evenly,” “Condense,” or “Expand.”
If you selected “Align,” click the type of alignment from among
“Align to Left,” “Align to Right,” “Align to Top,” “Align to
Bottom,” “Align to Center [Vertical],” and “Align to Center
[Horizontal].”
If you selected “Display Evenly,” “Condense,” or “Expand,” select
the orientation by clicking “Vertical” or “Horizontal.”
(continued)
81
Page 82

To add colour to the image
Click “Add Color” in the “File” menu to open the “Color” dialog
box.
Select the desired colour to display it on the image palette.
The colour, like other images, can be assigned to a template.
To delete an image
Select the image you want to delete on the image palette, and then
click “Delete” in the “Edit” menu.
6 Enter the label text.
Click “Text” in the Edit menu or
you want to start the text on the label creation area to open the
“Text” dialog box.
Click “Properties” to specify the text attributes.
and click at the position where
82
To change the font
Click “Change Font” to open the “Font” dialog box.
Select the font name, style and size of your preference. Then click
“OK.”
Page 83

To change the colour of the text
Click the “Text Color” or “Background” button according to the
colour of which you want to change, the text or the background of
the text. The “Color” dialog box opens.
You can check the “Transparent” to use a transparent background
colour.
To change vertical/horizontal text direction
Select “Horizontal” or “Vertical” under the “Line Direction” group
box.
To rotate the text
Select the desired angle under the “Rotation” group box.
To change the text alignment position
Select “Left,” “Center,” or “Right” under the “Align” group box.
To change the text spacing
Enter the desired line spacing and character spacing in points
under the “Spacing” group box.
(continued)
Performing MD operations
83
Page 84

7 Click “OK.”
The “Text” dialog box closes.
To delete the text
Select the text you want to delete in the label creation area, and
then click “Delete” in the “Edit” menu.
To rotate the text 90 degrees
Select the text in the label creation area and click “Rotate” in the
“Edit” menu.
To move overlapping texts to the front or back
Select the text in the label creation area and click “Front” or “Back”
in the “Overlap” menu.
84
Page 85

8 Save the label.
Click “Save As” in the “File” menu to open the “Save As” dialog
box.
Select the folder, input file name, and then click “Save” to save the
file.
The “Save As” dialog box closes.
9 Print the label.
Click “Page Setup” in the “File” menu to select the page settings.
Click “Print” in the “File” menu, and then click “OK.”
10Quit the Label Maker.
Click “Exit” in the “File” menu or click the
.
Performing MD operations
85
Page 86

Operating the tuner
Listening to the radio
Listening to the radio using the TUNER bar
1 Display the TUNER bar (page 18).
2 Click the Radio Band display in the TUNER bar.
A list of the radio bands is displayed.
3 Click to select a band.
The selected band appears in the Radio Band display.
4 Click the Preset Number/Radio Station Name display in the
TUNER bar.
If the stations are named (page 88), a list of the station names
appears. Otherwise, a preset number list appears.
5 Click the preset number of the station that you want to listen to.
The station assigned to the preset number starts to play.
86
Page 87

Listening to the radio using the TUNER window
1 Open the TUNER window (page 19).
2 Select a radio band.
Click
in the TUNER window to change the radio band.
3 Click the preset number in the Preset display of the radio station
you want to listen to.
The station assigned to the preset number starts to play.
Operating the tuner
87
Page 88

Assigning names to radio stations
1 Open the TUNER window (page 19).
2 Click the radio station name in the Preset display in the TUNER
window that you want to name.
The edit mode for entering the name is activated.
3 Input the name.
Right-clicking in the edit mode opens up a pop-up menu that lets
you copy and paste previously entered text data.
4 Press the ENTER key.
The name you entered is saved.
Notes
• The names you entered are saved to your computer’s hard disk. Do not delete,
move, or modify the folder in which the names are stored.
• Radio station names are displayed only in M-crew and not on the system
stereo component. Names entered on the system stereo component are
displayed only on the component and not in M-crew.
88
Page 89

Adding an image to the TUNER Jacket display
You can add one jacket image (bitmapped or JPEG file) for each preset
number.
1 Open the TUNER window (page 19).
2 Drag a bitmapped image file from the Explorer and drop it onto the
Jacket display.
The bitmapped image will appear in the Jacket display.
z Tips
• The bitmapped image file that is dragged and dropped is copied to the
TUNER Jacket folder (default location: C:\Program Files\M_crew\Jacket),
which is located in the same folder as the M-crew application.
• When the image in the Jacket folder is deleted, the image in the TUNER Jacket
display will not disappear. To delete the TUNER Jacket display image, rightclick the Jacket display, and then click “Initialize image.” The image file in the
Jacket folder, on the other hand, is not affected when the TUNER Jacket
display image is deleted.
Operating the tuner
89
Page 90

Editing preset numbers
1 Open the TUNER window (page 19).
2 Click in the TUNER window.
The “Edit” dialog box appears.
1
2
3 Set individual items.
1 Select the radio band.
Click to select a band.
2 Select the preset number to be edited.
Click
The frequency, station name, stereo/monaural, and URL for the
selected preset number will appear in the respective display
fields.
Note
The settings entered in the “Edit” dialog box are saved for the preset
number selected in 7, and not for the preset number selected here.
on the right side of the “PRESET No” field.
3
4
5
6
7
90
Page 91

3 Specify the frequency.
Click on the right side of the “Frequency” field.
The “TUNED” indicator will glow when a station is received.
Hold down the mouse button for 2 seconds or longer to initiate
auto-scanning. Scanning stops when a station is received or
when you click in an empty area in the dialog box.
4 Select a reception mode (only if FM was selected in 1).
Click to select STEREO or MONO.
5 Input the radio station name.
Click to enter a new radio station name.
6 Input the URL for the preset number.
Click to enter an URL (website address) that you want to
associate with the current preset number.
7 Select the preset memory number to which the settings will be
saved.
Select the preset memory number to which settings made in the
“Edit” dialog box will be saved.
4 Click .
The frequency 3, reception mode 4 (FM only), radio station
name 5, and URL 6 are saved to the preset number selected in
7 for the radio band selected in 1.
5 Click .
The “Edit” dialog box disappears.
Operating the tuner
91
Page 92

Operating the computer
Listening to file albums
Music files must be registered to file albums before they can be played
by M-crew. M-crew can play the following kinds of music files:
• MP3 files*
• WAVE files
• MIDI files
* Certain music files cannot be played back. As a rule, if Windows
Media Player cannot play an MP3 file, M-crew cannot play it either.
Registering music files to a file album
1 Open the File window (page 28).
My Album appears in the Function Tree display.
2 Click the icon of the file album in the Function Tree display to
which you want to register a music file.
The File window appears.
3 Click the icon.
The dialog box for registering music files appears.
92
4 Select a music file and click “Open.”
The track name of the registered music file appears in the Track
Name display.
z Tips
• You can also register a music file from the list in Explorer on your computer
by dragging and dropping the track name onto My Album or onto the Track
Name display in the File window. At this time, you can drag and drop more
than two files at once.
• The location of the actual music files does not change after they have been
registered to a file album.
• To find out where music files are stored, click the Display mode selector (page
31) to change to the File Name display.
Page 93

Listening to file albums using the AudioFile bar
1 Display the AudioFile bar (page 27).
2 Click the File Information display in the AudioFile bar.
A list of file albums appears.
3 Click the file album (in the list) that you want to play.
The selected file album appears in the File Information display.
4 Click the Track Number/Track Name display in the AudioFile bar.
A list of tracks appears.
5 Click the track (in the list) that you want to play.
Sequential playback of the tracks starts with the selected track.
Listening to file albums using the File window
1 Open the File window (page 28).
2 Click the file album that you want to play in the Function Tree
display.
A list of the tracks in the selected file album appears in the Track
Name display.
3 Click the track number of the track you want to play in the Track
Name display.
Double-clicking the track number starts playback of the track.
4 Click in the File window (only if you clicked a track number in
step 3).
Playback starts in sequence with the track you clicked in step 3.
Operating the computer
93
Page 94

Editing a file album
Music files registered to My Album can be moved to newly created file
albums or folders for easier management of the music files.
Creating a new file album or folder
1 Open the File window (page 28).
2 Click the top of the Function Tree display (“File Album”).
The window for creating a new file album or folder appears.
94
3 Click or .
A new file album or folder will be created in the Function Tree
display.
z Tip
To create a new file album in a folder, open the File window with the folder
selected.
Page 95

Moving music files
1 Open the File window (page 28).
2 Click the file album (in the Function Tree display) with the music
file to be moved.
3 Drag the track number of the track to be moved in the Track Name
display and drop onto the destination file album in the Function
Tree display.
To select multiple tracks at the same time, click the track numbers
while holding down the CTRL key.
z Tips
• Multiple file albums can be placed within a single folder for easier
management.
• To add a new file album to a folder, select the folder and click .
• You can also move file albums with the same procedure used to move music
files. File albums can be moved to the end of another folder or the Function
Tree display.
Notes
• A music file cannot be moved to another file album while it is being played.
• Folders cannot be moved.
• My Album cannot be moved nor erased.
Operating the computer
95
Page 96

Erasing file albums or folders
1 Open the File window (page 28).
2 Click the folder containing the file album that you want to erase.
To erase a file album that is not contained in a folder, click “File
Album” at the top of the Function Tree display.
3 Select the file album or folder (in the Track Name display) that you
want to erase.
Two or more file albums or folders can be selected at the same time
by clicking them while holding down the CTRL key.
4 Click .
The “Erase” dialog box appears.
5 Click .
Erasing a music file
To erase a music file, select it in the Track Name display and click the
.
Notes
• File albums displayed in the Main bar cannot be erased.
• Erasing a folder also erases all file albums contained within it.
96
Page 97

Assigning names to file albums
You can assign names to file albums and the tracks contained in them.
As in the case of MDs, track names can be entered from another
application (page 50) and the completed file album and track name data
can be used by other applications (page 52).
1 Open the File window (page 28).
2 Click the file album name (in the Function Tree display) that you
want to name, and then click the File Information display.
To assign a name to a track, click the track name of the track in the
Track Name display.
The edit mode for entering the name is activated.
3 Input a file album name (or track name).
Right-clicking in the edit mode opens up a pop-up menu that lets
you copy and paste previously entered text data.
4 Press the ENTER key.
The name that you typed in is entered and the system becomes
ready for input of the next name.
z Tip
You can also use the above steps to assign names to folders.
Operating the computer
97
Page 98

Adding an image to the File Jacket display
You can add one jacket image (bitmapped or JPEG file) for each file
album.
1 Open the File window (page 28).
2 Drag a bitmapped image file from the Explorer and drop it onto the
Jacket display.
The bitmapped image will appear in the Jacket display.
z Tips
• The bitmapped image file that is dragged and dropped is copied to the Jacket
folder (default location: C:\Program Files\M_crew\Jacket), which is located
in the same folder as the M-crew application.
• When the image in the Jacket folder is deleted, the image in the Jacket display
will not disappear. To delete the Jacket display image, right-click the Jacket
display, and then click “Initialize image.” The image file in the Jacket folder,
on the other hand, is not affected when the Jacket display image is deleted.
Note
If you add a JPEG image to the Jacket display while playing a file album, the
track being played may be interrupted. Do not add a JPEG image to the jacket
display, especially when recording to an MD. Doing so will cause distortion in
the recorded sound.
98
Page 99

Using the disc library
The names of discs and track are saved to the M-crew disc library
automatically after they have been recorded or played back. The disc
library, like other functions, appears in the Function Tree display.
Viewing the disc library
1 Open the Disc Library window (page 32).
2 Click the icon of the disc library (in the Function Tree display) that
you want to view.
A list of the tracks stored in the selected disc library appears in the
Track Name display.
Operating the computer
99
Page 100

Searching the disc library
You can search through the disc library by specifying the type of a disc
library and keyword as search keys.
1 Open the Disc Library window (page 32).
2 Click .
The “Disc Library Search” dialog box appears.
3 Select the medium and the search category (“Item”), and enter the
keyword. Then click
The “Search Result Display” dialog box appears.
.
100
4 Click the field that you wish to view.
The Disc Library window for the selected data opens.
z Tip
The data storage media appear as icons in the “Media” field in the “Search
Result Display” dialog box.
 Loading...