

Page 1

Actual page number:
VIDEO CD
3-858-463-11 (1)
Player
Operating Instructions
MMMMM
MMMMM
EN
C1
C2
C2
MCE-F500
1996 by Sony Corporation
SONY MCE-F500 (E, C1, C2) 3-858-463-11
Page 2

Actual page number:
SONY MCE-F500 (E, C1, C2) 3-858-463-11
Page 3

Actual page number:
SONY MCE-F500 (E, C1, C2) 3-858-463-11
Page 4

Actual page number:
SONY MCE-F500 (E, C1, C2) 3-858-463-11
Page 5

Actual page number:
WARNING
To prevent fire or shock hazard, do not
expose the unit to rain or moisture.
To avoid electrical shock, do not open the
cabinet. Refer servicing to qualified personnel
only.
Laser component in this product is capable of emitting
radiation exceeding the limit for Class 1.
This appliance is classified as a CLASS 1 LASER product. The
CLASS 1 LASER PRODUCT MARKING is located on the rear
exterior.
The following caution label is located inside of the unit.
On placement
• Place the player in a location with adequate ventilation to
prevent heat build-up in the player.
• Do not place the player on a soft surface such as a rug that
might block the ventilation holes on the bottom.
• Do not place the player in a location near heat sources, or in
a place subject to direct sunlight, excessive dust or
mechanical shock.
On operation
• If the player is brought directly from a cold to a warm
location, or is placed in a very damp room, moisture may
condense on the lenses inside the player. Should this occur,
the player may not operate properly. In this case, remove
the disc and leave the player turned on for about an hour
until the moisture evaporates.
On adjusting volume
• Do not turn up the volume while listening to a portion with
very low level inputs or no audio signals. If you do, the
speakers may be damaged when a peak level portion is
played.
On cleaning
• Clean the cabinet, panel and controls with a soft cloth
slightly moistened with a mild detergent solution. Do not
use any type of abrasive pad, scouring powder or solvent
such as alcohol or benzine.
Precautions
On safety
• Caution – The use of optical instruments with this product
will increase eye hazard.
• Should any solid object or liquid fall into the cabinet,
unplug the player and have it checked by qualified
personnel before operating it any further.
On power sources
• Before operating the player, check that the operating
voltage of the player is identical with your local power
supply. The operating voltage is indicated on the nameplate
at the rear of the player.
• The player is not disconnected from the AC power source
(mains) as long as it is connected to the wall outlet, even if
the player itself has been turned off.
• If you are not going to use the player for a long time, be
sure to disconnect the player from the wall outlet. To
disconnect the AC power cord (mains lead), grasp the plug
itself; never pull the cord.
• Should the AC power cord (mains lead) need to be
changed, have it done at a qualified service shop only.
If you have any questions or problems concerning your
player, please consult your nearest Sony dealer.
Welcome!
Thank you for purchasing the Sony Video Compact Disc
(VIDEO CD) Player. Before operating the unit, please read
this manual thoroughly and retain it for future reference.
About This Manual
The instructions in this manual are for model MCE-F500.
Conventions
• Instructions in this manual describe the controls on the
player.
You can also use the controls on the remote if they have the
same or similar names as those on the player.
• The following icons are used in this manual:
Indicates that you can use only the remote to do
Z
the task.
Indicates tips and hints for making the task easier.
z
EN
2
SONY MCE-F500 (E, C1, C2) 3-858-463-11
Page 6

Actual page number:
TABLE OF CONTENTS
This Player Can Play the Following Discs................................................................4
Getting Started
Unpacking.............................................................................................................................4
Hooking Up the System...................................................................................................... 5
Basic Operations
Playing a VIDEO CD..............................................................................................................8
Enjoying Playback Using the PBC Functions
Playing VIDEO CDs with PBC Functions (PBC Playback)......................................... 10
Locating Scenes Directly Using the Scene Numbers (Scene Search)......................... 11
Locating a Scene or Track You Want
Using the On-Screen Display .......................................................................................... 13
Using the Front Panel Display ........................................................................................ 14
Resuming Playback from the Point You Stopped a VIDEO CD (Resume Play) ..... 15
Locating a Specific Scene or Track ................................................................................. 16
Locating a Particular Point in a Scene or Track............................................................ 17
Locating by Observing Several Scenes at One Time (Digest Play)............................ 18
Playing CDs in Various Modes
Playing Repeatedly........................................................................................................... 20
Playing in Random Order (Shuffle Play) ...................................................................... 21
Creating Your Own Program (Program Play).............................................................. 21
Reducing Distortion of the Picture (DNR) .................................................................... 23
Adding an Incidental Image to Moving Pictures (COMET) ...................................... 23
Playing Automatically When Turning On the Player (Auto Play)............................ 24
Switching the Sound ........................................................................................................ 24
Controlling the TV with the Supplied Remote............................................................. 25
EN
Additional Information
Notes on Discs ................................................................................................................... 26
Troubleshooting ................................................................................................................ 26
Specifications ..................................................................................................................... 27
Glossary.............................................................................................................................. 27
Index.......................................................................................................................................... 28
SONY MCE-F500 (E, C1, C2) 3-858-463-11
EN
3
Page 7

Actual page number:
Getting Started
This Player Can Play the
Following Discs
VIDEO CDs
Disc logo
Contents
Disc size
Play time
Audio + Video
(moving pictures)
12 cm/8 cm
74 min./
20 min.
To play VIDEO CDs, see page 8.
To enjoy PBC Playback of VIDEO CDs with PBC functions,
see page 10.
Note on VIDEO CDs
This player conforms to Ver. 1.1 and Ver. 2.0 of VIDEO CD
standards. You can enjoy two kinds of playback according to
the disc type.
Audio CDs
Audio
12 cm/8 cm (CD
single)
74 min./
20 min.
Getting Started
Unpacking
Check that you received the following items:
• Audio and video connecting cord
(3 phono plugs – 3 phono plugs) (1)
• Remote commander (remote) RMT-F500V (1)
• Sony SUM-3 (NS) batteries (2)
• Plug adaptor (1)
Inserting batteries into the remote
You can control the player using the supplied remote.
Insert two R6 (size AA) batteries by matching the +
and – on the batteries. When using the remote, point it
at the remote sensor g on the player.
Disc type
VIDEO CDs without
PBC functions
(Ver. 1.1 discs)
VIDEO CDs with PBC
functions
(Ver. 2.0 discs)
You can
Enjoy video playback (moving
pictures) as well as music.
Play interactive software using
menu screens displayed on the TV
screen (PBC Playback), in addition
to the video playback functions of
Ver 1.1 discs. Moreover, you can
play high-resolution still pictures, if
they are included on the disc.
z You can control Sony TVs with the g mark using the
supplied remote
See page 25.
z When to replace batteries
With normal use, the batteries should last for about six
months. When the remote no longer operates the player,
replace all the batteries with new ones.
Notes
• Do not leave the remote near an extremely hot or humid
place.
• Do not drop any foreign object into the remote casing,
particularly when replacing the batteries.
• Do not expose the remote sensor to direct sunlight or
lighting apparatuses. Doing so may cause a malfunction.
• If you don’t use the remote for an extended period of time,
remove the batteries to avoid possible damage from battery
leakage and corrosion.
EN
4
SONY MCE-F500 (E, C1, C2) 3-858-463-11
Page 8

Hooking Up the System
Overview
This section describes how to hook up the VIDEO CD
player to a TV (with audio/video input jacks) and/or
an amplifier. Be sure to turn off the power of each
component before making the connections.
pWhen listening to the sound through TV speakers
VIDEO CD player
Actual page number:
Getting Started
Playing CDsGetting Started
Getting Started
What cords will I need?
Audio and video connecting cord (supplied) (1)
Yellow
(video)
White
(L)
Red
(R)
Video connecting cord (not supplied) (1)
Yellow Yellow
Audio connecting cord (not supplied) (1)
White
(L)
Red
(R)
Yellow
(video)
White
(L)
Red
(R)
White
(L)
Red
(R)
To AUDIO
OUT
To VIDEO
OUT
To video input
To audio input
: Signal flow
To an AC outlet
TV
To an AC outlet
pWhen listening to the sound through speakers
connected to an amplifier
VIDEO CD player
To AUDIO
OUT
Amplifier
To VIDEO
OUT
To video input
To audio
input
TV
To an AC outlet
To an AC
outlet
Hookups
When connecting the cord, be sure to match the colorcoded cord to the appropriate jacks on the components:
Yellow (video) to Yellow, Red (right) to Red and White
(left) to White. Be sure to make connections firmly to
avoid hum and noise.
pWhen listening to the sound through TV speakers
VIDEO CD player
AUDIO OUT
RL
VIDEO
OUT
pWhen listening to the sound through speakers
connected to an amplifier
VIDEO CD player
AUDIO OUT
RL
VIDEO
OUT
TV
INPUT
VIDEO
L
AUDIO
R
TV
INPUT
VIDEO
L
AUDIO
R
: Signal flow
To an AC outlet
Amplifier
CD
L
R
(Continued)
SONY MCE-F500 (E, C1, C2) 3-858-463-11
EN
5
Page 9

Getting Started
z If your TV or VCR has an S video input connector
Connect the component via the S VIDEO OUT connector
using the S video cable (not supplied). You will get a
better picture.
S video cable
YC-15V (not supplied)
VIDEO CD player
S VIDEO
OUT
TV
S VIDEO IN
z If you have a digital component such as a DAT or MD
You can make digital recordings of audio CDs. Connect
the component via the DIGITAL OUT (OPTICAL)
connector using the optical cable (not supplied). Take off
the cap and plug in the optical cable.
Optical cable
POC-15 (not supplied)
VIDEO CD player
DIGITAL OUT
OPTICAL
Notes
• You cannot make digital recordings of VIDEO CDs,
since this player does not output signals through the
DIGITAL OUT (OPTICAL) connector while playing a
VIDEO CD.
• When you connect via the DIGITAL OUT (OPTICAL)
connector, noise may occur when you play CD
software other than music, such as a CD-ROM.
Digital component
DIGITAL IN
OPTICAL
Actual page number:
Important
Setting the color system switch
This player conforms to the NTSC and PAL color
systems. Set the COLOR SYSTEM switch on the rear
of the player to the appropriate position, according
to your TV.
• If the color system of your TV is NTSC:
Set the COLOR SYSTEM switch to NTSC. Pictures
will not be displayed if you set the switch to PAL.
When you play a VIDEO CD recorded in the PAL
color system, the picture will be stretched
vertically and will be displayed with the upper
and lower parts of the picture cut off.
• If the color system of your TV is PAL:
Set the COLOR SYSTEM switch to PAL. Pictures
will not be displayed if you set the switch to
NTSC. When you play a VIDEO CD recorded in
the NTSC color system, the picture will be
stretched horizontally and will be displayed with
the upper and lower parts of the screen masked in
black.
• If your TV automatically changes the color system
according to the input signal:
Pictures will be displayed with the switch set to
either NTSC or PAL.
If you set the COLOR SYSTEM switch to AUTO,
the player automatically changes the color system
of video output according to the color system of
the VIDEO CD to be played. In this case, the color
system selected remains until you turn off the
player, or you play another VIDEO CD with a
different color system. If you turn off the player,
the color system will be set to NTSC automatically
when you turn on the player again.
Be sure to turn off and on the player when you
change the setting.
COLOR SYSTEM
AUTO
NTSC
PAL
,
EN
6
SONY MCE-F500 (E, C1, C2) 3-858-463-11
Page 10

Setting the VOLTAGE SELECTOR
Check that the VOLTAGE SELECTOR on the rear
panel of the player is set to the local power line
voltage. If not, set the selector to the correct position
using a screwdriver before connecting the AC power
cord to a wall outlet.
When you set the selector to “110 – 120 V” position, be
sure to use the supplied plug adaptor.
VOLTAGE SELECTOR
220 - 240V110 - 120V
Actual page number:
Getting Started
Playing CDsGetting Started
Getting Started
Connecting the AC power cord
Connect the AC power cord to a wall outlet.
SONY MCE-F500 (E, C1, C2) 3-858-463-11
EN
7
Page 11
Actual page number:
Basic Operations
Playing a VIDEO CD
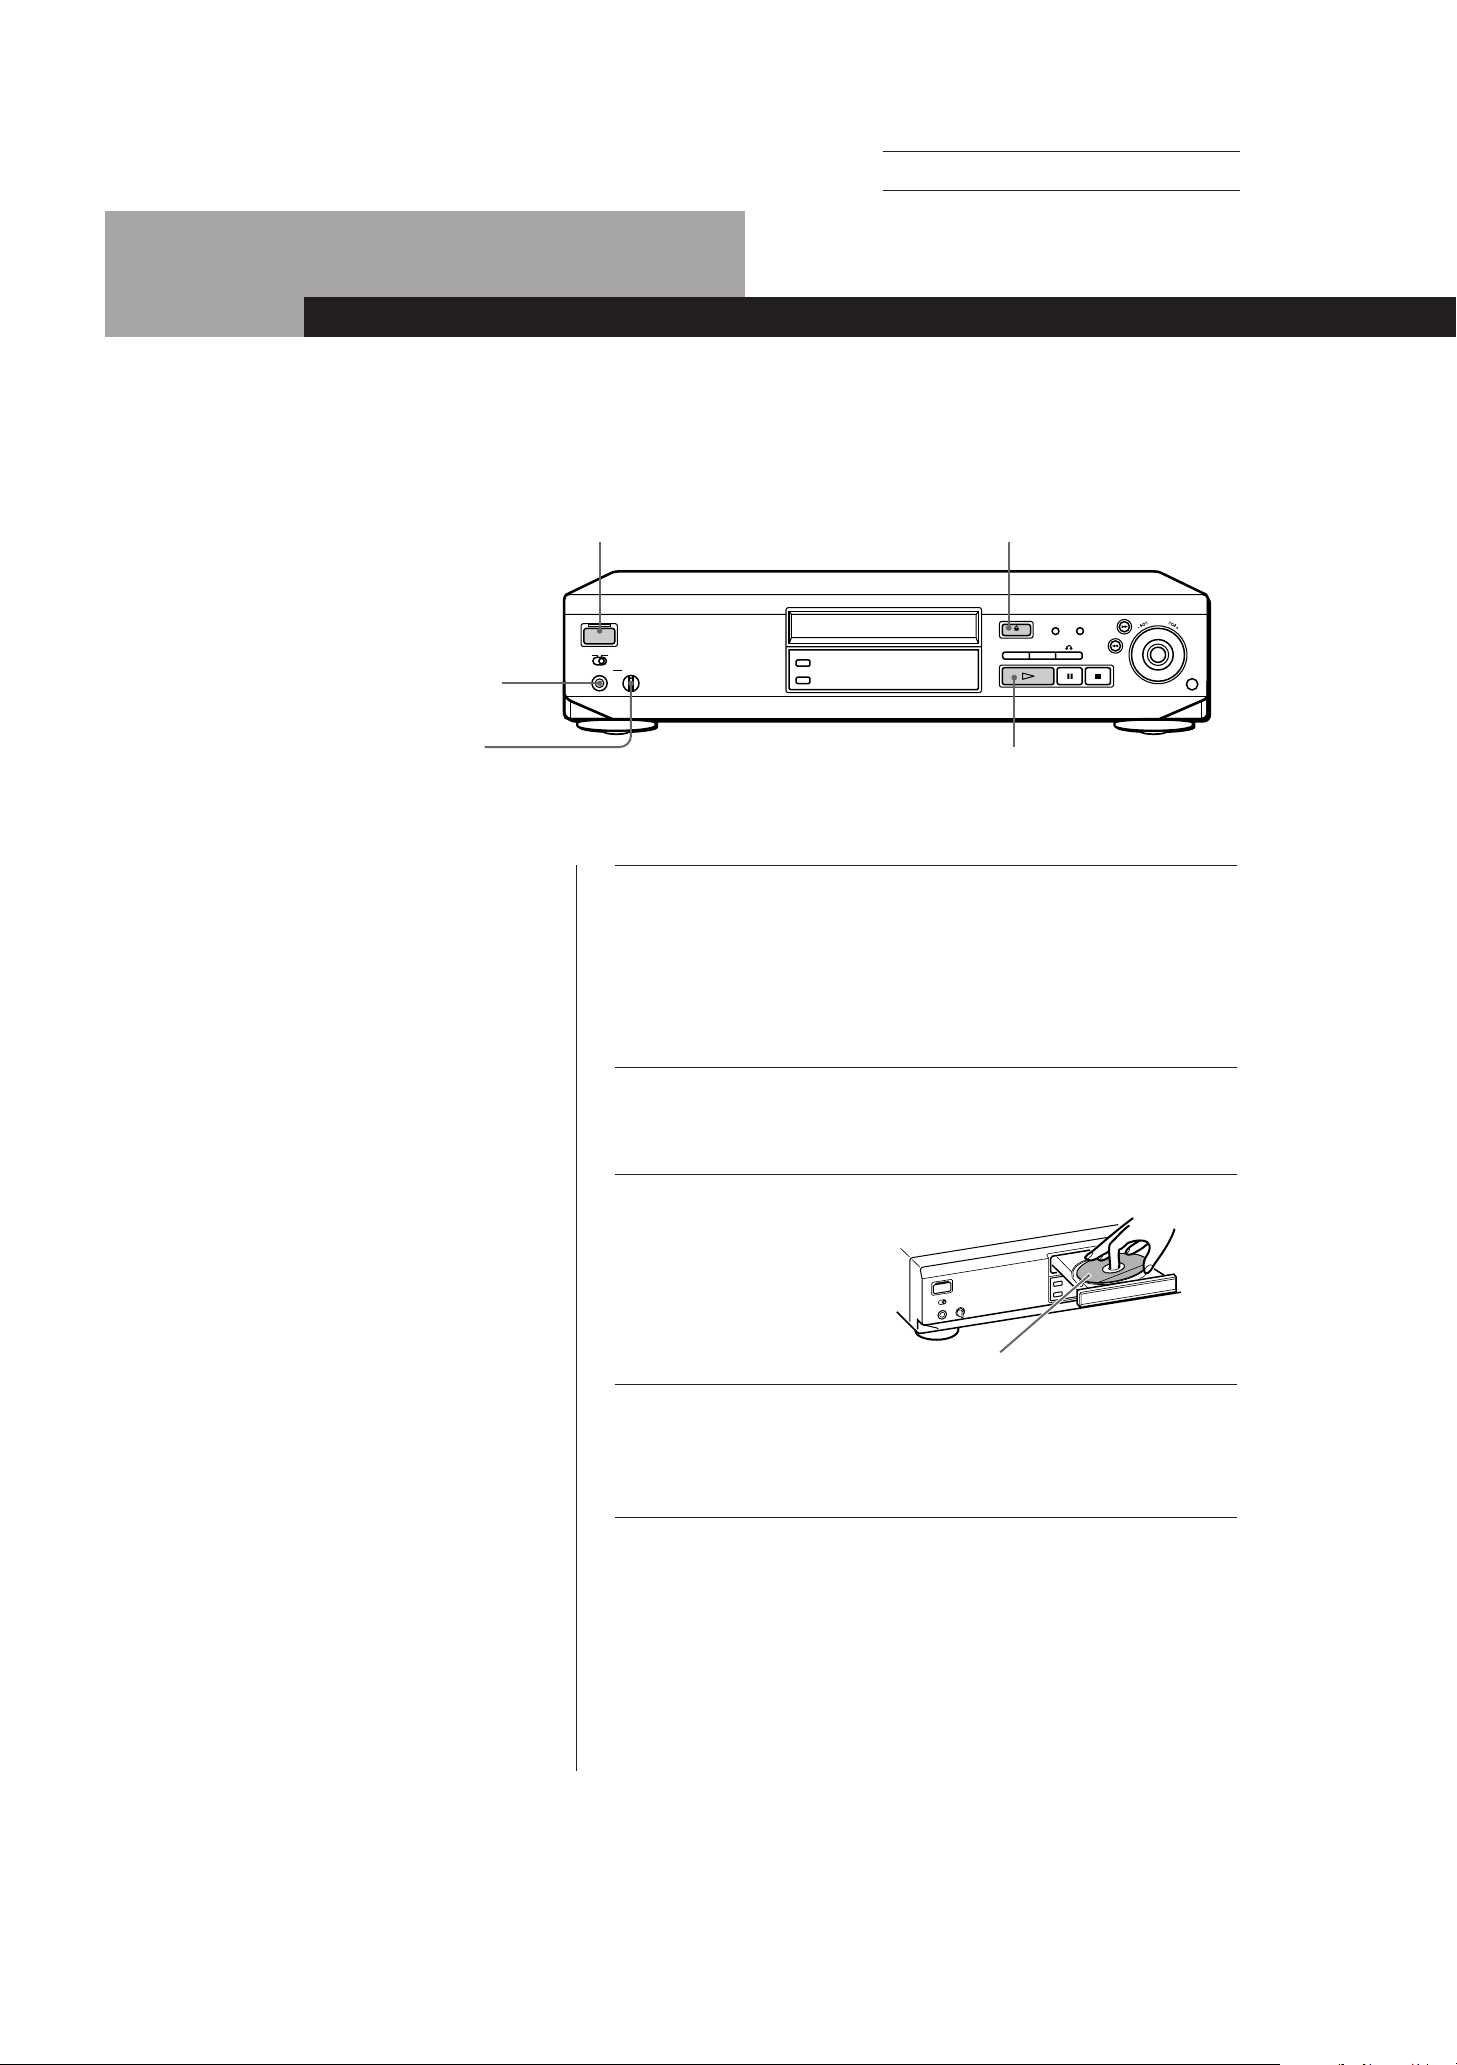
Connect the headphones.
Adjust the headphone
volume.
• See pages 5 – 6 for the hookup
information.
• You can also play audio CDs just
like VIDEO CDs.
z You can turn on the player
using the remote
Press POWER while the
indicator above the POWER
button on the front panel is
lit.
2
POWER
AUTO PLAY
OFF ON
3
DNR
OPEN/CLOSE
LEVELPHONES
PLAY MODE
REPEAT
COMET
RETURN
NEXTPREV
4
When using a TV
Turn on the TV and select the video input so that you can view
1
the pictures from this player.
When using an amplifier
Turn on the amplifier and select the CD player position so that
you can listen to the sound from this player.
Press POWER to turn on the player.
2
The indicator above the POWER button goes off and the front
panel display lights up.
Press § OPEN/CLOSE, and place the disc on the disc tray.
3
/
A
U
M
N
E
S
M
SELECT
g
z When playing VIDEO CDs with
PBC functions
In Step 4, the menu screen
appears on the TV screen.
You can play the VIDEO CD
interactively, following the
instructions on the menu
screen. (PBC Playback, see
page 10.)
Press ·.
4
The disc tray closes and the player plays all the tracks once
(Continuous Play). Adjust the volume on the TV or the
amplifier.
With the label side up
z What is a VIDEO CD with PBC
functions?
See page 10 or 27.
EN
8
SONY MCE-F500 (E, C1, C2) 3-858-463-11
Page 12
Actual page number:
Basic Operations
z When “RESUME” appears in
the front panel display
You can resume playback
from the point you stopped
the VIDEO CD (Resume
Play, see page 15).
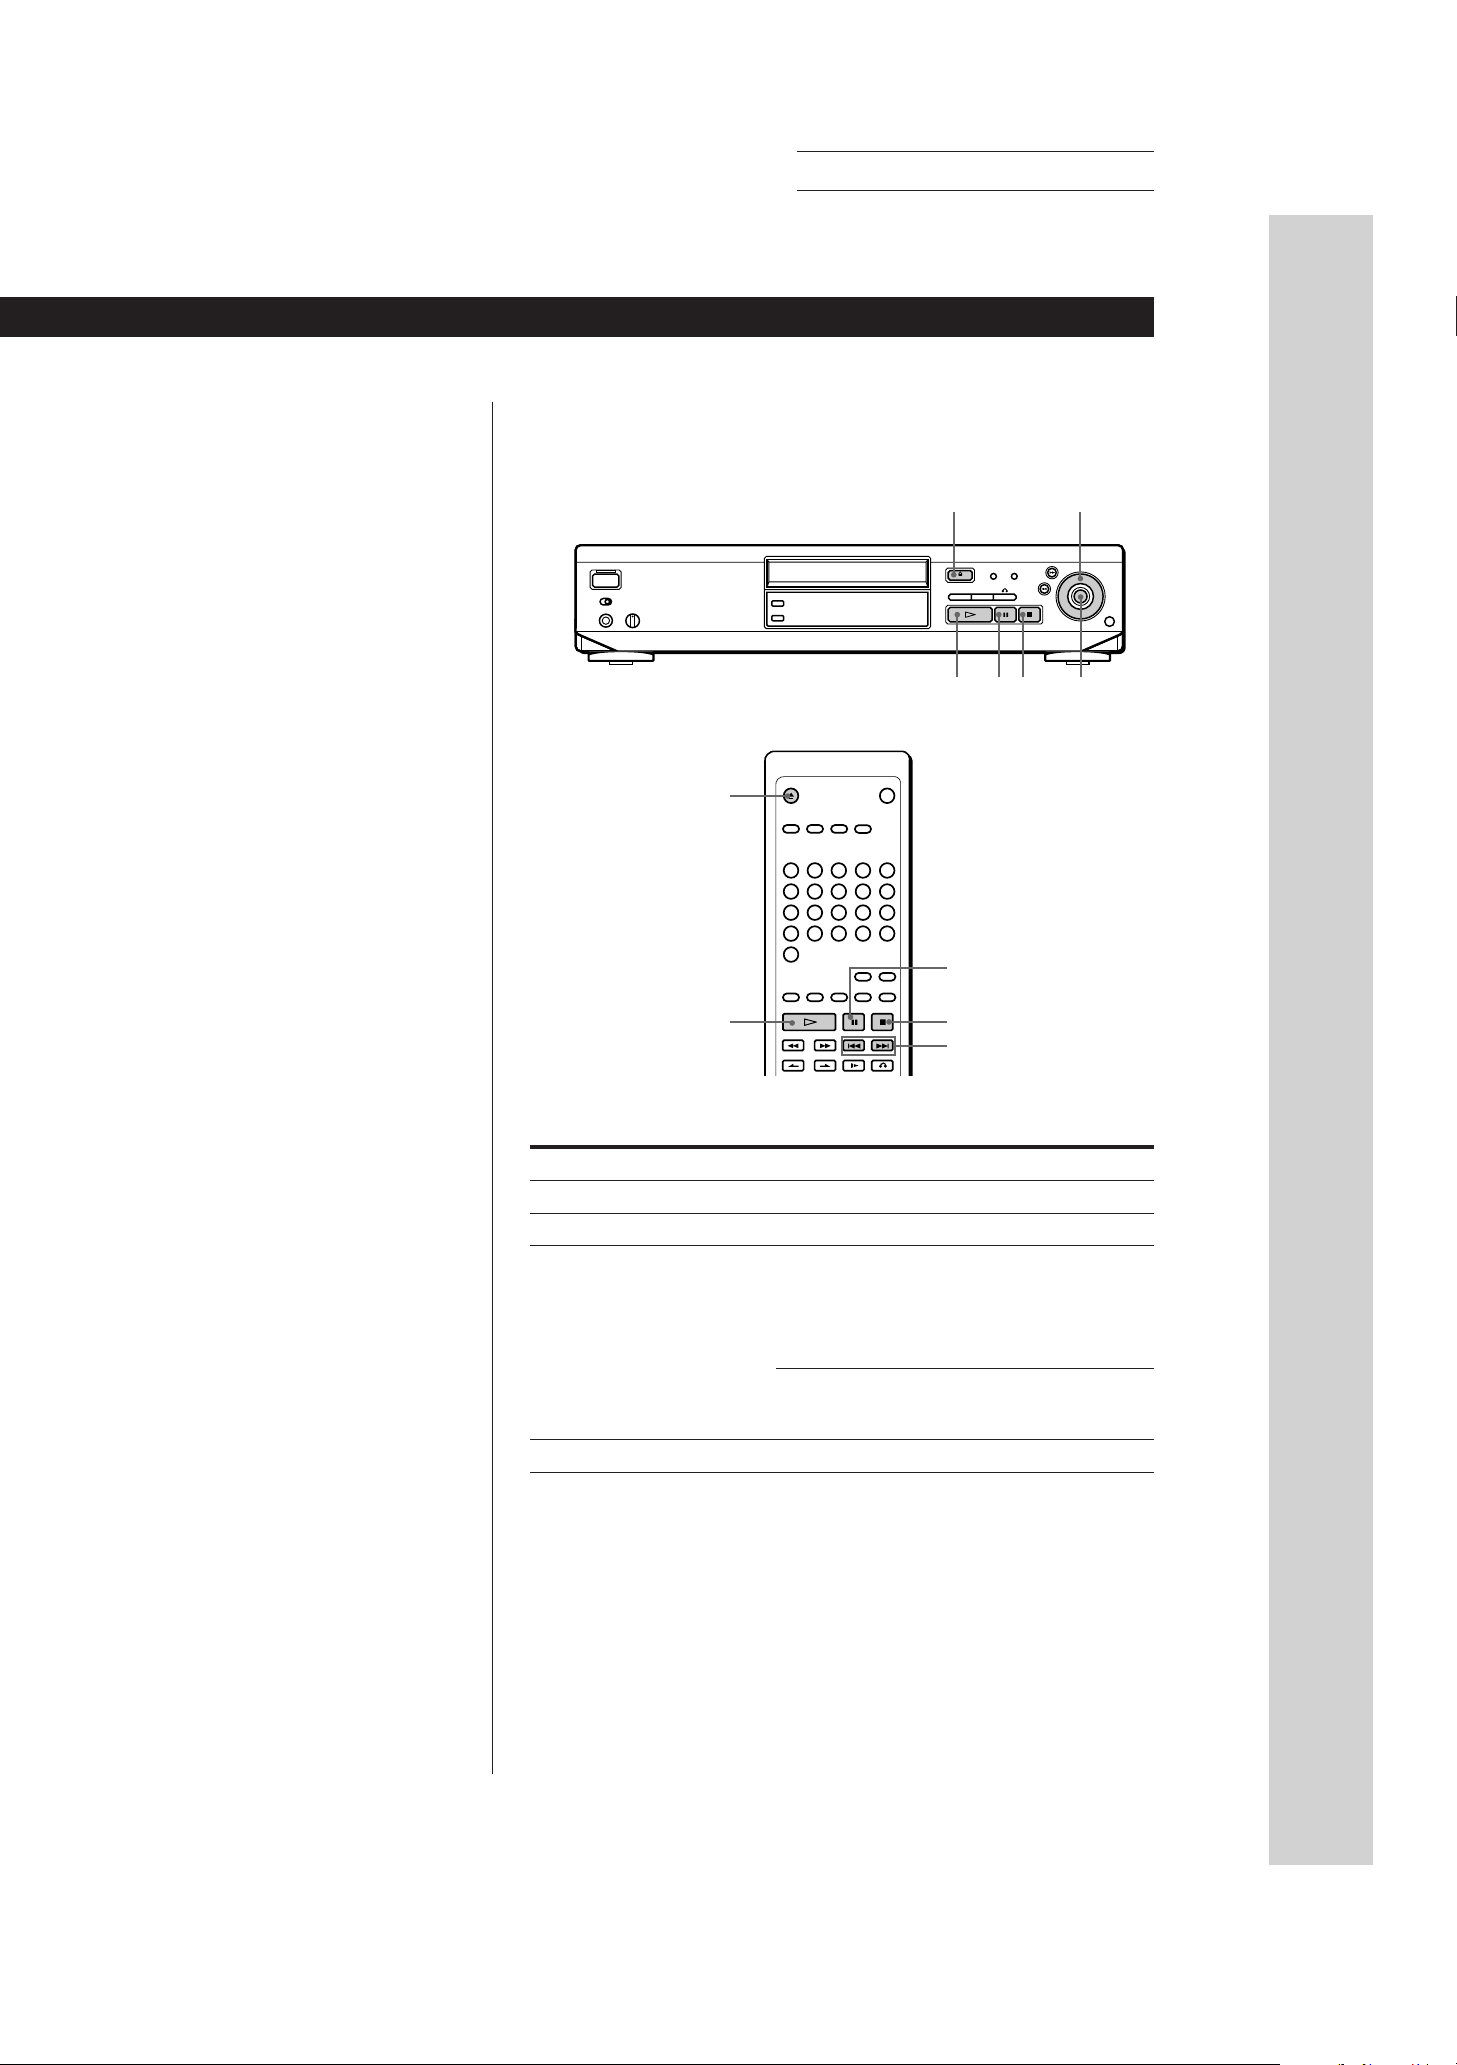
To stop playback
Press p.
§ OPEN/CLOSE Jog Dial
SELECTpP·
6 OPEN/CLOSE
Basic Operations
P
z What is a track?
A disc is divided into
sections of a picture or a
music piece called “tracks.”
Each track is assigned with a
track number to locate the
track you want.
·
To
Pause
Resume play after pause
Go to the next scene or track/
Go back to the preceding
scene or track
(in Continuous Play mode)
Stop play and remove the CD
p
=/+
Press
P
P or ·
While playing, on the player:
Turn Jog Dial to select the track number
While playing, on the remote:
Go to the next scene or track +
Go back to the preceding scene or track =
Before you start playing:
Turn Jog Dial or press =/+ to select the track
number, then press SELECT or ·
§ OPEN/CLOSE
SONY MCE-F500 (E, C1, C2) 3-858-463-11
EN
9
Page 13
Enjoying Playback Using the PBC Functions
Enjoying Playback Using the PBC Functions
2 Select the item number you want.
Playing VIDEO CDs with PBC Functions (PBC Playback)
When playing VIDEO CDs with PBC functions (Ver.
2.0 discs), you can enjoy playing simple interactive
software, software with search functions, etc.
PBC Playback allows you to play VIDEO CDs
interactively, following the menu screen on the TV
screen.
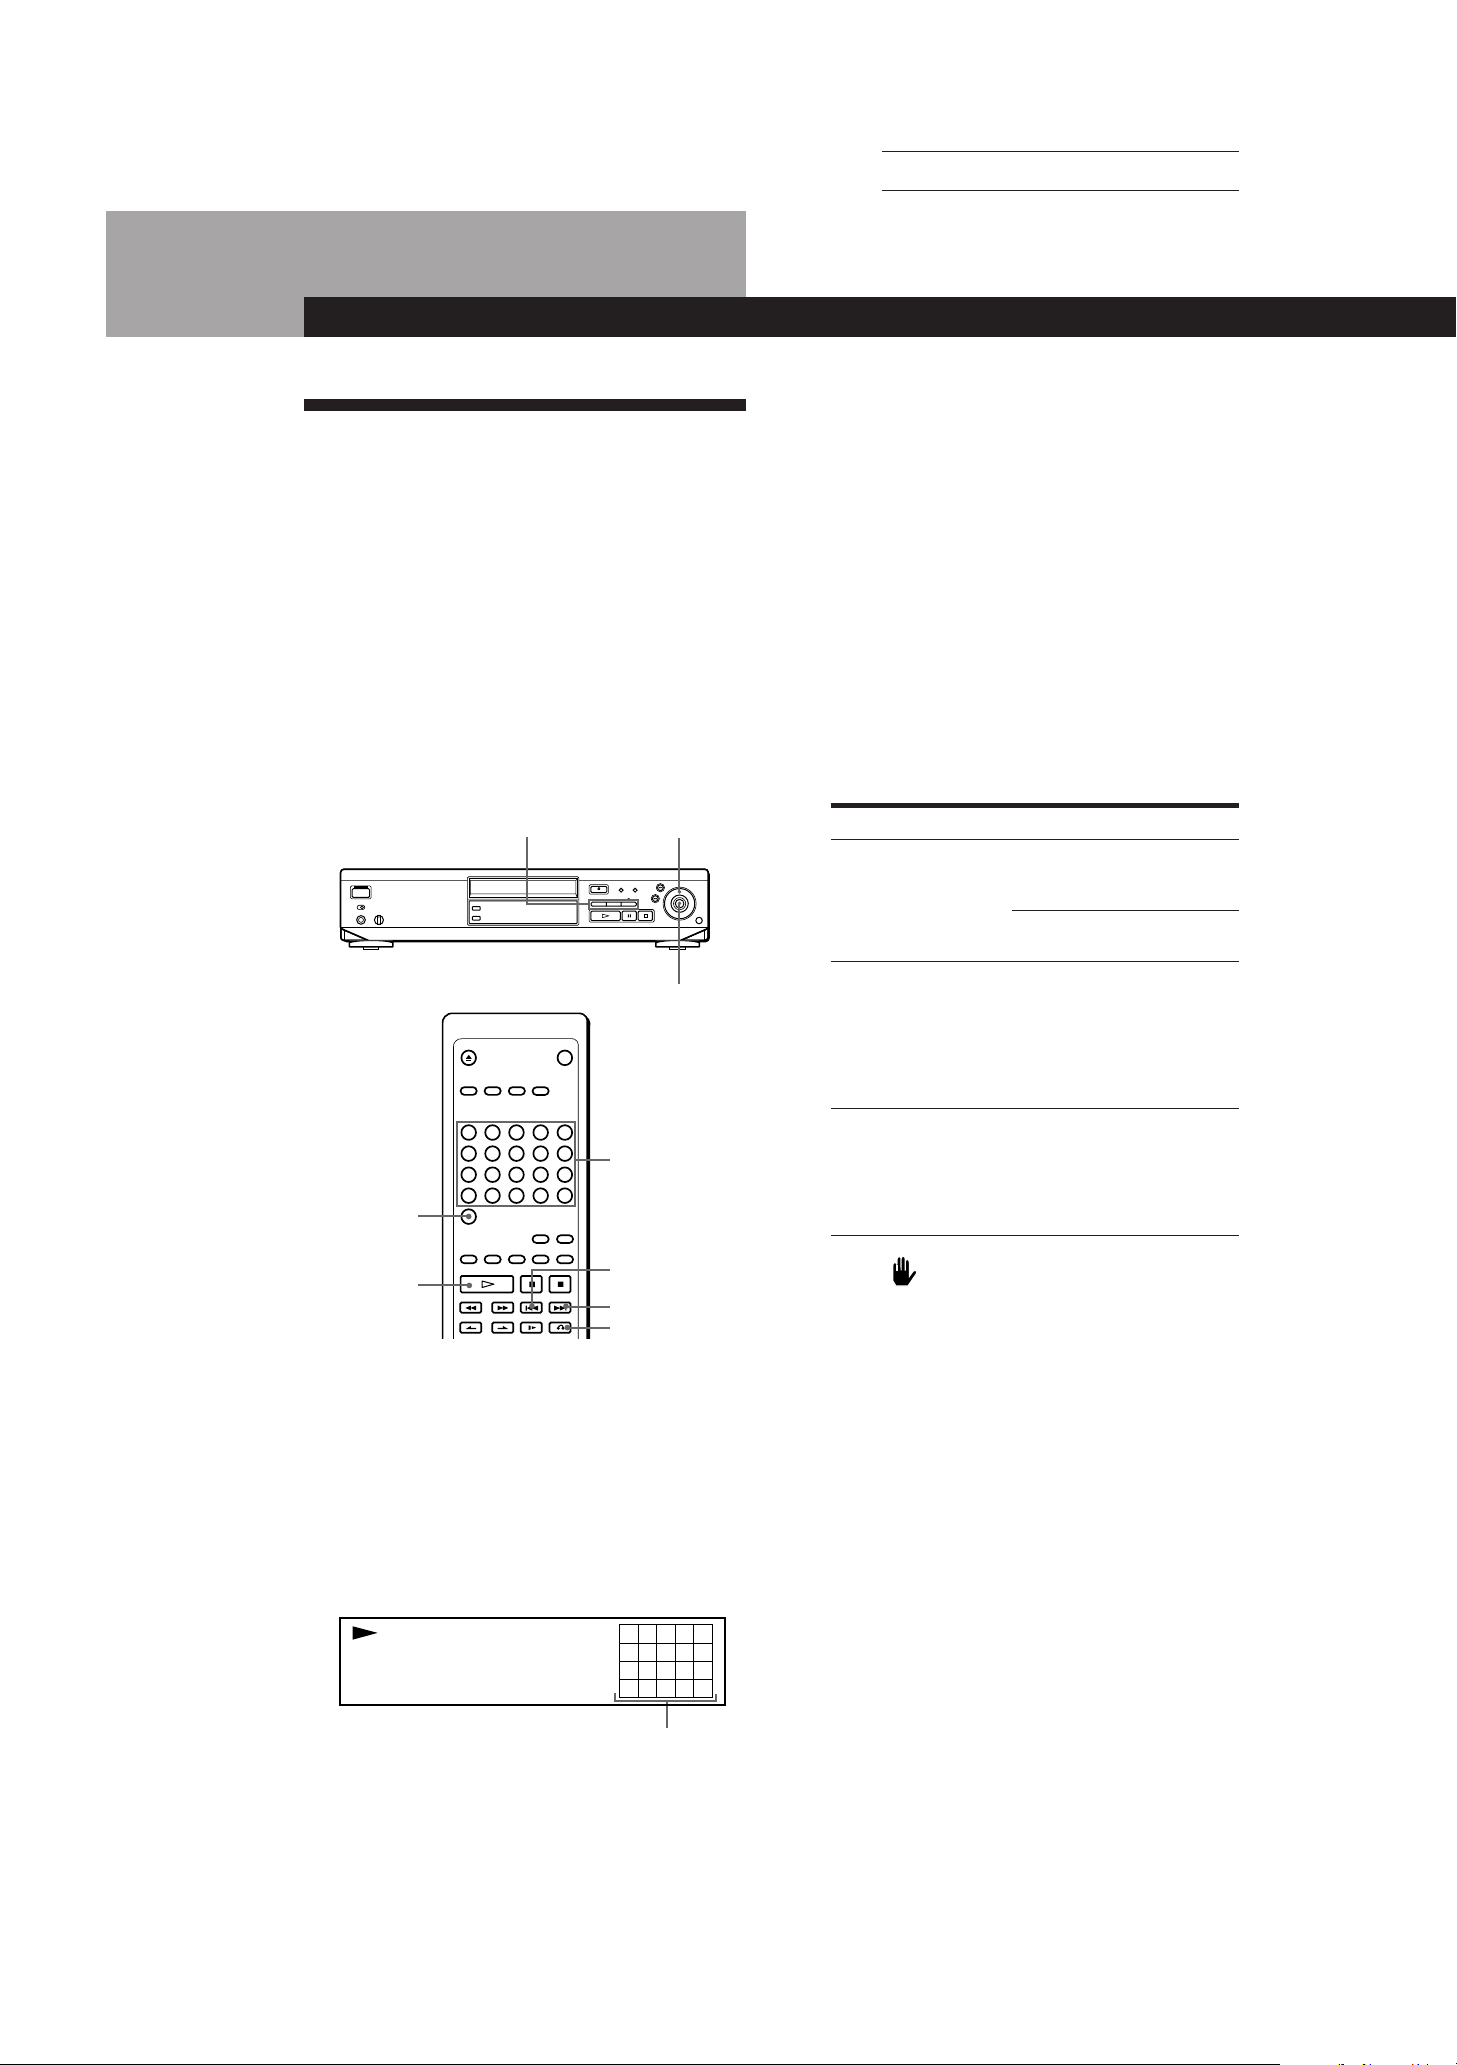
On this player, you can use the number buttons, Jog
Dial, SELECT, PREV, NEXT, and RETURN ˆ during
PBC Playback.
Also refer to the instructions supplied with the disc, as
the operating procedure may differ according to the
VIDEO CD.
3 Follow the instructions on the menu screen for
Actual page number:
On the player
Turn Jog Dial to select the item number, then press
SELECT.
On the remote
Press the number button of the item you want.
When you want to select an item number over 20,
press >20 first, then the corresponding number
buttons. To enter “0,” use button 10.
Exmaple: To select item number 30
Press >20 first, then 3 and 10.
interactive operations.
PREV/NEXT/RETURN ˆ
>20
· (SELECT)
Jog Dial
SELECT
Number buttons
PREV =
NEXT +
RETURN ˆ
1 Start playing a VIDEO CD with PBC functions,
following Steps 1 through 4 in “Playing a VIDEO
CD” on page 8.
The menu screen appears on the TV screen and
“SELECT” flashes. The item numbers you can
select in the menu appear in the front panel
display.
Note that some item numbers cannot be selected
even if they appear in the front panel display.
12345
678
PBC
VIDEO CD
Item numbers you can select
When
Selecting the item
“SELECT” is flashing
on the TV screen while
playing moving
pictures
Going back to the
menu screen
Do the following
Turn Jog Dial on the player to
display the item number, then
press SELECT.
Press the number button of the
item you want on the remote.
In this case, you can go to
another scene even while
playing moving pictures.
Turn Jog Dial then press
SELECT on the player, or press
number button of the item you
want on the remote.
Press RETURN ˆ, PREV, or
NEXT.
(Also refer to the instructions
supplied with the disc, as the
operating procedure may differ
according to the VIDEO CD.)
When ” CANNOT OPERATE NOW“ appears on the
TV screen
You’ve pressed an invalid button. Press the correct
button, following the instructions on the menu screen.
To cancel PBC Playback of a VIDEO CD with PBC functions
and play the disc in Continuous Play mode
There are two ways.
• Before you start playing, select the track you want with Jog
Dial, then press SELECT. When using the remote, select the
track with =/+, then press ·.
• Before you start playing, select the track number using the
number buttons on the remote.
“PBC OFF” and “CONTINUE” appear in the front panel
display and the player starts Continuous Play. You cannot
play still pictures such as a menu screen.
z You can use · instead of SELECT after turning Jog
Dial.
10
EN
SONY MCE-F500 (E, C1, C2) 3-858-463-11
Page 14
Actual page number:
Enjoying Playback Using the PBC Functions
Example of PBC Playback
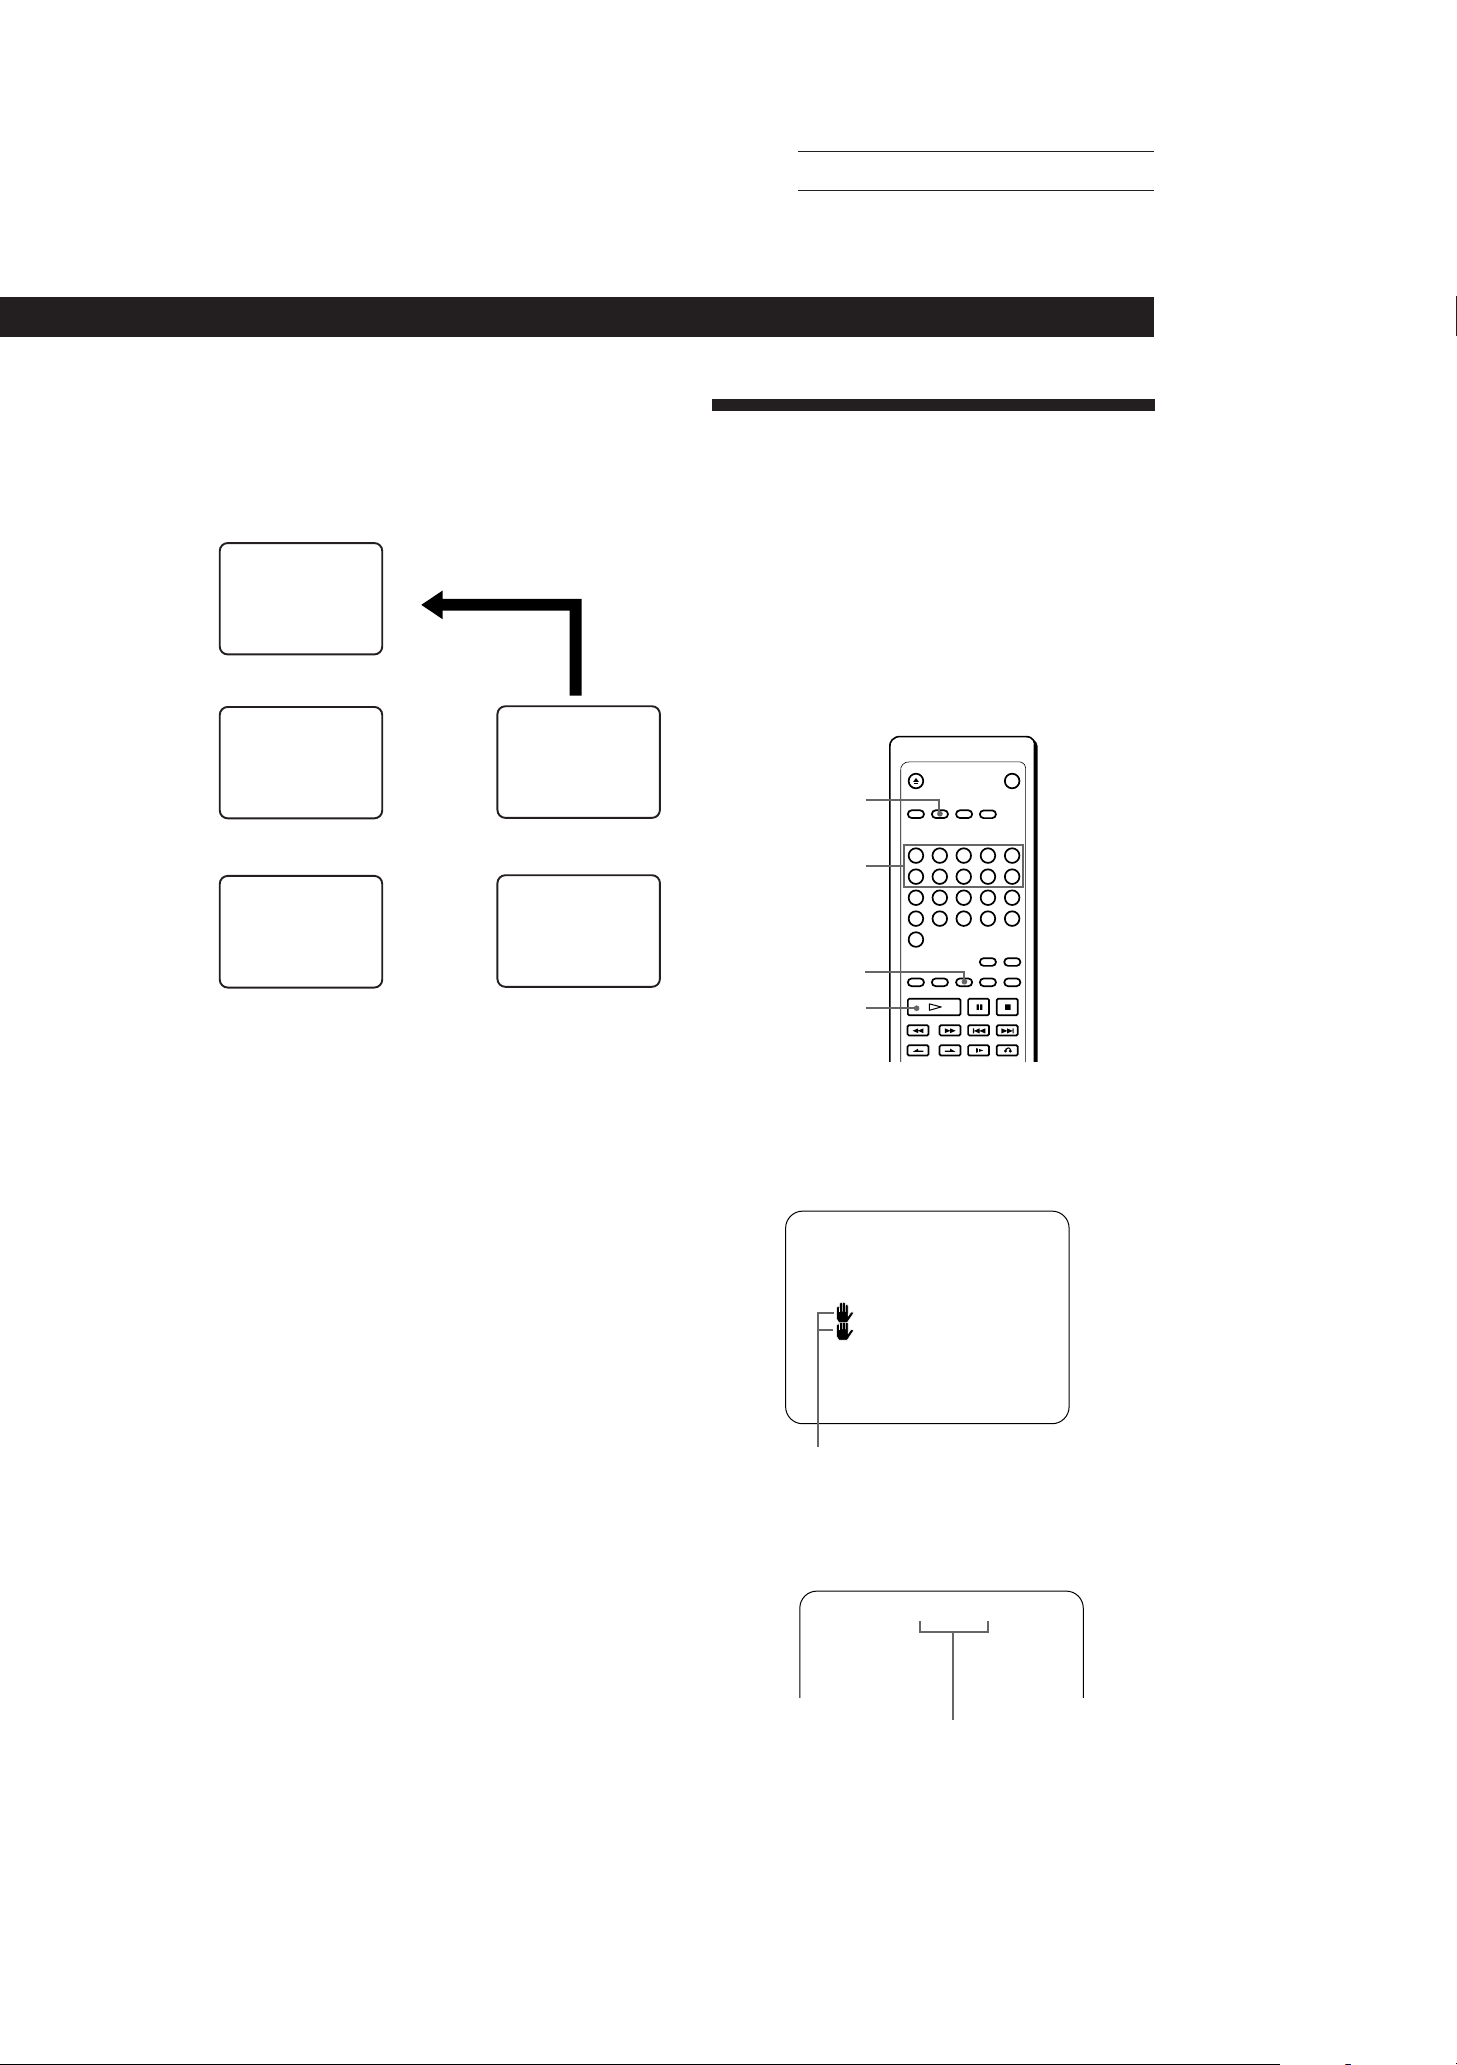
This is an example of PBC Playback. Also refer to the
instructions supplied with the disc, as the operating
procedure may differ according to the VIDEO CD.
TV screen
MENU 1
[1] AAAA
[2] BBBB
[3] CCCC
[4] DDDD
1
.
MENU 2 (#1)
[1] aaa
[2] bbb
+ next page
1
.
>
>
2
2
2
3
/
?
4
MENU 2 (#2)
[3] ccc
[4] ddd
= previous page
1
.
>
2
Playing CDsGetting Started
Locating Scenes Directly Using the Scene Numbers (Scene Search) Z
On VIDEO CDs with PBC functions, the menu screens,
moving pictures and still pictures are divided into
“scenes” and each scene is assigned with a scene
number.
You can check the current scene number by displaying
it on the TV screen during playback (see page 13). Be
sure to memorize the scene number from which you
want to start playing.
SPECIAL MENU
Number buttons
(1–10)
Moving
picture, etc.
1 To select the item:
Turn Jog Dial to select the item number, then press
SELECT, or select the number button you want on the
remote.
2 To go to the preceding menu:
Press ˆ.
3 To go to the next page of the menu:
Press NEXT.
4 To go back to the preceding page of the menu:
Press PREV.
Moving picture,
still picture, etc.
CLEAR
·
1 Press SPECIAL MENU before you start playing or
while playing a disc.
The following menu appears on the TV screen
while playing a disc.
TV screen
SPECIAL MENU
1) SCENE SEARCH
2) DISC DIGEST
3) TRACK DIGEST
You cannot select the item with this mark.
2 Press button 1.
“SCENE –” and the scene numbers appear on the
TV screen.
TV screen
SCENE – (1 – 312)
Total scene numbers
(Continued)
SONY MCE-F500 (E, C1, C2) 3-858-463-11
11
EN
Page 15

Enjoying Playback Using the PBC Functions
3 Press the number buttons (1 – 10) to select the
scene.
To enter “0”, use the button 10.
Example: To select scene number 103
Press 1, then 10 and 3.
The selected scene number appears on the TV
screen.
TV screen
SCENE 103 (1 – 312)
Selected scene number
Actual page number:
If you’ve made a mistake
Press CLEAR, then press the correct number button.
4 Press · to start playing from the selected scene.
The player automatically starts PBC Playback
(page 10).
z You can check the scene number while playing a disc
Press ON SCREEN repeatedly to select ON SCREEN 2
display mode (see page 13). The scene numbers appear
on the upper left side of the TV screen.
Notes
• Some discs don’t allow you to start playing from a
particular scene. In this case, when you do the task before
you start playing, the player starts playing from scene 1.
When you do the task while playing a disc, the player starts
playing from the current scene.
• Some discs don’t display the selected scene on the TV
screen.
12
EN
SONY MCE-F500 (E, C1, C2) 3-858-463-11
Page 16
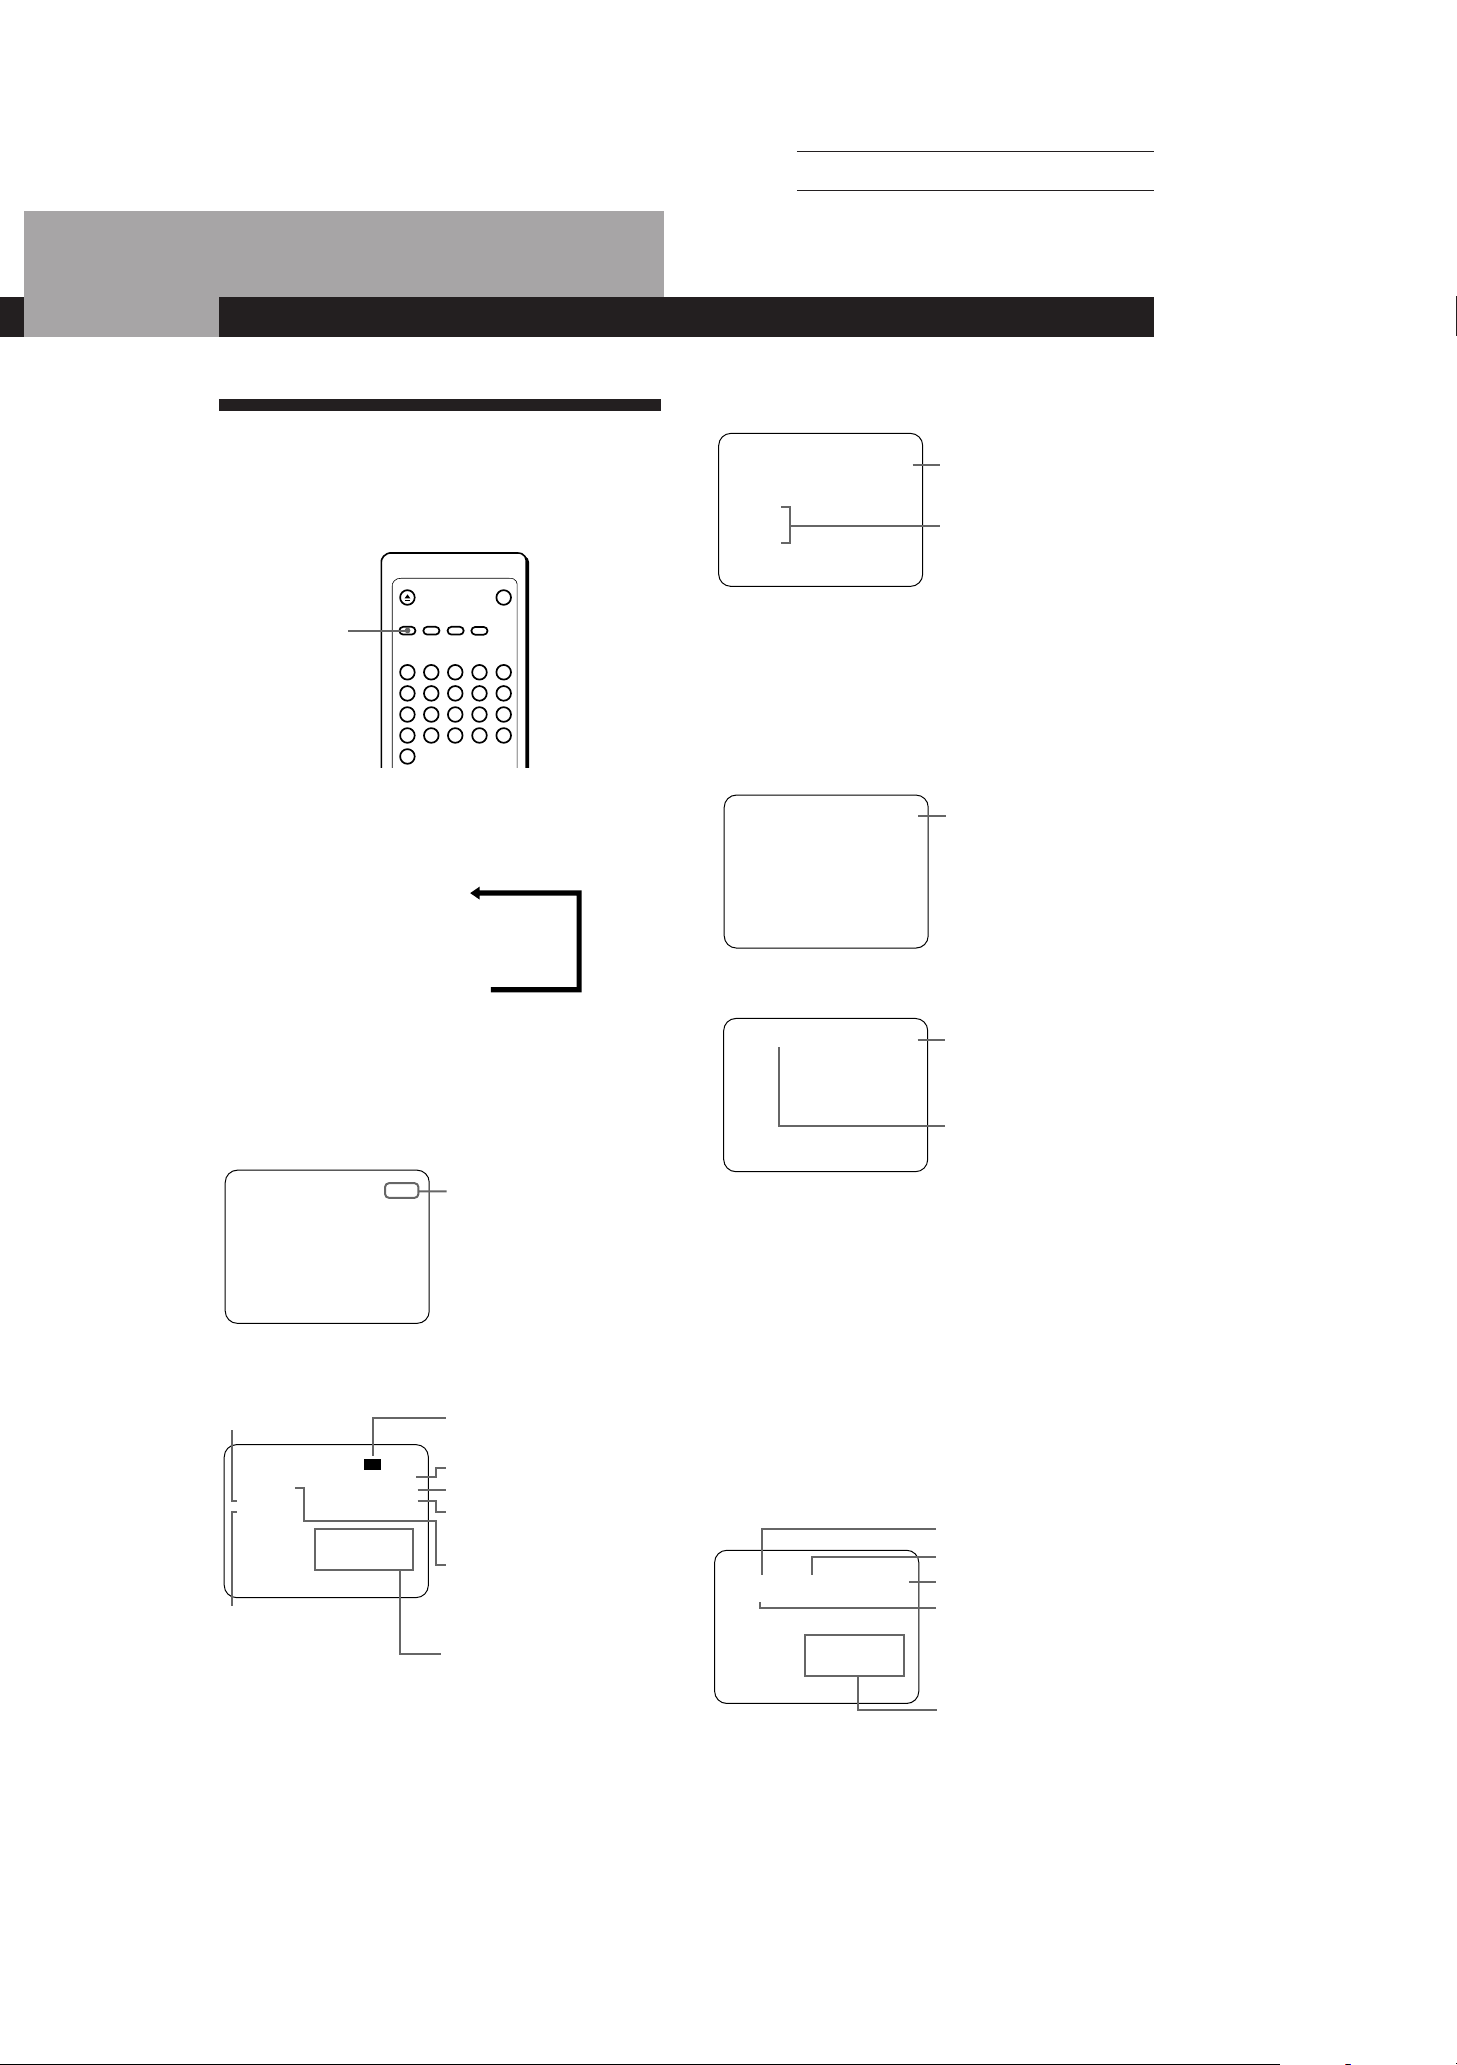
Locating a Scene or Track You Want
Using the On-Screen Display Z
You can check the operating status of the player and
the information about the disc with the on-screen
display on the TV screen.
Actual page number:
Locating a Scene or Track You Want
Locating a Scene or Track You Want
Locating a Scene or Track You Want
• Before you start playing in Program Play mode
PROGRAM
1. TRK 1
2. TRK 3
3. TRK 4
VideoCD STOP
TOTAL 10:04
Total playing time
Programmed track
numbers
ON SCREEN
Press ON SCREEN.
Each time you press the button, the on-screen display
changes as follows:
ON SCREEN 1
.
ON SCREEN 2
.
ON SCREEN OFF
When Using a VIDEO CD
pDisplay information of ON SCREEN 1 mode
The operating status is displayed for a few seconds only
when you change the operating status.
PLAY
• Before you start playing (except for the Program Play
mode)
Playing status
• “PLAY” when you start
playing
• “STOP” when you stop
playing
• “PAUSE” when you pause
playing
pDisplay information of ON SCREEN 2 mode
While playing a disc, the current track number and the
playing time are always displayed.
The operating status is displayed for a few seconds only
when you change the operating status.
The same information as in ON SCREEN 1 is displayed
before you start playing.
TRK 3 0:55
Playing time on the
current track
• “PLAY” is displayed
when you start playing
• “PAUSE” is displayed
when you pause playing
• During PBC Playback (page 10)
SCENE 1 0:55
Playing time of the scene
(not displayed
for some scenes)
Scene number (page 11)
pDisplay information of ON SCREEN OFF mode
No information is displayed.
When Using an Audio CD
The same information is displayed in ON SCREEN 1
mode and ON SCREEN 2 mode while playing an audio
CD.
During Repeat Play
While playing VIDEO CDs
with PBC functions
VideoCD
PBC
STOP
CONTINUE MONO L
REPEAT RESUME
DNR
1 2 3 4 5
6 7 8 9 10
11 12 13 14 15
47:55
Total playing time
Sound indication
When Resume Play is
available
Play mode
While DNR function is
turned on
(“COMET” is displayed
Music calendar*
when you select
COMET.)
* The music calendar is not displayed during PBC Playback.
pDisplay information of ON SCREEN 1 or ON SCREEN 2.
• In Continuous or Shuffle Play mode
Current track number
TRK 3 index 1 0:55
CONTINUE
∗ ∗ 3 4 5
6 7 8 9 10
11 12 13 14 15
CD PLAY
Current index number
Playing time of the current track
Play mode
Music calendar
(Continued)
SONY MCE-F500 (E, C1, C2) 3-858-463-11
13
EN
Page 17
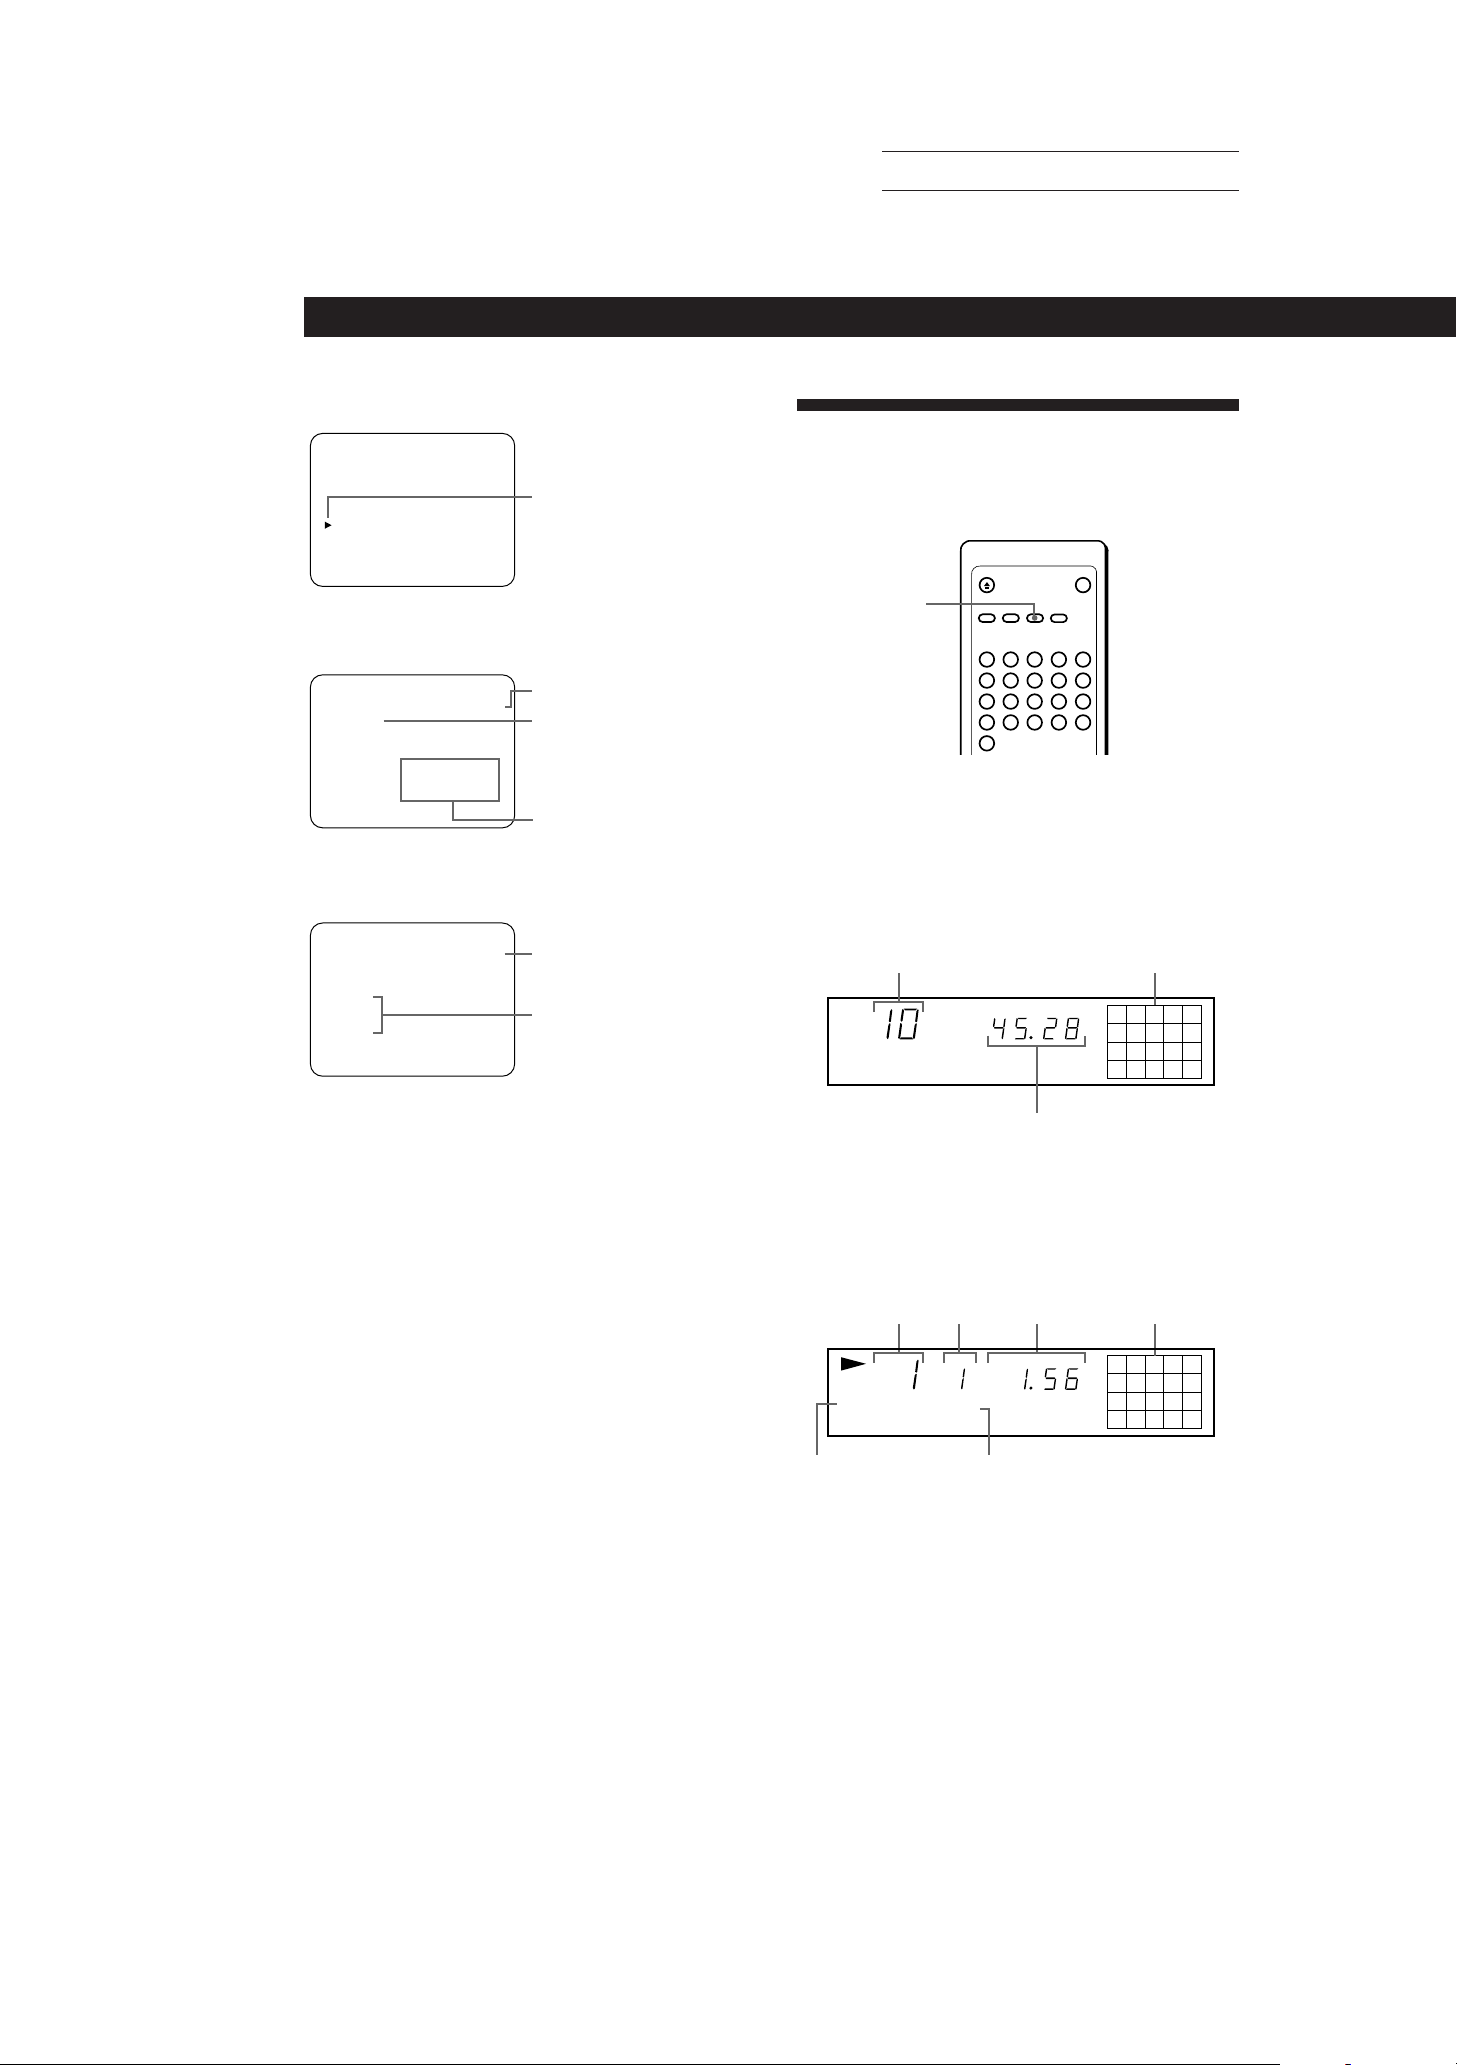
Locating a Scene or Track You Want
• In Program Play mode
TRK 3 index 1 0:55
PROGRAM
1. TRK 1
2. TRK 3
3. TRK 4
• Before you start playing (except for the Program Play
mode)
CD PLAY
Indicates the current track
Actual page number:
Using the Front Panel Display Z
You can check information about the disc using the
front panel display.
TIME
CD STOP
CONTINUE
1 2 3 4 5
6 7 8 9 10
11 12 13 14 15
47:55
Total playing time
Play mode
Music calendar
• Before you start playing in Program Play mode
PROGRAM
1. TRK 1
2. TRK 3
3. TRK 4
CD STOP
TOTAL 10:44
Total playing time of the
program
Programmed track numbers
pDisplay information of ON SCREEN OFF mode
No information is displayed.
Notes
• Select the display mode other than ON SCREEN OFF for
normal operation. When you select ON SCREEN OFF, you
cannot check the operating status while operating the
player. In this case, check the information in the front panel
display.
• When you record the playback picture of this player on
another VCR, etc., be sure to select ON SCREEN OFF.
Otherwise, the display information is also recorded on the
VCR.
Checking the total number and playing
time of the tracks
Press TIME before you start playing.
The front panel display shows the total number of
tracks, total playing time and music calendar.
Total number of tracks
VIDEO CD
CONTINUE
Total playing time
MIN SEC
Music calendar
12345
678910
The information also appears when you press
§ OPEN/CLOSE to close the disc tray.
Display information while playing a disc
Current track
number
PBC
VIDEO CD
Index
number
INDEX
CONTINUE
Playing
time
MIN SEC
Music calendar
12345
678910
14
EN
"PBC" is displayed
while playing a
VIDEO CD with PBC
functions.
"CONTINUE" is displayed
while playing a VIDEO CD
without PBC functions or an
audio CD.
pWhile playing a VIDEO CD without PBC functions or an
audio CD
The front panel display shows the current track number,
playing time of the track, index number (page 17), and the
music calendar. The track numbers in the music calendar
disappear after they are played.
SONY MCE-F500 (E, C1, C2) 3-858-463-11
Page 18
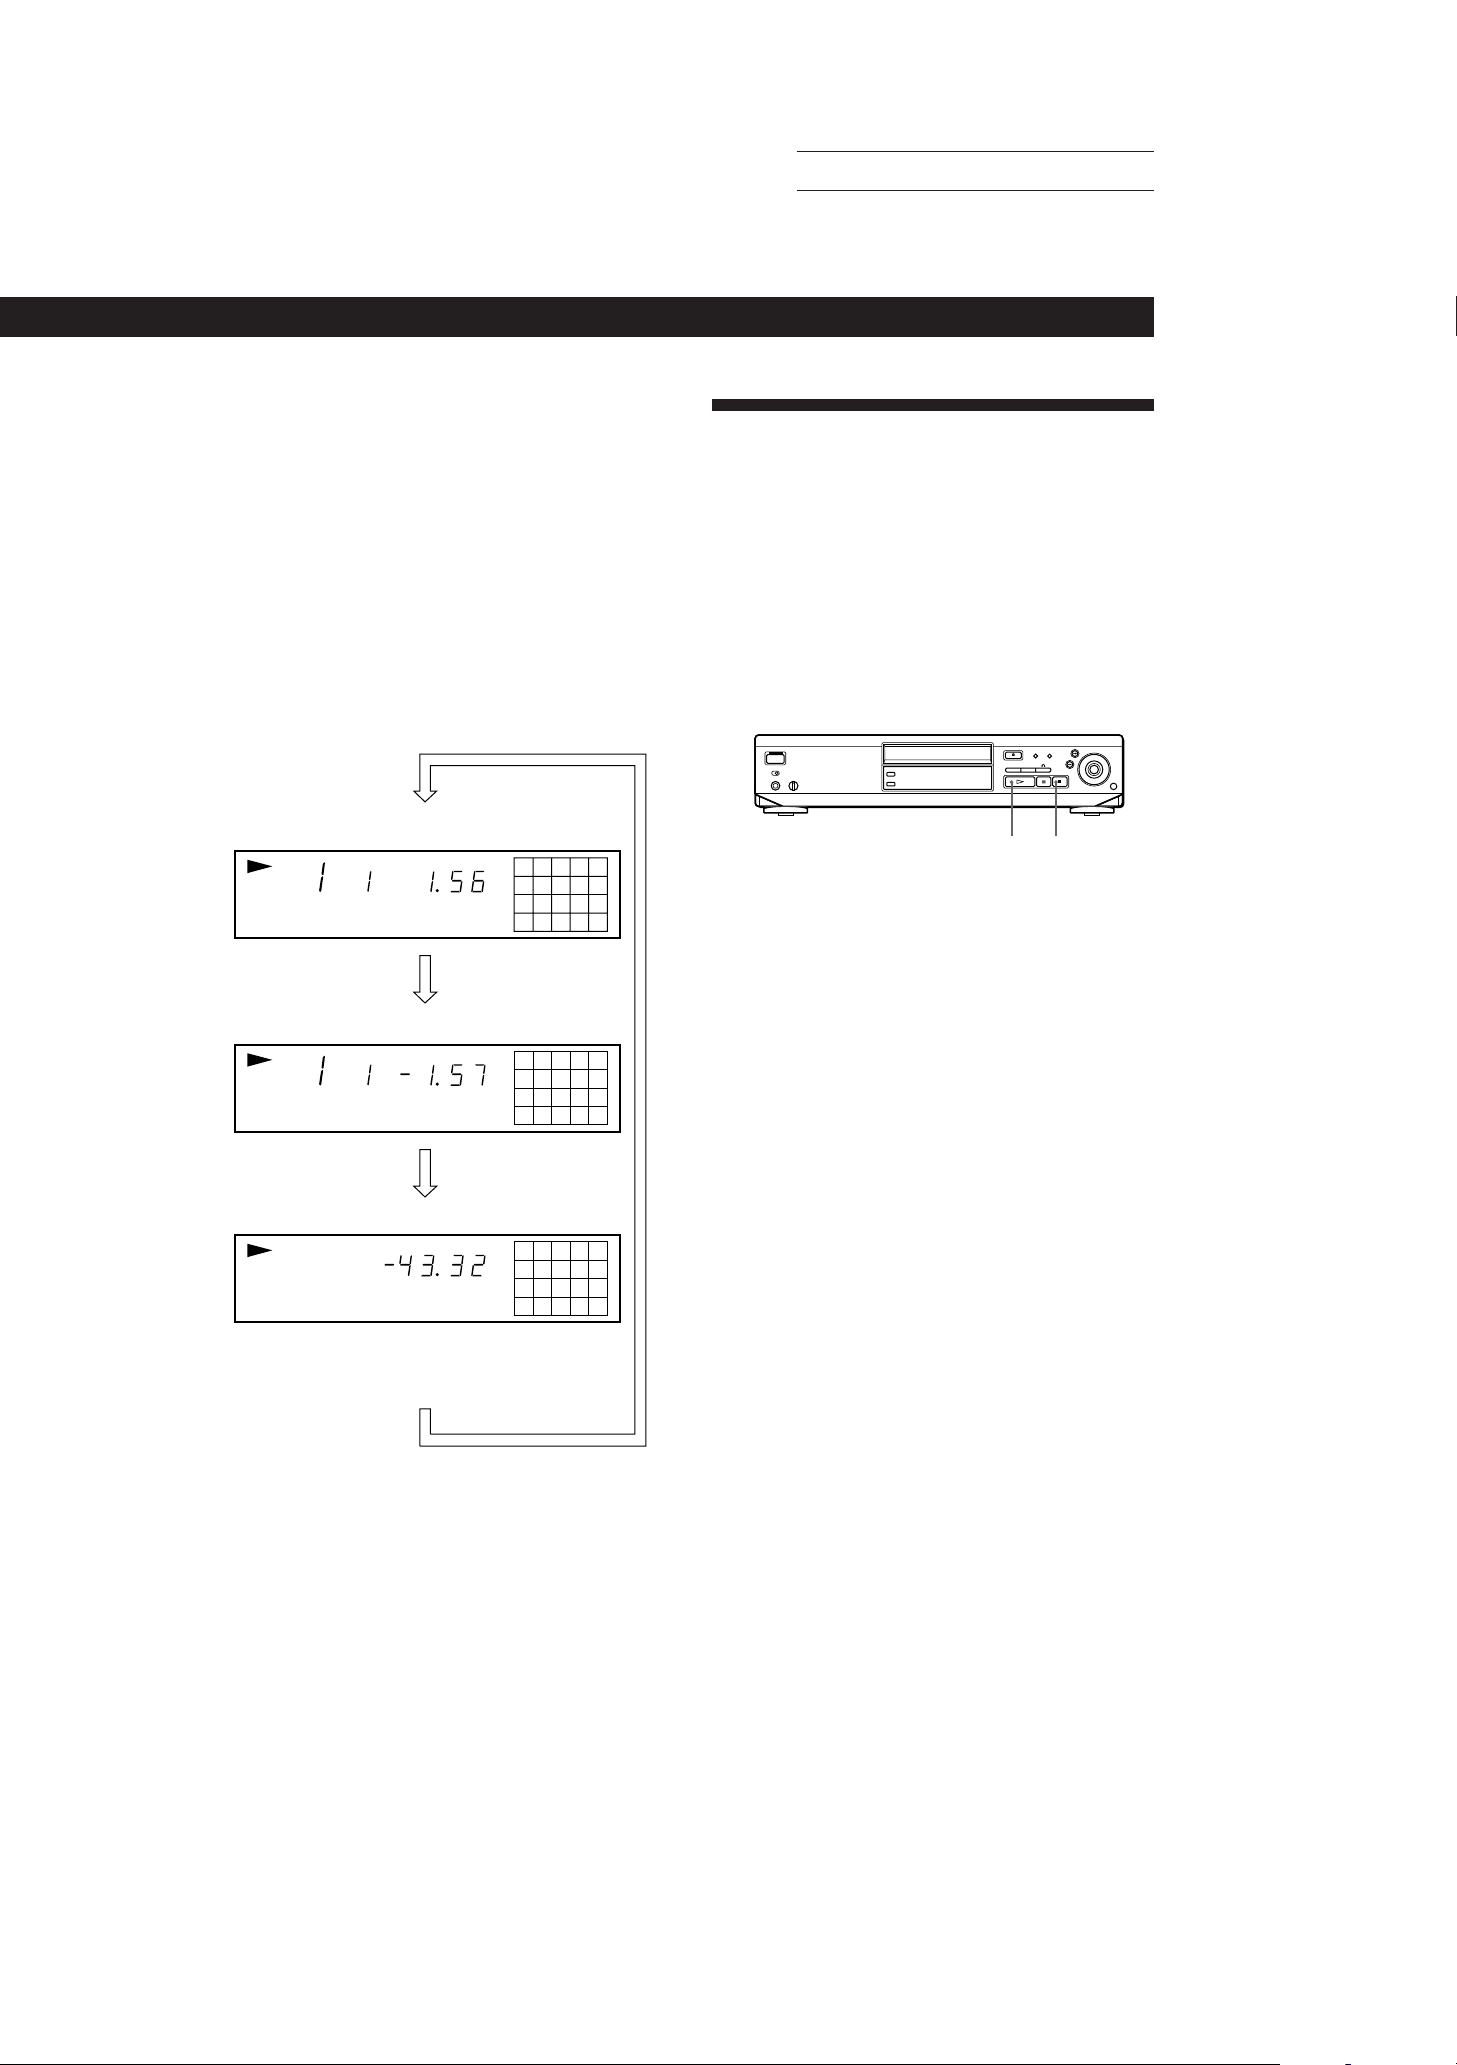
pWhile playing a VIDEO CD with PBC functions
The track numbers and the music calendar aren’t displayed.
However, while the menu screen is displayed on the TV
screen, the item numbers you can select in the menu appear
in the music calendar.
Note that you cannot select some item numbers even if they
appear in the music calendar.
Checking the remaining time
Each time you press TIME while playing a disc, the
display changes as shown in the chart below.
Note that you cannot check the remaining time during
PBC Playback (page 10).
Actual page number:
Locating a Scene or Track You Want
Locating a Scene or Track You Want
Locating a Scene or Track You Want
Resuming Playback from the Point You Stopped a VIDEO CD (Resume Play)
The player memorizes the point you stopped a VIDEO
CD and you can resume playback from that point.
Resume Play is not cancelled whenever you turn off
the player.
Note that Resume Play is not available while playing
an audio CD.
Playing time and number of the current track
MIN SECINDEX
CONTINUE
Press TIME
Remaining time on the current track
MIN SECINDEX
CONTINUE
Press TIME
Remaining time on the disc
MIN SEC
CONTINUE
This information does not appear in Program Play
mode if the remaining time exceeds 100 minutes.
Press TIME
12345
678910
12345
678910
12345
678910
p
·
1 While playing a VIDEO CD, press p to stop
playback.
“RESUME” appears in the front panel display and
on the TV screen.
If “RESUME” doesn't appear, Resume Play is not
available.
2 Press ·.
The player starts playback from the point you
stopped the VIDEO CD in Step 1.
z To view from the beginning of the VIDEO CD
When "RESUME" appears in the front panel display,
press p, then press ·.
Notes
• Resume Play is not available in Digest, Shuffle or Program
Play mode.
• Depending on where you stopped the VIDEO CD, the
player may resume playback from a different point.
• The point at which you stopped playing is cleared when :
– you press number buttons, PLAY MODE or p
– you turn the Jog Dial
– you remove the VIDEO CD from the player
– you unplug the AC power cord of the player
z What is a track?
A disc is divided into sections of a picture or a music
piece called “tracks.” Each track is assigned with a track
number to locate the track you want.
SONY MCE-F500 (E, C1, C2) 3-858-463-11
15
EN
Page 19
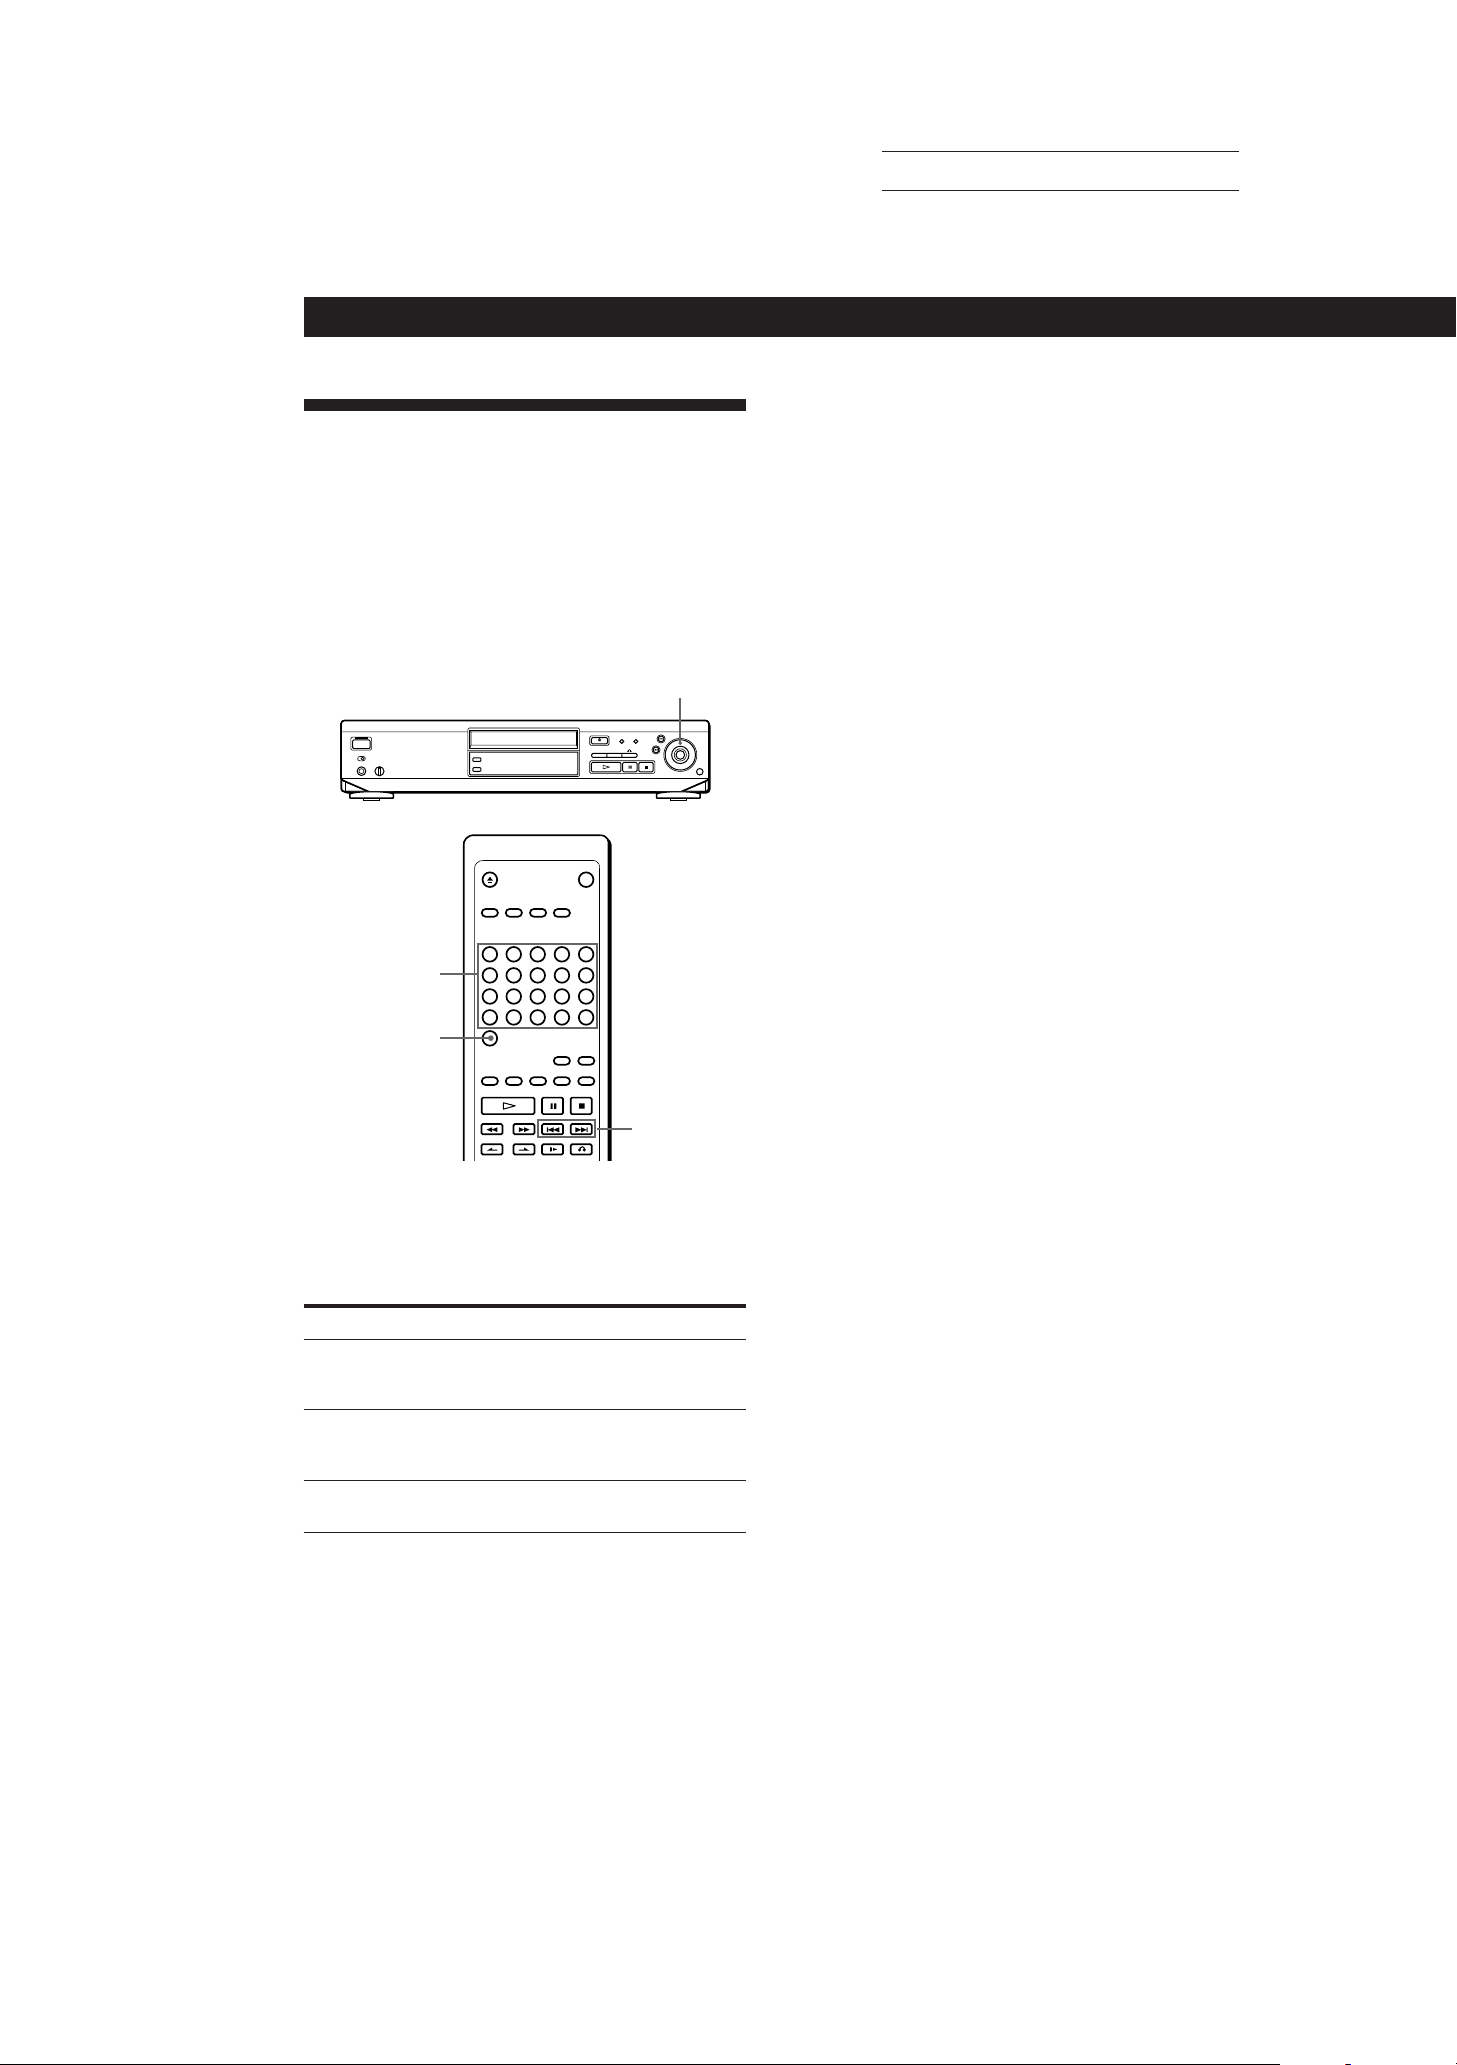
Locating a Scene or Track You Want
Locating a Specific Scene or Track
You can quickly locate any scene or track while playing
a disc using the Jog Dial, =/+ buttons (AMS:
Automatic Music Sensor) or number buttons.
Note that while playing a VIDEO CD with PBC
functions, this function is available only during
playback without PBC functions (PBC OFF, page 10).
Jog Dial
Actual page number:
z What is a track?
A disc is divided into sections of a picture or a music
piece called “tracks.” Each track is assigned with a track
number to locate the track you want.
Note
During PBC Playback, the Jog Dial, = and + buttons
have different functions from the ones explained above.
Number buttons
>20
pOn the player
Turn Jog Dial until you find the scene or track.
pOn the remote
To locate
The next or
succeeding scenes or
tracks (AMS)
The current or
preceding scenes or
tracks (AMS)
A specific track
directly Z
Press
+ repeatedly until you find the
scene or track
= repeatedly until you find the
scene or track
Number button of the track
=/+
16
EN
z
When you directly locate a track numbered over 20 Z
Press >20 first, then the corresponding number buttons.
To enter “0,” use button 10.
Example: To play track number 30
Press >20 first, then 3 and 10.
SONY MCE-F500 (E, C1, C2) 3-858-463-11
Page 20
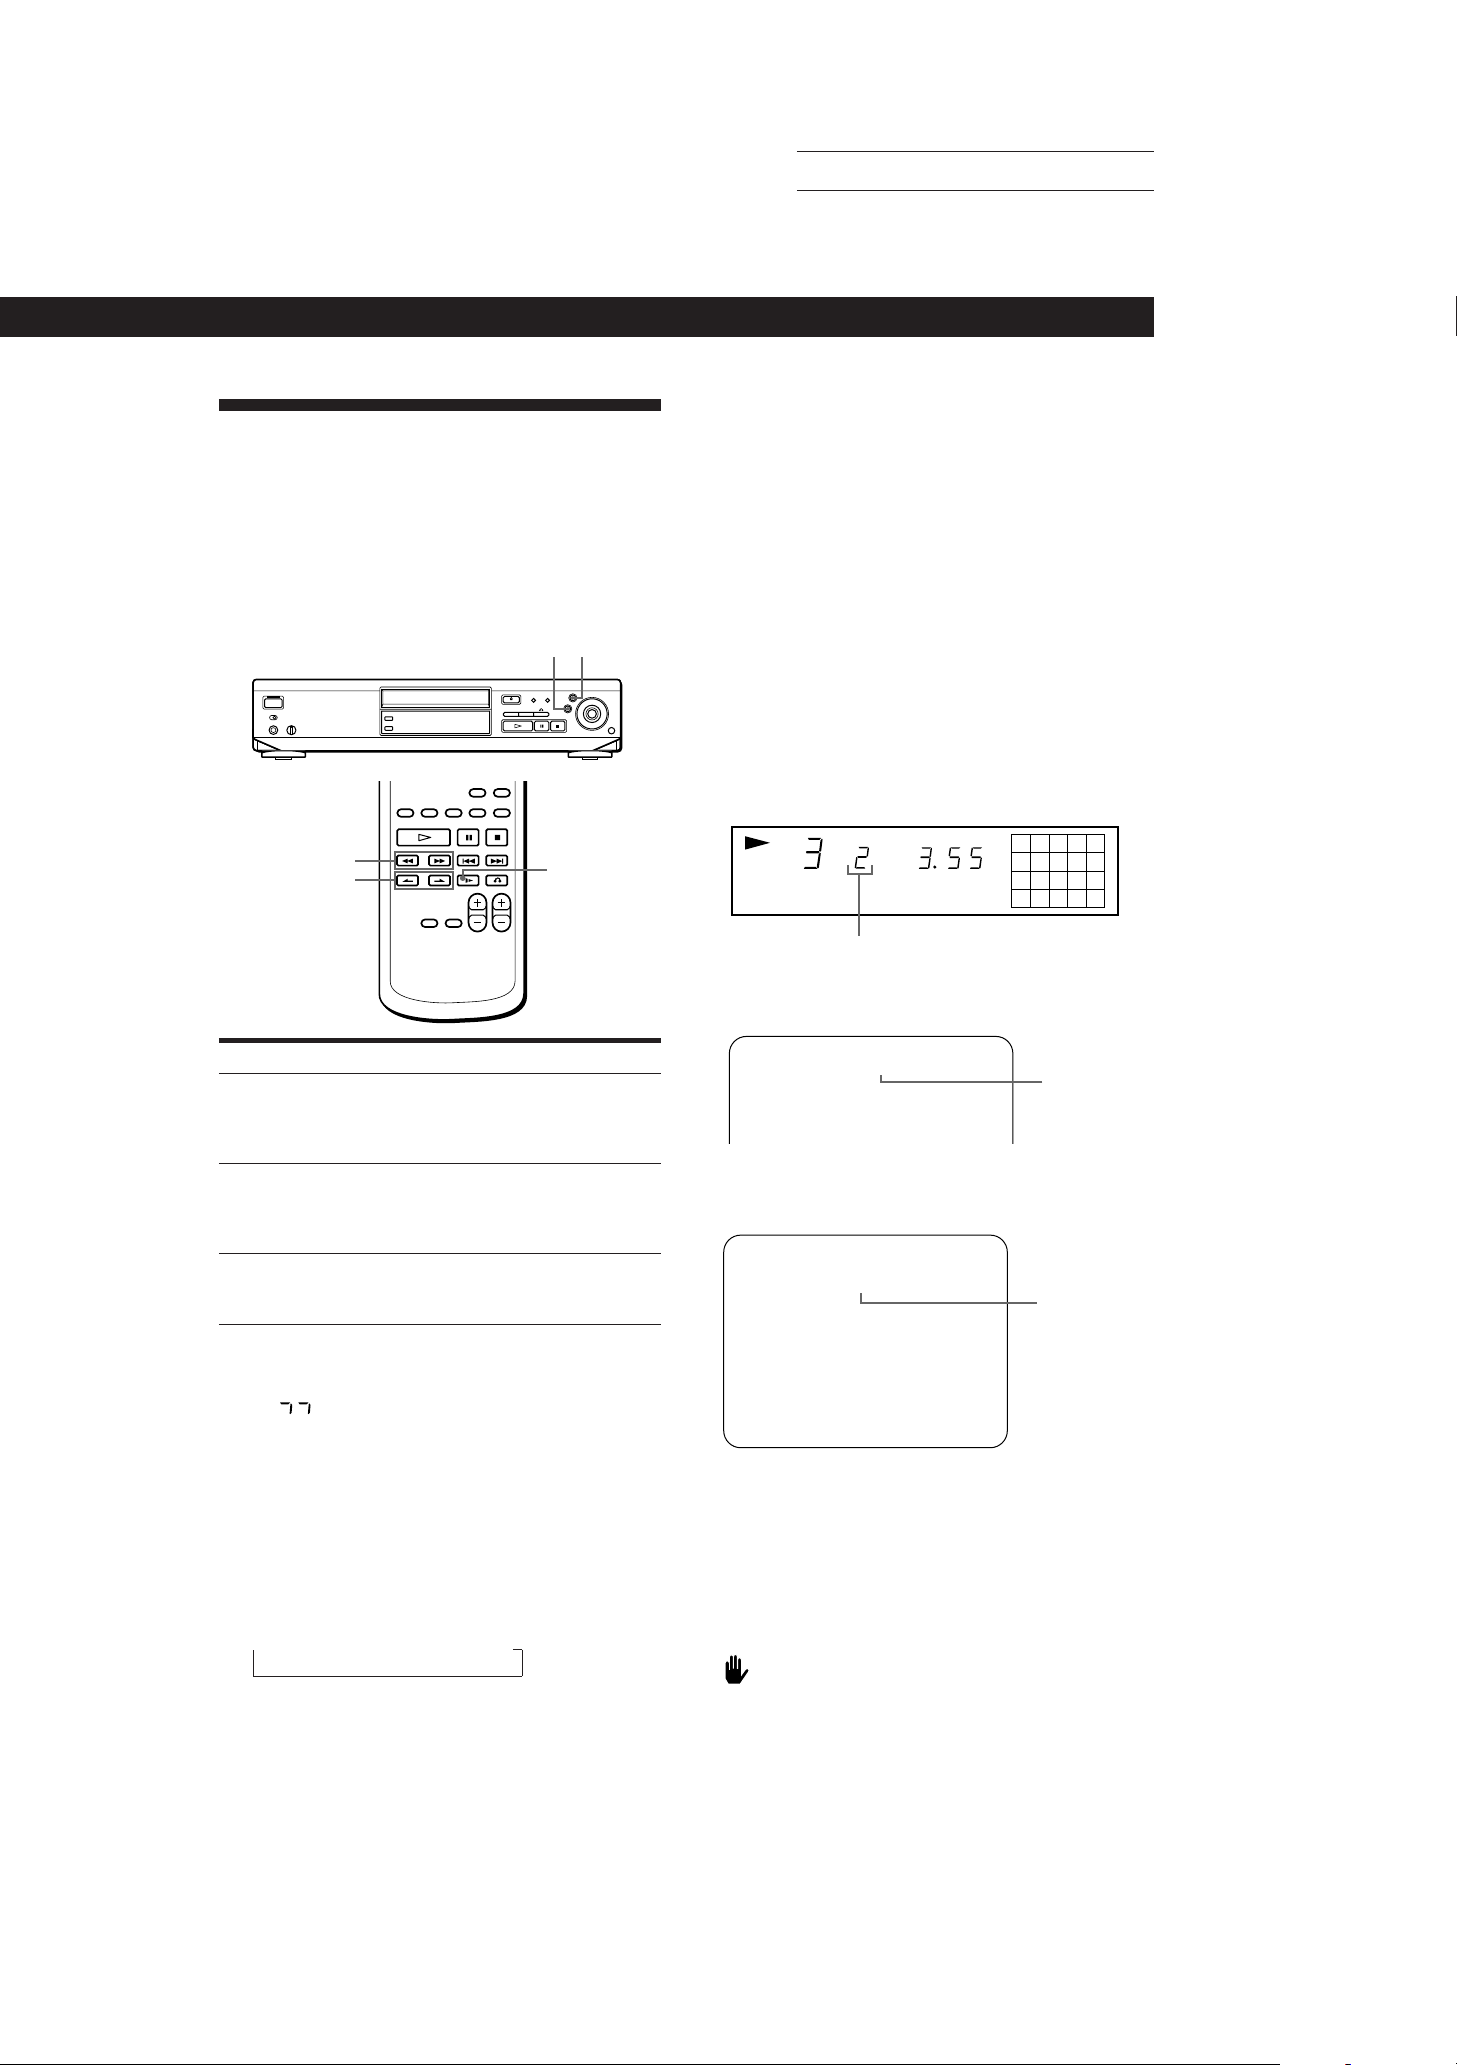
Locating a Particular Point in a Scene or Track
You can also locate a particular point in a scene or
track while playing a disc.
During PBC Playback (page 10), this function is
available only while playing moving pictures.
While playing an audio CD, Slow-motion Play is not
available.
0
)
Actual page number:
Locating a Scene or Track You Want
Locating a Scene or Track You Want
Locating a Scene or Track You Want
Locating a point using the index
(Index Search) Z
There are two kinds of indexes: one is for audio CDs
and the other is for VIDEO CDs. You can locate a point
you want using the index.
Note that this function is available only for indexed
discs. Also note that you cannot search indexes in
different tracks.
While playing a track, press INDEX C or c
repeatedly.
• To locate the current or preceding index numbers,
press INDEX C.
• To locate the next or subsequent index numbers,
press INDEX c.
0/)
INDEX C/c
To locate a point
While monitoring the
picture or sound Z
Slowly by observing
the TV screen
(Slow-motion Play) Z
Quickly by observing
the front panel display
during pause
z
If you want to locate a particular point of a long track
It is convenient to use Track Digest (see page 19).
Press
) (forward) or 0 (backward)
and hold down until you find the
point. You will not hear the sound
while playing a VIDEO CD.
& SLOW. You will not hear the
sound during the operation. When
you find the point, press ( to
return to the normal speed.
0/) and hold down until you
find the point. You will not hear the
sound during the operation.
& SLOW
z If “ ” appears in the front panel display
The disc has reached the end while you were pressing
). Press 0 or = to go back.
z If you want to change the playback speed during
Slow-motion Play Z
Press & SLOW repeatedly until you find the playback
speed you want. Three speeds are available: SLOW 1 (1/
5th the normal speed), SLOW 2 (1/10th) and SLOW 3 (1/
15th). Each time you press the button, the indication
changes as follows.
n SLOW 1 n SLOW 2 n SLOW 3
Note
While playing a VIDEO CD, the picture may be distorted
during the search operation.
Front panel display
INDEX
VIDEO CD
TV screen (while playing a VIDEO CD)
ON SCREEN 1 or 2 display mode
TRK 3 V-index 2
TV screen (while playing an audio CD)
ON SCREEN 1 or 2 display mode
TRK 3 index 2 0:55
CONTINUE
∗ ∗ 3 4 5
6 7 8 9 10
11 12 13 14 15
CONTINUE
Index number
MIN SEC
CD PLAY
345
678910
Index number
Index number
z What is an index?
It is a number that divides a track or a disc into some
sections in order to easily locate the point you want. You
may determine if a disc uses index by looking at the
disc’s packaging.
Note
If there are no more indexes while playing a VIDEO CD,
“ CANNOT OPERATE NOW” appears on the TV screen
and the player continues playing.
17
EN
SONY MCE-F500 (E, C1, C2) 3-858-463-11
Page 21
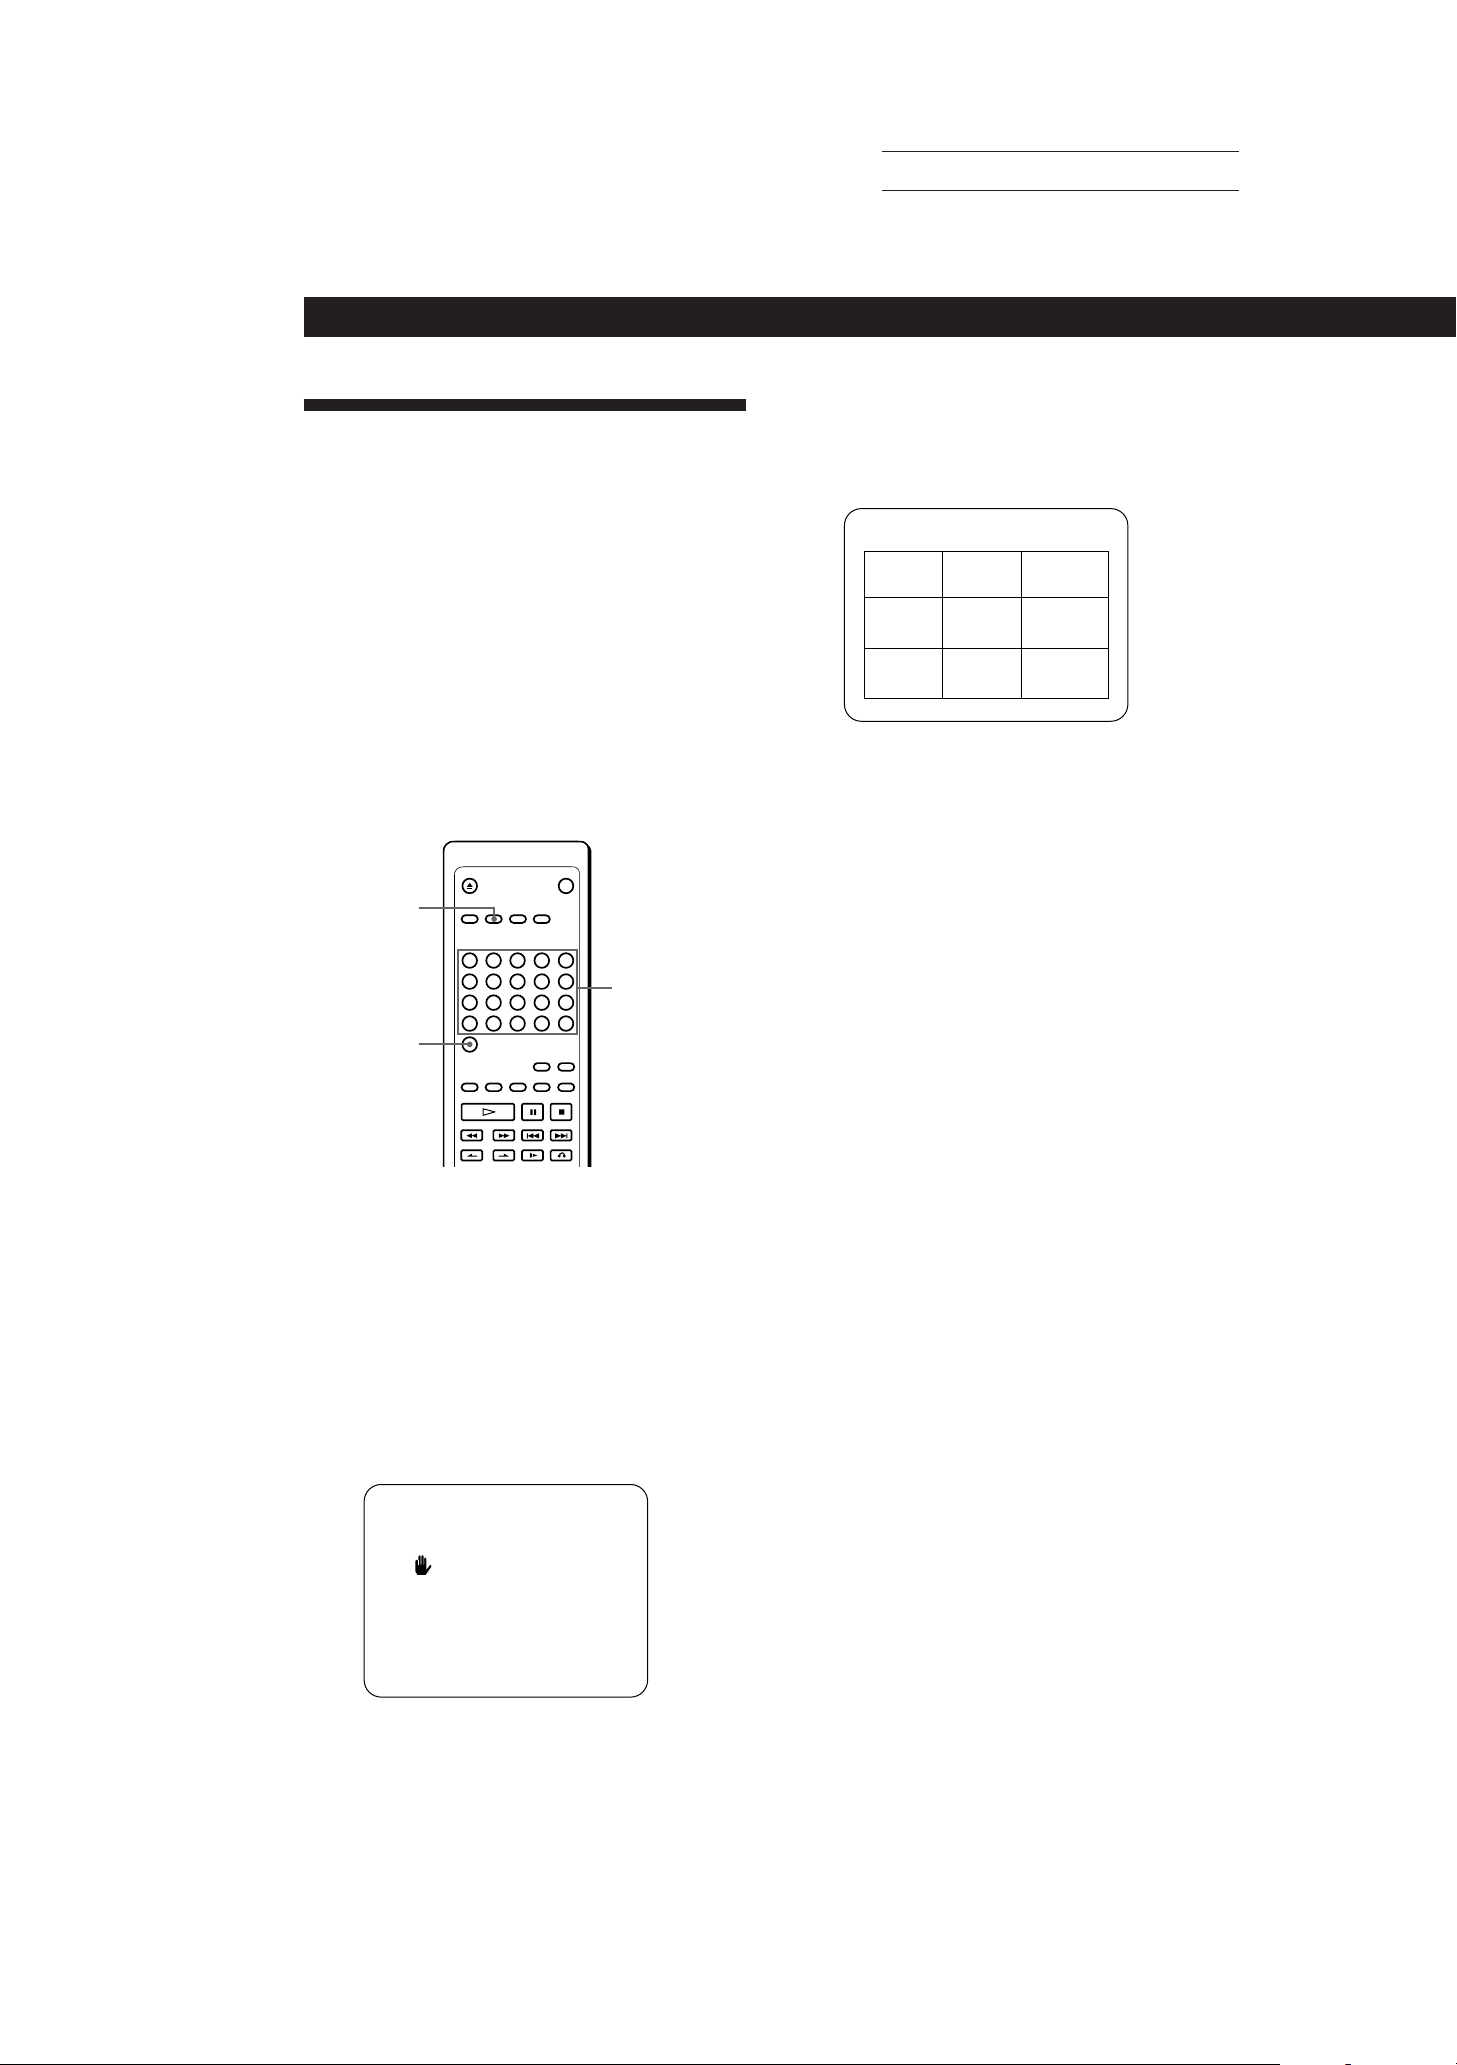
Locating a Scene or Track You Want
Locating by Observing Several Scenes at One Time (Digest Play) Z
You can locate the track or scene you want by
observing several still pictures at one time on the TV
screen.
Note that while playing a VIDEO CD with PBC
functions, this function is available before you start
playing or during playback without PBC functions
(PBC OFF, page 10).
While playing a VIDEO CD, you will not hear the
sound.
While playing an audio CD, you will only hear the
sound.
Actual page number:
2 Press button 2.
The TV screen shows still pictures of the first
scenes of tracks 1 to 9 on the disc.
TV screen
DISC DIGEST
12 3
45
78 9
To view still pictures of the tracks numbered over 9
Press +. The TV screen shows still pictures of tracks 10
to 18.
If there are more tracks, “+” is displayed on the upper
right side of the TV screen.
To go back to the previous screen, press =.
6
SPECIAL MENU
Number buttons
>20
Locating the track you want on a disc
(Disc Digest)
You can locate the track you want by observing the
first picture of up to 9 tracks on the disc at one time on
the TV screen.
1 Press SPECIAL MENU while playing a disc or
before you start playing.
The following menu appears on the TV screen.
TV screen
3 Press the number button to select the track.
The player starts playing from the selected track.
To select tracks numbered over 20
Use the >20 button (see page 16).
To cancel Disc Digest
Press p.
z While the still pictures are displayed in Step 2, you
can start playing the track you want right away
before all the still pictures are displayed
Press · when the picture of the track you want appears
on the TV screen.
Notes
• If you start Disc Digest before you start playing a VIDEO
CD with PBC functions, the player automatically starts
playing without PBC functions (PBC OFF, page 10).
• When you start Disc Digest in Shuffle or Program Play
mode, the player automatically enters Continuous Play
mode (page 8).
18
SPECIAL MENU
1) SCENE SEARCH
2) DISC DIGEST
3) TRACK DIGEST
EN
SONY MCE-F500 (E, C1, C2) 3-858-463-11
Page 22
Actual page number:
Locating a Scene or Track You Want
Locating a Scene or Track You Want
Locating a Scene or Track You Want
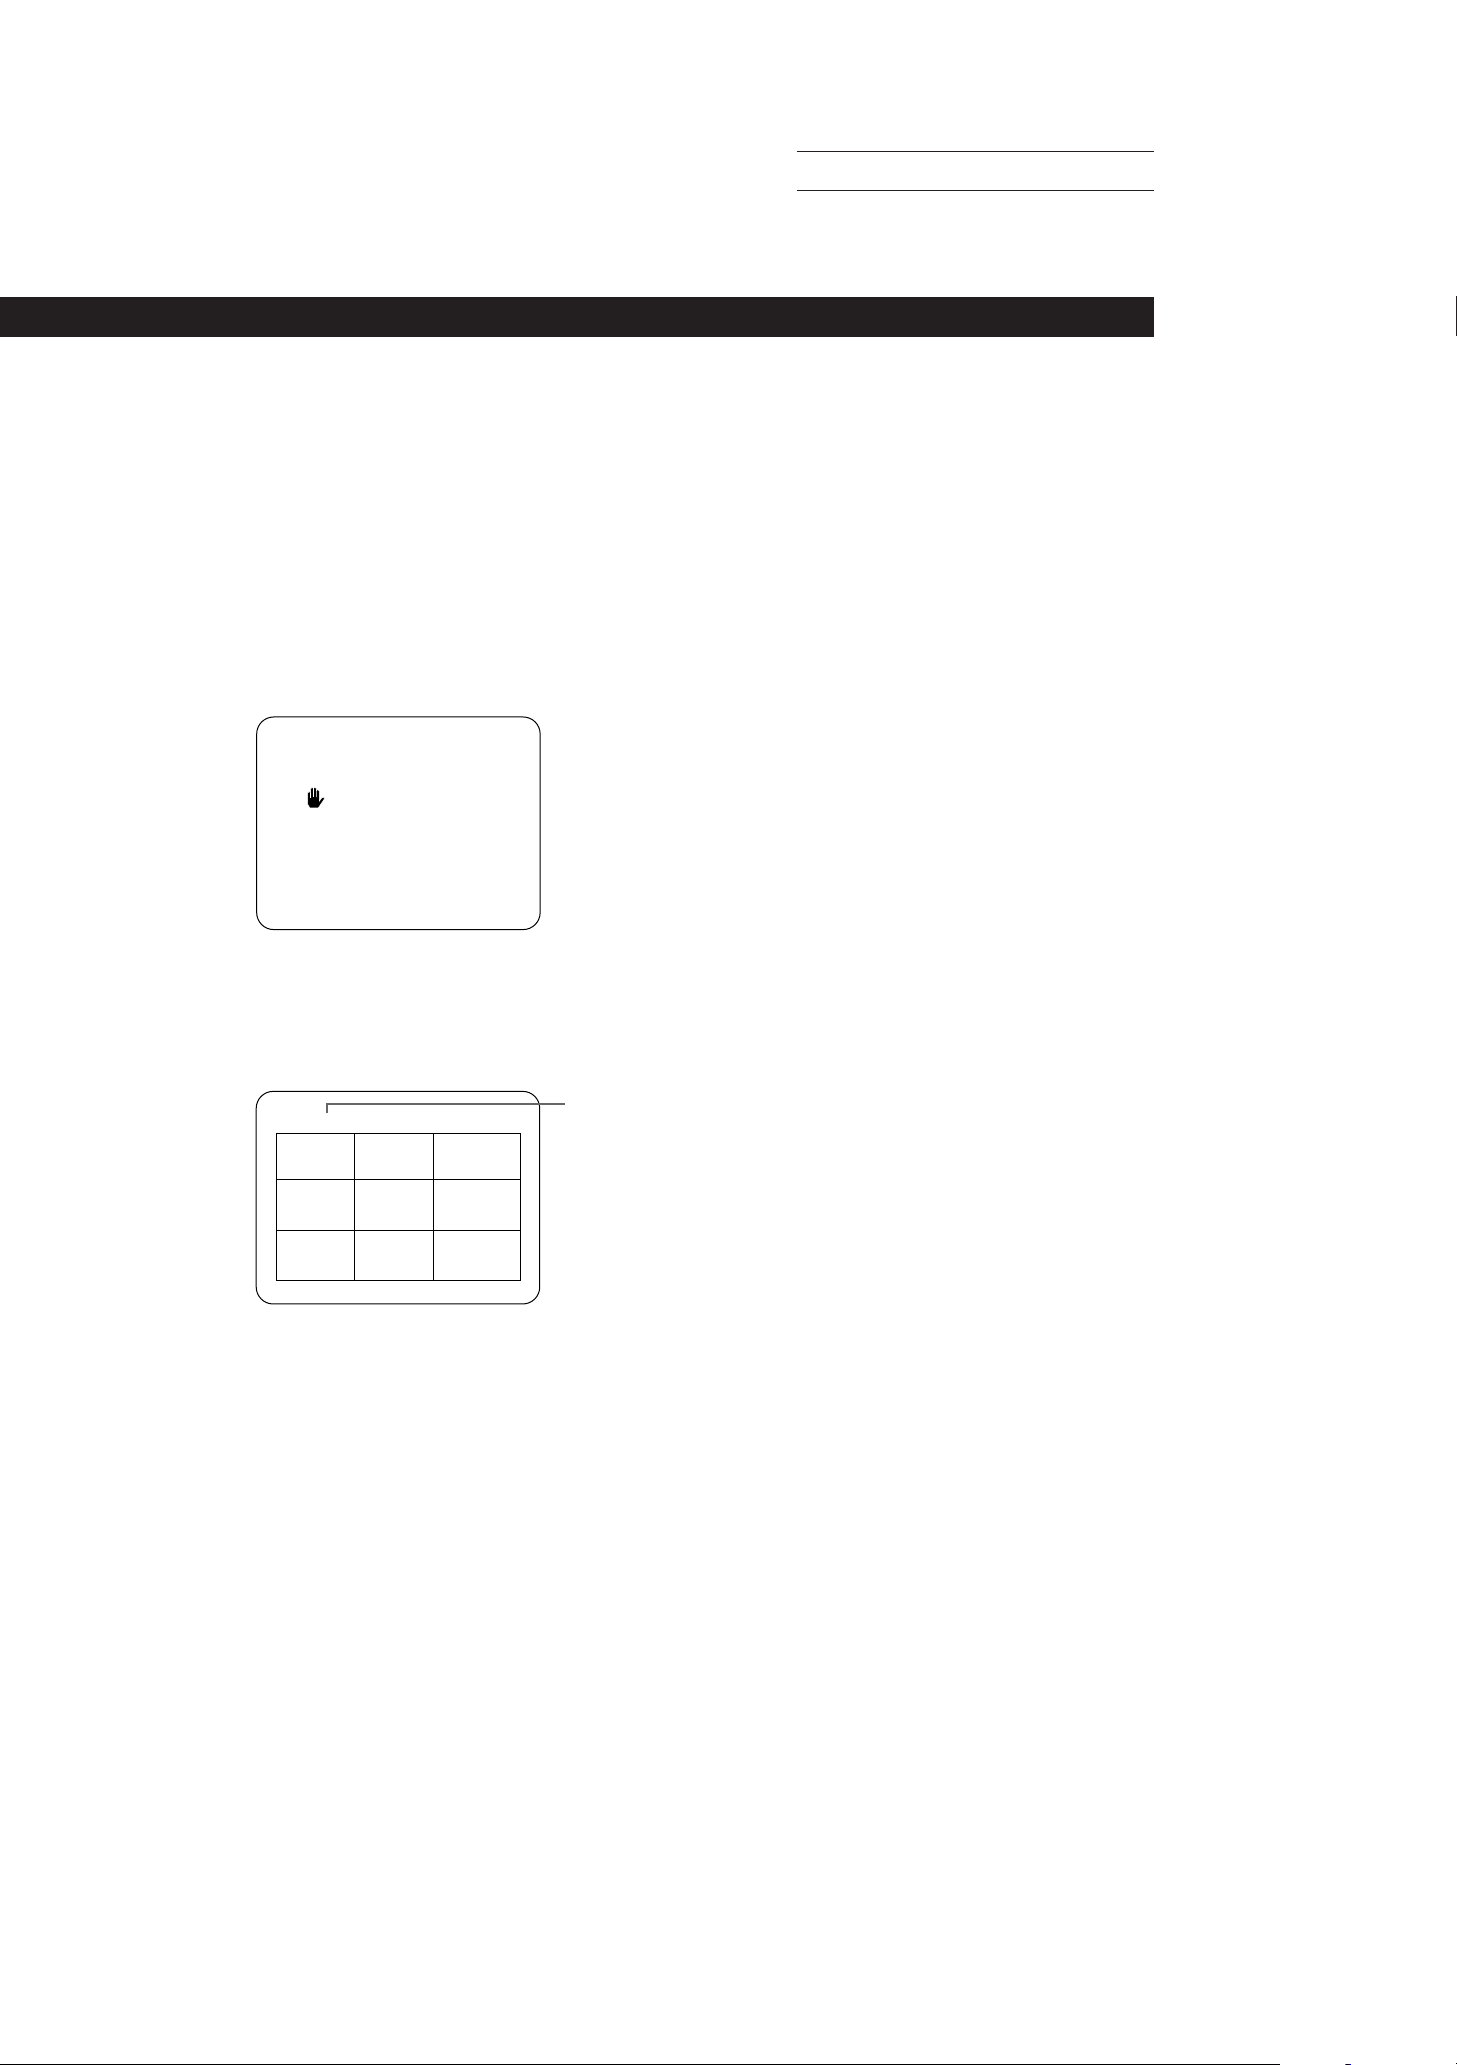
Locating the point you want in a track
(Track Digest)
You can have the player divide a track into 9 sections.
You can locate the point you want by viewing the first
picture of each section at one time on the TV screen.
This might be useful when you play a disc which is
divided into few tracks, such as a movie.
1 Press SPECIAL MENU while playing a disc or
before you start playing.
The following menu appears on the TV screen.
TV screen
SPECIAL MENU
1) SCENE SEARCH
2) DISC DIGEST
3) TRACK DIGEST
2 Press button 3.
The player divides the track into 9 sections and the
TV screen shows still pictures of each section in
order.
z You can select a point which isn’t displayed yet on
the TV screen in Step 2
z During Track Digest, you can start Track Digest on
another track
Press = or +.
Note that this function is not available in Shuffle or
Program Play mode.
Notes
• If you start Track Digest before you start playing a VIDEO
CD with PBC functions, the player automatically starts
playing without PBC functions (PBC OFF, page 10).
• If you start Track Digest before you start playing in Shuffle
or Program Play mode, the player automatically enters
Continuous Play mode (page 8).
• When a track is shorter than about 40 seconds, the player
may divide the track into less than 9 sections.
TV screen
TRACK 1 DIGEST
12 3
45
78 9
6
Current
track
3 Press the number button (1 – 9) to select the point
you want.
The player starts playing from the selected point.
The player may start playing from a point which is
a little different from the one displayed during
Track Digest.
To cancel Track Digest
Press p.
SONY MCE-F500 (E, C1, C2) 3-858-463-11
19
EN
Page 23
Playing CDs in Various ModesPlaying CDs in Various Modes
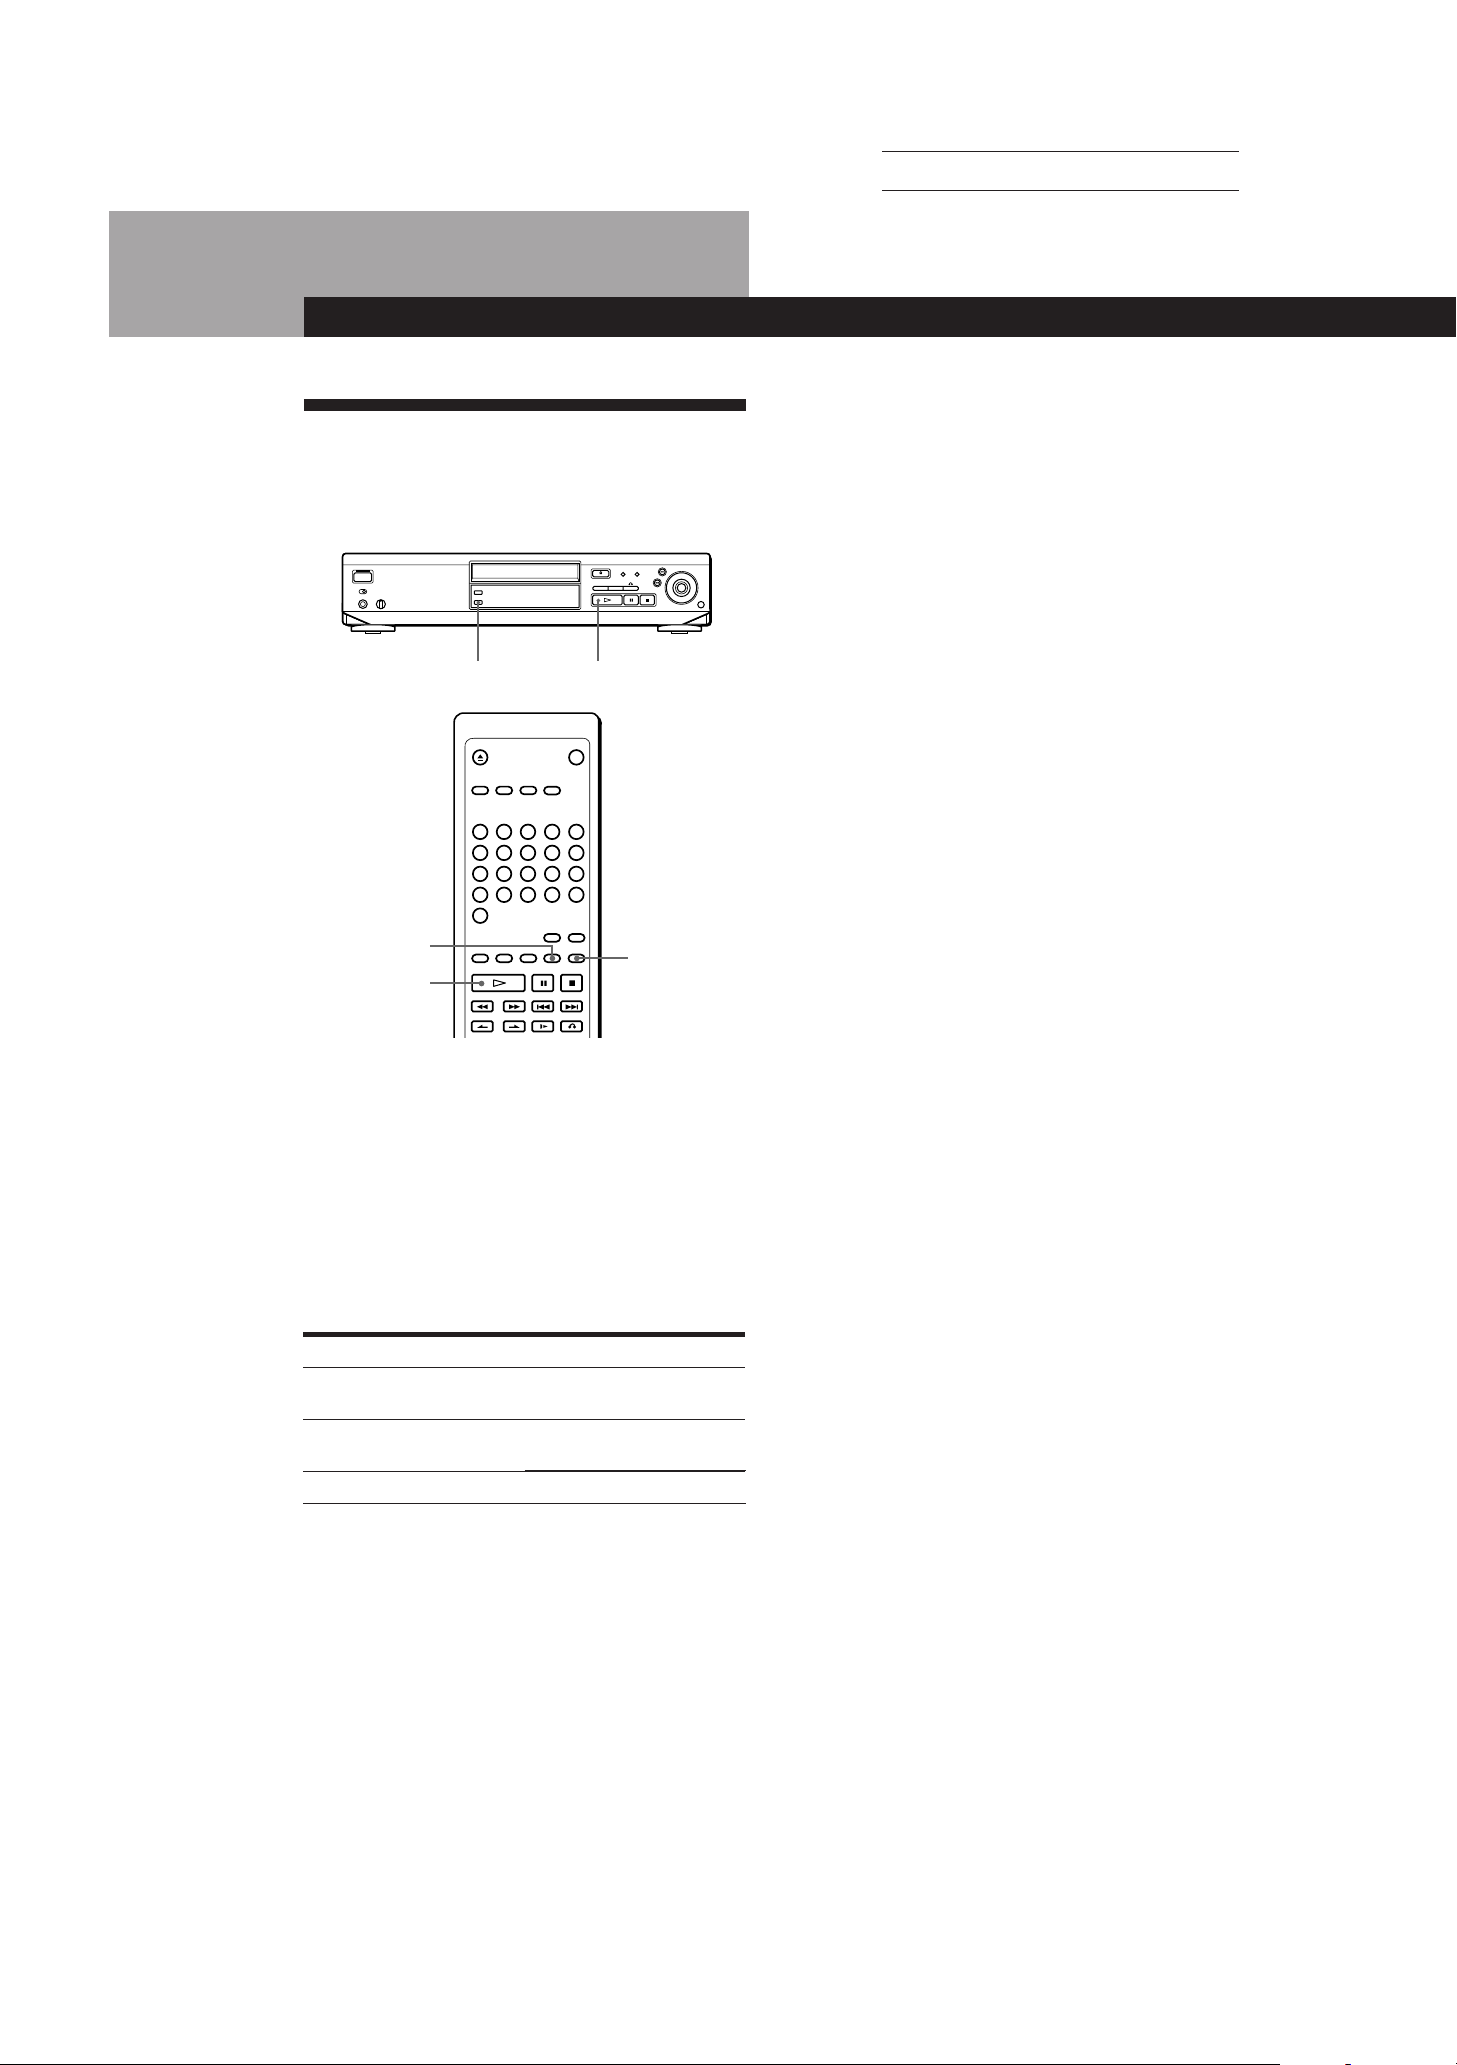
Playing Repeatedly
You can play all the tracks, a single track or a specific
portion repeatedly.
REPEAT
·
Actual page number:
Repeating the current track
You can repeat only the current track in Continuous
Play mode (page 8).
While the track you want is being played, press
REPEAT repeatedly until “REPEAT 1” appears in the
front panel display.
To cancel repeating the current track
Press REPEAT repeatedly until “REPEAT 1” disappears from
the front panel display.
Repeating a specific portion
(A˜B Repeat) Z
REPEAT
·
A˜B
Repeating all the tracks on a disc
In Shuffle or Program Play mode, the player repeats
the track in the shuffled or programmed order.
You cannot do Repeat Play during PBC playback
(page 10) or Digest Play (page 17).
Press REPEAT while playing a disc.
“REPEAT” appears in the front panel display. The
player repeats the tracks as follows:
When the disc is played in
Continuous Play
(page 8)
Shuffle Play
(page 21)
Program Play (page 21)
The player repeats
All the tracks
All the tracks in random order
The same program
You can play a specific portion in a track repeatedly.
This might be useful when you want to memorize
lyrics.
During PBC Playback (page 10), this function is
available only while playing moving pictures.
1 While playing a disc, press A˜B when you find
the starting point (point A) to be played
repeatedly.
“A–” of “REPEAT A–” flashes in the front panel
display.
2 When you reach the ending point (point B), press
A˜B again.
“REPEAT A–B” appears. The player plays this
specific portion repeatedly.
To cancel A˜B Repeat
Press REPEAT.
z When you want to restart from the starting point A
Press · during A˜B Repeat.
20
To cancel Repeat Play
Press REPEAT repeatedly until “REPEAT” disappears from
the front panel display.
EN
SONY MCE-F500 (E, C1, C2) 3-858-463-11
Page 24
Actual page number:
Playing CDs in Various Modes
Playing CDs in Various Modes
Playing in Random Order (Shuffle Play)
You can have the player “shuffle” tracks and play in a
random order.
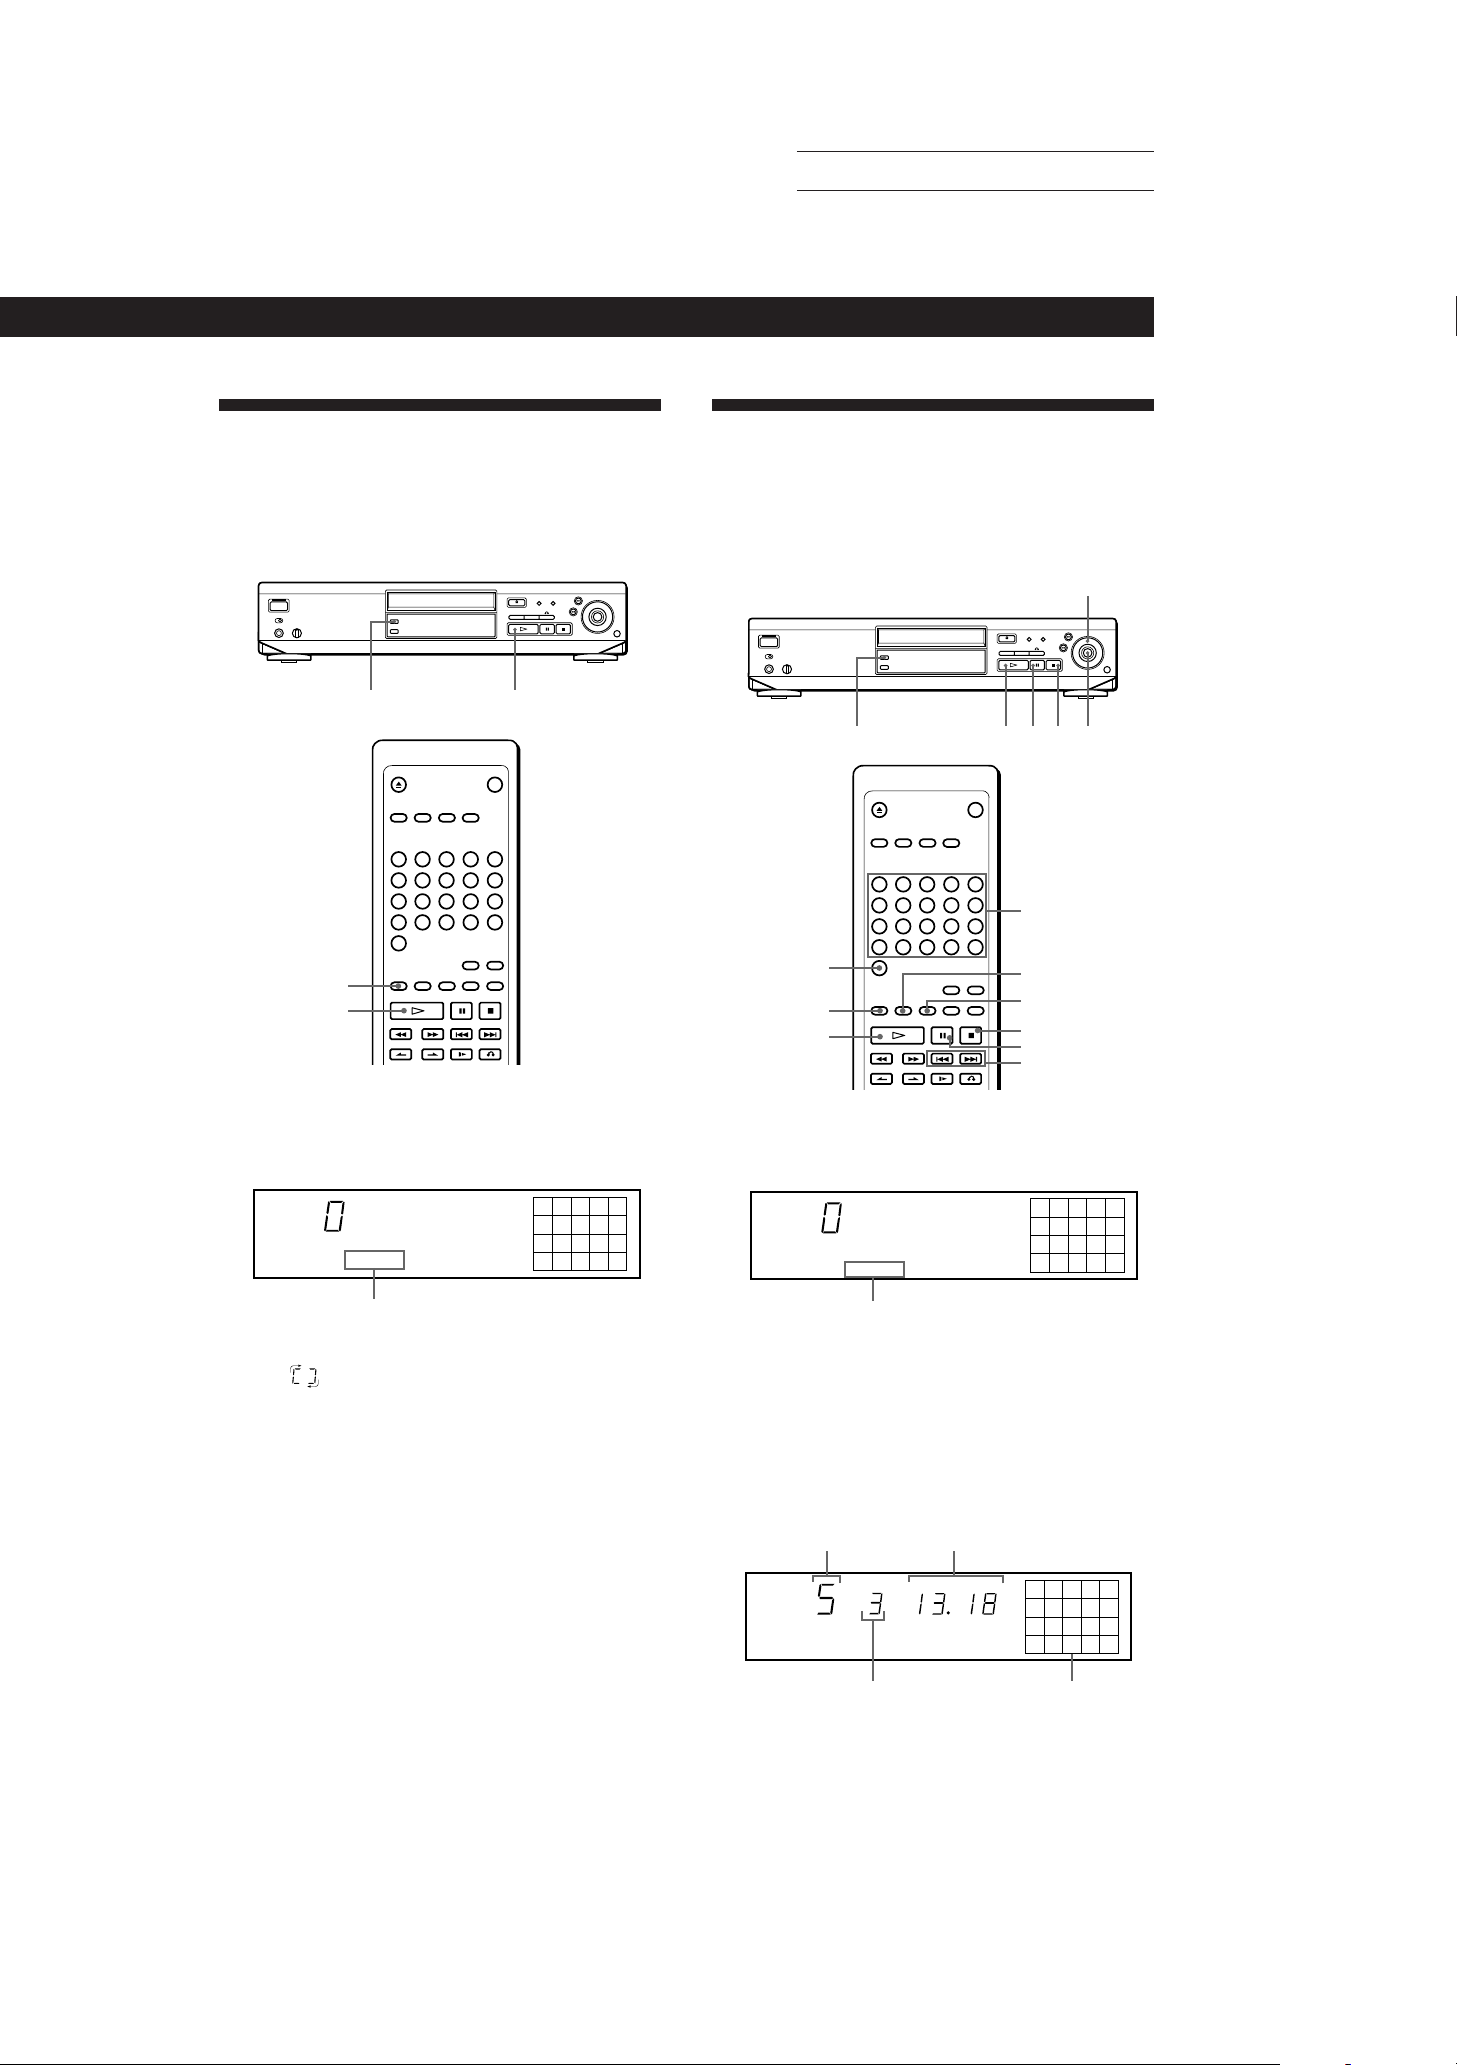
PLAY MODE ·
PLAY MODE
·
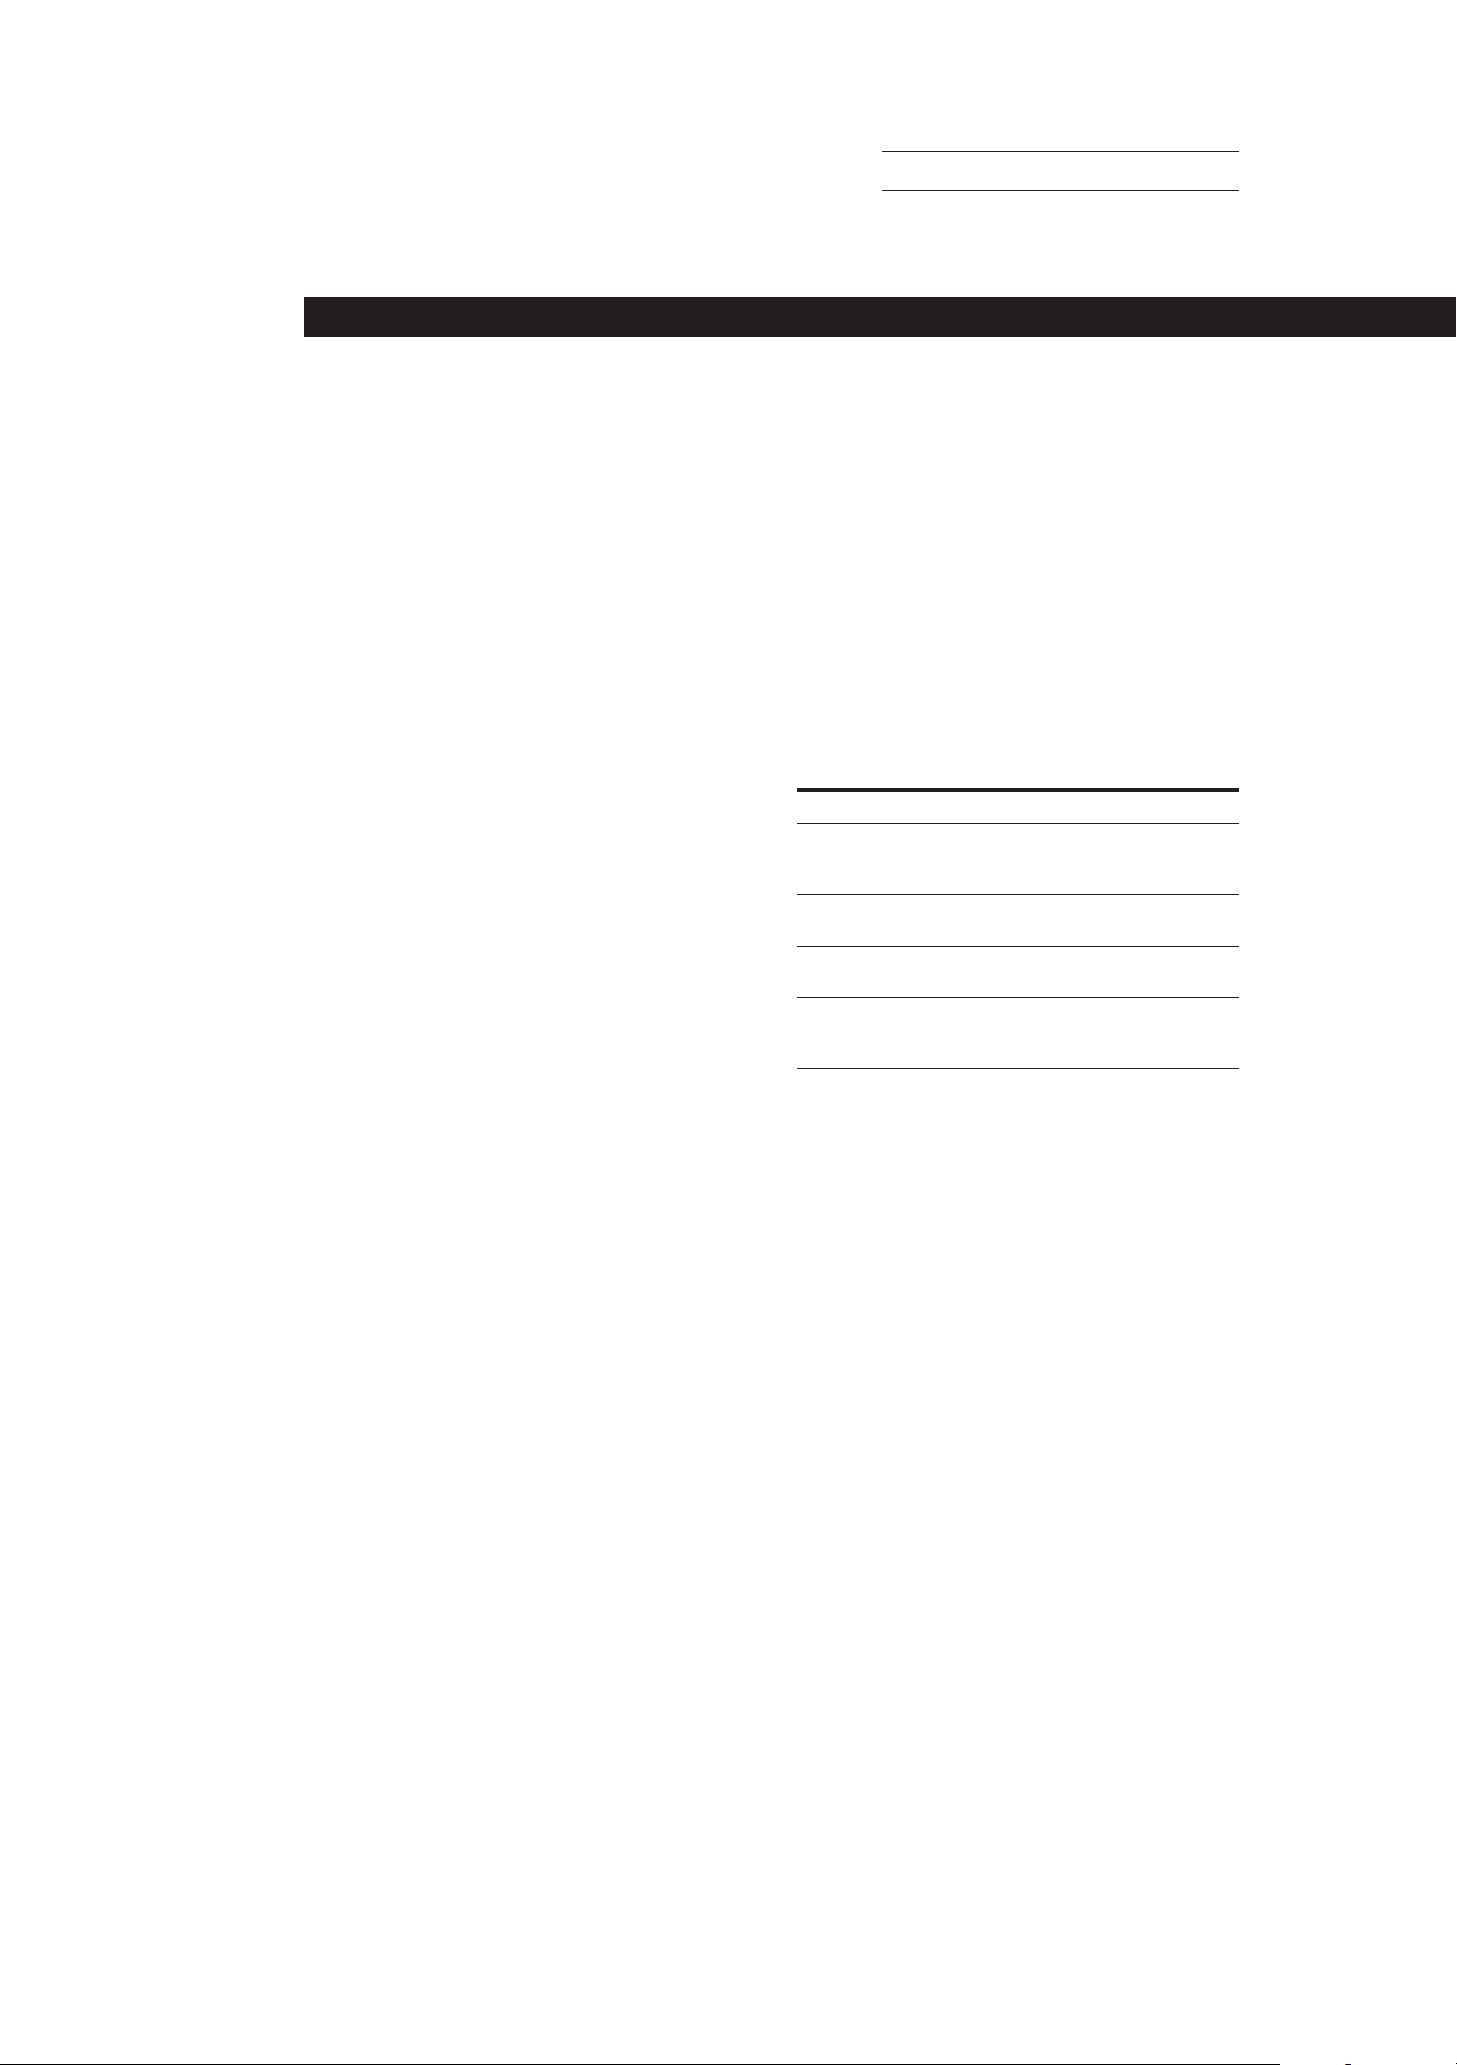
Creating Your Own Program (Program Play)
You can arrange the order of the tracks on the discs
and create your own program. The program can
contain up to 24 tracks.
PLAY MODE
>20
PLAY MODE
·
·pP
Jog Dial
SELECT
Number buttons
CHECK
CLEAR
p
P
=/+
1 Press PLAY MODE repeatedly until “SHUFFLE”
appears in the front panel display.
12345
678910
SHUFFLE
”SHUFFLE“ is lit
2 Press · to start Shuffle Play.
The
“shuffling” the tracks.
To cancel Shuffle Play
Press PLAY MODE repeatedly until “CONTINUE” appears in
the front panel display.
indication appears while the player is
z You can start Shuffle Play while playing in Continuous
Play mode
Press PLAY MODE repeatedly until “SHUFFLE” appears
in the front panel display. Shuffle Play starts from the
current track.
Note
If you play a VIDEO CD with PBC functions in Shuffle Play
mode, you cannot use the PBC functions.
1 Press PLAY MODE repeatedly until “PROGRAM”
appears in the front panel display.
12345
678910
PROGRAM
”PROGRAM“ is lit
2 Press the number buttons of the tracks you want to
program in the order you want. Z
Be sure to use the remote.
Example: To program the tracks in the order 2, 8, 5
Press the number buttons 2 n 8 n 5.
To program a track numbered over 20, use the >20
button (see page 16).
Last programmed
track
PROGRAM
Programmed order
Total playing time
MIN SECSTEP
Programmed tracks
25
8
(Continued)
SONY MCE-F500 (E, C1, C2) 3-858-463-11
21
EN
Page 25
Playing CDs in Various Modes
Actual page number:
If you’ve made a mistake
Press CLEAR, then press the correct number button.
3 Press · to start Program Play.
To cancel Program Play
Press PLAY MODE repeatedly until “CONTINUE” appears in
the front panel display.
z You can check the total playing time while
programming in Step 2 (Program Edit)
1 Turn Jog Dial or press = or + until the track you
want to program appears in the front panel display.
The total playing time including the selected track
appears in the front panel display.
2 Press SELECT or PLAY MODE to confirm your
selection.
3 Repeat Steps 1 and 2 to program more tracks.
z You can insert a pause as one step
During programming, press P to insert a pause. The
total playing time is reset to “0.00.”
When playing a program which contains a pause, the
player pauses at the step in which a pause is
programmed, until you press P or ·. This might be
useful when you record a program on both sides of a
tape.
z You can check the contents of the program during
programming on the TV screen
If you press ON SCREEN to select ON SCREEN OFF
display mode, you won’t see this information (page 13).
Checking the track order Z
You can check your program before or after you start
playing.
Press CHECK.
Each time you press this button, the front panel display
shows the track number and the total playing time in
the programmed order. After the last track in the
program, the front panel display shows “End” and
returns to the original display.
Changing the track order
You can change your program before you start playing.
To
Erase a track Z
Erase the last track in
the program Z
Add tracks to the end
of the program Z
Change the whole
program completely
Press
CHECK until the track you don’t
want appears in the display, then
press CLEAR.
CLEAR. Each time you press this
button, the last track is cleared.
Number buttons of the tracks to be
added.
p (stop). Create a new program
following the programming
procedure.
22
z The program remains even after the Program Play
ends
When you press ·, you can play the same program
again.
Notes
• If you play a VIDEO CD with PBC functions in Program
Play mode, you cannot use PBC functions (page 10).
• If the total playing time exceeds 100 minutes, “––.––”
appears in the front panel display.
• If you program more than 24 tracks, “FULL” appears in the
front panel display and on the TV screen.
EN
SONY MCE-F500 (E, C1, C2) 3-858-463-11
Page 26
Actual page number:
Playing CDs in Various Modes
Playing CDs in Various Modes
Reducing Distortion of the Picture (DNR: Digital Noise Reduction)
You can make picture clearly by reducing distortion of
the picture.
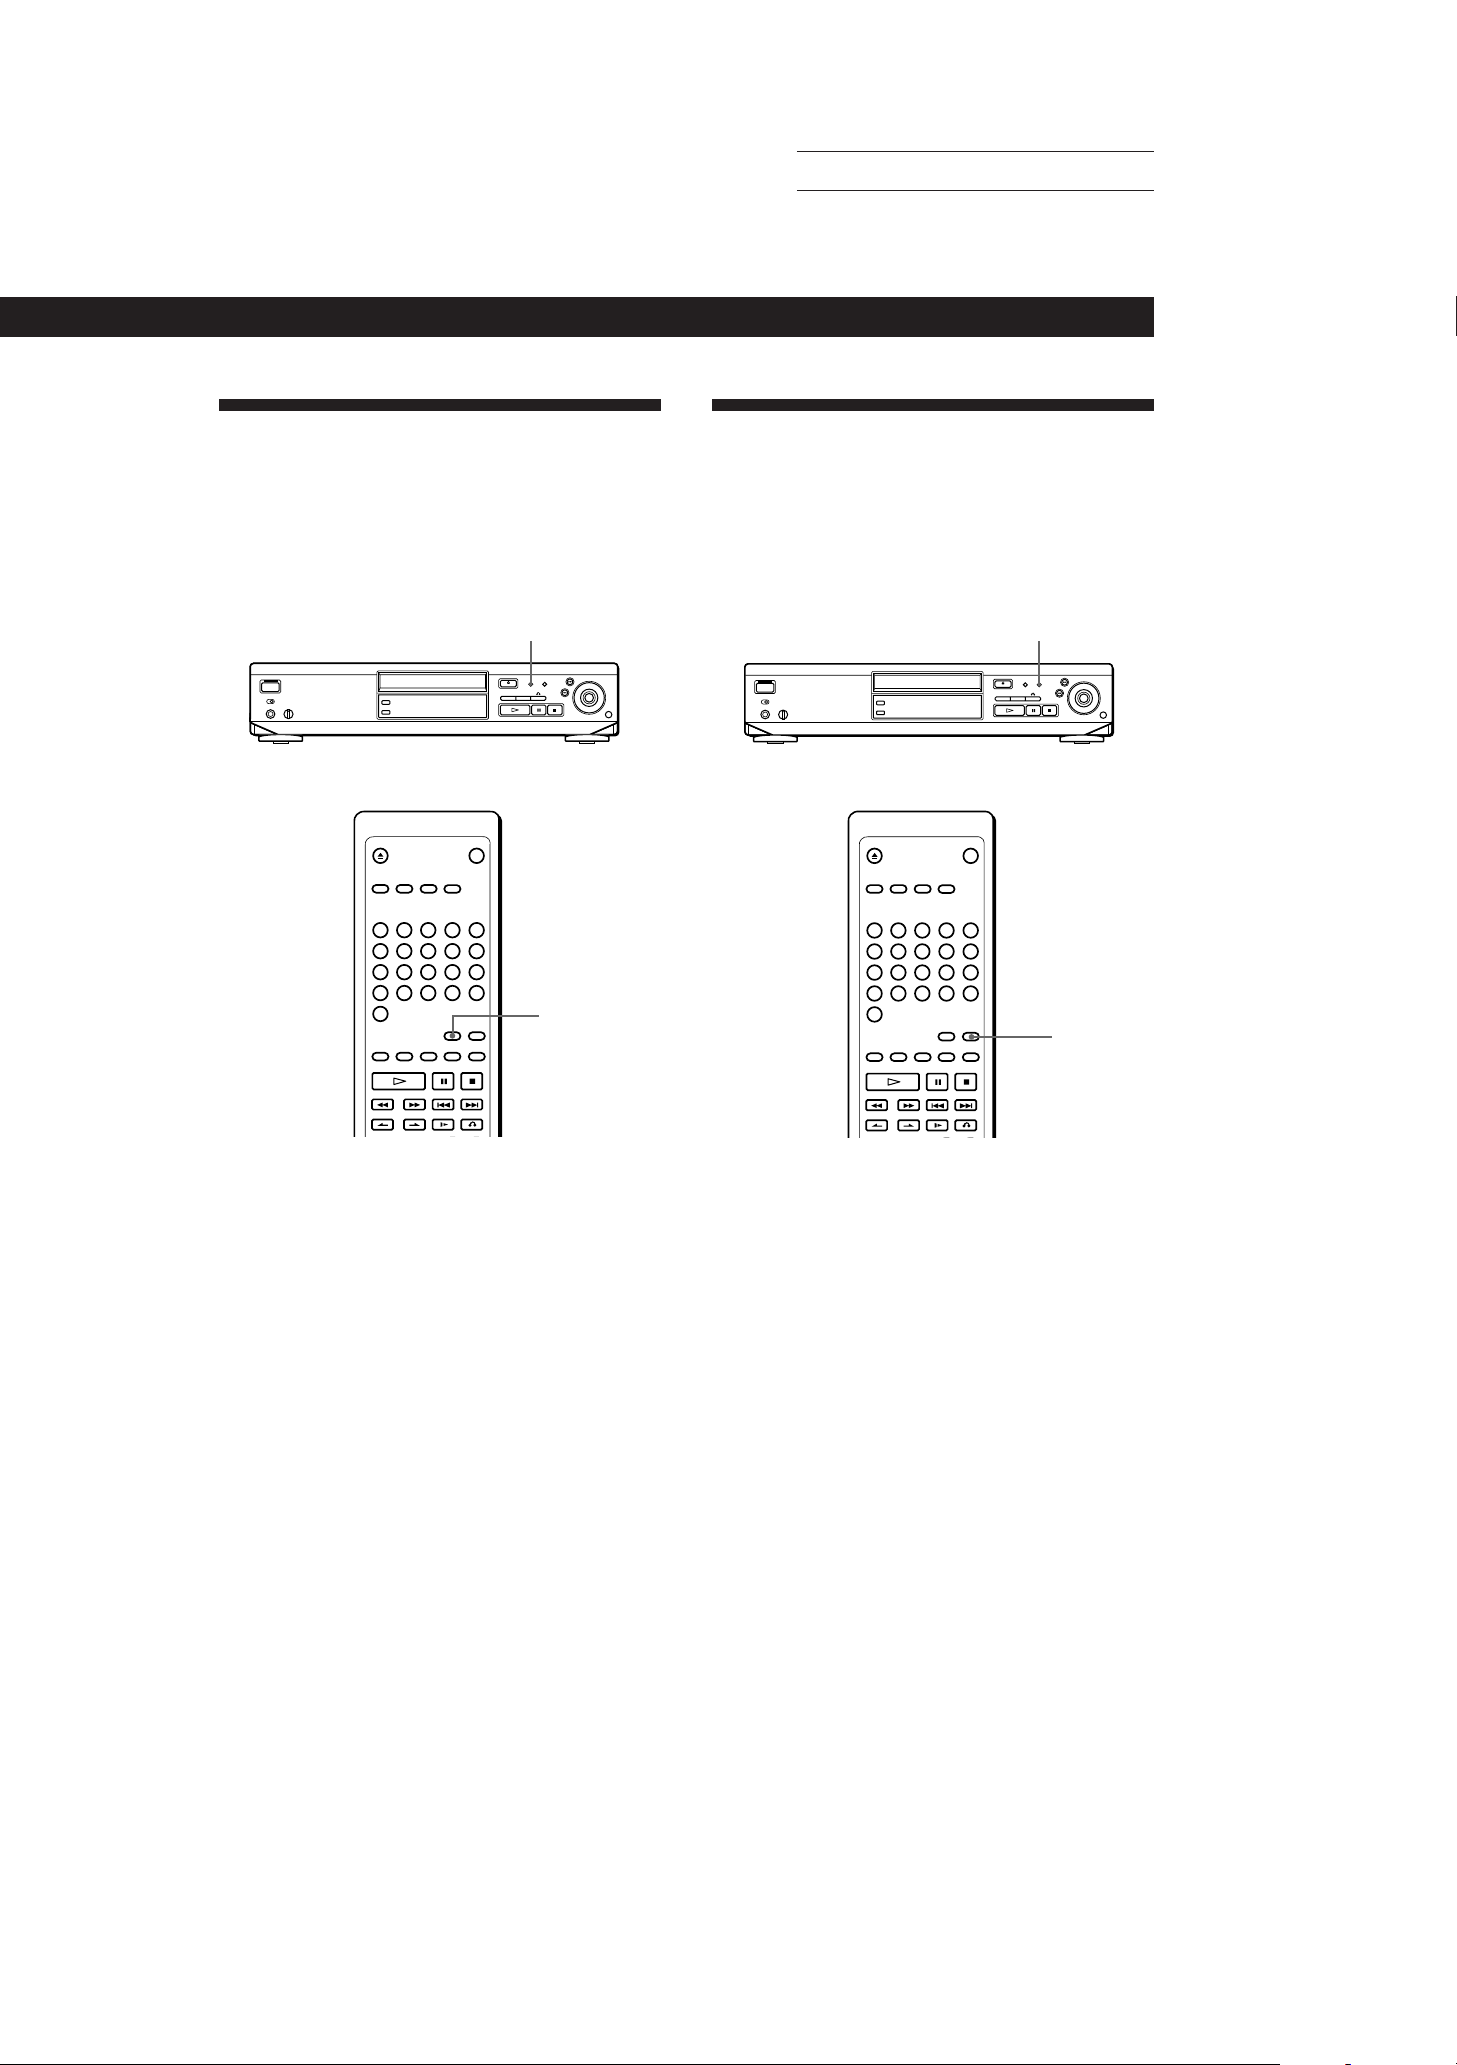
DNR
DNR
Adding an Incidental Image to Moving Pictures (COMET)
You can enjoy the picture which leaves an incidental
image, such as a trail of comet. The COMET function
gives an atmosphere to the picture.
COMET
COMET
To cancel the DNR function
Press DNR to goes off the DNR button indicator.
To turn on the DNR function again
Press DNR to lights up the DNR button indicator.
Notes
• If you press COMET, the DNR function is cancelled.
• The DNR function cannot reduce the outline noise of the
picture or block noise on the picture.
• The effect of the DNR function may not be noticeable with
the disc which contains low level noise.
• When you connect the AC power cord of the player to a
wall outlet, the DNR function is automatically turned on.
Press COMET. The COMET button indicator lights up.
To cancel the COMET function
Press COMET again. The COMET button indicator goes off.
Note
If you press DNR, the COMET function is cancelled.
SONY MCE-F500 (E, C1, C2) 3-858-463-11
23
EN
Page 27
Playing CDs in Various Modes
Actual page number:
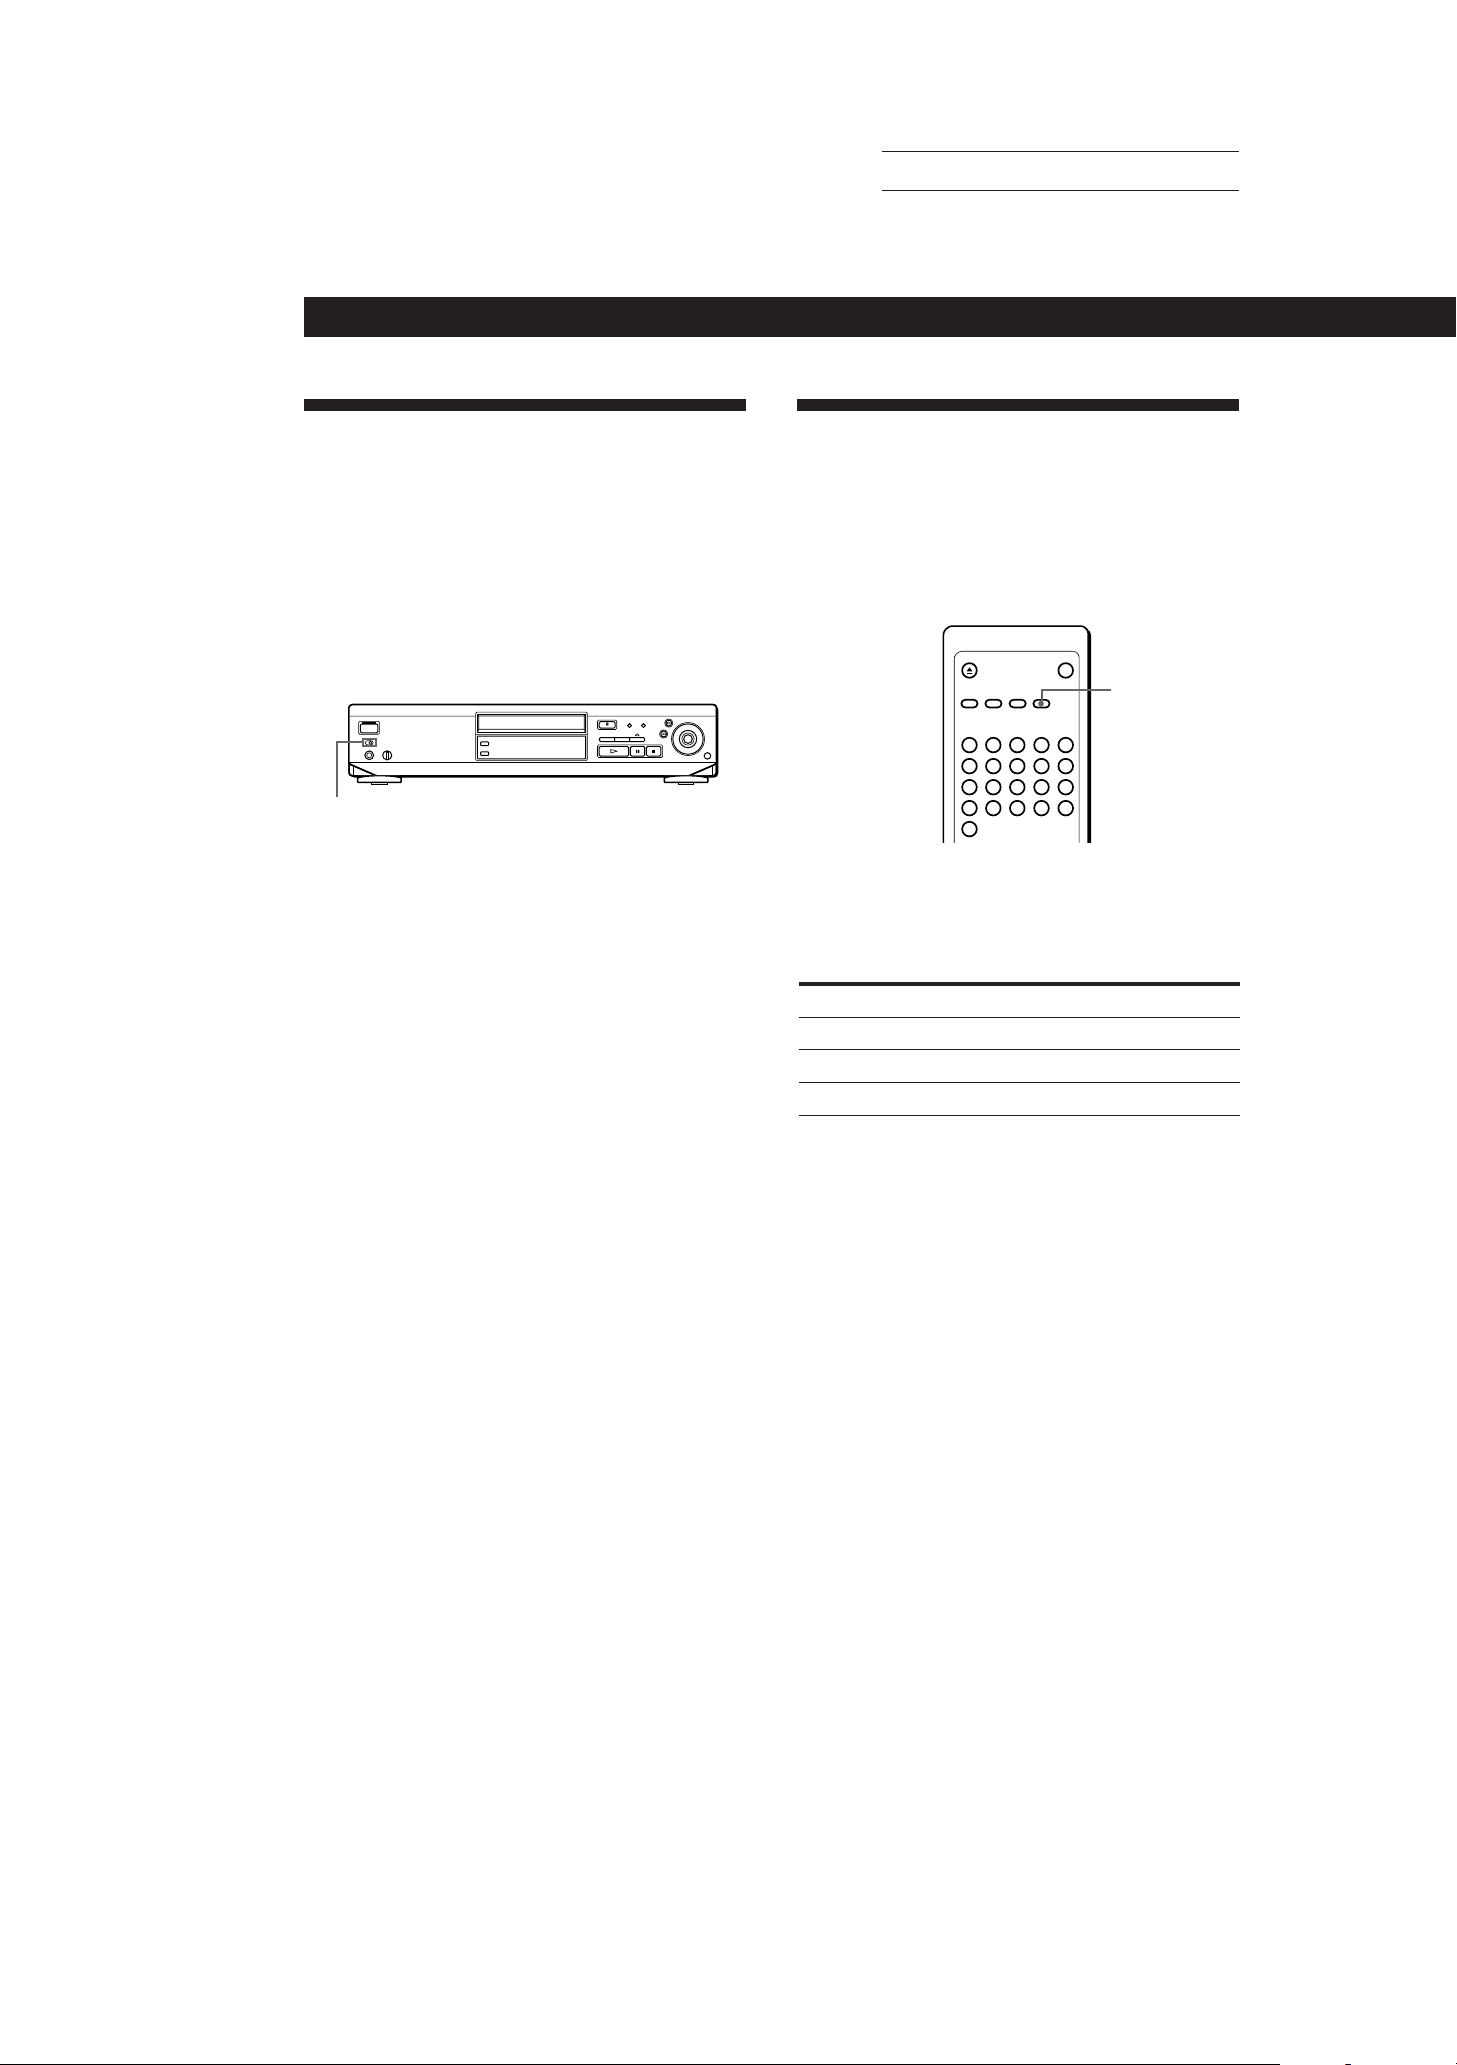
Playing Automatically When Turning On the Player (Auto Play)
You can start playing automatically when you turn on
the player.
By connecting a timer (not supplied), you can start
playing at any time you want.
AUTO PLAY
Set AUTO PLAY to ON.
The player starts playing automatically when you turn
on the player.
To cancel Auto Play
Set AUTO PLAY to OFF.
Note
If you start playing with Auto Play function, the player
automatically starts Continuous Play (When a VIDEO CD
with PBC functions is in the player, PBC playback starts). The
player cannot start in Shuffle Play or Program Play mode.
Switching the Sound Z
On multiplex discs, you can select the sound from the
right or left channel and listen to the sound of the
selected channel through both the right and left
speakers. In this case, the sound loses the stereo effect.
L/R/STEREO
Press L/R/STEREO while playing a disc.
Each time you press the button, the indication and the
sound from the speakers change as follows:
Press
Once
Twice
Three times
* When you select ON SCREEN OFF display mode, check the
indication on the front panel display.
** This indication doesn’t appear in the front panel display.
Indication*
MONO L
MONO R
STEREO**
You will hear
The sound of the left channel
The sound of the right channel
The standard stereo sound
24
Note
When you turn off the player, the standard stereo playback
will be resumed.
EN
SONY MCE-F500 (E, C1, C2) 3-858-463-11
Page 28
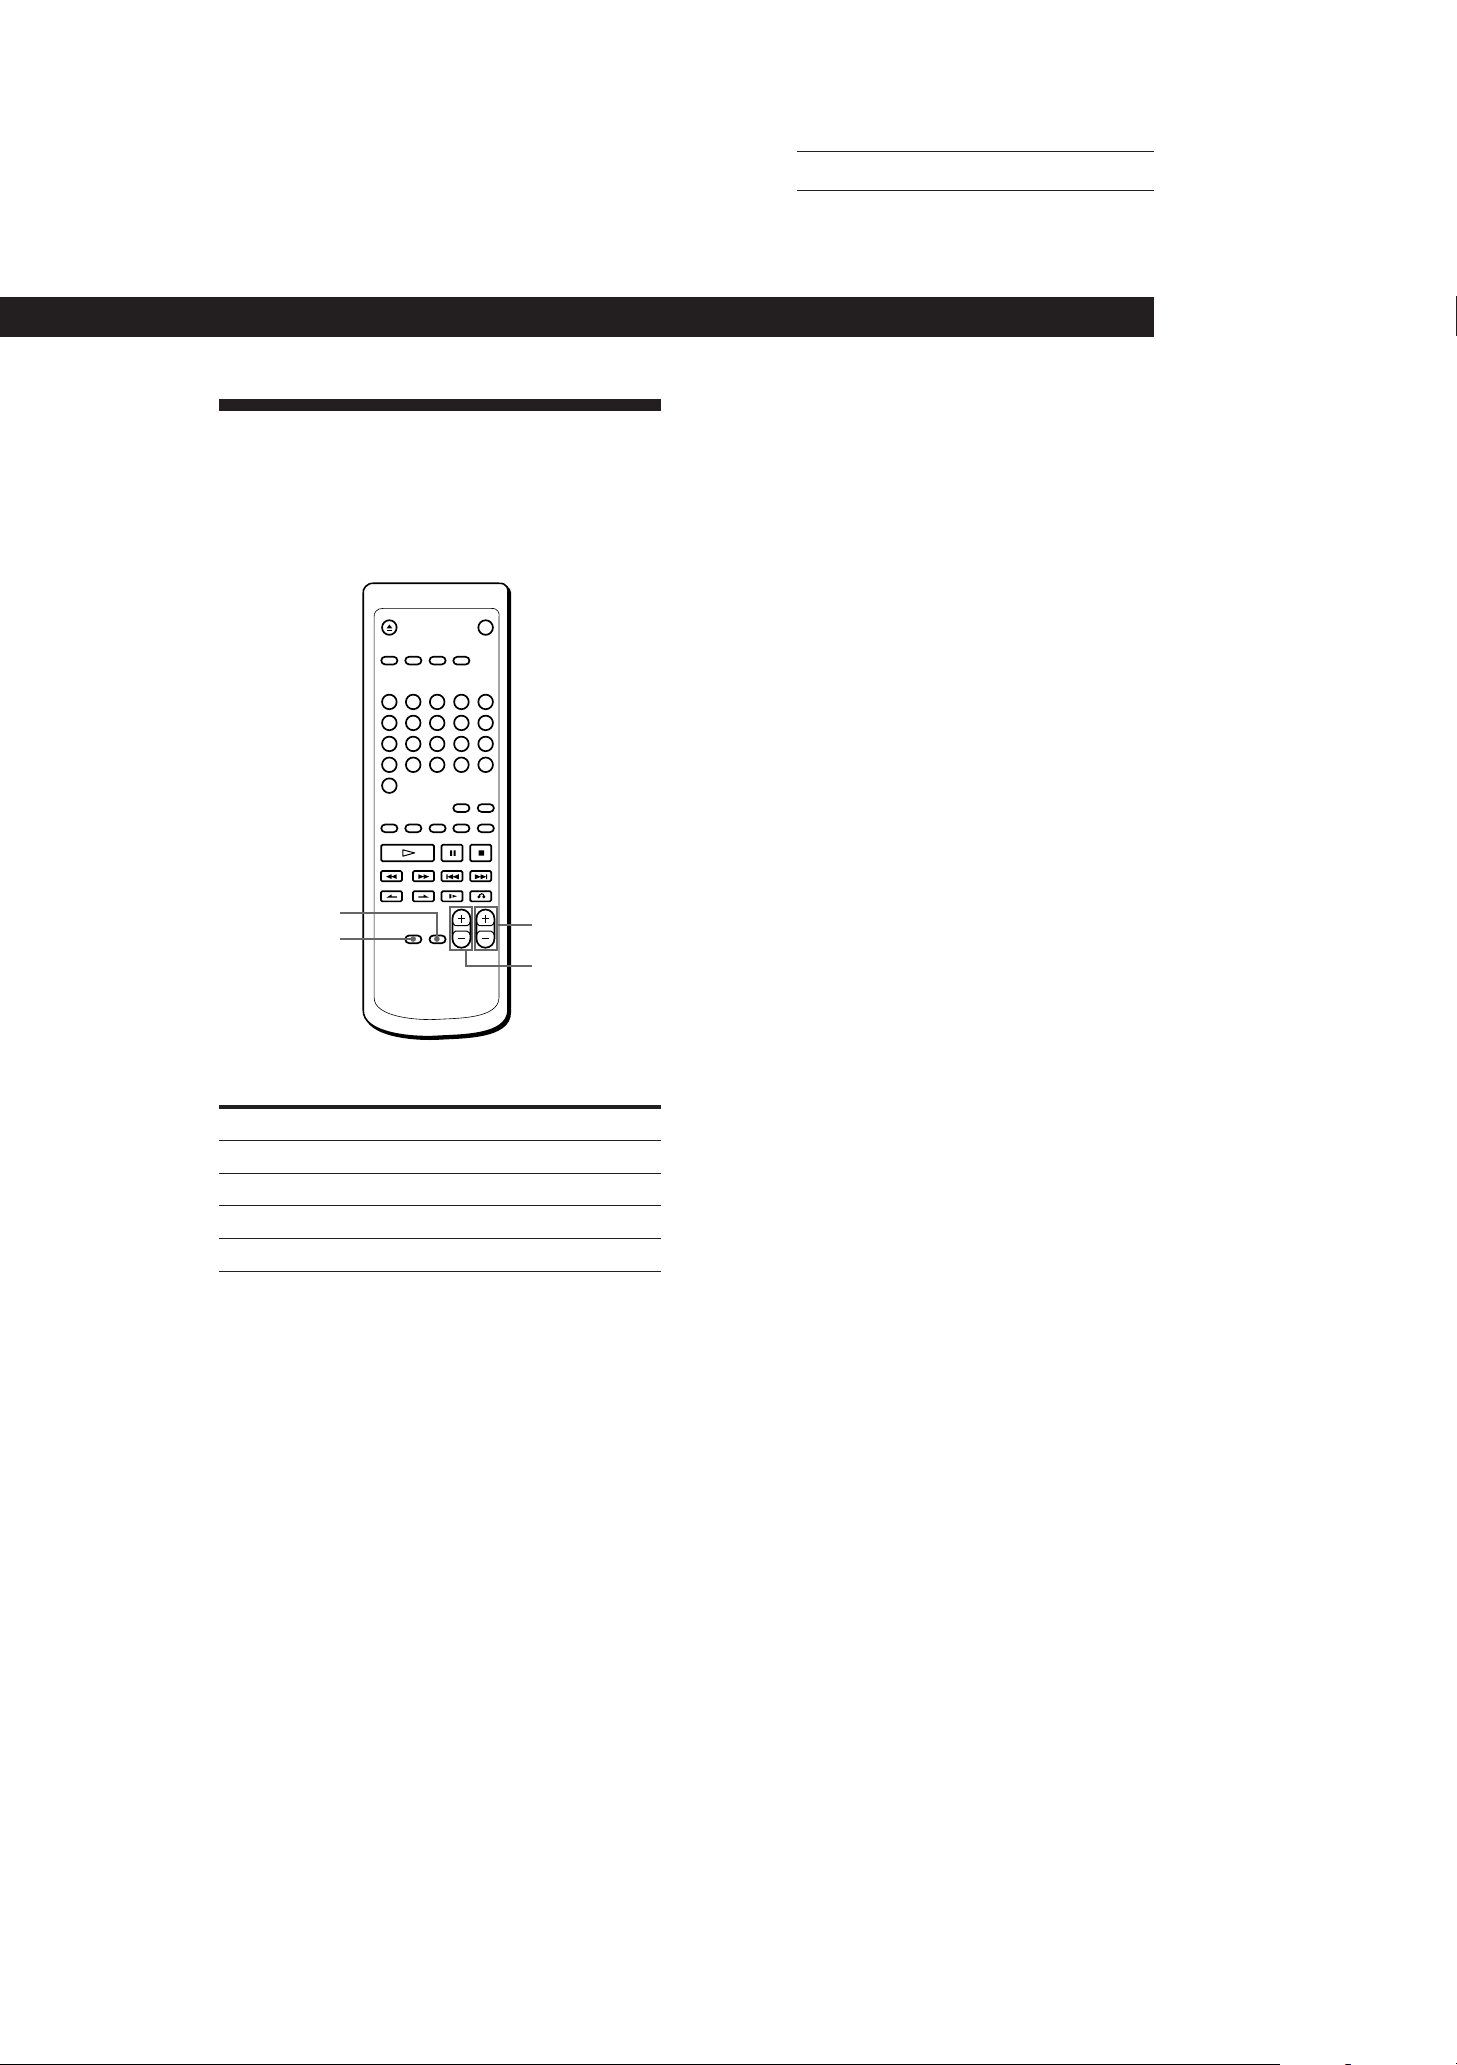
Controlling the TV with the Supplied Remote Z
You can control Sony TVs with the g mark using the
supplied remote.
Actual page number:
Playing CDs in Various Modes
Playing CDs in Various Modes
TV/VIDEO
POWER
Press
POWER
TV/VIDEO
VOL
CH
CH
VOL
You can
Turn on or off the TV
Select the input source to the TV
Adjust the volume of the TV
Change the channel of the TV
SONY MCE-F500 (E, C1, C2) 3-858-463-11
25
EN
Page 29
Additional Information
Additional Information
Actual page number:
Notes on Discs
On handling discs
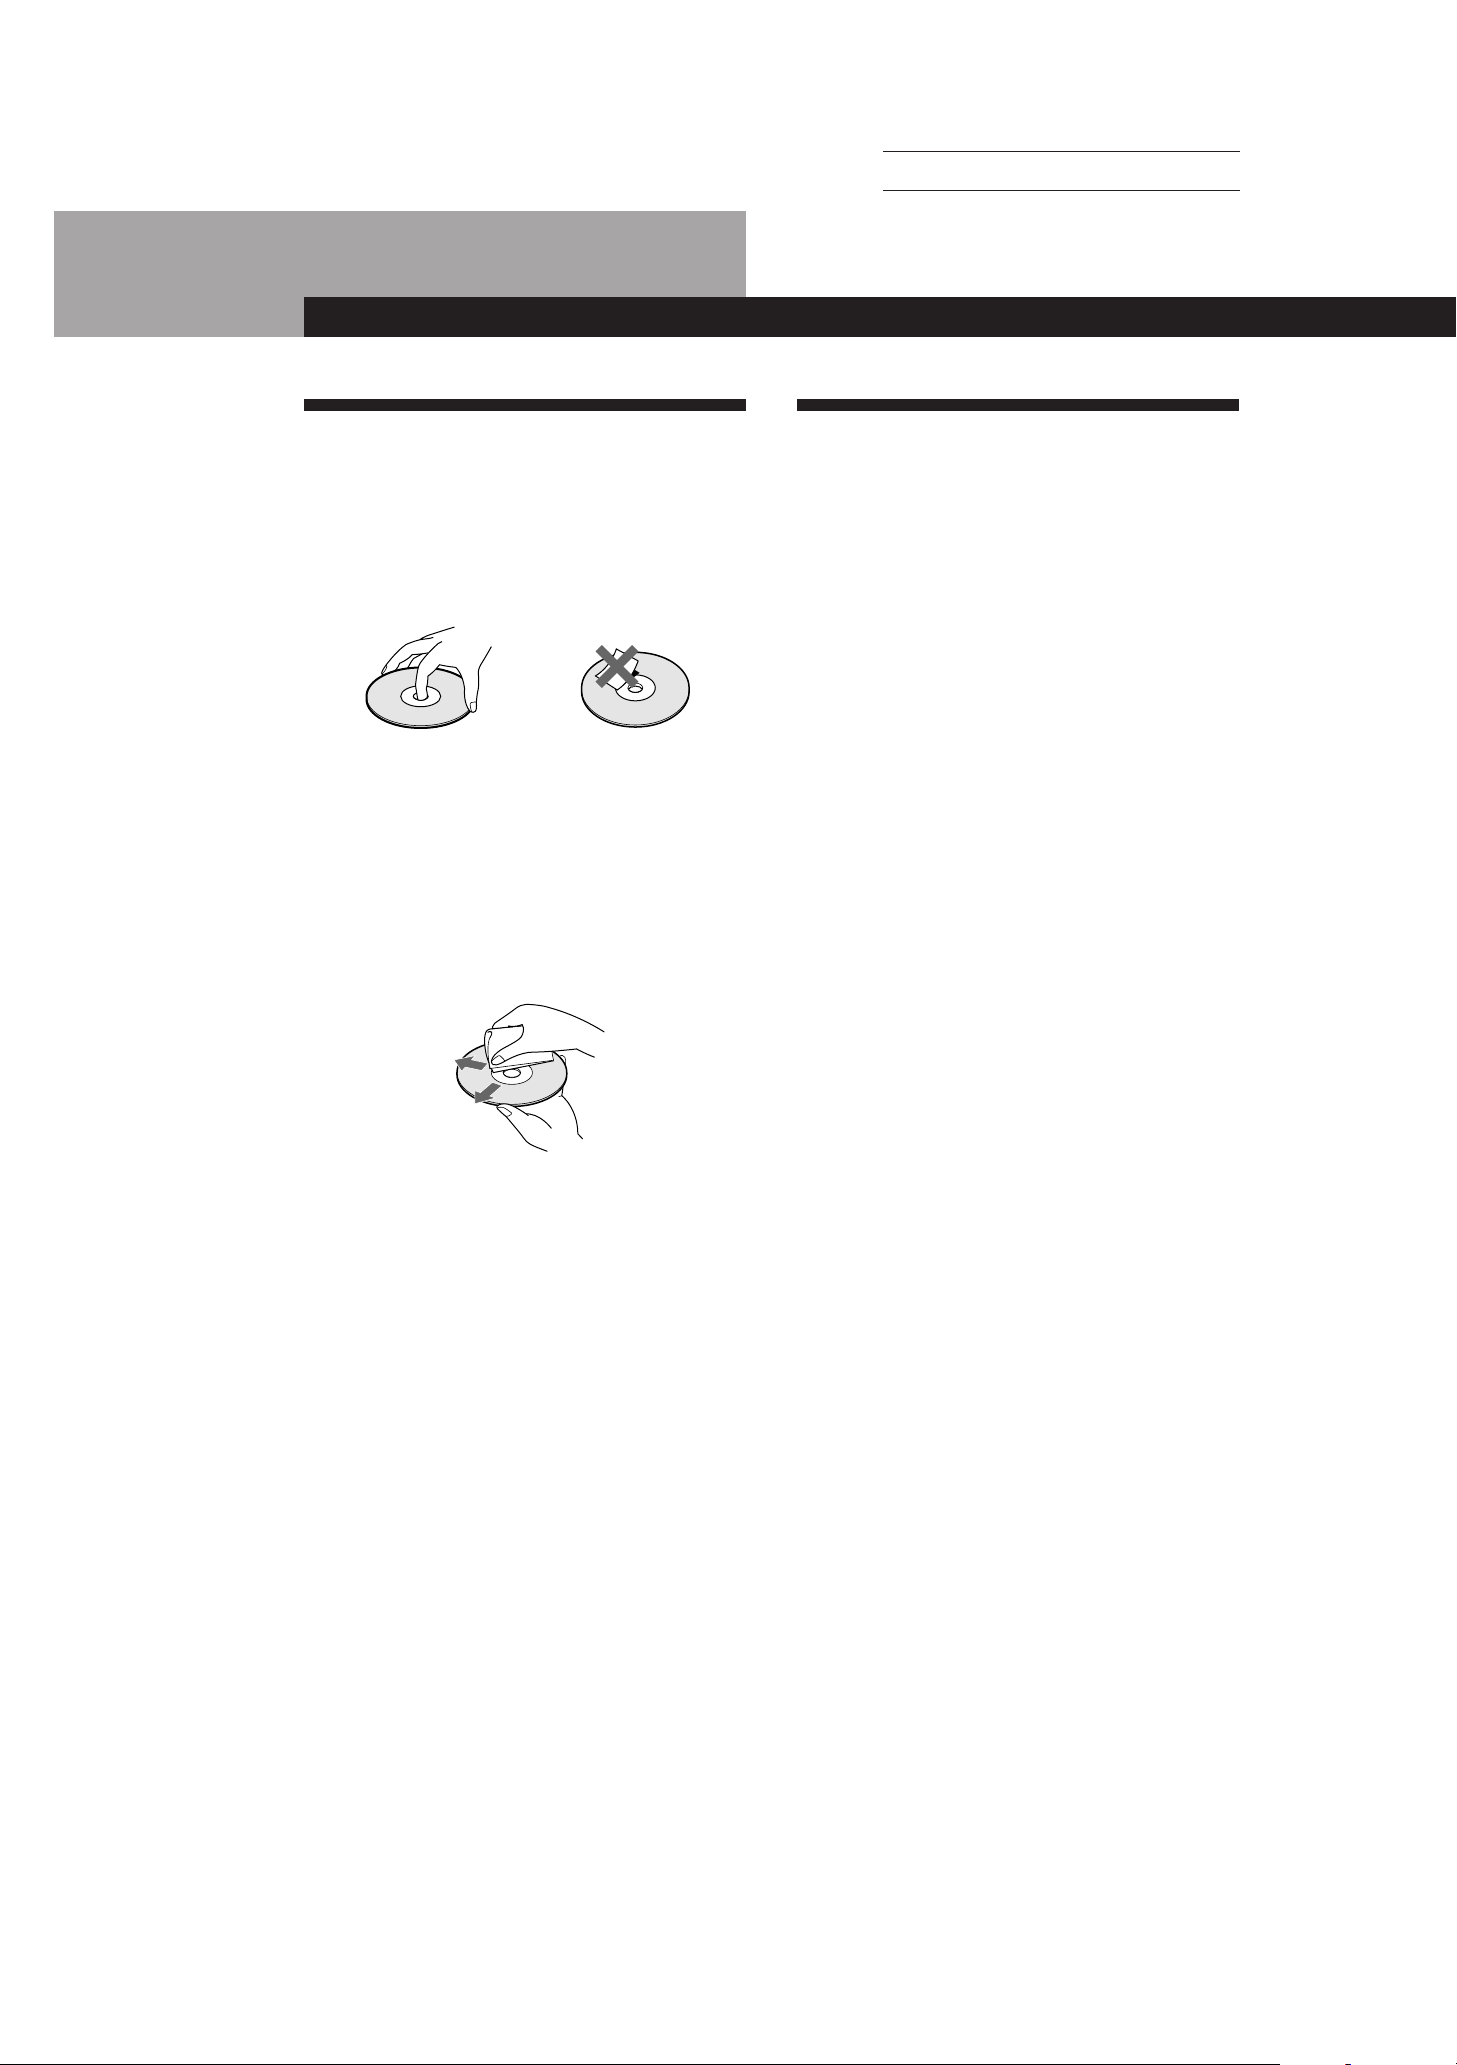
• To keep the disc clean, handle the disc by its edge. Do not
touch the surface.
• Do not stick paper or tape on the disc.
If there is glue (or a similar substance) on the disc, remove
the glue completely before using the disc.
Not this way
• Do not expose the disc to direct sunlight or heat sources
such as hot air ducts, or leave it in a car parked in direct
sunlight as there can be considerable rise in temperature
inside the car.
• After playing, store the disc in its case.
On cleaning
• Before playing, clean the disc with a cleaning cloth. Wipe
the disc from the center out.
Troubleshooting
If you experience any of the following difficulties while
using the player, use this troubleshooting guide to help
you remedy the problem. Should any problem persist,
consult your nearest Sony dealer.
There’s no sound.
/Check that the player is connected securely.
/Make sure you operate the TV or the amplifier
correctly.
/Make sure you select the CD player position on
the amplifier.
There’s no picture.
/Check that the player is connected securely.
/Make sure you operate the TV correctly.
/Make sure you set the COLOR SYSTEM switch
correctly, according to your TV.
The picture is distorted.
/Clean the disc (see page 26).
• Do not use solvents such as benzine, thinner, commercially
available cleaners or anti-static spray intended for vinyl
LPs.
The disc doesn’t play.
/There’s no disc inside (“no dISC” appears).
Insert a disc.
/Insert the disc with the label side up on the disc
tray correctly.
/Clean the disc (see page 26).
/Moisture has condensed inside the player.
Remove the disc and leave the player turned on
for about an hour (see page 2).
The sound loses stereo effect.
/“MONO R” or “MONO L” appears in the front
panel display (see page 24).
The remote doesn’t function.
/Remove the obstacles in the path of the remote
and the player.
/Point the remote at the remote sensor g on the
player.
/Replace all the batteries in the remote with new
ones if they are weak.
The player doesn't play from the first track when playing
a VIDEO CD without PBC functions or an audio CD.
/Press PLAY MODE repeatedly until
“CONTINUE” appears in the front panel
display, then press ·.
26
EN
SONY MCE-F500 (E, C1, C2) 3-858-463-11
Page 30
Actual page number:
Additional Information
Specifications
VIDEO CD player
Laser Semiconductor laser
Wavelength 780 – 790 nm
Signal format system NTSC, PAL
Frequency response 2 Hz to 20 kHz ±0.5 dB
Signal-to-noise ratio More than 94 dB
Outputs
Load impedance
Over 10 kilohms
Wave length: 660nm
75 ohms, unbalanced,
sync negative, white
peak
75 ohms, unbalanced,
sync negative
32 ohms
AUDIO OUT
DIGITAL OUT
(OPTICAL)
VIDEO OUT
S VIDEO OUT
PHONES
Jack
type
Phono
jacks
Optical
output
connector
Phono
jack
4-pin mini
DIN
Phone
jack
Maximum
output
level
2 V
(at 50 kilohms)
–18dBm
1 Vp-p
Y: 1 Vp-p
C: 0.286 Vp-p
10mW
General
Power requirements 110 – 120 V or 220 – 240 V AC,
adjustable, 50/60 Hz
Power consumption 22 W
Dimensions (approx.) 430 × 95 × 278 mm
(w/h/d) incl. projecting parts
Mass (approx.) 3.7 kg
Glossary
Auto Pause
Automatic pause function that works according to the
signal encoded on the disc during PBC playback. In
this case, “AUTO P” appears in the front panel
display. If the player doesn’t resume play for a long
time, press P or · to resume play manually.
PBC Playback
Playback using the menu screens recorded on VIDEO
CDs with PBC functions. You can enjoy simple
interactive operations using the PBC Playback
function.
Playback Control (PBC)
Signals encoded on VIDEO CDs (Version 2.0) to
control playback.
By using menu screens recorded on VIDEO CDs with
PBC functions, you can enjoy playing simple
interactive software, software with search functions,
and so on.
When you insert a VIDEO CD with PBC functions on
this player, “PBC” appears in the front panel display.
Track
Sections of a picture or a music piece on a disc. Each
track is assigned with a track number to locate the
track you want.
Supplied accessories
Audio and video connecting cord (3 phono plugs – 3
phono plugs) (1)
Remote commander (remote) RMT-F500V (1)
Sony SUM-3 (NS) batteries (2)
Plug adaptor (1)
Design and specifications are subject to change without notice.
VIDEO CD
A compact disc that contains moving pictures.
The picture information uses the MPEG 1 format, one
of the world wide standards of digital compact
technology. The picture information is compressed
about 120 times. Consequently, a 12 cm VIDEO CD can
contain up to 74 minutes of moving pictures.
VIDEO CDs also contain compact audio information.
Sounds outside the range of human hearing are
compressed while the sounds we can hear aren’t
compressed. VIDEO CDs can hold 6 times the audio
information of conventional audio CDs.
There are 2 versions of VIDEO CDs.
• Version 1.1: You can play only moving pictures and
sounds.
• Version 2.0: You can play high-resolution still
pictures and enjoy PBC functions.
This player conforms to both versions.
SONY MCE-F500 (E, C1, C2) 3-858-463-11
27
EN
Page 31

Index
Additional Information
Index
A, B
A-B repeat 20
Adjusting
volume 8
AMS 16
Auto Pause 27
Automatic Music Sensor. See
AMS
C
Color system switch 6
Comet 23
Connecting 5
Continuous play 8
D, E
Digest Play 18
Disc Digest 18
Display
front panel display 14
on-screen display 13
DNR 23
F, G
Front panel display 14
H
Handling CDs 25
Hooking up 5
I, J, K
Index 17
Index Search 17
L, M, N
Locating
a specific point 17
a specific scene 16
a specific track 16
by monitoring 17
by observing the front panel
display 17
directly 16
using AMS 16
using index 17
O
On-screen display 13
P, Q
PBC functions 10, 27
PBC Playback 10, 27
Playback
Continuous Play 8
Program Play 21
Repeat Play 20
Shuffle Play 21
Program
changing 22
checking 22
R
Remaining time 15
Remote control 4
Repeating 20
Resume Play 15
S
Scene 11
Scene Seach 11
Searching. See Locating
Shuffle Play 21
Slow-motion Play 17
Switching the sound 24
T
Total playing time 14
Track Digest 19
Troubleshooting 26
Names of controls
Buttons
A˜B20
CHECK 22
CLEAR 22
COMET 23
DNR 23
INDEX C/c 17
L/R/STEREO 24
Number 10, 16
ON SCREEN 13
§ OPEN/CLOSE 8
PLAY MODE 21
PREV/NEXT 10
REPEAT 20
RETURN ˆ 10
SELECT 8, 10
SPECIAL MENU 11, 18
& SLOW 17
TIME 14
· 8, 10
P 9
p 9
=/+ 9, 10
0/) 17
>20 16
Switch
AUTO PLAY 24
POWER 8
Control
Jog Dial 9, 10
PHONES LEVEL 8
Jack
PHONES 8
Others
Disc tray 8
Front panel display 14
g 4
28
U
Unpacking 4
V, W, X, Y, Z
VIDEO CDs 4, 8, 27
Voltage selector 7
EN
SONY MCE-F70 (E, C1, C2) 3-858-463-11
Page 32

Actual page number:
Additional Information
SONY MCE-F70 (E, C1, C2) 3-858-463-11
29
EN
Page 33

Actual page number:
Sony Corporation Printed in Japan
SONY MCE-F500 (E, C1, C2) 3-858-463-11
 Loading...