


Multi Audio Player
Getting started
System
Operating Instructions
Listening to a CD
Listening to the radio
Listening to a file on a USB
device
Listening to music of an
iPhone/iPad/iPod
Listening to music with
connected components
Listening to music through a
BLUETOOTH connection
Listening to music via a
wireless network
Additional information
About “SongPal”
Troubleshooting
Precautions/Specifications
MAP-S1

WARNING
To reduce the risk of fire, do not cover the
ventilation opening of the appliance with
newspapers, tablecloths, curtains, etc.
Do not expose the appliance to naked flame
sources (for example, lighted candles).
To reduce the risk of fire or electric shock, do not
expose this appliance to dripping or splashing,
and do not place objects filled with liquids, such as
vases, on the appliance.
As the main plug is used to disconnect the unit
from the mains, connect the unit to an easily
accessible AC outlet. Should you notice an
abnormality in the unit, disconnect the main plug
from the AC outlet immediately.
Do not install the appliance in a confined space,
such as a bookcase or built-in cabinet.
Do not expose batteries or appliances with
battery-installed to excessive heat, such as
sunshine and fire.
The unit is not disconnected from the mains as
long as it is connected to the AC outlet, even if the
unit itself has been turned off.
CAUTION
The use of optical instruments with this product
will increase eye hazard.
This device complies with industry Canada licenceexempt RSS standard(S).
Operation is subject to the following two
conditions: (1) this device may not cause
interference, and (2) this device must accept any
interference, including interference that may cause
undesired operation of the device.
This equipment complies with IC radiation
exposure limits set forth for an uncontrolled
environment and meets RSS-102 of the IC radio
frequency (RF) Exposure rules. This equipment
should be installed and operated keeping the
radiator at least 20 cm or more away from person’s
body (excluding extremities: hands, wrists, feet
and ankles).
Before operating this system
Malfunctions that occur during the
normal use of the system will be repaired
by Sony in accordance with the
conditions defined in the limited
warranty for this system. However, Sony
will not be liable for any consequences
arising from a failure to play caused by a
damaged or malfunctioning system.
Music discs encoded with
copyright protection technologies
This product is designed to playback discs
that conform to the Compact Disc (CD)
standard. Recently, various music discs
encoded with copyright protection
technologies are marketed by some record
companies.
Please be aware that among those discs,
there are some that do not conform to the
CD standard and may not be playable by
this product.
Note on DualDiscs
A DualDisc is a two sided disc product which
mates DVD recorded material on one side
with digital audio material on the other side.
However, since the audio material side does
not conform to the Compact Disc (CD)
standard, playback on this product is not
guaranteed.
GB
2

Table of Contents
Before operating this system..................................................................2
Getting started
Location and Function of Controls......................................................... 6
Inserting the batteries ........................................................................... 9
Setting the clock .................................................................................... 9
Listening to a CD
Playing a CD-DA/MP3 disc....................................................................10
To change the play mode................................................................10
Creating your own program (Program Play).........................................12
Listening to the radio
Tuning in a radio station....................................................................... 13
Presetting radio stations.......................................................................13
Listening to a file on a USB device
Playing a file on a USB device ............................................................... 15
Connecting a USB device to the USB port on the front of the unit ......... 15
Connecting a USB device to the USB port on the rear of the unit .......... 16
Playable audio formats...................................................................16
Listening to music of an iPhone/iPad/iPod
Playing an iPhone/iPad/iPod connected by USB................................. 17
Playing back an iPhone/iPad/iPod over a wireless connection
(AirPlay) ............................................................................................. 17
Listening to music with connected components
Playing back the music of connected components .............................18
GB
3

Listening to music through a BLUETOOTH
connection
Pairing the system with a BLUETOOTH device and listening to
music .................................................................................................19
Listening to music through a registered device................................. 20
Listening to music by one-touch action (NFC)......................................21
Playing with high quality sound codec (AAC/aptX)............................. 22
Listening to music via a wireless network
Preparing: setting up for a network..................................................... 23
Connecting with PC ....................................................................... 23
Connecting with a wired network.................................................... 24
Listening to music on an Xperia™/Xperia Tablet
(WALKMAN® application).................................................................. 25
Listening to music on iPhone, iPad, iPod or iTunes (AirPlay) ...............26
Listening to music on Windows 8/Windows 7 (Home network)......... 27
Using Internet music streaming (Music Services) ................................ 28
Additional information
Setting the Automatic Standby function ............................................. 29
Setting the BLUETOOTH/Network Standby mode............................... 30
Setting the wireless signal ON/OFF .....................................................30
Adjusting the sound..............................................................................31
Using the timers....................................................................................31
Setting the Sleep Timer...................................................................31
Setting the Play Timer.....................................................................31
Updating the software ......................................................................... 33
About “SongPal”................................................................................ 34
Troubleshooting
Troubleshooting .................................................................................. 35
Messages .............................................................................................40
GB
4

Precautions/Specifications
Precautions...........................................................................................41
Compatible devices and versions........................................................ 42
iPhone/iPad/iPod or iTunes ........................................................... 42
DLNA device................................................................................. 42
USB device ................................................................................... 42
BLUETOOTH wireless technology ........................................................ 43
Specifications....................................................................................... 44
Important information on software..................................................... 48
GB
5

Getting started
Location and Function of Controls
Note
This manual mainly explains operations using the remote, but the same operations can also
be performed using the buttons on the unit having the same or similar names.
Unit (front)
/ (power) button
Use to turn the power on or off.
Standby indicator
Lights in yellow-green when the power is
turned on. Lights in red when the power
is turned off. The indicator flashes in red
if the system detects an abnormality
(page 35).
When the system in BLUETOOTH/
Network Standby mode, the indicator
lights up in orange.
Display window
N-Mark
Place a smartphone/tablet equipped
with the NFC function close to this mark
to perform BLUETOOTH registration,
connection or disconnection by a onetouch action (page 21).
BACK button
Use to go back to the previous display.
GB
6
MENU button
Use to display the menu. Press / to
select the items in the menu.
/ (previous/next) /TUNING +/–
buttons
Use to cue to the beginning of a track
or file.
Use to tune in a desired radio station.
PUSH ENTER button
Use to operate as the ENTER button.
(play/pause) button
Use to start or pause playback.
Remote sensor
VOL dial
Use to adjust the volume.
(eject) button
Use to eject a CD.
Disk slot
Insert a CD with the label side facing
upward.

(USB FRONT) port
Connect a USB device (page 15).
PHONES jack
Use to connect headphones.
Remote
/ (power) button
Use to turn the power on or off.
DISPLAY button
Use to change the information displayed
in the display window when the power is
on. An underscore “_” is displayed in the
place of an unrecognizable character.
If you press this button when the power
is turned off, the clock is displayed.
However, if you press this button when
the BLUETOOTH/Network Standby mode
is on, the clock is not displayed.
//ENTER button
Press / to select an item, then press
ENTER to enter.
Use / to select a folder (album) on an
MP3 disc or USB device.
VOLUME +/– button
Use to adjust the volume.
MUTING button
Use to turn off the sound temporarily.
Press the button again to restore the
sound.
/ (previous/next, PRESET +/–)
buttons
Use to cue to the beginning of a track
or file.
Use to select a preset number of the
radio station tuned in.
/ (fast-rewind/fast-forward,
TUNING +/–) buttons
Use to fast-rewind or fast-forward a
track or file.
Use to tune-in a desired radio station.
(stop) button
Use to stop playback.
(play/pause) button
Use to start or pause playback.
BACK button
Use to return to the previous status.
MENU button
Use to display the menu. Press / to
select the items in the menu.
FUNCTION button
Press to change the functions. Each press
changes to the next function in the
following sequence:
CD USB FRONT USB REAR
BLUETOOTH TUNER FM TUNER AM
LINE IN NETWORK
Getting started
GB
7
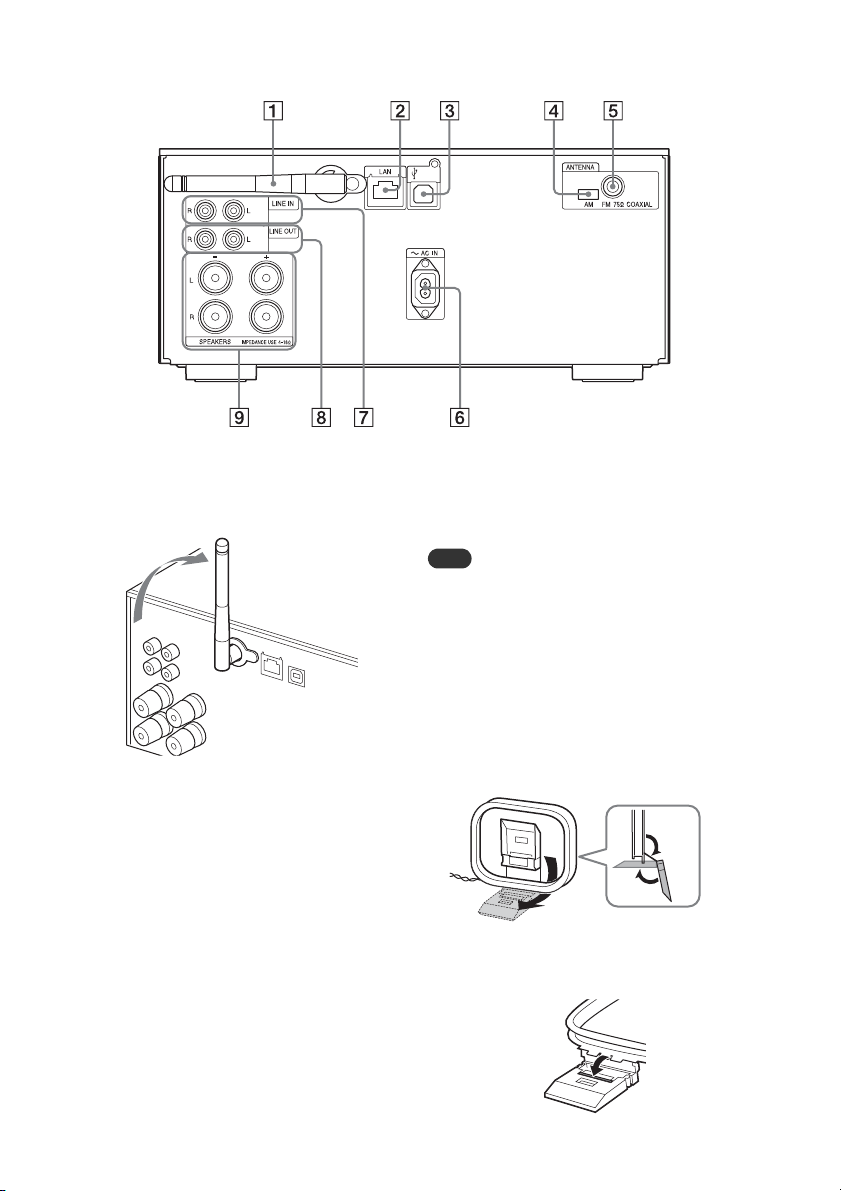
Unit (back)
Note
Side view
Fold both parts of the
stand.
Press until it clicks.
Wireless LAN antenna
If you use the wireless network function,
set the antenna as shown in the
illustration.
LAN connector
Connect network equipment with
network cable (not supplied) (page 24).
(USB REAR) port
Connect a computer or WALKMAN®
which is compatible with HighResolution Audio. Use the USB cable (not
supplied) (page 16). If you connect a
WALKMAN® to the unit, use an optional
High-Resolution Audio USB Adaptor WMPORT Cable* (not supplied) and the USB
cable (not supplied).
You can also use this as a USB-DAC.
* Optional High-Resolution Audio USB Adaptor
WM-PORT Cable can be ordered from your
nearest Sony dealer.
AM ANTENNA
Connect the AM loop antenna.
FM ANTENNA
Connect the FM antenna.
Find a location and an orientation that provide
good reception, and then fix the antennas to a
stable surface (window, wall, etc.).
Keep the antennas away from the unit, power
cord and other AV components to avoid picking
noise.
Secure the end of the FM lead antenna with
adhesive tape.
To prepare the AM loop antenna
1
Fold the antenna stand as illustration.
2
Attach the projecting part of the frame to
the antenna stand.
GB
8
~AC IN (120 V AC) input
Note
Note
Connect the power cord (supplied) to the
wall outlet.
LINE IN (external input) jack
Connect to an output jack of the optional
external components with an audio
connecting cable (not supplied).
LINE OUT (external output) jack
Outputs the audio of the selected
FUNCTION. Connects optional external
components with an audio connecting
cable (not supplied).
SPEAKERS L/R (left/right) connectors
Connect each speaker.
For details on connecting, see Quick Start
Guide.
Inserting the
Setting the clock
Press / to turn on the system.
1
Press MENU.
2
Press / to select “Timer
3
Menu,” then press ENTER.
If “Play Setting” is displayed, press /
to select “Clock Setting,” then press
ENTER.
Press / to set the hour, then
4
press ENTER.
Getting started
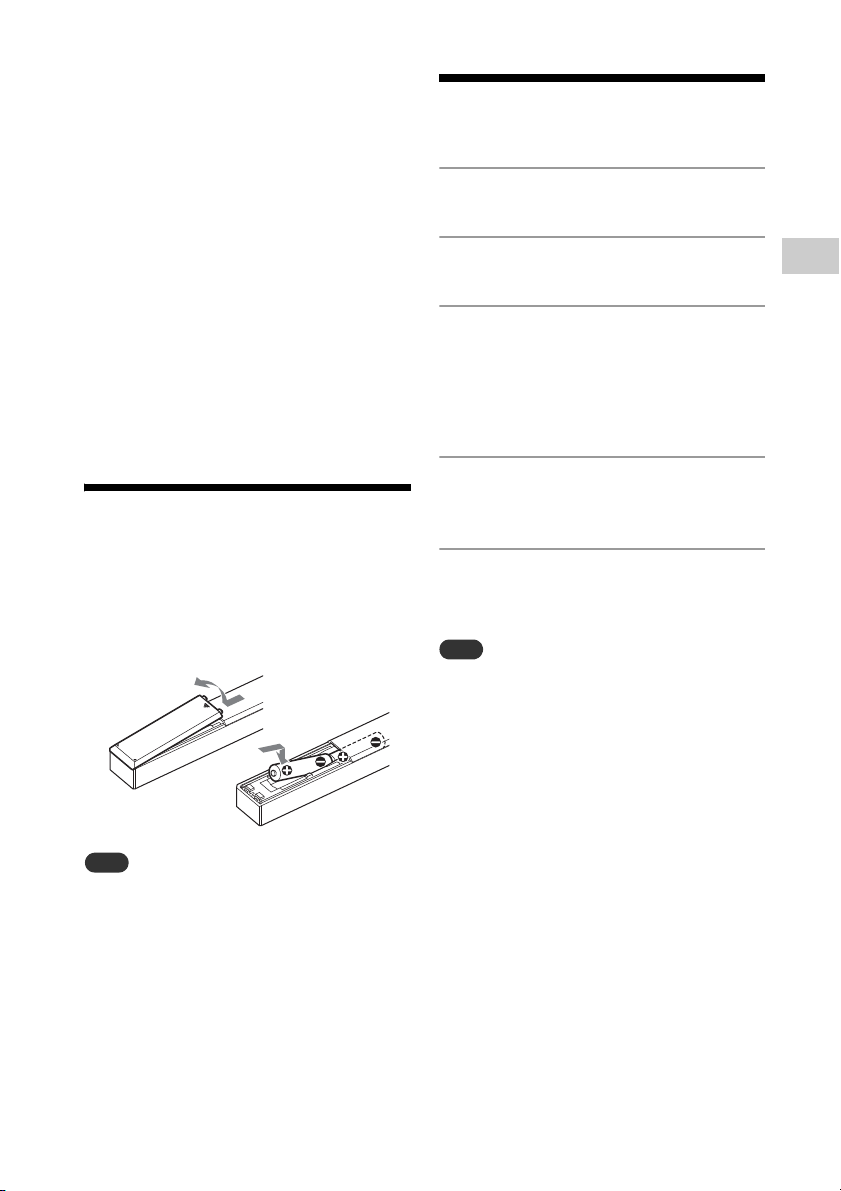
batteries
Insert two supplied R03 (size AAA) batteries,
side first, matching the polarities shown
below.
With normal use, the batteries should last for
about 6 months.
Do not mix an old battery with a new one or mix
different types of batteries.
If you do not use the remote for a long period of
time, remove the batteries to avoid damage
from battery leakage and corrosion.
Press / to set the minutes,
5
then press ENTER.
Complete the clock setting.
The clock settings are reset when you
disconnect the power cord or if a power failure
occurs.
To display the clock when the
system is off
Press DISPLAY repeatedly to display the
clock. The clock is displayed for about 8
seconds.
If the BLUETOOTH/Network Standby mode is
on, the clock does not appear by pressing
DISPLAY.
GB
9

Note
Listening to a CD
Label side
(printed side)
(eject)
Play mode
When you remove a disc, do not touch the
surface of the disc.
Playing a CD-DA/MP3 disc
Press FUNCTION to select “CD.”
1
Insert a CD to the disc slot at the
2
front of the unit.
Load a CD with the label side (printed
side) facing up.
Plays back automatically.
If you switch the function to “CD” from
another function when a CD is already
inserted in the slot, press after
“Reading” has disappeared from the
display window.
The button of the remote or the unit
enables you to fast-rewind/fastforward, select a track, file or folder (for
MP3 disc), etc.
To eject the CD
Press (eject) on the unit.
8 cm CDs cannot be used with this system.
Do not load a CD with non-standard shapes
(e.g., heart, square, star). Doing this may cause
irreparable damage to the system.
Do not use a CD with tape, stickers or paste on it
as this may cause malfunction.
GB
10
To change the play mode
Play mode enables you to playback the
same music repeatedly or shuffle-play.
Press to stop playback.
1
If you select “Repeat” in step 4, you do
not have to stop playback.
Press MENU.
2
Press / to select “CD Menu,”
3
then press ENTER.
Press / to select “Playmode”
4
or “Repeat,” then press ENTER.
Press / to select the play
5
mode, then press ENTER.
You can select the following play modes.
Playmode
Play mode Effect
Normal Plays a track or file.
Folder* Plays all tracks in the
Shuffle Plays all tracks or files in
selected folder. “FLDR”
lights up in the display
window.
random order. “SHUF”
lights up in the display
window.
Play mode Effect
Folder Shuffle* Plays all tracks or files in
Program Plays the programmed
* This play mode is applicable only for playing an
MP3 disc.
the selected folder in
random order. “FLDR.
SHUF” lights up in the
display window.
tracks or files. “PGM” lights
up in the display window.
For details, see “Creating
your own program
(Program Play)” (page 12).
Repeat
Play mode Effect
All (Repeat plays
all tracks)
One (Repeat
plays one track)
Off Cancels repeat playback.
The system plays all tracks
in a disc or folder
repeatedly. “ ” lights up
in the display window.
The system plays the
selected track repeatedly.
“ 1” lights up in the
display window.
Note on playing MP3 discs
Do not save unnecessary folders or files
on a disc that has MP3 files.
Folders that have no MP3 files are not
recognized on the system.
The system can only play MP3 files that
have a file extension of “.mp3.”
Even when file name has the “.mp3” file
extension, if it is not an audio MP3 file,
playing this file may generate a loud
noise, which could cause damage of the
system.
The maximum number of MP3 folders and
files compatible with this system is:
999* folders (including the root folder)
999 files
250 files in a single folder
8 folder levels (in the tree structure of
files)
* This includes folders that have no MP3 or
other files. The number of folders that the
system can recognize may be less than actual
number of folders, depending on the folder
structure.
Compatibility with all MP3 encoding/
writing software, CD-R/RW drive and
recording media cannot be guaranteed.
Incompatible MP3 discs may produce
noise or interrupted audio or may not play
at all.
11
Listening to a CD
GB

Creating your own
Tip
Note
Selected track
or file number
Total playing time of
the selected track or
file
program (Program
Play)
To delete a programmed track,
file or folder
Press while the play is stopped. Each time
you press the button, the last programmed
track, file or folder will be deleted.
When all the programmed tracks, files or
folders are deleted, “No Step” appears.
Plays the programmed track or file in a CD.
Select “Program” in step 5 of “To
1
change the play mode”
(page 10), then press ENTER.
When using an MP3 disc, press
2
/ to select the folder
containing the tracks or files that
you want to program.
If you want to play all tracks or files in
the folder, press ENTER.
Press / to select a
3
desired track or file, then select
ENTER.
Repeat the steps above to program
additional tracks or files.
Up to 25 tracks, files or folders can be
programmed. If you attempt to program more
than 25 tracks, files or folders, “Step Full!” will be
displayed. In this case, delete unnecessary
tracks.
To play the same program again, press .
When the disc is ejected or the power cord is
disconnected after programming, all the
programmed tracks, files and folders are
deleted.
12
Press .
4
Your program of tracks or files starts
playback.
To cancel program play
In step 1, select “Normal” for “Program,”
then press ENTER.
GB

Tip
Tip
Listening to the radio
Preset number
Presetting radio
Tuning in a radio station
Press FUNCTION to select “TUNER
1
FM” or “TUNER AM.”
Press and hold / until the
2
frequency indication in the
display window starts changing,
then release the button.
Tuning stops automatically when a
radio station is tuned in (Automatic
Scanning), and “STEREO” (when a FM
stereo broadcast is received) appears in
the display.
Manual tuning
Press / repeatedly to tune-in the
desired station.
If reception of an FM stereo broadcast is noisy,
press MENU and select “Tuner Menu,” “FM
Mode” and “Mono” in turn, to select monaural
reception. This reduces noise.
stations
You can preset your desired radio stations.
Tune in the desired station, then
1
press MENU.
Press / to select “ Tuner Menu,”
2
then press ENTER.
To preset an AM station, select “AM
Preset Memory” and follow step 4.
Press / to select “FM Preset
3
Memory” (for FM stations), then
press ENTER.
Press / to select “Ok,” then
4
press ENTER.
Press / to select preset
5
number, then press ENTER.
Listening to the radio
To change the AM tuning interval
The default setting for AM tuning interval is
9 kHz (or 10 kHz for some areas). Use the
buttons on the unit to perform this
operation.
1
Press FUNCTION on the unit repeatedly to
select “TUNER AM.”
2
Press / to turn off the unit.
3
Press and hold MENU and press / on
the unit.
“Step 9k” or “Step 10k” appears in the display.
When you change the interval, all the AM
preset stations are erased.
“Complete!” appears in the display
window and the radio station is
registered with the preset number.
Repeat the steps above to register
further radio stations.
Press / to turn off the power,
6
then press / again to turn on
the power.
You can preset up to 20 FM and 10 AM stations.
13
GB

If you select an already-registered preset
number in step 5, the preset radio station is
replaced by the currently tuned-in radio station.
To tune in to a preset radio
station
Press / to select the preset number
to which the desired station is registered.
14
GB

Note
Tip
Note
Listening to a file on a USB device
Playing a file on a USB device
Press .
3
Starts playback.
Operate with the button of the remote
or unit.
You can select a track, file or folder by
pressing ENTER, while “ROOT” is
appearing.
You can play audio files stored on a USB
device such as WALKMAN® or digital media
player, on this system by connecting a USB
device to the system.
The (USB REAR) port on the rear of th e unit
can be connected with a computer or
WALKMAN® which is compatible with HighResolution Audio.
For details on compatible USB devices, see
“Compatible devices and versions”
(page 42).
If you play back High-Resolution Audio, use the
device which is compatible with USB2.0 High
Speed cable.
Connecting a USB device to the USB port on the front of the unit
Press FUNCTION to select “USB
1
FRONT.”
Connect a USB device to the
2
(USB FRONT) port on the front of
the unit.
When connecting the USB device,
connect it directly, or via the USB cable
supplied with the USB device.
Wait until “Reading” disappears and
“ROOT” appears.
When playing the USB device, the play mode
can be selected. Press MENU, then select “USB
Menu.” Select “Playmode”or “Repeat.”
For details, see “To change the play mode”
(page 10). When a file on a USB device is playing,
a track or file in the folder, shuffle-playback or
programmed playback cannot be played.
Charging begins automatically when you
connect the USB device to the (USB FRONT)
port of the unit. When the system is turned off,
the USB device does not charge.
If the USB device cannot be charged, disconnect
and reconnect it. For details on the charging
status of the USB device, see the operating
manual of the USB device.
The playback order for the system may differ
from the playback order of the connected digital
music player.
Be sure to turn off the system before removing
the USB device. Removing the USB device while
the system is turned on may corrupt the data on
the USB device.
When USB cable connection is necessary,
connect the USB cable supplied with the USB
device to be connected. For details on
connection, refer to the operation manual
supplied with the USB device to be connected.
It may take time before “Reading” appears after
connecting, depending on the type of USB
device connected.
Do not connect the USB device through a USB
hub.
When the USB device is connected, the system
reads all the files on the USB device. If there are
many folders or files on the USB device, it may
take a long time to finish reading the USB
device.
With some connected USB devices, it may take a
long time to transmit signals from the system or
to finish reading the USB device.
When the unit is connected to a wired network,
depending on the router or network connection
conditions, the USB function may be temporarily
disabled. In this case, wait for a while, then
connect the unit to the network again.
Compatibility with all encoding/writing software
cannot be guaranteed. If audio files on the USB
device were originally encoded with
incompatible software, those files may produce
noise or may malfunction.
15
Listening to a file on a USB device
GB

The maximum number of folders and files on
Note
the USB device compatible with this system is:
998*1 folders (including the root folder)
998 files in a single folder
8 folder levels (in the tree structure of files)
1
This includes folders that have no playable
*
audio files and empty folders. The number
of folders that the system can recognize may
be less than actual number of folders,
depending on the folder structure.
The system does not necessarily support all the
functions provided in a connected USB device.
Folders that have no audio files are not
recognized.
If you connect a WALKMAN® to this port, use the
USB cable (not supplied) and an optional HighResolution Audio USB Adaptor WM-PORT
2
Cable*
If you play back High-Resolution Audio by
The USB device cannot be charged from the
*
(not supplied).
connecting your computer, “Hi-Res Audio
Player” (for Windows/Mac OS) is recommended.
The player can be downloaded for free;
http://esupport.sony.com/CA/
(USB REAR) port.
2
Optional High-Resolution Audio USB Adaptor
WM-PORT Cable can be ordered from your
nearest Sony dealer.
Connecting a USB device to the USB port on the rear of the unit
To listen to High-Resolution Audio from your
computer, install the dedicated driver* to
your computer.
* For Mac OS, a driver is not required.
Download the driver from the
1
website below;
http://esupport.sony.com/CA/
Install the driver.
2
Follow the procedure on the website.
Press FUNCTION to select “USB
3
REAR.”
Connect a computer or
4
WALKMAN® which is compatible
with High-Resolution Audio, etc.,
to the (USB REAR) port on the
rear of the unit.
Operate playback by the computer or
WALKMAN® which is compatible with
High-Resolution Audio. For details, see
the operating instructions of your
computer or WALKMAN®.
GB
16
Playable audio formats
The audio formats that you can listen to with
this system are as follows:
MP3: file extension “.mp3”
3
WMA*
AAC*
WAV: file extension “.wav”
FLAC: file extension “.flac”
ALAC: file extension “.m4a”
AIFF: file extension “.aiff,” “.aif” or “.aifc”
DSD: file extension “.dsf”
DSDIFF: file extension “.dff”
Note that even when file name has the correct file
extension, if the actual file differs, the system may
produce noise or may malfunction.
3
Files with DRM (Digital Rights Management)
*
copyright protection or files downloaded from
an online music store cannot be played on this
system. If you try to play one of these files, the
system plays the next unprotected audio file.
: file extension “.wma”
3
: f ile e xte ns ion “.m4a ,” “. m p 4” o r “.3gp ”
Tip
Note
Listening to music of an iPhone/iPad/ iPod
Playing an iPhone/ iPad/iPod connected by USB
You can play an iPhone/iPad/iPod by
connecting it to the (USB FRONT) port in
the front of the unit.
For details on compatible iPhone/iPad/iPod,
see “Compatible devices and versions”
(page 42).
Press FUNCTION to select “USB
1
FRONT.”
Before disconnecting the iPhone/iPad/iPod,
turn off the system. If you disconnect it when
the system is on, the data stored on the iPhone/
iPad/iPod may be corrupted.
Do not carry the system with an iPhone/iPad/
iPod connected to the system. Doing so may
cause a malfunction.
To use an iPhone/iPad/iPod, refer to the user’s
guide of your iPhone/iPad/iPod.
Sony cannot accept responsibility in the event
that data recorded to iPhone/iPad/iPod is lost or
damaged when using an iPhone/iPad/iPod with
this system.
Playing back an iPhone/iPad/iPod over a wireless connection (AirPlay)
Listening to music of an iPhone/iPad/iPod
Connect an iPhone/iPad/iPod to
2
(USB FRONT) port on the front
of the unit using the cable
supplied with the iPhone/iPad/
iPod.
Before connecting an iPhone/iPad/
iPod, connect the USB cable to the unit.
The display changes from “USB” to
“iPod”.
Press .
3
Starts playback.
You can fast-rewind/fast-forward the
track or select the track using buttons
on the remote or the unit.
Charging begins automatically when you
connect an iPhone/iPad/iPod to the system.
When the system is turned off, the iPhone/iPad/
iPod does not charge.
If an iPhone/iPad/iPod cannot be charged,
disconnect and reconnect it. For details on the
charging status of an iPhone/iPad/iPod, see the
operating manual of an iPhone/iPad/iPod.
You can play back an iPhone/iPad/iPod
touch or the computer with iTunes over a
wireless connection. For details, see
“Listening to music on iPhone, iPad, iPod or
iTunes (AirPlay)” (page 26).
17
GB
 Loading...