

Sony M98V User Manual
HOLD EJECT
3-865-293-63 (1)
1
2
3
MicrocassetteTMCorder
Operating Instructions
Owner’s Record
The model number is located at the bottom and the serial
number is located inside the tape holder. Record the serial
number in the space provided below. Refer to whenever you
call upon your Sony dealer regarding this product.
Model No. M-98V Serial No.
M-98V
Sony Corporation ©1999 Printed in Japan
For the customers in the United States
INFORMATION
This equipment has been tested and found to comply with the
limits for a Class B digital device, pursuant to Part 15 of the FCC
Rules. These limits are designed to provide reasonable
protection against harmful interference in a residential
installation. This equipment generates, uses, and can radiate
radio frequency energy and, if not installed and used in
accordance with the instructions, may cause harmful
interference to radio communications. However, there is no
guarantee that interference will not occur in a particular
installation. If this equipment does cause harmful interference to
radio or television reception, which can be determined by
turning the equipment off and on, the user is encouraged to try
to correct the interference by one or more of the following
measures:
– Reorient or relocate the receiving antenna.
– Increase the separation between the equipment and receiver.
– Connect the equipment into an outlet on a circuit different
from that to which the receiver is connected.
– Consult the dealer or an experienced radio/TV technician for
help.
This device complies with Part 15 of the FCC Rules. Operation
is subject to the following two conditions:
(1) This device may not cause harmful interference, and (2) this
device must accept any interference received, including
interference that may cause undesired operation.
You are cautioned that any changes or modifications not
expressly approved in this manual could void your authority to
operate this equipment.
z Getting Started
Preparing a Power Source
Choose one of the following power sources.
Dry Batteries
Make sure that nothing is connected to the DC IN 3V jack.
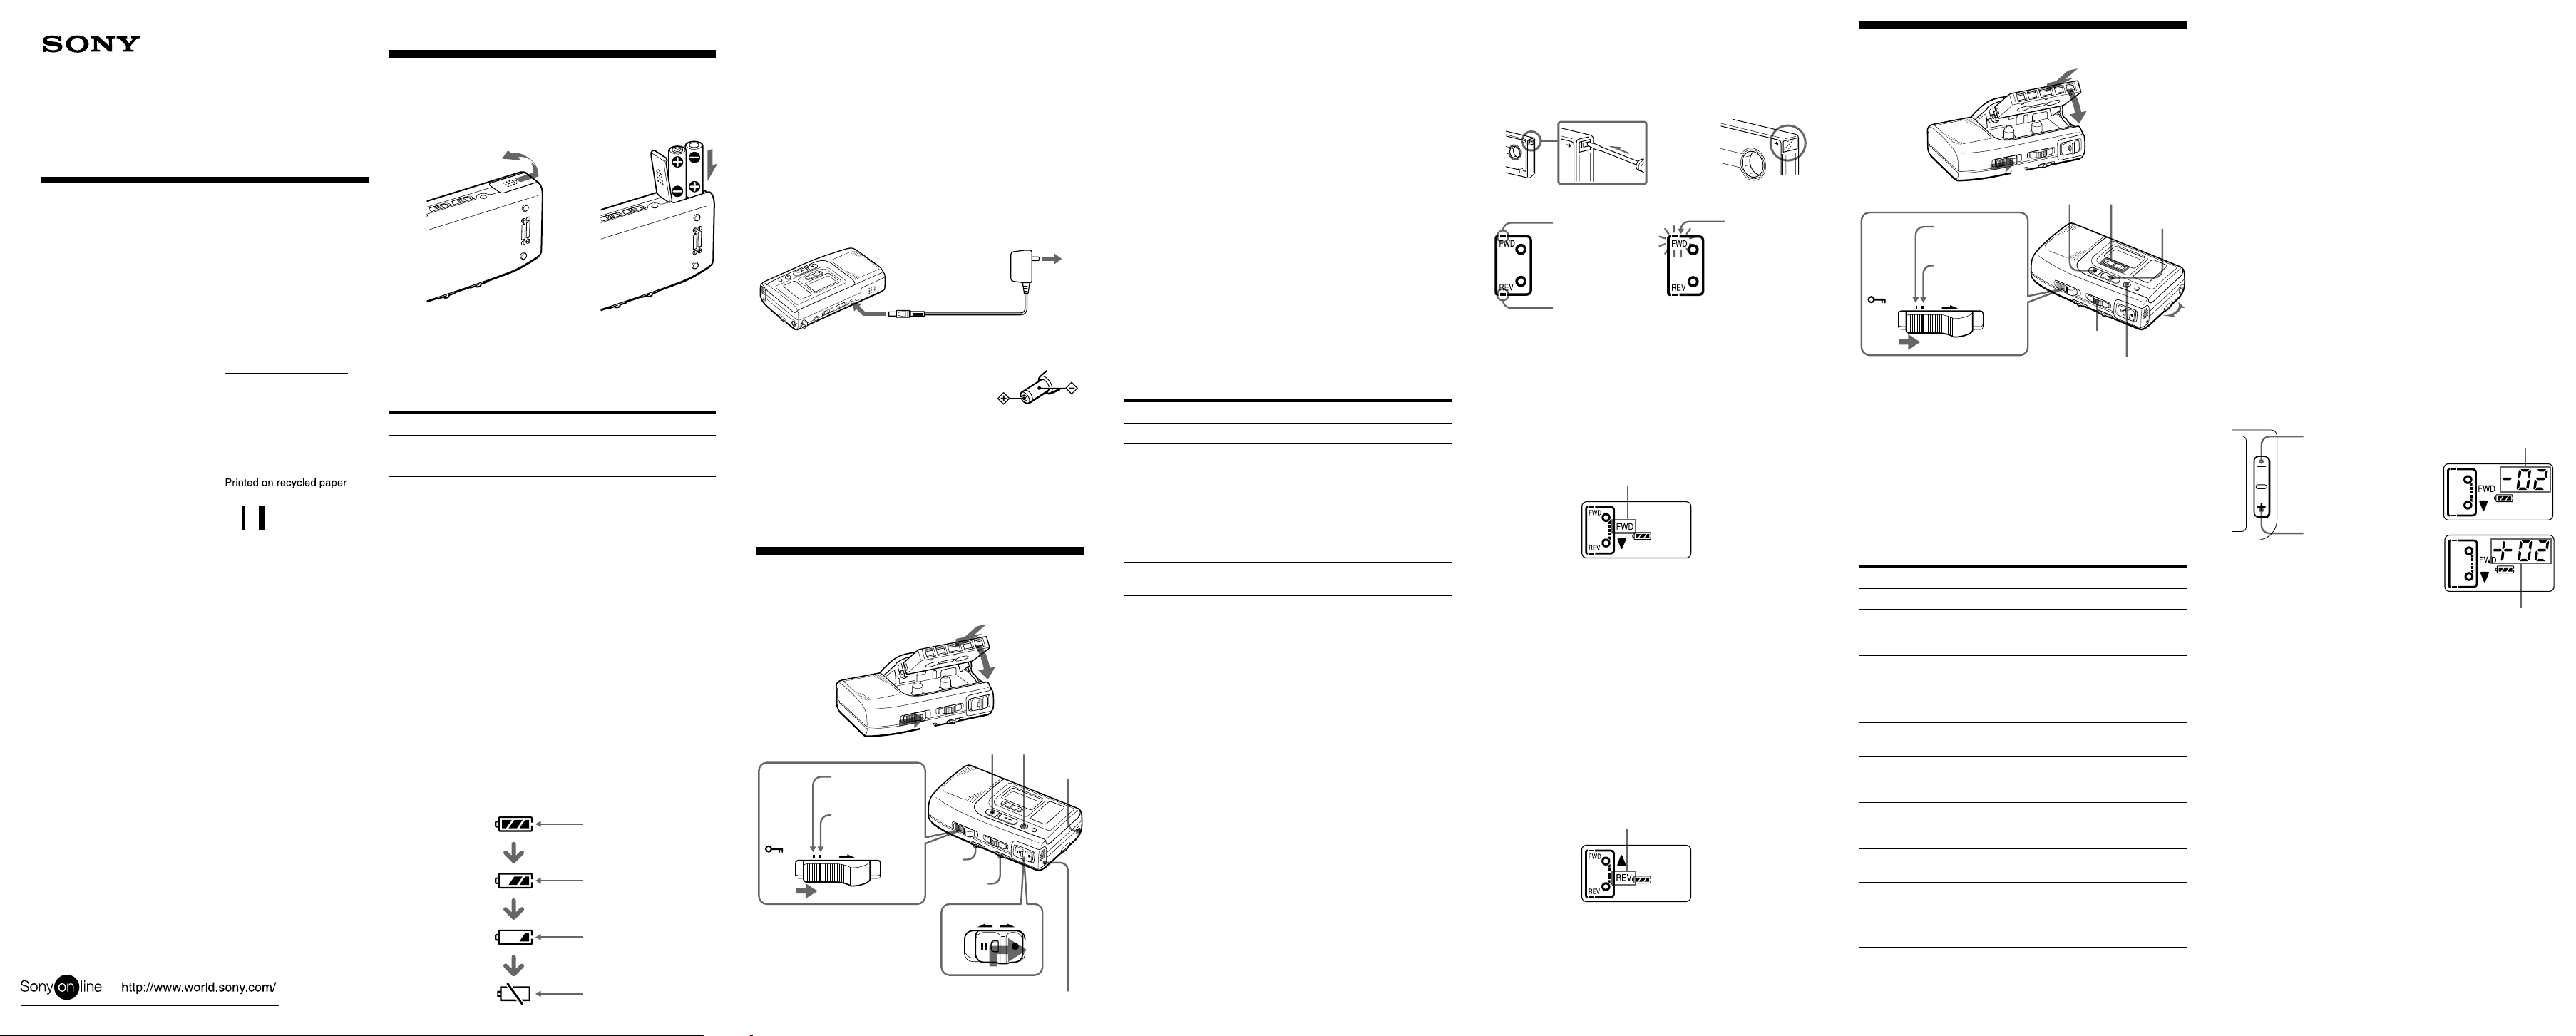
1
1 Slide OPEN on the battery compartment in the direction of
the arrow to open the battery compartment lid.
2 Insert two size AAA (R03) batteries with correct polarity.
3 Close the lid until it clicks.
Battery life (Approximate hours) (EIAJ*)
Battery Recording
Sony alkaline LR03 (SG) 9.5
Sony R03 (SB) 3.5
* Measured value by the standard of EIAJ (Electronic Industries
Association of Japan) (Using a Sony Microcassette tape)
For maximum performance, we recommend that you use
alkaline batteries.
Notes
• The battery life may shorten depending on the operation of the
unit.
• Do not charge a dry battery.
• Do not use a new battery with an old one.
• Do not use different types of batteries.
• When you do not use the unit for a long time, remove the batteries
to avoid any damage caused by battery leakage and subsequent
corrosion.
• Dry batteries will not be expended when another power source is
connected.
When to replace the batteries
The battery indicator in the display window shows the
remaining battery power.
When the batteries are exhausted, i appears in the display
window. Replace both batteries with new ones.
The battery indicator in the display window changes as
illustrated:
When batteries
are new
When batteries
become weak
Replace batteries.
2
light
go off one segment
go off another
segment
light
Notes
• When you have changed the batteries to new ones, the battery
indicator appears in the display window after running the tape
once.
• If you insert exhausted batteries (especially manganese batteries),
i may not appear even though the other indicators appear
properly. If the unit does not operate properly, replace the
batteries with new ones.
• While the tape runs rapidly (fast forward or rewind), i may
appear. Replace the batteries only when the unit does not operate
properly.
• During playback, the battery indicator may temporarily flicker
when you turn up the volume.
• At the beginning or end of the tape i may momentarily light. If
the indicator disappears, you do not need to replace the batteries.
House Current
To a wall outlet
DC IN 3V
Connect the AC power adaptor to DC IN 3V
and to a wall outlet. Use the AC-E30HG AC
power adaptor (not supplied) (For “Sony
World Model”: in Japan, use the AC-E30M,
not supplied). Do not use any other AC
power adaptor.
Note
Specifications for AC-E30HG vary for each area. Check your local
voltage and the shape of plug before purchasing.
AC power adaptor
(not supplied)
Polarity of
the plug
z Operating the Unit
Recording
You can record right away with the built-in microphone.
2
3
1
pP
HOLD function
is activated.
HOLD function
is released.
HOLD EJECT
VOR
MIC SENS
REC
PAUSE
REC
REC indicator
EAR
1 Slide HOLD/EJECT in the direction of the arrow and open
the lid.
2 Take out any slack in the tape and insert the cassette with
the side to start recording facing the lid.
Note
Make sure that the tabs are not removed.
3 Close the cassette compartment lid until it clicks.
4 Make sure that the HOLD function is released. If HOLD/
EJECT is set to H, slide HOLD/EJECT to the next position.
5 Set VOR to OFF. For details, refer to “VOR (Voice Operated
Recording)”.
6 Select the microphone sensitivity by setting MIC SENS to H
or L.
H (high): To record at meetings or in a quiet and/or
spacious place.
L (low): To record for dictation or in a noisy place.
7 Slide REC PAUSE/REC toward “REC” while holding the
center button down.
The REC indicator lights and “REC” appears in the display
window and the REC PAUSE/REC button automatically
returns to the center position. While recording, the REC
indicator flickers depending on the strength of the sound.
If you start recording from the upper side (“FWD” appears in
the display window), recording automatically goes on to the
reverse side (“REV” appears in the display window) and the
unit turns off automatically when the tape comes to the end of
the reverse side.
To Press or slide
Stop recording p
Pause recording Slide REC PAUSE/REC toward
“PAUSE”*, or press the P button.
“P” appears and the tape counter
flashes in the display window.
Release pause recording Slide REC PAUSE/REC toward
“REC” while holding the center
button down*, or press the P button.
“P” in the display window goes off.
Take out a cassette Press p and slide HOLD/EJECT in
the direction of the arrow.
* When you release the REC PAUSE/REC button after you have slid
it toward “REC” or “PAUSE”, the button returns to the center
position.
Notes
• Before taking out the cassette, make sure that the sound of the unit
operating has stopped.
• When an external microphone is connected to the MIC jack, the
built-in microphone does not work.
When you open the lid during stop
The tape always starts recording from the upper side after you
have opened the lid.
To monitor the sound
Connect an earphone (supplied) firmly to EAR.
To prevent a tape from being
accidentally recorded over
Break out and remove the cassette tabs. To reuse the cassette for
recording, cover the tab hole with adhesive tape.
When the cassette tab is removed, the bar in the display window
disappears.
Disappears when
the cassette tab
for the upper
side is removed.
Disappears when
the cassette tab
for the reverse
side is removed.
Flashes if you try
to record with
the cassette tab
removed.
To select the side to be recorded
To record on both sides continuously
Insert a cassette with the side to start recording facing the
1
lid.
2 Start recording on the upper side (“FWD” appears in the
display window).
Side to start recording
If “REV” is displayed, press p for more than 2 seconds to
display “FWD.”
When recording reaches the end of the upper (forward) side, it
will automatically go on to the reverse side. When recording
reaches the end of the reverse side, it will automatically stop.
Notes
• Make sure the tabs on both sides are not removed.
• Even if only the tab on the reverse side is removed, recording
cannot be made.
• When recording on both sides, recording will not be made for a
few seconds while the tape is switching sides.
To Record on one side only
1 Insert a cassette with the side to start recording facing away
from the lid (reverse side).
2 Start recording on the reverse side (“REV” appears in the
display window).
Side to start recording
If “FWD” is displayed, press p for more than 2 seconds to
display “REV.”
When recording reaches the end of the reverse side, it will
automatically stop.
Note
Make sure the tab on the reverse side is not removed.
Playing a Tape
EASY
SEARCH
p
HOLD function
is activated.
HOLD function
is released.
FF/CUE•
REW/REVIEW
1 Slide HOLD/EJECT in the direction of the arrow and open
the lid.
2 Take out any slack in the tape and insert the cassette with
the side to start playing facing the lid.
3 Make sure that the HOLD function is released. If HOLD/
EJECT is set to H, slide HOLD/EJECT to the next position.
4 Close the cassette compartment lid until it clicks.
5 Press 9(.
6 Adjust the volume using VOL.
If the playback starts from the upper side (“FWD” appears in the
display window), playback goes on to the reverse side (“REV”
appears in the display window) and the unit turns off
automatically.
To Press or slide
Stop playback p
Pause playback P
“P” appears and the tape counter
flashes in the display window.
Release pause playback* Press the P or 9( button.
“P” in the display window goes off.
Fast forward** Slide FF/CUE• REW/REVIEW
toward FF/CUE during stop.
Rewind** Slide FF/CUE• REW/REVIEW
toward REW/REVIEW during stop.
Fast forward while Slide and hold FF/CUE• REW/
listening to the sound REVIEW toward FF/CUE during
(CUE) playback.
Rewind while listening Slide and hold FF/CUE• REW/
to the sound (REVIEW) REVIEW toward REW/REVIEW
during playback.
Play the other side 9(
during playback
Play the other side p for more than 2 seconds
during stop
Take out a cassette Press p and slide HOLD/EJECT in
the direction of the arrow.
* The P button is released automatically when the p button is
pressed (stop-pause-release function).
**The tape stops at the end of the tape and the power is turned off
automatically (automatic shut-off mechanism).
9(
VOL
P
Note
Before taking out the cassette, make sure that the sound of the unit
operating has stopped.
When you open the lid during stop
The tape always starts playback from the upper side after you
have opened the lid.
To increase the playback speed
Slide the FAST PB switch in the direction of the arrow. The
playback speed will be increased.
To return to the original speed, slide the FAST PB switch to the
original position.
Note
While recording, the fast playback function does not work.
Searching for the point you want to
play
When you press EASY SEARCH – or + during playback or stop,
the unit enters rewind or fast forward mode and stops, then
starts playback.
Each press of the – button rewinds the tape to the point approx.
3 seconds earlier and plays it back.
Each press of the + button makes the tape run rapidly to the
point approx. 10 seconds ahead and plays it back.
You can press the – or + button up to 20 times (approx. 60
seconds earlier or 200 seconds ahead). (If you press and hold the
button, the digits change rapidly.)
Each time you press –,
you can locate recording
approx. 3 seconds
before.
Each time you press +,
you can locate recording
approx. 10 seconds
ahead.
Note
When you press EASY SEARCH during recording, the unit stops
recording and starts playback after fast-forwarding or rewinding for
as much as you pressed the button.
Number of times
you pressed –
Number of times
you pressed +
Various Ways of Recording
p
HOLD
VOR
FF/CUE•REW/REVIEW
VOR (Voice Operated Recording)
The VOR system works only while recording. Set VOR to ON
first and slide REC PAUSE/REC toward “REC” while holding
the center button down. The unit automatically starts recording
the sound and pauses when there is no sound (you can save
tapes and batteries).
When you use this system in a noisy place the unit stays in the
recording mode. If the sound is too soft, on the contrary, the unit
will not start recording. When you do not use this function, set
VOR to OFF.
You can set VOR to ON while recording too.
Notes
• The VOR system depends on the environment or operating
conditions. Set MIC SENS to H or L depending on the conditions.
If you cannot get the desired results, set VOR to OFF. When
recording with the supplied remote control microphone, the
recording may not stop even if the sound becomes very soft,
because the recording sensitivity of the remote control microphone
is higher than that of the built-in microphone.
• When using the VOR system, the unit starts recording only when a
sound is detected, therefore, the beginning of the word may not be
recorded. For an important recording, we recommend to recording
without the VOR system.
Start recording during playback
Slide REC PAUSE/REC toward “REC” while holding the center
button down during playback, recording starts immediately. It
is useful when you want to re-record the portion which was just
recorded.
Review the portion just recorded
When you press EASY SEARCH + or – during recording, the
unit stops recording and starts playback after fast-forwarding or
rewinding for as much as you pressed the button. (For details,
see the “Searching for the point you want to play” section of
“Playing a Tape”.)
You can also start playback after fast-forwarding or rewinding
by sliding FF/CUE•REW/REVIEW during recording and
releasing the button at the point to start playback.
Display window
EAR
REC PAUSE/REC
REC
PAUSE
REC
Recording with the supplied
remote control microphone
Connect the supplied remote control microphone to MIC. The
built-in microphone will be disconnected and the sound through
the remote control microphone will be recorded. The power to
the microphone is supplied from this unit.
As the recording sensitivity of the remote control microphone is
higher than that of the built-in microphone, it is useful to record
soft sounds in a quiet place.
To start recording, insert a cassette and slide REC PAUSE/REC
toward “REC” while holding the center button down.
M-98V
MIC
Supplied remote control
microphone
To pause playback/recording with the remote
control microphone
Slide PAUSE on the remote control microphone in the direction
of the arrow. To release pause, slide PAUSE back to the original
position.
Note
When operating with the remote control microphone, you cannot
pause using the P button on the unit.
Recording from various sound
sources
Notes (Before recording)
• When connecting cords, be sure you connect plugs firmly.
• Make a trial recording to make sure that you made connections
correctly and adjusted the volume properly.
• The following examples use Sony products. If you have any
problems when using other products, read the instruction manual
of those products.
Recording with an external microphone
Connect a microphone to MIC. Use a microphone of low
impedance (less than 3 kilohms). When using a plug-in-power
system microphone, the power to the microphone is supplied
form this unit.
To start recording, insert a cassette and slide REC PAUSE/REC
toward “REC” while holding the center button down.
Note
When using an external microphone, use a monaural type
microphone. If a stereo microphone is connected, this unit may not
operate properly. When the monaural microphone is equipped with
a 3-polarity mini plug, use the Plug Adaptor PC-236MS to convert to
2 polarity.
Recording from another equipment
Connect another equipment to MIC using the RK-G64HG
connecting cord (For “Sony World Model”: in Japan, use the RKG64, not supplied).
M-98V
To EAR,
EARPHONE, or
@ of audio
equipment
MIC
Connecting cord
(not supplied)
1 Insert a cassette.
2 Adjust the sound of the connected equipment.
3 Slide REC PAUSE/REC toward “REC” while holding the
center button down.
Using Other Functions
Display window
COUNTER RESET
HOLD/EJECT
TAPE SPEED
HOLD function
This function locks the unit to prevent it from operating when
you accidentally press a button except COUNTER RESET. To
lock the unit, set HOLD/EJECT to H. The H indicator flashes
in the display window.
To check the direction of the tape in the
display window
Display Display
Upper side is Reverse side is
recorded or recorded or
played back. played back.
The indication will disappear when you have not operated the
unit for more than one minute. To display the indication, press
p or P.
TAPE SPEED selector
2.4 cm: For optimum sound (recommended for normal use). A
60-minute recording can be made using both sides of the MC-60
microcassette.
1.2 cm: For longer recording time. A 120-minute recording can
be made using both sides of the MC-60 microcassette.
Tape counter
While the upper side of the tape is running (“FWD” appears in
the display window), the numbers in the tape counter increase.
While the reverse side is running (“REV” appears in the display
window), they decrease.
Press COUNTER RESET and release it within 2 seconds to
return to 000.
To return the tape to the position of
000
Press COUNTER RESET for more than 2 seconds until ZERO
STOP appears in the display window. During rewind or
REVIEW, the tape stops at 000. Press COUNTER RESET for
more than 2 seconds to make the ZERO STOP indicator
disappear.
z Additional Information
Precautions
On power
Operate the unit only on 3V DC. For AC operation, use the AC
power adaptor recommended for the unit. Do not use any other
type. For battery operation, use two R03 (size AAA) batteries.
On the unit
• Use only the y (standard microcassettes) with this
unit. Non-standard cassettes cannot be used because their “L”
dimension (see illustration) is different.
Standard Non-standard
• Do not leave the unit in a location near heat sources, or in a place
subject to direct sunlight, excessive dust or mechanical shock.
• Should any solid object or liquid fall into the unit, remove the
batteries or disconnect the AC power adaptor, and have the unit
checked by qualified personnel before operating it any further.
• When you do not use the unit for long, remove the batteries to
avoid damage caused by battery leakage and subsequent
corrosion.
Keep personal credit cards using magnetic coding or spring-wound
watches etc. away from the unit to prevent possible damage from the
magnet used for the speaker.
If you have any questions or problems concerning your unit, please
consult your nearest Sony dealer.
Only standard
microcassette have a small
indentation of side A.
Approx. 2.5 mmApprox. 5 mm
Troubleshooting
Should any problem persist after you have made these checks,
consult your nearest Sony dealer.
Recording cannot be made.
m The recording is paused using the connected remote control
microphone.
m The batteries are weak. Replace both batteries with new ones.
m There is no cassette.
m The tab on the tape has been removed. (Even if only the tab on
the reverse side is removed, recording cannot be made.) To
reuse the tape for recording, cover the tab hole with adhesive
tape. To record on one side only, insert a cassette with the side
to start recording facing away from the lid (reverse side).
m The record/playback head is contaminated. Clean it.
m MIC SENS has been set improperly when VOR function is
activated.
m Connection is made incorrectly.
m The VOR system is working. When you do not use VOR, set
VOR to OFF.
You cannot open the cassette compartment lid.
m The batteries are weak. Replace both batteries with new ones.
You cannot insert the cassette.
m The cassette is inserted front side back.
You cannot close the cassette compartment lid.
m The cassette is inserted into the wrong part (it should be
inserted into the lid side).
m The cassette is not inserted completely.
Playback is not possible even if you press 9(.
m The playback is paused using the connected remote control
microphone.
m The tape has reached the end of the reverse side.
m The batteries are weak. Replace both batteries with new ones.
During CUE/REVIEW the tape stops or does not
run.
You cannot fast-forward or rewind.
m The batteries are weak. Replace both batteries with new ones.
m The zero stop counter function works. Press COUNTER
RESET for more than 2 seconds to make ZERO STOP
disappear form the display window.
The unit does not operate.
m The batteries have been inserted with incorrect polarity.
m The batteries are weak. Replace both batteries with new ones.
m The AC power adaptor is not firmly connected.
m The batteries have been inserted; however, the AC power
adaptor is also connected but not plugged into the wall outlet.
m There is no cassette.
m HOLD function is activated. Slide HOLD/EJECT to release
HOLD function.
m The TAPE SPEED switch is set between the 1.2 cm and 2.4 cm
position.
The unit stops to operate a little after you have
pressed a button.
m The batteries are weak. Replace both batteries with new ones.
No sound comes from the speaker.
m The earphone is plugged in to EAR. Disconnect it.
m The volume is turned down completely.
The sound drops out, sound quality becomes
worse or sound has excessive noise.
m The volume is turned down completely.
m The batteries are weak. Replace both batteries with new ones.
m The record/playback head is contaminated. Clean it.
m The earphone plug/microphone plug is dirty. Clean the plug,
insert it into the jack, turn it few times, then disconnect it and
connect it again.
The speed is too fast or too slow in the playback
mode.
m Improper setting of the TAPE SPEED switch. Set it to the
same speed as that used for recording.
Tape speed is faster than the normal playback
speed.
m The FAST PB switch is slid in the direction of the arrow.
Recording is interrupted.
m The VOR system is working. When you do not use the VOR
system, set VOR to OFF.
Recording cannot be erased completely.
m The erase head is contaminated. Clean it.
Maintenance
Head
Pinch roller
Capstan
To clean the tape heads and path
Wipe the heads, pinch roller, and the capstan with a cotton swab
moistened with alcohol every 10 hours of use. After wiping with
alcohol, be sure to wipe with a dry cotton swab or wait until the tape
heads and path dry before inserting a cassette. You can see the inside
through the window of the cassette compartment lid. Clean the
pinch-roller from top to bottom by rotating it.
To clean the exterior
Use a soft cloth slightly moistened in water. Do not use alcohol,
benzine or thinner.
To clean the microphone plug
Clean the plug of the supplied remote control microphone
periodically with a soft dry cloth. Otherwise, noise may be
recorded. When using an optional external microphone, clean its
plug in the same way.
Head
Cotton swab
How to use the carrying case
Place accessories here.
Place M-98V here.
Specifications
Tape
y (normal position type)
Recording system
2-track 1 channel monaural
Frequency range
400 - 3,000 Hz (2.4 cm/s)
Speaker
Approx. 2.8 cm (1 1⁄8 in.) dia.
Power output
250 mW
Input
Microphone input jack (minijack/plug in power) sensitivity
0.37 mV for 3 kilohms or lower impedance microphone
Output
Earphone jack (minijack) for 8 - 300 ohms earphone
Power requirements
3 V DC batteries size AAA (R03) × 2/External DC 3 V power
sources
Dimensions (w/h/d) (incl. projecting parts and controls)
Approx. 60.5 × 93.9 × 26.0 mm (2 1⁄2 × 3 3⁄4 × 1 11⁄16 in.)
Mass
Approx. 130 g (4.6 oz.)
Supplied accessories
Remote control microphone (1)
Microcassette tape MC-30 (1)
Earphone (1)
Carrying case (1)
Hand strap (1)
Batteries R03 (SB) (2) (“Sony World Model” only)
Design and specifications are subject to change without notice.
This warranty is valid only in the
United States.
 Loading...