

Page 1
3-858-734-33 (1)
English
MicrocassetteTMCorder
Operating Instructions
Mode d'emploi
Инструкция по эксплуатации
M-950
Sony Corporation ©1997 Printed in Japan
A
a
1
b
1
c
d
e
When batteries
are new
Lorsque les piles sont
neuves
Когда батарейки
новые
When batteries
become weak
Lorsque les piles
faiblissent
Когда батарейки
становятся слабо
заряженными
Replace batteries
Remplacez les piles
Замена батареек
f
2
2
//
light
s’allume
свет
go off one segment
un segment s’éteint
исчезает одна
пластина
go off another
segment
un autre segment
s’éteint
исчезает другая
пластина
light
s’allume
свет
B
C
a
1
b
D
a
p STOP
OPEN
RECORD
PROTECT
r REC
P PAUSE
b
E
p STOP
FF/CUE
REW/REVIEW
OPEN
P PAUSE
HOLD
2
Display window
Fenêtre d’affichage
Индикатор
REC indicator
Indicateur REC
Индикатор
REC
9( PLAY/DIR
Display window
Fenêtre d’affichage
Индикатор
VOR
EAR/
MIC
VOLUME
Welcome!
Thank you for purchasing the Sony Microcassette-Corder.
Some features are:
• Super-mini size Microcassette-Corder with automatic
reverse function and feather-touch buttons.
• Supplied detachable speaker.
• LCD (Liquid Crystal Display) that shows tape counter,
remaining battery power and tape transport direction.
•Zero stop counter that stops the tape automatically at 000 in
rewind and review mode.
• VOR (Voice Operated Recording) system that starts and
stops recording automatically in response to the sound, to
save tapes and batteries.
z Getting Started
Preparing a Power Source
Choose one of the following power sources.
Dry Batteries
Make sure that nothing is connected to the DC IN 1.5V jack.
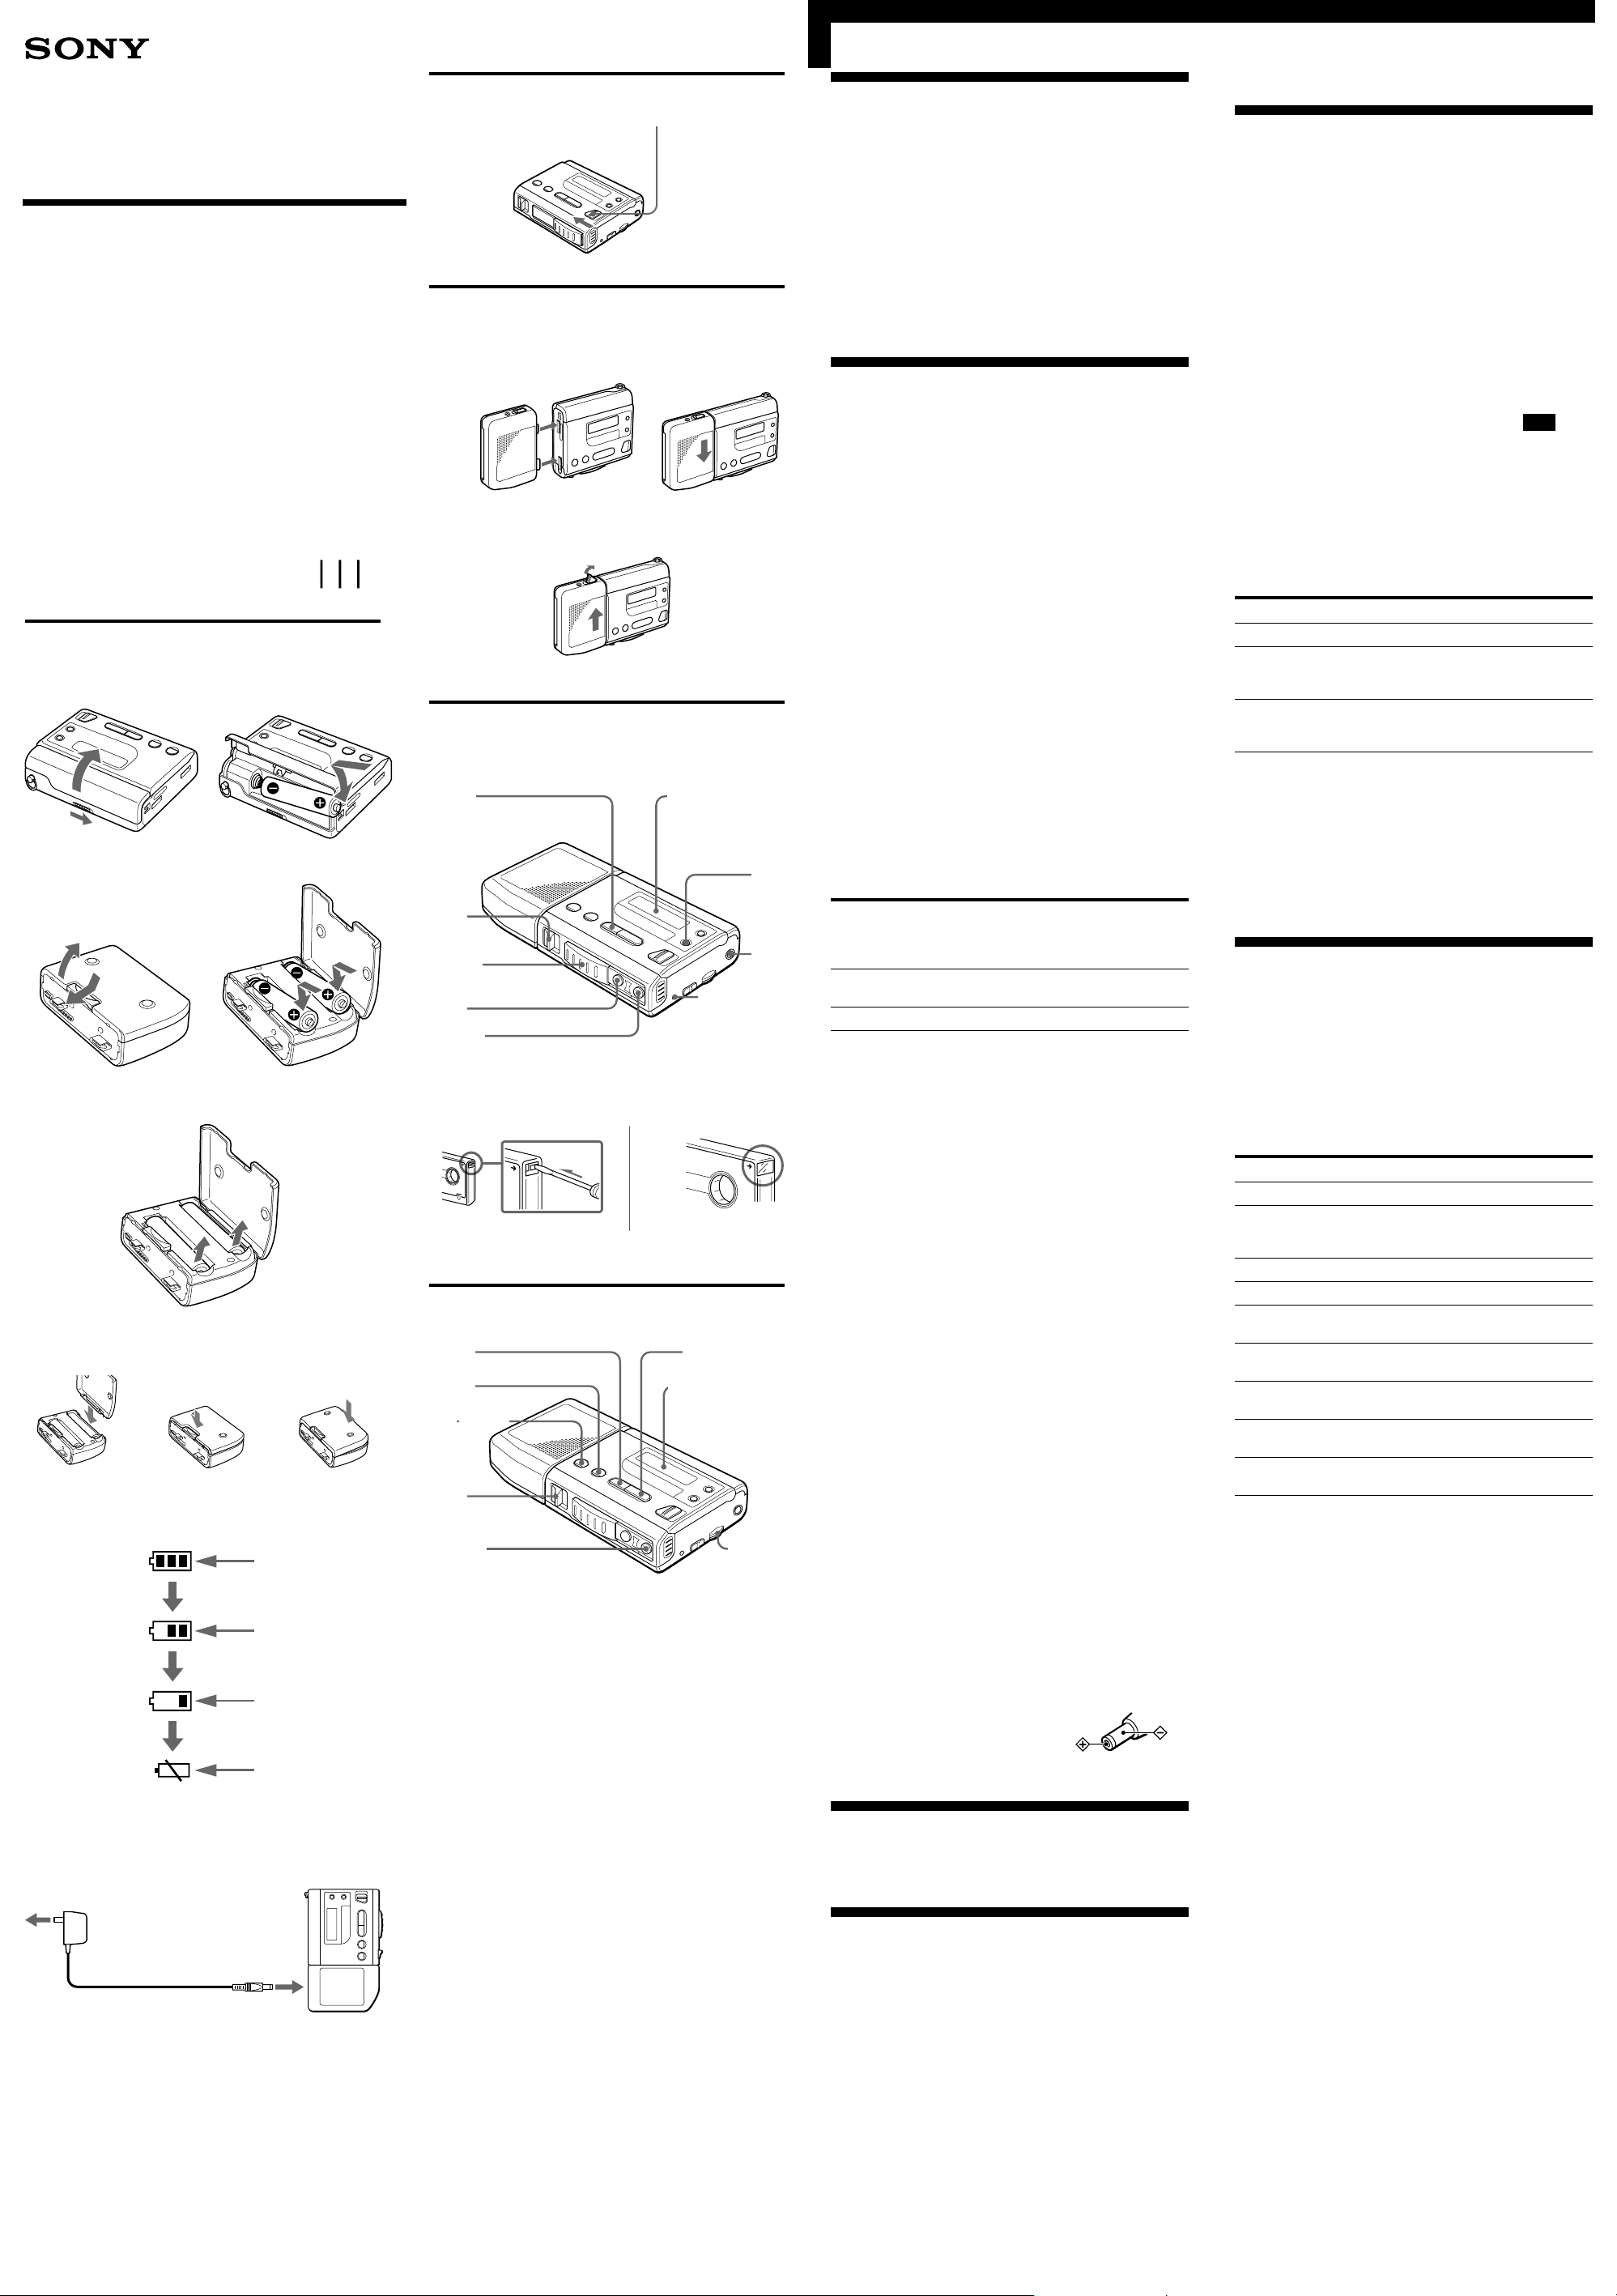
For the main unit (see Fig. A-a)
1 Slide OPEN on the battery compartment in the direction
of the arrow to open the battery compartment lid.
2 Insert one R03 (size AAA) battery (not supplied) with
correct polarity.
Note
Make sure that the battery is inserted with correct polarity.
You may not be able to distinguish between ‘ and ’ with
some batteries.
3 Close the lid until it clicks.
For the speaker unit (see Fig. A-b)
1 Push and slide OPEN on the speaker unit in the direction
of the arrow as illustrated to open the battery
compartment lid.
2 Insert two R03 (size AAA) batteries (not supplied) with
correct polarity.
3 Close the lid until it clicks.
To take out the batteries (see Fig. A-c)
To attach the battery compartment lid if it is
accidentally detached (see Fig. A-d)
Insert a wire, push the OPEN button-side and then push the
opposite side of the OPEN button.
Battery life (Approximate hours)
Battery Recording Recording Playback
Sony alkaline 5.5 22 24
LR03 (SG)
Sony R03 (SB) 1.5 10 11.5
* When one battery is installed in the main unit and two batteries
are installed in the speaker unit
We recommend to use long-life alkaline batteries.
Notes
• Do not charge a dry battery.
• Do not use a new battery with an old one.
• Do not use different types of batteries.
• When you do not use the unit for a long time, remove the
batteries to avoid any damage caused by battery leakage and
subsequent corrosion.
• Dry batteries will not be expended when another power source
is connected.
without (when speaker (when speaker
speaker speaker unit unit is
unit is installed*) installed*)
When to replace the batteries (see Fig. A-e)
The battery indicator in the display window shows the
remaining battery power.
When the battery is used up, i appears in the display
window. Replace all the batteries (one battery in the main unit
if the speaker is not installed) with new ones.
The i lamp changes as illustrated:
Notes
• When you have changed the batteries to new ones, the battery
indicator appears in the display window after running the tape
once.
• If you insert exhausted batteries (especially manganese
batteries), i may not appear even though the other indicators
appear properly. If the unit does not operate properly, replace
the batteries with new ones.
• While the tape runs rapidly (fast forward or rewind), i may
appear. Replace the batteries only when the tape does not run
properly.
• During playback, the battery indicator may temporarily flicker
when you turn up the volume.
• The tape will run for a while after i appears; however, a big
noise may be heard from the speaker or recording may not be
made. When i appears, replace all the batteries at once.
• At the beginning or end of the tape i may momentarily
appear. If the indicator disappears, you do not need to replace
the batteries.
House Current (see Fig. A-f)
1 Connect the AC-E15HG AC power adaptor (not supplied)
to DC IN 1.5V of the speaker.
2 Connect the other end of the AC power adaptor to a wall
outlet.
Note
Use the AC-E15HG AC power adaptor.
Do not use any other AC power adaptor.
Polarity of the plug
Releasing HOLD (see Fig. B)
Unlock the unit before operating by sliding HOLD in the
opposite direction of the arrow.
z Operating the Unit
Recording (see Fig. D-a)
You can record right away with the built-in microphone, with
or without the speaker unit.
Make sure that nothing is connected to the EAR/MIC jack.
1 Slide OPEN on the cassette compartment in the direction
of the arrow and open the lid.
2 Take out any slack in the tape and insert the cassette with
the side to start recording facing the lid.
3 Close the cassette compartment lid until it clicks.
4 Make sure that VOR L or VOR H is not displayed in the
display window. For normal recording, if VOR L or VOR
H is displayed, make it disappear. Refer to “VOR (Voice
Operated Recording)”.
5 Slide the RECORD PROTECT cover so that r REC and
P PAUSE buttons appear.
6 Press r REC.
Recording starts.
While recording, the REC indicator lights and
appears in the display window.
Note
Make sure the tab on the upper (forward) side is not removed;
otherwise, recording cannot be made.
If you start recording from the upper side (9 FWD appears
in the display window), recording automatically goes on to
the reverse side (REV ( appears in the display window) and
the unit turns off automatically when the tape comes to the
end of the reverse side. If the tab is removed, however, you
cannot record on that side.
To Press or slide
Stop recording p STOP
Pause recording P PAUSE
To release pause recording, press
r REC.
Take out a cassette Press p STOP and slide OPEN on the
cassette compartment lid in the
direction of the arrow.
Notes
• Before taking out the cassette, make sure that the sound of the
unit operating has stopped.
• When earphones or an external microphone is connected to the
EAR/MIC jack, the built-in microphone does not work.
REC
To prevent a tape from being accidentally
recorded over (see Fig. D-b)
Break out and remove the cassette tabs. To reuse the cassette
for recording, cover the tab hole with adhesive tape.
Playing a Tape (see Fig. E)
1 Slide OPEN on the cassette compartment in the direction
of the arrow and open the lid.
2 Take out any slack in the tape and insert the cassette with
the side to start playing facing the lid.
3 Close the cassette compartment lid until it clicks.
4 Press 9( PLAY/DIR.
5 Adjust the volume using VOLUME.
If the playback starts from the upper side (9 FWD appears
in the display window), playback goes on to the reverse side
(REV ( appears in the display window) and the unit turns
off automatically.
To Press or slide
Stop playback p STOP
Pause playback P PAUSE
Fast forward** FF/CUE during stop
Rewind** REW/REVIEW during stop
Fast forward while listening FF/CUE during Playback
to the sound (CUE)
Rewind while listening to REW/REVIEW during playback
the sound (REVIEW)
Play the other side 9( PLAY/DIR
during playback
Play the other side p STOP for more than 2 seconds
during stop
Take out a cassette Press p STOP and slide OPEN
* The P PAUSE button is released automatically when the
p STOP button is pressed (stop-pause-release function).
**The tape stops at the end of the tape and the power is turned off
automatically (automatic shut-off mechanism).
Note
Before taking out the cassette, make sure that the sound of the unit
operating has stopped.
To release pause playback, press
9( PLAY/DIR*.
in the direction of the arrow.
DC IN 1.5V
AC-E15HG AC power adaptor
(not supplied)
Adaptateur secteur AC-E15HG
(non fourni)
Переходник переменного тока
AC-E15HG (не поставляется)
Installing the Speaker Unit
(see Fig. C-a)
1 Attach the speaker unit to the main unit.
2 Slide the speaker unit as illustrated until it clicks.
To remove the speaker unit (see Fig. C-b)
Keep holding both the main unit and the speaker unit
1
with your both hands, release the speaker lock.
2 With the speaker locked released, remove the speaker unit
straight out from the main unit.
Notes
• When removing the speaker unit, make sure you are holding
both the speaker unit and the main unit firmly; otherwise,
the speaker unit may drop out.
• Before removing the speaker unit, make sure the tape has
stopped completely; otherwise, noise may be heard or a tape
may stop running.
Continued to the back c
Page 2

РусскийFrançais
Félicitations !
Nous vous remercions d’avoir fait l’acquisition d’un
magnétophone à microcassettes stéréo Sony. Voici quelquesunes des caractéristiques fonctionnelles de cet l’appareil :
• Enregistreur super-mini à microcassettes doté d’une
fonction d’inversion automatique et de touches à
effleurement.
• Haut-parleur amovible fourni.
• Ecran LCD (affichage à cristaux liquides) indiquant le
compteur de bande, la charge résiduelle de la pile et le sens
de défilement de la bande magnétique.
• Compteur à arrêt sur zéro qui arrête automatiquement la
bande magnétique sur 000 dans les modes de rembobinage
et de contrôle d’enregistrement.
• Le système VOR (enregistrement commandé par fréquence
vocale) démarre et arrête automatiquement l’enregistrement
en fonction des impulsions sonores de façon à économiser
les bandes et la pile.
” Préparation
Sélection de la source
d’alimentation
Choisissez l’une des sources d’alimentation présentées cidessous.
Piles sèches
Assurez-vous que rien n’est raccordé à la prise DC IN 1.5 V.
Pour l’appareil principal (voir Fig. A-a)
1 Faites coulisser OPEN sur le compartiment à piles dans le
sens de la flèche pour ouvrir le couvercle du
compartiment à piles.
2 Introduisez une pile R03 (AAA) (non fournie) en en
respectant la polarité.
Remarque
Assurez-vous que la pile est installée conformément à sa
polarité. Il se peut que vous ne puissiez distinguer les pôles ‘
et ’ sur certaines piles.
3 Refermez le couvercle jusqu’à ce qu’il s’encliquette.
Pour le haut-parleur (voir Fig. A-b)
Pressez et faites coulisser OPEN sur le haut-parleur dans
1
le sens de la flèche comme illustré de façon à ouvrir le
couvercle du compartiment à pile.
2 Introduisez deux piles R03 (AAA) (non fournies) en en
respectant la polarité.
3 Refermez le couvercle jusqu’à ce qu’il s’encliquette.
Pour retirer les piles (voir Fig. A-c)
Pour réinstaller le couvercle du compartiment
à piles s’il s’enlève accidentellement (voir Fig.
A-d)
Introduisez un fil, appuyez sur le côté OPEN de la touche et
poussez ensuite sur le côté opposé de la touche OPEN.
Autonomie des piles (approximative, en heures)
Piles Enregistrement Enregistrement Lecture
Sony alcaline 5,5 22 24
LR03 (SG)
Sony R03 (SB) 1,5 10 11,5
* Avec une pile installée dans l’appareil principal et deux piles
dans le haut-parleur
Nous préconisons l’emploi de piles alcalines longue durée.
Remarques
• Ne chargez pas une pile sèche.
• N’utilisez pas une pile neuve et une pile usagée en même temps.
• N’utilisez pas des piles de différents types en même temps.
• Si vous prévoyez de ne pas utiliser l’appareil pendant une
période prolongée, retirez-en les piles de façon à éviter tout
dommage causé par une fuite des piles et la corrosion
subséquente.
• Les piles sèches ne sont pas sollicitées lorsqu’une autre source
d’alimentation est raccordée.
sans le haut- (le haut-parleur (le hautparleur étant installé*) parleur
étant
installé*)
Quand faut-il remplacer les piles ? (voir Fig. Ae)
L’indicateur de pile dans la fenêtre d’affichage donne la
charge résiduelle de la pile.
Lorsque la pile est épuisée, i apparaît dans la fenêtre
d’affichage. Remplacez toutes les piles (ou la pile de l’appareil
principal si le haut-parleur n’est pas installé).
Le témoin i est activé comme illustré :
Remarques
• Lorsque vous avez remplacé les piles, l’indicateur de batterie
apparaît dans la fenêtre d’affichage après avoir actionné une
fois la cassette.
• Si vous introduisez des piles à plat (et, en particulier, des piles
au manganèse), il se peut que i n’apparaisse pas même si les
autres indicateurs apparaissent correctement. Si l’appareil ne
fonctionne pas correctement, remplacez les piles.
• Lorsque la bande défile rapidement (en avance rapide ou en
rembobinage), il se peut que i apparaisse. Ne remplacez les
piles que lorsque la bande magnétique ne défile plus
correctement.
• En cours de lecture, il se peut que l’indicateur de pile se mette
brièvement à clignoter lorsque vous augmentez le volume.
• La bande magnétique continue à défiler pendant un moment
après que i est apparu; il se peut cependant que vous
entendiez des parasites importants via le haut-parleur ou que
l’enregistrement ne soit plus possible. Lorsque i s’affiche,
remplacez les piles.
• Au début ou à la fin de la cassette, il se peut que i apparaisse
brièvement. Si l’indicateur disparaît, vous ne devez pas
remplacer les piles.
Secteur (voir Fig. A-f)
1 Branchez l’adaptateur secteur AC-E15HG (non fourni) sur
la prise DC IN 1.5 V du haut-parleur.
2 Branchez l’autre extrémité de l’adaptateur secteur sur une
prise murale (secteur).
Remarque
Utilisez l’adaptateur secteur AC-E15HG.
N’utilisez aucun autre type d’adaptateur
secteur.
Polarité de la fiche
Déverrouillage HOLD (voir Fig.
B)
Déverrouillez l’appareil avant de le faire fonctionner en
faisant coulisser HOLD dans le sens opposé à la flèche.
Pour enlever le haut-parleur (voir Fig. C-b)
1 Maintenez l’appareil principal et le haut-parleur des deux
mains et déverrouillez la fixation du haut-parleur.
2 La fixation du haut-parleur étant déverrouillée, dégagez
le haut-parleur de l’appareil principal d’un mouvement
rectiligne.
Remarques
• Lorsque vous retirez le haut-parleur, maintenez fermement le
haut-parleur et l’appareil principal; sinon, vous risquez de
laisser tomber le haut-parleur.
• Avant de retirer le haut-parleur, assurez-vous que la bande
magnétique est à l’arrêt complet; sinon, il se peut que vous
entendiez des parasites ou que la bande magnétique s’arrête.
” Utilisation
Enregistrement (voir Fig. D-
a)
Vous pouvez enregistrer directement à l’aide du microphone
intégré, que le haut-parleur soit raccordé ou non.
Assurez-vous que rien n’est branché sur la prise EAR/MIC.
1 Faites coulisser OPEN sur le compartiment à cassette dans
le sens de la flèche et ouvrez le couvercle.
2 Tendez la bande magnétique et introduisez la cassette
avec la face à enregistrer en premier lieu orientée vers le
couvercle.
3 Refermez le couvercle du compartiment à cassette jusqu’à
ce qu’il s’encliquette.
4 Assurez-vous que VOR L ou VOR H n’apparaît pas dans
la fenêtre d’affichage. Pour un enregistrement normal,
désactivez l’indication VOR L ou VOR H si elle est
affichée. Voir “VOR (enregistrement commandé par
fréquence vocale)”.
5 Faites coulisser le couvercle RECORD PROTECT de façon
à ce que les touches r REC et P PAUSE apparaissent.
6 Appuyez sur r REC.
L’enregistrement démarre.
Pendant l’enregistrement, l’indicateur REC s’allume et
apparaît dans la fenêtre d’affichage.
REC
Remarque
Vérifiez si l’onglet de la face supérieure (avant) n’est pas brisé;
sinon, l’enregistrement ne peut être réalisé.
Si vous commencez l’enregistrement par la face supérieure
(9 FWD apparaît dans la fenêtre d’affichage),
l’enregistrement se poursuit automatiquement sur la face
arrière (REV ( apparaît dans la fenêtre d’affichage) et
l’appareil se met automatiquement hors tension lorsque la
cassette arrive à la fin de la face arrière. Vous ne pouvez
cependant pas enregistrer sur cette face si l’onglet en a été
brisé.
Pour Pressez ou faites coulisser
Arrêter l’enregistrement p STOP
Activer une pause P PAUSE
d’enregistrement Pour désactiver une pause
Retirer une cassette Appuyez sur p STOP et faites
Remarques
• Avant de retirer la cassette, assurez-vous que le son de
l’appareil en cours de fonctionnement a cessé.
• Si un casque d’écoute ou un microphone externe est branché sur
la prise EAR/MIC, le microphone intégré est inopérant.
d’enregistrement, appuyez sur
r REC.
coulisser OPEN sur le couvercle
du compartiment à cassette dans
le sens de la flèche.
Pour éviter l’enregistrement accidentel d’une
cassette (voir Fig. D-b)
Brisez et retirez les onglets de la cassette. Pour pouvoir
réutiliser la cassette en vue d’un enregistrement, recouvrez de
bande adhésive l’orifice des onglets.
Lecture d’une cassette (voir
Fig. E)
1 Faites coulisser OPEN sur le compartiment à cassette dans
le sens de la flèche et ouvrez le couvercle.
2 Tendez la bande magnétique et introduisez-la avec la face
à reproduire en premier lieu orientée vers le couvercle.
3 Refermez le couvercle du compartiment à cassette jusqu’à
ce qu’il s’encliquette.
4 Appuyez sur 9( PLAY/DIR.
5 Réglez le volume avec VOLUME.
Si la lecture commence par la face supérieure (9 FWD
apparaît dans la fenêtre d’affichage), la lecture se poursuit par
la face arrière (REV ( apparaît dans la fenêtre d’affichage) et
l’appareil se met automatiquement hors tension.
Pour Pressez ou faites coulisser
Arrêter la lecture p STOP
Activer une pause de lecture P PAUSE
Avance rapidement** FF/CUE en cours d’arrêt
Rembobiner** REW/REVIEW en cours d’arrêt
Avancer rapide tout en FF/CUE en cours de lecture
écoutant le son (CUE)
Rembobiner tout en REW/REVIEW en cours de
écoutant le son (REVIEW) lecture
Reproduire l’autre face en 9( PLAY/DIR
cours de lecture
Reproduire l’autre face p STOP pendant au moins 2
Retirer la cassette Appuyez sur p STOP et faites
* La touche P PAUSE est automatiquement libérée lorsque vous
appuyez sur la touche p STOP (fonction arrêt-pausedésactivation).
**La cassette s’arrête lorsqu’elle arrive en fin de bande et
l’appareil se met automatiquement hors tension (mécanisme de
coupure automatique).
Remarque
Avant de retirer la cassette, assurez-vous que le son de l’appareil
en cours de fonctionnement a cessé.
Pour désactiver une pause de
lecture, appuyez sur
9( PLAY/DIR*.
secondes en cours d’arrêt
coulisser OPEN dans le sens de
la flèche.
Поздравляем с покупкой!
Влагодарим вас за покупку микрокассетного диктофона
компании Sony. Аппарат имеет следующие
характеристики:
• Миниатюрный кассетный диктофон с автоматической
перемоткой и легко нажимаемыми кнопками.
• Съемный динамик.
• ЖКИ (жидкокристаллический индикатор)
воспроизводит счетчик, уровень заряда батареи и
направление движения кассеты.
• Счетчик автоматически останавливает кассету на
установке 000 во время перемотки и просушивания.
• VOR (Система речевой записи), которая автоматически
начинает и останавливает запись, реагируя на звук, с
целью экономии кассет и батареек.
z Подготовка к эксплуатации
Подготовка источника питания
Выберите из следующих источников питания:
Сухие батарейки
Убедитесь в том, что к гнезду постоянного тока
мощностью DC IN 1.5V ничего не подключено.
Основной блок (см. рис. A-a)
1 Чтобы открыть крышку отсека для батарейки,
передвиньте кнопку OPEN в направлении стрелки.
2 Установите одну батарейку R03 (величиной ААА)
соответствующей полярностью (батарейка не
включена).
Примечание
Убедитесь, что батарейка вставлена правильно. У
некоторых батареек трудно определить полярность‘ и ’.
3 Закройте крышку до щелчка.
Динамик (см. рис. A-b)
1 Чтобы открыть отсек для батарейки на динамике,
двигайте кнопку ОPEN в направлении стрелки, как
показано на рисунке.
2 Установите две батарейки R03 (величиной ААА)
соответствующей полярностью (батарейки не
включены).
3 Закройте крышку до щелчка.
Как вытащить батарейки (см. рис. A-c)
Как вставить крышку батарейного отсека, если
она случайно отсоединилась (см. рис. A-d)
Подсоедините провод, нажмите одну сторону регулятора
OPEN, а затем его противоположную сторону.
Срок годности (примерное количество часов)
Батарейка
Щелочная 5,5 22 24
батарейка
Sony LR03 (SG)
Sony R03 (SB) 1,5 10 11,5
* Когда одна батарейка вставлена в основной блок и две
батарейки вставлены в динамик.
Мы рекомендуем использовать щелочные батарейки с
длительным сроком годности.
Примечания
• Не заряжайте сухую батарейку.
• Не используйте новую батарейку вместе со старой
батарейкой.
• Пользуйтесь батарейками одного типа.
• Если вы долгое время не пользуетесь аппаратом, удалите
из него батарейки, чтобы избежать повреждения,
вызванного протеканием батарейки и последующей
коррозией.
• Сухие батарейки не будут расходоваться, если аппарат
подсоединено к другому источнику питания.
Запись
без
динамика
Запись
(при
установленном
динамике*)
Воспроизведение
звукозаписи
(при установленном
динамике*)
Замена батареек (см. рис. A-e)
На индикаторе имеется указатель степени заряженности
батарейки.
Когда батарейка использована до конца, на индикаторе
появляется i. Замените все батарейки (одну
батарейку, если динамик не установлен) на новые.
Замена лампочки i производится как указано на
рисунках:
Примечания
• После того как Вы замените батарейки и один раз
включите ленту, в окошке дисплея появится индикация
состояния батареек.
• Если Вы вставите севшие батарейки (особенно это
касается магниевых батареек), i на дисплее может и не
появится, даже если другие индикаторы появляются как
положено. В случае сбоев в функционировании аппарата
осуществите замену батареек.
• При быстром движении пленки (перемотка вперед или
назад) может появиться i. Заменяйте батарейки только
при нарушении хода пленки.
• Во время воспроизведения звукозаписи, указатель
батарейки может временно мигать при увеличении громкость.
• После появления i пленка будет еще некоторое время в
движении; однако при этом может доноситься громкий
звук из динамика, или остановится запись. Когда появится
i, сразу же следует заменить все батарейки.
• В начале или в конце работы пленки i может ненадолго
появиться. Если индикатор исчезнет, вам не следует
менять батарейки.
Питание от сети (см. рис. A-f)
1 Подключите переходник переменного тока АС-Е15НG
(не поставляется) к вводу постоянного тока
мощностью DC IN 1.5V, расположенного на динамике.
2 Подсоедините другой конец переходника
переменного тока к стенной розетке.
Примечания
Используйте переходник переменного
тока АС-Е15НG.
Не используйте никакой другой
переходник переменного тока.
Полярность вилки
Отпуск кнопки HOLD
(временная остановка)
(см. рис. B)
Перед пользованием аппаратом передвиньте кнопку HOLD
в противоположную от указывающей стрелки сторону.
Как снять динамик (см. рис. C-b)
1 Продолжая держать основной блок и динамик в
руках, отпустите затвор динамика.
2 Отпустив затвор, снимите динамик с основного
блока.
Примечания
• При снятии динамика, убедитесь в том, что вы крепко
держите и динамик и основной блок; в противном
случае динамик может упасть.
• Перед тем, как снять динамик, убедитесь в том, что
кассета полностью остановлена; в противном случае будет
слышен шум, или остановится пленка.
z Инструкция к пользованию
аппаратом
Запись (см. рис. D-a)
Вы можете сразу же начать запись через встроенный
микрофон при наличии динамика или без него.
Убедитесь, что ничего не подсоединено к гнезду EAR/
MIC.
1 Передвиньте кнопку OPEN на кассетном отсеке в
направлении стрелки и откройте крышку.
2 Натяните пленку и вставьте кассету нужной стороной
к крышке, чтобы начать запись.
3 Закройте крышку кассетного отсека до щелчка.
4 Убедитесь в том, что на индикаторе не появились
обозначения VOR L или VOR H. Если VOR L или VOR
H появились на индикаторе при обычной записи,
постарайтесь избавиться от этих обозначений. См.
раздел “VOR (Система речевой записи).”
5 Выдвиньте крышку RECORD PROTECT
(защита записи) , чтобы появились кнопки r REC и
P PAUSE.
6 Нажмите r REC.
Запись начинается.
Во время записи на индикаторе загорится индикатор
REC и появится надпись .
Примечания
Убедитесь в том, что пластинка не удалена с первой стороны
кассеты (направление вперед); в противном случае запись не
может быть произведена.
Если вы начнете записывать с первой стороны (на
индикаторе появится 9 FWD), то запись автоматически
переходит на другую сторону (на индикаторе появится
REV (), и аппарат автоматически отключается, когда
пленка доходит до конца второй стороны. Однако, если
пластинка снята, вы не сможете производить запись на
этой стороне.
Для того, чтобы Нажмите или передвиньте
Остановить запись p STOP
Временно P PAUSE
приостановить Чтобы возобновить временную
запись остановку записи, нажмите r REC.
Удалить кассету Нажмите p STOP и передвиньте
Примечания
• Перед тем, как вытащить кассету, убедитесь в том, что
звук работающего аппарата отсутствует.
• Когда к гнезду EAR/MIC подключены наушники или
внешний микрофон, то встроенный микрофон не работает.
REC
кнопку OPEN на крышке
кассетного отсека в направлении
стрелки.
Как избежать случайное наложение записи на
уже имеющуюся запись (см. рис. D-b)
Удалите пластинки на кассете. Чтобы вторично
использовать кассету для записи, закройте
образовавшееся отверстие клейкой лентой.
Проигрывая пленку (см. рис. E)
1 Передвиньте кнопку OPEN на кассетном отсеке в
направлении стрелки и откройте крышку.
2 Натяните пленку и вставьте кассету нужной стороной
к крышке, чтобы начать проигрывать кассету.
3 Закройте крышку кассетного отсека до щелчка.
4 Нажмите 9( PLAY/DIR.
5 Отрегулируйте громкость, используя регулятор
VOLUME.
Если воспроизведение звукозаписи начнется с первой
стороны (на индикаторе появится 9 FWD), то
воспроизведение автоматически переходит на другую
сторону (на индикаторе появится REV (), и аппарат
автоматически отключается.
Для того, чтобы Нажмите или передвиньте
Остановить p STOP
воспроизведение
звукозаписи
Временно приостановить P PAUSE
воспроизведение Чтобы возобновить
Для ускоренной FF/CUE после остановки
перемотки вперед** пленки
Для перемотки назад** REW/REVIEW после
Для ускоренной FF/CUE во время
перемотки вперед во воспроизведения звукозаписи
время прослушивания
(CUE)
Для перемотки назад во REW/REVIEW во время
время прослушивания воспроизведения звукозаписи
(REVIEW)
Прослушать другую 9( PLAY/DIR
сторону во время
воспроизведения
звукозаписи
Прослушать другую p STOP и держите ее более
сторону во время двух секунд
остановки
Удалить кассету Нажмите p STOP и
* Кнопка P PAUSE автоматически отпускается, если нажать
кнопку p STOP (функция “стоп-пауза-отпуск”).
**Пленка останавливается, когда доходит до конца, и
аппарат автоматически отключается (механизм
автоматического отключения).
временную остановку
воспроизведение
звукозаписи, нажмите
9( PLAY/DIR*.
остановки пленки
передвиньте OPEN в
направлении стрелки.
Installation du haut-parleur
(voir Fig. C-a)
1 Installez le haut-parleur sur l’appareil principal.
2 Faites coulisser le haut-parleur comme illustré jusqu’à ce
qu’il s’encliquette.
Suite au verso c
Установка динамика (см. рис.
C-a)
1 Подсоедините динамик к основному блоку аппарата.
2 Двигайте динамик, как указано на рисунке, до щелчка.
Примечание
Перед тем, как вытащить кассету, убедитесь в том, что звук
работающего аппарата отсутствует.
Продолжение следует на обратную сторону
c
Page 3

English
English
Specifications
Tape
y (normal position type)
Recording system
2-track 1 channel monaural
Frequency range
300 - 4,000 Hz
Speaker
Approx. 3.6 cm (1 7⁄16 in.) dia.
Power output
80 mW
Input
Microphone input jack (minijack/plug in power) (same jack as
the earphone jack) sensitivity 0.33 mV for 3 kilohms or lower
impedance microphone
Output
Earphone jack (minijack) for 8 - 300 ohms earphone
Power requirements
1.5 V DC
One R03 (size AAA) battery for the main unit and two for the
speaker unit
Dimensions (w/h/d) (incl. projecting parts and controls)
Approx. 64.7 × 67 × 21.8 mm
(2 5⁄8 × 2 3⁄4 × 7⁄8 in.)
Approx. 64.7 × 108 × 21.8 mm with the speaker unit
(2 5⁄8 × 4 3⁄8 × 7⁄8 in.)
Mass
Main unit: Approx. 100 g (3.5 oz.)
Speaker unit: Approx. 40 g (1.4 oz.)
Approx. 120 g (4.2 oz.) when using, incl. one battery and
cassette
Approx. 180 g (6.3 oz.) with the speaker unit, incl. two batteries
Supplied accessories
Microphone (1), Holder clip for microphone (1)
Earphone (1), Carrying case (1), Hand strap (1)
Design and specifications are subject to change without notice.
How to use the carrying case
(see Fig. K)
Français
Spécifications
Cassette
y (type position normale)
Système d’enregistrement
2 pistes 1 canal monaural
Plage de fréquences
300 - 4.000 Hz
Haut-parleur
Approx. 3,6 cm (1 7⁄16 po) diam.
Puissance de sortie
80 mW
Entrée
Prise d’entrée de microphone (miniprise/auto-alimenté)
(même prise que pour le casque d’écoute) sensibilité de 0,33
mV pour un microphone d’une impédance de 3 kilohms ou
moins
Sortie
Prise casque d’écoute (miniprise) pour casque d’écoute 8 - 300
ohms
Puissance de raccordement
1,5 V CC
Une pile R03 (AAA) pour l’appareil principal et deux pour le
haut-parleur
Dimensions (l/h/p) (parties saillantes et commandes
comprises)
Approx. 64,7 × 67 × 21,8 mm
(2 5⁄8 × 2 3⁄4 × 7⁄8 po)
Approx. 64,7 × 108 × 21,8 mm avec le haut-parleur
(2 5⁄8 × 4 3⁄8 × 7⁄8 po)
Masse
Appareil principal : Approx. 100 g (3,5 onces)
Haut-parleur : Approx. 40 g (1,4 onces)
Approx. 120 g (4,2 onces) en ordre de marche, avec une pile et
une cassette
Approx. 180 g (6,3 onces) avec le haut-parleur et deux piles
Accessoires fournis
Microphone (1), Clip de fixation pour microphone (1)
Casque d’écoute (1), Etui de transport (1), Dragonne (1)
La conception et les spécifications sont sujettes à modifications
sans préavis.
Utilisation de l’étui de
transport (voir Fig. K)
Русский
Техническая характеристика
Пленка
y (стандартная)
Записывающая система
2 дорожки, 1 моноакустический канал
Диапазон частот
300-4000 Гц
Динамик
Диаметр около 3,6 см
Выходная мощность
80 мВт
Входная мощность
Чувствительность входного гнезда микрофона (мини
гнездо/штеккер) (аналогичное гнездо для наушников) 0,33
милливольта на 3 килоома или ниже.
Мощность
Гнездо для наушников (мини гнездо) рассчитано на
наушники в 8-300 ЛLЙѓOм.
Требования к источнику питания
1,5 вольт постоянного тока
одна батарея R03 (величина ААА) для основного блока и
две для динамика
Размеры (ш/в/г) (включая выступающие элементы и
ручки настройки)
приблиз. 64,7 х 67 х 21,8 мм
приблиз. 64,7 х 108 х 21,8 мм вместе с динамиком
Масса
основной блок: около 100 г
динамик: около 40 г
около 120 г во время работы, в том числе одна батарейка
и кассета
около 180 г с динамиком, в том числе две батарейки.
Поставляемые сопутствующие приспособления
микрофон (1), зажим для микрофона (1)
наушники (1), чехол (1), ремешок для ношения аппарата
на руке (1)
Конструкция и спецификация подлежат изменению без
особого предупреждения.
Микрокассетный диктофон
Сделано в Японии
F
a
p STOP
FF/CUE
REW/REVIEW
RECORD
PROTECT
r REC
b
EAR/MIC
M-950
G
M-950
H
I
Standard
Standard
Стандартная
J
K
EAR/
MIC
RK-G64HG connecting
cord (not supplied)
Câble de connexion
RK-G64HG (non fourni)
Соединительный шнур
RK-G64HG
(не поставляется)
HOLD
Only standard
microcassette have a small
indentation of side A.
Seules les microcassettes
standard comportent une
petite encoche sur la face
A.
Только стандартная
микро кассета имеет
небольшое углубление на
стороне А.
Approx. 5 mm
Approx. 5 mm
Прибл. 5 мм
Close the cover.
Refermez le couvercle.
Закройте крышку.
Close the volcro flap.
Refermez la patte velcro.
Закройте чехол.
Place accessories here.
Placez les accessoires ici.
Вложите аксессуары.
Display window
Fenêtre d’affichage
Индикатор
VOR
COUNTER
RESET
EAR/
MIC
HOLD
Supplied microphone
Microphone fourni
Прилагаемый микрофон
EAR,
EARPHONE,
@
Approx. 2.5 mm
Approx. 2,5 mm
Прибл. 2,5 мм
Place M-950 here.
Placez le M-950 ici.
Вложите аппарат
М-950.
Audio
equipment
Equipement
audio
Аудио
оборудование
RECORD
PROTECT
Non-standard
Non standard
Нестандартная
1
2
3
4
Using Various Functions (see
Fig. F-a)
To select the side to be recorded
To record on both sides continuously
1 Insert a cassette with the side to start recording facing the
lid.
2 Start recording on the upper side (9 FWD appears in the
display window). If REV ( is displayed, press p STOP
for more than 2 seconds to display 9 FWD.
When recording reaches the end of the upper side, it will
automatically continue on the reverse side.
Notes
• Make sure the tabs on both sides are not removed.
• Even if only the tab on the reverse side is removed, recording
cannot be made.
To Record on one side only
Insert a cassette with the side to start recording facing
1
away from the lid (reverse side).
2 Start recording on the reverse side (REV ( appears in
the display window). If 9 FWD is displayed, press p
STOP for more than 2 seconds to display REV (.
When recording reaches the end of the reverse side, it will
automatically stop.
Note
Make sure the tab on the reverse side is not removed.
VOR (Voice Operated Recording)
The VOR system works only while recording. Press VOR to
display VOR L or VOR H first and then press r REC. The unit
automatically starts recording the sound and pauses when
there is no sound (you can save tapes and batteries).
VOR L: To record for dictation in a noisy place.
VOR H: To record at meetings or in a quiet place.
When you use this system in a noisy place the unit stays in
the recording mode. If the sound is too soft, on the contrary,
the unit will not start recording. Press VOR to display VOR L
(low) or VOR H (high) depending on the conditions. When
you do not use this function, press VOR during recording
until VOR L or VOR H disappears in the display window.
Notes
• The VOR system depends on the environment conditions. If you
cannot get the desired results, record without the VOR system.
• When using the VOR system, the unit starts recording only
when a sound is detected, therefore, the beginning of the word
may not be recorded. For an important recording, we
recommend to recording without the VOR system.
• The VOR L or VOR H indicator appears during playback too.
Start recording during playback
Press r REC during playback, recording starts immediately.
It is useful when you want to re-record the portion which was
just recorded.
Review the portion just recorded
Press REW/REVIEW during recording. Release the button at
the point to start playback.
Recording with the supplied
Microphone (see Fig. F-b)
Connect the supplied microphone to EAR/MIC. The built-in
microphone will be disconnected and the sound through the
external microphone will be recorded.
To start recording, insert a cassette and press r REC.
Recording with the connected
equipment (see Fig. G)
Use VOR system depending on the environment condition.
Notes (Before recording)
• When connecting cords, be sure you connect plugs firmly.
• Make a trial recording to make sure that you made connections
correctly and adjusted the volume properly.
• The following examples use Sony products. If you have any
problems when using other products, read the instruction
manual of those products.
1 Insert a cassette.
2 Adjust the sound of the connected equipment.
3 Press r REC.
Using Other Functions
HOLD function (see Fig. H)
This function locks the unit to prevent it from operating when
you accidentally press a button except VOR, COUNTER
RESET, r REC and P PAUSE. To lock the unit, slide HOLD
H in the direction of the arrow. The H indicator appears in
the display window.
To prevent r REC and P PAUSE from pressing, slide the
RECORD PROTECT cover so that the buttons cannot be seen.
To check the direction of the tape in the
display window
9 FWD appears when recording on the upper side.
REV ( appears when recording on the reverse side.
The indication will disappear about one minute after the tape
starts running. To display the indication, press p STOP.
Display during Side of the tape during
recording/playback recording/playback
Upper side
FWD
Reverse side
REV
TAPE SPEED selector
2.4 cm: For optimum sound (recommended for normal use).
A 60-minute recording can be made using both sides of the
MC60 microcassette.
1.2 cm: For longer recording time. A 120-minute recording
can be made using both sides of the MC60 microcassette.
Tape counter
While the upper side of the tape is running (9 FWD appears
in the display window), the numbers in the tape counter
increase. While the reverse side is running (REV ( appears
in the display window), they decrease.
Press COUNTER RESET to return to 000.
To return the tape to the position of 000
Press COUNTER RESET for more than 2 seconds until ZERO
STOP appears in the display window. During rewind or
REVIEW, the tape stops at 000. Press COUNTER RESET for
more than 2 seconds to make the ZERO STOP indicator
disappear.
z Additional Information
Precautions
On power
Operate the unit only on 1.5V DC. For AC operation, use the AC
power adaptor recommended for the unit. Do not use any other
type. For battery operation, use two R03 (size AAA) batteries.
On the unit
• Use only the y (standard microcassettes) with this
unit. Non-standard cassettes cannot be used because their “L”
dimension (see illustration) is different. (see Fig. I)
• Do not leave the unit in a location near heat sources, or in a
place subject to direct sunlight, excessive dust or mechanical
shock.
• Should any solid object or liquid fall into the unit, remove the
batteries or disconnect the AC power adaptor, and have the unit
checked by qualified personnel before operating it any further.
• When you do not use the unit for long, remove the batteries to
avoid damage caused by battery leakage and subsequent
corrosion.
• If the unit has not been used for a long time, set it in the
playback mode and warm it up for a few minutes before
inserting a tape.
Keep personal credit cards using magnetic coding or springwound watches etc. away from the unit to prevent possible
damage from the magnet used for the speaker.
If you have any questions or problems concerning your unit,
please consult your nearest Sony dealer.
Troubleshooting
Should any problem persist after you have made these checks,
consult your nearest Sony dealer.
Recording cannot be made.
m The batteries are weak. Replace the battery for the main
unit and both batteries for the speaker unit, if the speaker is
installed, with new ones.
m There is no cassette.
m The tab on the tape has been removed. To reuse the tape for
recording, cover the tab hole with adhesive tape.
m The record/playback head is contaminated.
m VOR has been set improperly when VOR function is
activated.
m Connection is made incorrectly.
m The earphones are plugged in to EAR/MIC. Disconnect it.
You cannot insert the cassette.
m The cassette is inserted front side back.
You cannot close the cassette compartment
lid.
m The cassette is inserted into the wrong part (it should be
inserted into the lid side).
m The cassette is not inserted completely.
Playback is not possible even if you press
9( PLAY/DIR.
m The tape has reached the end. Rewind the tape.
m The TAPE SPEED switch is not set to the 1.2 cm or 2.4 cm
position.
m The batteries are weak. Replace the battery for the main
unit and both batteries for the speaker unit, if the speaker is
installed, with new ones.
During CUE/REVIEW the tape stops or does not
run.
You cannot fast-forward or rewind.
m The batteries are weak. Replace the battery for the main
unit and both batteries for the speaker unit, if the speaker is
installed, with new ones.
m The zero stop counter function works. Press COUNTER
RESET for more than 2 seconds to make ZERO STOP
disappear form the display window.
The unit does not operate.
m The batteries have been inserted with incorrect polarity.
m The batteries are weak. Replace the battery for the main
unit and both batteries for the speaker unit, if the speaker is
installed, with new ones.
m The AC power adaptor is not firmly connected.
m The batteries have been inserted; however, the AC power
adaptor is also connected but not plugged into the wall
outlet.
m There is no cassette.
m HOLD is slid in the direction of the arrow. Slide HOLD in
the opposite direction of the arrow.
No sound comes from the speaker.
m The earphones are plugged in to EAR/MIC. Disconnect it.
m The volume is turned down completely.
The sound drops out, sound quality becomes
worse or sound has excessive noise.
m The volume is turned down completely.
m The batteries are weak. Replace the battery for the main
unit and both batteries for the speaker unit, if the speaker is
installed, with new ones.
m The record/playback head is contaminated.
m The earphone plug/microphone plug is dirty. Clean the
plug, insert it into the jack, turn it few times, then
disconnect it and connect it again.
m If the cassette has been put on a speaker without its case,
the sound quality may be distorted.
Recording is interrupted.
m The VOR system is working. When you do not use VOR,
press it to make VOR L or VOR H disappear from the
display window.
Recording cannot be erased completely.
m The erase head is contaminated.
Maintenance (see Fig. J)
To clean the tape heads and path
Wipe the heads 1, pinch roller 2, and the capstan 3 with a
cotton swab 4 moistened with alcohol every 10 hours of use.
You can see the inside through the window of the cassette
compartment lid. Clean the pinch-roller from top to bottom by
rotating it.
To clean the exterior
Use a soft cloth slightly moistened in water. Do not use
alcohol, benzine or thinner.
To clean the microphone plug
Clean the plug of the supplied microphone periodically with a
soft dry cloth. Otherwise, noise may be recorded. When using
an optional external microphone, clean its plug in the same
way.
Как пользоваться переносным
чехлом (см. рис. K)
Page 4

Français
Русский
Utilisation des diverses
fonctions (voir Fig. F-a)
Pour sélectionner la face à enregistrer
Pour enregistrer sur les deux faces en continu
1 Introduisez une cassette avec la face à enregistrer en
premier lieu orientée vers le couvercle.
2 Commencez l’enregistrement par la face supérieure
(9 FWD apparaît dans la fenêtre d’affichage). Si REV (
est affiché, appuyez sur p STOP pendant au moins 2
secondes de façon à afficher 9 FWD.
Lorsque l’enregistrement atteint la fin de la face supérieure, il
se poursuit automatiquement sur la face arrière.
Remarques
• Vérifiez si les onglets des deux faces n’ont pas été brisés.
• Même si seul l’onglet de la face arrière a été brisé,
l’enregistrement ne peut être effectué.
Pour enregistrer sur une seule face
1 Introduisez une cassette avec la face à enregistrer du côté
opposé au couvercle (face arrière).
2 Commencez l’enregistrement par la face arrière (REV (
apparaît dans la fenêtre d’affichage). Si 9 FWD est
affiché, appuyez sur p STOP pendant au moins 2
secondes de façon à afficher REV (.
Lorsque l’enregistrement arrive à la fin de la face arrière, il
s’arrête automatiquement.
Remarque
Assurez-vous que l’onglet de la face arrière n’a pas été brisé.
VOR (enregistrement commandé par
fréquence vocale)
Le système VOR est uniquement opérant pour
l’enregistrement. Appuyez d’abord sur VOR de façon à
afficher VOR L ou VOR H et appuyez ensuite sur r REC.
L’appareil démarre automatiquement l’enregistrement du son
et passe en mode de pause lorsqu’il n’y a pas de son (ce qui
vous permet d’économiser la cassette et les piles).
VOR L : Pour enregistrer en dictée dans un endroit bruyant.
VOR H : Pour enregistrer lors de réunions ou dans un endroit
calme.
Lorsque vous utilisez ce système dans un endroit bruyant,
l’appareil reste en mode d’enregistrement. Si le son est trop
faible, en revanche, l’appareil ne démarre pas
l’enregistrement. Appuyez sur VOR de façon à afficher VOR L
(bas) ou VOR H (haut) suivant les conditions. Lorsque vous
n’utilisez pas cette fonction, appuyez sur VOR durant
l’enregistrement jusqu’à ce que VOR L ou VOR H disparaisse
de la fenêtre d’affichage.
Remarques
• Le système VOR dépend des conditions ambiantes. Si vous ne
parvenez pas à obtenir le résultat désiré, enregistrez sans le
système VOR.
• Lorsque vous utilisez le système VOR, l’appareil ne démarre
l’enregistrement que lorsqu’il détecte un son. Il se peut donc
que le début d’un mot ne soit pas enregistré. Si vous prévoyez
un enregistrement important, nous vous conseillons
d’enregistrer sans activer le système VOR.
• L’indicateur VOR L ou VOR H s’affiche également en cours de
lecture.
Pour démarrer l’enregistrement en
cours de lecture
Appuyez sur r REC en cours de lecture. L’enregistrement
démarre immédiatement. Cette fonction s’avère bien pratique
lorsque vous voulez réenregistrer un passage qui vient d’être
enregistré.
Pour contrôler un passage qui vient
d’être enregistré
Appuyez sur REW/REVIEW en cours d’enregistrement.
Relâchez la touche à l’endroit où vous voulez démarrer la
lecture.
Pour enregistrer à l’aide du
microphone fourni (voir Fig. F-b)
Branchez le microphone fourni sur la prise EAR/MIC. Le
microphone intégré est désactivé et le son transmis via le
microphone externe est enregistré.
Pour démarrer l’enregistrement, introduisez une cassette et
appuyez sur r REC.
Enregistrement avec
l’équipement fourni (voir Fig.
G)
Utilisez le système VOR en fonction des conditions ambiantes.
Remarques (avant l’enregistrement)
• Lorsque vous raccordez des câbles, veillez à brancher
fermement les fiches.
• Effectuez un test d’enregistrement pour vous assurer que vous
avez correctement établi les connexions et réglé le volume.
• Les exemples suivants font appel à des produits Sony. Si vous
rencontrez des problèmes en utilisant d’autres produits,
consultez le mode d’emploi fourni avec ces produits.
1 Introduisez une cassette.
2 Réglez le son sur l’appareil raccordé.
3 Appuyez sur r REC.
Utilisation des autres
fonctions
Fonction HOLD (voir Fig. H)
Cette fonction verrouille l’appareil de façon à éviter d’être
activé si vous appuyez accidentellement sur une touche à
l’exception des touches VOR, COUNTER RESET, r REC et
P PAUSE. Pour verrouiller l’appareil, faites coulisser HOLD
H dans le sens de la flèche. L’indicateur H apparaît dans la
fenêtre d’affichage.
Pour éviter d’appuyer sur les touches r REC et P PAUSE,
faites coulisser le couvercle RECORD PROTECT par-dessus
de façon à dissimuler les touches.
Pour vérifier le sens de défilement de la bande
magnétique dans la fenêtre d’affichage
9 FWD apparaît lors d’un enregistrement sur la face
supérieure.
REV ( apparaît lors d’un enregistrement sur la face arrière.
L’indication disparaît au bout d’environ une minute après que
la bande magnétique a commencé à défiler. Pour afficher
l’indication, appuyez sur p STOP.
Affichage en cours Face de la cassette en cours
d’enregistrement/lecture d’enregistrement/lecture
Face supérieure
FWD
Face arrière
REV
Sélecteur TAPE SPEED
2.4 cm : Pour un son optimal (conseillé en utilisation
normale). Un enregistrement de 60 minutes peut être réalisé
sur les deux faces d’une microcassette MC60.
1.2 cm : Pour une durée d’enregistrement prolongée. Un
enregistrement de 120 minutes peut être réalisé sur les deux
faces d’une microcassette MC60.
Compteur de bande
Pendant le défilement de la bande magnétique pour la face
supérieure (9 FWD apparaît dans la fenêtre d’affichage), la
valeur affichée par le compteur de bande augmente. Pendant
le défilement de la bande pour la face arrière (REV (
apparaît dans la fenêtre d’affichage), ils diminuent.
Appuyez sur COUNTER RESET pour remettre le compteur
sur 000.
Pour ramener la cassette sur la position 000
Appuyez sur COUNTER RESET pendant au moins 2 secondes
jusqu’à ce que ZERO STOP apparaisse dans la fenêtre
d’affichage. En cours de rembobinage ou de REVIEW, la
cassette s’arrête sur 000. Appuyez sur COUNTER RESET
pendant au moins 2 secondes pour désactiver l’indicateur
ZERO STOP.
” Informations complémentaires
Précautions
Alimentation
Faites uniquement fonctionner l’appareil sur une tension de
1,5 V CC. Pour un fonctionnement sur une tension alternative,
utilisez l’adaptateur secteur préconisé pour l’appareil.
N’utilisez aucun autre type d’adaptateur. Pour un
fonctionnement sur piles, utilisez deux piles R03 (AAA).
Appareil
• Utilisez uniquement la y(microcassette
standard) sur cet appareil. Des cassettes non standard ne
peuvent être utilisées parce que leur dimension “L” (voir
illustration) est différente. (voir Fig. I)
• Ne laissez pas l’appareil à proximité de sources de chaleur
ni dans des endroits soumis à la lumière directe du soleil ou
excessivement poussiéreux et ne lui faites pas subir de chocs
mécaniques.
• Si des corps étrangers ou des liquides pénètrent à l’intérieur
de l’appareil, retirez les piles ou débranchez l’adaptateur
secteur et faites contrôler l’appareil par le personnel qualifié
avant de le faire fonctionner à nouveau.
• Si l’appareil est appelé à ne pas être utilisé pendant une
période prolongée, retirez les piles afin d’éviter des
dommages par une fuite éventuelle des piles et la corrosion
qui en résulte.
• Si l’appareil n’a pas été utilisé pendant une période
prolongée, activez-le en mode de lecture et faites-le chauffer
pendant quelques minutes avant d’introduire une cassette.
Conservez les cartes de crédit à code magnétique, les montres
à mécanisme à ressort, etc., à l’écart de l’appareil de manière à
éviter d’éventuels dommages par l’aimant du haut-parleur.
Si vous avez des questions ou des difficultés au sujet de cet
appareil, consultez votre revendeur Sony.
Dépannage
Si les problèmes persistent après ces contrôles, consultez votre
revendeur Sony.
Impossible d’enregistrer.
m Les piles sont plates. Remplacez la pile de l’appareil
principal et les deux piles du haut-parleur, s’il est installé.
m Il n’y a pas de cassette.
m Les onglets de la cassette ont été brisé. Pour réenregistrer
sur la cassette, recouvrez l’orifice des onglets de bande
adhésive.
m La tête de lecture/enregistrement est encrassée.
m VOR n’est pas réglée correctement alors que le système
VOR est activé.
m Raccordement incorrect.
m Le casque d’écoute est branché sur EAR/MIC. Débranchez-
le.
Impossible d’introduire une cassette.
m La cassette est présentée dans le mauvais sens.
Impossible de refermer le couvercle du
compartiment à cassette.
m La cassette est introduite dans la mauvaise section (elle doit
être introduite dans la partie couvercle).
m La cassette n’est pas introduite complètement.
La lecture est impossible même lorsque vous
appuyez sur 9( PLAY/DIR.
m La cassette est en fin de bande. Rembobinez la cassette.
m Le sélecteur TAPE SPEED n’est pas réglé sur la position 1.2
cm ou 2.4 cm .
m Les piles sont plates. Remplacez la pile de l’appareil
principal et les deux piles du haut-parleur, s’il est installé.
En cours de CUE/REVIEW, la bande magnétique
s’arrête ou ne défile pas.
Impossible de rembobiner ou d’avancer
rapidement.
m Les piles sont plates. Remplacez la pile de l’appareil
principal et les deux piles du haut-parleur, s’il est installé.
m La fonction de compteur à arrêt sur zéro est activée.
Appuyez sur COUNTER RESET pendant au moins 2
secondes pour désactiver l’indication ZERO STOP de la
fenêtre d’affichage.
L’appareil ne fonctionne pas.
m La polarité des piles n’a pas été respectée.
m Les piles sont plates. Remplacez la pile de l’appareil
principal et les deux piles du haut-parleur, s’il est installé.
m L’adaptateur secteur n’est pas correctement raccordé.
m Les piles ont été introduites, mais l’adaptateur secteur est
simultanément raccordé et ne doit pas être branché sur une
prise murale (secteur).
m Il n’y a pas de cassette.
m HOLD set placée dans le sens de al flèche. Faites coulisser
HOLD dans le sens de la flèche.
Aucun son n’est diffusé par le haut-parleur.
m Le casque d’écoute est branché sur EAR/MIC. Débranchez-
le.
m Le volume est réglé au minimum.
Le son chute ou est fortement parasité.
m Le volume est réglé au minimum.
m Les piles sont plates. Remplacez la pile de l’appareil
principal et les deux piles du haut-parleur, s’il est installé.
m La tête de lecture/enregistrement est encrassée.
m La fiche du casque d’écoute/fiche du microphone est sale.
Nettoyez la fiche, branchez-la sur la prise, faites-la tourner
quelques fois et, ensuite, débranchez-la et rebranchez-la à
nouveau.
m Si la cassette a été placée sur un haut-parleur hors de son
boîtier, le son risque de comporter des distorsions.
L’enregistrement est interrompu.
m Le système VOR est opérant. Lorsque vous n’utilisez pas le
système VOR, appuyez dessus pour désactiver l’indication
VOR L ou VOR H de la fenêtre d’affichage.
Impossible d’effacer totalement un
enregistrement
m La tête d’effacement est encrassée.
Entretien (voir Fig. J)
Nettoyage de la tête et des guides de la bande
Nettoyez les têtes 1, le galet presseur 2 et le cabestan toute
3 les 10 heures de fonctionnement à l’aide d’un coton-tige 4
imbibé d’alcool. Vous pouvez voir l’intérieur par la fenêtre du
couvercle du compartiment à cassette. Nettoyez le galet
presseur de haut en bas en le faisant tourner.
Nettoyage des parties extérieures
Utilisez un chiffon légèrement imprégné d’eau. N’utilisez pas
d’alcool, d’essence ou de diluant.
Pour nettoyer la fiche du microphone
Nettoyez périodiquement la fiche du microphone fourni à
l’aide d’un chiffon doux et sec. Sinon, il se peut que des
parasites soient enregistrés. Si vous employez un microphone
externe en option, nettoyez sa fiche de la même manière.
Применение различных
функций (см. рис. F-a)
Выбор стороны кассеты для записи
Непрерывная запись на обеих сторонах
1
Установите кассету нужной стороной к крышке,
чтобы начать запись.
2 Начинайте записывать с первой стороны (на
индикаторе появится 9 FWD). Если на индикаторе
появится REV (, нажмите кнопку p STOP и
держите ее более двух секунд, чтобы на индикаторе
появилось обозначение 9 FWD.
Когда будет записана вся первая сторона,
автоматически начнется запись на другой стороне.
Примечания
• Убедитесь в наличии пластинок на обеих сторонах
кассеты.
• Если на второй стороне кассеты отсутствует пластинка,
запись производиться не будет.
Запись только на одной стороне
1
Установите кассету так, чтобы запись производилась
на второй стороне (от крышки).
2 Начните записывать на второй стороне (на
индикаторе появится REV (). Если на индикаторе
появится обозначение 9 FWD, нажмите кнопку p
STOP и держите ее более двух секунд до появиления
обозначения REV (.
Когда вторая сторона пленки будет полностью записана,
запись автоматически прекратиться.
Примечание
Убедитесь в наличии пластинки на второй стороне кассеты.
VOR (Система речевой записи)
Система речевой записи работает только во время
произведения звукозаписи. Нажмите VOR, чтобы на
индикаторе сначала появилось обозначение VOR L или
VOR H, а затем нажмите r REC. Аппарат автоматически
начинает записывать звук, а при отсутствии звука
делает паузу (вы можете сэкономить на пленках и
батарейках).
VOR L: для записи диктовки в шумном месте.
VOR Н: для записи на заседаниях или в тихом месте.
Когда вы используете эту систему в шумном месте,
аппарат остается в записывающем режиме. Если,
наоборот, звук слишком тихий, то аппарат записывать не
будет.
Нажмите VOR, чтобы на индикаторе появилось
обозначение VOR L (низкий) или VOR H (высокий) в
зависимости от условий. Если вы не используете эту
функцию, нажмите VOR во время записи и держите до
тех пор, пока с индикатора исчезнет обозначение VOR L
или VOR H.
Примечания
• Система VOR зависит от условий окружающей среды. Если
вы не сможете добиться желаемых результатов,
записывайте без системы VOR.
• При использовании системы VOR аппарат начинает
записывать только после обнаружения звука, поэтому
начало слова может оказаться не записанным. Для важных
мероприятий мы рекомендуем производить запись без
системы VOR.
• Обозначение VOR L или VOR H появляется также при
воспроизведении звукозаписи.
Запись во время воспроизведения
звукозаписи
Нажмите r REC во время воспроизведения, и сразу же
начнется запись. Это удобно, если вы хотите заново
записать только что записанную часть.
Прослушивание только что записанной
части
Нажмите REW/REVIEW во время записи. Отпустите
кнопку в том месте, где вы хотите воспроизвести
звукозапись.
Запись с помощью прилагаемого
микрофона (см. рис F-b)
Подсоедините микрофон к EAR/MIC. Встроенный
микрофон будет отсоединен, а запись будет
производиться через внешний микрофон.
Чтобы начать записывать, вставьте кассету и нажмите r
REC.
Запись с подключенным
оборудованием (см. рис. G)
Используйте систему VOR в зависимости от
обстоятельств.
Примечания (до записи)
• Убедитесь в правильности соединения проводов.
• Сделайте пробную запись, чтобы убедиться в
правильности соединения и выбора громкости.
• Используйте продукцию компании Sony. Если у вас
возникнут проблемы во время использования продукций
других компаний, ознакомьтесь с их инструкциями.
1 Вставьте кассету.
2 Отрегулируйте звук в подключенном оборудовании.
3 Нажмите r REC.
Пользование другими
функциями
Функция “ОЖИДАНИЕ” (HOLD) (см. рис. H)
Эта функция предназначена для остановки работы
аппарата, если вы случайно нажали какую-либо кнопку,
кроме VOR, COUNTER RESET (установка счетчика на
нуль), r REC и P PAUSE. Чтобы приостановить работу
аппарата, передвиньте кнопку HOLD H в направлении
стрелки. На индикаторе появится обозначение H.
Чтобы избежать нажатия кнопок r REC и P PAUSE
закройте эти кнопки крышкой RECORD PROTECT
(3ащита 3аписи).
Проверка направления движения пленки на
индикаторе
На индикаторе появляется обозначение 9 FWD, когда
производится запись на первой стороне.
REV ( появляется, когда запись производится на
второй стороне.
Обозначение исчезнет примерно через одну минуту
после начала хода пленки. Чтобы увидеть обозначение
на индикаторе, нажмите p STOP.
Обозначения во время Сторона кассеты во время
записи/воспроизведения записи/воспроизведения
Первая сторона
FWD
Вторая сторона
REV
Выбор скорости пленки (TAPE SPEED)
2.4 см: для оптимального звука (рекомендуется для
обычного использования). Может быть произведена 60минутная запись при использовании обеих сторон микро
кассеты МС60.
1.2 см: для более продолжительной записи. Может быть
произведена 120-минутная запись при использовании
обеих сторон микро кассеты МС60.
Счетчик
Во время проигрывания пленки на первой стороне (на
индикаторе появляется обозначение 9 FWD), цифры на
счетчике увеличиваются. Во время проигрывания пленки
на второй стороне (на индикаторе появляется
обозначение REV () цифры на счетчике идут в сторону
уменьшения. Нажмите COUNTER RESET, чтобы
установить счетчик на нуль 000.
Как установить счетчик в положение 000
Нажмите кнопку COUNTER RESET и держите ее более 2х секунд до тех пор, пока на индикаторе появится
обозначение ZERO STOP. Во время перемотки или
REVIEW (прослушивания), пленка остановится на нуле
000. Нажмите кнопку COUNTER RESET и держите ее
более 2-х секунд до тех пор пока на индикаторе исчезнет
обозначение ZERO STOP.
z Дополнительная информация
Меры предосторожности
Питание
Используйте источник питания только постоянного тока
мощностью 1,5 вольт. Для переменного тока используйте
переходник, рекомендуемый для данного аппарата. Не
пользуйтесь каким-либо другим типом переходника. Для
работы аппарата на батарейках используйте две батарейки
R03 (величиной ААА).
Аппарат
• Используйте только стандартные микро кассеты
y. Не следует использовать нестандартные
кассеты из-за других размеров “L”, как указано на рисунке
(см. рис. I).
• Не оставляйте аппарат около открытого огня или в местах
попадания прямых солнечных лучей, пыли и механических
ударов.
• Если в аппарат попадет твердое тело или жидкость,
удалите батарейки или отсоедините переходник
переменного тока, и отдайте аппарат на проверку
специалистам, прежде чем продолжать его использование.
• Если вы не пользуетесь аппаратом длительное время,
удалите из него батарейки, чтобы избежать повреждения,
вызванного протеканием батарейки и последующей
коррозией.
• Если вы не пользовались аппаратом длительное время,
установите его в режиме воспроизведения звукозаписи и
разогрейте его несколько минут перед тем, как вставлять
кассету.
Избегайте хранения кредитных карточек с магнитным
кодированием или механических часов и т.п. вместе с
аппаратом во избежании возможного повреждения от
магнита, используемого в динамике.
Если у вас имеются какие-либо вопросы или проблемы,
связанные с аппаратом, просьба обратиться к ближайшему
дилеру Sony.
Устранение неполадок
Если вы не сможете решить возникшую у вас проблему
после того, как сделаете нижеуказанные проверки,
обратитесь к ближайшему дилеру Sony.
Не производится запись
m Слабозаряженные батарейки. Замените одну
батарейку в основном блоке и две батарейки в
динамике, если он установлен.
m Отсутствует кассета.
m Удалена пластинка с кассеты. Для вторичного
использования пленки для записи закройте это
отверстие клейкой лентой.
m Загрязнена записывающая/воспроизводящая головка.
m Неправильно установлена система VOR.
m Неправильно выполнено подсоединение.
m Наушники подключены к гнезду EAR/MIC.
Отсоедините их.
Не устанавливается кассета.
m Кассета установлена неправильной стороной.
Не закрывается крышка кассетного отсека.
m Кассета не установлена в предназначенное для нее
место (со стороны крышки).
m Кассета установлена не полностью.
Не воспроизводится звукозапись, когда вы
нажимаете 9( PLAY/DIR.
m Пленка кончилась. Перемотайте пленку.
m Переключатель TAPE SPEED не установлен на
положение 1,2 см или 2,4 см.
m Слабозаряженные батарейки. Замените одну
батарейку в основном блоке и две батарейки в
динамике, если он установлен.
При CUE/REVIEW пленка останавливается и
далее остается без движения.
Не производится скоростная перемотка вперед
или назад
m Слабозаряженные батарейки. Замените одну
батарейку в основном блоке и две батарейки в
динамике, если он установлен.
m Работает функция установки счетчика на нуль.
Нажмите кнопку COUNTER RESET и держите ее более
2 секунд до тех пор пока на индикаторе исчезнет
обозначение ZERO STOP.
Аппарат не работает
m Батарейки были установлены с неправильной
полярностью.
m Слабозаряженные батарейки. Замените одну
батарейку в основном блоке и две батарейки в
динамике, если он установлен.
m Не плотно подсоединен переходник переменного тока.
m Батарейки установлены; переходник переменного тока
подключен, но не включен в стенную розетку.
m Не установлена кассета.
m Кнопка HOLD передвинута в направлении стрелки.
Передвиньте кнопку HOLD в противоположном
стрелке направлении.
Не раздается звук из динамика.
m Наушники подключены к гнезду EAR/MIC.
Отсоедините их.
m Полностью выключена громкость.
Пропадает звук, качество звука становится
хуже или слышен шум.
m Полностью выключена громкость.
m Слабозаряженные батарейки. Замените одну
батарейку в основном блоке и две батарейки в
динамике, если он установлен.
m Загрязнена записывающая/воспроизводящая головка.
m Штекер наушников/микрофона загрязнен. Очистите
вилку, установите ее в гнездо, поверните ее несколько
раз, а затем отсоедините и подсоедините вилку еще раз.
m Если кассета лежала на динамике без чехла, качество
звука может быть искажено.
Прерывается запись
m Работает система VOR. Когда вы не используете
систему VOR, нажмите эту кнопку и держите до тех
пор, пока с индикатора исчезнет обозначение VOR L
или VOR H.
Не стирается полностью запись
m Стирающая головка загрязнена.
Уход (см. рис. J)
Чистка головок и дорожки
После каждых 10 часов работы аппарата протирайте головки
1, валик 2 и шпиль 3 при помощи тампона из ваты 4,
смоченного спиртом. Вы можете посмотреть во внутрь
аппарата через окошко в крышке кассетного отсека. Вращая
валик, протирайте его движениями сверху вниз.
Чистка внешнего корпуса
Используйте мягкую ткань, слегка смоченную в воде. При
этом не применяйте спирт, бензин или растворитель.
Очистка штекера микрофона
Периодически протирайте штекер прилагаемого микрофона
сухой мягкой тряпочкой. В противном случае в записи могут
появляться шумы. При использовании не входящего в
комплект дистанционного микрофона очищайте его штекер
таким же образом.
 Loading...