

Page 1

This warranty is valid only in the United States.
Taoe Casbettp Plave'-Hecoraer CD piavo''Mirn Disc
SONY.
LIMITED WARRANTY
SONY fcLECTRONICS INC i 'SONY 'I warrants this PrCKloct Including any accessorie
defects in maTenal or workmanshio as lollows:
' ^ABOR r-or a period ot 90 days tron
tu be defective. Sony wii: repair the Product .
authorised service facility After the Warra'ii
2 PART'S' In addition, SONY wiH supply, at no charge new ot rebuilt repiacernents m e*
change tor defective parts for a period of one Ol year After 30 days from the date of purchase,
labor for removal and installation is available from SONY authorized service facilities or a Sony
Service Center at your expense
To obtain warranty service, you must take the Product, or deliver the Product freight prepaid, m
either Its original packaging or packaging affording an equal degree of protection, to any autho
rizad SONY service facility
This warranty does not cover cosmetic damage or damage due to acts of God, accident misuse,
abuse negligence, commercial use. or modificatiori of. or to any part of the Product, including the
antenna This warranty does riot cover damage due to improper operation or maintenance, con
election to improper voltage supply, or attempted repair by anyone other than a facility authorized
by Sony to service the Product This warrarity does not cover Products sold AS IS or WITH ALL
l-AULTS, O' consumables (such as fuses or batteries) This warranry is valid only ir the United
States
Proof of purchase m the form of a Dill of saie or receipted invoice which is evidence that the unit
IS within the War'anty period must be presented to obtain warranty service
RfcPAlR OR REPLACFMENT AS PROVlOEO UNDER THIS WARRANTY IS THE EXCLUSIVE RFWE
DY OF THE CONSUMER SONY SHALL NOT BE LIABLE FOR ANY INCIDENTAL OR CONSE
QUENTIAL DAMAGES FOP BREACH Of ANY EXPRESS OR IMPL'ED WARRANTY ON THIS
PRODUCT. EXCEPT TO THE EXTENT PROHIBITED BY APPLICABLE LAW, ANY IMPLIED WAR
RAMY Of MERCHANTABILITY OR FITNESS FOP A PARTICULAR PURPOSE 0-N THIS PRODUCT
IS LlMiTEO IN DURATION TO THE DURATION OF THIS WARRANTY
Some states dc not allow the exclus.O'. o' Unvtatior of incidental ot consequervtial damages, or
allow' limitations on ripw .ong an implied warranty lasts. so the above limitations or exclusions
may not apply to you in addition, il you entm into a servee contract w.ih the Sony Partnership
Within 90 days of the date of sale, the 'imitation on how long an implied warranty lasts does not
ao[>‘v to you This warranty gives yO'.' siiecific legal rights, and you may have other rights which
DAT Radio Head RЬo^^e.'SoeaWeг'MtC'PeгsoP'als
I Portable Audio ,
urchase, it this Product is detemiined
■r pay the labor charges to any SONY
must pay for all tabor cfiarges
mber has been altered or removeti from the
SONY
3-859-242-11(1)
Microcassette -
Corder
Operating Instructions
i
M-629V/679V/
729V
Sony Corporation 1996 Printed in China
Owner's Record
rhe model number is located at the bottom and the serial
number is located inside the battery compartment. Record these
numbers in the spaces provided below. Refer to these numbers
whenever you call upon vour Sonv dealer regarding this
product.
Model No. Serial No.
WARNING
To prevent fire or shock hazard, do not
expose the unit to rain or moisture.
For yOur convenience. SONY EL E.CTRONICS INC has established telephon*
ly asked questions.
To locate the servicer c
l-iSOO) 342 5721
For service assistance c:
For Product information or operation, c
For an accessory or part n
oiution of a seh/’ce problemi, call'
SONY CUSTOMER RELATIONS CENTER
1 (800г'2В2-2848
SONY CUSTOMER INFORMATION CENTER
(2011-368-9272
Sony Customer Information Center
One Sony Drive
Park Ridge, New Jersey 07656-8003
; available ftoni your authorized dealer, call'.
- M8001 488 SONY ,7669)
uimoerS for froouent'
Welcome'.
Thank you for purchasing the Sony Microcassettc-Cordcr. Some
features are:
• The ВАТТ lamps indicate remaining Vrattery power in two
steps and the lamp indicates when to replace the batteries.
•The CUH MARKER (M-729V only) function locates a specific
position of a dictation.
•The FAST PB (fast playback) function enables you to review
the contents approx. 20"л> faster than normal plavLrack.
•The VOR (Voice Operated Recording) system starts and stops
recording automatically in response to the sour'id.
• Edit functiern—You can start recording directly from the
playback mode by pressing the Ф button to correct a
previously recorded portion.
• Tape counter
• Automatic shut-otf mechanism at the end of the tape (in the
recording/playback mode only)
• Stop-pau.se-release function—The pau.se switch is released
automatically when the button is depressed, so that you
don't miss a recording chance.
About This Manual
The instructions in this manual are for the M-629V, M-679V and
M-729V. Before you start reading, check vour model number.
The .M-729V is the model used for illustration purposes. Any
differences in operation are clearly indicated in the text, for
example, "M-729V only".
Page 2
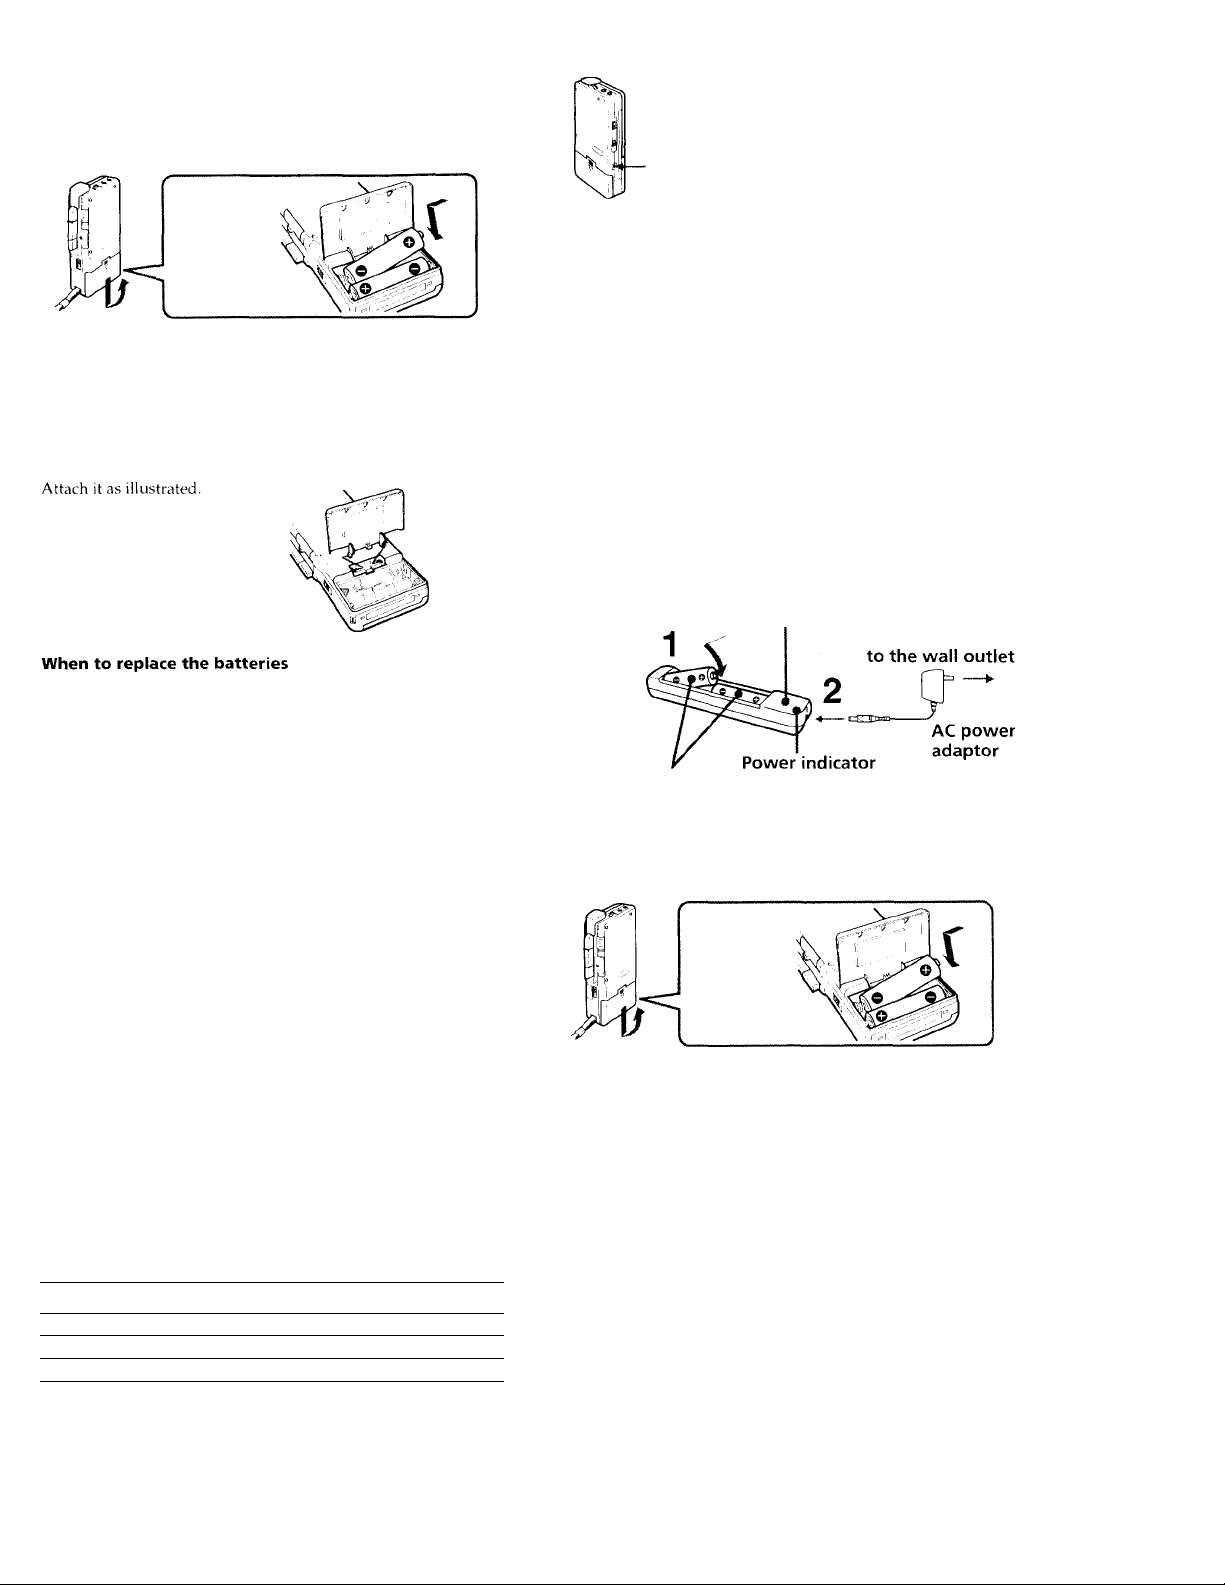
Preparing Power Sources
House current
Choose one of the following power sources.
Dry Batteries
Make sure that nothing is connected to the DC IN 3V jack.
1 Open the battery compartment lid.
2 Insert two size AA (R6) batteries with correct polarity and
close the lid.
If the battery compartment lid is accidentally detached
Replace the batteries with new ones when the ВАТТ lamps go
off and the <Xi lamp flaslies.
The ВАТТ lamps change as illustrated:
to the wall outlet
DC IN 3V
AC power adaptor (supplied with M-679V only) or AC-E30HG AC power adaptor (not supplied)
Connect the AC power adaptor to DC IN 3V and to a wall outlet.
Use the AC power adaptor (supplied with M-679V only)or the
AC-E30HG AC power adaptor (not supplied). Do not use any
other AC power adaptor.
Polarity of the plug
Rechargeable batteries (supplied with M679V only)
Charge the rechargeable batteries only with the supplied charge
adaptor and the AC power adaptor. The rechargeable batteries
can be charged approximately 500 times.
Be sure to charge the rechargeable batteries for approximately 8
hours before using them. The unit can be used for recording for
approximately 5.5 hours with the fully charged rechargeable
batteries.
To charge
Charge adaptor
When batteries are new
When batteries become weak
_ О О CD ВАТТ
1_\J 1 • • •
О CD О ВАТТ
tX]
f
light
Replace batteries
. О CD CD ВАТТ
T \ I
----
1 • • •
J
flash
Notes
• The unit will play back normally for a while, even after the lamp
flashes. I lowe\'er, replace the batteries as soon as you can. If yi>u do not,
the playback cannot be made with normal sound, noise may be
recorded and the recorded sound will not be loud enough.
• In the following cases you do not need to replace the batteries;
- if the ВАТТ lamps flash with the playback sound when you turn up
the v'olume.
- if the <Xi lamp lights momentarily when the tape starts running or at
the end of the tape.
- if the iX:] lamp flashes during FI- (CUE) or REW (REVIEW).
• In some cases when the unit is used with rechargeable batteries
(supplied with M-674V only or not supplied), only one ВАТТ lamp v\ ill
light even though the batteries have been fully charged.
Battery life (Approx, hours)
Batteries
Sony R6P (SR)
Sony alkaline LR6 (SC)
NC-AA (M-679V only)
Recording
5.5
19.0
5.5
g ht
-go off
go off
Rechargeable batteries NC-AA
The power indictor of the charge adaptor remains lit as long as power is
supplied from the wall outlet.
To use
Notes
• Use the supplied two rechargeable batteries only w'ith tht* supplied
charge adaptor.
• If there is distortion of stiund (ir excessive noise, or if the unit does not
operate properly, turn off the unit and recharge the two rechargeable
batteries together.
• The rechargeable batteries will discharge even when not in use. Be sure
to charge them before use.
• Recharge the two rechargeable batteries together. Otherwise, the
charging cannot be donev
• Be sure to remove the rechargeable batteries from the charge adaptor t<3
avoid overcharging (more than 20 hours) when charging has been
completed.
• Charging and operation should be made in temperature ranges 5X' to
40"C (40"Etol04"F).
• The charge adaptor will bec(»me warm during charging but this is not a
sign of problem.
• Do ncit use or lea\'e the charge adapttfr in a location near heat sources or
in a place subject to direct sunlight or excessive moisture.
• Unplug the AC power adaptctr from the wall outlet W'hen it is not to be
used for l<mg.
• Do not attempt to charge dr\- batteries.
Page 3

Recording
M.iki' suri' that nothing is connected to MIC.
MIC (PLUG IN POWER)
-REC
■CUE MARKER
Microphone
1— PAUSE
◄ CUE/REVIEW
To
Stop recording
Start recording during
plavback
Re\'iew the portion just
recorded
I’ause recording
lake out a cassette
Press or slide
m±
• during playback (the unit bevomes m
the reciirding mode)
Push up -^^C'UF/^^Rk VIFTV toward
►►RHVIFW during the recording.
Release the button at the point to start
pla\back.
Slide * PAUSF, in the direction of the
arrow. The RFC and BATF lamps go off.
Note
St'lcct the 2.4 cm tape speed for recording, if von play back the recorded
tape with another unit. Otherwise, the sound quality may be changed.
-VOR
Press the reset button of the TAPP COUNTER.
Press I — and insert a standard microcassette with the side
to start recording facing the lid.
Select the desired tape speed.
2.4 cm for optimum sound (recommended for normal use):
A 30-minute recording can be made cTsing both sides of the
MC-30 microcassette.
1.2 cm for longer recording time: A 60-minute recording can
be made using both sides of the MC-30 microcassette,
Set VOR to H, L or OFF.
If you set VOR to H or L, the unit automatically starts
recording the sound and pauses when there is no .sound
(you can save tapes and batteries).
H:To record at meeting or in a quiet and/or spacious place.
L: To record for dictation or in a noisy place.
When the sound is not loud enough, set it to OFF, or the unit
may not start recording.
Press #.
Recording starts. While the tape runs, the REC lamp lights
and flashes depending on the strength of the sound.
Recording level is fixed.
Notes on VOR (Voice Operated Recording)
• The VOK system depends on the environmental conditions. If vou
cannot get the desired resLilts, set VOR to OFF.
• When you use the system in a noisv place, the unit will stay in the
recording mode. If the sound is too soft, on the contrarv, the unit will
not start recording. Set VOK to H (high) or 1. (low) depending on the
conditions.
To monitor the sound
Connect the earphone (not supplied) to EAR jack. The monitor
volume cannot be adjusted by VOL.
To prevent a cassette from being accidentally recorded over
Break out and remove the cassette tabs. To reuse the cassette for
recording, cover the tab hole wWh adhesive tape.
Recording cue markers (M-729V only)
While recording, you can record a special signal on the tape to
mark a specific position.
At the desired position, press CUE MARKER to record a signal.
The REC lamp goes off and a signal will be recorded on the tape.
If you want to record a signal longer than that, press CUE
MARKER as long as you want.
During cue and review, you will hear the beep sound at the
signal position. During playback, you will hear the signal with
low frequency sound at the signal position.
Notes
• We recommend recording cue markers when there is a break in the
sound.
• During cue and review, the beep sounds differentlv.
• The beep mav sound tlifferenflv depending on the marked position on
the tapi‘ because the winding speed varies from the beginning tci the
end of the tape.
Page 4

Playing a Tape
1 Insert a cassette with the side to start playing facing
the lid.
2 Select the tape speecf to the same speed as that used
for recorciing.
3 Press
4 Adjust the x'olume.
EAR-
FAST PB—-►
TAPE
SPEED-------►
ВАТТ-
VOL
.PAUSE
CUE/REVIEW I
Recording/Playback with the Connected Equipment
Dubbing onto another tape recorder
Set this unit to the pl.iybuck mode und another tape recorder to
the recording mode.
EAR
MIC
Connecting cord RK-G64HG (not supplied)
Recording from another tape recorder
Set this unit to the recording mode and another tape recorder to
the playback mode. In this case set VOR to OFh.
MIC
EAR,EARPHONE,d
Connecting cord RK-G64HG (not supplied)
To Press or slide
Stop playback/stop fast
forward tir rewinci*
I’ausc playback
Fast forward
Rewind
Search forwarci during
playback (CUE)
Search backward during
playback (REVIEW)
* If you leave the unit after the tape has been wound or rewound, the
batteries v\'ill be consumed rapidly. Be sure to depress I — .
** The tape moves faster in the rewind/REVIEW mode than in the fast
forward/CUE mode.
m±
Slide PAUSE in the direction of the
arrow. The BATT lamp goes off.
Slide ■♦^CUE/^^REVIEW toward
•^^CUE during stop.**
Slide ◄^CUE/^^RFVIEW toward
►►REVIEW during stop.**
Keep ◄◄CUH/^^REVIEW pushed down
during playback and release it at the point
you want.**
Keep •♦^CUE/^^REVIEW pushed up
during playback and release it at the point
you want.**
To increase the playback speed
Slide the FAST PB switch in the direction of the arrow. The
playback speed will be increased.
To return to the original speed, slide the FAST PB switch to the
original position.
At the end of the tape
In the recording or playback mode, the tape stops at the end of
the tape and the locked buttons will be released automatically
(Automatic shut-off mechanism).
After fast forward or rewind, be sure to set ’4^CUE/
►►REVIEW back to the center.
Recording with an External Microphone
Connect a microphone to MIC. When using a plug-in-power
system microphone, the power to the microphone is supplied
from this unit.
MIC
Electret condenser microphone ECM-T110 (not supplied)
Note
when recording with an external microphone, the VOR system may not
work properly because of the difference in sensitic'ity.
Page 5

Precautions
Troubleshooting
On power
• Operate the unit only on 3 V DC.
For AC operation, use the AC adaptor recommended for the
unit. Do not use any other type. For battery operation, use two
size AA (R6) batteries.
On the unit
• Use only the (microcass€tt6J" (standard microcassettes) with
this unit. Non-standard cassettes cannot be used because their
"L" dimension (see illustration) is different.
Standard
Only standard microcassettes
have a small indention of side A.
Approx. 5 mm
• Do not leave the unit in a location near heat sources, or in a
place subject to direct sunlight, excessive dust or mechanical
shock.
• Should any solid object or liquid fall into the unit, remove the
batteries or disconnect the AC power adaptor, and hav'e the
unit checked by qualified personnel before operating it any
further.
• Keep personal credit cards using magnetic coding or springwound watches etc. away from the unit to prevent possible
damage from the magnet used for the speaker.
• When you do not use the unit for long, remove the batteries to
avoid damage caused by battery leakage and subsequent
corrosion.
• If the unit has not been used for long, set it in the playback
mode and warm it up for a few minutes before inserting a
cassette.
Non-standard
Approx. 2.5 mm
RECYCLING NICKEL-CADMIUM BATTERIES
(supplied with M-679V only)
NICKEL-CADMIUM BATTERY.
MUST BE DISPOSED OF PROPERLY.
Nickel-Cadmium batteries are recyclable. You can
help preserve our environment by returning your
unwanted batteries to your nearest Sony Sercice
Ni-Cd Center or Factory Service Center for collection,
recycling or proper disposal.
Note: In some areas the disposal of nickel-
cadmium batteries in household or
business trash may be prohibited.
Should any problem persist after you have made these checks,
consult your nearest Sony dealer.
A cassette cannot be inserted.
—► The cassette is being inserted in the wrong way. (The
cassette should be inserted in the lid with the tape side
facing you.)
—► has been already pressed.
• cannot be pressed.
—► There is no cassette in the cassette compartment.
—► The cassette tab has been removed.
• or cannot be pressed.
—► The tape has reached the end.
—► After the automatic shut-off, PAUSE is slid in the
direction of the arrow.
The unit does not operate.
—► The batteries have been inserted with incorrect polarity.
—► The batteries are weak. Replace both batteries with new
ones.
—► PAUSE is slid in the direction of the arrow.
—► The AC power adaptor or car battery cord is connected to
the unit only and you are going to use the unit on
batteries.
No sound comes from the speaker.
—► The earphone is plugged in.
—► The volume is turned down completely.
The sound drops out or comes with excessive noise.
—► The volume is turned down completely.
—► The batteries are weak. Replace both batteries with new
ones.
—► The head is contaminated. See "Maintenance".
Tape speed is too fast or too slow in the playback mode.
—► Improper setting of the TAPE SPEED switch. Set it to the
same speed as that used for recording.
Tape speed is faster than the normal playback speed.
—► The FAST PB switch is slid in the direction of the arrow.
—► The TAPE SPEED switch is set between the 1.2 cm and 2.4
cm positions.
Recording cannot be made.
—► Connection is made incorrectly.
—► The batteries are weak. Replace both batteries with new
ones.
—► The head is contaminated.
—► Improper setting of the VOR switch. Set it to H or OFF.
Recording is interrupted.
—► The VOR switch is set to H or L. When you do not use
VOR, set it to OFF.
Recording cannot be erased completely.
—► The head is contaminated.
For the Sony Service Center nearest you call 1-800-222-SONY
(United States only)
For the Factory Service Center nearest you call 416-499-SONY
(Canada only)
Caution: Do not handle damaged or leaking nickel-cadmium
batteries.
If you have any questions or problems concerning your unit,
please consult your nearest Sony dealer.
Page 6

Maintenance
Press ^ and wipe the head, capstan and the pinch roller with a
cotton swab, moistened with alcohol every 10 hours of use.
To clean the exterior
Use a soft cloth slightly moistened in water. Do not use alcohol,
benzine or thinner.
Specifications
Tape
(MICROCA5S6TT€ (noriTiiil position tvpc)
Recording system
2-track 1-channel monaural
Speaker
Approx. 3.6 cm in.) dia.
Tape speed
2.4 cm/s ('yih ips), 1.2 cm/s ips)
Frequency range
250 - 4,000 Hz
Input
Microphone input jack (minijack/PLUG IN POWER)
sensitivity 0.24 mV for 3 kilohms or lower impedance microphone
Output
Earphone jack (minijack) for 8 - 300 ohms earphone
Power output (at 10"'ó harmonic distortion)
M-629V/679V 160 mW
M-729V 260 mW
Battery life (recording)
See “Preparing Power Souces".
Power requirements
3 V DC
Two size AA (R6) batteries
Dimensions (w/h/d)
Approx. 65.1 X 121.4 X 25.2 mm (2% x 4V8 x 1 in.) incl. projecting parts
and controls
Mass
Approx. 130 g (4.6 oz) incl. batteries
Supplied accessories
Micro cassette tape (1) (M-629V/729V European model only)
Size AA (R6) batteries (2) (M-629V/729V European model only)
AC power adaptor (1 ) (M-679V only)
Battery charge adaptor (1) (M-679V only)
Rechargeable batteries NC-AA, 1.2 V, 600 mAh, Ni-Cd (2) (M-679V'
only)
Design and specifications are subject to change without notice.
Optional accessories
Microcassette MC-6Ü, MC-30
Earphone ME-81, ME-L82
Connecting cord RK-G64HG (miniplug to miniplug with attenuator)
Electret condenser microphone ECM-Tl 10
AC power adaptor AC-E30HG
Car battery cord EX7C-E1301.
 Loading...